

Page 1

Portable GPS
MGM-03510K
Operation Manual
/
20070413
Page 2

Congratulations on your purchase of a Polaroid GPS. Please read
carefully and follow all warnings and instructions in this User’s Manual and those
marked on the product before
in personal injury or damage to your GPS. Also, remember to keep this User’s
Manual in a convenient location for future reference.
Important: Save the original box and all packing material for future shipping needs
first use. Failing to follow these warnings could result
Important safety
instructions
Please read and follow these safety instructions before using your GPS for
the first time, and save them for future reference.
GPS WARNING
• Failure to avoid the following potentially hazardous situations may result
in injury or property damage.
• The unit is designed to provide you with route suggestions. It does not
reflect road closures or road conditions, traffic congestion, weather
conditions, or other factors that may affect safety or timing while driving.
• Use the unit only as a navigational aid. Do not attempt to use the unit for
any purpose requiring precise measurement of direction, distance,
location, or topography. This product should not be used to determine
ground proximity for aircraft navigation.
General
• Keep away from extremely hot, cold or humid conditions.
• Do not allow the device to get wet.
• Avoid shocks or vibrations.
• Do not open your device. Any attempts to open this device will void the
warranty.
• Wipe the touch screen only with a lint-free cloth, slightly dampened, while
the device is switched off.
• Do not place objects on top of the device.
Working Conditions
• Do not charge the device in extremely hot or cold conditions.
2
Page 3

• If the red LED is flashing, please recharge the device immediately.
• Please use the car charger when possible during in-car use.
• Please only use the supplied USB cable.
• Please do not use other chargers or adaptors, as these may damage your
device.
• Only use the supplied MMCX equipment to connect to an external antenna.
• Do not operate this device in extremely hot or cold conditions.
Design Information
• Do not remove the SD/MMC card while using the photo viewer or music
functions.
• If you need to format the SD/MMC card, please specify the FAT file system.
• Please only use images of an acceptable format with the photo viewer.
• During charging, the LED will be orange until charging is complete, at
which time it will change to green. If the charger is removed and connected
again, the LED will remain orange for approximately 30 minutes before
changing to green.
• The music player supports mp3, wav and wma formats.
Use Information
• The music player supports mp3, wav and wma formats.
• Do not operate this device while you are driving.
• Before first use, please charge this device for at least 8 hours.
• For the best possible initial GPS fix, please be outdoors, in an open space,
with a clear sky.
• Do not store this device in extremely hot or cold conditions.
• Before first use, please make sure that the hardware reset switch is in the
correct position. Leave in this position from then on.
• To switch the device on, press the power button for 3 seconds. To switch off,
hold the power button for 3 seconds.
• Do not use this device in damp, wet or rainy conditions.
• The navigation information offered by this device is for reference only. We
cannot guarantee that the information on this device will always be 100%
accurate, so you should watch the road for indications or dangers in the
same way as usual. Please use common sense and drive carefully.
3
Page 4

Contents
Contents:
Important safety instructions................................ 2
Contents.................................................................. 4
Features .................................................................. 7
About the GPS
Package contents...................................................................7
Overview ................................................................. 8
Front ........................................................................................8
Back.........................................................................................8
Top...........................................................................................9
Bottom.....................................................................................9
Left and Right Sides ..............................................................9
Section One: Initial Setup.................................... 10
Power Up...............................................................................10
Screen Calibration
Set the Time/Date
Inserting an SD/MMC Card
Connecting to a Computer .................................. 12
Establishing GPS-PC connection
Charging the GPS ................................................................13
Battery Indicators
LED indicators
Using the AC Adaptor
Car Installation ..................................................... 14
Using the Suction Cup .......................................................14
Unit Basics............................................................ 18
Using the Touch Screen ......................................................18
Main menu screen .............................................................18
Navigation.............................................................................20
Accessing the Navigation Function
Music Player ......................................................................21
Accessing the Music Player ...............................................21
Music Player Screen Definitions ........................................22
Using the Music Player........................................................23
Playing music..................................................................... 23
Adjusting the volume..........................................................23
Changing the order of tracks..............................................23
Repeating tracks ................................................................23
Creating a playlist ................................................................24
Using the Photo Viewer ....................................................... 25
........................................................................7
..............................................................10
...............................................................10
..................................................11
........................................12
...............................................................13
....................................................................13
.........................................................13
....................................20
4
Page 5

Viewing photos
Slideshows......................................................................... 27
...................................................................26
Settings ................................................................. 28
Accessing the Setup Screen
Setting the Time/Date
Adjusting Volume
Screen options
Choosing your on-screen language................................... 31
System Information..............................................................31
.................................................................30
......................................................................30
..............................................28
...........................................................29
Resetting the GPS................................................ 32
Performing a Soft Reset ......................................................32
Performing a Hard Reset ..................................................... 32
Troubleshooting................................................... 33
Section Two: Navigation...................................... 34
Section Two: Navigation...................................... 35
Icons......................................................................................35
Introduction .......................................................... 36
Key features..........................................................................36
Getting started...................................................... 37
Choosing a language...........................................................37
Set time zone ........................................................................37
Safety Warning Message.....................................................37
GPS connection ...................................................................38
Main elements....................................................... 39
Main menu ............................................................................39
Map ........................................................................................40
Tracking mode and browsing mode................................... 40
Navigation screen ................................................................41
Main features ........................................................ 43
Choosing and finding locations .........................................43
Search for an address........................................................43
Searching for and choosing POIs ......................................46
Choosing a location on the map ........................................49
Favorites ............................................................................49
Navigating.............................................................................52
Browse the map during navigation.....................................53
Menu options .....................................................................53
Planning a route ...................................................................54
Settings .................................................................................57
General settings.................................................................57
Map settings.......................................................................58
Route options.....................................................................61
Volume...............................................................................62
5
Page 6

Route recording ...................................................................62
Frequently asked questions................................ 63
Index ...................................................................... 64
Copyright and license notes............................... 66
6
Page 7

Features
About the GPS
The GPS is not only a portable GPS navigation system which can be used in
or out of the car, it is also a music player with a built-in speaker (can still be
used with earphones if you prefer) and photo viewer.
Package contents
Please check that you have the following items. Packaging should be saved
for future use.
•
GPS unit
•
Car mount kit
•
Car charger
•
AC charger
•
USB cable
•
GPS quickstart guide
•
GPS warranty
Note: Accessories are subject to change without prior notice.
7
Page 8
Overview
Front
1. Power LED
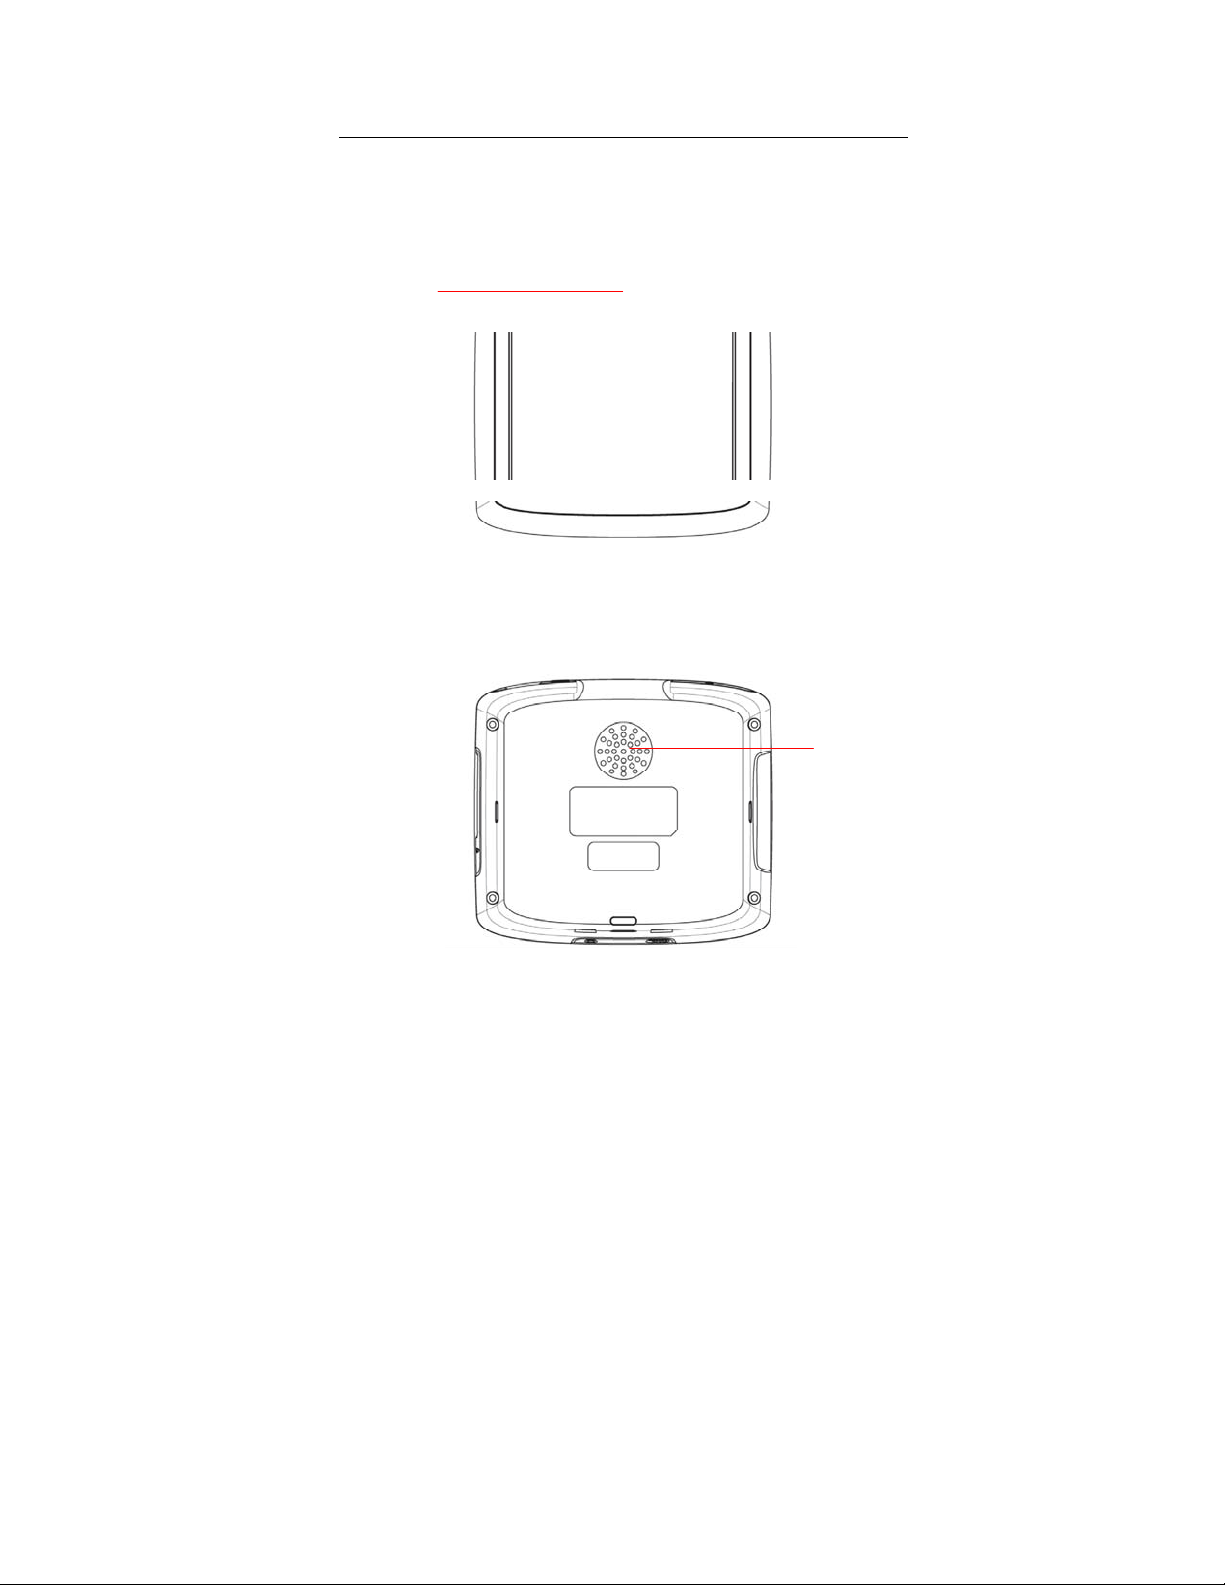
Back
1. Speaker
1
1
8
Page 9

Top
1. Power Button
1
Bottom
1. Hardware reset switch
2. Soft reset button
12
Left and Right Sides
1
2
1. Headphone jack
2. Mini USB port/DC in
3. SD/MMC card slot
3
9
Page 10
Section One:
Initial Setup
Power Up
To switch the GPS on for the first time, slide the hardware reset switch left to the
“ON” position.
NOTE: After switching your device on for the first time, you should not
use the hardware reset switch again unless you want to do a hardware
reset. See “Resetting the Device” on page 34 for more information.
Instead, use the power button on the top of the device.
Screen Calibration
When you switch the device on for the first time, you will have to calibrate the screen.
Follow the simple on-screen instructions on page 32.
Set the Time/Date
You may wish to set the time before you first use the device. For information on
setting the time and date, see “Setting the Time/Date” on page 30.
For more information on other setup options, see “Settings” on page 29.
10
Page 11
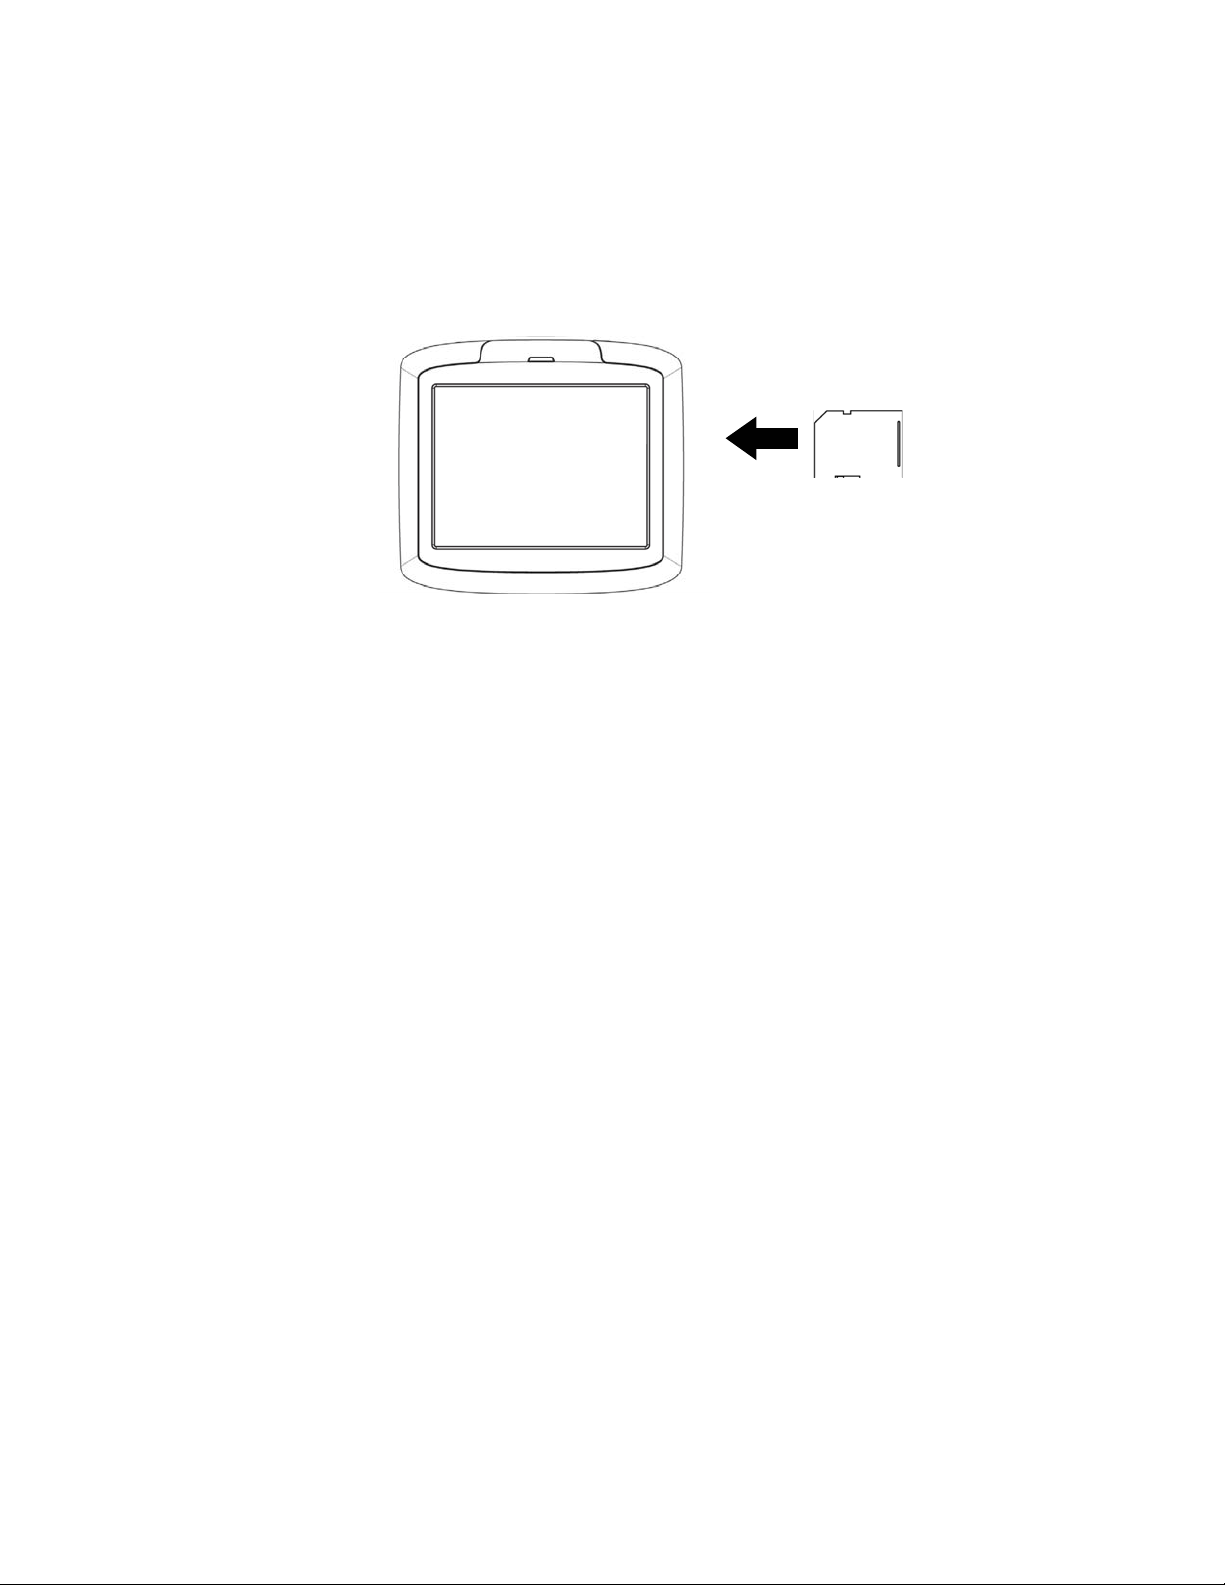
Inserting an SD/MMC Card
Any music tracks or photos that you may transfer from your computer are
stored on the SD/MMC card.
To insert the SD/MMC card, make sure it is aligned correctly, and then push it
into the SD/MMC slot on the right-hand side of the device until you hear an
audible signal to say that it has been correctly inserted.
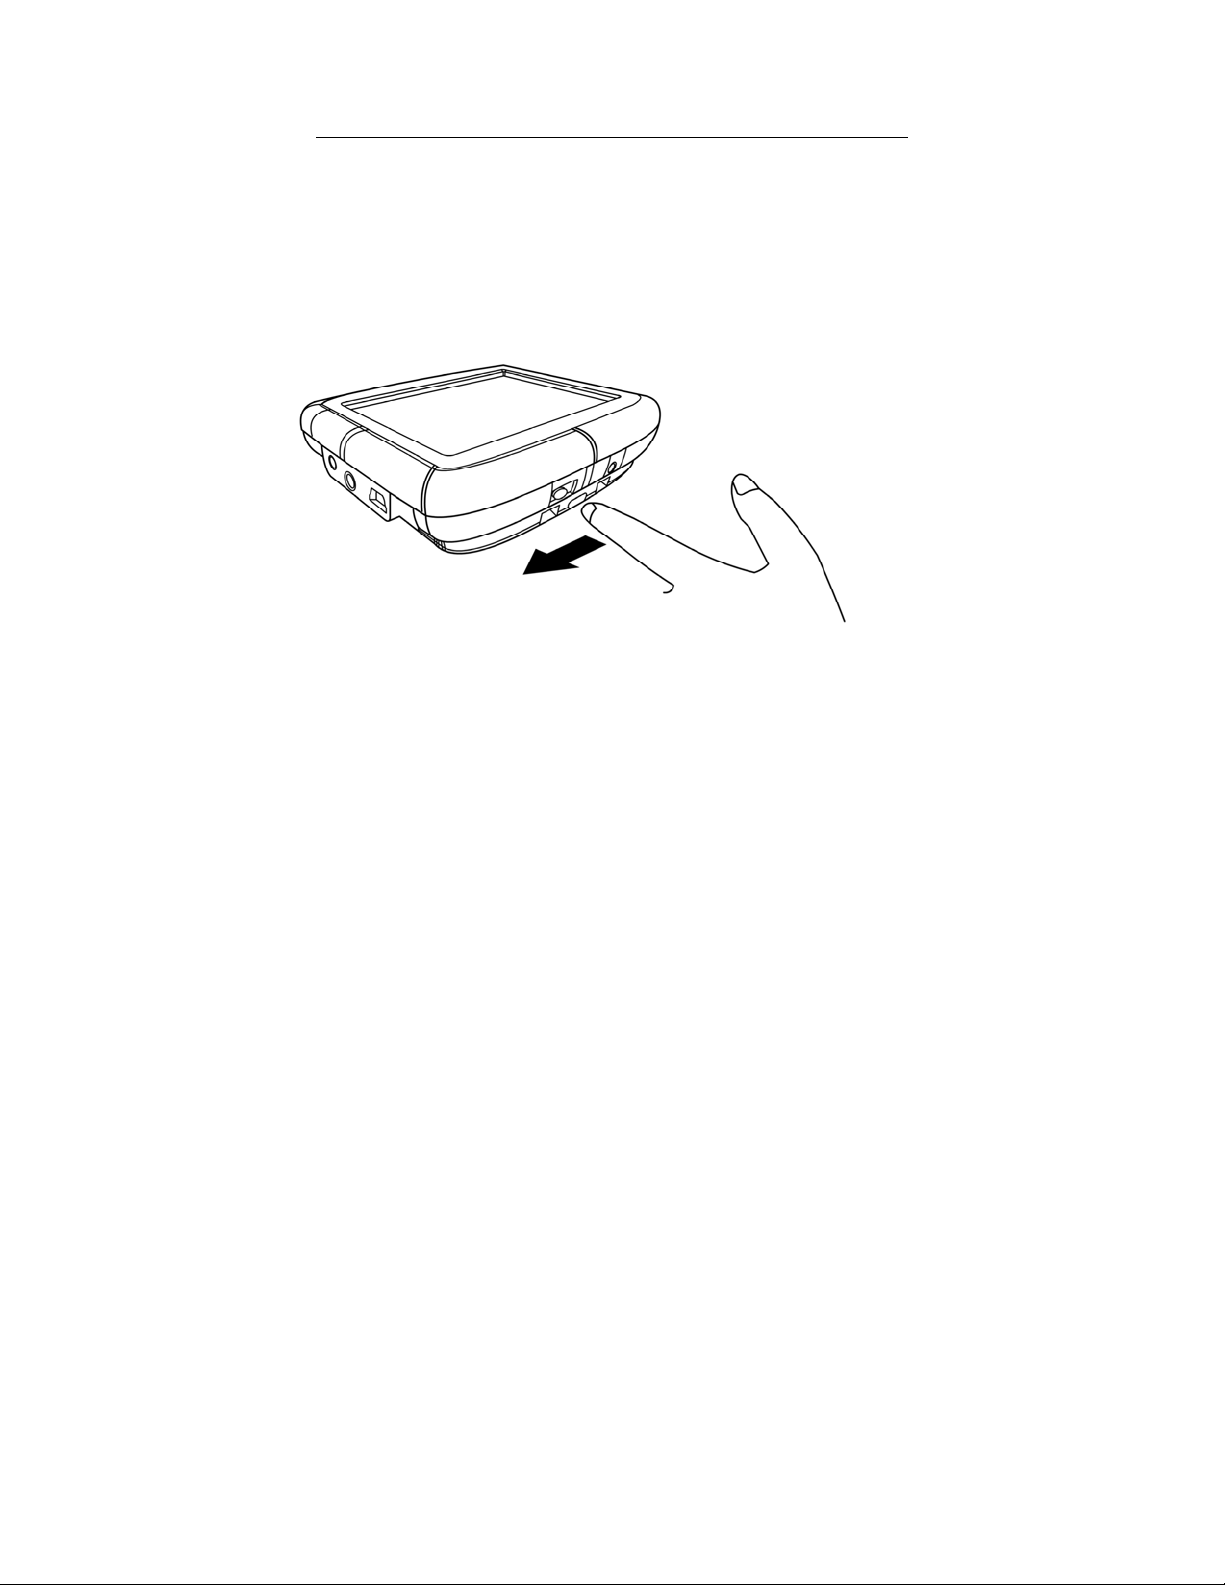
NOTE: Should you ever need to remove the SD/MMC card, push it in a little
and let it pop out.
11
Page 12
Connecting to a
Computer
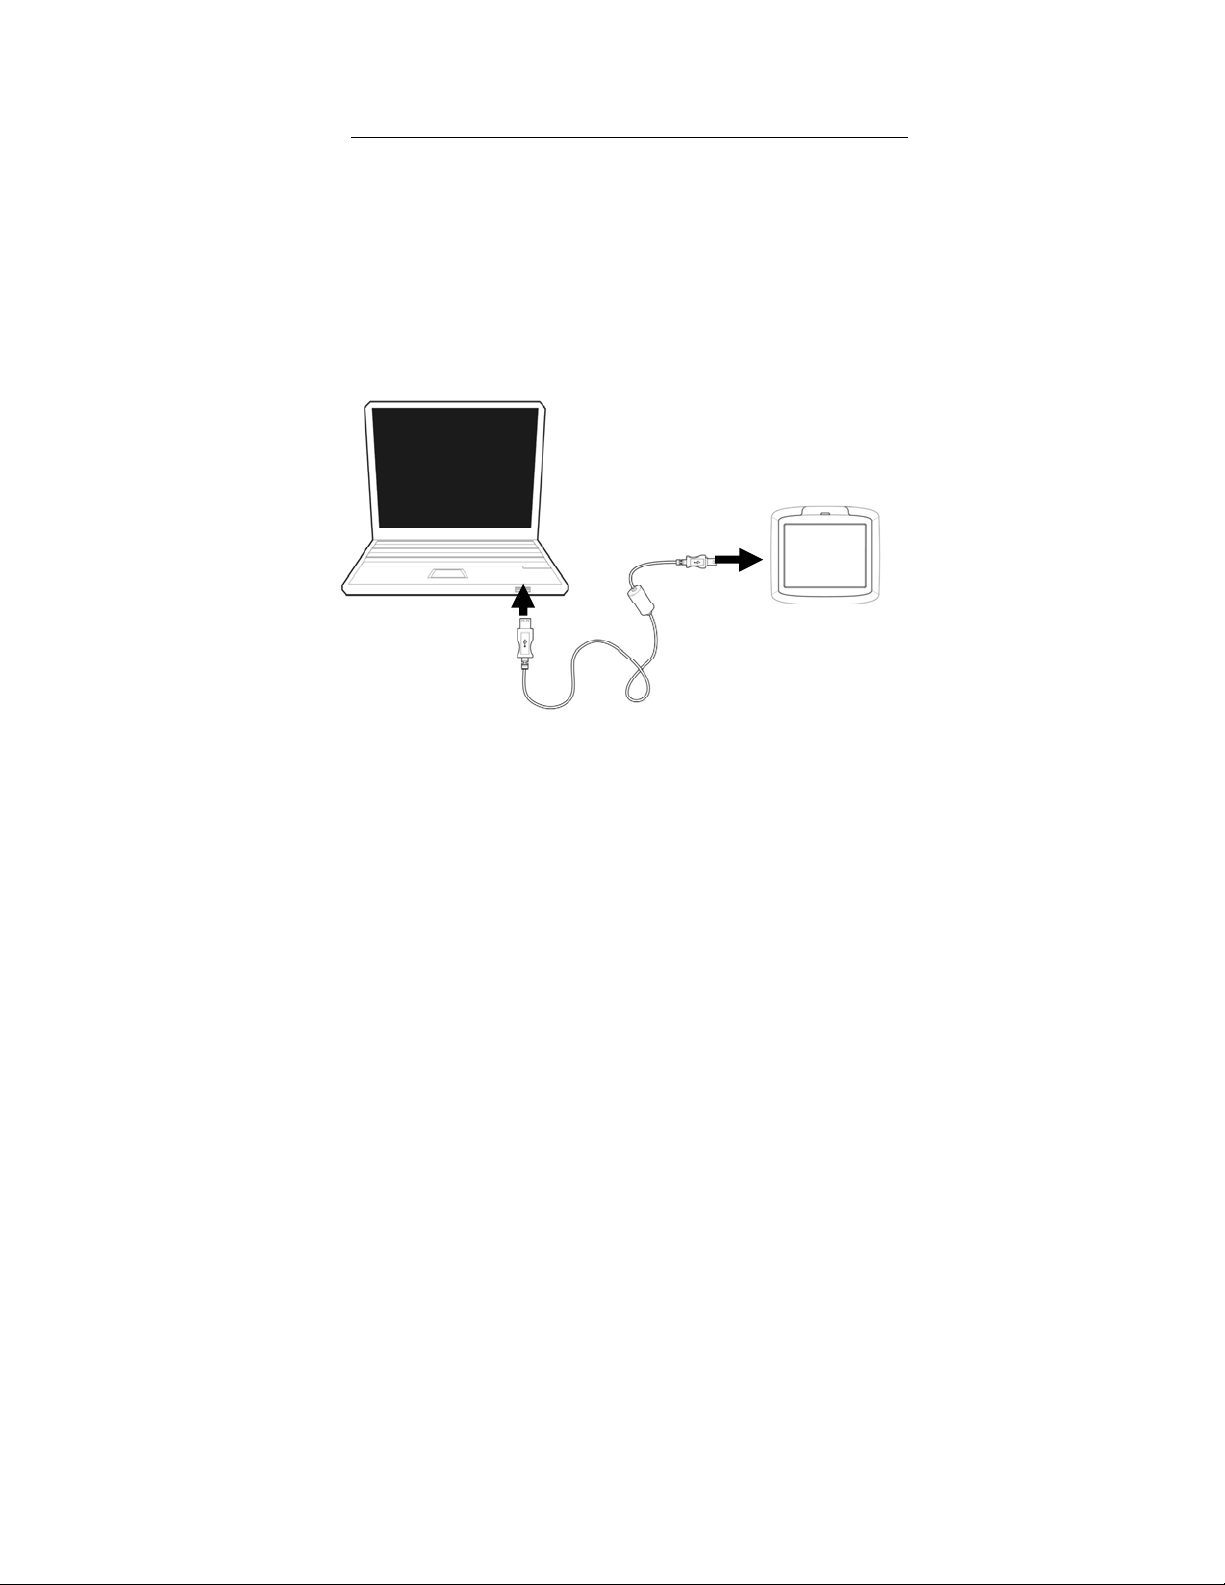
Establishing GPS-PC connection
Connect the smaller end of the USB cable to the mini-USB port on the
left-hand side of your GPS. Connect the larger end of the USB cable to an
available USB port on your computer.
12
Page 13
Charging the GPS
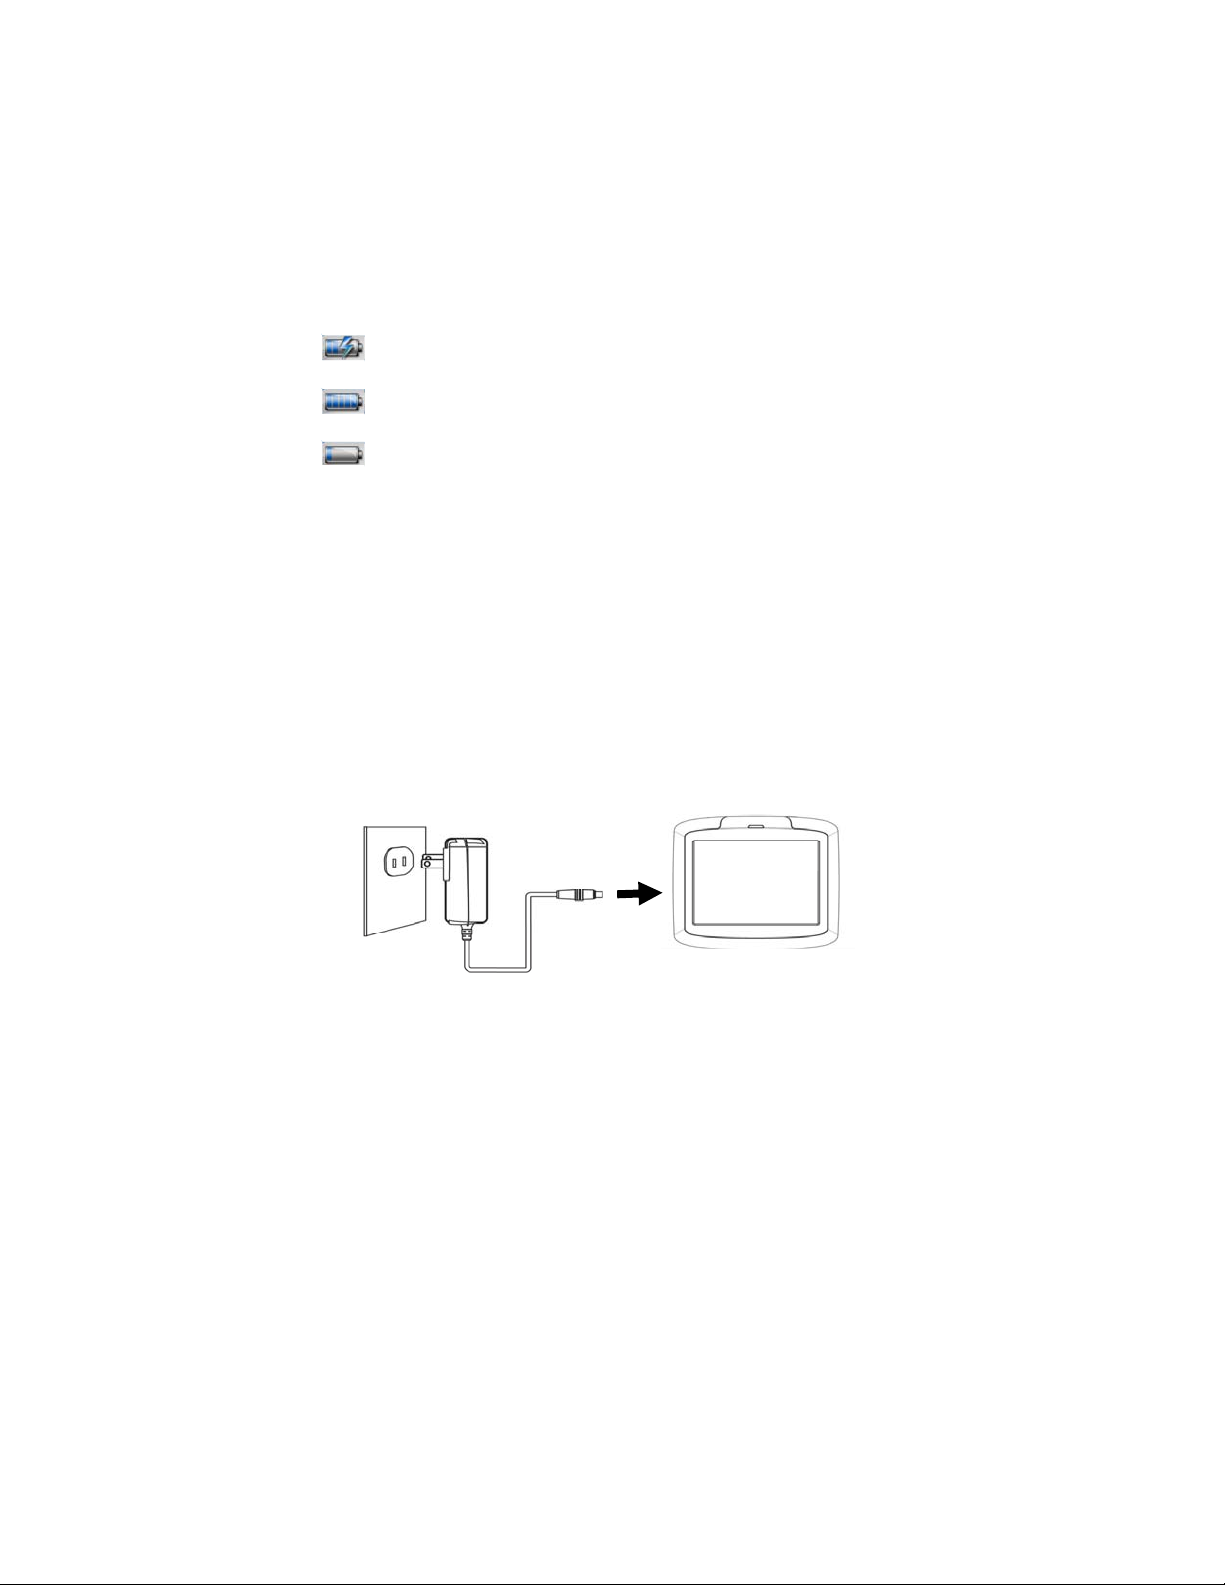
Battery Indicators
Your device uses a rechargeable 1200 mAh Lithium Ion battery. The battery
icon is located on the top right-hand corner of the Main Menu screen and
indicates the battery level, or charging state, as follows:
- Charger attached. Battery is charging.
- Running on battery power. Battery fully charged.
- Running on battery power. Battery is low and charging
is recommended.
When the battery reaches an extremely low level, a warning message will appear.
When you see this message, you must recharge the battery immediately.
LED indicators
• Blue - Charging
• Green - Fully charged (charger plugged in)
• Flashing blue - Low battery
Using the AC Adaptor
Plug the AC adaptor into an AC power source, then plug the other end into the
Mini USB/DC in connector on the left side of the GPS.
Charge the GPS for 8 hours before initial use. After the first charge, recharging
will normally take approximately 4 hours.
13
Page 14
Car Installation
Setting up the GPS in your vehicle
Use the included car kit to set up the GPS in your vehicle. The car kit can either be
used on the windshield (using the suction cup), or on the dashboard using the self
adhesive disk and the suction cup together.
CAUTION: Please check with local laws regarding the mounting of devices on or
close to the windshield of your vehicle.
CAUTION: Do not mount the device where it obscures your view of the
road.
CAUTION: Do not mount the device anywhere where it might affect the
deployment of any airbags.
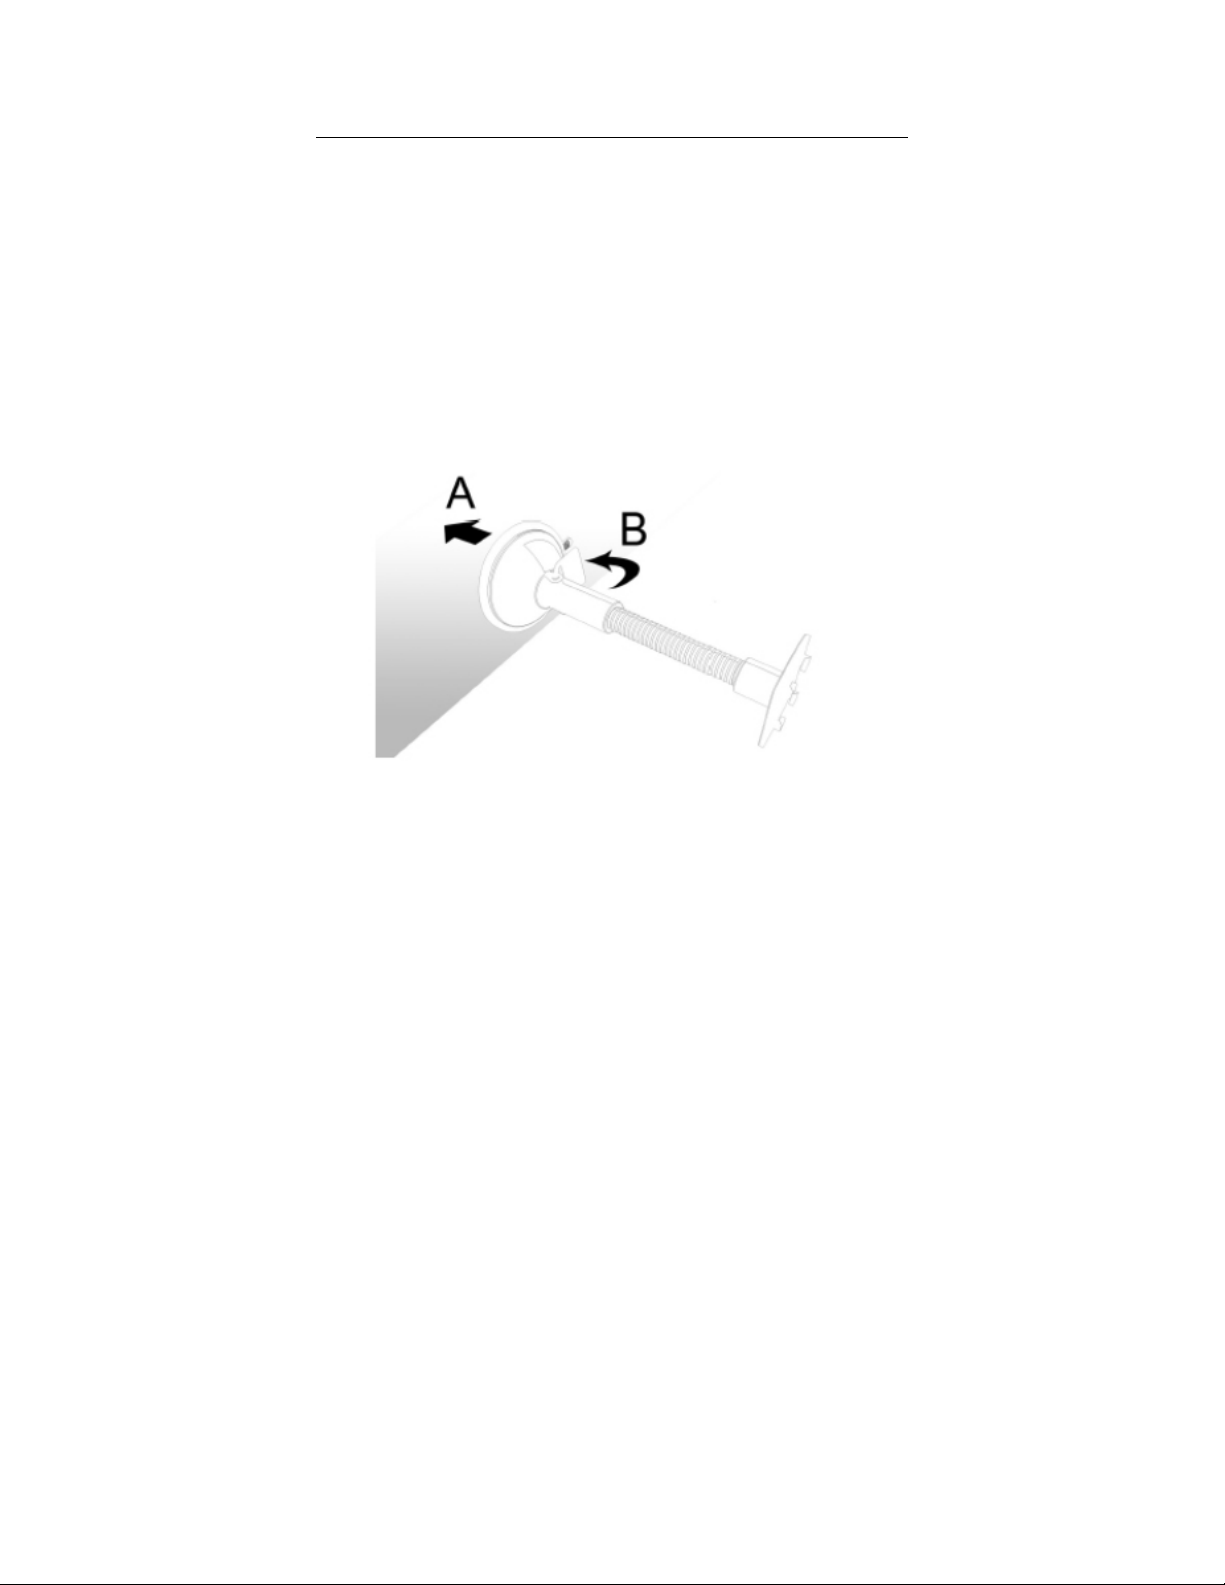
Using the Suction Cup
NOTE: Make sure the mounting surface is clean before mounting the car kit.
1. Fix the suction cup to the selected area with the locking lever facing up (A),
then flip the locking lever away from you to create a vacuum between the
suction cup and the mounting surface (B).
NOTE: Make sure that the suction bond is strong enough before proceeding to
the next step.
14
Page 15
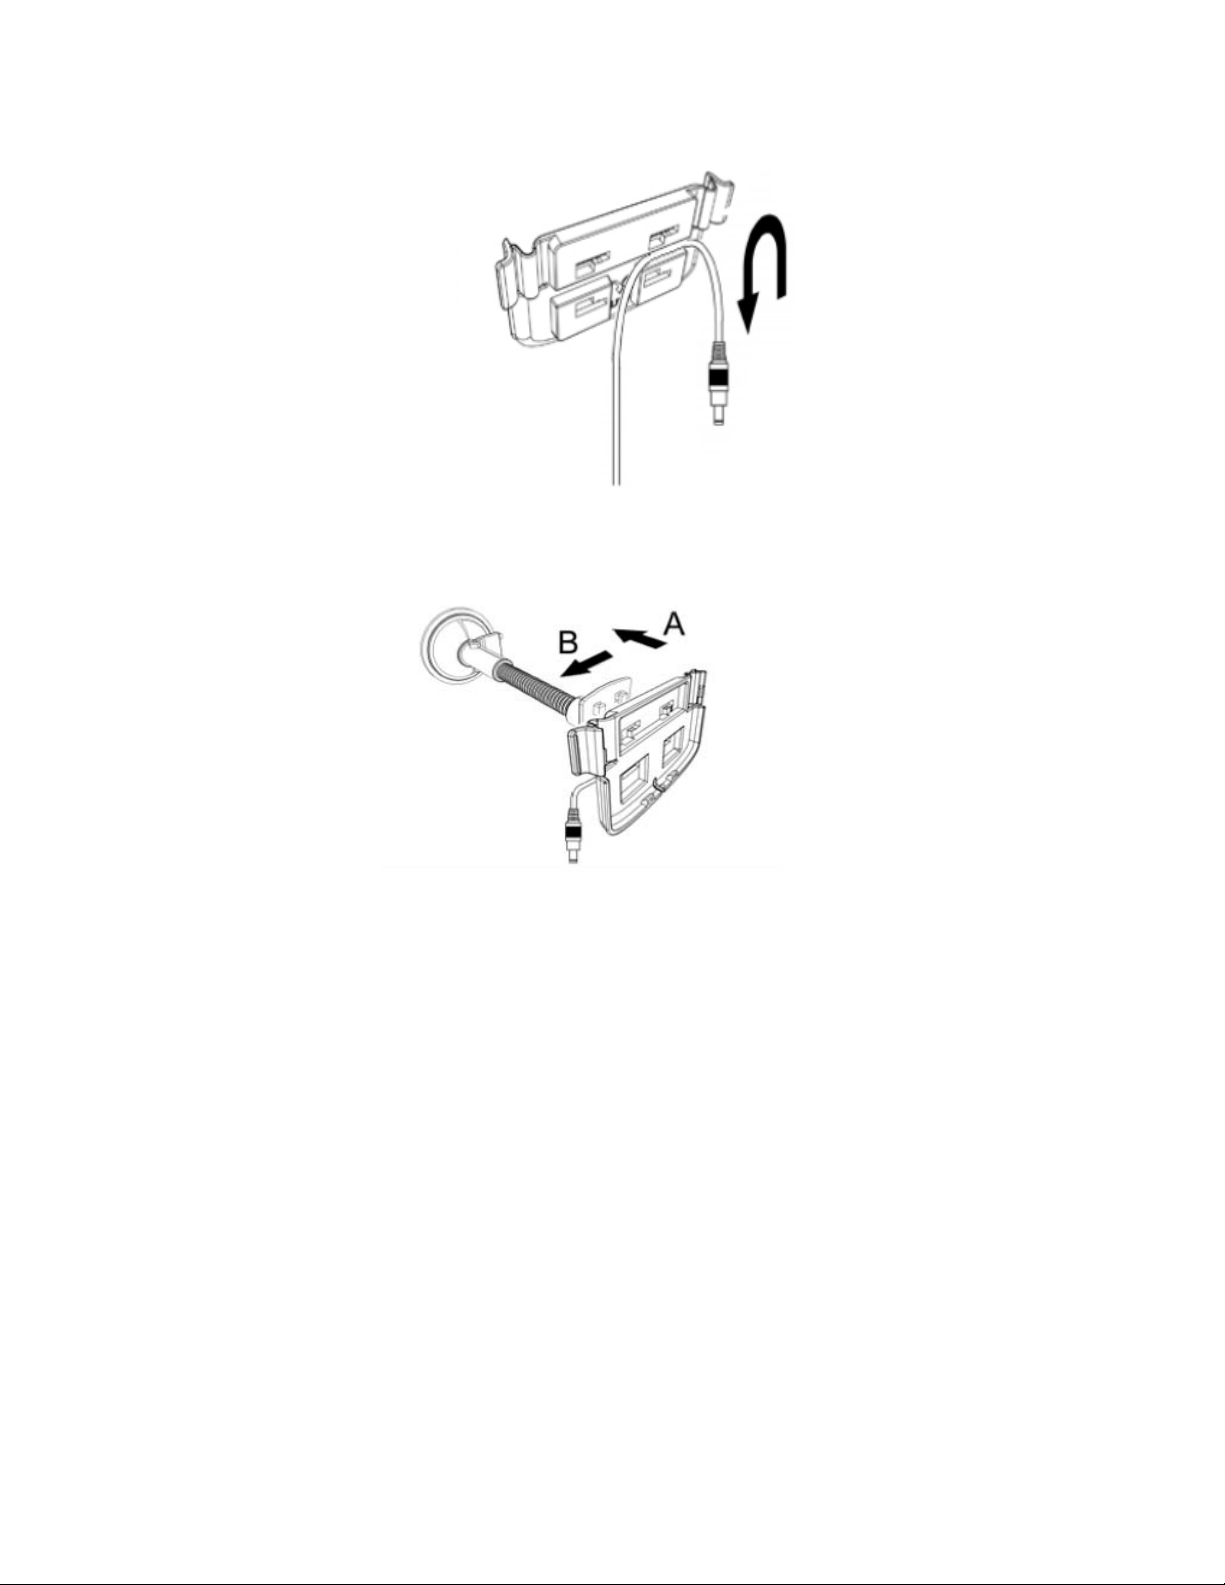
2. Feed the car charger cable down the back of the car holder.
3. Insert the pegs on the car mount’s holder plate to the holes on the back of
the car holder, then move the car holder downwards until both parts are
engaged.
15
Page 16

4. Dock the GPS on the car holder.
5. Adjust the car mount for the best viewing angle.
16
Page 17

6. After setting up the GPS, connect the car charger.
17
Page 18

Unit Basics
Using the Touch Screen
This device does not require a stylus and can be operated with your finger. This
leads to a much more natural way to operate the device.
As well as tapping options on the screen, in certain cases it is also possible to drag,
for example in the Photo Viewer it is possible to drag a photo when it does not fit on
the screen.
Main menu screen
After going through the initial screen calibration, you will see the Main Menu screen.
This is the screen that you will generally come back to each time you exit other
functions.
At the top of the Main Menu screen, you will see the speaker volume, time/
date and battery icon.
To adjust the time/date, see “Setting the Time/Date” on page 29.
For more information on the battery icon, see “Charging the GPS” on page 13.
18
Page 19

There are also four program icons on the Main Menu panel.
Navigator. Refer to the Navigation section starting on
page 35 for more information.
Music. See “Using the Music Player” on page 23 for more
information.
Photo. See “Using the Photo Viewer” on page 25 for more
information.
Setup. See “Settings” on page 28 for more information.
19
Page 20

Navigation
Accessing the Navigation Function
Switch the unit on and tap Navigator in the Main Menu screen.
After the application loads, the main Navigator menu will appear.
For more information regarding the Navigator functions see Section Two starting on
page 35.
20
Page 21

Music Player
This section tells you how to use the music player included on the GPS.
Accessing the Music Player
Switch the unit on and tap Music in the Main Menu screen.
The music player screen will appear in the display.
NOTE: Music must be loaded to the SD memory card from your computer. See
“Connecting to a Computer” on page 12 for more information.
NOTE: The following file formats can be played on the Music Player: MP3, WMA,
WAV.
21
Page 22

Music Player Screen Definitions
22
Minimize Information Exit
Page 23

Using the Music Player
Playing music
To play or pause music, tap the Play/Pause button.
To skip to the next track, tap the Skip forward button.
To go to the beginning of the current track or skip back to the previous track,
tap the Skip back button.
Adjusting the volume
To adjust the volume, press the Volume +/- buttons.
Changing the order of tracks
To choose between playing tracks in random or sequential order, tap
the Shuffle button. The current order is indicated in the top
right-hand side of the screen (Play mode).
Repeating tracks
To choose between repeating tracks or not, tap the
Repeat button. The current mode is indicated in the top right-hand
side of the screen.
23
Page 24

Creating a playlist
Tap the Browse button . The following screen will now appear in the display
NOTE: By default, all music tracks on SD/MMC cards are added to the playlist.
To change which track is highlighted, tap the up/down arrow keys or tap
the track on the touch screen.
To remove ALL tracks from the play list, press the Remove all tracks
button . You will be asked to confirm this operation.
To remove only the currently highlighted track, press the Remove track
button.
To add tracks, press the Add track button, then navigate to the track(s) you
would like to add.
When you have finished editing the playlist, tap
the OK button
For more information, tap the I button.
To exit the Music Player, tap the x button.
.
24
Page 25

Using the Photo Viewer
Switch the unit on and tap Photo in the Main Menu screen.
The Photo Viewer screen will now appear in the display:
NOTE: Unrecognized files or folders will be appear with question marks (?).
25
Page 26

Viewing photos
You can view either individual photos or slideshows on your GPS.
If you cannot immediately see the photo thumbnails you are looking for, but see
folders, tap the folders to access their contents.
You can also tap Scroll up or Scroll down to search up or down the list of
folders or photos.
NOTE: To move up one level while browsing for photos, tap
Once you tap on a thumbnail, you will see a screen similar to the following:
Zoom in or out (you can also use the zoom in or out key)
View photo at default rotation
View photo at 90° (clockwise or counterclockwise) rotation
View next or previous photo
Exit screen
26
Page 27

Slideshows
From the Photo Viewer screen, press the Slideshow button to start a
slideshow.
To stop the slideshow, click anywhere on the screen.
NOTE: Photos must be loaded to the SD memory card from your computer. See
“Connecting to a Computer” on page 12 for more information.
NOTE: The following file formats can be viewed on your device: BMP, GIF (Still
images), JPEG, PNG.
NOTE: If you are using the zoom function, you may not be able to view all of the
images at the same time. To see the missing parts of the image, tap on the photo
and drag it any direction. Or, exit the zoom function to see the image in its entirety.
NOTE: For more information, tap the information button.
NOTE: To exit the photo viewer, tap the exit button.
27
Page 28

Settings
Accessing the Setup Screen
To access the settings features on your device:
Switch the unit on and
tap Setup in the
Main Menu screen.
The Setup screen
will now appear in
the display.
From this screen
you can access:
Audio Setting – Adjust the volume.
Screen Setting – Calibrate touch screen, adjust brightness & idle time.
Time/Date – Set the time/date.
Language – Select the default language.
System Info – View system information.
28
Page 29

Setting the Time/Date
Choose Time/Date from the Setup screen.
Changing the Time/Date
1. Tap Time/Date
2. Tap the time or date field
you wish to change.
3. Tap the up/down arrows
to adjust up/down.
4. When you’re finished
with adjustments, tap OK.
Changing the Time Zone:
1. Tap Time Zone
2. Tap on a region
3. Tap on a city
4. Tap OK
29
Page 30

Adjusting Volume
Choose Audio Setting from the Setup screen. Tap +/- to adjust volume. When
you’re finished, tap the OK button.
Screen options
Choose Screen Setting from the Setup screen.
Tap +/- to adjust backlight.
Tap the right/left arrows to adjust idle time (the amount of time the GPS will wait
before going to sleep when not used).
Press “Calibrate” to calibrate the screen, then follow the onscreen directions.
30
Page 31

Choosing your on-screen language
Choose Language from the Setup screen.
Scroll up or down to find the language you wish to use.
Tap the language you wish to use, then tap the OK button.
System Information
Choose System Info from the Setup screen.
This screen gives you valuable information about your GPS.
Tap the return button to exit this screen.
31
Page 32

Resetting the GPS
If your device ever stops responding to your commands, you may need to reset
it. There are two reset options: a soft reset and a hard reset. Always try the soft
reset first, as this simply restarts the device and clears the memory.
Performing a Soft Reset
Use a pen or similar object to press the soft reset button on bottom of GPS.
Performing a Hard Reset
If a soft reset does not correct the problem, perform a hard reset. A hard reset
will delete settings and reset the GPS. To perform a hard reset, move the
hardware reset switch to the right and then back to the left.
32
Page 33

Troubleshooting
Problem Possible Reason Solution
Unit will not switch on Battery is dead Make sure the battery is
Bad reception The folding antenna is
Bad reception Car windows are tinted,
Bad reception Signal is weak in this
New memory card
doesn’t work
Screen is froze, or
unit is behaving
strangely
I cannot play music
on the unit
I cannot play music
on the unit
My music appears to
be playing, but I can’t
hear it
My music appears to
be playing, but I can’t
hear it
My music appears to
be playing, but I can’t
hear it the unit
closed or in the wrong
position
blocking GPS reception
area
Card has not yet been
formatted correctly
Unit is in need of a reset Perform a soft reset, or if
Music may be the wrong
format
Music track(s) may be
corrupt
Volume is set too low Increase the volume.
Music track Make sure all music is
When earphones are
plugged in, the speakers
are automatically muted
properly charged. See
“Charging the GPS” on
page 13 and 14 for more
information.
Unfold the antenna and
make sure it’s parallel
with the ground, i.e., in a
horizontal position.
Use an external antenna
(not included).
Use an external antenna
(not included).
Format card using FAT
file system.
necessary, a hard reset.
See “Resetting the GPS”
on page 34 for more
information.
Make sure all music is
MP3, WMA or WAV
format.
Make sure the track
plays correctly on your
computer.
MP3, WMA or WAV
format.
Listen through the
earphones or disconnect
them to hear sound from
the speakers.
33
Page 34

I cannot see my
photos
I cannot see my
photos
The touch screen
doesn’t react
correctly to my finger
taps
Images may be in the
wrong format
Image file(s) may be
corrupt
The touch screen may
need to be recalibrated
Makes sure your images
are JPG or BMP format.
Make sure the image
can viewed correctly on
your computer.
Recalibrate the screen.
See “Screen Options” on
page 30.
34
Page 35

Section Two: Navigation
Icons
The following icons are used throughout the application:
Icon Name Function
Menu icon Open a menu
containing various
options.
Back icon Go back to the
previous screen.
Navigation icon Start navigation.
GPS icon Availability/strength
of GPS signal.
Search icon Open a search
screen.
Confirmation icon Apply settings.
Select/deselect all.
Cancel icon Cancel route
calculation.
35
Page 36

Introduction
We hope that you enjoy using your new GPS Navigation
system. This manual is designed to help you get the most
out of your system. This navigation system leads you straight
to your destination, whether you are traveling by car or on foot.
You can navigate and plan your route with an easy-to-use and
intuitive interface, plan your trip to suit your personal
preferences and interests and find and save
interesting destinations before you begin your trip.
Key features
• Accurate navigational guidance with spoken word
commands anywhere
• Real pedestrian mode – through parks and open
spaces
• Trip planning
• Look-ahead search function
(Bookmark)
• Earth browsing – zoom from satellite view to street
level view
• Unique night mode for easy night viewing
• State of the art guidance engine
36
Page 37

Getting started
Please make sure that the battery in your device is fully
charged. Refer to the hardware section of this manual for
instructions covering how to charge your system.
• Power up the unit and tap NAVIGATION on the first
screen.
Choosing a language
If more than one language is available on your device, you will
be prompted to select the desired language. The language
selected will change not only the audible commands that you
hear during navigation, but also the text displayed throughout
the user interface.
• Click on the flag representing the desired country
language
o You may change the language selection at any time
• On the next screen, choose the desired voice type to
be used for the voice commands during navigation
(e.g., female or male voice)
Set time zone
Your PND automatically determines the time through the GPS
signal. However, you must set the time zone.
• Select your time zone from the list
It can be changed at a later time (see page 58)
o
• Press the Confirmation icon
Safety Warning Message
Next, a screen that displays a safety warning will be shown.
• Please read the safety precautions
37
Page 38

• You may select Hide at start-up to hide this warning
for future start-ups if you wish
• Press the forward arrow
GPS connection
Your device uses Global Positioning System (GPS)
technology for navigation. The device receives signals from a
variable number of GPS satellites in order to determine your
current position.
• Following the instructions provided in the hardware
section of this manual, place your PND in a location
with an unobstructed view of the sky to set up your
first satellite connection. In a car this will usually be on
the dashboard.
It may take up to 5 minutes to establish the first
connection. Subsequent connections will be faster (30
seconds to 1 minute), but if you have not used the unit
for several days or are very far away from the last
location where you used it, it may again take up to 5
minutes to find a strong signal.
38
Page 39

Main elements
Main menu
The main menu is your central point of access to all functions
of your Personal Navigation Device. It allows you to find and
set your destination, manage your favorites and control all
settings of your device.
On the left-hand panel there are three large buttons. Click on
one of the buttons to enable a set of sub-options, which will be
shown on the right hand side of the screen:
• Destination lets you choose your destination – either
by searching for an address (see page 43), choosing
an entry from the POI directory or a city guide (see
page 46), selecting a location from the map (see page
49) or a recently visited location (see page 51).
• Favorites allows you to manage your favorites (like
bookmarks, recently visited locations, trips). You can
rename, sort or delete them.
• Use Settings to configure your Personal Navigation
Device to suit your needs. Define general settings
39
Page 40

(e.g., time, language, system of measurement, see
page 57), configure your map (e.g., 2D or 3D mode,
day or night mode) or load a map of a different region
(see page 58), set the route options (e.g., choose to
avoid or allow toll roads or ferries or select your mode
of transportation; see page 57) or adjust the volume
(see page 62).
Map
The map is the core component of your Personal Navigation
Device. It is centered on your current location by default,
provided you have a GPS connection. You can browse the
map, display information about the different locations shown
on it and choose them for routing and navigating.
Tracking mode and browsing mode
The map has two basic states: tracking and browsing.
In the tracking mode, the map follows your actual position
(GPS position), displaying information about your geographic
position, your speed, etc.
Time
Elevation
above mean
sea level
Geographic
coordinates GPS position
Speed GPS status
Battery status
Zoom out
Back icon Menu icon
40
Zoom in
Page 41

As soon as you tap or touch the map, you enter the browsing
mode:
GPS status
Battery status
Zoom out
Back icon I Menu icon
Cursor
GPS position
Zoom in
• Use a stylus or your finger to browse the map. The
selected position will be identified by a cursor.
Clicking on an icon on the map opens an overlay
window with information about the selected item.
• To zoom in or out, press the + or - icons. As soon as
you press one of the icons, the zoom slider is
displayed to enable smooth zooming.
• If you want to return to the tracking mode, press the Back
icon.
Navigation screen
Speed
Current time
Estimated
arrival time
Distance to
destination
Back icon Menu icon
Next Maneuver icon
Distance to next maneuver
Next turn/junction/exit no.
Zoom out
Direction
GPS position
Zoom
The navigation screen displays your route (in blue) and your
surroundings. The GPS position icon identifies your current
41
Page 42

position. The red arrow indicates the direction of your next
turn.
The upcoming turn or maneuver is always shown in the upper
left corner – together with the distance to it. When you
approach a turn, there will be a voice command at the
appropriate time.
On the left side, additional information is displayed, such as
current / estimated arrival time and the distance to your
destination.
For one-way streets, the allowed direction of travel is
indicated by a red arrow.
For more information about navigation see page 52.
42
Page 43

Main features
This chapter describes the functions of your Personal
Navigation Device in detail. On the following pages you will
learn how to
- Find and choose locations (see page 43)
- Navigate to your destination (see page 52)
- Use the route planner (see page 54)
- Configure the application (see page 57)
Choosing and finding locations
This section describes the different ways of finding and
choosing locations. You can search for an address, browse
Point Of Interest (POI) directories and city guides, choose
locations on the map and choose one of your favorites such
as your home and work addresses, your bookmarks and
recently visited locations.
Search for an address
Use the address search function to find an address. Just enter
information about the desired destination, select an entry from
the results list and then use the address found for different
purposes, such as showing it on a map, planning a route or
navigating to it.
• In the main menu, press Destination
• Press Address
43
Page 44

The Find Address window will be displayed:
• Begin by tapping or touching the City text box.
How to search
Your Personal Navigation Device offers a convenient,
interactive look-ahead search function to prevent misspelling.
Only keys that lead to a search result can be pressed – all
others are locked!
• Enter the first character.
You will see that some keys on the keypad turn grey. You can
only select keys that are not grey:
44
Page 45

• Enter the second character.
Again, some keys will turn grey, depending on your choice.
• Keep on entering characters until you have narrowed
down the search to only one result.
OR
• Press the Search icon (magnifying glass).
A result list will be displayed.
• Choose the appropriate entry from the list.
Switch between letter and number mode by pressing
123 or ABC. Switch between upper case and lower
case by pressing ^.
If at any point you want to go back and delete
characters, press the backspace button <- on the
screen. To add a space, press the space bar _.
If you need to enter an apostrophe (‘) use the space
key instead.
Search for the city
• To select a city, press City.
• Search for the city as described above.
A result list will be displayed.
• Choose the appropriate town/city from the list.
You will return to the Find Address screen, and the City field
is populated with the name of the chosen town/city.
Search for the street
• To select a street, press Street.
• Search for the street as described above.
A result list will be displayed.
45
Page 46

• Choose the appropriate street from the list.
You will return to the Find Address screen, which now
contains the data previously entered.
You may also enter the number.
Navigate to the address found
Once you have narrowed down your search to a unique
address, you can start navigation.
Press the Menu icon to access further options:
• To navigate to the location, press Navigate (see page
52)
• To use the location for planning a route, press Via
(see page 54)
• To save the location as a bookmark, press Save.
• To show the location on the map, press On Map
Searching for and choosing POIs
The POI finder allows you to quickly find points of interest like
gas stations and restaurants in a database of millions of POIs.
These places can be nearby to your current position (the
46
Page 47

default) or at any other location.
• In the main menu, press Destination.
• Press POI Search.
The POI Search screen will be displayed:
Note that the text in the white ‘Where?’ box is your current
location. To search for a POI in another location, touch
the ‘Where?’ button.
Choosing a POI
• Select the desired POI category
A menu with subcategories will be shown
• Select a subcategory (if applicable)
• To return to the previous category, press the Back
icon
A list of POIs will be shown
• Select a POI by clicking on it
47
Page 48

A menu with a set of actions will be displayed:
• To navigate to the location, press Navigate (see page
52)
• To use the location for planning a route, press Via
(see page 54)
• To save the location as a bookmark, press Save.
• To show the location on the map, press On Map
• If detailed information is available about a particular
POI, you can view it by pressing the Description icon
To set a starting point other than your current location,
press Where?.Enter a new location by one of the
methods shown and POIs near that point will be
displayed.
Searching for a POI
• To enter a search keyword, press the Search icon
48
Page 49

• Enter the search keyword (at least three characters),
and press the Confirmation icon
A list of POIs will be shown
• Select a POI by clicking on it
A menu with a set of actions will be displayed as described
above.
Choosing a location on the map
An easy way to choose a location is to select it on the map.
Browse your surroundings and choose any street or location
to set it as your destination.
• In the main menu, press Destination
• In the main menu, press Map
• Point the cursor at any place on the map. The name of
the selected location/street will be shown in the info
box
• Press the Menu icon
From the following menu you can choose to be guided to the
address, use it for route planning, show it on the map, etc.
(see page 52)
Favorites
You may use your frequently used or favorite destinations for
guidance. You can choose among your bookmarks, recently
visited locations, previously saved trips (see page 54) and
presets (e.g., your home or place of work).
• In the main menu, press Destination
• In the main menu, press Favorites
49
Page 50

The Favorites menu will be displayed on the screen:
Bookmarks
The bookmarks list contains the destinations you have saved
as favorites (from the guides, by choosing them on a map,
etc.). This means that you do not need to perform repeated
searches for those destinations.
• Press Bookmarks
The bookmark list will be displayed on the screen:
Use the up and down arrows to scroll up and down in the list.
50
Page 51

• Select an item by clicking on it
A menu with a set of actions will be displayed:
• To navigate to the location, press Navigate (see page
52)
• To use the location for planning a route, press Via
(see page 54)
• To sort the list of location alphabetically, press Sort
• To show the location on the map, press On Map
• To delete the selected location, press Delete
selected
• To edit the location, press Rename
• To delete all locations, press Delete all
All user information such as settings, bookmarks and
recently visited locations are stored on the memory
card and not on the device.
Recent
Pressing Recent opens a list of recently visited or looked-up
destinations.
• Press Recent
The list of recent places will be displayed on the screen.
Use the up and down arrows to scroll up and down in the list.
• Select an item by clicking on it
A menu with a set of actions will be displayed as described
above.
Trips
• To access your previously saved trips, i.e., routes,
press Trips (see page 54)
Presets
You can save your home and street addresses as presets for
51
Page 52

quick access.
• Press Presets
• Press My Home
A menu with a set of actions will be displayed:
• To navigate to the location, press Navigate (see page
52)
• To edit the location, press Rename
• To delete the location, press Delete selected
• To show the location on the map, press On Map
• To use the location for planning a route, press Via
(see page 54)
• To delete all locations, press Delete all
If no home address has been set, you are prompted to
set one. You can choose it by searching for an
address, through your current GPS position or by
choosing a recently visited location.
Proceed similarly with your work address.
Navigating
The powerful navigation capabilities of your Personal
Navigation Device guide you along the shortest or quickest
route from A to B – with voice commands and in 3D.
This section describes the navigation feature.
See page 49 for information about choosing elements
on the map. See page 43 for information about finding
and choosing addresses, POIs and locations inside a
guide.
• Choose a location through Destination, and press
Navigate in the respective menu
Your route is calculated, and the navigation screen is called
52
Page 53

up (see page 41)
Browse the map during navigation
You can browse the map even while navigating. However,
navigation will not be interrupted – you will be still guided
through voice commands. Press the Back icon to switch to
on-screen navigation.
Menu options
• To open a set of navigation options during navigation,
press the Menu icon:
Here you will find the following items:
Alt. route
With this option, you can choose to block the calculated route
for a given distance (e.g., 0.5 mile) and force an alternate
route. Simply tap on the icon which shows the desired
distance to block. Your route will be recalculated, and the
previous route will be discarded for the given distance.
List of waypoints
Opens the list of the waypoints (turns) along your route.
Save
Save your present position as a bookmark.
53
Page 54

Volume
Alter the volume of the voice commands.
Search
You can redirect your route by choosing a point of interest
(POI), e.g., a gas station
Settings
Change the settings of your Personal Navigation Device as
described on page 57.
Planning a route
This section describes the route planning feature. This feature
allows you to plan your route in advance, choosing multiple
stopovers along your journey.
See page 49 for information about choosing elements
on the map. See page 43 for information about finding
and choosing addresses, POIs and locations inside a
guide.
• Choose a location on the map or use the Destination
function, and press VIA in the respective menu.
• The Destination List will be displayed:
54
Page 55

The location will be added to the Destination List.
• To add another stopover, press the + icon.
The Choose stopover: screen is called up. You may choose
stopovers like your home or work addresses, a bookmark, a
point of interest, a recent location, or you can search for an
address or pinpoint a destination on the map.
Once you have added stopovers (with the + icon) and
returned to the Destination List, you have several options:
55
Page 56

• Use the + icon to choose additional stopovers.
• To change the order of the stopovers, select a
stopover and then use the up and down arrows to
move it up/down in the list.
• Use the Trash icon to delete a selected stopover.
Once you have chosen your route, you have several options.
You can access these options by pressing the Menu icon
(bottom right-hand corner of the screen).
• To simulate the planned route, press Simulate
• To start guidance, press Start Navi. The display will
switch to the navigation map
• To calculate the route, press Routing. The Route
Summary will be displayed. Tap on one of the items in
the Route Summary to display the Waylist. Tap
again to show the map view.
• To save the route as a favorite trip, press Save as
(see page 51)
56
Page 57

Settings
You can configure your Personal Navigation Device to suit
your needs. When it comes to navigating, you can, for
example, choose to avoid or allow toll roads or ferries or
select your mode of transportation, like a fast or slow car, a
scooter or even your own feet. You can also edit several
display settings, such as 2D or 3D mode, day or night mode,
map complexity, etc.
• In the main menu, press Settings.
General settings
• Choose General to change the general settings
57
Page 58

The window with the general settings will be shown:
• To choose the language, press Language
• To change the time zone, press Set time
• To change the system of measurement, press Miles
or Kilometers
• To show information about the application, press
About
Map settings
• Choose Map Options to change the map settings.
58
Page 59

The window with the map settings will be shown:
• To toggle between night and day modes, press the
corresponding icon. By selecting Automatic, the
mode will be chosen depending on the actual time.
• To select a map, press Maps
• If you have map data for different regions on your
memory card, tap on the name of the current region
(e.g., London). All available maps on the memory card
will be listed. Choose the desired region by simply
tapping on its name.
• To toggle between 2D and 3D modes, press the
corresponding icon
• To maintain the way ahead in an ‘up’ or ‘North’ position,
press Track Up. To keep the map oriented to the north,
press North Up.
59
Page 60

• To select which and how many icons will be shown on
the map, press Info Layers:
• Check the boxes of any category you want to have
displayed on the map. Uncheck those that should be
hidden. Note that this will NOT affect any searches
that you perform.
• To apply your settings, press the Confirmation icon
• To return to the previous screen, press the arrow
60
Page 61

Route options
• Choose Route Options to change the route options
The window with the route settings will be displayed:
• To switch between the modes, just touch the icons.
These will toggle so you can quickly see the activated
settings.
You can choose among the following options: mode of
transportation (fast car, slow car, motorbike, pedestrian, etc.),
fastest or shortest route, allow or avoid toll roads, highways,
and ferries. You can also choose the distance unit
(miles/kilometers).
Once you have chosen your settings, press the Confirmation
icon to return to the main menu.
Mode of transportation – Overview
Fast – Assumes fast driving on highways
Slow – Assumes slower driving on highways
Bike – Takes into account bike paths and restricts highways
where bikes are prohibited
Pedestrian – Provides true pedestrian routing including
access to one-way streets and pedestrian zones, where
possible
61
Page 62

Volume
• To change the volume of voice commands, press
Volume
Route recording
The route recording function enables you to record your
routes. You may save your traces and import them in any kind
of NMEA program. This allows you to document your trips.
• To do so, tap the display during navigation and press
Record.
Your route will be stored until you press the button again.
• To return to the navigation screen, press the Back
icon.
62
Page 63

Frequently asked
questions
I can’t find an address.
Please make sure you have correctly spelled your entry. If you
do not know how an address is spelled, simply enter the parts
of the address about which you are certain – e.g. “Brook” for
Brooklyn in New York. Then browse the results list and look
for the address. Also make sure that the city in which you are
looking for an address is correct. Sometimes the official postal
address differs from the address you are looking for. In that
case, search for a known address nearby and browse the
map.
I am experiencing problems getting GPS fix.
If you have problems getting a satellite fix with GPS (you can
see how many satellites are being received on the main menu
at the bottom left), please make sure you are outside and the
GPS antenna has good ‘visibility’ to the open sky.
Where can I get technical support?
In the US call, 1-866-289-5168. In Mexico, please contact
01-800-400-2443.
Where can I get software updates?
www.polaroid.com
63
Page 64

Index
2
2D/3D, 59
A
Address
Set as destination, 43
Alternative route
Enforce, 53
Ferries
Avoid/allow, 61
G
GPS, 38
I
Info box, 49
Info Layers, 60
B
Block route, 53
Bookmarks
Memory Card, 51
Set as destination, 50
Browsing mode, 41
C
Choose destination
Recent locations, 51
Close application, 41
Compass
Adjust orientation, 41
D
Day mode, 59
Delete
Stopover, 56
Destination
Address, 43
Bookmarks, 50
Look-ahead search, 44
Map, 49
My Home, 52
POI, 47
Destination List
Route planning, 54
E
Exit application, 41
L
Look-ahead search, 44
M
Main menu, 43
Favorites, 49
Settings, 57
Map, 40, 58, 59
Browsing mode, 41
Choose as destination, 49
Compass icon, 41
Zoom slider, 41
Map Options, 57, 58
Memory Card
Save bookmarks, 51
Motorways
Avoid/allow, 61
My Home
Set as destination, 52
N
Navigate
Command, 46, 48, 51
Navigation, 52
Navigation screen, 41
Night mode, 59
O
On Map
Command, 46
F
Favorites
Main menu, 49
64
P
Pedestrian, 61
POI
Page 65

Redirect route, 54
Set as destination, 47
R
Recent location
Set as destination, 51
Route, 61
Route planning, 54
Choose stopover:, 55
Route Summary, 56
Simulate, 56
Waylist, 56
S
Satellite connection, 38
Save
Command, 46, 48
Search
POI, 54
Settings
2D/3D mode, 59
change volume, 62
Day/night mode, 59
Ferries, 61
Info Layers, 60
Main menu, 57
Map Options, 57, 58
Maps, 58, 59
Motorways, 61
Pedestrians, 61
Route, 61
Toll roads, 61
Simulate
Route, 56
Stopover
Choose for route planning, 55
Delete, 56
Summary
Route planning, 56
T
Toll roads
Avoid/allow, 61
V
Via
Command, 46, 48, 51, 52
Volume
change, 62
W
Waylist
Route planning, 56
Z
Zoom slider, 41
65
Page 66

Copyright and license
notes
WEEE:
This product contains electrical or electronic materials. The presence of these
materials may, if not disposed of properly, have potential adverse effects on the
environment and human health. Presence of this label on the product means it
should not be disposed of as unsorted waste and must be collected separately.
As a consumer, you are responsible for ensuring that this product is disposed of
properly. To find out how to properly dispose of this product, please go to
www.polaroid.com and click on “Company“ or call the customer service number
for your country listed in the instruction manual.
Copyright for this manual: © Nokia gate5 GmbH, 2007. All
rights reserved.
Portions of the software are copyright © 1996-2002 The
FreeType Project (www.freetype.org). All rights reserved.
“Polaroid” and “Polaroid and Pixel” are trademarks of Polaroid
Corporation, Waltham, MA, USA.
For service, support and warranty information, visit
www.polaroid.com.
66
 Loading...