

Page 1

www.pol aroid .com
Digital Camera
User Guide
Page 2
2
Polaroid izone30 0™ Digital Ca mera User Gu ide
www.polaroid.com
3
Polaroid izone30 0™ Digital Ca mera User Gu ide
www.polaroid.com
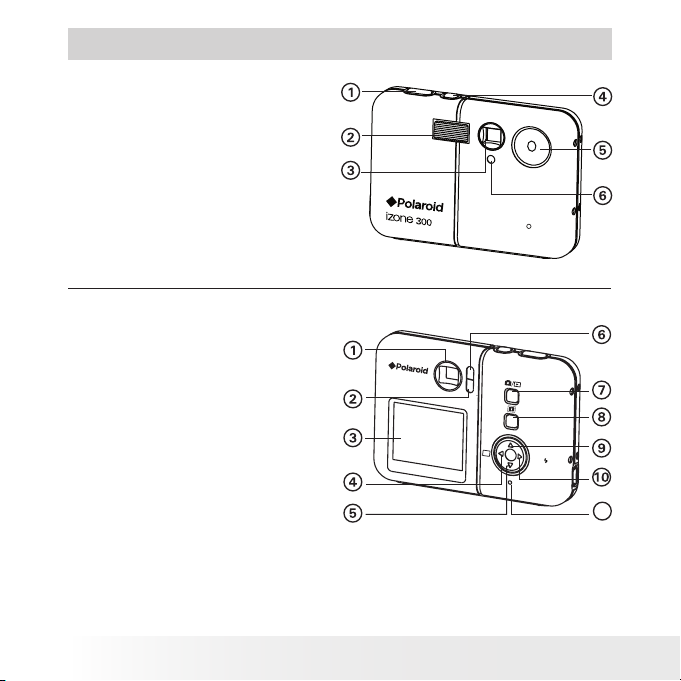
Product Overview
1. Shutter button
2. Flash
3. Viewnder
4. Power button
5. Lens
6. Self Timer LED
1. Viewnder
2. Saving LED
3. LCD screen
4. Menu / Left button
5. Down button
6. Flash / Battery charge LED
7. Capture / Playback mode button
8. LCD screen on/off button
9. Up button
10. Set / Right button
11. Reset button
M
S
E
T
/
11
Page 3
3
Polaroid izone30 0™ Digital Ca mera User Gu ide
www.polaroid.com
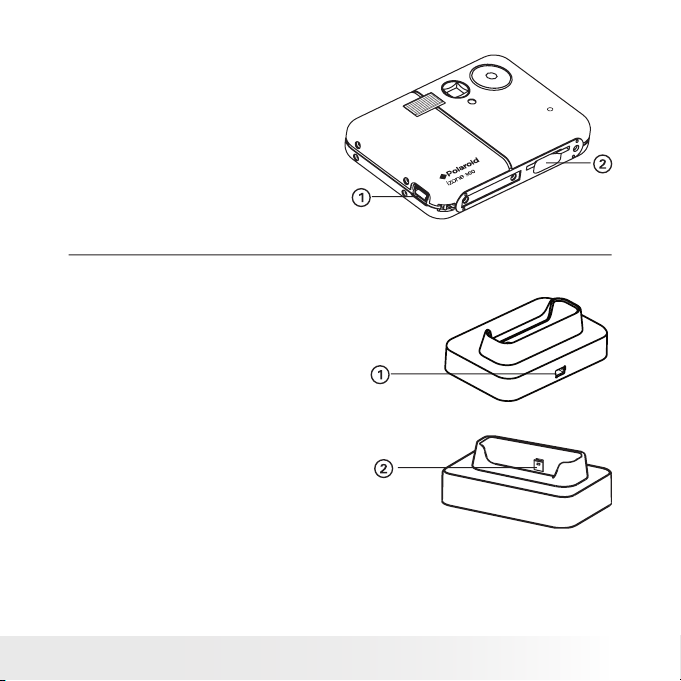
1. USB port
2. SD card slot
1. USB port
2. USB plug
Docking Station
Page 4

4
Polaroid izone30 0™ Digital Ca mera User Gu ide
www.polaroid.com
5
Polaroid izone30 0™ Digital Ca mera User Gu ide
www.polaroid.com
Table of Contents
1 Getting Started ................................................................................ 7
• Camera Package Contents............................................................ 8
• Attaching the Hand Strap ............................................................. 9
• Using the Docking Station ............................................................ 9
• How to Use the Tether (Optional)................................................. 10
• Charging the Battery...................................................................11
• Turning the Camera On and Off ...................................................15
• Reset Feature.............................................................................16
• Checking the Battery Power Level................................................16
• How to Navigate Menus ..............................................................17
2 Camera Setting ...............................................................................18
• Checking Camera Status .............................................................18
• Camera Modes .......................................................................... 20
• Drive Mode ............................................................................... 20
• Setup Menu .............................................................................. 20
• Formatting the Internal Memory.................................................. 22
• Setting the Current Date and Time ...............................................23
• Auto Power Save Setting ............................................................24
• Setting the Beep Sound On/Off ...................................................25
• Setting Frequency ......................................................................25
• Setting Display Language ............................................................26
• Setting the Date Stamp On and Off..............................................27
• Resetting to Default Settings.......................................................27
• Switching the Information Display and LCD Screen On and Off.......28
Page 5

5
Polaroid izone30 0™ Digital Ca mera User Gu ide
www.polaroid.com
3 Taking Pictures................................................................................29
• Taking a Picture..........................................................................29
• Taking a Picture with the LCD Screen Off .....................................29
• Setting Flash Mode.................................................................... 30
• Setting Self-timer .......................................................................32
• Zoom Feature............................................................................ 33
• Setting the Image Size and Quality ............................................. 34
• Setting Exposure Compensation ................................................. 36
• Setting the White Balance for Pictures .........................................37
4 Recording Video Clips ..................................................................... 38
• Recording Video Clips ................................................................ 38
• Setting Video Resolution............................................................ 39
• Setting the White Balance for Video Clips .................................... 40
5 Reviewing and Managing Pictures and Video Clips.............................. 41
• Reviewing the Pictures................................................................41
• Reviewing Picture and Video Clip Files in Thumbnail ......................41
• Auto Play...................................................................................42
• Playing the Video Clip ................................................................ 44
• Protect or Unprotect Picture (s ) or Video Clip( s)............................ 44
• Deleting Picture( s) or Video Clip (s) ............................................. 45
6 Print Settings ................................................................................. 46
• About PictBridge ....................................................................... 46
• DPOF (Digital Print Order Format) ............................................... 53
7 Using SD (Secure Digital) Card .........................................................56
• Using the SD Card ......................................................................56
• To Copy Pictures and Video Clips from Internal Memory to a Memory
Card ..........................................................................................59
8 Installing the Software onto a Computer........................................... 60
• Installing the Software............................................................... 60
• Software Included with Your Camera ...........................................62
• Computer System Requirements ................................................. 64
Page 6

6
Polaroid izone30 0™ Digital Ca mera User Gu ide
www.polaroid.com
7
Polaroid izone30 0™ Digital Ca mera User Gu ide
www.polaroid.com
9 Transferring Pictures and Video Clips To Your Computer .................... 65
• Before You Transfer Files............................................................ 65
• Changing the Driver Type Between Mass Storage Mode and P C
Camera Mode............................................................................ 65
• Connecting to Your Computer..................................................... 66
• Transferring Pictures and Video Clips ...........................................67
10 Using the Camera as a Web Cam (PC Only)..................................... 68
• Setting up NetMeeting™ ............................................................. 68
• Start NetMeeting™ ..................................................................... 69
11 Troubleshooting Problems...............................................................72
12 Getting Help ..................................................................................73
• Polaroid Online Services..............................................................73
• Customer Support ......................................................................73
• ArcSoft Sof tware Help................................................................73
13 Appendix ......................................................................................74
• Technical Specications ..............................................................74
• Storage Capacities .....................................................................76
• Uninstalling Polaroid izone300™ driver (PC Only) ...........................79
• Camera Default Settings ............................................................ 80
• Using Your Battery .....................................................................81
• Tips, Your Safety & Maintenance.................................................81
• Regulatory Information ...............................................................82
Page 7

7
Polaroid izone30 0™ Digital Ca mera User Gu ide
www.polaroid.com
1 Getting Started
The izone300™ camera has easy-to-use features. It has never been
easier or more enjoyable to take digital pictures. Here are a few
examples of what you can do with your camera.
• Enjoy point & shoot operation. Adjust the resolution for print
or email.
• Store pictures and video clips to the internal memory or a SD
card.
• Playback of pictures and video clips on the LCD screen or on a
computer.
• Send the pictures and video clips over the Internet to family
and friends.
• Enjoy PictBridge directly plug-and-print experience.
Page 8
8
Polaroid izone30 0™ Digital Ca mera User Gu ide
www.polaroid.com
9
Polaroid izone30 0™ Digital Ca mera User Gu ide
www.polaroid.com
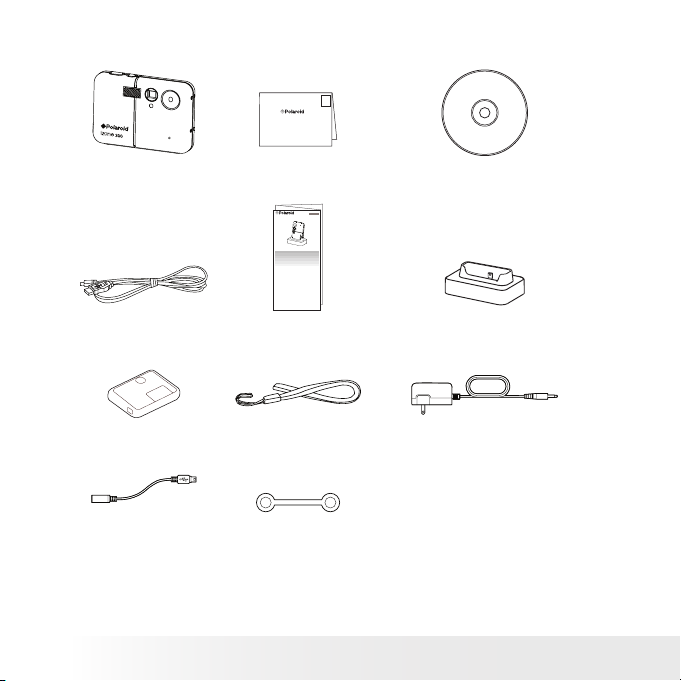
• Camera Package Contents
Tether
(Optiona l)
USB Co nnector
(Optiona l)
Hand S trap AC Adapter
(Optiona l)
USB Ca ble
izone300 ™
The CD -ROM i nclud es
Polaro id izone 300™ C amera d river ( PC)
izone Ph otoBa se (PC & M ac)
Micros oft ® NetM eeting ™ (PC )
Adobe® Ac robat ® Reader™ (P C & Mac)
User Gu ide (in P DF form at)
Regi stration Card
Digital Imaging Product s
201 Burlington Road
Bedford, MA 01730-1434
First Class
Postage
Required
Post Ofce will
not deliver
without proper
postage
Quick Guide Docking Station
Pouch
PDC iZONE
Quick Start Guide
Guide de Démarrage rapide
Guida Rapida
Guía Rápida de Inicio
Guia de Início Rápido
ML 0405
Part no.: OM837657 R1
Printed in China
Schnellanleitung
Page 9
9
Polaroid izone30 0™ Digital Ca mera User Gu ide
www.polaroid.com
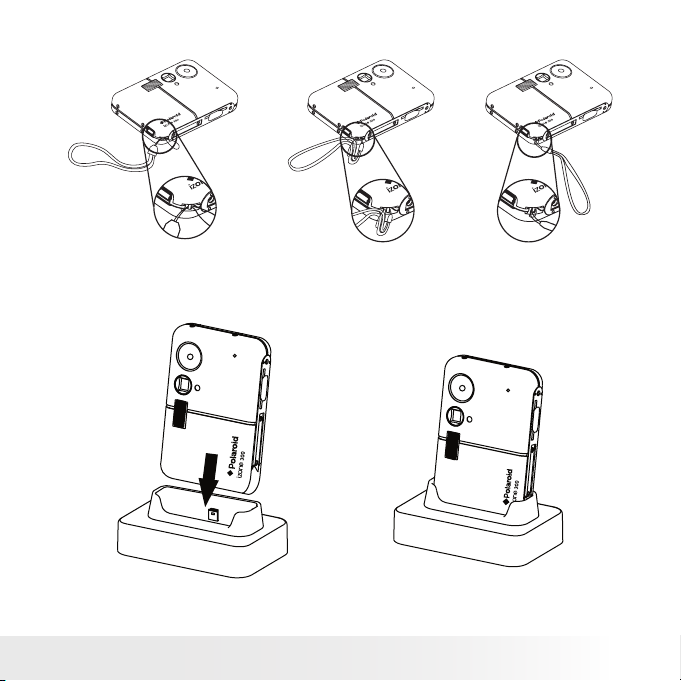
• Attaching the Hand Strap
• Using the Docking Station
Page 10
10
Polaroid izone30 0™ Digital Ca mera User Gu ide
www.polaroid.com
11
Polaroid izone30 0™ Digital Ca mera User Gu ide
www.polaroid.com
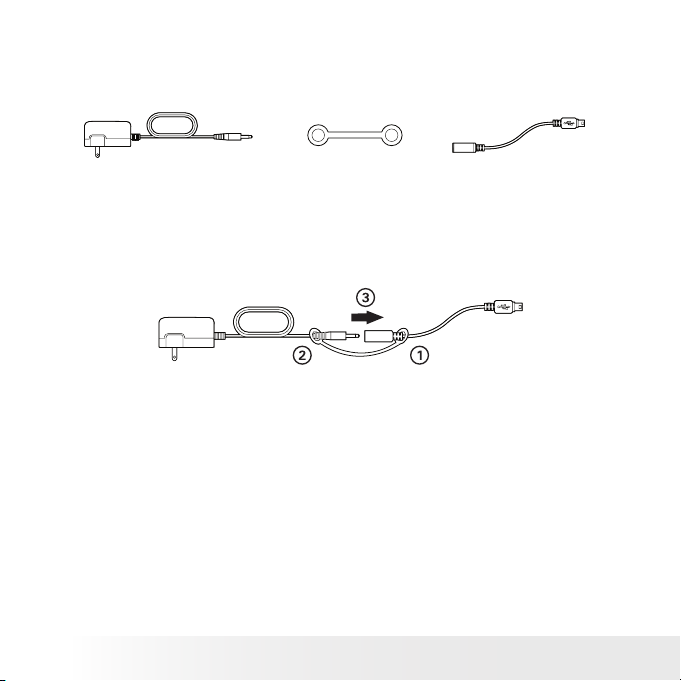
• How to Use the Tether (Optional)
A rubber tether is included in the accessory kit of the camera. It offers
a quick, simple, and secure connection between the USB connector and
the AC adapter for battery charge.
USB Co nnector
(Optiona l)
AC Adapter (O ptional) Tether ( Optional )
Connecting USB Connector with AC Adapter
1. Put the jack of USB connector through one ring of the tether.
2. Put the plug of AC adapter through the other ring of the tether.
3. Connect the AC adapter with the USB connector.
Electric current varies for different computers. Some computers may
not provide a sufcient charging current. For a full battery charge or
when you use the camera away from your computer, we recommend
the usage of an AC adapter (DC 5V, 500 mA, with a 3.5 x 1.35 x 9 mm
female plug, Positive Center) to charge the battery.
Visit www.polaroid.com for detailed information on an adapter.
Page 11

11
Polaroid izone30 0™ Digital Ca mera User Gu ide
www.polaroid.com
• Charging the Battery
There are four ways to charge the battery. Please fully charge the
battery for four hours before using the camera for the rst time after
purchase, and about three hours for subsequent recharging.
NOTE:
• It is normal for the camera to be slightly warm while charging the battery.
• Electric current varies for different computers. Some computers may not
provide a sufcient charging current. For a full batter y charge or when
you use the camera away from your computer, we recommend the usage
of an AC adapter ( DC 5V, 500 mA, with a 3.5 x 1.35 x 9 mm female plug,
Positive Center) to charge the battery.
Visit www.polaroid.com for detailed information on an adapter.
• For a full battery charge, we recommend turning off the camera before
charging the battery.
• To get the best per formance out of the battery, it is recommended the
camera be kept charged at all times. Especially when not in use for a
period of time, like over a month or so.
• When the camera is connected to a computer, a message may prompt
for installing the camera driver. (The message window varies for different
Windows® OS) The battery can be charged without installing the driver. Click
“Cancel” to close the message window. To install the driver, please refer to
page 60 “Installing the Software onto a Computer” for further details.
Page 12

12
Polaroid izone30 0™ Digital Ca mera User Gu ide
www.polaroid.com
13
Polaroid izone30 0™ Digital Ca mera User Gu ide
www.polaroid.com
1. Using the USB cable via the computer
• Plug the labelled end of the USB cable into the socket marked
on your computer.
• Plug the other end of the USB cable into the USB port on the camera.
The battery begins charging and the battery charge LED on the
camera blinks. The LED stops blinking and remains on when
battery is fully charged.
USB Se ries “ Min i B” Plu g conn ects to your
izone300 ™ Came ra or Do cking Stati on
USB Se ries “A” Plu g connects to
your PC
iz
o
Page 13
13
Polaroid izone30 0™ Digital Ca mera User Gu ide
www.polaroid.com
2. Using the USB cable via the docking station.
• Place the camera into the docking station. For further details, refer
to “Using the Docking Station” on page 9.
• Plug the labelled end of the USB cable into the socket marked
on your computer.
• Plug the other end of the USB cable into the USB port on the
docking station.
The battery begins charging and the battery charge LED on the
camera blinks. The LED stops blinking and remains on when
battery is fully charged.
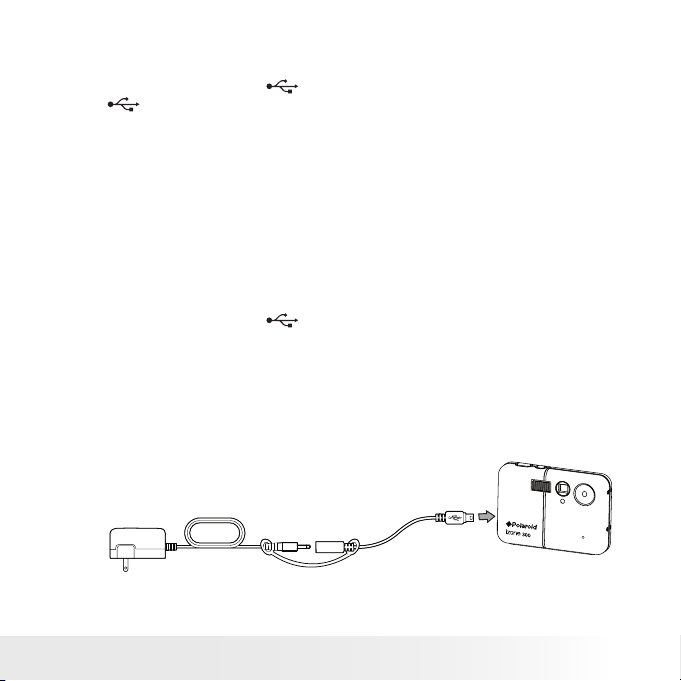
3. Using an AC adapter
If your camera comes with the USB connector and the tether, follow
method A for battery charging.
A. Using an AC adapter and a USB Connector, via the camera (optional)
• Plug the labelled end of the connector into the USB port on
the camera.
• Connect the AC adapter with the USB connector.
• Connect the adapter to the household power outlet.
The battery begins charging and the battery charge LED on the
camera blinks. The LED stops blinking and remains on when battery
is fully charged.
Page 14

14
Polaroid izone30 0™ Digital Ca mera User Gu ide
www.polaroid.com
15
Polaroid izone30 0™ Digital Ca mera User Gu ide
www.polaroid.com
If your camera comes with an AC adapter like the diagram below, use
method B for battery charging.
B. Using an AC adapter, via the camera (optional)
• Plug the labelled end of the AC adapter into the USB port on
the camera.
• Connect the adapter to the household power outlet.
The battery begins charging and the battery charge LED on the
camera blinks. The LED stops blinking and remains on when
battery is fully charged.
The internal battery should last for the life of the camera, but as is the
case with all rechargeable batteries the actual charge held may decline
with use. Should it ever become necessary to replace the internal battery,
please visit www.polaroid.com for service instructions.
Page 15
15
Polaroid izone30 0™ Digital Ca mera User Gu ide
www.polaroid.com
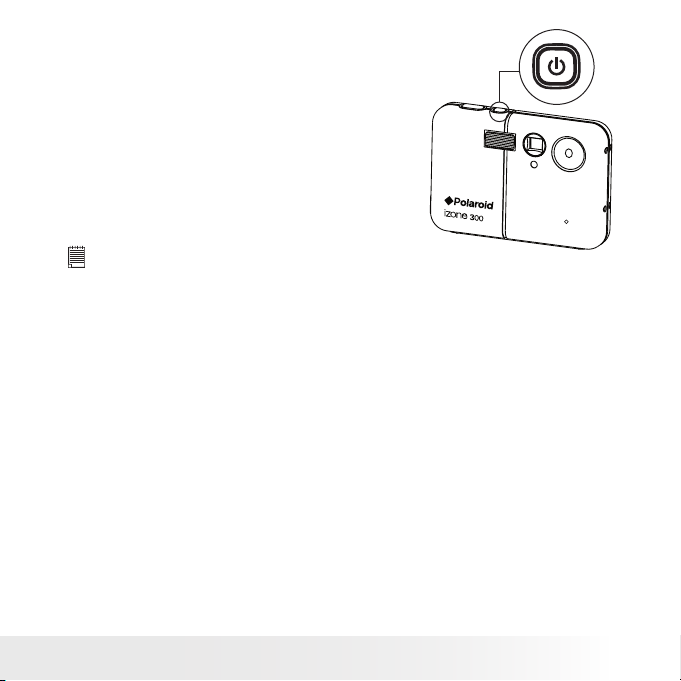
• Turning the Camera On and Off
To turn on the camera, fully press and
hold the Power button until the LCD
Screen is activated. Press and hold the
Power button again and the camera will
power off.
NOTE:
• Make sure that the Flash / Bat tery charge LED remains lighted before
shooting.
• The camera is designed with an automatic power-off feature to conserve
battery life. After a specied period of inactivity, the camera automatically
powers off. Pressing the Power button can deactivate this feature and turn
on the camera again.
• An indicator appears if bat tery power is low. Recharge the battery
immediately.
Page 16
16
Polaroid izone30 0™ Digital Ca mera User Gu ide
www.polaroid.com
17
Polaroid izone30 0™ Digital Ca mera User Gu ide
www.polaroid.com
• Reset Feature
In the rare situation that the camera locks up (usually in a very low
power situation), we have incorporated a Reset button on the back of
the camera that allows the camera processor to be reset without losing
any images.
To use the Reset button, simply depress the Reset button gently
(holding for around 5 seconds) using a paper clip or ball point pen. The
camera will power off automatically. It is important to note that the
camera probably needs to be recharged immediately in order to avoid
locking up again.
M
S
E
T
/
Rese t But ton
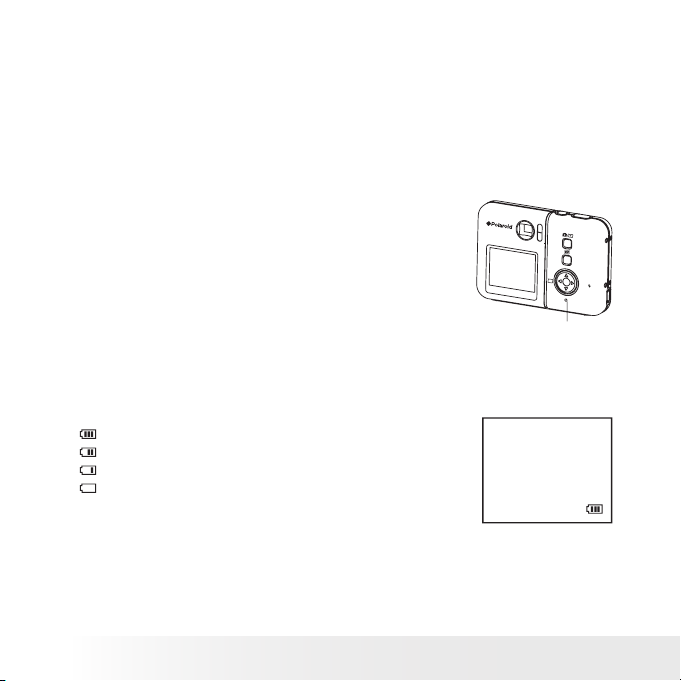
• Checking the Battery Power Level
Check the battery power level before taking pictures.
1.
Turn the camera on.
2. Check the battery power level that appears on the LCD screen.
Battery power is full.
Battery power is adequate.
Battery power is low.
Battery power is exhausted.
Page 17
17
Polaroid izone30 0™ Digital Ca mera User Gu ide
www.polaroid.com
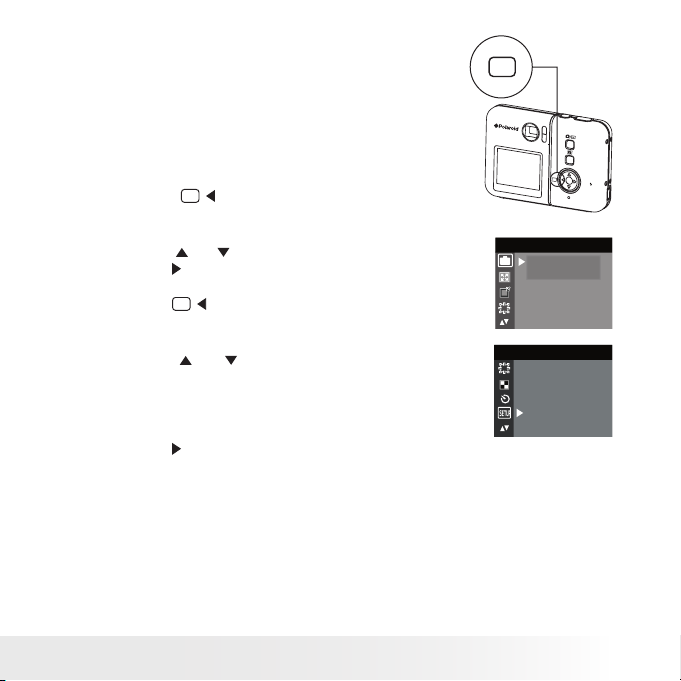
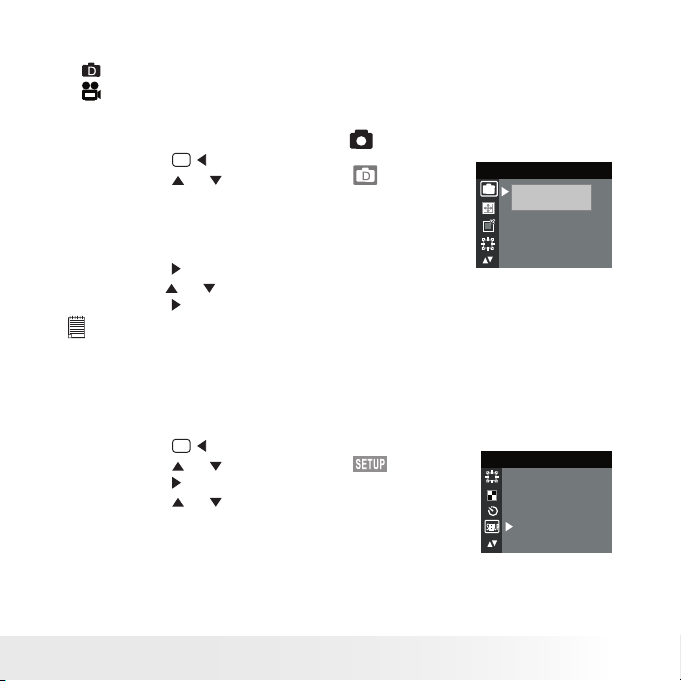
• How to Navigate Menus
Menus are used to adjust capture and
play settings, as well as other camera
settings like the date/time and auto
power off.
M
S
E
T
/
M
1.
Press the
M
button to enter the menu bar.
Press it again to exit.
2. Press the
or
button to select a menu item.
Press the
S
E
T
button to enter the submenu.
Press the
M
button to return to the menu
DRIVE MOD E
STIL L
VIDE O
D
3. Press the
or
button to select the desired
setting.
SETUP
SETUP
FORM AT
DATE/T IME
AUTO OF F
BEE P
FREQ UENC Y
LAN GUAGE
4.
Press the
S
E
T
button to conrm.
Page 18
18
Polaroid izone30 0™ Digital Ca mera User Gu ide
www.polaroid.com
19
Polaroid izone30 0™ Digital Ca mera User Gu ide
www.polaroid.com
2 Camera Setting
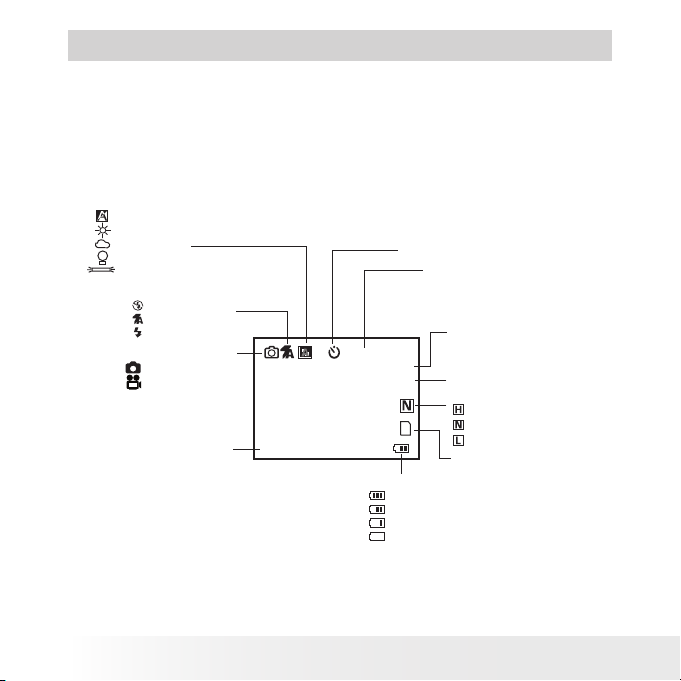
• Checking Camera Status
Turn on the camera, view the camera LCD screen to check which
camera settings are active. Those particular features whose icons are
not displayed are not activated.
Still Image mode
Self- timer On
Digi tal Zoo m Stat us
Numb er of rem aining
pictu res
Battery L evel
Full
Adequ ate
Low
Exha usted
Captu re Mod e
Still I mage*
Vide o
Image Resol utio n
204 8 X 1536*
1600 X 1200
640 X 4 80
SD Car d Inse rted
+0.3
2048 X 1536
0007
X1.0
White B alan ce
Auto*
Dayli ght
Cloud y
Tungste n
Fluoresce nt
Flash Mode
Flash Off
Auto Fl ash*
Force d On
High*
Normal
Low
Quality
Expo sure Compen sati on
Value
* Default Setting
Page 19
19
Polaroid izone30 0™ Digital Ca mera User Gu ide
www.polaroid.com
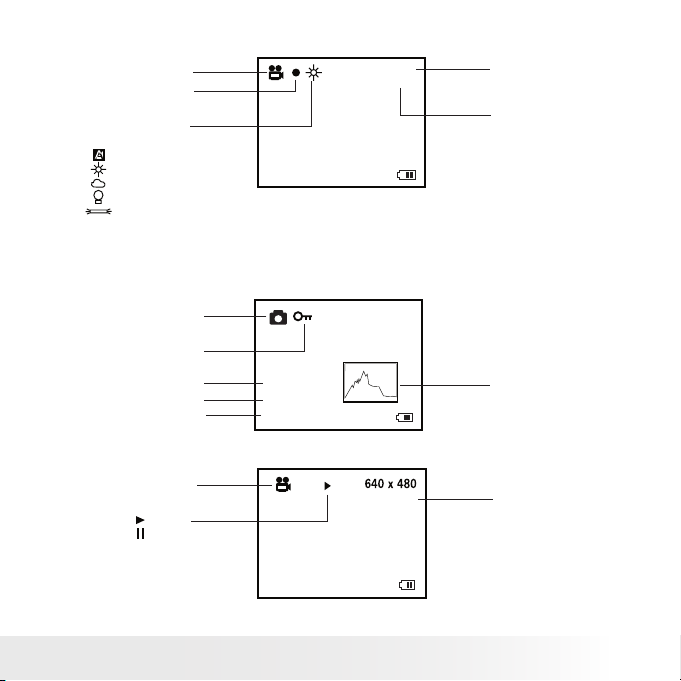
Video mode
X2.0
Vide o Mode
White Bala nce
For Vi deo Cl ips
Auto*
Dayli ght
Cloudy
Tungste n
Fluoresce nt
Reso lution
640 X 4 80*
320 X 240
Rema ining Time
Reco rding Indicator
640 X 4 80
00: 00: 28
* Default Setting
Playback Mode
02:10
160 0 x 1200
Pict ure
Looke d File
Play
Pause
Time
Date
Histogram
Vide o Clip
Vide o Length
07:55
08/10 /04
0024 -0 023
07:55
08/10 /04
0024 -0 023
File N umbe r
Page 20
20
Polaroid izone30 0™ Digital Ca mera User Gu ide
www.polaroid.com
21
Polaroid izone30 0™ Digital Ca mera User Gu ide
www.polaroid.com
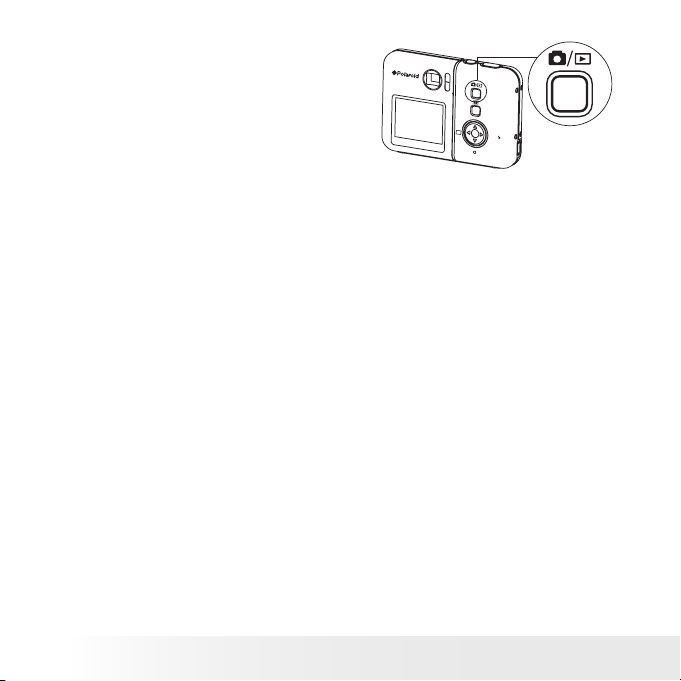
• Camera Modes
The camera has two working modes,
Capture mode and Playback mode. You
can switch between them by pressing
the Capture/Playback mode button at
the back of the camera.
M
S
E
T
/
Capture Mode
Under this mode, you can select the image and video settings according
to shooting preference, and take pictures and video clips under the
settings you have selected. For more details, please refer to “Taking
Pictures” on page 29 and “Recording Video Clips” on page 38.
Playback Mode
This mode allows the review or deletion of pictures and video clips from
the camera. For more details, please refer to “Reviewing and Managing
Pictures and Video Clips” on page 41.
Page 21
21
Polaroid izone30 0™ Digital Ca mera User Gu ide
www.polaroid.com
• Drive Mode
The camera has two modes for taking pictures and video clips.
Still Image Mode
Video Mode
You may switch between these two modes according to the following
steps.
1. Set the camera to Capture mode
.
2. Press the
M
button.
3. Press the
or
button to select
(DRIVE
MODE).
D
STIL L
VIDEO
DRIVE MODE
4. Press the
S
E
T
button.
5. Press he
or
button to select the desired drive mode.
6. Press the
S
E
T
button.
NOTE:
• Still Image mode is the default capture mode.
• This setting is also available in Video mode.
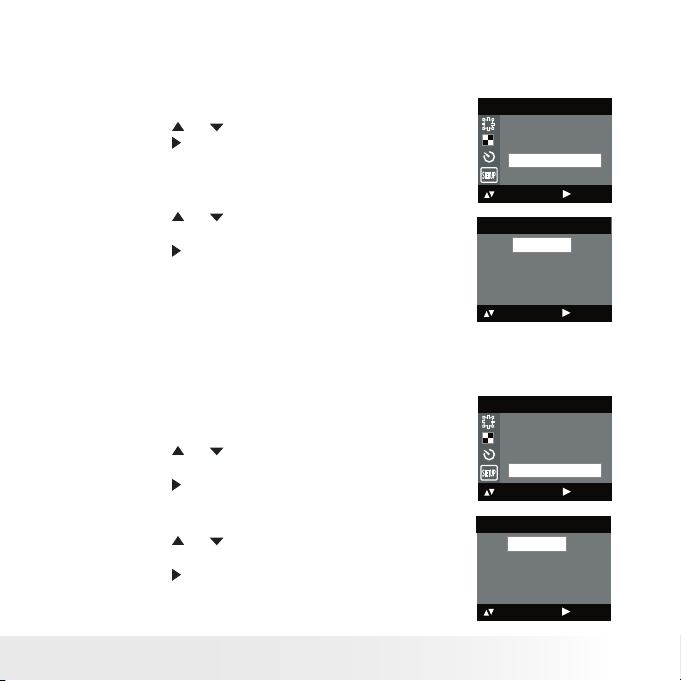
• Setup Menu
Setup menu can be accessed in both Still Image and Video modes.
1. Set the camera to Still Image mode.
2. Press the
M
button.
3. Press the
or
button to select
(SETUP).
4. Press the
S
E
T
button.
5. Press the
or
button to select the desired
setting.
SETUP
SETUP
FORM AT
DATE/TIME
AUTO OF F
BEE P
FREQ UEN CY
LAN GUAGE
Page 22
22
Polaroid izone30 0™ Digital Ca mera User Gu ide
www.polaroid.com
23
Polaroid izone30 0™ Digital Ca mera User Gu ide
www.polaroid.com
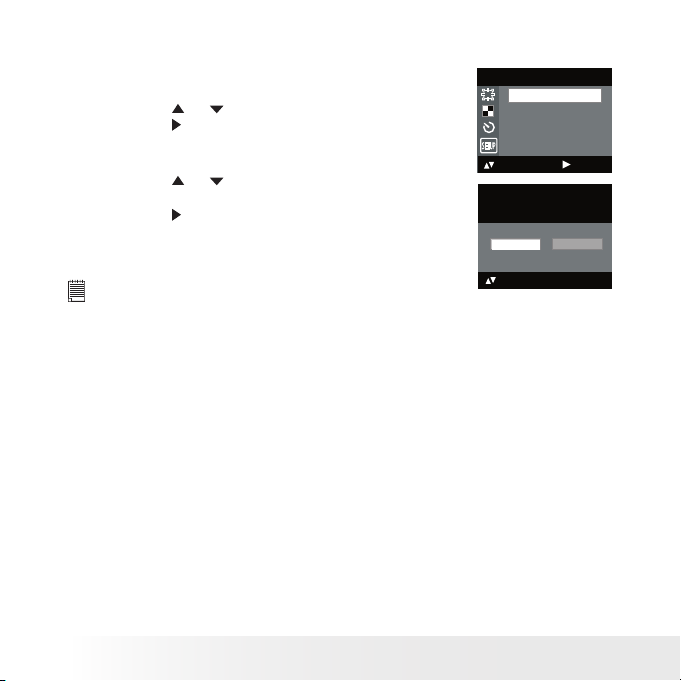
• Formatting the Internal Memory
Formatting the internal memory deletes all data stored in it.
1. Set the camera to Still Image mode.
2. Access the Setup menu.
3. Press the
or
button to select “FORMAT”.
4. Press the
S
E
T
button.
SETUP
FORM AT
DATE/ TI ME
AUTO OF F
BEE P
FREQ UEN CY
: SET
5. Press the
or
button to select the desired
setting.
6. Press the
S
E
T
button.
REA LLY WANT TO
FORM AT?
FORM AT
OK
CANC EL
NOTE:
• Data deleted by a format operation cannot be recovered. Make sure you do
not have any useful data currently stored in the internal memory before you
format it.
• Formatting the internal memory destroys all the pictures, even those that
are protected.
• With a memory card inserted, the above operation would format the
inserted memory card only. The internal memory will not be formatted when
a memory card is inserted.
Page 23
23
Polaroid izone30 0™ Digital Ca mera User Gu ide
www.polaroid.com
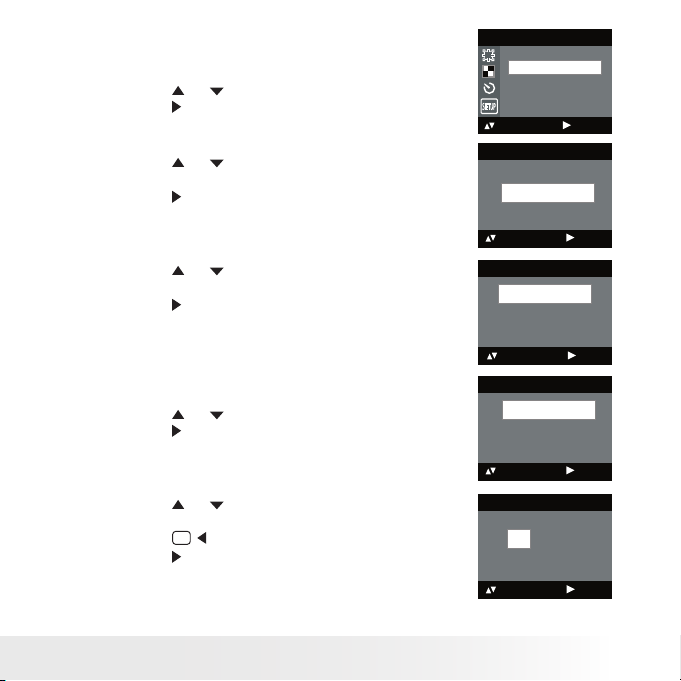
• Setting the Current Date and Time
1. Set the camera to Still Image mode.
2. Access the Setup menu.
3. Press the
or
button to select “DATE/TIME”.
4. Press the
S
E
T
button.
SETUP
: SET
FORM AT
DATE/TIME
AUTO OF F
BEE P
FREQ UEN CY
Setting the date format
5. Press the
or
button to select “DATE
FORMAT”.
6. Press the
S
E
T
button.
DATE/TIME
SETUP
DATE FORMAT
: SET
7. Press the
or
button to select the desired
setting.
8. Press the
S
E
T
button.
DATE FORMAT
DD/ MM/YY
MM/ DD/YY
YY/MM/ DD
: SET
Setting the date and time
5. Press the
or
button to select “SETUP”.
6. Press the
S
E
T
button.
DATE/TIME
SETUP
DATE FORMAT
: SET
7. Press the
or
button to adjust the value in
the eld.
8. Press the
M
button to switch to the next eld.
9. Press the
S
E
T
button.
SETUP
DD/ MM/YY
00/ 00/00
00: 00 :0 0
EXI T
: SET
Page 24
24
Polaroid izone30 0™ Digital Ca mera User Gu ide
www.polaroid.com
25
Polaroid izone30 0™ Digital Ca mera User Gu ide
www.polaroid.com
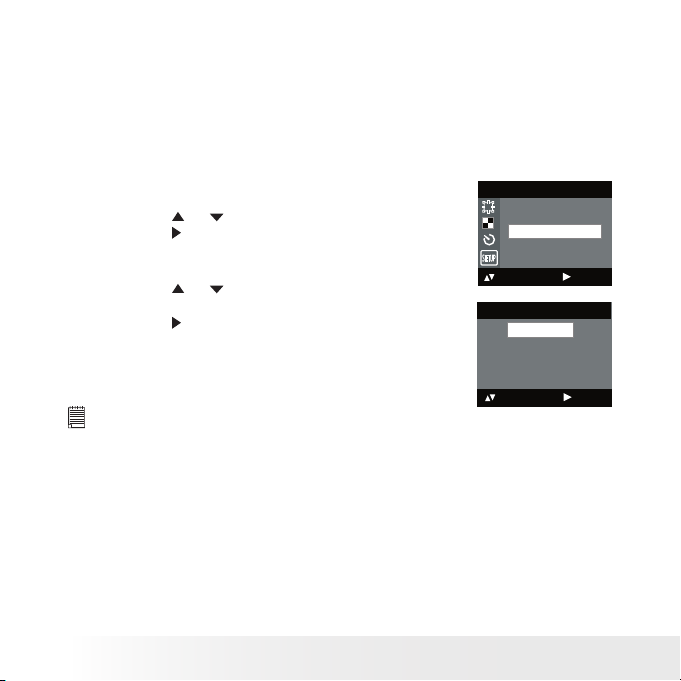
• Auto Power Save Setting
The camera performs the following power save operations to conserve
battery power.
OFF The power save feature is not activated.
1/3/5 MIN The camera is designed to switch off automatically to
save battery life after the specied period of inactivity.
You can change the power save setting according to the following steps:
1. Set the camera to Still Image mode.
2. Access the Setup menu.
3. Press the
or
button to select “AUTO OFF”.
4. Press the
S
E
T
button.
SETUP
: SET
FORM AT
DATE/TIME
AUTO OF F
BEE P
FREQ UEN CY
5. Press the
or
button to select the desired
setting.
6. Press the
S
E
T
button.
AUTO OFF
OFF
1 MIN
3 MIN
5 MIN
: SET
NOTE:
• Auto power off is automatically disabled under any one of the following
conditions.
- While an auto play is undergoing.
- While the camera’s USB port is connected to a computer or other external
devices, or while the camera is being controlled by an external device.
• The LCD screen automatically goes to hibernation after one minute of
inactivit y. Press any button, except the Power button, to re-activate the
LCD screen.
Page 25
25
Polaroid izone30 0™ Digital Ca mera User Gu ide
www.polaroid.com
• Setting the Beep Sound On/Off
You can turn the beep sound on and off. When the beep sound is turned
on, the camera will beep when you press the buttons.
1. Set the camera to Still Image mode.
2. Access the Setup menu.
3. Press the
or
button to select “BEEP”.
4. Press the
S
E
T
button.
SETUP
FORM AT
DATE/TIME
AUTO OF F
BEE P
FREQ UEN CY
: SET
5. Press the
or
button to select the desired
setting.
6. Press the
S
E
T
button.
BEE P
ON
OFF
: SET
• Setting Frequency
In order to take a better indoor picture, the camera needs to be set to
suit the correct lighting frequency. Set the frequency to 60Hz for US
and 50Hz for Europe.
1. Set the camera to Still Image mode.
2. Access the Setup menu.
3. Press the
or
button to select
“FREQUENCY”.
4. Press the
S
E
T
button.
SETUP
FORM AT
DATE/TIME
AUTO OF F
BEE P
FREQ UEN CY
: SET
: SELE CT
5. Press the
or
button to select the desired
setting.
6. Press the
S
E
T
button.
FREQUENCY
50 Hz
60 hz
: SET
Page 26
26
Polaroid izone30 0™ Digital Ca mera User Gu ide
www.polaroid.com
27
Polaroid izone30 0™ Digital Ca mera User Gu ide
www.polaroid.com
• Setting Display Language
Under this setting, you can select the language you prefer for the LCD
screen.
1. Set the camera to Still Image mode.
2. Access the Setup menu.
3. Press the
or
button to select “L ANGUAGE”.
4. Press the
S
E
T
button.
SETUP
DATE/TIME
AUTO OF F
BEE P
FREQ UEN CY
LAN GUAGE
: SET
5. Press the
or
button to select the desired
setting.
6. Press the
S
E
T
button.
LAN GUAGE
ENGLISH
DEUTSCH
FRA NÇAIS
ESPAÑOL
ITALIANO
: SET
Page 27

27
Polaroid izone30 0™ Digital Ca mera User Gu ide
www.polaroid.com
• Setting the Date Stamp On and Off
Use the date stamp to imprint the date on your pictures.
1. Set the camera to Still Image mode.
2. Access the Setup menu.
3. Press the
or
button to select “DATE
STAMP”.
4. Press the
S
E
T
button.
SETUP
AUTO OF F
BEE P
FREQ UEN CY
LAN GUAGE
DATE STAMP
: SET
5. Press the
or
button to select the desired
setting.
6. Press the
S
E
T
button.
NOTE:
This setting is congured for images only.
DATE STAMP
ON
OFF
: SET
• Resetting to Default Settings
You can easily change all the settings you made back to the camera
default settings by the following steps.
Please refer to “Camera Default Settings” on page 80 for more details.
1. Set the camera to Still Image mode.
2. Access the Setup menu.
3. Press the
or
button to select “DEFAULT”.
4. Press the
S
E
T
button.
SETUP
FREQ UEN CY
LAN GUAGE
DATE STAMP
TWAI N DRI VER
DEFAU LT
: SET
5. Press the
or
button to select the desired
setting.
6. Press the
S
E
T
button.
DEFAU LT SETT ING?
OK
NO
YES
Page 28

28
Polaroid izone30 0™ Digital Ca mera User Gu ide
www.polaroid.com
29
Polaroid izone30 0™ Digital Ca mera User Gu ide
www.polaroid.com
• Switching the Information Display and LCD Screen On and Off
Pressing the
button each time switches the LCD screen to the next
display mode in the following sequence.
Capture mode
Pres s
Pres s
Pres s
Pres s
2048 X 1536
10
H
X0.1
2048 X 1536
10
H
X0.1
Playback mode
Pres s
Pres s
Pres s
2048 X 1536
07:55
08/10/0 4
0024-0 023
07:55
08/10/0 4
0024-0 023
Page 29

29
Polaroid izone30 0™ Digital Ca mera User Gu ide
www.polaroid.com
3 Taking Pictures
Before you take pictures, please read this note rst:
Outdoor Pictures Without the Flash
• Avoid intense sunlight that may cause sun spots in pictures.
• Always make sure that the sun or other light source is in front of the
subject.
• Taking a Picture
Taking pictures at approximately 3.2 feet to
innity (1 meter to innity).
1. Set the camera to Still Image mode.
2. Frame your subject using the LCD screen
or the viewnder.
3. Hold the camera steady. Press the
shutter button completely down to take
a picture. A beep will sound (if the beep
sound is turned on) when a picture is
taken.
NOTE:
Make sure that the Flash / Battery charge LED remains lighte d before
shooting.
• Taking a Picture with the LCD Screen Off
You can also take a picture with the LCD screen off. The procedure is the
same as above but frame your subject using the viewnder instead.
Page 30

30
Polaroid izone30 0™ Digital Ca mera User Gu ide
www.polaroid.com
31
Polaroid izone30 0™ Digital Ca mera User Gu ide
www.polaroid.com
• Setting Flash Mode
1. Set the camera to Still Image mode.
2. Pressing the Flash button cycles through the ash modes in the
following sequence.
When you press the Flash button, the icon (according to the ash
setting you selected) will appear on the LCD screen. You can now
take pictures using the ash mode you have selected. The ash will
recharge after each ashed picture.
The ash range is approximately 3.2 feet to 4.9 feet (1 to 1.5 meters).
Page 31

31
Polaroid izone30 0™ Digital Ca mera User Gu ide
www.polaroid.com
The camera has three ash modes (default setting is Auto Flash). Use the
ash when you take pictures at night, indoors, or outdoors in heavy shadows.
When shooting
under these conditions:
Select
this mode
Flash Off
The ash does not re. Use this settin g for
outdo or pict ures, or where as h is prohi bite d or
may be dist racting, or when shooti ng toward s a
ree ctive sur face, suc h as a window or a mirror.
If there is not enough light when using this
sett ing, yo ur pic tures may turn out dark.
The ash res auto matically as needed. Use
this se tting to take m ost pi ctures.
The ash res for every picture. Use t his
sett ing in high- cont rast situatio ns to provide
ll-lig ht or use it ind oors in low light.
Icon shown
on the LCD screen
Auto Fl ash
Forced On
NOTE:
• Flash modes are not available in Video mode.
• Never touch or block the ash with your ngers. Doing so can soil these
components and interfere with the correct ash operation.
Page 32

32
Polaroid izone30 0™ Digital Ca mera User Gu ide
www.polaroid.com
33
Polaroid izone30 0™ Digital Ca mera User Gu ide
www.polaroid.com
• Setting Self-timer
Your camera is designed with a self-timer function, which allows you to
take pictures with a 10-second built-in timer.
1. Set the camera to Still Image mode.
2. Press the
M
button.
3. Press the
or
button to select
(SELF
TIMER).
4. Press the
S
E
T
button.
SELF TIM ER
ON
OFF
5. Press the
or
button to select the desired
setting.
6. Press the
S
E
T
button.
SELF TIM ER
ON
OFF
: SET
7. The icon
will appear on the LCD screen.
NOTE:
To disable the self-timer function, repeat the
above steps and select “OFF”.
2048 X 1536
10
+1.5
H
8. Frame your subject using the LCD screen or the viewnder.
9. Press the shutter button to take a picture. The camera beeps (if the
beep sound is turned on) and the Self-timer LED blinks.
NOTE:
Place the camera on a at surface or use a tripod when using the self-timer
function.
Page 33

33
Polaroid izone30 0™ Digital Ca mera User Gu ide
www.polaroid.com
• Zoom Feature
Your camera is designed with 3X digital zoom. This feature lets you
zoom in on the central area of a photo and photograph only the enlarged
portion of the picture.
1. Set the camera to Capture mode
.
2. Press the
button to zoom in. Press the
button to zoom out. The
zoom factor is shown on the LCD screen.
M
S
E
T
/
2048 X 1536
10
+1.5
H
Digi tal Zoo m Facto r
For the digital zoom feature, the viewnder does not reect the actual
zoomed image. We recommend the user to use the LCD screen to
monitor the zoom factor.
NOTE:
• You may notice a decrease in image quality when using the digital zoom.
• The zoom feature is not available during recording video clips at 320 x 240
pixels.
Page 34

34
Polaroid izone30 0™ Digital Ca mera User Gu ide
www.polaroid.com
35
Polaroid izone30 0™ Digital Ca mera User Gu ide
www.polaroid.com
• Setting the Image Size and Quality
Picture resolution refers to the number of pixels in a digital picture.
Picture quality depends on the JPEG le compression that the camera
applies when the picture is taken. Higher resolution and less compression
produces better quality but occupies more memory space. Smaller size
pictures and normal quality are easier to email while larger size and ne
quality are better for printing.
Image Size Setting
1. Set the camera to Still Image mode.
2. Press the
M
button.
3. Press the
or
button to select
(IMAGE
SIZE).
4. Press the
S
E
T
button.
D
2048 X 1536
1600 X 1200
640 X 4 80
IMAG E SIZ E
5. Press the
or
button to select
the desired setting.
6. Press the
S
E
T
button.
D
2048 X 1536
1600 X 1200
640 X 4 80
IMAG E SIZ E
: SET
: SELE CT
NOTE:
It is recommended to use the 2048 x 1536 resolution for printing.
Page 35

35
Polaroid izone30 0™ Digital Ca mera User Gu ide
www.polaroid.com
Quality Setting
1. Set the camera to Still Image mode.
2. Press the
M
button.
3. Press the
or
button to select
(QUALITY).
4. Press the
S
E
T
button.
D
HIGH
NORM AL
LOW
QUALITY
5. Press the
or
button to select
the desired setting.
6. Press the
S
E
T
button.
D
HIGH
NORM AL
LOW
QUALITY
Page 36

36
Polaroid izone30 0™ Digital Ca mera User Gu ide
www.polaroid.com
37
Polaroid izone30 0™ Digital Ca mera User Gu ide
www.polaroid.com
• Setting Exposure Compensation
You can adjust the exposure compensation value (EV) within the range of
-1.5EV to +1.5EV in order to compensate for current lighting conditions.
This setting can be used to obtain better result when shooting with
backlighting, indirect indoor lighting, a dark background, etc.
1. Set the camera to Still Image mode.
2. Press the
M
button.
3. Press the
or
button to select
(EXPOSURE).
4. Press the
S
E
T
button.
D
AUTO
EXP OSURE
5. Press the
or
button to select the desired
setting.
6. Press the
S
E
T
button.
D
+0.3
EXP OSURE
: SET
NOTE:
• A higher E V value is bes t used for light-colored subjects and backlit
subjects. A lower EV value is best for dark-colored subjects and for
shooting outdoors on a clear day.
• When shooting under very dark or very bright conditions, you may not
be able to obtain satisfactory results even after performing exposure
compensation.
Page 37

37
Polaroid izone30 0™ Digital Ca mera User Gu ide
www.polaroid.com
• Setting the White Balance for Pictures
Selecting the right type of white balance can help to make the color
of a subject in a picture appear more natural under the type of lighting
that is available.
1. Set the camera to Still Image mode.
2. Press the
M
button.
3. Press the
or
button to select
(WHITE
BALANCE).
4. Press the
S
E
T
button.
WHITE BAL ANCE
AUTO
DAYLIGHT
CLOUDY
TUNG STE N
FLUORESC ENT
5. Press the
or
button to select the desired
setting.
6. Press the
S
E
T
button.
WHITE BAL ANCE
AUTO
DAYLIGHT
CLOUDY
TUNG STE N
FLUORESC ENT
When shooting under these conditions: Select this setting
Automatic adjustment
Outdoor daylight
Cloudy
Indo ors, il lumi nated by tung sten lighti ng
Indo ors, il lumi nated by uor esce nt lighting
Page 38

38
Polaroid izone30 0™ Digital Ca mera User Gu ide
www.polaroid.com
39
Polaroid izone30 0™ Digital Ca mera User Gu ide
www.polaroid.com
4 Recording Video Clips
NOTE:
Change the drive mode from Still Image mode to Video mode before recording
video clips, since Still Image mode is the default capture mode. Please refer
to “Drive Mode” on page 21 for more details.
• Recording Video Clips
Use the Video mode to record video clips. The recording time displayed
on the LCD screen will decrease and the
icon will blink while
recording.
1. Set the camera to Video mode.
2. Frame your subject using the LCD screen.
3. Press the shutter button completely down to
start recording.
4. Press the shutter button again to stop
recording. Recording stops when the current
memory is full.
Reco rding Indicator
640 X 48 0
00:12:5 8
Page 39

39
Polaroid izone30 0™ Digital Ca mera User Gu ide
www.polaroid.com
• Setting Video Resolution
Video resolution refers to the number of pixels in a digital video clip.
Video clip quality depends on the le resolution that the camera applies
when the video clip is recorded. Higher resolution makes better quality
which occupies more memory space.
1. Set the camera to Video mode.
2. Press the
M
button.
3. Press the
or
button to select
(IMAGE
SIZE).
4. Press the
S
E
T
button.
IMAG E SIZ E
640 X 4 80
320 X 24 0
D
SETUP
5. Press the
or
button to select the desired
setting.
6. Press the
S
E
T
button.
IMAG E SIZ E
640 X 4 80
320 X 24 0
D
SETUP
Page 40

40
Polaroid izone30 0™ Digital Ca mera User Gu ide
www.polaroid.com
41
Polaroid izone30 0™ Digital Ca mera User Gu ide
www.polaroid.com
• Setting the White Balance for Video Clips
Selecting the right type of white balance can help to make the color of
a subject in the video clip appear more natural under the type of lighting
that is available.
1. Set the camera to Video mode.
2. Press the
M
button.
3. Press the
or
button to select
(WHITE
BALANCE).
4. Press the
S
E
T
button.
WHITE BALANCE
AUTO
DAYLIGH T
CLOUDY
TUNG STEN
FLUOR ESC ENT
D
SETUP
5. Press the
or
button to select the desired
setting.
6. Press the
S
E
T
button.
WHITE BALANCE
AUTO
DAYLIGH T
CLOUDY
TUNG STEN
FLUOR ESC ENT
D
SETUP
When shooting under these conditions: Select this setting
Automatic adjustment
Outdoor daylight
Cloudy
Indo ors, il lumi nated by tung sten lighti ng
Indo ors, il lumi nated by uor esce nt lighting
Page 41

41
Polaroid izone30 0™ Digital Ca mera User Gu ide
www.polaroid.com
5 Reviewing and Managing Pictures and Video Clips
NOTE:
Change the camera mode from Capture mode to Playback mode before
reviewing pictures and video clips. Please refer to “Camera Mode” on page
21 for more details.
• Reviewing the Pictures
1. Set the camera to Playback mode.
2. Use the
or
button to view the pictures taken.
The
icon is shown on the LCD screen when a picture is selected.
• Reviewing Picture and Video Clip Files in Thumbnail
You can view up to 9 picture and video clip les at a time on the LCD
screen by using the Thumbnail function.
1. Set the camera to Playback mode.
2. Press the
button twice. Thumbnail les will be shown on the LCD
screen and the last reviewed picture will be highlighted.
3.
Press the
,
,
M
and
S
E
T
button to select a thumbnail le and
view it in full screen by pressing the
button.
M
S
E
T
/
Page 42

42
Polaroid izone30 0™ Digital Ca mera User Gu ide
www.polaroid.com
43
Polaroid izone30 0™ Digital Ca mera User Gu ide
www.polaroid.com
• Auto Play
The Auto Play function enables you to view all the picture and video
clip les stored in the camera one by one forward or backward on the
LCD screen.
You can activate the Auto Play function and make Auto Play direction
and interval according to the following steps.
1. Set the camera to Playback mode.
2. Press the
M
button.
3. Press the
or
button to select
(AUTO
PLAY).
4. Press the
S
E
T
button.
AUTO PL AY
ON
SETUP
: SET
5. Press the
or
button to select “SETUP”.
6. Press the
S
E
T
button.
AUTO PL AY
ON
SETUP
: SET
Set Auto Play Direction
7. Press the
or
button to select
“DIRECTION”.
8. Press the
S
E
T
button.
AUTO PL AY
DIR ECTI ON
INTE RVAL
: SET
9. Press the
or
button to select the desired
setting.
10. Press the
S
E
T
button.
DIR ECTION
BACKWA RD
FORWA RD
: SET
Page 43

43
Polaroid izone30 0™ Digital Ca mera User Gu ide
www.polaroid.com
Setting Auto Play Interval
7. Press the
or
button to select “INTERVAL”.
8. Press the
S
E
T
button.
AUTO PL AY
DIR ECTI ON
INTE RVAL
: SET
9. Press the
or
button to select the desired
setting.
10. Press the
S
E
T
button.
INTERVAL
1 SEC
10 SEC
: SET
Start Auto Play
Perform steps 1, 2, 3 and 4 on page 42.
5. Press the
or
button to select “ON”.
6. Press the
S
E
T
button.
AUTO PL AY
ON
SETUP
: SET
The camera will automatically run from the last le that you have
reviewed. Every le will display according to your interval setting. You
may press the
or
button to stop the auto play. The auto play will
keep running as long as there is power.
Page 44

44
Polaroid izone30 0™ Digital Ca mera User Gu ide
www.polaroid.com
45
Polaroid izone30 0™ Digital Ca mera User Gu ide
www.polaroid.com
• Playing the Video Clip
1. Set the camera to Playback mode.
2. Press the
or
button to select the video clip
you want to play.
3. Press the
S
E
T
button to start playing video
clip. Press it again to pause.
4. Press the
button to stop.
640 X 48 0
00:12:32
08:54
04/10/ 03
0006 - 00 06
The
icon is shown on LCD screen when a video clip is selected.
• Protect or Unprotect Picture(s) or Video Clip(s)
1. Set the camera to Playback mode.
2. Press the
M
button.
3. Press the
or
button to select
(PROTECT).
4. Press the
S
E
T
button.
PROTECT
LOCK TH IS
UNLOC K THIS
LOCK AL L
UNLOC K ALL
5. Press the
or
button to select the desired
setting.
6. Press the
S
E
T
button.
PROTECT
LOCK TH IS
UNLOC K THIS
LOCK AL L
UNLOC K ALL
: SET
LOCK THIS Protect the selected picture or video clip
UNLOCK THIS Remove protection from the selected picture or video
clip
LOCK ALL Protect all pictures and video clips in the current
memory
UNLOCK ALL Remove protection from all of the pictures and video
clips
Page 45

45
Polaroid izone30 0™ Digital Ca mera User Gu ide
www.polaroid.com
Once the images or video clips are protected, an
icon will appear on
the LCD screen, indicating it is locked when you review it.
NOTE:
To protect one picture or video clip or to remove protection from one picture
or video clip, use the
or
but ton to choose the selection you want to
protect or unprotect before the above operation.
• Deleting Picture(s) or Video Clip(s)
1. Set the camera to Playback mode.
2. Press the
M
button.
3. Press the
or
button to select
(ER ASE).
4. Press the
S
E
T
button.
ERASE
ERASE THIS
ERASE ALL
5. Press the
or
button to select the desired
setting.
6. Press the
S
E
T
button.
7. Press the
or
button to select the desired
setting.
8. Press the
S
E
T
button.
You can cancel the deletion by choosing “NO”.
ERASE THIS ?
NO
YES
: SET
NOTE:
• To delete one picture or video clip, use the
or
button to select the one
you want to delete before the above operation.
• Protected le can not be deleted. Remove protection before deleting.
• All deleted pictures and video clips can not be recovered.
Page 46

46
Polaroid izone30 0™ Digital Ca mera User Gu ide
www.polaroid.com
47
Polaroid izone30 0™ Digital Ca mera User Gu ide
www.polaroid.com
6 Print Settings
• About PictBridge
PictBridge is a new industry standard that allows you to print images
directly from a PictBridge enable digital still camera to a PictBridge
compatible printer without using a photo editing software or a
computer.
Printing Procedures
1. Preparing the camera and the printer.
Printer
Camera
Be sure battery level is full before printing.
Refer to the user guide that comes with your
printer and make preparations (paper, ink cassette,
cartridge, etc.) as required.
Turn on the camera and the printer.
2. Selecting PictBridge mode
Set the camera to Playback mode and select the PictBridge mode.
Refer to page 47 for details.
3. Connecting the camera to the printer
Refer to "Camera/Printer Connection" on page 48 for details.
4. Select print settings.
Use the camera's function and navigation buttons to select the print
settings. Refer to page 49 for details.
5. Printing
Select “PRINT” and press the
S
E
T
button to start printing. Refer to
page 52 for details.
Page 47

47
Polaroid izone30 0™ Digital Ca mera User Gu ide
www.polaroid.com
Cancelling Printing
Press the
S
E
T
button to cancel printing the
print job. The printer will stop printing and
eject the paper.
PRI NT SE TTI NG
PROG RESS 001/0 02
PRI NTED 0 00
CANC EL
: SET
Printing Errors
If for some reason an error occurs during
or before printing, select “CANCEL” or
“CONTINUE” and then press the
S
E
T
button.
NOTE:
• Please refer to the printer’s user guide for
the solutions. Printing may resume once the
problem is solved.
PRI NT SE TTI NG
ERRO RS
CANC EL
CONT INU E
: SET
• Printing operation may still fail with some errors
even if you press the
S
E
T
button after selec ting
“CONTINUE”. In that case, select “CANCEL”
and press the
S
E
T
button.
PRI NT SE TTI NG
PICT BRI DGE
DPOF
Selecting PictBridge Mode
1. Set the camera to Playback mode.
2. Press the
M
button.
3. Press the
or
button to select
(PRINT
SETTING).
4. Press the
S
E
T
button.
PRI NT SE TTI NG
PICT BRI DGE
DPOF
5. Press the
or
button to select
“PICTBRIDGE”.
6. Press the
S
E
T
button.
NOTE:
To print a single image, select the image before
enabling PictBridge mode.
PLEASE
CONN ECT TO D EVIC E
Page 48

48
Polaroid izone30 0™ Digital Ca mera User Gu ide
www.polaroid.com
49
Polaroid izone30 0™ Digital Ca mera User Gu ide
www.polaroid.com
Camera/Printer Connection
Connecting with the USB Cable.
1. Plug Series A of the USB cable into the
marked socket on your
printer. Location of USB socket will vary from printer to printer.
2. Plug Series Mini B of the USB cable into the port on your camera.
DEVICE IS
CONN ECTE D
NOTE:
• “
DEVICE IS CONNECTED” displays on the LCD
screen, indicating a proper connection to the printer.
• Do not connect the USB cable to the camera until
PictBridge is enable and when prompted by the
“PLEASE CONNECT TO DEVICE” screen. Or if you
already have connected the cable to the camera,
do not plug into printer until prompt to do so. Not
following this sequence will result in connection
failure.
• When “ PLEASE CONNECT TO DEVICE” is displayed for about ten
seconds, it will skip to the PictBridge print setting screen even if there is
no connection between camera and printer.
Page 49

49
Polaroid izone30 0™ Digital Ca mera User Gu ide
www.polaroid.com
Selecting Print Settings
1. Press the
or
button to select the print
mode.
PICTBRIDGE
THIS IMAG E
ALL IMAGE S
ALL INDE X
: SET
2. The following options are available.
ALL IMAGES
THIS IMAGE
Print the selected image in the camera’s internal
memory or a memory card according to specied
settings. Use the
or
button to designate
the image you want to print before selecting the
PictBridge mode.
Print all images in the camera’s internal memory or
a memory card according to the specied settings.
ALL INDEX
All images in the camera’s internal memory or
a memory card are given an index and printed
according to the specied settings.
NOTE:
• To print a single image, select the image before enabling PictB ridge.
• Print settings are congure d for images only. Make sure there are no video
clips or other le besides images in the memor y before printing, otherwise,
an error will occur if trying to print using the “ALL I MAGES” or “ALL
INDEX” option.
• Not all printers will support all these print options. Please refer to the
printer user guide for options available.
Page 50

50
Polaroid izone30 0™ Digital Ca mera User Gu ide
www.polaroid.com
51
Polaroid izone30 0™ Digital Ca mera User Gu ide
www.polaroid.com
3. Press the
S
E
T
button to select the print settings.
NO. OF COPY
0 1
1
DEFAU LT
DEFAU LT
DEFAU LT
Numbe r of Copi es
Print L ayout
File Na me On/ Off
Date St amp On /Of f
Paper S ize
Select a setting item using the
or
button and select setting contents
using the
M
or
S
E
T
button.
NOTE:
“PR INTER SETTING NOT SUPPORTED” may appear
on the LCD screen after selecting a particular setting.
The camera’s print settings are not supported by
the printer. In this case, select “DEFAULT” for this
particular setting, or visit
http://www.polaroid.com for possible solutions.
PRI NTER S ETTING
NOT SUPPOR TED
Specifying the Number of Copies
1. Press the
or
button to select
(NO. OF
COPY).
2. Press the
M
or
S
E
T
button to specify the
number of copies (from 1 to 99) you want to
print for the selected image or all images.
NOTE:
“01” is the default setting.
NO. OF COPY
0 1
DEFAU LT
DEFAU LT
DEFAU LT
DEFAU LT
Page 51

51
Polaroid izone30 0™ Digital Ca mera User Gu ide
www.polaroid.com
Selecting Print Layout
1. Press the
or
button to select
(N-UP
LAYOUT).
2. Press the
M
or
S
E
T
button to specify the
number of printed images on a page.
N-U P LAYOUT
0 1
1
DEFAU LT
DEFAU LT
DEFAU LT
DEFAULT Print settings differ according to the printer model.
1/2/4/6/8 Print 1/2/4/ 6/ 8 on a page.
BORDERLESS Print right to the edge of the page.
Setting the File Name On/Off
1. Press the
or
button to select (FILE NAME).
2. Press the
M
or
S
E
T
button to select
“DEFAULT”, “ON” or “OFF”.
FILE NAME
0 1
1
DEFAU LT
DEFAU LT
DEFAU LT
DEFAULT Print settings differ according to the printer model.
ON Add the le name to the printed image.
OFF Print without the le name.
Setting the Date Stamp On/Off
1. Press the UP or DOWN button to select ( DATE
STAMPING).
2. Press the
M
or
S
E
T
button to select
“DEFAULT”, “ON” or “OFF”.
DATE STAMP ING
0 1
1
DEFAU LT
DEFAU LT
DEFAU LT
DEFAULT Print settings differ according to the printer model.
ON Add the date stamp to the printed image.
OFF Print without the date stamp.
Page 52

52
Polaroid izone30 0™ Digital Ca mera User Gu ide
www.polaroid.com
53
Polaroid izone30 0™ Digital Ca mera User Gu ide
www.polaroid.com
Selecting Paper Size
1. Press the
or
button to select
“SIZE”.
2. Press the
M
or
S
E
T
button to select the paper
size.
The following paper sizes are available:
8” x 10”, 4” x 6”, A4 and default.
SIZE
0 1
1
DEFAU LT
DEFAU LT
4 X 6
DEFAULT Print settings differ according to the printer model.
Printing
1. Press the
or
button to select “PRNIT”.
2. Press the
S
E
T
button.
NOTE:
To return to the normal playback mode, press the
or
button to select
“EXIT” and press the
S
E
T
button.
Page 53

53
Polaroid izone30 0™ Digital Ca mera User Gu ide
www.polaroid.com
• DPOF (Digital Print Order Format)
”DPOF” stands for “Digital Print Order Format”, which is a format for
recording on a memory card or other medium which captured images
and how many copies should be printed. Then you can print on a DPOFcompatible printer or at a professional print service from the memory
card in accordance with the le name and number of copies settings
recorded on the card.
With this camera, you should always select images by viewing them on
the LCD screen. Do not specify images by le name without viewing the
le contents.
NOTE:
Print settings are congured for images only. Make sure there are no video clips
or other le besides images in the memory before printing, otherwise, an error
will occur if tr ying to print using the “ALL IMAGES” option.
1. Insert an SD card into the camera.
2. Turn on the camera.
3. Set the camera to Playback mode.
4. Press the
M
button.
5. Press the
or
button to select
(PRINT
SETTING).
6. Press the
S
E
T
button.
PRI NT SE TTING
PICTBRIDGE
DPOF
7. Press the
or
button to select “DPOF”.
8. Press the
S
E
T
button.
PRI NT SE TTING
PICTBRIDGE
DPOF
Page 54

54
Polaroid izone30 0™ Digital Ca mera User Gu ide
www.polaroid.com
55
Polaroid izone30 0™ Digital Ca mera User Gu ide
www.polaroid.com
9. Press the
or
button to select the desired
setting.
10. Press the
S
E
T
button.
PRI NT SETTING
THIS IMAG E
ALL IMAGE S
: SET
THIS IMAGE The selected picture in a memory card will be printed up
to 99 copies.
ALL IMAGES All pictures in a memory card will be printed up to 99
copies for each picture.
NOTE:
To print a single image, select the image before enabling DPOF mode.
11. Press the
or
button to select the desired
setting.
12. Press the
S
E
T
button.
PRI NT SE TTING
PRI NT 01 COP IES
: SET
Page 55

55
Polaroid izone30 0™ Digital Ca mera User Gu ide
www.polaroid.com
13. Remove the memory card from the camera and insert it into the
printer’s card slot (as illustrated). Location of the card slot may
vary from printer to printer model.
NOTE:
Make sure you turn off the camera before inserting or removing a memory card.
14. Press the Print button on the printer to start printing.
Gently push the SD card inwards
and release it for the SD card to
eject from the SD card slot.
Page 56

56
Polaroid izone30 0™ Digital Ca mera User Gu ide
www.polaroid.com
57
Polaroid izone30 0™ Digital Ca mera User Gu ide
www.polaroid.com
7 Using the SD (Secure Digital) Card
• Using the SD Card
Your camera comes with built-in ash memory for storing pictures
and video clips. You can expand the memory using a commercially
available SD card (up to 1GB). The camera senses whether a memory
card is inserted, and automatically saves pictures and video clips
accordingly. Note that you cannot save pictures or video clips to the
built-in ash memory while a memory card is installed in the camera.
See pages 76 to 78 for storage capacities.
Memory Card Precautions
1. Use only an SD memory card with this camera.
2. Electrostatic charge, electrical noise, and other phenomena can
cause data corruption or even loss. Always make sure that you
always back up important data on other media (MO disc, computer
hard drive, etc.).
3. If a memory card starts to behave abnormally, you can restore
normal operation by reformatting it. However, we recommend that
you always take along more than one memory card whenever using
the camera far away from the home or ofce.
4. We recommend that you format a memory card before using it for
the rst time after purchasing it, or whenever the card you are using
seems to be the cause of abnormal pictures. Remember to format
a memory card if it was used in another digital camera or other
devices.
Page 57

57
Polaroid izone30 0™ Digital Ca mera User Gu ide
www.polaroid.com
IMPORTANT!
• Make sure you turn off the camera before inserting or removing a memory card.
• Be sure to orient the card correctly when inser ting it. Never try to force a
memory card into the slot when you feel resistance.
• SD memory cards have a write protection switch that you can use to
protect les from accidental deletion. However, you must remove the write
protection whenever you want to record new les onto it, format it, or
delete its les.
• Files contained in the SD card recorded by other cameras may conict with
the izone300™ camera, and valuable data in your existing SD card may be
distorted or lost when the card is inserted in the izone300™ camera. We
strongly recommend the user to use a NEW or formatted SD card for the
izone300™ camera. The manufacturer is not liable for losing or corrupting any
valuable data or les in your SD card due to your improper operation.
• As tests prove, the izone300™ works best with popular brands of memory
cards such as SanDisk, Panasonic, Lexar and TOSHIBA. Consider using these
cards for best performance.
Inserting the SD Card
Turn off the camera. Insert the SD card
and ensure the card is inserted correctly
as illustrated.
The
icon will appear on the LCD
screen when a SD card is inserted into
the camera.
Removing the SD Card
To remove the SD card, turn off your camera
and gently push the SD card inwards. And
then release it for the SD card to eject from
the SD card slot.
Page 58

58
Polaroid izone30 0™ Digital Ca mera User Gu ide
www.polaroid.com
59
Polaroid izone30 0™ Digital Ca mera User Gu ide
www.polaroid.com
IMPORTANT!
• Never inser t any other object into the camera’s SD card slot. Doing so
creates the risk of damage to the camera and card.
• Should water or any foreign objects ever get into the card slot,
immediately turn off the camera, remove the batteries and contact your
deale r or nearest service provider.
• Never remove a card from the camera while the camera is powered on.
Doing so can cause the recording operation to fail, and even damage the
memory card.
Formatting the SD Card
Formatting the SD card erases all les stored in it, including the
protected ones. Removing the SD card during formatting may damage
the card.
1. Insert an SD card into the camera card slot.
2. Turn on the camera.
3. Procedures are the same as for formatting the internal memory.
Refer to “Formatting the Internal Memory” on page 22 for details.
IMPORTANT!
• You can format a memor y card on the camera or on a computer. However
formatting a memory card on a computer takes much longer.
• Note that the data deleted by a format operation cannot be recovered.
Make sure you do not have any useful data currently store d on a memory
card before you format it.
Page 59

59
Polaroid izone30 0™ Digital Ca mera User Gu ide
www.polaroid.com
• To Copy Pictures and Video Clips from Internal Memory to a
Memory Card
1. Insert an SD card into the camera card slot.
2. Turn on the camera.
3. Set the camera to Playback mode.
4. Press the
M
button.
5. Press the
or
button to select
(COPY TO
CARD ).
6. Press the
S
E
T
button.
COPY TO CARD
COPY
CANC EL
: SET
7. Press the
or
button to select the desired
setting.
8. Press the
S
E
T
button.
COPY TO CARD
COPY
CANC EL
: SET
In the above operation, you can exit to the
normal Playback mode by choosing “CANCEL”
and conrm it. Please note that you cannot copy
pictures or video clips from a memory card to
the internal memory.
Proce ssin g...
NOTE:
The original pictures and video clips will still be in the camera’s internal
memory after the copy operation has been performed. You must take the
card out before you can erase it.
Page 60

60
Polaroid izone30 0™ Digital Ca mera User Gu ide
www.polaroid.com
61
Polaroid izone30 0™ Digital Ca mera User Gu ide
www.polaroid.com
8 Installing the Software onto a Computer
• Installing the Software
For Windows® Users:
PC
IMPORTANT!
• Please backup all the necessary data before any driver and software installation.
• The CD-ROM is tested and recommended to use under English Windows OS.
• Please restart the computer after installing the sof tware.
IMPORTANT! (For Windows® 98SE)
Windows® 98S E needs to install the izone300™ camera driver for Mass
Storage function. After the installation, please restart the Windows before
connecting the camera to the PC.
IMPORTANT!
To experience higher performance in graphics and sound when you’re
watching video clips on your PC, it is recommended to install the DirectX ver.
9.0 or above. It can be downloaded from http://www.microsoft.com/directx.
IMPORTANT! (For Windows® Me, 2000, XP)
Directly plug-in the camera to transfer and view the pictures. No need to
install the driver.
IMPORTANT!-If the computer requests you to install the Windows® system
disk during the software installation, place the Windows® CD into the
computer CDROM drive or inser t the izone300™ driver CD to the CD- ROM
drive. If izone300™ driver CD is inserted, please set the path to “CD -ROM
drive \software\ Driver\ Sysle”. The computer will install the necessary les
from the CD automatically. When the software completes installation, close
the Windows® screen. Remove the Windows® CD and store safely.
Page 61

61
Polaroid izone30 0™ Digital Ca mera User Gu ide
www.polaroid.com
1. Before you begin, close all other software
applications opened on your computer.
2. Insert the CD supplied into the computer
CD- ROM Drive.
3. The CD User Interface Screen will
automatically launch.
4. With the mouse, click on each software
interface button in turn and follow the
on-screen instructions.
Open & C lose
NOTE:
If the setup screen does not appear after loading
the CD, then you can manually start it by double
clicking the “My Computer” icon on your desktop,
then double clicking the icon for the CD -ROM
drive. When the CD-ROM window opens, double
click the “INSTALL-E.EXE” icon.
For Macintosh Users :
Mac
1. Before you begin, close all other software applications opened on
your computer.
2. Insert the CD supplied into the computer CD -ROM Drive.
3. Double click the CD-ROM icon “Polaroid”.
4. Install the software included.
Page 62

62
Polaroid izone30 0™ Digital Ca mera User Gu ide
www.polaroid.com
63
Polaroid izone30 0™ Digital Ca mera User Gu ide
www.polaroid.com
• Software Included with Your Camera
izone300™ Camera Driver Plug & P lay removable disk
Easy to use, just plug the camera to a computer and use it as a
removable disk. Use the izone PhotoBase to edit and print the Pictures.
izone PhotoBase software - the intelligent software that makes nding
your pictures easy!
izone PhotoBase helps you to organize and present multimedia les.
You can quickly and easily create Slide Shows, Web Albums and Video
Postcards. Meanwhile, you can effectively print contact sheets for
quick image referencing. The unique “album” structure of the program
makes le access convenient. On top of that, you can acquire les from
various sources, including digital cameras, scanners, video devices, and
removable media.
After you plug-in the camera, the izone PhotoBase software
automatically checks to see if you have taken new photos that need to
be transferred to your computer. If there are new images, you will be
prompted if you want izone PhotoBase to download all the images in the
camera to your computer automatically.
With the izone PhotoBase software, you can quickly sort all the photos
on your computer either by the date or by image/folder name. Once you
have located your images, you can make your simple edits, print or share
in no time at all!
Page 63

63
Polaroid izone30 0™ Digital Ca mera User Gu ide
www.polaroid.com
Microsoft® NetMeeting™ Web C am software
NetMeeting™ provides the most complete conferencing solution for the
Internet and corporate intranet.
Powerful features let you communicate with both audio and video,
collaborate on virtually any Windows-based application, exchange
graphics on an electronic whiteboard, transfer les, use the text-based
chat program, and much more. Using your PC and the Internet, you can
now hold face -to-face conversations with friends and family around the
world.
Adobe® Acrobat® Reader™ . PDF F ile R eading Software
Adobe® Acrobat® Reader™ lets you view and print Adobe Portable
Document format (PDF) les on all major computer platforms, as well
as ll in and submit Adobe PDF forms online.
Page 64

64
Polaroid izone30 0™ Digital Ca mera User Gu ide
www.polaroid.com
65
Polaroid izone30 0™ Digital Ca mera User Gu ide
www.polaroid.com
• Computer System Requirements
For acceptable picture transferring and editing performance, we
recommend the following minimum requirements;
For Windows® Users
PC
• Compatible with Microsoft® Windows® 98SE, Me, 2000 or XP
• Pentium® III 450MHz or equivalent processor
• 128MB RAM (512MB recommended)
• USB Port
• DirectX 9.0 or higher
• 500MB free disk space
• Color monitor with high color (16-bit) graphic capability or higher
• CD- ROM drive
• Standard mouse and keyboard
• Stereo speakers
For Macintosh Users
Mac
• PowerPC® Processor
• Mac™ OS Version 9.2~X
• USB Port
• 96MB RAM (128MB recommended)
• 400MB Free disk space
• Color monitor with high color (16-bit) graphic capability or higher
• CD- ROM drive
• Standard mouse and keyboard
• Stereo speakers
Page 65

65
Polaroid izone30 0™ Digital Ca mera User Gu ide
www.polaroid.com
9 Transferring Pictures and Video Clips to Your Computer
• Before You Transfer Files
IMPORTANT!
BEFORE YOU CONNECT YOUR DIGITAL CAMERA TO THE COMPUTER, MAKE
SURE THAT YOU HAVE INSTALLED THE SOFTWARE FROM THE ENCLOSED
CD. PLEASE REFER TO “8 Installing the Software Onto a Computer”.
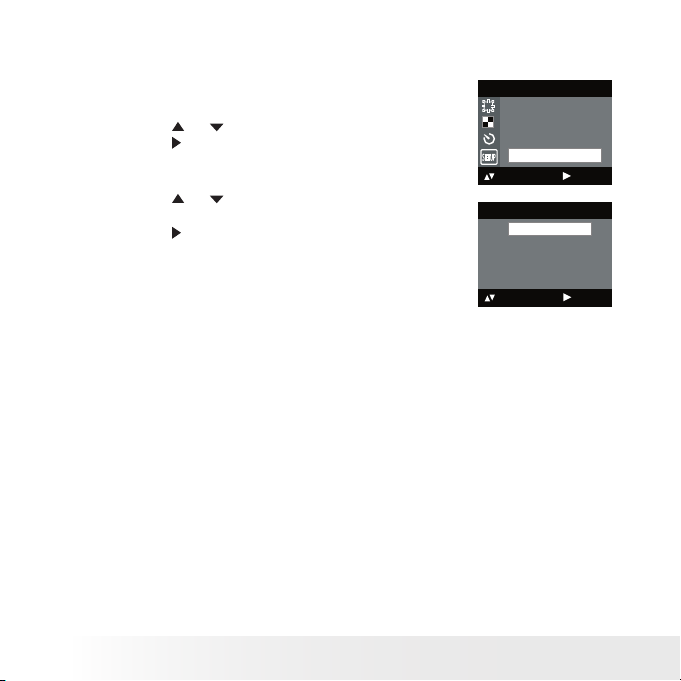
• Changing the Driver Type Between Mass Storage Mode and
PC Camera Mode
You can choose either Mass Storage or PC Camera as a driver type in
this camera. Mass storage is the drive type by default. Set the camera to
the PC Camera mode when you want to use the PC Camera function.
Mass Storage mode allows the camera to become an external hard
disk drive, and you may view and download pictures and video clips
stored in your camera’s internal memory or a SD memory card onto
your computer. PC Camera mode allows you to take video clips on your
computer.
1. Set the camera to Still Image mode.
2. Access the Setup menu.
3. Press the
or
button to select “TWAIN
DRIVER”.
4. Press the
S
E
T
button.
SETUP
: SET
BEE P
FREQ UEN CY
LAN GUAGE
DATE STAMP
TWAI N DRI VER
5. Press the
or
button to select the desired
setting.
6. Press the
S
E
T
button.
NOTE:
The driver type always resets to Mass Storage when
the camera is turned off.
TWAI N DRIVE R
: SET
MASS S TORAGE
PC CAM ERA
Page 66

66
Polaroid izone30 0™ Digital Ca mera User Gu ide
www.polaroid.com
67
Polaroid izone30 0™ Digital Ca mera User Gu ide
www.polaroid.com
For Windows® and Macintosh Users:
PC
Mac
• Connecting to Your Computer
Connecting with the USB Cable.
USB Se ries “ Min i B” Plu g conn ects to your
izone300 ™ Came ra or Do cking Stati on
USB Se ries “A” Plu g
connects to your PC
iz
o
1. Turn off the camera.
2. Plug Series A of the USB cable into the
marked socket on your
computer.
3. Plug Series Mini B of the USB cable into the port on your camera or
on the docking station.
4. Turn on the camera and an interface “New Hardware Found” will
show on the computer desktop.
5. A removable disk drive will be installed onto your computer
automatically.
Page 67

67
Polaroid izone30 0™ Digital Ca mera User Gu ide
www.polaroid.com
• Transferring Pictures and Video Clips
For Windows® Users:
PC
NOTE:
You can transfer pictures and video clips in any mode.
1. Turn on the camera
2. Connect the camera to a computer via the USB cable.
3. Double click on “My Computer” on your PC desktop and you will
see a “Removable Disk” drive.
4. Double click “Removable Disk” -> double click “DCIM”-> double
click any directory folder under “DCIM”.
5. All the pictures and video clips are in the directory folder. Highlight
the pictures and video clips and drag them to a folder of your
choice. You can also create sub-folders to group them or use the
PhotoBase software to edit and manage the pictures or video clips.
For Macintosh Users
Mac
NOTE:
For Mac user, directly plug -in the camera and no need to install the driver.
1. Turn on the camera
2. Set the camera to Playback mode.
3. Connect the camera to a computer via the USB cable, the systems
will automatically recognize the MASS STORAGE drive. (System will
automatically create a Mass Storage named “Unlabelled”)
NOTE:
This Drive name will vary from different version of Mac OS system.
4. Double click the folder “Unlabelled” to enter sub-folder “DCIM”.
5. Double click the folder “DCIM” and then any sub folder inside.
6. You can copy the pictures and video clips from this directory folder
and paste to the hard disk.
Page 68

68
Polaroid izone30 0™ Digital Ca mera User Gu ide
www.polaroid.com
69
Polaroid izone30 0™ Digital Ca mera User Gu ide
www.polaroid.com
10 Using the Camera as a Web Cam
IMPORTANT!
Before using the Web Camera function, make sure that your camera has been
switched to PC Camera mode. (Please refer to “Changing the Driver Type Between
Mass Storage Mode and PC Camera Mode” on page 64 for more details.
• Setting up NetMeeting™
NOTE:
Set the camera to Video Mode before starting NetMeeting™.
1. Place the camera into the docking station. For further details, refer to
“Using the Docking Station” on page 9.
2. Plug the labelled end of the USB cable into the socket marked
on your computer. Plug the other end of the USB cable into the
USB port on the docking station.
3. When it is the rst time to use the camera as a “Web Cam”. The
Windows may prompt the user to insert the Windows system disk.
Please insert the izone300™ driver CD or the Windows CD into the
CD- ROM drive to install the requested les.
4. Connect your microphone (not included) and speakers (not included)
to your audio card’s Mic in and line out jack respectively.
Page 69

69
Polaroid izone30 0™ Digital Ca mera User Gu ide
www.polaroid.com
• Start NetMeeting™
NOTE:
For Windows® XP / 2000 users who use NetMeeting for the rst time , go to
Start -> Run ->type in “conf” ->click “OK” and then follow the on-screen set
up instruction to set up NetMeeting.
1. Double click the “NetMeeting” icon on the desktop or select the
“NetMeeting” icon from the Windows Start Menu.
2. If you need further help on how to use Microsoft® NetMeeting™, select
the “Help” under the menu bar and choose the topic you need. You
can also refer to Polaroid “EASY TO USE GUIDE TO MICROSOFT®
NETMEETING™” or visit the website:
http://www.microsoft.com/windows/netmeeting.
Page 70

70
Polaroid izone30 0™ Digital Ca mera User Gu ide
www.polaroid.com
71
Polaroid izone30 0™ Digital Ca mera User Gu ide
www.polaroid.com
11 Troubleshooting Problems
The troubleshooting guide is designed to help you. If problems
continue, please contact customer support. Details are provided under
“Getting Help”.
Symptom Problem Solution
I recei ve an erro r messa ge
when I am i nstal ling th e
Polar oid izon e300 ™ came ra
driver.
Polar oid izon e300 ™ came ra
driver ” does no t load.
Shut dow n all oth er appl icati ons and
attem pt to rei nstal l the dri ver.
Check to s ee if the U SB con trolle r in your
BIOS i f it is act ivated . Pleas e refer to
Polar oid webs ite for ho w to activ e USB
contro ller i n BIOS .
I canno t uploa d image s to
my compu ter.
Conne ction f ailur e.
Check a ll cabl e conne ction s are sec ured.
I canno t run the P olaro id
izone3 00™ c amera d river”.
Coni ct with a nothe r camer a
driver o r captu re devi ce.
If you have a nothe r camer a insta lled o n
your com puter, re move it an d it’s dri ver
compl etely f rom your s ystem to av oid
coni cting w ith your i zone3 00™.
Incor rect dr iver ty pe.
Set the c amera ’s driver t ype to the M ass
Storag e mode.
My CD In stall ation wi zard
does no t work.
The aut o insta llati on le is
switch ed off or t he CD- ROM i s
disco nnect ed.
Go to the c ompute r desk top. Rig ht clic k on
“My Co mpute r”. Click “ Prope rtie s”. Selec t
“Devi ce Mana ger”. Dou ble cli ck on “CD ROM”, dou ble cli ck on “CD -R ( norma lly the
manufa cture r’s name. C lick on “ Sett ings”.
Ensur e both “Auto i nser t noti catio n” and
the “disc onne ct” are t icked. I f you chan ge
the set tings t he comp uter wi ll ask you t o
resta rt your P C. Cli ck “Yes”.
I get a blu rred im age whe n
uploa ding my im ages to my
compu ter.
There may be a momentary delay
between pressing the shutter
button and the actual exposure.
Hold yo ur izone 300 ™ camer a stead y
until yo u hear a be ep whic h indic ates th e
exposu re is com plete d.
Page 71

71
Polaroid izone30 0™ Digital Ca mera User Gu ide
www.polaroid.com
My izone 300 ™ camer a
hange d and all b utto ns do
not work .
Your came ra may be af fecte d by
the ele ctros tatic d ischa rge.
Depre ss the Re set bu tton ge ntly
(hol ding for a bout 5 s econd s) usi ng a
paper c lip or ba ll pen.
I canno t activa te my digi tal
camer a by press ing the
Power bu tton.
Batt ery is ex haust ed.
Rech arge th e batte ry.
Symptom Problem Solution
Camer a sudde nly powe rs off. Auto power of f funct ion is
activa ted.
Or
Batt ery is ex haust ed.
Turn the ca mera on .
Or
Rech arge th e batte ry.
Image i s not rec orded w hen
the shu tter b utton i s press ed.
Came ra is tur ned of f
Or
Flash u nit is c hargi ng.
Or
Memo ry is fu ll.
Turn the cam era on.
Or
Wait unt il ash u nit cha rging nishe s.
Or
Delet e image s you no lon ger ne ed, or
use ano ther me mory c ard.
Camer a powers of f duri ng
self-t imer co untdow n.
Batt ery is ex haust ed. Recha rge the b atter y.
Recor ded pic tures a re not
saved in m emor y.
Camer a powers of f befor e the save
opera tion is c omple te.
Or
Remov ing the m emory c ard bef ore
the save o perati on is com plete .
If the ba tter y indic ator is on t he LCD
scree n, repla ce bat terie s with a ful l
set of new o nes as so on as pos sible .
Or
Do not remove the memory card before
the save operation is complete.
Color of the playback pictures is
different from the picture on the
LCD screen during recording.
Sunli ght or li ght fro m anothe r
sourc e is shin ing dire ctly in to the
lens du ring re cordi ng.
Posit ion the c amera s o that sun light
does no t shine d irect ly onto th e lens.
Pictu res are n ot disp layed.
A memor y card wi th non -DC F
pictu res rec orded wi th anot her
camer a is load ed in the c amera .
This ca mera ca nnot di splay no n-D CF
pictu res rec orded o nto a memo ry car d
used by a nothe r digita l came ra.
My memo ry car d is not
recog nized by th e came ra
when it i s inser ted in to the
card sl ot.
Some br ands of m emor y cards ma y
not have th eir phy sical di mens ions
meeti ng the in ternat ional s tanda rd.
As a cons equen ce, the se card s will
not be re cogniz ed by your c amera .
Try anoth er bran d of memo ry car d
with you r camer a. If pro blem st ill
exist, p lease v isit
http ://ww w.polar oid.co m for
custo mer ser vice.
Page 72

72
Polaroid izone30 0™ Digital Ca mera User Gu ide
www.polaroid.com
73
Polaroid izone30 0™ Digital Ca mera User Gu ide
www.polaroid.com
AVI le ca nnot be p layed. D irect X vers ion is lowe r than 9.0.
Or
Windo ws Media p layer no t
insta lled in t he comp uter
Insta ll dire ctx 9.0 o r above.
Visit h ttp: //ww w.micros oft.c om/
direc tx for mo re deta il.
Or
Pleas e go to
http ://ww w.micro soft.c om/w indows /
windows medi a/pl ayers. aspx to
downlo ad the Wi ndows Me dia Pl ayer
to play th e video c lips.
The cam era is de tected by t he
Window s and works p roper ly.
But a dri ve lett er of the
Remova ble disk i s not cre ated.
The rem ovable di sk cras hes with t he
networ k drives .
Disco nnect t he crash ed net work driv e
and res erve thi s drive le tter fo r the
camer a.
Symptom Problem Solution
I canno t erase p ictur es. All the pictures in memory are protected. Unpro tecte d the pic tures yo u want
to dele te.
There is no response from the
camera while pressing any buttons.
The LCD s creen is f rozen or t he
camer a is hange d.
Depre ss the Re set but ton gen tly
(hold ing for a bout 5 se conds ) using a
paper c lip or bal l pen.
An error message appears on the
LCD screen before or during printing.
Print er may not s uppor t some
advanc ed prin t featur es.
Or
Some fa ult occu rs with t he print er.
Or
Print s ettin gs can be c ongu red for
image s only.
Select “DEFAULT” for a particular print
setting or visit http://www.polaroid.com for
the solutions.
Or
Pleas e refer to th e print er’s user g uide fo r
the sol utions .
Or
Make it su re that th ere is no vi deo cli ps
or other le form at in the cu rrent m emory
before p rintin g.
Pictu res are ove rexpos ed or
under ex posed .
An incorrect flash mode is applied for shooting. Select a correct ash mode for shooting
according to the surrounding lighting conditions.
When co nnect t he came ra
to the PC i n Captu re mode,
Window s prompt t o inser t
system d isk.
izone3 00™ ca mera dr iver
insta llatio n has not c omplet ed.
Insert the Windows CD or izone3 00™
driver CD. If izone3 00™ driver CD
is inserted, please set the path to
CD-Rom drive\software\Driver\Sysle .
And continue the installation.
Please also refer to the help les & User Guides that accompany the
enclosed applications. For further information and support, please visit
our website: http://www.polaroid.com
Page 73

73
Polaroid izone30 0™ Digital Ca mera User Gu ide
www.polaroid.com
12 Getting Help
• Polaroid Online Services
Website: http://www.polaroid.com
• Customer Support
Questions? Need Help? Call us at 0120-103-772. Or visit us
at http://www.polaroid.com
• ArcSoft Software Help
For United St ates For Latin America
ArcS oft HQ S upport Ce nter E-mail: latinsuppor t@a rcsoftsu ppor t.co m
(Fremont, CA 94538)
Tel.: 1-510-979 -559 9
Fax: 1- 510-4 40 -7978
E-mail: s uppo rt@ arcsoftsupport.com
Web: ht tp: //www.arcs oft.com/ en/sup por t/
For Europe For China
ArcS oft Eu rope S uppo rt Ce nter ArcSoft China Support Center
(Irelan d) (Ha ngzhou)
Tel.: +353 -( 0) 61-702087 Tel.: +86 -571-8 8210575
Fax: +353- (0 ) 61-702001 E -mail: su ppor t@ arcsoft.c om.cn
E-mail: eurosupport@arcsoft.com Web: http://www.arcsoft.com.cn/new/support
For Japan For Taiwan
ArcS oft Ja pan Su ppor t Cen ter (Tokyo) ArcS oft Taiwan S upport Ce nter ( Taiwan)
Tel.: +81-3-5795 -1392 Tel.: +886 - (0 ) 2-250 6-9355
Fax: +81-3 -579 5-1397 Fax: +886- (0 ) 2-250 6- 8922
E-mail: s uppo rt@ arcsoft.jp E-mail: support@arc soft .com.t w
Web: ht tp: //www.arcs oft. jp Web: ww w.arcs oft.com.tw
Visit http://www.arcsoft.com for technical support and frequently
asked questions (FAQ’s).
“Polaroid” and “Polaroid and Pixel” and “izone” are trademarks of Polaroid Corporation, Waltham,
MA, USA.
Page 74

74
Polaroid izone30 0™ Digital Ca mera User Gu ide
www.polaroid.com
75
Polaroid izone30 0™ Digital Ca mera User Gu ide
www.polaroid.com
13 Appendix
• Technical Specications
Picture
Resolution
• Sensor:
- 1/2.5 inch
- 3.2 Mega Pixels CMOS
Lens
• Type: 5 elements plus IR lter
• Aperture: F 3.5
• Focal Length: 8.66 mm
• Focal Distance
- Normal Focus: 3.2 ft to ∞ (1 m to ∞)
(The focusing range is the distance from the
lens surface to the subject.)
• Focus Zones: center
LCD Screen 1.5” TFT color panel
Built-in Flash
• Modes
- Auto Flash, Forced On, Flash Off
• Range: 3.2 to 4.9 ft (1 to 1.5 m)
Exposure
Control
-/+1.5 EV in 0.3 increments
Shutter Speed Electronic shutter 1/1000 sec ~ 1/20 sec
White Balance Auto, Daylight, Cloudy, Tungsten, Fluorescent
Page 75

75
Polaroid izone30 0™ Digital Ca mera User Gu ide
www.polaroid.com
Storage • Internal Memory: 8MB (3MB for data storage) or
16MB (11MB for data storage) Nand Flash
• External Memory
- supports SD card up to 1GB (not included)
File Format • Still Image
- EXIF 2.2 compatible format (JPEG compression)
• Video Clip: AVI format
Power Supply
One lithium ion rechargeable battery (integrated)
Self-timer 10 seconds with beep sound
Connectivity With computer via USB cable and docking station
(included)
Dimension • Size: (W) 91 mm x (D) 17 mm x (H ) 63.5 mm
• Weight: Approximately 90g (including the
integrated battery and excluding card)
Operating
System
• For Windows® Users: Microsoft® Windows®
98SE, Me, 2000 or XP
• For Macintosh Users: Mac OS 9.2~X
Page 76

76
Polaroid izone30 0™ Digital Ca mera User Gu ide
www.polaroid.com
77
Polaroid izone30 0™ Digital Ca mera User Gu ide
www.polaroid.com
• Storage Capacities
The charts below indicate the approximate numbers of pictures and
length of video clips the camera can hold at each setting based on the
internal memory and different capacities of SD card.
Recordable Images
Units: Images
Resolution Quality 8MB
Internal
Memory
(3MB
for data
storage)
16MB
Internal
Memory
(11MB
for data
storage)
32MB SD 64MB SD
2048 x 1536
High 3 18 35 70
Normal 6 28 54 108
Low 9 28 55 110
1600 x 1200
High 7 31 62 124
Normal 12 45 90 180
Low 17 48 96 192
640 x 4 80
High 31 127 234 468
Normal 46 145 290 580
Low 62 149 298 596
Page 77

77
Polaroid izone30 0™ Digital Ca mera User Gu ide
www.polaroid.com
Resolution Quality 128MB SD 256MB SD 512MB SD 1GB SD
2048 x 1536
High 140 280 560 1120
Normal 216 432 864 1728
Low 220 440 880 1760
1600 x 1200
High 248 496 992 1984
Normal 360 720 1440 2880
Low 384 768 1536 3072
640 x 4 80
High 936 1872 3744 7488
Normal 1160 2320 4640 9280
Low 1192 2384 4768 9536
Page 78

78
Polaroid izone30 0™ Digital Ca mera User Gu ide
www.polaroid.com
79
Polaroid izone30 0™ Digital Ca mera User Gu ide
www.polaroid.com
Recordable Video Length
Units: Minute
Resolution Video clips can be taken
8MB Internal Memory
(3MB for data storage)
640 x 4 80 0.2
320 x 240 0.3
16MB Internal Memory
(11MB for data storage)
640 x 4 80 1.4
320 x 240 1.5
32MB SD 640 x 480 2.6
320 x 240 2.9
64MB SD 640 x 480 5.1
320 x 240 5.1
128MB SD 64 0 x 480 9.6
320 x 240 10
256MB SD 640 x 480 19.2
320 x 240 20.6
512MB SD 640 x 480 37.7
320 x 240 4 0.1
1GB SD 64 0 x 480 75.6
320 x 240 81.1
NOTE:
Scene complexity affects a picture’s le size. For example, a picture of
trees in autumn has a larger le size than a picture of blue sky at the same
resolution and quality setting. Therefore, the number of pictures you can
store on a memory card may vary.
Page 79

79
Polaroid izone30 0™ Digital Ca mera User Gu ide
www.polaroid.com
• Uninstalling Polaroid izone300™ driver (PC Only)
For Windows® 98SE Users:
PC
NOTE:
The following driver uninstall procedure is for Windows 98SE users only
because only Windows 98SE needs to install the izone300™ driver.
1. Open Add/Remove Program Properties in Control Panel and select
“Polaroid Digital Cam" program, then click Add/ Remove .
2. The following dialog box appears, click "OK" to conrm removing
the camera driver.
3. The uninstallation program runs automatically, please restart your
computer when it is nished.
Page 80

80
Polaroid izone30 0™ Digital Ca mera User Gu ide
www.polaroid.com
81
Polaroid izone30 0™ Digital Ca mera User Gu ide
www.polaroid.com
• Camera Default Settings
Camera Mode
Still Image Mode
Video Mode
Setup Mode
Description
Image Resolution
Quality
Exposure Compensation
White Balance for Pictures
Flash Mode
Video Resolution
White Balance
Date Format
Auto Power Off
Beep
Frequency
Language
Date Stamp
Twain Driver
Default
2048 x 1536
High
Auto
Auto
Auto Flash
640 x 480
Auto
DD/MM/YY
1 minute
On
60 Hz for USA/
50 Hz for Europe
English
Off
Mass Storage
NOTE:
The default language for the LCD screen may vary with different countries
and regions.
Page 81

81
Polaroid izone30 0™ Digital Ca mera User Gu ide
www.polaroid.com
• Using Your Battery
Limit the following activities that reduces battery life:
• Reviewing your pictures on the LCD screen.
• Using the LCD screen to take pictures (Use the optical viewnder to
frame pictures).
• Excessive use of the ash.
WARNINGS!
• Battery should be recharged by an adult.
• Batteries life varies depends on the camera usage.
These instructions should be retained for future reference.
• Tips, Your Safety & Maintenance
Your Camera should only be operated within the following environmental
conditions;
• 32 - 104º Fahrenheit; 0 - 40º Celsius
• 20% - 85% relative humidity, non condensing
Battery life or image quality may be affected outside these conditions.
Camera Cautions
• NEVER immerse any part of the Camera or its accessories into any
uid or liquid.
• ALWAYS disconnect the Camera from your PC or TV before cleaning
it.
• ALWAYS remove dust or stains with a soft cloth dampened with
water or neutral detergent.
• NEVER place hot items on the surface of the Camera.
• NEVER attempt to open or disassemble Camera as this will affect
any warranty claim.
Page 82

82
Polaroid izone30 0™ Digital Ca mera User Gu ide
www.polaroid.com
83
Polaroid izone30 0™ Digital Ca mera User Gu ide
www.polaroid.com
• Regulatory Information
FCC Notice
This device complies with Part 15 of FCC Rules. Operation is subject
to the following two conditions: (1) This device may not cause harmful
interference, and (2) This device must accept any interference received,
including interference that may cause undesired operation.
Warning: Changes or modications to this unit not expressly approved
by the party responsible for compliance could void the user’s authority
to operate the equipment.
NOTE: This equipment has been tested and found to comply with the
limits for Class B digital device, pursuant to Part 15 of the FCC Rules.
These limits are designed to provide reasonable protection against
harmful interference in a residential installation. This equipment
generates, uses and can radiate radio frequency energy and, if not
installed and used in accordance with the instructions, may cause
harmful interference to radio communications.
However, there is no guarantee that interference will not occur in a
particular installation. If this equipment does cause harmful interference
to radio or television reception, which can be determined by turning
the equipment off and on, the user is encouraged to try to correct the
interference by one or more of the following measures:
Page 83

83
Polaroid izone30 0™ Digital Ca mera User Gu ide
www.polaroid.com
• Reorient or relocate the receiving antenna.
• Increase the separation between the equipment and receiver.
• Connect the equipment into an outlet on a circuit different from that
to which the receiver is needed.
• Consult the dealer or an experienced radio/TV technician for help.
Shielded cable must be used with this unit to ensure compliance with
the Class B FCC limits.
Under the environment with electrostatic discharge, the product may
malfunction and require user to reset the product.
Page 84

US 1105
Part No.: OM3392US008
 Loading...