

Page 1

A Guide to Using Polaroid
Instant Pack Films
For people who want fast results
Tips, techniques and inside information designed to help you get
consistently good results with Polaroid instant pack films
Instant Pack Films
What’s inside
w Polaroid Pack films —
The Inside Story
w Formats & Applications
w The 3 critical keys to
quality images
w Avoiding common
mistakes
w Storing and handling
Polaroid films
w If it’s hotter or colder
than 75
o
F (24oC)...
w Tab pulling: How fast?
...and how to get it
straight!
w Making sure your prints &
images last a long time
w Picture problems and
problem prevention
w Toll-free help and
technical assistance
Page 2
Please keep this booklet
near your camera system.
The information in this
booklet is designed to help
experienced and occasional
users of Polaroid pack films
get good pictures...solve
some common picture-taking
errors...perform a few
simple, routine, preventive
maintenance checks...
and get expert assistance
when needed.
This booklet covers in
quick reference form
much of the material contained in the instructions
originally packed with
your Polaroid equipment.
Please consult those instructions when first learning
to use the camera system.
Users also should regularly
review the film tip sheet
packed with Polaroid films,
since ongoing improvements may change technical
characteristics, especially
time and temperature processing guidelines.
A similar booklet is available
to users of Polaroid Model
545 film holders and 4x5 sheet
films. To obtain a copy, call
Polaroid Technical Assistance at
the toll-free number given on
page 2.
Polaroid instant pack films —
The inside story
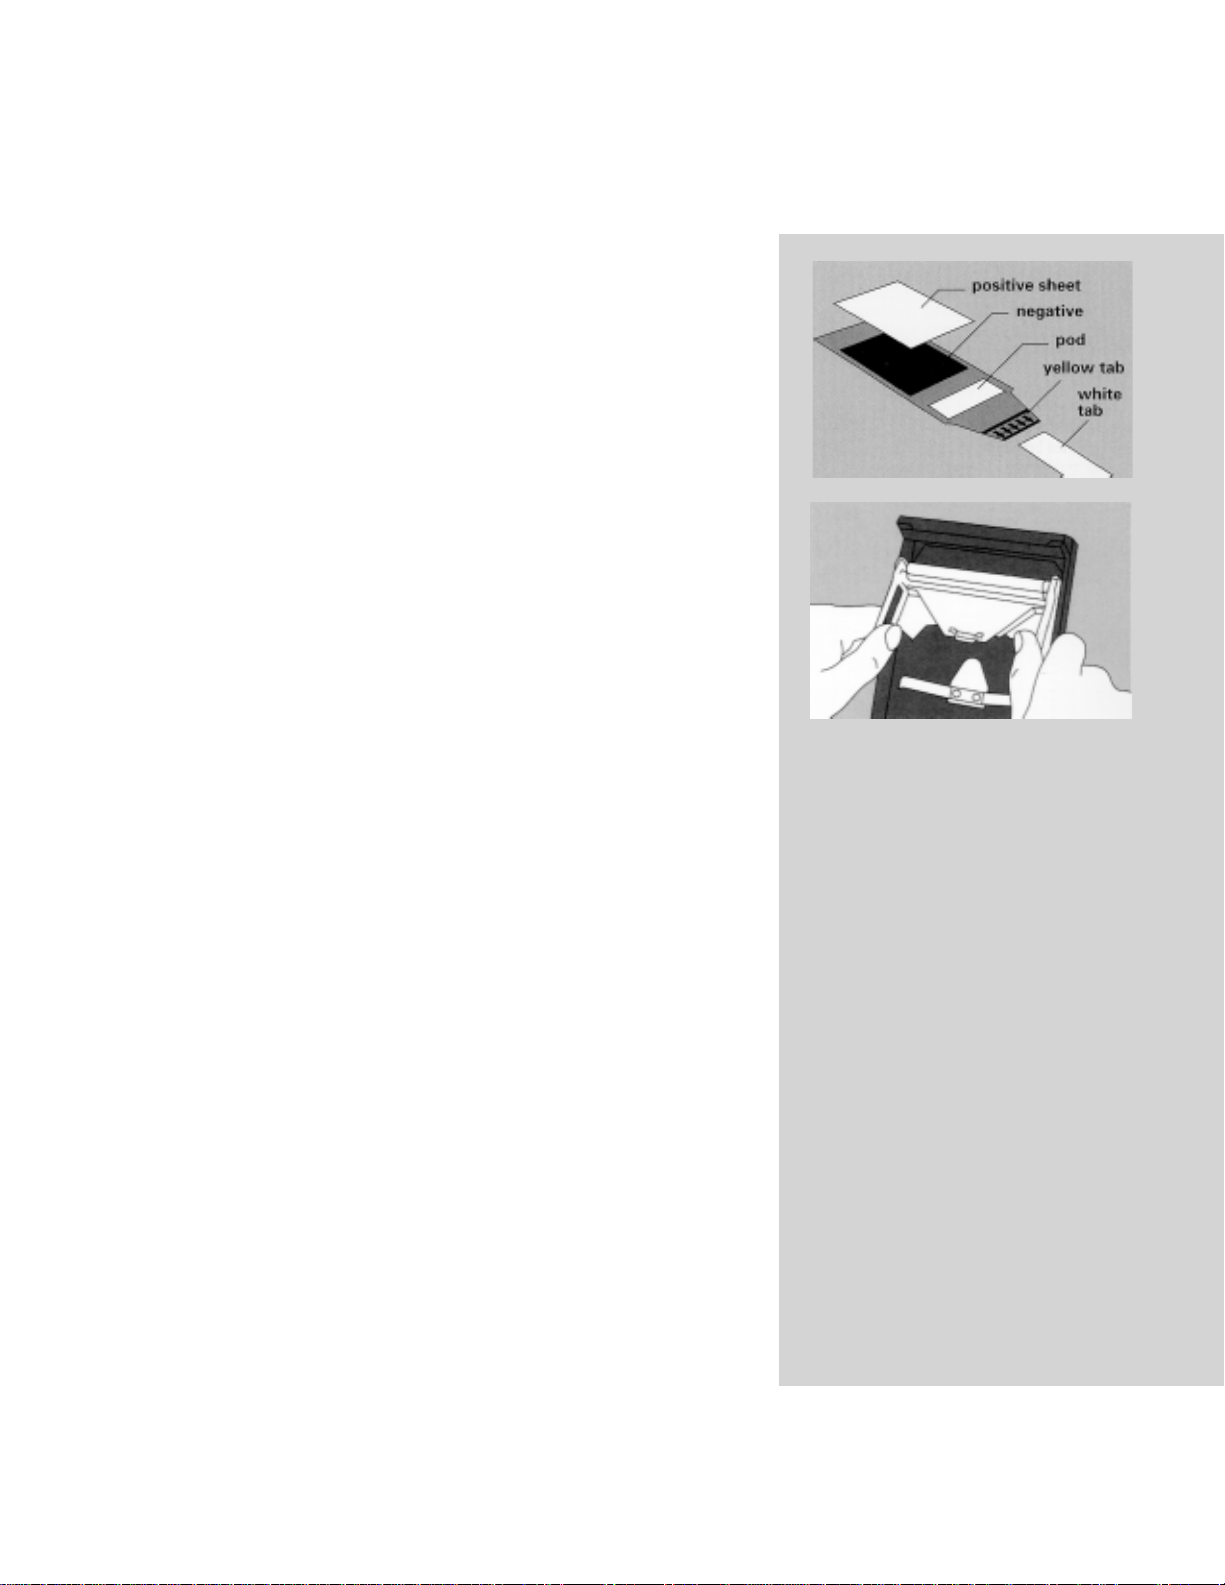
Each pack of Polaroid
instant film contains all the
elements needed to produce
instant pictures. Inside, for
each picture, there is a film
assembly consisting of a lightsensitive negative, a positive
sheet, a pod containing
the developer, and tabs, which
are pulled to activate the
developing process.
The rollers inside the camera
or film holder are used
to break the pod and spread
the developer between the
exposed negative and positive
sheet. Clean rollers are
important in achieving a
smooth, consistent spread;
they should be inspected
and cleaned regularly to
assure high quality results.
(See page 3.)
1
Page 3
After an exposure is made,
pulling the white tab
all the way out moves the
exposed negative from
the focal plane behind the
lens to a position facing
the positive sheet.
Simultaneously, the larger
tab of the film assembly
is positioned between the
rollers, and sticks out
of the camera or film holder
where it can be grasped.
Film Data Sheets &
Technical Assistance
For further information
about Polaroid pack films,
or for information about
other Polaroid films,
products, and applications,
call toll free from within
the U.S.A. at 800-225-1618,
Monday through Friday,
8 a.m. to 8 p.m., Eastern
time. Or, write to:
Technical Assistance
Polaroid Corporation
201 Burlington Rd.
Bedford, MA 01730
For assistance outside the
U.S.A., consult your nearest
Polaroid office.
Film Data Sheets covering
most Polaroid films used for
business, technical, medical
and professional applications
are available at no charge on
the Web at www.polaroid.com.
Pulling the large tab drags
the film assembly negative,
pod, and positive sheet
through the rollers. The pod
bursts open and the developer
is spread between the
positive and negative. It is
important to pull the
tabs straight and at a steady,
moderate speed to ensure the
developer is spread evenly.
(See page 3.)
Development begins immediately, outside the camera or
film holder. After the proper
development time, the finished picture is peeled away
from the negative. (See page
7 for important tips about
handling developing pictures.)
2
Page 4

Formats & Applications
The 3 critical keys to quality images
There are three Polaroid
Pack Film formats:
3 1/4 x 4 1/
Image area: 2
(7.3 x 9.5cm)
10 pictures per pack
These films are used in many
different Polaroid handheld
cameras, such as ProPack
and 600SE. They are also
used with Polaroid
Miniportrait cameras for
making instant passport and
other document photos; the
Polaroid MP 4, CU-5 and
DS-34 Photographic
Systems; the Polaroid
Palette System; and Polaroid
ID Systems. They also are
used in cameras and instruments manufactured
or modified by OEMs to
accept the Polaroid Model
405 film holder or other
3
1/4 x 4
1/4 camera backs.
3 1/4 x 4 1/
4
7/8 x 3
3/4 in.
4
4 x 5
Image area: 3
(8.9 x 11.7 cm)
10 pictures per pack
These films are used in
cameras and instruments that
accept the Polaroid Model
550 film holder, including
most professional view
cameras, scanning electron
microscopes, the Polaroid
MP 4 and CU-5 Photographic Systems, and
Polaroid Miniportrait
cameras, and many other
OEM systems.
Square-format
(3
1/4 x 3
Image area: 2
(7 x 7.3 cm)
10 pictures per pack
These films are used in
Polaroid square format pack
film cameras and OEM
photographic systems
designed to accept a squareformat camera back.
3/8 in.)
1/2 x 4
3/4 x 2
5/8 in.
7/8 in.
1
Keep the processing
rollers in the camera or
film holder clean.
Inspect and clean the roller
surfaces regularly. It is
recommended that you check
the rollers each time you load
a pack of film, and before
one
each picture-taking session.
Cleaning the rollers is easy.
Use a soft, non-abrasive
cloth, moistened with water
if necessary.
Dry the rollers thoroughly
before use. Do not use
alcohol or other cleaning fluids, and never scrape the
rollers with a hard object or
with your fingernails.
Also clean the tab slot on
the camera or film holder.
Use a damp cloth or cotton
swab to clean the area.
Your instruction book
contains details on locating
and cleaning the rollers in
your Polaroid equipment.
If you need further information, please call us toll-free
at 800-225-1618.
2
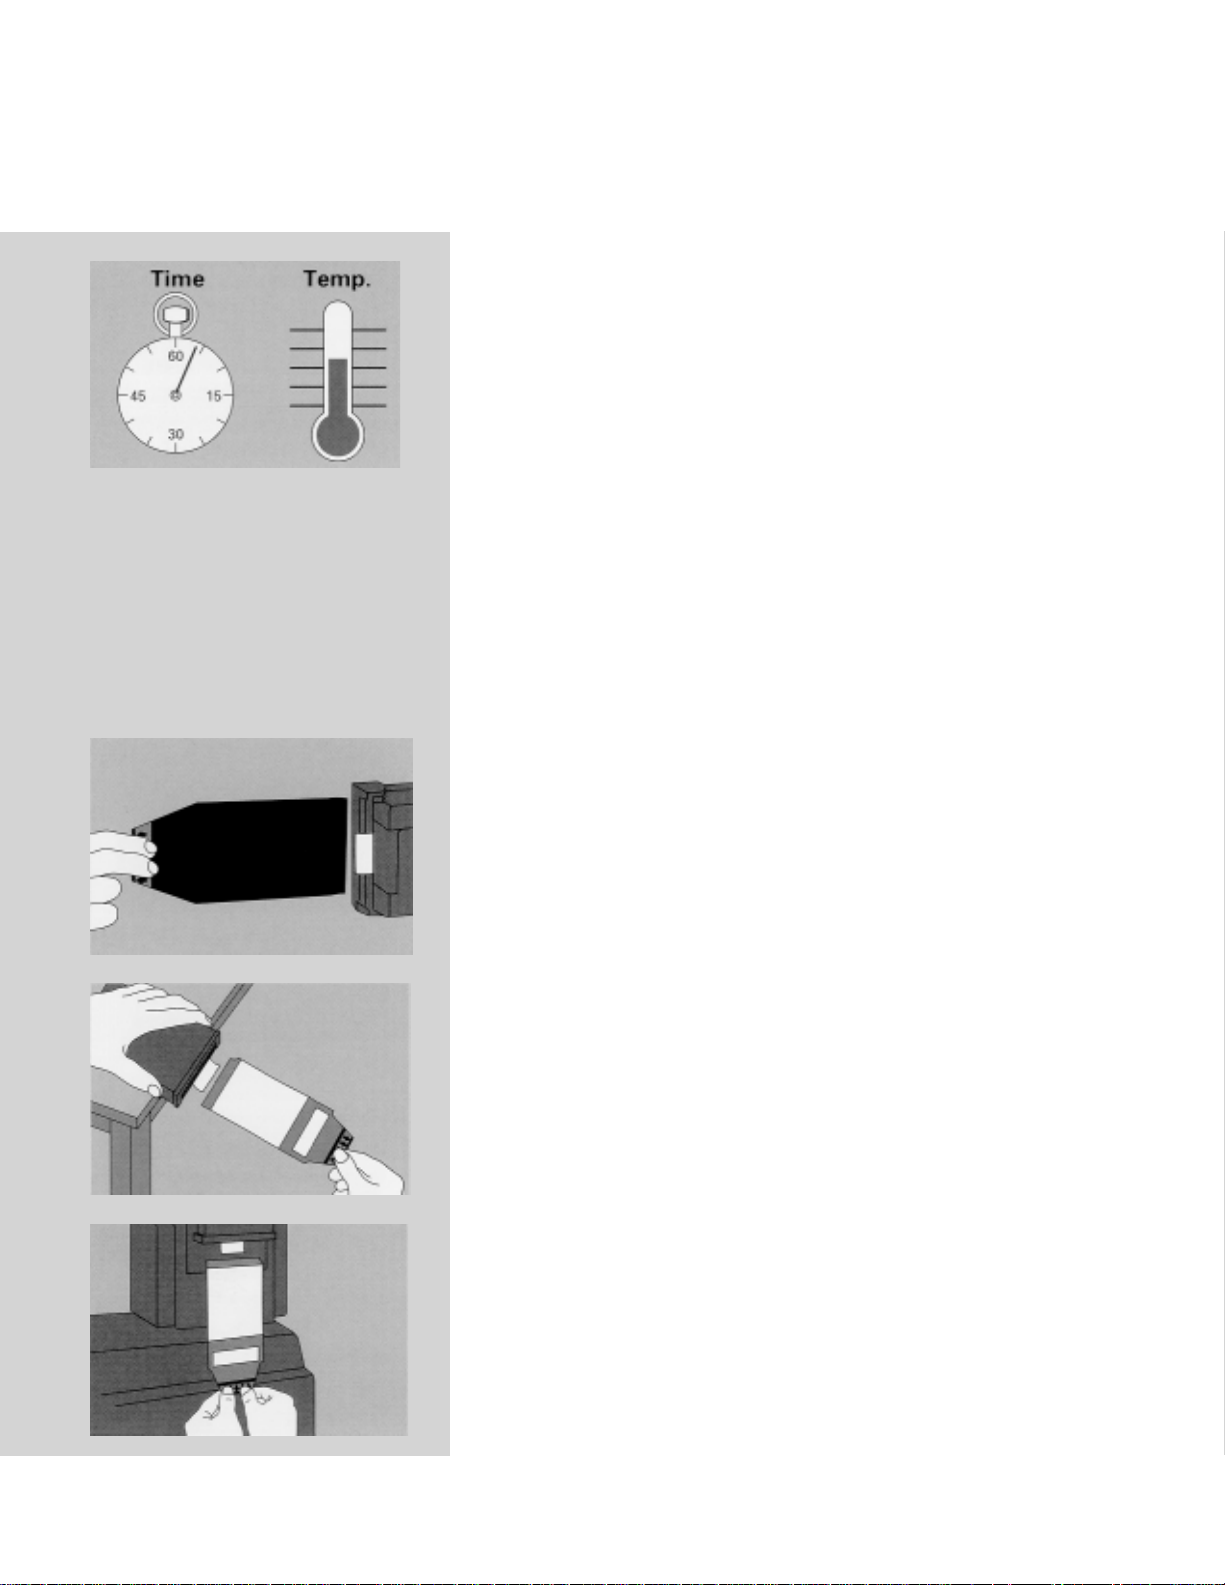
Note the temperature...
and time development
accurately.
You can take Polaroid
pictures at any temperature.
But, processing time and
the temperature of the film
at the time of processing
affect picture quality. Ideally,
Polaroid films should be
processed at about 70-75
two
o
C). If the temperature
(21-24
is much higher or lower,
you may need to adjust processing times and/or exposure
settings for best results.
Make it a habit to check the
tip sheet packed with
Polaroid films for the latest
time/temperature processing
information.
3
Pull the film tabs straight
Always pull both film tabs
straight out of the camera
or film holder. Since the
film should be pulled parallel
to the camera back, avoid
camera positions that make
tab pulling awkward. If
you are using a removable
film holder, insert the
dark slide, then remove the
holder and place it on a
flat surface for tab pulling,
whenever possible.
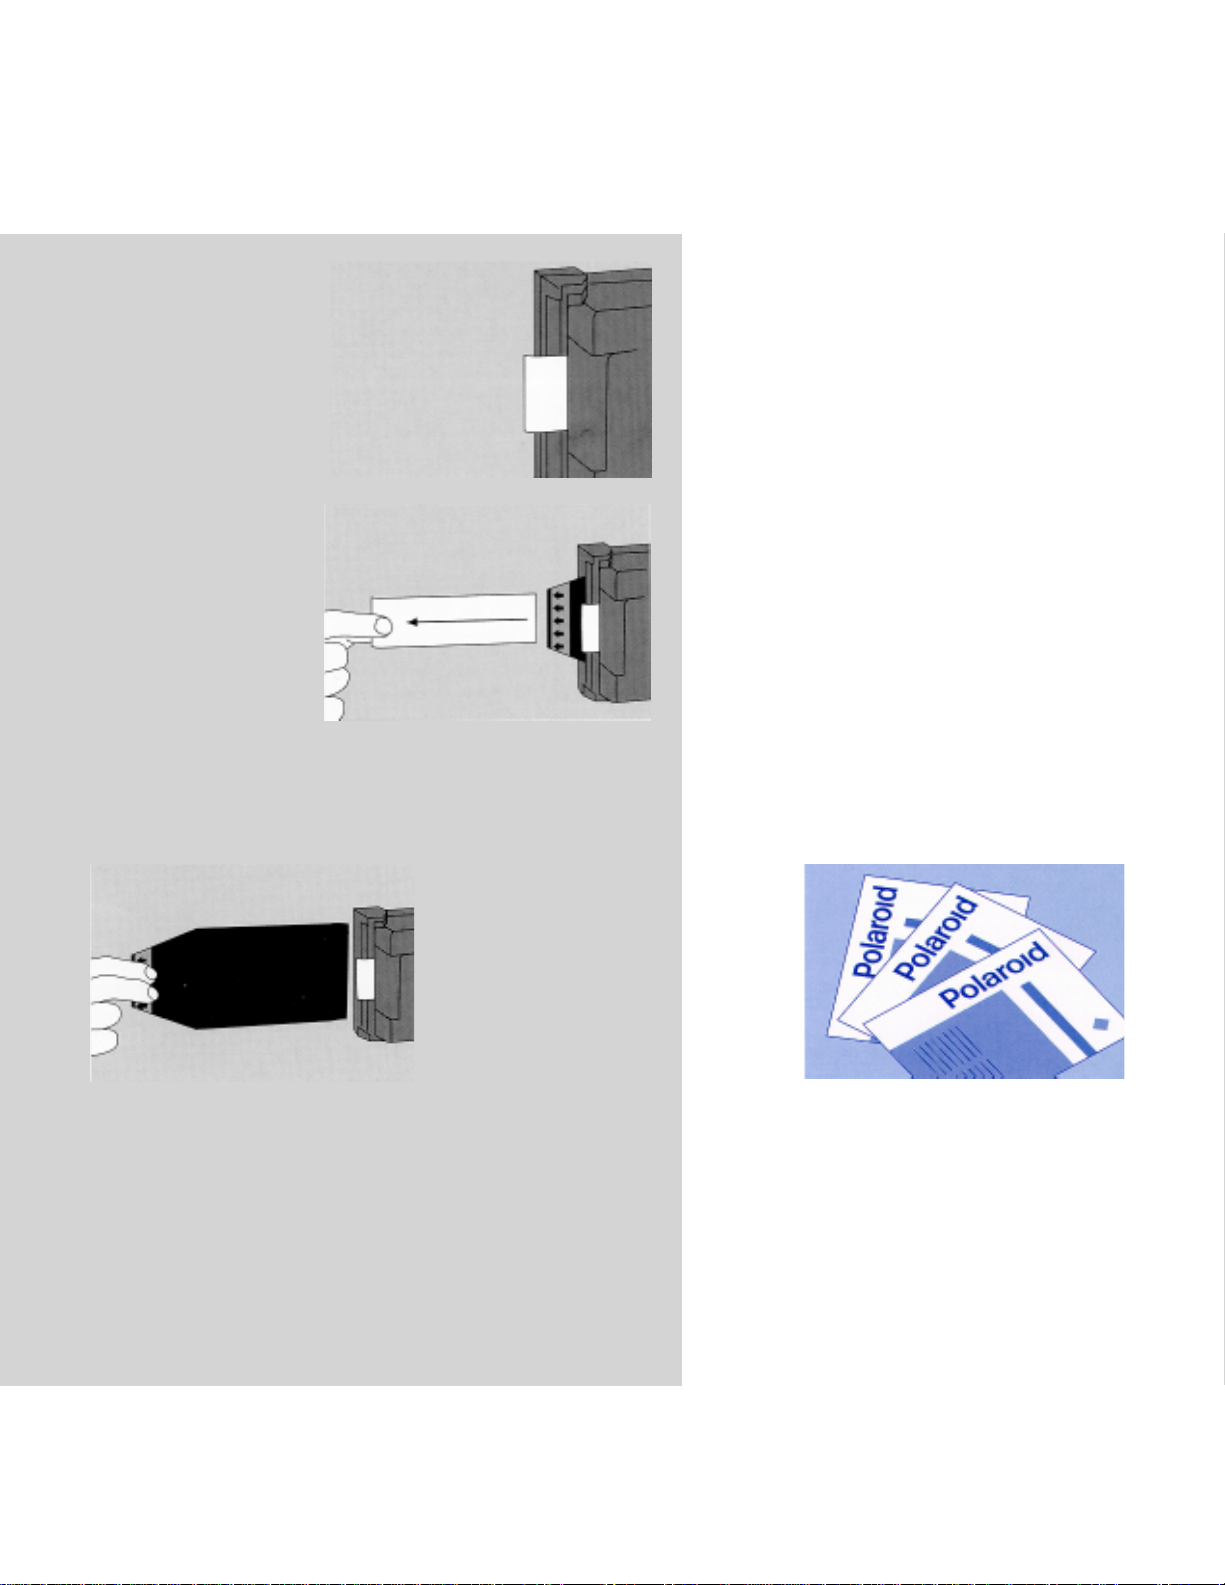
Pull at a steady, moderate
speed. Saying the word
Polaroid is a good way to
time the speed of the pull.
three
o
F
4 x 5
Square-format
3
Page 5
Avoiding common mistakes
Heres a brief list of
reminders to help you avoid
frustrating moments
and unsatisfactory results.
w Dont pull the black safety
cover out of a film pack
before loading the pack into
the camera or film holder.
If you do, at least one exposure will be lost.
But if you do...
...load the film anyway and
pull the film tabs for the first
picture. It will be a totally
white image, but the rest of
the pack should be fine.
w If you are using a removable
film holder, remember
to pull the holders dark side
before making an exposure...
...and push it back after
making the exposure before
removing the holder
for off-camera processing.
w If your camera has a
lens cap, dont forget to
remove it!
w If your system has an
electronic shutter powered
by batteries, be sure the
batteries are fresh and
installed correctly. Dead
batteries mean the shutter
wont work, no exposure
will be made, and youll
end up with a totally black
picture (see page 10).
w Check the camera exposure
settings.
If you set the camera for color
film (ISO 80/20
using high speed black and
white film (ISO3000/36
your pictures will be overexposed (too light).
If you set the camera for high
speed black and white film
(ISO3000/36
color film (ISO 80/20
pictures will be underexposed
(too dark).
w Pull the film tabs straight
and in the proper sequence.
Pull the white tab after
making the exposure, then
the other tab. Never pull
a white tab before taking
the picture.
w If you pull a white tab and
no other tab appears, dont
pull another white tab.
(See page 9.)
w Never wave developing
film back and forth in an
attempt to keep it warm
or cool; this could adversely
affect image quality.
Be careful not to bend or
squeeze developing film.
Questions? Problems?
Call us, toll-free:
800-225-1618
Many common picturetaking problems are
discussed on pages 8 - 10.
But...if you can’t find a
solution to a problem you
are experiencing, or if you
have a question, or need
information, please call us.
Chances are we can help.
o
), but are
o
o
), but are using
o
), your
),
The call is toll-free, and we
can be reached Monday
through Friday, 8 a.m. to
8 p.m., Eastern time.
4
800-225-1618
Page 6

Storing and handling Polaroid films
If it’s hotter or colder
than 70-75oF (21-24oC)...
Note the film
expiration date
Always use Polaroid film
before the expiration
date stamped on the package.
Outdated film may not
produce satisfactory results,
and it is not covered by
the Polaroid film warranty.
Storage recommendations & cautions
w Store Polaroid film in a
cool, dry place. Unopened
film may be refrigerated in
its sealed wrapper. Do not
freeze film.
w Before opening film that
has been refrigerated,
allow it to reach room temperature. This will take
about 2 hours.
w Avoid leaving film or
a loaded camera in direct
sunlight, or in a hot, humid
place, such as the trunk
or glove compartment of a
car. High temperatures
and humidity can affect
picture quality.
Read the “Caution” notice
w Please note the Caution
Notice printed on
Polaroid film packages.
Heres what it says:
This process uses a caustic
paste. Avoid contact with
skin, eyes and mouth and
keep away from children and
animals. If you get some paste
on your skin, wipe it off
immediately and wash with
water to avoid an alkali burn.
If eye or mouth contact
occurs, quickly wash the area
with plenty of water and see a
doctor. Keep discarded materials away from children, animals, clothing and furniture.
w Please dispose of used nega-
tives and packaging properly.
When loading film...
w Handle film packs by their
edges to avoid damaging
film surfaces or the pod of
developer inside.
w Keep the film in its wrapper
until you are ready to use it.
Tear open the film wrapper
along the printed arrow.
w Place the film pack in the
camera or film holder
so it fits into place. Check to
be sure that the white
tabs are not tucked under
the pack.
w After securely closing the
back of the camera, or after
attaching the film holder
securely to the camera with
the film holder dark slide
closed, pull the black tab of
the safety cover all the
way out, as shown. Now you
are ready to take pictures.
You can take Polaroid
pictures at any temperature,
but when processing Polaroid
films, you should be aware
of the temperature since it can
affect picture quality.
The developer in each
sheet of film is designed to
work best at about 70-75
o
C). By minimizing
(21-24
tem-perature variations when
processing pictures you will
get more consistent results.
At temperatures higher or
lower than 70-75
o
F, it may be
necessary to adjust processing
times and/or exposure
settings to achieve optimum
results.
w At low temperatures, keep
the film warm, under your
coat or in a heated car or
room. Place developing film
in a warm place, such as
a heated car or under your
coat, being careful not
to bend or crush it. Or, wait
until you are in a warm
place before developing
each picture. (Allow film
exposed to cold to
warm up to room temperature before processing.)
w At high temperatures,
keep your film in the shade,
or in an air-conditioned
car or room, or in a picnic
cooler, before exposure.
Wait until you have reached
a cool place before developing each picture.
w Never wave developing
film back and forth in an
attempt to keep it warm
or cool; this could adversely
affect image quality.
o
F
5
Page 7

Normal development
Tab pulling: How fast?...and how to get it straight!
To assure consistently
well-processed images:
Always pull the film straight
out of the camera or film
holder. The film should be
pulled parallel to the camera
back or holder. Pulling at
an angle can cause missing
corners and/or marks
and streaks on pictures.
(See page 8.)
If you are using a removable
film holder, and the camera
is positioned so that it is
difficult to reach the tabs
comfortably, or if tab pulling
would disturb the camera
set-up, remove the film
holder, if possible, for tab
pulling. (Dont forget to
reinsert the dark slide first!)
Underdeveloped
The speed at which you
pull is very important.
Pull at a steady, moderate
speed. Saying the word
Polaroid is a good way to
time the speed of the pull.
Pulling too rapidly can cause
white specks in images
and/or angle pull. Pulling
too slowly, or stopping or
hesitating, can cause streaks
on pictures. (See page 8.)
Overdeveloped
6
Page 8

Making sure your prints and images last a long time
w Always use your film before
the expiration date stamped
on the package.
w Avoid leaving a partially-
used film pack in the camera
or film holder for a long
period of time.
w Process exposed film
promptly. Be aware that
development time
and the temperature of
the film affect picture
quality. Ideally, Polaroid
films should be developed
at about 70-75
o
F (21-24oC).
w Handle developing pictures
with care. Hold them
only at the tab end or lay
them flat on a table.
Never wave or bend the film
while it is developing,
and never touch the image
area, otherwise image
quality may be affected.
w At the end of the specified
development time, peel
the negative away from the
print, as shown. Do this
rapidly and smoothly
to avoid causing streaks on
the image area.
w Allow color pictures to
dry thoroughly before
stacking them or touching
the image area.
w Black & white pictures
that require coating should be
print-coated immediately to
protect them from scratching
and fading. Use six to
eight overlapping strokes to
fully coat each image.
w When using Polaroid
Type 665 Positive/Negative
film, prepare an 18%
sodium sulfite clearing bath
before exposing the film.
See the instructions packed
with the film for mixing
information. Treat Type
665 negatives immediately
after development.
w Avoid writing directly on
prints. If necessary, write only
in the border area, using a
soft pencil, china marker, or
a felt-tip pen designed for use
with photographic materials.
w To preserve prints, protect
them from exposure to
direct sunlight, high heat and
humidity, chemicals and
chemical vapors, and rough
or excessive handling.
w Dont store prints face to
face or with conventionallyprocessed prints.
w For long term storage, use
seamless envelopes or sleeves
made of acid-free paper,
cellulose acetate, polyethylene
or polyester. Avoid using
glassine envelopes, PVC
plastic, ordinary black album
paper, brown Kraft paper
and cardboard.
Please read the Polaroid
film “Caution Notice”
Please note the Caution
Notice printed on Polaroid
film packages. (See page 5.)
Preservation
7
Page 9

Picture problems &
problem prevention
Problem: White specks
Pictures with small white
specks in the image area are
often caused by pulling the
film out of the camera or
film holder too rapidly.
Pulling too fast may also
cause a mottled appearance
in color photographs.
Always pull both film tabs
at a moderate speed. Saying
the word Polaroid is a
good way to time the speed
of pulling.
Problem: Missing corner
Pictures with missing
corners, and/or streaks and
marks, are usually the
result of pulling the film
crookedly, at an angle, from
the camera or film holder.
Always pull both film tabs
straight out of the camera.
Pull at a moderate speed.
Saying the word Polaroid
is a good way to time the
speed of pulling.
Since it is important to
pull the tabs parallel to the
camera back, users of
imaging systems with
removable film holders may
find it convenient to
remove the holder and place
it flat on a table for film
processing.
Problem: Rectangular
area in print
A picture that looks like this
is caused by NOT pulling
the white tab all the way out
of the camera. The long,
rectangular area is an impression made by the white tab
on the developing picture.
Always pull the white
tab straight and all the way
out of the camera or
film holder before pulling
the other film tab.
Prevention
8
Page 10

Problem: Film jam
If the film jammed inside
the camera or film holder,
and you were unable to
get any pictures, dirt on the
processing rollers and/or tab
slot may have blocked the
film tabs from coming out.
For example, if you pull
a white tab and no other tab
appears, then pull another
white tab, the problem will
only get worse, and more film
will jam. If you try another
pack of film, the same problem may occur, if you have
not cleaned the rollers inside
the camera or film holder.
Inspect and clean the roller
surfaces regularly. It is
recommended that you check
the rollers each time you
load a pack of film.
Here’s how to avoid losing an
entire pack of film if you pull a
white tab and another tab fails
to appear:
1
Do not pull another white tab.
2
Carefully open the back of
the camera or film holder just
enough so that you can
place a finger on the edge of
the film pack inside. Hold
the pack in position and open
the back all the way.
(You can open the camera or
film holder without spoiling
additional film, provided
you do so away from bright
light, and do not move the
film pack.)
3
Gently remove any crumpled
film tabs and discard them.
4
Inspect and clean the rollers
thoroughly. Clean the tab
slot, too.
5
Unfold the top white tab so
it sticks out, as shown. Close
the camera back securely.
Resume picture taking.
Problem: Evenly spaced
marks on picture
Pictures with evenly spaced
spots or streaks are usually
caused by dirty rollers inside
the camera back or film
holder. Typically, the pattern
is repeated across the picture
surface because dirt or other
particles are stuck to one
or both rollers. The rollers
should be cleaned regularly
to prevent this problem.
Important notice for high
volume film users
If your camera or film
holder is several years old,
it may be advisable to
replace the rollers. Polaroid
recommends that the rollers
be cleaned every 3-5 packs of
film. If the user experiences
non-uniform coverage,
separation of positive or
negative, contact Polaroid
Technical Assistance.
9
Page 11

Problem: Black picture
(no picture)
A picture that is totally
black usually indicates that
no exposure was made
no light reached the film.
There are several possible
causes:
Equipment problem
w The camera shutter may
not be working. If the camera
is powered by batteries,
dead batteries may prevent
the shutter from opening.
Check that the batteries are
fresh. Batteries should be
changed at least once a year.
w The flash may have failed to
fire, resulting in a severely
underexposed picture (which
may appear all black). Check
your flash unit batteries;
allow sufficient recycle time
between flash exposures.
Operator mistake
w With some photographic
systems occasional, common,
oversights will result in a
black picture:
w Not removing the dark
slide or the lens cap during
the exposure.
w Wrong exposure setting:
lens aperture too small; shutter speed too fast; incorrect
flash exposure guide number;
incorrect film speed setting
(for example, using ISO
o
color film in a camera
80/20
system set for ISO 3000/36
black & white film).
Problem: White picture
(fogged)
A picture that is totally white
usually indicates that the film
was severely overexposed,
or light-struck or fogged
exposed to light outside of the
camera or film holder.
There are several possible
causes:
Handling errors
w Removing the black safety
cover before loading the film
into the camera or film
holder. Doing this exposes
the first pictures negative to
light (fogging it), and
the first picture processed
will be white. (Subsequent
pictures should be fine.)
w Reloading a partially-used
film pack. If the film pack
has been exposed to light, the
first picture processed will be
white.
w Removing the dark slide of
the film holder while it is off
the camera system. Doing this
exposes a negative to light.
Reinsert the dark slide, then
process the picture (which will
be white). Subsequent pictures
should be fine.
Operator mistake
An occasional, common,
oversight may result in white
pictures. For example, a
wrong exposure setting: lens
aperture too large; shutter
speed too slow; incorrect
o
flash exposure guide number;
incorrect film speed setting
(using ISO 3000/36
white film in a camera system
set for ISO 80/20
o
black &
o
color film).
Problem: Overexposed
pictures (too light)
Pictures with faint, washed
out images usually indicate
that the film was overexposed
too much light reached
the negative.
There are several possible
causes:
Wrong exposure setting
w Lens aperture too large;
shutter speed too slow; incorrect flash exposure guide
number; incorrect film speed
setting (for example, using
ISO 3000/36
film in a camera system
set for ISO 80/20
o
black & white
o
color
film).
w A background that is much
darker than the main subject
may cause inaccurate
exposure readings, and the
main subject to be overexposed, or too light. Exposure
settings must be adjusted to
compensate for this. See
your camera system
instruction.
w If the background is
too light or washed out,
exposure settings must
be adjusted to compensate
for this, or background
lighting may have to be
adjusted, if possible.
Equipment problem
w The camera shutter may not
be working properly.
w The camera system has
developed a light leak, or
the film holder was
not mounted correctly.
Underexposed pictures
(too dark)
Pictures that are too dark
overall, or in which the
main subject appears as a
silhouette with little or
no detail, usually indicate
that the film was underexposed too little light
reached the negative.
There are several possible
causes:
Wrong exposure setting
w Lens aperture too small;
shutter speed too fast; incorrect flash exposure guide
number; incorrect film speed
setting (for example, camera
system set for ISO 3000/36
black & white film when using
ISO 80/20
o
color film).
w A background that is much
lighter or brighter
than the main subject may
cause inaccurate exposure
readings, and the main
subject to be underexposed,
or too dark. Exposure
settings must be adjusted to
compensate for this. See your
camera system instructions.
w If the background is too
dark, exposure settings must
be adjusted to compensate
for this, or additional
background lighting may
be required.
Equipment problem
w The camera shutter may not
be working properly.
o
Equipment problem
w The camera shutter may not
be working properly.
w The camera system has
developed a light leak, or the
film holder was not mounted
correctly.
10
Page 12

How to get consistently good results with
Polaroid instant pack films
3 things you need
to know...
About storing film...
w Use film before expiration
date on package
w Do not freeze Polaroid
film. Store film in cool, dry
place. Keep film in sealed
wrapper until use.
Allow refrigerated film
to reach room temperature
before opening (about
2 hours).
Keep film and camera out
of direct sunlight and hot,
humid places.
1
Keep processing rollers
clean.
Clean rollers regularly —
before loading film...
before each picture-taking
session.
Use soft, non-abrasive
cloth, moistened with
water. Also, clean tab slot
on camera or film holder.
When loading film...
w Handle film packs by
edges only. T ear open film
wrapper along printed
arrow.
w After loading, check that
white tabs are not tucked
under pack.
w After closing camera back,
or attaching film holder to
camera, pull safety cover
all the way out.
2
Note temperature.
Time accurately.
T ake Polaroid pictures at
any temperature. But...
temperature of film at time
of processing affects
picture quality . Polaroid
films should be processed
at about 70-75
o
C). See the Film Data
24
Sheets on the Web at
www.polaroid.com for
latest time/temperature
processing information.
Before taking pictures...
w Check camera exposure
settings.
Set camera for correct film
speed or film type. (See
Film Data Sheets at
www.polaroid.com Customer Service for details.)
After taking each picture...
1
Pull white tab.
2
Pull other tab. Pull both
tabs straight, at moderate
speed.
w If no other tab appears
when you pull white
tab, don’t pull another
white tab. (See next page.)
w Hold developing film by
tab or lay it down. Never
wave film pack back
and forth. Do not bend
or squeeze.
o
F (21-
3
Pull film tabs straight, at
moderate speed.
Pull both film tabs straight
out of camera or film holder.
Avoid camera positions
that make tab pulling
awkward. Place removable
film holder on flat surface
for tab pulling if possible.
Always pull at steady,
moderate speed.
3
Time development
accurately according to
information in Film Data
Sheets. T emperature of film
affects picture quality .
4
After specified development time, peel negative
away from print, as
shown. Peel rapidly and
smoothly .
Quick Tips
Page 13

After developing
pictures...
w Let color pictures dry
thoroughly before stacking or touching.
w Black & white pictures
requiring coating
should be print-coated
immediately .
w When using Polaroid type
665 Positive/Negative film,
prepare 18% sodium
sulfite cleaning bath before
exposing film. (See film
tip sheet.)
Picture problems &
problem prevention
“Missing” corner, and/or
streaks and marks,
indicates film tabs were
pulled crookedly, at angle,
from camera or film
holder. Always pull both
film tabs straight.
Evenly spaced spots or
streaks indicate rollers
inside camera back or film
holder are dirty. Clean
rollers regularly .
Quick Tips
Small white specks are
often caused by pulling
film out of camera
or film holder too rapidly .
Always pull both film
tabs at moderate speed.
Other problems &
remedies
Film jam
After pulling white tab,
no other tab appears. DO
NOT pull another white
tab (otherwise more film
will jam inside camera
or film holder.)
Polaroid
Here’s what to do:
1
Open back of camera
or film holder and place
finger on edge of film
pack inside to hold it in
position. Open back all
the way.
2
Gently remove crumpled
film tab(s) and discard.
3
Clean rollers thoroughly.
Clean tab slot, too.
4
Unfold top white tab so
it sticks out. Close camera
back. Resume picture
taking.
Black picture
Black picture indicates no
exposure was made — no
light reached film.
Possible causes:
w Camera shutter not work-
ing; flash failed to fire.
(Check for dead batteries.)
w Wrong exposure setting.
White picture
White picture indicates
film was severely overexposed, or light-struck
or “fogged” — exposed
to light outside of camera
or film holder.
Possible causes:
w Black safety cover
removed before loading
film.
w Partially-used film pack
removed from camera or
film holder.
w Film holder dark slide
removed while holder was
off camera, or before
securely mounting holder.
w Wrong exposure setting.
w Camera light leak.
Toll-free Technical
Assistance
For help or information,
call Polaroid T echnical
Assistance toll free from
within U.S.A.:
800-225-1618
Monday through
Friday, 8 a.m. to 8 p.m.,
Eastern time.
800-225-1618
Page 14

Toll-free help and technical
assistance
Information about — and
assistance with using — Polaroid
products is available to all
Polaroid customers. And it’s as
close as your telephone.
Call us toll-free: 800-225-1618.
Monday through Friday,
8 a.m. to 8 p.m., Eastern time
We recommend that you call us
if you encounter any difficulties
with film or your photographic
system. You may also contact
Polaroid through the Web at
www.polaroid.com.
PP1389 1B5564
“Polaroid” and “Polacolor” ®
Printed in U.S.A. 2/92
 Loading...