

Page 1
Impulse Series Camera
User Guide
Page 2

Impulse Series Camera User Guide
IMPORTANT SAFEGUARDS
Note: This product is listed by Underwriters Laboratories, Inc. (UL).
As a condition of listing, UL requires that basic safety information
be provided.
As with any battery-operated equipment, observe these basic safety precautions:
1. Follow all of these instructions.
2. Do not use the electronic flash if it has been damaged, until it has been examined at
an authorized Polaroid Service Center.
3. Do not disassemble the electronic flash. To reduce the risk of an electronic shock,
service or repair work must be done only by an authorized Polaroid Service Center .
Incorrect reassembly can cause electrical shock when the electronic flash is used
again.
4. Do not immerse the electronic flash in water or other fluids.
PLEASE KEEP THESE INSTRUCTIONS
Please read this book cover to cover
We recommend that you take the time to read through this entire book so you are
completely familiar with your camera system. It is especially important to know how
to handle Polaroid film and pictures to ensure high quality results.
2
Page 3

Impulse Series Camera User Guide
Table of Contents
Important Safeguards .............................................................................. 2
The camera ....................................................................................... 4
Impulse .............................................................................................. 4
Impulse AF......................................................................................... 4
T o take a picture...................................................................................... 5
Load the film ...................................................................................... 5
Raise the electronic flash to activate the camera ................................ 5
Position your subject .......................................................................... 5
T ake a picture .................................................................................... 6
Other features.......................................................................................... 6
The lighten/darken control .................................................................. 6
The self-timer (Impulse AF Only) ...................................................... 6
Sonar focusing (Impulse AF Only).................................................... 7
Camera care ..................................................................................... 7
Film care............................................................................................ 7
Lens care........................................................................................... 7
Picture care ....................................................................................... 7
T o take better pictures ............................................................................. 8
Camera accessories............................................................................... 8
Camera bag ...................................................................................... 8
Photofile 20 ....................................................................................... 8
Troubleshooting....................................................................................... 9
Possible picture problems and their solutions..................................... 9
Warranty.................................................................................................. 1 1
3
Page 4
Impulse Series Camera User Guide
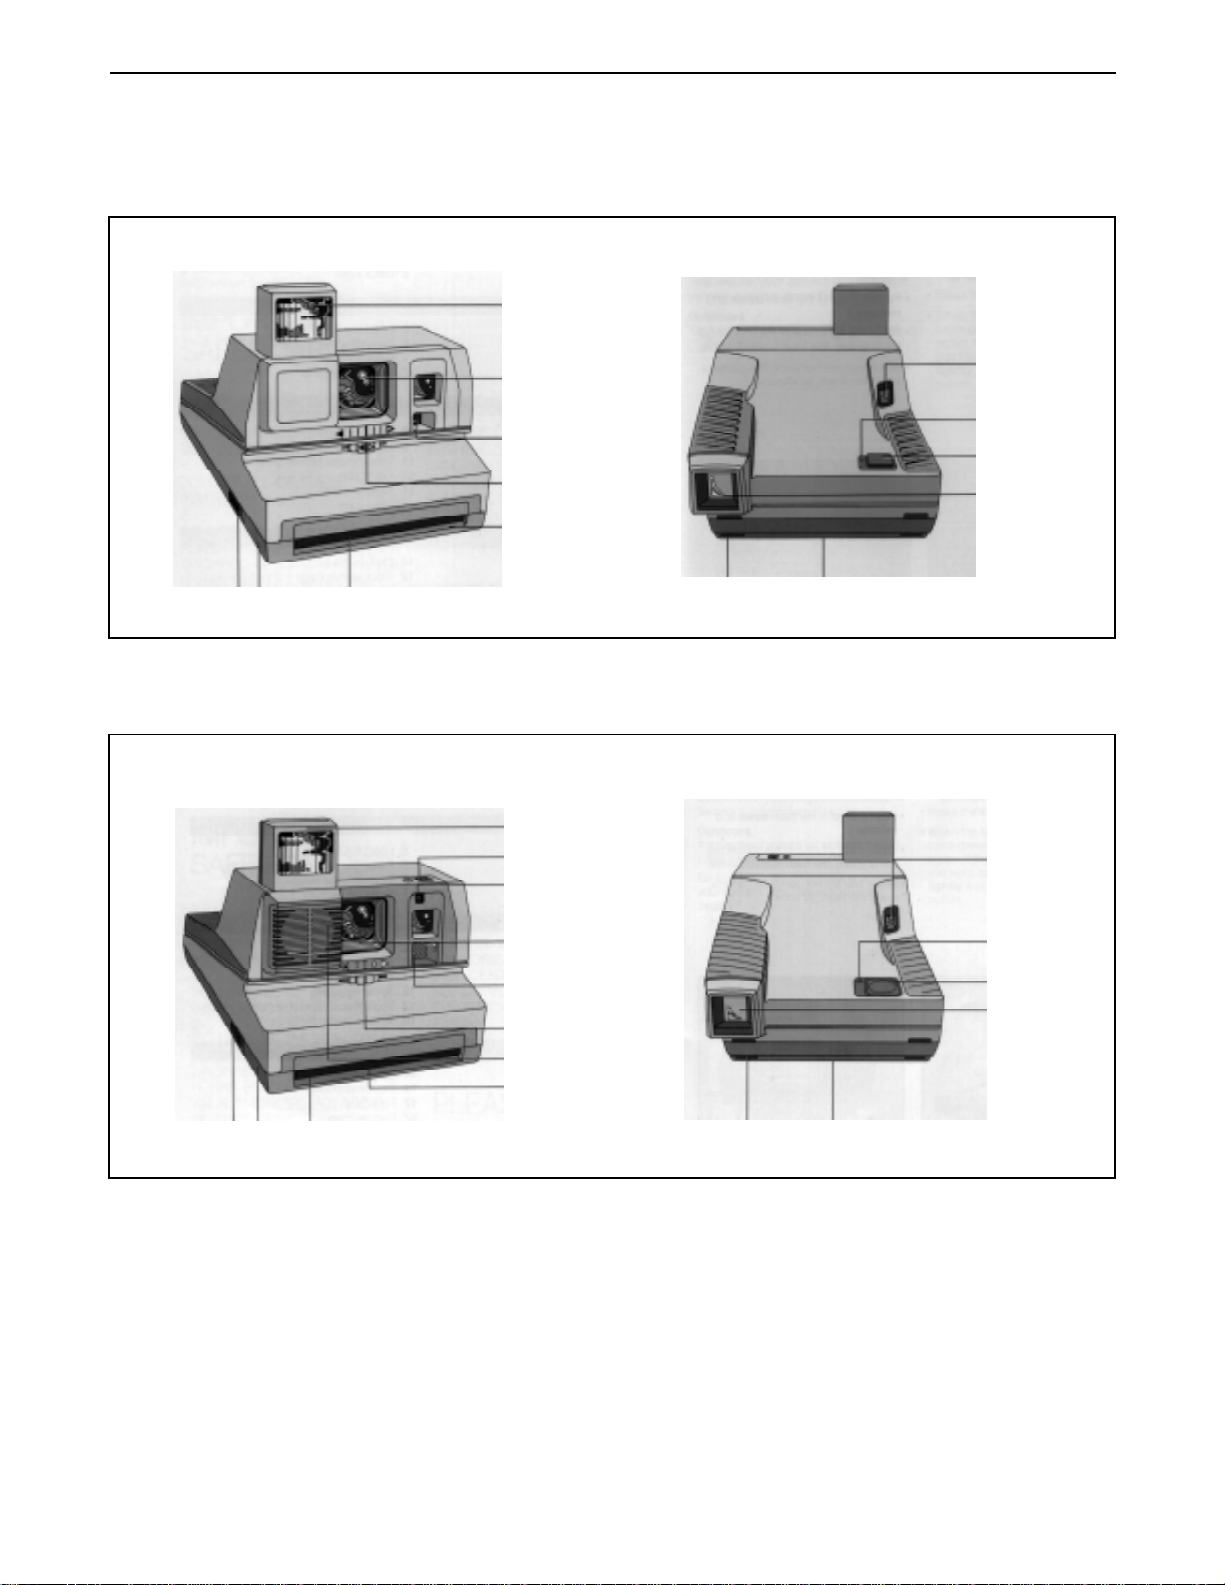
The camera
Impulse
Front View Back View
A
Impulse AF
B
C
D
E
FGH
Front View Back View
A
A1
A2
MN
I
J
K
L
I
B
C
D
E
E1
FGH
A-Electronic flash (shown raised).
A1 - Self-timer button (Impulse AF only).
A2 - Self-timer indicator (Impulse AF only).
B - Single -element, 1 13mm lens (protected by a
lens cover when the flash is lowered).
C - Photocell (measures light from the scene.
D - Lighten/darken control.
E - Film exit slot.
E1 - Sonar rangefinder (Impulse AF only).
F - Film shade (protects the picture from light as it
exits the camera).
G - Film door .
J1
K
L
MN
H - Film door latch.
I - Picture counter (counts down to show how many
pictures are left in the film pack).
J - Green ready light (shows the flash is ready to
fire).
J1 - Flash status light (red when the flash is charging;
green when flash is ready to fire; Impulse AF
only).
K - Shutter button.
L - Viewfinder.
M - Tripod socket (underneath the camera).
N - Neckstrap connector.
4
Page 5

Impulse Series Camera User Guide
To take a picture
Load the film
1. Push the latch forward to open the film
door.
Latch
2. Hold the pack by its edges, as shown.
3. Slide it all the way into the camera.
2. When the light next to the shutter button is
green, the electronic flash is ready to fire.
3. When you are not using the camera, push
the electronic flash down. The lens cover will
move to cover the lens.
Note: As mentioned, the flash is designed for
every picture – indoors and outdoors –
combining with the light from the scene to
provide the right lighting for the best
possible picture.
Position your subject
Indoors
Y our subject should be within the camera’s
flash range:
4. Close the film door . The camera ejects
the film cover .
Raise the electronic flash to
activate the camera
Note: Since the electronic flash is
designed to be used for every
picture, indoors and outdoors,
the camera will not operate until
the electronic flash is raised.
1. Push the top of the electronic flash
down and release it. The electronic
flash will come up automatically and the
lens cover will move to the side to expose
the lens.
Impulse – 4 to 10 feet (1.2 to 3m)
Impulse AF – 2 to 14 feet (.6 to 4.25m)
For best results, your subject should also
be near a light-colored background.
Outdoors
Y our subject should be:
Impulse – at least 4 feet (1.2m) away
Impulse AF – at least 2 feet (.6m) away
(Be sure there are objects
in front of your subject. See
Sonar focusing, page 7.)
5
Page 6

Impulse Series Camera User Guide
T ake the picture
1. Hold the camera as you would a pair of
binoculars.
2. Frame your subject in the viewfinder .
3. Press the shutter button all the way .
4. When the light next to the shutter button is
green, the electronic flash is ready to fire
again. If the green light goes off and you
want to take another picture, lightly touch
and release the shutter button to
recharge the electronic flash.
When you have finished retaking the
picture, return the control to the center
position (c).
Note: Pictures taken of people in highly
reflective beach or snow scenes
often turn out too dark. Set the
control all the way to the lighten
setting (a) before taking this type of
picture.
The self-timer (Impulse AF only)
The self-timer lets you get into your picture. T o
use this feature:
Other Features
The lighten/darken control
Use the lighten/darken control when you want
to retake a picture to make it lighter or
darker.
T o take a lighter picture, slide the
control all the way to the lighten setting
(a).
1. Place the camera on a tripod or other steady
support.
2. Frame your picture in the viewfinder .
3. Push the self-timer button down and release
it (d).
d
Y ou now have 12 seconds to get into your
picture. During the first 10 seconds, you will
see a flashing red light (e) on the front of the
camera.
T o take a darker picture, slide the
control all the way to the darken setting
(b).
e
T wo seconds before the camera takes the
picture, the red light will stay on to remind you
to hold still and smile. If you want to stop the
12-second countdown, push the self-timer
button down and release (d).
6
Page 7

Impulse Series Camera User Guide
Sonar focusing (Impulse AF only)
When you take a picture, your camera uses
sound waves to measure the distance to your
subject.
A built-in computer then uses this
measurement to provide the correct lens
setting.
The sound waves travel to the central part of
the scene (approximate area circled in
white), so be sure there are no objects in
front of your subject.
Film care
For best results, use 600 color film when the
temperature is between 55° F (13° C) and
95° F (13° C). At temperatures below 55° F
(13° C), keep the camera and film as warm as
possible. Above 95° F (13° C), keep the
camera and film as cool as possible. Store the
film below 75° F (24° C), if possible. In its
sealed box, the film can be refrigerated (not
frozen).
Picture care
During the first 60 seconds of development,
handle the picture gently . Fanning or
bending the picture will disturb the
development process.
At temperatures below 55° F (13° C),
immediately place the developing picture
(being careful not to bend it) in a warm pocket
for at least a minute. In hot weather, keep the
developing picture cool by placing it in shade.
Camera care
Keep the camera free of water and sand.
Avoid storing the camera in hot places.
Lens care
Avoid touching the lens. Remove dust and
fingerprints by breathing on the lens and
wiping it gently with a clean, soft, facial
tissue.
Do not use silicone-treated
eyeglass tissues.
7
Page 8

Impulse Series Camera User Guide
To take better pictures
By following these three simple rules, you will
take better pictures indoors and out:
• Include color – Look for color when
framing the scene in the viewfinder or use
colorful props.
• Move in close – You can take the most
pleasing picture of peoplewhen they are 3
to 5 feet (.9 to 1.5m) from the camera.
• Look for light-colored backgrounds
indoors –– When your subject is near
a light background, both are well lit by the
flash.
Camera accessories
The accessories listed add to the versatility of your camera and to your enjoyment of your
photographs. For information on these and other accessories, please contact your dealer or
your nearest Polaroid office.
Camera bags
These durable, padded nylon bags hold a
camera, film, and accessories. Each hasa n
adjustable strap.
PhotoFile 20
This distinctively styled photo album holds20
photos and offers easy flip-throughviewing.
8
Page 9

Impulse Series Camera User Guide
Troubleshooting
Possible picture problems and their solutions
Problem Cause Solution
Repeated spots The developer rollers inside Open the film door (do not do this
or bar pattern the film door need to be in direct sunlight, when there is film
cleaned. in the camera).
Clean the developer rollers with a
lint-free cloth dampened with
water, if necessary .
Background to dark The background was either too Be sure the lighten/darken
far from the subject or beyond control is in center position.
the flash range.
Place your subject near the
background and keep both within
the applicable flash range.
Impulse - 4 to 10 feet (1.2 to 3m)
Impulse AF - 2 to 14 feet (.6 to
4.25m)
Unsharp picture The subject was too close to Be sure your subject is at least
the camera. 4 feet (1.2m) from the camera.
9
Page 10

Impulse Series Camera User Guide
Possible picture problems and their solutions (cont’d)
Problem Cause Solution
Unsharp picture An object in the foreground The sound waves travel to the
(Impulse AF Camera)
prevented the sound waves central part of the scene. Be sure
from measuring the distance there are no objects in front of your
to the subject. The lens subject.
focused on the object, causing
the subject to be unsharp and
at times too dark.
Pictures too blue or Pictures taken at temperatures In cold weather (below 55° F/
too red/yellow below 55° F/13° C) can 13° C), keep the developing
have a blue tint. Pictures picture warm by placing it inside
taken at temperatures above your pocket. In hot weather, keep
95° F/35° C can have a red the developing picture cool by
or yellow tint. placing it in shade.
Subject too dark The camera’s photocell Reposition your subject away from
measured the bright window the bright background.
light, causing the subject to be
too dark.
When a bright source of light Move the source of light to one
(lamplight, candlelight, etc.) side of your subject so it is not
is in the central part of the part of the scene.
scene and in front of the subject,
the camera’s photocell will
measure the bright light, causing
the subject to be too dark.
Featherlike pattern When you fan or bend a Handle the picture gently , by its
developing picture, it disturbs wide white border , during the first
the development process. 60 seconds of development.
10
Page 11

Impulse Series Camera User Guide
Full one-year warranty
U.S. and Canada
If your camera proves to be defective within
the warranty period, we will, without charge,
either repair it or , at our option replace it with
a fully reconditioned or new camera.
The warranty period is one year from the
original date of purchase. T o verify the
warranty period, you should keep the
sales slip or other proof of the purchase
date. Without this information, the warranty
will be determined by the manufacturing date
on the camera.
The repair or replacement of your camera is
guaranteed for the remaining warranty period
on your original camera.
The warranty does not cover damage caused
by accident, misuse or tampering with the
camera and a charge will be made for such
repairs.
For warranty service or information, call our
toll-free number listed below. If your camera
is not working, our representatives will verify
the problem and can ship a replacement
camera to you quickly (within approximately
two or three Polaroid business days in the
U.S.).
U.S. only: This warranty gives you specific
legal rights, and you may also have other
rights, which vary from state to state.
This warranty excludes all consequential
damages. Some states do not allow the
exclusion of consequential damages, so
the foregoing exclusion may not apply to
you.
Canada only: The warranty and provisions do
not affect your statutory rights.
For more information: From within the U.S.,
please call us toll-free at 1-800-343-5000,
Monday through Friday , 8 am to 8 pm (Eastern
time).
In Canada, call toll-free: 1-800-268-6970; in
T oronto, call 675-3680.
Americas Business Center
If you have any questions about your camera or
pictures, you believe your camera needs
repair , or you need additional information, call
us toll-free: 1-800-343-5000 from anywhere in
the U.S.
Our representatives can be reached every
weekday from 8 am to 8 pm, Eastern time. In
Canada, call toll-free: 1 800-268-6970. In
T oronto, call 675-3680.
Or , if you prefer, write to us. The address is:
Americas Business Center, 201 Burlington
Rd., Bedford, Massachusetts 01730. Please
include a sample picture of the problem you
are having with your camera.
Polaroid instant color film is sold in the U.S.,
Canada, and Latin America. Before traveling
to countries outside the U.S. and Canada, call
us toll-free to learn where film for your camera
is being sold.
11
 Loading...