

Page 1
E
o
-ln
o
o
E)
G
.E
t,
'p
§
I
I
Page 2
Page 3

4.
5. 6. 7.8.
't0.
5
Page 4

English
Throughout
series
refers
the
text
of numbers.
picture
to a
pages.
The film
Use only Polaroid
film.
Each film
pictures
both the
Check the film
film
The
box to
camera
'I
.
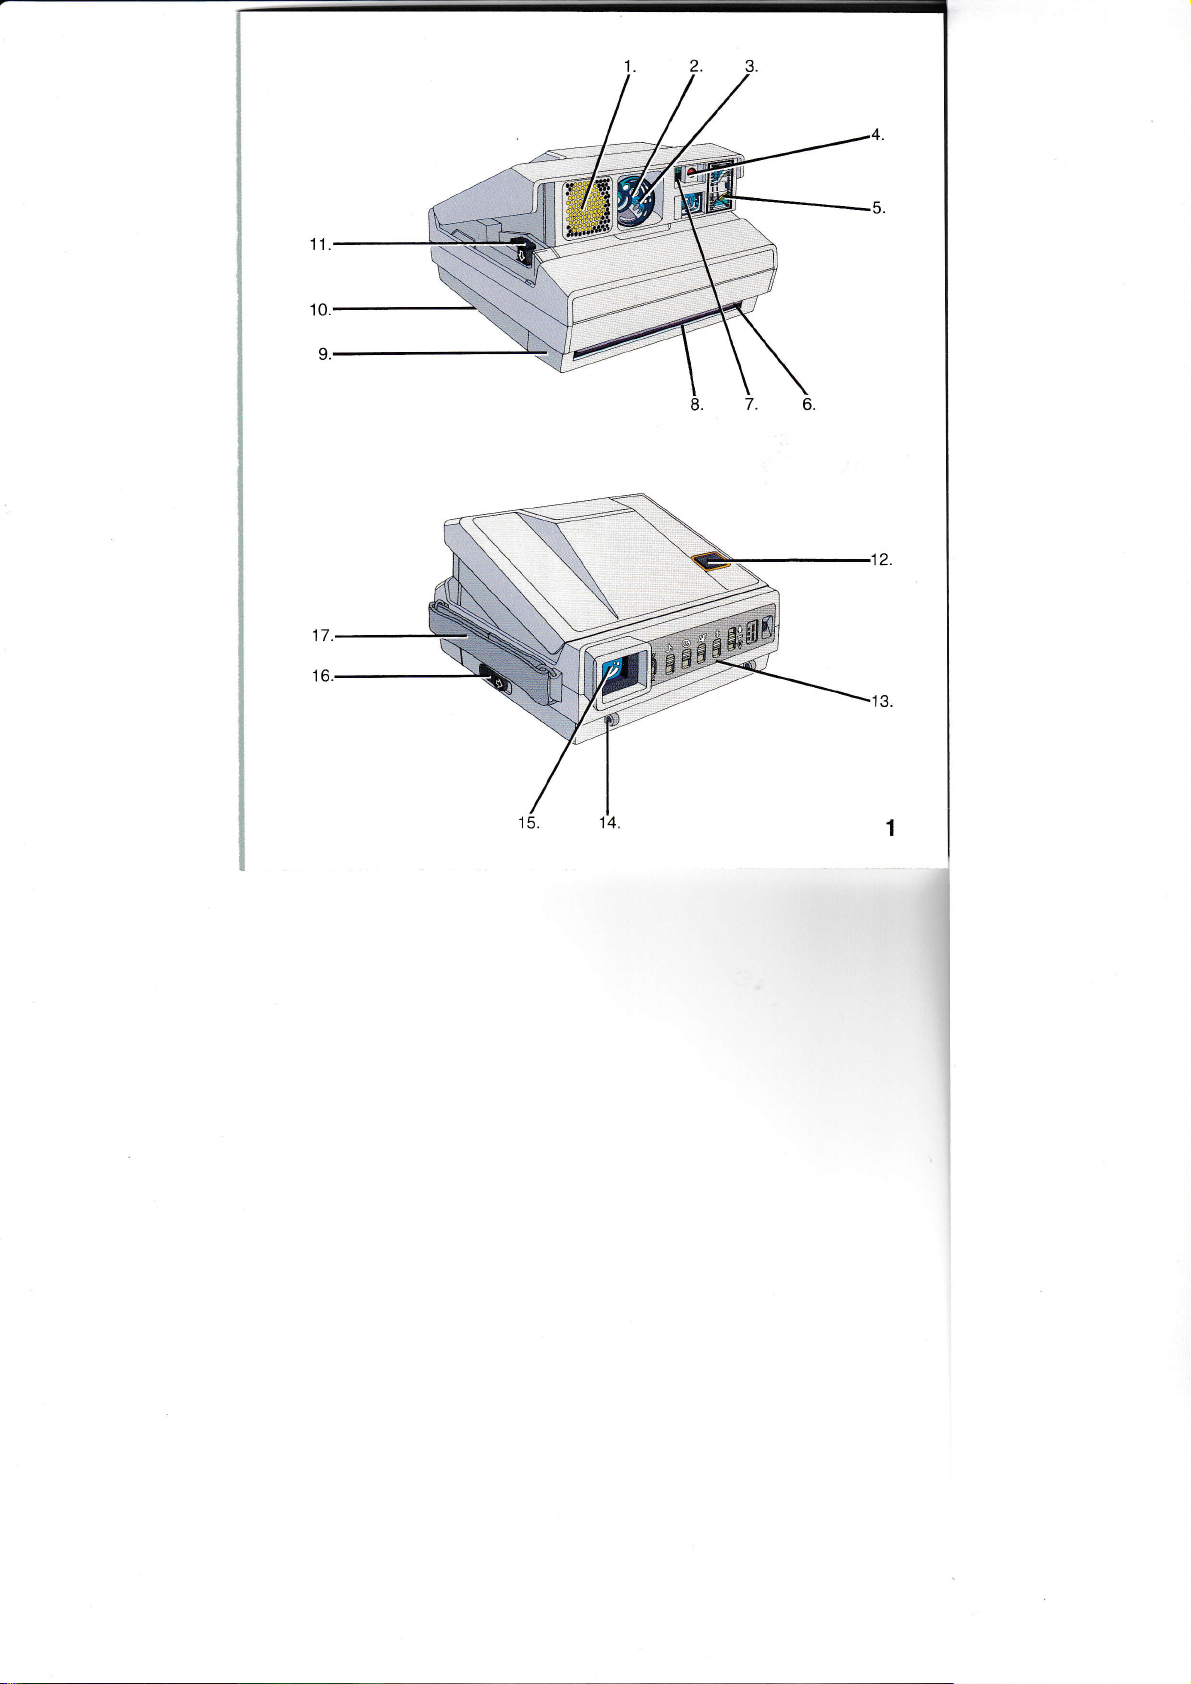
Sonar disk
waves to
subject)
and contains
camera
be sure the film
lmage
pack
and the
expiration date
(picture
(sends
measure
2. Three-element,
3. Automatic
aperture variable (speeds
from
seconds;
ft45)
4. Red l¡ght
switch is
5. Electronic
1l2O,OOO
Film
6.
light
7. Photocell
measures
from
8. Film
shulter
11245
of a second
apertures from
(indicates
on)
flash
of a second)
(protects
shade
as it exits the
(silicon
light from
the flash)
exit slot
you
will find
Each of these
on the fold-out
System
provides
125mm lens
10
a battery
electronic flash.
on every
is fresh.
1)
out
sound
distance
system
-
range
color
that
to
speed/
to 2.8
f/10
self-timer
(from
1/3000
picture
camera)
photo-dibde;
the
from
scene and
color
to
to
a
powers
Film
9.
10.
11.
12.
13.
door
Tripod
socket
camera)
Film
door release
Shutter button
panel
Control
14. Neckstrap
15.
Viewfinder
16.
Release latch
the camera)
17. Adjustable
The
control
1. Meters
change
viewfinder
2. Audible
to turn
panel
or feet
the distance
signal switch
off all sound
3. Self-timer
turn
self-timer on)
4. Autofocus
turn
off autofocus when
photographing
5. Flash
switch
off the electronic
6. Lighten/darken
7-
Remote
8. Red
charging)
control socket
(indicates
light
9. Green light
ready)
10. Picture
indicate
counter
remaining
(on
connector
(to
hand
(picture
switch
to feet)
switch
switch
through
(slide
control
(indicates
(counts
the bottom
button
open and
strap
2)
(slide
display in
(slide
signals)
(slide
it down
(slide
it
glass)
it down to
flash)
flash is
flash is
down to
pictures)
of the
close
it
up to
the
it
down
to
down to
turn
Page 5

Basic
Opening
To
open
hands
as
release
open
automatically.
To
close
as
shown
latch
back.
both
sides
you
When
era,
close it
Check
the
Before you
switches
5). This
automatic.
Load
the
Use only
color film.
Push
the film
down.
The film
Hold
the film
(picture
the
camera.
As
soon
battery
the
.
.
.
camera
the film
picture
the
green
a
ready
in
to fire.
operating
and
closing
the
camera:
(picture
shown
latch
back. The
the
camera:
(picture
Push
the
lock.
have
finished
protect
to
control
load
the film,
are
aligned
way,
the
camera
film
Polaroid
door
door
pack
6)
and
slide it
you
as
close the
the film
you
and
cover
eject
counter
light
that
instructions
the
place
3).
camera
Hold
4).
Slide
cover
using
the
lens.
panel
be
as
shown
will
lmage
release
will
open.
by its
edges
all the
film
pack
will
will
see
set
to
shows
the
camera
both
Slide
will
the
camera
the release
down
until
the
sure
all the
(picture
be fully
System
button
only
way
into
door, the
power
"10"
flash
the
cam-
is
To
remove
you
have
hear
the
remove
button
by
the
the
pack
will
the
will
you
taken
3 chimes
the
colored
camera
hear
camera
hear
and
will
remove
To
release
out
When
film
.
you
open
.
you
a flashing
when
halfway
Position your
lndoors,
the
range
colored
Outdoors,
least
60cm
and, for
background.
60cm
your
to 4,6m (2
your
(2
an
empty
the
to remind
empty
film
pack,
down.
tab.
contains
three
three
zero
in
press
the
hold
it.
subject
subject
best results,
subject
ft.)
away.
pack:
film
lOth picture,
you
pack.
push
the film
pull
the film pack
an
empty
chimes
chimes
the viewfinder
to 15
shutter
should
ft.)
near
should
when you
and
button
be within
flash
be at
After
you
io
door
see
a light_
Page 6

.'..,.
Take the
Slide
strap and hold the
(picture
vertical
Frame
and
You
The
ple
A
The lmage
The
When
halfway,
(in
"good
the viewfinder.
When
picture"
p¡cture,.
your
left hand
7) for horizontal
pictures,
your
press
the shutter
should
see:
distance
(in
meters):
"good
green
viewfinder
you press
displays indicating
meters
or feet) and
picture"
you
see the
symbol:
subject in the viewfinder
your
to
p¡cture"
System camera
displays
or
thr.ough the hand
camera as shown
pictures.
picture,S.
see
button halfway.
subject; for
symbol
the shutter
"caution"
green
tl- r:
,.rJ ll9l
button
drstance
symbols for
appear in
"good
For
exam-
To take the
button
When
era will
picture, press
the rest
you
release
eject the
will immediately
Note:
lf, after having
ter
button halfway,
your
tion
subject or
the button. Make
press
the shutter button
Press the
shutter button the rest of
the way to take
the
of
the button,
p¡cture
recharge.
pressed
you
yourself,
the
changes and
picture.
the
the shutter
way.
the cam-
and the flash
the shut-
wish to reposi-
release
halfway
again.
6
Page 7

iYhen
you
'lashing
,:ur
subject
:
stant,
:xample:
:aution"
hear
a beep
yellow',caut¡on,'
is
either
flash
display
and
too
is
or
the
The
symbol
and
close,
turned
shows
see
the
symbol,
too
off.
For
the
the
distance
0.1
the
60cm (2
(in
Your
meters)
subject
shutter
button
ft.)
from your
is
too
and
close.
stand
subject.
Release
at least
'When
ft
(20
blank.
your
),
the
@
subject
distance
t.E
is
disptay
beyond
a distance
a distance
6.2m
wiil
be
or
from
or
from
7
4.8
Your
range.
and
60cm
0.6
Your
flash
to
turn
to
6.2.
subject
Release
position
to
4.6m
to
4.6
subject
ís
off.
the
your
is
Stide
flash
is
beyond
the
subject
(2-1S
within
the
back
shutter
ft.)
flash
range,
flasi
on.
the
button
within
but
iwitcn
flash
the
range.
the
up
Page 8

Automatic focusing
you press
When
waves
sound
our range of hearing)
part
central
computer
the
soundwaves to reach the
and the
measurement
lens
.
.
The lighten/darken
Use this control
retake
darker.
echo to return
setting.
Be
sure the sound waves
a clear
near
object
prevents
scene
from
reaching
will focus
subject to be unsharp.
photographing
When
person,
improved
same distance from
picture
a
the
(at
frequencies
of the
measures
provide
to
path
focus
your
to
the central
lhe
your
on that object, causing
and illumination
if everyone is
only
to make it lighter
shutter button,
scene. A built-in
the time it
subject, the lens
control
when
beyond
are sent to the
takes
scene
and uses this
the correct
have
subject. lf
part
of the
waves
sound
more
than one
are
about the
the camera.
you
want to
or
an
your
To make
control all
To make
control all the way
As
soon as
picture,
the
center
elA ñ]A
tYt I tl
Uy
picture
the
the
picture
the
you
return
position
lighter:
wáy
up
darker:
down
have finished
the control
(c).
Hv
a. b.
Lighten
lmportant:
picture
flash
is well
illuminated
.
be sure the lighten/darken
the
center
.
place
your
colored background,
within the
flash
range
.
retake
When the
is too
position
subject near
60cm to
picture.
the
Darken
background
dark but
4.6m
Slide the
(a).
Slide the
(b).
retaking
to the
your
control is in
light-
a
keeping both
(2
to 15
-ta
tÉl:
[:Jl _
rJv
G.
Normal
of a
subject
ft.)
Page 9

The
electronic
quick-recharge
The
,
:,,
subject
-
eeded for
s-c1ect
'
esh
systems.
¡,
asted.
ows
-
^
f
aster
:¡an
a second.
The
red light
.ome
on and
cegin
to
.
load
.
press
.
take
.
open the
When
the
f
lash
is
on for
20
lf you
wish
green
light
ter
button
picture
again.
The
electronic
used
for
outdoors
Every
time
era's
built-in
from
the
give
you
ln
the
shade,
cally
supply the
produce
to
the f |ash
rs
farther
Polaroid's
this
energy
recharge
charge
film
into
the
shutter
picture,
a
camera.
green
ready
to
30 seconds.
to
has
halfway.
when
every
you
electronic
scene
the
best
pleasing
a
flash
is
close,
away. ln
unused
on the
the
flash
every time
the
or
light
to fire.
take
a
gone
green
the
flash
picture
take
with
possible
the
flash
additional
system:
less
than
energy
new
thyristor
to
be
saved,
t¡mes
-
control
will
camera,
button
comes
The
light
picture
press
off,
You
can take
light
is
designed
-
picture,
a
flash
just
enough
will
photograph.
When
energy
when your
is
conventional
is
flash
resulting
usually
less
panel
will
automatically
you
or
halfway,
on,
the
will
stay
and
the
the
shut-
the
comes
to
indoors
picture.
light
and
your
blends
flash
automati-
needed
or
on
be
cam-
light
to
ln
bright
blend
the
amount
reveal
the
see
in
the
The
self-timer
Place
the
steady
support.
the
viewfinder
ton
halfway
"good
picture"
Release
Slide the
You
now
your
picture.
During
the
will
beep
light
on
the front
2
seconds
p¡cture,
the
beeps
will
After
the
it
will
not
self-timer
double
exposure,
camera
up.
Whenever you
second
countdown,
and the
timer
@
/-)
r@ll
tél
sunlight, your
sunlight
of flash
to
facial
details you
picture.
camera
on
Frame
and
to
be
sure
symbol
the
shutter
self-t¡mer
have
12
seconds
first
10
seconds,
you
and
camera
eject
switch
before
red
light
become
the
up
will
of
the
has
film
do not
you
before
will
turn
r@)
t=l
t-t
want
trl
with
soften
a tripod
press
you
in the
button.
switch
see
the
camera.
camera
will
a
steady
taken
untilyou
(b).
slide
slide
off.
b.
camera
just
the
shadows
expect
your
the
get
down (a).
to
a flashing
stay
signal.
the
To
avoid
close
the
to
stop
the
switch
will
right
and
to
or
other
picture
in
shutter
green
the
viewfiñder.
gefinto
the
camera
red
takes
the
on
and
the
picture,
slide
the
a
the
sw¡tch
the
12-
up
but_
Page 10

photograph
To
through
To
avoid
ting
a flash reflection,
autofoeus
both
switches
glass
focusing
flash
and
down, as
a distant
AF'
fsÉl f§.ll
-\
t^\t I lx\t
r,--{
-l
¡,.3t
E] EI
you
When
the lens
picture
.
Be
(15
daylight.
Frame
and
(you
because the
When
p¡cture"
lf
ing
not
picture.
lmportant:
taking the
autofocus
the
turn
off
sets for distant
has to
be taken a
sure the scene is
ft.) from
you
yellow
enough light
system back
picture
the
press
the
will
not see
you
see the
symbol, take
hear
a beep
"caution"
When
picture,
and
the camera
shutter
autofocus
flash
on.
scene
glass
on the
turn
off the
systems
shown.
the
autofocus
scenes and the
special way.
at least 4.6m
and in
in the viewfinder
button halfway
a distance
green
and see the
to take
you
slide both the
switches up to
display
system is
"good
picture.
the
symbol, there
good
a
have finished
get-
and
by sliding
system
off).
flash-
is
turn
Trou
ble-f ree
Be
sure the
path
your
to
lf
an object
the
soundwaves
subject,
ground
be
Center
When
soundwaves
the
lens
causing
lf
center,
viewfinder
ter
lens
ter
center
the
Avoid
shutter
lf
yourself
ton
ton.
viewfinder
Hold
ln low
flash
place
the lens
object,
out of focus.
your
the
distance
will
then
the
you
wish
frame
button
setting.
button,
and
way
to take
subject
button
you
wlsh
after
halfway,
Make
the
camera
light,
range,
it
on a firm
p¡ctu
soundwaves
subject
in the
foreground prevents
from
reaching your
will
focus
in the
is not
pass
by it
background.
on the
to be unsharp.
your
the middle
and hold
get
to
releasing
your
the
button
picture.
the
pressed
is
the
the
and take
steady
a
subject
the
camera
support.
your
centered,
subject
subject
shutter
recheck
causing
subject
subject
will
to the
focus
subject
to keep
it in
press
and
halfway
Without
reframe
press
movement
to reposition your
pressing
release
the
changes,
display
with
hold
re
taking
have
a
on
the fore-
subject
picture
and
measure
The
background,
otf
of the
the
the
correct
the
off
the
rest
after
the
halfway
subject
shutter
but-
the
picture.
the
beyond
the
steady
clear
to
the
shut-
shut-
of
or
but-
or
10
Page 11

Avoid
bright backgrounds,
sources in the
central
scene
Bright window
sources can
cell to underexpose
light
cause the camera's
Temperature
Extreme temperatures
have
to
When
(55"F),
Avoid
places.
from hot
incorrect
the temperature
keep
storing camera
Keep
surfaces.
colors.
camera
developing
Developer rollers
The
developer rollers inside
(picture
door
repeated
avoid
pictures.
free cloth.
must
9)
spots or bar
Clean rollers with
Lens
To remove
lens
facial
eyeglass
Gopies
Beautiful
be made from
For
your
office.
fingerprints,
gently
wipe
and
tissue. Do not
tissue.
and
enlargements
copies and enlargements
your
copy service information,
dealer or the nearest
or
part
of the
or central light
the
subject.
may
cause
is below'13'C
film
and
be kept
with
use
favorite
warm.
film
or
in hot
pictures
the film
clean to
patterns
a damp,
breathe
a clean,
silicone{reated
pictures.
contact
Polaroid
light
photo-
prints
away
on the
soft
can
on
lint-
Warranty
lf this
camera
year
1
we
will repair ¡t
it free
same or
no
charges for labor,
This
warranty
caused by
ing
with
such damage will
able
charge.
To take
camera must
repaired
Centers.
The
above warranty
do not
proves
of the
original
of charge with
or, at
equivalent model.
does not
accident, misuse
the camera. Repairs
advantage
by, one
affect
be made
returned
be
of the Polaroid
your
For information
you
lf
are unable
review
this instruction
problems
Picture
rect
use
or contact the
you
write,
problem
pictures.
of
ther help,
camera for repair,
dealer
office.
lf
the
sample
address.
the
and
please
and, if
to
are
camera.
before
please
lnclude
defective
purchase
our option,
a
camera
service
of th¡s warranty,
and
statutory
and
get
book.
often
you
nearest
explain
possible,
within
date,
replace
of the
We
will make
parts.
or
cover
damage
or tamper-
to correct
at
reason-
a
to, and
Service
provisions
rights.
help
good pictures,
due to incor-
you
lf
need fur-
your
return
your
see
Polaroid
the nature
enclose
your
return
the
of
11
 Loading...