

Page 1

Full HD Driving Recorder
E101W
Quick Start Guide
400-8401-030
400-8401-030
www.polaroidcarcam.com
www.polaroidcarcam.com
Page 2

Polaroid ●E101W
Packing List
1. Car Power Adaptor 3. USB Cable 5. Warranty Card
2. Suction Mount 4. Quick Start Guide
Thanks for purchasing the camera. Please read the instruction
manual on the supplied CD ROM to ensure correct use of the
product. The warranty does not cover any damage that may
occur during a sport activity.
For more operation details, please refer to CD-ROM.
1. Overall Introduction
1.1 Button operation
You can operate the camera alone without connecting to a mobile
device via Wi-Fi/App. See the table below for a description of
each button’s function.
EN-1
Top and bottom views Side (left and right) views
Front view
Rear view
1
2
3 4
Page 3
Polaroid ● E101W Polaroid ●E101W
2. Getting started
2.1 Inserting the memory card
Install a micro SD card (class 10 or higher rating, max up to
32GB) into the camera device. Press the
Power
button to switch
on the equipment.
Note:
1. Do not remove or insert the memory card when the
device is turned on. This may damage the device and
memory card.
2. Please format the micro SD card before initial use.
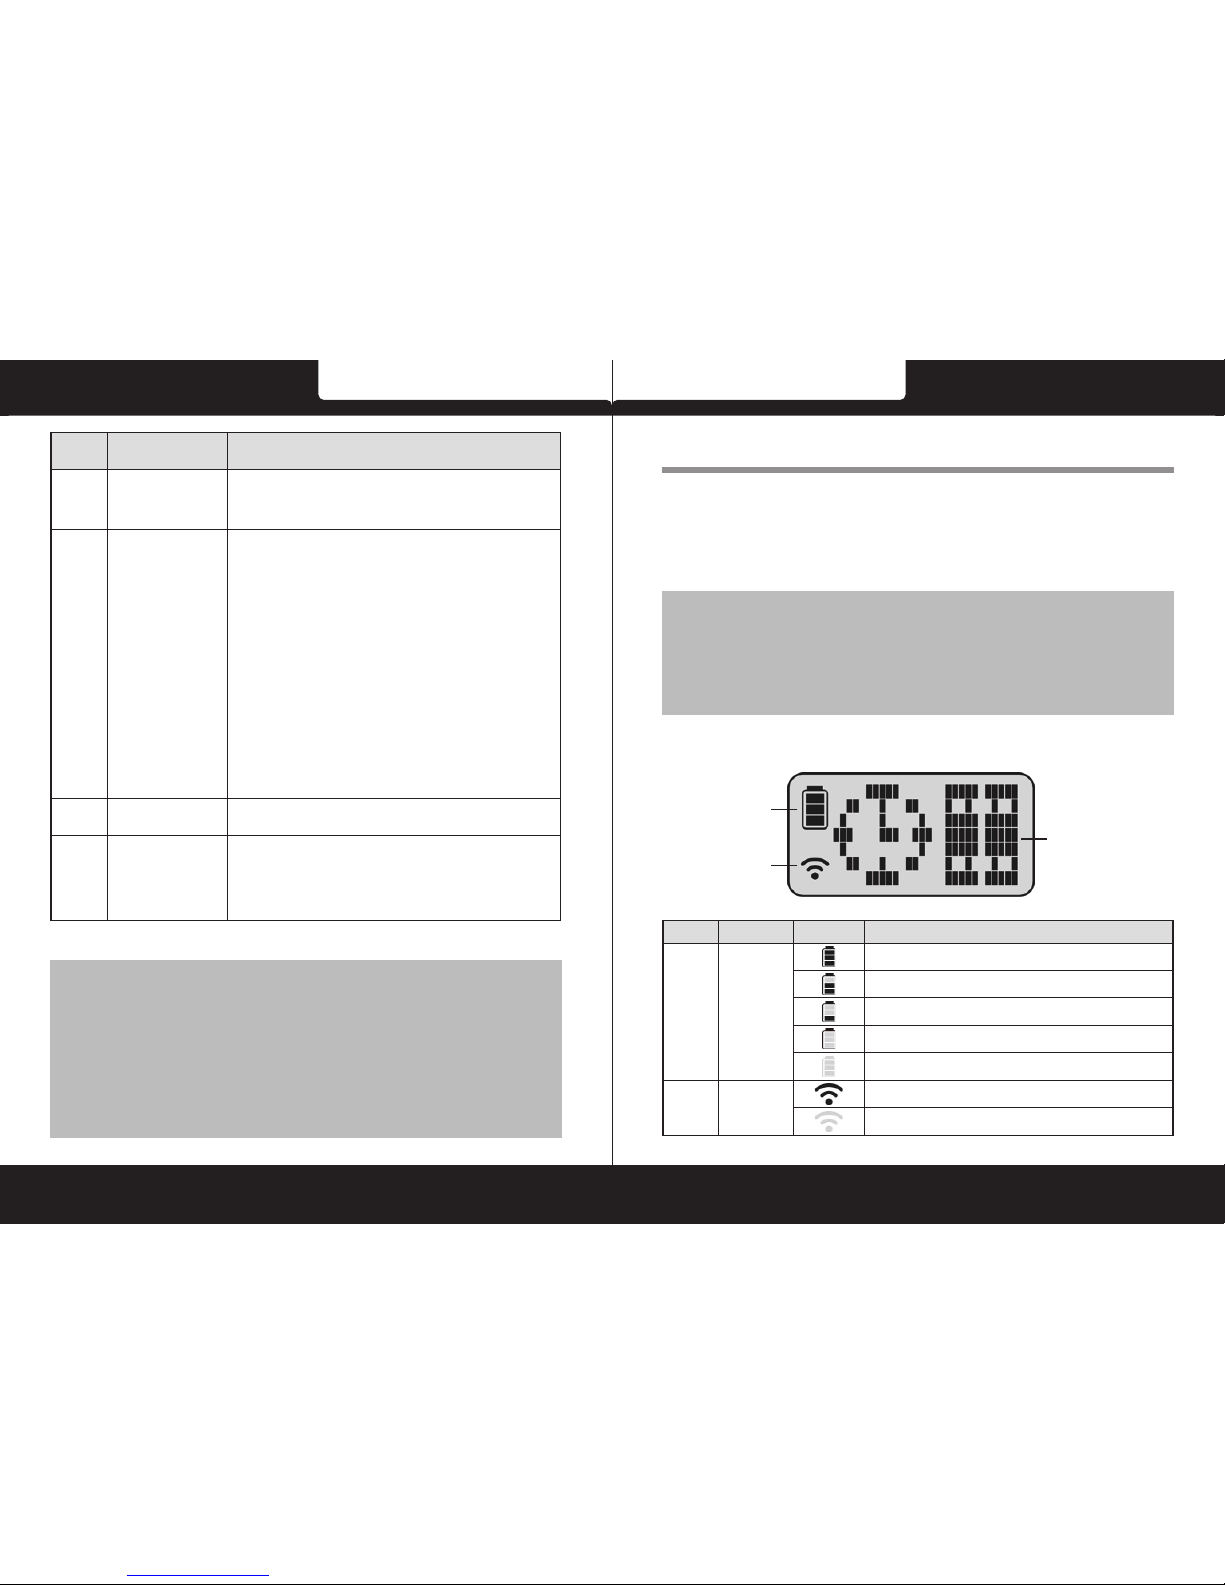
2.2 Information in LCM screen
EN-2 EN-3
No. Item Function
1 Mode button
Changing Modes (Timelapse / Capture /
Recording Mode)
2 Record button
●
In
Timelapse mode
, press the
Record
button to start recording a video. Press it
again to stop recording (When the device
enters Power Saving Mode and is in
shutdown status, press the
Power
button
to stop recording).
●
In
Camera
mode, press the
Record
button to capture a photo.
●
In
Video
mode, press the
Record
button
to start recording a video. Press it again to
stop recording.
3 Wi-Fi button Press to turn the Wi-Fi on or off.
4 Power button
●
Press to turn the camera on or off.
●
To reset, press and hold the
Power
button for at least 5 seconds.
Note:
If you want the recorder to go back to the
Default Setting
,
make sure the camera’s Wi-Fi is turned off. Press and onhold the
Mode
button, then press the
Wi-Fi
button, when
the beep tone is promoted, which indicates the completion
of factory settings.
1
2
3
No. Item Icon Description
1
Battery
status
Full battery power
2/3 battery power
1/3 battery power
Out of battery power
Charging
2
Wi-Fi
status
Wi-Fi on
Wi-Fi off
Page 4
Polaroid ● E101W Polaroid ●E101W
EN-4 EN-5
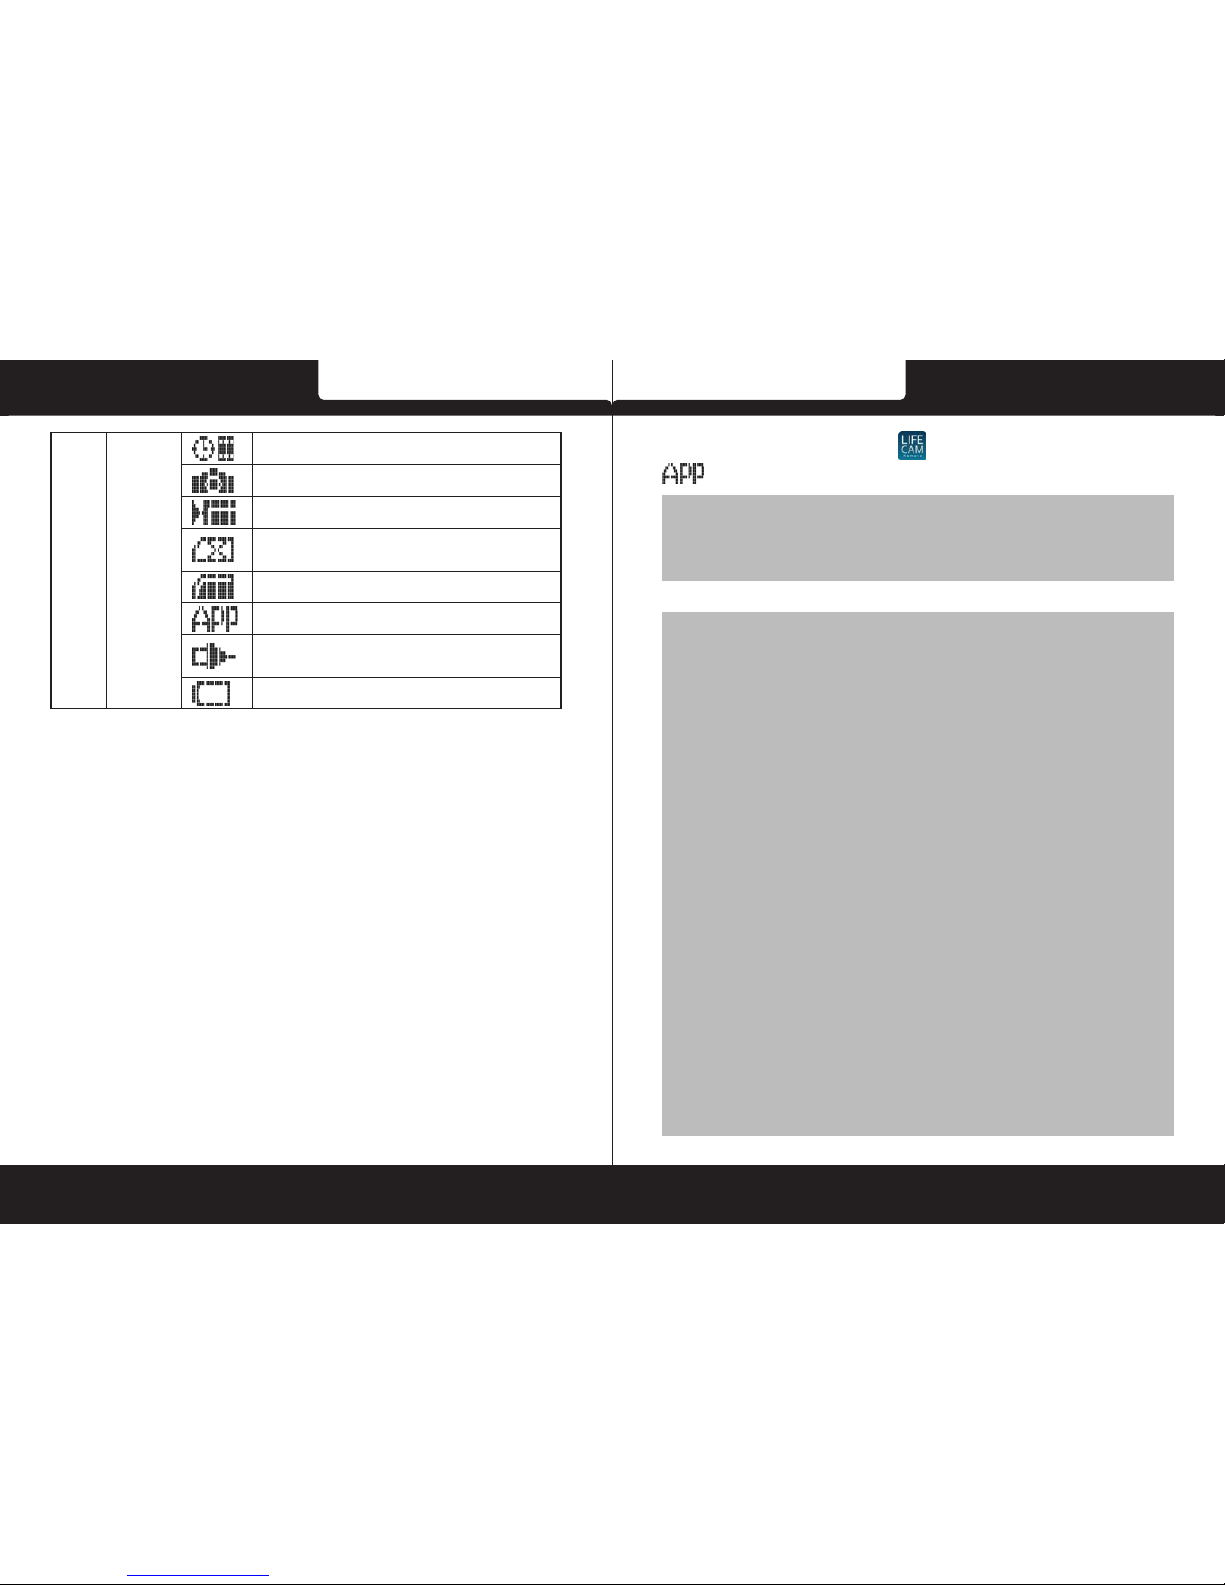
3 Status
Timelapse mode
Capture mode
Recording mode
Memory card error (damaged, locked or
no card inside)
Memory card full
Connect with mobile
Enter USB mode when connected with a
computer
Power will soon run out
2.3 Wi-Fi connecting
1.Press the
Power
button to switch on the equipment.
2.Press the
Wi-Fi
button to activate the wireless network.
3.Using the Wi-Fi function of the mobile device, search for the
equipment ID from the list. Each device has a unique ID no.:
i3XXXXXX (if the last 2 digits are the same as the last 2 digits of
your password, your device corresponds).
4.Select and input Wi-Fi password (repeating the 4 numeral/letter
on your LCM display twice will give you the Wi-Fi password.
E.g., if LCM display shows “1234”, you Wi-Fi password will be
12341234).
For iOS / Android Users:
Using the mobile device [Settings] → [Wi-Fi] → [Select device ID
no.: i3XXXXXX] → [Enter the password] → [Connecting]
5.Execute the
Life Cam
app , device LCM display will show
, indicating the connection is established.
APP Layout and Features may be changed subject to
different software versions. Please refer to Google Play or
APP Store for update.
Note:
1. Make sure the Wi-Fi function of the equipment is
activated and the mobile device is receiving Wi-Fi signal
before executing the Life Cam app, or the app will be
exited.
2. The mobile device shall be within a maximum of a 10m
distance from the equipment without any buildings in
between.
3. When the Wi-Fi function of the equipment is activated
for 3 minutes without connecting with your mobile device,
or the connection is disconnected, the equipment will
automatically stop the Wi-Fi function and you will need to
re-activate the Wi-Fi function.
4. We suggest that you should set the correct date and time
for your mobile device before using the equipment, so that
the recorded video will be consistent with the date and time
settings of the mobile device.
5. After connecting the mobile device with the equipment,
all the mode switch, Record and Wi-Fi operation buttons of
the equipment will be inoperable; all the operations shall be
carried out via the Life Cam app.
6. The language of the Life Cam app will be consistent with
that of your mobile device, it shall be the default language if
it is not the built-in one.
Page 5

Polaroid ● E101W Polaroid ●E101W
EN-6 EN-7
1
2
3
4
5
8
9
10
11
6
7
1
2
12
13
5
8
9
15
16
6
14
1
2
17
18
19
20
5
8
9
15
22
6
21
2.4 Screen
Recording screen Shooting screen Timelapse screen
No. Icon Item Description
1 Wi-Fi status Indicates the Wi-Fi status.
2
Battery
status
Indicates the remaining battery power.
3
Video
duration
The device will follow the set recording
video length to store them as individual
les.
Touch to select the required video
duration.
Available options: 3 min. / 5 min. / 10
min. / 30 min.
4
Voice
record
Touch to select the required voice
record setting.
Available options: On / Off
5
Zoom
indicator
Indicates the zoom status. Touch
/ to adjust the zoom.
Available options: x1.0~x2.4
6 Playback Touch to enter Playback mode.
7 Recording
Touch to start recording, and touch
again to stop.
8
2014/01/01
12:00:00
Date and
time
Indicates the current recording date and
time.
9 Menu Touch to enter the menu.
10
Video
resolution
Indicates the current video resolution.
11
Recording
mode
Indicates the current Recording mode.
Touch to switch to Timelapse or
Shooting mode.
12
Capture
mode
Touch to select the need capture mode.
Available options: Normal / 5 sec. / 10
sec. / Burst 3 Photos / Burst 5 Photos
13 Beauty
Touch to select the required Beauty
mode.
Available options: 0 / 1 / 2
14 Shooting Touch to start shooting photos.
15
Photo
resolution
Indicates the current photo resolution.
Page 6

Polaroid ● E101W Polaroid ●E101W
EN-8 EN-9
16
Shooting
mode
Indicates the current Shooting mode.
Touch to switch to Timelapse or
Recording video modes.
17 Timelapse
Touch to select a suitable Interval.
Available options: 5 sec. / 10 sec. / 30
sec. / 1 min. / 5 min. / 10
min. / 30 min.
18 Store type
Touch to select the required storage
type.
Available options: Picture / Video /
Picture & Video
19 Frame rate
Touch to select the required frame rate.
Available options: 3 fps / 5 fps / 10 fps
20
Power
saving
mode
Touch to select the power saving mode.
Available options: On / Off
21 Shooting
Touch to start shooting photos, and
touch again to stop.
22
Timelapse
mode
Indicates the current Timelapse mode.
Touch to switch to Shooting photos or
Recording video modes.
Safety precautions
Please observe all safety precautions before using Polaroid
C151. Please follow all procedures outlined in this manual to
correctly operate the device.
● Do not attempt to disassemble or alter any part of the device
that is not described in this guide.
● Do not place the device in contact with water or any other
liquids. The device is NOT designed to be liquid proof of any
sort.
● In the event of liquid entry into interior of device, immediately
disconnect the device from the computer. Continuing use of the
device may result in re or electrical shock. Please consult your
product distributor or the closest support center.
● To avoid risk of electrical shock, do not connect or disconnect
the device with wet hands.
● Do not place the device near a heat source or directly expose
it to ame or heat.
● Never place the device in vicinity of equipments generating
strong electromagnetic elds. Exposure to strong magnetic elds
may cause malfunctions or data corruption and loss.
Disclaimer
If device has been damaged by liquid (for example, water, coffee
or a soft drink, etc.), the service for such liquid damage is not
covered by the Polaroid one (1) year limited warranty.
We are NOT responsible for any damages or consequences
damages by charging the product other than our original charger.
As the Polaroid products are constantly updated and improved,
your device may have a slightly different appearance or modied
functionality than presented in this Quick Start Guide.
Page 7

全高清行車記錄儀
E101W
快速使用指南
www.polaroidcarcam.com
400-8401-030
Page 8

Polaroid ● E101W Polaroid ●E101W
産品和配件清單
1. 車載充電器 3. USB 線 5. 保修卡
2. 吸盤支架 4. 快速指引
感謝您惠顧此款攝錄機,請詳閱隨貨附贈 CD-ROM 光碟中的使
用說明書,以確保正確地使用本產品。
本產品的保固範圍不包含運動期間設備可能發生的任何損壞。
欲瞭解更多的操作訊息,請參閱 CD-ROM。
1. 產品介紹
1.1 操作按鈕
您不需透過 Wi-Fi 連接到 [Life Cam] 應用程式,即可直接操作生
活紀錄器。操作按鈕功能之描述請參閱下表。
頂視圖與底視圖 側視圖 ( 左側與右側 )
前視圖
後視圖
1
2
3 4
EN-12 TC-1
Page 9

Polaroid ● E101W Polaroid ●E101W
TC-2 TC-3
2. 開始使用
2.1 插入記憶卡
插入一張 Micro SD 卡於設備的記憶卡槽中 ( 請使用 10 級或更高
等級的 Micro SD 卡,容量最高可達 32 GB)。按下設備的電源按
鈕開啟電源。
註:
1. 當設備在開機狀態時請勿取出或插入記憶卡,這可能會損
壞設備及記憶卡。
2. 開始使用前請先格式化 Micro SD 卡。
2.2 LCM 螢幕訊息
編號 項目 功能
1 模式按鈕 切換模式 ( 縮時攝影 / 拍照 / 錄影模式 )
2 錄製按鈕
● 在縮時攝影模式下, 按下錄製按鈕開始錄
製視頻,再次按下即停止錄製 ( 當設備進入省
電模式並且處於關機狀態下,請按下電源按鈕
停止錄製 )。
● 在相機模式下,按下錄製按鈕拍攝照片。
● 在錄影模式下,按下錄製按鈕開始錄製影片,
再次按下即停止錄製。
3 Wi-Fi 按鈕 按下以開啟或關閉 Wi-Fi 功能。
4 電源按鈕
● 按下以開啟或關閉生活紀錄器。
● 按住電源按鈕不放至少 5 秒鐘以重置。
註:
欲將設備 回復原廠設定 ,請先確認生活記錄器的 Wi-Fi 功
能已關閉。按住模式按鈕不放,接著按下 Wi-Fi 按鈕,設
備發出嗶一長音即表示已完成原廠設定。
1
2
3
編號 項目 圖示 描述
1
Battery
status
電池電量充足
電池剩餘三分之二電量
電池剩於三分之一電量
電池電量已耗盡
電池充電中
Page 10

Polaroid ● E101W Polaroid ●E101W
TC-4 TC-5
2
Wi-Fi
狀態
Wi-Fi 開啟
Wi-Fi 關閉
3 Status
縮時攝影模式
拍照模式
錄影模式
記憶卡錯誤 ( 損壞、鎖定或記憶卡槽內無記
憶卡 )
記憶卡儲存空間已滿
與行動裝置連線
與電腦連線進入 USB 模式
電力即將殆盡
2.3 Wi-Fi 連線
1. 按下設備的電源按鈕開啟電源。
2. 按下設備的 Wi-Fi 按鈕開啟無線網路。
3. 使用行動裝置的 Wi-Fi 功能,搜尋清單中的設備識別碼。每一
部設備都有獨特的識別碼:i3XXXXXX ( 識別碼後 2 碼與密碼後
2 碼相同,表示已對應到您的設備 )。
4. 請選擇並輸入 Wi-Fi 密碼 ( 設備 LCM 螢幕顯示的 4 位英文
字母與數字重複 2 次即為 Wi-Fi 密碼,例如設備 LCM 螢幕顯示
1234,請您輸入 Wi-Fi 密碼 12341234)。
iOS / AndrOid 作業系統用戶:
使用行動裝置 [設定] → [Wi-Fi] → [選擇設備識別碼
i3XXXXXX] → [ 輸入密碼 ] → [ 連線 ]。
5. 執行 [Life Cam] 應用程式 , 設備 LCM 螢幕顯示 表
示已完成連線。
應用程式的介面和功能可能會因應用程式版本的不同而改
變,詳情請參訪 Google Play 或 APP Store 的更新。
註:
1. 執行 [Life Cam] 應用程式前請確認設備的 Wi-Fi 功能已
開啟,且行動裝置已搜尋到 Wi-Fi 訊號,否則 [Life Cam]
應用程式將退出。
2. 行動裝置與設備連線需在 10 公尺以內,並且沒有建築物
阻隔。
3. 當設備的 Wi-Fi 功能開啟或斷線達 3 分鐘仍未與您的行
動裝置連線,設備將自動關閉 Wi-Fi 功能,欲再次連線請重
新開啟 Wi-Fi。
4. 使用設備之前,我們建議您將行動裝置設定為正確的日期
與時間,錄製下來的 檔案將與行動裝置設定的日期與時間一
致。
5. 當行動裝置與設備連線之後,設備的模式切換、錄製及
Wi-Fi 等操作按鈕將失去作用,請透過 [Life Cam] 應用程
式進行操作。
6. [Life Cam] 應用程式的語言將與您的行動裝置一致,非內
建語言則為預設。
Page 11

Polaroid ● E101W Polaroid ●E101W
1
2
3
4
5
8
9
10
11
6
7
1
2
12
13
5
8
9
15
16
6
14
1
2
17
18
19
20
5
8
9
15
22
6
21
2.4 介面
錄影介面 拍照介面 縮時攝影介面
編號 圖示 項目 描述
1 Wi-Fi 狀態 顯示 Wi-Fi 狀態。
2 電池狀態 顯示電池的剩餘電量。
3 影片長度
設備依循您所設定的影片長度將錄製的
影片儲存為各個檔案。觸控選擇所需的
影片長度。
可用選項:3 分鐘 / 5 分鐘 / 10 分鐘 /
30 分鐘
4 聲音記錄
觸控選擇所需的聲音記錄。
可用選項:開 / 關
5 變焦指示器
顯示變焦狀態。觸控
/
以調節變
焦。
可用選項:x1.0~x2.4
6 播放 觸控進入播放模式。
7 錄影
觸控 開始錄影,再次觸控 停止
錄影。
8
2014/01/01
12:00:00
日期與時間 顯示當前拍攝的日期與時間。
9 目錄 觸控進入目錄。
10 影像解析度 顯示當前的影像解析度。
11 錄影模式
顯示當前為錄影模式。
觸控可切換到縮時攝影或拍照模式。
12 拍照模式
觸控選擇所需的拍攝模式。
可用選項:一般 / 5 秒 / 10 秒 / 連拍 3
張照片 / 連拍 5 張照片
13 美顏
觸控選擇所需的美顏級數。
可用選項:0 / 1 / 2
14 拍照 觸控即可拍攝照片。
15 拍照解析度 顯示當前的照片解析度。
TC-6 TC-7
Page 12

Polaroid ● E101W Polaroid ●E101W
16 拍照模式
顯示當前為拍照模式。
觸控可切換到錄影或縮時攝影模式。
17 縮時攝影
觸控選擇合適的間隔時間。
可用選項:5 秒 / 10 秒 / 30 秒 / 1 分鐘
/ 5 分鐘 / 10 分鐘 / 30 分鐘
18
檔案儲存格式觸控選擇所需的檔案儲存格式。
可用選項:照片 / 影片 / 照片和影片
19 畫面更新率
觸控選擇所需的畫面更新率。
可用選項:3 fps / 5 fps / 10 fps
20 省電模式
觸控選擇省電模式。
可用選項:開 / 關
21 拍照
觸控 開始拍攝照片,再次觸控
停止拍攝。
22
縮時攝影模式顯示當前為縮時攝影模式。
觸控可切換到錄影或拍照模式。
安全措施
使用 Polaroid C151 前,請仔細閱讀所有的安全措施並遵守本手冊
規定的所有程序,正確操作設備。
●
如本指南未說明,請勿拆卸或改動本産品的任何設備或部件。
●
該産品爲非防水設計,請勿使設備接觸水及其他液體。
●
若有液體進入設備內部,應立即斷掉設備電源,繼續使用設備
會可能會導致起火或漏電,屆時請向您購買本產品的經銷商或離
您最近的服務中心諮詢處理。
●
爲避免觸電危險,請勿用濕手操作連接或斷開設備。
●
請勿將設備靠近熱源或與火焰或高溫接觸。
●
請勿將設備靠近產生強大電磁場的設備。與強磁場接觸可能會
導致發生故障或數據損壞和丟失。
免責聲明
●
若設備因為接觸液體(如水、咖啡、飲料等)而損壞,其維修
不包含在 Polaroid 一(1)年有限質保範圍內。
●
如果使用其他車載充電器導致設備損壞或其他損失,我司概不
負責。
●
由於 Polaroid 產品會不斷更新和改善,您所購買的産品可能與
本快速使用指南所述外觀或功能上稍有不同
TC-8 TC-9
Page 13

全高清行车记录仪
E101W
快速使用指南
400-8401-030
www.polaroidcarcam.com
Page 14

Polaroid ● E101W Polaroid ●E101W
产品和配件清单
1. 车载充电器 3. USB 线 5. 保修卡
2. 吸盘支架 4. 快速指引
感谢您惠顾此款摄像机,请详阅随货附赠 CD-ROM 光盘中的操
作说明书,以确保正确地使用本产品。
体育活动期间发生的任何损坏均不在本产品保修范围内。
欲了解更多操作信息,请参阅 CD-ROM。
1. 产品介绍
1.1 操作按钮
无需通过 Wi-Fi 连接到 [Life Cam] 应用程序,便可单独操作生活
记录仪。有关每个按钮的功能描述,请参见下表。
顶视图与底视图 侧视图 ( 左侧与右侧 )
前视图
后视图
1
2
3 4
TC-12 TC-13
Page 15

Polaroid ● E101W Polaroid ●E101W
TC-14 TC-15
2. 开始使用
2.1 插入存储卡
将微型 SD 卡 (10 级或更高等级,最大容量可达 32GB) 安装在
生活记录仪设备中。按电源按钮启动设备。
註:
1. 當設備在開機狀態時請勿取出或插入記憶卡,這可能會損
壞設備及記憶卡。
2. 開始使用前請先格式化 Micro SD 卡。
2.2 LCM 螢幕訊息
编号 项目 功能
1 模式按钮 切换模式(缩时摄影 / 拍摄 / 录制模式)
2 录制按钮
● 在缩时摄影模式下,按录制按钮可开始录制
视频。再按一次可停止录制 ( 如果设备进入节
能模式并处于关机状态,按电源按钮可停止录
制 ) 。
● 在拍摄模式下,按录制按钮可拍照。
● 在录制模式下,按录制按钮可开始录制视频。
再按一次停止录制。
3 Wi-Fi 按钮 按下可打开或关闭 Wi-Fi 功能。
4 电源按钮
● 按下可打开或关闭生活记录仪。
● 要重新设置,请至少按住电源按钮 5 秒。
注:
如果要使生活记录仪 恢复原厂设置 ,请确保生活记录仪的
Wi-Fi 处于关闭状态。按住模式按钮不放,接着按下 Wi-Fi
按钮,如果发出哔一长声,表示恢复原厂设置完毕。
1
2
3
编号 项目 图标 描述
1
电池
状态
电池电量已充满
电池电量剩余 2/3
电池电量剩余 1/3
电池电量耗尽
正在充电
Page 16

Polaroid ● E101W Polaroid ●E101W
TC-16 TC-17
2
Wi-Fi
状态
Wi-Fi 开启
Wi-Fi 关闭
3 状态
缩时摄影模式
拍摄模式
录制模式
存储卡错误(损坏、锁定或设备内无卡)
存储卡已满
与手机连接
与计算机连接后进入 USB 模式
电量即将耗尽
2.3 Wi-Fi 连接
1. 按电源按钮启动设备。
2. 按 Wi-Fi 按钮激活无线网络。
3. 使用移动设备的 Wi-Fi 功能从列表中搜索设备 ID。每台设备都
有唯一的 ID 号:i3XXXXXX ( 如果该 ID 号的最后 2 位与密码的
最后 2 位相同,表示您的移动设备已响应 )。
4. 选择并输入 Wi-Fi 密码 (LCM 显示屏上的 4 个数字与字母重
复输入两次即为 Wi-Fi 密码。例如 LCM 显示屏显示 “1234”,
您的 Wi-Fi 密码就是 12341234)。
iOS / AndrOid 操作系统用户:
使用行動裝置 [設定] → [Wi-Fi] → [選擇設備識別碼
i3XXXXXX] → [ 輸入密碼 ] → [ 連線 ]。
5. 执行 Life Cam 应用 程 序 , 设备 LCM 显示 屏 将 显 示
, 提示连接已建立。
应用程式的界面和功能可能会因应用程序版本的不同而改
变,详情请参访 Google Play 或 APP Store 的更新。
注:
1. 执行 Life Cam 应用程序之前,请确保设备的 Wi-Fi 功能
已激活,移动设备正在接收 Wi-Fi 信号,否则应用程序将退
出。
2. 移动设备与设备的距离最远不能超过 10 米,且两者之间
不能存在任何建筑物。
3. 如果设备的 Wi-Fi 功能已激活 3 分钟,但没有与您的移
动设备相连,或者连接断开,那么设备将自动停止 Wi-Fi 功
能,您需要再次激活 Wi-Fi 功能。
4. 我们建议您在使用设备前为移动设备设置正确的日期和时
间,这样,录制的视频将与移动设备的日期和时间设置一致。
5. 将移动设备与本设备相连后,设备的所有模式切换、录制
和 Wi-Fi 操作按钮都将无法操作;所有操作都应通过 Life
Cam 应用程序执行。
6. Life Cam 应用程序的语言与您移动设备的语言一致,如
果该语言不是内置语言,应是默认语言。
Page 17

Polaroid ● E101W Polaroid ●E101W
1
2
3
4
5
8
9
10
11
6
7
1
2
12
13
5
8
9
15
16
6
14
1
2
17
18
19
20
5
8
9
15
22
6
21
2.4 屏幕
录制屏幕 拍照屏幕 缩时摄影屏幕
编号 图标 项目 描述
1 Wi-Fi 状态 指示 Wi-Fi 状态。
2 电池状态 提示剩余电池电量。
3 视频时长
设备将按照设定的录制视频时长将视频
存储为单个文件。
触摸选择所需视频时长。
可用选项:3 分钟 / 5 分钟 / 10 分钟 /
30 分钟
4 声音记录
触摸选择所需声音记录设置。
可用选项:开 / 关
5 变焦指示器
指示变焦状态。触摸
/
可调整变
焦。
可用选项:x1.0~x2.4
6 播放 触摸可进入播放模式。
7 录制
触摸 可开始录制,再次触摸 可
停止录制。
8
2014/01/01
12:00:00
日期和时间 指示当前录制日期和时间。
9 菜单 触摸可进入菜单。
10 视频分辨率 提示当前视频分辨率。
11 录制模式
指示当前录制模式。
触摸可切换为缩时摄影或拍照模式。
12 拍摄模式
触摸选择所需拍照模式。
可用选项:一般 / 5 秒 / 10 秒 / 连拍 3
张照片 / 连拍 5 张照片
13 美颜
触摸选择所需美颜模式。
可用选项:0 / 1 / 2
14 拍摄 触摸可开始拍摄照片。
15 照片分辨率 指示当前照片分辨率。
TC-18 TC-19
Page 18

Polaroid ● E101W Polaroid ●E101W
16 拍照模式
指示当前拍照模式。
触摸可切换为缩时摄影或录制视频模式。
17 缩时摄影
触摸选择合适的时间间隔。
可用选项:5 秒 / 10 秒 / 30 秒 / 1 分钟
/ 5 分钟 / 10 分钟 / 30 分钟
18 存储类型
触摸选择所需存储类型。
可用选项:照片 / 视频 / 照片和视频
19 畫面更新率
觸控選擇所需的畫面更新率。
可用選項:3 fps / 5 fps / 10 fps
20 省電模式
觸控選擇省電模式。
可用選項:開 / 關
21 拍照
觸控 開始拍攝照片,再次觸控
停止拍攝。
22
縮時攝影模式顯示當前為縮時攝影模式。
觸控可切換到錄影或拍照模式。
安全需知
使用 Polaroid C151 前,请仔
细阅读
所有的安全措施并遵守本手册
规
定的所有程序,正确操作设备。
●
如本指南未说明,请勿拆卸或改动本产品的任何配件或零部件。
●
该产品为非防水设计,请避免使设备接触水或其他液体。
●
若有液体进入设备内部,应立即断掉设备的电源。继续使用设
备可能会导致起火或漏电,届时请向您购买本产品的经销商或离
您最近的服务中心咨询处理方法。
●
为避免触电危险,请勿用湿手操作或连接、断开设备。
●
请勿将设备靠近热源或与火焰、高温接触。
●
请勿将设备靠近产生强大电磁场的设备或环境,与强磁场接触
可能会导致发生故障或数据损坏、丢失。
免责声明
●
若设备因为接触液体(如水、咖啡、饮料等)而损坏,其维修
不在 Polaroid 一(1)年有限质保范围内。
●
如果使用其他车载充电器导致设备损坏或其他损失,我司概不
负责。
●
由于 Polaroid 产品会不断更新和改善,您所购买的产品可能与
本快速使用指南所述外观或功能上稍有不同。
TC-20 TC-21
 Loading...