


ColorShot Printer
User Guide

1
POLAROID COLORSHOT INSTALLATION GUIDE
INTRODUCTION . . . . . . . . . . . . . . . . . . . . . . . .2
System requirem ents . . . . . . . . . . . . . . . . . . . .3
The printer . . . . . . . . . . . . . . . . . . . . . . . . . . . . .4
CONNECT THE PRINTER . . . . . . . . . . . . . . . . . .6
Position the printer . . . . . . . . . . . . . . . . . . . . . .6
Before you begin . . . . . . . . . . . . . . . . . . . . . . . .7
Connect the cables . . . . . . . . . . . . . . . . . . . . . .7
INSTALL THE SOFTWARE . . . . . . . . . . . . . . . . .9
PRINT TEST IMAGES . . . . . . . . . . . . . . . . . . .15
Start up your imaging softw are . . . . . . . . . . .16
Load the film . . . . . . . . . . . . . . . . . . . . . . . . . .16
Check the printer settings . . . . . . . . . . . . . . . .18
Print KIDS.TIF . . . . . . . . . . . . . . . . . . . . . . . . .18
Print FLOWERS.TIF . . . . . . . . . . . . . . . . . . . . .20
TROUBLESHOOTING . . . . . . . . . . . . . . . . . . .22
Technical Support . . . . . . . . . . . . . . . . . . . . . .22
Enabling USB . . . . . . . . . . . . . . . . . . . . . . . . .24
Recommended m onitor setting . . . . . . . . . . .26
Recommended video accelerator setting . . . .26
If installation is unsuccessful . . . . . . . . . . . . .27
To uninstall IQA and the ColorShot driver . . .28
Reconnection note . . . . . . . . . . . . . . . . . . . . .29
Polaroid Offices and Service Centers . . . . . . .29
Index . . . . . . . . . . . . . . . . . . . . . . . . . . . . . . . .35

2
INTRODUCTION
his Polaroid®ColorShot™Installation Guide covers connecting
the printer, installing the softw are, and printing test images.
T
tures and options in the print driver, as well as full troubleshooting
inform ation, please refer to the Polaroid ColorShot User’s Guide
(CSguide.pdf).
For detailed inform ation on using the printer and all the fea-

3
INTRODUCTION (CONT.)
System requirements
A PC-compatible com puter with a
•
Pentium
USB (Universal Serial Bus) connector
Microsoft®Windows®95 operating
•
system , Version B
16MB RAM (m inim um); 32MB RAM
•
(recom m ended)
50MB free hard disk space (mini-
•
mum); more space required w hen
printing multiple copies (10+)
®
processor (or later) and a
(see page 24)
A VGA 640 x 480 color monitor, 256
•
colors m inim um, 16-bit recomm end-
see page 26 for advice on setting
ed (
*
your m onitor and video accelerator)
A CD-ROM drive, 2x speed (mini-
•
mum); 4x or faster (recom mended)
* Note: Microsoft USB softw are is not
com patible with early versions of
Toshiba’s Infinia In-Touch™ modules,
and installing the software on
Toshiba Infinia system s w hich include
such m odules will render such Infinia
system s inoperable.
4
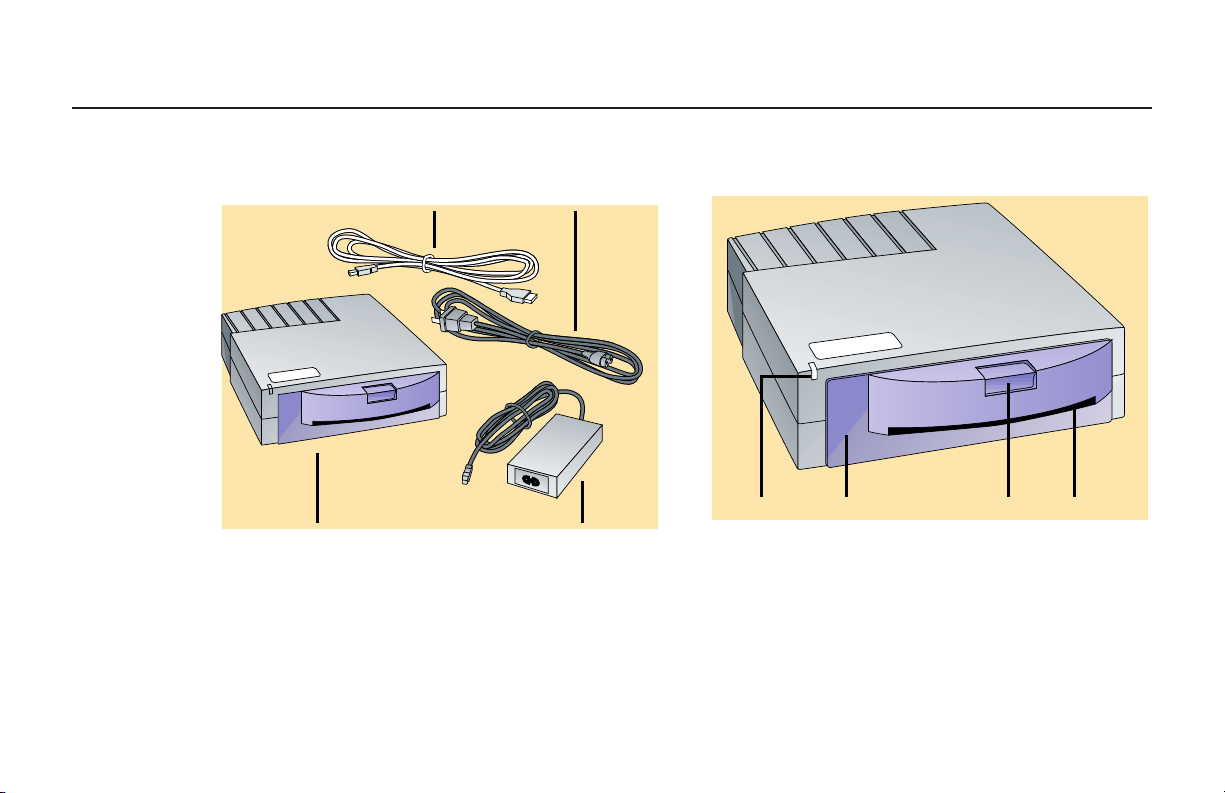
INTRODUCTION (CONT.)
The printer
a. Printer
b. Pow er adapter
c. Pow er cord
d. USB cable
e. Printer software (not shown)
FRON T OF PRINTER
cd
c dba
ba
a. Power/Printer busy LED
b. Film door
c. Film door latch
d. Film ejection slot
5
INTRODUCTION (CONT.)
BACK OF PRINTER
ba
a. USB connector
b. Pow er connector
Note: If any of these com ponents is
missing, contact your dealer.
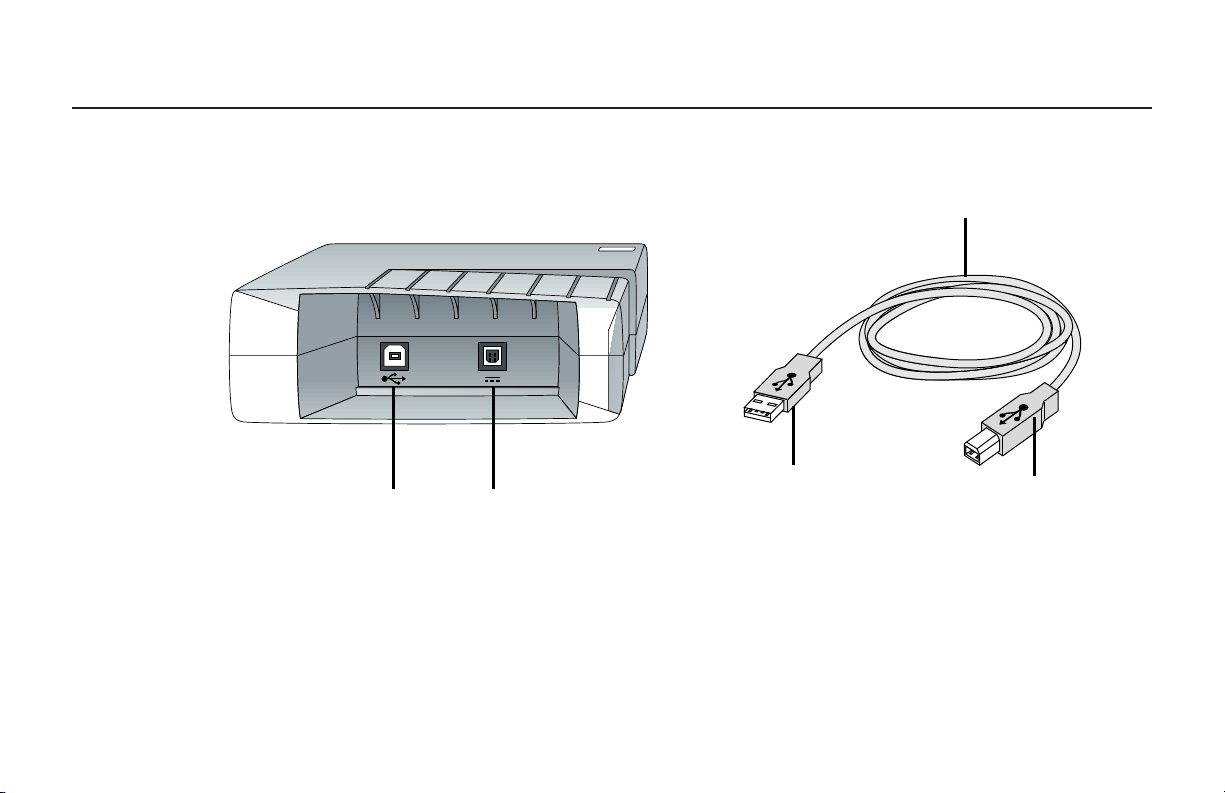
USB CABLE
b
a. USB cable
b. Com puter connector
c. Printer connector
a
c

6
CONNECT THE PRINTER
Position the printer
lace the printer horizontally, on a flat
surface near your computer. (Do not
P
The Polaroid ColorShot printer is a “ plug-and-play” device. Leave
your com puter on when you connect the printer. When the printer is
connected to your computer and plugged into a pow er supply, the
system detects the new hardware and prom pts you to install the soft-
ware. Follow the detailed installation instructions in the next section
carefully.
position the printer vertically.)
7
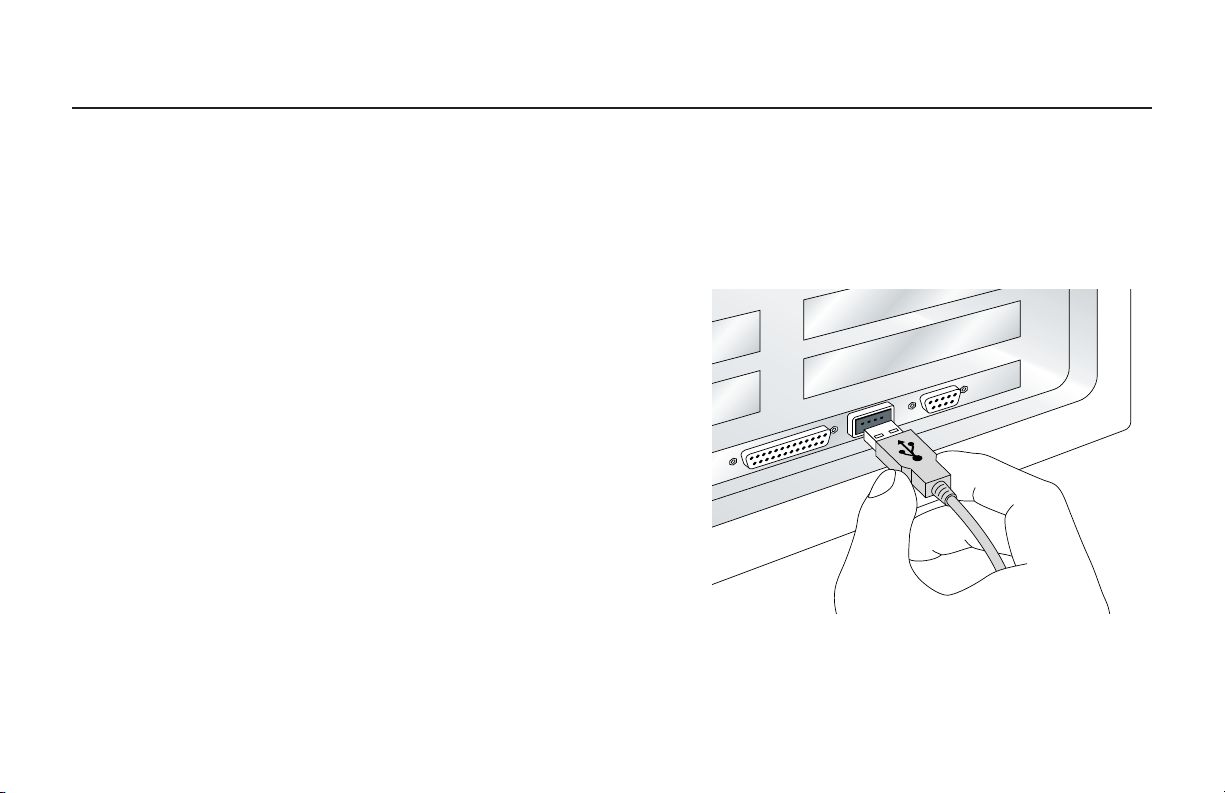
CONNECT THE PRINTER (CONT.)
Before you begin
Your com puter should be USB-ready.
•
If you are not sure, see the section
Enabling USB
Note the drive letter for your CD-ROM
•
drive: To find it, click M y Com puter
on the desktop and note w hich drive
has the CD-ROM icon.
Insert the Polaroid ColorShot CD
•
ROM into the CD-ROM drive.
Be sure your m onitor and video
•
accelerator card are set properly (see
page 26).
on page 24.
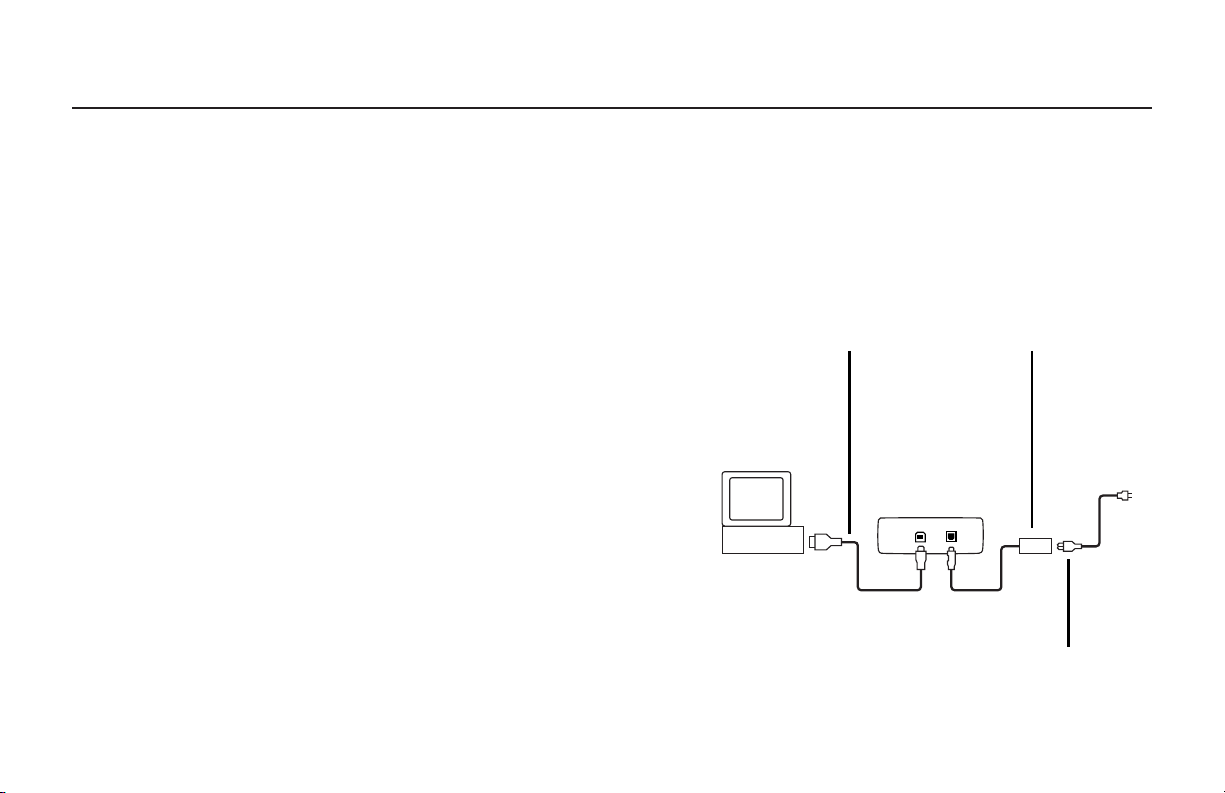
Connect the cables
1 Connect the pow er cord to the pow er
adapter.
2 Connect the pow er adapter into the
connector on the printer.
USB cable Power
adapter
Power
cord
8
3 Connect the pow er cord to a ground-
ed outlet. When the unit is plugged
in, the LED on the front of the unit
lights to indicate power is on.
Note:
The power is now on to the printer.
There is no on/off switch.
4 Connect the USB cable into a USB
connector on the back of the com puter, or into another hubbed USB
device. (Polaroid ColorShot has to be
at the end of the device chain.)
5 While watching the com puter screen,
connect the USB cable to the back of
the printer.
6 The system detects the printer as
soon as you connect it and prompts
you to install the software. See the
next section,
Install the softw are
.

9
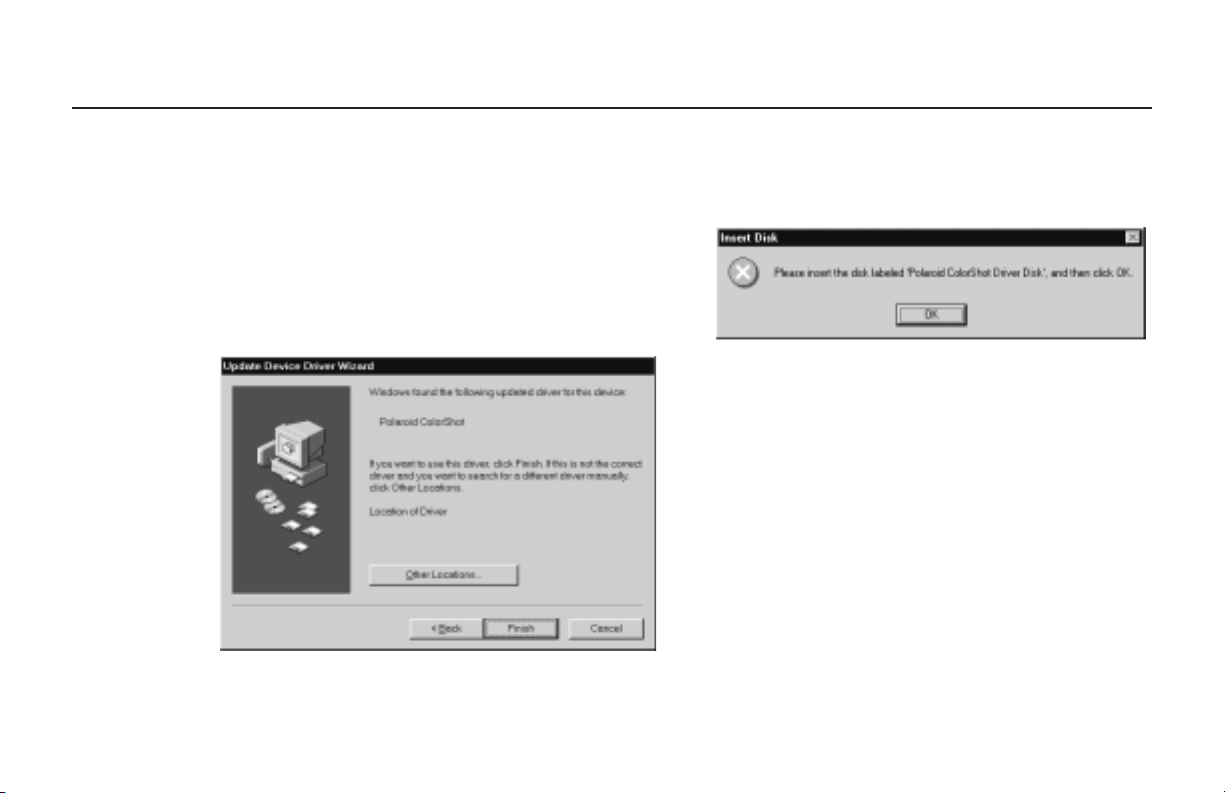
INSTALL THE SOFTWARE
s soon as you connect the printer, the screen displays
“ Building driver inform ation database.” The Update Device
A
Important: For successful installation, read each screen carefully
before proceeding to the next step. See the detailed instructions that
follow.
Note: As part of the installation, Adobe
two .pdf files of the user manuals are installed on your hard drive, in
the ColorShot folder: CSinstal.pdf (this manual), and CSguide.pdf (the
User’s Guide). Three sam ple images are also installed in the
ColorShot folder, in .tif and .bmp formats: kids, flow ers, and test.
Driver Wizard is displayed. Click Next to continue.
®
Acrobat™Reader and the
10
INSTALL THE SOFTWARE (CONT.)
1 The system locates the device and
displays the name: Polaroid
ColorShot. If you do not see the
nam e Polaroid ColorShot, be sure the
CD is in the CD-ROM drive. Click
Finish.
2 The screen prompts you to insert the
disk; disregard it and click OK.
11
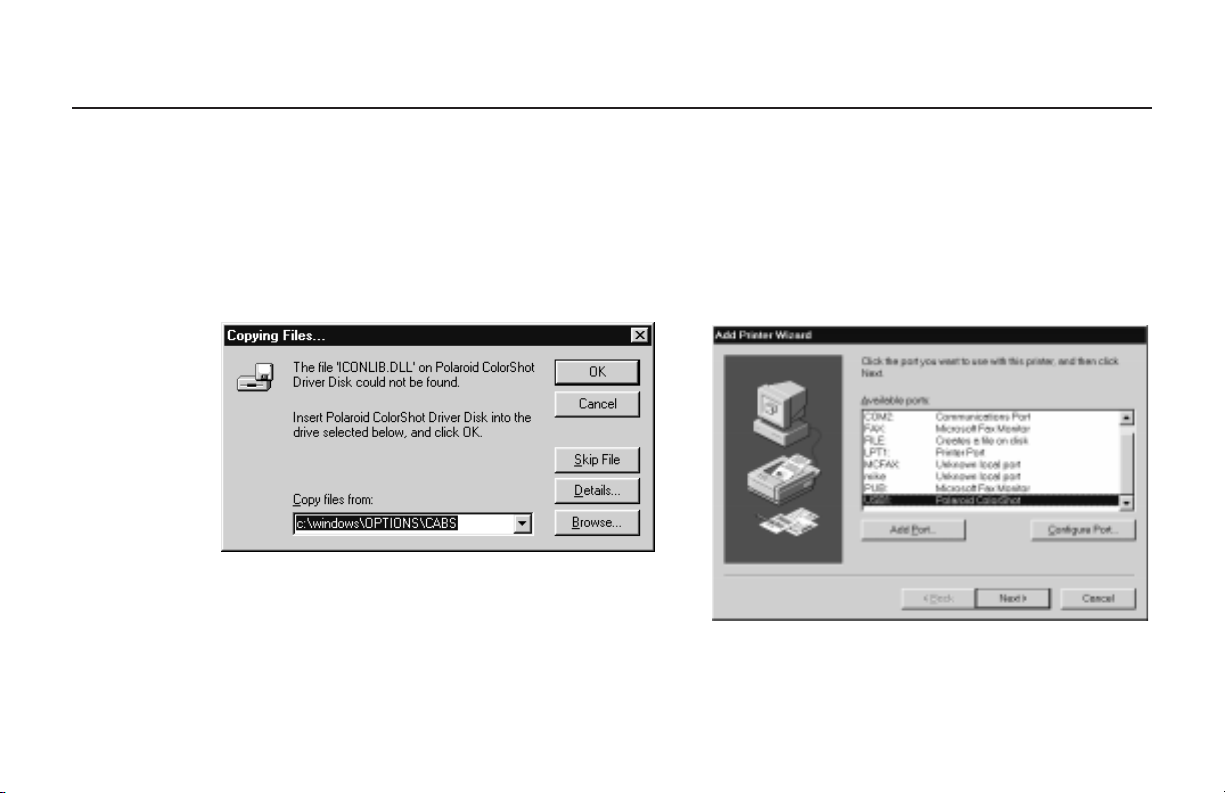
INSTALL THE SOFTWARE (CONT.)
3 In the Copy Files From list, press the
Delete key to delete the highlighted
text , then type the drive letter for
your CD-ROM drive (for example, D:\
or E:\).
4 Click OK to begin installation.
5 The Add Printer Wizard is displayed.
Scroll dow n the list of printer ports
and select the USB port and Polaroid
printer.
default port, LPT1. Click Next.
Important: Do not select the
12
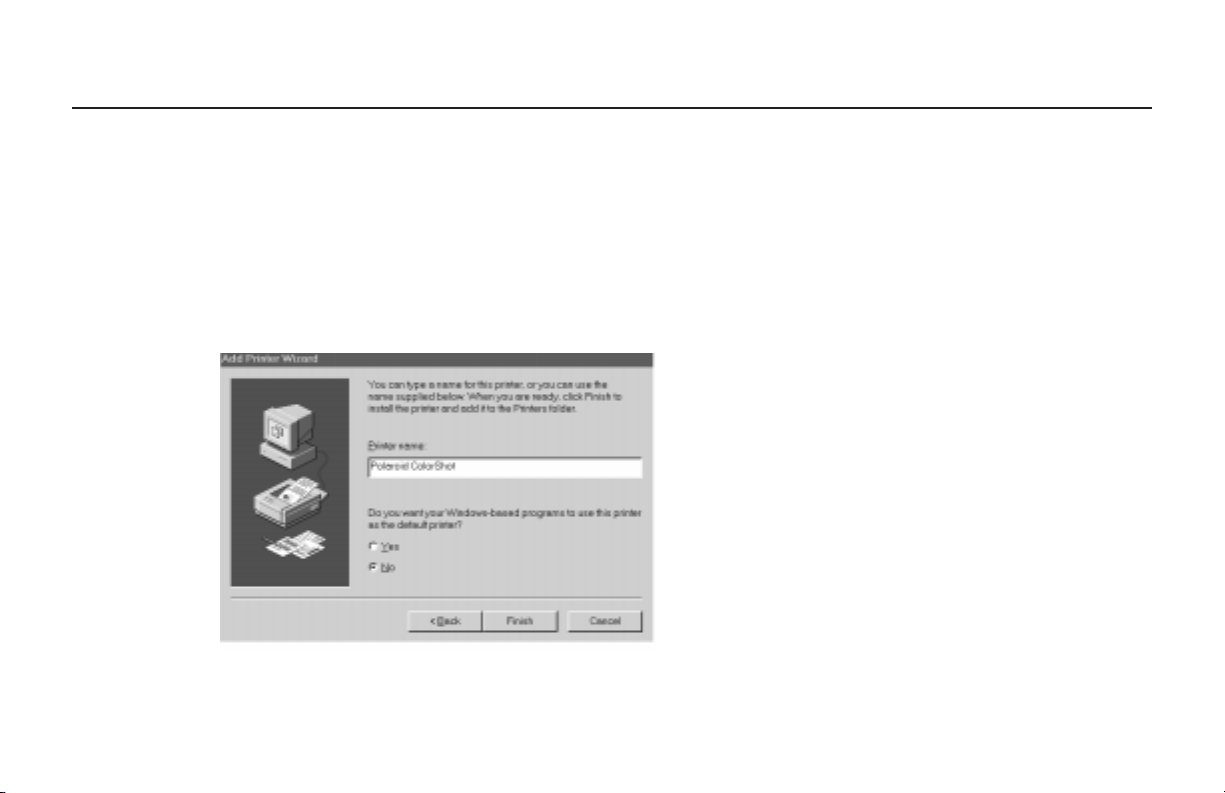
INSTALL THE SOFTWARE (CONT.)
6 The Add Printer Wizard displays
“ Polaroid ColorShot” for the Printer
nam e. If you have a paper printer you
normally print to, do not select
ColorShot as your default printer.
Click Finish once.
Important: The computer takes a few
moments to install the driver.
Although there is no status bar or wait
icon displayed during this process,
installation is proceeding!
13
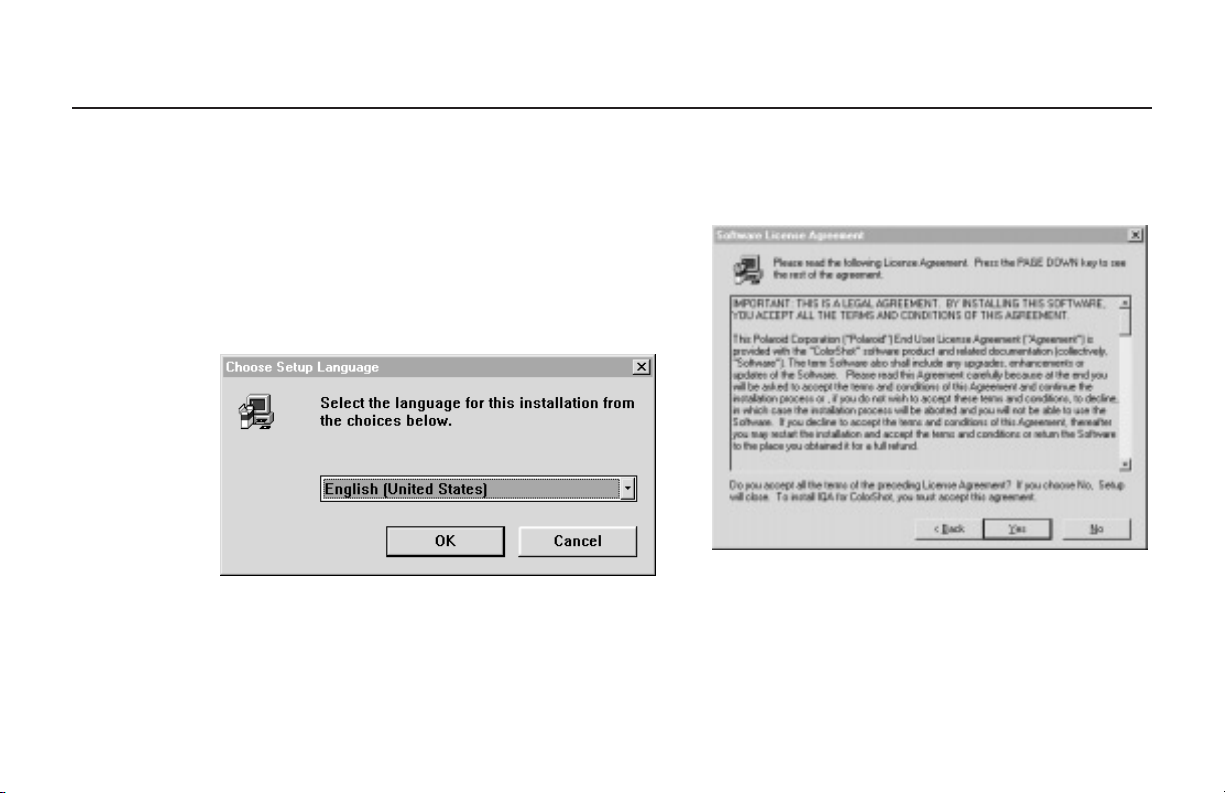
INSTALL THE SOFTWARE (CONT.)
7 If the print driver is not available in
the sam e language as the operating
system , the screens appear in
English. If you prefer another language, click the list and choose from
French, German, Italian or Spanish:
8 Click OK. The License Agreem ent is
displayed.
9 If you click Yes to accept the License
Agreement, installation proceeds.
14
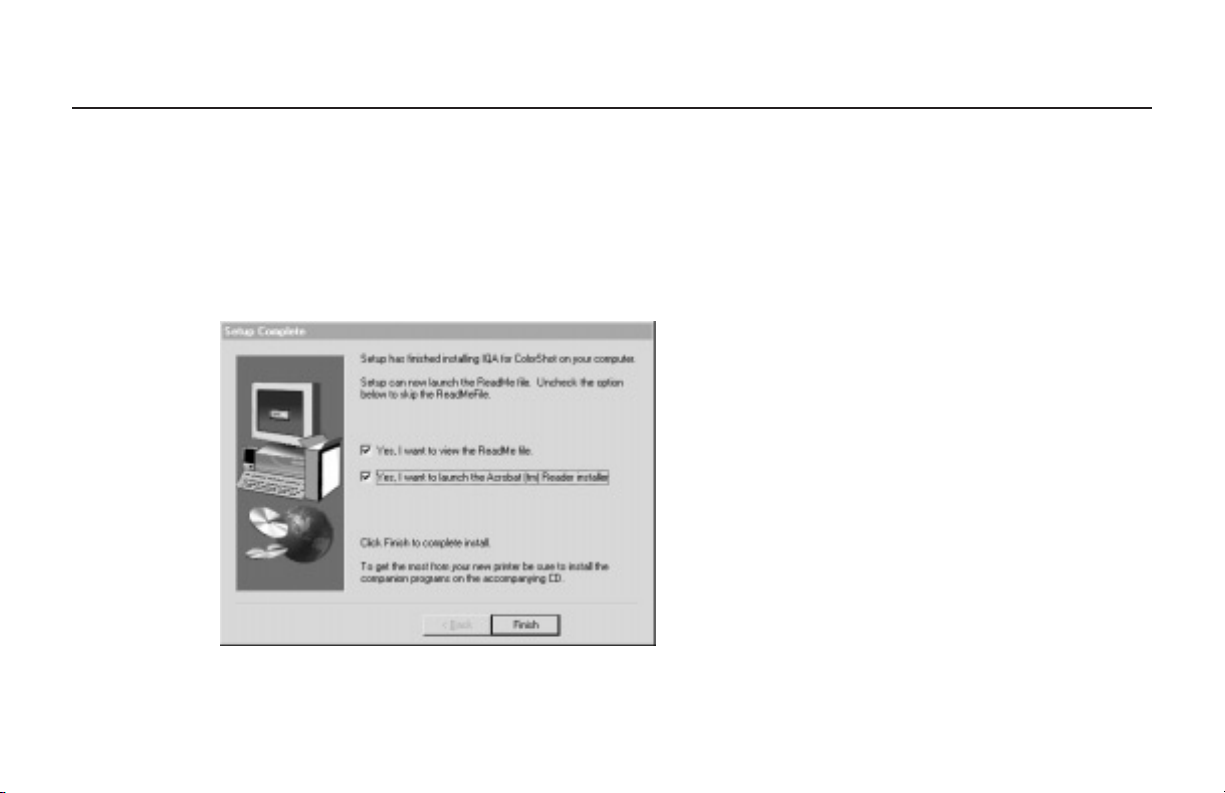
INSTALL THE SOFTWARE (CONT.)
10When installation is com plete, click
the first checkbox to see the Readme
file, click the second checkbox to start
Acrobat Reader, or leave them blank
to return to Windows. Click Finish.
Readme: The Readme file contains
•
last-m inute tips and news about your
printer.
Acrobat Reader: Use Adobe Acrobat
•
Reader to read and print the user
manuals, CSinstal.pdf (this manual)
and CSguide.pdf. The files are located
in the ColorShot directory on your C
drive, and on the Polaroid ColorShot
CD ROM.
IM PORTAN T REM INDER
If you have not already done so, check
your m onitor and video accelerator
card settings; see
page 26 for details.

15
PRINT TEST IMAGES
o be sure the printer is properly connected and to acquaint
yourself with the print driver, we recom mend you use the
T
located in the Sam ples folder w ithin the ColorShot folder on your
hard drive.
default settings. To configure the print driver for your own use, see
the detailed descriptions of Print Properties in the Polaroid ColorShot
User’s Guide (CSguide.pdf).
follow ing tutorial to print two test images. The im ages are
When printing the test images, keep all the print properties at the
16
PRINT TEST IMAGES (CONT.)
Start up your imaging softw are
1 Insert the M GI PhotoSuite™ CD into
your CD-ROM drive.
2 Follow the instructions on the screen
to install the software.
3 Start up M GI PhotoSuite.
Note: Be sure Brightness, Enhance
Colors and Adjust Colors (on the
Image menu) are at their neutral settings. If this is the first time you have
used M GI PhotoSuite, these sliders
will already be at their neutral settings.
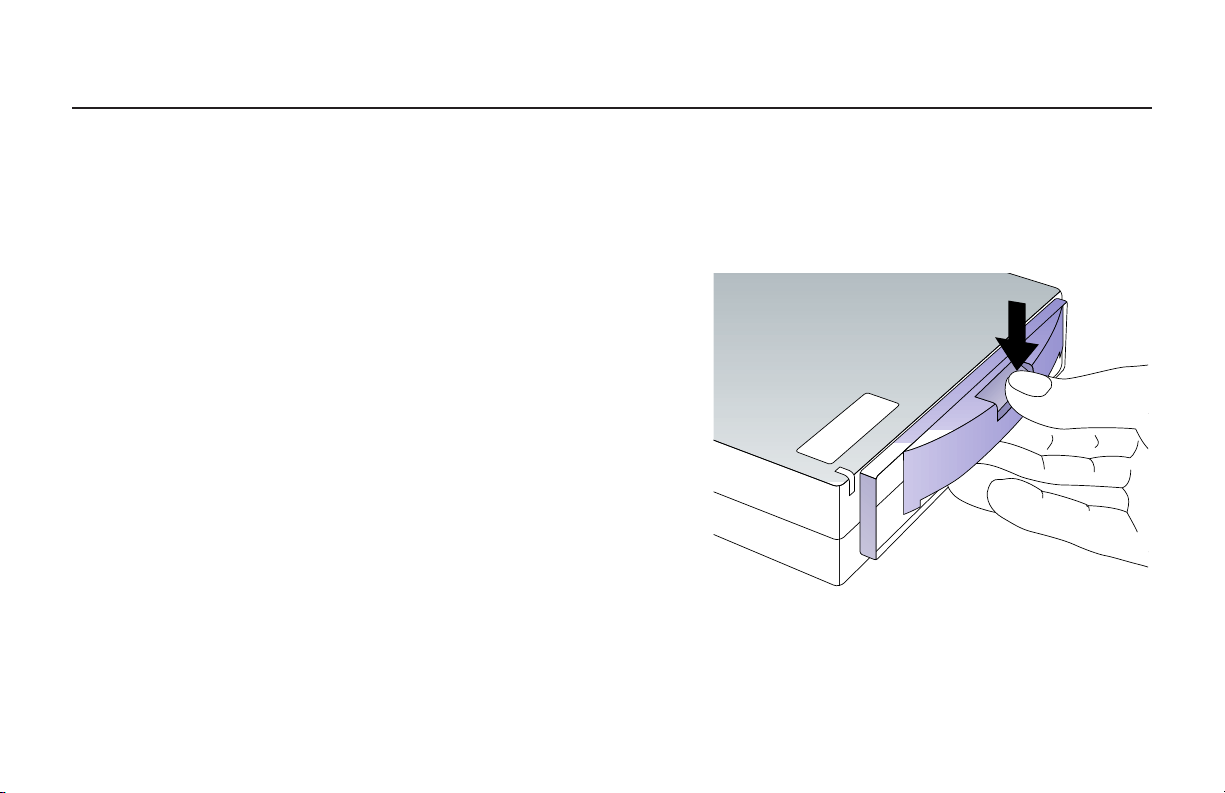
Load the film
1 Press and hold down the door latch.
Pull open the film door.
17
PRINT TEST IMAGES (CONT.)
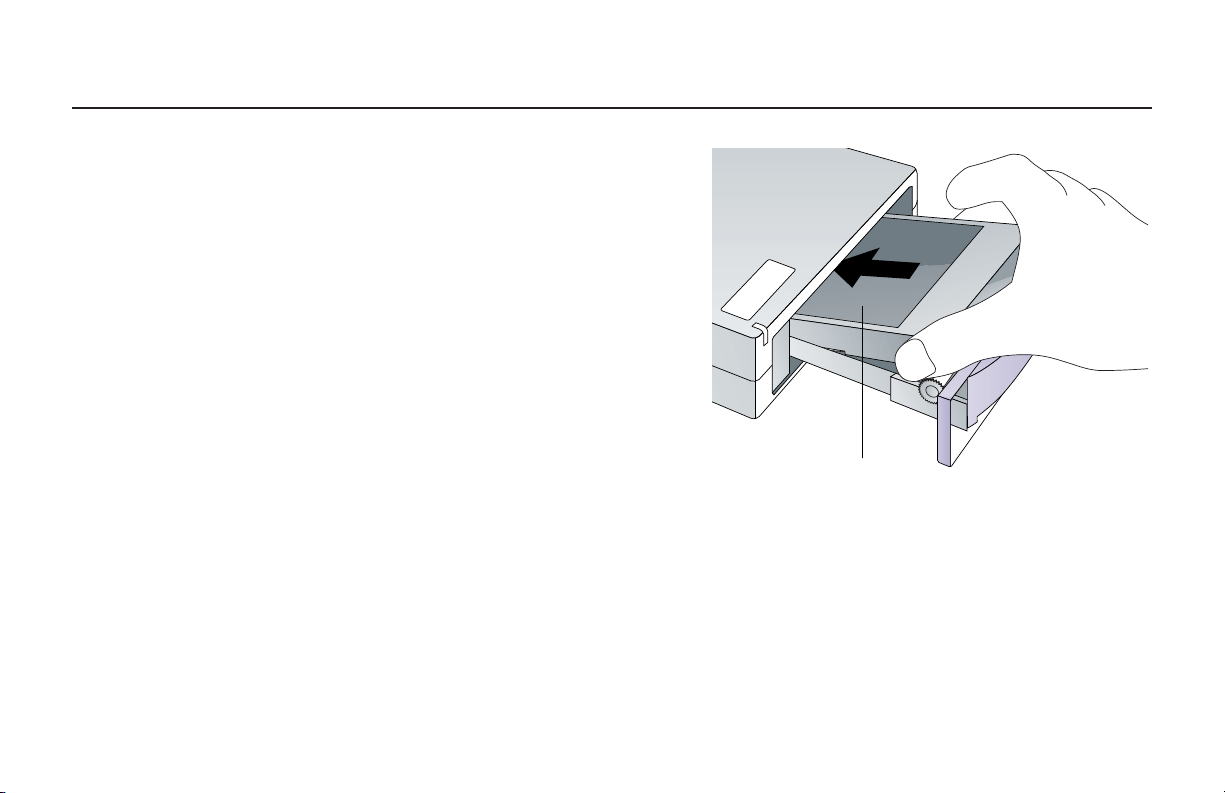
2 Remove the Polaroid ColorShot film
from the foil package and insert it
into the tray, with the film cover facing up and the w ide plastic border
nearest the door. The film cover protects the light-sensitive material
beneath it.
3 Slide the film tray in until it latches
shut.
Warning: After the first picture, do not
open the film tray until the film pack
is empty. Doing so ruins the top picture in the pack.
Film cover

18
PRINT TEST IMAGES (CONT.)
Check the printer settings
1 From Windows, go to Start and select
Settings. Select the Printers folder
and open it.
2 Double-click the ColorShot Printer
icon inside the folder.
3 The Polaroid ColorShot status box is
displayed. This message box displays
the print queue.
4 If you w ant to change any settings,
click Properties on the Printer menu.
After m aking changes, click OK.
5 Close the Printers w indow.
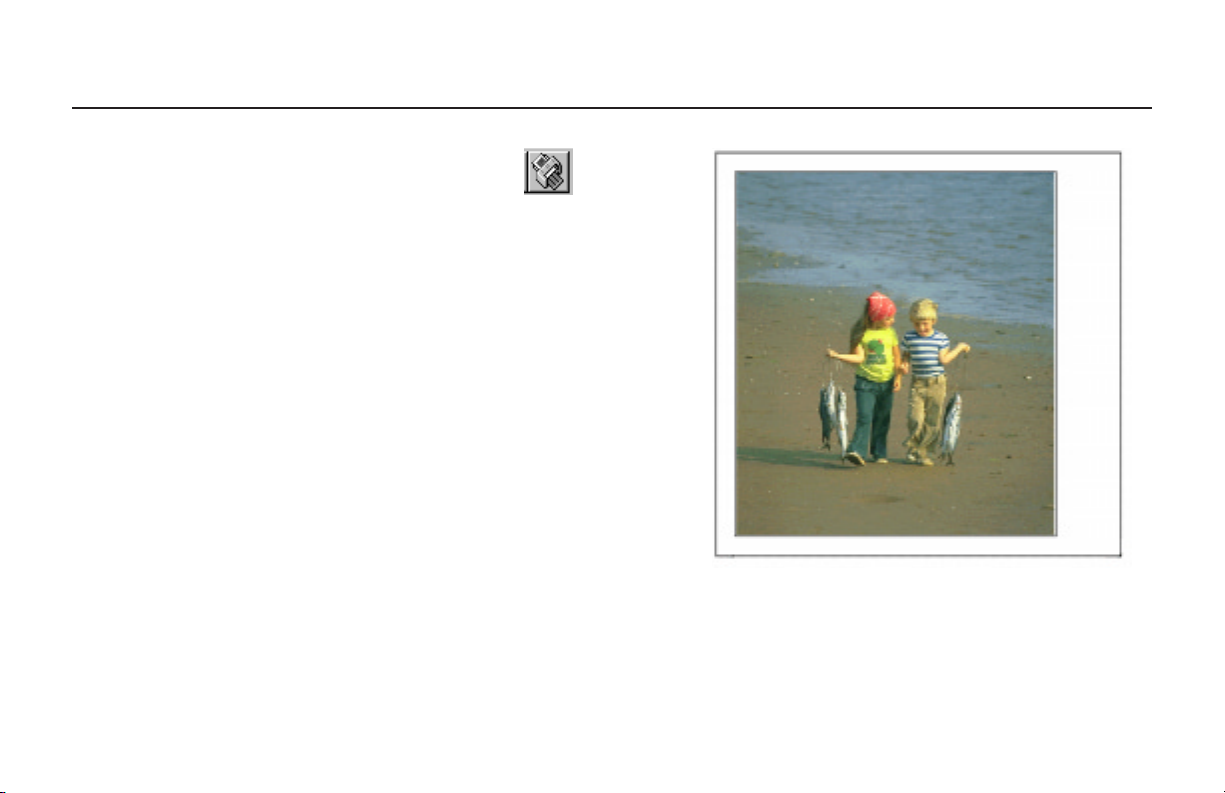
Print KIDS.TIF
1 Open the im age KIDS.TIF in the
Samples folder, located in the
ColorShot folder on your hard drive.
2 Click Printer Setup on the File menu.
3 Select Polaroid ColorShot as the
printer and select Portrait orientation.
Click OK.
4 Click the Print Preview icon
on the toolbar to display the
MGI PhotoSuite preview screen.
5 Click Size to Fit.
19
PRINT TEST IMAGES (CONT.)
6 Click the Printer icon in
the Print Preview screen.
7 Click OK to print the image.
8 The ColorShot preview screen is dis-
played. Click the printer icon in the
Preview tool bar to begin printing.
If this is your first print of the film
pack, the printer w ill eject the film
cover first. In a few m oments, the
printer w ill eject KIDS.TIF.
KIDS.TIF, in portrait orientation
20
PRINT TEST IMAGES (CONT.)
Print FLOWERS.TIF
1 To print the second test im age, open
the image FLOWERS.TIF in the
Samples folder, located in the
ColorShot folder on your hard drive.
2 Click Printer Setup on the File menu.
3 Select Polaroid ColorShot as the
printer and select Landscape orientation. Click OK.
4 Click the Print Preview icon
on the toolbar to display the
MGI PhotoSuite preview screen.
5 Click Size to Fit.
6 Click the Printer icon in
the Print Preview screen.
7 Click OK to print the image.
8 The ColorShot preview screen is dis-
played. Click the printer icon in the
Preview tool bar to begin printing.
In a few m oments, the printer will
eject FLOWERS.TIF.
21
PRINT TEST IMAGES (CONT.)
FLOWERS.TIF, in landscape orientation

22
TROUBLESHOOTING
Technical Support
f the printer is not operating properly and you cannot resolve it
with the troubleshooting information in this m anual or the User’s
Guide (CSguide.pdf), contact Polaroid Technical Support.
I
MGI PhotoSuite: If you need help with M GI PhotoSuite, check the
on-line help in PhotoSuite for information on obtaining product sup-
port from MGI.

23
TROUBLESHOOTING (CONT.)
WITHIN THE U .S.A.
Call us toll-free from w ithin the continental U.S.A. at 1-800-432-5355,
Monday through Friday, 8 a.m. to
8 p.m ., Eastern Time. We offer a variety of Custom er Support services; call
us for details and applicable fees.
You may also write to National Digital
Imaging Support, Polaroid
Corporation, 201 Burlington Road,
1-2A, Bedford, M A 01730.
Fax: 1-781-386-9688.
OU TSID E THE U.S.A
Contact the nearest Polaroid Service
Center.
IN TERNET SUPPORT
Technical Support is also available
over the Internet. Connect to our w eb
site at http://ww w.polaroid.com .
See the list on pages 29 – 34.

24
TROUBLESHOOTING (CONT.)
Enabling USB
If your system does not respond when
you connect the printer, your system
may not be compatible with USB, or
USB may not be enabled. Take the follow ing steps.
1 Be sure you are connected to
a USB port on your computer.
2 Be sure your operating system is
com patible:
Highlight the My Com puter icon.
•
Click the right mouse button and
•
choose Properties from the menu.
On the General tab, check the version
•
num ber of Microsoft Window s 95. A
“ B” or later after the num ber (for
example, 4.00.950 B) designates that
your system can install OSR 2.1, a
system upgrade required for the USB
connector. This upgrade is provided
on the ColorShot CD; see the next
step for installation instructions.
Note: If you do not have a “ B” after
the num ber, your computer w ill not
accept the USB supplem ent. Contact
your computer m anufacturer.

25
TROUBLESHOOTING (CONT.)
3 To install the USB supplement:
Be sure the USB cable is not connect-
•
ed to the printer.
Click My Com puter icon, then click
•
the CD-ROM drive icon. (The Polaroid
CD should be in the drive).
Click the USB Supplement folder.
•
Click DetroitR. The USB supplem ent
•
is installed.
4 After installing the supplement, you
need to enable USB in the system
BIOS:
Restart the computer and press the
•
key shown on the screen to run Setup
before Window s 95 starts up, to get
to the system BIOS.
Refer to your computer manual for
•
details on how to enable the USB
port in the system BIOS. For example, this option m ay be located in
Integrated Peripherals, Advanced
Chip Set, PCI Plug and Play, or under
another heading.
5 If you are still unable to install the
printer driver after following these
steps, contact your com puter manufacturer.

26
TROUBLESHOOTING (CONT.)
Recommended monitor set ting
We recom mend you adjust your
monitor for the highest available
resolution. To do so:
1 Click the right mouse button on the
desktop and select Properties.
2 Select the Settings tab.
3 Set Color Palette to 16 bit or higher.
4 M ove the slide control under Desktop
area to the right, to the highest resolution available; 800 x 600 is recommended. Click OK and close window s
as necessary.
Recommended video accelerator setting
Note: Intel recommends that you set
your video accelerator card to the
basic setting when connected to a
USB device, for smoother, m ore reliable communication with your printer.
This setting does not slow dow n your
system in any way. To do this:
1 Double-click the My Computer icon
on your desktop.
2 Double-click the Control Panel folder.
3 Double-click the System icon.
4 Select the Perform ance tab.

27
TROUBLESHOOTING (CONT.)
5 Click the Graphics button under
Advanced Settings.
6 M ove the slide control until Basic is
indicated. Click OK twice and close
window s as necessary.
If installation is unsuccessful
The Polaroid ColorShot printer m ust
be installed as a plug-and-play device.
If you use Add/Remove Programs or
Add Printer to install the software (or
if you interrupt the installation
process), your Windows registry may
be corrupted. To solve this problem ,
try the following:
1 Disconnect the USB cable from the
back of the printer.
2 Insert the Polaroid ColorShot CD-
ROM into the CD-ROM drive.
3 Double-click the My Computer icon.
4 Double-click the CD-ROM icon.
5 Click Recover Plug and Play using the
right mouse button.
6 Select Install and follow the instruc-
tions for Quick Installation.

28
TROUBLESHOOTING (CONT.)
To uninstall IQA and the ColorShot driver
Be sure the print queue is em pty. If
not, delete all jobs in the queue.
1 Restart your com puter.
2 Disconnect the USB cable from the
back of the printer.
3 Double-click the My Computer icon.
4 Double-click Control Panel folder.
5 Double-click Add/Remove Programs.
6 On the Install/Uninstall tab, highlight
Polaroid IQA for ColorShot in the list.
Click the Add/Remove button.
7 Click Yes to confirm the rem oval.
8 Click Yes to the Rem ove Shared File?
prompts.
9 When the uninstall is com plete, click
OK.
10Close window s until you return to the
Control Panel.
11Double-click Printers.
12Select the Polaroid ColorShot with
the right mouse button.
13Select Delete from the drop-dow n
menu. Click Yes as necessary to confirm the deletion.
14Close all w indows.
15If you want to reinstall the driver,
check the printer folder and be sure
there is no icon for the Polaroid printer before you reconnect the printer. If
there is, repeat steps 10 through 14.

29
TROUBLESHOOTING (CONT.)
Reconnection note
Your system or hub may have several
USB ports. If you connect the printer
into a port other than the one used at
original installation, the system
prompts you to reinstall the softw are.
Follow the instructions on the screen
to reinstall the softw are and specify
the current USB port when prompted.
Polaroid Offices and Service Cent ers
Australia
Polaroid Australia Pty. Ltd.
13-15 Lyonpark Road
P.O. Box 163
North Ryde, NSW 2113
Tel.: (02) 950 7000
Fax: (02) 887 2209
Belgique/België
Polaroid (Belgium ) N.V. - S.A.
Rue Colonel Bourg 111
Kolonel Bourgstraat 111
1140 Bruxelles-1140 Brussel
Tel.: 027143102 (Flem ish)
027143106 (French)

30
TROUBLESHOOTING (CONT.)
Brasil
Polaroid do Brasil Ltda.
Av. Paulista, 1776/11º andar
Cerqueira Cesar
São Paulo - Capital
01310-921
Tel.: 55.11.285.6411
Fax: 55.11.283.2625
288.6521
287.5393
Canada
Polaroid Canada Inc.
350 Carlingview Drive
Etobicoke, Ontario M 9W 5G6
Toll free: 1-800-268-6970
Danmark
Polaroid a.s.
Blokken 75
3460 Birkerød
Tlf.: 80011887
Deutschland
Polaroid GmbH
Sprendlinger Landstrasse 109
63069 Offenbach
Tel.: 06995096056
España
Polaroid (España), S.A.
Calle Orense 16 - 2ª planta.
28020-Madrid
Tno.: 913778103

31
TROUBLESHOOTING (CONT.)
France
Polaroid (France) S.A.
B.P. 7
78996-Elancourt Cédex
Tel.: 0141913810
Hong Kong
Polaroid (Far East) Ltd.
32/F Windsor House
311 Gloucester Road
Causeway Bay
Tel.: (852) 2894 0333
Italia
Polaroid (Italia) S.p.A.
Via Piave 11
21051 Arcisate (Varese)
Tel.: 0269633253
Japan
Nippon Polaroid
Kabushiki Kaisha
Mori Building, No. 30
2-2 Toranom on 3-chome
Minato-ku, Tokyo (105)
Tel.: 81-3-3438-8811
Fax: 81-3-3433-3537
México
Polaroid de M éxico S.A. de C.V.
Paseo de la Reform a 195-Piso 17
C.P. 06500 México, D.F.
Tel.: 703-1111
Fax: 566-0505
Del interior al 91 (800) 70-727
Ventas 91 (800) 70-747

32
TROUBLESHOOTING (CONT.)
Nederland
Polaroid Nederland B.V.
Zonnebaan 45
3606 CH Maarssen
P.O. Box 1219
3600 BE M aarssen
Tel.: 0204874534
New Zealand
Polaroid New Zealand Ltd.
Camera Services
24-26 Anzac Avenue
Auckland
Tel.: (09) 377 3773
Norge
Polaroid (Norge) A/S
Industriveien 8B, 1473 Skårer
Postboks 80, 1471 Skårer
Tlf.: 80011887
Österreich
Polaroid Ges.m.b.H.
Eitnergasse 5A
1231 Wien
Tel.: 06607433
Portugal
Polaroid (España) S.A.
Sucursal em Portugal
Edificio Monumental
Avenue Praia da Vitória 71-A, 4ºB
1050 Lisboa
Tel.: 0505446017

33
TROUBLESHOOTING (CONT.)
Puerto Rico
Polaroid Caribbean Corporation
Centro de Seguros
Ave. Ponce de León 701,
Miram ar, Santurce 00907
Tel.: (809) 725-6240
Fax: (809) 725-5462
Schw eiz/ Suisse/ Svizzera
Polaroid AG
Hardturmstrasse 133
8037 Zürich
Tel.: 018385329 (Deutsch)
018385348 (Français)
018385349 (Italiano)
Suomi
Polaroid Oy
Sinikalliontie 10
02630 Espoo
Puh.: 0800117008
Sverige
Polaroid AB
Ekholmsvägen 36
Box 204
127 24 Skärholm en
Tel.: 084451231

34
TROUBLESHOOTING (CONT.)
U.K.
Polaroid (U.K.) Ltd. &
Polaroid Export Operations
Wheatham pstead House
Codicote Road
Wheatham pstead
Hertfordshire AL4 8SF
Tel.: 0181 308 6508 (U.K.)
(44) 181 308 6593 (Export)
U.S.A.
Polaroid Corporation
Technical Support
Toll free: 1-800-432-5355

35
INDEX
A
Adobe Acrobat Reader, 9, 14
C
cable connection, 7 - 8
CD-ROM drive letter, 7, 11
CD-ROM drive requirem ents, 3
ColorShot CD-ROM , inserting, 7
ColorShot printer
illustrated, 4 - 5
plugging in, 8
positioning, 6
com puter requirements, 3
Csguide.pdf, 2, 9
Csinstal.pdf, 9
E
enabling USB, 24 - 25
F
film cover, 17
film door latch, 4
film door, 4
film ejection slot, 4
film loading, 16 - 17
FLOWERS.TIF, printing, 20 - 21
I
installing softw are, 9 - 14
problems with, 27
internet support, 23

36
K
KIDS.TIF, printing, 18 - 19
L
language choice for setup, 13
LED on ColorShot, 4, 8
License Agreement, 13
loading film , 16 - 17
M
mem ory requirements, 3
MGI PhotoSuite, 16
technical support, 22
Microsoft Window s, 3
monitor
requirements, 3
setting, 26
P
plug-and-play, 6
Polaroid Offices and Service Centers,
29 - 34
Polaroid Technical Support, 22 - 23
pow er adapter, 4, 7
pow er connector, 5
pow er cord, 4, 7, 8
pow er on, 8
print queue, 18
printer port selection, 11

37
printer settings, checking, 18
printing test im ages, 15 - 21
R
RAM requirements, 3
Readme file, 14
reconnecting the printer, 29
S
sample images, 9, 15
Samples folder, 15
Service Centers, 29 - 34
system requirem ents, 3
T
technical support, 22 - 23
test image, printing, 15 -21
U
uninstalling softw are, 28
USB (Universal Serial Bus), 3
cable, 4, 5, 8
connector, 5
enabling, 24 - 25
software supplement, 24 - 25
V
video accelerator setting, 26
W
Windows. See Microsoft

38
Note: Polaroid Corporation reserves
the right to m ake changes or improvements in the product described in this
manual at any time and without
notice.
“ Polaro id” , “ Polaroid Col orShot” , and “ IQA”
are trademarks of Polaroid Corporation.
All other product names may be the p roperty o f
their respective ow ners.
3/98

1
POLAROID COLORSHOT USER’S GUIDE
INTRODUCTION . . . . . . . . . . . . . . . . . . . . . . . .2
Compatible imaging applications . . . . . . . . . . .3
System requirem ents . . . . . . . . . . . . . . . . . . . .4
Registration . . . . . . . . . . . . . . . . . . . . . . . . . . . .4
Polaroid ColorShot film . . . . . . . . . . . . . . . . . .5
The printer . . . . . . . . . . . . . . . . . . . . . . . . . . . . .6
Load the film . . . . . . . . . . . . . . . . . . . . . . . . . . .8
CONFIGURE THE DRIVER . . . . . . . . . . . . . . . . .9
Check the printer settings . . . . . . . . . . . . . . . .10
Set Properties . . . . . . . . . . . . . . . . . . . . . . . . .10
Details tab . . . . . . . . . . . . . . . . . . . . . . . . . . . .10
Graphics tab . . . . . . . . . . . . . . . . . . . . . . . . . .11
Device Options tab . . . . . . . . . . . . . . . . . . . . .14
PRINTING . . . . . . . . . . . . . . . . . . . . . . . . . . . .16
Using the preview . . . . . . . . . . . . . . . . . . . . . .17
Tips on resizing your im age . . . . . . . . . . . . . .18
Start printing . . . . . . . . . . . . . . . . . . . . . . . . . .20
Handling the print . . . . . . . . . . . . . . . . . . . . . .22
Removing an em pty film pack . . . . . . . . . . . .22
TROUBLESHOOTING . . . . . . . . . . . . . . . . . . .23
Technical Support . . . . . . . . . . . . . . . . . . . . . .23
Cleaning the rollers . . . . . . . . . . . . . . . . . . . . .25
Cleaning the printer . . . . . . . . . . . . . . . . . . . .26
Loading a partially used pack . . . . . . . . . . . . .26
Increasing printer performance . . . . . . . . . . .27
Picture and printer problems . . . . . . . . . . . . .28
Printing test im ages . . . . . . . . . . . . . . . . . . . .31
Reconnection note . . . . . . . . . . . . . . . . . . . . .35
Lim ited Equipm ent Warranty . . . . . . . . . . . . .36
FCC Com pliance . . . . . . . . . . . . . . . . . . . . . . .38
Polaroid Offices and Service Centers . . . . . . .40
Index . . . . . . . . . . . . . . . . . . . . . . . . . . . . . . . .45

2
INTRODUCTION
he Polaroid®ColorShot™Digital Photo Printer is a com pact
desktop printer designed to output digital im ages from your
T
oping color film.
printer and the print driver. It also includes tips for best printing
results, and a full troubleshooting guide. For inform ation on connect-
ing the printer, installing the softw are, and printing test images, refer
to the Polaroid ColorShot Installation Guide (CSinstal.pdf).
PC-com patible computer onto Polaroid ColorShot self-devel-
This m anual (CSguide.pdf) describes the use of the ColorShot

3
INTRODUCTION (CONT.)
The Polaroid ColorShot can print
images from m any M icrosoft
Windows®95 applications, and is
ideal for printing:
Images downloaded from the Internet
•
using a browser
Images taken with a digital cam era
•
Images from a Photo CD
•
Any digitized image on your com put-
•
er, such as a scanned im age
The printer is sim ple to load. When
you initiate a print command, the
printer autom atically ejects the picture. The image appears w ithin seconds and develops into a fully saturated color photograph within m inutes.
®
Compatible imaging applications
ColorShot is compatible with m ost
popular imaging applications, such as:
Adobe PhotoDeluxe™V2.0
•
Adobe Photoshop®V4.0
•
Corel Draw™V7.0
•
Corel PhotoPaint™V7.0
•
Deneba Canvas™v5.02
•
MGI PhotoSuite™V8.05
•
Micrographx Picture Publisher™V6.0
•
PhotoMAX™V1.0
•
Polaroid Before & After Lite
•
For an updated list, see the Polaroid
web page (http:// www.polaroid.com).
™

4
INTRODUCTION (CONT.)
System requirements
For details, see the Polaroid ColorShot
Installation Guide (CSinstal.pdf).
A PC-compatible com puter with a
•
Pentium processor (or later) and a
USB (Universal Serial Bus) connector
Microsoft Window s 95 operating
•
system , Version B
16MB RAM (m inim um); 32MB RAM
•
(recom m ended)
50MB free hard disk space (mini-
•
mum); more space required w hen
printing multiple copies (10+)
A VGA 640 x 480 color monitor, 256
•
colors m inim um, 16-bit recomm ended (see the Installation Guide,
CSguide.pdf, for advice on setting
your m onitor and video accelerator)
A CD-ROM drive, 2x speed (mini-
•
mum); 4x or faster (recom mended)
* Note: Microsoft USB softw are is not
com patible with early versions of
*
Toshiba’s Infinia In-Touch™ modules,
and installing the software on
Toshiba Infinia system s w hich include
such m odules will render such Infinia
system s inoperable.
Registration
Please com plete and return the registration card so w e can put you on our
mailing list. We will keep you informed
of the latest product developm ents, so
you can get the best and most effective
results from your printer.

5
INTRODUCTION (CONT.)
Polaroid ColorShot film
The printer uses Polaroid ColorShot
film to create instant color pictures
featuring highly saturated, continuous-tone colors. Unlike other Polaroid
film, this specially-m ade pack does
not contain a battery. A finished print
is autom atically ejected from the
printer. Each pack produces ten pictures.
The picture size is approxim ately 4x4
inches (10.2 x 10.2 cm ) w ith an im age
area of 3.6 x 2.9 in. (9.1 x 7.4 cm). The
aspect ratio is approxim ately 6:5.
Images with a resolution of 580 (horizontal) x 480 (vertical) w ith 24-bit
color resolution (8 bits each for R, G
and B) are printed directly.
3.6 in.
2.9 in.

6
INTRODUCTION (CONT.)
The printer
a. Printer
b. Pow er adapter
c. Pow er cord
d. USB cable
e. Printer software (not shown)
FRON T OF PRINTER
cd
c dba
ba
a. Power/Printer busy LED
b. Film door
c. Film door latch
d. Film ejection slot
Note:
missing, contact your dealer.
If any of these components is

7
INTRODUCTION (CONT.)
IN SIDE PRINTER
a. Film tray
b. Processing rollers
BACK OF PRINTER
ba
ba
a. USB connector
b. Pow er connector

8
INTRODUCTION (CONT.)
Load the film
1 Press and hold down the door latch.
Pull open the film door.
2 Remove the Polaroid ColorShot film
from the foil package and insert it
into the tray, with the film cover fac-
ing up and the w ide plastic border
nearest the door. The film cover protects the light-sensitive material
beneath it.
Film cover
3 Slide the film tray in until it latches
shut.

9
CONFIGURE THE DRIVER
ou can configure the driver for each image before printing by
using the Properties dialog box. Here you can select paper
Y
apply Polaroid’s patented image enhancement technology (IQA
Here you also choose the Preview option and film type.
See the following for details.
orientation, use controls to lighten or darken the print, and
™
).

10
CONFIGURE THE DRIVER (CONT.)
Check the printer settings
1 From Windows, go to Start and select
Settings. Select the Printers folder
and open it.
2 Double-click the ColorShot Printer
icon inside the folder.
3 The Polaroid ColorShot status box is
displayed. This message box displays
the print queue.
4 If you w ant to review the settings,
click Properties on the Printer menu.
Click OK.
5 Close the Printers w indow.
Set Propert ies
1 Display the Polaroid ColorShot
Properties dialog box as described in
the previous section.
also click the Properties button from
within an application (typically in the
Page Setup or Print dialog box), but
not all the tabs are displayed.
2 Click a tab to m ake your selections,
as described below.
Note: You can
Details tab
On the Details tab, be sure you selected the USB port (not an LPT port) for
the ColorShot printer.
ever change to another USB port, you
can select it here.
Note: If you

11
CONFIGURE THE DRIVER (CONT.)
Graphics tab
ORIENTATION
Select a default orientation. You can
override this choice for the current
image from w ithin the application.
• Select Portrait if your image is vertical.
The im age is rotated 90 degrees on
the Polaroid film, for a better fit.
• Select Landscape if your im age is horizontal. The image is printed with the
wide w hite border at the bottom.
Note: The follow ing sample images
are copied to your hard drive
(ColorShot folder) during installation
They can be printed out as a test; see
pages 31 – 34.

12
CONFIGURE THE DRIVER (CONT.)
Portrait orientation (KIDS.TIF)
Landscape orientation: (FLOWERS.TIF)

13
CONFIGURE THE DRIVER (CONT.)
IN TENSITY
The Intensity control offers five settings, from darkest to lightest. Slide
the control toward Darkest to m ake
the image darker on film, or tow ard
Lightest to make the image lighter on
film. (Som e film packs m ay require an
adjustm ent to com pensate for a slight
speed variation.) Leave it at the center
setting, 2, unless needed.
COPIES
Select the num ber of
of copies to print.
USING PREVIEW
Click to see a preview
of the image before
printing. The Preview screen allow s
you to magnify the image and scroll to
display the portion you want to print.
If you do not need to see a preview,
turn it off for faster printing.
ABOUT
Click to display version
num bers and copyright
information for the software.
RESTORE DEFAULTS
Click to recall the
default settings.

14
CONFIGURE THE DRIVER (CONT.)
Device Options tab
FILM TY PE
Click the Film Type arrow to display a
drop-dow n list of film types. Select
the film type that is currently loaded.
IM AGE ENHA N CEM ENT
IQA (Im age Quality Assurance)
Technology is a Polaroid-patented
image enhancement software
designed to produce brighter colors in
images
enhanced.
that have not been previously

15
CONFIGURE THE DRIVER (CONT.)
• Turn on IQA Technology for general
photographic im ages that have been
scanned using default settings, or
images that have not had any color
correction or image processing
applied.
• Turn off IQA for im ages obtained from
the Internet, and for im ages that have
been color-corrected in an im age-editing application such as M GI
PhotoSuite™ or Adobe Photoshop®.
Also, turn off IQA for business graphics with ramped backgrounds and
images that contain im portant details
(such as m edical images).
If you w ant to see the effect this feature has, print an im age with and
without it for comparison.
RESTORE DEFAULTS
Click to recall the
default settings.

16
PRINTING
isplay an image on the screen. Select Print on the File menu
and click the OK button in the ColorShot Print dialog box to
D
Preview on the Device Options dialog box, a preview appears first.
begin printing the current im age. If you selected Using
See the next section,
preview
.
Using the

17
PRINTING (CONT.)
Using the preview
Important: What you see on the pre-
view is what you will get on the print.
The Preview screen includes som e
tools to resize/crop the im age. For
best results, however, you should
resize your im age in your im aging
application. See
image
FILM COUNTER
In the toolbar, the preview screen also
displays the num ber of pictures you
have left in the current film pack. It
counts dow n from ten to one, and
resets automatically when you load a
new pack of film .
on page 18.
Tips on resizing your
PRINTIN G THE FU LL IM A GE
The default setting prints the full
image, w hich m ay result in borders on
the top and bottom or on the sides,
depending on the aspect ratio of the
image.
ZOOMING A N D SCROLLING
You can zoom in on the im age with
the m agnifier tool and use the scroll
bars to crop the image to your liking.
A zoom out tool is provided to return
the image to the original size.

18
PRINTING (CONT.)
THE TOOL BAR
Printer icon: Click to start
printing.
Plus m agnifying glass (zoom-in
tool): M ultiple-click to m ake the
image larger, in small increments.
Minus magnifying glass (zoom out tool): Multiple-click to undo
a zoom in.
Click the Cancel icon to exit
without printing.
Tips on resizing your image
If your im age is a horizontal scene,
•
choose Landscape orientation on the
Graphics tab for a better fit.
If your im age is a vertical scene,
•
choose Portrait orientation on the
Graphics tab for a better fit.
If your im age does not have the cor-
•
rect proportions for the ColorShot
film (even after the appropriate orientation has been selected), you can
reproduce the entire im age w ith borders, or crop the image to fit. See the
following illustrations.

19
PRINTING (CONT.)
LANDSCAPE ORIENTATION
Entire im age Cropped image
PORTRA IT ORIENTATION
Entire im age Cropped image
You can enlarge your image and
select a crop by using the scroll bars
in the ColorShot Print Preview Screen.
For the best control over image size,
how ever, we recomm end that you
resize your im age in your im aging
application before printing.
In
Adobe Photoshop (and other appli-
cations that allow you to specify
image size in dots-per-inch and pixels), set your image to 580 x 480 pixels (3.625 x 3.0 in.) and to 160 dpi.
In
MGI PhotoSuite and other applica-
tions that do not allow you to specify
your image size in terms of dpi and
pixels, use the Fit To Page or Size To
Fit option.

20
PRINTING (CONT.)
Start printing
To start printing the current im age,
click the printer icon on the preview
tool bar (if Using Preview is checked),
or click OK in the ColorShot dialog
box (if Using Preview is not checked).
Note: If this is the first image in a
pack, the protective film cover ejects
first.
Warning: After the first picture, do not
open the film tray until the film pack
is empty. Doing so ruins the top picture in the pack.
Film cover

21
PRINTING (CONT.)
Once the im age is sent, the power
LED flashes slow ly while printing. The
print automatically ejects when it is
ready (in about 10 to 20 seconds).
Once ejected, the image starts to
appear right away, and appears fully
developed in about 10 minutes.
Note: See
mance
speed up printing.
Increasing printer perfor-
on page 27 for tips on how to

22
PRINTING (CONT.)
Handling the print
The print is dry as soon as it is ejected
and can be handled immediately;
how ever, for the first few minutes, do
not shake or bend the print. Handle it
gently, by the wide white border only.
Allow several m inutes for the print to
develop fully saturated colors.
Removing an empty pack
The screen displays an “ out of film ”
message when the pack is em pty.
1 Press the door latch and pull open
the tray.
2 Remove the em pty pack and reload a
fresh pack as described in
film
on page 8.
Load the

23
TROUBLESHOOTING
Technical Support
f the printer is not operating properly and you cannot resolve it
with the troubleshooting information in this m anual or the
Installation Guide (CSinstal.pdf), contact Polaroid Technical
I
Support.
MGI PhotoSuite: If you need help with M GI PhotoSuite, check the
on-line help in PhotoSuite for information on obtaining product sup-
port from MGI.

24
TROUBLESHOOTING (CONT.)
WITHIN THE U .S.A.
Call us toll-free from w ithin the continental U.S.A. at 1-800-432-5355,
Monday through Friday, 8 a.m. to
8 p.m ., Eastern Time. We offer a variety of Custom er Support services; call
us for details and applicable fees.
You may also write to National Digital
Imaging Support, Polaroid
Corporation, 201 Burlington Road,
1-2A, Bedford, M A 01730.
Fax: 1-781-386-9688.
OU TSID E THE U.S.A
Contact the nearest Polaroid Service
Center.
IN TERNET SUPPORT
Technical Support is also available
over the Internet. Connect to our w eb
site at http://ww w.polaroid.com .
See the list on pages 40 – 44.

25
TROUBLESHOOTING (CONT.)
Cleaning the rollers
For best results, clean the rollers before
loading a fresh pack of film. If dirt or
dust accum ulates on the print rollers, it
can result in a repeated pattern on your
pictures, as illustrated.
1 Open the door and remove the pack.
Note: If there is a partially loaded
pack in the printer, you w ill lose the
top frame when you reload that pack.
See
Loading a partially used pack
page 26
avoid exposing the frames beneath
the top frame.)
. (Handle the pack carefully to
on

26
TROUBLESHOOTING (CONT.)
2 Turn the rollers with one hand. With
the other hand, use a clean, lint-free
tissue to wipe the full length of the
steel rollers located just inside the
door. Use a damp cloth if necessary,
then wipe the rollers dry.
Cleaning the printer
Wipe the surface with a damp cloth.
Do not use aromatic solvents such as
acetone, MEK, strong detergent solutions, or abrasives of any sort.
Loading a partially used pack
If you load a partially used pack, the
printer assumes a full pack is loaded
and the software gives you an incorrect picture count. Keep track of the
num ber of exposures m anually.
Note: The top frame acts as a film
cover. It w ill be ejected when you initiate your first print command.

27
TROUBLESHOOTING (CONT.)
Increasing printer performance
To optimize speed and perform ance,
try the following:
Increase the am ount of RAM in your
•
com puter.
Increase the available hard disk space.
•
Decrease the size of your image files,
•
if possible (the larger the file, the
longer it takes to print).
Close other applications and docu-
•
ments that are open w hile you are
trying to print.

28
TROUBLESHOOTING (CONT.)
Picture and printer problems
Problem Solution
Print is too dark. Intensity m ay be set too low. Increase
intensity in the Graphics tab of the
Properties dialog box, in the print driver.
Your original may be dark. Try lightening it in a photo-editing application, or
try applying IQA, w hich is on the
Device Options tab of the Properties
dialog box, in the print driver.
Print is not what you expected Print out the sam ple im ages provided
(in color, brightness, or som e other on the Polaroid ColorShot CD ROM for
imaging characteristic). com parison; see
page 31 for details.
Printing test im ages
on

29
TROUBLESHOOTING (CONT.)
The picture has a blue tint. The film m ay be too cold. Let
the pack warm up to room tem perature
before using, if it has been refrigerated
or stored in a cold environment. Film
should be between 55 and 95
(13 and 35oC) for best results.
o
F
Print has a large spot or repeated Print rollers are dirty. See
spots details on cleaning them .
Print has an area that did not Check your film packaging for details on
develop how to return defective film.
Two prints came out one after the You loaded a partial pack. The top picother, and the first one is all gray. ture acts as a film cover to protect the
other fram es from exposure, and it is
ejected at the first print com m and.
page 25 for

30
TROUBLESHOOTING (CONT.)
Som e of the edges of the image are Resize the im age in an im age-editing
•
cropped off in the picture, or application. See also
The print has borders you did not
•
expect, or check Using Preview on the Graphics
The printer creates m ultiple tab to preview what will appear in the
•
partial prints for one im age (tiling). print before it is printed.
The green pow er light is blinking. This is normal w hile printing. It should
Imaging application cannot Check the video accelerator setting;
com municate w ith the print driver see the Installation Guide for details.
(Print dialog box or preview screen If problem persists, call Polaroid
does not appear). Technical Support; see page 23.
The film counter in the preview Loading a partially used pack or opening
window is not accurate. the film tray results in an inaccurate
your image
stop flashing w hen printing is done.
film count. The counter resets when you
load a new film pack.
on page 18. Be sure to
Tips on resizing

31
TROUBLESHOOTING (CONT.)
Printing test images
1 Start up M GI PhotoSuite and be sure
all options are set to their default settings.
2 Be sure all the ColorShot Properties
are set to their default settings (see
Configure the driver
Graphics tab: Portrait Orientation;
•
Intensity set to 2 and Using Preview
checked.
Device Options tab: The correct film
•
type selected and IQA Technology
checked.
for details):
PRINT KIDS.TIF
1 Open the im age KIDS.TIF in the
Samples folder in the ColorShot
folder on your hard drive.
2 Click Printer Setup on the File menu.
3 Select Polaroid ColorShot as the
printer and select Portrait orientation.
Click OK.
4 Click the Print Preview icon on
the toolbar (the fourth from the
the left).
5 Click Size To Fit.
6 Click the Printer icon in
the Print Preview screen.

32
TROUBLESHOOTING (CONT.)
7 Click OK to print the image.
8 The ColorShot preview screen is dis-
played. What you see in the preview
box is w hat will appear in the print.
Click the printer icon in the Preview
tool bar to begin printing.
If this is your first print of the film
pack, the printer w ill eject the film
cover first. In a few m oments, the
printer w ill eject KIDS.TIF.
KIDS.TIF, in portrait orientation

33
TROUBLESHOOTING (CONT.)
PRINT FLOWERS.TIF
1 To print the second test im age, open
the image FLOWERS.TIF, also located
in the Sam ples folder.
2 Click Printer Setup on the File menu.
3 Select Polaroid ColorShot as the
printer and select Landscape orientation. Click OK.
4 Click the Print Preview icon on
the toolbar (the fourth from the
left).
5 Click Size To Fit.
6 Click the Printer icon in
the Print Preview screen.
7 Click OK to print the image.
8 The ColorShot preview screen is dis-
played. What you see in the preview
box is w hat will appear in the print.
Click the printer icon in the Preview
tool bar to begin printing.

34
TROUBLESHOOTING (CONT.)
In a few m oments, the printer will
eject FLOWERS.TIF.
FLOWERS.TIF, in landscape orientation
If the tw o sample images print correctly (as show n in the preview and in
this manual), then the printer and
printer driver are working properly. If
you are having a problem printing
from your imaging application or you
are getting unexpected results with
your own im ages, check the settings
in your imaging application.

35
TROUBLESHOOTING (CONT.)
Reconnection note
Your system or hub may have several
USB ports. If you connect the printer
into a port other than the one used at
original installation, the system
prompts you to reinstall the softw are.
If this happens, click cancel at the
prompt to reinstall, and plug the printer into the previously used port.
Alternatively, you can reinstall the
software and specify the new USB
port w hen prom pted. Follow the
instructions on the screen to reinstall
the software.

36
TROUBLESHOOTING (CONT.)
Limited Equipment Warranty
Polaroid Corporation w arrants your
Polaroid C
defects in manufacture for a period of
90 days from the date of purchase. To
verify the warranty period, you should
keep the sales slip or other proof of
the purchase date.
Should this product, or any component or accessory included with it,
becom e defective at any time during
the w arranty period, Polaroid
Corporation will, at its discretion,
either replace or repair this item , without charge, provided the product is
returned to a designated servicing
location (prepaid and insured). Please
OLORSHOT printer against
return the product in its original packaging.
This Limited Warranty does not apply
to product dam age resulting from
accident, incorrect installation, unauthorized modification, m isuse or
abuse.
Warning: Opening the printer housing
voids the w arranty.
Outside the U.S.A. and Canada
Refer to the registration card for local
warranty conditions.
THIS WARRANTY EXCLUDES ALL
INCIDENTAL AND CONSEQUENTIAL
DAM AGES AND DOES NOT AFFECT
YOUR STATUTORY RIGHTS.

37
TROUBLESHOOTING (CONT.)
REPAIR
Within the U.S.A. and Canada: Before
you return your equipm ent for
repair, please call Polaroid Customer
Service from within the U.S.A. at
1-800-432-5355, Monday through
Friday, 8 a.m . to 8 p.m., Eastern Tim e.
In Canada, call 1-800-268-6970. We
can help you determine what is at
fault, and advise you on how and
where to get service in the quickest
and m ost convenient w ay.
Outside the U.S.A.: Contact the nearest
Polaroid Service Center. See the
addresses on pages 40 – 44.
list of
NOTES
There are no user serviceable parts
•
inside the unit. Refer servicing to qualified service personnel.
Polaroid Corporation reserves the
•
right to make changes in the product
described in this manual at any tim e
and w ithout notice.

38
TROUBLESHOOTING (CONT.)
FCC Compliance
Product: The Polaroid COLORSHOT
Digital Photo Printer
Marketed by: Polaroid Corporation,
575 Technology Square, Cambridge,
MA 02139 U.S.A. Telephone: 1-800432-5355
This device com plies w ith part 15 of
the FCC Rules. Operation is subject to
the following tw o conditions: (1) This
device may not cause harmful interference, and (2) this device m ust
accept any interference received,
including interference that m ay cause
undesired operation.
FCC NOTICE: RADIO AND
TELEVISION IN TERFERENCE
Note: This equipm ent has been tested
and verified for compliance w ith the
lim its for a Class B digital device pursuant to Part 15 of the FCC rules.
These limits are designed to provide
reasonable protection against harmful
interference in a residential installation. This equipment generates, uses
and can radiate radio frequency energy and, if not installed and used in
accordance w ith the instructions, m ay
cause harmful interference to radio
com munication. How ever, there is no
guarantee that interference will not
occur in a particular installation. If this

39
TROUBLESHOOTING (CONT.)
equipm ent does cause harm ful interference to radio or television reception, w hich can be determined by
turning the equipm ent off and on, the
user is encouraged to try to correct
the interference by one or more of the
following measures:
Reorient the receiving antenna
•
Increase the separation between the
•
equipm ent and the receiver
Connect the equipm ent into an outlet
•
on a circuit different from that to
which the receiver is connected
Consult the dealer or an experienced
•
radio TV technician for help.
Changes and m odifications not
expressly approved by the manufacturer or registrant of this equipment
can void your authority to operate this
equipm ent under Federal
Comm unications Com m ission rules.

40
TROUBLESHOOTING (CONT.)
Polaroid Offices and Service Cent ers
Australia
Polaroid Australia Pty. Ltd.
13-15 Lyonpark Road
P.O. Box 163
North Ryde, NSW 2113
Tel.: (02) 950 7000
Fax: (02) 887 2209
Belgique/België
Polaroid (Belgium ) N.V. - S.A.
Rue Colonel Bourg 111
Kolonel Bourgstraat 111
1140 Bruxelles-1140 Brussel
Tel.: 027143102 (Flem ish)
027143106 (French)
Brasil
Polaroid do Brasil Ltda.
Av. Paulista, 1776/11º andar
Cerqueira Cesar
São Paulo - Capital
01310-921
Tel.: 55.11.285.6411
Fax: 55.11.283.2625
288.6521
287.5393
Canada
Polaroid Canada Inc.
350 Carlingview Drive
Etobicoke, Ontario M 9W 5G6
Toll free: 1-800-268-6970

41
TROUBLESHOOTING (CONT.)
Danmark
Polaroid a.s.
Blokken 75
3460 Birkerød
Tlf.: 80011887
Deutschland
Polaroid GmbH
Sprendlinger Landstrasse 109
63069 Offenbach
Tel.: 06995096056
España
Polaroid (España), S.A.
Calle Orense 16 - 2ª planta.
28020-Madrid
Tno.: 913778103
France
Polaroid (France) S.A.
B.P. 7
78996-Elancourt Cédex
Tel.: 0141913810
Hong Kong
Polaroid (Far East) Ltd.
32/F Windsor House
311 Gloucester Road
Causeway Bay
Tel.: (852) 2894 0333
Italia
Polaroid (Italia) S.p.A.
Via Piave 11
21051 Arcisate (Varese)
Tel.: 0269633253

42
TROUBLESHOOTING (CONT.)
Japan
Nippon Polaroid
Kabushiki Kaisha
Mori Building, No. 30
2-2 Toranom on 3-chome
Minato-ku, Tokyo (105)
Tel.: 81-3-3438-8811
Fax: 81-3-3433-3537
México
Polaroid de M éxico S.A. de C.V.
Paseo de la Reform a 195-Piso 17
C.P. 06500 México, D.F.
Tel.: 703-1111
Fax: 566-0505
Del interior al 91 (800) 70-727
Ventas 91 (800) 70-747
Nederland
Polaroid Nederland B.V.
Zonnebaan 45
3606 CH Maarssen
P.O. Box 1219
3600 BE M aarssen
Tel.: 0204874534
New Zealand
Polaroid New Zealand Ltd.
Camera Services
24-26 Anzac Avenue
Auckland
Tel.: (09) 377 3773

43
TROUBLESHOOTING (CONT.)
Norge
Polaroid (Norge) A/S
Industriveien 8B, 1473 Skårer
Postboks 80, 1471 Skårer
Tlf.: 80011887
Österreich
Polaroid Ges.m.b.H.
Eitnergasse 5A
1231 Wien
Tel.: 06607433
Portugal
Polaroid (España) S.A.
Sucursal em Portugal
Edificio Monumental
Avenue Praia da Vitória 71-A, 4ºB
1050 Lisboa
Tel.: 0505446017
Puerto Rico
Polaroid Caribbean Corporation
Centro de Seguros
Ave. Ponce de León 701,
Miram ar, Santurce 00907
Tel.: (809) 725-6240
Fax: (809) 725-5462
Schw eiz/ Suisse/ Svizzera
Polaroid AG
Hardturmstrasse 133
8037 Zürich
Tel.: 018385329 (Deutsch)
018385348 (Français)
018385349 (Italiano)

44
TROUBLESHOOTING (CONT.)
Suomi
Polaroid Oy
Sinikalliontie 10
02630 Espoo
Puh.: 0800117008
Sverige
Polaroid AB
Ekholmsvägen 36
Box 204
127 24 Skärholm en
Tel.: 084451231
U.K.
Polaroid (U.K.) Ltd. &
Polaroid Export Operations
Wheatham pstead House
Codicote Road
Wheatham pstead
Hertfordshire AL4 8SF
Tel.: 0181 308 6508 (U.K.)
(44) 181 308 6593 (Export)
U.S.A.
Polaroid Corporation
Technical Support
Toll free: 1-800-432-5355

45
INDEX
A
About box, 13
Adobe Photoshop, 15, 19
applications, 3
B
blue tint in pictures, 29
C
cancel printing icon, 18
CD-ROM requirements, 4
cleaning
the printer, 26
the rollers, 25 - 26
ColorShot film , 5, 8
ColorShot printer, described, 2
com munication problems, 30
com patible applications, 3
com ponents, missing, 6
com puter requirements, 4
configuring the driver, 9 - 15
Copies, num ber of, 13
cropping the image, 19
D
Darkest, 13
Details tab, 10
Device Options tab, 14
digital cam era, 3
dirty rollers, 25, 29
disk space requirements, 4

46
E
empty film pack, 22
F
FCC compliance, 38 - 39
film count, 26
inaccurate, 30
film counter, 17
film cover, 8, 20
film door latch, 6, 8
film door, 6, 8
film ejection, 21
slot for, 6
film pack
empty, 22
partially used, 26
film tray, 7
Film Type box, 14
film, 5
defective, 29
partial pack, 29
FLOWERS.TIF, 12
printing, 31 - 32
G
Graphics tab, 11
I
Image Enhancement, 14
image resolution, 5
image sizing, 19
image, cropping, 19

47
images, 3
imaging applications, 3
Intensity control, 13, 28
internet, 3
support, 24
IQA Technology
checkbox, 14
described, 15
K
KIDS.TIF, 12
KIDS.TIF, printing, 31 - 32
L
landscape orientation, 11
LED, 6, 21, 30
Lightest, 13
loading film , 8
partial pack, 26
M
manuals, described, 2
MGI PhotoSuite, 15, 19
support, 23
Microsoft Window s, 3, 4
monitor requirem ents, 4
O
orientation, 11
out of film, 22
photo CD, 3
PhotoShop. See Adobe Photoshop

48
PhotoSuite. See M GI PhotoSuite
picture cropping, 30
picture problems, 28 - 31
Polaroid Offices and Service Centers,
40 - 44
Polaroid technical support, 23
portrait orientation, 11
pow er adapter, illustrated, 6
pow er connector, 7
pow er cord, illustrated, 6
Preview in ColorShot, 16
Preview, using the feature, 17
Print com m and, 16
print
ejection, 21
handling, 22
queue, 10
size of, 5
with spots, 29
printer
cleaning, 26
illustrated, 6 - 7
performance, increasing, 27
problems, 28 - 31
reconnecting, 35
settings, checking, 10

49
printing, 16 - 22
icon, 18
starting, 20
test images, 31 - 34
the full image, 17
with borders, 17
problems, troubleshooting, 28 - 31
processing rollers, 7
cleaning, 25 - 26
product registration, 4
properties, 10
R
RAM requirements, 4
reconnecting the printe r , 35
registration, product, 4
repair, 37
requirements, system , 4
resizing your im age, 18
Restore Defaults button, 13, 15
rollers. See processing rollers
S
sample images,
illustrated, 12
using, 34
scrolling the image, 17
Service Centers, 40 - 44
speeding up printing, 27
system requirem ents, 4

50
T
technical support, 23
MGI, 23
over internet, 24
Polaroid, 23, 24
tem perature, 29
test image, printing, 31 - 34
tool bar (Preview), 18
troubleshooting guide, 28 - 31
U
USB cable, 6
USB connector, 7
USB port, changing, 10
Using Preview checkbox, 13, 16
V
video accelerator setting, 30
W
warrant y, 36
Windows. See Microsoft
Z
zoom -out tool, 18
zoom -in tool, 18
zoom ing, 17

51
Note: Polaroid Corporation reserves
the right to m ake changes or improvements in the product described in this
manual at any time and without
notice.
“ Polaro id” , “ Polaroid Col orShot” , and “ IQA”
are trademarks of Polaroid Corporation.
All other product names may be the p roperty o f
their respective ow ners.
3/98
 Loading...