

Page 1

Direct Connect Adapter
User Guide
Page 2

Table Of Contents
What is the Polaroid Direct Connect adapter?
Direct Connect features
What is in the Direct Connect package
About the adapter
Setting up the Direct Connect adapter
1
Install the software
2
Connect the adapter to your computer
3
Start the configuration software
4
Select a camera
5
Select a printer
6
Add a watermark to your pictures
7
Choose a picture format
Printing with the Direct Connect adapter
Connecting the camera, adapter and printer
Printing modes
Printing steps
Solving problems
Direct Connect software cannot find serial port
Adapter does not print
About LED indicator codes
Obtaining technical assistance
Within the U.S.A.
Outside the U.S.A.
Internet support
Polaroid Technical Support telephone numbers
Repair service
Obtaining configuration files for additional cameras
Limited Equipment Warranty
FCC notices
Software license agreement
5
5
6
7
8
8
9
10
10
11
12
16
18
18
19
20
22
22
23
25
27
27
27
27
28
28
29
31
31
32
Page 3

What is the Polaroid Direct Connect adapter?
The Polaroid Direct Connect adapter lets you print
photographic-quali ty digital pictures from your digital
camera – without your computer . Th e adapter connects
your camera directly to your Pol aroid Color Shot Phot o
Printer so you can print self-developing, full-color pictures any time, any place.
To print a digital picture from your camera, display the
picture on the camera's LCD panel and press the print
button on the Direct Connect adapter. The adapter also
has other modes for printing all pictures and printing
an index picture with several thumbnails (small pictures) on one sheet of film. Additionally , you can add a
watermark (a graphic logo and text) to each picture.
Direct Connect features
No computer needed for printing pictures from your
digital camera
Sets up easily with your PC, then prints with out
the computer
Small and lightweight
Works with digital cameras from leading manufactur-
ers such as Olympus, Agfa, Epson and Casio
Can be upgraded to support additional cameras from
other manufacturers such as Kodak
Offers multiple modes for printing single pictures, all
pictures in the camera at once, and indexes (several
pictures on each sheet)
Capable of adding a logo and text (watermark) to pictures
5
Page 4
Note: The quality of pictures printed with the Direct
Connect adapter depends on the quality of the pictures
captured by the digital camer a. Picture quality can v ary
considerably among digital camera models.
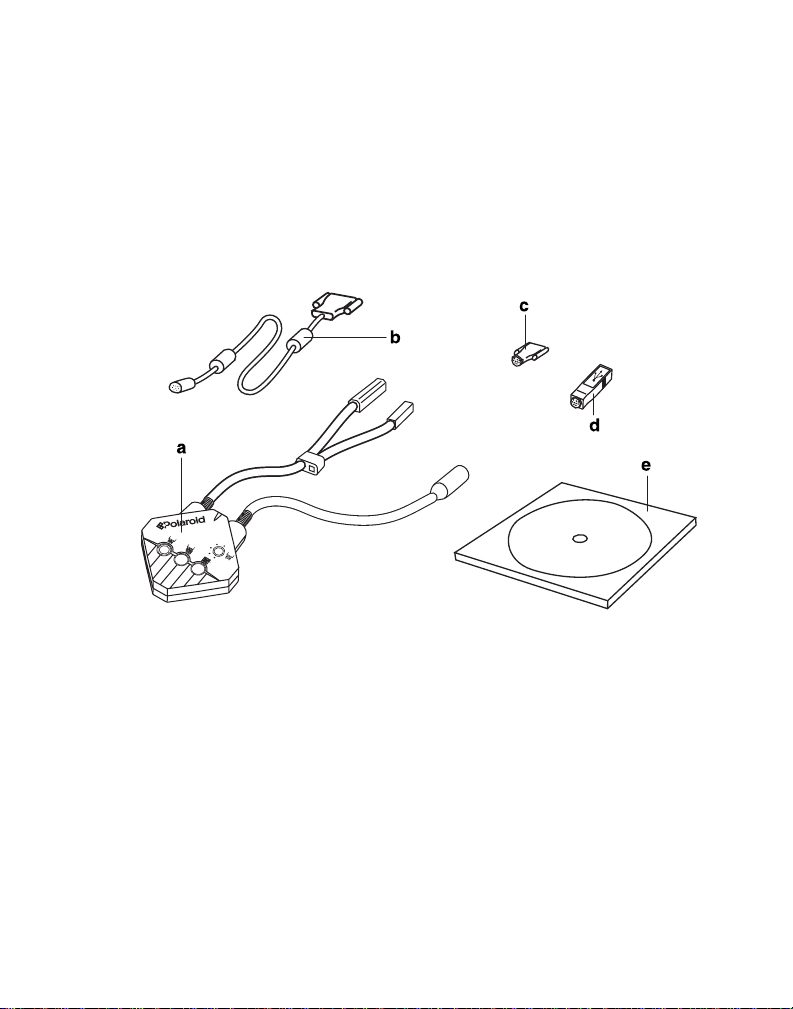
What is in the Direct Connect package
Direct Connect adapter
a
Computer interface cable
b
Serial camera connector
c
USB camera connector
d
Direct Connect configuration software on CD-ROM
e
User's guide (not shown)
f
6
Page 5
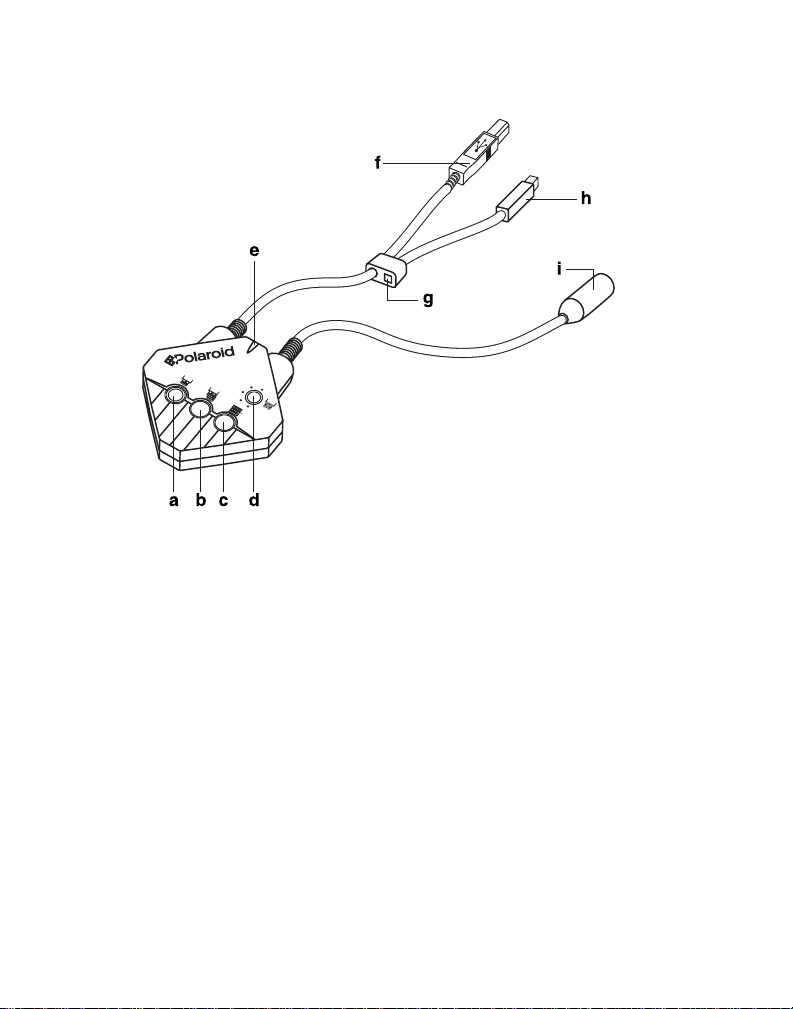
About the adapter
Print button
a
Print All button
b
Print Index button
c
Select Picture/Cancel Print button
d
LED indicator
e
ColorShot Photo Printer USB or parallel connector
f
(USB shown)
Direct Connect power connector
g
ColorShot printer power connector
h
Camera and computer connector
i
7
Page 6

Setting up the Direct Connect adapter
Before printing with the adapter for the first time, you
need to configure it with the Direct Connect Configuration Software. You can also use the software to
change the setup later.
Using the software, you define:
• the digital camera you are using.
• the printer you are using.
• the option of adding a watermark to your pictures.
• the picture format: Best Fit to Page or Fill Entire Page.
To set up the adapter:
1
Install the software.
Start your computer.
a
Insert the Direct Connect CD-ROM in your
b
CD-ROM drive.
Click the Start button and then click Run.
c
Type x:setup.exe (substitute the letter of your CD-
d
ROM drive for x) and click OK.
Follow instructions on your screen to complete the
e
installation.
Remove the CD-ROM from your CD-ROM drive.
f
8
Page 7
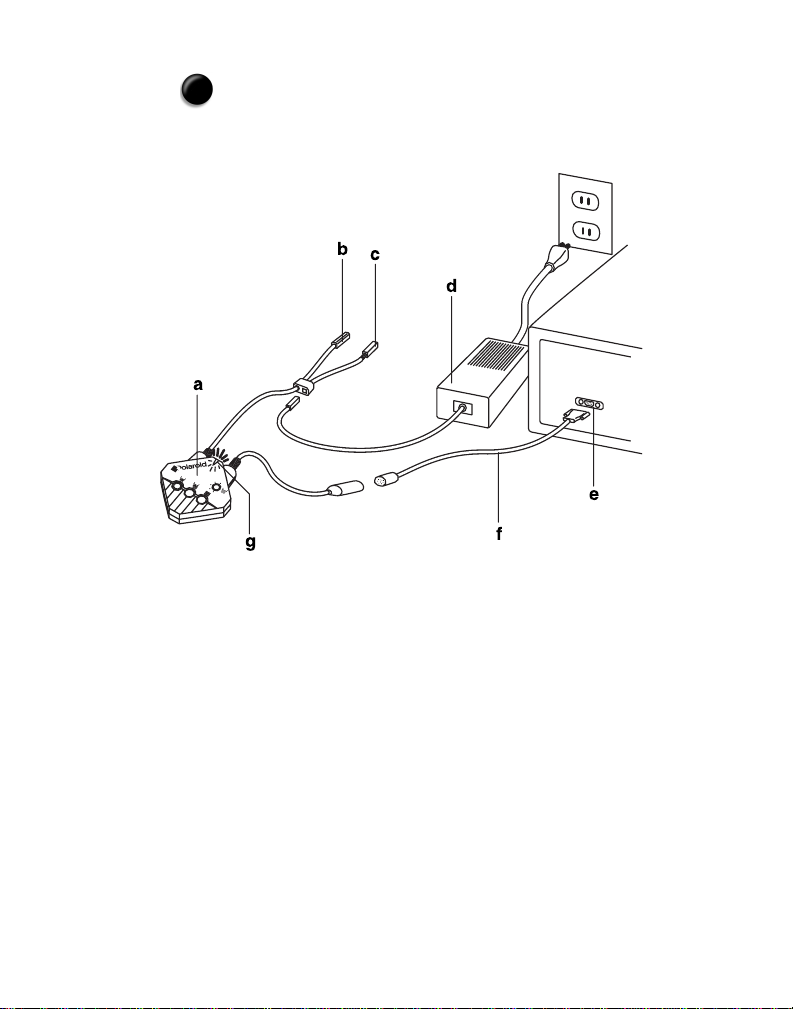
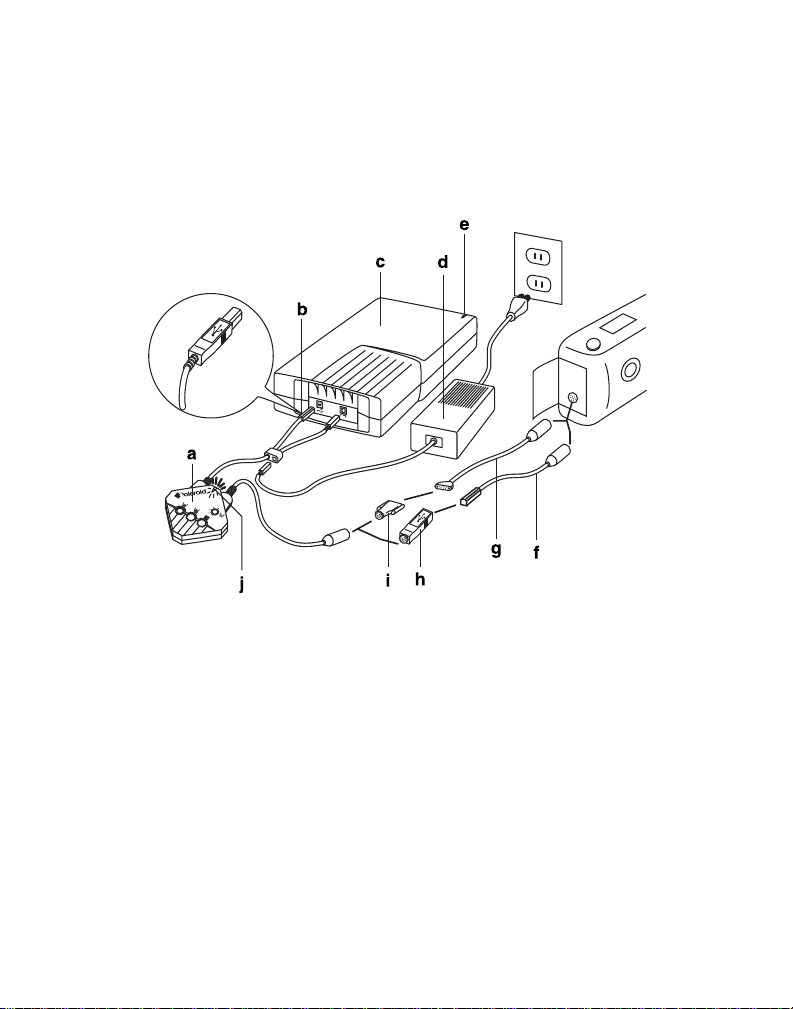
2
Connect the adapter to your computer as
shown in Figure 1.
Figure 1. Connecting the adapter to your computer
Direct Connect adapter
a
Not connected (USB connector shown; Direct Connect
b
parallel versio n has 25-pin connector inst ead)
Not connected
c
ColorShot power cord and adapter (provided with
d
ColorShot printer)
Serial port (COM1, COM2, etc.)
e
Interface cable
f
LED indicator (flashing red until you start the configu-
g
ration software in the following step)
9
Page 8
3
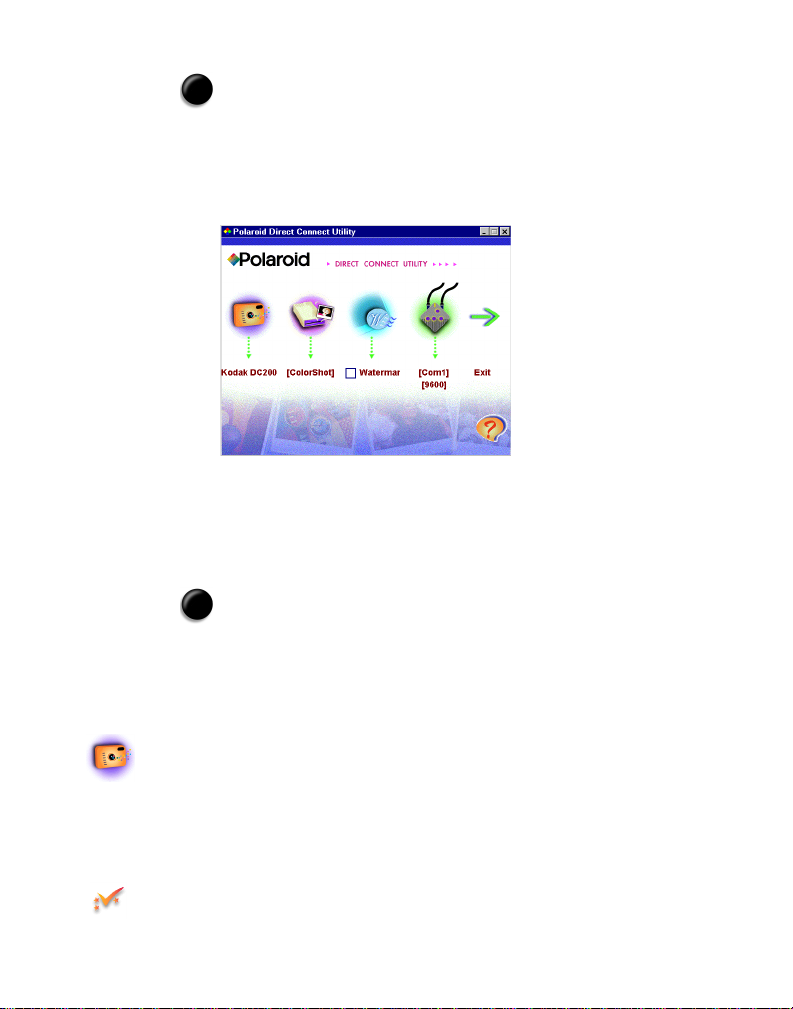
Start the configuration software.
Click Start and then click Programs.
a
Click Direct Connect Configuration Software
b
The main wind ow opens.
The LED indicator on the adapter changes from flashing red to steady orange, indicating that the adapter and
computer are communicating. If the indicator is not
steady orange, see Solving problems on page 22.
4
Select a camera.
Note: The Direct Connect adapter can be set up for
only one camera at a time. If you have multiple adapters set up for different cameras, you may want to label
each adapter to indicate its current setup.
10
Click the Camera button to display a list of compatible
a
digital cameras.
If you do not see your camera listed, s ee Obtaining
configuration files for additional cameras and printers
on page 29.
Click your camera model and then click the OK button to
b
send the camera setup information to the adapter.
Page 9

5
Select a printer.
Click the Printer button to display a list of compatib le
a
printers.
If you do not see your printer listed, see Obtaining
configuration files for additional cameras and printers
on page 29.
Click your printer model and then click the OK button to
b
send the setup information to the adapter.
If you ... Then ...
c
are finished configuring the
software
Click Exit
The setup data is sent to
the adapter .
want to add a watermark to
your pictures
want to select a picture
format
Continue to Add a
6
watermark to yo ur pictures.
Skip to Choose a pic-
7
ture format (page 16).
11
Page 10
6
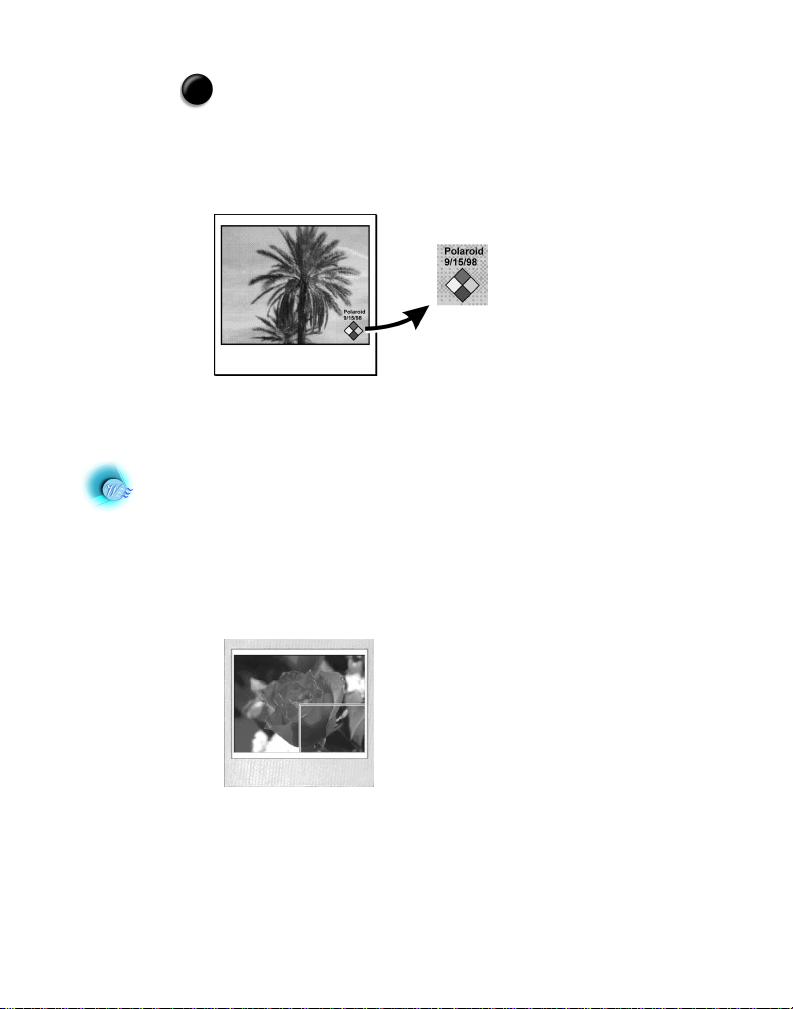
Add a watermark to your pictures.
You can use the Direct Connect configu ration softw are
to add a watermark containing a logo or text (or both)
as shown in Figure 2 to all pictures you print.
Figure 2. Picture with a watermark
The watermark location is limited to one of four picture quadrants, which you select during setup.
At the Direct Connect software main window, click the
a
Watermark button.
The current watermark location appears as a rectangl e
in one of the four quadrants of the image area, as
shown in Figure 3.
12
Figure 3. Watermark rectangle
T o cho ose a differ ent quadrant for the watermark, click
b
the desired quadrant to move the watermark rectangle.
For example, to move the watermark rectangle to the
Page 11
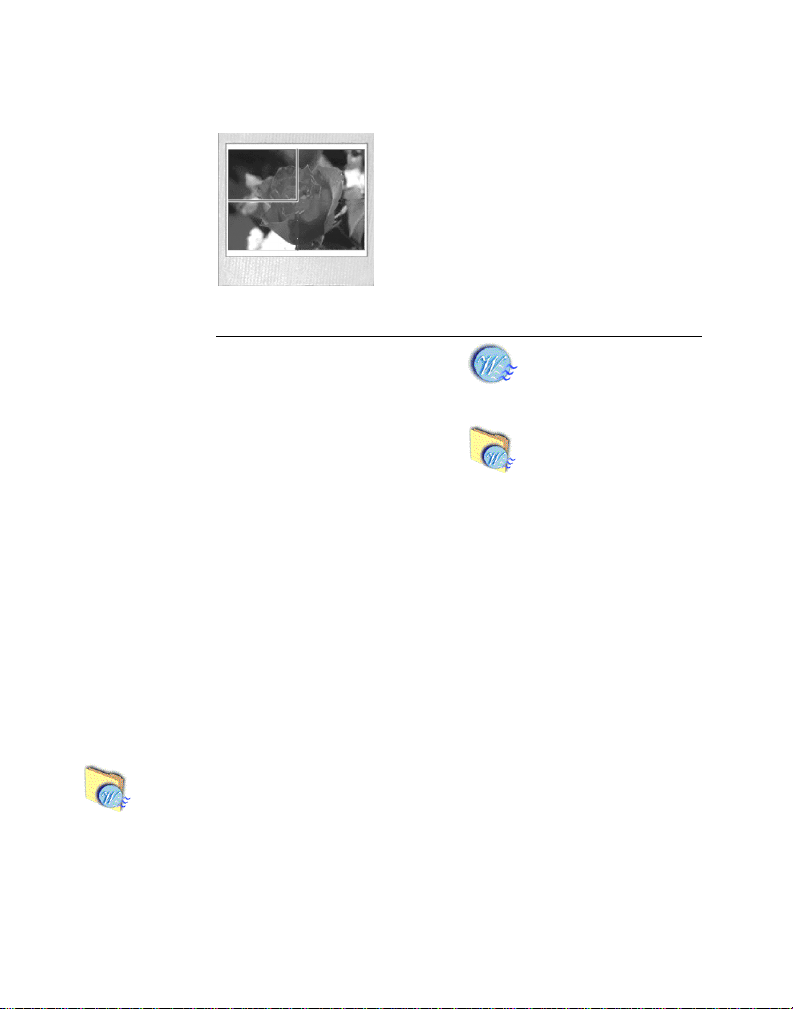
upper left quadrant as shown in Figure 4, click the
upper left quadrant area.
Figure 4. Watermark rectangle
If you want to ... Then ...
c
create a new watermark Click the Create
Watermark button
and go to step d.
add a watermark saved earlier
Click the Load
1
Watermark button.
Choose the
2
folder and
.BMP file containing the
watermark.
Click Open.
3
Skip to step k
4
on page 15.
Click the Load Image button and then choose the
d
folder and file containing the logo.
The following file formats are supported:
.BMP .PCX .TGA
.ICO .PNG .TIF
.JPG .PSD .WMF
13
Page 12

When you select the file, the logo appears in the
selected quadrant.
To change ... Then ...
e
the logo location within the
quadrant
the logo size Click an edge of the logo
Click inside the logo and
drag it to its new location.
and drag it outward or
inward.
the logo background
or another color from
solid to transparent so
the picture shows
through
the logo background from
transparent to solid so the
picture does not show
through
To add text to your pictures, click the Text button.
f
A text box with five blank lines appears.
Click the
1
Transparent
Color Selector button.
Click the color
2
in the logo you
want to ma ke
transparent.
Click the Cancel
Transparent
Color button.
14
Page 13

Click one of the lines, type the text you want to print, and
g
then click the Text Format button to choose the font, style,
size and font effects (underline, color, etc.) for the line.
If necessary, repeat steps g to create additional text
h
lines.
After all the text lines are formatted, click the OK button.
i
To change ... Then ...
j
the text box locatio n withi n
the quadrant
Click inside the text box
and drag it to its new
location
the text box size Click an edge of the text
box and drag it ou tward or
inward.
When done, click the OK button and view the water-
k
mark in place on the picture.
l If you want to ... Then ...
save the watermark
logo and text as a
.BMP file you can
reuse late r
Click the Save
1
Watermark button.
Choose a folder
2
for the watermark file and
type a file name.
Click Save.
3
Go to step
4
m.
use the watermark on your
pictures without saving it as
a separate file
Go to step
m.
15
Page 14

Click the OK button.
m
If you ... Then ...
n
are finished configuring the
software
Click Exit.
The setup data is sent to
the adapter .
want to select a picture
format
7
Choose a picture format.
Continue to Choose a
picture format
7
The Direct Connect Configuration Software lets you choose
between two picture formats: Best Fit to Page, and Fill
Entire Frame.
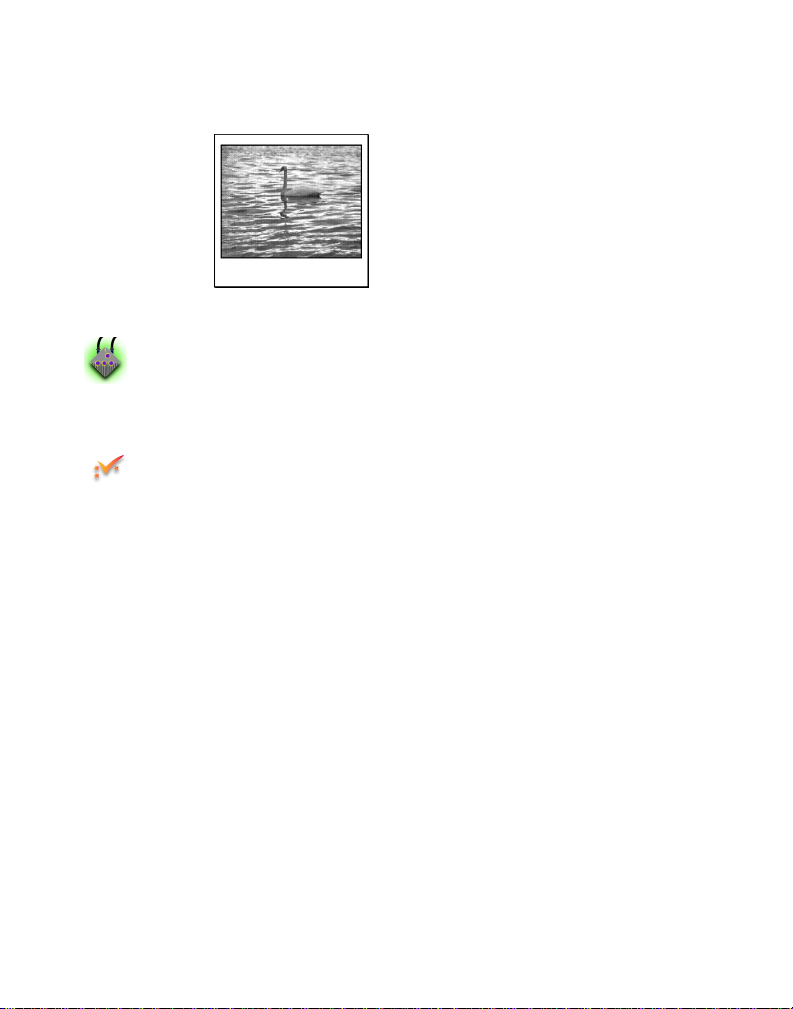
The Best Fit to Page format prints the complete pict ure. It
may leave white borders on two edges of the picture if the
aspect ratio of the picture (ratio of width to height) does not
match the aspect ratio of the ColorShot fil m image area
(6:5). See Figure 5.
Figure 5. Best Fit to Page format
The Fill Entire Frame format eliminates any white borders
on the picture. If the aspect ratio of the picture does not
16
Page 15
match the film image area, the picture is cropped to fit the
image area as shown in Figure 6.
Figure 6. Fill Entire Frame format
To choose a picture format:
At the Direct Connect Software main window, click
a
the Settings button.
In the Print Size box, click Fit to Page or Fill Entire
b
Frame.
Click the OK button.
c
Click Exit to send the configuration data to the adapter
d
and to close the configuration program.
17
Page 16
Printing with the Direct Connect adapter
Connecting the camera, adapter and printer
Connect your camera to the Direct Connect adapter
and the ColorShot printer as shown in Figure 7.
Figure 7. Connecting the adapter for printing
Direct Connect adapter
a
USB connector (The Direct Connect parallel version
b
has a 25-pin connector instead.)
18
ColorShot Photo Printer
c
ColorShot power cord and adapter
d
ColorShot LED indicator (steady green after all con-
e
nections are complete)
Camera-to-PC USB cable (provided with USB cameras)
f
Camera-to-PC serial cable (provided with serial cameras)
g
Page 17

USB camera connector (provided with Direct Connect
h
adapter) for use with camera-to-PC USB cable
Serial camera connector (provided with Direct Connect
i
adapter) for use with camera-to-PC serial cable
Direct Connect LED indicator (alternates green and
j
orange until camera communication is established)
Printing modes
Single print
Prints a single picture: the one most recently displayed
in camera preview mode on the camera LCD.
Print all pictures
Prints all the pictures stored in the camera memory.
Print index
Prints all the pictures stored in the camera memory,
with several pictures on one sheet.
19
Page 18
Printing steps
Note: If the Direct Connect LED indicator displays
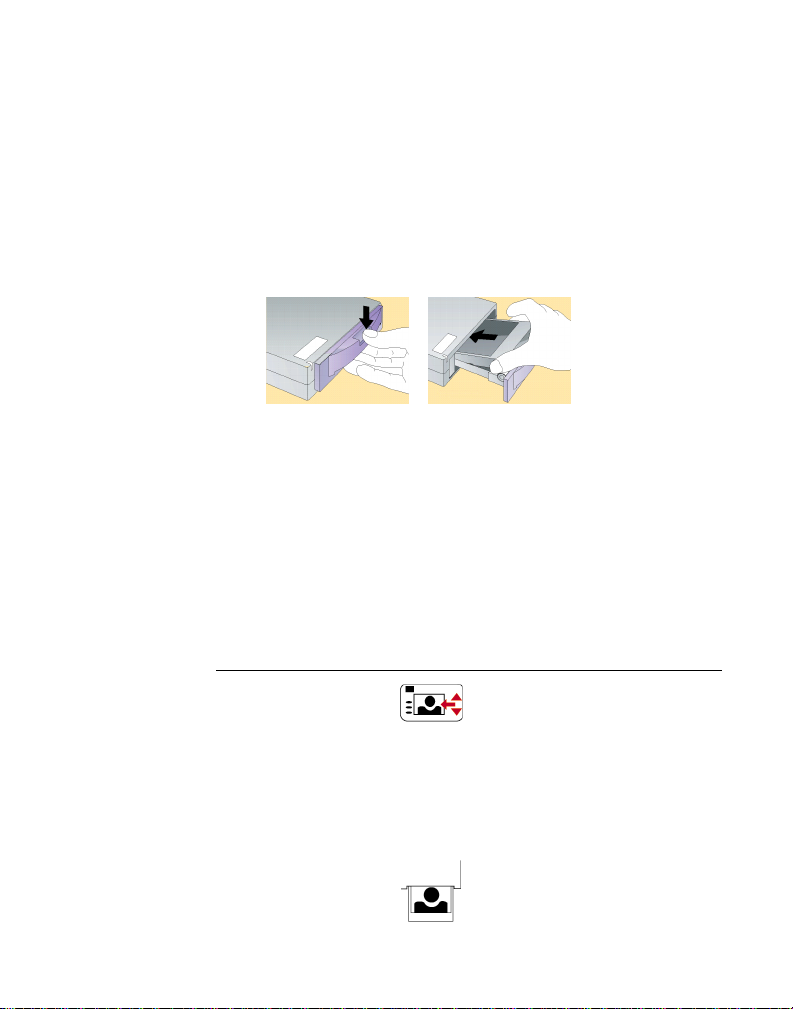
flashing orange before o r d uri ng thes e s teps , the ColorShot Photo Printer is out of film. When this happen s,
load a new pack of fil m as shown in Fig ure 9. (The film
cover ejects when you close and latch the film door.
Turn on the camera.
1
See your camera instructions.
Set the camera to the PC Connect mode. (Your camera
2
may use a different name for this mode.)
The adapter LED shows a steady orange, indicating
communication among the adapter , camera and pr in ter.
To print ... Then ...
3
Figure 9. Loading the ColorShot Photo Printer
20
a single picture
Press the Picture Select
a
button on the Direct Connect adapter to scroll
through the pictures until
the one you want to print
appears. (Press the button
twice rapidly to scroll
backward.)
Press the Single Print But-
b
ton.
Page 19

To print ... Then ...
all pictures
stored in camera
index print(s) Press the Print Index button.
Note: You can cancel printing by pressing the Picture
Select/Cancel Print button.
Press the Print All button.
If pictures do not appear on the camera LCD
Some digital cameras cannot display pictures on their
LCD screen while connected to the Direct Connect
adapter. If your camera d oes not display pictures while
connected, use these steps to print a single picture:
Disconnect the Direct Connect cable from the camera.
1
Set the camera to the Review mode.
2
Your camera may have a differ ent name for this mode.
See the camera instructions.
Display the picture you want to print.
3
Reconnect the Direct Connect cable to the camera.
4
Set the camera to the PC Connect mode.
5
Press the Single Print button.
6
21
Page 20

Solving problems
Direct Connect software cannot find serial port
Possible cause Solution
Direct Connect adapter not powered onVerify that the LED indicator is on. If
not, check the connections (page 9)
and make sure AC power is av ailable
at the outlet.
Direct Connect adapter not connected
to the computer
Computer screen-saver software
interfering with communication
Serial port turned off by computer's
power management software (some
laptop computers)
Two devices (Direct Connect adapter
and a modem, for example) attempting to use the same serial port
Software unable to automatically
detect adapter
V er ify that the adapter is connected to
a serial port on the computer before
you start the configuration software.
See your computer's user guide and
disable the screen saver
See your computer's user guide and
disable automatic shutoff for the
computer serial ports.
Move the Direct Connect adapt er or
the other device to a di fferent serial
port, or disable the other device. See
your computer's user guide or the
user guide for the conflicting device
for instructions.
Manually choose the COM port:
At the Dirrect Connect
1
Configuration Software
main window, click the
Settings button.
On the Communication
2
Port drop-down list, click
the COM port to which
the adapter is connected.
Click the OK button.
3
22
Page 21

Possible cause Solution
Computer communication baud rate
too high
Other condition as shown by the LED
indicator
Manually select a low baud rate:
At the main window , click
1
the Settings button.
On the Baud Rate list,
2
click 19200 or 9600.
Click the OK button.
3
See Computer connection codes
(page 25).
Adapter does not print
Possible cause Solution
No film in printer (flashing orange
adapter LED)
Direct Connect adapter not properly
connected to camera and printer
Camera not powered on Verify that the camera is on. See the
Insert a new pack of f ilm (Figure 9 on
page 20).
Check the connections as described
on page 18, and verify that the
adapter LED and the printer LED are
both on.
camera instructions if necessary.
Camera not in Connect mode Verify that the camera is in the Con-
nect mode before pressing the print
button on the adapter . See the camera
instructions if necessary.
23
Page 22

Possible cause Solution.
Direct Connect adapter set up for
wrong camera or printer
Other condition as shown by the
adapter LED indicator
Camera problem Connect the camera to your computer
Printer problem Connect the prin te r to your computer
Connect the adapter to your computer, start the configuration software, and choose the correct camera
and printer. See Setting up the Direct
Connect adapter, page 8.
See Printer/digital camera connec-
tion codes (page 26).
according to the camera instructions
and verify camera communication by
transferring a picture from the camera to your computer .
according to the ColorShot instructions, and verify printer operation by
printing a picture from your computer.
24
Page 23

About LED indicator codes
The LED indicator on the Direct Connect adapter can help you troubleshoot connection and printing problems. The meaning of the codes depends on whether the
adapter is connected to your computer for setup or to the ColorShot printer.
Computer connection codes
LED state Meaning Suggested action
Off No power to adapter Connect adapter to
power supply (page 9).
Slowly flashi ng red No communication
with computer;
attempting to establish
communication
Steady orange Communication with
computer established
Flashing green Transferring setup data
or busy with other operation
Occasional red flash
while flashing green
Rapidly flashing red Serial communication
Missed communication
packet
problem
Start Direct Connect
configuration software to
establish communications.
Continue with procedure (normal indication).
Continue with current
procedure (normal indication).
Repeat operation just
completed.
Unplug adapter from
power supply and reconnect. Repeat operation
just completed.
25
Page 24

Printer/digital camera connection codes
LED state Meaning Suggested action
Off No power to adapter Connect adapter to
power supply (page 18).
Steady orange Communication with
printer and camera
established
Flashing green Printing Wait for picture to eject
Flashing orange Printer out of film Insert new film pack in
Alternating green and
orange
Alternating red and
orange
Alternating red and
green
No communication
with camera
No communication
with printer
No communication
with camera or printer
Print when ready (normal indication).
from printer (normal
indication).
ColorShot printer.
Make sure camera is in
correct mode for printing. (See Printing steps
on page 20.)
Make sure printer is connected properly and
printer LED is lighted
(page 18).
Make sure camera is in
correct mode for printing. (See Printing steps
on page 20.) Make sure
printer is connected
properly and printer
LED is lighted (page 18).
Flashing red Communication or soft -
ware error
26
Unplug adapter from
power supply and reconnect. Repeat operation
just completed.
Page 25

Obtaining technical assistance
Before calling for technical assistance, be sure to check the problem-solving
information in the previous sections. If none of the suggested actions solves your
problem, contact Polaroid Technical Assistance as follows.
Within the U.S.A.
Call us toll-free from within the continental U.S.A. at 1-800-432-5355, Monday
through Friday, 8 a.m. to 8 p.m., Eastern time. We offer a variety of Customer
Support services; call for details and applicable fees.
You may also write to Polaroid National Technical Support Operations, 201 Burlington Rd. 1-2A, Bedford, MA 01730. Fax: 1-781-386-9688.
Outside the U.S.A.
See Polaroid Technical Support Telephone Numbers later in this section.
Internet support
Technical Support is also available over the Internet. Connect to the Polaroid site
on the World Wide Web at http://www.polaroid.com.
27
Page 26

Polaroid Technical Support telephone numbers
Australia (toll-free)
1800 242 640
Sydney Metro
(tel) 02 9842 7120
Austria
(tel) 06 60 74 33
(fax) 01 7956 7040
Belgium
(tel) 02 714 31 02
(fax) 02 713 12 18
Brazil
(tel) 55.11.285.6411
(fax) 55.11.283.2625
Canada
(tel) 1-800-268-6970
Denmark
(tel) 80 01 59 56
(fax) 80 88 09 19
Finland
(tel) 0800 117 008
(fax) 0800 118 05 1
France
(tel) 01 41 91 38 10
(fax) 01 41 91 86 54
Germany
(tel) 069 95 09 6056
(fax) 069 95 09 6218
Hong Kong
(tel) (852) 2894 0333
Italy
(tel) 167 820050
(fax) 02 696333 37
Japan
(tel) 81-3-3438-8811
(fax) 81-3-3433-3537
Luxembourg
(tel) 0800 25 42
(fax) 0800 31 86
Mexico
(tel) (01) 800 70-72777
(fax) (5) 703- 3068
Netherlands
(tel) 020 487 45 34
(fax) 020 346 91 60
New Zealand
(tel) (09) 377 3773
Norway
(tel) 80 01 18 87
(fax) 0800 1362 6
Portugal
(tel) 0505446017
Puerto Rico
(tel) (809) 725-6240
(fax) (809) 725-5462
Spain
(tel) 91 377 81 03
(fax) 91 406 93 33
Suomi
(tel) 0800117008
Sweden
(tel) 08 4451 231
(fax) 08 4451 223
Switzerland (Fr enc h)
(tel) 01 838 53 49
(fax) 01 800 90 62
Switzerland (German)
(tel) 01 838 53 29
(fax) 01 800 90 62
Switzerland (Italian)
(tel) 01 838 53 48
(fax) 01 800 90 62
UK
(tel) 0181 308 6508
(fax) 0181 308 6585
USA
(tel) 1-800-432-5355
(fax) 1-781-386-9688
Repair service
Before you return equipment for repair , please call Polaroid Technical Assistance
as described on page 27. We can help you determine what is at fault, and advise
you on how and where to get service in the quickest and most convenient way.
28
Page 27

Obtaining configuration files for additional cameras and printers
Software for configuring the Direct Connect adapter
for additional digital cameras and printers is under
development. For information about configuration
files that became available after this user guide was
printed, visit us at http://www/polaroid.com or call
Technical Assistance as described in the previous section.
To install a new configuration file:
1 Download the .PCC file for the camera or the .PCP f ile
for the printer to your computer hard drive or insert a
diskette containing the file into your floppy drive.
2 Connect the Direct Connect adapter to your computer
(page 9) and start the Direct Connect configuration
software (page 10).
29
Page 28

To install ... Then ...
3
a camera
configuration
file
a printer
configuration
file
Click the Camera button
a
Navigate to the drive and
b
folder containing the .PCC file
for the new camera, click the
file name, and click Open.
The new camera appears on
the list of installed cameras.
c Click the camera name and
then click the OK button.
Click the Printer button
a
Navigate to the drive and
b
folder containing the .PCP file
for the new printer, click the
file name, and click Open.
The new printer appears on the
list of installed printers.
c Click the printer name and
then click the OK button.
30
Page 29

Limited Equipment Warranty
Polaroid Corporation warrants your Polaroid Direct Connect adapter against
defects in manufacture for a per iod o f on e year fro m the date of purchase. To verify the warranty period, you should keep the sales receipt or other proof of the
purchase date .
Should this product, or any component or accessory included with it, become
defective at an y time during the w arranty per iod, Polaroid Cor poration will, at its
discretion, either repair or replace this item, without charge, provided the product
is returned prepaid and insured to a designated servicing location. Please return
the product in its original packaging .
This Limited W arranty does not app ly to product damage resulting from accident,
incorrect installation, unauthorized modification, misuse or abuse.
Warning: Opening the adapter housing voids the warranty.
Outside the U.S.A. and Canada, refer to the registration card for local warranty
conditions.
THIS WARRANTY EXCLUDES ALL INCIDENTAL AND CONSEQUEN-
TIAL DAMAGES AND DOES NOT AFFECT YOUR STATUTORY RI GHTS.
FCC notices
FCC COMPLIANCE
Product: The Polaroid Direct Connect Adapter
Marketed by: Polaroid Corporation, 575 Tech nology Square, Cambridge, MA
02139 U.S.A. Telephone: 1-800-432-5355
This device complies with Part 15 of the FCC Rules. Operation is subject to the
following two conditions: (1) This device may not cause harmful interference,
and (2) this device must accept any interference received, including interference
that may cause undesired operation.
31
Page 30

FCC NOTICE: RADIO AND TELEVISION
INTERFERENCE
Note: This equipment has been tested and verified for compliance with the limits
for a Class B digital device pursuant to P art 15 of the FCC Rules. These limits are
designed to provide reasonable protection against harmful interference in a residential installation. This equipment generates, uses and can radiate radio frequency energy and, if not installed and used in accordance with the instructions,
may cause harmful interference to radio communication. However, there is no
guarantee that interference will not occur in a particular installation. If this equipment does cause harmful interference to radio or television reception, which can
be determined by turning the equipment off and on, the user is encouraged to try
to correct the interference by one or more of the following measures:
• Reorient the receiving antenna
• Increase the separation between the equipment and the receiver
• Connect the equipment into an outlet on a circuit different from that to whi ch
the receiver is connected
• Consult the dealer or an experienced radio-TV technician for help
Changes and modifications not expressly approved by the manufacturer or regis-
trant of this equipment can void your authority to operate this equipment under
Federal Communications Commission rules.
Software license agreement
Polaroid End User License Agreement
IMPORTANT: THIS IS A LEGAL AGREEMENT. BY INSTALLING THIS
SOFTWARE, YOU ACCEPT ALL THE TERMS AND CONDITIONS OF
THIS AGREEMENT.
This Polaroid Corporation ("Polaroid") End User License Agreement ("Agreement") is provided with the "Polaroid Direct Connect Configuration Software"
product and related documentation (collectively, "Software"). T he term Softw are
also shall include any upgrades, en hancements or updates of the Softw are. Please
32
Page 31

read this Agreement carefully because at the end you will be asked to accept the
terms and conditions of this Agreement and continue the installation process or ,
if you do not wish to accept these terms and conditions, to decline, in which case
the installation process will be aborted and yo u will not be able to use the Software. If you decline to accept the terms and conditions of this Agreement, thereafter you may restart the installation and accept the terms and conditions or
return the Software to the place you obtained it for a full refund.
1. Grant of License.
accompanying Polaroid Software on a single terminal connected to a single computer (i.e., with a single CPU). You may not network the Software or otherwise
use it on more than one computer or computer terminal at the same time.
2. Copyright.
tected by United States Copyright Laws and International Treaty provisions.
Therefore, you must treat the Software like any other copyrighted material (e.g.,
a book or musical recording) e xcept that you may either (a) mak e one co py of the
Software solely for backup or archival purposes, or (b) transfer the Software to a
single hard disk provided you keep the original solely for backup or archival purposes. You may not copy the written materials accompanying the software.
3. Other Restrictions.
neer, decompile, disassemble or otherwise attempt to discover the source code of
the Software. You may not rent or lease the Software, but you may transfer the
Software on a permanent basis provided you retain no copies and the recipient
agrees to the terms of this Agreement. If Software is an update, any transfer must
include the update and all prior versions.
4. Limited Warranty.
of defects in materials and wor kmans hi p for a peri od of 90 days fro m th e date of
purchase. Polaroid's entire liability and your exclusive remedy shall be, at
Polaroid's option, either (a) return of the price p aid or (b) repair or replacement of
the Software that does not meet Polaroid's Limited Warranty and which is
returned to Polaroid with a copy of your sales receipt. This limited Warranty is
void if failure of the Software has resulted from accident, abuse, or misapplication. Any replacement Software wi ll be warranted for the remainder of the original warranty period or 30 days, whichever is longer.
5. No Other Warranties.
TIES WITH RESPECT TO THE SOFTWARE, EITHER EXPRESS OR
The Software is owned by Polaroid or its suppliers and is pro-
Polaroid grants to you the right to use one copy of the
You agree not to modify, adapt, translate, reverse engi-
Polaroid warrants that the Software media will be free
POLAROID MAKES NO OTHER WARRAN-
33
Page 32

IMPLIED, INCLUDING BUT NOT LIMITED TO IMPLIED WARRANTIES
OF MERCHANTABILITY AND FITNESS FOR A PARTICULAR PURPOSE.
Some states and countries do not allow the exclusion of implied warranties, so
the above exclusions may not apply to you.
6. Limitation of Liability.
SUPPLIERS BE LIABLE FOR ANY CONSEQUENTIAL OR INCIDENTAL
DAMA GES (INCLUDING, WITHOUT LIMITATION, D AMAGES FOR LOSS
OF BUSINESS PROFITS, BUSINESS INTERR UPTION, LOSS OF BUSINESS
INFORMATION, OR OTHER PECUNIARY LOSS) ARISING OUT OF THE
USE OR INABILITY TO USE THIS POLAROID PRODUCT, EVEN IF
POLAROID HAS BEEN ADVISED OF THE POSSIBILITY OF SUCH DAMAGES. Some states and countri es do not allow the exclusion or limitation of liability for consequential or incidental damages, so above limitation s m a y not
apply to you.
7. U.S. Government Restricted Rights.
RESTRICTED RIGHTS. Use, duplication, or discl osure by the United States
Government is subject to r estriction s as set fo rth in s ub paragraph (c)(1)(ii) of the
rights in Technical Data and Computer Software clause at DFAR 52.227-7013, or
such other applicable government or agency regulations providing equivalent
protection. Contractor/Manufacturer is Polaroid Corporation, 549 Technology
Square, Cambridge, Massachusetts 02139.
8. Governing Law and General Provisions.
by the laws of the Commonwealt h of Massachusetts, USA, excl uding its conflicts
of law rules, and the laws of the United States of America. If any part of this
Agreement is found void and unenforceable, it will not affect the validity of the
balance of the Agreement, which shall remain valid and enforceable according to
its terms. You agree that the Software will not be shipped, transferred or exported
into any country or used in any manner prohibited by the United States Export
Administration Act or any other export laws, restrictions or regulations. This
Agreement shall automatically terminate upon failure by you to comply with its
terms. This Agreement may only be modified in writing signed by an authorized
officer of Polaroid.
Your acceptance of the foregoing agreement will be indicated during installation.
IN NO EVENT SHALL POLAROID OR ITS
The Software are provided with
This Agreement is governed
34
Page 33

35
Page 34

“Polaroid” and “Polaroid ColorShot” are trademarks of Polaroid Corporation,
Cambridge, MA, U.S.A. All other product names may be trademarks of their
respective owners.
PN-00000X-0 9/98 Printed in U.S.A.
36
 Loading...