

Page 1
Full HD 1080p Driving Recorder
C200
User Guide
China toll free No.:
400-84010 30
(For other region, please
contact the local agent.)
China toll free No.:
400-84010 30
(For other region, please
contact the local agent.)
Page 2

EN-1
About this Guid e .................................... .. .. .. .. .. .. .. .. .. .. .. .. .. .. ................1
Battery Warni ng ......................................... .. .. .. .. .. .. .. .. .. .. .. .. .. .. ............1
Notes on Installation ........................................... .. .. .. .. .. .. .. .. .. .. .. .. .. .. ...1
Caution ............ .. .. ................. .. .. .. ................. .. .. .. ................. .. .. ..........2
1 Int ro du ct io n ..................................................................... .. .. .. .. .. .. .. 3
1.1 Features .......................................................... .. .. .. .. .. .. .. .. .. .. .. .. .. .3
1.2 Package Contents ........................................................................3
1.3 Product Overview .............................................................. .. .. .. .. .. .4
2 Getting Started .......................................... .. .. .. .. .. .. .. .. .. .. .. .. .. .. .........5
2.1 Inserting the Memory Card ........................................ .. .. .. .. .. .. .. .. .. .. .5
2.2 Installing in Vehicles ............................................ .. .. .. .. .. .. .. .. .. .. .. .. .. 5
2.3 Connecting to Power ....................................... .. .. .. .. .. .. .. .. .. .. .. .. .. .. ..6
2.4 Powering th e Device On / Off .................................... .. .. .. .. .. .. .. .. .. .. .7
2.4.1 A ut o Power On / Off .......................... .. .. .. .. .. .. .. .. .. .. .. .. .. .. ..............7
2.4.2 Manual Powe r On / Off and Re se t .................................. .. .. .. .. .. .. .. 7
2.4.2.1 Ma nu al Power On / Off ............................ .. .. .. .. .. .. .. .. .. .. .. .. .. .. .....7
2.4.2.2 Reset the Device ................................... .. .. .. .. .. .. .. .. .. .. .. .. .. .. ......8
2.5 Se t the Date / Ti me .............................. .. .. .. .. .. .. .. .. .. .. .. .. .. .. ..............8
2.6 Mod e Selection ................................... .. .. .. .. .. .. .. .. .. .. .. .. .. .. ..............8
3 Using the Driving Recorder ........................................ .. .. .. .. .. .. .. .. .. .. .8
3.1 Recording Videos ........................................... .. .. .. .. .. .. .. .. .. .. .. .. .. .. ...8
3.1.1 The Recording Screen ....................................... .. .. .. .. .. .. .. .. .. .. .. .. .9
3.1.2 A key Protection ............................. .. .. .. .. .. .. .. .. .. .. .. .. .. .. ................9
3.1.3 Motion Detection .................................... .. .. .. .. .. .. .. .. .. .. .. .. .. .. .......10
3.1.4 G-sensor Collision R ec or di ng Pr ot ec ti on .. ....................................11
3.1.5 Aud io On / Off ..................................................................... .. .. .. .. 11
3. 1.6 Me nu Ope rati on ... ... . ... .... ... . ... .... ... . ... .... .... ... . ... .... ... . ... .... ..11
3.1.7 Movie Mo de Menu Options .........................................................11
3.1.8 Video Menu Op ti on s ................................... .. .. .. .. .. .. .. .. .. .. .. .. .. .. ....12
3.1.9 Setup Menu Options .................................... .. .. .. .. .. .. .. .. .. .. .. .. .. .. ...13
3.2 Taki ng Picture ........................................ .. .. .. .. .. .. .. .. .. .. .. .. .. .. ..........14
3.2.1 S ti ll Capture Sc re en .......................................... .. .. .. .. .. .. .. .. .. .. .. .. .1 4
3.2.2 Zoom in / out .................................. .. .. .. .. .. .. .. .. .. .. .. .. .. .. ...............14
3.2.3 Still Capture Menu Operation ...................................... .. .. .. .. .. .. .. .. .1 4
3.2.4 Still Capture Menu Op ti on s ....................................... .. .. .. .. .. .. .. .. .. 15
3.3 Playing Videos and Viewing Pictures ........................................... .. .1 7
3.3.1 Playing Videos ...................................... .. .. .. .. .. .. .. .. .. .. .. .. .. .. ........17
3.3.2 Play Video Screen .................................. .. .. .. .. .. .. .. .. .. .. .. .. .. .. ........17
3.3.3 View Picture Sc re en .................................... .. .. .. .. .. .. .. .. .. .. .. .. .. .. ...17
3.3.4 Playback M en u Options ........................................ .. .. .. .. .. .. .. .. .. .. .. 18
3.4 Delete Video / Picture ....................................... .. .. .. .. .. .. .. .. .. .. .. .. .. .. 18
4 Specications ........................... .. .. .. .. .. .. .. .. .. .. .. .. .. .. .........................19
Polaroid·C200
Trademark
Polaroid, Polaroid Pixel, Polaroid Classic Border Logo, and Polaroid Color
Spectrum are trademarks of PLR IP Holdings, LLC, used under license. PLR IP
Holdings, LLC does not manufacture this product. Fairyard Enterprises Limited
will provide manufacturer warranty and support.
Copyright © 2015, All Rights Reserved.
Manufactured By:
Fairyard Enterprises Limited
Room, 2110, 21/F., CCT Telecom Bldg., 11 Wo Shing Street, Fotan, N.T., Hong Kong
www.polaroidcarcam.com
Page 3

About this Guide
The content in this document is for information purpose and is subject to change
without prior notice. We made every effort to ensure that this User Guide is
accurate and complete, however, no liability is assumed for any errors and
omissions that may have occurred.
Battery Warning
·Always charge using the provided system. Improper handling of the battery
may result in explosion.
·Never dismantle or pierce the battery or allow the battery to short-circuit.
·Batteries may explode if exposed to naked re. Never dispose of batteries in
a re.
·Disposed of used batteries observing local regulations.
·Never replace the battery on your own, have the dealer do it for you.
Notes on Installation
·This product shall be installed near the rear view-mirror, at the center of
windshield, if possible, for optimal viewing.
·Make sure that the lens is within the wiping range of the windscreen wiper to
ensure a clear view even when it rains.
·A protective lm on the lens will affect the video or photographic effect, remove
the protective lm before using the device.
·Do not touch the lens with your ngers. Finger grease may be left on the lens
and will result in unclear videos or snapshots. Clean the lens on a regular basis.
·Do not install the device on a tinted window. Doing so may damage the tint lm.
·Make sure that the installation position is not hindered by the tinted window.
·To use the contained car power adaptor only. In order to avoid equipment burn
or cause the battery explosion, please do not use other brand car power adaptor.
.
Do not attempt to disassemble or alter any part of the device that is not
described in this guide.
Caut ion
·Due to local laws and vehicles safety considerations, do not operate the
device while driving.
·Set up time and date accurately before you use this device.
·This product gets warm when in use, this is normal.
·Do not place the device near a heat source or directly expose it to ame or heat.
·Never place the device in vicinity of equipments generating strong
electromagnetic elds. Exposure to strong magnetic elds may cause
malfunctions or data corruption and loss.
·The system is used only for non-commercial use, within the maximum limits
permitted by applicable law. Our company does not accept any responsibility
for any data loss during the operation.
·Improper use or operation of the product may result in damage of the product
or its accessories and void the warranty.
Before you start using the system, it is assumed that you agree to the
above statement.
Polaroid·C200Polaroid·C200
EN -2EN -1
Page 4
EN -4EN -3
1.3 Product Overview
1
2
3
4
5
6
7
8
9
10
11
12
LED light
Lens
SD card slot
USB port
Reset button
LCD display
REC/Menu/OK button
Power/Mode button
Microphone
Up button
Down button
Speaker
1 Introduction
Thank you for purchasing this advanced Driving Recorder. This device is
specically designed for real time video , audio and photo recording.
1.1 Features
Full HD 1080p Driving Recorder
3 Megapixel CMOS Sensor
2.0” TFT Display
100˚ Wide Angle Lens
Interpolated to 12MP
Support up to 32GB Micro SD Memory Card
Support Motion Detection
Seamless Loop Recording
Automatic Record Function When Engine Start Up
Support G-sensor Collision Recording Protection
1.2 Package Contents
The package contains the following items. In case there is any missing
or damaged item, contact your dealer immediately.
Driving Recorder
USB Cable
Car Power
Adaptor
Suction Mount
User Manual
Warrant y Card
MIC
RESET
Inside your package
Polaroid·C200Polaroid·C200
3M Mount Black Slint
Page 5
EN -6EN -5
2 Getting Started
2.1 Inserting the Memory Card(not included)
Follow the direction indicated by the silk printing on the device to insert the
memory card, a click sound is heard indicating the card is in position .
To remove the memory card, push to eject the memory card out of the slot.
Note:
1. Do not remove or insert the memory card when the device is turned on. This
may damage the memory card.
2. Please use a Class 6 or higher rating Micro SD card, max. up to 32GB.
3. Please format the micro SD card before the initial use.
4. When removing the memory card, be careful that the card may spring out
and get lost. The memory slot has this spring-out feature for easy removal
of the card.
2.2 Installing in Vehicles
←Place the driving recorder into the black slint.
←Loosen the knob to swivel the device
vertically. Lo ck in g kn ob , an d conrm that
the device is securely locked in place.
→Push the head of suction mount into the
Slot of the back splint, attention must be put
in place.
→Remove the protective lm from the
suction cup, with the suction-cup
laying at, position the suction-cap
on the windshield, and then hold the
base rmly on the windshield and
press down the clamp to mount the
holder to the windshield. Make sure
the base is securely locked in place.
2.3 Connecting to Power
Use only the attached car power adaptor for activating the device and
charging the built-in battery.
(not i ncluded)
→Horizontally rotating the device can
further adjust a proper view.
Polaroid·C200Polaroid·C200
Page 6
EN -8EN -7
2.4 Powering the Device On / Off
2.4.1 Auto Power On / Off
Once the vehicle engine is started, the device automatically turns on and
recording (must have SD Card). After the car engine stopped, the device will
automatically save the last recorded le and shutdown.
2.4.2 Manual Power On / Off and Reset
2.4.2.1 Manual Power On / off
1. Connect one end of power connector to US B
port on the device.
2. Plug the other end of the power
adapter to the cigarette lighter
socket of your vehicle. Once the
vehicle engine is started, the
device automatically turns on.
Press Power button to turn it on.
To power off th e de vi ce p re ss t he
Power button with 3 seconds.
2.5 S et the Date / Time
To set the correct date and time, press butto n with three seconds to
ent er the menu setting, then press Mode but ton switch to Setup menu
, pre ss Up / Down button to select Dat e/Time , press OK
but ton to enter date / time settin g, then pre ss Up / Down button to
adj ust the value, press OK button switch to n ext setting, after nished
all t he settings, press OK button to back Set up menu, press Mode
but ton to exit from menu setting.
2.4.2.2 Reset the Device
2.6 Mode Selection
The defa ult setting is Video Mode , pre ss Mode button can switch
to Still Capture Mod e and Playback Mode / .
3 Using the Driving Recorder
3.1 Recording Videos
Before starting recording, please insert a SD card (not inclu ded) into th e SD
card slot in the device, and make sure the Video Mode is selected. Press REC
button to start recording, the video recording icon ashes on the
screen. The recorded les are saved on the SD card. To stop recording, press
REC button again.
In case the device fails to function normally
due to unknown causes, press the Reset
button inside, then press the button to
restart the device.
MIC
RESET
MIC
RESET
Polaroid·C200Polaroid·C200
Page 7

MIC
RESET
EN -1 0EN -9
⑴
⑵
⑶
Note:
1. If unlock protection for all les, please sele ct Unlock all
insead of Unlock Current.
2. Th e si mi la r st ep s to p ro te ct le s.
3.1.3 Motion Detection
If Motion Detction is activated (the default setting is Off) and the device is
powered on and standby for recording, it will recording automatically once
the device detected any motion in front of lens within 2.5m. The device will
stop recording if no motion detected after one movie clip time recording and
return to standby recording until next motion detected.
Notes:
1. When the battery is fully charged and is in good condition, the device can
record continuously for about 15 minutes.
Manual remove lock from videos steps:
Press Mode button switch to Playback Mode (1), press Menu button
to enter Playback menu (2), press Up/Down button to select
Protect,press OK button to enter the sub menu, press Up/Down
button to select Unlock Current (3), then press OK button to
conrm. Press Mode button to exit and return Playback Mode. Press
Mode button switch to Vid eo M od e.
3.1.1 The Recording Screen
3.1.2 A Key Protection
During recording, press Mode button to protect current video, the key
icon appears on the screen, the current movie clip will be protected and
cannot be replaced (the default setting for a movie clip is 3-minute), the next
movie clip will unlock automatically and can be replaced if the SD card is full.
Remove the protection for current movie clip:
Press Mode button again to remove protection for current movie clip,
the key icon will disappear from the screen, the movie clip will not be
protected and can be replaced if the SD card is full.
Note:
The recording will stop automatically and the screen will show SD card is full
if the SD card is full of protected les. To continue recording, please change
a SD card or delete the protected les manually.
MIC
RESET
Vid eo Re cordi ng Mode Rem ainin g memor y time
Res oluti on
SD ca rd stat us
Loo p recor ding & ti me
Exp osure v alue
Aud io stat us
Sys tem dat e & time
Pow er adap tor
MIC
RESET
MIC
RESET
Polaroid·C200Polaroid·C200
Page 8
EN -1 2EN -1 1
Main Menu Function List
Description
Available Option
Video
Setting for video resolution.
108 0FHD 19 20 x 1080
720 P 1280 x 72 0
VGA 64 0 x 480
Setting for enabling automatic loop record and
the movie clip time.
Off - The recording will stop when the SD card
is full.
1 Minute / 3 Minutes / 5 Minutes – Select to
limit recording time per le.
3 Minutes, for example, the recording time for
per le is 3 minutes. If 21 minutes of video
is recorded, then 7 les of 3 minutes in length
is created.
Off / 1 M inute /
3 Min utes / 5 Mi nutes
Manual compensation for low or bright light
levels. The more negative “-“in scale, the
darker the recorded video appears. The more
positive “+”, the lighter the recorded video
appears. 0 is the neutral setting for this option
and is the default value.
+2.0 / +1.0 / +0.0
/ -1.0 / -2.0
Setting for activating the motion detection.
On: Select this to enable the motion detection.
Off: Disable the motion detction.
Off / O n
Setting for activating audio in the video
On - This enables the audio recording.
This is the default setting for this option.
Off - This records video without audio.
Off / O n
Setting for the indication of date and
logo stamp on the video recorded.
Off - No date or logo is displayed on the video.
Date - Only date is displayed on the video.
Logo - Only logo is displayed on the video.
Date+Logo - Date and logo is displayed
on the video.
Off / D ate / Log o /
Dat e+Log o
Setting for the sensitivity of G-sensor
to detect collision to protect the recording video.
Off - Disable the G-sensor function.
Low / Medium / High - The higher sensitivity
the collision will be detected easier.
The default setting is Medium.
Off / Low / Medium / High
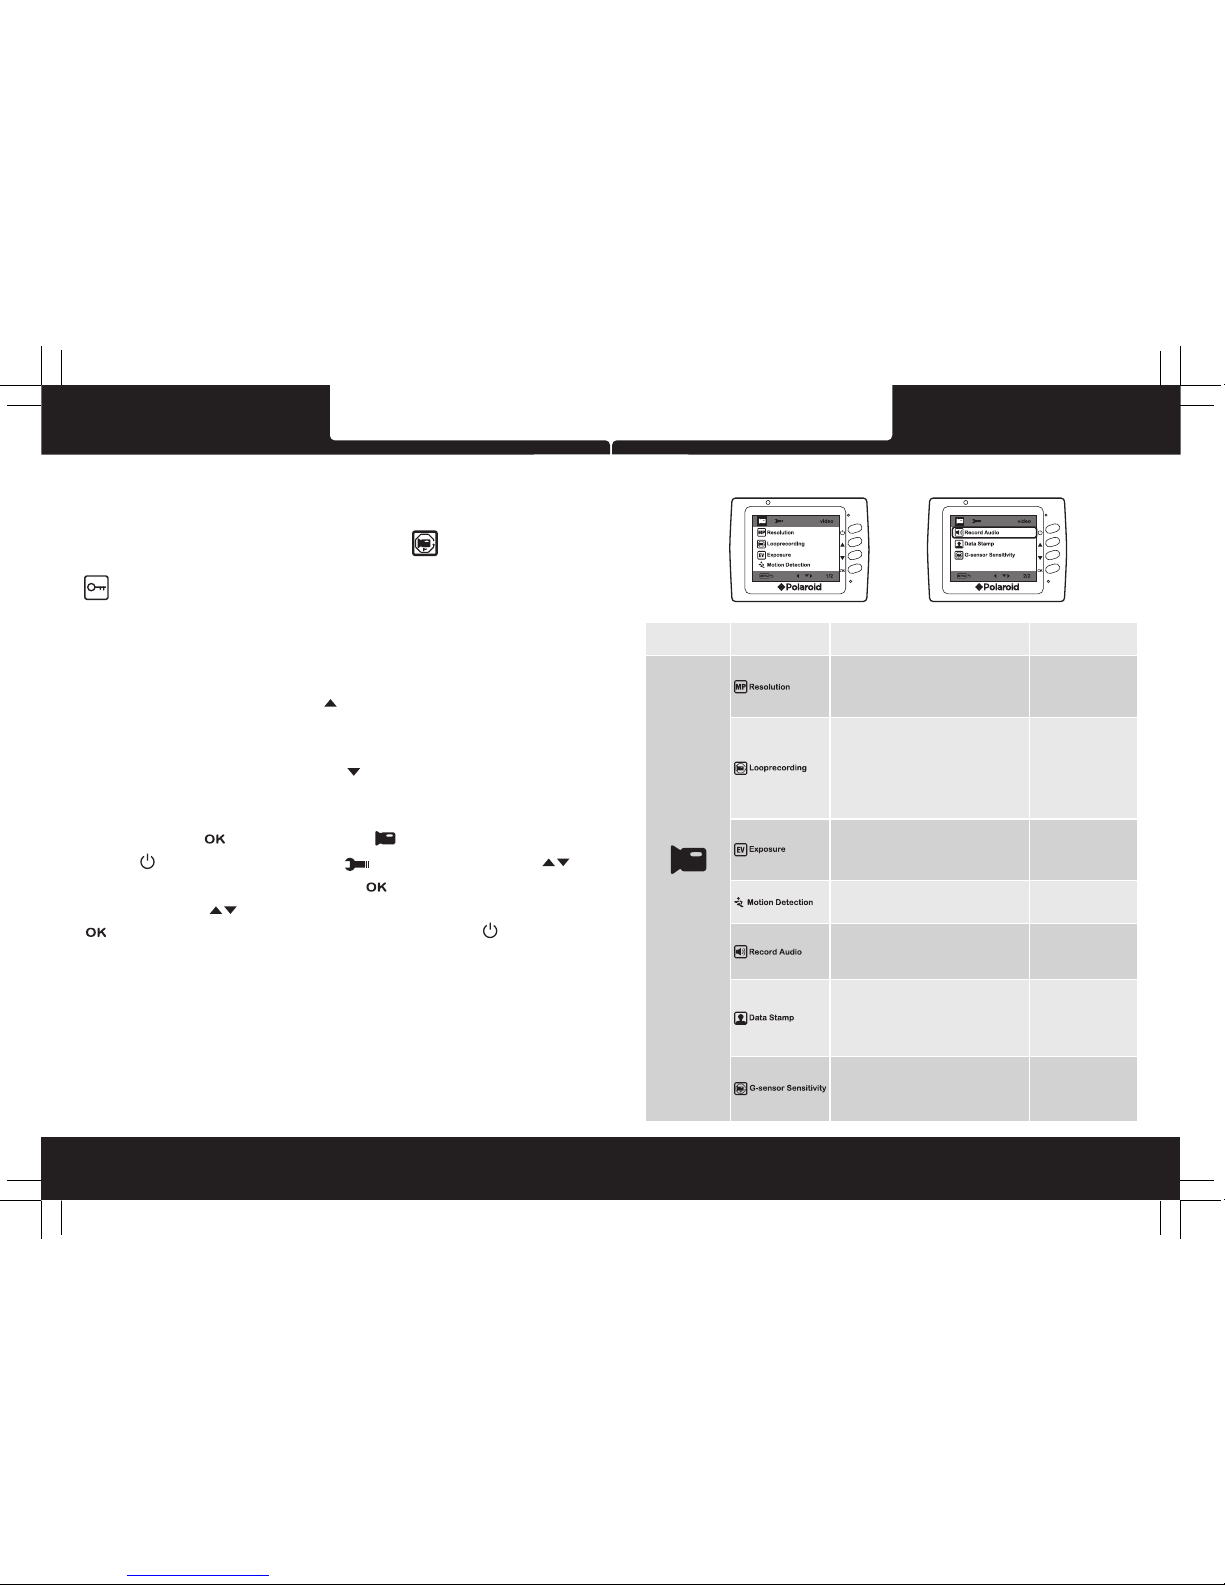
3.1.8 Vid eo M en u Op ti on s
2. As the device is used, the battery storage capacity will decrease gradually.
3. Th is i s no rm al p he no menon for the battery.
3.1.4 G-sensor Collision Recording Protection
If the setting for G-sensor Sensitivity is Low / Medium / High, the key icon
will appear on the screen when a collision is detected while recording,
the current movie clip will be protected automatically and can not be
replaced. The d ef au lt setti ng is Medium.
3.1.5 Audi o On / O ff
On the Vi de o Mo de , pr es s Up b ut to n ca n tu rn O ff / On the audio.
3.1.6 Adjusting EV
On the Vi de o Mo de , pr es s Do wn b ut to n ca n ad ju st t he e xposure value.
3.1.7 Vid eo M en u Op er at io n
Press OK button to enter Vi de o me nu s et ti ng , pr es s Mo de
button can switch to Setup menu . Press Up / Down button
to select sub menu, then press OK button to enter the setting, press
Up / Down button to select the option, and then press OK button
conrm. After nished the setting, press Mode button to exit
menu setting.
MIC
RESET
MIC
RESET
Polaroid·C200Polaroid·C200
Page 9

EN -1 4EN -1 3
3.1.9 Setup Menu Options
Main Menu Function List
Description
Available Option
Set the date and the time. Change the format of
the date and time is displayed on the screen:
YY/MM/DD - Year, Month, Day
MM/DD/YY - Month, Day, Year
DD/MM/YY - Day, Month, Year
Setting for enable / disable the beep.
On - Select this to enable audible system beeps
when setting the menu options. This is the
default setting for this option.
Off - Disables the audible system beeps.
Off / On
Select the desired OSD language.
Englis h / 繁体中文 /
简体中文 / 日 本语 / 한국어/
tiếng Việ t
Set the suitable frequency.
50 Hz / 6 0Hz
Manage the backlighting and presentation of the
LCD. It is advisable to enable this feature to
preserve battery power.
Off - Select to disable power saving mode for
the LCD. This is the default setting for this option.
1 Minute/2 Minutes/3 Minutes – The driving
recorder automatically powers off the LCD after
1 Minute/2 Minutes/3 Minutes of inactivity or
during video recording.
Note: If enabled, the driving recorder continues
to record video even when the LCD is shut off.
Press any button to power up the LCD.
Off / 1 M inute /
2 Min utes / 3 Mi nutes
Setup
Set the automatic power off time when the
driving recorder is not active.
Off - The driving recorder will not automatically
power off. This is the default setting.
3 Minutes/5 Minutes/10 Minutes – The driving
recorder will automatically power off in inactive
for 3 minutes/5 minutes/10 minutes.
Off / 3 M inute /
5 Min utes / 10 M inute s
Formats the inserted micro SD card.
OK - Selecting this option completes the format
process.
Cancel - Select this to abort the format and
return to the previous menu.
Warning: ALL Video and photo les are be
permanently deleted and CANNOT be recovered
once the memory card is formatted.
Can cel / OK
This option sets the driving recorder to the original
factory default settings.
Can cel / OK
This option displays the current rmware number
of the driving recorder. This information may be
important for service and support communications.
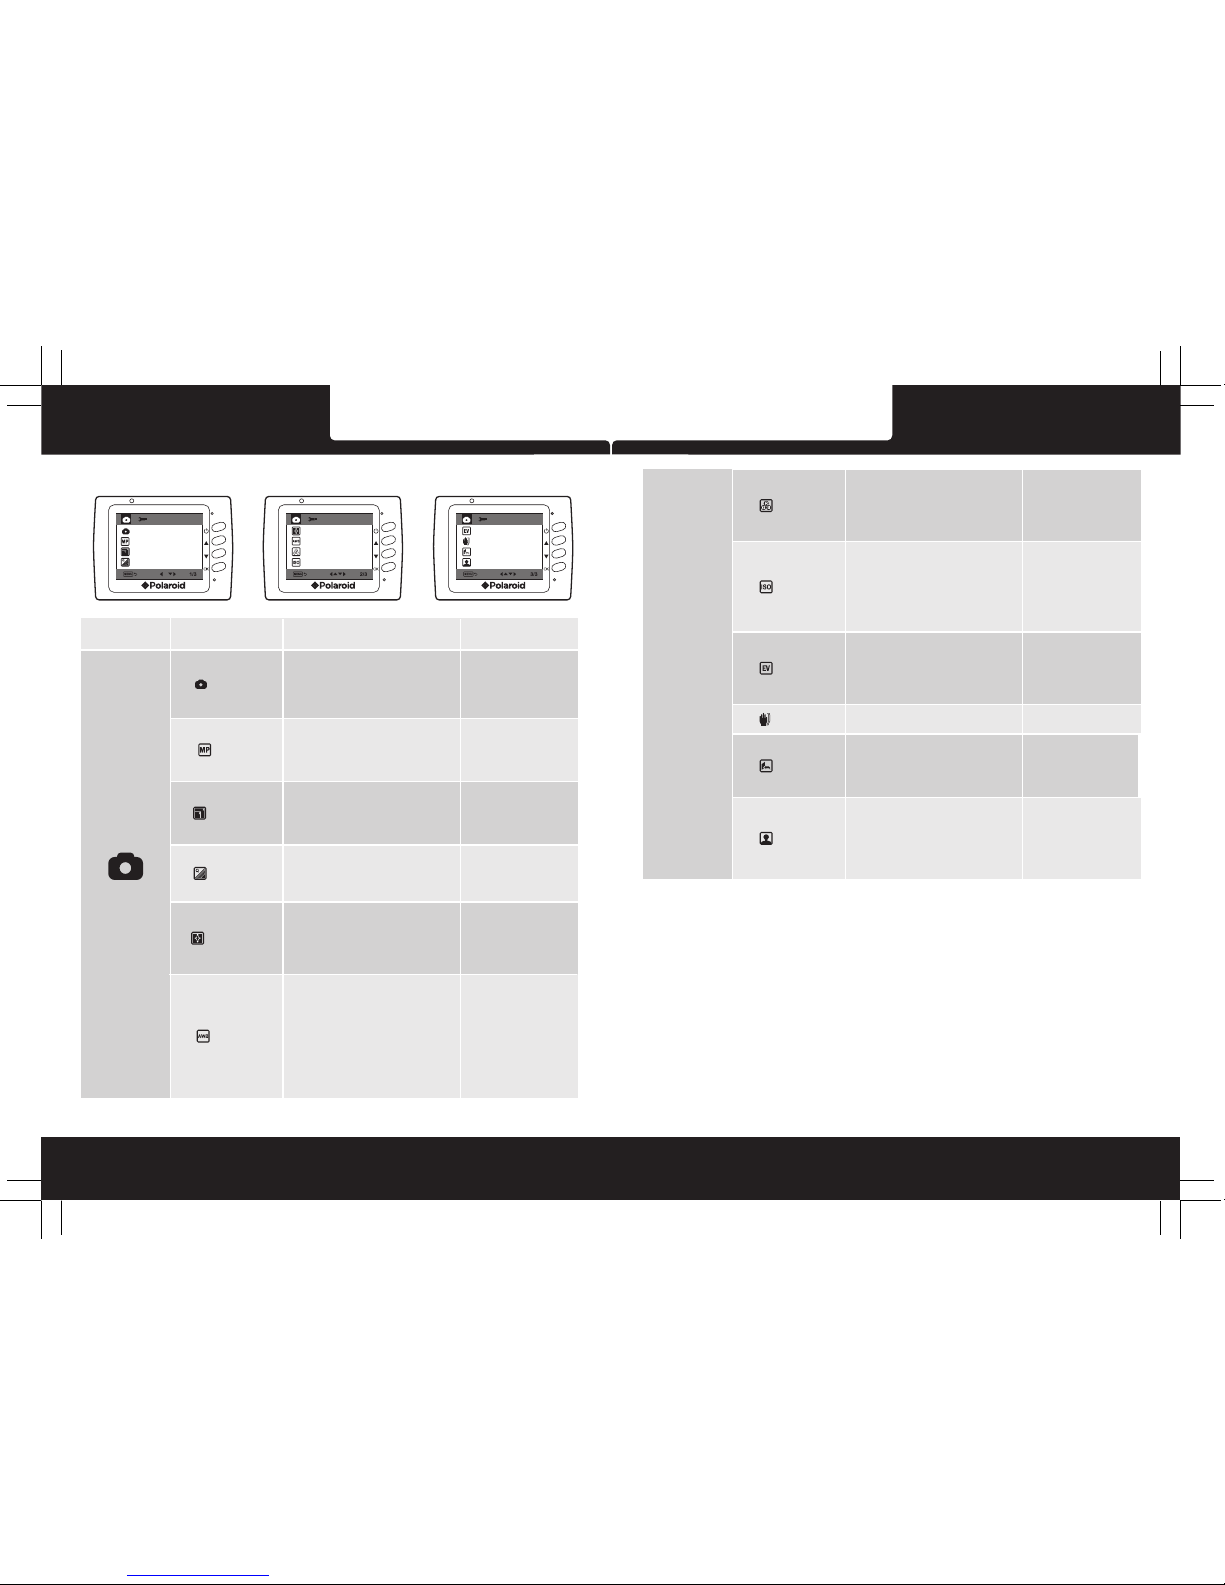
3.2 Taki ng P ic tu re
To take a picture make sure the Still Capture Mode is selected. Press
the REC button to take a photo. Taken p ho to s are saved on SD Card.
3.2.1 Still Capture Screen
Still
Capture
Mode
Exposure
Value
Anti
-shaking
Resolution
SD card
status
Auto White
balance
ISO
sensitivity
Remaining
numbers to
take photo
Photo
quality
Date and
time
3.2.2 Zoom in / out
On the still capture mode, press Up/Down button to zoom in / out.
3.2.3 Still Capture Menu Operation
On Still Capture mode, press OK button three seconds to enter Still
Capture menu setting, press Up/Down button to select sub menu,
then press OK button to enter the setting, press Up/Down button to
select the option, and then press OK button conrm the setting. After
nished the setting, press MODE button to exit menu setting.
MIC
RESET
MIC
RESET
MIC
RESET
MIC
RESET
Polaroid·C200Polaroid·C200
Page 10

MIC
RESET
EN -1 6EN -1 5
3.2.4 Still Capture Menu Options
Main Menu Function List
Description
Available Option
Set the shooting time.
At once: The driving recorder will taking
picture at once.
In 2 sec/In 5 sec/In 10 sec: The driving
recorder will taking picture in 2
seconds/5 seconds/10 seconds.
Set to activating burst shooting for 5
photos.
On: Enable the driving recorder to burst
shooting 5 photos.
Off: Disable to burst shooting photos.
This is the default setting.
Off / On
Set the photo quality.
Fine - This option generates the best
quality for the picture.
Normal - Normal quality.
Economy - Poor quality.
Fine / Normal / Economy
Setting for the sharpness of the picture.
Strong - The color of the picture is sharp
and bright.
Normal - General color for the picture.
This is the default setting.
Soft - The color of the picture is seems
soft.
Str ong / Nor mal / Sof
Setting for the white balance. The default
setting is Auto to correct white balance
according to the lighting conditions.
Changes recording parameters to
compensate for different light color
“temperatures”.
Auto - Allows the driving recorder to
automatically detect the light color
temperature and change its parameters
to produce optimal picture color. This is
the default setting for this option.
Daylight - Select when taking photo in
bright sunny outdoor lighting.
Cloudy - Select for heavy overcast
Aut o / Dayli ght /
Clo udy / Flu oresc ent /
Tung sten
Set the photo resolution.
12M 4 000 x 300 0
8M 32 64 x 2448
5M 25 92 x 1944
3M 20 48 x 1536
1.3 M 1280 x 96 0
VGA 64 0 x 480
Setting for the special picture color.
Normal – Capture photos with normal
color parameters. This is the default
setting for this option.
Black&White – Capture photos with
Black&White color.
Sepia - Capture photos with sepia color.
Nor mal /
Bla ck&Wh ite / Sep ia
Setting for ISO sensitivity to compensate
for some extreme lighting situations.
Auto - This allows the driving recorder to
automatically detect the light levels and
change its aperture and shutter speed
parameters to produce optimal picture.
This is the default setting.
ISO100 - Select for taking picture in
bright outdoor light situations.
ISO200 - Select for taking picture in
indirect sunlight situations.
ISO400 - Select for taking picture indoors.
Auto / ISO100 /
ISO200 / ISO 400
Manually compensate for low or bright
light levels. The more negative “-“in scale,
the darker the Photo appears. The more
positive “+”, the lighter the recorded video
appears.
0 is the neutral setting for this option and
is the default value.
Still Capture
At once / In 2 sec / In 5
sec / In 10 sec
+2.0 / +1.0 / +0.0 /
-1.0 / -2.0
Setting for activating anti-shaking.
Off / On
Setting for the time reviewing the photo
once shooting done.
Off - This option will return to still capture
mode immediately.
2sec / 5sec - This option can view the
picture 2 seconds/5seconds after shooting,
and then return to still capture mode.
Off / 2sec / 5sec
Setting for the indication of date and logo
stamp on the pictures.
Off - No date or logo is displayed on the
video.
Date - Only date is displayed on the video.
Logo - Only logo is displayed on the video.
Date+Logo - Date and logo is displayed
on the video.
Off / Date / Logo /
Date+Logo
outdoor color.
Flourescent - Select in standard CFL
bulb indoor uorescent light in.
Tungsten - Select for tungsten kind color.
MIC
RESET
MIC
RESET
Polaroid·C200Polaroid·C200
Page 11

MIC
RESET
EN -1 8EN -1 7
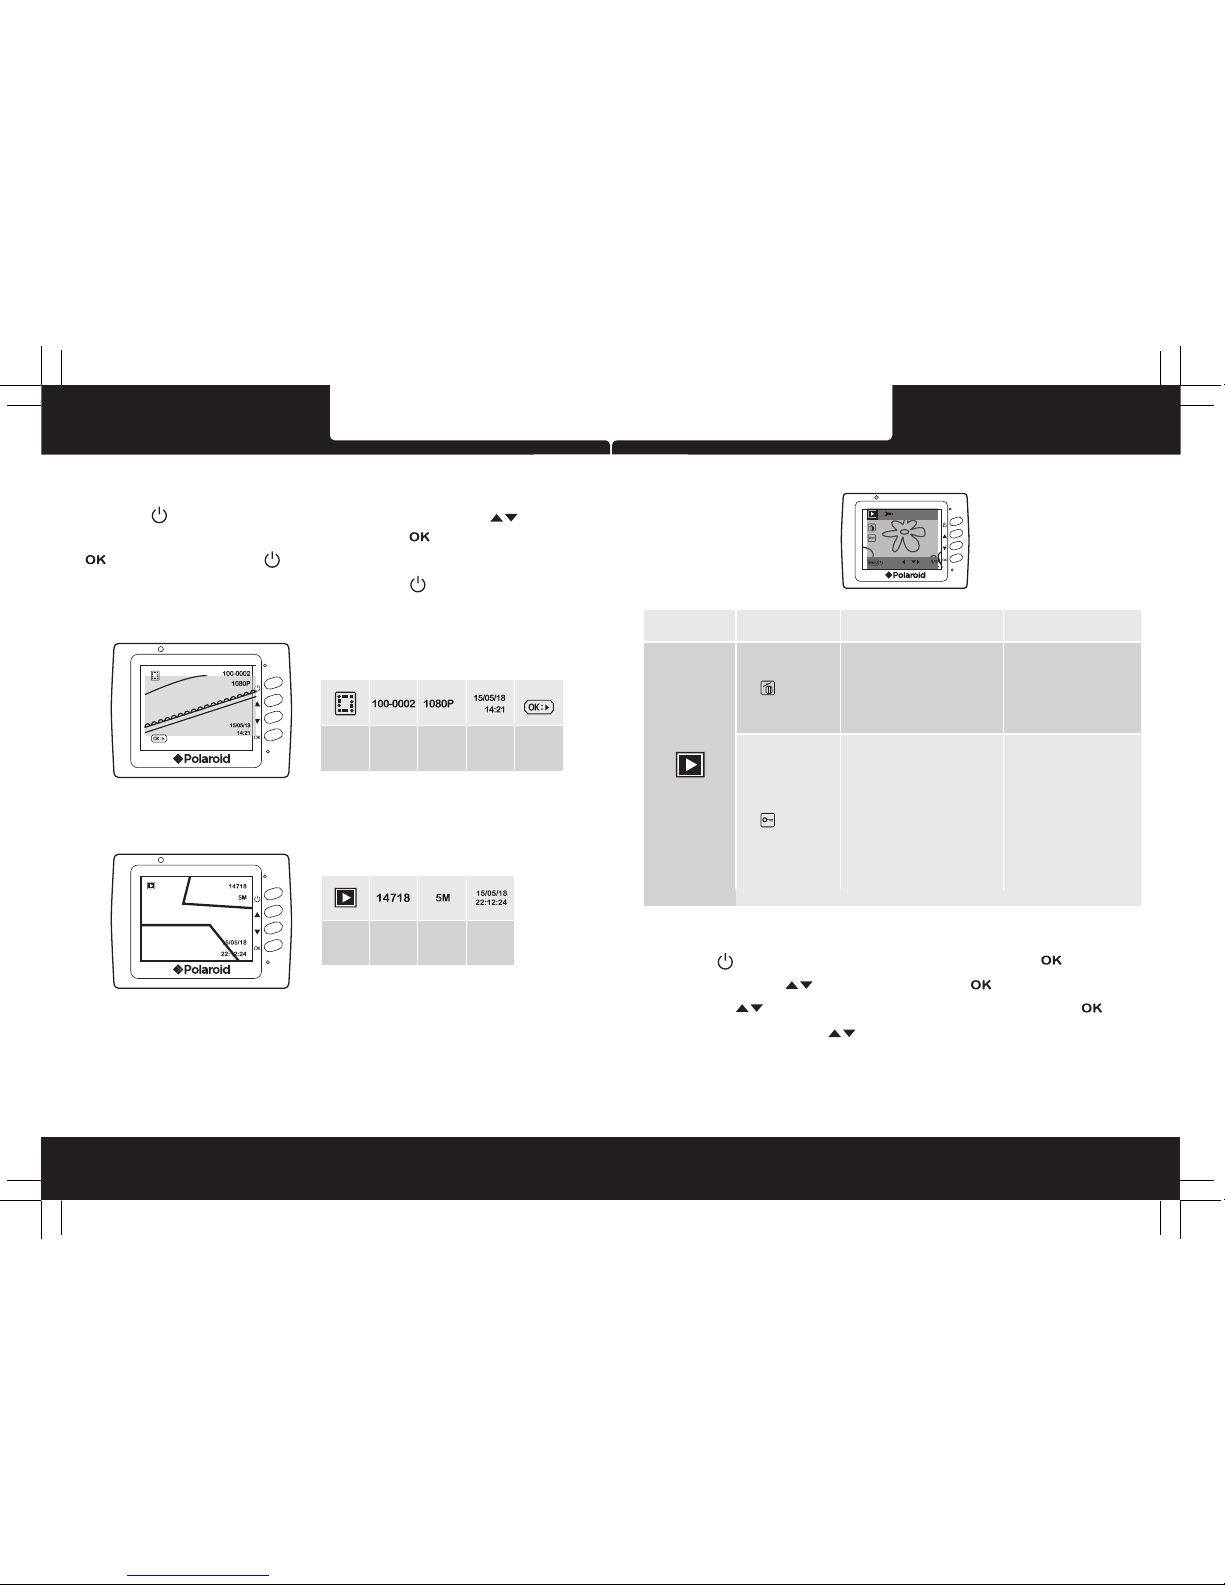
3.3 Playing Vid eo s an d Viewing Pictures
3.3.1 Playing Vid eo s
Press Mode button switch to Playback mode / , press Up / Down
button to review videos or pictures. Th e vi de o ic on w il l ap pear on
the top left corner of the screen if the le is a video, press REC button to
playing video, then press REC button to pause the playing, press
Mode button to stop playing.
3.3.2 Play Video Screen
Video
Video
number/
name
Video
resolution
Date&time
3.3.3 Vie w Pi ct ur es S cr ee n
Picture
Picture
number/
name
Pictures
resolution
Date&time
3.3.4 Playback Menu Options
Main Menu Function List
Description
Available Option
Thi s optio n allow s for the d eleti on of one
or mo re vide o/pho to les f rom the
mem ory car d.
Del ete Cur rent - Th is opti on allo ws a
sin gle vid eo or pho to to be de leted f rom
the m icro SD m emory c ard per a ction .
Del ete All - Th is opti on allo ws all vi deo
and p hoto l es to be de leted f rom the
mic ro SD mem ory car d per act ion.
Warn ing: Vi deos an d photo s CANNO T
be re cover ed once t hey are d elete d.
Del ete Cur rent /
Del ete All
Pro tect on e or all vi deo/p hoto l es from
bei ng repl aced wh en the me mory ca rd is
ful l.
Loc k Curre nt - This o ption a llows a s ingle
vid eo or pho to to be pr otect ed.
Unl ock Cur rent - Th is opti on allo ws a
sin gle vid eo or pho to to be un prote cted.
Loc k Al l - This op tion al lows al l video o r
pho to les t o be prot ected .
Unl ock All - Th is opti on allo ws all vi deo
or ph oto le s to be unp rotec ted.
Warn ing: Vi deos an d photo s will NO T be
pro tecte d if the me mory ca rd is for matte d.
Onc e the mem ory car d is form atted , all
le s will be d elete d and CAN NOT be
rec overe d.
Loc k Curre nt
Unl ock Cur rent
Loc k Al l
Unl ock All
Playback
3.4 Delete Vi de o / Pi ct ur e
Press Mode button switch to Playback mode / , press OK
button three seconds to enter Playback menu press Up / Down
button to select Delete, then press OK button to enter delete
menu, press Up / Down button to select Delete Current, pess OK
button to enter sub menu, press Up / Down button to select OK, then
Press OK button to conrm the erase.
Start
Playing
MIC
RESET
MIC
RESET
Polaroid·C200Polaroid·C200
Page 12
EN -1 9
4 Tech ni ca l Sp ec i ca ti on s
LCD d ispla y
2.0 " color T FT sc reen
Ima ge sens or
3.0 MP, 1/ 4" CMOS s en sor
108 0FHD 19 20 x 1080 ( Inter polated )
720 P 12 80 x 720
VGA 64 0 x 480
Vid eo reso lutio n
Pic ture re solut ion
12M ( Inter polat ed)
Vid eo form at
AVI
Pic ture fo rmat
JPG
Mem ory
Support Class 6 or higher rating Micro SD card,
maximum up to 32GB
Mic ropho ne
Bui lt-in
Spe aker
Bui lt-in
G-s ensor
Yes
Pow er sour ce
Bui lt-in b atter y, ca r power a dapto r
Int erfac e
Min i USB 2.0 , SD card s lot
Ope ratin g tempe ratur e
0°~ 4 5° C
Dim ensio ns
67. 5mm x 51m m x 31mm
Wei ght
54g
To delete all the les in the SD card, including videos, pictures and any other
les, please format the SD card.
Note:Deleted les cannot be recovered. Ensure the les have backup
before deletion.
Full HD 1080p 行车记录仪
C200
使用说明书
Vie w angle
100 °
China toll free No.:
400-84010 30
(For other region, please
contact the local agent.)
Polaroid·C200
Page 13

EN-1
有關本手 冊 .. .. ........... .. .. ........... .. .. .. ........... .. .. ........... .. .. .. ......... .. .. .. ........... .. .. .1
電池注意 事項 . ....... .. ....... .. .. ....... .. ....... .. .. ....... .. ....... .. .. ....... .. ....... .. .. ....... .. .....1
安裝須知 . .. ....... .. ....... .. .. ....... .. ....... .. .. ....... .. ....... .. .. ....... .. ......... .. ....... .. ......... .1
安全注意 事項 . ....... .. ....... .. .. ....... .. ....... .. .. ....... .. ....... .. .. ....... .. ....... .. .. ....... .. .....2
1 導論. .. ....... .. .. ....... .. ......... .. ....... .. .. ....... .. ....... .. .. ....... .. ....... .. .. ....... .. ....... .. .. ..3
1.1 功能 .. .. ........... .. .. .. ........... .. .. ........... .. .. .. ......... .. .. .. ........... .. .. ........... .. .. .. ...3
1.2 包裝 內容 .. .. .. .. ........... .. .. ........... .. .. .. ........... .. .. ........... .. .. .. ........... .. .. .........3
1.3 產品 概要 .. .. .. .. ........... .. .. ........... .. .. .. ........... .. .. ........... .. .. .. ........... .. .. .........4
2 開 始 .... ........... .. .. ........... .. .. .. ......... .. .. .. ........... .. .. ........... .. .. .. ........... .. .. .........5
2.1 插入記憶卡 .. .. ........... .. .. .. ........... .. .. ........... .. .. .. ........... .. .. ........... .. .. .. ........5
2.2 安裝於車內 .. .. ........... .. .. .. ........... .. .. ........... .. .. .. ........... .. .. ........... .. .. .. ........5
2.3 連接 電源 . ........... .. .. ........... .. .. .. ........... .. .. ........... .. .. .. ......... .. .. .. ........... .. .. 6
2.4 設備開/關 .. .. .. ........... .. .. .. ......... .. .. .. ........... .. .. ........... .. .. .. ........... .. .. .........7
2.4.1 自動開/關 ............ .. .. .. ........... .. .. ........... .. .. .. ......... .. .. .. ........... .. .. ........... 7
2.4.2 手動 開/關及 設備回復 .... .. .. .. ........... .. .. ........... .. .. ........... .. .. .. ........... .. .. .7
2.4.2. 1 手動 開/關機 ...... .. .. .. ........... .. .. ........... .. .. .. ........... .. .. ........... .. .. .. ........7
2.4. 2. 2 設備回復 .. .. ....... .. ....... .. .. ....... .. ......... .. ....... .. .. ....... .. ....... .. .. ....... .. ....8
2.5 時間 設定 .... .. ....... .. ..... .. ....... .. ....... .. ....... .. ..... .. .. ..... .. ....... .. ....... .. ..... .. .. ..8
2.6 模式 選擇 .... .. ....... .. ..... .. ....... .. ....... .. ....... .. ..... .. .. ..... .. ....... .. ....... .. ..... .. .. ..8
3 使用行車記 錄儀 .. .. .. ........... .. .. .. ........... .. .. ........... .. .. .. ........... .. .. ........... .. .. .. ..8
3.1 錄影 . .. ......... .. .. ......... .. .. ........... .. .. ......... .. .. ........... .. .. ......... .. .. ........... .. .. ..8
3.1.1 錄影 畫面 . ......... .. .. .. ........... .. .. ........... .. .. .. ........... .. .. ........... .. .. .. ........... .9
3.1.2 一鍵 鎖檔 . ......... .. .. .. ........... .. .. ........... .. .. .. ........... .. .. ........... .. .. .. ........... .9
3.1.3 移動檢測 ........... .. .. .. ........... .. .. ........... .. .. .. ......... .. .. .. ........... .. .. ........... .1 0
3.1.4 碰撞感應 ........... .. .. .. ........... .. .. ........... .. .. .. ......... .. .. .. ........... .. .. ........... .1 1
3.1.5 關閉/開啟錄音 .... .. .. ........... .. .. .. ........... .. .. ........... .. .. .. ........... .. .. ........... 11
3.1.6 調整曝光 值 ......... .. .. ........... .. .. .. ........... .. .. ........... .. .. .. ......... .. .. .. ........... 11
3.1. 7 使用選 單 ..... .. ... .. ..... ..... .. ..... ..... .. ..... ..... .. ... .. ..... ..... .. ..... ..... .. ... .. ..... .1 1
3.1. 8 錄影模 式播 放選單選項 .... .. ... .. ..... ..... .. ..... ..... .. ... .. ..... .. ... .. ..... ..... .. ...12
3.1. 9 設置 選單選項 .. .. ....... .. ....... .. .. ....... .. ......... .. ....... .. .. ....... .. ....... .. .. ....... 13
3.2 拍照 ......... .. .. ........... .. .. .. ........... .. .. ........... .. .. ........... .. .. .. ........... .. .. ..........1 4
3.2.1 拍照 畫面 ............. .. .. ........... .. .. .. ........... .. .. ........... .. .. .. ......... .. .. .. ........... 14
3.2.2 放大/縮小畫面 .... .. .. ........... .. .. .. ........... .. .. ........... .. .. .. ........... .. .. ........... 14
3.2. 3 使用選 單 ..... .. ... .. ..... ..... .. ..... ..... .. ..... ..... .. ... .. ..... ..... .. ..... ..... .. ... .. ..... .1 4
3.2. 4 拍照 模式拍照選 單選 項 ....... .. ....... .. .. ....... .. ......... .. ....... .. ......... .. ....... .1 5
3.3 播放錄影 與查 看照片 ..... .. .. ........... .. .. .. ........... .. .. ........... .. .. .. ......... .. .. .. ....17
3.3.1 播放 錄影 ............. .. .. ........... .. .. .. ........... .. .. ........... .. .. .. ......... .. .. .. ........... 17
3.3.2 錄影 播放 畫面 .... .. ........... .. .. ........... .. .. .. ......... .. .. .. ........... .. .. ........... .. .. .. 17
3.3.3 查看 照片 畫面 .... .. ........... .. .. ........... .. .. .. ......... .. .. .. ........... .. .. ........... .. .. .. 17
3.3. 4 播放 模式播放選 單選 項 ....... .. ....... .. .. ....... .. ....... .. .. ....... .. ......... .. ....... .1 8
3.4 刪除檔案 ... .. .. ........... .. .. .. ......... .. .. .. ........... .. .. ........... .. .. .. ........... .. .. ..........1 8
4 技術規格 ... .. .. .. ........... .. .. ........... .. .. .. ........... .. .. ........... .. .. ........... .. .. .. ........... 19
Polaroid·C200
Page 14

有關本手冊
本手冊中的內容資訊僅供參考,如有更改,恕不另行通知。本公司已儘量確保本使
用手冊的正確與完整,但有任何錯誤與遺漏,概不負責。廠家保留不需事先通知,
直接更改技術規格的權利。
電池注意事項
· 請務必使用隨附的車載充電器進行充電。電池處置不當可能導致爆炸。
· 切勿拆卸電池或在電池上鑽孔,切勿使電池短路。
· 電池暴露在明火下可能爆炸。處理電池時切勿放入火中。
· 請按照當地法規處理廢電池。
· 切勿自行更換電池;請交由經銷商進行更換。
安裝須知
· 本產品應安裝在靠近後視鏡之處,並儘量接近前擋風玻璃中央位置,以獲得最好的
視野。
· 確定鏡頭是在擋風玻璃雨刷的範圍內,確保視野良好,即使雨天也同樣好。
· 鏡頭上的保護膜會影響錄影或拍照效果,使用前務必撕掉鏡頭上的保護膜。
· 不要用手指觸摸鏡頭。手指上的油脂可能會留在鏡頭上,導致攝像或攝影不清楚。
定期清潔鏡頭。
· 不要將產品安裝在有色車窗上。因為這樣會損壞淺色薄膜。
· 確定安裝位置不會受有色車窗的阻礙。
· 本設備僅適用產品所附之車載充電器,請勿使用其他廠牌以免設備燒毀或導致電池
爆炸。
如本指南未說明,請勿拆卸或改動本產品的任何配件或零部件。
Polaroid·C200Polaroid·C200
TC- 2TC -1
安全注意事項
· 使用者須遵守當地法律並以行車安全為優先考量,請勿於行車中操作本設備。
· 使用設備前請先確認日期與時間已設置完成。
· 本產品使用時會變熱,這屬於正常現象。
· 請勿將本產品靠近熱源或與火焰、高溫接觸。
· 請勿將本產品靠近產生強大電磁場的設備或環境,與強磁場接觸可能會導致發生故
障或資料損壞、丟失。
· 本設備僅供使用於非商業用途,適用法律允許的最大限度內,本公司對使用者因使
用本設備造成之損失不承擔任何責任。
· 產品使用或操作不當可能導致產品或其附件損壞,並會使保修失效。
開始使用本設備視為同意以上聲明事項。
Page 15

1 導論
感謝購買Poloraid行車記錄器 。這套設備專門用在行車時的錄影 、錄音 。
1.1 功能
1080p全高清行車記錄儀
300萬像素CMOS
2.0寸LCD彩色屏幕
100度廣角鏡頭
1200萬像素插值
支持高達32GB的外置Micro SD儲存卡
移動偵測
循環錄影
汽車啓動時自動錄影
G-sensor防撞錄影
1.2 包裝內容
以下為包裝清單。如果有任何遺漏或損壞項目,請立即聯繫您的經銷商,外觀請依
實際內容物為主。
TC- 4TC -3
EN-1
包裝內容
行車記錄儀
USB線
車載充電器
吸盤支架
使用說明書
背 夾
1.3 產品概要
1
2
3
4
5
6
7
8
9
10
11
12
LED燈
鏡 頭
SD 卡槽
USB接口
還原出廠設定 鍵
顯示螢幕
錄影/拍照/選單鍵/O K鍵
電源/模式鍵
麥克風
向上鍵
向下鍵
喇叭
MIC
RESET
Polaroid·C200Polaroid·C200
3M膠支架
Page 16

← 鬆開旋鈕,將 設備 垂直 方向 調整定位後,
再鎖緊旋鈕, 並確 認設 備已 牢牢固定。
→ 水平方向轉動 設備 可進 一步 調整合適視角。
2 開始
2.1 插入記憶卡(不包含)
按產品指示方向插入記憶卡,推入記憶卡直到嗒 一聲插 入定位為止。
取出記憶卡
往裡推記憶卡,彈出插槽。
注意:
1.設 備在開機狀態時,不要取出或插入記憶卡,以免 損壞記 憶卡。
2. 請使用Micro SD卡6級或以上,最高支援3 2GB。
3. 使用前請先格式化Micro SD存 儲卡。
取出記憶卡時,小心記憶卡快速彈出導致遺失記 憶卡, 此為記憶卡插槽彈片特性,
便於使用者易於取出。
2.2 安裝與車內
→ 撕掉吸盤上的 保護 膜, 將支 架的吸盤輕
壓於擋風玻璃 上, 再按 下支 架的夾子固定。
確認支架已牢 牢固 定。
← 將設備裝入背夾。
2. 3 連接電源
限使用產品所 附之 車載 充電 器,啟動設備以及充電。
TC- 6TC -5
(不包含 )
→ 將支架卡位推 入設 備上 的背 夾槽位中,
注意一定要到 位。
Polaroid·C200Polaroid·C200
Page 17

2. 5 時間設定
設置正確的日 期和 時間 。開 機後長按錄影鍵進入選單 設置 ,再 按電源鍵
切換到設置選 單 ,按 向上/向 下鍵 選 擇日期和時間 ,再按錄 影
鍵 進入日期和時間設 置, 按向 上/向下鍵 調整數值,按錄 影鍵 進
入下一項設置 ,全 部完 成正 確設置後,再按錄影 鍵 確認 並返 回到 設置功能
表,再按菜單鍵 退出選單 設置 。
2. 4. 2. 2 設備 回復
2.6 模 式選擇
出廠設 置為錄影模式 ,按模式鍵 依次可切換到拍照模式 、播放影
片與檢 視照片模式 / 。
3 使用行車記錄器
3.1 錄影
開始錄影前,請確保已選擇錄影模式並已插入SD卡。按錄影鍵 開始錄影,
錄影圖標 閃爍;錄影文件保存在SD卡上;若需停止錄影,請再按錄影键 。
如設備在車内連接車用充電器,默認設置為汽車引擎開啟時自動開機並開始錄影,
汽車引擎停止後保存檔案並停止錄影。
1. 將車用充電器 的一 端連 接到設備的USB / 電源接孔。
2. 將車用充電器 的另 一端 插接汽
車內的點煙器 的插 孔。 汽車 引擎
一旦發動,設 備即 自動 開機 並錄影。
2. 4 設備開/關
2. 4. 1 自動 開/關機
連接車用充電 器後 ,汽 車引 擎發動會自動開機並開始 錄影 (須 有SD卡情況下)。
汽車引擎停止 後, 設備 會自 動保存最後錄製的檔案並 關機 。
2. 4. 2 手動 開/關機 及設 備回 復
2. 4. 2. 1 手動 開/關機
短按電源鍵 開機 ,再 長按 電
源鍵 3秒關機。
當設備因不明 因素 導致 無法 正常操作,
請按回復原廠 設定 鍵, 再按 電源鍵
重新啟動設備 完成 開機 。
TC- 8TC -7
MIC
RESET
Polaroid·C200Polaroid·C200
MIC
RESET
Page 18

⑴
⑶
備註:
1. 如果要解除 全部 檔案 保護 ,則選擇全部解鎖 。
2. 手動保護錄 影檔 案選 擇加 鎖檔前 或者 ,操作方式同上。
3. 1. 3 運動 檢測
在開啟移動偵 測功 能後 (原 廠設定為關閉 ),設備在開機 待機 錄影 時,如果偵測
到距鏡頭2.5 m以內 有移 動的 物體會自動錄影。
錄影持續 時間 同循 環錄 影時間設置,但如果鏡頭 前無 移動 物體,持續10秒後,
設備會自動停 止, 等待 下一 次移動物體的偵測。
備註 :
1. 在電池充滿電與 狀態 良好 的情況下,移動偵測可持 續時 間約1 5分鐘。
2. 電池的蓄電能力 會隨 著設 備使用逐漸減少,此為電 池的 正常 現象 。
手動解除保護 錄影 檔案 步驟 :
按模式鍵 切換到播放 模式 (圖 一),再按錄影鍵 進入播放 選單
(圖二),按 向上/向 下鍵 到 保護 選項 ,再按錄影鍵 進入保護子
選單,按向上/向 下鍵 選 擇解 鎖檔 案(圖三),再按錄 影鍵 確 認解 除
保護。長按錄 影鍵 退 出選 單設 置。
3. 1. 1錄影 畫面
3. 1. 2 一鍵保 護
在錄影過程中 ,按 模式 鍵 進行 一鍵保護當前錄影片段, 螢幕 的右 上角會
出現鎖形圖標 這時錄 製的 目前 片段(時長取決於單段影 片時 間設 置, 出
廠設定3分鐘)會 被保 護起 來, 被保護的片段不會被替換 ;下 一個 錄影片段會自
動取消錄影保 護 。
取消當前 錄影 片段 保護 :
再按一次模式 鍵 取消 保護 ,螢 幕右上角的鎖定圖標 消失, 這時 錄製
的片段不會被 保護 並在S D卡滿 時會自動刪除替換。
備註:
在所有檔案都 被保 護, 則SD卡 錄滿後錄影自動停止;如 需繼 續錄 影,需更換SD
卡或把SD卡内檔 案手 動刪 除。
TC- 10TC- 9
保護
全部解 鎖
保護檔案
全部加鎖
MIC
RESET
錄影模 式
可錄影 時間
循環錄 影片段時間
曝光值
聲音開 關
時間和 日期
車充圖 示
錄影解 析度
S 卡圖示D
MIC
RESET
⑵
刪除
保護
回放
MIC
RESET
保護檔案
解鎖檔案
全部加鎖
全部解鎖
保護
MIC
RESET
Polaroid·C200Polaroid·C200
Page 19

設置錄影解析度
108 0FHD 19 20 x 1080
720 P 1280 x 72 0
VGA 64 0 x 480
設置循環錄影及錄影片段時間。
關 – 選擇此選項在卡錄滿時會自動停止錄影。
1分鐘/3分鐘/5分鐘 – 設置循環錄影分段單個
錄影片段時間。例如選擇3分鐘,則循環錄影
的每個錄影片段爲3分鐘,如果錄影21分鐘,
則會有7個3分鐘的錄影片段。
關/1分鐘/ 3分鐘/5分鐘
手動調整補光. 負值越大,光線會越暗,正值
越大,光線越明亮。
此選項的原廠設定是0,爲自然的光亮度。
+2.0 / +1.0 / +0.0
/ -1.0 / -2.0
開啟或關閉移動檢測或移動偵測。
開: 開啟移動檢測。
關: 關閉移動檢測。
關/開
開啟或關閉錄影時的聲音。
關 - 關閉聲音,錄影檔案不會有聲音。
開 - 開啟聲音,原廠設定為此選項。
關/開
設置顯示在錄影檔案上的標示。
關 - 無日期或商標標示顯示在錄影檔案上。
日期 - 僅顯示日期標示在錄影檔案上。
商標 - 僅顯示商標在錄影檔案上
日期+商標 - 顯示日期和商標在錄影檔案上
關/日期/商標/
日期+商標
設置碰撞的靈敏度。
關 - 關閉重力感應功能,碰撞時不會重力感應
保護目前檔案。
低/中/高 - 重力感應的靈敏度設置越高就越容
易感應到碰撞保護目前檔案。原廠設定為中。
關/低/中/高
3. 1. 8 錄影 模式 選單 選項
3. 1. 4 重力 感應
當行車時遇到 碰撞 、摇 晃或 振動等情況時,原廠設定 設備 會自 動啟動重力感應
功能,這時螢 幕上 會顯 示保 護片段圖標 ,當前錄製片段 會被 保護 起來 不會
被替換 。
3. 1. 5 關閉/開啟 錄音
錄影模式下, 按向 上鍵 可 關閉/開 啟錄音。
3. 1. 6 調整 曝光 值
錄影模式下, 按向 下鍵 可 調整 曝光值。
3. 1. 7 使用 功能 表
長按錄影鍵 進入錄影 選單 設 置, 按模式鍵 可切換到設置選單
。按向上/向下鍵 來選擇 選單 ,再 按錄影鍵 進入選項,
按向上/向下 鍵 確定 所要 的選 項, 再按錄影鍵 確認。完成設置 後,
長按錄影鍵 可退出選 單設 置。
解析度
循環錄影
曝光
移動檢測
錄影聲音
日期記錄
G-Se nsor 靈敏 度
解析度
循環錄影
曝光
移動检 测
錄影聲音
日期記錄
G-Sen so r
靈敏度
主選單
功能選項
描 述
可用選單
TC- 12T C-1 1
錄影 錄影
錄影
MIC
RESET
MIC
RESET
Polaroid·C200Polaroid·C200
Page 20

3. 1. 9 設置 選單 選項
調整系統日期和時間,以及日期顯示格式。
YY/MM/DD – 年/月/日
MM/DD/YY - 月/日/年
DD/MM/YY – 日/月/年
設置開啟或關閉按鍵音。
開 - 按鍵會有聲音,原廠設定為此選項。
關 - 按鍵不會有聲音。
+1, +2, 0, -1, -2
設置選單語言。
設置選擇適合的頻率。
50H z/60H z
設置在錄影時是否關閉螢幕省電、以及關閉螢幕
關 - 不關閉螢幕省電,原廠設定此選項。
1分鐘/2分鐘/3分鐘 - 錄影時在1分鐘/2分鐘/3
分鐘內如果無動作,螢幕會自動關閉。
注:選擇自動關閉螢幕時間後,會繼續錄影,
可以按任一鍵開啟螢幕。
關/1分鐘/ 2分鐘/3分鐘
設置待機無操作時自動關機時間。
關 – 設備不會自動關機(電池沒有電除外),原
廠設定為此選項
3分鐘/5分鐘/10分鐘 – 在3分鐘/5分鐘/10分鐘
內如果無任何操作或錄影,會自動關機。
關/3分鐘/ 5分鐘/10分鐘
格式化記憶卡。
確認 - 選擇此選項確認格式化。
取消 - 選擇此選項放棄格式化。
警告: 選擇格式化後,所有的錄影及照片檔案會
被全部刪除,無法回復。
取消/確認
恢復原廠設定。
取消/確認
顯示目前的軟體版本。
此訊息對售後服務很重要。
3.2 拍照
拍照前,請確保已選擇拍照模式,再按錄影鍵 拍照,照片會保存在記憶卡上。
3.2.1 拍照畫面
拍照模式
曝光補償
防手震
拍照解析度
S 卡圖標
自動
白平衡
ISO感光度
可拍照
張數
拍照影
像品質
時間日期
3. 2. 2 放大/縮 小畫 面
在拍照模式: 按向 上/向下 鍵 可放 大/縮小 畫面。
3. 2. 3 使用 選單
長按菜單 鍵 進入 拍照 選單 設 置, 按模式鍵可切換到設置選 單 。
按向上/向下 鍵 來選 擇選 單, 再按 錄影鍵 進入選項,按向 上/向下 鍵
確定所要的選項, 再按 錄影 鍵 確認。完成設置後, 按模 式鍵
退出選單設置 。
日期/時間
自動關機
提示音
頻率
背光
格式化
預設值
版本
日期/時間
自動關 機
提示音
語系
頻率
背光
格式化
預設值
版本
主選單
功能選項
描 述
可用選單
設置
設置 設置
D
TC- 14T C-1 3
设置
語系
Englis h / 繁体中文 /
简体中文 / 日 本语 / 한국어/
tiếng Việ t
MIC
RESET
MIC
RESET
MIC
RESET
MIC
RESET
Polaroid·C200Polaroid·C200
Page 21

3. 2. 4 拍照 模式 拍照 選單 選項
選擇拍照方式。
單張 - 立即拍照。
2秒自拍/5秒自拍/10秒自拍 - 設置按錄影
鍵後在2秒/5秒/10秒後進行拍照。
開啓或關閉拍照時連拍5張。
關 - 不連拍。
開 - 連拍。
關/開
設置照片質量。
清晰 - 最好的照片質量。
標準 – 標準照片質量。
經濟 - 較差照片質量。
清晰/標準/經濟
設置照片色彩的光亮度。
强烈 - 色彩較鮮亮。
標準 - 一般的色彩。
柔和 - 較柔的色彩。
强烈/標準/柔 和
設置白平衡色溫,原廠設定為自動感應光亮
環境校正色溫,根據不同的色彩亮度色溫
調整補光。
自動 - 自動感應色溫調整補光,原廠設定
此選項。
日光 - 設置為白天環境的色溫。
陰天 - 設置為陰天環境的色溫。
熒光燈 - 設置為熒光燈環境的色溫。
鎢絲燈 - 設置為鎢絲燈環境的色溫環境
的色溫。
自動/陰天/多 雲/
熒光燈/鎢 絲燈
設置所要拍攝照片的解析度。
12M 4 000 x 300 0
8M 32 64 x 2448
5M 25 92 x 1944
3M 20 48 x 1536
1.3 M 1280 x 96 0
VGA 64 0 x 480
設置照片色彩。
標準 – 標準色彩,默認爲此選項。
黑/白 – 照片顔色爲黑和白。
棕褐色 - 照片顔色爲褐色。
標準/黑白/棕 褐色
設置感光度。
自動 - 設置自動感應光亮度、光圈調整
快門速度進行最佳拍攝。
ISO100 – 較亮環境拍攝。
ISO200 – 日光環境拍攝。
ISO400 – 室內環境拍攝。
自動/ISO100
/ISO200/ISO400
動調整補光,負值越大,光線會越暗,
正值越大,光線越明亮。
此選項的原廠設定是0,為自然的光亮度。
單拍/2秒定時/5秒定時
/10秒定時
+2.0 / +1.0 / +0.0 /
-1.0 / -2.0
關閉或開啓防抖動拍攝。
關/開
設置拍照後快速檢視時間。
關 - 拍攝完成後返回拍照模式。
2秒/5秒 - 拍攝完成後停留顯示圖片,
2秒/5秒后後再返回拍照模式。
關/2秒/5秒
設置顯示在照片上的標示
關- 無日期或商標顯示在照片上。
日期- 僅顯示日期在照片上。
商標- 僅顯示商標在照片上。
日期+商標- 顯示日期和商標在照片上。
關/日期/商標/日期+商標
拍攝方式
解析度
連拍
圖像品質
銳利度
白平衡
色彩
ISO
曝光補償
防手震
快速預覽
日期標籤
拍攝方式
解析度
連拍
圖像品 質
銳利度
色彩
ISO
曝光補 償
防手震
快速預 覽
日期標 籤
主選單
功能選項
描 述
可用選單
TC- 16
拍照 拍照 拍照
白平衡
拍照
MIC
RESET
MIC
RESET
MIC
RESET
Polaroid·C200Polaroid·C200
TC- 15
Page 22
3. 3 播放錄影 與查 看照 片
3. 3. 1 播放 錄影
按模式鍵 切換到 錄影 播放 和照 片瀏覽模式,按向上/向 下鍵 流 覽所 需
的影片或照片 。目 前檔 案為 錄影片段時,按錄影 鍵 播放 錄影 ,再 按錄影鍵
暫停播放,按 模式 鍵 停止 播放 。
3. 3. 2 錄影播 放畫 面
影片圖標
3. 3. 3 查看 照片 畫面
3. 3. 4 播放 模式 播放 選單 選項
3. 4 刪除檔案
按模式鍵 切換到錄影 播放/照 片瀏 覽模式,再按錄影鍵 進入播 放
選單,按向上/向 下鍵 選 擇刪 除, 再按錄影鍵 進入刪除子選單 ,
按向上/向下 鍵 選擇 刪除 當前 視頻 或刪除當前圖片,再按錄 影鍵 進 入
刪除子選單, 按向 上/向下 鍵 選擇 確認,再按錄影鍵確 認刪 除。 如要 刪
除所有文件( 包括 錄影 文件 、照片),請選擇刪除所 有檔 案。
注:刪除 的檔 案不 能恢 復。刪除前,請確保 檔案 留有 備份。
文件名稱
所錄影片
解析度
日期時間
開始播放
照片圖標 檔案名稱 解析度 日期時間
刪除
保護
刪除
保護
主選單
功能选项
描 述
可用選單
刪除記 憶卡上當前 、全部錄影 、照片。
刪除目 前錄影(或 者圖片) - 刪除 目
前的影 像或者照片 。
删除所 有檔案 – 刪除所 有的影
像和照 片。
刪除目 前影像
(或者 圖片)/
移除所 有檔案
TC- 18T C-1 7
播放
播放
保護目 前或者所有 的影像、照 片在
記憶卡 滿時不會被 自動刪除替 換。
保護目 前檔案 - 當前影 像或者照片
會被保 護起來不會 被自動刪除 替換。
解除保 護目前檔案 - 解 除保護目前
的影像 或照片,當 記憶卡滿時 會被
自動刪 除替換。
保護所 有檔案 - 保護記 憶卡内所有
的影像 和照片,當 記憶卡滿時 不會
被刪除 替換。
解除保 護所有檔案 - 解 除記憶卡内
所有的 影像和照片 保護,當記 憶卡
滿時會 被自動刪除 替換。
保護目 前檔案/
解除保 護目前檔案/
保護所 有檔案/解除
保護所 有檔案
MIC
RESET
MIC
RESET
MIC
RESET
Polaroid·C200Polaroid·C200
Page 23

TC- 19
4 技術規格
螢 幕
2.0寸彩色 螢幕
影像感測器
300萬CMO S 感光 元件
1080F HD 1 920 x 108 0
720P 12 80 x 7 20
VGA 6 40 x 4 80
影像解析度
照片解析度
1200萬像 素拍 照
錄影格式
AVI
照片格式
JPG
存儲卡
支持Class 6以上的Micro SD存儲卡,最高支持32GB
麥克風
支援
揚聲器
支援
重力感應
支援
電 源
內置可充電 電池 、車 用充電 器
接 口
Mini US B接頭 、SD卡 槽
(最大支持3 2G B,建議用Cl as s 6以上 的Micro S D記憶 卡)
工作溫度
0°~ 45° C
尺 寸
重 量
54g
Full HD 1080p 行车记录仪
C200
使用说明书
視 角
100 度
China toll free No.:
400-84010 30
(For other region, please
contact the local agent.)
67. 5mm x 51m m x 31mm
Polaroid·C200
Page 24

EN-1
Polaroid·C200
有关 本手 册 ... .. ... .. ..... ..... .. ..... ..... .. ..... ..... .. ... .. ..... ..... .. ..... ..... .. ... .. ..... ..... .. ..... ..1
电池 注意 事项 .. ... .. ... .. ... .. ... .. ... ..... ..... ..... ..... ..... ... .. ... .. ... .. ... .. ... .. ... ..... ..... ..... ..1
安装 须知 .... ... .. ... .. ... .. ... .. ... .. ... ..... ..... ..... ..... ..... ... .. ... .. ... .. ... .. ... .. ... ..... ..... ..... ..1
安全 注意 事项 .. ... .. ... .. ... .. ... .. ... ..... ..... ..... ..... ..... ... .. ... .. ... .. ... .. ... .. ... ..... ..... ..... ..2
1 介绍 . .. ......... .. .. ......... .. ......... .. .. ......... .. .. ......... .. ......... .. .. ......... .. .. ......... .. ......3
1.1 功能 .... .. .. ..... .. ....... .. ....... .. ....... .. ..... .. ....... .. ....... .. ....... .. ..... .. .. ..... .. ....... .. ..3
1.2 包装 内容 .... .. ....... .. ..... .. ....... .. ....... .. ....... .. ..... .. .. ..... .. ....... .. ....... .. ..... .. .. ....3
1.3 产品 概要 .... .. ....... .. ..... .. ....... .. ....... .. ....... .. ..... .. .. ..... .. ....... .. ....... .. ..... .. .. ....4
2 开始 . .. ........... .. .. .. ........... .. .. ........... .. .. .. ......... .. .. .. ........... .. .. ........... .. .. .. ........5
2.1 插入 储存 卡 ..... .. ......... .. ....... .. .. ....... .. ....... .. .. ....... .. ....... .. .. ....... .. ....... .. .. ....5
2.2 安装 于车 内 ..... .. ......... .. ....... .. .. ....... .. ....... .. .. ....... .. ....... .. .. ....... .. ....... .. .. ....5
2.3 连接电源 .. ..... ..... .. ..... ..... .. ... .. ..... ..... .. ..... ..... .. ... .. ..... .. ... .. ..... ..... .. ..... ..... .6
2.4 设备 开/关 . .. ... .. ..... ..... .. ..... ..... .. ... .. ..... ..... .. ..... ..... .. ..... ..... .. ... .. ..... ..... .. ....7
2.4. 1 自动开/关 . ..... .. ..... ..... .. ..... .. ..... .. ..... ..... .. ..... .. ..... .. ..... ..... .. ..... .. ..... .. ..... 7
2. 4. 2 手动开/关 及重置 设备 .... ..... ..... ..... ..... .. ... .. ... .. ..... ..... ..... ..... ..... .. ... .. ... .. 7
2.4. 2.1 手 动开/关机 . .. ... .. ..... ..... .. ..... ..... .. ... .. ..... ..... .. ..... ..... .. ..... ..... .. ... .. ..... .7
2. 4. 2.2 重 置设备 . ... .. ... ..... ..... ... .. ... .. ... ..... ..... ..... ... .. ... .. ... ..... ..... ... .. ... .. ... ..... 8
2. 5 时间设 定 ... .. ... ..... ... .. ... ..... ..... ... .. ... ..... ... .. ... ..... ..... ... .. ... ..... ... .. ... .. ... ..... .8
2. 6 模式选 择 ... .. ... ..... ... .. ... ..... ..... ... .. ... ..... ... .. ... ..... ..... ... .. ... ..... ... .. ... .. ... ..... .8
3 使用 行车 记录 仪 ... .. .. ....... .. ......... .. ....... .. .. ....... .. ....... .. .. ....... .. ....... .. .. ....... .. ..8
3.1 录像 .. .. ..... ..... .. ..... ..... .. ... .. ..... .. ... .. ..... ..... .. ..... ..... .. ... .. ..... ..... .. ..... ..... .. ....8
3.1. 1 录像画 面 ..... ..... .. ..... ..... .. ..... ..... .. ... .. ..... ..... .. ..... ..... .. ..... ..... .. ... .. ..... ..... 9
3.1. 2 一键保 护 ..... ..... .. ..... ..... .. ..... ..... .. ... .. ..... ..... .. ..... ..... .. ..... ..... .. ... .. ..... ..... 9
3.1. 3 运动 检测 .... .. ....... .. ......... .. ....... .. .. ....... .. ....... .. .. ....... .. ....... .. .. ....... .. .....10
3.1. 4 重力 感应 .... .. ....... .. ......... .. ....... .. .. ....... .. ....... .. .. ....... .. ....... .. .. ....... .. .....11
3.1.5 关闭/开 启录音 ... .. ....... .. .. ....... .. ....... .. .. ....... .. ......... .. ....... .. .. ....... .. ....... 11
3.1.6 调整 曝光 值 ..... .. .. ......... .. .. ......... .. ......... .. .. ......... .. .. ......... .. ......... .. .. .....11
3.1.7 使用 功能 表 ..... .. .. ......... .. .. ......... .. ......... .. .. ......... .. .. ......... .. ......... .. .. .....11
3.1.8 录像 模式 视频功能表选项 . .. .. ........... .. .. .. ........... .. .. ........... .. .. ........... .. .. 12
3.1.9 设置功能表选项 ... ........... .. .. ........... .. .. .. ........... .. .. ........... .. .. .. ......... .. .. .. 13
3.2 拍照 . .. ........... .. .. .. ........... .. .. ........... .. .. .. ........... .. .. ........... .. .. .. ......... .. .. .. ...14
3.2.1 拍照画面 ..... .. .. ........... .. .. .. ........... .. .. ........... .. .. .. ........... .. .. ........... .. .. .. ..14
3.2.2 放大/缩 小画面 ... .. ....... .. .. ....... .. ....... .. .. ....... .. ......... .. ....... .. .. ....... .. ....... 14
3.2.3 使用 功能 表 ..... .. .. ......... .. .. ......... .. ......... .. .. ......... .. .. ......... .. ......... .. .. .....14
3. 2 .4 拍照模 式功能表 选项 ... . ... . ... ... . ... . ... .... ... . ... .... ... . ... . ... ... . ... . ... .... ... . .15
3.3 播放 录像 与查 看照片 ... .. .. ......... .. ......... .. .. ......... .. .. ......... .. ......... .. .. ......... 17
3.3.1 播放录像 ..... .. .. ........... .. .. .. ........... .. .. ........... .. .. .. ........... .. .. ........... .. .. .. ..17
3.3.2 录像播放画面 ......... .. .. ........... .. .. .. ........... .. .. ........... .. .. .. ......... .. .. .. ........17
3.3.3 查看照片画面 ......... .. .. ........... .. .. .. ........... .. .. ........... .. .. .. ......... .. .. .. ........17
3. 3 .4 回放模 式功能表 选项 ... . ... . ... ... . ... . ... .... ... . ... .... ... . ... . ... ... . ... . ... .... ... . .18
3.4 删除档案 ... .. .. ........... .. .. .. ......... .. .. .. ........... .. .. ........... .. .. .. ........... .. .. ........... .1 8
4 技术规格 ... .. .. .. ........... .. .. ........... .. .. .. ........... .. .. ........... .. .. ........... .. .. .. ........... 19
Page 25

有关本手册
本手册中的内容信息仅供参考,如有更改,恕不另行通知。本公司已尽量确保本使
用手册的正确与完整,但有任何错误与遗漏,概不负责。厂家保留不需事先通知,
直接更改技术规格的权利。
电池警告
· 请务必使用随附的车载充电器进行充电。电池处置不当可能导致爆炸。
· 切勿拆卸电池或在电池上钻孔,切勿使电池短路。
· 电池暴露在明火下可能爆炸。处理电池时切勿放入火中。
· 请按照当地法规处理废电池。
· 切勿自行更换电池;请交由经销商进行更换。
安装须知
· 本产品应安装在靠近后视镜之处,并尽量接近前挡风玻璃中央位置,以获得最好的
视野。
· 确定镜头是在挡风玻璃雨刷的范围内,确保视野良好,即使雨天也同样好。
· 镜头上的保护膜会影响录影或拍照效果,使用前撕掉镜头上的保护膜。
· 不要用手指触摸镜头。手指上的油脂可能会留在镜头上,导致摄像或摄影不清楚。
定期清洁镜头。
· 不要将产品安装在有色车窗上。因为这样会损坏浅色薄膜。
· 确定安装位置不会受有色车窗的阻碍。
· 本设备仅适用产品所附之车载充电器,请勿使用其他厂牌以免设备烧毁或导致电池
爆炸。
如本指南未说明,请勿拆卸或改动本产品的任何配件或零部件。
Polaroid·C200Polaroid·C200
SC -2
SC -1
注意事项
· 使用者须遵守当地法律并以行车安全为优先考量,请勿于行车中操作本设备。
· 使用设备前请先确认日期与时间已设置完成。
· 本产品使用时会变热,这属于正常现象。
· 请勿将本产品靠近热源或与火焰、高温接触。
· 请勿将本产品靠近产生强大电磁场的设备或环境,与强磁场接触可能会导致发生故
障或数据损坏、丢失。
· 本设备仅供使用于非商业用途,适用法律允许的最大限度内,本公司对使用者因使
用本设备造成之损失不承担任何责任。
· 产品使用或操作不当可能导致产品或其附件损坏,并会使保修失效。
开始使用本设备视为同意以上声明事项。
Page 26

SC -4S C- 3
1 介绍
谢谢购买这套先进的行车记录仪。这套设备专门用在行车时的实时录影、录音。
1.1 功能
1080p全高清行车记录仪
300万像素CMOS传感器
2.0寸LCD彩色屏幕
100度广角镜头
1200万像素插值
支持高达32GB的外置Micro Sd存储卡
移动侦测
循环录影
汽车启动时自动录影
重力感应碰撞记录保护
1.2 包装内容
以下为包装清单。如果有任何遗漏或损坏项目,请立即联系您的经销商,外观请依
实际内容物为主。
EN-1
包装内容
行车记录仪
USB线
车载充电器
吸盘支架
使用说明书
保修卡
1.3 产品概要
1
2
3
4
5
6
7
8
9
10
11
12
LED灯
镜 头
SD 卡槽
复位键
显示屏
录影/拍照/菜单键/O K键
电源/模式键
麦克风
向上键
向下键
喇叭
USB接口
MIC
RESET
背 夹
Polaroid·C200Polaroid·C200
3M膠支架
Page 27

SC -6S C- 5
2 开始
2.1 插入存储卡(不包含)
按产品丝印指示方向插入存储卡,推入存储卡直 到咔嗒 一声插入定位为止。
取出存储卡
往里推存储卡,弹出插槽。
注意:
1.设 备在开机状态时,不要取出或插入存储卡,以免 损坏存 储卡。
2. 请使用Micro SD卡6级或以上,最高支持3 2GB。
3. 使用前请先格式化Micro SD存 储卡。
取出存储卡时,小心存储卡快速弹出导致遗失记 忆卡, 此为存储卡插槽弹片特性,
便于使用者易于取出。
2.2 安装于车内
← 松开旋钮,将 设备 垂直 方向 调整定位后,
再锁紧旋钮, 并确 认设 备已 牢牢固定。
→ 水平方向转动 设备 可进 一步 调整合适视角。
→ 撕掉吸盘上的 保护 膜, 将支 架的吸盘轻压于
挡风玻璃上, 再按 下支 架的 夹子固定。
确认支架已牢 牢固 定。
2. 3 连接电源
限使用产品所 附之 车载 充电 器,启动设备以及充电。
(不包含 )
← 将背夹和设备组合在一起
→ 将背夹卡位推入设备上的支架槽位中,
注意一定要到位。
Polaroid·C200Polaroid·C200
Page 28

SC -8S C- 7
2. 5 时间设定
设置正确的日 期和 时间 。开 机后长按录影键 进入菜单设 置, 再按 电源键
切换到设置菜单 , 按向 上/向下 键 选择 日期和时间 ,
再按录影键 进入 日期 和时 间设 置,按向上/向下键 调整数值, 按录 影键
进入下一项设置, 全部 完成 正确设置后,再按录 影键 确 认并 返回 到设
置菜单, 再长按录 影键 退 出菜 单设 置。
2. 4. 2. 2 重置 设备
2.6 模 式选择
出厂默 认设置为录影模式 , 按模式 键 依次可切换到拍照模式 、
播放影 片与检视照片模式 / 。
3 使用行车记录仪
3.1 录影
开始录影前,请确保已选择录影模式并已插入SD卡。按录影键 开始录影,
录影图标 闪烁;录影文件保存在SD卡上;若需停止录影,请再按录影键 。
如设备在车内连接车载充电器,默认设置为汽车引擎开启时自动开机并开始录影,
汽车引擎停止后保存文档并停止录影。
1. 将车载充电器 的一 端连 接到设备的 USB / 电源接孔。
2. 将车载充电器 的另 一端 插接汽
车内的点烟器 的插 孔。 汽车 引擎
一旦发动,设 备即 自动 开机 并录影。
2. 4 设备开/关
2. 4. 1 自动 开/关
连接车载充电 器后 ,汽 车引 擎发动会自动开机并开始 录影 (须 有SD卡情况下)。
汽车引擎停止 后, 设备 会自 动保存最后录制的文档并 关机 。
2. 4. 2 手动 开/关机 及重 置设备
2. 4. 2. 1 手动 开/关机
短按电源键 开机 ,再 长按 电源 键
3秒关机。
当设备因不明 因素 导致 无法 正常操作,
请按复位键, 再按 电源 键 重新 启动
设备完成开机 。
MIC
RESET
MIC
RESET
Polaroid·C200Polaroid·C200
Page 29

SC -1 0SC -9
MIC
RESET
⑴
⑵
⑶
备注:
1. 如果要解除 全部 文件 保护 ,则选择全部解锁 。
2. 手动保护录 影文 件选 择加 锁当前 或者 ,操作方式同上。
3. 1. 3 运动 检测
在开启运动检 测功 能后 (预 设为关闭),设备在开机待机录 影时 ,如 果侦 测到
距镜头2.5m以 内有 移动 的物 体会自动录影。
录像持续 时间 同循 环录 像时间设置,但如果镜头 前无 移动 物体,持续10秒后,
设备会自动停 止, 等待 下一 次移动物体的侦测。
注:
1. 在电池充满电与 状态 良好 的情况下,运动检测可持 续时 间约1 5分钟。
2. 电池的蓄电能力 会随 着设 备使用逐渐减少,此为电 池的 正常 现象 。
手动解除录影 文件 保护 步骤 :
按模式键 切换到回放 模式 (图 一),再按录像键 進进入回 放子 菜
单(图二), 按向 上/向下 键 到保 护选项 ,再按录影键 进入保护
子菜单,按向 上/向下 键 选择 解锁 当前(图三),再按录影 键 确认 解
除保护。长按 录像 键 退出 菜单 设置。
3. 1. 1 录像 画面
录影模 式
3. 1. 2 一键保 护
在录影过程中 ,按 模式 键 进行 一键保护当前录影片段, 屏幕的 右上 角会
出现锁形图标 这时录 制的 当前 片段(时长取决于单段影 片时 间设 置, 默
认3分钟)会被保 护起 来, 被保 护的片段不会被替换;下 一个 录影 片段 会自动取
消录影保护。
取消当前 录影 片段 保护 :
再按一次模式 键 取消 保护 ,荧 幕右上角的锁定图标 消失, 这时 录制
的片段不会被 保护 并在S D卡满 时会自动删除替换。
备注:
在如果所有文 档都 被保 护, 则SD卡录满后录影自动停止 ;如 需继 续录影,需更
换SD卡或把SD卡内 文档 手动 删除 。
可录影 时间
录影解 析度
S 卡图标
循环录 影片段时间
曝光值
声音开 关
时间和 日期
车充图 标
保护
全部加 锁
D
解锁当 前
加锁当 前
刪除
保护
回放
加锁当前
解锁当前
全部解锁
全部加锁
保护
MIC
RESET
MIC
RESET
MIC
RESET
Polaroid·C200Polaroid·C200
Page 30

SC -1 2
SC -1 1
MIC
RESET
设置录影解析度。
108 0FHD 19 20 x 1080
720 P 1280 x 72 0
VGA 64 0 x 480
设置循环录影及录影片段时间。
关 – 选择此选项在存储卡录满时会自动停止
录影。
1分钟/3分钟/5分钟 – 设置循环录影分段
单个录影片段时间。例如选择3分钟,则循环录
影的每个录影影片段为3分钟,如果录影21分
钟,则会有7个3分钟的录影片段。
关/1分钟/ 3分钟/5分钟
+2.0 / +1.0 / +0.0
/ -1.0 / -2.0
开启或关闭运动检测或移动侦测。
开: 开启移动检测。
关: 关闭移动检测。
关/开
开启或关闭录影时的声音。
关 - 关闭声音,录影文件不会有声音。
开 - 开启声音,默认为此选项。
设置显示在录影文件上的信息。
关 - 无日期或商标信息显示在录影文件上。
日期 - 仅显示日期信息在录影文件上。
商标 - 显示日期和商标在录影文件上。
日期+商标 - 显示日期和商标在录影文件上。
关/日期/商标/
日期+商标
设置重力感应碰撞的灵敏度。
关 - 关闭重力感应功能,碰撞时不会重力感应
保护当前文档。
低/中/高 - 重力感应的灵敏度设置越高就越容
易感应到碰撞保护当前文档。默认设置为中。
关/低/中/高
3. 1. 8 录影 模式 视频 功能 表选项
3. 1. 4 重力 感应
当行车时遇到 碰撞 、摇 晃或 振动等情况时,默认设置 设备 会自 动启动重力感应
功能,这时屏 幕上 会显 示保 护片段图标 ,当前录制片段 会被 保护 起来 不会
被替换。
3. 1. 5 关闭/开启 录音
录影模式下, 按向 上键 可 关闭/开 启录音。
3. 1. 6 调整 曝光 值
录影模式下, 按向 下键 可 调整 曝光值。
3. 1. 7 使用 功能 表
长按录像键 进入视频 菜单 设 置, 按模式键 可切换到设置菜单 。
按向上/向下 键 来选 择菜 单, 再按 录影键 进入选项,按向 上/向下 键
确定所要的选项, 再按 录影 键 确认。完成设置后,长按 录像 键
可退出菜单设置。
分辨率
循环录 影
曝光补 偿
运动检 测
录影音 频
日期标 签
G-S ensor 灵 敏度
主菜单
功能选项
描 述
选 项
手动调整补光. 负值越大,光线会越暗,正值
越大,光线越明亮。 此选项的默认设置是0,
为自然的光亮度。
分辨率
循环录影
曝光补偿
运动检测
视频
录影音频
日期标签
G-Se nsor 灵敏 度
视频
视频
关/开
MIC
RESET
Polaroid·C200Polaroid·C200
Page 31

SC -1 4S C- 13
MIC
RESET
MIC
RESET
恢复默认设置。 取消/确认
显示当前的软件版本号。
此信息对售后服务很重要。
默认设 置
版本
3. 1. 9 设置 功能 表选 项
调协系统日期和时间,以及日期显示格式。
YY/MM/DD - 年/月/日
MM/DD/YY - 月/日/年
DD/MM/YY - 日/月/年
设置开启或关闭按键音,声音。
开 - 按键会有声音,默认设置为此选项。
关 - 按键不会有声音。
开/关
设置菜单语言。
设置选择适合适的电频率。
50赫茲/ 60赫茲
设置在录影时是否关屏省电、以及关屏时间。
关 - 不关屏省电,默认设置此选项。
1分钟/2分钟/3分钟 – 录影时在1分钟/2分钟/3
分钟內如果无操作,会自动关屏。
注:选择自动关屏时间后,会继续录影,可以按
任一键开屏。
关/1分钟/ 2分钟/3分钟
设置待机无操作时自动关机时间。
关 - 设备不会自动关机(电池没有电除外),默
认设置为此选项。
3分钟/5分钟/10分钟 - 在3分钟/5分钟/10分钟
內如果无任何操作或录影,会自动关机。
关/3分钟/ 5分钟/10分钟
格式化存储卡。
确认 - 选择此选项确认格式化。
取消 - 选择此选项放弃格式化。
警告: 选择格式化后,所有的录像及照片文件会
被全部刪除,不可恢复。
取消/确认
3. 2 拍照
拍照前, 请确保已 选择 拍照 模式, 再 按录影键 拍照, 照片会保存在SD卡 上。
3.2.1 拍照 画面
拍照模式
曝光补偿
防手抖
拍照解析度
S 卡图标
自动
白平衡
ISO感光度
可拍照
张数
拍照影
像品质
时间日期
3. 2. 2 放大/缩 小画 面
在拍照模式: 按向 上/向下 键 可放 大/缩小 画面。
3. 2. 3 使用 功能 表
长按录像 键 进入 拍照 菜单 设 置, 按模 式键可切换到设置菜单 。
按向上/向下 键 来选 择菜 单, 再按 录影键 进入选项, 按向上/向下 键
确定所要的选项, 再按 录影 键 确认 。完成设置后, 按模式键
退出菜单设置 。
日期/時間
自动关 机
按键声 音
语言设 置
光源频 率
背光
格式化
主菜單
功能選項
描 述
可用選單
光源频率
背光
格式化
默认设置
设置
D
日期/時間
自动关机
按键声音
设置
语言设置
设置
MIC
RESET
MIC
RESET
版本
设置
Englis h / 繁体中文 /
简体中文 / 日 本语 / 한국어/
tiếng Việ t
Polaroid·C200Polaroid·C200
Page 32
SC -1 6S C- 15
MIC
RESET
MIC
RESET
MIC
RESET
3. 2. 4 拍照 模式 功能 表选 项
选择拍照方式。
单张 - 立即拍照。
2秒自拍/5秒自拍/10秒自拍 - 设置按录影
键后在2秒/5秒/10秒后进行拍照。
开启或关闭拍照时连续拍5张。
关 - 不连拍。
开 - 连拍。
关/开
设置照片质量。
优质 - 最好的照片质量。
标准 - 标准的照片质量。
经济 - 较差的照片质量。
优质/标准/经济
设置照片色彩的光亮度。
强烈 - 色彩较鮮亮。
标准 - 一般的色彩。
柔和 - 较柔的色彩。
强烈/标准/柔 和
设置白平衡色溫,默认为自动感应光亮环
境校正色温,根据不同的色彩亮度色温调
整补光。
自动 - 自动感应色温调整补光,默认设
置此选项。
日光 - 设置为白天环境的色温。
阴天 - 设置为阴天环境的色温。
荧光灯 - 设置为荧光灯环境的色温。
钨丝灯 - 设置为钨丝灯环境的色温环境
的色温。
自动/日光/阴 天/
荧光灯/钨 丝灯
设置所要拍攝照片的分辨率。
12M 4 000 x 300 0
8M 32 64 x 2448
5M 25 92 x 1944
3M 20 48 x 1536
1.3 M 1280 x 96 0
VGA 64 0 x 480
设置照片色彩。
标准 - 标准色彩,默认为此选项。
黑/白 - 照片颜色为黑和白。
棕褐色 - 照片颜色为褐色。
标准/黑白/棕 褐色
设置感光度。
自动 - 设置自动感应光亮度、光圈,调
整快门速度进行最佳拍攝。
ISO100 - 较亮环境拍攝。
ISO200 - 日光环境拍攝。
ISO400 - 室內环境拍攝。
自动/ISO100
/ISO200/ISO400
手动调整补光,负值越大,光线会越暗,
正值越大,光线越明亮。
此选项的默认设计是0,为自然的光亮度。
单张/2秒定时/5秒定时/
10秒定时
+2.0 / +1.0 / +0.0 /
-1.0 / -2.0
关闭或开启防抖动拍摄。
关/开
设置拍照后快速检视时间。
关 - 拍摄完成后返回拍照模式。
2秒/5秒 - 拍摄完成后停留显示图片,
2秒/5秒后再返回拍照模式。
关/2秒/5秒
设置显示在照片上的信息。
关 - 无日期或商标信息显示在录影文件上。
日期 - 仅显示日期信息在录影文件上。
商标 – 仅显示商标信息在照片上。
日期+商标 - 显示日期+商标在照片上。。
关/日期/商标/
日期+商标
拍攝方 式
分辨率
连拍
图像质 量
锐度
色彩
ISO
曝光补 偿
防手震
快速预 览
日期标 签
主菜单
功能选项
描 述
选 项
白平衡
拍攝方式
分辨率
连拍
图像质量
拍照
锐度
白平衡
色彩
ISO
拍照
曝光补偿
防手震
快速预览
日期标签
拍照
拍照
Polaroid·C200Polaroid·C200
Page 33

SC -1 8S C- 17
MIC
RESET
MIC
RESET
MIC
RESET
3. 3 播放录影 与查 看照 片
3. 3. 1 播放 录影
按模式键 切换到 录影 回放 和照 片浏览模式,按向上/向 下键 浏 览所 需
的影片或照片 。当 前文 件为 录影片段时,按录影 键 播放 录影 ,再 按录影键
暂停播放,按模式键 停止播 放。
3. 3. 2 录影播 放画 面
3. 3. 3 查看 照片 画面
3. 3. 4 回放 模式 功能 表选 项
影片图标
文件名称
录影分辨率
照片图标
文件名称
分辨率
日期时间
刪除
保护
主菜单
功能选项
描 述
选 项
加锁当 前/解锁当前/
全部加 锁/全部解锁
3.4 删除 档案
按模式键 切换到录影回放/照片浏览模式,再按录像键 进入回放菜
单,按向上/向下键 选择删除,再按录影键 进入删除子菜单,按向
上/向下键 选择删除当前视频或删除当前图片,再按录影键 进入删除
子菜单,按向上/向下键 选择确认,再按录影键确认删除。如要删除所有
文件(包括录影文件、照片),请选择删除所有文件。
注:删除的文件不能恢复。删除 前,请确保文件留有备份。
刪除存储 卡上当前、全部视 频、照片。
刪除当前 视频 - 刪除当前的视
频或者照 片。
删除所有 文件 – 刪除所有的视
频和照片 。
刪除
保护
回放
回放
保护当 前或所有的 视频、照片 ,在存储卡 满
时不会 被自动删除 替换。
加锁当 前 – 当前视频或 者照片会被 保护起来
不会被 自动删除替 换。
解锁当 前 - 解除保护当 前的视频或 照片,当
存储卡 满时会被自 动删除替换 。
全部加 锁 - 保护存储卡 内所有的视 频和照片,
当存储 卡满时不会 被删除替换 。
全部解 锁 - 解除存储卡 内所有的视 频和照片
保护, 当存储卡满 时会被自动 删除替换。
删除当 前/全部删除
日期时间
开始播放
Polaroid·C200Polaroid·C200
Page 34

SC -1 9
4 技术规格
屏 幕
2.0寸彩色 螢幕
影像传感器
300万CMO S 传感 器
1080F HD 1 920 x 108 0
720P 12 80 x 7 20
VGA 6 40 x 4 80
影像分辨率
照片分辨率
1200万像 素插 值
录像格式
AVI
照片格式
JPG
存储卡
支持Class 6以上的Micro SD存储卡,最高支持32GB
麦克风
支持
扬声器
支持
重力感应
支持
电 源
內置可充电 电池 、车 载充电 器
接 口
Mini US B接口 、SD卡 槽(最 大支 持32 GB,建议用 高速 卡)
工作温度
0°~ 45° C
尺 寸
67.5 x 51 x 3 1 毫米
重 量
约54克
视 角
100度
Polaroid·C200
Độ phân giải Full HD 1080p
C200
Hướng dẫn sử dụng
China toll free No.:
400-84010 30
(For other region, please
contact the local agent.)
Page 35

EN-1
Về Tài liệu hướng dẫn ………………………………………………………..1
Cảnh báo pin … … …… … …… …… …… …… … …… …… … …… … …… …1
Lưu ý k hi cài đặt ………………………………………………………………1
Thận trọng … … … … … … …… …… …… … … … … … …… …… … … … … . 2
1. Giớ i t hiệ u … ………… ……… ………… ………… ……… ………… …….3
1. 1 T ính nă n g ………… … ……… ……… … ………… … ……… ……… … ….3
1.2 Thi ết bị đóng gói …………………………………………………………….3
1.3 Tổng quan về t hi ết bị ………………………………………………………….4
2 B ắt đ ầu … … …… …… …… … … …… ……… … …… …… …… … …… .5
2.1 Gắ n thêm thẻ nhớ …………………………………………………………….5
2.2 Lắp đặt trong xe ……………………………………………………………….5
2.3 Kết nối nguồn ………………………………………………………………….6
2.4 Bật/Tắt nguồn thiết bị ……………………………………………………….7
2.4.1 Bật/Tắt nguồ n tự động …………………………………………………….7
2.4.2 Bậ t/ Tắ t n gu ồn bằng tay và Thiết lập lại (R es et ) thiết bị ……………….7
2.4.2.1 B ật /T ắt nguồn bằng tay ………………………………………………….7
2.4.2.2 Thiết lập lại (R es et ) th iế t bị …………………………………………….8
2.5 Cài đặt ngày/thời gian ……………………………………………………….8
2.6 Lựa chọn chế độ …………………………………………………………….8
3 Sử dụng thiết bị ghi h ìn h trên xe …………………………………………….8
3.1 Ghi hì nh video ………………………………………………………………….8
3.1.1 Màn hình quay video ……………………………………………………….9
3.1.2 K hó a bảo v ệ ………………………………………………………………….9
3.1.3 Nhận diện chuyển động ………………………………………………….10
3.1.4 Bảo vệ ghi hình tíc h hợ p cả m ứn g va chạm (G-sensor) ……………11
3.1.5 Bật/tắt âm ………………………………………………………………….11
3.1.6 Điều chỉnh giá trị p hơ i s án g … …… …… …… …… …… …… …… …… …11
3.1.7 Vận hà nh menu video …………………………………………………….11
3.1.8 Tùy chọn danh mục vide o ……………………………………………….12
3.1.9 Tùy chọn cài đ ặt da nh mục ……………………………………………….13
3.2 Ch ụp hình ……… …………… …………… …………… …………… …….15
3.2.1 M àn hình chụp ả nh trong khi q ua y hình ……………………………….15
3.2.2 Phóng to/nhỏ …… …… … … …………………………………………….15
3.2.3 Vận hành menu chụp ảnh trong khi quay hình ………… …… …… …… 15
3.2.4 Tùy chọn menu chụp ảnh trong k hi q ua y hình ………………………….16
3.3 P há t video v à Xem hình ản h ……………………………………………….18
3.3.1 Phát vid eo ………………………………………………………………….18
3.3.2 Màn hình chạy video ……………………………………………………….18
3.3.3 Xe m hình ản h ……………………………………………………………….18
3.3.4 Màn hình x em ảnh ………………………………………………………….19
3.4 Xóa Video/hình ản h ………………………………………………………….19
4 Thông số kỹ thuật ……………………………………………………………20
Polaroid·C200
Page 36

Về Tài liệu hướng dẫn
Nội dung trong tài liệu này được sử dụng cho mục đích cung cấp thông tin và có
thể thay đổi mà không cần thông báo trước. Chúng tôi nỗ lực hết sức để đảm bảo
rằng Tài liệu hướng dẫn cho Người sử dụng này mang đến thông tin chính xác và
đầy đủ, Tuy nhiên, chúng tôi không chịu trách nhiệm cho bất kỳ sai sót và thiếu
sót có thể xảy ra.
Cảnh báo pin
·Luôn sạc thiết bị bằng hệ thống được cung cấp. Việc xử lý pin không đúng
cách có thể gây nổ.
·Không bao giờ tháo rời hoặc đục thủng pin hoặc để pin kết nối với dòng điện
ngắn mạch.
·Pin có thể phát nổ nếu tiếp xúc với ngọn lửa không có che chắn. Không bao
giờ ném pin vào đám cháy.
·Việc xử lý pin đã qua sử dụng theo các quy định của địa phương.
·Không bao giờ thay thế pin cho sản phẩm bằng pin của riêng bạn, cần yêu cầu
đại lý thực hiện việc này.
Lưu ý khi cài đặt
·Sản phẩm này nên được đặt ở gần gương chiếu hậu sau, ở giữa phần kính
chắn gió, nếu có thể, để thu được hình ảnh tối ưu.
·Cần đảm bảo rằng ống kính nằm trong khoảng cần gạt của kính chắn gió để
đảm bảo thu được hình ảnh rõ ràng ngay cả khi có mưa.
·Sử dụng màng bảo vệ ống kính sẽ làm ảnh hưởng đến phần hình ảnh hoặc
hiệu ứng hình, nên loại bỏ phần màng bảo vệ này trước khi sử dụng thiết bị.
·Không dùng ngón tay để chạm vào ống kính. Phần nhờn từ ngón tay có thể lưu
lại trên ống kính và có thể dẫn đến phần hình ảnh và ảnh chụp nhanh không rõ
nét. Vệ sinh ống kính thường xuyên.
·Không lắp thiết bị lên cửa sổ nhuộm màu. Bởi điều này có thể làm hỏng phần
phim ảnh thu được.
·Hãy chắc chắn rằng vị trí lắp đặt không bị cản trở bởi cửa sổ nhuộm màu.
·Chỉ sử dụng bộ sạc nối nguồn điện trên xe. Để tránh gây cháy thiết bị hoặc nổ
pin, vui lòng không sử dụng bộ sạc nối nguồn điện trên xe của các hãng khác.
.
Không cố gắng tháo rời hoặc thay đổi bất kỳ phần nào của thiết bị nếu không
được hướng dẫn trong tài liệu này.
Thận trọng
·Tuân thủ luật pháp địa phương và đảm bảo an toàn trên xe, không vận
hành thiết bị khi đang lái xe.
·Thiết lập thời gian và ngày tháng chính xác trước khi sử dụng thiết bị.
·Sản phẩm sẽ nóng lên khi sử dụng, đây là hiện tượng bình thường.
·Không đặt thiết bị gần nguồn nhiệt hoặc tiếp xúc trực tiếp với ngọn lửa
hoặc nhiệt.
·Không bao giờ đặt thiết bị trong vùng lân cận của khu tạo ra điện từ trường
mạnh. Tiếp xúc với điện từ trường mạnh có thể gây hỏng hóc hoặc thay đổi,
mất dữ liệu.
·Hệ thống chỉ được sử dụng cho mục đích phi thương mại, trong các giới
hạn tối đa cho phép của pháp luật hiện hành. Công ty chúng tôi không chịu
trách nhiệm cho bất kỳ trường hợp mất dữ liệu nào trong quá trình vận hành
thiết bị.
·Sử dụng hoặc vận hành sản phẩm không đúng cách có thể gây ra thiệt hại
cho sản phẩm và các phụ kiện đi kèm cũng như làm mất hiệu lực bảo hành.
Trước khi bắt đầu sử dụng hệ thống, mặc định rằng quý khách hàng đã
đồng ý với các nội dung thông tin nêu trên.
Polaroid·C200Polaroid·C200
VN -2VN- 1
Page 37

VN -4VN- 3
1.3 Tổng quan về thiết bị
1
2
3
4
5
6
7
8
9
10
11
12
Đèn LED
Ống kính
Khe cắm thẻ nhớ SD
Cổng USB
Nút thiết lập lại (Reset)
Màn hình LCD
Nút REC/Menu/OK
Nút nguồn/ Chế độ)
Micro
Nút lên
Nút xuống
Loa
1 Giới thiệu
Cảm ơn vì quý khách hàng đã lựa chọn sản phẩm Thiết bị ghi hình trên xe tiên
tiến này. Đây là thiết bị được thiết kế đặc biệt cho việc ghi âm, ghi hình, chụp
ảnh với thời gian thực.
1.1 Tính năng
Độ phân giải Full HD 1080p Driving Recorder
Cảm biến CMOS 3 Megapixel
Màn hình LCD 2.0 inch
Góc độ quay rộng 100˚
Độ phân giải ảnh to 12MP
Hỗ trợ thẻ nhớ Micro HD lên đến 32GB
Hỗ trợ nhận diện chuyển động
Ghi hình liên tục không bị nhiễu âm thanh
Chức năng tự động ghi hình khi khởi độnng xe
Bảo vệ ghi hình khi có cảm ứng va chạm
1.2 Thiết bị đóng gói
Gói hàng bao gồm các thiết bị dưới đây. Trong trường hợp có bất kỳ thiết bị nào
bị thiếu mất hoặc hư hỏng, liên hệ với đại lý của bạn ngay lập tức.
Máy ghi hình
Cáp USB
Bộ sạc điện
trên xe
Giá hút đỡ thiết bị
Sách hướng dẫn
sử dụng
Phiếu bảo hàng
MIC
RESET
Inside your package
Polaroid·C200Polaroid·C200
keo dán 3M kẹp
Page 38

VN -6VN- 5
2 Bắt đầu
2.1 Gắn thêm thẻ nhớ (không đi kèm sản phẩm)
Làm theo hướng dẫn được chỉ định trên thiết bị để lắp thẻ nhớ, Đẩy thẻ nhớ
vào trong cho đến khi nghe thấy tiếng tách, nghĩa là thẻ đã được đặt vào đúng
vị trí.
Để tháo thẻ nhớ, Đẩy vào để thẻ nhớ bật ra khỏi khe cắm.
Chú ý:
1. Không tháo hoặc lắp thẻ nhớ khi đang bật thiết bị. Điều này có thể làm hỏng
thẻ nhớ.
2. Vui lòng sử dụng thẻ Micro SD loại 6 hoặc cao hơn, dung lượng tối đa 32G.
3. Vui lòng format thẻ nhớ micro SD trước khi sử dụng lần đầu.
4. Khi tháo thẻ nhớ, hãy cẩn thận bởi thẻ nhớ có thể bật ra và bị rơi mất. Khe
cắm thẻ nhớ có chức năng này để dễ dàng gỡ thẻ ra nếu cần.
2.2 Lắp đặt trong xe
←Lắp đặt thiết bị ghi hình vào chân đế.
←Tháo lỏng phần núm để xoay thiết bị theo
chiều dọc. Vặn chặt núm, và đảm bảo rằng
thiết bị được khóa cẩn thận đúng vị trí.
→Đẩy phần đầu đế hút vào khe cắm thiết bị,
chú ý đẩy đúng vị trí.
→Loại bỏ phần màng bảo vệ trên giác
hút, đặt giác hút bằng phẳng, gắn giác
hút lên kính chắn gió, và sau đó giữ cho
phần đế chắc chắn trên kính chắn gió
và ấn kẹp xuống để gắn vòng kẹp lên
kính chắn gió. Phải đảm bảo rằng phần
đế đỡ được khóa cẩn thận đúng vị trí.
2.3 Kết nối nguồn
Chỉ sử dụng bộ nối nguồn điện được cung cấp kèm theo để kích hoạt thiết
bị và sạc pin thiết bị.
(Khô ng đi kèm sản phẩm)
→Xoay thiết bị theo chiều ngang để điều
chỉnh đến khi có góc thu hình thích hợp.
Polaroid·C200Polaroid·C200
Page 39

VN -8VN- 7
2.4 Bật/Tắt nguồn thiết bị
2.4.1 Bật/Tắt nguồn tự động
Khi khởi động động cơ xe, thiết bị sẽ bật tự động và ghi hình (phải có thẻ SD).
Sau khi động cơ xe dừng lại, thiết bị sẽ tự động lưu le ghi hình cuối cùng và
tắt máy.
2.4.2 Bật/Tắt nguồn bằng tay và Thiết lập lại (Reset) thiết bị
2.4.2.1 Bật/Tắt nguồn bằng tay
1. Kết nối một đầu của bộ nối nguồn với cổng
USD trên thiết bị.
2. Cắm đầu kia của bộ sạc điện trên
xe vào ổ cắm bật lửa trên xe. Khi
khởi động động cơ xe, thiết bị sẽ
bật tự động.
Nhấn vào nút Nguồn để bật thiết
bị. Để tắt thiết bị, nhấn vào nút
Nguồn và giữ trong 3 giây.
2.5 Cài đặt ngày/thời gian
Để cà i đặt ngày giờ chính xác, nhấn nút giữ trong 3 giây để vào me nu
cài đ ặt, sau đó nhấn nút chế độ Mode để chuyển sang danh mục cài đ ặt
Men uSetup , nhấn nút Lên/Xuống để lựa chọn Ng ày/thời gian
, nhấ n nútOK để vào phần cài đặt Ngày/ thời gian , sau đó nhấn nút
Lên/Xuống để điều chỉnh giá trị, nhấn nútOK để chuyển sa ng cài
đặt t iếp theo, sau khi hoàn tất các cài đặt, nhấn n útOK để qua y trở lại
dan h mục cài đặt Menu Setup, nhấn nút chế độMode để thoát về d anh
mục c ài đặt.
2.4.2.2 Thiết lập lại (Reset) thiết bị
2.6 Lựa chọn chế độ
Cài đặt mặc định ở Chế độ Video , nhấn nút chế độ để chuyển san g
chế độ Chụp ảnh khi quay Chế độ phát lại / .
3 Sử dụng thiết bị ghi hình trên xe
3.1 Ghi hình video
Trước khi bắt đầu ghi hình, vui lòng gắn thẻ SD (không đi kèm sản phẩm) vào
khe cắm thẻ SD trên thiết bị, và đảm bảo rằng chế độ Video đã được chọn.
Nhấn nút REC để bắt đầu ghi hình, biểu tượng ghi hình sẽ nhấp nháy
trên màn hình. Các le ghi hình được lưu trên thẻ nhớ SD. Để ngừng ghi hình,
nhấn nút REC một lần nữa .
Trong trường hợp thiết bị không hoạt động
bình thường nhưng chưa rõ nguyên nhân tại
sao, nhấn nút RESET, sau đó nhấn nút
để khởi động lại thiết bị.
MIC
RESET
MIC
RESET
Polaroid·C200Polaroid·C200
Page 40

MIC
RESET
MIC
RESET
MIC
RESET
VN -1 0V N -9
⑴
⑵
⑶
Chú ý:
1. Nếu mở khóa bảo vệ cho tất cả các le, vui lòng chọn Mở khóa tất cả
thay vì Mở khóa le hiện tại.
2. Thực hiện các bước tương tự để bảo vệ le.
3.1.3 Nhận diện chuyển động
Nếu tính năng Phát hiện chuyển động được kích hoạt (thiết lập mặc định là
Tắt) và thiết bị được khởi động hoặc ở chế độ chờ ghi hình, nó sẽ tự động ghi
hình khi thiết bị phát hiện bất kỳ chuyển động nào trong phạm vi 2.5 m ở phía
trước ống kính. Thi ết b ị sẽ n gừ ng g hi h ìn h nế u kh ông có chuyển động nào
được phát hiện sau 1 đoạn video theo thời gian đã cài đặt, và quay trở về chế
độ chờ ghi hình cho đến khi phát hiện được chuyển động kế tiếp.
Chú ý:
1. Khi pin được sạc đầy và trong tình trạng tốt, thiết bị có thể ghi hình liên tục
trong khoảng 15 phút.
Các bước hướng dẫn loại bỏ khóa video thủ công:
Nhấn nút chế độ Mode để chuyển sang Chế độ phát lại (1), nhấn nút
Menu để vào menu phát lại (2), nhấn nút Lên/Xuống để lựa chọn
Bảo vệ, nhấn nútOK để vào menu phụ, nhấn nút Lên/Xuống để
lựa chọn Mở khóa video hiện tại (3) , sau đó nhấn nútOK để xác nhận.
Nhấn nútchế độMode để thoát ra và trở về chế độ phát lại.Nhấn nút
chế độMode để chuyển sang chế độ Vi de o.
3.1.1 Màn hình quay video
3.1.2 Khóa bảo vệ
Trong thời gian ghi hình, nhấn nút chế độ Mode để bảo vệ video hiện
tại, biểu tượng khóa xuất hiện trên màn hình, clip hình hiện tại sẽ được
bảo vệ và không thể bị thay thế (cài đặt mặc định độ dài cho một clip hình là
3 phút), clip hình tiếp theo sẽ mở khóa tự động và có thể được thay thế nếu
thẻ SD bị đầy.
Loại bỏ bảo vệ cho clip hình hiện tại:
Nhấn nút chế độ Mode một lần nữa để loại bỏ bảo vệ cho clip hình hiện
tại, biểu tượng khóa sẽ biến mất khỏi màn hình, clip hình sẽ không còn
được bảo vệ và có thể bị thay thế nếu thẻ nhớ SD bị đầy.
Chú ý:
Việ c gh i hì nh s ẽ dừ ng t ự độ ng v à mà n hì nh s ẽ hi ển t hị t hô ng b áo t hẻ n hớ SD
bị đầy nếu thẻ nhớ SD có đầy các le được bảo vệ. Để tiếp tục ghi hình, hãy
đổi một thẻ nhớ SD khác hoặc xóa thủ công các le được bảo vệ.
Polaroid·C200Polaroid·C200
Hủy
Bảo vệ
Khóa
Mở khóa
Khóa toàn bộ
Mở khóa toàn bộ
Mở khóa toàn bộ
Trở về Bảo vệ
Page 41

MIC
RESET
VN -1 2VN- 1 1
Danh mục
chính
Danh sách
chức năng
Nội dung
Tùy chọn có sẵn
Video Clip
Thiết lập cho độ phân giải của video
108 0FHD 19 20x10 80
720 P 1280x 720
WVG A 84 8x480
VGA 64 0 x 480
Thiết lập đối với khả năng ghi hình liên tục
không gây nhiễu âm thanh tự động và thời
gian cho clip hình.
Tắt - Việc ghi hình sẽ dừng lại khi thẻ SD bị đầy
1 phút / 3 phút / 5 phút - Lựa chọn thời gian
ghi hình giới hạn cho mỗi le. Ví dụ, chọn 3
phút, nghĩa là thời gian ghi hình cho một le là
3 phút. Nếu ghi hình trong 21 phút, 7 le sẽ
được tạo ra, mỗi le có độ dài 3 phút.
Tắt / 1 p hút /
3 phú t / 5 phút
Bù thủ công cho mức ánh sáng thấp hoặc cao.
Nếu nút âm "-" càng lớn, video quay sẽ càng
đậm nét. Nếu nút dương "+" càng lớn, video
quay sẽ càng sáng. 0 là giá trị trung lập cho
tùy chọn này và là giá trị mặc định.
+2.0 / +1.0 / +0.0
/ -1.0 / -2.0
Thiết lập để kích hoạt tính năng nhận diện
chuyển động.
Bật: Lựa chọn để thiết bị nhận diện chuyển
động.
Tắt: Vô hiệu hóa tính năng nhận diện chuyển
động.
Tắt /Bật
Thiết lập để kích hoạt phần âm thanh trong
video.
Bật - Cho phép ghi âm
Đây là cài đặt mặc định cho tùy chọn này.
Tắt - Ghi hình video nhưng không có phần âm
thanh
Tắt /Bật
Thiết lập đối với chỉ số ngày tháng và dấu biểu
tượng trên video được ghi hình
Tắt - Không hiển thị ngày tháng và biểu tượng
trên video
Ngày - Chỉ hiển thị ngày tháng trên video
Biểu tượng - Chỉ hiển thị biểu tượng trên video
Ngày + biểu tượng - Cả ngày và biểu tượng
đều được hiển thị trên video.
Tắt / N gày /
Biể u tượng /
Ngà y + biểu tư ợng
3.1.8 Tùy chọn danh mục video
2. Khi thiết bị được sử dụng, dung lượng pin lưu trữ sẽ giảm dần.
3. Đây là hiện tượng bình thường cho pin.
3.1.4 Ghi hình có tích hợpcảm ứng va chạm (G-sensor)
Nếu thiết lập cảm ứng va chạm ở mức Thấ p/ Tr un g bình/ Cao, biểu tượng
khóa sẽ xuất hiện trên màn hình khi phát hiện va chạm trong quá trình
ghi hình, clip hình hiện tại sẽ được bảo vệ tự động và không thể được thay
thế. Th iế t lậ p mặ c đị nh l à ở mứ c Tru ng b ìn h.
3.1.5 Bật/tắt âm
Khi ở chế độ Vi de o, n hấ n nú t Lê n để Tắt/bật âm thanh.
3.1.6 Điều chỉnh giá trị phơi sáng
Khi ở chế độ Vi de o, n hấ n nú t Xu ốn g để đ iề u ch ỉn h gi á tr ị phơi sáng.
3.1.7 Vận hành menu video
Nhấn nútOK giữ 3 giâyđể vào danh mục cài đặt Vi deo , nh ấn nút
chế độ Mode để chuyển sang danh mục cài đặt . Nhấn nút
Lên/Xuống để lựa chọn danh mục phụ, sau đó nhấn nútOK để
vào phần cài đặt, nhấn nút Lên/Xuống để lựa chọn tùy chọn,vàsau
đó nhấn nútOK để xác nhận. Sau khi hoàn tất cài đặt, nhấn nút chế
độMode để thoát khỏi danh mục cài đặt.
MIC
RESET
Polaroid·C200Polaroid·C200
Độphângiải
Ghi đè liên tục
Bù phơi sáng
Nhận diện chuyể n động
Video Clip Video Clip
Ghi âm
Hiển thị ngày thá ng
Cảm ứng va chạm G-s ensor
Độphângiả i
Ghi đè liên t ục
Bù phơi sán g
Nhận diện
chuyển độ ng
Ghi âm
Hiển thị ng ày
tháng
Page 42

MIC
RESET
MIC
RESET
MIC
RESET
VN -1 4VN- 1 3
3.1.9 Xóa Vid eo /h ìn h ản h
Cài đặt ngày và thời gian. Thay đổi định dạng
ngày và thời gian sẽ được hiển thị trên màn
hình:
YY/MM/DD - Năm, Tháng, Ngày
MM/DD/YY - Tháng, Ngày, Năm
DD/MM/YY - Ngày, Tháng, Năm.
Thiết lập cho phép/không cho phép có tiếng bíp.
Bật - Lựa chọn điều này để có tiếng bip trên hệ
thống âm thanh khi cài đặt tùy chọn menu.
Đây là cài đặt mặc định cho tùy chọn này.
TắtTắt tiếng bíp trên hệ thống âm thanh.
Tắt/Bật
Lựa chọn ngôn ngữ hiển thị trên màn hình
theo ý muốn.
Englis h / 繁体中文 /
简体中文 / 日 本语 / 한국어/
tiếng Việ t
Cài tần số thích hợp
50 Hz / 6 0Hz
tùy chọn này.
1 phút/2 phút/3 phút -Thiết bị ghi hình trên xe tự
động tự động tắt màn hình LCD sau 1 phút/
2 phút/3 phút thiết bị không hoạt động hoặc trong
khi ghi hình video
Chú ý: Nếu được kích hoạt, thiết bị ghi hình trên
xe sẽ tiếp tục ghi hình ngay cả khi màn hình LCD
tắt. Nhấn bất kỳ phím nào để bật màn hình LCD.
Thiết lập tắt nguồn tự động khi thiết bị ghi hình
không hoạt động.
Tắt - Thiết bị ghi hình trên xe sẽ không tự động
tắt nguồn. Đây là cài đặt mặc định.
3 phút/5 phút/10 phút - Thiết bị ghi hình trên xe
sẽ tự động tắt nguồn nếu không hoạt động
trong vòng 3 phút/5 phút/10 phút.
Tắt /3 phút /
5 phú t/10 ph út
Format thẻ micro SD được gắn vào.
OK - Lựa chọn tùy chọn này để hoàn thành quy
trình format.
Hủy bỏ - Lựa chọn tùy chọn này để hủy bỏ
format và trở về menu trước đó.
Cảnh báo: TẤT CẢ các le sẽ bị xóa vĩnh viễn và
KHÔNG THỂ khôi phục nếu thẻ nhớ bị format.
Polaroid·C200Polaroid·C200
Thiết lập cho độ nhạy của Cảm ứng tự xoay
màn hình (G-sensor) nhằm phát hiện va chạm
để bảo vệ các video ghi hình.
Tắt - vô hiệu hóa tính năng Cảm ứng tự xoay
màn hình.
Thấp / Trung bình / Cao - Độ nhạy càng cao
khả năng phát hiện va chạm càng dễ dàng hơn
Thiết lập mặc định là ở mức Trung bình.
Tắt / Thấp /
Trung bình / Cao
Danh mục
chính
Danh sách
chức năng
Nội dung
Tùy chọn có sẵn
Quản lý phần nền chiếu sáng và phần hiển thị
của màn hình LCD.. Nên sử dụng tính năng này
để tiết kiệm pin.
Tắt - Chọn để vô hiệu hóa chế độ tiết kiệm điện
cho màn hình LCD. Đây là cài đặt mặc định cho
Tắt / 1 phút /
2 phú t / 3 phút
Hủy b ỏ/OK
Khi lựa chọn tính năng này, thiết bị ghi hình trên
xe sẽ quay trở về các thiết lập mặc định ban đầu
của nhà máy.
Hủy b ỏ/OK
Tùy chọn này hiển thị số phần vững hiện tại của
thiết bị ghi hình trên xe. Thông tin này có thể quan
trọng đối với công tác liên lạc hỗ trợ và dịch vụ.
Cảm ứng va
chạm G-se nsor
Ngày tháng/Th ời gian
Tự động tắt
Tiếng Bíp bàn phí m
Cài đặt ngôn ngữ
Cài đặt Cài đặt
Tần số ánh sáng
Ngược sáng
Format
Thiết lập mặc địn h
Phiên bản
Cài đặt
Ngày thán g/
Thời gian
Tự động tắt
Cài đặt
Tiếng Bíp bà n
phím
Cài đặt ngô n
ngữ
Tần số ánh sá ng
Ngược sán g
Format
Thiết lập m ặc
định
Phiên bản
Page 43

MIC
RESET
MIC
RESET
MIC
RESET
VN -1 6VN- 1 5
3.2.4 Tùy chọn menu chụp ảnh trong khi quay hình
Thiết lập thời gian chụp.
Cùng một lúc: Thiết bị ghi hình trên xe sẽ
chụp ảnh cùng một lúct.
Trong 2 giây/Trong 5 giây/ Trong 10 giây:
Thiêt bị ghi hình trên xe sẽ chụp ảnh
trong 2 giây/5 giây/10 giây.
Lựa chọn để kích hoạt chụp liên tiếp
5 ảnh.
Bật: Cho phép thiết bị ghi hình trên xe
chụp 5 ảnh liên tiếp.
Tắt: Vô hiệu hoá chức năng chụp hình
liên tiếp. Đây là cài đặt mặc định.
Tắt / Bật
Thiết lập chất lượng hình ảnh.
Đẹp - Tùy chọn này tạo ra chất lượng tốt
nhất cho hình ảnh.
Bình thường - Chất lượng bình thường.
Tiết kiệm - Chất lượng kém.
Đẹp / Bình thường /
Tiết kiệm
Thiết lập cho độ sắc nét của hình ảnh.
Mạnh - Màu sắc của hình ảnh sắc nét và
tươi sáng.
Bình thường - Màu cơ bản cho hình ảnh.
Đây là cài đặt mặc định.
Nhẹ - Màu sắc của hình ảnh sẽ nhạt hơn
Mạn h / Bình th ường /
Nhạ t
Thiết lập cho cân bằng trắng. Thiết lập
mặc định là Tự động chỉnh cân bằng trắng
theo điều kiện ánh sáng. Thay đổi các
tham số quay hình để bù trừ phần "nhiệt
độ" màu sắc sáng khác nhai.
Tự động (Auto) - Cho phép thiết bị ghi
hình trên xe phát hiện tự động nhiệt độ
màu ánh sáng và thay đổi các tham số để
tạo ra màu sắc hình ảnh tối ưu. Đây là cài
đặt mặc định cho tùy chọn này.
Ánh sáng ban ngày (Daylight) - Lựa
chọn khi chụp hình ở điều kiện ánh sáng
ngoài trời
Có mây (Cloudy) - Lựa chọn khi màu sắc
Tự độ ng / Ánh sá ng ban
ngà y / Có mây / Án h
sán g huỳnh q uang /
Vonf ram
Thiết lập độ phân giải của hình ảnh.
12M 4 000x3 000
8M 32 64x24 48
5M 25 92x 194 4
3M 20 48 x 1536
1.3 M 1280x 960
VGA 64 0x480
Chụp ảnh
Cùng một lúc/
Trong 2 giây /
Trong 5 giây/
Trong 10 giây
Polaroid·C200Polaroid·C200
3.2 Chụp hình
Để chụp hình, hãy đảm bảo rằng Chế độ chụp ảnh khi quay hình được
lựa chọn. Nhấn nút REC để chụp hình. Ảnh chụp được lưu trong thẻ SD.
3.2.1 Màn hình chụp ảnh trong khi quay hình
Chế độ chụp
ảnh trong
khi quay hình
Giá trị phơi
sáng
Chống
rung lắc
Độ phân
giả
Tình trạng
thẻ SD
Tự động
cân bằng
trắng
Độ nhạy
ISO
Số lượng
ảnh còn lại
có thể chụp
Chất lượng
ảnh
Ngày và
giờ
3.2.2 Phóng to/nhỏ
Khi ở chế độ chụp ảnh khi đang ghi hình, nhấn nút Lên/Xuống để
zoom to/nhỏ.
3.2.3 Vận hành danh mục chụp ảnh trong khi quay hình
Khi ở chế độ chụp ảnh trong khi quay hình, nhấn nút OK giử trong 3
giâyđể vào danh mục cài đặt Chụp ảnh khi quay hình , nhấn nút
Lên/Xuống để lựa chọn danh mục phụ, sau đó nhấn nút OK
để vào phần cài đặt, nhấn nút Lên/Xuống để lựa chọn tùy chọn, sau
đó nhấn nút OK để xác nhận cài đặt. Sau khi hoàn tất cài đặt, nhấn nút
chế đô Mode để thoát ra khỏi danh mục cài đặt.
MIC
RESET
Danh mục
chính
Danh sách
chức năng
Nội dung
Tùy chọn có sẵn
Quay phim
Độphân giải
Chụp liên tiếp
Chất lượng ảnh
Độsắc nét
Cân bằng trắng
Màu
ISO
Bù phơi sáng
Chống rung
Xem nhanh
Hiển thị ngày thá ng
Quay phim
Độphân giả i
Chụp liên t iếp
Chất lượn g ảnh
Độsắc nét
Cân bằng tr ắng
Chụp ảnh Chụp ảnh Chụp ảnh
Page 44

MIC
RESET
VN -1 8VN- 1 7
3.3 Phát video và Xem hình ảnh
3.3.1 Phát video
Nhấn nút Mode để chuyển sang chế độ Phát lại / , nhấn nút
Lên/Xuống để xem lại các video và hình ảnh.Biểu tượng video sẽ
xuất hiện trên góc trên bên trái của màn hình nếu le đó là video, nhấn nút
REC để phát video, sau đó nhấn nút REC để tạm ngừng phát, nhấn
nút Mode để ngừng phát video.
3.3.2 Màn hình chạy video
Biểu
tượngVideo
Số/Tên
Video
Độ phân
giải Video
Ngày và
giờBắt
3.3.3 Màn hình xem ảnh
Biểu tượng
hình ảnh
Số/Tên
hình ảnh
Độ phân
giải
hình ảnh
Ngày và giờ
đầu ghi
MIC
RESET
Polaroid·C200Polaroid·C200
Thiết lập cho màu sắc hình ảnh đặc biệt.
Bình thường - Chụp ảnh với các tham số
màu sắc bình thường. Đây là cài đặt mặc
định cho tùy chọn này.
Đen & trắng - Chụp ảnh với màu
Đen & Trắng.
Màu nâu đỏ - Chụp ảnh với màu nâu đỏ
(nâu đỏ).
Bìn h thườn g /
Đen & t rắng / nâ u đỏ
Thiết lập cho độ nhạy ISO để bù đắp các
trường hợp cực sáng.
Tự động - Điều này cho phép thiết bị ghi
hình trên xe để phát hiện tự động mức độ
sáng và thay đổi khẩu độ cũng như tham
số tốc độ để tạo ra hình ảnh tối ưu. Đây
là cài đặt mặc định.
ISO100 - Lựa chọn để chụp ảnh trong các
trường hợp ánh sáng ngoài trời sáng.
ISO200 - Lựa chọn để chụp ảnh trong các
trường hợp ánh sáng mặt trời gián tiếp.
ISO400 - Lựa chọn để chụp ảnh trong nhà.
Tự động / ISO100 /
ISO200 / ISO400
Bù thủ công cho mức ánh sáng thấp hoặc
cao. Nếu nút âm "-" càng lớn, ảnh chụp
sẽ càng đậm. Nếu nút dương "+" càng
lớn, ảnh chụp sẽ càng sáng.
0 là giá trị trung lập cho tùy chọn này và
là giá trị mặc định.
+2.0 / +1.0 / +0.0 /
-1.0 / -2.0
Thiết lập để kích hoạt chống rung lắc.
Tắt/Bật
Thiết lập thời gian để xem lại ảnh mỗi lần
chụp.
Tắt - Tùy chọn này cho phép quay trở
lại ngay lập tức chế độ chụp ảnh khi quay
hình.
2 giây/5 giây - Tùy chọn này có thể xem
hình 2 giây/5 giây sau khi chụp, vào sau
đó quay trở lại chế độ chụp ảnh khi
quay hình.
Tắt / 2 giây / 5 giây
Thiết lập đối với chỉ số ngày tháng và dấu
biểu tượng trên ảnh được chụp.
Tắt - Không hiển thị ngày tháng hoặc biểu
tượng trên video.
Ngày - Chỉ hiển thị ngày tháng trên video.
Biểu tượng - Chỉ hiển thị biểu tượng trên
video.
Ngày + Biểu tượng - Cả ngày và biểu
tượng đều được hiển thị trên video.
Tắt / Ngày /
Biểu tượng /
Ngày + Biểu tượng
ngoài trời u ám, phủ mây.
Ánh sáng huỳnh quang - Lựa chọn để
được ánh sáng đèn huỳnh quang trong
nhà CFL tiêu chuẩn.
Vonfram - Lựa chọn cho màu sắc loại
vonfram.
Màu
ISO
Bù phơi sán g
Hiển thị ng ày
tháng
Chống run g
Xem nhanh
Page 45

MIC
RESET
VN -1 9
4 Thông số kỹ thuật
Màn h ình LCD
Màn h ình TFT màu 2. 0"
Cảm b iến hìn h ảnh
Cảm b iến CMO S 3.0MP, 1/ 4"
108 0FHD 19 20 x 1080 ( Inter polated )
720 P 12 80 x 720
VGA 64 0 x 480
Độ ph ân giải c ủa vide o
Độ ph ân giải h ình ảnh
12M ( Nội suy )
Địn h dạng vi deo
AVI
Địn h dạng hì nh ảnh
JPG
Bộ nh ớ
Hỗ trợ thẻ nhớ micro SD loại 6 hoặc cao hơn, tối đa lên đ
ến 32GB
Mic ro
Tíc h hợp
Loa
Tíc h hợp
Cảm ứ ng va chạ m
Có
Ngu ồn
Pin t ích hợp , bộ xạc ng uồn xe ô tô
Gia o diện
Min i USB 2.0 , khe thẻ n hớ SD
Nhi ệt độ vận h ành
0°~ 4 5° C
Kíc h thước
67. 5mm x 51m m x 31mm
Trọng lư ợng
54g
Để xóa tất cả các le trong thẻ SD, bao gồm các video, hình ảnh và bất kỳ le
nào khác, vui lòng format thẻ SD.
Chú ý: Các le bị xóa không thể khôi phục lại được. Đảm bảo các le có
bản sao lưu trước khi xóa.
Góc đ ộ quay
100 °
Polaroid·C200
VN -2 0
Polaroid·C200
3.3.4 Tùy chọn menu phát lại
Tùy c họn này c ho phép x oá một ho ặc tất
cả cá c le ảnh /hình ả nh hiện c ó trong
thẻ n hớ.
Xóa le hiện t ại -Tùy c họn này c ho phép
xóa m ột vide o hoặc hì nh ảnh kh ỏi thẻ
nhớ m icro SD t rong mộ t lần.
Xóa t ất cả - Tùy c họn này c ho phép t ất
cả cá c le vid eo và hìn h ảnh từ th ẻ nhớ
mic ro SD tro ng một lầ n.
Cản h báo: Cá c video v à ảnh KHÔ NG
THỂ đ ược phụ c hồi sau k hi bị xóa .
Xóa le hiện t ại/
Xóa t ất cả
Bảo v ệ một hoặ c tất cả cá c le vid eo/hì nh
ảnh k hỏi bị th ay thế kh i thẻ nhớ b ị đầy.
Khó a le hiệ n tại -Tù y chọn nà y cho
phé p bảo vệ mộ t le vid eo hoặc h ình ảnh .
Mở kh óa le hi ện tại - Tùy c họn này c ho
phé p bỏ bảo vệ m ột le vi deo hoặ c
hìn h ảnh.
Khó a tất cả - Tù y chọn nà y cho phé p bảo
vệ tấ t cả các l e video /hình ả nh.
Mở kh óa tất cả - Tù y chọn n ày cho ph ép
bỏ bả o vệ của tấ t cả các l e video /hình
ảnh .
Cản h báo: Cá c video v à hình ản h sẽ
KHÔ NG được b ảo vệ nếu t hẻ nhớ bị
for mat. Kh i thẻ nhớ b ị forma t, tất cả c ác
le s ẽ bị xóa và K HÔNG TH Ể khôi ph ục.
Khó a le hiệ n tại
Mở kh óa le hi ện tại
Khó a tất cả
Mở kh óa tất cả
3.4 Xóa Vid eo /h ìn h ản h
Nhấn nút Mode để chuyển sang chế độ Phát lại / , nhấn nút OK
giữ 3 giâyđể vào danh mục Phát lại nhấn nút Lên/Xuống để
lựa chọn Xóa , sau đó nhấn nút OK để vào danh mục xóa, nhấn nút
Lên/Xuống để lựa chọn Xóa le hiện tại, nhấn nút OK để vào danh
mục phụ, nhấn nút Lên/Xuống để lựa chọn OK, sau đó nhấn nút OK
để xác nhận xóa.
Danh mục
chính
Danh sách
chức năng
Nội dung
Tùy chọn có sẵn
Trở về
Hủy
Bảo vệ
Trở về
Hủy
Bảo vệ
 Loading...