

Page 1

Page 2

Donated to www.orphancameras.com
Page 3
Donated to www.orphancameras.com
Page 4
CONTENTS
Donated to www.orphancameras.com
Getting
I ntrod
How to
How to close
Hovv to
How to
How to focus
How to focus
Practice
What
Acquainted
uct i on
open the camera
and cover
hold the camera
aim and focus
the
you
pictures
for
for subjects
1, 2, 3 system
know
should
the
the
of
other
about
camera
camera
PeoPle
than
your film
people
Operation
good
for
good
take
develop
a f ilm
daylight
daylight
picture
a
the
Pack
Print
the camera
the camera
3O0O
for
black
75
for
color
speed
and white
pictures
speed
color
film
pictures
film
How to load
How tc set
Tips
How to set
Tips for
How to
How to
4
5
6
7
B
9
10
no
lf
Check
How to
Black
How to
Troublesome
Using
1i
I2
Miscellaneous
must
You
Flash
Some
13
Copies
16
Plcture
I7
Protect f
18
Where
19
Warranty
20
List of repair
22
yellow tab appears
temperature!
the
prints lighter
make
and white
use
3OOO
pictures
helpful
and
troubles,
ilm
to
prints must be coated
the Cold-Clip
lighting
speed
take
accessories
enlargements
and camera
write for
stations
black
of
care
their
information
situations
Your
lt's important
or darker
color f
with
white film
and
camera
and cure
cause
heat
rom
f
ilm
to avoid
dim daylight
in
.
24
25
26
z/
2A
30
31
32
34
35
36
37
41
41
4I
42
2LO
Page 5
View/rangef
Donated to www.orphancameras.com
inder
Battery
compartment
Shutter release
Rangef
Small
yellow
Large
2-efement lens,
Lighten/darken
Shutter
pushbutton
inder
white
tab slot door
l14mm.,
cocking
tab
slot
t18.8
control
lever
Rangef inder
Film
Selector
Electric eye
Flash outlet
pushbutton
(flashbulbs
only)
Page 6
HOW
Donated to www.orphancameras.com
TO GET
THE
MOST OUT OF THIS
CAMERA
you
Before
read carefully
Acquainted, and Operation
you
As
all the
you'll
first
you
very important that
you're
with
a film
black and white film.
camera
they are to
uD
4
read
motions
be completely familiar
picture.
This is
Once
one of the world's easiest-to-use
understand a
bound to waste
your picture
you
pack.
and film need some help
prod
sentence:
in one
your
load
the first two sections in this booklet:
the text and look at the
get
the simple operating routine
We suggest that
uce
camera
using the camera - without
of
simple techniques. However,
few
you
film
results.
Please
good
with film,
(the
pages
with
learn the basic operating
and money
you
remember that even
pictures.
from the
please
with colored edges).
pictures, go
you
before
it
cameras, once
and be disappointed
start with 3000
That help can be summed
down
photographer
be sure
film. Then
make
to
Getting
through
your
it
is
steps or
pat,
load
speed
the finest
Plan and
here are some helpful
1.
behind
bright
2. Move in close,
3. Focus carefully,
4. Ghoose colorful
5. Pick a
6. Pull the tabs
7.
8.
if
explained in detail.
getting good pictures
think before
quick guide
As a
Always
you.
sunshine.
Time development
Keep an
you go
As
you
shoot.
you get a good
to help
hints.
have
the light
For
best color
to
to
subjects
good
background, particularly
correctly.
eye on the
through
They can
on the
pictures
get
a big
get
sharp
for
carefully.
temperature.
this booklet
poor
and
picture
They're
important.
subject coming from
place your
image
in the
pictures.
your
color
you'll
make the difference
ones.
every time,
subjects in
print.
pictures.
with
flash.
find these
points
between
2Lo
.I
I
I
Page 7
HOW TO OPEN THE
Donated to www.orphancameras.com
CAMERA
GETTING
ACQUAINTED
A
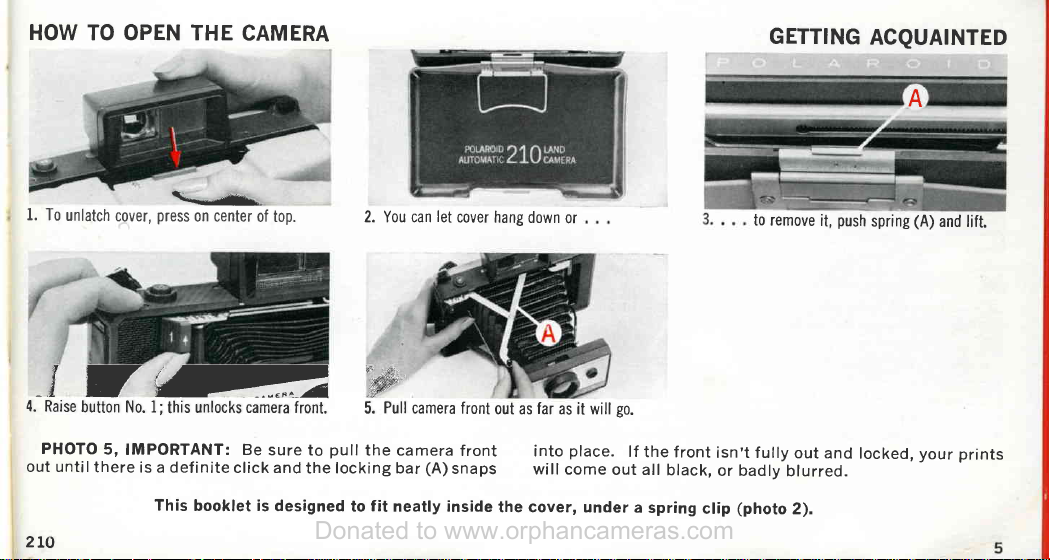
1. To
unlatch
{J'
4.
Raise
button No. l;
PHOTO
5, ImPORTANT: Be
out until there
2LO
Z-...r.*^
press
cover,
on center
unlocks camera front.
this
is a definite click and
This
booklet is
of top.
sure to
the locking bar
designed
2. You can
W
Pull
5.
pull
the carnera
fit
to
neatly inside
let
cover hang
camera front
front into
(A)
snaps
down
or
far
out as
as it will
will come
the cover,
go.
place.
out all black,
under a
lf the front
spring
clip
to remove
isn'i fully
or bad ly
(photo
push
it,
spring
out and locked,
blurred.
2).
(A)
and lift.
your
prints
Page 8
HOW
Donated to www.orphancameras.com
TO CLOSE
AND COVER
THE
CAMERA
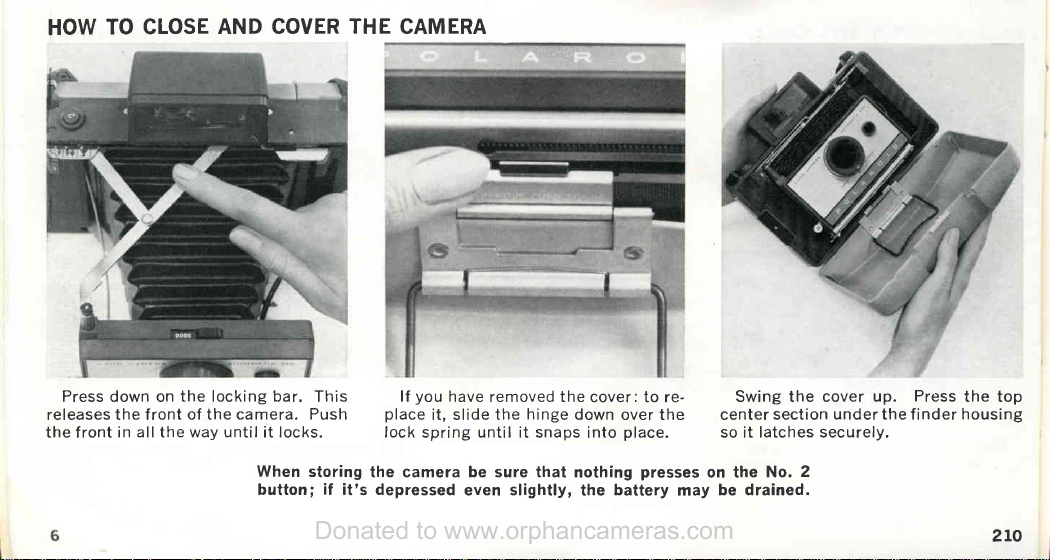
Press
releases the f ront
the f ront in
down on
the locking bar.
of the camera. Push
all
way until
the
it locks.
When
button;
This
storing
if
it's
lf
place
lock spring until it snaps
the camera be sure that
depressed
you
have
it, slide the
even
removed
hinge
slightly,
the
cover:to re-
down over the center
place.
into
nothing
the
presses
battery
Swing the cover
so it latches securely.
on the
be drained.
may
Press
section under the finder
2
No.
up.
the top
housing
2LO
Page 9
HOW
Donated to www.orphancameras.com
TO
HOLD
THE
CAMERA
G ETTI
NG
ACQUAINTED
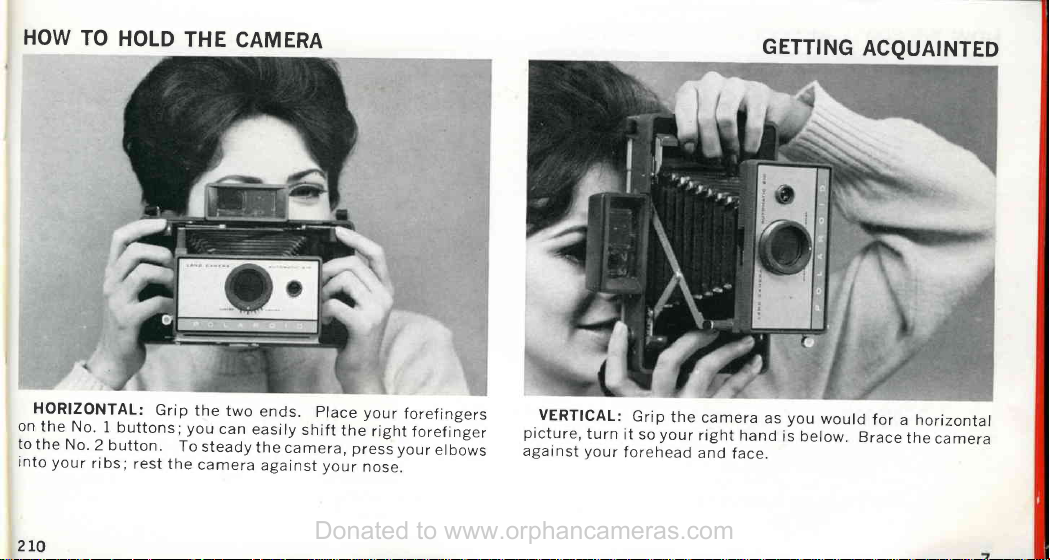
H0RIZoNTAL:
on
the No.
to
the
No.
rnto your
2LO
ribs;
Grip
I
buttons;you
2 button.
rest
the
the
To
steady
camera
two
can
easiry
prace
ends.
shift
the
against your
the
camera, press
your
right
your
nose.
forefingers
forefinger
eloows
VERTICAL:
picture,
against
turn
your
Grip
the
your
it
so
forehead
camera
right
hand
and
face.
you
as
is below.
would
f or
Brace
a horizontal
the
camera
Page 10

AIM
Donated to www.orphancameras.com
AND
FOCUS
THEHOW TO CAM
ERA
THIS lS
and
Place
the finder at a
shown at
Push the
I
THE RANGEFINDER: Hold the
put
both forefingers
your
eye close to the finder window and look
plain
right.
No. 1
on the
wall, or the sky. You'll see the
buttons back
No. l buttons, as
and
forth.
camera
Notice
horizontal
shown.
through
pattern
that one
line moves
out. Their
The two
people,
nearby
scale and arrow are
objects,
and
up
inner
horizontal
as shown
pets,
etc.
points
down.
Also,
outline the
lines are
on the oppcsite
pictures
for
(see
page
the diamonds
picture
used to
of scenes,
i0).
focus for
area.
page.
groups,
big
move in ano
pictures
The distance
of
nearby
2tO
Page 11

HOW
Donated to www.orphancameras.com
TO FOCUS
FOR
PICTURES
OF PEOPLE
GETTING
ACQUAINTED
FOR ADULTS:
ject's
forehead,
moving
properly,
2to
lf the
line
lines
you're
at
the
won't
too
Place
the
and
move
bottom
of the
separate
close;
back
For
vertical pictures,
top
the
far
line
at
No.
I
buttons
chin.
enough
up
a
bit.
the
to
frame
focus
top
of
to
the
with
your
sub-
place
the
subject
the camera
FOR
SMALL
the
top line
bottom
way as
horizontal,
of
for
CHILDREN:
on
top
the
chin.
adults.
then
turn it
of
the head
with
bigger
to aim
lf they're
and
the
children,
and
shoot.
years
l.-3
moving
focus-in
place
old,
line
at
the same
the
Page 12

HOW TO
Donated to www.orphancameras.com
FOR PETS,
pets,
and inanimate objects
estimate carefully the distance from
Then
iect.
arrow
the
two white
BABIES, OBJECTS:
push
points
to
FOR SUBJECTSFOCUS
No. 1 buttons back
the
that distance
lines in the
up to 20 tt. from the camera,
(3r/z
rangefinder
OTHER THAN
pictures
For
the camera
and
'ft.
here). Do
for such subjects.
of babies,
to the sub-
forth
a
until
not use
PEOPLE
the
a
FOR SCENIC
of subjects
buttons to set
Do not use
only
more than 20tt.
the two
pictures
for
PICTURES:
arrow opposite
the
white
people
of
allscenics,
For
from
lines in
to
up
a
the camera,
20 ft.
and for
(infinity) setting.
INF
the
the
rangefinder;they
from
pictures
all
push
the
the camera.
No.
are
1
10
2LO
Page 13

PRACTfCE
Donated to www.orphancameras.com
ONE
is
finder
at
THE
for
focusing.
someone
nearby.
t,
2,
Look
g
SYSTEM
through
plaJe
the
the
TWO
the No.
clicks.
stay
very
click
as
can
move
is
2
In
for
shooting.
button
dim
tight
still
untilyou
the
shutter
and
slowly
hold
closes.
let No.
practice
until
the
No.2
hear
the
2 up.
pressing
shutter
down
and
second
you
Then
GETTING
ACQUAINTED
Page 14

WHAT
Donated to www.orphancameras.com
SHOULD KNOW ABOUT
YOU
YOUR FILM
This
camera
films. At
speed black and
speed
75
additional
be
You must know the film speed num-
ber, 3000 or 75, to set the
controls correctly.
forget the
f ilm instruction sheet.
The film speed number
how
"fast"
For
example, 75 speed film
"fast" but should be used in
daylight or with flash
However,
white
is 4OX
so
film,
where there isn't enough
speed
75
use 3000 speed
with
flash, too.
t2
uses Polaroid Land
present
color, Type
you
there
white,
types of f ilm in the f
n umber,
(light
3000 speed black
as
can
film. Of
108. There may
However,
just
sensitive)
for
"fast" as75 speed
make
course,
film
are
Type 107, and
good
pictures
in daylight
pack
two: 3000
uture.
camera
you
if
look at
light to use
the
describes
the f ilm is.
is tairly
bright
results.
and
color
with
you
can
The
the materials to
For
negative
and a thin
filled
needed
After snapping the
development by the simple act
ing a
This drags the exposed negative, a
sheet of
chemicals
The
the
between the
to form
it
or
The
camera.
opment
and there
Polaroid
picture
each
film, a sheet
with the
develop
to
piece
of
print paper,
between
pressure
pod,
spreading the
picture
a
picture
After
you
time
your
is
pack
film
make eight
there
foil container
jelly-like
paper
of
the rollers
negative and
"sandwich".
develops outside
the recommended devel-
separate the
f inished
contains all
a
is
print paper,
of
picture.
the
picture,
out of the
and a
steel
two
print paper
picture.
pictures.
piece
(the pod)
chemicals
you
start
pull.
of
camera.
pod
rollers.
squashes
chemicals
the
sandwich
of
of
3000
speed
film
selector to
75 speed
black and
3000.
film.
color
white
Set
the
film.
film
camera's
Set the
selector to
75.
2LO
Page 15

HOW
Donated to www.orphancameras.com
TO
LOAD
Open
the
mounts;
these
film
carry
black
Hold
2to
top
with
the
white
package
the
brack
in safery.
and
package.
prints
and
A
of
the
box.
and
rt
near
white
it
arso
the
instruction
Handre
prints.
FILM
PACK:
With
color
firm
sheet (prease
genfly,'carefuily.
can
edges.
film
there's
read
be
very
Don,t press
usefur
OPEN
there,s
a
coater.
puil
it).
Save
when
hard
THE
the
PACKAGE
a
set
of
Remove
out
the
uo*
to
coating
on
the
middle
of
:,1,i:^r,-1"
stoe
rs
open,
Lift
out.the
supplied
Always
in
direct
package.
the
of
the
rip
pack.
with
coror
open
the
sunlight,
A
special
As
soon
will
begin
There
will
pictures.
litter
in
the
landscape.
What
to
it
will
fit
you're
pictures,
container
ciate
this
palkage
apart
the
Discard
firm.
package
to
avoij
planning
Starting
Handre
request!
you
as
to
accumulate
be
more
We
hope
the
streets
do
with
into
an
bring
atong
for
waste.
litile
extra
at
atoni
ttre
front
and
*re
liiii" package
the
and
loaa
foggirrg
open
the
when
that
or
be
the
waste paper?
empty
to
take
paper
a
Everyone
effort
the
corner,
OotteO
back
p-ack
by
film
ihe
in
fitm.
OPERATION
film pack
waste
develop
box.
of
bag
will
your
tear
open
When
pu"Xug".
the
of
sirica
edges
shade,
paper.
become
around
Usuaily,
Or,
outdoor
or
other
appre_
part.
the
the
gel
onry.
not
you
it
won't
scattered
film
lots
on
Ine.
of
the
the
you
the
if
Page 16

HOW
Donated to www.orphancameras.com
TO
LOAD A
FILM
PACK
(Cont.)
back
Push the
1.
pack
4. Push
the
feel
it snap
14
into
down into
place.
the
the
latch;
door
pop
door will
camera. You'll
up.
2. Open it all the
lf
not, clean them
care of
firmly
lf not, reopen the
your
be
to
way.
as
camera.
that
sure
back,
Are
rollers
the
lead
in
latch.
the
described
both sides
the
tab
(A)
clean?
section
The
black
out.
on
tab
Hold
3.
push
and
hinge against
door
safety
of the
pack
film
the
closed end of the
the
spring tension.
must
cover
by the
stick
edges
pack
out of the
shown
as
under
small
2LO
the
slot.
Page 17

Pull
Donated to www.orphancameras.com
the
safety
cover
all
the
way
out
of
the
camera
without
IF
NO
WHITE
l. lf
there's
slot,
do
the following
indoors,
not
2ro
no
white
in
bright
TAB
tab in
in
sun.
the
APPEARS
the No.4
shade
or
2.
0pen
the back
disturbing
out into
or
the open.
of
moving
stopping.
the
camera part
film
the
prik,
Don,t
rrp
way
and,
purt'tn,
it.
without
*nit.
trn
3.
Close
sides
in
the No.
are
9.
tab
(No.
now
the
back
locked
4
slot.
With
the
(A)
should
4).
Don't pull
ready
for
of
the
camera,
securely
and
safety
stick
the
first
making
the
cover
out,
out
of
the
the white
picture.
srre-ihat
whitjtab
the
small
tab.
ii
outside
white
slot
you're
both
Page 18

HOW
Donated to www.orphancameras.com
TO
SET
THE
CAMERA
FOR
3OOO
SPEED
FI
Set
with
Film Selector
the
speed
3000
as shown
film.
for
and white
black
pictures
the white
Set
arrow, as shown.
to the
dot on
Lighten/Darken
the
This is
the
(L/D)
Normal
control
position.
next
2LO
Page 19

TIPS
Donated to www.orphancameras.com
FOR
GOOD
..^Us9 ,!riSht.,.
yourself
shoulder.
For portraits
direct
sun,
For
scenic
.,
the
light
.Avoid
picture
film
and
follow
the
, ry3t9h
behind your
t
o1
llgf
if the
background
light
behind
Move
more
details
2Lo
even
so_the
Don't
you'll
or on
pictures,
coming
dim
light:
may
be
must
suggestions
the
background:
subject,
the
subject.
the
in
close:
you'll
DAYLIGHT
light,
light
on
have
the
get
an
overcast
avo.id
from
benrno
The
blurred.
make
a picture
on page
shoutd
Don't
is
out
subject
The
bigger your
be
able
BLACK
coming
the
subject'between
best
thutter
But
photogrupf,.o-uon"
in
the
,,fooi,,tne
wiit
to
from
.sublect
reiults
when
but
bright
high
o"u"rf,uii-"rn,
you
and
moves
you
if
without
31.
The
light
jusl
be
op-en'anA
subject
see.
is
OuV,
from
uru-r.ine'iOO0
on
aUout
eiectric
f'or
scenic
Never
AND
behind you:
coming
jnd
Vou
a'ciJul
orin
Lp"n
the
side.
slowly
flash"in
the
background,
is
ilignt
in
Orighily
eie (page
is
in
the
try
lit.
picirr"",
to
WHITE
place
over your
the
sun.
otoct<s
ttre
shade.
shoot
with
and your
speed
dim
light,
as
the
the
shade
Strong
3O).
print,
the
trv
use
flash
PICTURES
get
to
something
to help
development
. Ii."
in the
film
to time.
overdevelop
pictures.
some
recommended
with a gray,
Keep
an
.
the.quatity
.91?t;"j".,
what
to
do
your
lf
as
snown
ject,
in
the
exactly
as
with
daytight
fitt
the print
instruction
With
black
for a
time,
washed-out
eye
on
your
of
how
the
about
picture
page
on
same
you
want
pictures.
big
and
and
add
carefully:
sheet.
and
few
extra.seconds;
However,
your
look.
the
temperature:
pictures.
temperature
it.
is
too dark.or
26
to
make
location
it
and
to.
solid
a
feeting
Follow
These
white
film
you
if
pictures
Be
sure
too
the
lighting
looking
o't
the
rn"V
no
in
develop
will
Cold
to
affects
light:
next
one
conditions,
OPERATION
into
the
Oiit-"1.
harm
fact,
be
weather
;";J;;;u
yori
Use
foreground
recommendations
"f,""g"
for
is"oone
it may
less
of
pi"trr".
the
of
the
from
poor
can
25,
L/D
same
come
if
improve
than
quatity,
affect
which
control
time
you
the
una
sub-
out
Page 20

HOW
Donated to www.orphancameras.com
the
Set
the
Set
this
with
printed
toward
those
follow
THE
SET
TO
Selector
Film
Lighten/Darken
exception.
instruction
Lighten
instructions,
for
On
telling
all
CAMERA
as shown
control
pictures
(right)
some color
you
to set
made
may
which
FOR 75
above
f ilm
the L/D
with that
vary f rom
SPEED
for all color
Normal,
to
you'll
packs
control
pack. Please
pack
pictures.
shown,
as
find a
mark
one
pack;
to
COLOR
FILM
CAM
they
becomes the
with
darker
instruction on
shown
are
important.
pack.
that
(page
above.
position
new
The
Normal setting for
You can
with the L/D control.
26)
the
still make
pack,
set the L/D control
L/D
of the
all daylight
pictures
your
lf there's
control
pictures
lighter or
no
special
Normal
to
then
made
as
18
2to
Page 21

TIPS
Donated to www.orphancameras.com
FOR
GOOD
J
tures,
into
sharp,
may
should
Don't
is
the
with
bright
.Use
strongest
get
also
Stand
Don't
may
more
so
have
Avoid
be
blurred,
Move
in close:
color
try
the
.Focus
but
be
.Wa.t9h
be
photograph
out
in
subject
plenty
Have
strong,
pleasing
the
dim
foreground.
carefully:
fuzzy.
the
sun,
colors
light
the
light:
and
get
to
objects
the
background:
just
open
will
of color:
bright
I
2to
DAYLIGHT
coming
your
if
subject
results
on
on
the
subject
detailyou'll
about
,,fool"
subject
between you
The
shutter
The
bigger
something
Focus
much
farther
as
bright
someone
and
brighfly
the
Look
colors
from
is in
an
overcast
is
moves
your
be
able
big,
on
the
The
as
in
the
lit.
electric
for
in
big,
COLOR
behind you:
bright
but
coming
and
the
slowly
subject
to see.
solid
looking,
main
subject.
or
nearer
light
on
the
light
shadJif
The
strong
(see
eye
subjects
solid
chunks.
Never
PTCTURES
(but
sun
very
ytur
over
sun.
and
is
in
the
For
and
than
the
on
the
the
light
page
and
backgrounds
lf
try
to
you'll
get
yo,
brig-ht
your
the
background
background
5O;.
i,
day).
snou
lder.
picture
print,
the
scenic pic-
colorful
lt
will
be
subjeci
suUlect.
behind
your
sub-
use
flash
with
ject
isn't
shirt,.
anything
with
Time
.
in
to
time.
Development
with
developing
is
not harmf
look
will
Keep
sive
read
your
lf
as
shown
ject,
exactly
daylight
wearing
scarf,
that
strong,
development
the
film
Use an
a
second
too
bluish;
have a pinkish
an
eye
heat
can
page
25,
pictures
your
picture
on
in
the same
you
as
color
colorful
jacket.
or
will
fill
solid
color.
accurate
Timer,
hand;
pictures.
prints
but
those
cast
on
the
affect
which
and
what
is
too dark
26
tocation
want
it to.
pictures.
carefully:
check
if it's
temperature:
the
explains
to
instruction
your
ul,
page
clothes,
Or,
find
at
least
one_third
sheet.
that.aren't
and
quality
to
make
Follow
These
timepiece.
it
occasiona'lly
fast
or
A
few
that
are
the
colors
of
how
do
about
or
too
the
and
lighting
OPERATION
add
color
u
cotoiiui'bact<ground _
the
-uV
tt
slow,
seconds
much
develop"J-tong
will'be
Cold
your
picturei.
the
it.
light:
next
one
"onAiiioni,
with
picture
of
the
recommendations
"f,unC"
you
uifo*"io,
ouerJeveloped
weather
temperature
Use
from
triie
a
ugiin"t
this
oveJevelopment
weak.
Be
the
L/D
of
thl
same
come
a
bright
area
time
polaroid
a
watch
when
may
enough
or
exces-
sure
affects
control
sub-
out
to
Page 22

HOW
Donated to www.orphancameras.com
TO
TAKE
PICTURE
A
FOCUS:
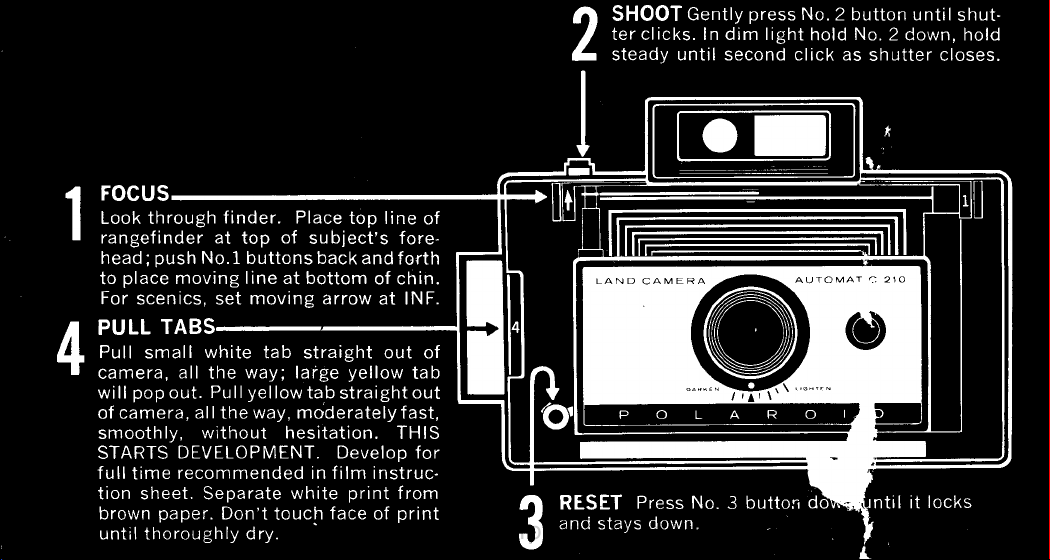
1
I
window.
Place the top
ject's
forehead.
20
Look at
Come close
line
Then
your
subject
push
enough
the
of the rangefinder
through the finder
most of the f rame.
to fill
at the top of
No. 1 buttons to
your
place
sub-
the
moving
of
focusing
line at the
children,
bottom of the subject's chin.
pets,
instructions
nearby objects,
on
pages
and scenics, follow
9 and 10.
For
pictures
the
2to
I
I
Page 23

OPERATION
Donated to www.orphancameras.com
SHOOT:
t
I
shutter
jab
No.
at
color in the
down and don't move until
shutter
closes.
2LO
Firmly
release,
-
you
2
shade
may shake
or black and white
Then
but smoothly
until
you
No.
let
2
you
hear
the
camera.
hear
button
press
button No.
a
loud click. Don't
When
dim light, hold
in
a second
come up.
2,
shooting
No.2
click as
the
the
?
a,
This
resets
Always
RESET:
No.3
reset No.
lmmediately
button
the shutter
3
down
so
right
after
firmly until
you'll
be
away.
snapping
it locks
ready
picture,
a
and
for the next picture.
stays
press
down.
2L
Page 24

DEVELOP
Donated to www.orphancameras.com
TO
THE
PRINT
I
I
way
TABS:
(Don't
between
camera,
of the
white
the
tab
tabs.
the
white
the film
Grip
when
tab out
properly.
Pull it all the
Hold the
hold
the
tab out,
pops
out.
tab
for
yellow
the
pull
you
at an angle,
First,
the
A
at
small
straight
it
When
opens
while
way
Pulling the
only
It
yellow
the
come
pull
the
may
22
white tab.
small
THE
PULL
shown.
as
tab
white
out
pull
you
yellow
a
and
pulling
small
prepares
tab.
out straight
yellow
not
develop
camera
it any
and forefinger
thumb
all the
Don't
does
next step,
the
tab in
it out
one
out
way,
not start
camera.
of the
your
in
way!) Grasp the
other
without
a concealed
block this
development.
which
the center
of the camera.
edge of
Don't blo
Don't block the
hand,
left
and
stopping.
door
door in any
pulling
is
so it
lf
picture
your
pull
(A)
will
you
(A). Next,
door
you pull
When
straight
faces
gripping
swiftly,
picture,
fast
you
lf
veloping,
assembly down flat.
the center
Pull the
without
so begin timing
a swift
is
to say
your picture
picture
The
the
ahead
of the
yellow
tab straight
hesitating. This starts development of
pull?
"PULL
is full
develops outside the camera.
hold
the
yellow
large
the
yellow
tab,
you,
of
lt
lT" briskly, each time
of
tab
not
tab, helps
out of the camera all the
as
soon
should take about as long as it'takes
white specks,
yellow
by
the
Don't
touch or
tab.
hold the
pointing
you
to
get
you
as
pull
tip, or
bend
camera
so the
down. Tftis,
pull
out straight:
it
the tab'out.
you pull
a bit
the white
slower.
While
lay
the
the
,
lens
plus
way,
your
How
tab.
de-
it's
picture
paper
2to
/Q
Page 25

PULL
Donated to www.orphancameras.com
STRAIGHT, PULL
SWIFTLY
/
Pull it
straigtrt out of
or lift
it
in the breeze.
mended
the white
nearest
but don't
toatough,
off . Outdoors,
in the
After
the
to the
print
mount,
Don't
touch
coat
them to
for how
to
2t0
the camera,
Develop
film instruction
recommended
print
off
the brown
yellow
touch
glossy
which
prevent
coat
tab. A
the
face
finish. When
is supplied
the
face of black
fading and
prints).
i'ry.
s,
Begin
timing development.
don't
let
picture
the
sheet.
development
paper
color
for a
few minutes. lt will haru..n
with the
icture
tr,,
?l:,"
for
f ull time
time, q
starting
print
will look nean)i
it is
dry, mount
film. -
and
other damage
Check
prints.
white
the temperature!
assembly
frorr. ri
it on a
(see page
f lap
recom-
strip
.r:kly
e
end
,ry,
cot
You must
27
rr
lt's
Avoid
print
about this
with
film
Don't
in
you
or
move
important.
contact with
is removed.
moist
the
box. Don't
yellow
lf no
pull
this situation.
pull
Never
do
so accidentally,
you'll
spread developer
yellow
the
4
print.
white
your
in
side
be a litterbug!
pops
tab
another
a white
tabs as
page
See
Fold
chemicals left
(Be
sure to read
film
instructions.) Fold up
in.
out when
white
tab.
when
tab
don't
shown on
25.
put
Please
you pull
Page
you
pull
the
all over the
page
negative.
up
the
negative
on the
cAUTtoN
the
it in a wastebasket
the white
24 shows
can see a
yellow
tabs that appear
rollers. Instead,
24.
after
paragraph
the negative
tab, stop.
you
what
yellow
tab. lf
to
the
or
do
re-
23
Page 26

IF
Donated to www.orphancameras.com
NO YELLOW
APPEARS
TAB
WHEN YOU
PULL
THE
WHITE TAB, STOP !
Don't
camera
down
the film
pull
back
another
just
enough
pack
white
and
tab.
get
to
keep
Instead,
one
it
in
finger
place.
gently
under it
Do
I
I
pull
Gently
pack
the
door
is open check
24
the entire
and discard
picture
Don't try to save
it.
the rollers
that
assembly
it.
are clean
all the way out
While the back
(page
the
open
hold
to
this indoors
of
32).
or
in the shade.
at
left)
slowly open the
topmost
white tab sticks
that both sides
yellow
the back of the camera,
Close
While holding
PULL
tab,
out
of the small
of the back latch
the
back allthe way and take
as
shown.
pack
down lightly
making sure that the
next
slot
sec u rely.
to No. 4. Check
(picture
hold of the
next
2'2
Page 27

Donated to www.orphancameras.com
 Loading...