

Page 1

345AF
35mm Auto Focus Camera
Instruction Manual
345AF (515055-00)_ENU.indd 1345AF (515055-00)_ENU.indd 1 11/1/04 10:51:36 AM11/1/04 10:51:36 AM
Page 2

345AF (515055-00)_ENU.indd 2345AF (515055-00)_ENU.indd 2 11/1/04 10:51:37 AM11/1/04 10:51:37 AM
Page 3

Camera Overview
En
1
12
2
2
345 6
2
13
15
16 17 18
14
7
8
910 11
345AF (515055-00)_ENU.indd 1345AF (515055-00)_ENU.indd 1 11/1/04 10:51:37 AM11/1/04 10:51:37 AM
21 20
- 1 -
19
Page 4

En
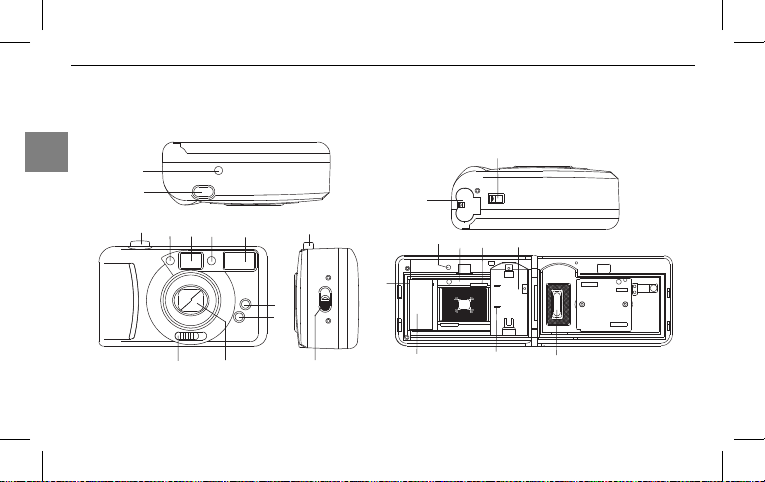
1. Film Counter Window
2. Shutter-Release Button
3. Flash Sensor
4. Viewfi nder
5. Red-Eye Reduction LED
6. Flash
7. Flash-off Button
8. Fill-in Flash Button
9. Lens Cover Switch
10. Lens
11. Film Door Latch
345AF (515055-00)_ENU.indd 2345AF (515055-00)_ENU.indd 2 11/1/04 10:51:38 AM11/1/04 10:51:38 AM
12. Rewind Switch
13. Battery Compartment Door
14. Film Take-up Spool Teeth
15. Flash Ready LED
16. Film Guide Rail
17. Sprocket Gear
18. Film Chamber
19. DX Window
20. DX Film Speed Contact
21. Film Take-up Spool
- 2 -
Page 5
Thank you for buying this 35mm camera. Before using, please read the manual carefully to ensure
correct use.
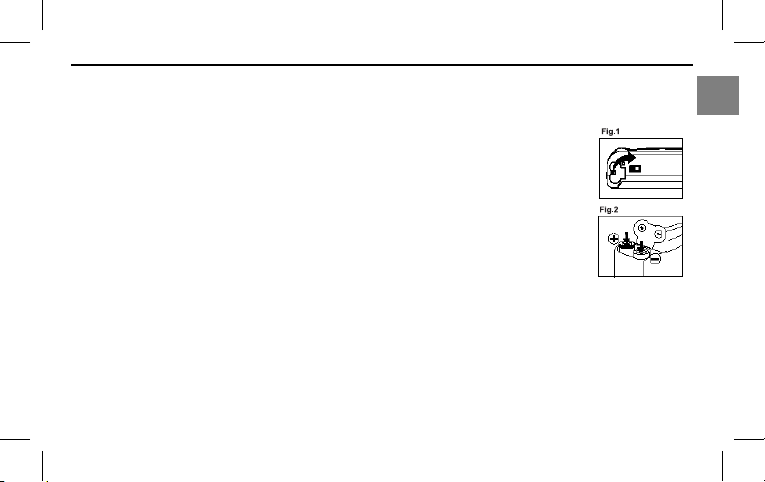
Loading the Batteries
Use two fresh AAA Alkaline batteries to power up the camera.
1. Open the Battery Compartment Door by sliding the latch on the Battery
Compartment Door to the direction of the arrow. (Fig.1)
2. Gently lift up on the Battery Compartment Door.
3. Insert two AAA alkaline batteries into the Battery compartment, checking that the
(+) and (-) on the batteries are aligned according to the polarity indication shown
on the contact plate. (Fig.2)
4. Close the Battery Compartment Door by pushing it back until it latches.
Note:
• Do not use Ni-Cd batteries
• When replacing the batteries, always replace both batteries at the same time.
• Remove the batteries from the camera if it is not in use for an extended period of time to reduce
the possibility of battery leakage.
- 3 -
345AF (515055-00)_ENU.indd 3345AF (515055-00)_ENU.indd 3 11/1/04 10:51:38 AM11/1/04 10:51:38 AM
En
Page 6
Power Save Function
If the camera is not in use for over 60 seconds, the camera will turn off
En
automatically to save battery power. To re-activate the camera, press the
Shutter-Release Button lightly or close and then re-open the lens cover.
About the Film Speed
The camera is designed to use DX-coded ISO100, ISO200 or ISO400 fi lm. When
the fi lm is loaded, the camera automatically sets the correct fi lm speed by reading
the black-and-silver pattern on the fi lm cassettes.
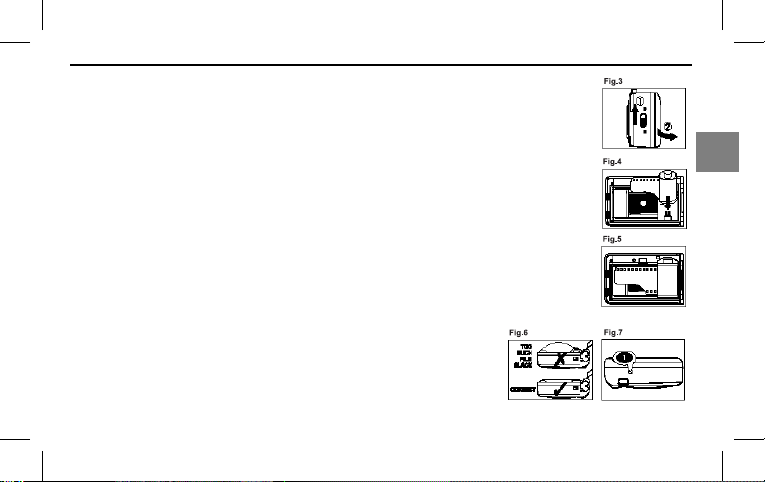
Loading The Film
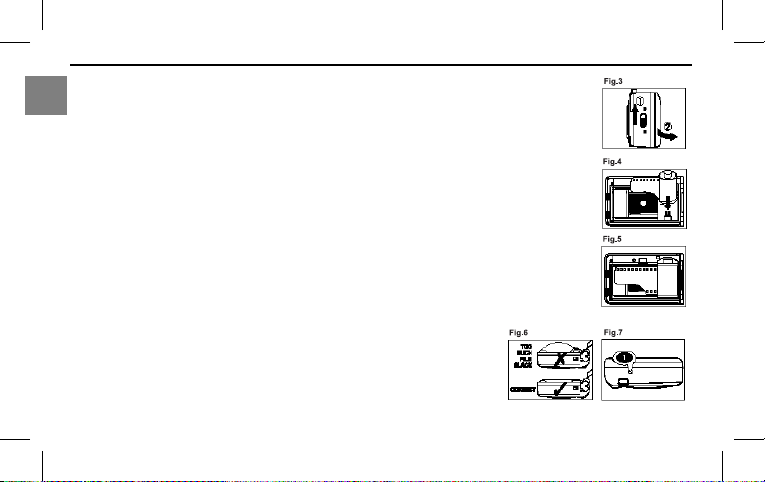
1. Open the fi lm compartment door by pressing upward on the Film Door Latch
and gently lift open the fi lm compartment door. (Fig. 3)
2. Insert the fi lm into the Film Chamber (Fig. 4), pull out the fi lm leader to reach
the Film Take-up Spool Teeth (Fig. 5).
3. Make sure the fi lm perforations engage the Sprocket Gear, and the fi lm lies
evenly between the guide rails (Fig. 5 & 6)
4. Close the door. The Film Counter Window will show “S”. Slide the
Lens Cover Switch to turn the camera on (Fig. 8) and press the
Shutter-Release Button until the Film Counter Window shows “1”.
(Fig. 7) Your camera is now ready to take your fi rst picture.
- 4 -
345AF (515055-00)_ENU.indd 4345AF (515055-00)_ENU.indd 4 11/1/04 10:51:38 AM11/1/04 10:51:38 AM
Page 7
Note:
If the Film Counter Window does not show “1”, the fi lm may not be loaded properly. Please open
the Film Compartment Door and repeat the fi lm loading procedures.
Taking Photographs
1. Slide the Lens Cover Switch to turn the camera ON. (Fig.8)
2. Hold the camera steady with both hands. Be careful not to block the Lens, Flash
and Flash Sensor with your fi ngers or hair. (Fig.9)
3. Look through the Viewfi nder and center the main subject in the Viewfi nder. To
ensure sharp pictures, make sure your subject is at least 4.92 ft. (1.5 m) away
from the camera. (Fig.10)
4. Press the Shutter-Release Button to take a picture. (Fig.11)
5. The camera will advance automatically to the next frame.
Note:
• Always make sure the Flash Ready LED is lit before you take your
next picture.
• When taking vertical pictures, always position the camera with the
fl ash at the top.
• Do not take pictures toward the sun directly.
- 5 -
345AF (515055-00)_ENU.indd 5345AF (515055-00)_ENU.indd 5 11/1/04 10:51:39 AM11/1/04 10:51:39 AM
En
Page 8
About the Flash
This camera is equipped with 3 fl ash modes.
En
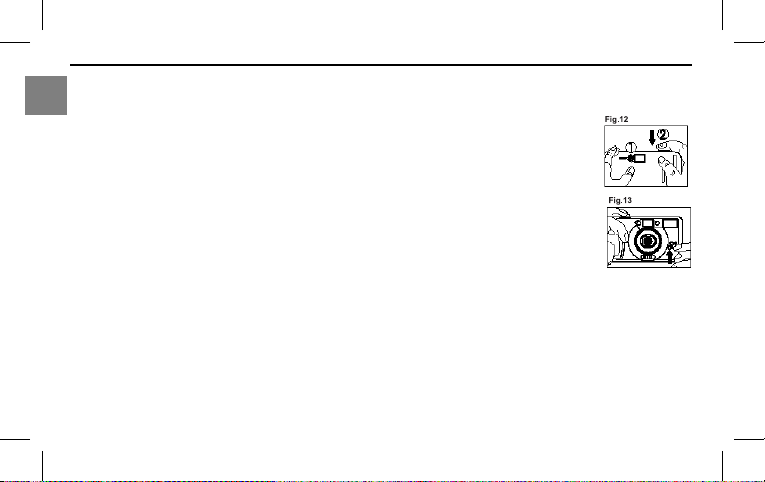
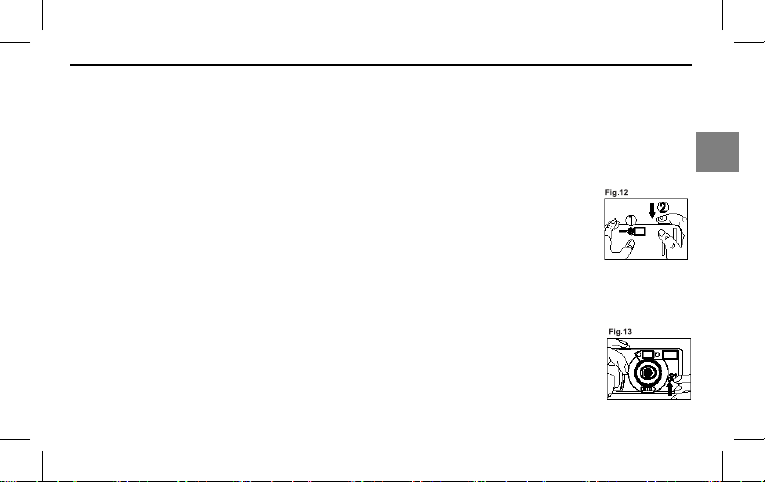
1. Auto Flash (default setting)
a. The camera determines when fl ash is needed and fi res the fl ash
automatically.
b. When the fl ash is recharged and full (the green Flash Ready LED will light
up), press the Shutter-Release Button to take a fl ash photograph. (Fig. 12)
2. Fill-in Flash
a. This camera also has a Fill-in fl ash function that helps obtain better pictures in
daylight shooting when your subject is in a shadow or has their back to
the light source. The fl ash will fi re regardless of the lighting conditions.
b. Press and hold the Fill-in Flash Button while, at the same time, pressing the
Shutter-Release Button to take a picture with Fill-in fl ash. (Fig. 13)
Note:
• Please wait for the green Flash Ready LED to light up before taking your next fl ash picture.
• The green Flash Ready LED will go into sleep mode after about 1 minute. The camera will
re-awaken when the Shutter-Release Button is pressed or by closing and re-opening the Lens
Cover.
- 6 -
345AF (515055-00)_ENU.indd 6345AF (515055-00)_ENU.indd 6 11/1/04 10:51:39 AM11/1/04 10:51:39 AM
Page 9

• Recommended fl ash shooting range:
ISO100: 4.92 – 9.84ft. (1.5 – 3m)
ISO200: 4.92 – 14.76ft. (1.5 – 4.5m)
ISO400: 4.92 – 19.68ft. (1.5 – 6m)
3. Flash-off
a. This camera also has a Flash-off Mode that helps to obtain a more natural
effect or when using the fl ash is forbidden (such as in a museum, exhibitions
or aquariums). The fl ash will be disabled in this mode.
b. Press and hold the Flash-off Button while, at the same time, pressing the
Shutter-Release Button to take a picture without fl ash. (Fig. 14)
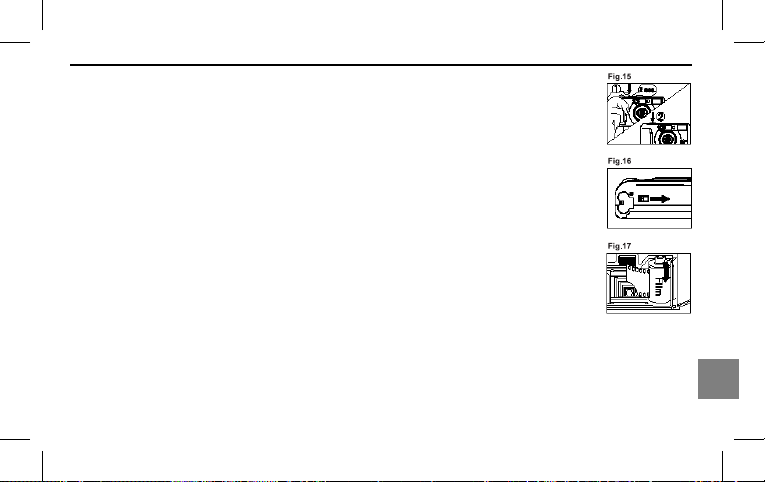
Using Red-Eye Reduction
This function makes it possible to minimize the red-eye effect that sometimes occurs
when taking portrait photographs with the fl ash.
1. Press the Shutter-Release Button halfway.
2. The Red Eye Reduction LED will light up.
3. Hold for at least two seconds.
4. Then press the Shutter-Release Button down completely to take your picture. (Fig.15)
- 7 -
345AF (515055-00)_ENU.indd 7345AF (515055-00)_ENU.indd 7 11/1/04 10:51:39 AM11/1/04 10:51:39 AM
En
Page 10
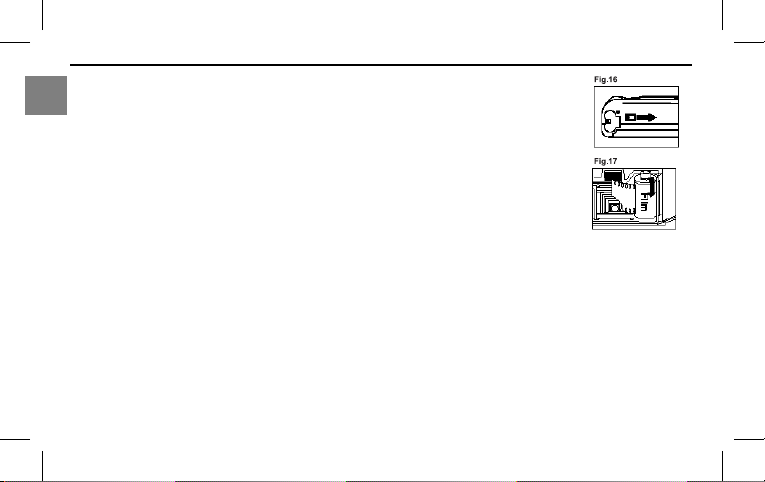
Rewinding the Film
When the end of the fi lm is reached, the fi lm will not advance when you press the
En
Shutter-Release Button.
1. Slide the fi lm Rewind Switch in the direction as indicated by the arrow. The
switch latches in this position and the fi lm is rewound automatically. (Fig. 16)
2. To rewind the fi lm in mid-roll, slide the fi lm Rewind Switch in the direction as
indicated by the arrow. (Fig. 16)
3. When rewinding is complete, the motor stops automatically. Open the Film
Compartment Door and remove the fi lm for processing. (Fig.17)
Do not open the Film Compartment Door if the fi lm is not completely
rewound, otherwise the fi lm may be ruined.
Precautions
- Store the camera in a cool, dry place;
- Do not expose the camera to heavy dust or water;
- Do not expose the camera to extreme high or low temperature and humidity (they may cause
serious damage to the camera);
- Do not attempt to disassemble the camera by yourself (to avoid risk of electronic shock);
- Avoid excessive force or impact caused by handling, bumping or dropping;
- Do not break up the batteries or throw them into fi re;
- 8 -
345AF (515055-00)_ENU.indd 8345AF (515055-00)_ENU.indd 8 11/1/04 10:51:40 AM11/1/04 10:51:40 AM
Page 11

- Keep batteries away from children;
- If necessary, clean the lens by gently wiping it with a clean, lint-free cloth. Do not use chemicals
or other cleaning agents. Remove the dust from the fi lm compartment by using an air blower.
SPECIFICATION
Type: 35mm Motorized Compact Camera
Lens: 30mm f/7 3 groups, 3 elements
Focusing: Auto Focus
Shutter: Mechanical Shutter
Shutter Speed: 8±3ms (5-11 ms)
Specifi cations are subject to change, for improvement, without prior notice.
- 9 -
345AF (515055-00)_ENU.indd 9345AF (515055-00)_ENU.indd 9 11/1/04 10:51:40 AM11/1/04 10:51:40 AM
En
Page 12
VUE D’ENSEMBLE DE L’APPAREIL PHOTO
Fr
1
2
2
345 6
13
2
15
12
16 17 18
14
7
8
910 11
345AF (515055-00)_FRA.indd 10345AF (515055-00)_FRA.indd 10 11/1/04 10:52:27 AM11/1/04 10:52:27 AM
21 20
- 10 -
19
Page 13

1. Compteur de la pellicule
2. Déclencheur.
3. Capteur du fl ash
4. Viseur
5. Voyant de la fonction anti-yeux
rouges
6. Flash
7. Bouton d’arrêt du fl ash
8. Bouton du fl ash forcé
9. Tirette du couvre-objectif
10. Objectif
345AF (515055-00)_FRA.indd 11345AF (515055-00)_FRA.indd 11 11/1/04 10:52:27 AM11/1/04 10:52:27 AM
11. Loquet du couvercle de la pellicule
12. Bouton de rembobinage
13. Couvercle du logement des piles
14. Cran de la bobine réceptrice
15. Voyant d’enclenchement du fl ash
16. Rail de guidage du fi lm
17. Dents d’entraînement
18. Logement de la pellicule
19. Fenêtre DX
20. Contact de sensibilité du fi lm DX
21. Bobine réceptrice
- 11 -
Fr
Page 14

Félicitations. Vous venez d’acquérir un appareil photo 35mm. Avant de l’utiliser, veuillez lire
attentivement ce manuel afi n d’assurer une utilisation adéquate.
Chargement des piles
Utilisez deux piles neuves alcalines AAA pour alimenter l’appareil photo.
Fr
1. Ouvrez le couvercle du logement des piles en faisant glisser le loquet
d’ouverture de celui-ci dans le sens de la fl èche. (Fig. 1)
2. Soulevez avec précaution le couvercle de logement des piles.
3. Insérez deux piles alcalines AAA dans le logement des piles en vérifi ant que les
bornes (+) et (-) des piles correspondent aux informations de polarité indiquées
sur la plaque de contact. (Fig. 2)
4. Refermez le couvercle du logement des piles en appuyant dessus jusqu’à ce
qu’il s’enclenche.
Remarque :
• N’utilisez pas de piles Ni-Cd.
• Lorsque vous changez les piles, remplacez toujours les deux piles en même temps.
• Retirez les piles de l’appareil si vous ne l’utilisez pas pendant un certain temps afi n d’éviter les
risques de fuite.
- 12 -
345AF (515055-00)_FRA.indd 12345AF (515055-00)_FRA.indd 12 11/1/04 10:52:27 AM11/1/04 10:52:27 AM
Page 15
Fonction Économie des piles
Si l’appareil photo n’est pas utilisé pendant plus de 60 secondes, il s’éteint
automatiquement afi n d’économiser les piles. Pour réactiver l’appareil photo,
appuyez sur le déclencheur puis retirez à nouveau le couvre-objectif.
À propos de la sensibilité de la pellicule
Cet appareil photo a été conçu pour utiliser des pellicules codées DX ISO100,
ISO200 ou ISO400. Quand la pellicule est insérée, l’appareil photo détecte
automatiquement la sensibilité du fi lm à l’aide du motif de couleur noir et argent qui
se trouve sur les pellicules.
Chargement de la pellicule
1. Ouvrez le couvercle du compartiment de la pellicule en faisant remonter le
loquet et soulevez doucement le couvercle. (Fig. 3)
2. Insérez la pellicule dans son logement (Fig.°4) et faites glisser l’amorce du fi lm
jusqu’au cran de la bobine réceptrice du fi lm (Fig.°5).
3. Vérifi ez que les perforations du fi lm sont bien engagées dans les
dents d’entraînement du fi lm et que le fi lm est bien en place sur
les rails guide-fi lm (Fig.°5 et 6).
4. Fermez le couvercle du compartiment. Le compteur de la
pellicule affi che « S ». Faites glisser la tirette du couvre-objectif
- 13 -
345AF (515055-00)_FRA.indd 13345AF (515055-00)_FRA.indd 13 11/1/04 10:52:27 AM11/1/04 10:52:27 AM
Fr
Page 16

et mettez l’appareil photo en marche (Fig.°8) puis appuyez sur le déclencheur jusqu’à ce que le
compteur de la pellicule affi che « 1 ». (Fig.°7)Vous pouvez maintenant prendre votre première
photo.
Remarque :
Si le compteur de la pellicule n’affi che pas « 1 », la pellicule n’est probablement pas
Fr
insérée correctement. Veuillez alors ouvrir le couvercle du logement de la pellicule et
effectuer de nouveau les procédures de chargement de la pellicule.
Prise de vues
1. Faites glisser la tirette du couvre-objectif afi n de mettre l’appareil photo en
marche. (Fig. 8)
2. Stabilisez l’appareil en le maintenant avec vos deux mains. Prenez garde de
ne pas bloquer l’objectif, le fl ash ou le capteur du fl ash avec vos doigts ou vos
cheveux. (Fig. 9)
3. Regardez dans le viseur et utilisez-le pour centrer le sujet
principal. Pour que votre prise de vue soit nette, veillez à vous
placer à une distance d’au moins 1,5 m. (Fig. 10)
4. Pour prendre la photo, appuyez sur le déclencheur. (Fig. 11)
5. La pellicule avance automatiquement jusqu’à l’image suivante.
- 14 -
345AF (515055-00)_FRA.indd 14345AF (515055-00)_FRA.indd 14 11/1/04 10:52:28 AM11/1/04 10:52:28 AM
Page 17
Remarque :
• Vérifi ez toujours que le voyant d’enclenchement du fl ash est allumé avant de prendre votre
photo.
• Lors de la prise de photos verticales, placez toujours l’appareil de manière à ce que le fl ash se
trouve en haut.
• Ne prenez jamais de photos en direction du soleil.
À propos du fl ash
Cet appareil photo est équipé de 3 modes de fl ash.
1. Flash automatique (défi ni par défaut)
a. L’appareil photo détermine si le fl ash est nécessaire et le déclenche
automatiquement.
b. Lorsque le fl ash est totalement chargé (le voyant vert d’enclenchement du fl ash s’allume),
appuyez sur le déclencheur pour prendre une photo avec fl ash. (Fig. 12)
2. Flash forcé
a. Cet appareil photo possède également une fonction Flash forcé qui permet
d’obtenir de meilleures prises de vue de jour si le sujet est à l’ombre ou si la
source de lumière est dans son dos.
b. Pour prendre une photo avec le fl ash forcé, appuyez et maintenez le bouton
du fl ash forcé et appuyez en même temps sur le déclencheur. (Fig. 13)
- 15 -
345AF (515055-00)_FRA.indd 15345AF (515055-00)_FRA.indd 15 11/1/04 10:52:28 AM11/1/04 10:52:28 AM
Fr
Page 18

Remarque :
• Veuillez attendre que le voyant vert d’enclenchement du fl ash soit allumé avant de prendre une
nouvelle photo avec fl ash.
• Le voyant vert d’enclenchement du fl ash se remet en mode veille au bout d’1 minute environ.
Vous pouvez réactiver l’appareil en appuyant sur le déclencheur ou en ouvrant à nouveau le
couvre-objectif.
Fr
• Portée du fl ash recommandée :
100 ASA°: 4,92 -199,95cm. (1,5 – 3m)
200 ASA°: 4,92 - 37,49cm. (1,5 – 4,5m)
400 ASA°: 4,92 – 49,98cm. (1,5 – 6m)
3. Flash désactivé
a. Cet appareil photo possède également une option Mode fl ash désactivé
qui permet d’obtenir un effet plus naturel ou si l’utilisation du
fl ash est interdite (par exemple dans un musée, une exposition ou un
aquarium). Le fl ash est désactivé dans ce mode.
b. Pour prendre une photo sans le fl ash, appuyez et maintenez le bouton du
fl ash désactivé et appuyez en même temps sur le déclencheur. (Fig. 14)
Utilisation de la fonction anti-yeux rouges
Cette fonction permet de réduire l’effet yeux rouges qui intervient parfois lorsque vous faites des
portraits avec fl ash.
- 16 -
345AF (515055-00)_FRA.indd 16345AF (515055-00)_FRA.indd 16 11/1/04 10:52:28 AM11/1/04 10:52:28 AM
Page 19

1. Appuyez à moitié sur le déclencheur.
2. Le voyant de la fonction anti-yeux rouges s’allume.
3. Maintenez le bouton dans cette position pendant au moins deux secondes.
4. Appuyez ensuite complètement sur le déclencheur pour prendre votre photo.
(Fig. 15)
Rembobinage de la pellicule
Lorsque vous atteignez la fi n de la pellicule, celle-ci n’avance pas lorsque vous
appuyez sur le déclencheur.
1. Faites glisser le bouton de rembobinage de la pellicule dans le sens indiqué par
la fl èche. Le bouton s’enclenche dans cette position et la pellicule se rembobine
automatiquement. (Fig. 16)
2. Pour rembobiner une pellicule non terminée, faites glisser le bouton de
rembobinage de la pellicule dans le sens indiqué par la fl èche. (Fig. 16)
3. Lorsque la pellicule est entièrement rembobinée, le mécanisme s’arrête
automatiquement. Ouvrez le couvercle du logement de la pellicule et retirez la
pellicule à développer. (Fig. 17)
N’ouvrez pas le couvercle du logement de la pellicule tant que celle-ci n’est pas entièrement
rembobinée. Elle risquerait d’être détruite.
- 17 -
345AF (515055-00)_FRA.indd 17345AF (515055-00)_FRA.indd 17 11/1/04 10:52:28 AM11/1/04 10:52:28 AM
Fr
Page 20

Précautions d’emploi
- Conservez l’appareil photo dans un endroit frais et sec ;
- N’exposez pas l’appareil photo à un niveau de poussière élevé et protégez-le de l’eau ;
- N’exposez pas votre appareil photo à une humidité et à des températures très basses ou élevées
(cela risquerait de provoquer de graves dommages sur l’appareil) ;
- N’essayez pas de démonter l’appareil vous-même (pour éviter le risque d’électrocution) ;
Fr
- Évitez d’exercer une force ou un impact important sur l’appareil qui serait occasionné(e) par un
maniement inadapté, une secousse ou une chute ;
- Ne morcelez pas les piles, ne les jetez pas au feu ;
- Tenez les piles hors de portée des enfants ;
- Si nécessaire, nettoyez l’objectif en l’essuyant doucement avec un chiffon propre et non
pelucheux. N’utilisez pas de produits chimiques ou d’autres produits de nettoyage. Retirez la
poussière se trouvant dans le logement de la pellicule à l’aide d’un souffl et.
CARACTÉRISTIQUES
Type : Appareil photo compact motorisé 35mm
Objectif: 30mm f/7 3 groupes, 3 éléments
Mise au point°: Mise au point automatique
Obturateur°: Déclencheur mécanique
Vitesse d’obturation°: 8±3ms (5-11 ms)
Les caractéristiques sont susceptibles d’être modifi ées sans préavis, en vue de leur amélioration.
- 18 -
345AF (515055-00)_FRA.indd 18345AF (515055-00)_FRA.indd 18 11/1/04 10:52:29 AM11/1/04 10:52:29 AM
Page 21

VISTA GENERAL DE LA CAMARA
1
12
Es
2
2
345 6
2
13
15
16 17 18
14
7
8
910 11
345AF (515055-00)_ESP.indd 19345AF (515055-00)_ESP.indd 19 11/1/04 10:52:58 AM11/1/04 10:52:58 AM
21 20
- 19 -
19
Page 22

1. Ventana del contador de película
2. Botón de liberación del obturador
3. Sensor del fl ash
4. Visor
5. LED para reducción de ojos rojos
6. Flash
7. Botón del modo Sin fl ash
8. Botón del Flash de relleno
9. Interruptor de la tapa de la lente
10. Lente
11. Traba de la puerta de la película
345AF (515055-00)_ESP.indd 20345AF (515055-00)_ESP.indd 20 11/1/04 10:52:59 AM11/1/04 10:52:59 AM
12. Interruptor de rebobinado
13. Puerta del compartimento de las pilas
14. Diente de la bobina de enganche de
la película
15. LED de fl ash listo
16. Guía de la película
17. Engranaje dentado
18. Cámara de la película
19. Ventana DX
20. Contacto de velocidad de película DX
21. Bobina de enganche de la película
- 20 -
Es
Page 23

Gracias por comprar esta cámara de 35mm. Antes de utilizarla, lea este manual con atención para
asegurar el uso correcto.
Cómo colocar las pilas
Utilice dos pilas alcalinas AAA nuevas para hacer funcionar la cámara.
1. Abra la puerta del compartimento de las pilas deslizando la traba de la puerta
del compartimento en la dirección indicada por la fl echa. (Fig.1)
2. Levante suavemente la puerta del compartimento de las pilas.
Es
3. Inserte dos pilas alcalinas AAA en el compartimento de las pilas, controlando
la alineación del (+) y del (-) de las pilas de acuerdo con las indicaciones de
polaridades que aparecen en la placa de contacto. (Fig.2)
4. Cierre la puerta del compartimento de las pilas deslizándola hasta que se trabe.
Nota:
• No use pilas de níquel-cadmio
• Al cambiar las pilas, cambie siempre las dos pilas al mismo tiempo.
• Retire las pilas de la cámara si no pretende utilizarla durante un período prolongado para
reducir la posibilidad de derrame de líquido corrosivo.
- 21 -
345AF (515055-00)_ESP.indd 21345AF (515055-00)_ESP.indd 21 11/1/04 10:52:59 AM11/1/04 10:52:59 AM
Page 24

Función para ahorrar carga
Si la cámara no se usa por más de 60 segundos, se apagará automáticamente
para ahorrar la carga de las pilas. Para reactivar la cámara, presione levemente el
botón de liberación del obturador o cierre y abra nuevamente la tapa del lente.
Sobre la velocidad de la película
La cámara está diseñada para usar películas ISO 100, ISO 200 o ISO 400
codifi cadas para DX. Cuando la película esté colocada, la cámara confi gurará
automáticamente la velocidad correcta de película al leer el diseño negro y
plateado del cassette de la película.
Cómo colocar la película
1. Abra la puerta del compartimento de la película presionando hacia arriba
la traba de la puerta de la película y levante la puerta del compartimento
suavemente. (Fig. 3)
2. Inserte la película dentro de la cámara (Fig. 4), tire de la guía de la película
hasta alcanzar el diente de la bobina de enganche de la película
(Fig. 5).
3. Asegúrese de que las perforaciones de la película se encastren
en el engranaje dentado y que la película esté colocada en forma
uniforme entre las guías. (Fig. 5 & 6)
- 22 -
345AF (515055-00)_ESP.indd 22345AF (515055-00)_ESP.indd 22 11/1/04 10:52:59 AM11/1/04 10:52:59 AM
Es
Page 25

4. Cierre la puerta. La ventana del contador de película mostrará la letra “S”. Abra la tapa del lente
para encender la cámara (Fig. 8) y presione el botón de liberación del obturador hasta que la
ventana del contador de película indique “1”. (Fig. 7) Su cámara está ahora lista para tomar la
primera fotografía.
Nota:
Si la ventana del contador de película no muestra “1”, es posible que la película no
se haya colocado correctamente. Vuelva a abrir la puerta del compartimento y repita
los procedimientos para colocar la película.
Es
Cómo tomar fotografías
1. Abra el interruptor de la tapa de la lente para encender la cámara. (Fig.8)
2. Sostenga la cámara fi rmemente y con ambas manos. Tenga cuidado de no tapar
la lente, el fl ash ni el sensor del fl ash con sus dedos o el cabello. (Fig.9)
3. Mire a través del visor y centre el objeto principal. Para garantizar
fotografías bien nítidas, asegúrese de que su objeto esté a una
distancia mínima de 1,5m de la cámara. (Fig.10)
4. Presione el botón de liberación del obturador para tomar una
fotografía. (Fig.11)
5. La cámara avanzará automáticamente hacia el siguiente cuadro.
- 23 -
345AF (515055-00)_ESP.indd 23345AF (515055-00)_ESP.indd 23 11/1/04 10:52:59 AM11/1/04 10:52:59 AM
Page 26

Nota:
• Siempre asegúrese de que el LED de fl ash listo esté encendido antes de tomar la siguiente
fotografía.
• Cuando tome fotografías verticales, coloque siempre la cámara con el fl ash en la parte superior.
• No tome fotografías en dirección al sol.
Sobre el fl ash
Esta cámara está equipada con tres modos de fl ash.
1. Flash automático (confi guración predeterminada)
a. La cámara determina cuándo es necesario el fl ash y lo dispara
automáticamente.
b. Cuando se recarga el fl ash y se completa la operación (al encenderse el LED
de fl ash listo de color verde), presione el botón de liberación del obturador
para sacar una foto con fl ash. (Fig. 12)
2. Flash de relleno
a. Esta cámara también tiene una función de fl ash de relleno que ayuda a
obtener fotografías mejores con luz diurna cuando el objeto está a la sombra
o de espaldas a la fuente de luz.
b. Presione y mantenga presionado el botón de fl ash de relleno mientras que,
al mismo tiempo, presione el botón de liberación del obturador para sacar una
- 24 -
345AF (515055-00)_ESP.indd 24345AF (515055-00)_ESP.indd 24 11/1/04 10:52:59 AM11/1/04 10:52:59 AM
Es
Page 27

fotografía con el fl ash de relleno. (Fig. 13)
Nota:
• Espere a que el LED de fl ash listo de color verde se encienda antes de tomar la siguiente
fotografía con fl ash.
• La LED de fl ash listo de color verde pasará al modo de descanso después de 1 minuto. La
cámara se volverá a activar cuando se oprima el botón de liberación del obturador o al cerrar y
abrir nuevamente la tapa del lente.
• Alcance recomendado del fl ash:
Es
ISO100: 4.92 – 9.84ft. (1,5 -3m)
ISO200: 4.92 – 14.76ft. (1,5 –4,5m)
ISO400: 4.92 – 19.68ft. (1,5 -6m)
3. Sin fl ash
a. Esta cámara también cuenta con un modo Sin fl ash que permite obtener un
efecto más natural o que se puede utilizar cuando el uso del fl ash está
prohibido (por ejemplo, en museos, exposiciones o acuarios). En este modo,
el fl ash se desactiva.
b. Presione y mantenga presionado el botón del modo Sin fl ash mientras que, al
mismo tiempo, presione el botón de liberación del obturador para sacar una
fotografía sin fl ash. (Fig. 14)
- 25 -
345AF (515055-00)_ESP.indd 25345AF (515055-00)_ESP.indd 25 11/1/04 10:53:00 AM11/1/04 10:53:00 AM
Page 28

Cómo usar la función de reducción de ojos rojos
Esta función permite minimizar el efecto de ojos rojos que se produce algunas veces
cuando se toman fotorretratos con fl ash.
1. Presione el botón de liberación del obturador hasta la mitad.
2. Se encenderá el LED de reducción de ojos rojos.
3. Sostenga durante algunos segundos.
4. Luego presione el botón de liberación del obturador completamente para tomar la
fotografía. (Fig.15)
Cómo rebobinar la película
Cuando alcance el fi nal de la película, ésta no avanzará cuando presione el botón
del obturador.
1. Deslice el interruptor de rebobinado en la dirección que indica la fl echa. El
interruptor se traba en esta posición y la película se rebobina automáticamente.
(Fig. 16)
2. Para rebobinar la película en mitad del rollo, deslice el interruptor de rebobinado
de la película en la dirección que indica la fl echa. (Fig. 16)
3. Cuando fi nalice el rebobinado, el motor se detendrá automáticamente. Abra la
puerta del compartimento de la película y extraiga la película para procesarla. (Fig.17)
No abra el compartimento de la película si no está completamente rebobinada, de lo
contrario, la película podría estropearse.
- 26 -
345AF (515055-00)_ESP.indd 26345AF (515055-00)_ESP.indd 26 11/1/04 10:53:00 AM11/1/04 10:53:00 AM
Es
Page 29

Precauciones
- Guarde la cámara en un lugar fresco y seco.
- No exponga la cámara al polvo ni al agua;
- No exponga la cámara a temperaturas extremadamente altas o bajas ni a la humedad (esto
podría provocar serios daños a la cámara).
- No intente desarmar la cámara (para evitar riesgos de descarga electrónica).
- Evite ejercer una fuerza excesiva o golpear la cámara debido al manipuleo, golpes o por dejarla
caer.
- No debe abrir las pilas ni arrojarlas al fuego.
- Mantenga las pilas lejos del alcance de los niños.
Es
- Si es necesario, limpie la lente suavemente con una paño limpio sin pelusas. No utilice productos
químicos ni otros agentes de limpieza. Quite el polvo del compartimento de la película utilizando
un soplador.
ESPECIFICACIONES
Tipo: Cámara compacta motorizada de 35mm
Lente de: 30mm f/7 3 grupos, 3 elementos
Enfoque: Enfoque automático
Obturador: Obturador mecánico
Velocidad del obturador: 8±3ms (5-11 ms)
as especifi caciones están sujetas a cambios sin previo aviso con fi nes de mejora.
- 27 -
345AF (515055-00)_ESP.indd 27345AF (515055-00)_ESP.indd 27 11/1/04 10:53:00 AM11/1/04 10:53:00 AM
Page 30

KAMERABESCHREIBUNG
1
12
2
2
345 6
2
De
7
8
910 11
345AF (515055-00)_DEU.indd 28345AF (515055-00)_DEU.indd 28 11/1/04 10:58:51 AM11/1/04 10:58:51 AM
14
- 28 -
13
15
16 17 18
21 20
19
Page 31

1. Bildzähler
2. Auslöser
3. Blitzsensor
4. Sucher
5. Rote-Augen-Verringerungs-LED
6. Blitz
7. Blitz-Aus-Taste
8. Aufhellblitz-Taste
9. Betätigungsschalter der
Objektivabdeckung
10. Objektiv
345AF (515055-00)_DEU.indd 29345AF (515055-00)_DEU.indd 29 11/1/04 10:58:51 AM11/1/04 10:58:51 AM
11. Filmdeckelverschluss
12. Rückspulschalter
13. Batteriedeckel
14. Aufwickelspulenzahnung
15. Blitzbereitschafts-LED
16. Filmführungsschiene
17. Filmtransportzahnrad
18. Filmfach
19. Filmkontrollfenster
20. Filmempfi ndlichkeitssensor
21. Aufwickelspule
- 29 -
De
Page 32

Vielen Dank, dass Sie sich zum Kauf dieser 35-mm-Kamera entschieden haben. Bitte lesen Sie
diese Anleitung sorgfältig durch, bevor Sie die Kamera benutzen.
Einlegen der Batterien
Bitte verwenden Sie für die Stromversorgung der Kamera zwei ungebrauchte
Alkaline-Batterien der Größe AAA.
1. Schieben Sie den Batteriedeckelverschluss in Pfeilrichtung und öffnen Sie den
Deckel des Batteriefachs. (Abb.1)
2. Heben Sie den Batteriedeckel behutsam an.
3. Legen Sie die beiden AAA-Alkaline-Batterien ins Batteriefach und achten
Sie dabei darauf, dass die Lage von (+) und (-) der Batterien mit der
Polaritätsangabe auf dem Kontaktblech übereinstimmt. (Abb.2)
De
4. Schließen Sie den Batteriedeckel, indem Sie ihn bis zum Einrasten
zurückdrücken.
Hinweis:
• Verwenden Sie keine Ni-Cd-Batterien.
• Bitte wechseln Sie die beiden Batterien stets gemeinsam.
• Sollten Sie die Kamera über einen längeren Zeitraum nicht benutzen, entnehmen Sie die
Batterien, um mögliche Schäden durch Auslaufen zu vermeiden.
- 30 -
345AF (515055-00)_DEU.indd 30345AF (515055-00)_DEU.indd 30 11/1/04 10:58:51 AM11/1/04 10:58:51 AM
Page 33

Energiesparfunktion
Wenn die Kamera über 60 Sekunden lang nicht benutzt wird, schaltet sie sich
automatisch ab, um die Batterien zu schonen. Zum Wiedereinschalten der Kamera
drücken Sie leicht den Auslöser oder schließen Sie die Objektivabdeckung und
öffnen Sie sie anschließend wieder.
Filmgeschwindigkeit
Die Kamera ist für DX-codierte Filme mit den Empfi ndlichkeiten ISO100, ISO200
oder ISO400 geeignet. Sobald der Film eingelegt ist, liest die Kamera den
silberschwarzen Code auf der Filmpatrone und stellt automatisch die richtige
Empfi ndlichkeit ein.
Einlegen des Films
1. Schieben Sie den Filmdeckelverschluss nach oben und öffnen Sie behutsam
den Deckel des Filmfachs. (Abb. 3)
2. Legen Sie den Film ins Filmfach (Abb. 4) und ziehen Sie die Filmzunge bis zur
Zahnung der Filmaufwickelspule (Abb. 5).
3. Achten Sie darauf, dass die Filmperforation richtig im
Transportzahnrad einrastet und der Film gleichmäßig zwischen
den Führungsschienen zu liegen kommt (Abb. 5 und 6).
4. Schließen Sie den Deckel. Der Bildzähler zeigt “S” an. Betätigen
- 31 -
345AF (515055-00)_DEU.indd 31345AF (515055-00)_DEU.indd 31 11/1/04 10:58:52 AM11/1/04 10:58:52 AM
De
Page 34

Sie den Schalter der Objektivabdeckung, um die Kamera einzuschalten (Abb. 8) und drücken Sie
den Auslöser so oft, bis der Bildzähler “1” anzeigt. (Abb. 7) Die Kamera ist nun bereit für die erste
Aufnahme.
Hinweis:
Wenn der Bildzähler nicht die Zahl “1” anzeigt, ist der Film möglicherweise
nicht richtig eingelegt. Bitte öffnen Sie den Filmdeckel und wiederholen Sie den
Einlegevorgang.
Fotografi eren
1. Betätigen Sie den Schalter für die Objektivabdeckung, um die Kamera
einzuschalten. (Abb.8)
2. Halten Sie die Kamera mit beiden Händen ohne zu wackeln. Achten Sie darauf,
De
das Objektiv, die Blitzlampe oder den Blitzsensor nicht mit Fingern oder Haaren
zu verdecken. (Abb.9)
3. Schauen Sie durch den Sucher und zentrieren Sie Ihr Motiv im
Sucher. Um scharfe Aufnahmen zu gewährleisten, vergewissern
Sie sich, dass der Abstand zwischen Kamera und Motiv
mindestens 1,5 m beträgt. (Abb.10)
4. Drücken Sie den Auslöser, um das Bild aufzunehmen. (Abb.11)
5. Der Film wird automatisch zum nächsten Bild weitertransportiert.
- 32 -
345AF (515055-00)_DEU.indd 32345AF (515055-00)_DEU.indd 32 11/1/04 10:58:52 AM11/1/04 10:58:52 AM
Page 35

Hinweis:
• Achten Sie vor der nächsten Aufnahme darauf, dass die Blitzbereitschafts-LED leuchtet.
• Achten Sie bei Aufnahmen im Hochformat stets darauf, dass sich der Blitz oben befi ndet.
• Bitte machen Sie keine Bilder direkt gegen die Sonne.
Blitzaufnahmen
Die Kamera verfügt über drei verschiedene Blitzmodi.
1. Automatischer Blitz (Standardeinstellung)
a. Die Kamera ermittelt, ob der Blitz erforderlich ist und löst diesen automatisch
aus.
b. Wenn der Blitz geladen und bereit ist (grüne Blitzbereitschafts-LED leuchtet),
drücken Sie den Auslöser, um die Blitzaufnahme zu machen. (Abb. 12)
2. Aufhellblitz
a. Die Kamera verfügt außerdem über eine Aufhellblitzfunktion zur Verbesserung
der Bildqualität, wenn sich Ihr Motiv bei Tageslicht im Schatten oder mit der
Rückseite zur Lichtquelle befi ndet.
b. Um eine Aufnahme mit Aufhellblitz zu machen, drücken Sie die Aufhellblitz-
Taste und halten Sie sie bis zum Drücken des Auslösers gedrückt. (Abb. 13)
Hinweis:
• Bevor Sie die nächste Blitzaufnahme machen, warten Sie bitte, bis die grüne
- 33 -
345AF (515055-00)_DEU.indd 33345AF (515055-00)_DEU.indd 33 11/1/04 10:58:52 AM11/1/04 10:58:52 AM
De
Page 36

Blitzbereitschafts-LED wieder aufl euchtet.
• Die grüne Blitzbereitschaftsanzeige geht nach ca. 1 Minute in den Schlafmodus. Durch Drücken
des Auslösers oder Schließen und Öffnen der Objektivabdeckung wird die Kamera wieder
betriebsbereit.
• Empfohlene Entfernung bei Blitzaufnahmen:
ISO100: 1,5 – 3m
ISO200: 1,5 – 4,5 m
ISO400: 1,5 – 6 m
3. Blitz Aus
a. Um Bilder an Orten zu schießen, an denen Blitzaufnahmen untersagt sind
(z.B. Museen, Ausstellungen oder Aquarien) oder um natürlichere Bilder zu
erzielen, kann der Blitz ausgeschaltet werden. Der Blitz bleibt in diesem
Modus ausgeschaltet.
De
b. Um eine Aufnahme ohne Blitz zu machen, drücken Sie die Blitz-Aus-Taste und
halten Sie sie bis zum Drücken des Auslösers gedrückt. (Abb. 14)
Rote-Augen-Verringerung
Diese Funktion ermöglicht die Abschwächung des bei manchen Porträtaufnahmen mit Blitz
entstehenden Rote-Augen-Effekts.
1. Drücken Sie den Auslöser halb durch.
- 34 -
345AF (515055-00)_DEU.indd 34345AF (515055-00)_DEU.indd 34 11/1/04 10:58:52 AM11/1/04 10:58:52 AM
Page 37

2. Die Rote-Augen-Verringerungs-LED leuchtet auf.
3. Warten Sie mindestens 2 Sekunden.
4. Drücken Sie dann den Auslöser ganz durch, um das Bild aufzunehmen. (Abb.15)
Zurückspulen des Films
Wenn das Filmende erreicht ist, wird der Film beim Drücken des Auslösers nicht
mehr weitertransportiert.
1. Betätigen Sie den Filmrückspulschalter in Pfeilrichtung. Der Schalter rastet in
dieser Position ein und der Film wird automatisch zurückgespult. (Abb. 16)
2. Auch wenn der Film nur halb abgespult ist, kann er durch Betätigen des
Filmrückspulschalters in Pfeilrichtung zurückgespult werden. (Abb. 16)
3. Nach Beendigung des Rückspulens wird der Motor automatisch angehalten.
Öffnen Sie den Filmdeckel und entnehmen Sie den Film, um ihn entwickeln zu
lassen. (Abb.17)
Bitte öffnen Sie den Filmdeckel erst, wenn der Film vollständig zurückgespult ist, da sonst
die Aufnahmen verderben könnten.
Sicherheitshinweise
- Kamera an einem kühlen und trockenen Ort lagern.
- 35 -
345AF (515055-00)_DEU.indd 35345AF (515055-00)_DEU.indd 35 11/1/04 10:58:52 AM11/1/04 10:58:52 AM
De
Page 38

- Kamera von starker Staub- oder Wassereinwirkung fernhalten.
- Kamera vor extrem hohen oder tiefen Temperaturen sowie extremer Feuchtigkeit schützen
(Risiko schwerwiegender Geräteschäden).
- Versuchen Sie nicht, die Kamera selbst zu zerlegen (Risiko elektrischer Schläge).
- Vermeiden Sie übermäßige Gewalteinwirkung durch Handhabung, Stöße oder Fallenlassen.
- Batterien nicht öffnen oder ins Feuer werfen.
- Batterien von Kindern fern halten.
- Kameralinse gegebenenfalls mit einem sauberen, fusselfreien Tuch abwischen. Dabei keine
Chemikalien oder sonstige Reinigungsmittel verwenden. Staubablagerungen im Filmfach mit
Druckluft beseitigen.
TECHNISCHE DATEN
Typ: Kompakte 35-mm-Motorkamera
De
Objektiv: 30mm f/7 3 Gruppen, 3 Elemente
Schärfeeinstellung: Autofokus
Verschluss: mechanischer Verschluss
Verschlussgeschwindigkeit: 8±3ms (5-11 ms)
Die Technischen Daten können aufgrund der laufenden Verbesserungen unangekündigten
Änderungen unterliegen.
- 36 -
345AF (515055-00)_DEU.indd 36345AF (515055-00)_DEU.indd 36 11/1/04 10:58:53 AM11/1/04 10:58:53 AM
Page 39

PANORAMICA DELLA FOTOCAMERA
1
12
2
2
345 6
It
2
7
8
910 11
345AF (515055-00)_ITA.indd 37345AF (515055-00)_ITA.indd 37 11/1/04 10:59:06 AM11/1/04 10:59:06 AM
- 37 -
13
15
16 17 18
21 20
19
Page 40

1. Contafotogrammi
2. Pulsante di scatto
3. Sensore del fl ash
4. Mirino
5. Spia riduzione effeto occhi rossi
6. Flash
7. Pulsante disattivazione fl ash
8. Pulsante Flash in qualsiasi condizione
9. Interruttore dello sportello
dell’obbiettivo
10. Obiettivo
11. Fermo dello sportello pellicola
345AF (515055-00)_ITA.indd 38345AF (515055-00)_ITA.indd 38 11/1/04 10:59:06 AM11/1/04 10:59:06 AM
12. Pulsante riavvolgimento pellicola
13. Sportello scomparto batterie
14. Rocchetto dentato di presa della
pellicola
15. Spia di fl ash pronto
16. Guida pellicola
17. Meccanismo rocchetto
18. Scomparto pellicola
19. Finestra DX
20. Lettore velocità pellicola DX
21. Rocchetto di presa della pellicola
- 38 -
It
Page 41

Grazie per l’acquisto di questa fotocamera. Prima dell’uso, leggere attentamente il manuale per
assicurarsi di usarla correttamente.
Inserimento delle batterie
Per accendere la macchina fotografi ca, utilizzate due batterie AAA alcaline nuove.
1. Aprire lo sportello dello scomparto batterie, facendo scorrere il fermo sullo
sportello in direzione della freccia. (Fig.1)
2. Sollevare delicatamente lo sportello dello scomparto batterie
3. Inserire due batterie AAA alcaline nello scomparto batterie, controllando che la
polarità (+) e (-) delle batterie corrisponda alla polarità indicata sulla piastrina
dei contatti. (Fig.2)
4. Chiudere lo sportello della batteria, facendolo scorrere fi no allo scatto.
Nota:
It
• Non utilizzare batterie Ni-Cd.
• Quando sostituite le batterie, sostituire entrambe le batterie allo stesso momento.
• Quando la macchina fotografi ca non viene utilizzata per un lungo periodo di tempo, si consiglia
di rimuovere le batterie per evitare fuoriuscita di liquido dalle stesse.
- 39 -
345AF (515055-00)_ITA.indd 39345AF (515055-00)_ITA.indd 39 11/1/04 10:59:06 AM11/1/04 10:59:06 AM
Page 42

Funzione di risparmio energetico
Dopo 60 secondi d’inattività, la fotocamera si spegne automaticamente per
prolungare la durata delle batterie. Per riaccendere la fotocamera, premere
leggermente il pulsante di scatto oppure chiudere e riaprire lo sportello
dell’obiettivo.
Velocità della Pellicola
Questa fotocamera è progettata per usare pellicole con codifi ca DX ISO100,
ISO200 o ISO400. La fotocamera imposta automaticamente la velocità di pellicola
adeguata, in quanto la legge sul codice nero-argentato del rivestimento della
pellicola.
Inserimento della pellicola
1. Aprire lo scomparto pellicola premendo verso l’alto il fermo dello sportello dello
scomparto pellicola e sollevandolo quindi delicatamente. (Fig. 3)
2. Inserire la pellicola nello scomparto pellicola (Fig. 4), estrarre la coda della
pellicola fi no a raggiungere il rocchetto dentato (Fig. 5).
3. Verifi care che i fori della pellicola si innestino sui denti del
rocchetto dentato e che la pellicola sia tesa uniformemente tra le
guide laterali (Fig. 5 & 6).
4. Chiudere lo sportello. Sul contafotogrammi apparirà una “S”.
- 40 -
345AF (515055-00)_ITA.indd 40345AF (515055-00)_ITA.indd 40 11/1/04 10:59:07 AM11/1/04 10:59:07 AM
It
Page 43

Spostare l’interruttore dello sportello dell’obiettivo per accendere la fotocamera (Fig. 8) e premere
il pulsante di scatto fi no a quando sul contafotogrammi apparirà “1”. (Fig 7) La fotocamera è
pronta per scattare la prima foto.
Nota:
Se sul contafotogrammi non appare “1”, la pellicola potrebbe non essere collocata
correttamente. In questo caso aprire lo scomparto pellicola e ripetere il processo di
inserimento della pellicola.
Scattare le fotografi e
1. Far scorrere l’interruttore dello sportello dell’obbiettivo per accendere la
fotocamera. (Fig.8)
2. Tenere stabilmente la macchina fotografi ca con entrambe le mani. Fate
attenzione a non coprire l’obiettivo, il fl ash o il sensore del fl ash con le dita o con
i capelli. (Fig.9)
3. Guardare attraverso il mirino e centrare il soggetto nel mirino. Per
It
ottenere fotografi e nitide, accertarsi che il soggetto sia ad almeno
1,5 m dalla macchina fotografi ca. (Fig.10)
4. Premere il pulsante di scatto per scattare la foto. (Fig.11)
5. La macchina fotografi ca avanzerà automaticamente al fotogramma
successivo.
- 41 -
345AF (515055-00)_ITA.indd 41345AF (515055-00)_ITA.indd 41 11/1/04 10:59:07 AM11/1/04 10:59:07 AM
Page 44

Nota:
• Verifi care sempre che la spia di fl ash pronto sia accesa prima di scattare la foto successiva.
• Se scattate foto in verticale, collocate sempre la fotocamera con il fl ash in alto.
• Non scattare foto direttamente verso il sole.
Uso del fl ash
La fotocamera è dotata di tre modalità fl ash.
1. Auto Flash (predefi nito)
a. La fotocamera determina quando è necessario il fl ash e lo attiva
automaticamente.
b. Quando il fl ash si sarà ricaricato completamente (la spia verde di fl ash pronto
si accenderà), premete il pulsante di scatto per scattare la foto con fl ash. (Fig.12)
2. Flash in qualsiasi condizione
a. La fotocamera è dotata anche della modalità di fl ash in qualsiasi condizione,
grazie alla quale è possibile migliorare la qualità di foto scattate con luce
giorno e soggetto in ombra o con sorgente di luce alle spalle.
b. Per scattare fotografi e con fl ash in qualsiasi condizione, tenere premuto
il pulsante Flash in qualsiasi condizione e premere contemporaneamente il
pulsante di scatto. (Fig. 13)
- 42 -
345AF (515055-00)_ITA.indd 42345AF (515055-00)_ITA.indd 42 11/1/04 10:59:07 AM11/1/04 10:59:07 AM
It
Page 45

Nota:
• Prima di scattare la seguente fotografi a è necessario attendere che si accenda la spia verde di
fl ash pronto.
• La spia verde di fl ash pronto si spegnerà dopo circa 1 minuto. Premendo il pulsante di scatto o
chiudendo e riaprendo lo sportello dell’obiettivo, la fotocamera si riaccenderà.
• Distanza consigliata per l’attivazione del fl ash
ISO100: 1,5 – 3 m
ISO200: 1,5 – 4,5 m
ISO400: 1,5 – 6 m
3. Flash disattivato
a. La fotocamera è dotata anche della modalità Flash disattivato, da usare
quando si vuole ottenere un effetto più naturale o quando l’uso del fl ash
è proibito (come è il caso in musei, esposizioni o acquari). In questa modalità il
fl ash è disabilitato.
b. Per scattare fotografi e senza il fl ash, tenere premuto il pulsante Flash
disattivato e premere contemporaneamente il pulsante di scatto. (Fig. 14)
It
Utilizzo della funzione riduzione effetto occhi rossi
Questa funzione riduce l’effetto occhi rossi, che potrebbe verifi carsi in caso di ritratti scattati con il
fl ash.
- 43 -
345AF (515055-00)_ITA.indd 43345AF (515055-00)_ITA.indd 43 11/1/04 10:59:07 AM11/1/04 10:59:07 AM
Page 46

1. Premere il pulsante di scatto a metà.
2. La spia di riduzione effetto occhi rossi si accenderà.
3. Mantenetelo in questa posizione per circa due secondi.
4. Quindi premere il pulsante di scatto fi no in fondo per fare la foto. (Fig.15)
Riavvolgimento della pellicola
Una volta raggiunta la fi ne della pellicola, il pulsante di scatto non la farà più
avanzare.
1. Fare scorrere il pulsante di riavvolgimento della pellicola come indicato dalla
freccia. Il pulsante si fermerà in questa posizione e la pellicola verrà riavvolta
automaticamente. (Fig. 16)
2. Per il riavvolgimento a metà pellicola, fare scorrere il pulsante di riavvolgimento
come indicato dalla freccia. (Fig. 16)
3. Una volta terminata la procedura di riavvolgimento, il motore si arresterà
automaticamente. Aprire lo scomparto della pellicola ed estrarre la pellicola per
svilupparla. (Fig.17)
Non aprire lo scomparto della pellicola se la pellicola non è stata completamente riavvolta,
in caso contrario essa rischia di essere danneggiata.
- 44 -
345AF (515055-00)_ITA.indd 44345AF (515055-00)_ITA.indd 44 11/1/04 10:59:07 AM11/1/04 10:59:07 AM
It
Page 47

Precauzioni
- Riporre la macchina fotografi ca in un luogo fresco e asciutto;
- Non esporre la macchina fotografi ca in luoghi molto polverosi o umidi;
- Non esporre la macchina fotografi ca a temperature estremamente alte o basse, né a umidità
(potrebbe causare gravi danni alla machina fotografi ca);
- Non tentate di smontare la macchina fotografi ca da soli (per evitare rischio di scossa);
- Evitare sollecitazioni eccessive o colpi, dovuti a maneggio, urti o cadute;
- Non spezzare le batterie e non gettarle nel fuoco;
- Tenete le batterie lontano dalla portata dei bambini;
- Se necessario, pulite l’obiettivo spolverandolo delicatamente con un panno pulito e privo di
peli. Non utilizzate agenti chimici o abrasivi. Togliete la polvere dall’alloggiamento della pellicola
utilizzando un asciugacapelli.
SPECIFICHE
Tipo: Fotocamera compatta 35 mm, motorizzata
Obiettivo: 30 mm f/7 3 gruppi, 3 elementi
It
Messa a fuoco: Messa a fuoco automatica
Otturatore: Otturatore meccanico
Velocità Otturatore: 8±3 ms (5-11 ms)
Le specifi che sono soggette a modifi che per miglioramento, senza preavviso.
- 45 -
345AF (515055-00)_ITA.indd 45345AF (515055-00)_ITA.indd 45 11/1/04 10:59:08 AM11/1/04 10:59:08 AM
Page 48

OVERZICHT CAMERA
1
12
2
2
345 6
910 11
2
7
8
13
15
16 17 18
21 20
19
Ne
- 46 -
345AF (515055-00)_NLD.indd 46345AF (515055-00)_NLD.indd 46 11/1/04 10:59:19 AM11/1/04 10:59:19 AM
Page 49

1. Fototeller
2. Sluiterknop
3. Flitssensor
4. Zoeker
5. Lampje Rode-ogenreductie
6. Flitser
7. Flitser-Uit knop
8. Knop Invulfl itser
9. Knop voor de lensklepbediening
10. Lens
11. Sluitpal van het cameradeurtje
345AF (515055-00)_NLD.indd 47345AF (515055-00)_NLD.indd 47 11/1/04 10:59:19 AM11/1/04 10:59:19 AM
12. Terugspoelknop
13. Batterijklep
14. Tanden van fi lmoprolspoel
15. Lampje Flitser gereed
16. Filmgeleide
17. Vertanding van het spoelmechanisme
18. Filmcompartiment
19. DX-venster
20. DX lichtgevoeligheidscontact
21. Filmoprolspoel
- 47 -
Ne
Page 50

Vriendelijk dank voor de aanschaf van deze 35 mm camera. Lees deze handleiding vóór
ingebruikname aandachtig door om er zeker van te zijn dat u haar op de juiste wijze gebruikt.
De batterijen plaatsen
Gebruik twee nieuwe AAA alkaline batterijen om de camera van stroom te voorzien.
1. Maak het deksel van het batterijvak open door de sluitpal op het deksel in de
richting van de pijl te schuiven. (Afb.1)
2. Licht het deksel van het batterijvak voorzichtig op.
3. Plaats twee AAA alkaline batterijen in het batterijvakje en controleer of de (+)
en (-) op de batterijen overeenkomen met de aanduiding van de polen op het
contactplaatje. (Afb.2)
4. Doe het deksel van het batterijvak dicht en druk totdat het vast klikt.
Opmerking:
• Gebruik geen Ni-Cd batterijen.
• Als u de batterijen vervangt, altijd beide batterijen gelijktijdig te vervangen.
• Haal de batterijen uit de camera wanneer u haar voor langere tijd niet gebruikt om de kans dat
de batterijen gaan lekken zo klein mogelijk te maken.
Ne
- 48 -
345AF (515055-00)_NLD.indd 48345AF (515055-00)_NLD.indd 48 11/1/04 10:59:19 AM11/1/04 10:59:19 AM
Page 51

Energiezuinige functie
Als de camera gedurende 60 seconden niet gebruikt wordt, schakelt deze
automatisch uit om de batterijen te sparen. Druk om de camera weer in te
schakelen zachtjes op de sluiterknop of sluit en open de lensklep.
Lichtgevoeligheid
De camera is ontworpen voor gebruik met ISO100, ISO200 of ISO400 fi lms met
DX-codering. Wanneer de fi lm geladen wordt, stelt de camera automatisch de juiste
lichtgevoeligheid in door het patroon van de zwarte en zilverkleurige blokjes op de
fi lmcassette af te lezen.
Het fi lmrolletje inleggen
1. Maak het cameradeurtje open door de sluitpal omhoog te drukken en vervolgens
het deurtje voorzichtig open te klappen. (Afb. 3)
2. Leg het fi lmrolletje in het fi lmcompartiment (Afb. 4) en trek vervolgens het begin
van het fi lmrolletje naar de fi lmoprolspoel (Afb. 5).
3. Let erop dat de perforaties in de fi lm in de tanden van het
spoelmechanisme vallen en dat de fi lm vlak tussen geleiders ligt
(Afb. 5 & 6).
4. Sluit het deurtje. Op de fototeller wordt een “S” aangeduid.
Verschuif de bedieningsknop van de lensklep om de camera aan
- 49 -
345AF (515055-00)_NLD.indd 49345AF (515055-00)_NLD.indd 49 11/1/04 10:59:19 AM11/1/04 10:59:19 AM
Ne
Page 52

te zetten (Afb. 8) en druk op de sluiterknop tot de teller “1” aanduidt. (Afb. 7) Uw camera is nu
gereed om de eerste foto te nemen.
Opmerking:
Als de teller niet “1” aanduidt kan het zijn dat het fi lmrolletje niet goed geladen is. Doe het
cameradeurtje open en herhaal alle handelingen om het rolletje te laden.
Foto’s maken
1. Schuif de lensklep open om de camera AAN te zetten. (Afb.8)
2. Houd de camera stevig met beide handen vast. Let erop dat u de lens, fl itser
of sensor van de fl itser niet met uw vingers of haren afdekt en zo de camera
blokkeert. (Afb. 9)
3. Kijk door de zoeker en plaats het onderwerp in het midden van de zoeker. Voor
scherpe foto’s moet u erop letten dat het onderwerp zich op minimaal anderhalve
meter afstand van de camera bevindt. (Afb.10)
4. Druk op de sluiterknop om een foto te maken. (Afb.11)
5. De camera draait de fi lm automatisch naar het volgende
beeldraam door.
Ne
- 50 -
345AF (515055-00)_NLD.indd 50345AF (515055-00)_NLD.indd 50 11/1/04 10:59:20 AM11/1/04 10:59:20 AM
Page 53

Opmerking:
• Let er steeds op dat het lampje Flitser gereed brandt, voordat u de volgende foto maakt.
• Als u verticale foto’s maakt, houd de camera dan zo dat de fl itser bovenaan zit.
• Maak geen foto’s recht tegen de zon in.
Flitser
Dit fototoestel beschikt over drie fl itserstanden.
1. Automatische fl itser (standaard)
a. De camera bepaalt zelf wanneer de fl itser nodig is en laat hem automatisch
afgaan.
b. Druk als de fl itser weer geladen en vol is (het groene lampje Flitser gereed
gaat branden) op de sluiterknop om een foto met fl itslicht te maken. (Afb. 12)
2. Invulfl itser
a. De fl itser heeft ook een invulfunctie die gebruikt kan worden voor betere
foto’s bij daglicht als uw onderwerp in de schaduw staat of als zich achter het
onderwerp een lichtbron bevindt.
b. Druk en houd de knop voor de invulfl itser vast en druk tegelijkertijd op de
sluiterknop om een foto met de invulfl itser te maken. (Afb. 13)
- 51 -
345AF (515055-00)_NLD.indd 51345AF (515055-00)_NLD.indd 51 11/1/04 10:59:20 AM11/1/04 10:59:20 AM
Ne
Page 54

Opmerking:
• Wacht tot het lampje Flitser gereed brandt, voordat u de volgende foto met fl itser maakt.
• Het groene lampje Flitser gereed schakelt na ca. 1 seconde in stand-by. U schakelt de camera
weer in door de sluiterknop in te drukken of de lensklep te sluiten en opnieuw te openen.
• Aanbevolen afstanden bij fl itsopnamen:
ISO100: 1,5 – 3 meter
ISO200: 1,5 – 4,5 meter
ISO400: 1,5 – 6 meter
3. Flitser-Uit
a. Deze camera heeft tevens een Flitser-Uit instelling om een meer
natuurgetrouw effect te bewerkstellingen of wanneer het gebruik van
een fl itser verboden is (zoals in een museum, tentoonstellingen of
aquaria). De fl itser werkt in deze stand niet.
b. Druk en houd de knop Flitser-Uit vast en druk tegelijkertijd op de sluiterknop
om een foto zonder fl itser te maken. (Afb. 14)
De rode-ogenreductie gebruiken
Met deze functie kunt u het rode-ogeneffect dat zich soms bij portretfoto’s met een fl itser voordoet,
tegengaan.
Ne
- 52 -
345AF (515055-00)_NLD.indd 52345AF (515055-00)_NLD.indd 52 11/1/04 10:59:20 AM11/1/04 10:59:20 AM
Page 55
1. Druk de sluiterknop half in.
2. Het lampje Rode-ogenreductie gaat branden.
3. Houd de knop minstens twee seconden ingedrukt.
4. Druk vervolgens de sluiterknop helemaal in om de foto te maken. (Afb.15)
De fi lm terugspoelen
Als het einde van het fi lmrolletje bereikt is, wordt hij niet verder doorgedraaid als u
de sluiterknop indrukt.
1. Schuif de terugspoelknop in de richting van de pijl. De knop klikt in deze stand en
het fi lmrolletje wordt automatisch teruggespoeld. (Afb. 16)
2. Schuif, om het fi lmrolletje halverwege terug te spoelen, de terugspoelknop in de
richting van de pijl. (Afb. 16)
3. Als het terugspoelen voltooid is, stopt de motor automatisch. Open het
cameradeurtje en haal het fotorolletje uit het toestel om het te laten ontwikkelen.
(Afb. 17)
Maak het cameradeurtje niet open zolang het rolletje niet volledig teruggespoeld is, omdat de
foto’s anders mogelijk vernietigd worden.
- 53 -
345AF (515055-00)_NLD.indd 53345AF (515055-00)_NLD.indd 53 11/1/04 10:59:20 AM11/1/04 10:59:20 AM
Ne
Page 56

Voorzorgsmaatregelen
- Bewaar de camera op een koele, droge plek;
- Stel de camera niet aan veel stof of water bloot;
- Stel de camera niet bloot aan extreem hoge of lage temperaturen en vochtigheid (dit kan ernstige
schade aan de camera tot gevolg hebben);
- Probeer niet zelf de camera uit elkaar te halen (om de kans op elektronische schokken te
vermijden);
- Vermijd dat de camera bij het hanteren kan vallen of ergens hard tegenaan kan stoten;
- Breek de batterijen niet doormidden en gooi ze niet in het vuur;
- Bewaar batterijen buiten bereik van kinderen;
- Maak de lens, indien nodig, schoon met een schone, niet pluizende doek. Gebruik geen
chemische producten of andere schoonmaakmiddelen. Verwijder het stof met een blazer uit het
fi lmcompartiment.
TECHNISCHE GEGEVENS
Type: Gemotoriseerde 35 mm compactcamera
Lens: 30 mm f/7 3 groepen, 3 elementen
Scherpstelling: autofocus (automatische scherpstelling)
Sluiter: mechanische sluiter
Sluitersnelheid: 8±3 ms (5-11 ms)
Ne
Ter verbetering kunnen zonder voorafgaande kennisgeving wijzigingen in de technische gegevens
aangebracht worden.
345AF (515055-00)_NLD.indd 54345AF (515055-00)_NLD.indd 54 11/1/04 10:59:21 AM11/1/04 10:59:21 AM
- 54 -
Page 57

515055-00
345AF (515055-00)_NLD.indd 55345AF (515055-00)_NLD.indd 55 11/1/04 10:59:21 AM11/1/04 10:59:21 AM
 Loading...