

Page 1

PLEASE READ
We are in no way responsible for the
contents of the manual. We do not guarantee
its accuracy and we do not make any claim
of copyright. The copyright remains the
property of their respective owners.
Visit the site to read the latest projector
news and reviews, read and comment on
projector specifications, download user
manuals and much more.
Page 2

User’s Guide
Page 3

Table of Contents
Introduction ............................................................................... 1
Getting Started.......................................................................... 2
Connecting to Power.................................................................................2
Connecting to an IBM-compatible Desktop PC.......................................3
Connecting to an IBM-compatible Laptop PC.........................................4
Connecting to a Macintosh Desktop PC ..................................................4
Connecting to a Macintosh Laptop PC ....................................................5
Connecting to Audio .................................................................................6
Connecting to a Video Player...................................................................6
Connecting to the Remote Mouse ...........................................................7
Operating the Projector ............................................................ 9
Turning On the Projector..........................................................................9
Focusing the Image.................................................................................10
Adjusting the Image Size
Distance to Screen vs. Image Size.........................................................11
Adjusting the Image Height....................................................................12
Leveling the Image
Operating States...................................................................... 14
Using the Remote Control...................................................... 15
Remote Control Functions......................................................................15
On/Standby........................................................................................ 15
Source ................................................................................................16
Menu ..................................................................................................16
Direction Keys ....................................................................................16
Joystick ..............................................................................................16
Left Mouse .........................................................................................16
Curtain ................................................................................................ 16
Freeze .................................................................................................16
Zoom In/Zoom Out ............................................................................16
Pointer ................................................................................................ 16
Audio Controls ...................................................................................17
Drag .................................................................................................... 17
Right Mouse and Remote Backlight ................................................17
........................................................................10
..................................................................................13
Using the Menus..................................................................... 18
Main Menu...............................................................................................18
Audio Menu .............................................................................................19
Volume ............................................................................................... 20
Bass ....................................................................................................20
Treble ................................................................................................. 20
Stereo Mode ......................................................................................20
Mute ...................................................................................................20
Balance ............................................................................................... 20
Reset ................................................................................................... 20
Picture Menu............................................................................................20
Frequency ..........................................................................................21
Tracking ..............................................................................................21
Contrast .............................................................................................. 21
English iii
Page 4

Brightness .......................................................................................... 22
Sharpness ..........................................................................................22
Room Light ........................................................................................22
Color ................................................................................................... 22
Tint ......................................................................................................22
Reset ................................................................................................... 22
Source Menu............................................................................................22
Computer ...........................................................................................23
Composite .......................................................................................... 23
S-Video ............................................................................................... 23
Features Menu.........................................................................................23
Language ...........................................................................................23
Startup Logo 24
Curtain Style ......................................................................................24
Compression ......................................................................................24
Ceiling Mount ....................................................................................24
Rear Projection ..................................................................................24
Reset ................................................................................................... 24
Custom Modes Menu..............................................................................25
Mode 1 ...............................................................................................26
Mode 2 ...............................................................................................26
Mode 3 ...............................................................................................26
Mode 4 ...............................................................................................26
Reset ................................................................................................... 26
Service Menu...........................................................................................26
Lamp Life ...........................................................................................27
Reset Lamp Timer .............................................................................27
Projector Life ......................................................................................27
Test Pattern ........................................................................................27
Advanced Configuration......................................................... 28
Installing a Custom Startup Logo ..........................................................28
Configuring the Remote Mouse.............................................................28
Windows 95 .......................................................................................28
Windows 3.x ......................................................................................29
Using the Internal Pointer and Remote Mouse Simultaneously.........29
Possible Problem Using the Remote Mouse.........................................30
Macintosh Issues.....................................................................................30
Macintosh PowerBook Series 140, 145, 145B, 150, 170 .................31
Macintosh PowerBook Series 200, 230, 250, 280, 2300 .................31
Macintosh PowerBook 5300 .............................................................31
Macintosh PowerBook Series 160, 165, 180, 185, 500, 520, 540 ...31
Macintosh PowerBook 1400 .............................................................32
Macintosh PowerBook 3400 and G3 ................................................32
Activating the Laptop External Video Port............................................32
Maintaining the Projector....................................................... 37
Replacing the Lamp Module...................................................................37
Cleaning the Dust Filters.........................................................................37
Back Filter ...........................................................................................38
Bottom Filter ......................................................................................38
Troubleshooting ..................................................................... 39
iv English
Page 5

Appendix A - Parts and Accessories...................................... 45
Parts..........................................................................................................45
Accessories..............................................................................................45
Appendix B - Specifications ................................................... 46
Appendix C - Notices, Warranties, Safety Precautions........ 47
Notices......................................................................................................47
FCC Statement.........................................................................................47
Canadian Notice ......................................................................................47
European Notice......................................................................................47
Declaration of Conformity for U.S.A......................................................48
Declaration of Conformity ......................................................................48
Warranties................................................................................................49
U.S.A. and Canada ............................................................................49
Outside the U.S.A. and Canada ........................................................49
English v
Page 6

Introduction
Introduction
The Polaroid Polaview 330 LCD projector is designed for the traveling
presenter. Its light weight, small size, and easy-to-use features make it a
premium portable presentation system that is ideally suited to small
group meetings or large formal presentations. A true XGA (1024x768)
projector at 700 lumens, it produces images bright enough to be used in
any normal room lighting conditions.
The Polaview 330 LCD projector is compatible with IBM-compatible
personal computers and Macintosh computers.
The Polaroid Polaview 330 LCD projector has the following features:
• Stereo audio
• Three-panel polysilicon active matrix liquid crystal display (LCD)
• Palette capable of 16.7 million colors
• Backlit keyboard
• Optical zoom
• Adjustable front foot used to set the projected image height
• Adjustable back feet used to level the projected image
• Startup logo that you can customize
• Automatic projector settings storage and use for up to 10 computers
• Remote control
The Polaroid Polaview 330 LCD projector is a true XGA projector; you do
not need to turn off your laptop computer display to see your entire screen
in the projected image.
The advanced broadcast video technology allows the Polaview 330 LCD
projector to provide bright, sharp NTSC, P AL, and SECAM video images.
S-Video and composite inputs insure compatibility with any video source.
The ultra high pressure lamp insures true color rendition with truer
whites. With 2000 hours of typical lamp life, you can be on the road for
months before you need to replace the lamp.
English 1
Page 7
Getting Started
Getting Started
This section explains how to set up and connect the projector, including
information about basic adjustments and interfacing with peripherals.
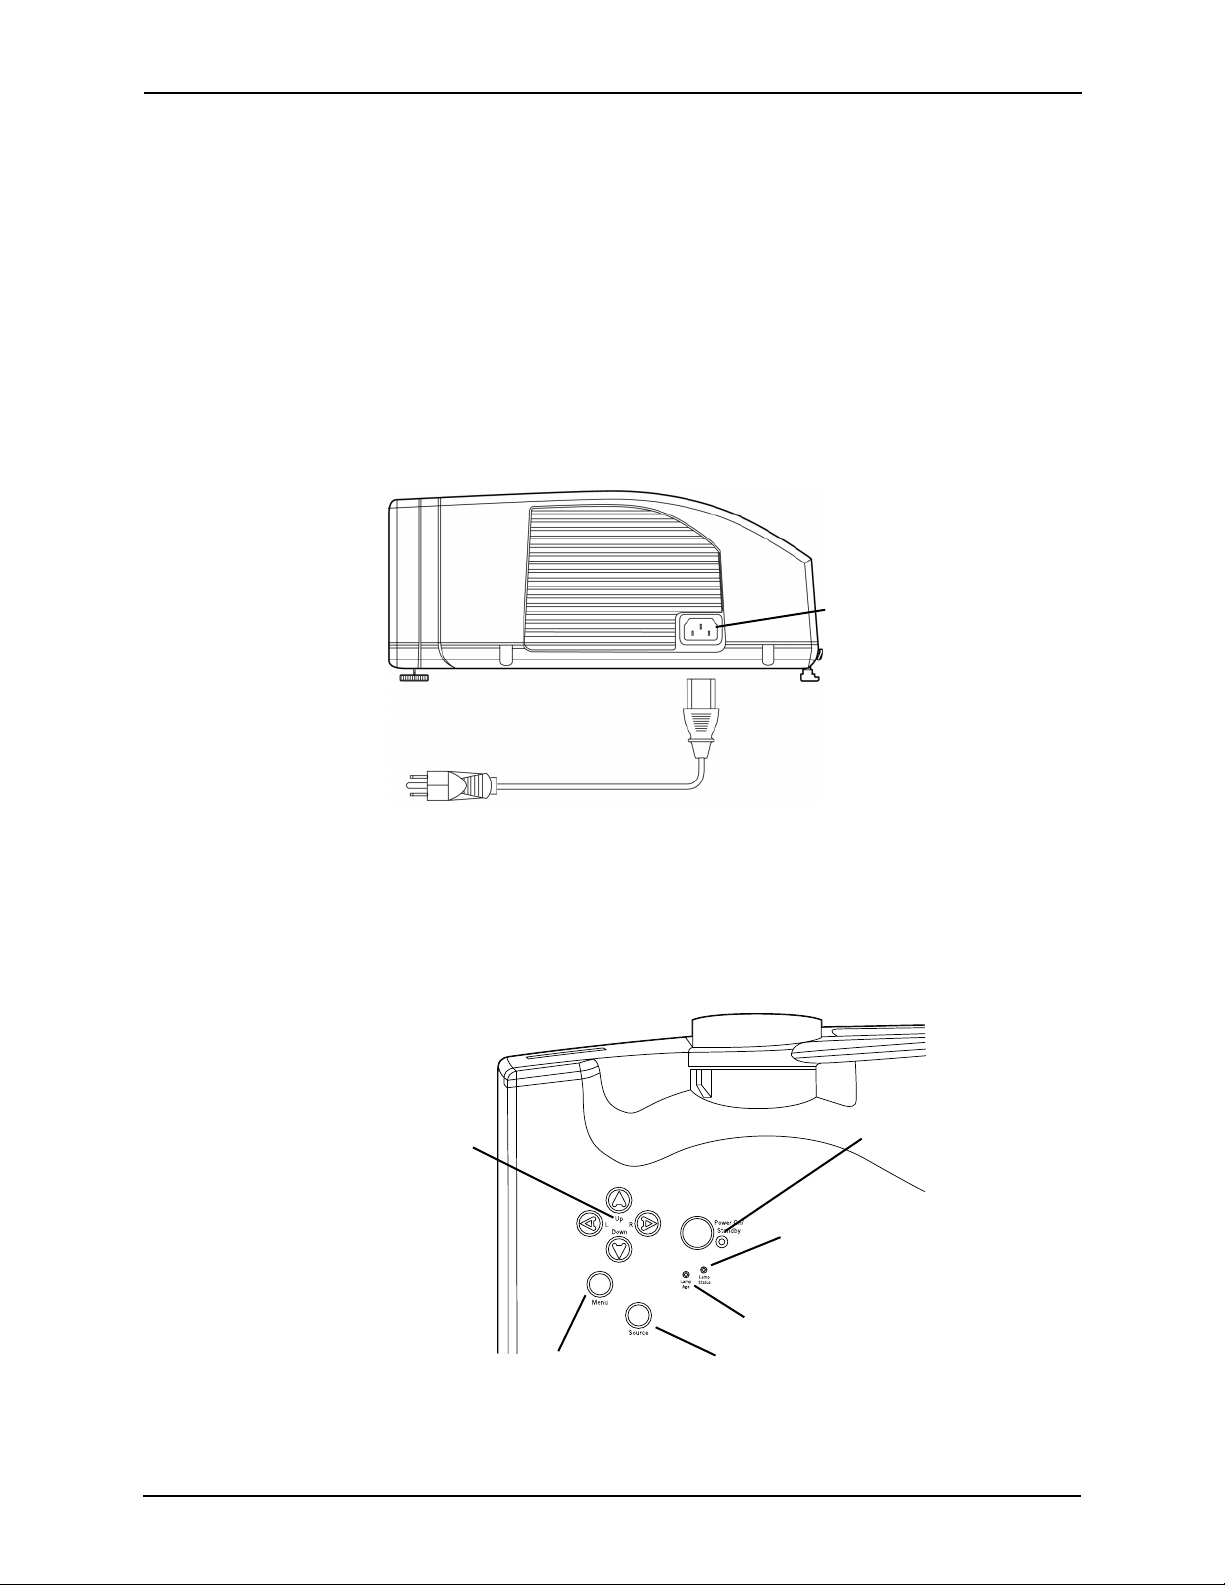
Connecting to
Power
Important : To avoid damage to electronic components, first connect the
power cord to the AC socket on the projector , then connect the
plug to an AC outlet.
To connect to power:
1 Connect the power cord to the AC socket on the projector.
2 Connect the power cord plug to an AC outlet.
AC socket
Figure 1: Connecting the Power Cord
The projector enters the sleep state , with the fans and lamp off. The
Power On/Standby LED, the Lamp Age LED, and the Lamp Status LED
on the projector keypad are on while the projector is in the sleep state . For
more information on the projector’s operating states, see “Operating
States” on page 14.
Direction
keys
Menu
Figure 2: Projector Keypad
Lamp Status LED
Lamp Age LED
Source
Power On/Standby
LED
2 English
Page 8

Getting Started
Connecting to an
IBM-compatible
Desktop PC
To connect to an IBM-compatible desktop computer:
1 Set the computer display resolution to XGA (1024x768).
2 Disconnect the PC monitor cable from the monitor output connector
on the computer.
3 Connect the VGA/SVGA cable to the Computer In connector on the
projector and to the monitor output connector on the computer.
Monitor Out
connector
Computer In
connector
Figure 3: Connecting to an IBM-compatible Desktop PC
If the computer resolution is lower than XGA, the projector automatically
resizes the image to fill the screen. If the resolution is higher than XGA,
the projector displays a compressed SXGA image or a cropped 1024x768
window of an SXGA screen. If the image is cropped, use the direction keys
on the projector or remote control to adjust the display.
If you need to view the computer monitor and the projected image
simultaneously, using the 15connect the display to the built-in Monitor
Loop-Through connector on the projector.
To use the Monitor Loop-Through connection:
1 Attach the 15-pin HD gender changer to the Monitor Out connector on
the projector.
2 Connect the PC monitor cable to the 15-pin HD gender changer.
English 3
Page 9

Getting Started
Connecting to an
IBM-compatible
Laptop PC
To connect to an IBM-compatible laptop computer:
1 Set the computer display resolution to XGA (1024x768) or lower.
2 Connect the VGA/SVGA cable to the Computer In connector on the
projector and to the external monitor output connector on the laptop
computer.
Computer In
connector
Figure 4: Connecting to an IBM-compatible Laptop PC
3 Activate the VGA external monitor port on the laptop computer.
Connecting to a
Macintosh
Desktop PC
Note: For a list of laptop manufacturers and more information on the
method you use to activate the VGA external monitor port, see
“Activating the Laptop External Video Port” on page 32.
If your Macintosh desktop computer has a separate VGA output port:
1 Connect the VGA cable to the Computer In connector on the projector
and to the VGA output connector on the computer.
Monitor Out
connector
Computer In
connector
Figure 5: Connecting to a Macintosh Desktop PC
4 English
Page 10

Getting Started
2 In the Control Panel of the Macintosh operating system, set the
Mirroring option to “On” and select the external monitor as the active
monitor. For more information on the Mirroring function, see
“Macintosh PowerBook Series 160, 165, 180, 185, 500, 520, 540” on
page 31.
If your Macintosh desktop computer does not have a separate VGA output
port:
1 Disconnect the monitor cable from the monitor output connector on
the computer.
2 Connect the Macintosh adapter to the monitor output connector on the
computer .
3 Connect the monitor cable to the output side of the Macintosh adapter.
4 Set the DIP switches on the Macintosh adapter to match the output
settings of the computer. For more information on the correct DIP
switch settings, see “Macintosh Issues” on page 30.
Connecting to a
Macintosh Laptop
PC
If you need to view the computer monitor and the projected image
simultaneously , connect the display to the built-in Monitor Loop-Through
connector on the projector.
To use the Monitor Loop-Through connection:
1 Connect the Macintosh loop-through adapter to the monitor out
connector on the computer.
2 Connect the Macintosh monitor cable to the output side of the loop-
through adapter.
To connect to a Macintosh laptop computer:
1 Connect the Macintosh adapter to the external monitor output
connector on the laptop computer.
2 Connect the VGA cable to the Computer In connector on the pr ojector
and to the output side of the Macintosh adapter.
Computer In
connector
Figure 6: Connecting to a Macintosh Laptop PC
English 5
Page 11

Getting Started
3 Set the DIP switches on the Macintosh adapter to match the output
settings of the laptop. For more information on the correct DIP switch
settings, see “Macintosh Issues” on page 30.
4 In the Control Panel of the Macintosh operating system, set the
Mirroring option to “On” and select the external monitor as the active
monitor. For more information on the Mirroring function, see
“Macintosh PowerBook Series 160, 165, 180, 185, 500, 520, 540” on
page 31.
Connecting to
Audio
You can connect the projector to computer audio output and, once
connected, you can provide an audio signal to powered external speakers.
Note that there are separate audio input connections for a computer and
VCR on the projector.
To connect to computer audio:
1 Connect one end of the stereo audio cable (3.5 mm male plugs on each
end) to the audio output connector on your computer’s sound card or
the speaker output connector on your laptop computer.
2 Connect the other end of the stereo audio cable to the Audio In
connector on the projector.
Audio In
connector
Audio Out
connector
Connecting to a
Video Player
6 English
Figure 7: Connecting to Audio
To provide an audio signal to powered external speakers:
• Connect the powered external speaker cable plug to the Audio Out
connector on the projector.
You can connect either composite video/stereo audio or S-video signal
inputs to the projector.
To connect to composite video:
1 Connect the red and white audio plugs on the three-wire composite
audio/video cable to the left and right audio connectors on the
projector and to the audio output connectors on the video player.
Page 12

Getting Started
2 Connect the yellow video plug to the Composite Video In connector on
the projector and to the video output connector on the video player.
Left Audio connector
Right Audio connector
Composite Video In
connector
Figure 8: Connecting to Composite Video/Audio
To connect to S-video:
1 Connect the audio plugs on the audio/video cable to the left and right
audio connectors on the projector and to the audio output connectors
on the video player.
Connecting to the
Remote Mouse
2 Connect the S-video plug to the S-Video connector on the projector
and to the video output connector on the video player. Note that the
composite video cable remains unused.
Left Audio connector
S-Video
Right Audio connector
connector
Unused composite
video cable
Figure 9: Connecting to S-Video Video/Audio
You can use the joystick on the projector’s remote control to control your
computer mouse. To use the joystick, connect the remote mouse.
Note: If the remote mouse does not work after you follow these
instructions, see “Configuring the Remote Mouse” on page 28.
To connect to the remote mouse:
1 Turn off the computer.
2 Disconnect the mouse from the mouse connector on your computer.
English 7
Page 13

Getting Started
3 Connect the remote mouse interface cable to the Mouse connector on
the projector and to the mouse connector (serial, PS/2, ADB) on your
computer.
Mouse
connector
Figure 10: Connecting to the Remote Mouse
8 English
Page 14

Operating the Projector
This section explains how to turn on the projector and adjust the
projected image.
Operating the Projector
Turning On the
Projector
Use the Power On/Standby button to turn on the projector.
To turn on the projector:
1 Check that the projector is connected to AC power and the projector is
in the sleep state as described on page 14.
2 Press the Power On/Standby button on the projector keypad.
Power On/Standby
button
Figure 11: Power On/Standby Button
The projector enters the live state with the lamp on and the fan at high
speed. The lamp takes approximately 30 seconds to reach full brightness.
The start-up sequence that the projector follows depends on the selections
that you make in the projector system menus. For more information on
how to modify these choices, see “Using the Menus” on page 18.
By default, the projector displays the startup logo for five seconds then
selects the data input source. If no data input source is present, the
projector selects a video player input source. If no video player input
source is present, it displays the startup logo. If you did not select a
startup logo in the Features menu, the projector displays a blank screen.
CAUTION: Ultra high pressure lamps need to be in a stable condition
prior to turning them on or off. To protect the lamp and the
projector, the power up and power down circuitry contain
built-in protective delays. After you turn on the lamp, a
timer prevents you from turning it off for at least 30 seconds.
After you turn off the lamp, a timer prevents you from
turning it on for at least 60 seconds. Do not attempt to
bypass these delays.
English 9
Page 15

Operating the Projector
For more information on the projector’s operating states, see “Operating
States” on page 14.
Tip: If the projector is connected to a laptop computer but is not project-
ing an image, make sure that you have activated the external video
output port correctly. For more information, see “Activating the
Laptop External Video Port” on page 32.
Focusing the
Image
Adjusting the
Image Size
Use the Focus Ring to focus the projected image.
To focus the image:
• Rotate the Focus Ring until the image is clear.
Focus Ring
Figure 12: Focusing the Image
Use the Zoom Ring Tab to adjust the size of the projected image.
To adjust the image size:
10 English
• Move the Zoom Ring Tab until the image is the desired size.
Zoom Ring
Tab
Figure 13: Adjusting the Image Size
Refer to the Distance to Screen vs. Image Size chart below to help you
make the adjustment.
Page 16
Operating the Projector
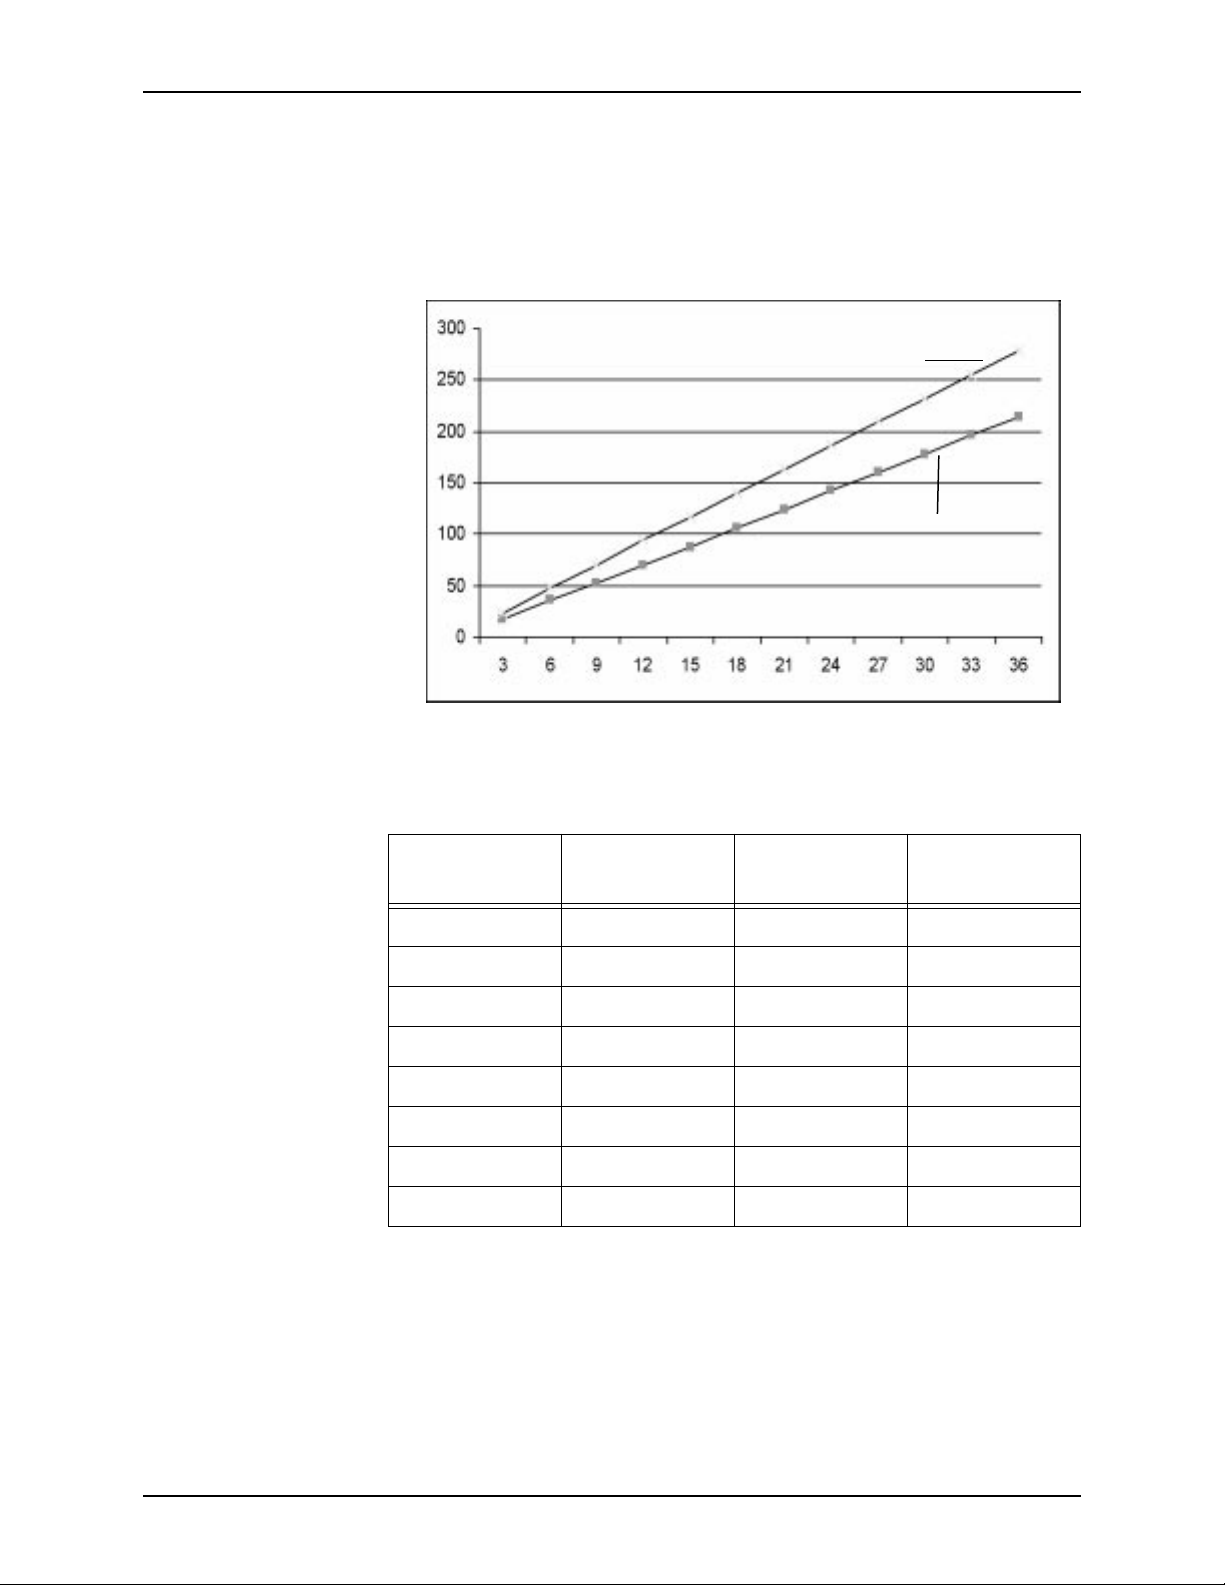
Distance to
Screen vs. Image
Size
Use the following chart and tables to determine the distance between the
projector and the screen for a desired screen image size.
The top line in the graph indicates the image size with the lens at the
maximum zoom position. The bottom line in the graph indicates the
image size with the lens at the minimum zoom position.
Lens at maximum zoom
Lens at minimum zoom
Image Size (inches diagonal)
Distance to Screen (feet)
Figure 14: Distance to Screen vs. Image Size
The following table contains information about image size with the zoom
lens at the minimum zoom position.
Distance to
Screen (feet)
5 301824
10 60 36 48
15 90 54 72
20 120 72 96
25 150 90 120
30 180 108 144
35 210 126 168
40 240 144 192
Diagonal
(inches)
Height
(inches)
Width
(inches)
Table 1: Distance to Screen vs. Image Size, Lens at Minimum Zoom
English 11
Page 17

Operating the Projector
The following table contains information about image size with the zoom
lens at the maximum zoom position.
Adjusting the
Image Height
Distance to
Screen (feet)
5 402432
10 80 48 64
15 120 72 96
20 160 96 128
25 200 120 160
30 240 144 192
35 280 168 224
40 320 192 256
Diagonal
(inches)
Height
(inches)
Width
(inches)
Table 2: Distance to Screen vs. Image Size, Lens at Maximum Zoom
Use the quick-release Elevator Foot Release under the front of the
projector to adjust the height of the projected image.
To adjust the image height:
1 Press the Elevator Foot Release and lift the front of the projector.
2 Release the Elevator Foot Release to lock the elevator foot in place.
Elevator
Foot
Release
Figure 15: Adjusting the Image Height
12 English
Page 18

Operating the Projector
Leveling the
Image
Use the leveling feet, located on both rear corners of the projector, to level
the projected image.
To level the image:
• Rotate one or both leveling feet until the projected image is level.
Leveling Foot
Figure 16: Leveling the Image
English 13
Page 19

Operating States
Operating States
The Polaview 330 LCD projector has five operating states:
1 Sleep state - The lamp, all fans, and keypad lighting are off. The
2 Live state - The lamp and keypad lighting are on. The fans are on at
3 Standby state - If the lamp has been on for more than 30 seconds,
4 Startup pending state - Turning on the lamp within 60 seconds after
Power On/Standby LED, Lamp Age LED, and Lamp Status LED are
on.
high speed. The projector displays either the source video or the logo.
pressing the Power On/Standby button causes the projector to enter
the standby state . The lamp and keypad lighting are off. The fans are
on at low speed.
turning it off can damage the lamp or power supply. The startup
pending state prevents this by preventing the lamp from being turned
on for 60 seconds after turning it off. If you press the Power On/
Standby button within 60 seconds after turning off the lamp, the
projector turns on the keypad lighting and sets the fans to high speed.
The Power On/Standby LED flashes. After 60 seconds, the projector
turns on the lamp and enters the live state .
5 Standby pending state - Turning off the lamp before it has stabilized
can cause damage to the lamp. The standby pending state prevents
this by preventing the lamp from being turned off for 30 seconds after
turning it on. If you press the Power On/Standby button within 30
seconds after turning on the lamp, the projector displays a “Will Shut
Down In...” message and a 30-second countdown timer. The Power
On/Standby LED flashes. After 30 seconds, the projector turns off the
lamp and enters the standby state . After another five minutes of
inactivity, the projector enters the sleep state .
The following table summarizes the projector operating states.
Operating
State
Sleep On Off Off Off Off
Live On Source/Logo On High On
Standby On Off Off Low Off
Startup Pending Flashing Off Off High On
Standby Pending Flashing Message On High On
Power On/
Standby
LED
Display Lamp Fans
Keypad
Lighting
14 English
Table 3: Projector Operating States
Page 20

Using the Remote Control
This section explains how to use the remote control.
The wireless remote control that comes with the Polaview 330 LCD
projector is similar to a remote control for a television or VCR. Use the
remote control to set up and adjust the image settings and to control
interactive presentations.
Using the Remote Control
On/Standby
Source
Menu
Direction keys
Joystick
Left mouse
Figure 17: Remote Control
Use the projector control buttons on the remote control to control
projector functions. Use the built-in joystick and the mouse buttons to
remotely control the computer mouse.
For more information on how to configure the remote mouse, see
“Configuring the Remote Mouse” on page 28.
Curtain
Freeze
Zoom In
Zoom Out
Pointer
Audio controls
Drag
Right mouse and
remote backlight
Remote Control
Functions
On/Standby Press the On/Standby button on the remote control (Power On/Standby
This section describes the projector functions that you can control from
the remote control. Functions that are also available from the projector
keypad are noted.
button on the projector keypad) to change the projector operating state.
If the projector is in the sleep state , press the On/Standby button to
change the projector to the live state . If the projector is in the live state ,
and the lamp has been on for more than 30 seconds, press the On/
Standby button to change the projector to the standby state . If the lamp
has been on for less than 30 seconds, the projector changes to the
pending state
For more information on the projector’s operating states, see “Operating
States” on page 14.
prior to changing to the
standby state
.
standby
English 15
Page 21

Using the Remote Control
Source
Menu
Direction Keys
Joystick
Press the Source button on either the remote control or the projector
keypad to toggle the input signal source between computer, composite
video, and S-video. If there are no other active input signal sources
connected, the projector displays an error message.
Press the Menu button on either the remote control or the projector
keypad to display the on-screen main menu. Press the Menu button again
to exit the menu.
Use the direction keys on either the remote control or the projector
keypad to control these functions:
• Menu navigation and selection
• Projected image positioning
• Zoomed or cropped image panning
• Pointer movement
• Slide control adjustment
• Curtain operation
Use the joystick on the remote control to move the cursor just as you use
the mouse attached to your computer.
Left Mouse
Curtain
Freeze
Zoom In/Zoom Out
Pointer
Use the left mouse button on the remote control just as you use the left
mouse button on the mouse attached to your computer.
Press the Curtain button on the remote control to overlay a curtain on the
projected image. Use the direction keys to move the curtain and reveal
portions of the display.
Press the Freeze button on the remote control to freeze the current
projected image until you press the Freeze button again.
Tip:
You can use the Freeze button to hold an image on the projected
screen while making changes to your presentation or checking notes
on your computer screen. Once the adjustments are made, press the
Freeze button again to return to your presentation.
Press the Zoom In button on the remote control to zoom in on the center
of the projected image (up to 8X magnification in 1X increments). Press
the Zoom Out button to zoom out of the center of the projected image (in
1X increments). While in the zoom mode, use the direction keys to move
the zoom window around the full screen.
Press the Pointer button on the remote control to display a pointer in the
center of the projected image. Use the direction keys to move the pointer.
16 English
Page 22

Using the Remote Control
Audio Controls Press the + button on the remote control to increase the audio volume.
Press the - button to decrease the audio volume. Press the Mute button to
mute the audio.
Drag Use the Drag button in combination with the joystick to drag an item. Y ou
can also use this button to “Drag & Drop” items.
Right Mouse and
Remote Backlight
Use the right mouse button on the remote control just as you use the right
mouse button on the mouse attached to your computer.
To activate the backlight for the remote control buttons, press and hold
the right mouse button on the remote control for several seconds.
English 17
Page 23

Using the Menus
Using the Menus
Main Menu This section intr oduces you to the main menu and explains how to use the
projector menu system.
1 Press the Menu button on either the remote control or on the projector
keypad to display the main menu. Each menu item has a submenu.
Help
Audio
Picture
Source
Features
Custom Modes
Service
Reset
4
4
4
4
4
4
4
4
Figure 18: Main Menu
2 Press the up and down direction keys to highlight a menu item. When
a menu item is highlighted, the system displays a submenu containing
a list of choices.
3 Press the right direction key to move the highlight to the submenu.
4 Press the up or down direction keys to highlight a choice.
5 Press the right direction key to display either a slide-rule control used
to adjust the level/value of the choice or a second submenu containing
a list of additional choices.
18 English
6 Press the up or down direction keys to adjust the level/value of the
choice or to highlight a submenu choice.
7 If you highlight a submenu choice, pr ess the up or down direction keys
to adjust the level/value of the choice.
8 Press the Menu button, or the left direction key repeatedly, to confirm
your selection and exit the menu system.
Page 24

Using the Menus
Use the Reset menu item to reset these submenu values to default values:
Submenu Effect of Reset
Audio Resets all values.
Picture Resets all values.
Source Resets to Computer.
Features Resets Compression, Ceiling Mount, Rear Projection values.
Does not reset Language, Startup Logo, or Curtain values.
Custom Modes Clears all saved custom modes.
Table 4: Effect of Reset by Submenu
Use the Reset item on a submenu to reset values for all submenu items.
Audio Menu Use the Audio menu to control presentation sound characteristics.
Help
Audio
Picture
Source
Features
Custom Modes
Service
Reset
4
4
4
4
4
4
4
4
Figure 19: Audio Menu
• Once you have highlighted the Audio menu item, press the right
direction key to display the Audio submenu.
Volume
Bass
Treble
Stereo Mode
Mute
Balance
Reset
4
4
4
4
Figure 20: Audio Submenu
English 19
Page 25

Using the Menus
Volume Use Volume to increase or decrease the volume level.
Treble Use Treble to increase or decrease the treble level.
Stereo Mode Use Stereo Mode to select mono or stereo audio effects.
Balance Use Balance to adjust the balance of the sound between stereo speakers.
Bass Use Bass to increase or decrease the bass level.
The choices are:
• Mono: Mixes contents of right and left channels
• Linear Stereo: Normal stereo sound without any extra processing
• Pseudo Stereo: Creates “like stereo” effect from mono source
• Spatial Stereo: Simulates “3D space” sound from stereo source
Mute Use Mute to turn off the sound.
Reset Use Reset to reset all values on the Audio menu to default values.
Picture Menu Use the Picture menu to control the appearance of the projected image.
Help
Audio
Picture
Source
Features
Custom Modes
Service
Reset
4
4
4
4
4
4
4
4
Figure 21: Picture Menu
20 English
Page 26

Using the Menus
• Once you have highlighted the Picture menu item, press the right
direction key to display the Picture submenu.
Frequency
Tracking
Contrast
Brightness
Sharpness
Room Light
Color
Tint
4
4
4
4
4
4
4
4
Reset
4
Figure 22: Picture Submenu
Frequency The Polaview 330 LCD projector automatically adjusts the frequency
based on detected input signals. However, in some cases you may need to
manually adjust the frequency.
Use Frequency to eliminate evenly spaced dark vertical lines or distortions
on the projected image. Adjust the frequency until the vertical lines or
distortions disappear.
If you have adjusted the frequency but there are still vertical lines or
distortions on the projected image, follow the Tracking instructions to
adjust tracking.
Tip: If your computer is running Windows 95, the Shut Down screen is
the best place to adjust frequency. To display the Shut Down screen,
click on the Start button in the lower left-hand corner of the screen.
Click on Shut Down. Adjust the frequency, then click on No to return to the display screen.
Tracking The Polaview 330 LCD projector automatically adjusts the tracking
based on the detected input signals. However , in some cases you may need
to manually adjust the tracking.
Use Tracking to remove distortions or shaded areas that remain on the
screen after adjusting the frequency . Do not adjust tracking until you have
finished adjusting the frequency. You may need to adjust the frequency
and tracking values a few times to completely eliminate vertical lines,
distortions, and shaded areas. Adjust the tracking until all distortions
and/or shaded areas disappear.
Contrast Use Contrast to increase or decrease the contrast level.
English 21
Page 27

Using the Menus
Brightness Use Brightness to increase or decrease the brightness level.
Sharpness Use Sharpness to increase or decrease the sharpness.
Room Light Use Room Light to compensate for differences in room lighting
conditions. The three Room Light values provide the best levels of
brightness, contrast, and color saturation for different lighting conditions.
The choices are:
• Dark Room
• Normal
• Bright Room
Color Use Color to adjust the color intensity.
Tint Use Tint to adjust the red/green tint level.
Reset Use Reset to return all values on the Picture menu to default settings.
Source Menu Use the Source menu to select the input signal source. The choices include
the computer, composite video, or S-video input signals.
Help
Audio
Picture
Source
Features
Custom Modes
Service
Reset
4
4
4
4
4
4
4
4
Figure 23: Source Menu
• Once you have highlighted the Source menu item, press the right
direction key to display the Source submenu.
Computer
22 English
Composite
S-Video
Figure 24: Source Submenu
Page 28

Using the Menus
Computer Use Computer to select the computer as the signal source.
Composite Use Composite to select composite video as the signal source.
S-Video Use S-Video to select s-video as the signal source.
Note: If the system does not detect a computer or video source, it
displays a message that indicates that the TV/VCR or computer
source was not detected.
Features Menu Use the Features menu to select top-level usage preferences for the
projector.
Help
Audio
Picture
Source
Features
Custom Modes
Service
Reset
4
4
4
4
4
4
4
4
Figure 25: Features Menu
• Once you have highlighted the Features menu item, press the right
direction key to display the Features submenu.
Language
Startup Logo
Curtain Style
Compression
Ceiling Mount
Rear Projection
Reset
4
4
4
4
4
4
Figure 26: Features Submenu
Language Use Language to display on-screen menus in English, French, German,
Spanish, Italian, or Chinese.
English 23
Page 29

Using the Menus
Startup Logo Use Startup Logo to select the logo displayed during projector startup.
Curtain Style Use Curtain Style to select curtain appearance.
The choices are:
• Default Logo
• Custom Logo
• Blank
For more information on how to install a custom logo in projector
memory, see “Installing a Custom Startup Logo” on page 28.
The choices are:
• Red
• Green
• Blue
• Yellow
• Cyan
• Magenta
• Black
• White
• Default Logo
• Custom Logo
Compression Use Compression to enable or disable image compression for SXGA image
resolution and above. Enabling compression compresses the SXGA image
to fit the XGA screen. Disabling compression displays a 1024x768
window on the SXGA screen.
Ceiling Mount Use Ceiling Mount to vertically reverse the projected image to allow for an
upside down ceiling mount of the projector.
Rear Projection Use Rear Projection to horizontally reverse the projected image to allow
for rear projection.
Reset Use Reset to return all values on the Features menu to default settings.
24 English
Page 30

Using the Menus
Custom Modes
Menu
Use the Custom Modes menu to save the current projector settings as one
of four custom modes or to activate a previously saved custom mode.
Help
Audio
Picture
Source
Features
Custom Modes
Service
Reset
4
4
4
4
4
4
4
4
Figure 27: Custom Modes Menu
• Once you have highlighted the Custom Modes menu item, press the
right direction key to display the Custom Modes submenu.
Mode 1
4
4
Mode 2
Mode 3
Mode 4
Reset
4
4
4
4
Figure 28: Custom Modes Submenu
Saving the current projector settings as a custom mode saves these
parameters:
• Frequency
• Tracking
• Vertical position
• Horizontal position
• Contrast
• Brightness
• Room light
• Zoom setting
• Tint
• Color
• Sharpness
English 25
Page 31

Using the Menus
Mode 1 Use Mode 1 to save the current projector settings as a custom mode or to
Mode 2 Use Mode 2 to save the current projector settings as a custom mode or to
Mode 3 Use Mode 3 to save the current projector settings as a custom mode or to
Mode 4 Use Mode 4 to save the current projector settings as a custom mode or to
activate the previously saved Mode 1 settings.
activate the previously saved Mode 2 settings.
activate the previously saved Mode 3 settings.
activate the previously saved Mode 4 settings.
Reset Use Reset to return all values on the Custom Modes menu to default
settings.
To save a custom mode from the Custom Modes submenu:
1 Use the up or down direction keys to highlight the mode number under
which you want to save the current projector settings.
2 Highlight the Set to Current item.
3 Press the left direction key to exit the menu and save the custom mode.
To activate a custom mode from the Custom Modes submenu:
1 Use the up or down direction keys to highlight the mode number that
you want to activate.
2 Highlight the Active item.
3 Press the left direction key to exit the menu and activate the custom
mode.
Service Menu Use the Service menu to display information on the lamp life and/or
projector life, to reset the lamp life timer, or to display test patterns.
Help
Audio
Picture
Source
Features
Custom Modes
Service
Reset
4
4
4
4
4
4
4
4
26 English
Figure 29: Service Menu
Page 32

Using the Menus
• Once you have highlighted the Service menu item, press the right
direction key to display the Service submenu.
Lamp Life
Reset Lamp Timer
Projector Life
Test Pattern
4
4
4
4
4
Figure 30: Service Submenu
Lamp Life Use Lamp Life to display the number of hours left in the life of the lamp.
Reset Lamp Timer Use Reset Lamp Timer to reset the lamp life timer after you install a new
lamp.
Projector Life Use Projector Life to display information about total projector usage.
Test Pattern Use Test Pattern to display patterns you can use to evaluate the condition
of the projector. The Color Cycle option displays the patterns in sequence.
The choices are:
• Pattern 1
• Pattern 2
• Pattern 3
• Solid Red
• Solid Green
• Solid Blue
• Solid White
• Solid Black
• Ramp Red
• Ramp Green
• Ramp Blue
• Ramp Grey
• Color Cycle
• Off
English 27
Page 33

Advanced Configuration
Advanced Configuration
This section gives you more detailed information about various projector
setup, peripheral connection, and projector usage issues.
Installing a
Custom Startup
Logo
You can create a custom startup logo, save it as a standard 16-color
Windows bitmap (BMP) file, and install it in projector memory. You use
the Startup Logo item on the Features menu to replace the default logo
displayed during projector startup with the custom logo. Use the
LOADLOGO.EXE program, on the Polaview 330 Tools diskette included
with the projector, to download a custom logo to the projector.
To install a custom startup logo:
1 Connect an RS232 cable to the projector’ s RS232 connector and to the
computer serial port.
2 Start the LOADLOGO.EXE program.
3 Select a communications port from the on-screen menu.
4 Click on the Download menu on the menu bar.
5 Click on Custom Logo.
6 Select the directory in which the custom logo is stored, and click on
Open.
The LOADLOGO.EXE program installs the custom startup logo in
projector memory.
Configuring the
Remote Mouse
Windows 95 1 Click on the Start button in the lower left-hand corner of the Windows
If you need LOADLOGO.EXE, visit Polaroid’s web site
(www.polaroid.com/service/sfwdownload/index.html).
Windows 95 comes with standard serial or PS/2 mouse drivers that may
not be compatible with the projector’s remote mouse. These drivers are
most likely to be compatible with the Polaview 330 LCD projector:
• Microsoft serial mouse
• Microsoft PS/2 port mouse
• Logitech serial mouse
• Logitech PS/2 port mouse.
To change to a Microsoft or Logitech mouse driver:
Note: The Windows and menu choices that different manufacturers use
sometimes vary greatly in appearance. The procedure below may
not apply to all situations.
95 screen. Highlight Settings, and select Control Panel.
2 Double-click on the Mouse icon.
28 English
Page 34

3 In the Mouse Properties window, click on the General tab. Windows
indicates the driver that is currently in use.
4 Click on the Change button.
5 Click on the Show All Devices radio button.
6 Under Manufacturers, select either Microsoft or Logitech.
7 Under Models, select either Microsoft Serial Mouse or Microsoft PS/2
Port Mouse or the Logitech Serial Mouse or Logitech PS/2 Port Mouse.
8 Click on OK, then click on Close.
Windows 3.x 1 Open the Program Manager Main group.
2 Run the Windows Setup program.
3 Pull down the Options menu and select Change System Settings.
4 In the Mouse dialogue box, click the down direction key and select the
appropriate driver as described above.
If the remote mouse still does not work correctly, use the IPSETUP.EXE
program, on the included Polaview 330 Tools diskette, to install the
IPOINT .EXE driver. Then, load the driver from the command line or from
the Windows 95 Start Menu. If you need IPSETUP.EXE, visit Polaroid’s
web site (www.polaroid.com/service/sfwdownload/index.html).
Advanced Configuration
Using the Internal
Pointer and
Remote Mouse
Simultaneously
Note: The driver supplied by IPOINT.EXE is only present when the
program is running. If you close the program, it no longer sends a
driver to the serial port. It does not load automatically when you
boot the system. You can load it automatically by installing it in
the W indows 95 Start Menu and selecting “Run Minimized” in the
I-Point properties shortcut menu.
Warning: Do not use IPOINT.EXE program to reconfigure the mouse.
There is no reset to bring the remote back to the original
configuration.
Laptop computers with an internal pointing device will usually work with
both internal and external mouse control.
To use the internal pointer and remote mouse simultaneously:
1 Set up the internal pointing device to use a PS/2 driver and load
IPOINT.EXE to send a mouse driver to the serial port.
2 Use the procedure above for changing mouse drivers and select a PS/2
driver for the internal pointing device. Then connect the projector’s
remote mouse interface cable to the computer’s serial port.
3 Reboot the computer for the changes to take effect. Then install
IPOINT.EXE, as described above, to use both the internal pointing
device and the external mouse.
English 29
Page 35

Advanced Configuration
Some computers require you to make changes in the BIOS to allow use of
an external mouse or simultaneous use of both an internal and external
mouse. If the internal pointing device and the external mouse do not work
after following the steps above, see your computer’s manual to determine
how to make these changes in the BIOS.
Possible Problem
Using the Remote
A problem can occur while using Microsoft PowerPoint®. Each click of
the left remote mouse button may show two slides.
Mouse
To correct this problem:
1 In Windows 95 or Windows 3.x, choose the Mouse icon from the
Control Panel window. Windows displays a dialog box with a scroll
arrow that determines the double-click speed.
2 Move the scroll arrow to the left to slow down the double-click speed.
If this does not correct the problem, it may be due to fluorescent lighting.
In this case, shade the infrared receiver on the projector or turn down the
lights in the room.
Macintosh Issues Most Macintosh computers require an adapter to connect the video output
of the computer to the Polaview 330 LCD projector. Enhance Cable’s
Liberty Lite adapter is included. This table shows Liberty Lite switch
settings used to adapt to various display resolutions.
Display Mode Selection Guide
123456789
VGA/SVGA Multi • • • •
640x480 • • • •
832x624 • • • •
1024x768 @ 75Hz • • • •
1152x870 •••• ••
Multisync-832 • • • • • •
Multisync-1024 • • • • •
Multisync-1280 • • • • •
•: On
#7: Composite Sync #8: Horizontal Sync #9: Vert Sync
Table 5: Liberty Lite Switch Settings
For computers such as the Macintosh 7500 or 8500 that use composite
sync for the external monitor, set switch 7 to On and switches 8 and 9 to
Off.
30 English
Page 36

Advanced Configuration
Macintosh computers use several methods to connect to an external
monitor or projector. The following paragraphs describe the different
models and methods used as of this printing.
Macintosh
PowerBook Series
140, 145, 145B,
150, 170
Macintosh
PowerBook Series
200, 230, 250,
280, 2300
Macintosh
PowerBook 5300
These do not include video out support. Contact a third-party supplier for
an interface adapter for these computers.
The following companies supply the necessary adapters:
• Power-R Corporation 1-800-729-6970
• Griffin Technologies 1-800-255-0990
• Enhance Cable Technologies 1-800-343-2425
• Novaid Tower Company 1-800-255-0990
These systems must be connected to a docking station. The docking
station has the external video out port that allows connection to the
projector.
The PowerBook 5300 uses a Processor Direct Slop (PDS) to implement
external video. This card provides an external connection for video at the
back of the computer . It provides resolutions up to 832x624 at 256 colors.
All 5300 series PowerBooks require a video adapter cable to connect to an
external display. The part number is M3927LL/A*. For more
information, call your local Macintosh dealer.
Macintosh
PowerBook Series
160, 165, 180,
185, 500, 520, 540
The 5300ce provides SVGA (800x600) at thousands of colors for the
internal display only . The external display is limited to 256 colors unless a
third-party video card has been installed.
These systems use Macintosh Video Mirroring to send an image to an
external monitor or projector.
To set up these systems:
1 Connect the Macintosh video cable supplied with your PowerBook to
its external video out port.
2 Connect the switchable Macintosh adapter to the PowerBook video
cable.
3 Connect the VGA cable to the Macintosh Adapter.
4 Connect the other end of the VGA cable to the projector.
5 Turn on the projector.
6 Turn on the Macintosh PowerBook.
7 From the Macintosh PowerBook desktop Apple symbol, choose Control
Panel.
English 31
Page 37

Advanced Configuration
8 Choose Monitors in the Control Panel. Within the Monitors Setup
screen you will see two center squares. They represent the internal
display and the external monitor or projector. Each square has a
number . The number 1 represents the primary display and the number
2 represents the secondary display.
9 The primary display square (1) contains a small menu bar. Drag this
square to the secondary display square (2). You may also need to drag
the Happy Macintosh icon onto the desired monitor. To see the Happy
Macintosh icon, hold down the Option key while the Monitor’s Control
Panel is open. This change will switch the primary display (1), to the
secondary display (2), activating the external video port and sending
video to the projector.
Note: Y ou may need to restart the Macintosh PowerBook for the changes
to take effect.
Macintosh
PowerBook 1400
Macintosh
PowerBook 3400
and G3
Activating the
Laptop External
Video Port
The PowerBook 1400 uses the “Monitors and Sound” Control Panel.
When the Macintosh PowerBook computer recognizes a second monitor or
projector, the “Monitors and Sound” Control Panel contains an Arrange
button.
To use the Mirroring feature:
1 Click on Arrange. A window below it shows an icon representing each
monitor.
2 Drag one icon on top of the other.
The PowerBook 3400 and G3 have a standard DB9/15 VGA connector
built into the backplane for an external video monitor or projector. It is
capable of resolutions up to 1024x768. There is no Video Mirroring
Control Panel. The mode of display called Simulscan can only display
800x600 at 60Hz (refresh rate) simultaneously. If the external monitor
has any other resolution or refresh rate, the external monitor will be the
only display available.
Most laptop computers have a method for activating the VGA external
video port.
To activate the VGA port on IBM-compatible laptop personal computers,
use the function (Fn) key on the computer’s keyboard with one of the
regular function keys (for example, hold down the Fn key while pressing
F12). Some laptop computers need to be rebooted to allow the computer
to check for an attached external monitor, and then activate the external
port.
32 English
The following table describes, by computer manufacturer , how to activate
the external video port. Some manufacturers have several models that
require different activation methods; those methods are listed.
Page 38

Advanced Configuration
On some laptop computers, you need to use a separate setup menu to
activate the external video port.
Computer
Manufacturer
Acer Ctrl-Alt-Esc (for Setup menu)
Fn-F5
AST Fn-F5
Fn-D
Fn-F1
Fn-F12
Ctrl-Fn-D
Ctrl-D
AT&T Fn-F6
Austin Ctrl-Alt-Shift
Altima Shift-Ctrl-Alt-C
Ambra Ctrl-Alt-Esc (for Setup menu)
Amrel Shift-Ctrl-D (for Setup menu)
AMS Fn-F2
AMT Setup Screen Display Mode select CRT
Award Fn-F6
Port Activation Keys
BCC Automatic when computer is booted
Bondwell LCD/CRT options after computer is booted
Canon Fn-F6
Fn-F7
Setup menu
Select CRT in CMOS
Chaplet Setup menu
Chembook Fn-F6
Commax Ctrl-Alt-#6
Compaq Fn-F4
Ctrl-Alt-<
CompuAdd Fn-F3 (for Setup menu)
Alt-F (for Setup menu)
Compudyne Ctrl-Shift D
Setup Screen
Fn-F8
Data General Ctrl-Alt-Command
Datavue Ctrl-Shift-M
English 33
Page 39

Advanced Configuration
Computer
Manufacturer
DEC Fn-F5
Fn-F4
Dell Ctrl-Alt-F10
Ctrl-Alt-<
Fn-F12
Fn-F8
Fn-D
Dolch Set DIP switch to CRT before the computer is
booted
Epson Set DIP switch to CRT when the computer is booted
Automatic
Setup Icon
Fn-F10
Everex Setup Screen
For-A Ctrl-Alt-Shift-C
Fujitsu Fn-F10
Gateway Fn-F1
Fn-F5
Fn-F3
Port Activation Keys
Grid Fn-F2 (for Setup menu)
Automatic
Ctrl-Alt-Tab
Hitachi Fn-F12
Fn-F7
Honeywell Fn-F10
Hyundai Setup screen
Hewlett-Packard Automatic when computer is booted
Fn-F5
IBM Fn-F7
Fn-F1 (for Setup menu)
Ctrl-Alt-S
Automatic when computer is booted
Infotel Fn-F12
Jetbook Fn-F6
Kaypro Automatic when computer is booted
Kris Tech Fn-F8
Keynote Fn-F7
34 English
Page 40

Advanced Configuration
Computer
Manufacturer
Leading Edge Fn-T
Macintosh See “Macintosh Issues” on page 30.
Magitronic Fn-F4
Mastersport Fn-F2
Micro Express Automatic when computer is booted
Micron Fn-F2
Microslate Automatic when computer is booted
Midwest Micro Fn-F11
Mitsubishi SW2 on-off-off-off
NCR Setup screen
NEC Setup screen
Fn-F2
Fn-F3
Fn-F10
Olivetti Automatic when computer is booted
FN-O
Port Activation Keys
Packard Bell Fn-F0
Ctrl-Alt-<
Panasonic Fn-F2
ProStar Ctrl-Alt-S (when computer is booted)
Fn-F6
Sager Fn-F6
Fn-F9
Samsung Fn-F4
Fn-F6
Setup screen with DIP switch #10 on
Sanyo Setup screen
Sharp Automatic when computer is booted
Fn-F5
DIP switch to CRT
Sun Sparc Ctrl-Shift-M
Tandy Ctrl-Alt-Insert
Setup screen
Tangent Fn-F5
English 35
Page 41

Advanced Configuration
Computer
Manufacturer
Texas Instruments Setup (on keyboard)
Ctrl-Alt-Setup
Ctrl-Alt-Esc
Control Panel-TIsetup-Sys config-
display device, LCD/CRT
Fn-F10
Fn-F12
Top Link Setup screen
Fn-F6
Toshiba Fn-F5
Fn-F6
Ctrl-Alt-End
Fn-End
Tsetup Utility
Automatic when computer is booted
Twinhead Fn-F5
Fn-F7
Automatic when computer is booted
Winbook Ctrl-Alt-F10
Fn-F10
Fn-F6
Fn-F12
Port Activation Keys
Wyse Software driver
Zenith Fn-F10
Fn-F2
Fn-F1
Fn-F7
Zeos Ctrl-Shift-D
Fn-F1
Table 6: External Video Port Activation Keys
36 English
Page 42

Maintaining the Projector
This section explains how to replace the lamp module and clean the
projector dust filters.
Maintaining the Projector
Replacing the
Lamp Module
To replace the lamp module:
1 Press the catch on the lamp door to release the lamp door.
2 Lift out the lamp door.
3 Grasp the wire bale and remove the lamp module.
Lamp door catch
Wire bale
Replacement lamp module
Cleaning the Dust
Filters
Figure 31: Replacing the Lamp Module
4 Insert the replacement lamp module.
5 Replace the lamp door.
6 Turn on the projector.
7 Use the Reset Lamp Timer option in the Service menu to reset the
lamp life counter.
The Polaview 330 LCD projector has two dust filters to protect the optical
components and electronics. The best procedure for cleaning the filters is
to use a vacuum cleaner from the outside of the filter covers. If the filters
need a more thorough cleaning or replacement, follow these procedures.
English 37
Page 43

Maintaining the Projector
Back Filter To clean the back filter:
1 Remove the three retaining screws located on the back of the projector.
Rear filter cover
Retaining
screws
Figure 32: Replacing the Back Filter
2 Lift and remove the rear filter cover.
3 Remove the foam filter from the filter cover.
4 Clean the foam filter with soap and water, rinse, and dry thoroughly.
5 Replace the filter in the filter cover and reinstall it in the projector.
Bottom Filter To clean the bottom filter:
1 Remove the four retaining screws located on the bottom of the
projector.
Figure 33: Replacing the Bottom Filter
2 Remove the bottom filter cover.
3 Use a vacuum cleaner to remove dust from the exposed filter.
4 Replace the bottom filter cover.
Retaining
screws
Bottom filter cover
Retaining
screws
38 English
Page 44

Troubleshooting
This section outlines problems you might encounter while using the
projector and tells you how to solve them.
Warning: Except to replace the lamp or dust filter, do not attempt to
If you need technical help with the projector:
1 Check the table below to see if you can solve the problem.
2 Call your dealer’s technical support line and explain your problem.
3 Call Polaroid Corporation. Refer to the listing of Polaroid offices and
Maintaining the Projector
open the projector cabinet to service it yourself. Doing so will
subject you to dangerous voltages and other hazards.
service centers on page 41.
Problem Solution
When using a laptop, only
the logo or blank screen is
projected.
The projected image has vertical lines or vertical shaded
areas in the background.
• Check that you have activated the video
output port on the laptop computer. The
logo will only appear if there is no signal
present on the computer or video input. See
“Activating the Laptop External Video
Port” on page 32.
• Activate the external port on Macintosh
computers by opening the Macintosh Control Panel and selecting Video Mirroring.
See “Macintosh PowerBook Series 160, 165,
180, 185, 500, 520, 540” on page 31.
The frequency of the projector does not match
the frequency of the computer.
1 Press the Menu button on the remote con-
trol or on the projector keypad.
2 Select Picture from the menu.
3 Select Frequency from the menu.
4 Use the up and down direction keys on the
remote control or on the projector keypad
to adjust the frequency until the vertical
lines and/or shaded areas disappear.
Tip: On a PC that is running W indows 95,
use the Shut Down screen to adjust
the frequency. To display this screen,
click on the Start button in the lower
left-hand corner of the screen. Click
on Shut Down. When you finish the
Frequency adjustment, click on No to
return to the display screen.
English 39
Page 45

Maintaining the Projector
Problem Solution
When viewing text on the
projected image, some of the
characters seem darker or
thicker than others.
The image is noisy in video
mode.
The image lacks red, blue, or
green color.
The bottom of the projected
image is straight but the top
is crooked.
The remote control does not
work correctly.
The frequency of the projector does not match
the frequency of the computer.
1 Press the Menu button on the remote con-
trol or the keypad on the projector.
2 Select Picture from the menu.
3 Select Frequency from the menu.
4 Use the left and right direction keys on the
remote control or on the projector keypad
to adjust the frequency up or down until all
of the text characters are the same.
Use a continuity tester to check for poor or
open ground on the video cable.
Check the contrast adjustment. Also, check
the VGA cable for broken or bent pins.
Align the projector so that it directly faces the
screen. See “Leveling the Image” on page 13.
Check that the IR (infrared) window on the
front of the projector is not blocked. Check
that the red power LED is energized when any
button is pushed. If not, check the batteries in
the remote control.
The projected image is rolling
vertically or horizontally.
Check for broken or bent pins on the VGA
cable. The problem may also be related to the
computer refresh rate. The projector is able to
synchronize with a refresh rate between
55.378 and 85Hz. Any refresh rate outside
these limits will cause problems with the projected image. Check the refresh rate of the
computer and adjust it if necessary.
Table 7: Troubleshooting Procedures
40 English
Page 46

Polaroid Offices
and Service
Centers
Maintaining the Projector
Country Address
Australia Polaroid Australia Pty. Ltd.
13–15 Lyonpark Road
P.O. Box 163
North Ryde, N.S.W. 2113
Tel.: (02) 9 950 7000
Fax: (02) 887 2209
Belgique/België Polaroid (Belgium) N.V.–S.A.
Rue Colonel Bourg 111
Kolonel Bourgstraat 111
1140 Bruxelles–1140 Brussel
Tel.: 32 2 702 86 20
Fax: 32 2 726 92 99
Toll free: 32 78 155 905
Brasil Polaroid do Brasil Ltda.
Av. Paulista, 1776–11º andar
Cerqueira Cesar
São Paulo–Capital
01310-921
Tel.: 55.11.285.6411
Fax: 55.11.283.2625
288.6521
287.5393
Canada Polaroid Canada Inc.
350 Carlingview Drive
Etobicoke, Ontario M9W 5G6
Toll free: 1-800-268-6970
Danmark Polaroid a.s.
Blokken 75
3460 Birkerød
Tlf.: 42 81 75 00
Fax: 42 81 70 26
Deutschland Polaroid GMBH
Sprendlinger Landstrasse 109
63069 Offenbach
Tel.: (49-69) 840 4100
Fax: (49-69) 840 4 204
España Polaroid (España), S.A
Calle Orense, 16
2a planta
28020 Madrid
Tno: 34-1-597.02.52
Fax: 34-1-597.27.82
English 41
Page 47

Maintaining the Projector
Country Address
France Polaroid (France) S.A.
12 Bis Ave. Gay Lussac
La Clef de Saint-Pierre, B.P. 7
78996 Elancourt Cédex
Tel.: (33-1) 30 68 38 38
Fax: (33-1) 30 68 38 39
Hong Kong Polaroid (Far East) Ltd.
32/F Windsor House
311 Gloucester Road
Causeway Bay
Tel.: (852) 2894 0333
Fax: (852) 2895 1382
Italia Polaroid (Italia) S.p.A.
Via Piave 11
21051 Arcisate (Varese)
Tel.: (39-332) 470031
Fax: (39-332) 478249
Japan Nippon Polaroid
Kabushiki Kaisha
Mori Building No. 30
Toranomon 3-2-2
Minato-ku
Tokyo 105
Tel.: (81-3) 3438 8811
Fax: (81-3) 3433 3537
México Polaroid de México S.A. de C.V.
Paseo de la Reforma 195
Piso 17
C.P. 06500 México, D.F.
Tel.: (52-5) 703-1111
Fax: (52-5) 566-0505
Del interior al 91 (800) 70-727
Ventas 91 (800) 70-747
Nederland Polaroid Nederland B.V.
Zonnebaan 45
3606 CH Maarssen
PO Box 1219
3600 BE Maarssen
Tel.: (31-30) 241 0420
Fax: (31-30) 241 1969
Reparaties:
Polaroid (Europe) B.V.
Hoge Bothofstraat 45
7511 ZA Enschede
Tel.: (31-53) 486 5050
Tel.: (32-53) 486 9905
42 English
Page 48

Country Address
New Zealand Polaroid New Zealand Ltd.
24-26 Anzac Avenue
Auckland
Tel.: (64-9) 377 3773
Norge Polaroid (Norge) A/S
Industriveien 8B,
1473 Skårer, Norway
Tlf: (47-67) 90 47 10
Fax: (47-67) 90 51 73
Österreich Polaroid Ges.m.b.H.
Eitnergasse 5A
1231 Wien, Austria
Tel.: (43-1) 869 86 27
Fax: (43-1) 869 81 00
Portugal Polaroid (España) S.A.
Sucursal em Portugal
Edificio Monumental
Avenida Praia da Vitória, 71-A 4º B
1050 Lisboa
Tel.: (351-1) 316.10. 49
Fax: (351-1) 316.10. 56
Maintaining the Projector
Puerto Rico Polaroid Caribbean Corporation
Centro de Seguros
Ave. Ponce de León 701
Miramar, Santurce 00907
Tel.: (1-809) 725-6240
Fax: (1-809) 725-5462
Schweiz/Suisse/
Svizzera
Suomi Polaroid Oy
Sverige Polaroid AB
Polaroid AG
Hardturmstrasse 133
8037 Zürich, Switzerland
Tel.: (41-1) 277.72.72
Fax: (41-1) 271.38.84
Sinikalliontie 10
02630 Espoo
Tel.: (358-0) 502 35 33
Fax: (358-0) 502 35 50
Ekholmsvägen 34
Box 204
127 24 Skärholmen
Tel.: (46-8) 710 08 50
Fax: (46-8) 740 73 68
English 43
Page 49

Maintaining the Projector
Country Address
U.K. Polaroid (U.K.) Ltd. &
Polaroid Export Operations
Wheathampstead House
Codicote Road
Wheathampstead
Hertfordshire AL4 8SF U.K.
Tel: (44) 1582 63 2000
Freefone: (800) 010119
U.S.A. Polaroid Corporation
Technical Assistance
Tel.: Toll free 1-800-432-5355
Call for the nearest Polaroid location
Table 8: Polaroid Offices and Service Centers
44 English
Page 50

Appendix A - Parts and Accessories
Parts
Part Part Number
Rear air filter 39-0001-1A0
Bottom air filter 39-0003-1A0
Soft nylon carrying case 91-0003
Projector/computer mouse remote control 91-0001-000
PS2 remote mouse adaptor 91-0006
ADB mouse adaptor 91-0005
Macintosh monitor adaptor 91-0004
AC power cord - North America 22-0005-000
AC power cord - Europe 22-0012-000
Appendix A - Parts and Accessories
Accessories
AC power cord - UK 22-0015-000
Remote mouse computer/projector interface cable 22-0010
3.5mm composite video/stereo audio cable 22-0009
RCA cable 22-0008
S-video signal cable 22-0007
VGA video signal cable 22-0006
15-pin HD gender changer 91-0007-000
Polaview 330 Tools diskette 92-0003-000
Polaroid Polaview 330 LCD Projector User’s Guide PW-20287M-0
Quick Reference card PW-20287Q-0
Registration card PW-20287R-0
Table 9: Parts List
Accessory Part Number
PV330 ATA case with wheels 627193
PV330 Interlink RemotePoint Cordless Mouse 627194
PV330 Spare lamp assembly 627237
Table 10: Accessories List
English 45
Page 51

Appendix B - Specifications
Appendix B - Specifications
Computer Compatibility IBM-compatible computers
Video Compatibility NTSC-M/N/4.43
Audio Built-in stereo audio system with two internal 3
Number of colors 16.7 million
Display type 3-panel polysilicon LCD
Display format SXGA (with compression)
Apple Macintosh computers
PAL-M/N/B/D/G/H/IK/L
SECAM (B,D,G,K,K1,L)
Composite and S-Video
watt amplifiers and speakers.
XGA (1024x768)
SVGA (800x600) resized to XGA
VGA (640x480) resized to XGA
Contrast ratio 150 to 1
Lens zoom ratio 1.4 to 1
Light source 120 watt Ultra High Pressure Lamp
Lamp life 2000 hours
Brightness 700 lumens
Horizontal frequency 24.366 - 70 kHz
Vertical frequency 55.378 - 85.000 Hz
Cooling Internal fans and ventilation
Electrical supply AC 110/220V, 50 to 60 Hz
Power consumption 200 watts
Temperature Ambient operating 50 ˚F to 89.6˚F (10˚C to 32˚C)
Ambient storage -4˚F to 140˚F (-20˚C to +60˚C)
Dimensions 14 x 11 x 5 inches (35.56 cm x 27.94 cm x 12.7
cm)
Weight 13 lbs. (5.9 kilograms)
46 English
Table 11: Specifications
Page 52

Appendix C - Notices, Warranties, Safety Precautions
Appendix C - Notices, Warranties, Safety Precautions
Notices The information in this document is subject to change without prior
notification for the sake of improving reliability, design and function.
This document contains proprietary information that is protected by
copyright laws. All rights are reserved. No part of this manual may be
reproduced by any mechanical, electronic, or other means in any form
without obtaining prior written permission from the developer.
All brand or product names are trademarks or registered trademarks of
their respective companies.
Personal computers and computer software referred to in this manual are
not included with this unit.
FCC Statement Warning: This equipment generates, uses and can radiate radio
frequency energy and, if not installed and used in accordance
with the instruction manual, may cause interference to radio
communications. It has been tested and found to comply with
limits for a Class “A” computing device pursuant to Subpart
B of Part 15 of the FCC Rules, which are designed to provide
reasonable protection against such interference when
operated in a commercial environment. Operation of this
equipment in a residential area is likely to cause interference
in which case the user , at his own expense, will be requir ed to
take whatever measures may be necessary to correct the
interference.
Warning: Changes or modifications to this unit not expressly approved
by Polaroid could void the user’s authority to operate the
equipment.
Canadian Notice This digital apparatus does not exceed the Class A limits for radio noise
emissions from digital apparatus set out in the Radio Interference
Regulations of the Canadian Department of Communications.
Le présent appareil numérique n’émet pas de bruits radioélectriques
dépassant les limites applicables aux appareils numériques de la classe A
prescrites dans le Règlement sur le brouillage radioélectrique edicté par le
ministère des Communications du Canada.
European Notice Warning: This is a Class A product. In a domestic environment this
product may cause radio interference in which case the user
may be required to take adequate measures. The “CE” mark
certifies that this product satisfies the requirements of the EU
(European Union) regarding safety, public health,
environment and consumer protection. (“CE” is the
abbreviation of Conformité Européenne.) This product is in
English 47
Page 53

Appendix C - Notices, Warranties, Safety Precautions
conformity with the following directives: 73/23/EEC, low
voltage directive; 89/33/EEC, EMC directive; 93/68/EEC,
“CE” marking directive.
Declaration of
Conformity for
U.S.A
Model Number: PV330
Trade Name: Polaroid
Responsible Party: Polaroid Corporation
Address: 784 Memorial Drive
Cambridge, MA 02139
Telephone Number: 1-800-343-5000
This device complies with Part 15 of the FCC Rules. Operation is subject
to the following two conditions:
1 This device may not cause armful interference, and
2 This device must accept any interference received, including
interference that may cause undesired operation.
Declaration of
Conformity
Model Number: PV330
Trade Name: Polaroid
Responsible Party: Polaroid (Europa) BV
Address: Hoge Botofstraat 45 7511 ZA
Enschede, The Netherlands
Telephone Number: 31-53-486-5050
This device complies with the following directives and standards:
89/336/EEC
EN50081-1
EN55022 - (Class A) IT equipment emissions EN50082-1
IEC801-2
IEC801-3
IEC801-4
48 English
73/23/EEC
EN60950 - Safety of IT Equipment
Page 54

Appendix C - Notices, Warranties, Safety Precautions
Warranties Polaroid Corporation warrants your Polaview Projector equipment
against defects in manufacture for a period of one year from the date of
purchase. To verify the warranty period, you should keep the sales slip or
other proof of the purchase date.
Should this product, or any component or accessory included with it,
become defective at any time during the warranty period, Polaroid
Corporation will, at its discretion, either replace or repair this item,
without charge, provided the product is returned to a designated servicing
location (prepaid and insured). To ship the unit, pack the carrying case in
the original carton or equivalent, with plenty of padding.
This Limited Warranty does not apply to product damage resulting from
accident, incorrect installation, unauthorized modification, misuse or
abuse.
U.S.A. and Canada Before you return your equipment for repair, please call Polaroid
Electronic Imaging Technical Support from within the U.S.A. at 1-800432-5355, Monday through Friday, 8 a.m. to 8 p.m., Eastern Time. In
Canada, call 1-800-268-6970. We can help you determine what is at
fault, and advise you on how and where to get service in the quickest and
most convenient way.
Outside the U.S.A.
and Canada
THIS WARRANTY EXCLUDES ALL INCIDENTAL AND
CONSEQUENTIAL DAMAGES. ALL EXPRESSED OR IMPLIED
LIABILITY FOR THIS EQUIPMENT INCLUDING BUT NOT LIMITED
TO THE IMPLIED WARRANTY OF MERCHANTABILITY AND
FITNESS FOR A PARTICULAR PURPOSE ARE LIMITED IN
DURATION TO THE ONE-YEAR WARRANTY PERIOD.
SOME STATES DO NOT ALLOW THE EXCLUSION OR LIMITATION
OF INCIDENTAL OR CONSEQUENTIAL DAMAGES OR THE
DURATION OF IMPLIED WARRANTIES SO THE ABOVE
LIMITATIONS MAY NOT APPLY TO YOU. THIS WARRANTY GIVES
YOU SPECIFIC LEGAL RIGHTS, AND YOU MA Y ALSO HA VE OTHER
RIGHTS WHICH MAY VARY FROM STATE TO STATE.
THIS WARRANTY EXCLUDES ALL INCIDENTAL AND
CONSEQUENTIAL DAMAGES AND DOES NOT AFFECT YOUR
STATUTORY RIGHTS.
Note: No user-serviceable parts inside, with the exception of the lamp
and air filter which can be replaced as described in this manual.
Attempts to modify mechanical or electronic parts inside will void
your warranty, and may be hazardous.
English 49
Page 55

Appendix C - Notices, Warranties, Safety Precautions
Safety
Precautions
To prevent accidents caused by improper handling or operation, please
take note of the following precautions.
Be careful when handling UHP lamps.
There is a serious risk of eye damage from the intense illumination
provided by the UHP lamp. Avoid direct viewing or unprotected viewing
back into the projection lens.
While operating, UHP lamps are under very high internal pressure.
Even after you turn off the lamp, the pressure remains high until the lamp
cools down. At room temperature the internal pressure drops to about one
atmosphere.
Handle the UHP lamp by the metal parts only. Do not get fingerprints on
the glass of the lamp. This could adversely affect its operation. If
fingerprints get on the glass, clean it with alcohol and a clean, lint free
cloth or tissue. Clean the lamp before turning it on. A hot lamp will etch
the fingerprint permanently into the glass and affect performance.
Do not attempt to repair the product yourself. Opening the case may
expose the user to dangerous voltage or other hazards.
Keep the product away from dirt and dust, and periodically wipe its
surface with a soft, dry cloth. You can remove stubborn marks by using a
soft cloth moistened with a mild detergent.
Avoid condensation that is caused by moving the projector from a cold
environment to a warm, humid environment. If condensation occurs,
allow the projector to dry out completely before powering it up.
If the product will not be in use for a long period of time, disconnect the
power plug from the AC outlet.
Avoid using the product under the following conditions:
• Extremely hot, cold or humid environments
• Areas susceptible to dust
• Near an appliance that generates a strong magnetic field
• In direct sunlight
50 English
Page 56

Index
Index
Numerics
800 number for Technical Support, 49
A
AC power
connecting
specifications, 46
Accessories and parts, 45
Adapters
Macintosh computers
remote mouse, 45
Adjusting
for room lighting
image height, 12
image size, 10
Alignment problems, 40
Audio
connecting
specifications, 46
Audio In connector, 6
Audio Menu options, 19
Audio Out connector, 6
, 2
, 30
, 22
, 6
B
Back filter, cleaning/replacing, 37
Balance feature, 20
Bass, controlling, 20
BIOS, changing, 30
Blank screen, 39
Bright Room, 22
Brightness
adjusting
specifications, 46
Bulb, replacing light, 37
Buttons
Arrange
Change Driver, 29
On/Standby, 14
remote control, 15
, 22
, 32
C
Cables
monitor, connecting
parts and accessories, 45
stereo audio, 6
VGA, connecting, 5
, 3, 5
Canadian notice, 47
Care and use precautions, 50
Ceiling Mount, controlling, 24
Characters, dark, 40
Cleaning precautions, 50
Cleaning/replacing filters, 37
Color specifications, 46
Colors, poor, 40
Composite
, 1, 46
inputs
video cable, 46
Composite video, as input signal source, 23
Compressed image, 3
Compression
enable, disable
Computer
activating external video port
as input signal source, 23
compatibility, 1, 46
Computer In connection, 3, 5
Configuration problems, 39
Configuring remote mouse, 28
Connecting
, 6
audio
Computer In, 3, 5
Macintosh computers, 4, 5, 30
Monitor Out, 3
personal computers, 3, 4, 5
power, 2
remote mouse, 7
VGA cable, 5
Contrast ratio, 46
Contrast, adjusting, 21
Control, remote, 15
Cooling specifications, 46
Copyright information, 47
Cords, 45
Crooked display, 40
Cropped image, 3
Curtain Style
adjusting, menu
Custom logo, 24
Custom Modes Menu options, 25
Custom Startup Logo, installing, 28
, 24
, 32
, 24
English 1
Page 57

Index
D
Dark characters, 40
Dark Room, 22
Dimensions of projector, 46
DIP switches, setting, 5, 30
Display
crooked
formats, 3, 46
noisy in video mode, 40
poor colors, 40
problems, 39, 40
specifications, 46
switch settings, 30
Displaying
lamp life
projector usage, 27
test pattern, 27
Drivers, mouse, 28
Dust filters, cleaning/replacing, 37
, 40
, 27
E
Electrical specifications, 46
Elevator foot, 12
Elevator Foot Release, 12
Environment specifications, 46
European notice, 47
External speakers, connecting to, 6
External video port, activating, 32
I
IBM-compatible computers. See Personal com-
puters
Icon, Happy Macintosh
Image
compressed
focus, 10
height, 12
leveling, 13
reversing, 24
rolling, 40
size, 10
Image compression, enabling or disabling, 24
Image height, adjusting, 12
Image size, adjusting, 10
Image, leveling, 13
Input signal source
computer, composite video, S-video
Installing custom startup logo, 28
Interface adapters for Macintosh computers, 31
Internal pointer, using with remote mouse, 29
, 3
, 32
, 23
J
Joystick, 15
K
Keys, port activation, 32
F
Fan specifications, 46
FCC statement, 47
Features Menu options, 23
Features of projector, 1
Filters, cleaning/replacing, 37
Flipping image, 24
Focus Ring, 10
Focus, adjusting, 10
Focusing
, 10
image
Frequency
adjusting
problems, 39
specifications, 46
Functions, remote control, 15
, 21
H
Happy Macintosh icon, 32
Help, getting technical, 49
L
Lamp, 14, 46
replacing, 37
specifications, 46
ultra high pressure, 1
won’t turn on, 14
Lamp life, displaying, 27
Lamp timer, resetting, 27
Language, on-screen menus, 23
Laptop personal computer, connecting to, 4
Legal notices, 47
Lens zoom ratio, 46
Leveling
, 13
feet
Foot, 13
image, 13
Light bulb, replacing, 37
Light source specifications, 46
Linear Stereo, 20
Lines, vertical in background, 39
Live state, 14
2 English
Page 58

Index
Logo
choosing startup
custom, 24, 28
default, 24
off, 24
startup, 9
, 24
M
Macintosh computers, connecting to, 4, 30
Main menu, use of Reset, 19
Maintaining projector, 37
Manufacturers, activate external video port, 32
Menus, 18–27
Message, Will Shut Down In..., 14
Microsoft PowerPoint®, problem using remote
mouse
Mirroring option, 31
Monitor cable, connecting, 3, 5
Monitor Out, connecting, 3
Mono, 20
Mouse, remote, 7, 28
Multisync switch settings, 30
Mute feature, 20
, 30
N
Noisy display in video mode, 40
Normal room, 22
Notices, legal, 47
NTSC, 1, 46
O
On/Standby button, 14, 15
On-screen menus, language choices, 23
Operating
specifications
states, 14
, 46
P
PAL, 1, 46
Parts and accessories, 45
Personal computers
activating external video port
connecting to, 3, 4, 5
Picture Menu options, 20
Polaroid Polaview 330 LCD projector. See Pro-
jector
Polaroid Technical Support
Poor display quality, 40
Port, activating external video, 32
, 32
, 49
Portable Macintosh computer, connecting to, 5
Power
connecting
specifications, 46
Powered external speakers, connecting to, 6
Powering up the projector, 9
PowerPoint®, problems with, 30
Precautions, safety, 50
Problems
PowerPoint®
projector, 39
Processor Direct Slot (PDS), 31
Projecting images
from behind screen
from upside down ceiling mount, 24
Projector
alignment problems
audio, connecting, 6
cleaning precautions, 50
connecting to Macintosh computers, 4, 30
connecting to personal computer, 3, 5
dimensions, 46
features, 1
filters, cleaning/replacing, 37
focus, adjusting, 10
image height, adjusting, 12
image level, adjusting, 13
image size, adjusting, 10
lamp, 1, 37
legal notices, 47
Macintosh issues, 30
maintaining, 37
operating states, 14
parts and accessories, 45
powering up, 9
safety precautions, 50
setting up, 28, 30
troubleshooting, 39
warranties, 49
Projector life, displaying, 27
Projector usage, displaying, 27
Pseudo Stereo, 20
, 2
, 30
, 24
, 40
Q
Quality problems with display, 39
R
Ratio specifications, 46
Rear Projection, controlling, 24
English 3
Page 59

Index
Remote control, 15, 40
Remote mouse
configuring
connecting, 7
problem using Microsoft PowerPoint®, 30
using with internal pointer, 29
Replacing lamp module, 37
Reset
use on main menu
use on submenu, 19
Resetting lamp life timer, 27
Resolution, setting, 3
Reversing image, 24
Room Light menu, 22
Room lighting, adjusting for, 22
, 28
, 19
S
Safety precautions, 50
Screen, blank, 39
SECAM, 1, 46
Service Menu options, 26
Setting
DIP switches
up projector, 28, 30
Sharpness, adjusting, 22
Slanted display, 40
Sleep state, 14
Source Menu options, 22
Spare parts, 45
Spatial Stereo, 20
Standby state, 14
Startup logo, 9
menu, 24
selecting, 24
Startup pending state, 14
Start-up sequence, and selections in projector
system menus
States, operating, 14
Stereo audio
connecting
specifications, 46
Stereo Mode menu, 20
Storage specifications, 46
Submenu, use of Reset, 19
SVGA
DIP switch settings
display format, 46
S-video
compatibility
, 5, 30
, 9
, 6
, 30
, 1, 46
specifications, 46
S-video, as input signal source, 23
SXGA display format, 3, 46
T
Technical Support, 49
Temperature specifications, 46
Test pattern, displaying, 27
Tint, adjusting, 22
Tracking, adjusting, 21
Treble, controlling, 20
Troubleshooting, 39
U
Ultra high pressure lamp, 1
V
Vertical lines in background, 39
VGA
cable problems
cable, connecting, 5
DIP switch settings, 30
display format, 46
port, activating, 32
Video
card, PDS
compatibility, 1, 46
out for Macintosh PowerBooks, 31
port, activating external, 32
problems, 40
specifications, 46
Video Mirroring, 31
Volume, controlling, 20
, 40
, 31
W
Warnings, 50
Warranties, 49
Weight of projector, 46
Will Shut Down In... message, 14
X
XGA display format, 1, 3, 46
Z
Zoom Ring Tab, 10
Zoom, lens ratio, 46
4 English
Page 60

PLEASE READ
We are in no way responsible for the
contents of the manual. We do not guarantee
its accuracy and we do not make any claim
of copyright. The copyright remains the
property of their respective owners.
Visit the site to read the latest projector
news and reviews, read and comment on
projector specifications, download user
manuals and much more.
 Loading...