

Page 1
3100Bf Camera
User Guide
Page 2

Parts and Controls
1. Auto-Focus Window 12. Film Rewind Shaft
2. Shutter Release Button 13. Flash Ready Light
3. Viewfinder Window 14. Viewfinder Eyepiece
4. Red-Eye Reduction Light 15. Film T ake-Up Spool
5. Auto-Flash Sensor 16. Back Cover
6. Film Counter Window 17. Film Check Window
7. Built-In Auto Flash 18. Strap Eyelet
8. Lens Cover 19. Battery Compartment Cover
9. Lens 20. Tripod Socket
10. Lens Cover Switch 21. Film Rewind Switch
1 1. Back Cover Latch 22. Film Chamber
3
2
4
5
6
1
8
9
10
Attaching the Strap
Insert the loop at the end of the strap
under the strap eyelet (18) (Fig. 1).
7
17
16
18
19
11
12
22
13
21
14
15
20
2
Page 3

Camera Batteries
1. This camera requires two AA alkaline batteries for normal camera operation, and one
CR2025 lithium battery to power the camera’s date back.
2. Closely supervise children when the camera is operated by them or used in their presence.
T o avoid electrical shock, the camera should not be exposed to or immersed in water or
other fluids, disassembled, or operated if dropped or damaged. For repair information,
contact a Polaroid Service Center .
3. When the batteries are depleted, discard or recycle them in accordance with local or
national environmental requirements, and where noted, with the battery manufacturer’s
instructions. Replace only with batteries of the same type (e.g., AA alkaline or CR2025
lithium); DO NOT USE NiCd rechargeable batteries.
CAUTION
DUE TO THE RISK OF EXPLOSION, DO NOT RECHARGE,
MUTILATE OR INCINERATE BATTERIES.
Loading the Alkaline Batteries
1. Make sure the lens cover (8) is closed
so that all camera power is off.
2. Open the battery compartment cover
(19) by pressing it in an outward
direction and pivoting it upwards
(Fig. 2).
3. Insert the batteries, making sure that
the ( + ) and ( – ) signs on each battery
are aligned according to the polarity
symbols shown inside the
compartment cover (19) (Fig. 3).
4. Close the compartment cover by
sliding it until it latches.
3
Page 4
Replacing the Lithium Battery
Replace the lithium battery when the date or time is dim or washed out on your pictures.
The lithium battery has an expected life of about three years.
Setting the Film Speed
Camera automatically sets the correct film speed by reading the black and silver DX-coded
pattern on the film cartridge.
Note: Do not use slide film. For best results, use Polaroid Color Print films.
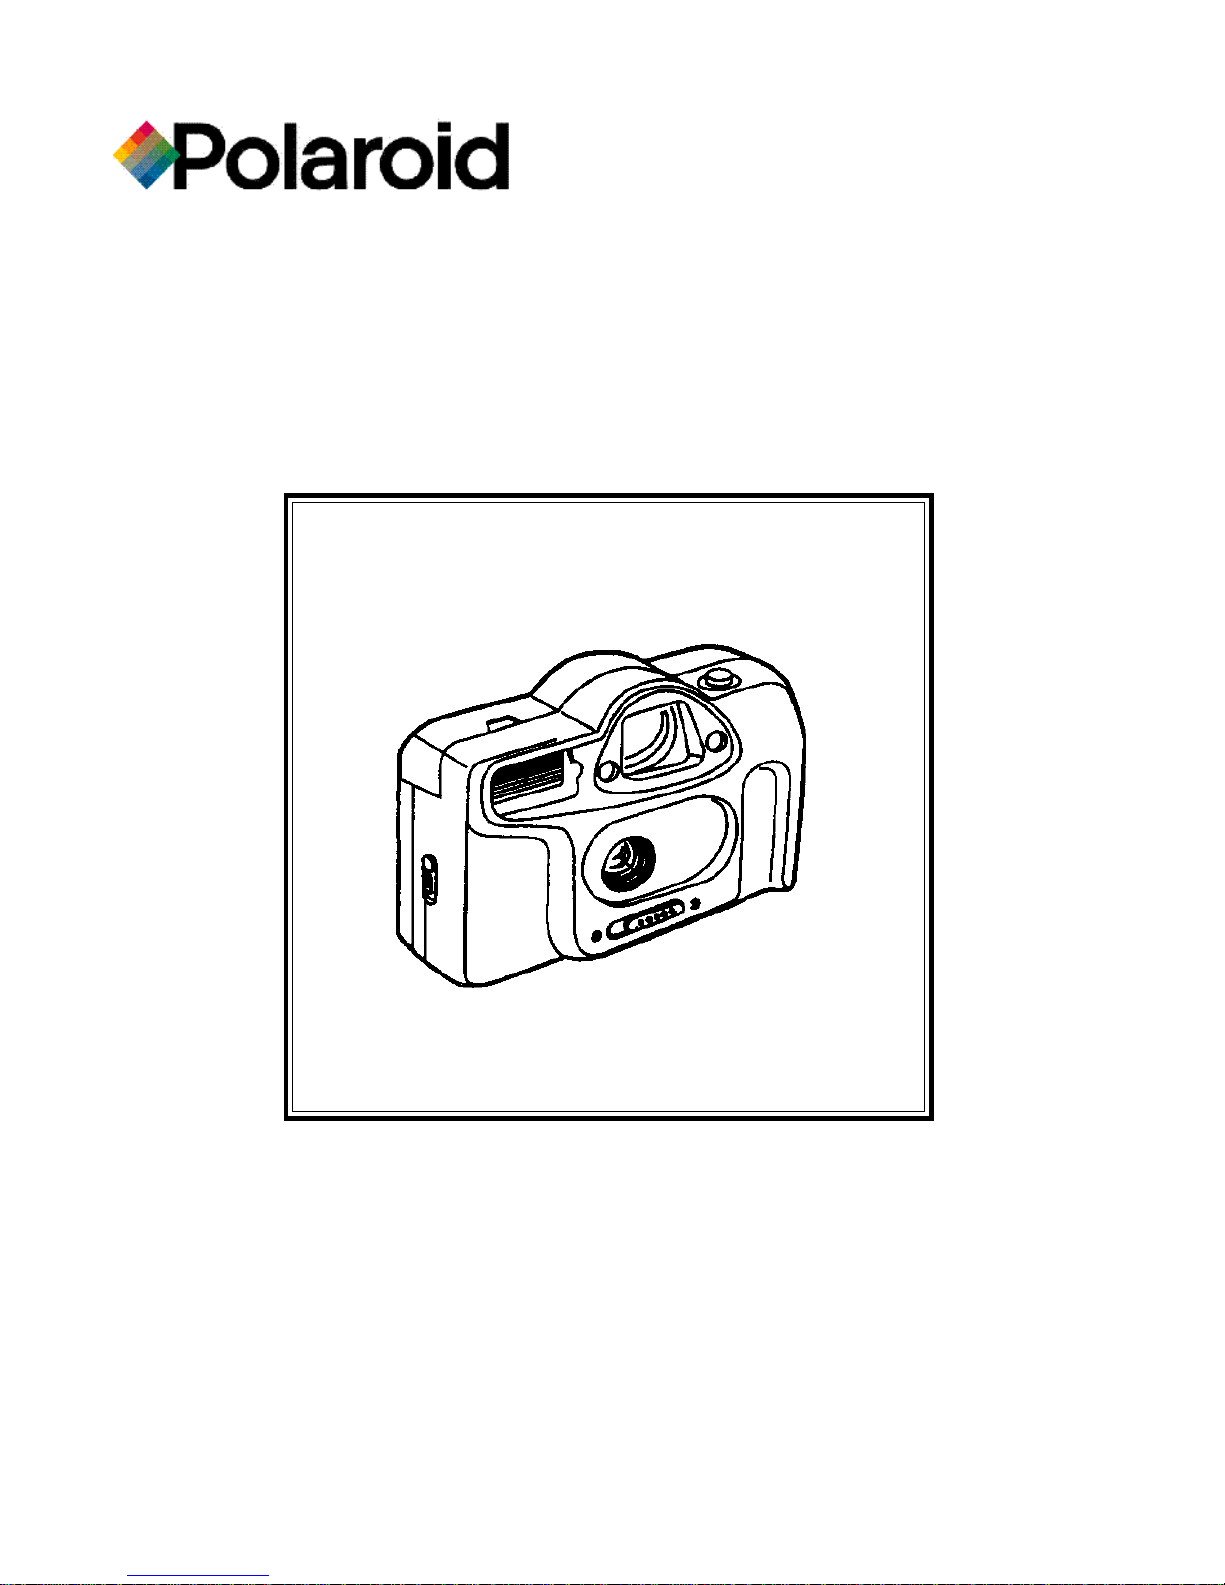
Loading the Film
1. Slide the lens cover switch (10) to turn
on the camera.
2. Slide the back cover latch (11) to
open the back cover (16)(Fig. 4).
3. Insert film into film chamber, place film
leader on take-up spool (15) to the
film tip indicator (Fig. 5).
Note: Make sure the film lies flat
between the film guides,
and that the sprocket teeth
engage the film perforations.
4. Press the back cover shut so that the
back cover latch returns to its original
position. Y ou can always be sure that
there is film in the camera by looking
through the film check window (17)
(Fig. 6).
5. Press the shutter release button (1)
several times until the “1” appears in
the film counter window (6). The
camera is then ready for you to take a
picture.
Note: Be sure the pinwheel in the film
counter window is rotating. This
ensures the film is advancing properly .
If pinwheel is not rotating, reload film.
4
Page 5

Holding the Camera (Fig. 7)
1. Always use both hands to steady your
camera.
2. T ake picture with sunlight behind you.
3. When holding the camera vertically ,
always position it with the flash at the
top.
Taking Pictures
1. Turn on the camera power and open
the lens cover (8) by sliding the lens
cover switch (10). Be sure the lens
cover is opened completely (Fig. 8).
Note: Auto-flash is designed into this
camera. If additional light is
needed, the flash will turn on
automatically while a picture is
taken.
4. Be careful not to place your fingers
over the lens (9), the flash (7), the
auto-flash sensor (5), or the
auto-focus windows (2).
2. Frame the subjects through the
viewfinder eyepiece (14). Make sure
all your subjects are within the bright
frame marked on the viewfinder. (The
camera will focus on subjects from
1.3m (4ft.) to infinity .)
5
Page 6
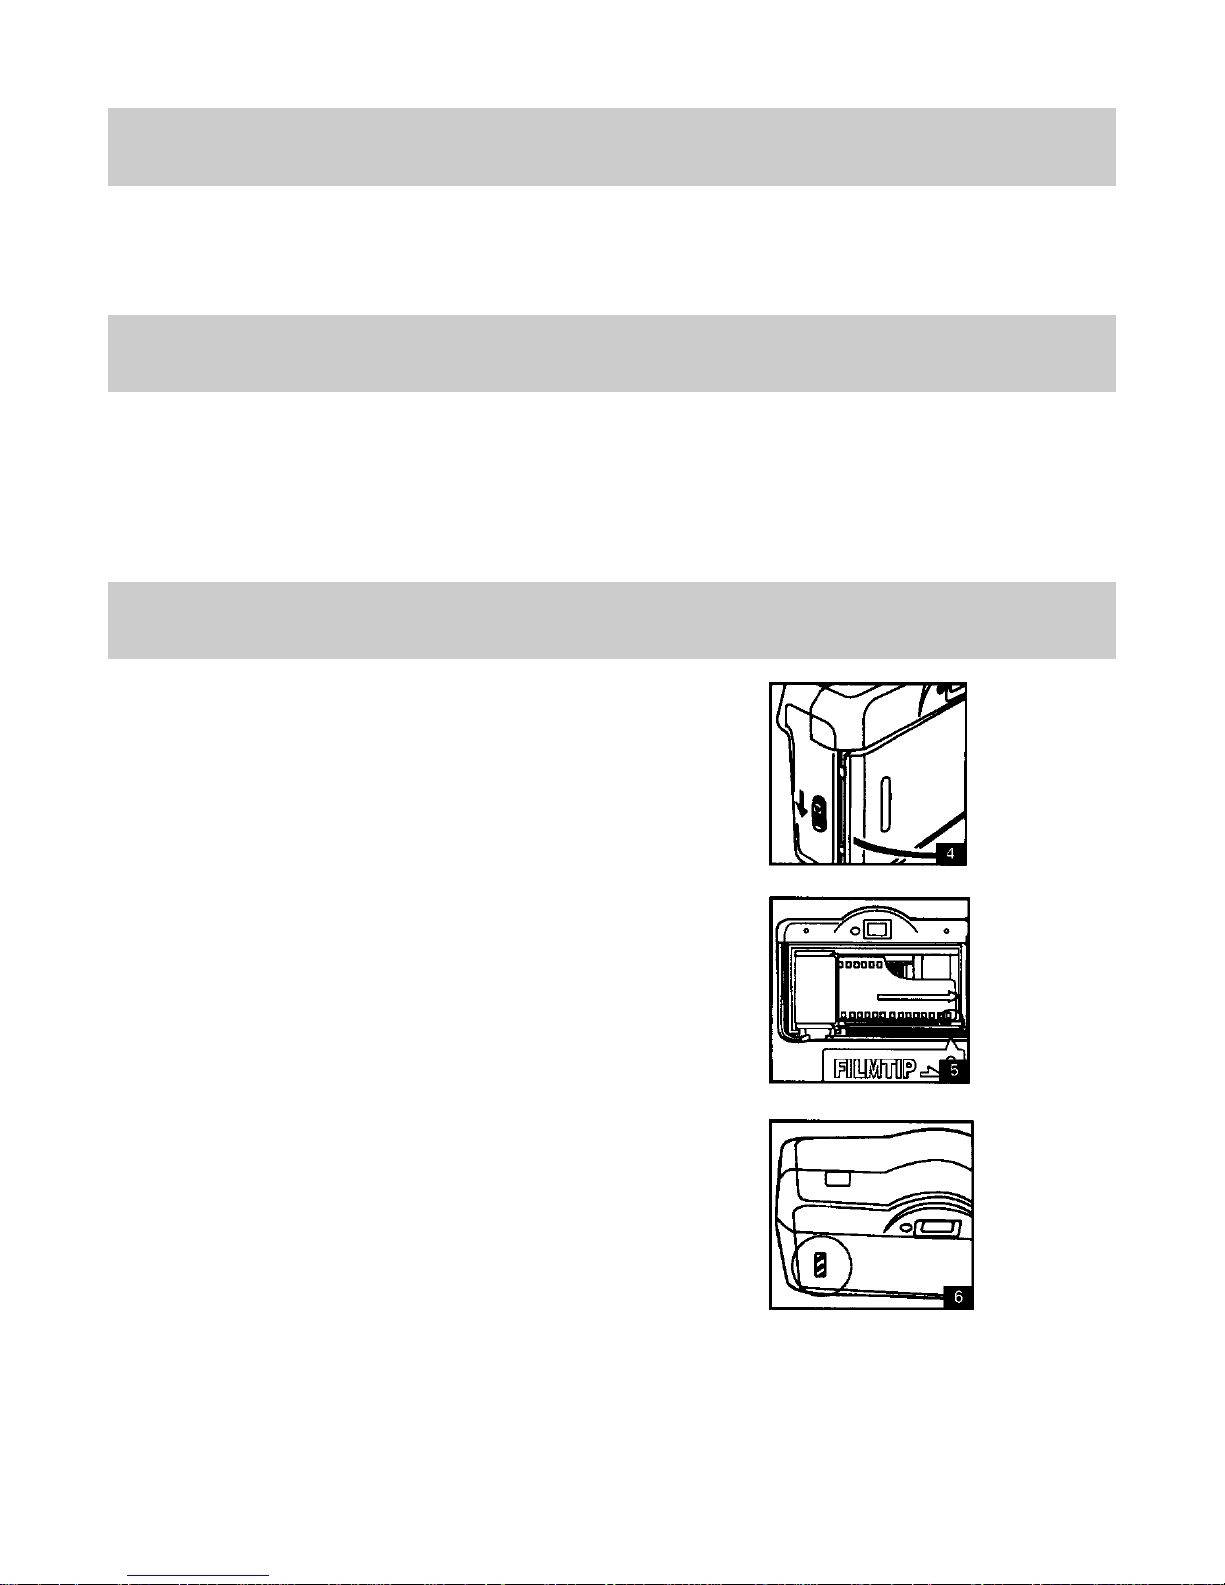
Taking Pictures (con’t)
3. Press the shutter release button (1)
gently and smoothly half way; the
red-eye reduction light (4) will come
on to reduce the red-eye effect on the
pictures when flash is used (Fig. 9).
Continue to press the shutter release
button all the way down to release the
shutter to take a picture. The camera
automatically winds the film to prepare
for the next picture.
Note: T o get better red-eye
reduction effect, holding the
shutter release button half
way for at least one second
is recommended.
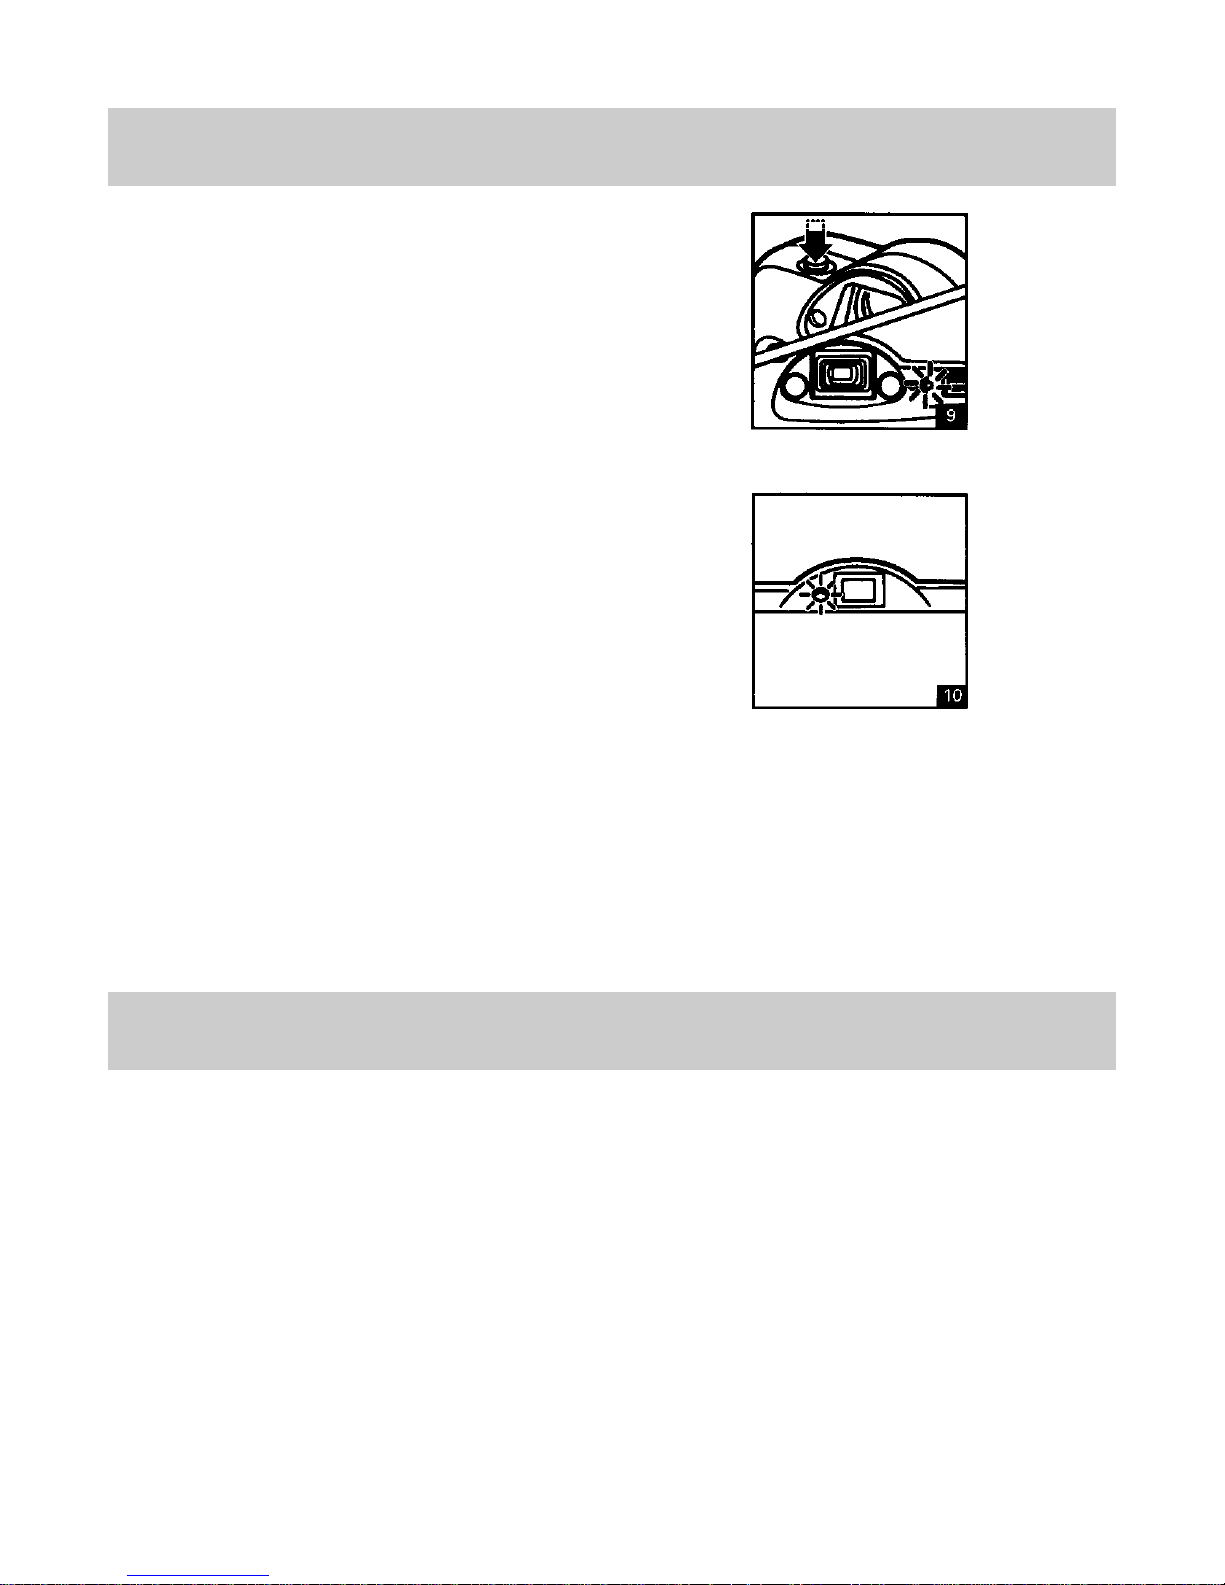
4. When flash is needed for a
photograph, wait for the green flash
ready light (13) to come on. It takes
approximately 6 seconds for the flash
to charge when fresh batteries are
used (Fig. 10). While flash is still
charging, the green ready light (13)
will not be on.
Picture Distance Range
Daylight distance range: 4’ (1.3m) to infinity .
Flash distance range:
ISO 100/21° 4’ (1.3m) – 10’ (3.0m)
ISO 200/24° 4’ (1.3m) – 12’ (3.6m)
ISO 400/27° 4’ (1.3m) – 16’ (5.0m)
Note: When taking pictures, avoid aiming camera toward direct sunlight.
6
Page 7

Auto Power Saving System
• A battery power saving device is designed into this camera. If the camera is left unused for
approximately 3 minutes, the flash charge will stop automatically to save battery power and
the ready light will turn off.
• Press the shutter release button halfway down to recover flash charging.
Auto-Focus/Focus Lock
This camera is equipped with an infrared auto-focus system that measures the distance of
subjects from the camera and automatically sets the lens to the optimum focus for every
photograph.
1. Press the shutter release button half
way down and hold it there; the lens
will be set to the correct focus position
automatically according to the
distance measured by the system (the
red-eye reduction light will also turn
on).
2. Y ou may lock the focus position by
holding the shutter release button
halfway down; you may then further
compose your picture in the
viewfinder (Fig. 1 1).
Setting the Date or Time
A date and time recorder , called a “date
back”, located on the back cover , lets you
add a date to your photograph, in a day/
month/year format (e.g., October 14,
1997 would be “14 10 97”), or a year/
month/day format (e.g., October 14, 1997
would be “97 10 14”). Y ou may also
record the time you took your photo,
shown in an hour/minute format.
3. Continue to press the shutter release
button all the way down to finish taking
the picture.
Hours are shown in a continuous cycle
from 1 to 23, with no reference to AM or
PM; so 9:30 AM would show as “9 – 30”,
while 9:30 PM would show as “21 – 30”.
Note: While you may add either a date
or a time, you can not have both
on the same picture.
7
Page 8

Setting the Date or Time (con’t)
1. Press the mode button to select the
format for adding either the date or the
day (in the date format) or the minute
(in the time format).
time.
5. T o turn off the date or time display ,
2. Press the “Y/H” button to change the
year (in the date mode format) or the
hour (in the time format).
3. Press the “M” button to change the
press the mode switch until horizontal
lines appear (— - —). No date or time
will print on your photograph.
Note: The date or time may be
month in the date format. (The “M”
button is not used in the time format.)
4. Press the “D/M” button to change the
Rewind the Film and Unload Film Cartridge
Once the end of the film is reached, the
film will not advance any further.
washed out when viewed
against bright or orange
backgrounds.
1. Slide the rewind switch (21) until it
clicks into position and the film
automatically rewinds (Fig. 12).
2. After the film is fully rewound, the
motor will stop, and “S” will be seen in
the film counter window . Y ou may
open the back cover and remove the
film cartridge.
3. If you wish to rewind the film before
reaching the end of the roll, slide the
rewind switch.
4. Be careful not to touch the inner lens
surface with your fingers or the edge
of the film.
5. Send the film for processing as soon
as possible.
8
Page 9

Caring for your Camera
• Always close the lens cover before
putting the camera away to keep the
lens free of dust and dirt and to
• Do not use solvents, alcohol or
abrasive cleaners to clean the camera
body .
prevent accidental shutter release.
• Remove batteries if storing the camera
• Protect camera from rain, dampness
for an extended period.
and high heat as well as dust and dirt.
Specifications
T ype: 35mm motorized compact with auto flash
Film: 35mm perforated cartridge film; 24mm x 36mm format
Lens: 35mm f/6.3 lens; 3 elements, 3 groups
Focusing: Active automatic focusing system with focus lock
Focusing range: 1.3m to infinity (normal)
Shutter speed: 1/125 sec
Aperture setting: ISO 100 (f/5.6)
Film speed index: ISO 100/200 and 400
Viewfinder: Inverted Galilean finder. Picture area: over 80%.
Flash and red-eye: Built-in auto-flash with red-eye reduction
Recycling time: Approximately 6 sec
Film winding and
rewinding: Auto winding and power rewinding
Imprint function: Built-in date imprinting function (option: date back only)
Counter: Additive, automatic reset to “S” when the camera back door is opened
9
Page 10

Specifications (con’t)
Power source: 2 AA alkaline batteries
Dimensions: 124.7mm (L) x 81.3mm (H) x 43.3 (W)
124.7mm (L) x 81.3mm (H) x 48.3 (W) (with date back)
Weight: 182g; 192 (with date back)
Note: Design and specifications are subject to change without notice.
One-Year Warranty
If your camera proves to be defective
within the warranty period, we will without
charge repair it or, at our option, replace
it with a camera of the same or equivalent
model.
T o verify the warranty period, keep the
receipt or other proof of purchase;
otherwise the warranty is determined by
the date of manufacture on the camera.
The warranty does not cover damage
caused by accident, misuse, or tampering
with the camera, and a charge will be
made for such repairs.
This warranty excludes all consequential
damages. Some jurisdictions do not
allow the exclusion of consequential
damages so the foregoing exclusion may
not apply to you. For warranty service, the
camera must be returned to and repaired
by an authorized Polaroid Service Center.
Caution
This camera is battery operated.
Closely supervise children when
camera is operated by them or
used in their presence. To avoid
electric shock, camera should
not be exposed to or immersed in
water or other fluids, disassembled,
or operated if dropped or damaged.
For repair information, contact a
Polaroid Service Center .
Polaroid Service Centers and Offices
If you need information or help, or if your camera needs repair, please see your dealer or
contact the nearest Polaroid office.
U.S. - Polaroid
Americas Business Center
201 Burlington Road
Bedford, Massachusetts 01730
Representatives available weekdays from 8 a.m. to 8 p.m., Eastern Time.
Tel: 1-800-343-5000
10
 Loading...