

Page 1
How to use the
Polaroid Land camera
Model
180
Page 2
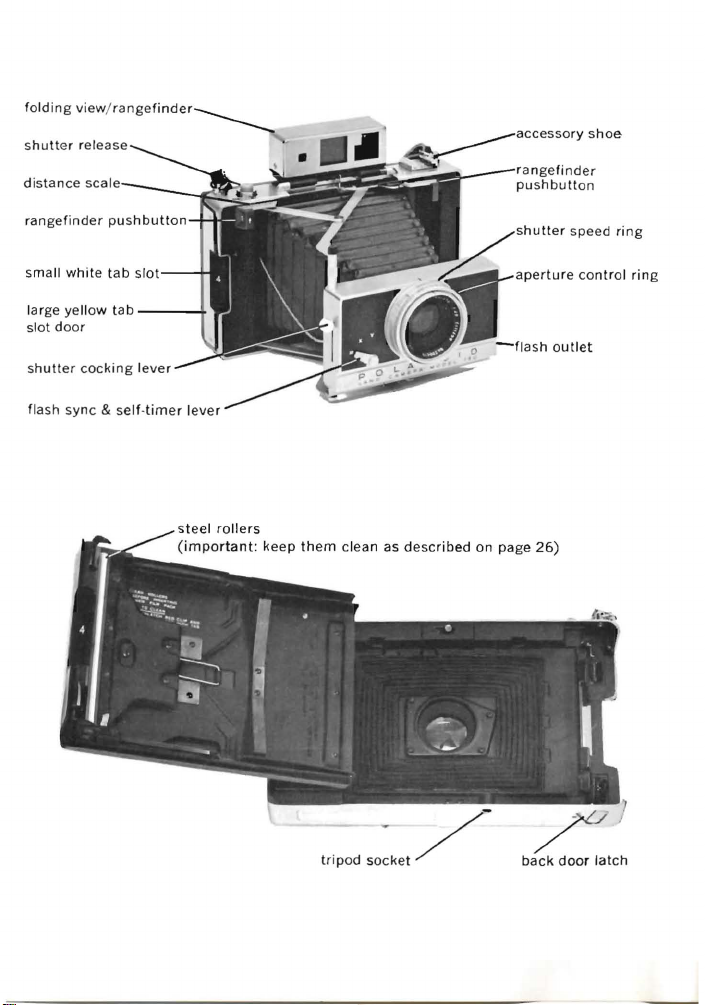
fol
ding
distance
sm all w
view/range
SCa«,
__
hit
e t
ab slot
finder
_
____
_~a(
:ce'ss'D
utt
er
rv
spee
shoe
d ring
large yellow t
slot d
oor
shu
tter
coc ki
flash
sync
& se
ab
ng
---
lev
lf·tim
er
er lever
st
(imp
-+
eel
roll
ers
ortant
: ke ep them clean as des
cribed
on page 26)
Page 3
JUST A MINUTE,
Eager as
new
please
booklet
As you read
pictures,
using
Once
routine
suggest
white.
finest
from
duce
summed
think
carefully
with
change
idea
THE
The
tile
standards
picture
Its
four
The
lens
air·to·glass
internal
quality.
The
between·the·lens
shutter/lens
you
camera
the
your
to
and
take
the
carefully
go
through
the
camera -without
you
get
down
pat, load a
that
you
Please
camera
good
before
remember
and
photographer
pictures.
up
in
you
the
instruction
film.
from
time
review
them
CAMERA
Model
of
taking
114mm,
is
highly
surfaces
reflections
lens
is
180
that
professional
ability.
and
mounted
combination
camera
elements
may
begin
time
before
the
the
one
shoot.
Those
to
is
f/4.5
color
text
start
film
meets
is
are
and
PLEASE
be
to
get
making
to go
through
loading
and
look
all
the
motions
film.
simple
film
with
black
that
need
some
if
they
That
sentence:
time,
occasionally.
an
Tominon
of
shutter,
are
help
As a starter,
sheet
instructions
so
it's
extremely
the
quality
the
Tessar
corrected
coated
improve
in a Seiko SLV
and
gives
at
your
pictures,
this
film
.
at
the
operating
pack.
We
and
even
the
help
to
pro·
can
be
Plan
and
read
packed
may
a good
versa·
highest
and
lens
has
type.
and
all
to
reduce
image
this
the
cam·
good
helpful
1.
2.
of
the
3.
4.
color
5.
with
6.
7.
8.
these
They
getting
era
The
coupled
range/viewfinder
made
German
similar
pack
oped
color
whites
As a quick
picture
hints.
Be
careful
Move
in
print.
Focus
accurately.
Choose
pictures.
Pick
a good
flash.
Pull
the
Time
development
Keep
an
As
you go
eight
can
make
good
extraordinary
shutter
For
accurate
to
for
this
firm,
The
picture
to
that
film
cameras.
outside
prints
in
15
guide
every
ti
They
're
about
close,
to
colorful
background,
tabs
correctly.
eye
on
the
through
this
pOints
explained
the
pictures
exposure
is
described
focusing,
an
easy·to·use
specially
camera
Zeiss
Ikon.
development
used
Pictures
the
in a minute
seconds.
camera,
to
help
me,
here
important.
exposure.
get a big
subjects
carefully.
temperature.
booklet
difference
and
poor
capabilities.
on page
the
designed
by
the
in
other
and
you
get
are
eight
image
for
your
particularly
you
'Illi
nd
in
detail.
between
ones.
8.
lens
combined
system
are
producing
black
is
and
famous
is
Polaroid
devel·
and
a
in
THE FILM
Two
kinds
are
presently
Model
180
and
white,
Type
3JA x 4JA
Type
108.
in.
of
Polaroid
avai
lable
camera:
107,
Each
pack
(8.3 x 10.8
3000
and
Land
for
75
prod
use
speed
speed
uces
cm)
pack
film
with
black
color,
eight
pictures.
the
There
film
in
Complete
using
this
booklet
packed
may
the
film
with
be
additional
future.
instructions
packs
are
and
in
the
film.
given
the
instruction
types
for
loading
elsewhere
of
pack
and
in
sheet
3
Page 4
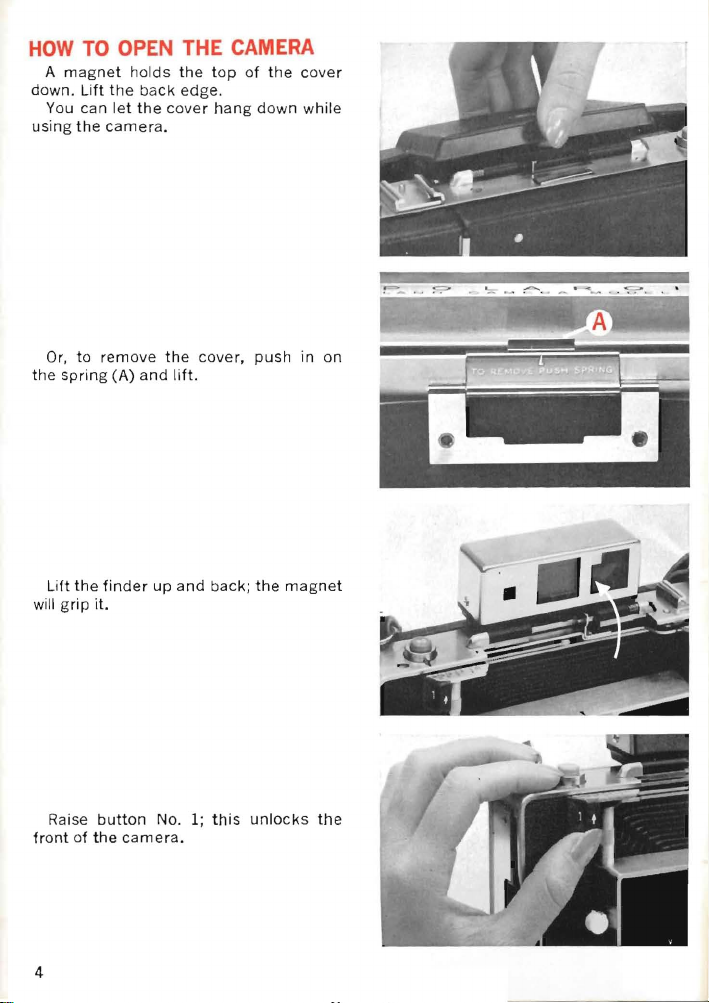
HOW
A
magnet
down.
You can
using
Or,
the
spring
Lift
will
grip
TO
OPEN THE CAMERA
holds
the
Lift
the
to
the
the back
let
camera.
remove
(A)
finder
it.
the
and
cover
the
up
edge.
lift.
and
top
hang
cover,
back;
of
down
push
the
the
magnet
cover
while
in on
Raise
front
4
of
button
the
camera.
No.1;
this
unlocks
the
Page 5
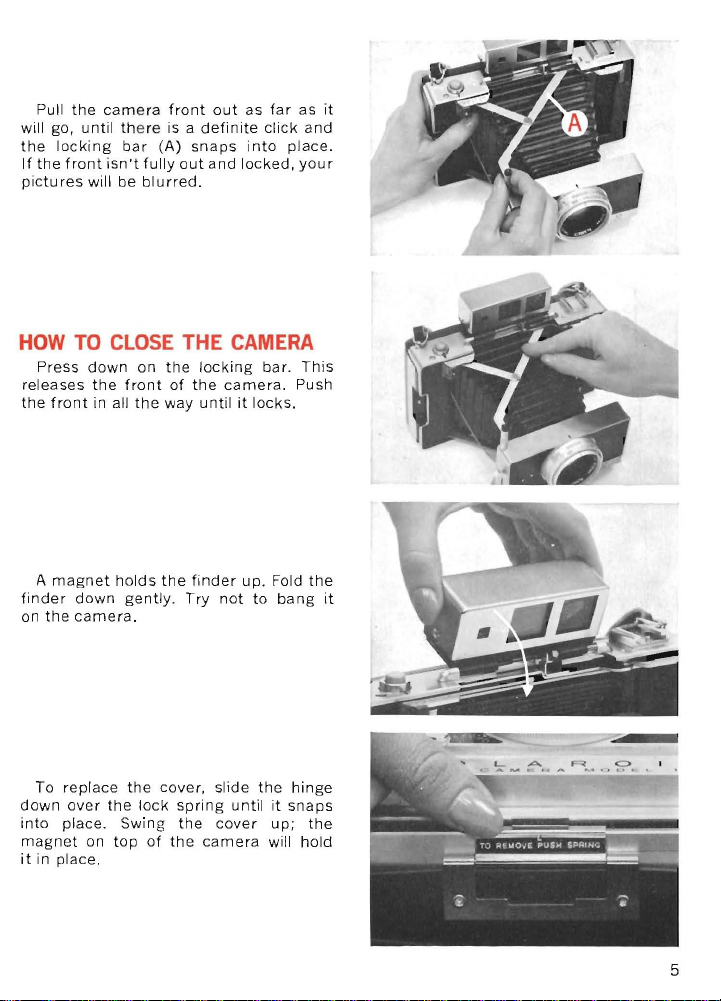
Pull
will go,
the
locking
If
the
front
pictures
the
cam
era
until there is a
bar
(A)
isn't
fully
will be
blurred.
front
out
out
definite
snaps
and
as
far
click
into
locked,
as
and
place.
your
it
HOW TO
Press
front
A
magnet
the
To
place.
down
down
camera.
replace
over
place.
on
releases
the
finder
on
down
into
magnet
itin
CLOSE
the
front
in all
holds
gently.
the
the
Swing
top
THE CAMERA
on
the
locking
of
the
the
way
until
the
finder
Try
cover,
lock
spring
the
of
the
camera
camera.
it
up.
not
slide
until
cover
bar.
locks.
Fold
to
bang
the
it
up;
will
This
Push
the
it
hinge
snaps
the
hold
5
Page 6
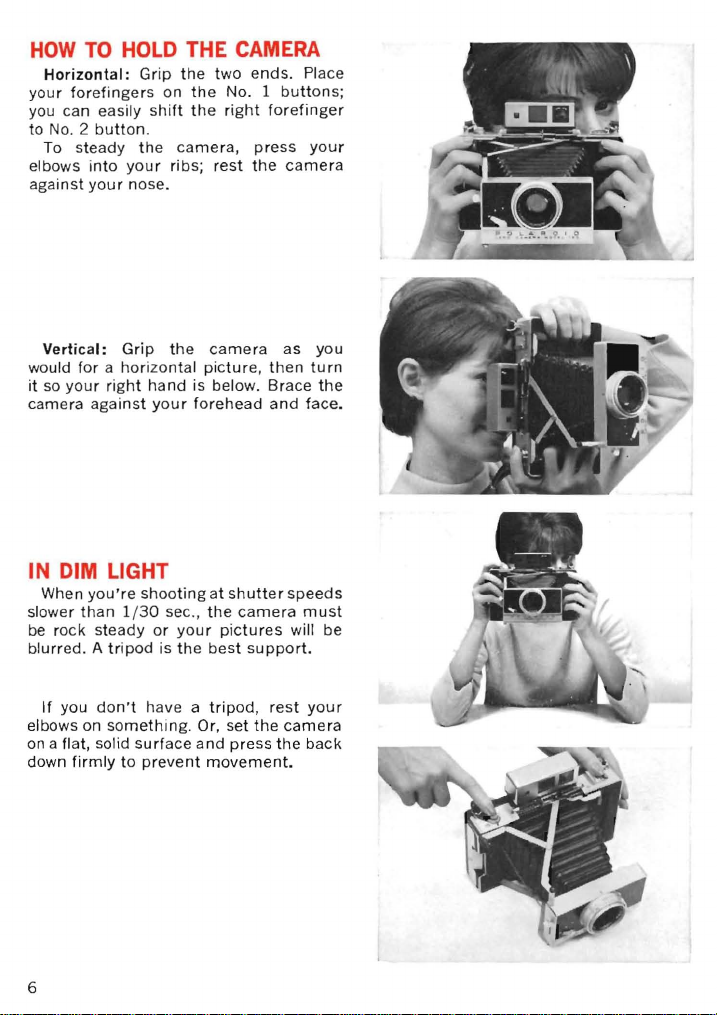
HOW
TO
HOLD THE CAMERA
Horizontal: Grip
your
forefingers
To s
easily
button
teady
into
your
your
nose.
you can
to No. 2
elbows
against
.
the
on
shift
ribs;
the
two
the
the
right
camera,
rest
ends.
No. 1
press
the
Place
buttons
forefinger
your
camera
;
Vertical:
would for a hori zo
it so
camera aga
your
Grip
right
inst
hand
your
IN DIM LIGHT
When
you're
slower
than 1/3
be rock
blurred . A
If
you
elbows on
on
a flat, solid
down
firmly
shooting
0 sec
steady
or
tripod
don't
have a
something.
surface
to
prevent
the
camera
ntal
picture,
is below. Brace
forehead
at
shutter
.,
the
your pictures
is
the
best
tripod,
Or, set
and
press
movement.
then
and
camera
support.
rest
the
the
as
you
tu
rn
the
face.
speeds
must
will be
your
camera
back
6
Page 7
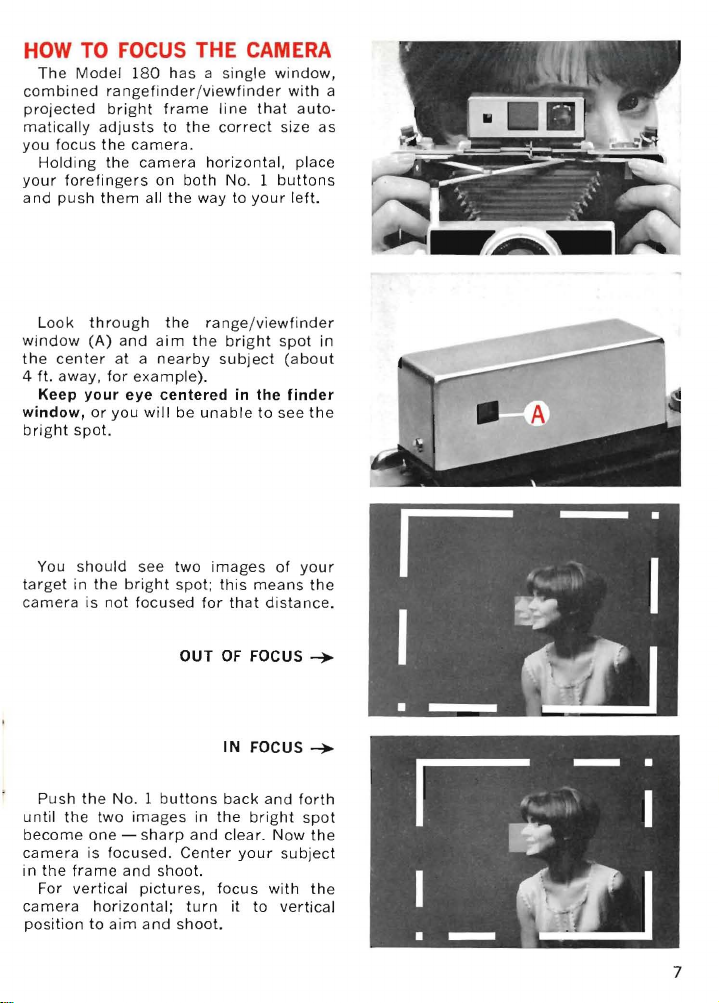
HOW TO FOCUS THE CAMERA
The
Model
180
combined
projected
matically
you
focus
Holding
your
forefingers
a nd
push
Look
window
the
center
4 ft.
away,
Keep
window,
bright
spot.
You
should
target
in
camera
rangefinder/viewfinder
bright
adjusts
the
the
them
through
(A)
for
your
or
the
is
not
has a single
frame
to
camera.
camera
on
both
all
the
the
and
aim
at a nearby
example).
eye
centered
you
will
be
see
two
bright
spot;
focused
the
horizontal,
way to
range/viewfinder
the
unable
images
for
line
that
correct
No. 1
your
bright
subject
in the
to
this
means
that
window,
with
auto-
size
place
buttons
left.
spot
(about
finder
see
the
of
your
the
distance.
a
as
in
Push
until
the
become
camera
in
the
For
camera
position
the No. 1
two
images
one -sharp
is
focused.
frame
and
vertical
pictures,
horizontal;
to
aim
buttons
shoot.
and
OUT
in
and
Center
turn
shoot.
OF
IN
back
the
clear.
your
focus
it
FOCUS
FOCUS
and
bright
Now
subject
with
to
vertical
...
...
forth
spot
the
the
7
Page 8
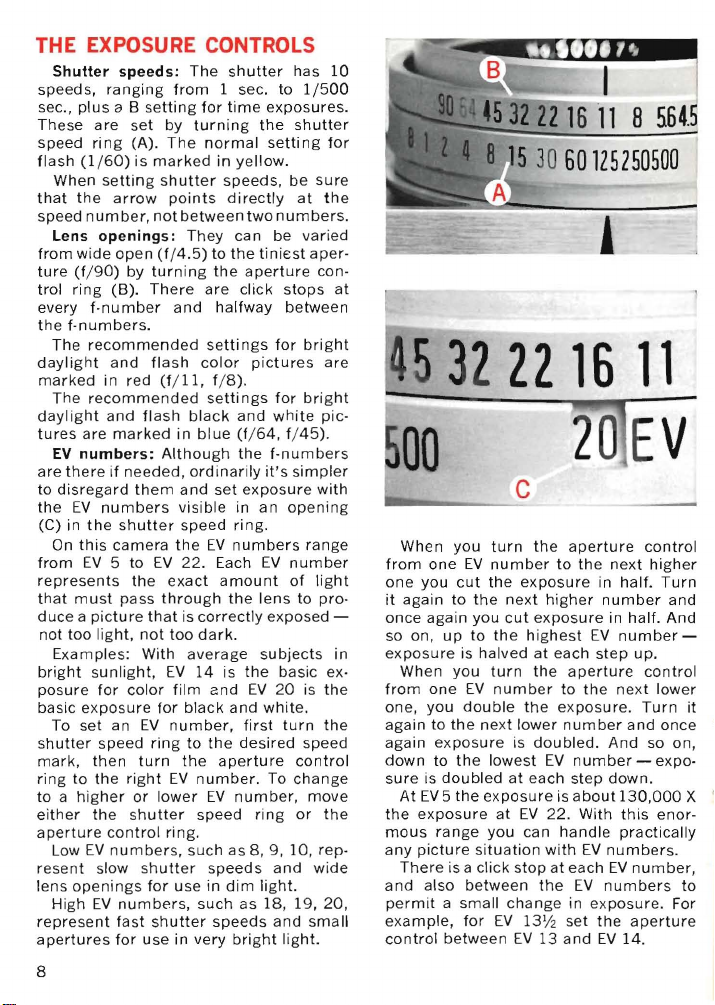
THE EXPOSURE CONTROLS
Shutter
speeds,
sec.,
These
speed
flash
When
that
speed
Lens
from
ture (1/90)
trol
every
the
The
daylight
marked
The
daylight
tures
EV
are
to
disregard
the
(C) in
On
from
represents
that
duce a picture
not
E
bright sunlight, EV
posure
basic
To
shutter
mark,
ring
to a higher
either
aperture
Low
resent
lens
Hi
represent
apertures
B
speeds:
ranging
plus
a 8
are
ring
(1/
60)
setting
the
arrow
number,
openings:
wide
open
ring
(8).
f-number
f-numb
ers.
recommended
and
in
recommended
and
are
marked
numbers:
there
if
needed,
EV
numbers
the
shutter
this camera
EV 5 to
must
pass
too
light, not
xamp
les:
for
exposure
set
an
speed
then
to
the
the
control
EV
numbers,
slow s
openings
gh
EV
numbers,
last
lor
from
setting
set
by
(A). The
is
marked
shutter
pOints
not
(1/4.5)
by
turning
There
and
flash
red (f/
flash
Although
them
EV
the
exact
through
that
too
With
color
film
lor
EV
number,
ring
turn
right
EV
or
lower
shutter
ring.
hutter
for
shutter
use
The
for
turning
normal
in
between
They
to
the
are
hallway
settings
color
11,
fi B).
settings
black
in
blue (1/
ordinarily
and
set
visible
speed
the
EV
22.
Each
is
correctly
dark
average
14
<!nd
black
to
the
the
number.
EV
speed
such
speeds
use
in
such
speeds
in
very
shutter
1 sec.
time
exposures.
the
setting
yellow.
speeds,
directly
two
can
the
tiniest
aperture
click
pictures
and
64, f/45)
the
it's
exposure
in an
ring.
numbers
EV
amount
the
lens
exposed
.
subjects
is
the
EV
and
white.
first
desired
aperture
To
number,
ring
as
B,
9, 10,
dim
light.
as 1B, 1
bright
has
to
1/500
shutter
be
at the
numbers
be
varied
stops
between
for
bright
for
bright
white
f-numb
simpler
opening
number
of
to
basic ex-
20
is
turn
speed
control
change
or
and
9,20,
and
light.
10
for
sure
aper-
con-
at
are
pic-
.
ers
with
range
light
pro-
-
in
the
the
move
the
rep-
wide
small
.
45
00
When
from
one
it
again
once
so on,
exposure
When
from
one,
again
again
down
sure
At
the
mous
any
There
and
permit a small
ex
ample,
control
32221611
20
EV
c
you
turn
the
one
EV
you
cut
to
the
again
you
up
to
is
you
one
EV
you
double
to
the next
exposure
to
the
is
doubled
EV 5 the
exposure
range
picture
is a
also
between
for
between
number
the
next
cut
the
halved
turn
number
lowest
at
exposure
at
you
situation
click
change
EV
aperture
to
the
each
aperture
to
the
number
number
step
is
about
With
handle
EV
at
each
EV
in ex
set
and
next
in
half.
number
in half.
EV
number-
step
next
and
And
down.
130,000
this
practically
numbers.
EV
numbers
posure.
the
aperture
EV 14.
number,
exposure
higher
exposure
highest
at
the
the exposure. Turn
lower
is
doubled.
EV
each
EV
22.
can
with
stop
the
13
V2
EV
13
control
higher
Turn
and
And
up.
control
lower
it
once
so on,
- expoX
enor-
to
For
Page 9

HOW TO COCK THE SHUTTER
Push No. 3
will go
and
shutter
when
you
forget
to
happen
will
a
picture except
appointed
button
let
it
come
mechanism
pres
s No. 2
depre
ss
the
next
.
No.3
time
that
down
up.
so
you
as
This
it
will
button.
button,
you
will
far
cocks
operate
noth
try
to
be
If
as
the
you
ing
take
dis
HOW TO RELEASE THE
SHUTTER
No
. 2
Press
you
you
button
it
slowly
hear a definite click.
may
shake
is
with
the
the
your
camera
shutter
forefin
Don't
.
release.
ger
jab
at it-
until
it
·
HOW TO MAKE
TIME
EXPOSURES
To
make a time
shutter
speed
be
cocked
No.2
No. 2
No.2
of a cable
just
stay
button
Press
which will
down
et
l
Use
recommended
button.
ring
to B.
as
for a snaps
button
open
come up.
release
for
all
exposure,
The
to
open
as l
ong
To close
and a tripod
time
shutter
hot.
the
as you hold
the
exposures.
THE SELF -TIMER
The shutter has a built·in self· tim
Either
before
or
after
you
sired
shutter
as shown.
a
timing
10
seconds
before
The self·
or electronic
self·
timer
synchronization. Use
speed
self·timer
speed,
When
mechanism
to
the
shutter
timer
flash
automatically
for
flash
.
you
get
into
clicks
may
pictures
pictures.
move
the
press
will give
your
.
be
used
sets X flash
1/30
made
set the
lever
No.2
you
own
Setting
sec.
set
must
shutter,
shutter
to
button
about
picture
for
flash
shutter
with
the
,
is
er.
de·
V,
the
the
9
Page 10
CHOOSING SHUTTER SPEED
AND LENS OPENING
One
EV
combinations
number
openings
choice
from
f/90.
ring and
can
the
best one
For
turn
eight
, all
example,
of
1/500
If
you
the
them
combinations
to
In general.
aperture
tion, while
shutter
ring
due
speed
to
as possible
at
can stand
of
shutter
giving
eight
sec.
grip
aperture
together
speeds and lens
the
same
at
EV
14
combinations
at
f/5
.6.
both
the
control
to
. Which is
use?
you
should use as small an
in
same
enough
shake
any
time
.
the
fast
camera
for
several
exposure.
you
have a
ranging
to
1
/2
sec.
shutter
ring, you
anyone
given situakeeping
to
avoid
speed
the
the
blur-
For
most
speed;
some
shaking
the
people will shake
they
brace
speeds
slower
should
at
such
can also choose special
of
various
1/500
focus
ture).
into
and
be
as a
tripod
using
Still
needs. To stop very
sec. and
carefully
Or,
to
sharp
focus at
1/8
sec.,
need a tripod.
people,
can use
camera .
themselves
than
resting
_
EV
14
f/5.6
with
get
both
for
which
1/125
sec. is a safe
1/60
sec.
At
the
1/30
sec.,
camera
without
unless
carefully.
1/30
sec.
the
on a solid
as an ex
camera
support
ample, you
settings
fast
(you'll
action.
have to
such a wide aper-
near
and far
the
same
you'll
objects
time,
probably
most
At
,
for
f/45
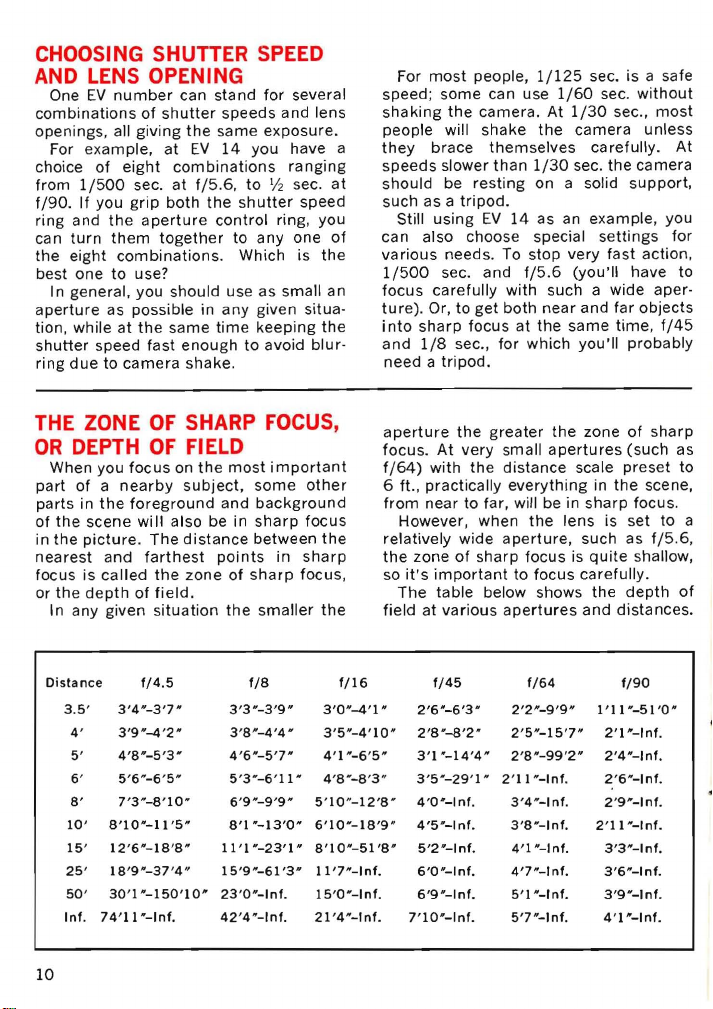
THE ZONE
OR
DEPTH
When you
part
of a nearby
parts in
of
in
nearest
focus is
or
10
the
the
scene
the
picture.
and
called
the
depth
any given
In
Distance
3.5'
3'4"-3']"
4'
3'9 "
4'8"-5
5'
5'6"-6'5
6'
7'3"-8'10"
8'
8'10"-11
10'
15' 12'6"-18'8"
25' 18'9"-37'4"
30
50'
Inl. 74'11"-lnl.
' 1 "
OF
SHARP FOCUS,
OF
FI
on
ELD
the
focus
subject.
foreground
will
also be in
The
distance
farthest
the
zone
of
field
.
situation
1/4.5
-4'2
" 3'8 "
'3 " 4'6 "
"
'5"
-150'10"
most
some
and
background
sharp
between
pOints
of
sharp
the
smaller
1/8
3'3 "
-3'9"
-4'4"
-5']
5'3"-6'11"
6'9"-9'9"
8'1"-13'0"
11 '
1"-23'1"
15
'9 "
-61'3"
23
'0"
-lnl.
42'4"-lnl.
important
other
focus
the
in
sharp
focus,
the
3'0"-4'1
3'5"-4'10"
"
4'1"-6'5"
4'8"-8'3
5'10"-12'8"
6'10"-18'9"
8'10"-51 '8"
11
IS
21
1/16
'7"-lnl
'O"
-lnl
'4 "
-lnl.
"
"
.
.
aperture
focus.
f/64)
6 ft..
from
the
At
very
with
the
practically
near to far, will be in
However, when
relatively wide
the
zone
of
important
table
at
various
1/45
2'6"-6'3
2'8"-8'2"
3'1"-14'4"
3' 5"
-29'1
4'0"-lnl
4'5"-lnl.
5'2"-lnl.
6'0"-lnl.
6'9"-lnl.
-lnl.
sharp
" 2'
.
so
The
field
it's
7'10"
greater
small
the
apertures
distance
everything
the
lens
aperture,
focus is
to
focus
below shows
apertures
1/64 1/90
2"-9'9"
2'
5"-15'7"
2'8 "
-99'2"
"
2'1
1 "
-Inl.
3'4"-lnl
.
3'8"-lnl.
4'1"-1
nl.
4'
7"-lnl.
S'I"-lnl.
S,]"-Inl.
zone
scale
in
the
sharp
is set
such as
quite
carefully
the
and
distances.
1
'11"-51
2'1"-lnl
2'4"-lnl.
2'6"-lnl.
2'9"-lnl
2'11"-lnl
3'3"-lnl.
3'6"-lnl
3'9"-lnl
4'1"-lnl
of
sharp
(such
preset
scene,
focus.
f/5.6
shallow,
.
depth
'a"
.
.
.
.
.
.
to
as
to
a
.
of
Page 11

PRACTICE THE
ONE
is
for
and
aim
Push
bringing
subject
image.
the
is
for
button
dim
still
the
shutter
perhaps
focusing
the
the
together
in
bright
shooting.
lig
ht
until
happens
you
finder
subjects.
practice
of
your
one
clear
ject
inside
TWO
the
No.2
clicks. I n
stay
very
click
as
f
nothing
I
No.2,
1,
2, 3
. Look
bright
No. 1
the
bright
Then
center
frame
Practice
slowly
until
hold No. 2
you
hear
closes
when
forgot
SYSTEM
through
spot
buttons
the
two
spot
line
the
the
.
you
to
reset
at
various
images
to
make
your
.
pressing
shutter
down
second
press
No.3.
the
and
sub·
and
THREE
a
picture
firmly;
resets
you
will
happen
for
your
then
the
don't
is
for
always
shutter
reset
when
next
let
pic
resetting. After
push
down NO. 3
it
come
up
for
the
reo
button,
press
next
No . 2
No . 3
you
tu
snapping
again.
picture.
nothing
button
This
If
button
11
Page 12

OPEN THE FILM PACKAGE
Open
the top
of
the
box .
In
the
instruction
there's
a set
film,
and a coater
and
white
Remove
gently. Save
safely.
Hold
the
press
on
may
Tear
along
front
moisture
against
the
damage
open
and
it
only
you
age
the
Handle
the
flat
of
film.
the
film
the
package
middle
the
the
dotted
back
by
absorbing
the
pack
sheet
print
in a tube
package.
box
near
of
one
or
entire
line;
and
the
edges.
of
(please
mounts
to
carry
the
the
more
side
then
lift
out
card
color
addition
with
with
Handle
prints
edges. Don't
package
pictures.
of
the
rip
the
Dispose
that
film.
read
packapart
pack.
to
it)
color
black
it
in
or
of
lies
SPECIAL EXPOSURE
INSTRUCTIONS
On
some
color
film
printed
Darken
one
mark
made
crease
with
that
To give
with
the
correct
the
chart
aperture
toward
f-number
with
that
12
instructions
control
toward
with
that
the
exposure
pack.
the
Model
exposure
on
control
the
next
. Do
pack.
of
pack.
same
180,
with
page
ring
this
packs
to
electric
Lighten
This
for
exposure
first
your
16.
halfway
lower
for
all
all
you
set
the
eye
for
all
is
done
pictures
determine
meter
Then
EV
number
pictures
may
Lighten/
cameras
pictures
increase
or
set
(one
find
to
in-
made
the
from
the
click)
or
made
Page 13

HOW TO
Push
the
pop
up a short
Open
rollers
shown
Hold
ight
Push
the
the
Push
the
spring
the
feel it
steel
as
printing
lens.
under
a I
You'll
on
on
LOAD
back
back
(A).
page
pack
the
the
door
tension
pack
snap
A FILM PACK
door
latch;
distance.
all
the
26.
by
must
the
cover
end
as
.
into
place.
way.
shown,
They
safety
closed
hinge,
down
into
the
be
kept
edges
faces
of
the
door
Note
clean
so
the
pack
against
camera.
will
the
the
the
are
Be
not
sure
folded
the
white
under
tabs
the
are
pack.
free
and
13
Page 14

LOADING
Close
The
(A)
must
the
tab
Grip
and
forefinger.
Pull
of
the
straight
black
the
to
be
black
If not,
out
the
the
camera
so
safety
firmly
(No.4).
(cont.)
back
sure
tab
stick
reopen
into
the
black
safety
without
you
won't
cover.
door.
they
of
out
tab
cover
latch.
of
slot.
rip
Press
the
the
the
back
with
all
stopping.
it!
both
safety
small
your
the
Discard
and
thumb
way
sides
cover
slot
lead
out
Pull
the
With
(A)
should
(No.4).
time.
first
picture.
14
the
Don't
You're
safety
stick
pull
now
cover
out
the
ready
out, a white
of
the
small
white
tab
to
make
at
tab
slot
this
your
Page 15

IF THERE'S NO WHITE TAB
If,
after
you
there's
ing
in
the
sunlight.
Open
and,
without
film
pack,
out
into
Close
sure
that
and
the
no
shade
the
the
the
both
white
remove
white
back
disturbing
push
open.
back
sides
tab
tab
to
pull,
or
indoors, not
of
the
the
end
of
the
are
is
out
the
safety
do
camera
or
of
the
camera,
locked
in
the
the
in
part
moving
white
making
securely
slot.
cover,
follow-
bright
way
the
tab
15
Page 16

HOW
TO
GET
EXPOSURE
The
best
way
pictures
The Polaroid Ex
designed
camera. It
to
use, and gives
numbers
speeds and
its
use
come
An
important
that
the
of
the
scene .
with a nearby
close
subject, as shown,
cast a shadow
sure
color
the
lower
you
black and
few
be used
can still
average
bright
shown in
when
direct
the
shutter
then
the
that
speed
light
Therefore, when
enough
If
you
meter
pictures
film
speed dial to
than
may
meters
If
you have no
open shade
Bright
the
sun,
bright
set
To
speed ring
turn
proper
When
setting
the
number,
to
is
to
use a
specifically
's
accurate,
and
combinations
f·numbers.
with
meter
measures
reflected
subject.
so
on
already
you
may
with
75
have
white
besides
with
3000
get
well exposed
subjects
the
table
open
shade
subject's
with
nothing
. open sky .
the
exposure,
the
aperture
EV
number
shutter
arrow
not
CORRECT
get
correctly
meter
posure
for
small,
the
exposure
Instructions
the
meter
point
to
from
using
bring
that
it
"sees"
but
be
the
subject.
own an
(usually
difficulty
film
points
be
able
the
Model
the
as
there
the #628
speed
exposure
in
bright
with
at
right.
is
face is
overhead
to
the
or
speeds,
directly
between
accurate
closest
64).
film
what
first
desired
control
f·number.
exposed
consistently.
Meter #628
use
with
light
, easy
in
of
shutter
.
remember
the
brightness
the
entire
the
meter
the
meter
only
careful
not
expo
to use
it
180
. Set
number
However,
using
it
with
are only a
that
can
.
meter,
pictures
sunlight
the
just
two
you
settings
you
have
out
except
turn
speed ;
ring
be
sure
at
the
numbers.
this
EV
for
the
to
for
of
or
of
the
to
is
is
·
BLACK
AND
in
sun
in
open
in
sun
in
open
WHITE
shade
shade
EV20
1/250.
EV
1/125,
EV
14
1/125,
between
EV
1/60,
f/64
17
f/32
or
13V2
f/11
f/11·f/8
12
f/8
or
subject
bright
subject
bright
COLOR
subject
bright
subject
bright
16
Page 17

HOW
After
proper
correct
1.
FOCUS: Look
the
viewfinder.
most
of
tons
until
clear
image
of
your
the
bright
TO
TAKE A PICTURE
setting
EV
exposure,
the
subject
number
frame.
the
bright
of
frame.
the
do
at
Come
the
Center
shutter
(or
the
your
close
Push
spot
most
speed
through
to
No. 1
subject
and
but·
part
f·number)
following:
subject
enough
the
shows a single
important
your
for
fill
in
2. SHOOT:
No. 2
you
hear a distinct
No.2 -you
3.
RESET:
a
picture,
firmly
all
This
resets
for
the
Now you are ready
picture as shown
button,
press
the
the
next
Firmly
the
may
Immediately
the
way;
then
shutter
picture.
but
smoothly
shutter
click.
shake
the
after
No.3
let
it
so
you'll
to
on
the next page.
release,
Don't
camera.
snapping
button
pop
up
be
develop
press
until
jab
down
again.
ready
the
at
17
Page 18

HOW
Hold
shown,
ahead
Grip
thumb
Pull
camera,
When
cealed
pops
out.
pulling
I f
no
the
white
white
tab.
do in
this
Never
see a
yellow
Pulling
start
development;
film
for
the
yellow
TO
DEVELOP
the
camera
with
the
of
you.
Don't
the
small
and
forefinger.
the
white
all
the
you
pull
door
(A)
Don't
the
tabs.
yellow
tab
tab,
Page
situation.
pull a white
tab.
the
small
the
next
tab
(below).
lens
tab
way,
the
opens
block
pops
stop.
20
step,
THE
in
your
pointing
hold
it
white
straight
without
white
and a yellow
this
out
Don't
shows
tab
white
it
only
which
PICTURE
left
any
other
tab
with
out
stopping.
tab
out, a con-
door
when
pull
you
when
tab
does
prepares
is
hand,
straight
way.
your
of
while
you
another
what
you
can
pulling
as
the
tab
pull
to
not
the
will
18
Grip
come
the
yellow
out
tab
straight
in
the
when
center
you
pull.
so
it
Page 19

Pull
camera
tating.
picture,
get
How
about
" PULL
the
...
specks,
The
era. While
by
assembly
the
paper.
assembly
picture
the
After
time,
print)
the
A
don't
It
wiJl
When
mount.
Don't
prints.
fading
for
Avoid
the
(Be
about
up
Please
box.
the
yellow
all
the
This
so begin
the tab
out.
fast
is a
as
long
IT"
tab.
If
your
puJl a bit
picture
it's
the
yeJlow
down
picture
assembly
Outdoors,
flap
for
the
instruction
the
quickly
off
the
end
nearest
color
print
touch
harden
it
is
dry,
touch
You
and
to
other
coat
how
contact
negative
sure
to
read
this
in
the
negative
put
Don't
be a
tab
straight
way, swiftly,
starts
development
timing
as soon as
swift
pull7 It
as
it
briskly
takes
, each
picture
slower.
develops
outside
developing
tip,
or
don't
or
lay
lift
flat;
don't
in
the
breeze. Develop
fuJI
time
sheet
recommended
packed
recommended
strip
the
to
will
face
white
paper,
the
yellow
look
for a few
brown
the
to a tough,
mount
it
on a
the
face
of
coat
black
them
must
damage
prints).
with
after
your
it
chemicals
the pri
the
CAUTION
film
instructions.)
with
the
in a wastebasket
litterbug!
out
without
of
should
you
to
time
you pull
is full
of
the
, hold
the
the
picture
touch
or
off
the
let
the
picture
with
the
development
paper
starting
tab.
nearly
dry,
minutes.
glossy
color
and
to
prevent
(see page
left
nt
is
removed.
paragraph
moist
side
or
of
the
hesi-
your
you
take
say,
white
cam-
tab
bend
white
the
film
(the
from
but
finish.
print
white
23
on
Fold
in.
film
in
.
19
Page 20

IF NO
AS
YOU
Stop!
I
nstead,
Just
enough
to
hold
in
place.
not
in
bright
While
with a
fingertip,
the
way.
hand
and
yellow
PULL
Gently
assembly
and
discard
While
the
the
rollers
bits
of
developer
described
YELLOW
TAB
POPS
PULL THE WHITE TAB
Don't
pull
gently
down
Do
this
sun.
holding
Steady
take
pull
all
back
are
on page
to
the
tab,
the
the
it.
clean.
open
get
film
indoors
the
slowly
the
hold
as
entire
way
Don't
door
on
them,
26.
another
one
pack
pack
shown.
is
the
finger
pack
or
open
with
of
jammed
out
try
open,
If
you
clean
white
camera
and
in
the
down
the
your
the
of
the
to
check
find
OUT
tab.
back
under
keep
shade,
lightly
back
all
left
topmost
picture
pack
save
that
dirt
them
as
it
it
it.
or
Close
sure
the
the
20
that
No.4
back
the
the
latch
back
next
slot.
of
the
white
Check
securely.
camera,
tab
that
sticks
both
making
out
sides
of
of
Page 21

TEMPERATURE
Cold
and
heat
the way
print
ruin
cautions.
ture
you're
- cold
oughly chilled.
house and a few
flash color
to be bad.
camera
doors
to
back
the
may have to be
temperature.
each
tion
peratures.
mendations;
time
tendency
out
as
velopment.
the
in
careful
your
quality
your
important
The
of
the
developing
A
loaded
weather
and
However,
and
snap
the
in
again in a
picture
In
cool
film
pack
about
to
time.
In
very
hot
of
the
you
pull
steel rollers
your
prints.
to
keep
have a
picture
. Even
pictures
factor
camera
camera
for
half
If
you
picture,
It
takes a long
film
to
if
camera and film
warm,
children
normally.
weather,
adjusted
The
contains
development
Be
sure
they
weather
for
chemicals
edges
of
the
yellow
If
these
they
So,
when
the
IS
IMPORTANT
great
develops
moderate
unless you
and
the
picture.
carried
an
then
minutes
the
results
warm
you can
in
minute
development
instruction
detailed
to
read
may
there
the
picture
tab
chemicals
can cause
it's
rollersclean(page26).
effect
and
cold can
take
is
the
tempera-
film
at
the
outdoors
hour
gets
enter a warm
later
shoot
are likely
time
for
up.
are
step
outside
the
snow,
and
develop
according
sheet
informa-
times
and
these
recom·
change
is a
to
greater
be squeezed
assembly
to
begin decollect
defects
hot, be
on
pre-
time
thor·
a cold
pop
times
to
with
tem-
from
extra
on
the
in
in-
the
on
How
normal
are
and
action
down
time
more
When
65'F
sluggish
a
properly
Coldcold
be
dark,
Whenever
must
Clip
You'll
made
But
think
may
film;
For
details
How
white
development
temperatures
When
camera
a
longer-than-normal
see
Never use
white
temperature
developing
set
for
temperatures
warmer.
of
the
and
you
. See
the
details.
the
(IS'C)
that
without
Clip
(page
weather
with
it
wear
warm
for
all
color
get
your
in
pleasantly
when
only
of
be too
hot
your
prints
see
temperature
film:
The
the
is
below
the
fi
1m
instruction
the
film.
affects
times
When
it's a bit
developer
must
develop
film
instruction
temperature
the
chemical
the
picture
help.
27). Prints
without
muddy
you're
a cool
times
of
temperature
the
colors.
is
cool
enough
clothes,
pictures.
best
warm
sweltering
drink
for
best
may
show weak colors.
the
film
affects
film's
gives
70'F
(21'C)
70'F
(21'C),
time
Cold-Clip
color
film:
for
color
of
75'F
cooler
chemicals
for a longer
sheet
gets
action
won't
That
help
developed
Cold-
so
use
the
color in
weather.
and
a swim, it
results
with
instruction
black
normal
good
results
and above.
of
film
develop
. For
sheet.
with
black
The
film
(24'C)
the
slows
for
below
is so
develop
is
the
Clip
will
that
you
Cold-
pictures
and can
color
sheet.
and
range
and
for
details
and
in
of
in
21
Page 22

POINTERS
FOR
GOOD
NATURAL LIGHT PICTURES
FOR
COLOR
Use
colors if
. you can also
an overcast
Have
and
backgrounds
colors in big, solid
If
your
clothes, add color with a
scarf,
ground one-third
solid color.
Don't
dressed in
cate
colors
Plain,
color
to
FOR
BLACK
Use
you'll
blocks
but
bright
For
bright
your
but
plenty
subject
or
jacket. Or,
anything
of
the
expect
dark
or
drab
your
bright,
get
best
the
direct
day,
scenic
PICTURES
sun:
You'll
subject
get
prints.
is in
very pleasing
bright
of
color:
with
chun
isn't
find a colorful
that
picture
colorful
clothes,
white.
backgrounds
AND
WHITES
even
light:
results
sun,
or
in
bright
pictures:
get
strongest
bright
day).
ks.
or
results
Look
for
strong,
wearing
bright
will fill
area with
prints
of
or
wearing
won't
For
when a cloud
on an
open shade.
Avoid
sun
(but
on
subjects
bright
colorful
skirt,
back-
at
least
strong,
people
deli-
add
portraits,
overcast
shooting
when
the
sun is
right
when
the
light
Indoor
have
the
avoid
deep
FOR
ALL
Move
The
bigger
the
more
to
see.
For scenic
thing
big
if
possible)
fill
the
Time
the
recommendations
tion sheet. These may change
to
time.
is
not
for
less
color
pictures
black and
washed out.
Keep an eye on
weather
your
pictures. See page 2 L
casts shadows
snapshots
room
shadow areas .
PICTURES
in
close
your
color
and
pictures:
and
solid
into
print.
development
A few seconds
harmful.
than
whites
or
excessive
However,
the
will have
overhead;
without
lighting
and
subject
the
even so as
focus
is in
details
Try
looking
foreground
carefully:
in
the
overdevelopment
if
recommended
poor
will
look
the
temperature:
heat
flash:
you'll
to
(and
shoot
to
the
side.
Try
to
to
accurately:
the
print,
be
able
get
some-
colorful,
to
help
Follow
film
instruc-
from
time
you develop
time
colors
and
gray
and
Cold
can
affect
,
HOW
TO
LIGHTEN
DARKEN PICTURES
For the
ject, in
conditions, follow
For a
lower
the
22
EV
next
next
picture
the
same location and
number
shutter
this
pictu re, use
or
lighter
slower
of
rule:
f-number_ Or, use
speed_
OR
the
same
lighting
the
sub-
next
For a
higher
the
next
For a
the
aperture
click)
EV
number
darker
EV
faster
small change in
toward
picture, use
number
shutter
control ring halfway
the
or
f-number.
or
f-number.
speed.
next
exposure
higher
the
Or, use
or
lower
next
turn
(one
Page 23

BLACK
MUST
soon as
two
uncoated
may
touching
they
an
I n each black
a
tube
of
liquid;
smooth
on a
An
of
Spread
over
borders.
strokes
scratch
coater. To
partly
near
squeezed·out
the
The
tough
For
film
coated
they
You
small
camera,
AND WHITE PRINTS
BE
Coat all
it
is
hours,
for
begin
the
are
easily
empty
film
containing a coater.
absorbent
it's
Lay
the box
Remove
in a
the
surface
table,
and
empty
film
and
the
the
ENTI
Use 6
and
the
used
end
of
print.
coating
protective
more
details
instruction
prints
will
stick
can
compartment
as shown.
COATED
black
and
convenient
if
possible. If
more
than a few
to
fade
face
of
damaged;
box.
and
material
plastic
print,
face
, such
hold
box will do;
press
the
coater
liquid
straight
RE
to 8 straight
moderate
print
with
get
more
coater,
the
print;
liquid
dries
layer
about
sheet.
away
together
carry
an
white
pictures
to
do
so -
prints
and
streak.
uncoated
carry
white
film
box
This is a wad
soaked
with a clear
handle.
up, on a clean
as
a piece
it
down
by
open
it
flat.
from
away
print,
including
overlapping
pressure.
the
edge
liquid
press
it
down
then
over
coating
.
the
spread
the
and
the
Keep
each
coater
rear
across
quickly
from
extra
in
are
hours
prints
them
there's
of
one
the
the
from
out
face
forms
see
other,
as
within
left
they
Avoid
as
in
paper
edge.
ends
tube.
you
the
Don't
of
the
of
on
the
the
of
image.
the
freshly
or
in
the
of
the
a
a
23
Page 24

FLASH
for
onto
press
black
focus
camera/flashgun
the
pictures
of
the
wi
on
electronic
excellent
white
be
numbers
flash
numbers
with
to
blue
nization
speed
pictures
V
lever
pi
lever
both
AND
There
this
camera,
the
the
Once
the
and
the
exposure
Complete
are
The
flashgun
the
shutter. It
Model
ll
accept
other
Suitable
and
necessary
unit
the
get
correct
Settings
flashbulbs.
ring
made
and
use
Settings
to
ctures
to
V.
positions
is
a special Polaroid
camera
No.2
bas
white
camera
for
instructions
packed
280
standard
makes
flash uni
electronic
results
color
to
for
that
you
are
then
distance
exposu
for
lever
to
a 1/
30
for
X as
with
Suggested
ELECTRONIC
the
Model
and
button.
ic
settings
film
on
combination
you
connection
has
flashgun
of
ts.
with
films.
work
the
particular
are
used
scale on
flash.
Set
to
M,
1/60
with
flash,
sec.
electronic
shown.
electronic
is
1/125
280. It
fires
for
are
made, you
your
subject; the
automatically
for
making
with
each
is
on
a special
. I n
PC
connectors
flashguns
flash
units
both
It
will ,
out
exposure
using.
These
in
conjunction
the
reo
Use
on Iy AG·1 B
the
flash
and
the
sec. For
set
the
shutter
flash.
For
flash,
shutter
sec.
FLASH
flashgun
clips
when
you
color
or
just
then
sets
.
flash
flashgun.
the
side
fitting
addition, it
speed.
for
used
and
can
give
black
and
of
course,
guide
electronic
guide
camera
synchro-
shutter
self·timed
lever
Set
the
self-ti
med
set
the
speed
on
to
at
24
Page 25

ACCESSOR
These s
gr
add
Exposure
correct
black
lighti
ng con
given in
tions
of
Filter
in a
neat
The #596
white
out
against the
The #597
co
lor film,
pictures made
in
overcast
The
stray
when you
near a strong
sun or a powerful lamp.
I
ES
imple·to·u
eatly
to
your
Meter #628.
exposure
and
both
f·numbers
Kit #595.
carrying
pictures makes
days.
#
598
light
settings
white films
ditions. The
EV
numbers
and
It
case.
Cloud Filter
blue
UV Filter,
prevent
s excessive
Lens Shade
rays
from
aim
the
light
se
picture taking
contains
sky.
in
camera
source,
accessories can
in a
shu
white
for
the
hitting
fun.
Quickly gives
for
color and
wide
ran
inform
ation is
and
combina·
tter
speeds.
three items
for
black
clouds
use only
bluishnes
shade
helps
to
the lens
at
subjec
such
as
ge
and
stand
with
or
on
keep
the
of
s
ts
Portrait
#
593.
much
focusing
P
ortrait Kit
can
and
Kit
objects like
close as 9 in.
Development
the
ment
Cable Release #191. A
holds
It'
s a g
Custom
deluxe
flashgun,
Kit #591
They
nearer
distance
come
as
shoulder
#593
yo u can
camera
of
pictures
it
in
place
reat
Fitted
container
bulbs,
let you focus on
than
#591
close
portraits.
flowers
Timer #128.
strap,
to assure
over
help
for
Case #
and
and
Close-up
the
normal
(3
V2
ft.). With
(shown
as
for
at
in.
to take
With
the Cl
coins from
the
best
plastic
the
No. 2
328.
Model
accessories
right)
It
Compact
180, film,
19
photograph
and
times
time exposures.
other
Kit
subjects
closest
the
you
head
ose·up
sma
as
fit
s on
develop·
results.
adapter
button.
ll
.
25
Page 26

CARE
Keep
rollers
print
colors,
from
collect
the
camera.
the
rollers
film
pack.
the
camera
that
you
lift
it
out.
To
check
latch
sembly.
OF
THE CAMERA
the
rollers
causes
(right).
popping
(A)
and
on
the
don't
and
Turn
It
even
out.
rollers
It's a good
before
You
is
loaded
the
and
repeated
may
prevent
Bits
can
also
disturb
rollers,
swing
inspect
clean:
also
the
of
and
in
idea
loading
check
with
the
lift
out
the
Dirt
on
spots
on
cause
yellow
developer
the
back
to
inspect
each
them
film,
provided
film
pack,
up
the
roller
the
rollers.
the
the
poor
tab
can
new
when
or
red
as-
of
u
\~
.
'
",,
'
"
~
'
..
"-'
Clean
dry
thing
Open
dirt
lint
Push
26
the
them.
metall
the tab
around
or
dust
the
rollers
Never
ic
the
in
roller
with a damp
scrape
nor
with
slot
tab
the
back
assembly
them
your
door;
clean
slot
(A). Blowout
of
back
cloth
with
fingernail.
out
the
camera
into
place.
and
any·
any
'f
r _
~
- .
.
.~.~
. -do",
I
.. ' -.'
~./
Page 27

Clean the lens gently:
silicone
Blowdustoff
gently
lightly
Clean
the
on
with
the
same
coated
way.
eyeglass
or
brush
lens
it
to
the
clean, dry
view/rangefinder
Never
tissues
off
lightly.
m.oisten it,
absorbent
windows
on
Breathe
wipe
cotton.
PROTECT FILM AND CAMERA
FROM
damage
film
Don't
of
that
a
store
keep
cooler.
its
are
HEAT
Extreme
your
pack
has
leave a loaded
film
lying
the
glove
car
can
get
film
or a loaded
it
near
Don't
sealed
ready
to
heat
and
films, especially
been placed in
camera
in
direct
compartment
as
hot
the
bottom
remove a film
foil
inner
use it.
wrapping
high
humidity
after
the
or
packages
sun.
Remember
or
as an oven.
camera
where
in a
the
pack
until
camera.
trunk
If
closet,
air
from
THE COLD-CLIP
The
Cold-Clip
to
get
temperature
If
you
use
the
noticeable
your
pictures
the
temperature
if
than 65°F
preheat
between
five
minutes
pictu
res .
When
Clip,
you
posure
for
the
exposure
set
or
one
f-number
by
your
Immediately
tab
to
start
place
the
Clip
with
This
must
(right)
65°F
it
can
is
warm
before
enough
give 2X
color
controls
lower
meter
after
assembly
within
makes
pictures
(l8°C)
of
the
somewhat
inside
and
starting
pictures.
than
pulling
tab
good
color
is
are
unsure
Cold-Clip anyway.
improvement
and
(l8
°C). To use
it
in a
your
body
it's
cold
should
your
exposure
development
picture
the
yellow
be
done
it
when
or
below
temperature,
It
may
in
the
do
no
harm
the
Cold-Clip,
pocket,
arm,
for
to
use
the
normal
one
EV
is
or
the
chart.
the
of
your
in
hanging
10
seconds.
possible
.
make
color
even
higher
about
to
take
the
Cold-
That
number
indicated
yellow
picture,
the
Cold-
use
it.
in
can
the
of
you
is
you
the
a
of
or
ex-
is,
out.
27
Page 28

Place
assembly
arm.
inside
then
separate
the
Cold-Clip
terial.
graph
using
damp
in
white
weather
sheet
the
inside,
Develop
the
remove
the
Occasionally,
picture
. Av
(Please
in
your
the
Cold-Clip,
cloth.
the
camera
Never
use
pictures. Instead,
directions
packed
Cold-Clip,
between
the
picture
Cold-Clip
the
picture
print
developer
assembly
oid
contact
read
film
Store
cover.
the
Cold-Clip
with
with
the
your
for
the
and
CAUTION
under
follow
the
film.
60
to
assembly
negative.
may
stick
with
it
clean
the
for
next
from
the
instructions.)
wipe
it
on
the
picture
body
and
seconds
body
heat,
and
leak
from
to
the
this
ma-
para-
Before
with
retainer
black
and
the
cold
instruction
a
POSSIBLE
Too
dark,
next
lower
the
next
same
next
Too
light,
higher
same
next
picture
lighting
in
ring
lower
picture
lighting
in
ring
higher
the
change
control
the
next
the next
the
change
control
the
28
PICTURE
daylight
EV
number
of
conditions.
exposure,
halfway
EV
number
daylight
EV
number
of
conditions.
exposure,
halfway
EV
number
PROBLEMS
pictures:
or
f-number
the
same
set
the
(one
click)
or
pictures:
or
the
same
set
the
(one
Use
subject
For a
aperture
toward
f·number.
Use
f-number
subject
For a
aperture
click)
toward
or
f-number.
the
for
in
small
the
for
in
small
Page 29

White,
greatly
will
happen
before
camera,
the
camera
safety
One
for
color
loaded
Black,
details
didn't
No. 3
If a color
you
may
posure
Many
that
you
slow
down
faint
overe
putting
or
if
cover.
possible
film
with
black
faint
at
all
open.
button
print
have
suitable
white
pulled
a bit.
image
xposed
if
you pull
the
you
remove a film
after
pulling
cause
when
and
image
are
Perhaps
.
shows a few
mistakenly
for
specks:
the
or
or
light
the
film
is
that
the
white.
or
visible,
you
black
They
yellow
none:
struck.
safety
pack
out
you
camera
none:
the
didn't
faint
used
and
tab
Film
in
pack
the
exposed
shutter
details,
white
are
too
was
This
cover
the
from
black
was
If
no
reset
an ex-
film.
a sign
swiftly;
U-shaped
possible
were
folded
film
pack
15).
page
too slowly
dirt
on
the
clean
(page
squeezed
back
while
page
19
camera).
white
causes:
under
(correct
Or,
you
(page
ends
26).
the tab
pulling
for
the
area,
One
when
pulled
19)
of
the
Or, in
slot
the
correct
any
or
more
this
. Or,
rollers;
end
yellow
way
size:
white
you
loaded
as
shown
the
yellow
there may
keep
some
way
of
the
tab
to
hold
Several
tabs
the
on
tab
be
them
you
camera
(see
the
29
Page 30

Undeveloped
print: There
area,
or a combination
and
streaks
how
n at
tabs
caused
of
inspect
taking
no
yellow tab
tab,
follow
right
developer;
smeared
s
white
and
spread
developer
get a picture
always
before
If
a
white
Instead,
or
may
be a single
(orange
. You pulled
before
pulling a yellow
one
of
the
on
Ii ke
the
and
more
pictures
appears
never
pull
the
directions
streaked
of
in color
following:
jammed
the
rollers.
one
clean
when
another
areas
blank
blank
pictures)
two
or
uneven
film;
at
the
the
rollers
.
you
white
on
page
white
areas
as
more
tab,
If
you
right,
pull
tab.
20.
in
or
Repeated
these
show
dirty.
Inspect and
(page
26).
Muddy
oped
and
time
tion
how
If
prints
black
ject
didn't
be
proper
looking
long
white
recommended
sheet. See page
to
use
you
don't
will be
and
Subject
didn't
focus
sure
that
manner.
white
that
enough.
and
the
Cold·Clip
deve
whites
fuzzy.
move
carefully.
you
spots:
the
clean
print:
Develop
color
prints
in
27
lop
long
brownish
will
be
rest
sharp:
but
are
steel
them
It
wasn't
the
film
for
with
color
enough,
pink
muddy
is
unsharp
Check
focusing
Marks
rollers
frequently
devel·
both
black
for
the
instruc-
details
prints.
over-all;
gray.
I f
the
page 7
in
like
are
full
of
color
sub-
you
to
the
30
Page 31

Oblong
red
white
As
tab,
the
Always
out
in
in a color
tab
a result,
the
white
camera
pull
of
the
camera
all
print:
picture
the
when
tab
and
the
The
. You
way
out
you
was
spoiled
white
(page
oblong
didn't
of
the
pulled
dragged
the
picture.
tab
18).
is
the
back
all
pink
or
pull
the
camera.
yellow
into
the
way
Undeveloped
picture
ing
In
instead
the
the
not
and
of
Keep
dish-orange
flaws
the
white
this
example
of
developer
picture
develop.
swiftly
Dried
developer
the
steel
the
Orange-red
edge
and/or
generally
was
pulled
Pull
the
way
(pages
TO
OBTAIN INFORMATION AND HELP
I f
you
camera
whether
you
urge
film
waste
your
dealer
Polaroid
Customer
Cambridge, Mass.
edges
are
or
yellow
the tab
straight.
is
and
edges
Pull
, all
the
rollers
rollers
clean.
marks
marks
in
the
indicate
out
of
yellow
tab
18, 19).
ever
have a problem
or
film, or
or
not a repair
to
seek
and
or
office
(list
Service,
or
usually
not
both
the
help
write
corners:
caused
tab
out
at
was
pulled
When
this
spread
evenly
and
corners
tabs
(pages
may
along
this
the
camera
straight
if
you
is
promptly
to
back
out
at
edge:
(A)
of
at
needed,
the
page),
Corporation,
Or,
way
chemicals
also
like
corners
that
out
disappointment.
on
Polaroid
02139.
by pull-
an angle.
happens
straight
18, 19).
the
cause
along
the
yellow
an
angle
, all
with
don't
to
nearest
call
Such
down,
over
may
ends
this.
Red-
the
print
tab
the
the
know
we
avoid
See
or
to
Cus-
.
tomer
from
Massachusetts.
setts,
(617)864-4568.
ple
what
be
turn
Service
anywhere
and
pictures
camera
sure
to
address.
toll-free
from
and,
model
include a clearly
in
the
From
Canada,
When
most
at
800-225-1384
U.S.A.
within
writing, send
important,
you
Massachu-
call
have.
printed
except
collect
sam-
state
Please
re-
31
Page 32

POLAROID SERVICE CENTERS AND OFFICES
CALIFORN
IA
Polaroid
Corp.
875
Stanton
Corp.
E.
Maple
Segundo
Corp.
Browns
Corp.
Swift
Drive
Brook
60521
Corp
ond
Avenue
JERSEY
Corp.
O.
Box
607
Century
07652
Corp.
Manufacturing
44135
Corp.
Governors
75247
RICO
of
Industrial
190,
Km
00630
address:
203
00630
Road
94010
Avenue
90245
Mill
.
Road
Puerto
1.7
2,
Ceramica
Row
Burlingame
Polaroid
2040
EI
GEORGIA
Polaroid
3720
Atlanta 30315
ILLINOIS
Polaroid
2020
Oak
MASSACHUSETTS
Polaroid
89 Sec
Waltham 02154
NEW
Polaroid
P.
W·95
Paramus
OHIO
Polaroid
4640
Cleveland
TEXAS
Polaroid
9029
Dallas
PUERTO
Polaroid
Charlyn
Road
Carolina
Mailing
P.O. Box
Carolina
Road
, S.E.
Road
Rico, Inc.
Park
Annex
AUSTRALIA
Polaroid
Australia
2
Smail Streel
Ultimo,
N.S.
O.
Box
335
GmbH
Wien
(Belgium)
rue
de
Bruxelles
Corp. of
Carlingview
Ontario
(U.K.)
Garden
Center
Lane
Green,
(France)
rue
de
Center
Chaptal
GmbH
(Italia)
Certosa
Milano
W.
N.S.W.
27
3
la
Villiers
sur
Stra
222
Mailing address:
P.
Broadway,
AUSTRIA
Polaroid
Kegelgasse
A·I035
BELGIUM
Polaroid
12·16
1060
CANADA
Polaroid
350
Rexdale,
ENGLAND
Polaroid
Office, Rosanne
Welwyn
Hertfordshire
Service
Huggins
Welham
Hertfordshire
FRANCE
Polaroid
57,
92·Neuilly
Service
61, rue
92·Levallois
GERMANY
Polaroid
Konigslacher
6 Frankfurl/Main
ITALY
Polaroid
Viale
20156
Ply.
2007
2007
SA
Victoire
Canada,
Drive
Ltd.
House
City
near
Hatfield
SA
Seine
sse
15·21
·Niederrad I
S.p.A.
Ltd.
Ltd.
JAPAN
Nippon
Polaroid
. No.6
Postal
.
(Europ
Maas
sluisstraat
9167
Center
(Norge) AI S
AFRICA
1803
get
AB
,
-
21
Skll'fholmen
A.
G.
8037
Kabushiki
Tomoe·cho
16·952
a)
N.V.
Nederland
III
(Pty.) Ltd."
Streets
175
Mori Bldg
32,
Nishikubo
Shiba
, Minato·ku
Tokyo
MEXICO
Michelmex S.A.·
Apartado
Mexico 6 D.F
THE
NETHERLANDS
Polaroid
Verkoopkantoor,
Office,
P.
O.
Box
Amsterdam·W.
Service
Markt 24
Enschede
NORWAY
Polaroid
Hvamkrysset
Boks 35
2007
Kjeller
SOUTH
Frank & Hirsch
P.
O.
Box
Bree
and Nug
Johannesburg
SWEDEN
Polaroid
Box 20
S·
127
SWITZERLAND
Polaroid
Hardturmstrasse
ZUrich
"Authorized Independent
Repair"Station
Kaisha
258
Additional Repair Stations:
Repa
ir
Stations
in
the
Customer
anywhere
(617)
864·4568.
P540B
Service,
in
6/72
the
U.S.A.
Polaroid
U.S.
A.
except
32
Besides
Polaroid's
and
Canada.
Corporation,
Cambridge,
Massachusetts. From
To
locate
"Polaroid"
own
the
Mass.
Service
one
within
and
Centers
closest
to
02139.
Or,
Massachusetts,
"Polacolor"®
lis
you
call
ted
here,
, write
Customer
to
and
there
the
from
are
nearest
Service
several
Authorized Independent
Polaroid
toll·free al
Canada,
you
Service
Cenler
800·225·1384
may
call collect at
Printed
or
to
from
in
U.S
.A.
 Loading...