

Page 1

PLEASE READ
We are in no way responsible for the
contents of the manual. We do not guarantee
its accuracy and we do not make any claim
of copyright. The copyright remains the
property of their respective owners.
Visit the site to read the latest projector
news and reviews, read and comment on
projector specifications, download user
manuals and much more.
Page 2
MON (monitor)
LCD
CPU
(computer/VGA)
Polaview 1700/1900
Quick reference guide
Thank you for purchasing Polaroid’s liquid-crystal-display
(LCD) projection panel. This quick-setup information is
common to both the Polaview Model 1700 and Model 1900
Projection Panels, except where indicated.
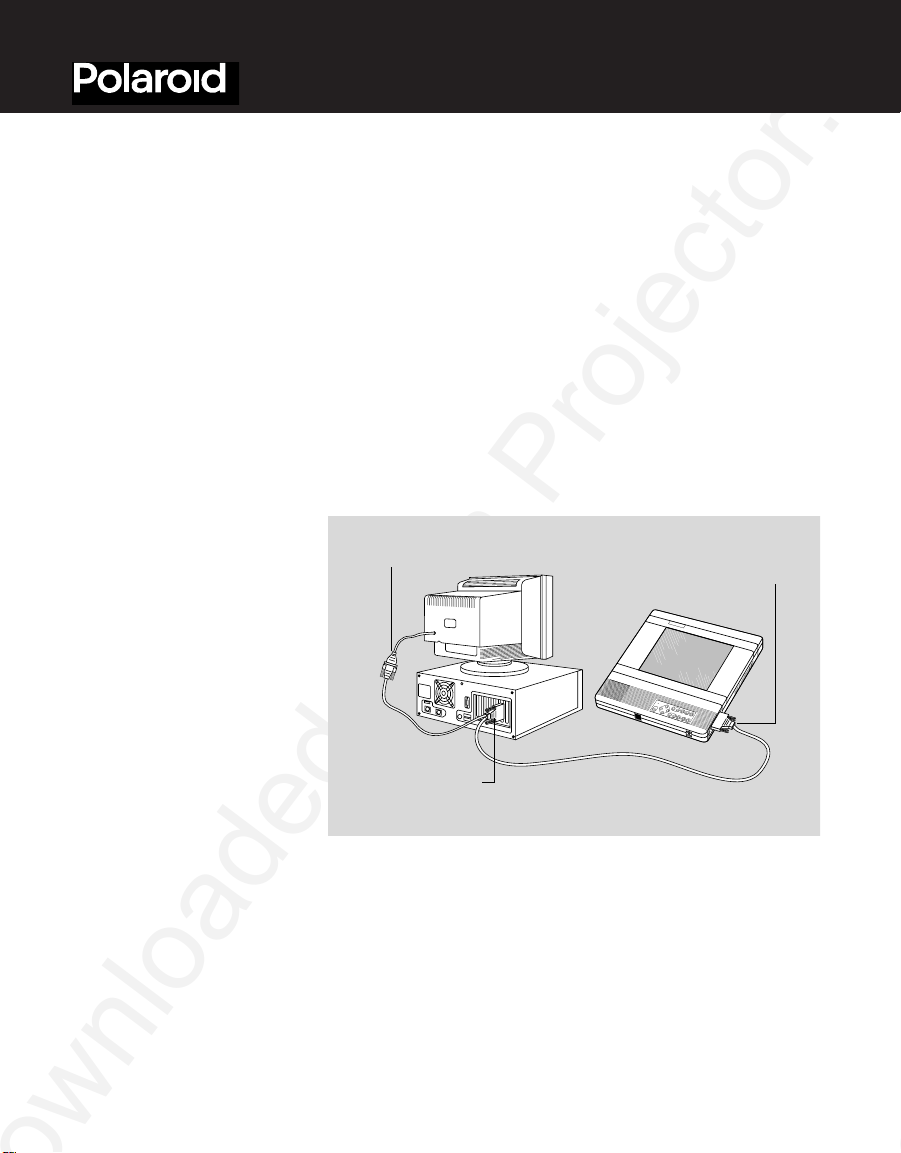
Quick setup
procedures
1 Turn off your computer system and overhead projector.
Place your panel on the overhead projector.
2 Connect the video Y-cable as shown below for either
VGA or Macintosh II systems. VGA systems use cable part
number C454-6, Macintosh II systems use cable part number C464-6.
3 Power: With your panel POWER switch in the Off position,
connect the AC adapter to the panel power connector, then
plug the power cord into the adapter. Finally, plug the
power cord into a grounded AC wall outlet.
4 Turn on your panel first, then the computer, monitor, and
finally the overhead projector.
Page 3
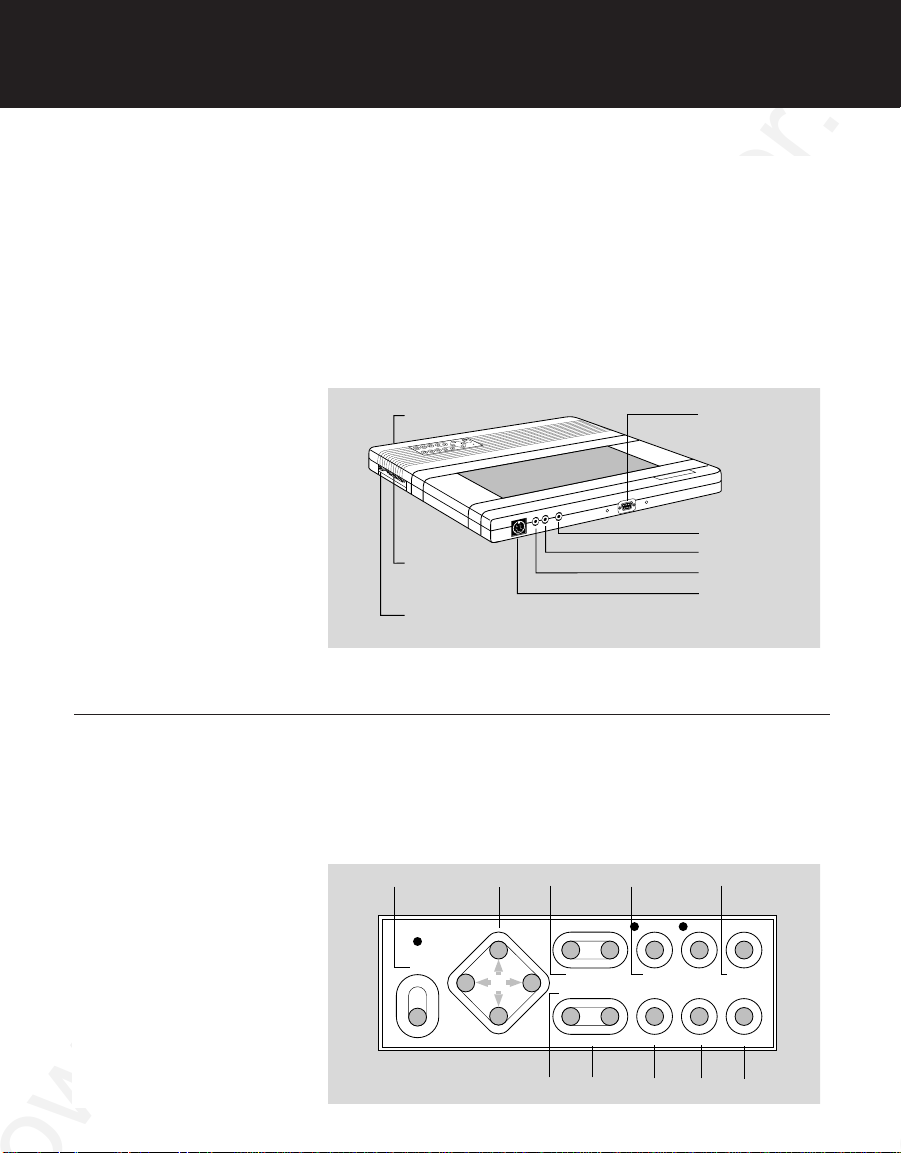
2 Quick reference guide
Video In*
Audio In*
Audio Out*
S-VHS In*
Cyclops
connector
Computer
video port
Serial port
Power port
*Model 1900 only
Power
– Intensity +
Freeze
Clear
Sync Store Rear Proj
Colors Rev Vid Status– Contrast +
Shift
Text Vid Sel
– Volume +
R Tint G
On
Model 1900 only
9876
5
4
3
21
For video connections
(Model 1900 only)
For audio connections
(Model 1900 only,
cables not included)
Control panel
Cable part number C400-6 connects the video-source
Video Out jack to the Video In jack of your panel. Cable
part number C466-6 (not included) connects an S-VHS or
S-Video source to the S-VHS input port of your panel.
Connect the audio-source Audio Out jack to the
Audio In jack of your panel. Connect your panel
Audio Out jack to the optional loudspeaker system
(part number A55) or other audio source.
Un-SHIFTed keys
Un-SHIFTed key functions are printed in black on the
panel. For the Model 1700, the VID SEL key is printed
in red and is functional only when the external video
adapter (part number A194) is installed.
Page 4

3 Quick reference guide
1 POWER ON Main power switch.
2 Arrow keys Use these keys to select and adjust the
Status Window settings or to make small
adjustments to the image position.
3 TINT Adjusts color-balance: R adds red; G adds
green*
4 TEXT For VGA video mode, this key toggles
between text and graphics modes.
5 VIDeo SELect 3-way toggle: computer video, composite
(NTSC/PAL/SECAM) and S-VHS
(NTSC/PAL/ SECAM) video inputs. For the
Model 1700, it functions only when the
external video adapter is installed.
6 CONTRAST (- and +), decreases and increases the
difference between light and dark image
segments.*
7 COLORS 4-way toggle. 8 colors (best for text),
3,375 colors, 226,981 colors (computer
default), or 2 million colors
(NTSC/PAL/SECAM).
8 REVerse VIDeo Toggles between normal and reverse
video.
9 STATUS Brings up the Status Window. Shows
currently selected values for video source
and image settings.
* Functions only in analog video (e.g., NTSC/PAL/SECAM, VGA, and Mac).
Page 5

4 Quick reference guide
Power
– Intensity +
Freeze
Clear
Sync Store Rear Proj
Colors Rev Vid Status– Contrast +
Shift
Text Vid Sel
– Volume +
R Tint G
On
(Model 1900 only)
17
1615
14
13
121110
SHIFTed keys
Gain access to these key functions by first pressing the
SHIFT key. SHIFTed key functions are printed in green
on the panel.
10 INTENSITY (- and +) decreases and increases
color intensity in the analog video
(NTSC/PAL/SECAM) mode. For the
Model 1700, the key function is printed
in red and works only when the external
video adapter is attached.
11 FREEZE “Freezes” the image.
12 SHIFT Toggles between SHIFTed and
unSHIFTed functions. The green light
indicates the SHIFTed function is active.
13 CLEAR Blanks and restores the screen.
A “cleared” screen is white.
14 VOLUME (- and +) decreases and increases volume
if an audio device is connected (Model
15 SYNC Adjusts for fine variations in a computer
1900 only).
video signal.
16 STORE Saves current control-panel settings.
17 REAR Reverses an image left-to-right. For use
PROJection with a rear-projection screen.
Page 6

5 Quick reference guide
VID. SEL. COLORS STATUS
SYNC
FREEZE REV. VID. CLEAR
R–+G
FWD PAUSE TEXTREV
TINT CONTRAST
–+
INTENSITY
–+
VOLUME
Model 1900 only
Remote control
The remote-control gives you access to all of
the control-panel functions except for those of the
POWER ON switch and the STORE and REAR
PROJection keys. In addition to the control-panel key
functions, the remote control has FWD, REV and PAUSE
keys. These function only with utility software (refer to
your instruction manual for details).
Note: In video (NTSC/PAL/SECAM) mode, SYNC is
replaced by SIGnal LEVEL when the Status Window is
displayed. SIG LEVEL is used to adjust the brightness of
NTSC/PAL/SECAM video signals. You can use only the
arrow keys to adjust SIG LEVEL. After you set SIG LEVEL,
use the CONTRAST keys to adjust for fine variations.
Page 7

6 Quick reference guide
Compatibility matrix
Computer Video Cable/Interface kit
IBM PC, XT, AT PS/2 VGA1, S-VGA2, MCGA C454-6 cable, included
or compatible
Olivetti OVC
Macintosh II family, LC, Standard video, 8-bit or C464-6 cable, included
Quadra, Centris, Performa, 24-bit color when used with
or PowerBook
IBM PC/XT/AT or CGA, EGA, MDA, C456-6 cable
compatible Hercules, Hercules+
Olivetti OEC
Olivetti M22, M24, OGC, PGC, EGC with C457-6 cable
M28, AT&T 6300, 63xx, DB-25 pin connector
WGS
Macintosh SE, SE/30 Monochrome A33 interface kit
Macintosh Plus, 128K, Monochrome A34 interface kit
512K, 512Ke
Macintosh Classsic, Monochrome A35 interface kit
Classic II
NEC 9801 Color analog (640 x 400) C465-6 cable
1 Including VESA 640 x 480 at 72 Hz
2 640 x 480 resolution, 256 color mode only
3 May require external third party adapter; call Polaroid for more information
4 Optional accessory
3
12 and 13 in. monitors
4
4
4
4
4
4
For technical support, please contact your dealer or call Polaroid Corporation
at 1-800- 432-5355.
“Polaroid” and “Polaview” are trademarks of Polaroid Corporation, Cambridge, MA 02139.
Other trademarks may be the property of their respective owners. U.S. and foreign patents are pending.
P8458 7/96 Printed in U.S.A. 710-00515-1
Page 8

PLEASE READ
We are in no way responsible for the
contents of the manual. We do not guarantee
its accuracy and we do not make any claim
of copyright. The copyright remains the
property of their respective owners.
Visit the site to read the latest projector
news and reviews, read and comment on
projector specifications, download user
manuals and much more.
 Loading...