

Page 1

Page 2
English
1200
English
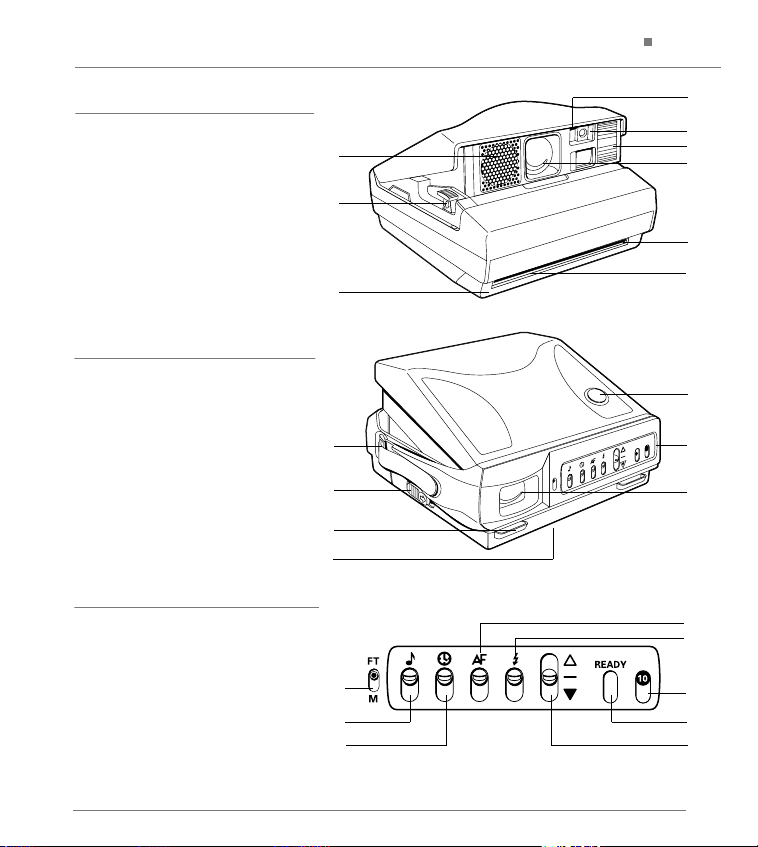
Front View
a
Sonar range finder
b
Film door release
c
Film door
d
Film exit
e
Film shade
f
Quintic, three-element, 125mm lens
g
Programmed flash
h
Photocell
i
Self-timer indicator (1200si)
Rear View
j
Hand strap
k
Release latch (open/close camera)
l
Neck strap connector
m
Tripod socket
n
Viewfinder
o
System control panel (1200si shown)
Two-stage shutter button
p
Control Panel
q
Feet or meters selector (1200si)
r
Audio signal switch (1200si)
s
Self-timer switch (1200si)
t
Exposure control (1200si/1200i)
u
Recharge indicator (1200si/1200i)
v
Picture counter (1200si/1200i)
w
Programmed flash override (1200si)
x
Sonar autofocus override (1200si)
i
h
a
b
c
j
T
k
l
m
q
r
s
F
M
g
f
e
d
p
o
Y
D
A
E
R
n
x
w
v
u
t
1
Page 3
1200
English
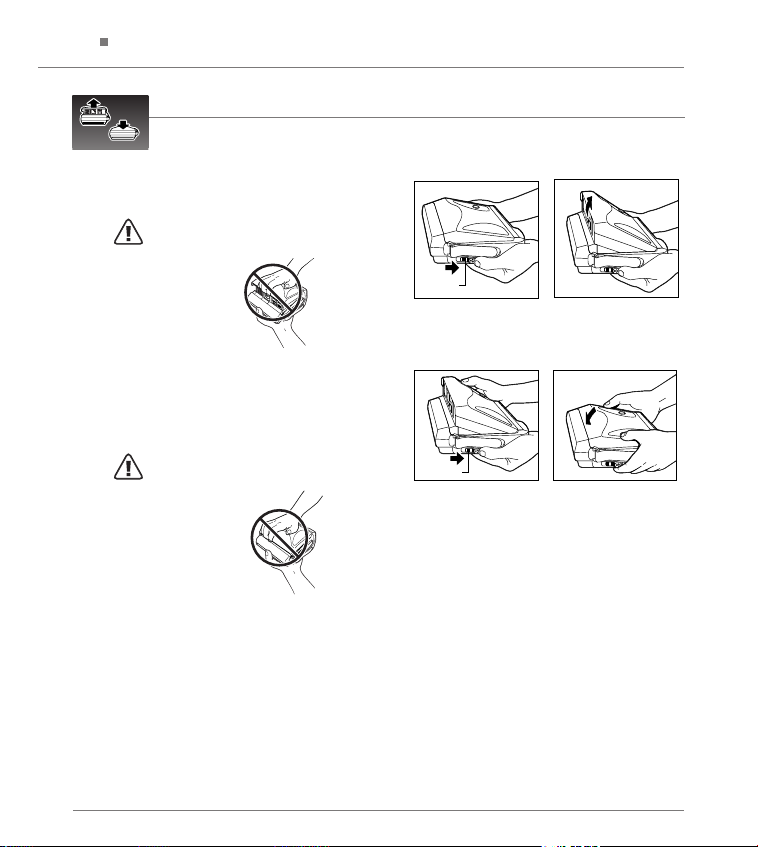
Opening and Closing the Camera
To open, slide release latch
arrow. Camera opens automatically.
DO NOT force cover open as it will damage
camera.
(a)
in direction of
To close, slide release latch
arrow. Hold camera as shown. Close lid and let
go of release latch.
DO NOT force cover closed as it will damage
camera.
(a)
in direction of
a
a
2
Page 4
English
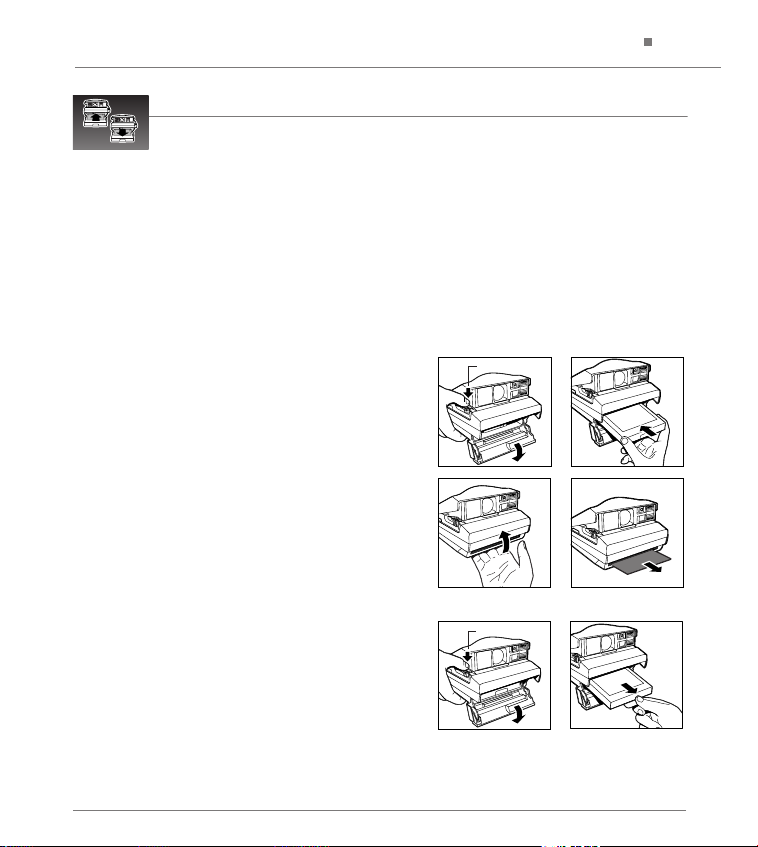
Loading and Unloading the Film
Note:
Use only Polaroid film. Before use, check expiration date.
This camera uses 1200 film with 12 frames per pack, or Spectra or Image 990 film with 10 frames
per pack.
12-frame film: 10-frame film:
•
Blank = no film pack inserted•Blank = no film pack inserted
•
S = start, numbers count up
•
E = empty, 12 frames taken
•
S = start, numbers count up
•
10 (orange) = empty, 10 frames taken
•
11, E (orange) = empty, camera cycled beyond last (10th) frame
1200
To load the film, press film door release
Hold film by edges. Insert film pack as shown. Push
film pack in until a "click" is heard.
Close film door. Film cover ejects automatically.
To unload film, press film door release
Pull tab to remove empty film pack.
(a)
(a)
to open.
to open.
a
a
3
Page 5

1200
English
Taking Pictures with the 1200si
For horizontal photos, hold camera as shown in a.
For vertical photos, hold camera as shown in b.
Frame your subject in viewfinder.
1
2
Press shutter button halfway. The distance to your subject (in meters or
feet) and a symbol are displayed. A green symbol indicates that it is okay
to take photo.
3
Press shutter button all the way. The photo is automatically ejected.
Note:
If flash or focus is not correct, camera beeps and/or a flashing yellow caution symbol appears.
Adjust the camera or reposition your subject as described in the next section.
If the flash or focus is not correct. . .
When the caution symbol and the following error indicators appear:
•
Your subject is too close. The number “0.1” is displayed. Release
shutter button and stand at least 0.6 m (2 ft.) from subject.
•
Your subject is beyond flash range. A number from 4.8 to 6.2 is
displayed. Release shutter button and position your subject within
the 0.6 m to 4.6 m (2-15 ft.) flash range.
ab
•
Your subject is within range, but the flash is off. A number from
4.8 to 6.2 is displayed. Slide the flash switch up to turn flash on.
Note: Distance readings do not appear when subject is beyond
6.2 m (20 ft).
4
Page 6

Taking Pictures with the 1200i
For horizontal photos, hold camera as shown in a.
For vertical photos, hold camera as shown in b.
English
1200
a
ab
1
Frame your subject in viewfinder.
Press shutter button all the way. The photo is automatically ejected.
2
b
Other Features
Exposure Control
Use this feature to retake photo that was too light or too dark. To lighten dark photo, slide exposure
(a)
control up
. To darken light photo, slide exposure control down
Initial result (too dark)
a = corrective action
ab
Initial result (too light)
b = corrective action
(b)
. Retake photo.
5
Page 7

1200
English
Using Self-timer
Place camera on tripod or other secure surface and set up photo.
Press shutter button halfway and release button. Slide self-timer
switch down. You have 12 seconds before self-timer activates
shutter release. Camera beeps and red light flashes for 10 seconds,
then beeps steadily and red light shines continuously for an additional two seconds before taking photo.
Slide self-timer up. Photo ejects automatically.
Note:
To avoid double exposure, do not close camera before
sliding self-timer up.
Taking Photos Through Glass
Use these features
To override autofocus and autoflash slide their controls down to
OFF position.
Always return controls to normal position after using.
6
Page 8

English
Camera Maintenance
Do not touch lens. Clean camera lens with soft, lint-free cloth.
If spots or banding appears on photos, camera may have dirty developer rollers.
To clean developer rollers, dampen clean cloth with tap water.
Open film door and thoroughly clean rollers. If film is in camera, clean rollers in dimly lit area.
Developing Photos
55 F
13 C
1200
Do not shake. Do not bend. If temperature is below 55° F (13° C) place developing photo in warm location,
such as your pocket.
7
Page 9

1200
English
Guide to better pictures
Be sure soundwaves have clear path to your subject.
If an object in foreground prevents soundwaves from reaching your subject, lens focuses on foreground object. Subject
will be out of focus.
Blurry Picture Cause Solution
When subject is not centered in the picture, the sound waves pass by the
subject and measure the distance to the
background. This causes the subject to
be unclear because the lens focuses on
the background.
Object in foreground prevented sound
waves from measuring correctly. Lens
focuses on object, causing unclear and
possibly dark subject.
Center the subject in the picture. Or, if
you want to keep your subject offcenter, frame your subject in the middle
of the viewfinder. Press and hold the
shutter button halfway to lock in the
correct lens setting. Then reframe your
subject off center and press the shutter
button all the way.
The sound waves travel to the central
part of the scene. Be sure there are no
objects in front of your subject.
Background was too far from subject.
Subject may have been beyond flash
range.
Place subject near a background and
keep the exposure control in the normal
position. Stay within flash range of
0.6 m to 4.6 m (2 to 15 ft), and keep the
exposure control in the normal position.
8
Page 10

Repeated spots or bar pattern Cause Solution
Developer rollers inside the film door
need to be cleaned.
Damaged picture Cause Solution
Picture was shaken back and forth or
bent shortly after it was ejected from
the camera.
Picture was left in the exit slot, and
camera was set down on a table or
other surface.
Subject too dark Cause Solution
Camera’s photocell measured the bright
window light, causing the subject to be
too dark.
Open film door in indirect light (do not
remove film). While turning rollers,
clean them with a lint-free cloth dampened with water.
During first 60 seconds of development,
handle print gently; hold it only by its
wide white border, and do not wave or
bend it.
Remove print from exit slot as soon as it
ejects.
Reposition subject away from the bright
background.
English
1200
When a bright source of light (lamplight,
candlelight, etc.) is in the central part of
the scene and in front of the subject, the
camera’s photocell will measure the
bright light, causing the subject to be
too dark.
Move the source of light to one side of
your subject so it is not in the central
part of the scene.
9
Page 11

1200
English
Picture too blue or too red/yellow Cause Solution
Picture taken at temperatures below
55
°
F (13°C) can have a blue tint.
Pictures taken at temperatures above
95
°
F (35°C) can have a red or yellow
tint.
In cold weather, keep camera and film
as warm as possible. Immediately place
developing picture in a warm pocket for
at least a minute, being careful not to
bend it.
Avoid storing camera and film in hot
places, such as glove or luggage compartments of a car, or near a heat
source, such as a radiator.
Warranty
Three-year limited warranty
Three-year limited warranty except in U. S., Latin America and Canada, where one-year limited warranty
applies.
Caution
This camera is battery operated. Supervise children when camera is operated by them or used in their presence. To avoid
electrical shock, do not expose to or immerse in water or other fluids, disassemble, or operate if dropped or damaged.
Questions? Need Help?
Contact Polaroid Customer Care Center
Toll Free at: 1-800-343-5000
www.polaroid.com
10
© Copyright 2000 Polaroid Corporation, Cambridge MA 02139 U. S. A., Owner of trademarks “Polaroid”, “Spectra”,
“Polaroid 1200”, “Polaroid 990” and “Image”.
 Loading...