

Polaris Communications HD WIRELESS User Manual

1. INTRODUCTION
Congratulations on purchasing the HD Wireless™.
The HD Wireless was developed by Polaris Communications, Australia’s leading supplier of high
quality and acoustically safe headset solutions.
• Designed for headset users of both traditional & VoIP telephone systems as well as PCs.
• HD Wideband Sound Quality.
• Easy Call Controls.
• Large and Intuitive Colour Touchscreen.
• Uses Polaris’ patented Sonaron™ software which provides unique Shriek Rejection™ protection.
HD Wireless is the best wireless headset for today’s offi ce.
Introduction
1
Care and
Maintenance
2
Product
Overview
3
System
Setup and
Connections
4
Touchscreen
Display
5
Settings
Overview
6
HD Wireless
Headset Controls
7
Advanced
HD Wireless
Features
8
Conference
Calling
9
Support
10
Warranty
and Safety
Information
11

2. CARE AND MAINTENANCE
Protect your HD Wireless headset just as you would any other electronic equipment.
If your HD Wireless base or headset requires cleaning please consider the following:
• Do not use spray cleaning solutions directly onto the base or headset piece.
• Clean the product or cables by wiping with a damp cloth as required.
• Clean the touchscreen with standard computer screen cleaning solution and soft cloth
provided.
• When cleaning the back of the HD Wireless, make sure not to place the damp cloth in or too close
to the ports.
• Ear cushions can be cleaned or replaced. Leatherette ear cushions should be removed and wiped
with a damp cloth. We recommend that you replace ear cushions as required.
• Avoid exposing the HD Wireless ports to rain or other liquids.
• Do not immerse the product in water.
Introduction
1
Care and
Maintenance
2
Product
Overview
3
System
Setup and
Connections
4
Touchscreen
Display
5
Settings
Overview
6
HD Wireless
Headset Controls
7
Advanced
HD Wireless
Features
8
Conference
Calling
9
Support
10
Warranty
and Safety
Information
11
3. PRODUCT OVERVIEW
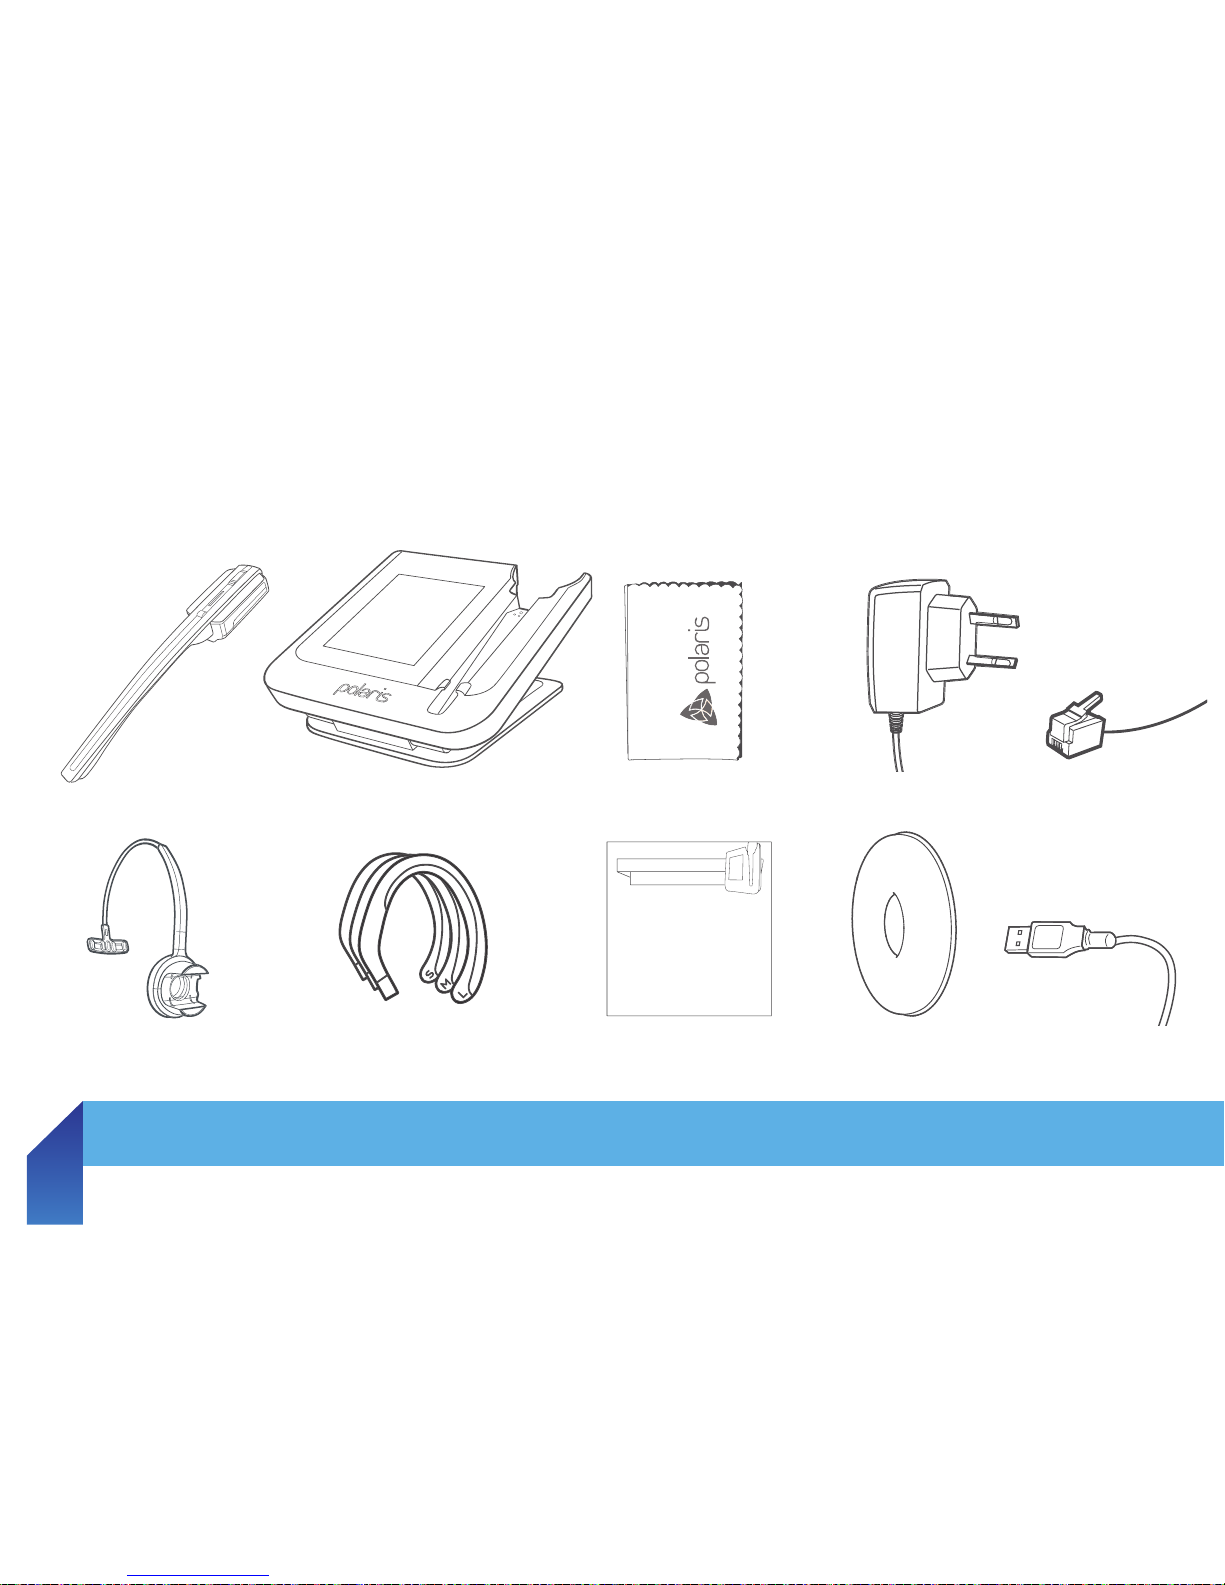
3.1 PACKAGE CONTENTS
3.2 OPTIONAL ACCESSORIES
3.3 HEADSET DIAGRAM
3.4 HEADSET ATTACHMENTS
3.5 HD WIRELESS BASE DIAGRAM
Headset
Headband Attachment
Wireless Base
Earhooks
(small, medium and large)
Power Adaptor
Ear Cushion
TAIL CORD
USB Cable
Introduction
1
Care and
Maintenance
2
Product
Overview
3
System
Setup and
Connections
4
Touchscreen
Display
5
Settings
Overview
6
HD Wireless
Headset Controls
7
Advanced
HD Wireless
Features
8
Conference
Calling
9
Support
10
Warranty
and Safety
Information
11
Cleaning Cloth
Quick Start Guide
HD wireless
Quick Start Guide
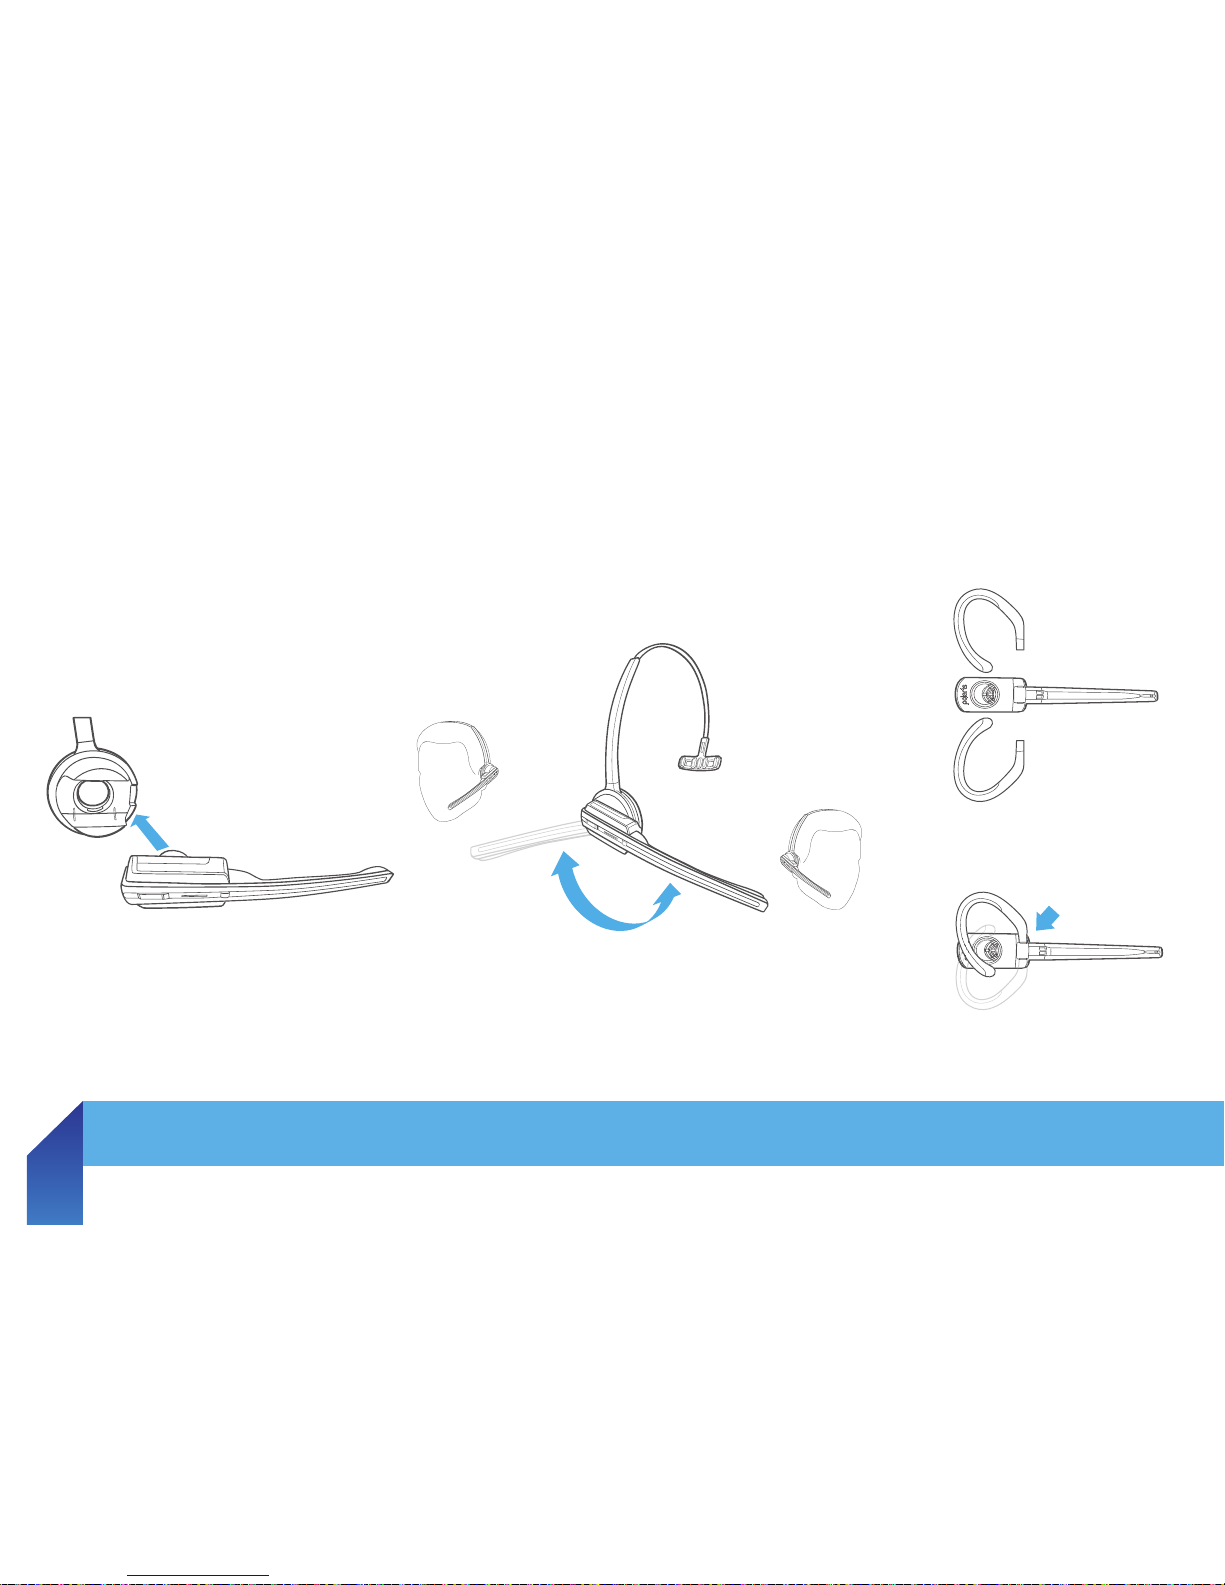
STEP 1 SETTING UP YOUR HEADSET
HD Wireless Offers the choice of two wearing styles - Headband
and Earhook.
OPTION 1: ATTACHING THE HEADBAND
1. Align the headset and the headband attachment, as
illustrated, and press firmly together until they click into place.
2. Rotate the microphone boom arm for left or right ear use.
3. Adjust the length of the headband to fit comfortably against
your head.
wHAT'S IN THE BOX?

The following accessories are available separately.
Both the Electronic Hook Switch (EHS) and Remote Handset Lifter enable you to answer your phone
via your headset while away from your desk.
EHS Cables are available for Avaya, Cisco and Polycom telephones. Contact our Firstpoint Customer
Service & Sales team for more information on 1800 626 505.
3. PRODUCT OVERVIEW
3.1 PACKAGE CONTENTS
3.2 OPTIONAL ACCESSORIES
3.3 HEADSET DIAGRAM
3.4 HEADSET ATTACHMENTS
3.5 HD WIRELESS BASE DIAGRAM
Remote Handset Lifter
Electronic Hookswitch Adaptor (EHS)
Introduction
1
Care and
Maintenance
2
Product
Overview
3
System
Setup and
Connections
4
Touchscreen
Display
5
Settings
Overview
6
HD Wireless
Headset Controls
7
Advanced
HD Wireless
Features
8
Conference
Calling
9
Support
10
Warranty
and Safety
Information
11
3. PRODUCT OVERVIEW
3.1 PACKAGE CONTENTS
3.2 OPTIONAL ACCESSORIES
3.3 HEADSET DIAGRAM
3.4 HEADSET ATTACHMENTS
3.5 HD WIRELESS BASE DIAGRAM
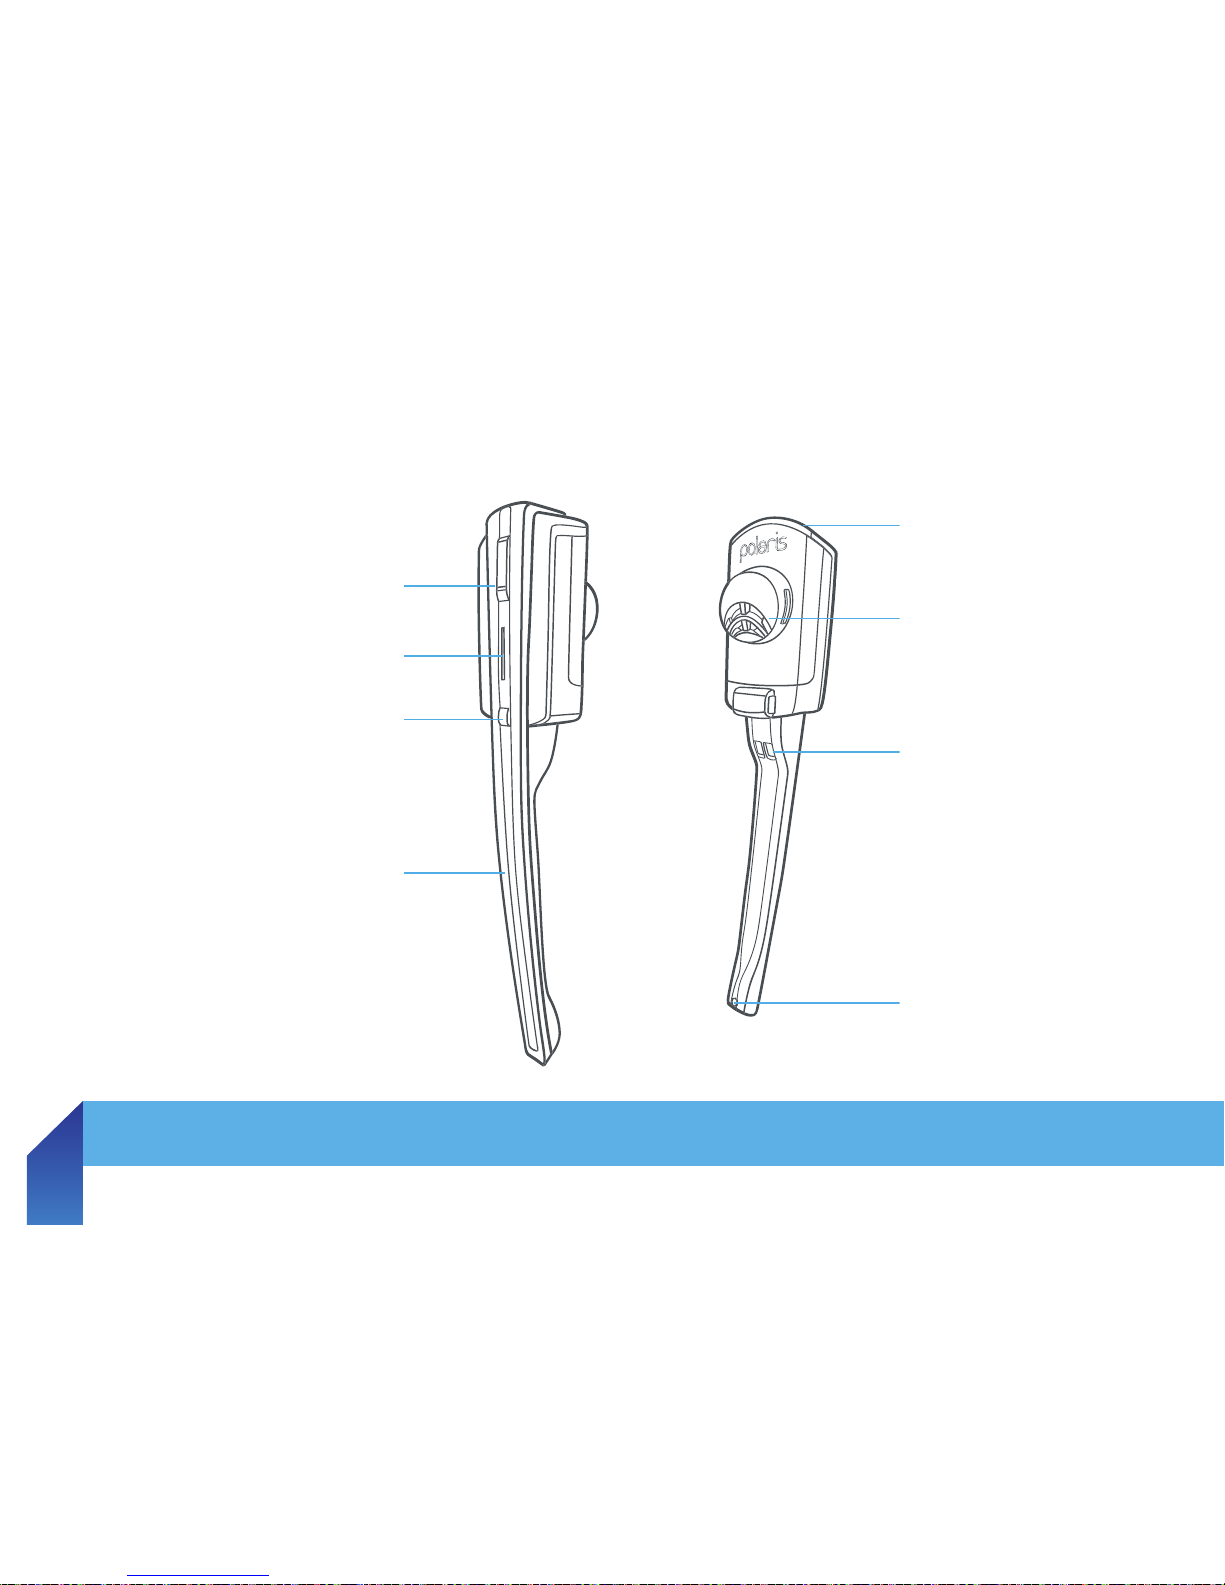
MULTI-FUNCTION BUTTON
(ANSWER/END)
Volume
Speaker
LED INDICATOR
MUTE
Recharge Contact
MICROPHONE BOOM ARM
Noise-cancelling
Microphone
Introduction
1
Care and
Maintenance
2
Product
Overview
3
System
Setup and
Connections
4
Touchscreen
Display
5
Settings
Overview
6
HD Wireless
Headset Controls
7
Advanced
HD Wireless
Features
8
Conference
Calling
9
Support
10
Warranty
and Safety
Information
11
3. PRODUCT OVERVIEW
3.1 PACKAGE CONTENTS
3.2 OPTIONAL ACCESSORIES
3.3 HEADSET DIAGRAM
3.4 HEADSET ATTACHMENTS
3.5 HD WIRELESS BASE DIAGRAM
The HD Wireless headset can be worn in the headband or earhook wearing-styles and can be worn
on either the left or right ear. Regardless of wearing-style, remember to ensure your microphone is
positioned at least two fi nger widths from your mouth to maximise the effi ciency of the noise-cancelling
microphone.
CLICK!
CLICK!
LEFT
RIGHT
LEFT
RIGHT
Introduction
1
Care and
Maintenance
2
Product
Overview
3
System
Setup and
Connections
4
Touchscreen
Display
5
Settings
Overview
6
HD Wireless
Headset Controls
7
Advanced
HD Wireless
Features
8
Conference
Calling
9
Support
10
Warranty
and Safety
Information
11

3. PRODUCT OVERVIEW
3.1 PACKAGE CONTENTS
3.2 OPTIONAL ACCESSORIES
3.3 HEADSET DIAGRAM
3.4 HEADSET ATTACHMENTS
3.5 HD WIRELESS BASE DIAGRAM
TOUCHSCREEN
USB PORT POWER ADAPTOR
PORT
AUXILIARY
PORT
HANDSET
PORT
TELEPHONE
PORT
HEADSET RECHARGE CONTACT
Introduction
1
Care and
Maintenance
2
Product
Overview
3
System
Setup and
Connections
4
Touchscreen
Display
5
Settings
Overview
6
HD Wireless
Headset Controls
7
Advanced
HD Wireless
Features
8
Conference
Calling
9
Support
10
Warranty
and Safety
Information
11

4. SYSTEM SETUP AND
CONNECTIONS
4.1 CONNECTING YOUR HD WIRELESS TO MAINS POWER
4.2 DOCKING YOUR HD WIRELESS HEADSET
4.3 CONNECTING YOUR HD WIRELESS TO A PC
4 4 IDENTIFYING THE CORRECT TAIL CORD FOR YOUR
TELEPHONE
4.5 CONNECTING YOUR HD WIRELESS TO A DESK-PHONE
This section describes how to connect your HD Wireless to your telephone and other equipment.
NOTE: Before following these instructions, you will need to determine whether your desk-phone has
a headset port. If you are unsure, please contact our Firstpoint Customer Service & Sales team on
1800 626 505 for further assistance.
CONNECT YOUR HD WIRELESS TO MAINS POWER
1. Plug the supplied power adaptor into the port marked on the HD Wireless headset base.
2. Connect the other end of the power adaptor to the mains power socket.
Introduction
1
Care and
Maintenance
2
Product
Overview
3
System
Setup and
Connections
4
Touchscreen
Display
5
Settings
Overview
6
HD Wireless
Headset Controls
7
Advanced
HD Wireless
Features
8
Conference
Calling
9
Support
10
Warranty
and Safety
Information
11
 Loading...