

Page 1

TR36P
OWNER’S MANUAL
H0570700_REVC
English | Français | Español
Page 2
English
Before You Start: Important Information
• Before installing the Polaris® cleaner, make sure the pool filter is clean.
• New plumbing lines should be flushed out before installing the Polaris cleaner.
• The Polaris cleaner should not be used to remove plaster dust in new pools.
• Always disconnect the cleaner before cleaning or backwashing the pool filter.
• After cleaning or backwashing, let the filtration system run for at least five (5) minutes before
reconnecting the cleaner.
• Always remove the cleaner from the pool before chemical shock treatements, such as super oxidation or
chlorination.
• Solar heating systems, ozone generators, and other air inducing equipment may cause air flow through the
cleaner, adversely affecting cleaner balance and performance. Plumb the dedicated cleaner line upstream
of these components.
• Highly chlorinated water can cause maintenance problems. Avoid running the Polaris cleaner while
chlorinating.
For customer service or support:
• Please mail warranty card immediately.
• For on-line support: www.polarispool.com
• To contact Polaris: US and Canada
Customer Service
2620 Commerce Way
Vista, CA 92081-8438
1-800-822-7933
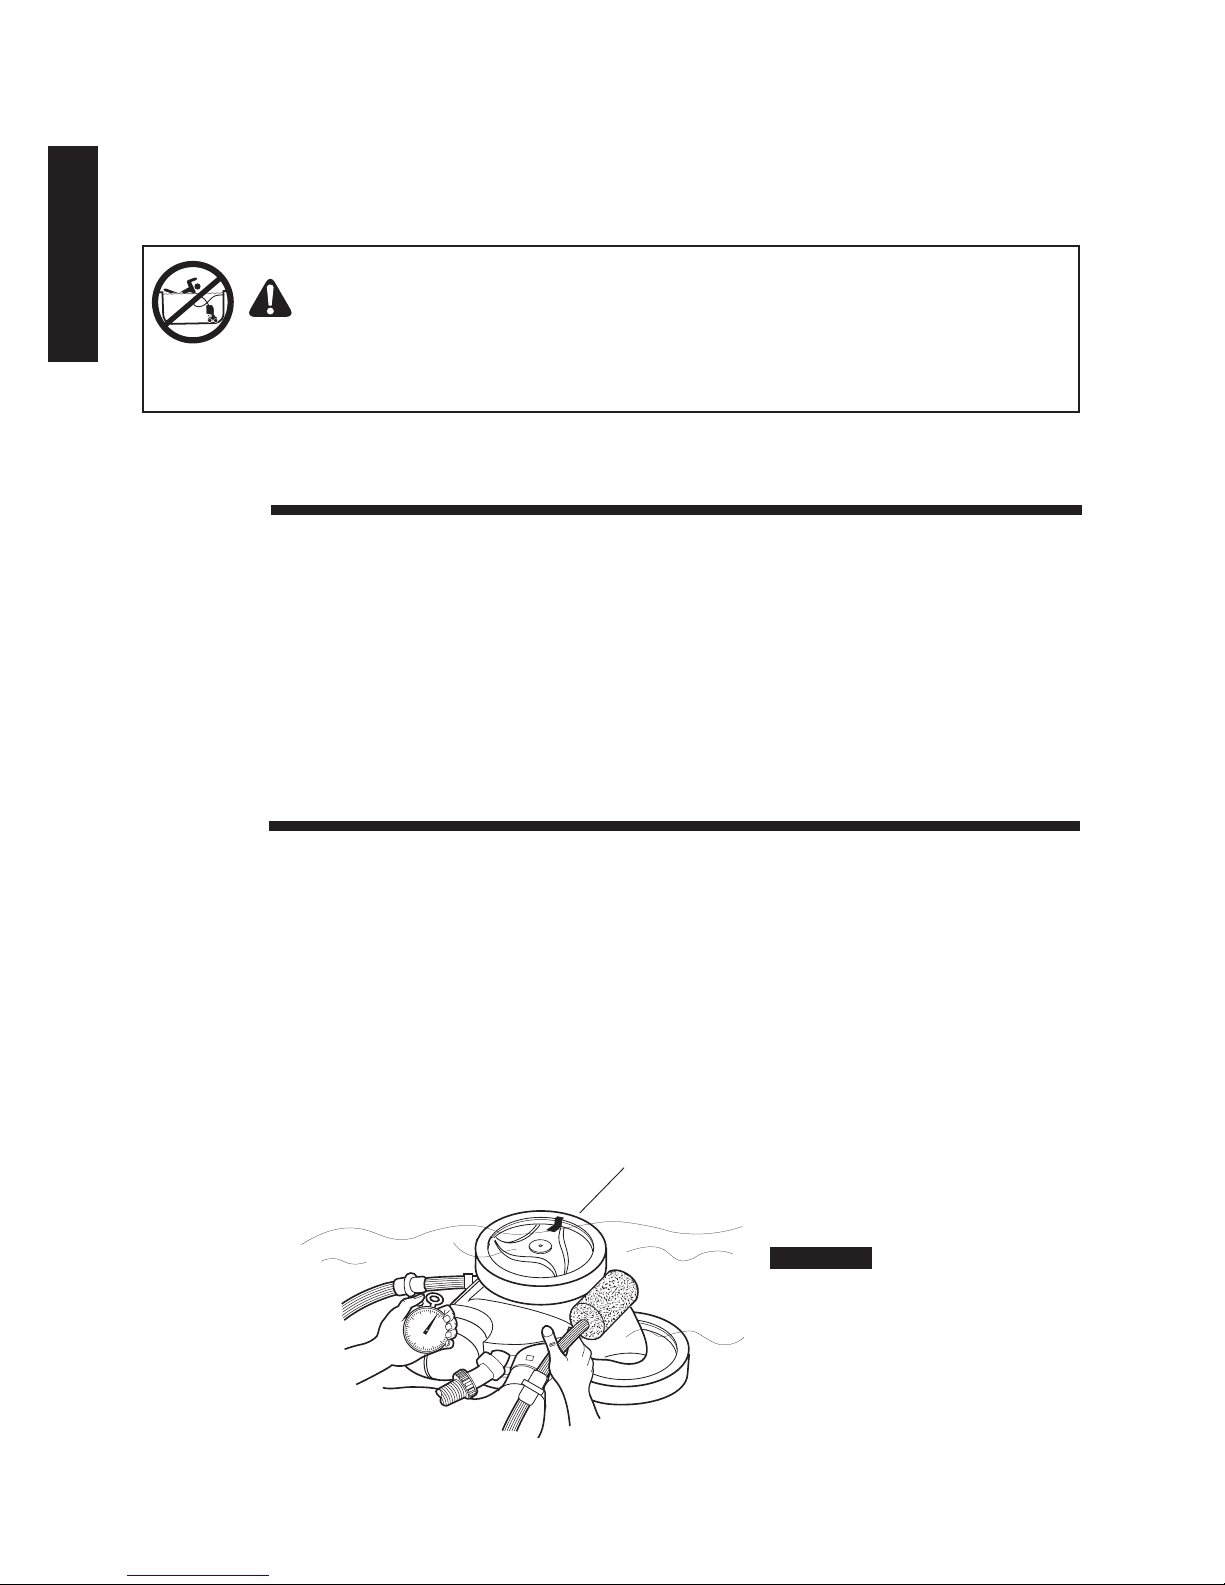
WARNING
To avoid risk of potentially serious injury:
• Do not handle the Polaris cleaner while it is operating, except when checking the wheel RPM.
• Always remove the Polaris cleaner before swimmers enter the pool.
CAUTION
USE OF THE POLARIS CLEANER IN A VINYL LINER POOL
Certain vinyl liner patterns are particularly susceptible to rapid surface wear or pattern removal caused by objects coming
into contact with the vinyl surface, including pool brushes, pool toys, floats, fountains, chlorine dispensers, and automatic
pool cleaners. Some vinyl liner patterns can be seriously scratched or abraded simply by rubbing the surface with a pool
brush. Ink from the pattern can also rub off during the installation process or when it comes into contact with objects in the
pool. Zodiac Pool Systems, Inc. is not responsible for, and the Limited Warranty does not cover, pattern removal, abrasion
or markings on vinyl liners.
2
Page 3
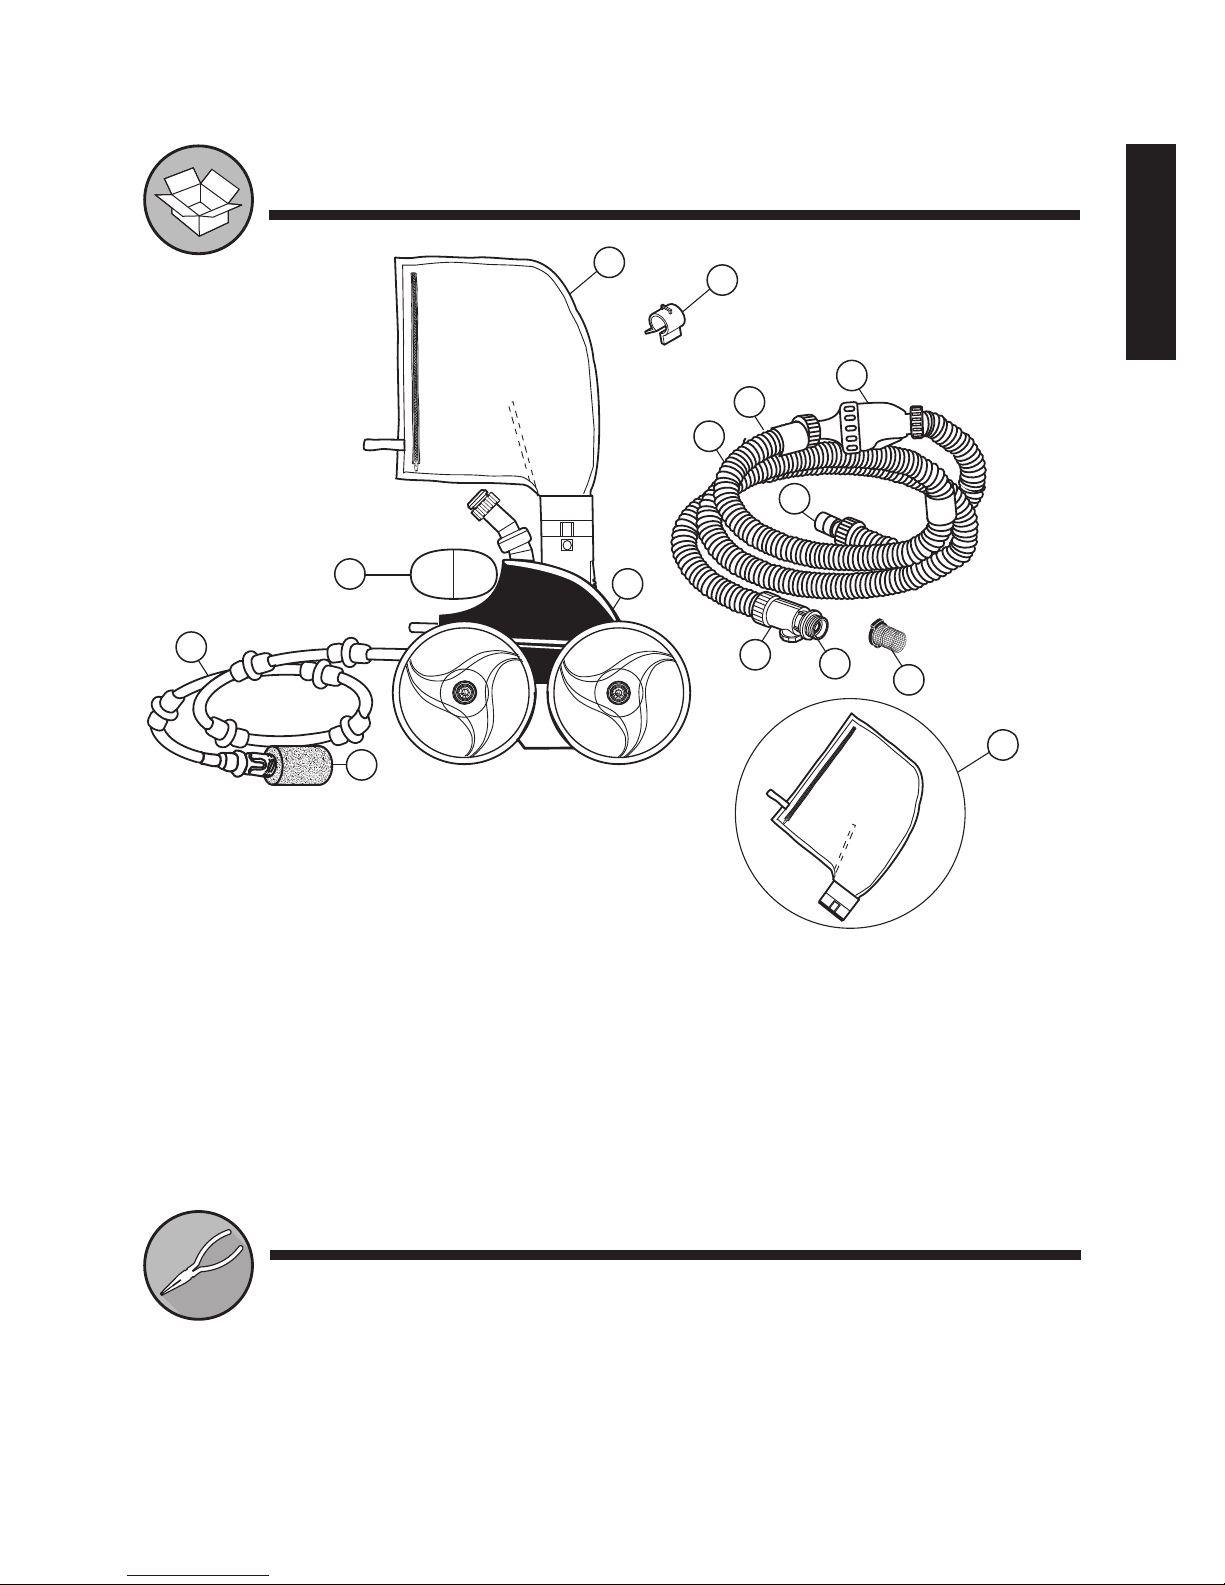
Included in the Box
English
b
l
h
g
f
7
m
c
d
a
i
j
k
n
e
a. Cleaner Body
b. All-Purpose Zipper Bag
c. Head Float
d. Sweep Hose
e. Tail Sweep PRO®
(with Sweep Hose Scrubber)
f. Feed Hose
g. Hose Float(s)
h. Back-up Valve
i. Quick Disconnect and
Pressure Relief Valve
j. Universal Wall Fitting (UWF®)
k. Filter Screen, UWF/QD
l. Bag Collar
m. Pressure Tester
n. Bonus All-Purpose Zipper Bag
Tools Needed for Installation
• Scissors or garden shears
• Pliers
• Tape measure
• Piece of tape
• UWF tool (optional part # 10-102-00)
3
Page 4

English
Installing the Cleaner
Read the complete owner’s
manual before you begin installation.
Prepare the Pool
1
1. Turn on the filtration pump for 2-3 minutes to flush out the plumbing lines.
2. Turn off the filtration pump.
3. Lay hose (f) out on the pool deck in sunlight to relax coils. This will reduce
the risk of tangling during cleaning.
2
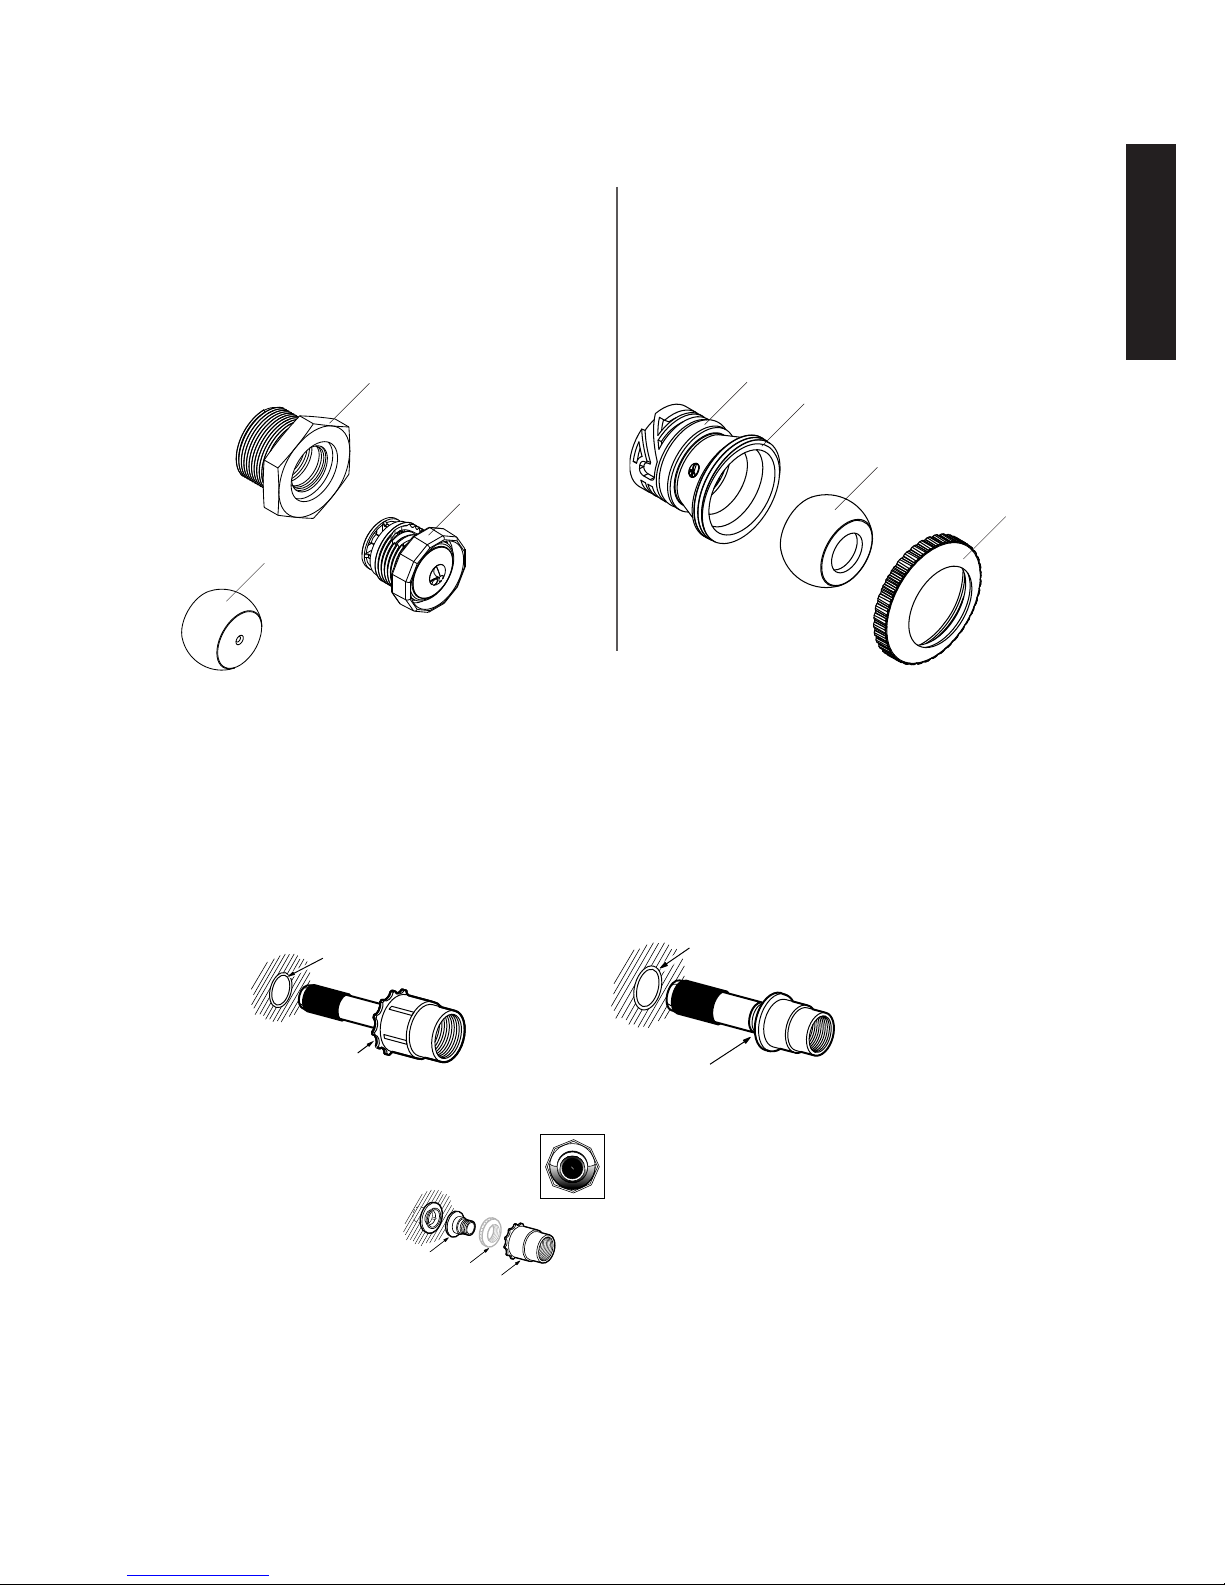
Install the Universal Wall Fitting
Purpose of installing the UWF®: Once the UWF is properly installed, the Quick
Disconnect can be removed each time without removing the UWF.
1. Remove the Universal Wall Fitting (UWF) (j) from the end of the hose (f) and
thread (by hand) into the dedicated return line opening in the pool.
2. Make sure the filter screen (k) is firmly seated in the Quick Disconnect (i).
3. Install Quick Disconnect into the UWF by turning clockwise (do not over-tighten),
then pull to secure in place.
j
k
i
4
Page 5
1" Stub Pipe Connection Kit
(part #9-100-8002)
1-1/2" Stub Pipe Connection Kit
(part #9-100-8003)
Does current fitting
Head
Eyeball Adapter Connection Kit
(part #9-100-8005)
Multiple Return Lines? Polaris® Cleaner Removed from Pool?
If your pool has two or three return lines, use the Eyeball
Fitting Connection Kit (part #9-100-8001). This kit
provides a Universal Wall Fitting (UWF®) and pressure
relief valve to be installed into the 2nd return line. Also
included is an eyeball regulator, which will replace the
existing eyeball if a 3rd return line is present.
Use the UWF Eyeball Fitting Kit (part
#6-511-00) to restore proper water
circulation when the cleaner is removed
from the pool.
English
Universal Wall Fitting
(UWF)
Pressure
Relief Valve
Eyeball Regulator
O-Ring
Eyeball Connector
Eyeball Regulator
Retainer Ring
Installing Other Pool Connections
If the pool does not have a dedicated return line, the Polaris TR36P cleaner connects to most common
return lines using special adapter kits available for purchase at a participating Polaris dealer.
For pools with plastic-pipe return lines (without pipe threads) that are cut off flush with the pool wall:
If pipe is 1″ in
diameter, use 1″ Stub
Pipe Connection Kit
(part #9-100-8002)
1" Return Line
If pipe is 1-1/2″ in
diameter, use 1-1/2″
Stub Pipe Connection
Kit (part #9-100-8003)
1-1/2" Return Line
1" Expansion
Connector
For directional eyeball
fittings that do not
have a 1-1/2” threaded
socket, request the
Eyeball Adapter
Connection Kit (part
Wall Fitting
Adapter
#9-100-8005)
Pool/Spa Connections Requiring Special Fittings
If a spa is connected to the pool filtration equipment, obtain expansion regulators in addition to one of the
kits listed above. Contact your dealer or Customer Service to determine which parts may be necessary.
Retainer
Ring
Connector
1-1/2"
Expansion
Connector
look like this?
If the UWF and Eyeball
Regulators still cannot be
installed on the pool, contact
your dealer or Customer Service
to determine which parts may be
necessary.
5
Page 6

English
3
1. Turn on the filtration pump.
2. With the hose connected to the UWF®, hold
4
Test Water Pressure
o
i
the pressure tester (o) under water. Cover the
large hole with your thumb and confirm water is
releasing from the pressure
relief valve (i).
NOTE: There are two holes in the end of the pressure
tester. It is important to block the larger hole to verify
pressure.
No water flow from pressure relief valve?
• If your Polaris® cleaner is connected to a dedicated cleaner line, adjust the diverter valve to
increase the water flow to the cleaner.
• Make sure filter screen (k) is correctly positioned in Quick Disconnect.
• Check skimmer, pump basket, and main filter for debris restricting flow.
• If the Polaris cleaner is connected to one of multiple return lines, verify you have the correct
Polaris return line connection kits installed (see page 5 of this manual).
Adjust Hose Length
7ft (2.13m)
4ft (1.2m)
Float (g)
Flotteur (g)
Flotador (g)
p
i
1. Turn the pump on. Hold hose
under water until the pressure
relief valve releases pressure.
2. Extend the hose to the
farthest point of the pool.
The hose end must be within
6 inches (15 cm), longer or
shorter.
3. Measure the hose with the
pressure on and cut excess
length from the first hose
section (p). (This is the
section connected to the
Quick Disconnect (i).)
4. Reconnect hose sections.
5. After adjusting the hose
length, position the three
hose floats as shown.
Hose too short?
• Contact your local Polaris dealer. Buy a new hose section. Add to
the first hose section (p) and cut until within 6 inches (15 cm).
6 in (15cm)
h
g
f
Recommended
Recommandé
Recomendado
6
Page 7
5
English
Assemble the Cleaner
1. Remove the pressure tester (o) by unscrewing the hose nut (q).
NOTE: The hose nut has reversed threads.
2. Use the same hose nut (q) and secure the hose to the cleaner body at the
feed pipe.
3. Pull the bag up and attach to the hose using the bag clip (n) .
4. Push the head float (c) all the way forward, up against the
cleaner body.
n
q
c
7
Page 8
English
Operating the Cleaner
WARNING
To avoid risk of potentially serious injury, do not swim or use the pool
when the cleaner is submerged or operating.
Start the Cleaner
1
1. Connect hose in the pool at the UWF®.
2. Submerge the cleaner in the pool, allowing it to sink to the bottom.
3. Turn on the filtration pump and allow it to prime. Cleaner will begin to move.
2
Check for Proper Wheel RPM
Before operating the Polaris cleaner®, check for proper wheel revolutions per minute
(RPM). For maximum efficiency, the Polaris should operate between 28 and 32
RPM.
1. Mark the single side wheel using using a piece of tape (or a small leaf tucked
into the tire).
2. Turn the pump on, hold the cleaner below the water level and count wheel
revolutions for one minute.
3. Optimum wheel speed should be between 28 and 32 RPM.
mark the single
mark the single side
side wheel
wheel (tape or small leaf)
(leaf, tape, or
marker)
Single-wheel Side
C
28 - 32 RPM
1 min
IMPORTANT
Keep cleaner
submerged for
accurate wheel
speed count.
Sweep Hose
8
Page 9
3
English
Adjust the Wheel Speed
Wheel Speed less than 28 RPM?
• Check the filter screen in the Quick Disconnect for debris.
• Clean the skimmer, filter and pump basket.
• Check the hoses, connections, and swivel for leaks.
• If the cleaner is connected to a dedicated return line, adjust the diverter
valve to increase water flow.
Wheel Speed more than 32 RPM?
• If the cleaner is connected to a dedicated cleaner line, adjust the diverter
valve to reduce the water flow to the cleaner.
• Unscrew the pressure relief valve until proper RPM is reached.
NOTE: For easier removal, use the Polaris® UWF® removal tool (Contact
your local Polaris dealer, Part # 10-102-00).
9
Page 10
English
Fine Tuning the Cleaner
When operating correctly, the Polaris® cleaner vacuums, sweeps and scrubs all surfaces
randomly throughout the pool. The climbing ability depends on the pool’s shape and water
pressure or flow. The Polaris cleaner climbs best in pools without sharp angles or curves
in the transition from the pool floor to the pool wall. Approximately every 3-1/2 minutes the
Polaris cleaner goes into back-up mode. This action pulls the Polaris cleaner away from pool
obstacles.
Fine tune your cleaner by adjusting the sweep hose or the
thrust jet as necessary, for optimal operation.
Adjust the Sweep Hose
1
The sweep hose should move in a gentle sweeping motion. To increase or
decrease sweeping motion:
1. Turn the filtration pump OFF.
2. Turn the adjustment screw on the feed pipe (r) counterclockwise to
increase sweep hose motion. Turn the adjustment screw clockwise to
decrease motion.
2
Decrease
motion
Increase
motion
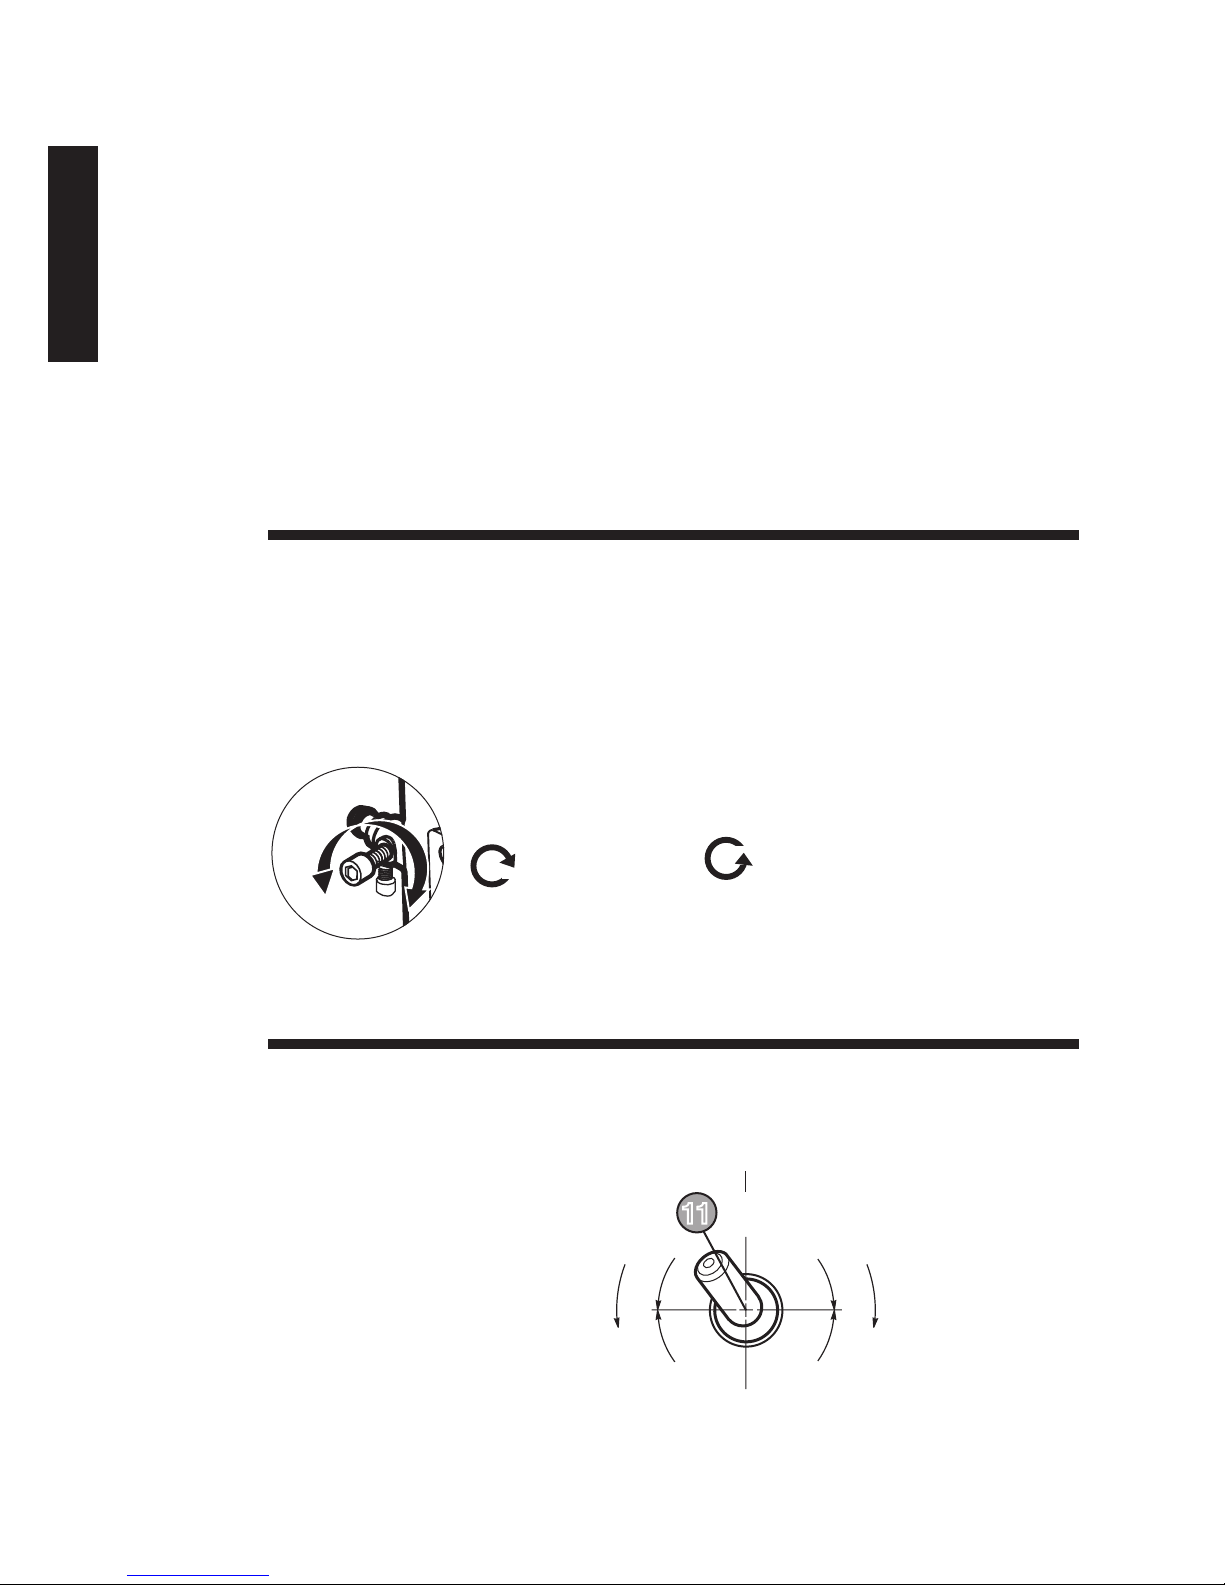
Adjust the Thrust Jet
If the cleaner is veering left or right instead of tracking straight, adjust the
thrust jet (on the back of the cleaner body) for climbing walls or turning.
P
t
u
NOTE: Factory default setting is
eleven o’clock. Only adjust thrust
jet to accomodate unique pools
shapes.
f
e
L
t
i
n
U
s
11
11
e
h
s
u
P
a
e
r
c
n
I
D
e
c
r
e
a
s
h
e
s
12
C
s
e
s
s
e
s
6
U
n
i
t
l
i
m
m
i
l
C
R
b
i
g
i
n
g
h
t
39
g
n
i
b
10
Page 11

Routine Maintenance
Perform routine maintenance to prolong the life of your cleaner.
Empty the Bag
1
Empty the bag when it is half full, especially if the dirt load is mostly sand.
NOTE: It is easier to empty a dry bag. Remove the bag and let dry before emptying.
Alternate between two bags while drying, so the cleaning cycle is not interrupted.
1. Detatch the bag by releasing the prongs.
2. Remove the bag tie collar from the feed hose.
3. Open the closure and dump out the debris.
English
2
3
Backwash the Pool Filter
Backwash your pool filter periodically. Always disconnect the Polaris® cleaner
from the pool wall before cleaning or backwashing the pool filter. After cleaning or
backwashing, let the filtration system run for at least five minutes to flush out the
return lines before re-connecting the Polaris cleaner.
Storage and Winterizing
NOTE: Never store the cleaner in direct sunlight.
To store the cleaner for the winter:
1. Remove cleaner from the pool and drain all water to avoid freezing water damage
(freeze damage is not covered under the warranty).
2. Remove the UWF® from the pool wall using the Quick Disconnect. Use a pulling
pressure as you unscrew.
If necessary, use the UWF Removal Tool (part #10-102-00) available from your local
Polaris dealer.
11
Page 12
English
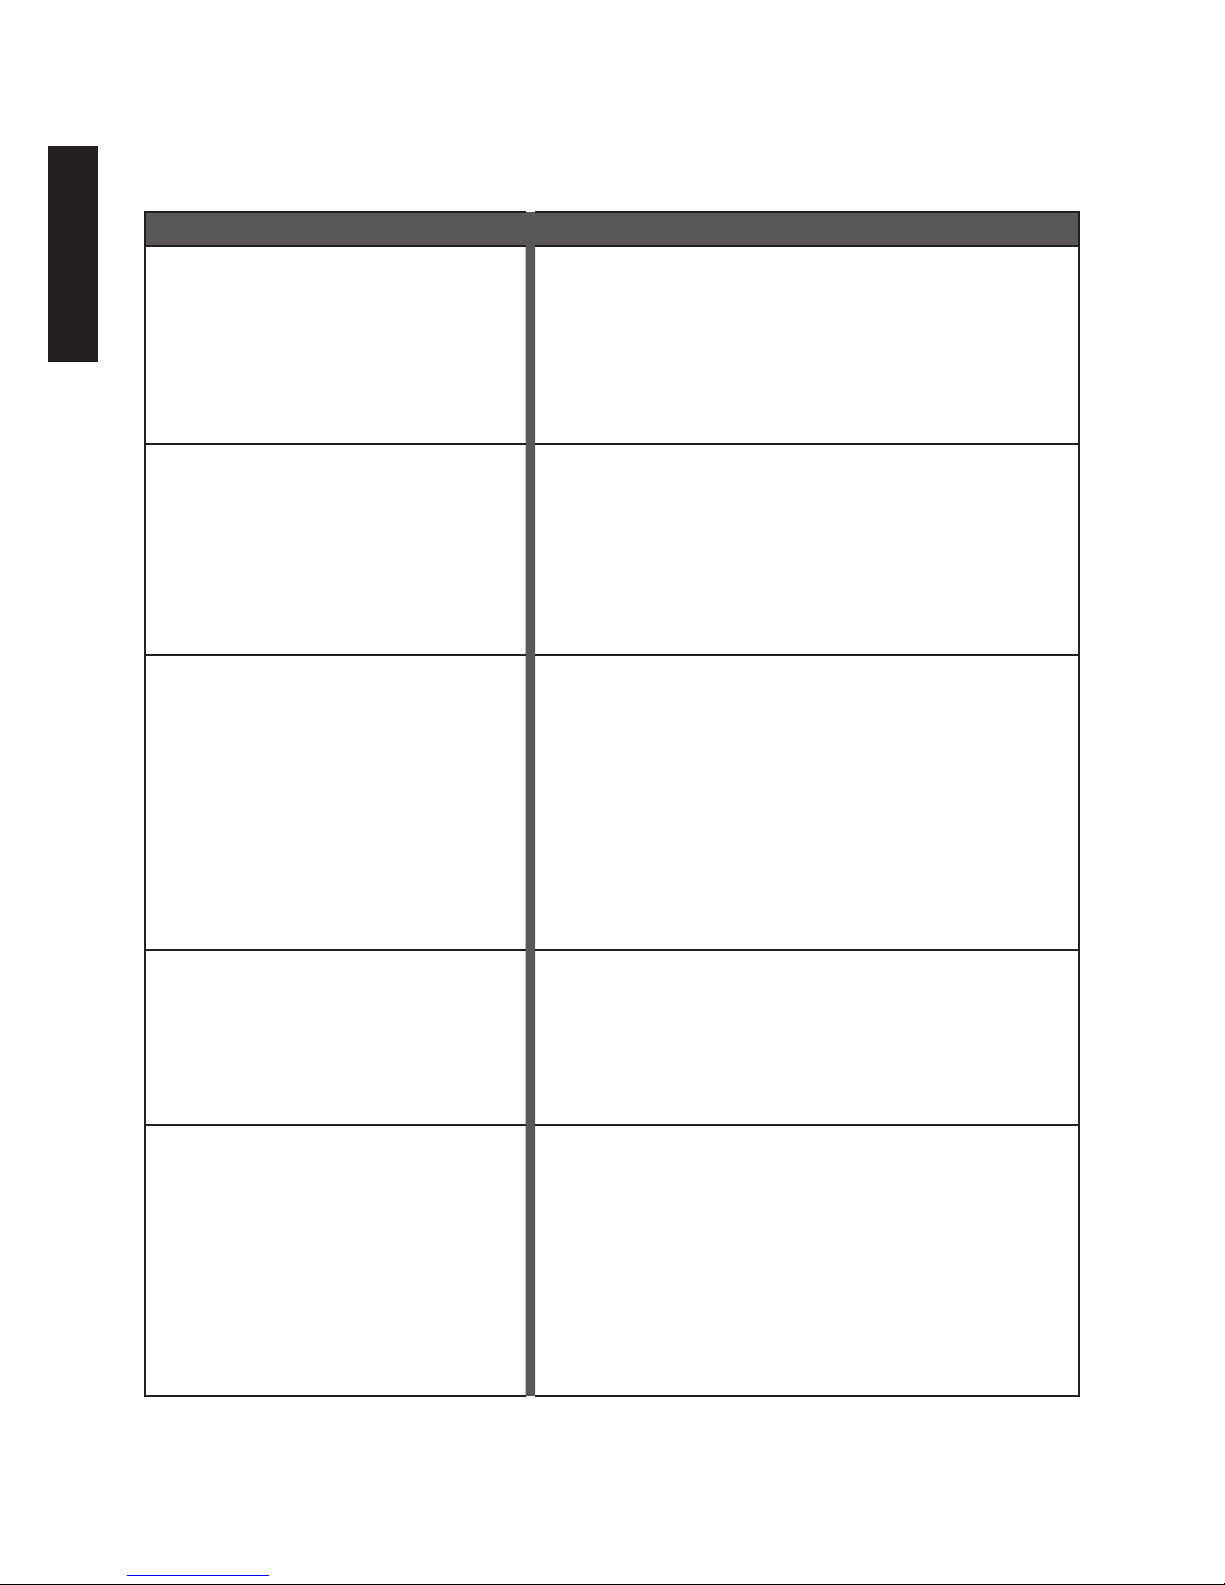
Troubleshooting
Problem Solution
Hangs up on steps or other
Cleaner is sluggish, running with less
obstacles for longer than
3 1/2 minutes.
power than normal.
Cleaner flies around the pool and/or
does not make contact with
the bottom.
1. Check the wheel RPM.
2. Verify the back-up valve is cycling.
3. Adjust the thrust jet.
4. Remove unnecessary pool hardware or install a Ladder
Guard Kit (Part # G21) from a Polaris® dealer.
5. Check the bag and empty if needed.
1. Check the filter screen in the Quick Disconnect and
clean, if necessary.
2. Clean the skimmer basket, pump basket, and pool
filter.
3. Check hoses, connections, and swivels for leaks that
could cause loss of water pressure.
4. Check the wheel RPM (between 28 - 32).
1. Check the wheel RPM.
- If cleaner is connected to a dedicated return line with
a diverter valve, adjust the valve to decrease water flow
to cleaner.
- If more than 32 RPM, unscrew the pressure relief
valve to decrease water flow to
the cleaner.
2. Verify the back-up valve is cycling. Hold the valve out
of the water and watch the jet. It should come on and
go off every 3 1/2 minutes.
Cleaner does not back up. 1. Verify the back-up valve is cycling every 3 1/2 minutes.
2. Check the wheel RPM (between 28 - 32).
3. If the bag is full, empty it.
4. If the head float has water in it, replace it.
5. Make sure feed hose is floating.
Cleaner only turns in one direction. 1. Adjust the thrust jet.
2. Verify the feed hose assembly is floating properly.
Waterlogged hose floats can cause the feed hose
to sink. Older hoses may lose buoyancy, replace if
needed.
3. If the end of the hose connecting to the cleaner has a
curve, align it with the curve in the feed pipe.
4. Make sure that the swivel on the feed pipe turns freely.
12
Page 13
Problem Solution
Feed hose becomes tangled. 1. Remeasure the hose to verify that it is adjusted to the
proper length for the pool shape.
2. With the Polaris cleaner operating, check that the
swivels in the hose and the hose connections turn
freely.
3. Make sure feed hose is floating.
4. With the Polaris® cleaner turned off, spin each of the
wheels.
All wheels should turn together.
English
Sweep hose is sucked into
the vacuum tube.
Sweep hose sprays too much water
out of the pool.
The cleaner does not clean the
entire pool.
The cleaner is running in circles on
its side.
1. Make sure the orifice at the end of the sweep hose is
not blocked by the sweep hose scrubber.
2. Adjust the sweep hose to a gentle sweeping motion.
1. Verify the Tail Sweep Pro® is installed correctly.
2. Adjust the speed of the sweep hose by tightening the
adjustment screw.
1. Check the hose length reaches within 6″ of the farthest
point of the pool. If not, order a new hose section from
your Polaris dealer.
2. Check thrust jet for 11 o’ clock position that optimizes
random turning.
3. With the pump running, turn the cleaner head upside
down. Verify the three vacuum jets have consistent
unobstructed flow. If not, contact Customer Service or
a Polaris authorized Service Center for assistance.
1. Check filter bag, if full it can weigh the cleaner down on
one side.
2. Remove the head float and shake it. If there is water in
the float, order a new one.
3. The feed hose float should float evenly on the surface
of the pool.
13
Page 14
English
Problem Solution
Cleaner does not climb walls. 1. Verify the wheel speed is 28 - 32 RPM.
2. Verify the thrust jet is in the 11 o’clock position.
3. Verify the head float is positioned all the way forward.
4. Verify the hoses have been cut correctly, following the
instructions.
5. With the pump running, turn the cleaner head upside
down. Verify the three vacuum jets have consistent
unobstructed flow. If not, contact customer service or a
Polaris® authorized service center for assistance.
Cleaner tires are slipping on tile or
fiberglass pool surface.
Wheels rotate less than 28 times
per minute
Wheels rotate more than 32 times
per minute
1. Verify your cleaner has Polaris PosiTrax® tires installed
on all three wheels. Polaris PosiTrax tires are only for
use on tile and fiberglass pool surfaces.
2. Verify the wheel speed is 28 - 32 RPM.
1. Verify the filter screen, pump baskets, and main filter
are clean.
2. Verify there are no leaks in the cleaner hoses, swivels,
or connectors.
3. If cleaner is installed on a dedicated cleaner line, adjust
the diverter valve to increase flow to the cleaner.
1. If cleaner is connected to a dedicated cleaner line,
adjust the diverter valve to reduce the water flow to the
cleaner.
2. Unscrew the pressure relief valve on the UWF®
connector assembly until RPM is between 28 and 32.
14
Page 15

®
Questions?
For replacement parts or additional troubleshooting
questions, call or go online.
1.800.822.7933
www.polarispool.com
English
15
Page 16

Zodiac Pool Systems, Inc.
2620 Commerce Way, Vista, CA 92081
1.800.822.7933 | www.polarispool.com
Polaris® and the 3-wheeled cleaner design are registered trademarks of Zodiac Pool Systems, Inc.
All other trademarks referenced herein are the property of their respective owners.
©2016 Zodiac Pool Systems, Inc. H0570700_REVC
Page 17

H0570700_REVC
TR36P
MANUEL DU PROPRIÉTAIRE
Page 18

Français
Avant de commencer: Informations importantes
• Avant d’installer le nettoyeur Polaris®, assurez-vous que le filtre de piscine est propre.
• Rincez les nouvelles conduites de plomberie avant l’installation du nettoyeur Polaris.
• N’utilisez pas le nettoyeur Polaris pour enlever la poussière de plâtre dans les nouvelles piscines.
• Déconnectez toujours le nettoyeur avant de procéder au nettoyage ou au lavage à contre-courant du filtre.
• Après le nettoyage ou le lavage à contre-courant, laissez le système de filtration en marche pendant au
• Retirez toujours le nettoyeur de la piscine avant de procéder à un traitement chimique de choc, notamment
• Les systèmes de chauffage solaire, les générateurs d’ozone et les autres appareils à admission d’air
• L’eau fortement chlorée peut causer des problèmes d’entretien. Évitez d’utiliser le nettoyeur Polaris pendant
moins cinq (5) minutes avant de reconnecter le nettoyeur.
de super oxydation ou chloration.
peuvent générer un écoulement d’air au travers du nettoyeur et exercer une influence négative sur son
équilibre et ses performances. Raccordez la tuyauterie de nettoyeur dédiée en amont de ces composants.
la chloration.
Pour le service à la clientèle ou l’assistance :
• Veuillez retourner la carte de garantie immédiatement.
• Pour l’assistance en ligne : www.polarispool.com
• Pour contacter Polaris : États-Unis et Canada
Customer Service
2620 Commerce Way
Vista, CA 92081-8438
1-800-822-7933
AVERTISSEMENT
Pour réduire les risques de blessures potentiellement graves :
• Ne manipulez pas le nettoyeur Polaris pendant qu’il fonctionne, sauf pour vérifier la vitesse
tr/min de la roue.
• Retirez toujours le nettoyeur Polaris avant que des nageurs entrent dans la piscine.
ATTENTION
UTILISATION DU NETTOYEUR POLARIS DANS UNE PISCINE À TOILE EN VINYLE
La surface de certaines toiles en vinyle à motifs peut s’user rapidement et les motifs peuvent disparaître au contact
d’objets tels que les brosses de nettoyage, jouets, bouées, fontaines, distributeurs de chlore et nettoyeurs de piscine
automatiques. Les motifs de certaines toiles en vinyle peuvent être sérieusement égratignés ou usés par le simple
frottement d’une brosse de piscine. La couleur de certains motifs peut également s’effacer pendant l’installation ou en cas
de contact avec des objets présents dans la piscine. Les motifs effacés, l’usure ou les traces de frottement sur les toiles en
vinyle ne relèvent pas de la responsabilité de Zodiac Pool Systems, Inc. et ne sont pas couverts par la garantie limitée.
18
Page 19

Contenu de la boîte
Français
b
l
h
g
f
7
m
c
d
a
i
j
k
n
e
a. Corps du nettoyeur
b. Sac tout usage à glissière
c. Flotteur de tête
d. Tuyau de balayage
e. Tail Sweep PRO®
(avec brosse de tuyau de balayage)
f. Tuyau d’arrivée
g. Flotteur(s) de tuyau
h. Soupape de recul
i. Raccord de déconnexion rapide et
soupape de surpression
j. Raccord mural universel (UWF®)
k. Crépine, UWF/déconnexion rapide
l. Collier de serrage du sac
m. Testeur de pression
n. Sac tout usage à glissière supplé
mentaire
Outils requis pour l’installation
• Ciseaux ou cisailles de jardinier
• Pinces
• Ruban à mesurer
• Morceau de ruban adhésif
• Outil UWF (pièce en option n° 10-102-00)
19
Page 20

Français
Installation du nettoyeur
1
Lisez la totalité du manuel du propriétaire
avant de commencer l’installation.
Préparez la piscine
1. Mettez la pompe de filtration en marche pendant 2 à 3 minutes pour rincer
les conduites.
2. Arrêtez la pompe de filtration.
3. Disposez le tuyau (f) sur la terrasse de la piscine afin de l’exposer au soleil
pour assouplir les rouleaux. Cela réduira les risques d’emmêlement pendant
le nettoyage.
2
Installez le raccord mural universel
Raison d’installer le raccord UWF®: Lorsque le raccord UWF est correctement installé,
vous pouvez retirer le raccord à déconnexion rapide sans avoir à retirer le raccord UWF.
1. Retirez le raccord mural universel (UWF) (j) de l’extrémité du tuyau (f) et vissez-le (à la
main) dans l’ouverture de la tuyauterie de retour dédiée dans la piscine.
2. Assurez-vous que la crépine (k) repose fermement dans le raccord à déconnexion
rapide (i).
3. Installez le raccord à déconnexion rapide dans le raccord UWF en tournant dans le
sens horaire (sans le serrer excessivement), puis tirez pour le verrouiller en place.
j
k
i
20
Page 21

Ensemble de raccordement de tubulure de 1 po
(pièce n° 9-100-8002)
Ensemble de raccordement de tubulure de 1 1/2 po
(pièce n° 9-100-8003)
Ensemble de raccordement pour adaptateur à rotule
(pièce n° 9-100-8005)
Plusieurs tuyauteries de retour? Nettoyeur Polaris® retiré de la picine?
Si votre piscine comporte deux ou trois tuyauteries de
retour, utilisez l’ensemble de raccordement pour raccord
à rotule (pièce n° 9-100-8001). Cet ensemble comprend
un raccord mural universel (UWF®) et une soupape de
surpression, à installer dans la 2e tuyauterie de retour.
Il contient également un régulateur de rotule, qui doit
remplacer la rotule existante si la piscine comporte une
3e tuyauterie de retour.
Raccord mural universel (UWF)
Utilisez l’ensemble de raccord à rotule
UWF (pièce n° 6-511-00) pour rétablir
une circulation d’eau adéquate lorsque le
nettoyeur est retiré de la piscine.
Joint torique
Connecteur de rotule
Régulateur de rotule
Français
Soupape de surpression
Régulateur de rotule
Anneau de retenue
Installation des autres raccords de piscine
Si la piscine n’est pas équipée d’une tuyauterie de retour dédiée, le nettoyeur Polaris TR36P peut être
raccordé à la plupart des tuyauteries de retour standard à l’aide des ensembles d’adaptation spéciaux,
disponibles auprès des détaillants Polaris participants.
Pour les piscines équipées de tuyauteries de retour en plastique (sans filetage de tuyau) coupées au
même niveau que la paroi de la piscine :
Si le tuyau mesure 1 po de
diamètre, utilisez l’ensemble de
raccordement de tubulure de 1 po
(pièce n° 9-100-8002)
Tuyauterie de retour de 1 po
Si le tuyau mesure 1 1/2 po de
diamètre, utilisez l’ensemble de
raccordement de tubulure de
1 1/2 po (pièce n° 9-100-8003)
Tuyauterie de retour de 1 1/2 po
Connecteur
d’extension de 1 po
Pour les raccords à rotule
de type directionnel qui ne
possèdent pas d’emboîture
filetée de 1 1/2 po, demandez
l’ensemble de raccordement
pour adaptateur à rotule
(pièce n° 9-100-8005)
Autres raccordements de piscine/spa nécessitant des raccords spéciaux
Si un spa est raccordé au système de filtration de la piscine, demandez des régulateurs d’expansion au
moment de commander l’un des ensembles indiqués ci-dessus. Contactez votre détaillant ou le service à
la clientèle pour savoir quelles sont les pièces nécessaires.
Adaptateur de
raccord mural
Anneau de
retenue
Tête de
connecteur
Connecteur
d’extension de 1 1/2 po
Le raccord actuel
ressemble-t-il à ceci?
Si le raccord UWF et les
régulateurs de rotule ne peuvent
toujours pas être installés dans la
piscine, contactez votre détaillant
ou le service à la clientèle pour
savoir quelles sont les pièces
nécessaires.
21
Page 22

Français
3
Effectuez le test de pression d’eau
1. Mettez la pompe de filtration en marche.
2. Avec le tuyau raccordé au raccord UWF®,
maintenez le testeur de pression (o) sous
l’eau. Recouvrez le grand trou avec le pouce et
confirmez que l’eau s’échappe de la soupape
de surpression (i).
REMARQUE : L’extrémité du testeur de pression
comporte deux trous. Il est important de bloquer le
plus grand trou pour vérifier la pression.
Il n’y a aucun débit d’eau au niveau de la soupape de surpression?
• Si votre nettoyeur Polaris® est raccordé à une tuyauterie de nettoyeur dédiée, réglez la vanne
de dérivation de manière à augmenter le débit d’eau au nettoyeur.
• Assurez-vous que la crépine (k) est positionnée correctement dans le raccord à déconnexion
rapide.
• Vérifiez l’écumoire, le panier de la pompe et le filtre principal pour vous assurer qu’aucun
débris ne limite le débit.
• Si le nettoyeur Polaris est raccordé à l’une de plusieurs tuyauteries de retour, vérifiez que
des ensembles adéquats de raccordement pour tuyauterie de retour Polaris sont installés
(consultez la page 5 de ce manuel).
o
i
Ajustez la longueur du tuyau
4
1. Mettez la pompe en marche.
Maintenez le tuyau sous l’eau jusqu’à
ce que la soupape de surpression
relâche la pression.
2. Tendez le tuyau jusqu’au point le plus
éloigné de la piscine. L’extrémité du
tuyau doit se trouver à plus ou moins
6 pouces (15 cm) de ce point.
3. Mesurez le tuyau pendant que la
pression est présente et coupez la
longueur excédentaire de la première
section de tuyau (p). (Il s’agit de
la section raccordée au raccord à
déconnexion rapide (i).)
4. Rebranchez les sections de tuyau.
5. Après l’ajustement de la longueur de
tuyau, positionnez les trois flotteurs de
tuyau, comme indiqué.
Le tuyau est trop court?
• Communiquez avec votre détaillant Polaris local. Achetez une
nouvelle section de tuyau. Ajoutez-la à la première section de
tuyau (p) et coupez jusqu’à un maximum de 6 pouces (15 cm).
7 pi (2,13 m)
4ft (1.2m)
Flotteur (g)
Flotteur (g)
Flotador (g)
p
6 po (15 cm)
h
g
f
i
Recommandé
Recommandé
Recomendado
22
Page 23

5
Français
Assemblez le nettoyeur
1. Retirez le testeur de pression (o) en dévissant l’écrou de tuyau (q).
REMARQUE : L’écrou de tuyau est muni de filetages inversés.
2. Utilisez le même écrou de tuyau (q) pour fixer le tuyau au corps du nettoyeur, au
niveau du tuyau d’arrivée.
3. Tirez le sac vers le haut et fixez-le au tuyau en utilisant le clip de sac (n).
4. Poussez le flotteur de tête (c) vers l’avant, pour l’appuyer entièrement contre le corps
du nettoyeur.
n
q
c
23
Page 24

Français
Utiliser le nettoyeur
1
2
AVERTISSEMENT
Pour réduire les risques de blessures potentiellement graves, ne nagez
ou n’utilisez pas la piscine pendant que le nettoyeur est submergé ou
en cours d’utilisation.
Démarrez le nettoyeur
1. Raccordez le tuyau dans la piscine au niveau du raccord UWF®.
2. Submergez le nettoyeur dans la piscine, en le laissant couler au fond.
3. Mettez la pompe de filtration en marche et laissez-la s’amorcer. Le nettoyeur
commencera à se déplacer.
Vérifiez que la vitesse tr/min de la roue est
adéquate
Avant de faire fonctionner le nettoyeur Polaris®, vérifiez que le nombre de tours de
roue (tr/min) est adéquat. Pour une efficacité maximale, le Polaris doit fonctionner à
une vitesse de 28 à 32 tr/min.
1. Marquez la roue latérale unique à l’aide d’un morceau de ruban adhésif (ou une
petite feuille rentrée dans la bande).
2. Mettez la pompe en marche, tenez le nettoyeur sous le niveau de l’eau et
comptez le nombre de tours de roue effectués en une minute.
3. La vitesse de roue optimale doit se situer entre 28 et 32 tr/min.
marquez la roue latérale
unique (feuille, ruban
adhésif ou marqueur)
28 à 32 tr/min
1 min
IMPORTANT
Laissez le nettoyeur
submergé pour
calculer avec
précision la vitesse
de la roue.
24
Page 25

3
Français
Réglez la vitesse de la roue
La vitesse de la roue est inférieure à 28 tr/min?
• Vérifiez la crépine dans le raccord à déconnexion rapide pour vous assurer
qu’il n’y a aucun débris.
• Nettoyez l’écumoire, le filtre et le panier de la pompe.
• Vérifiez les tuyaux, les raccordements et le pivot pour vous assurer qu’il n’y
a pas de fuites.
• Si le nettoyeur est raccordé à une tuyauterie de retour dédiée, réglez la
vanne de dérivation de manière à augmenter le débit d’eau.
La vitesse de la roue est supérieure à 32 tr/min?
• Si le nettoyeur est raccordé à une tuyauterie de nettoyeur dédiée, réglez la vanne de
dérivation de manière à réduire le débit d’eau au nettoyeur.
• Dévissez la soupape de surpression jusqu’à l’obtention de la vitesse tr/min adéquate.
REMARQUE : Pour la retirer plus facilement, utilisez l’outil de retrait Polaris® UWF®
(communiquez avec votre détaillant Polaris local, pièce n° 10-102-00).
25
Page 26

Français
Réglage de précision du nettoyeur
Lorsqu’il fonctionne correctement, le nettoyeur Polaris® aspire, balaie et frotte toutes les surfaces
de la piscine en effectuant un parcours aléatoire. Sa capacité à monter le long des parois dépend
de la forme de la piscine et de la pression ou du débit d’eau. Le nettoyeur Polaris grimpe plus
facilement dans les piscines sans courbes ni angles marqués dans la transition entre les parois et
le fond de la piscine. Le nettoyeur Polaris passe en marche arrière toutes les 3,5 minutes environ.
Cette action permet au nettoyeur Polaris de s’éloigner des obstacles.
1
Réglez avec précision votre nettoyeur en ajustant le tuyau de
balayage ou le jet de propulsion, si nécessaire, pour obtenir
un fonctionnement optimal.
Ajustez le tuyau de balayage
Le tuyau de balayage doit se déplacer dans un mouvement de balayage
délicat. Pour augmenter ou diminuer le mouvement de balayage :
1. Arrêtez la pompe de filtration.
2. Tournez la vis de réglage du tuyau d’arrivée (r) dans le sens antihoraire
pour augmenter le mouvement du tuyau de balayage. Tournez la vis de
réglage dans le sens horaire pour diminuer le mouvement.
2
Diminuer le
mouvement
Augmenter le
mouvement
Réglez le jet de propulsion
Si le nettoyeur dévie vers la gauche ou la droite au lieu de se déplacer en ligne droite, réglez
le jet de propulsion (situé à l’arrière du corps du nettoyeur) pour lui permettre de monter le
long des parois ou tourner.
REMARQUE: Le réglage d’usine
par défaut est onze heures.
Réglez le jet de propulsion
uniquement pour adapter
l’appareil aux formes de piscines
uniques.
L
t
i
n
U
s
11
11
e
h
s
c
u
n
I
P
D
e
c
r
P
t
u
f
e
a
e
r
e
a
s
h
e
s
12
C
s
e
s
s
e
s
6
U
n
i
t
l
i
m
m
i
l
C
R
b
i
g
i
n
g
h
t
39
g
n
i
b
26
Page 27

Entretien de routine
Effectuez l’entretien de routine pour prolonger la durée de vie de votre nettoyeur.
Videz le sac
1
Videz le sac lorsqu’il est à moitié plein, en particulier s’il est surtout rempli de sable.
REMARQUE : Il est plus facile de vider le sac lorsqu’il est sec. Retirez le sac et laissez-le
sécher avant de le vider. Alternez entre deux sacs pendant le séchage, afin de ne pas
interrompre le cycle de nettoyage.
1. Détachez le sac en relâchant les attaches.
2. Retirez le collier de serrage du tuyau d’arrivée.
3. Ouvrez l’ouverture et videz le sac.
Français
2
3
Effectuez le lavage à contre-courant du filtre
de la piscine
Effectuez périodiquement un lavage à contre-courant du filtre de la piscine.
Déconnectez toujours le nettoyeur Polaris® de la paroi de piscine avant de
procéder au nettoyage ou au lavage à contre-courant du filtre de la piscine. Après
le nettoyage ou le lavage à contre-courant, laissez le système de filtration en
marche pendant au moins cinq minutes pour rincer les tuyauteries de retour, puis
reconnectez le nettoyeur Polaris.
Entreposage et hivérisation
REMARQUE : N’entreposez jamais le nettoyeur dans un endroit exposé aux rayons
directs du soleil.
Pour l’entreposer pendant l’hiver :
1. Retirez le nettoyeur de la piscine et videz toute l’eau pour éviter que le gel
l’endommage (les dommages causés par le gel ne sont pas couverts par la garantie).
2. Retirez le raccord UWF® de la paroi de piscine en utilisant le raccord à déconnexion
rapide. Tirez sur celui-ci tout en dévissant.
Si nécessaire, utilisez l’outil de retrait UWF (pièce n° 10-102-00) disponible auprès de
votre détaillant Polaris local.
27
Page 28

Français
Dépannage
Problème Solution
Le nettoyeur s’accroche aux marches
Le nettoyeur se déplace rapidement
ou autres obstacles pendant
plus de 3,5 minutes.
Le nettoyeur se déplace très
lentement et fonctionne
avec une puissance
inférieure à la normale.
dans la piscine et/ou n’est
pas en contact avec le fond.
1. Vérifiez la vitesse de rotation tr/min de la roue.
2. Vérifiez le cycle de la soupape de recul.
3. Réglez le jet de propulsion.
4. Retirez tout matériel inutile de la piscine ou installez
un ensemble de protection d’échelle (pièce n° G21)
auprès d’un détaillant Polaris®.
5. Vérifiez le sac et videz-le, si nécessaire.
1. Vérifiez la crépine dans le raccord à déconnexion
rapide et nettoyez-la, si nécessaire.
2. Nettoyez le panier de l’écumoire, le panier de la pompe
et le filtre de la piscine.
3. Vérifiez si les tuyaux, raccords et pivots présentent des fuites
qui pourraient entraîner une baisse de pression d’eau.
4. Vérifiez la vitesse de rotation tr/min (entre 28 et 32).
1. Vérifiez la vitesse de rotation tr/min de la roue.
- Si le nettoyeur est raccordé à une tuyauterie de retour
dédiée avec vanne de dérivation, réglez la vanne de
manière à réduire le débit d’eau au nettoyeur.
- Si elle est supérieure à 32 tr/min, dévissez la soupape
de surpression pour diminuer le débit d’eau au
nettoyeur.
2. Vérifiez le cycle de la soupape de recul. Sortez la
soupape de l’eau et observez le jet. Il doit fonctionner
et s’arrêter à des intervalles de 3,5 minutes.
Le nettoyeur ne recule pas. 1. Vérifiez que le cycle de la soupape de recul s’effectue
toutes les 3,5 minutes.
2. Vérifiez la vitesse de rotation tr/min (entre 28 et 32).
3. Videz le sac s’il est plein.
4. Si le flotteur de tête contient de l’eau, remplacez-le.
5. Assurez-vous que le tuyau d’arrivée flotte.
Le nettoyeur tourne dans
un seul sens.
1. Réglez le jet de propulsion.
2. Vérifiez que l’assemblage du tuyau d’arrivée flotte
correctement. Les flotteurs de tuyau gorgés d’eau
peuvent faire couler le tuyau d’arrivée. Les tuyaux plus
anciens peuvent perdre de la flottabilité; remplacez-les
si nécessaire.
3. Si l’extrémité du tuyau raccordée au nettoyeur est
courbée, alignez-le avec la courbe dans le tuyau
d’arrivée.
4. Assurez-vous que le pivot et le tuyau d’arrivée tournent
librement.
28
Page 29

Problème Solution
Le tuyau d’arrivée s’emmêle. 1. Remesurez la longueur du tuyau et vérifiez qu’elle
correspond à celle requise pour la forme de la piscine.
2. Pendant que le nettoyeur Polaris fonctionne, vérifiez
que les pivots et raccords de tuyau tournent librement.
3. Assurez-vous que le tuyau d’arrivée flotte.
4. Avec le nettoyeur Polaris® arrêté, faites tourner
chacune des roues.
Toutes les roues doivent tourner ensemble.
Français
Le tuyau de balayage est aspiré
dans le tuyau aspirant.
Le tuyau de balayage projette
beaucoup d’eau hors de
la piscine.
Le nettoyeur ne nettoie
pas toute la piscine.
1. Assurez-vous que l’ouverture à l’extrémité du tuyau de
balayage n’est pas bloquée par la brosse du tuyau de
balayage.
2. Ajustez le tuyau de balayage de manière à obtenir un
mouvement de balayage délicat.
1. Vérifiez que le Tail Sweep Pro® est installé
correctement.
2. Réglez la vitesse du tuyau de balayage en serrant la
vis de réglage.
1. Vérifiez que le tuyau atteint le point le plus éloigné de
la piscine à plus ou moins 6 po. Si ce n’est pas le cas,
commandez une nouvelle section de tuyau auprès de
votre détaillant Polaris.
2. Vérifiez que le jet de propulsion est orienté à la position
11 heures pour optimiser le déplacement aléatoire.
3. Pendant que la pompe fonctionne, tenez la tête
du nettoyeur à l’envers. Vérifiez que les trois jets
d’aspiration présentent un débit régulier, sans
obstruction. Si ce n’est pas le cas, contactez le service
à la clientèle ou un centre de service agréé par Polaris
pour obtenir de l’aide.
Le nettoyeur tourne en rond,
couché sur le côté.
1. Vérifiez le sac de filtrage; s’il est plein, son poids peut
faire basculer le nettoyeur sur le côté.
2. Retirez le flotteur de tête et secouez-le. S’il contient de
l’eau, commandez un nouveau flotteur.
3. Le flotteur du tuyau d’arrivée doit flotter uniformément à
la surface de la piscine.
29
Page 30

Français
Problème Solution
Le nettoyeur ne monte pas
le long des parois.
1. Vérifiez que la vitesse de la roue se situe entre 28 et
32 tr/min.
2. Vérifiez que le jet de propulsion est orienté à la position
11 heures.
3. Vérifiez que le flotteur de tête est positionné
entièrement vers l’avant.
4. Vérifiez que les tuyaux ont été coupés correctement,
en suivant les instructions.
5. Pendant que la pompe fonctionne, tenez la tête
du nettoyeur à l’envers. Vérifiez que les trois jets
d’aspiration présentent un débit régulier, sans
obstruction. Si ce n’est pas le cas, contactez le service
à la clientèle ou un centre de service agréé par Polaris®
pour obtenir de l’aide.
Les roues du nettoyeur glissent sur
les surfaces de piscine en
carreaux ou en fibre
de verre.
Les roues effectuent moins de
28 rotations par minute
Les roues effectuent plus de
32 rotations par minute
1. Assurez-vous d’installer des bandes Polaris PosiTrax®
sur les trois roues de votre nettoyeur. Les bandes
Polaris PosiTrax doivent être utilisées uniquement
sur les surfaces de piscine en carreaux ou en fibre de
verre.
2. Vérifiez que la vitesse de la roue se situe entre 28 et
32 tr/min.
1. Vérifiez que la crépine, les paniers de la pompe et le
filtre principal sont propres.
2. Vérifiez que les tuyaux, pivots et raccords du nettoyeur
ne présentent aucune fuite.
3. Si le nettoyeur est installé sur une tuyauterie de
nettoyeur dédiée, réglez la vanne de dérivation de
manière à augmenter le débit au nettoyeur.
1. Si le nettoyeur est raccordé à une tuyauterie de
nettoyeur dédiée, réglez la vanne de dérivation de
manière à réduire le débit d’eau au nettoyeur.
2. Dévissez la soupape de surpression de l’assemblage
du raccord UWF® jusqu’à ce que la vitesse se situe
entre 28 et 32 tr/min.
30
Page 31

®
Questions?
Pour obtenir des pièces de rechange ou des
réponses à d’autres questions de dépannage,
appelez-nous ou visitez notre site.
1.800.822.7933
www.polarispool.com
Français
31
Page 32

Zodiac Pool Systems, Inc.
2620 Commerce Way, Vista, CA 92081
1.800.822.7933 | www.polarispool.com
Polaris® et la conception de nettoyeur à 3 roues sont des marques déposées de Zodiac Pool Systems, Inc.
Toutes les autres marques de commerce citées dans le présent document appartiennent à leurs propriétaires respectifs.
©2016 Zodiac Pool Systems, Inc. H0570700_REVC
Page 33

H0570700_REVC
TR36P
MANUAL DEL USUARIO
Page 34

Español
Antes de comenzar: Información importante
• Antes de instalar el limpiafondos de Polaris®, asegúrese de que el filtro de la piscina esté limpio.
• Los circuitos de cañerías nuevos deben purgarse antes de instalar el limpiafondos Polaris.
• El limpiafondos Polaris no debe usarse para eliminar polvo de yeso en piscinas nuevas.
• Siempre desconecte el limpiafondos antes de limpiar o retrolavar el filtro de la piscina.
• Luego de limpiar o retrolavar, deje el sistema de filtrado funcionando durante al menos cinco (5) minutos
• Siempre retire el limpiafondos de la piscina antes de tratamientos químicos, como súper oxidación o
• Los sistemas de calefacción solar, los generadores de ozono y otro equipo inductor de aire pueden inyectar
• El agua con mucho cloro puede causar problemas de mantenimiento. Evite poner en funcionamiento el
antes de volver a conectar el limpiafondos.
cloración.
flujo de aire a través del limpiafondos, lo que afecta de manera adversa el equilibrio y desempeño del
limpiafondos. Conecte el circuito exclusivo del limpiafondos de forma ascendente con respecto a estos
componentes.
limpiafondos Polaris durante el tratamiento con cloro.
Para obtener servicio o atención al cliente:
• Envíe de inmediato la tarjeta de garantía por correo:
• Para asistencia en línea: www.polarispool.com
• Para contactar a Polaris: Estados Unidos y Canadá
Atención al Cliente
2620 Commerce Way
Vista, CA 92081-8438
1-800-822-7933
ADVERTENCIA
Para evitar el riesgo de lesiones posiblemente graves:
• No manipule el limpiafondos Polaris mientras está en funcionamiento, excepto para chequear
las RPM de las ruedas.
• Siempre retire el limpiafondos Polaris antes de que ingresen personas a la piscina.
PRECAUCIÓN:
USO DEL LIMPIAFONDOS POLARIS EN UNA PISCINA CON REVESTIMIENTO DE VINILO
Determinados diseños de revestimiento de vinilo son particularmente susceptibles al desgaste rápido de la superficie o
a la desaparición del diseño a causa de los objetos que entran en contacto con la superficie de vinilo tales como cepillos
para piscinas, juguetes para piscinas, flotadores, fuentes, dosificadores de cloro y limpiafondos automáticos. Algunos
diseños de revestimiento de vinilo pueden rayarse o desgastarse mucho simplemente por la fricción de la superficie con
un cepillo para piscinas. La tinta del estampado también puede borrarse durante el proceso de instalación o cuando
entra en contacto con objetos en la piscina. Zodiac Pool Systems, Inc. no es responsable y la Garantía Limitada no cubre
desgastes, abrasiones ni marcas en el revestimiento de vinilo.
34
Page 35

Incluida en la Caja
Español
b
l
h
g
f
7
m
c
d
a
i
j
k
n
e
a. Cuerpo del limpiafondos
b. Bolsa con cierre multiuso
c. Flotador del cabezal
d. Manguera de barrido
e. Tail Sweep PRO®
(con depurador de manguera
de barrido)
f. Manguera de alimentación
g. Flotador(es) de la manguera
h. Válvula anti-retorno
i. Desconector rápido y Válvula de
alivio de presión
j. Conector universal de pared (UWF®)
k. Rejilla del ltro, UWF/QD
l. Fijador para bolsa
m. Comprobador de presión
b. Bolsa con cierre multiuso Extra
Herramientas necesarias para la instalación
• Tijeras o tijeras de podar
• Pinzas
• Cinta métrica
• Pedazo de cinta adhesiva
• Herramienta UWF (parte opcional #
10-102-00)
35
Page 36

Español
Instalación del limpiafondos
1
Lea el manual del usuario completo antes de
comenzar la instalación.
Prepare la piscina
1. Encienda la bomba de filtrado durante 2-3 minutos para purgar los circuitos
de cañerías.
2. Apague la bomba de filtrado.
3. Extienda la manguera (f) bajo el sol en el área que bordea la piscina para
aflojar los rollos. Esto reducirá el riesgo de que se enreden durante la
limpieza.
2
Instale el Conector universal de pared
Objetivo de instalar el UWF®: Una vez que el UWF está instalado de forma
apropiada, puede retirarse el desconector rápido sin quitar el UWF.
1. Quite el conector universal de pared (UWF) (j) del extremo de la manguera (f)
y enrósquelo (manualmente) en el orificio destinado al circuito de retorno en la
piscina.
2. Asegúrese de que la rejilla del filtro (k) esté firmemente ubicada en el
Desconector rápido (i).
3. Instale el Desconector Rápido en el UWF girándolo en el sentido de las agujas
del reloj (no ajuste demasiado), luego tire para asegurarlo.
j
k
i
36
Page 37

Kit de conexión de tubo corto de 1"
(parte #9-100-8002)
Kit de conexión de tubo corto
de 1-1/2" (parte #9-100-8003)
Circuito de retorno de 1-1/2"
¿El conector actual
Kit de conexión de adaptador
tipo globo (parte #9-100-8005)
¿Circuitos de retorno múltiples? ¿El limpiafondos Polaris® se
Si su piscina tiene dos o tres circuitos de retorno, use
el Kit de conexión tipo globo (parte #9-100-8001). Este
kit le brinda un Conector universal de pared (UWF®) y
una válvula de alivio de presión que debe instalarse
en el segundo circuito de retorno. También se incluye
un regulador tipo globo, que reemplazará al conector
existente si hay un tercer circuito de retorno.
Conector universal de pared (UWF)
encuentra fuera de la piscina?
Use el Kit de conexión tipo globo UWF
(parte #6-511-00) para restaurar la
circulación apropiada del agua cuando se
retira el limpiafondos de la piscina.
Junta tórica
Conector tipo globo
Regulador tipo globo
Español
Válvula de alivio de presión
Regulador tipo globo
Anillo de retención
Cómo instalar otras conexiones para piscina
Si la piscina no tiene un circuito de retorno exclusivo, el limpiafondos Polaris TR36P se conecta a la
mayoría de los circuitos de retorno usando un kit adaptador especial, disponible en los distribuidores
participantes de Polaris.
Para piscinas con circuitos de retorno con tuberías de plástico (sin rosca para tubos) que están cortadas
con la pared de la piscina:
Si la cañería tiene 1″ de
diámetro, use el Kit de
conexión de tubo corto de 1″
(parte #9-100-8002)
Circuito de retorno de 1"
Si la cañería tiene 1-1/2″ de diámetro,
use el Kit de conexión de tubo corto
de 1-1/2″ (parte #9-100-8003)
Conector de
expansión de 1"
Para accesorios tipo globo
direccionales que no tienen
una toma roscada de
1-1/2”, solicite el kit de
conexión de adaptador tipo
globo (parte #9-100-8005)
Conexiones de piscina/spa que requieren accesorios especiales
Si se conecta un spa al equipo de filtración de la piscina, obtenga reguladores de expansión además
de uno de los kits que se enumeran a continuación. Contacte a su distribuidor o Servicio de Atención al
Cliente para determinar qué partes necesita.
Adaptador de
conector para
pared
Anillo de
retención
Cabezal de
conector
Conector de
expansión
de 1-1/2"
luce así?
Si aún no puede instalar el UWP
y los reguladores tipo globo en la
piscina, contacte a su distribuidor
o Atención al Cliente para
determinar qué partes necesita.
37
Page 38

Español
3
Pruebe la presión del agua
1. Encienda la bomba de filtrado.
2. Con la manguera conectada al UWF®, mantenga
4
o
i
el comprobador de presión (o) bajo agua. Cubra el
orificio más grande con su pulgar y confirme que el
agua se escapa de la válvula de alivio de presión (i).
TENGA EN CUENTA: Hay dos orificios en el extremo
del comprobador de presión. Es importante tapar el más
grande para comprobar la presión.
¿No hay flujo de agua de la válvula de alivio de presión?
• Si su limpiafondos Polaris® está conectado a un circuito exclusivo, ajuste la válvula de
desviación para aumentar el flujo de agua al limpiafondos.
• Asegúrese de que la rejilla del filtro (k) esté correctamente ubicada en el Desconector rápido.
• Inspeccione el desnatador, la cesta de la bomba y el filtro principal en búsqueda de suciedad
que esté restringiendo el flujo.
• Si el limpiafondos Polaris está conectado a uno de múltiples circuitos de retorno, verifique si
tiene instalado el kit de conexión del circuito de retorno Polaris adecuado (ver página 5 de este
manual)
Ajuste la longitud de la manguera
1. Encienda la bomba. Sostenga la
manguera debajo el agua hasta que la
válvula
de alivio de presión libere la presión.
2. Extienda la manguera al punto más
alejado de la piscina. El extremo de la
manguera debe estar a menos de 6
pulgadas (15 cm) antes o más allá de
este punto.
3. Mida la manguera con la presión
encendida y corte el exceso de
manguera de la primera sección (p).
(Esta es la sección conectada al
Desconector rápido (i)).
4. Vuelva a conectar las secciones de la
manguera.
5. Luego de ajustar la longitud de la
manguera, coloque los tres flotadores
de manguera tal como se muestra.
7 pies (2,13m)
4ft (1.2m)
Flotador (g)
Flotteur (g)
Flotador (g)
p
i
¿La manguera es demasiado corta?
• Comuníquese con su distribuidor local de Polaris. Compre una sección
de manguera nueva. Añádala a la primera sección de la manguera (p) y
córtela hasta que quede dentro de las 6 pulgadas (15 cm).
6 pulgadas (15 cm)
h
g
f
Recomendado
Recommandé
Recomendado
38
Page 39

5
Español
Arme el limpiafondos
1. Quite el comprobador de presión (o) desenroscando la tuerca de la manguera (q).
TENGA EN CUENTA: La tuerca de la manguera tiene roscas invertidas.
2. Use la misma tuerca de la manguera (q), y asegure la manguera al cuerpo del
limpiafondos en la cañería de alimentación.
3. Levante la bolsa y sujete a la manguera utilizando el fijador de bolsa (n).
4. Empuje el flotador del cabezal (c) hasta el fondo, contra el cuerpo del limpiafondos.
n
q
c
39
Page 40

Español
Funcionamiento del limpiafondos
1
ADVERTENCIA
Para evitar riesgos de lesiones potencialmente graves, no nade ni use
la piscina cuando el limpiafondos está sumergido o en funcionamiento.
Encienda el limpiafondos
1. Conecte la manguera en la piscina al UWF®.
2. Sumerja el limpiafondos en la piscina, permitiendo que se hunda hasta el fondo.
3. Encienda la bomba de filtrado y permita que se cebe. El limpiafondos comenzará a
moverse.
Verifique la RPM apropiada de las ruedas
2
Antes de operar el limpiafondos Polaris®, verifique las revoluciones por minuto
(RPM) apropiadas de las ruedas. Para una máxima eficiencia, el Polaris debería
operar entre 28 y 32 RPM.
1. Marque la rueda que tiene un solo lado utilizando un pedazo de cinta adhesiva
(o una pequeña hoja metida en el neumático).
2. Encienda la bomba, mantenga el limpiafondos debajo del nivel del agua y
cuente las revoluciones de la rueda durante un minuto.
3. La velocidad óptima de las ruedas debería ser entre 28 y 32 RPM.
Marque la rueda que tiene un
solo lado (con cinta adhesiva,
una pequeña hoja o marcador).
28 - 32 RPM
1 min
IMPORTANT
Mantenga el
limpiafondos
sumergido para
un conteo preciso
de la velocidad
de las ruedas.
40
Page 41

3
Español
Ajuste la velocidad de la rueda
¿La velocidad de las ruedas es menor a 28 RPM?
• Verifique la rejilla del filtro en el Desconector rápido para ver si hay
suciedad.
• Limpie el desnatador, el filtro, y la cesta de la bomba.
• Verifique las mangueras, las conexiones y el eslabón giratorio por pérdidas.
• Si el limpiafondos está conectado a un circuito de retorno exclusivo, ajuste
la válvula de desviación para aumentar el flujo de agua.
¿La velocidad de las ruedas es mayor a 32 RPM?
• Si el limpiafondos está conectado a un circuito exclusivo, ajuste la válvula de
desviación para reducir el flujo de agua al limpiafondos.
• Desenrosque la válvula de alivio de presión hasta alcanzar la RPM apropiada.
TENGA EN CUENTA: Para una remoción más fácil, use la herramienta de
remoción UWF ® de Polaris® (Contáctese con su distribuidor local de Polaris,
Parte # 10-102-00).
41
Page 42

Español
Ponga a punto el limpiafondos
Cuando la opera correctamente, el limpiafondos Polaris® aspira, barre y friega todas las
superficies aleatoriamente a través de toda la piscina. La capacidad para trepar depende de
la forma de la piscina y de la presión o flujo de agua. El limpiafondos Polaris trepa mejor en
piscinas sin ángulos o curvas pronunciadas en la transición del piso a la pared de la piscina.
Aproximadamente cada 3-1/2 minutos el limpiafondos Polaris entra en modo marcha atrás.
Esta acción aleja al limpiafondos Polaris de los obstáculos en la piscina.
1
Ponga a punto su limpiafondos ajustando la manguera de barrido
o chorro impulsor según sea necesario, para un funcionamiento
óptimo.
Ajuste la manguera de barrido
La manguera de barrido debe realizar un movimiento de barrido suave. Para
aumentar o disminuir el movimiento de barrido:
1. Apague la bomba de filtrado.
2. Gire el tornillo de ajuste en la cañería de alimentación (r) en sentido
contrario a las agujas del reloj para aumentar el movimiento de la
manguera de barrido. Gire el tornillo de ajuste en el sentido de las agujas
del reloj para disminuir el movimiento.
2
Disminuya el
movimiento
Aumente el
movimiento
Ajuste del chorro impulsor
Si el limpiafondos está desviándose hacia la izquierda o derecha en lugar
de moverse en línea recta, ajuste el chorro impulsor (en la parte trasera del
cuerpo del limpiafondos) para que trepe las paredes o gire.
P
t
u
TENGA EN CUENTA: La
configuración de fábrica es
en la posición de las once en
punto. Ajuste el chorro impulsor
únicamente para adaptarse a
piscinas de formas únicas.
f
e
L
t
i
n
U
s
11
11
e
h
s
u
P
a
e
r
c
n
I
D
e
c
r
e
a
s
h
e
s
12
C
s
e
s
s
e
s
6
U
n
i
t
l
i
m
m
i
l
C
R
b
i
g
i
n
g
h
t
39
g
n
i
b
42
Page 43

Mantenimiento de rutina
Realice el mantenimiento de rutina para prolongar la vida de su limpiafondos.
Vacíe la bolsa
1
Vacíe la bolsa cuando esté llena hasta la mitad, especialmente si la carga de suciedad es
mayormente arena.
TENGA EN CUENTA: Es más fácil vaciar una bolsa seca. Retire la bolsa y déjela
secar antes de vaciarla. Alterne entre dos bolsas mientras se secan, de modo que no se
interrumpa el ciclo de limpieza.
1. Desconecte la bolsa soltando las clavijas.
2. Retire el fijador de la manguera de alimentación.
3. Abra la tapa y tire la suciedad.
Español
2
3
Retrolave el filtro de la piscina
Retrolave el filtro de su piscina periódicamente. Siempre desconecte el
limpiafondos Polaris® de la pared de la piscina antes de limpiar o retrolavar
el filtro de la piscina. Luego de limpiar o retrolavar, deje el sistema de filtrado
funcionando durante al menos cinco minutos para purgar los circuitos de retorno
antes de volver a conectar el limpiafondos.
Almacenamiento y Guardado durante el invierno
TENGA EN CUENTA: Nunca almacene el limpiafondos a la luz directa del sol.
Para almacenar el limpiafondos para el invierno:
1. Retire el limpiafondos de la piscina y drene todo el agua para evitar que el agua
congelada lo dañe (este daño no está cubierto dentro de la garantía).
2. Retire el UWF® de la pared de la piscina usando el Desconector rápido. Use presión de
jalón al desatornillarlo.
Si es necesario, use la Herramienta de remoción UWF (parte #10-102-00) disponible
de su distribuidor local Polaris.
43
Page 44

Español
Resolución de problemas
Problema Solución
Se cuelga en escalones
u otros obstáculos
por más de 3 1/2
minutos.
1. Controle las RPM de las ruedas.
2. Verifique que la válvula de retroceso esté girando.
3. Ajuste el chorro impulsor.
4. Retire los equipos innecesarios de la piscina o instale un Kit de
protección de escalera (Parte # G21) de un distribuidor Polaris® .
5. Verifique la bolsa y vacíe si hace falta.
El limpiafondos está
lento, funcionando
con menos potencia
de la normal.
El limpiafondos vuela
alrededor de la
piscina y/o no hace
contacto con el
fondo.
El limpiafondos no
retrocede.
1. Verifique la rejilla del filtro en el Desconector rápido y límpiela, si es
necesario.
2. Limpie la cesta del desnatador, la cesta de la bomba y el filtro de la
piscina.
3. Verifique las mangueras, conexiones y eslabones giratorios en busca
de pérdidas que podrían causar pérdida de presión de agua.
4. Controle las RPM de las ruedas (entre 28-32).
1. Controle las RPM de las ruedas.
- Si el limpiafondos está conectado a un circuito de retorno exclusivo
con una válvula de desviación, ajuste la válvula para disminuir el flujo
de agua al limpiafondos.
- Si hay más de 32 RPM, desatornille la válvula de alivio de presión
para disminuir el flujo de agua al limpiafondos.
2. Verifique que la válvula de retroceso esté girando. Mantenga la válvula
fuera del agua y observe el chorro. Debería ir y venir cada 3 1/2
minutos.
1. Verifique que la válvula de retroceso esté girando cada 3 1/2 minutos.
2. Controle las RPM de las ruedas (entre 28-32).
3. Si la bolsa está llena, vacíela.
4. Si el flotador del cabezal tiene agua dentro, reemplácelo.
El limpiafondos solo gira
en una dirección.
44
5. Asegúrese de que la manguera de alimentación esté flotando.
1. Ajuste el chorro impulsor.
2. Verifique que el montaje de la manguera de alimentación esté flotando
de forma apropiada. Los flotadores anegados de la manguera pueden
producir que la manguera de alimentación se hunda. Las mangueras
viejas pueden perder flotabilidad, reemplácela si fuera necesario.
3. Si el extremo de la manguera conectada al limpiafondos tiene una
curva, alinéela con la curva en la cañería de alimentación.
4. Asegúrese de que el eslabón giratorio en la cañería de alimentación
gire libremente.
Page 45

Problema Solución
La manguera de alimentación
se enreda.
1. Vuelva a medir la manguera para verificar que está
ajustada a la longitud apropiada para la forma de la
piscina.
2. Con el limpiafondos Polaris en funcionamiento,
verifique que los eslabones giratorios y las conexiones
de la manguera giren libremente.
3. Asegúrese de que la manguera de alimentación esté
flotando.
4. Con el limpiafondos Polaris® apagado, gire cada una
de las ruedas.
Todas las ruedas deben girar juntas.
Español
La manguera de barrido fue
succionada por el tubo de
aspiración.
La manguera de barrido rocía
demasiada agua fuera
de la piscina.
El limpiafondos no limpia
toda la piscina.
1. Asegúrese de que el orificio al final de la manguera
de barrido no esté bloqueado por el depurador de la
manguera.
2. Ajuste la manguera de barrido para que realice un
movimiento de barrido suave.
1. Verifique que el Tail Sweep Pro® esté instalado
correctamente.
2. Ajuste la velocidad de la manguera de barrido
apretando el tornillo.
1. Controle que la longitud de la manguera llegue a 6″
del punto más lejano de la piscina. Si no es así, ordene
una nueva sección de manguera de su distribuidor
Polaris.
2. Verifique que el chorro impulsor esté en la posición de
11 en punto que optimiza los giros aleatorios.
3. Con la bomba en funcionamiento, ponga el
limpiafondos al revés. Verifique que los tres chorros
impulsores tengan un flujo constante sin obstrucciones.
Si no es así, contáctese con Atención al cliente o
con un Centro de Servicio autorizado de Polaris para
solicitar asistencia.
El limpiafondos funciona en
círculos sobre su lado.
1. Verifique la bolsa del filtro, si está llena puede inclinar
el limpiafondos hacia un lado.
2. Retire el flotador del cabezal y sacúdalo. Si hay agua
en el flotador, ordene uno nuevo.
3. El flotador de la manguera de alimentación debería
flotar uniformemente sobre la superficie de la piscina.
45
Page 46

Español
Problema Solución
El limpiafondos no trepa las paredes. 1. Verifique que la velocidad de las ruedas sea 28-32
RPM.
2. Verifique que el chorro impulsor esté en la posición de
las 11 en punto.
3. Verifique que el flotador del cabezal esté ubicado
totalmente hacia adelante.
4. Verifique que las mangueras hayan sido cortadas de
forma correcta, siguiendo las instrucciones.
5. Con la bomba en funcionamiento, ponga el
limpiafondos al revés. Verifique que los tres chorros
impulsores tengan un flujo constante sin obstrucciones.
Si no es así, contáctese con Atención al cliente o con
un Centro de Servicio autorizado de Polaris® para
solicitar asistencia.
Los neumáticos del limpiafondos se
resbalan sobre la superficie
de fibra de vidrio o azulejo
de la piscina.
Las ruedas rotan menos de
28 veces por minuto.
Las ruedas rotan más de
32 veces por minuto.
1. Verifique que su limpiafondos tenga neumáticos
PosiTrax® de Polaris instalados en las tres ruedas. Los
neumáticos PosiTrax de Polaris son exclusivamente
para ser usados sobre superficies de fibra de vidrio o
azulejo.
2. Verifique que la velocidad de las ruedas sea 28-32
RPM.
1. Verifique que la rejilla del filtro, las cestas de la bomba
y el filtro principal estén limpios.
2. Verifique que no haya pérdidas en las mangueras,
conectores y eslabones giratorios del limpiafondos.
3. Si el limpiafondos está instalado en un circuito
exclusivo, ajuste la válvula de desviación para
aumentar el flujo de agua al limpiafondos.
1. Si el limpiafondos está conectado a un circuito
exclusivo, ajuste la válvula de desviación para reducir
el flujo de agua al limpiafondos.
2. Desatornille la válvula de alivio de presión en el
ensamble del conector UWF® hasta que las RPM estén
entre 28 y 32.
46
Page 47

®
¿Tiene alguna pregunta?
Para partes de reemplazo o preguntas adicionales
sobre resolución de problemas, llame o ingrese a:
1.800.822.7933
www.polarispool.com
Español
47
Page 48

Zodiac Pool Systems, Inc.
2620 Commerce Way, Vista, CA 92081
1.800.822.7933 | www.polarispool.com
Polaris® and the 3-wheeled cleaner design are registered trademarks of Zodiac Pool Systems, Inc.
All other trademarks referenced herein are the property of their respective owners.
Polaris® et la conception de nettoyeur à 3 roues sont des marques déposées de Zodiac Pool Systems, Inc.
Toutes les autres marques de commerce citées dans le présent document appartiennent à leurs propriétaires respectifs.
Polaris® y el diseño de limpiafondos de tres ruedas son marcas registradas de Zodiac Pool Systems, Inc.
Las demás marcas mencionadas en esta guía son propiedad de sus respectivos propietarios.
©2016 Zodiac Pool Systems, Inc. H0570700_REVC
 Loading...