

Page 1
O WNER’S MANUAL
IMPORTANT INFORMATION
SERIAL NUMBER
Page 2

Important Information
• Always disconnect the Polaris from the pool wall when cleaning or backwashing the pool filter.
• After cleaning or backwashing, let the filtration system run for at least five minutes before
re-connecting the Polaris.
• New plumbing lines should be flushed out before installing the Polaris.
• Do not handle the Polaris while it is operating.
• Always remove the Polaris
before swimmers enter the pool.
• Always remove the Polaris from the pool before chemical shock treatments.
For customer service or support:
• Please mail Warranty Card immediately.
• For on-line support: www.polarispool.com
• To contact Polaris:
US and Canada Australia Europe
Customer Service Unit 4, 19-21 Gibbes Street, C/Osana s/n.
2620 Commerce Way Chatswood, NSW 2067 (Pol.End.El Ramassar),
Vista, CA 92081-8438 1-300-POLARIS 98520 Les Franqueses del Vallés
1-800-822-7933 ACN 080 168 092 Barcelona, Spain
+34 93 840 25 85
Polaris Limited Warranty
This one year limited warranty is extended to the original consumer purchaser of this Polaris Vac-Sweep®65/ Polaris
Turbo Turtle®, Polaris Vac-Sweep®165 / Polaris Super Turtle®Automatic Pool Cleaner manufactured by Polaris Pool Systems,
Inc., from date of manufacture of the unit as established by the serial number, or one year from date of purchase with proof
of purchase, whichever is later. Polaris warrants this product, including all parts and components thereof, to be free of
defects in material and workmanship. Normal replacement items such as the filter bag, which have been worn out by use or
improper installation are not covered by this warranty.The Polaris 65/Turbo Turtle, Polaris 165/Super Turtle bottom is
warranted for a period of three years.
This limited warranty does not apply if the failure is caused or contributed to by any of the following: improper handling,
improper usage, improper storage, winter freezing, abuse, improper installation, removal of the UWF filter screen, unsuitable
application of the unit, improper maintenance, lack of reasonable and necessary maintenance, damage in transit or during
installation, or damage from repairs/alterations made or attempted by anyone other than Polaris or one of its Authorized
Service Centers. In no event shall Polaris be liable for incidental or consequential damages of any nature or for damages to
persons or property, including damage to vinyl liners, plaster, tile, aggregate-based and other pool surfaces, or damages
resulting from the use of this product with a substandard pool circulation system or a chemical imbalance.
Authorization to return a unit or part to the plant of manufacture must be obtained from the Polaris Customer Service
Department. Check with your dealer for the local procedure before exercising this warranty. If further directions or
instructions should be required, contact the Customer Service Department at 1-800-VAC-SWEEP (USA and Canada only)
or (760) 599-9600. Be sure to insure the shipment against loss or damage in transit.
This limited warranty is valid only in the United States of America, Canada and Australia, and it does not apply to Polaris
65/Turbo Turtle, 165/Super Turtle Automatic Swimming Pool Cleaners sold or installed in any other country. Polaris 65/Turbo
Turtle, 165/Super Turtle Automatic Pool Cleaners sold in the United Kingdom are warranted for a period of two years from
date of invoicing to the first user.
WARNING: USE OF POLARIS 65/TURBO TURTLE, 165/SUPER TURTLE IN A VINYL LINER POOL
tain vinyl liner patterns are particularly susceptible to rapid surface wear or pattern removal caused by objects coming
Cer
, pool toys, floats, fountains, chlorine dispensers, and automatic pool
into contact with the vin
cleaners. Some vinyl liner patterns can be seriously scratched or abraded simply by rubbing the surface with a pool brush.
Ink from the pattern can also rub off during the installation process or when it comes into contact with objects in the pool.
is is not responsib
olar
P
U.S. Patents: 4,994,178; 5,014,912; 2,860,058; RE34,301 and other patents pending.
oreign Patents: 610,303; 614,334; 615,498; 0,319,341; 0,319,342; 0,329,472; 1,307,881; 1,314,118; 1,335,166; P3871917.7.
F
yl surf
or, and the Limited Warranty does not cover, pattern removal, abrasion or markings on vinyl liners.
le f
, including pool br
ace
ushes
www.polarispool.com
Page 3
Introduction
9
8
7
10
6
1a
1b
2
5
4
3
Congratulations on the purchase of your new automatic pool cleaner, and thank you for
choosing Polaris. The Polaris 65/Turbo Turtle for aboveground pools and the Polaris
165/Super Turtle for in-ground vinyl or fiberglass pools are designed to give you years of
dependab
Like most mechanical devices, these cleaners will require periodic adjustments, routine
maintenance, and the replacement of certain hardworking parts. Please have your
cleaner checked occasionally by your local Polaris dealer or authorized service center.
Always insist on genuine Polaris replacement parts. Non-Polaris parts are not made to
our specifications. They may have an adverse effect on the operation of your Polaris or
may even damage it.
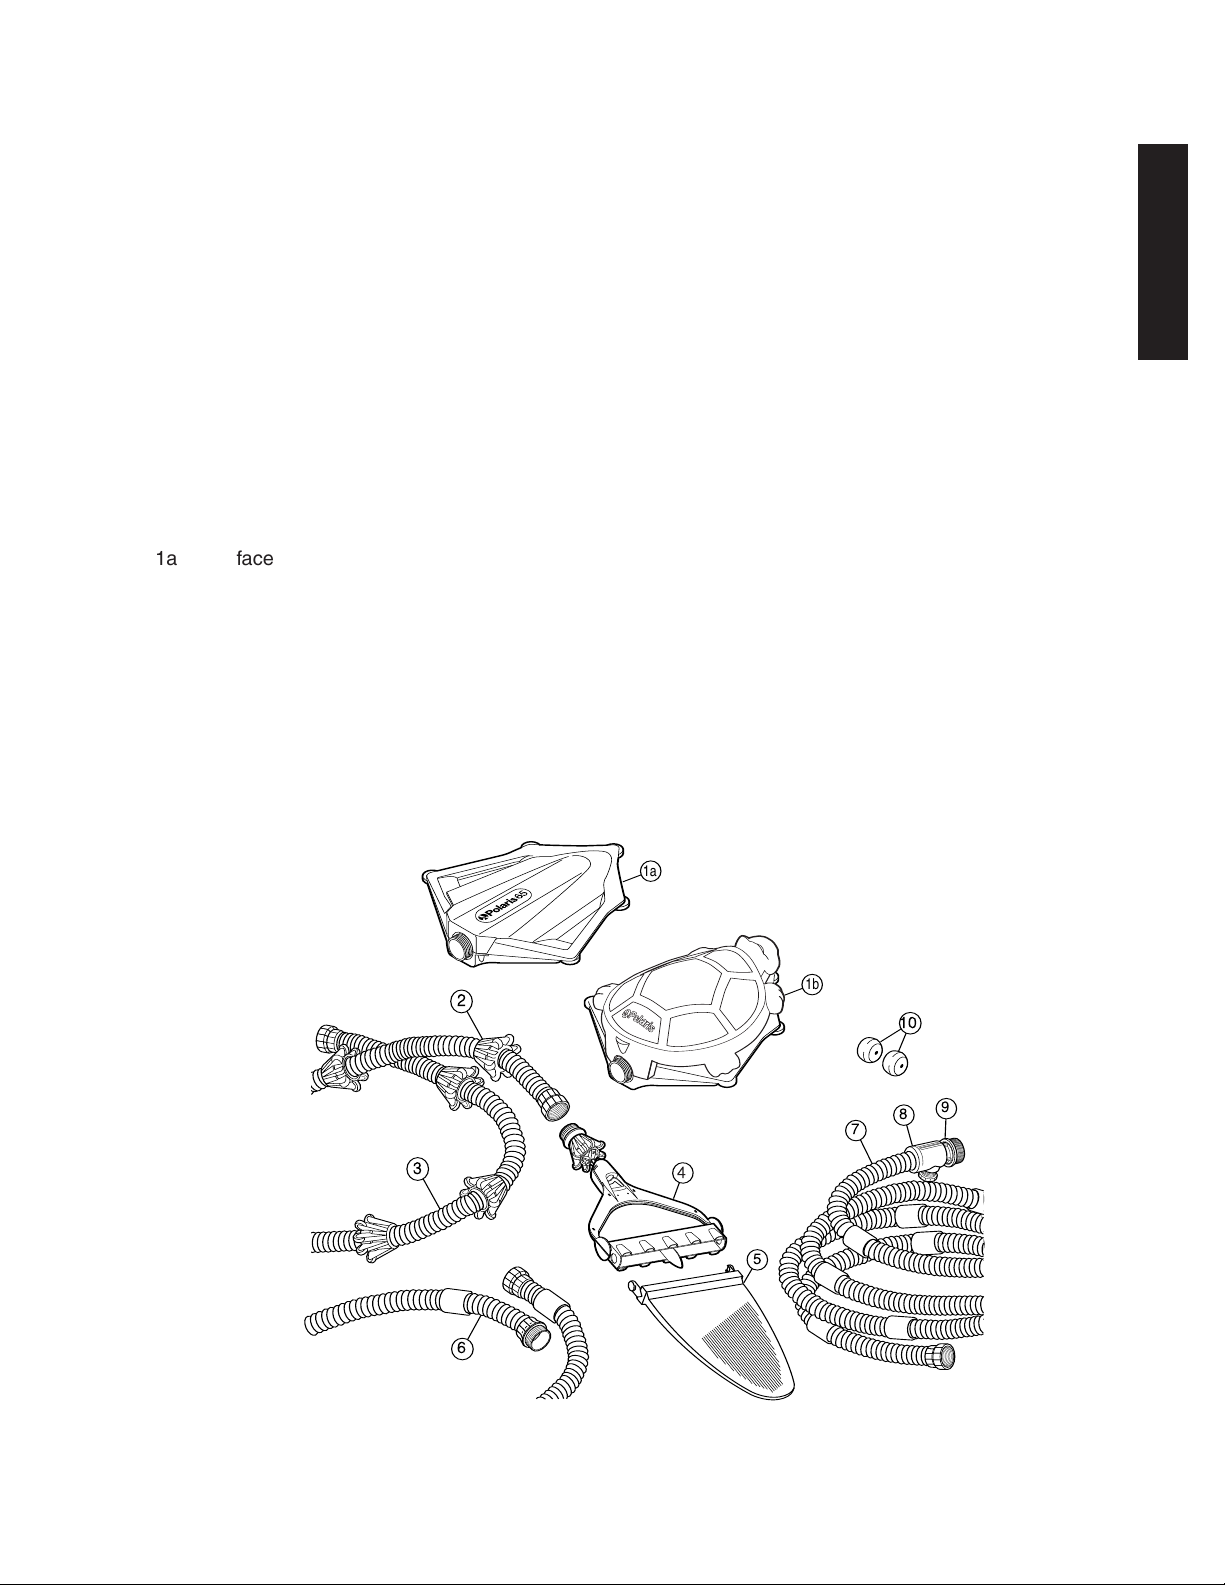
Polaris Complete Cleaner
le and efficient service.
English
1a. Surface Module
. Turtle Top
1b
02. Wheel Cage
03. Sweep Hose
04. Jet Sweep Assembly
05. All-Purpose Bag
06. Float Hose Extension with Connector
– 165 and Super Turtle only
07. Float Hose
8 Quick Disconnect
0
09. Universal Wall Fitting (UWF)
10. Eyeball Regulators (2) – 165 and
Super Turtle only
www.polarispool.com
Page 4

Quick Installation Instructions
Quick Disconnect
Pressure Relief Valve
Universal Wall Fitting (UWF)
1-1/2" return line
Filter Screen
Remove
1-1/2 Return Line
Quick
Disconnect
UWF
Remove
UWF
Quick
Disconnect
1-1/2 Return Line
English
Three quick steps to install and get maximum performance from the Polaris:
• Install the Universal Wall Fitting (UWF) with Quick Disconnect
Adjust sweep hose to fit pool depth
•
• Adjust float hose to fit pool length
Install the Universal Wall Fitting
Installs in minutes on pools with a 1-1/2” female threaded return line.
1
1. Turn on the filtration pump and flush out the plumbing line. Turn pump off.
2. Polaris 165/Super Turtle Only — Use the return line nearest the center point of the
longest pool wall for the Polaris. If there are two, choose the return line closest to the pool
equipment. Place the eyeball regulator disks into the remaining return lines.
3. Remove the UWF from the Quick Disconnect and screw the UWF into the return opening.
4. Turn the Quick Disconnect clockwise into the UWF and pull away to secure.
If the return line has either of the fittings diagrammed below, remove the parts as shown and
then install the UWF.
If the return line is a 1-1/4” or 2” eyeball fitting, order Polaris Adapter Kit (part #6-510-00)
ed Polaris dealer. If the return line differs from all of these, contact Polaris for
from an author
assistance.
iz
www.polarispool.com
Page 5

4 Feet
Return line
Return line
4 feet
2
Collapse Here
Insert
to Here
Hose
Connector
3
Adjust Sweep Hose to Fit Pool Depth
1. Measure the deepest part of the pool.
Add two feet to this measurement to
determine the correct length for the
weep hose.
s
2. If the sweep hose is longer than
the measured amount, cut off the
excess hose.
3. Remove the hose connector from the
excess hose piece just cut.
4. Use fingers to collapse sweep hose.
Push hose into connector until the first
groove is inside.
5. Slide fingers inside hose, through
connector, and pop hose back to
iginal shape.
or
Adjust Float Hose to Fit Pool Length
With float hose attached to the pool wall at the return line, extend the hose to the farthest
point of the pool. The end of the hose should be 4 feet shorter than this point.
Hose too long? Cut the excess float hose. Remove the hose connector from the excess
hose piece and attach it to the new end of the float hose as instructed above.
English
Hose too short? For Polaris 165/Super Turtle only, add the float hose extension between
the existing float hose section and the surface module. Remeasure and adjust as necessary.
1. Open the frame of filter bag completely and attach it to jet sweep assembly. Attach
assembly to sweep hose.
2. Attach float hose and sweep hose to the surface module.
3. Put the Polaris in the pool and turn on the pool filtration pump.
4. Extend the float hose to the farthest point in the pool. When the pool pump is running, the
surface module should be approximately one foot from the pool wall.
www.polarispool.com
Page 6

Fine Tuning the Polaris Cleaner
Quick Disconnect
Filter Screen
Preasure Relief Valve
Quick Disconnect
Pressure Relief Valve
Filter Bag
Jet Sweep Assembly
Button
Frame
English
Routine Maintenance
When operating correctly, the Polaris vacuums and sweeps all surfaces, moving randomly
throughout the pool. The surface module floats on the water’s surface recirculating clean,
filtered water. The sweep hose and filter bag move across the pool floor collecting dirt
and debr
Approximately every 15-25 seconds the Polaris will change directions.
is.
Pressure Relief Valve
The pressure relief valve in the Quick
Disconnect automatically releases
water if the Polaris is receiving too
much water pressure. It can also be
used to regulate the movement of
the cleaner.
If the Polaris changes directions too
quickly, adjust the pressure relief valve
to slow the cleaner.
Cleaning the Filter Bag
Depress the buttons on the jet sweep
assembly to release the bag. Turn
the filter bag inside-out to remove
the debris.
Open frame completely and
reattach bag.
Cleaning the Filter Screen
The filter screen inside the Quick Disconnect captures debris missed by the pool filtration
system. To clean, pull it out, rinse it and press it back into place.
Backwashing the Pool Filter
ys disconnect the P
a
Alw
After cleaning or bac
.
filter
flush out the return lines before re-connecting the Polaris.
Storage and Winterizing
Never store the Polaris in direct sunlight. When storing for the winter, drain out all the water
(freeze damage is not covered under the warranty). Remove the sweep jet assembly from
the sweep hose and store it flat. Hang or lay the hoses straight. Remove all fittings from the
return lines including the UWF. In some cases, it may be necessary to use the UWF Removal
Tool (part #10-102-00) available from an authorized Polaris dealer.
olaris from the pool wall before cleaning or backwashing the pool
or at least five minutes to
ashing, let the filtr
kw
ation system r
un f
www.polarispool.com
Page 7

Troubleshooting
English
If the Polaris cleaner regularly displays the
following actions, adjustments may be
necessary to restore performance. Refer to
xploded parts diagram for part references.
e
Action: Polaris does not clean the
entire pool or runs slowly.
Solution: 1. Verify that the pressure relief
valve is releasing water. If it is
not, clean or backwash the
pool filter.
2. Check the filter screen in the
quick disconnect and clean if
necessary.
3. Verify that the float hose is the
proper length.
4. Remove the surface module
top.With the Polaris operating,
verify that the randomizer tube
is moving back and forth.
not moving: Turn off
If it is
pump, disconnect hoses, look
into the mechanism and locate
the filter connector inside the
randomizer tube. If it is
covered with debris or algae,
remove the connector
chamber, cylinder, and piston.
Pull out the randomizer tube
and clean the filter connector.
If the connector is clean,
replace the piston.
ving:W
mo
If it is
randomizer ball in the
mechanism. If it does not
e within 2 min
v
mo
the randomizer tube and piston.
5. Verify that the water pressure
is between 5 and 10 psi. A
pressure tester (part #6-113-
00) is available through your
participating Polaris dealer.
atch the
utes, replace
Action: Surface module dives under the
water or leans to one side.
Solution:
Action: The float hose remains coiled.
Solution: 1. See “Polaris does not clean
Action: Surface module moves too fast.
Solution: 1. Adjust the pressure relief
Action: Bag does not stay on the
Solution: 1. Verify that the bag has been
1. Straighten twisted hoses.
2. Lift surface module out of the
water, empty it and then shake
it. If water is still heard inside,
remove the top, pull out the
drain plug assembly and drain
the module.
3. Adjust the pressure relief
valve until the surface module
levels off.
4. Verify that the water pressure
is between 5 and 10 psi.
A pressure tester (part #6113-00) is available from an
authorized Polaris dealer.
entire pool.”
2. Lay the float hose out straight
in the sun to remove the coils.
valve until the surface module
slows down.
165/Super Turtle only:
2.
Remove one of the eyeball
regulators and readjust the
pressure relief valve if
necessary.
3. Verify that the water pressure
is between 5 and 10 psi.
pool floor.
installed correctly.
2. Check for air bubbles around
the jet body assembly. This
y indicate air in the
ma
plumbing lines.
www.polarispool.com
3. See “Surface module moves
too fast.”
Page 8

English
12
14
10
16
17
25
35
30
31
32
29
28
33
Serial Number
2
25
15
34
11
15
18
26
15
1a
27
20
15
17
21
22
23
19
24
16
13
5
4
3
6
7
8
9
1
b
13
Exploded Parts Diagram
No. Part # Description Qty.
1a 6-306-00 Surface Module Top, Granite 1
1b 6-309-00 Turtle Top 1
2 6-400-00 Mechanism 1
3 6-407-00 Cylinder 1
4 6-413-00 Screw, Mechanism, #6 x 5/16" 4
5 6-411-00 Piston Assembly 1
6 6-409-00 Center Chamber Assy 1
7 6-403-00 Randomizer Ball 1
8 6-406-00 Filter Connector/Randomizer Tube Kit 1
9
6-408-00 Connector Chamber 1
10 6-507-00 Drain Plug Assembly 1
11 6-305-00 Body Bottom Assembly 1
12 6-301-00 Body Bottom Wheel Kit 5
13 ** Support Collar 1
14
6-302-00 Screw, Top, #10 x 3/4" SS
15 6-104-00 Hose Connector, Female 4
16 6-107-00 Wheel Cage Assembly 9
17 6-110-00 Hose Weight 9
18 6-114-00 Sweep Hose Complete
19 6-212-00 Jet Sweep Assembly 1
20 6-116-00 Jet Body Assembly 1
21 6-119-00 Jet Body Ball Kit 1
22 6-211-00 Jet Sweep Harness 1
23 6-210-00 Jet Sweep Head 1
24 6-206-00 All-Purpose Bag* 1
25 6-222-00 Float 24
26 6-225-00 Float Hose, 24 Foot (Hose only) 1
27 6-508-00 UWF Connector Assembly 1
28 6-502-00 Quick Disconnect, UWF 1
29 6-503-00 Pressure Relief Valve 1
30 6-505-00 O-ring, UWF/QD 1
31 6-504-00 Filter Screen, UWF/QD 1
32 6-500-00 Universal Wall Fitting (UWF) 1
33 10-107-00 Eyeball Regulator 2
34 6-221-00 Float Hose Extension Kit, 8 Ft 1
35 6-103-00 Hose Connector, Male 1
SS Sheet Metal, Blunt-end
Sheet Metal, Pan Head 2
, 10 Ft. 1
* Wear items not covered by warranty.
www.polarispool.com
Page 9

20
26
12
10
15
172717
Serial Number
2
29
14
18
25
25
30
28
13
11
13
15
17
21
22
23
19
24
16
16
1a
31
32
1b
13
5
4
3
6
7
8
9
Exploded Parts Diagram
English
No. Part # Description Qty.
1a 6-308-00 Surface Module Top, Blue 1
1b 6-309-00 Turtle Top 1
2 6-400-00 Mechanism 1
3
6-407-00 Cylinder 1
4 6-413-00 Screw, Mechanism, #6 x 5/16" 4
5 6-411-00 Piston Assembly 1
6 6-409-00 Center Chamber Assy 1
7
6-403-00 Randomizer Ball 1
8 6-406-00 Filter Connector/Randomizer Tube Kit 1
9 6-408-00 Connector Chamber 1
10 6-507-00 Drain Plug Assembly 1
11 6-305-00 Body Bottom Assembly 1
12 6-301-00 Body Bottom Wheel Kit 5
13 ** Support Collar 1
14 6-302-00 Screw, Top, #10 x 3/4" SS
15 6-104-00 Hose Connector, Female 3
16 6-107-00 Wheel Cage Assembly 6
17 6-110-00 Hose Weight 6
18 6-106-00 Sweep Hose Complete, 7 Ft. 1
19 6-212-00 Jet Sweep Assembly 1
20 6-116-00 Jet Body Assembly 1
21 6-119-00 Jet Body Ball Kit 1
22 6-211-00 Jet Sweep Harness 1
23 6-210-00 Jet Sweep Head 1
24 6-206-00 All-Purpose Bag* 1
25 6-222-00 Float 24
26 6-225-00 Float Hose, 24 Foot 1
27 6-508-00 UWF Connector Assembly 1
28 6-502-00 Quick Disconnect, UWF 1
29 6-503-00 Pressure Relief Valve 1
30 6-505-00 O-ring, UWF/QD 1
31 6-504-00 Filter Screen, UWF/QD 1
32 6-500-00 Universal Wall Fitting (UWF) 1
SS Sheet Metal, Blunt-end
Sheet Metal, Pan Head 2
*Wear items not covered by warranty.
www.polarispool.com
 Loading...