

Page 1

R-12-03-01
March 01, 2012
Battery Testing and Diagnostic Overview for Polaris Electric Vehicles
Polaris Dealer Services has released this Team Tip to inform you that detailed Battery Testing and Diagnostic
Procedures are located on the dealer website under ‘News, Forms & Links – Service & Warranty’.
Dealership technicians should refer to these procedures any time they are performing the battery testing and
diagnostic operations outlined below. Please distribute this Team Tip to all service personnel.
Battery Testing and Diagnostic Procedures:
How to Select the Proper Extension Cord
A.
B. Power Supply and Dedicated Circuit Information
C. Battery Electrolyte Maintenance
D. Battery Charging Tips
E. Open-Circuit Voltage Testing Procedure
F. Specific Gravity Reference Table (state of charge as related to specific gravity)
G. Specific Gravity Test Procedure
H. Torque-Load Battery Test Procedure
I. Carbon Pile Load Test Procedure
J. Discharge Machine Usage
Battery Testing Worksheets:
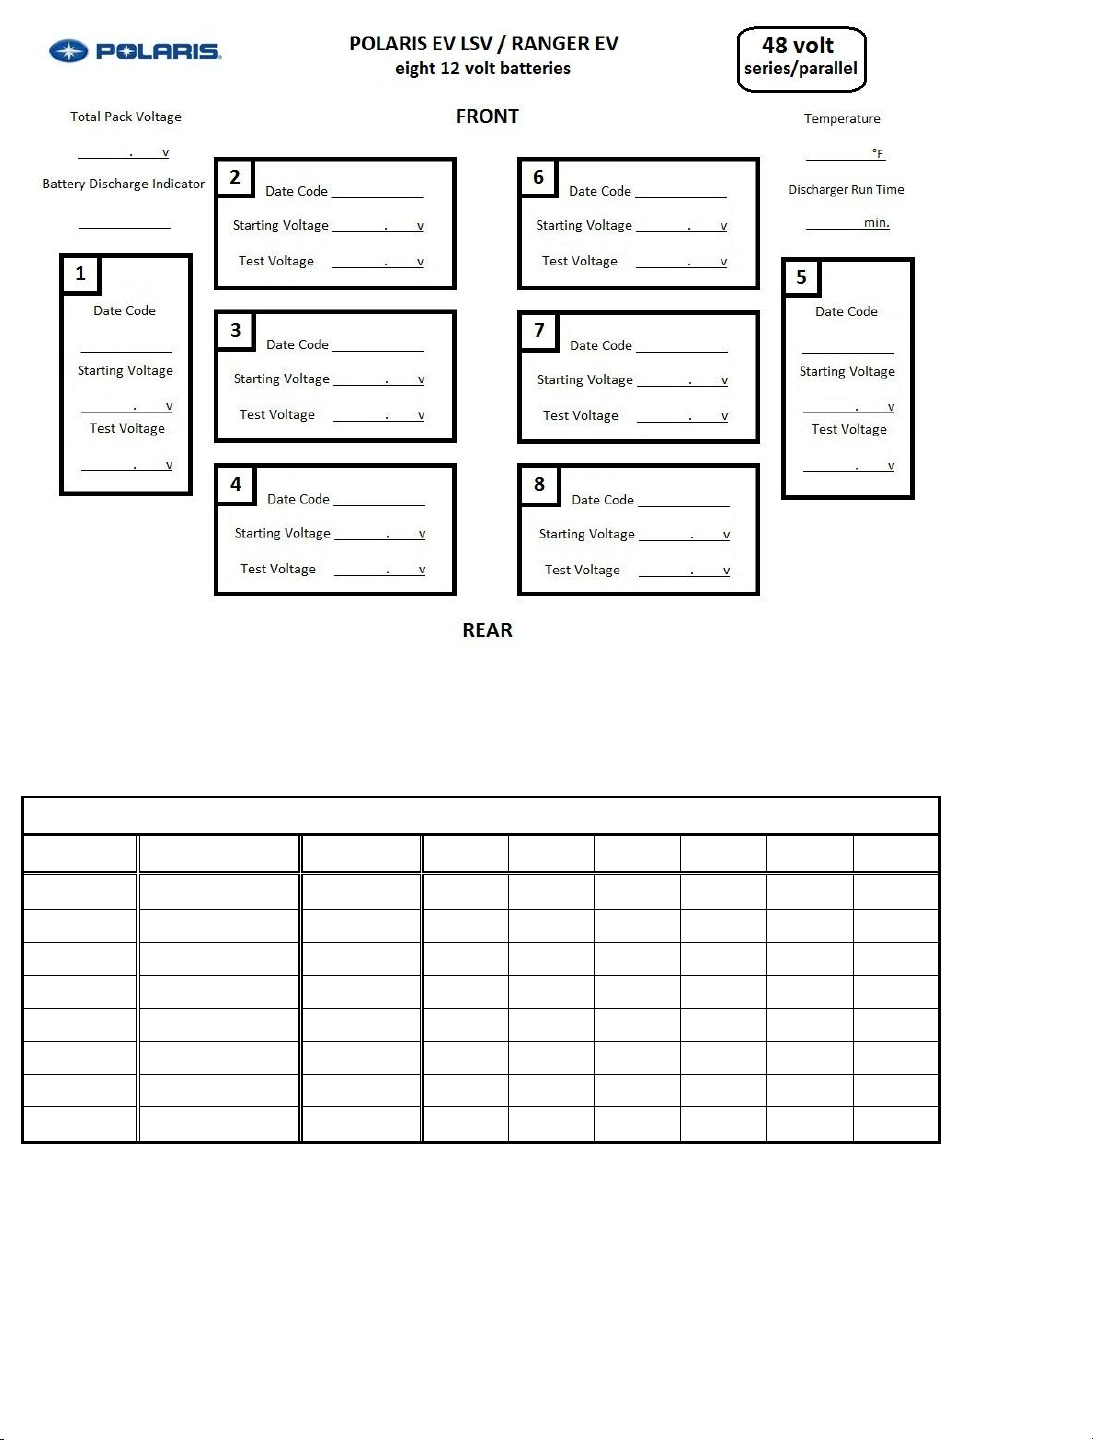
Polaris EV-LSV / RANGER EV (eight 12V batteries)
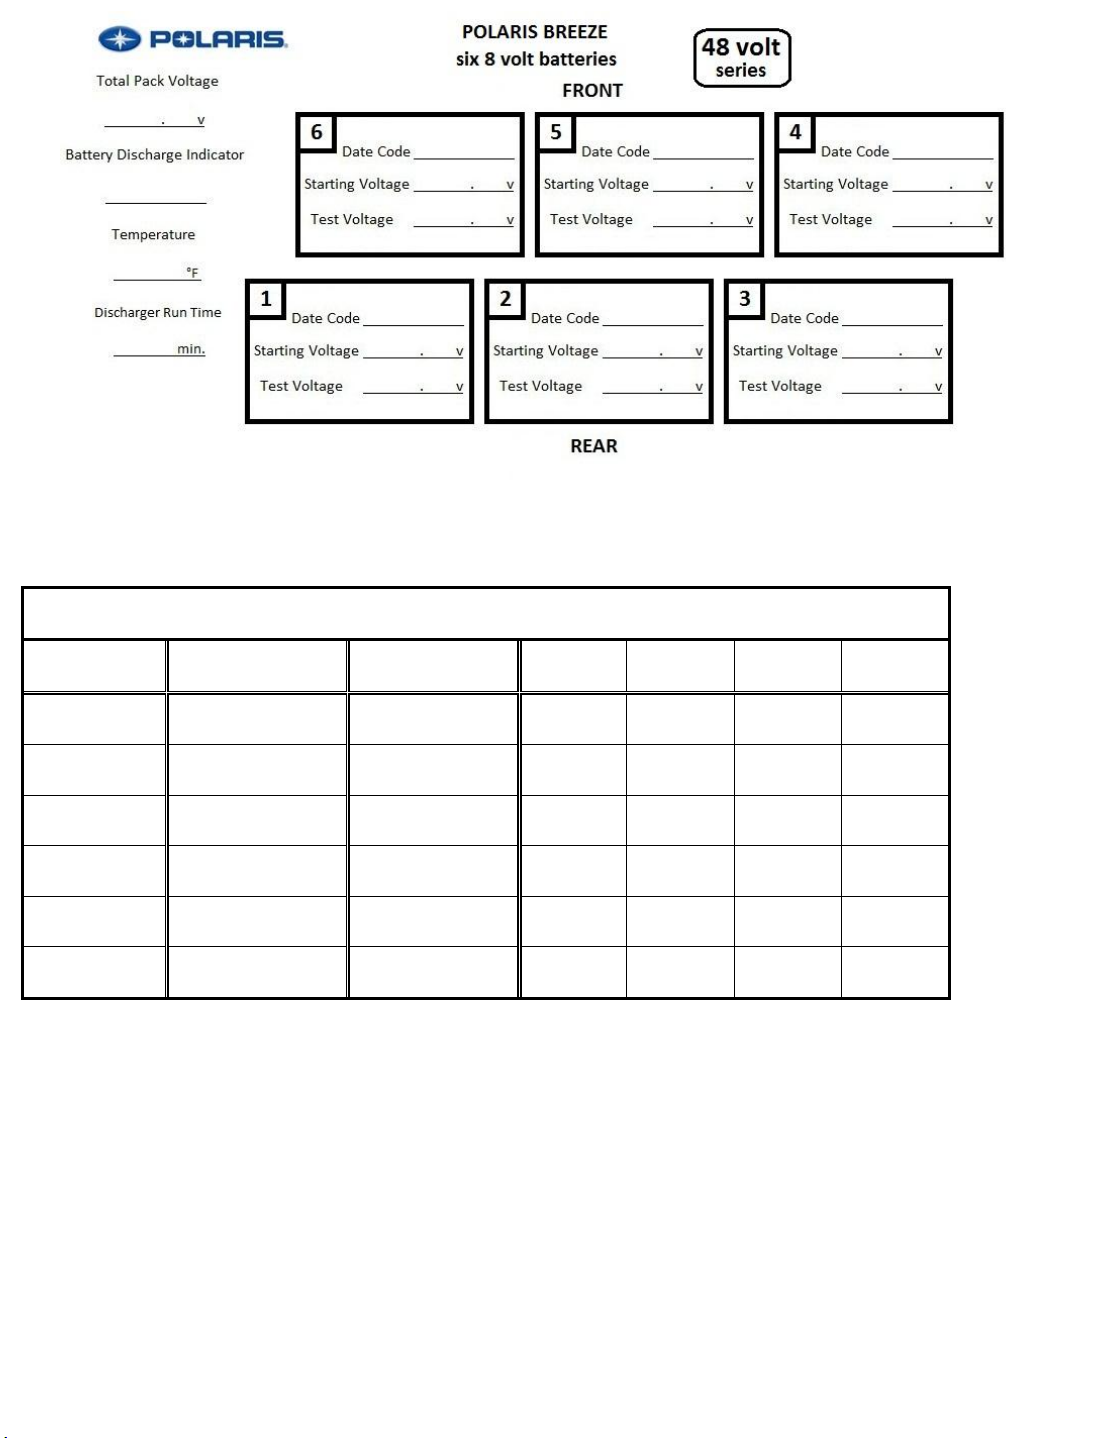
Polaris Breeze (six 8V batteries)
1999 – 2004 GEM (six 12V batteries)
2005 – 2012 GEM e2, e4, eS (six 12V batteries)
2007 – 2012 GEM eLXD, e6 (nine 8V batteries)
2006 – 2012 GEM e6, eL (six 12V batteries)
NOTE: If viewing this Team Tip electronically, simply click on the links above to jump to specific
topics.
To access the Battery Testing and Diagnostic Procedures document and accompanying worksheets
from the STOP site;
STEP 1: Select ‘News, Forms & Links’ from the ‘Service and Warranty’ dropdown menu.
STEP 2: Click on
Electric Vehicles – Battery Testing and Diagnosis
The information contained within this Team Tip is confidential and protected by U.S. and international copyright laws, and is the property of Polaris Sales Inc. This Team Tip is provided for the sole use of
authorized Polaris dealers and distributors. This Team Tip is not to be distributed, duplicated, or copied, digitally or otherwise, without the written consent of Polaris Sales Inc.
© 2012 Polaris Sales Inc. (Page 1 of 13)
Page 2

WARNING:
around batteries.
Electric Vehicle Battery Testing and Diagnostic Procedures
Polaris Technical Service is frequently asked questions regarding effective ways to properly test deep cycle
batteries on electric vehicles. These questions typically arise out of concern about range and/or run-time of a
vehicle. The following process document will provide vehicle charging tips, basic battery theory, proper
diagnostic techniques and maintenance tips on maximizing battery life. After reviewing this document, if you
still have questions, please refer to the appropriate service manual, or contact Technical Service.
Worksheets have been included at the end of this document for use during testing for all battery
configurations currently used in Polaris electric vehicles.
A: Use the Proper Cord
It is very important to charge the vehicle with the correctly sized power cord. Follow these guidelines when
choosing the right cord:
B: Power and Dedicated Circuit
C: Battery Fluid Level
For vehicles that have flooded batteries, maintenance should be performed on a monthly basis. Vehicles that
are used daily, or in hotter climates, require more frequent battery maintenance.
1. Disconnect battery power.
2. Clean the tops of the batteries, cables, and terminals with a plastic brush, using a baking soda and
water mixture. Rinse thoroughly. Never use a high pressure washer or compressed air for cleaning, as
they could possibly force contaminants into the cells.
3. Remove the caps on all of the battery cells, and check the fluid level.
4. If the fluid level is above the plates in each cell, continue to step 5. If the fluid level is below the plates
in any cell, fill with distilled water until water line is just above the plates.
NOTE: Battery electrolyte levels may vary with manufacturer. Verify manufacturers suggested
fill level before adding fluid.
Battery electrolyte is poisonous. It contains sulfuric acid. Serious burns can
result from contact with skin, eyes or clothing.
This battery may emit explosive gases; keep flames, sparks and ignition
sources away.
Protective clothing and safety glasses must be worn when working on or
- If the cord has 14 gauge wires, use a cord no longer than 25 feet.
- If the cord has 12 gauge wires, use a cord no longer than 50 feet.
- If the cord has 10 gauge wires, use a cord no longer than 100 feet.
- Vehicle should be plugged into a dedicated 120 volts AC outlet with a minimum of a 15 amp
circuit breaker.
- When using a power cord that has a Ground Fault Interrupter (GFI) on it, do not plug it into a
wall socket with a GFI on it. Only one GFI is recommended.
The information contained within this Team Tip is confidential and protected by U.S. and international copyright laws, and is the property of Polaris Sales Inc. This Team Tip is provided for the sole use of
authorized Polaris dealers and distributors. This Team Tip is not to be distributed, duplicated, or copied, digitally or otherwise, without the written consent of Polaris Sales Inc.
© 2012 Polaris Sales Inc. (Page 2 of 13)
Page 3
5. When all of the batteries have been checked and filled, connect battery power, and fully charge the
vehicle.
6. At the end of a complete charge, recheck all of the fluid levels, and fill with distilled water per
manufacturer’s instructions.
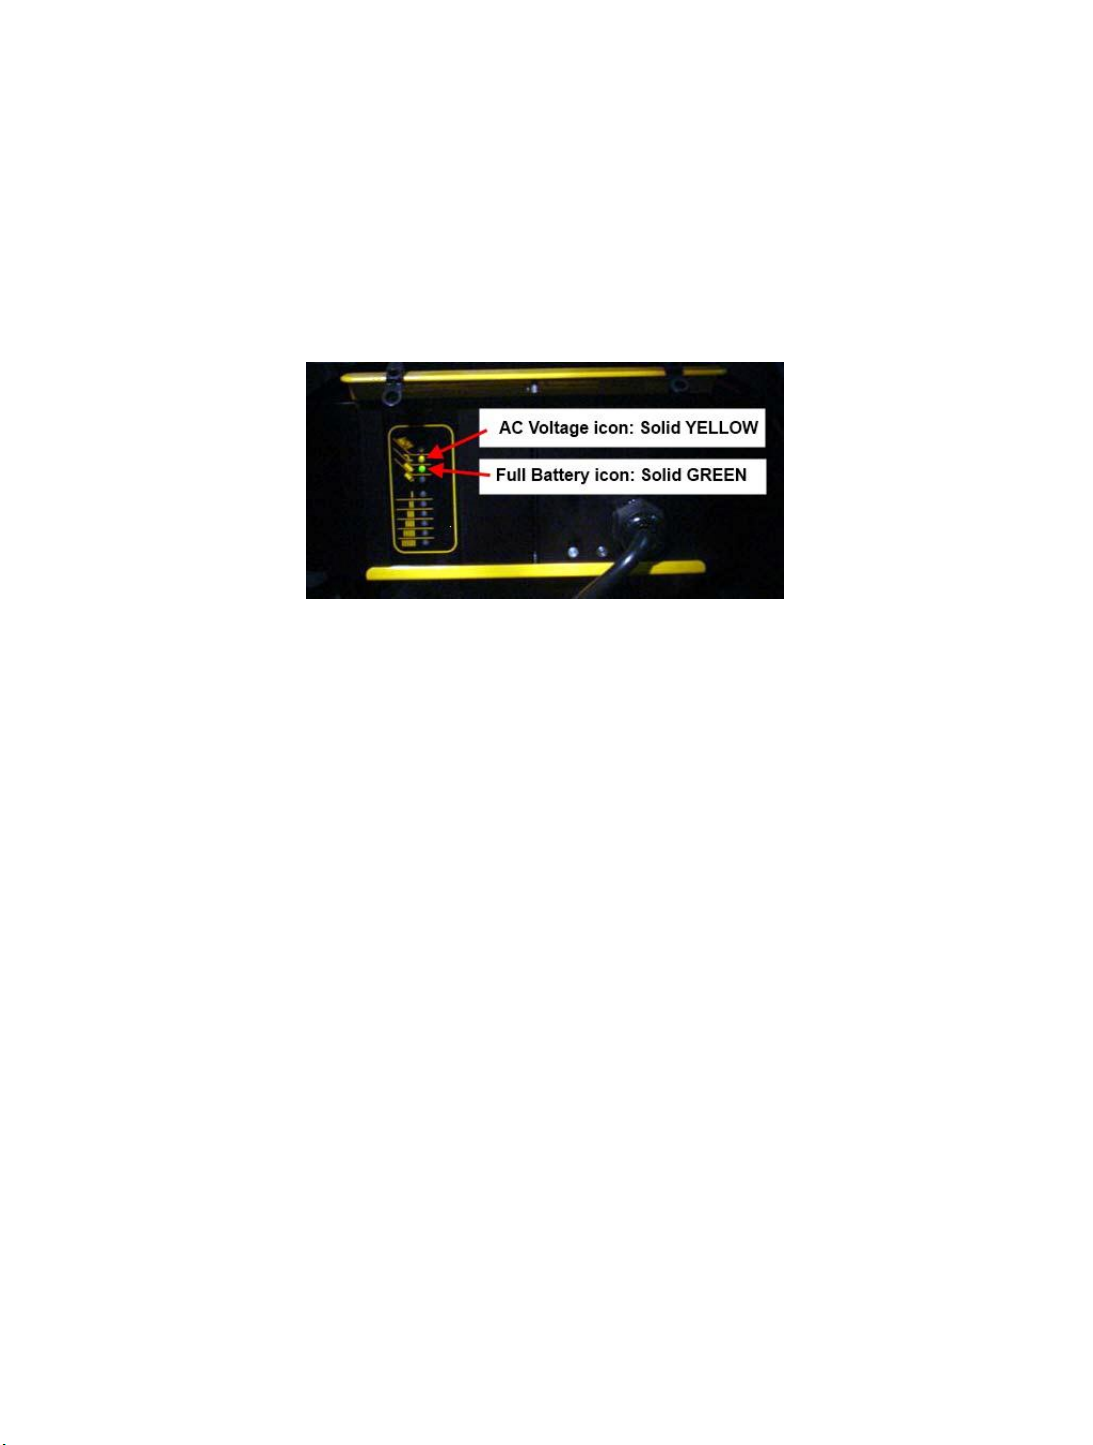
D: Complete a Full Charge
Most Polaris vehicles are equipped with a Delta-Q battery charger. A normal charge cycle can vary between 8
and 12 hours, depending on battery configuration and the state of charge. Before unplugging the vehicle,
locate the charger box and verify that there is a solid yellow light and a solid green light on the side panel. This
indicates that the charger has completed a full charge. If there is a red flashing light, a fault has occurred.
Please refer to the appropriate service manual for fault details.
E: Open-Circuit Voltage Test Procedure
When performing this procedure, follow this order to ensure the most accurate voltage readings:
1. Fully charge the batteries. Batteries must remain idle, no charging, no discharging for at least 6
hours. Preferably 24 hours.
2. Disconnect all loads from the batteries.
3. Measure the voltage using a DVOM.
4. Check the state of charge per the service manual.
5. Charge the battery if it registers 0% to 70% charged.
If the battery registers below the values in the service manual, the following conditions may exist:
1. The battery was left in a state of discharge too long.
2. The battery has a bad cell, or cells.
3. Battery was frozen at some point.
4. No fluid in the battery.
5. Battery is cycled out, or aged.
Batteries, in the conditions stated above, should be taken to a specialist for further evaluation or retired from
service. In some situations, where batteries were sitting for an extended period of time, a battery desulfator
charger will help to revive them.
The information contained within this Team Tip is confidential and protected by U.S. and international copyright laws, and is the property of Polaris Sales Inc. This Team Tip is provided for the sole use of
authorized Polaris dealers and distributors. This Team Tip is not to be distributed, duplicated, or copied, digitally or otherwise, without the written consent of Polaris Sales Inc.
© 2012 Polaris Sales Inc. (Page 3 of 13)
Page 4

State of charge as related to specific gravity and open circuit voltage
Percentage of
Charge
Specific Gravity
Corrected to
80°F
Open-Circuit Voltage
6V
8V
12V
24V
36V
48V
100
1.277
6.37
8.49
12.73
25.46
38.20
50.93
90
1.258
6.31
8.41
12.62
25.24
37.85
50.47
80
1.238
6.25
8.33
12.50
25.00
37.49
49.99
70
1.217
6.19
8.25
12.37
24.74
37.12
49.49
60
1.195
6.12
8.16
12.24
24.48
36.72
48.96
50
1.172
6.05
8.07
12.10
24.20
36.31
48.41
40
1.148
5.98
7.97
11.96
23.92
35.87
47.83
30
1.124
5.91
7.88
11.81
23.63
35.44
47.26
20
1.098
5.83
7.77
11.66
23.32
34.97
46.63
10
1.073
5.75
7.67
11.51
23.02
34.52
46.03
The information contained within this Team Tip is confidential and protected by U.S. and international copyright laws, and is the property of Polaris Sales Inc. This Team Tip is provided for the sole use of
authorized Polaris dealers and distributors. This Team Tip is not to be distributed, duplicated, or copied, digitally or otherwise, without the written consent of Polaris Sales Inc.
© 2012 Polaris Sales Inc. (Page 4 of 13)
Page 5

F: Specific Gravity Test Procedure
Special Tools:
Hydrometer – SPX Part # PU-50338
Visual inspection alone is not always sufficient in determining the overall
condition of a battery. Both open-circuit voltage and specific gravity readings
can give a good indication of a battery's charge level, age, and overall
condition. Routine voltage and gravity checks will not only show the state of
charge but also help spot signs of improper care, such as undercharging and
over-watering, and possibly even locate a bad or weak cell/battery.
The following steps outline how to properly perform a routine specific gravity
test for a flooded lead-acid battery:
1. Do not add water at this time.
2. Fill and drain the hydrometer 2 to 4 times before pulling out a sample.
3. There should be enough sample of electrolyte in the hydrometer to completely support the float.
4. Take a reading and record it on the corresponding worksheet, and return the electrolyte back to the
cell.
5. To check another cell, repeat steps 2-4 above.
6. Check all cells in the battery.
7. Replace the vent caps and wipe off any electrolyte that might have been spilled.
8. Reading correction calculation for ambient temperatures above or below 80°F:
a. Add .004 to reading for every 10 degrees above 80°F.
b. Subtract .004 for every 10 degrees below 80°F.
9. Compare the readings to each other.
10. Check the state of charge per the service manual.
G: Torque-Load Battery Test Procedure
A DC voltmeter is required to perform the following procedure.
1. Fully charge vehicle batteries.
2. Using a suitable lift table or jack stands, elevate the vehicle so all 4 tires are safely off the ground.
3. Set DC voltmeter to the correct scale to measure individual battery voltage, and so that at least one
decimal place can be read (auto-ranging meters should be set to DC volts).
4. Take a static voltage reading of each battery individually, to get each battery’s starting voltage, and
record the readings.
5. Attach voltmeter to the first battery, with the correct polarity, positive to positive, negative to negative.
6. Set drive mode switch to the highest forward position.
7. Depress and hold the foot brake firmly.
8. Release emergency brake.
NOTE: Some vehicles have a stall-out feature, where the controller cuts power after a set time.
If the vehicle that is being tested does not have this feature, then pick a set time between 5-8
seconds. Use the exact same time period for testing each battery.
9. Still holding the foot brake, push the accelerator all the way to the floor, and hold down for set time.
Watch voltmeter for the lowest voltage displayed.
The information contained within this Team Tip is confidential and protected by U.S. and international copyright laws, and is the property of Polaris Sales Inc. This Team Tip is provided for the sole use of
authorized Polaris dealers and distributors. This Team Tip is not to be distributed, duplicated, or copied, digitally or otherwise, without the written consent of Polaris Sales Inc.
© 2012 Polaris Sales Inc. (Page 5 of 13)
Page 6

10. Let up on accelerator pedal and record the lowest reading observed on voltmeter (the min/max feature
works well for obtaining the lowest reading on the battery during testing).
11. Repeat steps 5 - 10 on each battery individually.
NOTE: If tested after a full charge, the individual battery voltages should not drop below 11.5 volts for a
12 volt battery, and 7.5 volts for an 8 volt battery. Also, there should not be a difference of more than
0.5 volts between the highest battery reading, and any other battery reading.
This test can also be done at any time the battery charge is within the operating range. Sometimes the
problem might have to be duplicated before executing this procedure, for the results to show the weak battery,
or batteries. When testing at this point, especially watch for a difference of more than 0.5 volts between the
highest battery reading, and any other battery reading.
In cases where vehicles are programmed with a stall-out, do not hold the pedal to the floor longer than one cut
off by the controller, per battery, or allow 30 seconds of cooling time for the motor and controller following stallout.
H: Carbon Pile Load Test Procedure
Batteries should be fully charged before testing.
1. Take a voltage reading of each battery, record these readings.
2. Disconnect the battery cables from the battery that is being tested.
3. Observe the correct polarity and make sure the test leads are making good contact with the battery
posts.
4. Turn the load control knob (if the tester is so equipped) to draw current at the rate of three times the
battery’s ampere-hour (AH) rating or ½ of its CCA rating.
5. Maintain the load for 10-15 seconds.
6. Observe the tester’s voltmeter to read the lowest voltage for each battery, and record the readings.
7. For ambient temperatures at or above 70°F, or for testers that are temperature compensated, battery
voltage at the end of 10-15 seconds should not fall below 10.5 volts for a 12 volt battery, or 6.5 volts for
an 8 volt battery.
NOTE: It is important to observe ambient temperature as this will greatly affect test results.
The information contained within this Team Tip is confidential and protected by U.S. and international copyright laws, and is the property of Polaris Sales Inc. This Team Tip is provided for the sole use of
authorized Polaris dealers and distributors. This Team Tip is not to be distributed, duplicated, or copied, digitally or otherwise, without the written consent of Polaris Sales Inc.
© 2012 Polaris Sales Inc. (Page 6 of 13)
Page 7

I: Discharge Machine
Special Tools:
36/48 Volt Discharge Machine – SPX Part # PL-50285
72 Volt Discharge Machine – SPX Part # PL-51019
A discharge machine is an excellent tool to test battery capacity, and to test for a bad battery. There are
different discharge machines for different voltage battery packs. A discharge machine is programmed to shut
off once the battery pack drops to a certain voltage, under load. Typically with Polaris electric vehicles, you will
see a 48 volt, or a 72 volt battery pack.
- A 48 volt discharge machine puts a 56.25 amp load on a battery pack, and is set to shut off when the
battery pack reaches 42 volts, under load.
- A 72 volt discharge machine puts a 75 amp load on a battery pack, and is set to shut off when the
battery pack reaches 63 volts, under load.
Use the following procedure to test batteries with a discharge machine:
1. Fully charge the battery pack.
2. Turn the vehicle OFF.
3. Connect the appropriate discharge unit for the battery pack that you are working with, to the first and
last battery in the series. Connect the RED (+) lead of the discharge unit to the main positive battery
terminal, and the BLACK (-) lead to the main negative battery terminal.
4. After all the safety procedures specified by the manufacturer have been followed, start the discharge
unit.
5. When the discharge unit shuts off, record the discharge time. Refer to the appropriate vehicle service
manual for acceptable discharge times.
NOTE: If a battery pack has a short run time, check the battery voltages individually. The discharge
machine can be started a second time, for further tests. The technician can safely test the battery
voltages individually while the discharge machine is applying the load. There should not be a
difference of more than 0.5 volts between the highest battery reading, and any other battery reading.
The information contained within this Team Tip is confidential and protected by U.S. and international copyright laws, and is the property of Polaris Sales Inc. This Team Tip is provided for the sole use of
authorized Polaris dealers and distributors. This Team Tip is not to be distributed, duplicated, or copied, digitally or otherwise, without the written consent of Polaris Sales Inc.
© 2012 Polaris Sales Inc. (Page 7 of 13)
Page 8
Specific Gravity - Flooded Batteries
Battery
Date Code
Voltage
Cell 1
Cell 2
Cell 3
Cell 4
Cell 5
Cell 6
1
2
3
4
5
6
7
8
The information contained within this Team Tip is confidential and protected by U.S. and international copyright laws, and is the property of Polaris Sales Inc. This Team Tip is provided for the sole use of
authorized Polaris dealers and distributors. This Team Tip is not to be distributed, duplicated, or copied, digitally or otherwise, without the written consent of Polaris Sales Inc.
© 2012 Polaris Sales Inc. (Page 8 of 13)
Page 9
Specific Gravity - Flooded Batteries
Battery
Date Code
Voltage
Cell 1
Cell 2
Cell 3
Cell 4 1
2
3
4
5
6
The information contained within this Team Tip is confidential and protected by U.S. and international copyright laws, and is the property of Polaris Sales Inc. This Team Tip is provided for the sole use of
authorized Polaris dealers and distributors. This Team Tip is not to be distributed, duplicated, or copied, digitally or otherwise, without the written consent of Polaris Sales Inc.
© 2012 Polaris Sales Inc. (Page 9 of 13)
Page 10

Specific Gravity - Flooded Batteries
Battery
Date Code
Voltage
Cell 1
Cell 2
Cell 3
Cell 4
Cell 5
Cell 6
1
2
3
4
5
6
The information contained within this Team Tip is confidential and protected by U.S. and international copyright laws, and is the property of Polaris Sales Inc. This Team Tip is provided for the sole use of
authorized Polaris dealers and distributors. This Team Tip is not to be distributed, duplicated, or copied, digitally or otherwise, without the written consent of Polaris Sales Inc.
© 2012 Polaris Sales Inc. (Page 10 of 13)
Page 11

Specific Gravity - Flooded Batteries
Battery
Date Code
Voltage
Cell 1
Cell 2
Cell 3
Cell 4
Cell 5
Cell 6
1
2
3
4
5
6
The information contained within this Team Tip is confidential and protected by U.S. and international copyright laws, and is the property of Polaris Sales Inc. This Team Tip is provided for the sole use of
authorized Polaris dealers and distributors. This Team Tip is not to be distributed, duplicated, or copied, digitally or otherwise, without the written consent of Polaris Sales Inc.
© 2012 Polaris Sales Inc. (Page 11 of 13)
Page 12

The information contained within this Team Tip is confidential and protected by U.S. and international copyright laws, and is the property of Polaris Sales Inc. This Team Tip is provided for the sole use of
authorized Polaris dealers and distributors. This Team Tip is not to be distributed, duplicated, or copied, digitally or otherwise, without the written consent of Polaris Sales Inc.
© 2012 Polaris Sales Inc. (Page 12 of 13)
Page 13

Specific Gravity - Flooded Batteries
Battery
Date Code
Voltage
Cell 1
Cell 2
Cell 3
Cell 4
Cell 5
Cell 6
1
2
3
4
5
6
The information contained within this Team Tip is confidential and protected by U.S. and international copyright laws, and is the property of Polaris Sales Inc. This Team Tip is provided for the sole use of
authorized Polaris dealers and distributors. This Team Tip is not to be distributed, duplicated, or copied, digitally or otherwise, without the written consent of Polaris Sales Inc.
© 2012 Polaris Sales Inc. (Page 13 of 13)
 Loading...