

Page 1

User Guide
NRX-2H
The telephone for
the corporate user
Telephones of Distinction
Business Telephone Range
9091 NRX-2H_User Guide.qxd 8/12/2003 2:09 PM Page 1
Page 2

2
NRX-2H - The telephone for the corporate user
INDEX
TELEPHONE LAYOUT
1. INSTALLATION
2. OPERATION
2.1 Dialing
2.2 Tone or Pulse Option
2.3 Mixed Mode Dialing
2.4 Programming
2.5 Memory Dialing
2.6 Privacy (Muting the Microphone during Conversation)
2.7 Impedance Matching
2.8 Modem / Data Connection Socket
2.9 Message Waiting
2.10 Pause Button
2.11 Other Network Services
2.12 Last Number Redial
2.13 Adjustable Ringing Volume
2.14 Adjustable Ringing Tone Pitch
2.15 Headset Facility
2.16 On Hook Dialing
2.17 Hearing Aid Compatibility
3. WALL MOUNTING THE UNIT
NRX-2H - The telephone for the corporate user
9091 NRX-2H_User Guide.qxd 8/12/2003 2:09 PM Page 2
Page 3
3
NRX-2H - The telephone for the corporate user
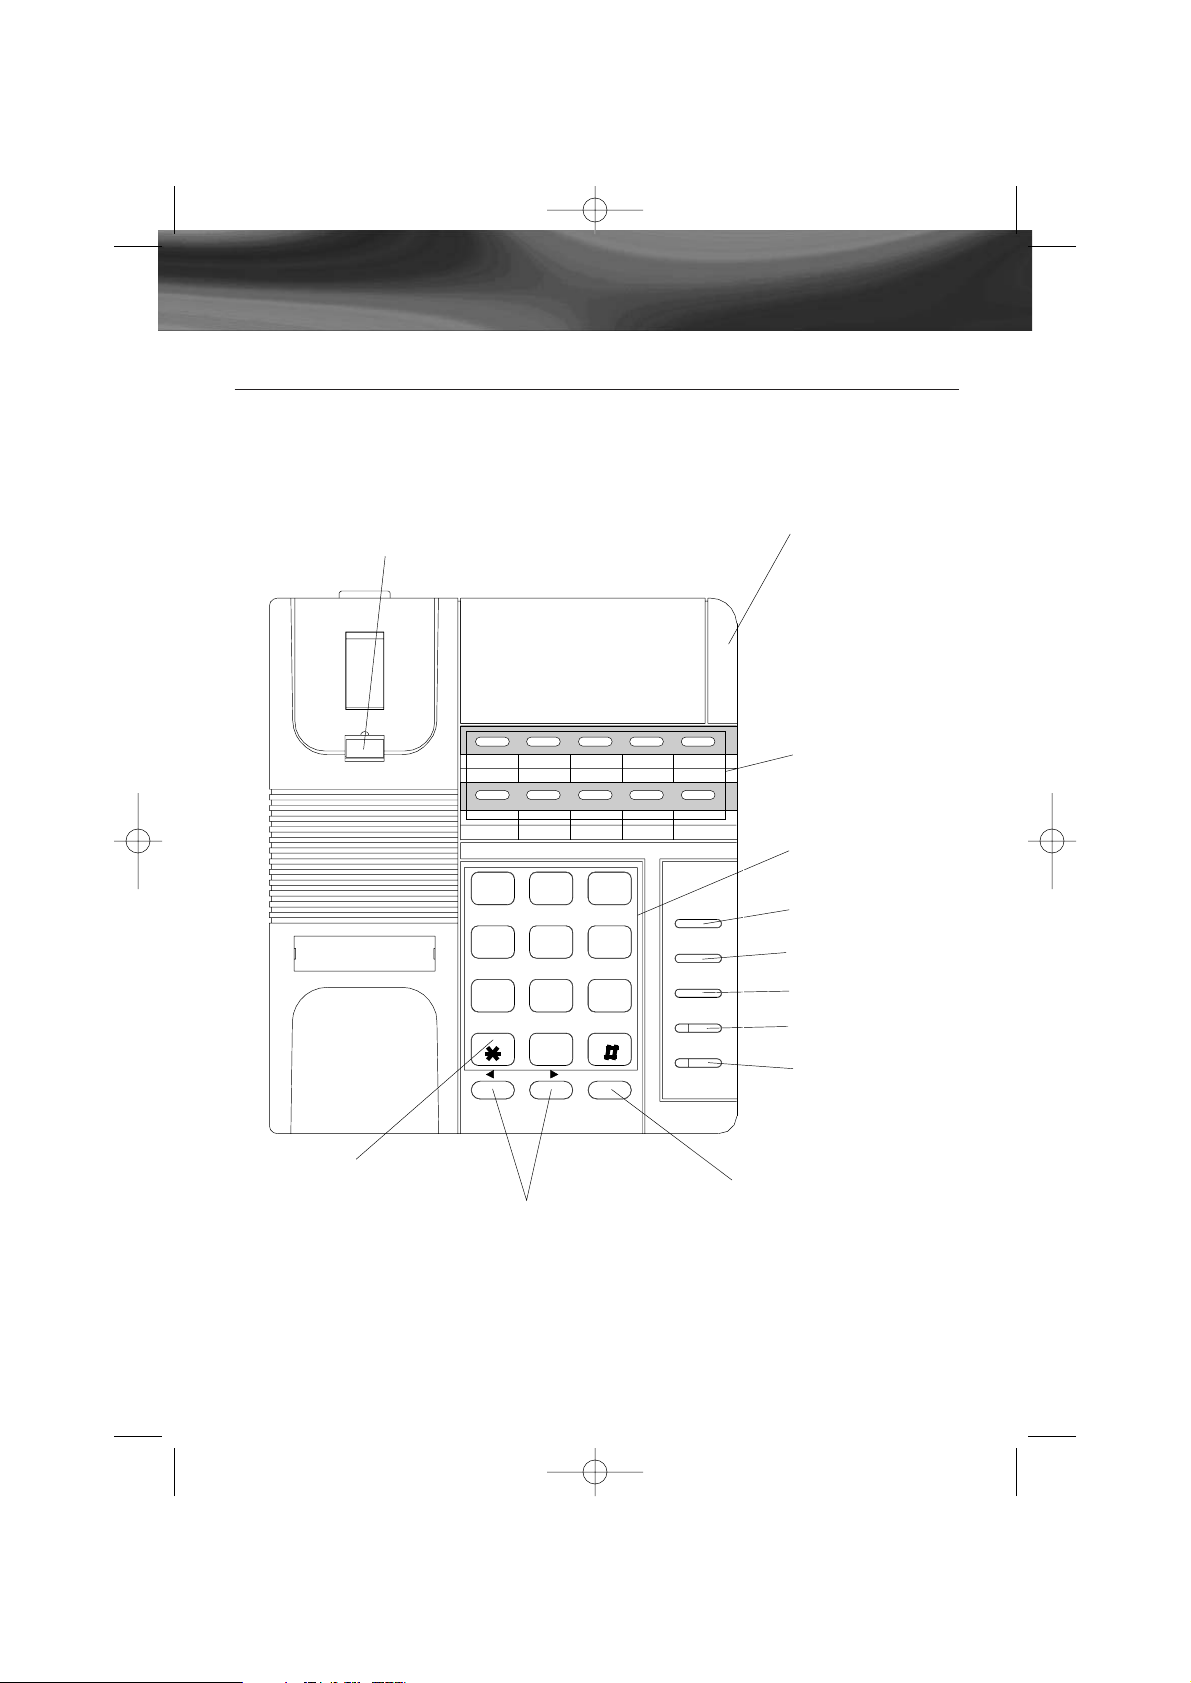
TELEPHONE LAYOUT
NRX-2H - The telephone for the corporate user
9091 NRX-2H_User Guide.qxd 8/12/2003 2:09 PM Page 3
Tel No:
EXT:
Wall Mount Tab
1
GHI
4
PQRS
7
TONE
VOLUME CONTROL
ABC DEF
2 3
5
TUV
WXYZ
8
0
PAUSE/LNR
Message Waiting/
Ring Indicator
Memory Buttons
Number Keypad
SHIFT
MNOJKL
6
9
PROGRAM
RECALL
MUTE
HEADSET/OHD
Memory Shift
Button
Program Button
Recall Button
Mute Button
Headset/On-Hook
Dial Button
Tone Button
Volume Step Up/Step Down
Control Buttons
Pause/Last Number
Redial Button
Page 4

1. INSTALLATION
The model NRX-2H requires no batteries to be fitted as the memories are stored in
EEPROM solid state memory which does not require battery backup.
Connect one end of the coiled cord to the handset and the other end to the socket
at the left of the base unit. Replace the handset on the cradle.
Connect one end of the telephone line cord to the socket at the back of the unit and
connect the other end to the telephone socket at the wall.
2. OPERATION
2.1 Dialing
Lift the handset and dial the number (local call charges may apply). The telephone is
pre-set at tone mode. To terminate a phone call, simply replace the handset.
If you want to terminate a call and make another call immediately, you may press the
NEW CALL key once. The unit will terminate a call and let you dial the number for
another call.
2.2 Tone / Pulse Option - Not applicable - see Section 2.4.4
To find out whether you are on a digital exchange that accepts tone dialing, locate
the switch marked TONE / PULSE inside the compartment underneath the unit. First
try dialing out with the switch in the TONE position. If this is unsuccessful, switch back
to the PULSE position.
Note: Pulse (Decadic) dialing is not available on NRX Telephones sold in NZ.
2.3 Mixed Mode dialing (how to switch from pulse to tone in mid – call)
Even if your local exchange only allows pulse dialing, there may still be occasions
when you need tone dialing. For instance, when you call into a bank’s computer
system, you may be asked to enter number codes. You can only do this if your
telephone sends out tones when you press the keypad.
The TONE button helps you make change over from pulse to tone dialing in the
middle of a call.
Note: Pulse (Decadic) dialing is not available on NRX Telephones sold in NZ.
What to do: Pulse – dial the telephone numbers you require.
When you are connected, press the “TONE” button
(This also introduces a four second pause into the dialing sequence)
What to do: Dial the rest of the sequence you require.
What you hear: Each number you dial emits a tone.
When the handset is replaced, the unit goes back to pulse dialing.
NRX-2H - The telephone for the corporate user
4
9091 NRX-2H_User Guide.qxd 8/12/2003 2:09 PM Page 4
Page 5

2.4 Programming
2.4.1 Memory Buttons
10 direct memory + 10 indirect memory, each memory up to 20 digits:
a) Program direct memory: Lift handset, press
<PROGRAM><DIGITS><PROGRAM><MEMORY BUTTON>
b) Program indirect memory: Lift handset, press
<PROGRAM><DIGITS><PROGRAM><SHIFT><MEMORY BUTTON>
2.4.2 Recall
Programmable recall TBR (Timed Break Recall) timing:
Set TBR timing: <PROGRAM><LNR><n<PROGRAM><RECALL>
n=1…6 TBR timing=n * 100ms Default Value: ie n = 1 (100ms)
Visual checking for programmed recall type and TBR timing:
a) Checking command: <PROGRAM><LNR><LNR><RECALL>
b) For the TBR timing n*100ms, the message LED will flash n times
Note: The message LED flash pattern is 500ms ON and 500ms OFF
2.4.3 Message Wait
Programmable Message Waiting type (OFF, Line reversal & 90VDC):
Lift Handset and press
a) Setting Command: <PROGRAM><LNR><n><PROGRAM><*>
(n=1,2) "1' for line reversal, "2" for 90VDC
b) Resetting command: <PROGRAM><LNR><0><PROGRAM><*>
Default Value: n = 0 (OFF)
Visual checking for programmed Message waiting type:
a) Checking command <PROGRAM><LNR><LNR><*>
b) If the type is line reversal, the message LED will flash 1 time.
c) If the type is 90VDC, the message LED will flash 2 times.
d) If all Message waiting types have been reset, the message LED will flash
quickly for 2 seconds.
Note: The message LED flash pattern is 500ms ON and 500ms OFF.
Quick flash pattern is 250ms ON and 250ms OFF
2.4.4 Tone / Pulse
Programmable Tone/Pulse mode:
a) Set Tone Mde: <PROGRAM><LNR><1><PROGRAM><#>
b) Set Pulse Mode: <PROGRAM><LNR><0><PROGRAM><#>
Default Value: Tone dial mode
2.4.5 Programming Enable / Disable Programming ON/OFF:
a) Set Programming ON: <PROGRAM><LNR><0000><LNR><1><PROGRAM>
NRX-2H - The telephone for the corporate user
5
9091 NRX-2H_User Guide.qxd 8/12/2003 2:09 PM Page 5
Page 6

b) Set Programming OFF: <PROGRAM><LNR><0000><LNR><0><PROGRAM>
Default Value : Programming ON Mode
Visual checking programming ON/OFF mode:
a) Checking command: <PROGRAM><LNR><LNR><PROGRAM>
b) If programming is ON, the message LED will flash 2 seconds normally.
c) If programming is OFF, the message LED will flash 2 seconds quickly.
Note: The message LED normal flash pattern is 500ms ON and 500ms OFF.
Quick flash pattern is 250ms ON and 250ms OFF
2.4.6 Line Reversal
<PROGRAM><LNR><0000><LNR><n><#>
Select B_line status - If N=0 then B_line is low
If N=1 the B_line is high
Default Value: B_line status is LOW
If the Message waiting type is LINE REVERSAL, then the B_line ststus must
be preset by User before they use it. If the actual B_line is high then you will
have to set the "N" to 1, otherwise you cannot see the message waiting signals.
2.5 Memory Dialing
To dial a telephone number that has been stored in one of the direct memory locations:
●
Lift the handset or press the ‘Headset / OHD’ button.
●
When you hear the dial tone, press one of the memory location buttons for dialing
from that memory (Use the shift button to access locations 11 to 20).
2.6 Privacy (Muting the Microphone during Conversation)
During a telephone conversation, you may switch off the microphone in the handset
by pressing the Mute button on the telephone base. The mute LED will be flashing to
indicate that the microphone is muted and the party, on the other end of the
telephone line, is not able to hear your conversation. Press the Mute button again to
release the Mute function and the LED will be off.
Alternatively, you may press the Mute button on the handset. As long as the handset
Mute button is pressed, the microphone mute function is activated. Releasing the
handset Mute button will re-enable the microphone for conversation.
2.7 Impedance Matching
The Impedance Matching switch inside the compartment in the base of the NRX-2H
allows the NRX–2H to be connected to different types of PABXs. There are 3 positions
in this switch for selecting the matching impedance with the PABX. The NRX–2H has
been factory set in position “Complex”. The other two settings, 600 ohm and 900
ohm are suitable for certain PABX types. Please note the compartment door should
be replaced when settings completed.
NRX-2H - The telephone for the corporate user
6
9091 NRX-2H_User Guide.qxd 8/12/2003 2:09 PM Page 6
Page 7

2.8 Modem / Data Connection Socket
The NRX-2H has an additional socket marked MODEM, which allows the user to
connect an extra telephone, modem or fax machine to the telephone line. This socket
is at the back panel of the base cabinet and has a removable plastic cover.
Only equipment complying with ACA standards and intended for connection to the
telephone network should be connected to this port marked MODEM.
2.9 Message Waiting
The NRX–2H Phone has a built in LED and neon lamp for message waiting indication.
This is compatible with various PABX systems providing such features. A Message
waiting switch is built inside the battery compartment. This switch enables the LED to
detect two different line reversal signals by selecting switch position 1 or 2.
For 90V DC or AC message waiting signaling PABX the neon is used for indication.
Set the position of the switch to OFF as the LED is not needed for indication.
The default switch position is OFF.
Please note the compartment door should be replaced when settings completed.
2.10 Pause Button
If the NRX-2H is being connected to a PABX system which requires the dialing of an
additional digit (most commonly digit “0”), a pause may be required for accessing the
external telephone line. The Pause key may be used for providing the pause period of
about 4 seconds while waiting for this dial tone after the first digit has been dialed.
This will be stored in the Last Number Redial memory and be automatically inserted
in the number when the LNR button is used.
2.11 Other Network Services
The NRX-2H is fully compatible with many telephone network services, which provide
a number of useful additional facilities, including three way calling, call diversion, call
waiting etc. If you are connected to one of the digital exchanges, you can access
these services via the RECALL button on the keypad at Tone mode. For further details,
please contact your telephone service provider.
Note: PCT 200 6.8 For Call Waiting Services in New Zealand.
The recall facility of this product may not always operate correctly on some parts of
the telephone network or on some PABXs available on the NZ market. If this is the
case then "recall" can be activated by 'flashing' the switch-hook or by repeated use
of the recall. Recall problems with this product are not to be reported to
Telecom Faults Service.
2.12 Last Number Redial If you dial a number and find it is engaged or there
is no reply, replace the handset. The number will be retained in the memory until
you dial a different number.
What to do: Lift the handset Press the ‘Pause / LNR’ button
NRX-2H - The telephone for the corporate user
7
9091 NRX-2H_User Guide.qxd 8/12/2003 2:09 PM Page 7
Page 8

NRX-2H - The telephone for the corporate user
8
2.13 Adjustable Ringing Volume
On the right of the unit is a switch, this adjusts the ringing volume of incoming calls.
From left to right it has three positions: off, low, high. Move the switch to the position
you require. In addition to the ringing tone there is a Ring Indicator Lamp on the unit
that will flash when the telephone is ringing as a visual indication. The Ringer
Switchdoes not control this Ring Indicator Lamp.
2.14 Adjustable Ringing Tone Pitch
On the right of the unit, there is also a switch that adjusts the ringing pitch of
incoming calls. From left to right it has three positions: low, medium and high. Move
the switch to the position you require.
2.15 Headset Facility
The ‘Headset / OHD’ button enables you to use the telephone without lifting the
handset. Connect a headset and simply press the ‘Headset’ button once to connect
to the line. Pressing the ‘Headset / OHD’ button again will disconnect the telephone
line and terminate the call.During a headset (handsfree) conversation, lifting the
handset will switch the unit to the handset mode. The headset will be disabled and
the handset should be used for conversation instead. The headset mode will be
activated again by pressing the ‘Headset / OHD’ button and replacing the handset.
2.16 On Hook Dialing
Pressing the ‘Headset / OHD’ button when a headset is not connected to the telephone, enables the user to dial without having to lift the handset. Once the call has
been connected, the handset should be lifted to speak.
2.17 Hearing – aid compatibility
The handset receiver is hearing aid compatible.
3. WALL-MOUNTING THE UNIT
The NRX-2H can be wall mounted using the wall mount bracket installed on the bottom of the unit.
●
Dismount the wall mount bracket from the unit
●
Place the wall mount bracket to the required position on the wall
●
Drill two holes on the wall according to the distance as marked by two mounting holes.
●
Install the two screws supplied with the unit in the wall
●
Re-install the wall mount bracket to the bottom cabinet for the wall mount position.
●
Position the wall mount slots on the bracket of the unit over the two screws on the
wall. Pull down and lock into place.
9091 NRX-2H_User Guide.qxd 8/12/2003 2:09 PM Page 8
Page 9

●
Beneath the earpiece section of the cradle you will find a small tab. Pull this up to
form the hook for the handset.
●
When you are on the telephone, you sometimes need to put the handset down.for
a moment. There is a special hook at the back (top) of the unit so that you can hang
the handset on the unit, when it is wall – mounted, without terminating the call.
NRX-2H - The telephone for the corporate user
9
NRX-2H - The telephone for the corporate user
9091 NRX-2H_User Guide.qxd 8/12/2003 2:09 PM Page 9
Page 10

Polaris Communications Pty Ltd
393 Flemington Road, North Melbourne, Victoria 3051
Sales & Service: 1-800 078 036 Fax: 1-800 079 036
Email: sales@polaris.com.au Web: www.polaris.com.au
Polaris Communications Pty Ltd ACN: 006 102 601
9091 NRX-2H_User Guide.qxd 8/12/2003 2:09 PM Page 10
 Loading...