

Page 1

POLARIS G52 DVR
Thankyou for purchasing the Polaris G52 DVR. The Polaris G52 DVR is a great
product for capturing adventures and incidents both on and off road. This
operation manual will guide you through each setting to allow you to set up
the best quality videos and photos
Packing List
QTY
Item
1
G52 Dash cam recorder
2
Cigarette lighter adaptor
3
16G micro SD card
4
Suction cup mount
5
110° Rear camera with 7m extension cable
6
Operation manual
Important Information: Please format your SD card before use
Page 2
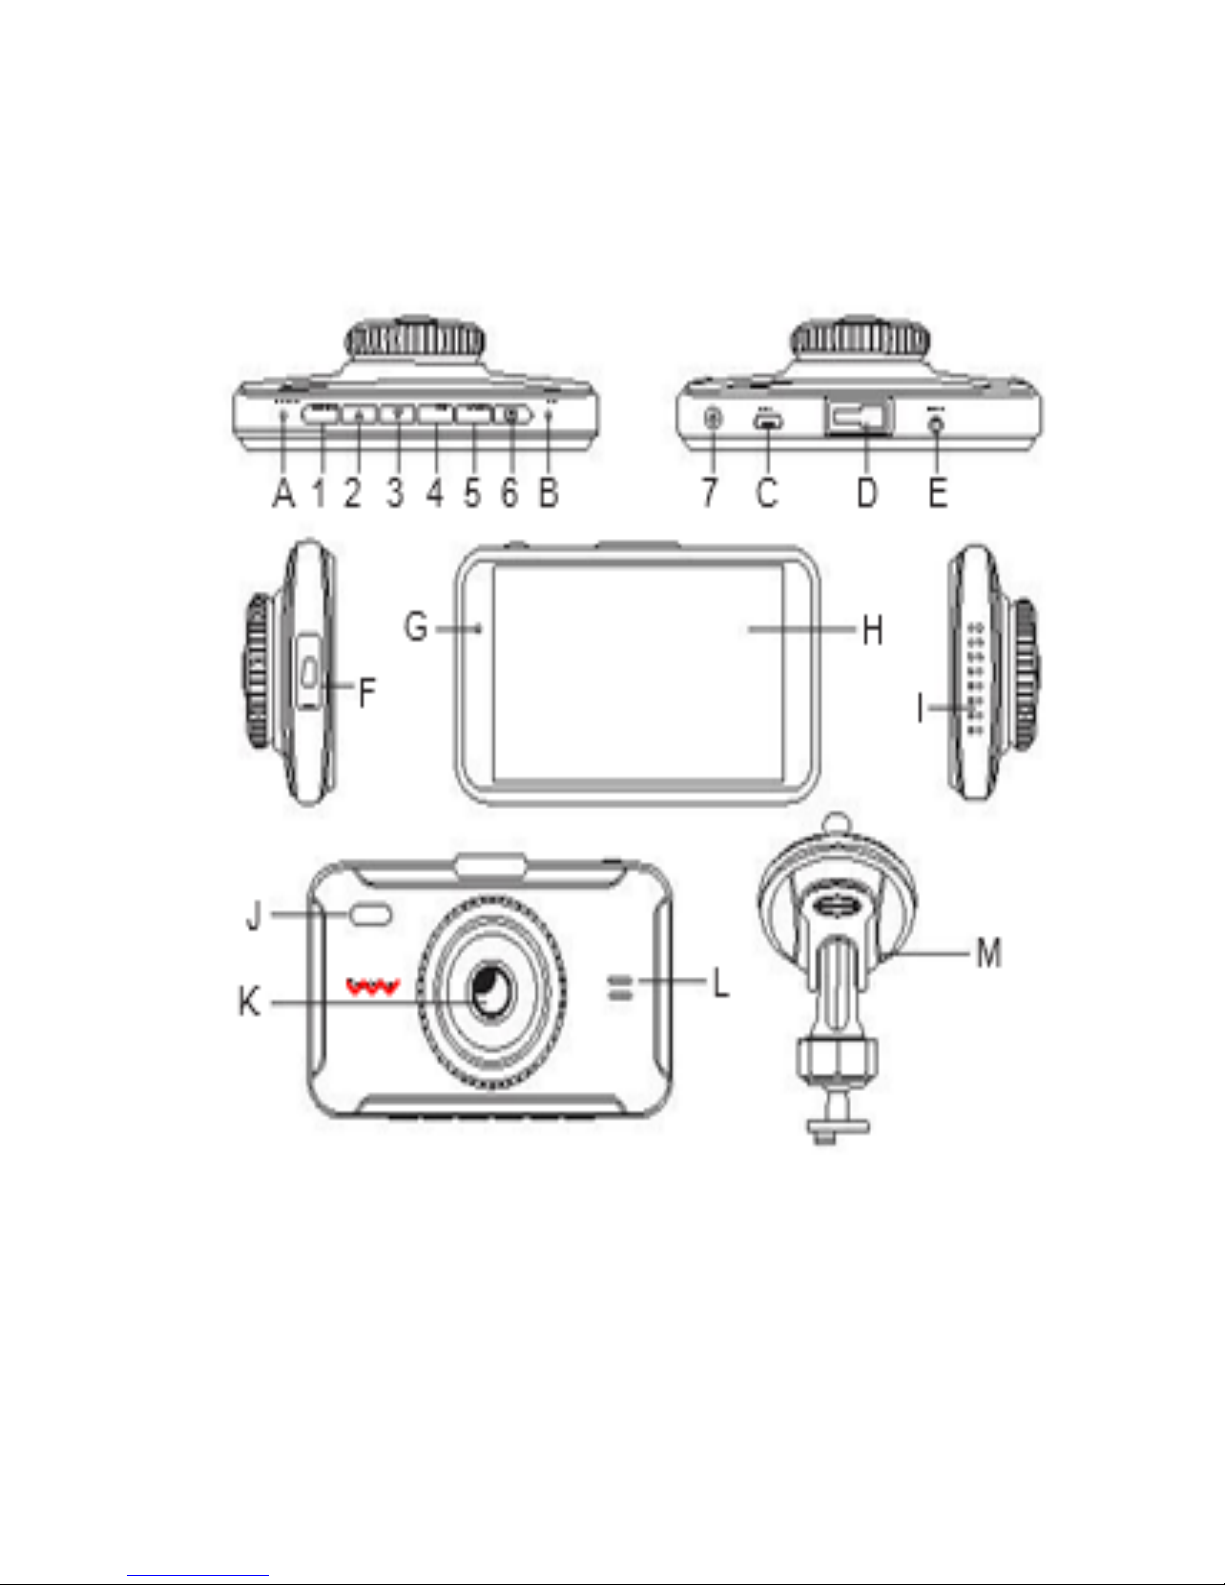
Getting to know your device
Page 3
No.
Name
Description
1
Mode
Switch between recording, camera and
playback.
In recording mode hold for 0.5s to lock video
file
2
Down Arrow
In menu option, downward function
In recording mode, can capture a photo
3
Up Arrow
In menu option, upward function
In recording mode, picture in picture function
4
OK
Use this button to select your desired setting
This button will also stop/start recording
5
Menu
Enter or exit devices menu/settings
Hold for 0.5s to activate torch
6
Lock
Lock/unlock the video file
7
On/Off
Press once to put screen in sleep mode
Hold down to power on/off
A
Reset
Will reboot the device
B
Mic
Microphone
C
USB support
Connects to cigarette lighter adaptor
D
Holder port
For bracket to connect to
E
AV IN
Rear camera socket
F
Micro SD card
slot
16G micro SD card supplied
G
Power
Indicator light to show if the device is on/off
H
Screen
4” HD IPS screen
I
Heat dissipation
Avoids overheating
J
Torch
Will help illuminate if image is too dark
K
Camera lens
170° angle
L
Speaker
Voice broadcast
M
Suction bracket
Windscreen mount suction bracket
Page 4

List of menu settings
Important: The unit will automatically record on start up. You cannot access
the menu whilst the unit is recording. To stop the recording in order to
access the menu settings, press the ok button.
Setting
Description
Comment
Movie off time
Shuts device down after
desired time selected
Options are: Off, 5 sec, 10
sec, 30 sec or 1 minute
Movie clip time
Set up recording time
intervals
Can be set to one
continuous video or 1, 3 &
5 minute intervals
Movie mode
Set up device resolution
Options are: 720P or 1080P
Sound record
Turn sound on/off
Language
Select desired language
Beep
Turn the beep sound
on/off when pressing a
button on the device
Volume
Volume of recorded
sound
LCD power save
Does not power the unit
off but shuts the screen
down after desired time
Options are: Off, 1 minute
or 3 minutes
Protect level
Acts as a G sensor
This setting will determine
how effective the protect
level performs if the device
detects a strong impact
measured via an
accelerated amount of
motion.
Options are: off, low,
medium & high
Parking
monitoring
If turned on and a strong
impact is detected from
an accelerated amount
of motion the device will
record for 20 seconds &
then shutdown
Page 5

List of menu settings
Setting
Description
Comment
Motion
Detection
Turn motion detection
on/off
Options are: Off, low,
medium & high
If turned on & motion is
detected the device will
begin recording. When no
motion is detected after 5
secs the device stops
recording.
Not recommended as the
unit is designed to start
recording upon start-up
regardless of whether it is
detecting motion or not.
Motion Detection can stop
the unit from recording
when stationary such as
when you are stopped at
traffic lights. Not ideal if an
accident occurs in this
instance.
Reset setup
Restore to default
settings
Format SD card
Will wipe all data from
SD card
Recommend to do this
upon installation
Clock settings
Set date & time
Press up/down arrow to
change & ok to go to the
next setting
Exposure
Set your desired
exposure
FW version
View the software
version
Page 6

Recording mode
When turned on, the device will start recording instantaneously. To stop
recording, press ‘OK’. To start recording again, press ‘OK’.
The video resolution that is chosen will determine how much recording time
you will get out of the SD card, for example the lower the resolution the more
storage that will be available on the SD card. This can be changed by entering
the ‘Menu’ and selecting ‘Movie Mode’
Camera mode
Allows you to capture photos with the G52 DVR by pressing the down arrow
when recording or not.
Playback mode
Press the mode button when not recording to access the playback mode.
Here you can view the photos and videos that you have captured.
This feature is a good way to ensure that the device has captured the footage
that you need instantaneously without having to retrieve it via an external
device.
Stores any forward facing video file that has not been
locked
Stores any rear facing video file that has not been locked
Stores forward facing locked files
Stores rear facing locked files
P
Stores forward facing parking monitoring files
P
Stores rear facing parking monitoring files
Stores all still captured photos
Page 7

Specifications
Video
resolution
Front: FHD1080P or 1296
Rear: 720P
Storage
compression
H.264
Video format
.mov
Picture format
JPEG
Frequency
Dual600MHZ 32-bit RISC
Ram
8GB
LCD Size
4 inches
LCD resolution
800x480
G-Sensor
380B
Working power
4W
SD Card (TF)
Comes with 16GB can take up to 32GB (max)
Voltage:
DC 5V – 36V
Working
temperature:
(-20°C~65°C)
Storage
Temperature:
(-25°C~75°C)
DVR Video:
HD video, no skip frame, no leak seconds, Good night
vision.
Automatic loop
time:
1, 3 or 5 minute intervals
Night Vision:
Built in WDR for optimal night vision recording
Record Audio
On/off
Screen
protection
On/off
If you have any questions or would like further information please contact
our office on 1300 55 55 14 or visit our website at www.mypolaris.com.au
 Loading...