

Page 1
1
Polaris G50 Dash cam incident recorder.
Operation manual – Quick Guide
Thank you for purchasing the Polaris G50 DVR. The Polaris G50 DVR is a great
product for capturing adventures and incidents both on and off the road. This
operation manual will guide you through each setting to allow you to setup the
best quality videos and photos.
Packing List
QTY
Item
1
G50 DVR dash cam recorder
1
Cigarette lighter adaptor
1
16 GB Micro SD card
1
Suction cup mount
1
HDMI cable
1
USB cable
1
Operation manual
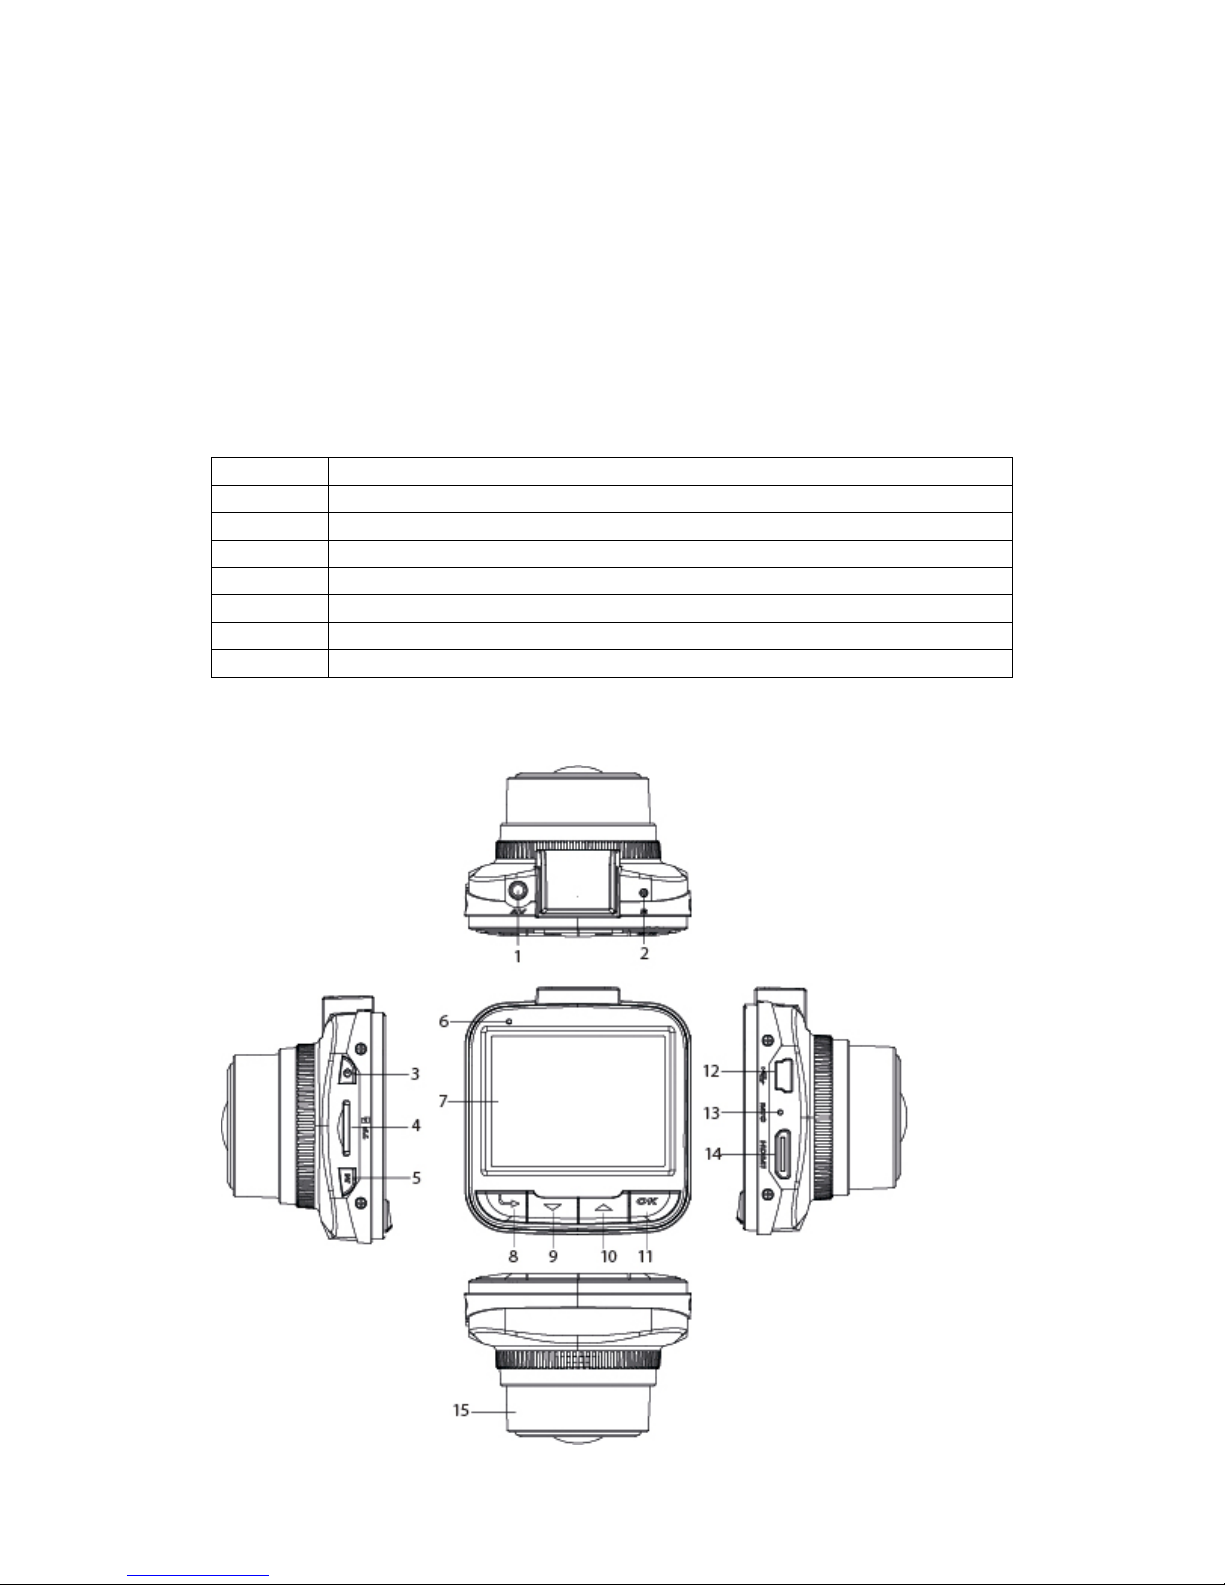
Getting to know your device
Page 2

2
No.
Name
Description
1
AV- out
2 Reset Button
Will reset the unit
3
Power
Use this button to switch the unit on and off
4
Micro SD card
slot
Insert your micro SD card into this slot.
The unit is supplied with an 8 GB Micro SD card. The
unit can take a maximum of 32 GB micro SD card.
5
Menu
Brings up the menu of your selected mode (e.g.
video, photo or playback mode menu).
Toggles between the settings of your selected mode
and the device settings.
Exits out of menu mode.
6
Indicator Lamp
To show power status
7
LCD screen
2.0” LCD screen
8
Mode Button
Use this button to toggle between video, still and
playback mode
9
Down arrow
Use this button to scroll down to desired setting
10
Up arrow
Use this button to scroll up to desired setting
11
Ok button
Use this button to select your desired setting
This button will also stop / start recording
12
USB input
Connects to either the cigarette lighter adaptor or
the USB cable supplied.
13
Microphone
Microphone for audio recording
14
HDMI input
Connects to the HDMI cable supplied so that it can
be plugged into an external device (e.g. Television)
15
FHD Lens
Page 3

3
Removing the SD card
1. Hold the unit so that the
buttons and screen are facing
towards you
2. Line the SD card up with SD
card slot on the left hand side of
the unit. Make sure the metal
prongs are facing towards you.
3. Insert SD card
4. Push the SD card in all the way
until you hear it click into the slot
1. Push on the SD card in the
slot to release.
2. Remove SD card
Inserting your SD Card
Page 4

4
A few things to know before getting started
About recording
When the device is switched on, it will automatically start recording. If you wish
to stop the device from recording, press ok
If you wish to start recording, press ok
About the different modes:
There are three different modes within the software – video, still and playback
mode. To toggle between the three different modes, press
About the different menus:
The mode selected will determine which menu will be displayed on the screen
when the menu button is pressed.
When the menu button is pressed, the selected mode’s menu will display on the
screen. To switch over to the device settings menu, simply press the menu
button again (the device settings are the same, regardless of which mode you are
in).
Please note: the menu button will not engage if the device is recording.
Video mode menu
Still mode menu
Playback mode
menu
Page 5

5
Video mode
When the device is turned on, the device will start recording instantaneously. To
stop recording, press the ok button. To start recording again, press the ok button.
The video resolution that is chosen will determine how much recording time you
will get out of the SD card, for example the lower the resolution the more storage
that will be available on the SD card.
Video mode Settings
To bring up the video mode settings, please ensure that you are already in video
mode (please see ‘about the different modes’).
1. Press the menu button once to bring up the video mode features
2. Use the up/ down buttons to choose which feature you would like to set
3. Press ok, once the desired feature you wish to setup is highlighted
4. A sub menu will display on the screen
5. Use the up / down buttons to select your desired setting
6. Press ok once the desired setting has been chosen
List of video mode settings
Settings
Description
Comments
Resolution
Set your desired
resolution.
Options:
1080FHD – 1920 x 1080
720P – 1280 x 720
WVGA - 848 x 480
VGA - 640 x 480
Loop
Recording
This feature will allow
you to set up an
automatic continuous
loop in 1, 3, 5 or 10minute intervals.
This feature is ideal if you are using
the device purely as an incident
recorder.
For example, if you set the loop
recording to 10 minutes, the device
will record in lots of 10-minute
intervals. Once the SD card is full,
the device will then start recording
over the 10-minute intervals from
the beginning.
WDR
Set Wide dynamic Range
on or off
Ideal for use at night to capture
high quality video where bright
and dark conditions occur together.
Also ideal for capturing number
plates at night.
Page 6

6
Exposure
Set your desired
exposure
Options:
+2.0
+5/3
+4/3
+1.0
+2/3
+1/3
+0.0
-2/3
-1.0
-4/3
-5/3
-2.0
Motion
Detection
Set motion detection on
or off
If this feature is turned on, the unit
will detect motion, such as a high
impact accident, and will
automatically start recording. It
will continue to record for 30
seconds. If the G sensor has
detected a high amount of motion,
it will automatically lock the video
so that it cannot be overwritten.
Record
Audio
Turn audio recording on
or off
G Sensor
Set G Sensor to off, high,
medium or low
This setting will determine how
effective the G sensor performs
when detecting motion.
Date Stamp
Turn date stamp on or off
This feature is to simply turn date
stamp on or off. To set the time and
date, please refer to device settings
Page 7

7
Still Mode
Still mode allows you to capture photos with the G50 DVR.
When in still mode, simply press ok to take a photo.
Still Mode Settings
To bring up the Still mode features, please ensure that you are already in still
mode (please see ‘about the different modes’).
1. Press the menu button once to bring up the still mode features
2. Use the up/ down buttons to choose which feature you would like to set
3. Press ok, once the desired feature you wish to setup is highlighted
4. A sub menu will display on the screen
5. Use the up / down buttons to select your desired setting
6. Press ok once the desired setting has been chosen
List of Still mode settings
Settings
Description
Comments
Capture
Mode
Use this setting to set up
a timer or capture photos
manually
Options:
Single
2s timer
5s timer
10s timer
Resolution
Set your desired
resolution
Options:
5M - 2592 x 1944
3M - 2048 x 1536
2MHD - 1920 x 1080
VGA - 640 x 480
1.3M - 1280 x 960
Sequence
Turn sequence on or off
This setting allows you to take a
sequence of three photos.
Quality
Select your desired
quality setting
Options:
Fine
Normal
Economy
Page 8

8
Sharpness
Select your desired
sharpness setting
Options:
Strong
Normal
Soft
White
Balance
Select your desired white
balance setting
Options:
Auto
Daylight
Cloudy
Tungsten
Fluorescent
Colour
Select your desired
colour setting
Options:
Normal
Sepia
Black & White
ISO
Select your desired ISO
setting
These settings are to reduce the
camera sensor’s sensitivity to light
Exposure
Select your desired
exposure.
Options:
+2.0
+5/3
+4/3
+1.0
+2/3
+1/3
+0.0
-2/3
-1.0
-4/3
-5/3
-2.0
Antishaking
Set Anti shake on or off
If this feature is switched on, it will
allow you to manually take photos
by hand and will compensate for
any blurriness by taking them at
slower shutter speeds
HDR
Set High Dynamic range
on or off.
This feature is ideal for capturing
photos where bright and dark
conditions occur together.
Date Stamp
Set date stamp on or off
This feature is to simply turn date
stamp on or off. To set the time and
date, please refer to device settings.
Page 9

9
Playback Mode
Playback mode will allow you to view the photos and videos that you have
captured on the device.
This feature is a good way to ensure that the device has captured the footage that
you need instantaneously, without having to retrieve it via an external device.
How to view your current data on the device
Once in playback mode you can scroll through your data using the up/down
arrows.
To play your desired video press ok
To stop the video press ok
Playback settings
To bring up the playback mode settings, please ensure that you are already in
playback mode (please see ‘about the different modes’).
1. Press the menu button once to bring up the playback mode settings
2. Use the (up/ down) buttons to choose which feature you would like to set
3. Press ok, once the desired feature you wish to setup is highlighted
4. A sub menu will display on the screen
5. Use the (up / down) buttons to select your desired setting
6. Press ok once the desired setting has been chosen
List of Playback mode settings
Settings
Description
Notes
Delete
Delete specific data
Options:
Delete current
Delete all
Protect
Protect specific data
Options:
Lock current
Unlock current
Lock all
Unlock all
Slideshow
View a slideshow of the
data
Options:
2 seconds
5 seconds
8 seconds
Page 10

10
Device Settings
Regardless of which mode you are in, the device settings are the same.
To access the device menu press the menu button twice.
List of Device Settings
Settings
Description
Notes
Date / time
Set your date and time
To change a setting press the
up/down arrow button and press ok
to move across to the next setting
Licence no set
Set your licence plate
number so that it will
display on the recorded
date
To change a setting press the
up/down arrow button and press ok
to move across to the next setting
Auto Power
Off
Use this setting to
automatically shut the
system down if no
buttons have been
pressed within a certain
amount of time.
Options:
Off
3 minutes
5 minutes
10 minutes
Beep Sound
Turn the beep sound on
or off when a button is
pressed
Language
Select your desired
language
TV mode
Select your desired TV
mode
Options:
PAL
NTSC
Frequency
Select your desired
frequency
Options:
50 Hz
60 Hz
Screen
protection
Does not power unit off
but shuts the screen
down after a certain
amount of time
Options:
Off
3 minutes
5 minutes
10 minutes
Format
Not available
Will only record data if an SD card is
inserted into the unit
Default Setting
Use this setting to restore
the unit back to its
original factory settings
Version
View the software
version
Page 11

11
How to retrieve data on external devices
Playing the videos
Important: to play the videos on your computer we recommend installing VLC
media player. It is a free player that you can download from the internet. We
have found that some media players (such as quick time and windows media
player) do not present the videos in high quality and you may experience some
lagging in the video.
Accessing the data
Computer via SD card
Windows
1. Simply insert the SD card into your computer or an SD card reader (If you
do not have a micro SD card input, then please use the SD card adaptor
provided. This will allow you to insert the card into a standard size SD
card slot.
2. The SD card should automatically open, if it does not automatically open,
go to my computer and find the removable disk
3. Double click the DCIM folder
4. Open your desired folder
5. Once you have found your data, you can simply drag and drop into a
selected folder on your computer.
Mac
6. Simply insert the SD card into your computer or an SD card reader (If you
do not have a micro SD card input, then please use the SD card adaptor
provided. This will allow you to insert the card into a standard size SD
card slot.
7. The SD card should appear as NO NAME on your desk top, double click on
it.
8. Double click the DCIM folder
9. Open your desired folder
10. Once you have found your data, you can simply drag and drop into a
selected folder on your computer.
11. Make sure that you eject NO NAME properly before removing it, so that it
does not damage your computer or the SD card.
Page 12

12
Computer via USB
Windows
1. Plug USB cable into G50 DVR and the other end into your USB input
2. Select Mass storage on the G50 DVR
3. Your computer will detect new hardware, please follow prompts to install
the new hardware correctly
4. Once it has installed, go to My computer
5. Double click your removable disk drive
6. Double click the DCIM folder
7. Open your desired folder
8. Once you have found your data, you can simply drag and drop into a
selected folder on your computer.
Mac
1. Plug USB cable into G50 DVR and the other end into your USB input
2. Select Mass storage on the G50 DVR
3. An icon should appear on your desktop with the title NO NAME, double
click on it.
4. Double click the DCIM folder
5. Open your desired folder
6. Once you have found your data, you can simply drag and drop into a
selected folder on your computer.
7. Make sure that you Eject NO NAME properly before removing it, so that it
does not damage your computer or the device.
HDMI
You can use the HDMI cable to hook up to an external device that has a HDMI
input (for example a TV).
Simply use the HDMI cable provided.
Plug one end into the G50 DVR and the other end into your HDMI input.
Once you have selected the HDMI source on your external device, it will simply
mirror your G50 DVR. For example, if you plug the device into your Television,
your Television screen will now look exactly the same as the software on your
G50 DVR. To view your data, you will have to enter playback mode on the G50
DVR. Please refer to playback mode if unsure of how to utilise this function.
Page 13

13
Specifications
Product Feature
Technical specifications
G- Sensor
Built in – will save footage if it detects high impact
accident and cannot be overwritten
LCD Screen size
2.0 inch
Lens
170 degree high definition ultra wide lens
Language
English, Russian, Chinese (simplified), Chinese
(traditional), Korean, Japanese etc.
File Format
MOV.
Video resolution
1080P@30FPS, 720P@60FPS, WVGA, VGA
Video codec
H.264
Colour
Black
Automatically power
on/off
Supports Auto ignition power on and off
Motion Detection
Supports
Time
synchronization
Supports
Photo mode
12M
Photo format
JPEG
Memory Card
TF (max 32 GB)
Loudspeaker / MIC
Supports
Built in sound
Supports
Video Format
PAL / NTSC
Frequency
50Hz/60Hz
Power Interface
5V 1.5A
Battery
Built-in 3.7V polymer 300mA
If you have any enquiries about your Polaris G50 DVR dash cam recorder, please
give us a call on 1300 555 514 or email us at sales@poron.com.au
 Loading...