

Page 1
O WNER’S MANUAL
IMPORTANT INFORMATION
SERIAL NUMBER
Page 2

Important Information
• Always disconnect the Polaris from the pool wall when cleaning or backwashing the pool filter.
• After cleaning or backwashing, let the filtration system run for at least five minutes before
re-connecting the Polaris.
• New plumbing lines should be flushed out before installing the Polaris.
• The Polaris should not be used to remove plaster dust in new pools.
• Always remove the Polaris
before swimmers enter the pool.
• Except when checking the wheel RPM, do not handle the Polaris while it is operating.
• Always remove the Polaris from the pool before chemical shock treatments.
For customer service or support:
• Please mail Warranty Card immediately.
• For on-line support: www.polarispool.com
• To contact Polaris:
US and Canada Australia Europe
Customer Service Unit 4, 19-21 Gibbes Street, C/Osana s/n.
2620 Commerce Way Chatswood, NSW 2067 (Pol.End.El Ramassar),
Vista, CA 92081-8438 1-300-POLARIS 98520 Les Franqueses del Vallés
1-800-822-7933 ACN 080 168 092 Barcelona, Spain
+34 93 840 25 85
Polaris Vac-Sweep®280 Limited Warranty
This one year limited warranty is extended to the original consumer purchaser of this Polaris Vac-Sweep 280 Automatic
Pool Cleaner manufactured by Polaris Pool Systems, Inc., from date of manufacture of the unit as established by the serial
number, or one year from date of purchase with proof of purchase, whichever is later. Polaris warrants this product, including
all parts and components thereof, to be free of defects in material and workmanship. Normal replacement items such as
bags, tires, sweep hoses or sweep hose scrubbers which have been worn out by use or improper installation are not covered
by this warranty. The Polaris 280 frame is warranted for a period of five years.
This limited warranty does not apply if the failure is caused or contributed to by any of the following: improper handling,
improper usage, improper storage, winter freezing, abuse, improper installation, removal of the UWF filter screen, unsuitable
application of the unit, improper maintenance, lack of reasonable and necessary maintenance, damage in transit or during
installation, or damage from repairs/alterations made or attempted by anyone other than Polaris or one of its Authorized
Service Centers.
Authorization to return a unit or part to the plant of manufacture must be obtained from the Polaris Customer Service
Department. Check with your dealer for the local procedure before exercising this warranty. If further directions or
instructions should be required, contact the Customer Service Department at 1-800-VAC-SWEEP (USA and Canada only)
or (760) 599-9600. Be sure to insure the shipment against loss or damage in transit.
This limited warranty is valid only in the United States of America, Canada and Australia, and it does not apply to Polaris
Vac-Sweep 280 Automatic Swimming Pool Cleaners sold or installed in any other country. Polaris Vac-Sweep 280 Automatic
Pool Cleaners sold in the United Kingdom are warranted for a period of two years from date of invoicing to the first user.
WARNING: USE OF POLARIS 280 IN A VINYL LINER POOL
ly susceptib
yl liner patter
tain vin
Cer
into contact with the vinyl surface, including pool brushes, pool toys, floats, fountains, chlorine dispensers, and automatic pool
Some vinyl liner patterns can be seriously scratched or abraded simply by rubbing the surface with a pool brush.
cleaners
Ink from the patter
P
.S
U
Foreign Patents: 732645; 2,260,903; 85149; 135,543; 2,072,463; 981274; 142,198; and other patents pending.
Unique product shape is a registered tr
.
is is not responsib
olar
Patents: 4,589,986; 4,618,420; 5,863,425; D409,341.
.
ns are par
n can also r
or
le f
ticular
ub off dur
, and the Limited
ing the installation process or when it comes into contact with objects in the pool.
ademar
k.
le to rapid surface wear or pattern removal caused by objects coming
er, pattern removal, abrasion or markings on vinyl liners.
anty does not co
arr
W
www
.polar
v
ispool.com
Page 3
Introduction
4
6
9
10
1
2
5
3
8
7
Congratulations on the purchase of your new automatic pool cleaner, and thank you for
choosing Polaris. The Polaris Vac-Sweep 280 is designed to give you years of dependable
and efficient service.
Like most mechanical devices, it will require periodic adjustments, routine maintenance, and
the replacement of certain hardworking parts. Please have your cleaner checked
occasionally by your local Polaris dealer or authorized service center.
Always insist on genuine Polaris replacement parts. Non-Polaris parts are not made to our
specifications. They may have an adverse effect on the operation of your Polaris or may even
damage it.
For best results, the Polaris 280 should be installed by a pool professional. For those with
experience and confidence in handling plumbing and mechanical equipment, installation is
outlined in this manual.
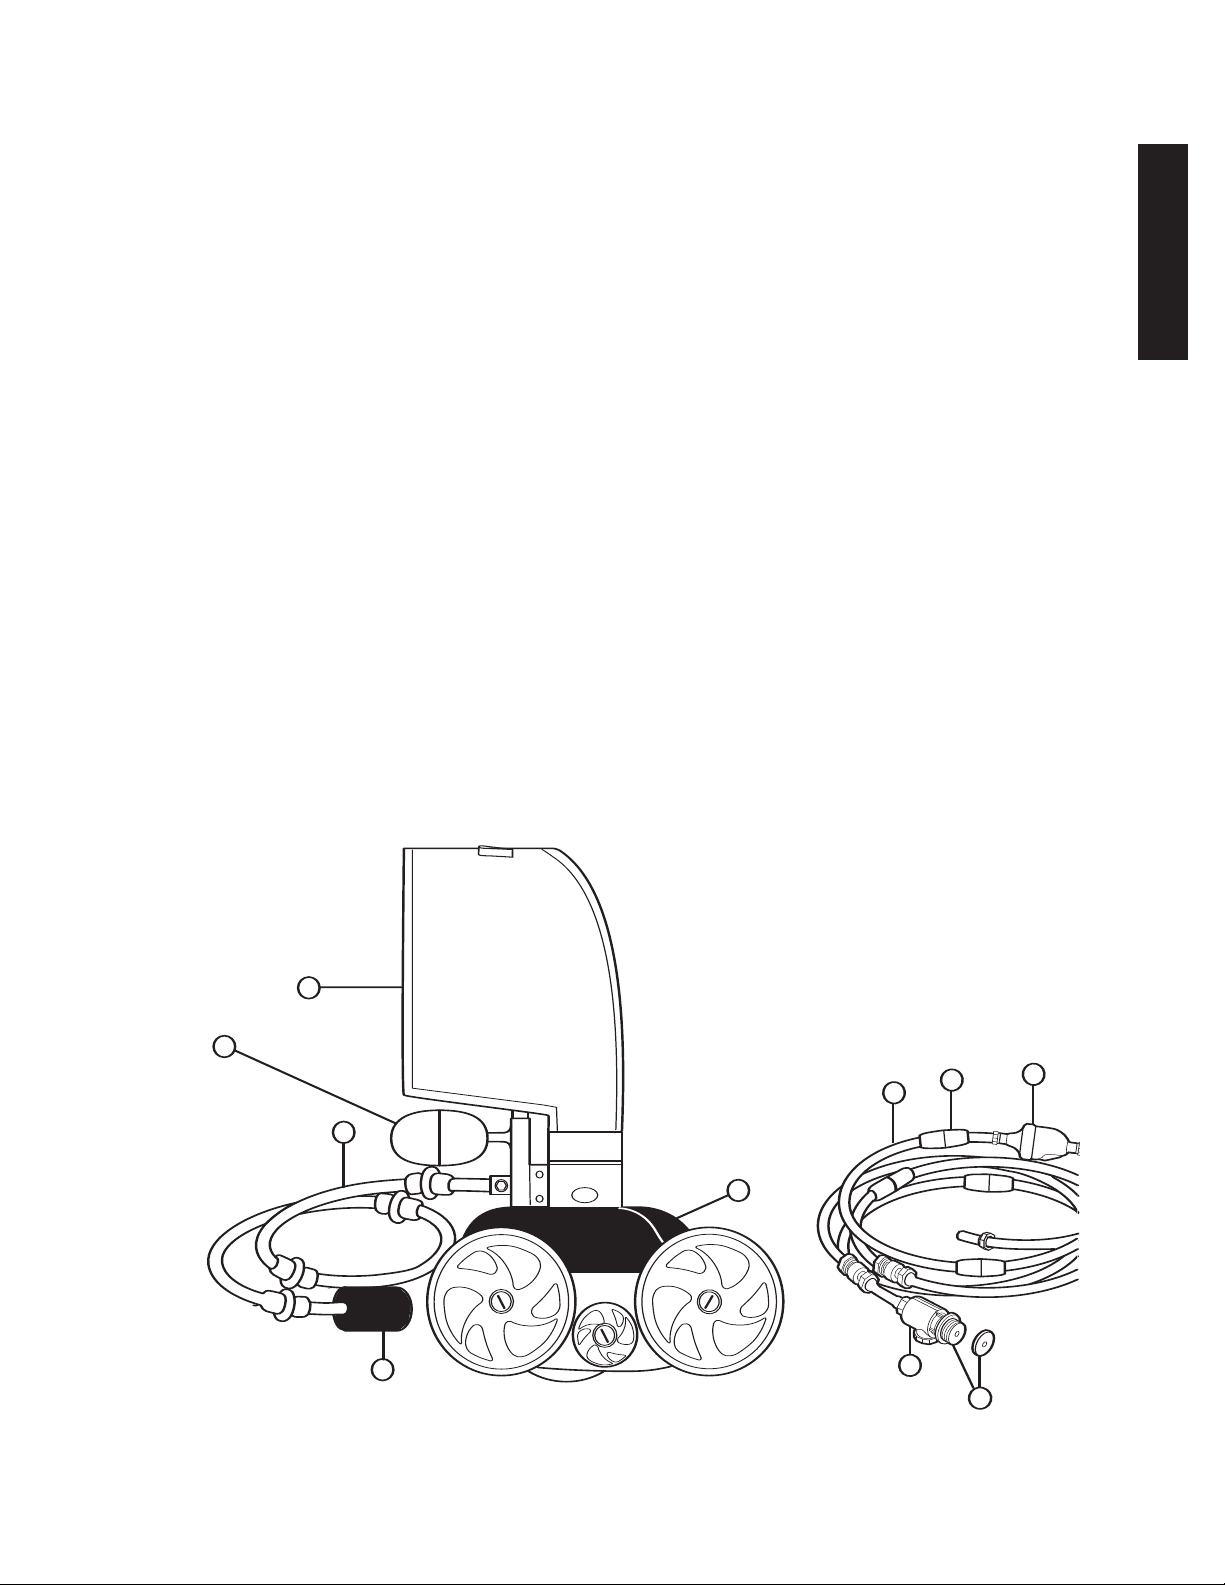
Polaris 280 Complete Cleaner
English
1. All Purpose Bag
2. Head Float
3. Sweep Hose
4. Sweep Hose Scrubber
5. Cleaner Body
07. Hose Floats
08. Back-up Valve
09. Quick Disconnect with
Universal Wall Fitting (UWF)
10. Restrictor Discs (one red and one blue)
6. Feed Hose
www.polarispool.com
Page 4
Quick Installation Instructions
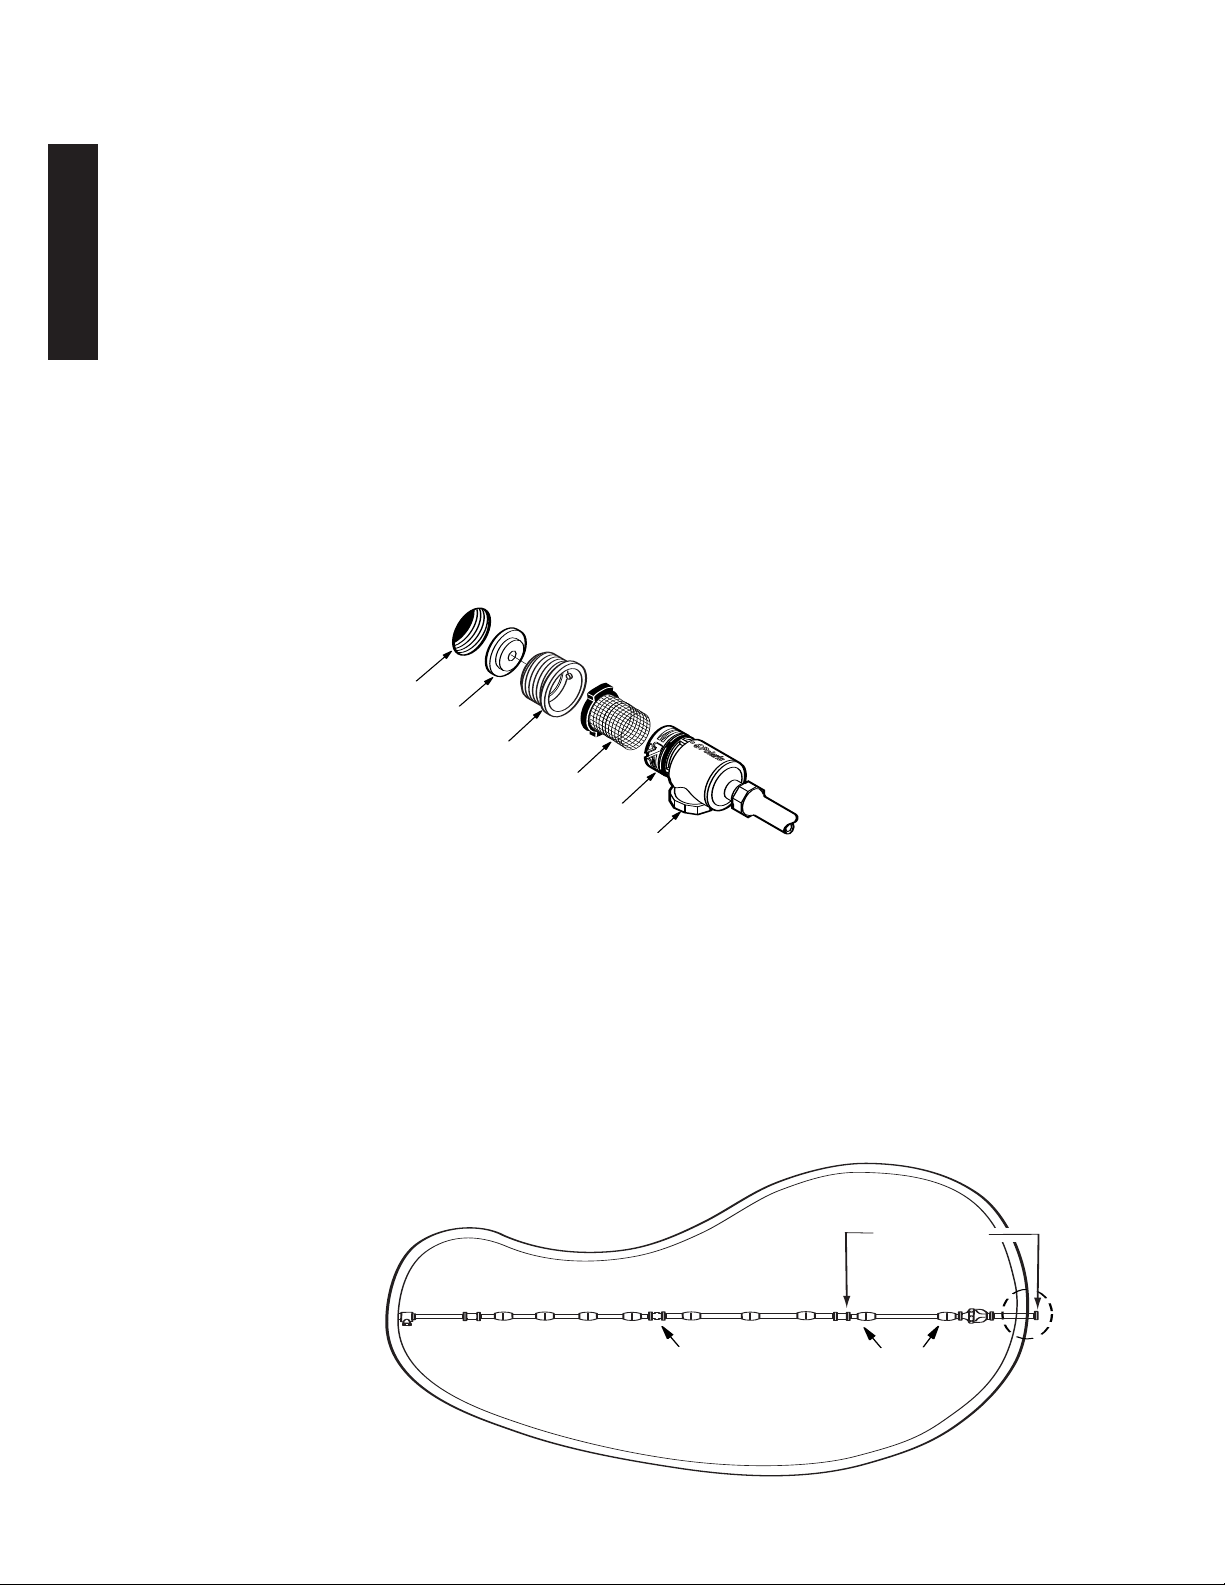
Universal Wall Fitting
Quick Disconnect
Pressure Relief Valve
Return Line
Restrictor Disc
Filter Screen
Leader Hose Floats
2-3’ apart
Return
Line
Feed Hose Floats
1.5 to 3’ apart
Center
Swivel
Leader Hose
Length = Max. Depth
English
1
our quick steps to install and get maximum performance from the Polaris 280:
F
• Install the Universal Wall Fitting (UWF) with Quick Disconnect
• Adjust feed hose to fit pool length
• Assemble the cleaner
• Check for proper wheel RPM (revolutions per minute)
Install the Universal Wall Fitting
Installs in minutes on pools with a dedicated cleaner return line and a threaded 1-1/2” female
pipe fitting.
1. Turn on the filtration pump and flush out the plumbing line.Turn pump off.
2. Remove the UWF from the Quick Disconnect and screw the UWF with the blue restrictor
disc into the return opening.
3. Turn the Quick Disconnect clockwise into the UWF and pull away to secure.
2
Adjust Feed Hose To Fit Pool Length
Measure the deepest part of the pool. Cut leader hose, from end that attaches to feed hose, so
length is equal to the greatest depth of the pool.
Attach leader hose to feed hose and connect hose to the pool wall at the return line. Extend
hose to farthest point of pool. The hose end must be within 6" – longer or shorter – of the
thest point. See dotted circle.
ar
f
Hose too long? Separate hose at center swivel. Cut equal amounts of the overage from
each 10-foot feed hose section.
Hose too short? Buy an additional feed hose section (part #9-100-3104), one swivel (part
#D20) and two hose nuts (part #D15) from an authorized Polaris dealer.
After adjusting hose, position hose floats as shown.
www.polarispool.com
Page 5
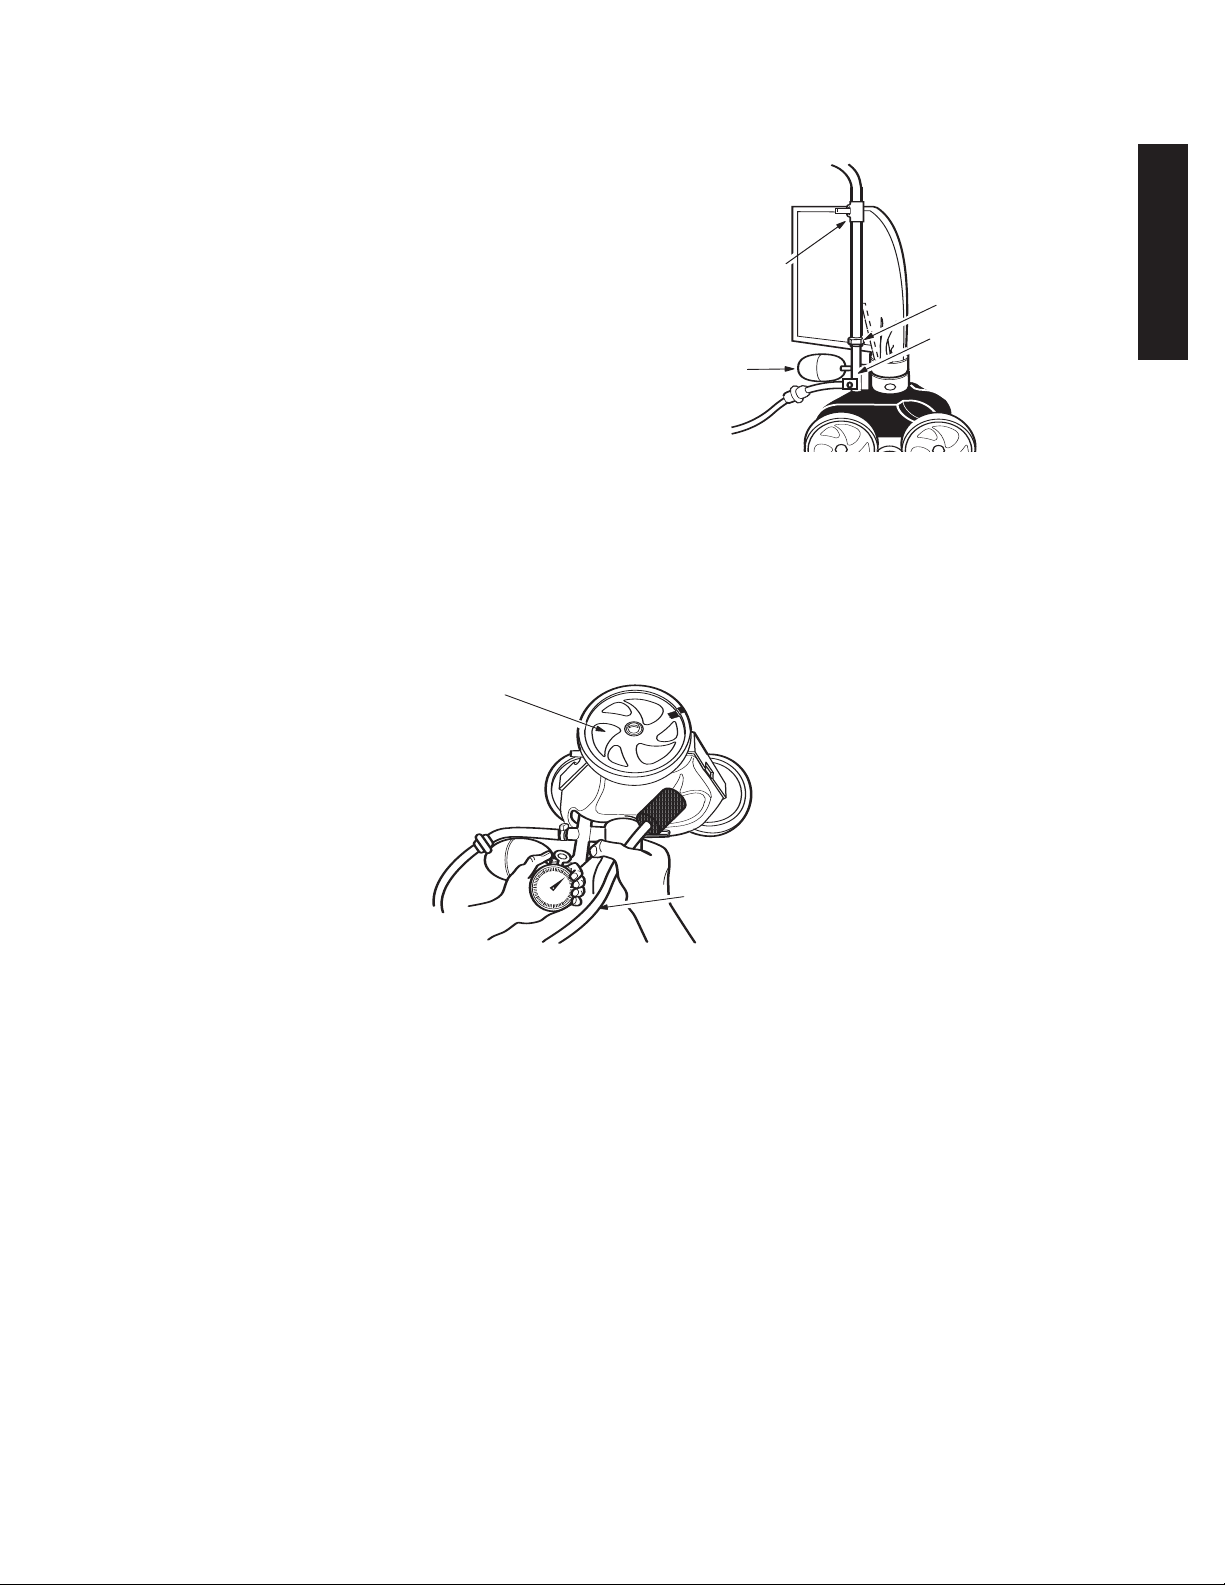
3
Bag Collar
Filter Bag
Feed Hose
Hose Nut
Feed Pipe
Head
Float
Single-wheel side
Sweep Hose
4
Assemble the Cleaner
1. Use the nut to attach the feed hose to
the feed pipe.
Pull out the bag and attach the bag
2.
collar to the feed hose.
3. Position the head float 1/2 to 1 inch
back from feed pipe.
4. Turn on the pool filtration pump and
allow it to prime before turning on the
booster pump.
Check for Proper RPM
Before operating the Polaris, check for proper wheel revolutions per minute (RPM). For
maximum efficiency, the Polaris should operate between 28 and 32 RPM.
Mark the single-wheel side tire.
1.
2. Turn pump on, hold cleaner below water level and count wheel revolutions for 1 minute.
English
3. Optimum speed should be
If count is less than 28 RPM:
• Check the filter screen in the Quick Disconnect for debris that restricts water flow.
• Clean the skimmer, filter and pump basket, clearing debris that restricts water flow.
• Check the hoses, connections and swivels for leaks that cause loss of water pressure.
Remove the blue restrictor disc from the UWF.
•
• If an adjustable gate valve is installed on the booster pump or cleaner line, open it
completely so water can flow freely to the Polaris.
between 28 and 32 RPM.
If count is
• Unscrew the pressure relief valve until the proper RPM is reached.
• If an adjustable gate valve is installed, adjust it to reduce the water flow to the cleaner.
•
more than 32 RPM:
Replace the blue restrictor disc in the UWF with the red restrictor.
www.polarispool.com
Page 6
Velcro
Closure
Bag Collar
Fine Tuning The Polaris Cleaner
1
2
3
9
6
P
u
s
h
e
s
U
n
i
t
L
e
f
t
P
u
s
h
e
s
U
n
i
t
R
i
g
h
t
I
n
c
r
e
a
s
e
s
C
l
i
m
b
i
n
g
D
e
c
r
e
a
s
e
s
C
l
i
m
b
i
n
g
English
Routine Maintenance
When oper
ating correctly, the Polaris 280 vacuums, sweeps and scrubs all surfaces
randomly throughout the pool. The climbing ability of the Polaris depends on the pool’s
shape and w
ater pressure or flow. The Polaris climbs best in pools without sharp angles
or curves in the transition from the pool floor to the pool wall.
Approximately every 3 minutes the Polaris 280 goes into back-up mode. This action pulls
the Polaris away from pool obstacles and increases its random pattern.
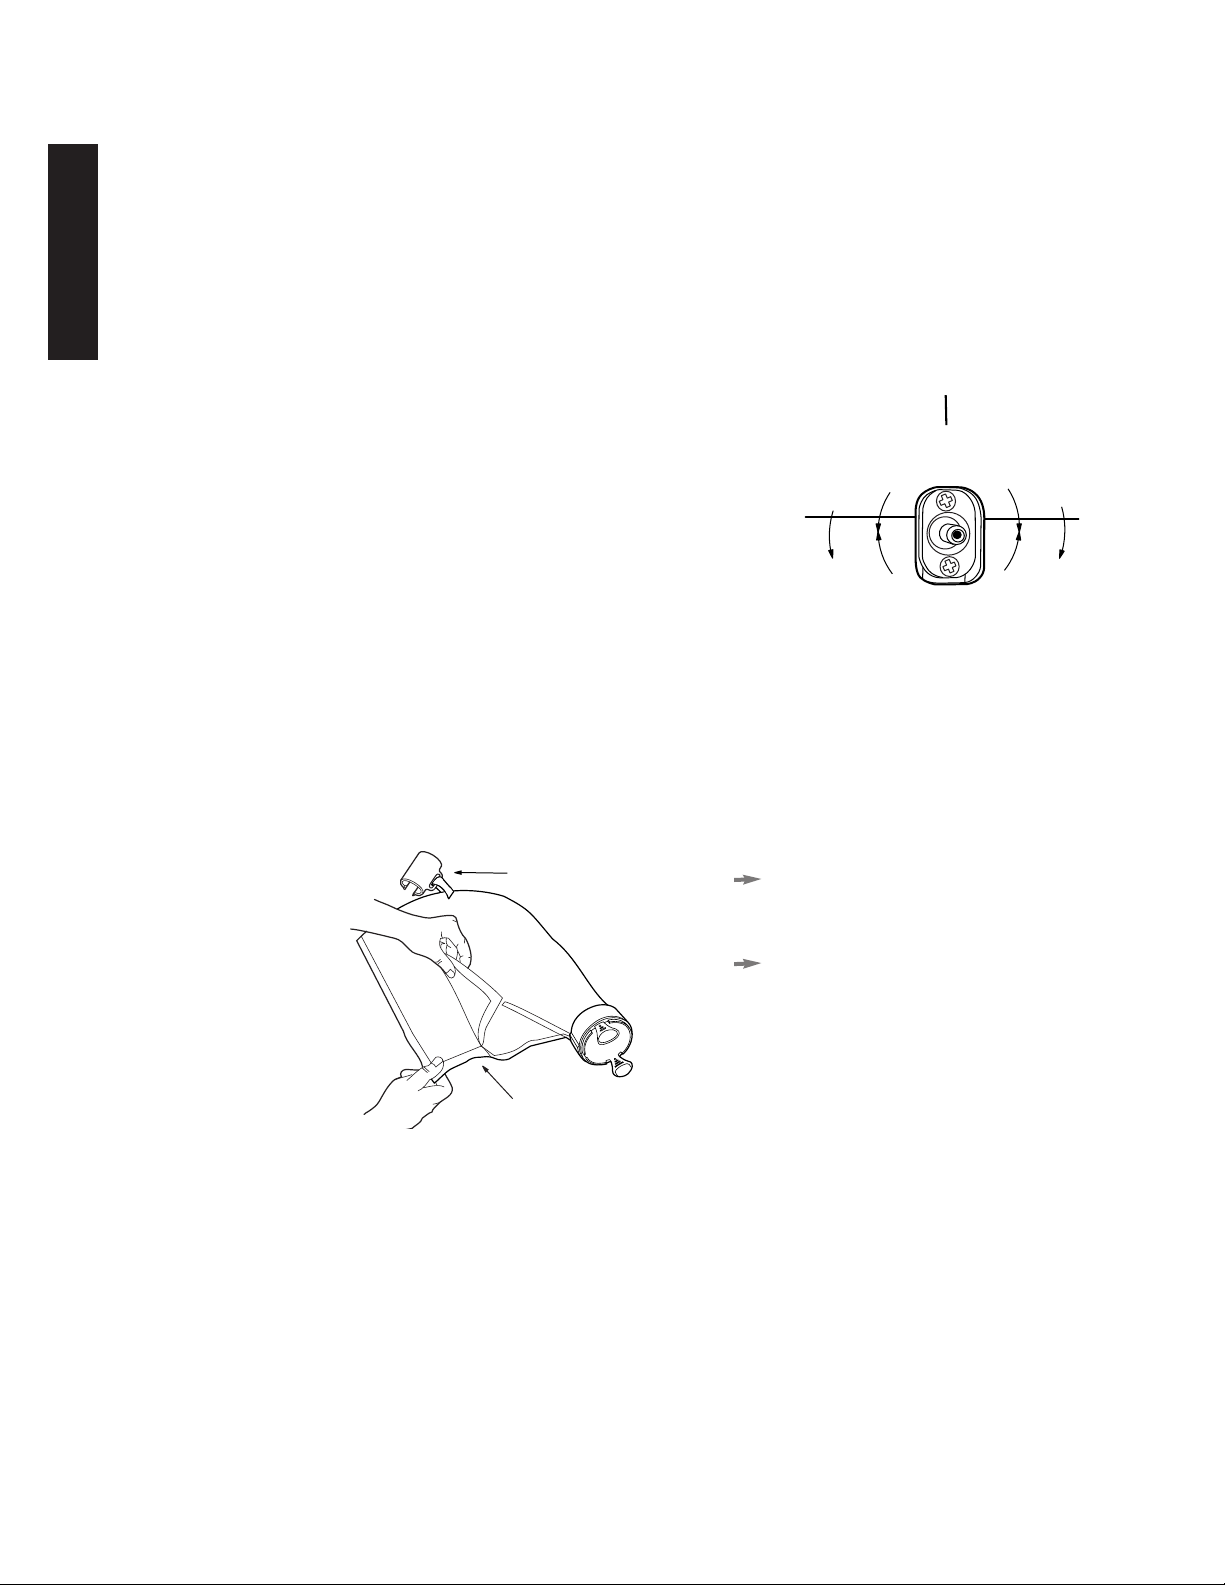
Thrust Jet Adjustment
The thrust jet powers the direction of the Polaris.
Factory position is straight back, but depending on the
pool, other settings are helpful.
Sweep Hose Adjustment
The sweep hose should move in a gentle sweeping
motion. To increase or decrease its motion, turn off the
booster pump and turn the sweep hose adjustment screw.
See Troubleshooting for other action adjustments.
Cleaning the Filter Bag
Remove the bag collar from the feed hose and depress the prongs to release the bag
from the cleaner. Open the bag closure and dump out the debris.
Whenever possible, empty the filter
bag when it is half full, especially if
the dirt load is sand.
It is easier to empty the filter bag
Alternate between two
.
when it is dr
y
filter bags. When one becomes full,
e it and put on the clean bag.
v
remo
Backwashing the Pool Filter
ys disconnect the P
a
Alw
After cleaning or bac
.
filter
to flush out the return lines before reconnecting the Polaris.
olaris from the pool wall before cleaning or backwashing the pool
or at least five minutes
ashing, let the filtr
kw
ation system r
un f
Storage and Winterizing
er store the Polaris in direct sunlight.When storing for the winter, drain out all the
v
Ne
anty). Remove the UWF from the
ater (freez
w
all b
pool w
some cases
le from an author
ailab
v
a
e damage is not co
y attaching the Quic
y be necessary to use the UWF Removal Tool (part #10-102-00)
, it ma
ed Polaris dealer.
iz
ered under the w
v
k Disconnect and using pulling pressure to unscre
arr
In
.
w
For on-line support: www.polarispool.com
Page 7
Install dished
side out
Serial
Number
M
A
D
E
I
N
U
S
A
M
A
D
E
I
N
U
S
A
1
39
23
18
16
21
15
9
10
2
4
13
16
14
32
33
25
6
24
15
13
14
19
26
28
37
34
38
33
36
35
2
17
8
5
7
11
12
18
19
20
21
22
17
29
31
20
30
17
15
18
19
32
Pool
Wall
10-foot Hose
10-foot Leader Hose
To The
Polaris
10-foot Hose
51
52
52
53
53
56
57
54
55
42
46 47454443 48 49 48
50
41
40
21
17
18
19
2
2
17
1
3
2
27
17
17
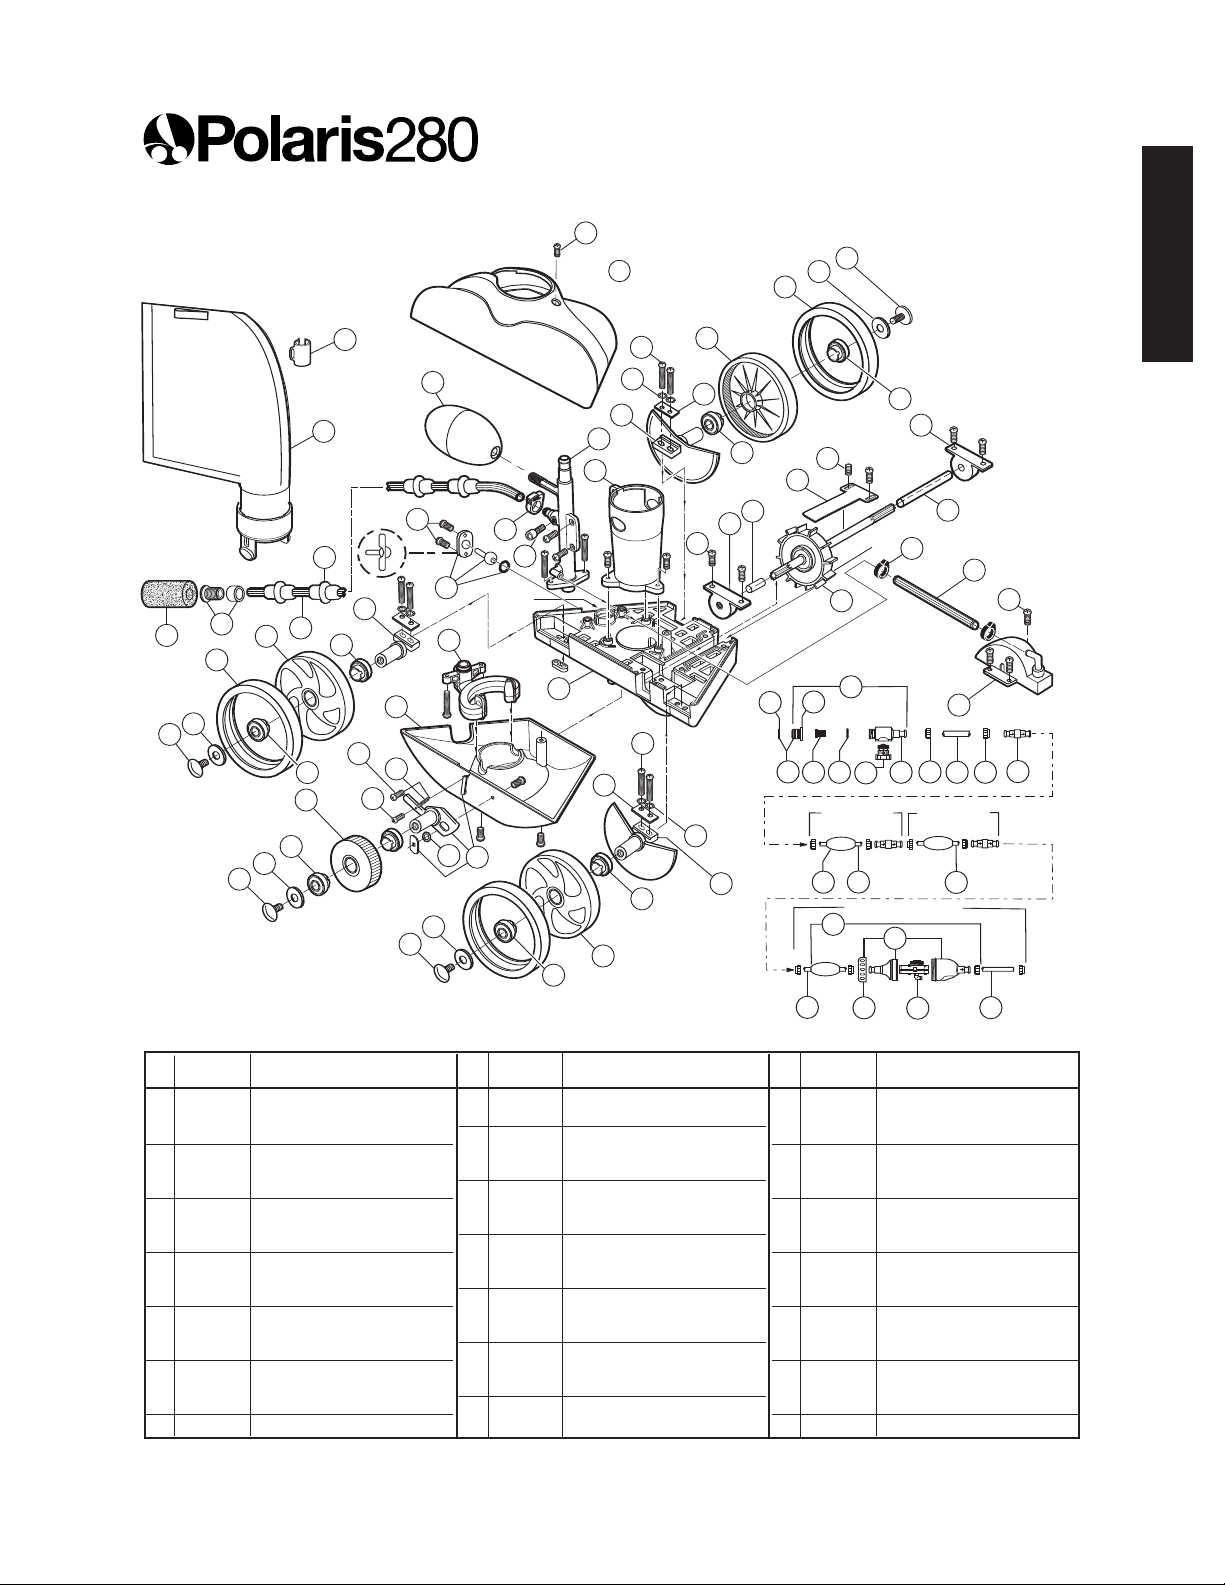
Exploded Parts Diagram
English
No. Part # Description Qty No. Part # Description Qty No. Part # Description Qty
10 B20 Adjust.Screw, Sweep Hose 1
11 K30 Feed Pipe with Elbow 1
12 K20 Vacuum Tube 1
13 C66 Axle, Large (w/Sand/Gravel Grd) 2
14 C76 Screw, 10-32 x 7/8" SS Pan 10
15 C45 Lock Washer for C36 7
16 C70 Axle Plate for C65/C66 3
17 C60 Ball Bearings, Wheels 8
18
19
1 K16 All-Purpose Bag* 1
2 C40 Screw, 10-32 x 3/8" SS Pan 20
3 K5 Top 1
4 A20 Float, Head 1
5 9-100-3105 Sweep Hose Scrubber* 1
6 B25 Orifice Tip w/Orifice Tip Guard 1
7 B5 Sweep Hose Complete*
8 B10 Wear Rings* 8
9 B15 Sweep Hose Attach Clamp 1
Wheel Scre
Wheel
w, Plastic 4
Washer, Plastic 4
C55
C64
20 C10 Tire, MaxTrax
21 C6 Wheel, Large (No Bearings Incl.) 3
22 C65 Axle, Large (Rear Wheel Only) 1
23 C131 Thrust Jet Kit 1
24 C16 Idler Wheel, Small 1
25 C30 Screw, 4-40 x 3/16" SS Pan 1
26 C32 Screw, 6-32 x 1/2" SS Pan Head 1
27 C25 Spring for C36 1
28 C36 Swing Axle Kit 1
29 K10 Base with Bracket 1
30 K25 Water Management System 1
31 K145 Frame 1
32 C80 Ball Bearings, Turbine 2
33 C83 Turbine Shaft Tubes 1
34 9-100-7170 Hose Clamp for WMS 2
35 A40 Turbine Shaft Shield 1
36 C86 Drive Shaft Assembly 1
37
38
C120
C110
or C110, 7-1/2" 1
Hose f
urbine Cover with Elbow 1
T
www.polarispool.com
®
*3
39 9-100-1018 Bag Collar 1
40 10-112-00 Restrictor Disks, Red and Blue 1
41 6-500-00 Universal Wall Fitting (UWF) 1
42 9-100-9001 UWF Connector Assembly 1
43 10-108-00 UWF Restrictor Kit 1
44 6-504-00 Filter Screen, UWF/QD 1
45 6-505-00 O-ring, UWF/QD 1
46 9-100-9002 Pressure Relief Valve, Black 1
47 D29 Quick Disconnect, UWF 1
48 D15 Nut, Feed Hose 10
49 ** Adapter Hose, 8-1/2" 1
50 D20 Swivel, Ball Bearing 3
51 D10 Float, Feed Hose 9
52 D45 Feed Hose, 10 Ft 2
53 D50 Feed Hose, Leader, 10 Ft 1
54 G52 Back-up Valve Kit 1
55 G54 Case Kit for G52 1
56
57
G57
G53
, Back-up Valve 1
Collar
Mechanism f
*Wear items not covered by warranty.
or G52 1
Page 8

Troubleshooting
English
If the Polaris cleaner displays the following
actions, adjustments may be necessary to
restore performance. Refer to exploded
ts diagram for part numbers indicated
par
in parentheses.
Action: Hangs up on steps or other
obstacles for longer than 3
minutes.
Solution: 1. Check the wheel RPM.
2. Verify the back-up valve
(54) is cycling.
3. Adjust the thrust jet (#23).
4. Remove unnecessary pool
hardware or install a Ladder
Guard Kit (order part #G21
from a Polaris dealer).
Action: Polaris is sluggish, running
with less power than normal.
Solution: 1. Check the filter screen (#44)
in the Quick Disconnect (#47)
and clean, if necessary.
3. Verify the back-up valve
(#54) is cycling. Hold the
valve out of the water and
atch the jet. It should come
w
on and go off.
Action: Polaris does not back up.
Solution: 1. Verify the back-up valve
(#54) is cycling.
2. Check the wheel RPM.
3. If the bag (#1) is full,
empty it.
4. If head float (#4) has water
in it, replace it.
5. Make sure feed hose is
floating.
Action: Polaris only turns in one
direction.
Solution: 1. Adjust the thrust jet (#23).
2. Make sure feed hose
is floating.
2. Clean the skimmer basket,
pump basket, and pool filter.
3. Check all of the hoses,
connections, and swivels
(#50) for leaks that could
cause loss of water pressure.
4. Check the wheel RPM.
olaris flies ar
Action:
Solution: 1. Check the wheel RPM. If
P
and/or does not make contact
with the bottom.
more than 32 RPM, unscrew
the pressure relief v
to decrease water flow
to cleaner.
Confir
2.
ictor disc is installed in
restr
the UWF to decrease water
.
w
flo
ictor disc to decrease
restr
water flow even more.
ound the pool
alve (#46)
m that the b
Or, install the red
lue
Action: Feed hose becomes tangled.
Solution: 1. Remeasure the hose to
verify that it is adjusted to
the proper length for the
pool shape.
2. With the Polaris operating,
k that the swivels (#50)
chec
in the hose and the hose
connections turn freely.
3. Make sure feed hose
is floating.
4. With the Polaris turned off,
All
spin each of the wheels
wheels should turn together.
Action: Sweep hose is sucked into
the vacuum tube.
Solution: 1. Make sure the opening at
the end of the sweep hose
ked by the
(#7) is not b
sweep hose scrubber (#5).
Adjust the sweep hose (#7)
2.
to a gentle s
loc
eeping motion.
w
.
www.polarispool.com
Page 9

Action:
Sweep hose sprays too
much water out of the pool.
Solution: 1. Adjust the speed of the
sweep hose (#7) by
tightening the adjustment
screw (#10).
2. Replace the sweep hose
scrubber (#5) if it is worn
or missing.
3. Add a sweep hose weight
(order part #B2) to keep the
sweep hose from spraying.
Action: The cleaner does not clean
the entire pool.
Solution: 1. Check the hose length
reaches within 6” of the
farthest point of the pool.
If not, order a new hose
section from your
Polaris dealer.
2. Check thrust jet for straight
back position that optimizes
random turning.
3. While the cleaner is
operating, hold it upside
down and look into the
vacuum tube.There should
be two distinct, even jets of
water. If there are not,
contact Customer Service or
a Polaris authorized Service
Center f
or assistance
.
Action: The cleaner is running in
circles on its side.
Solution: 1. Check filter bag, if full it can
weigh the cleaner down on
one side
.
2. Remove the head float (#4)
and shake it. If there is water
in the float, order a new one.
3. Check the hose floats to
mak
enly
v
e
e sure the
.
y are spaced
Troubleshooting Worksheet
If these solutions do not result in
improved performance, contact the
Polaris dealer who sold you the cleaner
or call Customer Service.
In order to provide faster and more
convenient service, please have the
following information available at the
time of your call or when taking the
Polaris in for service.
1. Serial #:________________________
2. Wheel RPM:__________________
3. Is the back-up valve cycling?
Yes No
4. Is the feed hose the proper
length?
Yes No
5. Are the swivels rotating freely?
Yes No
6. How often do you clean the
filter screen inside the
Quick Disconnect?
Never Once a Week
Twice a Week Once a Month
7. Are the vacuum jets obstructed?
(While the cleaner is oper
down and look into the vacuum tube.There
should be two distinct, even jets of water.)
es
Y
Is the drive train functioning?
8.
(As you spin each wheel independently,
all the wheels should spin.)
Yes No
ating, hold it upside
No
English
www.polarispool.com
 Loading...