

Page 1
2003
2003
120 XC SP
120 XC SP
Owner's Manual
Owner's Manual
for Vehicle Maintenance
for Vehicle Maintenance
and Safety
and Safety
Page 2
Read, understand, and follow all of the instructions
and safety precautions in this manual and on all
product labels.
Failure to follow the safety precautions could result
in serious injury or death.
PROPOSITION 65
WARNING
Snowmobile engines discharge fuel
and exhaust, which contain chemicals
known to the State of California to
cause cancer and birth defects or other
reproductive harm, onto the snow on
which they operate. Keep this engine
properly tuned and avoid unnecessary
idling and spillage during fueling.
WARNING
The engine exhaust from this
product contains chemicals
known to cause cancer, birth defects or other reproductive harm.
Page 3

What’s the hottest thing on snow?
Our new web site. It’s designed just for YOU!
S Technical tips
S New product introductions
S Event schedules
S Parts and Service Manual information
S Exciting details about The Way Out
Check it out...
www.polarisindustries.com/owner
1
Page 4

All information in this manual is based upon the latest product data and specifications available at
the time of printing. Polaris Industries Inc. reserves the right to make product changes and
improvements which may affect illustrations or explanations.
No part of this manual shall be reproduced or used without the written permission of Polaris
Industries Inc.
Illustrations included in this manual are general representations of parts having a similar function.
Your model may differ.
Comments and suggestions regarding this manual may be forwarded in writing to: Polaris
Industries Inc., Consumer Service, 2100 Highway 55, Medina, MN 55340.
Copyright 2002
Polaris Industries Inc.
All Rights Reserved Printed in U.S.A.
2
Page 5

TABLE OF CONTENTS
Table of Contents 3..........................
Welcome 4..................................
Introduction 5...............................
Important Notes for Owners and Drivers 6...........
Preservation of the Environment 7..................
Vehicle Identification Numbers 9....................
Safety 10....................................
YOUTH SECTION 13..........................
Know Your Snowmobile 14.........................
Pre-Ride Check 19................................
Riding Rules 21...................................
ADULT SECTION 25..........................
Pre-Ride Check 26................................
Operation Warnings 30............................
Component Identification 42........................
Break-In Period 44................................
Operation 46.....................................
Maintenance 51..................................
Accessories 79...................................
Troubleshooting 79................................
Specifications 80.............................
Polaris Recommended Products 82...........
Service and Warranty 83......................
Warranty 85.................................
Index 89.....................................
3
Page 6

WELCOME
Dear Parents:
We believe your children should have the opportunity to enjoy The
Way Out experience along with you. We’ve provided this owner’s
manual to assist you and your children in learning about the safe
operation and care of your new Polaris snowmobile. Please review the
information in this manual with any child who may operate the
snowmobile. Help your children learn to operate the snowmobile with
safety as a top priority. Help them also learn to show respect for our
environment and for the rights of others while operating the
snowmobile. Since the operator will be a newcomer to the exciting
winter sport of snowmobiling, please be sure he/she understands this
information before riding the snowmobile. Never allow a child to
operate the snowmobile without adult supervision.
The preventive maintenance program outlined in this manual is
designed to ensure that all critical components on your child’s
snowmobile are thoroughly inspected at various intervals. For safe and
enjoyable operation of the vehicle, be sure to follow all of the
instructions and recommendations in this manual. A table of
Polaris-recommended products is provided on page 82. If you have
any questions about the snowmobile, contact a Polaris dealer for
assistance.
This Owner’s Manual contains instructions for minor maintenance, but
major repairs are covered in the Polaris Service Manual and should be
performed by a Factory Certified MSD (Master Service Dealer)
Technician.
Dear Children:
Before you ride your new Polaris snowmobile, there are some
important things that you need to know. Your parents and Polaris want
you to enjoy riding your new snowmobile, and that’s why you need to
read and understand the information in your owner’s m anual.
Ask your parents to explain anything you don’t understand, and pay
close attention to the warnings and instructions you read. Your safety
and the safety of others is the m ost important thing to think about at all
times.
As the driver of the snowmobile, you must learn how to keep yourself
and those around you safe while you’re riding. S o read your manual,
and then enjoy riding your new Polaris snowmobile!
4
Page 7

INTRODUCTION
After reading this manual, store it in the snowmobile for convenient
reference. It should remain with the snowmobile when sold.
n This manual contains the latest information at the time of printing.
We reserve the right to make product changes and improvements
without notice.
n The illustrations and photos used in this manual are general
representations. Your model may differ.
n Follow the maintenance program outlined in this manual.
Preventive maintenance ensures that critical components of the
snowmobile are inspected by your dealer at specific mileage
intervals.
n A t able of Polaris-recommended products for your snowmobile is
provided on page 82.
n You and your dealer must complete the registration form included
with your snowmobile and forward it to us. This completed form
is necessary to ensure warranty coverage.
n Protect and preserve your right to ride by joining your local trail
riding clubs.
IMPORTANT
Parents should sit down with their children and read the Youth
Section with them before allowing them to use this snowmobile.
Parents must also read the Adult Section before allowing their
children to ride this snowmobile.
5
Page 8

INTRODUCTION
Important Notes for Owners and Drivers
P ARENTS: Do not allow anyone under the age of six (6) to operate
this machine. Review the information in this manual with any child
who may be operating the snowmobile. It is up to you to teach any
operator the proper and safe way to ride a snowmobile. You must set
boundaries and adhere to them, keeping the operator’s safety foremost
in your mind. Never allow a child to operate this machine without
adult supervision.
These units are not designed for adult use. Serious damage to the
vehicle may occur if the maximum rider weight capacity is exceeded.
The maximum rider weight capacity is 140 lbs. (63.5 kg).
CHILDREN: Before you ride your new Polaris snowmobile, there are
some important things that you need to know. Your safety and the
safety of others is the most important thing to think about at all times.
As the driver of the snowmobile, you must learn how to keep yourself
and those around you safe while you’re riding.
Pay attention when you see this symbol:
This is the safety alert symbol. When you see this
symbol on your snowmobile or in this manual it
means PAY ATTENTION because you could die or
be seriously hurt if you don’t follow the instructions.
6
Page 9

INTRODUCTION
Preservation of the Environment
T each your child to drive their snowmobile with consideration for the
protection and preservation of the environment.
Noise Level
One of the most publicized subjects with regard to snowmobiles is
noise. The Society of Automotive Engineers (SAE), which is the
standard-setting body for snowmobiles, has recommended that
snowmobiles conform to prescribed sound levels. This Polaris
snowmobile has been engineered to conform to these SAE standards.
In order to be meaningful, all regulations require the cooperation of the
snowmobile owner. Muffling systems, designed to reduce noise levels,
should not be altered or removed. Snowmobile drivers m ust be aware
that they have a public responsibility to operate their snowmobiles with
concern for others. As a snowmobile operator you may not realize the
sound of your snowmobile may annoy non-snowmobilers. We are
attempting to do our part through the manufacture of quieter machines,
and we also ask your help in the effort to further reduce the impact of
noise.
Air Pollution
As a part of Polaris’ plan for the snowmobile’s compatibility within the
environment, our engineers are investigating ways t o reduce emission
levels of engines. We expect our efforts to lead to the reduction of
potential air pollution.
The four-stroke engine used in this snowmobile produces less exhaust
emissions and reduces noise, as well.
In addition to technological research, we also suggest that
governmental agencies, manufacturers, distributors, dealers, ecologists,
and other interested parties work together to develop data on
environmental topics. We will continue to participate in this type of
study so that someday we may find the answers to these difficult
issues.
7
Page 10

INTRODUCTION
Preservation of the Environment
Environmental Protection
As part of the continuing environmental education campaign, we are
encouraging state and provincial governments across the snowbelt to
adopt rigorous safety training programs which also encourage
protection of our environment, wildlife and vegetation. Snowmobile
clubs and other organizations are working together to protect our
environment. It is very important that we encourage them as well as
become actively involved ourselves. Teach your child the following:
Respect your snowmobile;
respect your environment;
and you will earn
the respect of everyone.
8
Page 11
INTRODUCTION
Vehicle Identification Numbers
The frame vehicle identification number (VIN) and engine serial
number are important for model identification when registering your
vehicle, when obtaining insurance, and when ordering replacement
parts. In the event your vehicle is stolen, these numbers are essential to
the recovery and i dentification of your vehicle.
Remove the spare key and store it in a safe place. Your key can be
duplicated only by mating a Polaris key blank with one of your
existing keys. If both keys are lost, the ignition switch must be
replaced. See your Polaris dealer.
Please record your snowmobile identification numbers below for future
reference:
31XX
3
1
1. Tunnel VIN (lower right side of the tunnel)
2. Engine Serial Number (right front side of engine crankcase)
3. Key Number:
9
Page 12

SAFETY
WARNING
Failure to follow the warnings in this manual can result in severe
injury or death.
Read and understand the owner’s manual and all warnings
before operating a Polaris snowmobile. Adults must thoroughly
explain this information to all operators of the snowmobile.
All operators must be at least six (6) years old and must
understand the risk involved if these important warnings and
cautions are not heeded.
Equipment Modifications
All Polaris snowmobiles have been designed and tested to provide safe
operation when used as directed. Failure of critical machine
components may result from operation with any modification;
especially those that increase speed or power. There’s a significant
possibility of loss of control at higher speeds.
We are concerned for the safety of our customers and for the general
public. Any modifications to the original equipment of the vehicle
create a substantial safety hazard and increase the risk of bodily injury.
Therefore, we strongly recommend that consumers do not install on a
Polaris snowmobile any equipment that may increase the speed or
power of the vehicle, or make any other modifications to the vehicle
for these purposes.
The warranty on your Polaris snowmobile is terminated if any
equipment has been added to the vehicle, or if any modifications have
been made to the vehicle, that increase its speed or power.
10
Page 13

SAFETY
Maintenance Program
As with all snowmobiles, caution must be observed to ensure operator
safety. Particular caution must be taken to make sure that the
snowmobile is in excellent operating condition at all times. We
strongly recommend that the operator, as well as an adult, check major
and vital safety components before each use of the vehicle.
We also recommend that you strictly follow the maintenance schedule
outlined in this manual to ensure that all critical components on the
snowmobile are thoroughly inspected by your dealer at various mileage
intervals.
This snowmobile is not a toy. It is a well-engineered and
well-constructed recreational vehicle. The information in this manual
is provided to aid you in its safe operation.
11
Page 14
SAFETY
Safety Decals
Safety and warning decals have been placed on the vehicle for the
operator’s protection. Make sure the operator understands the
information on all decals. If any decal becomes illegible or comes off,
contact your Polaris dealer for a replacement. Any safety decal
needing replacement will be provided by Polaris at no charge. The part
number is printed on the decal.
CAUTION
Improper use of this snowmobile or failure to maintain it in good
operating condition can result in injury. To reduce this possibility,
read the important safety information on the following decal and
make sure all operators and guests are familiar with all warnings,
cautions and safe operating procedures. They must also
understand the consequences and risks if they choose to ignore
or neglect this information.
12
Page 15
SAFETY
The following signal words and symbols appear throughout this
manual and on your vehicle. Your safety is involved when these words
and symbols are used. Become familiar with their meanings before
reading the manual.
The safety alert symbol, on your vehicle or in this manual,
alerts you to the potential for personal injury.
WARNING
The safety alert warning indicates a potential hazard that may
result in serious injury or death.
CAUTION
The safety alert caution indicates a potential hazard that may
result in minor personal injury or damage to the vehicle.
CAUTION
A caution indicates a situation that may result in damage to the
vehicle.
NOTE:
A note will alert you to key information or instructions.
IMPORTANT
IMPORTANT will alert you to important information or instructions.
13
Page 16
YOUTH SECTION
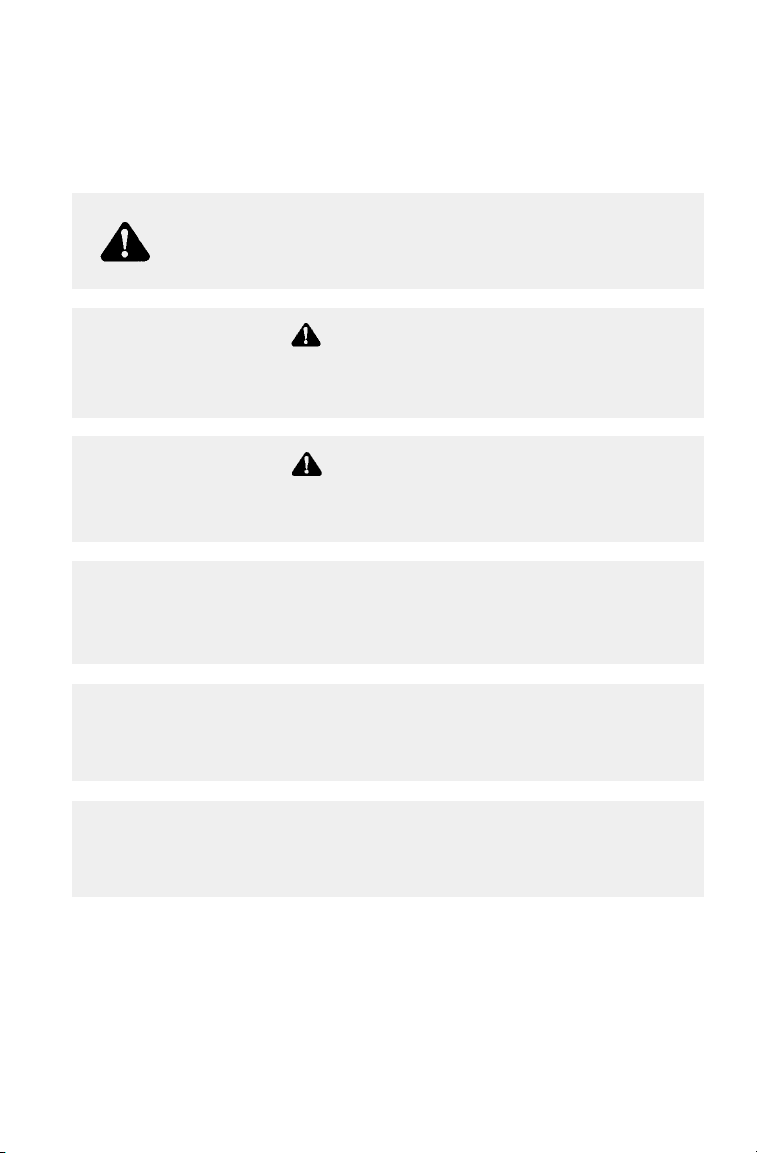
Know Your Snowmobile
Before you have an adult start the engine for you for the first time, let’s
learn about the controls on your new m achine.
7
6
99
5
4
8
1
2
3
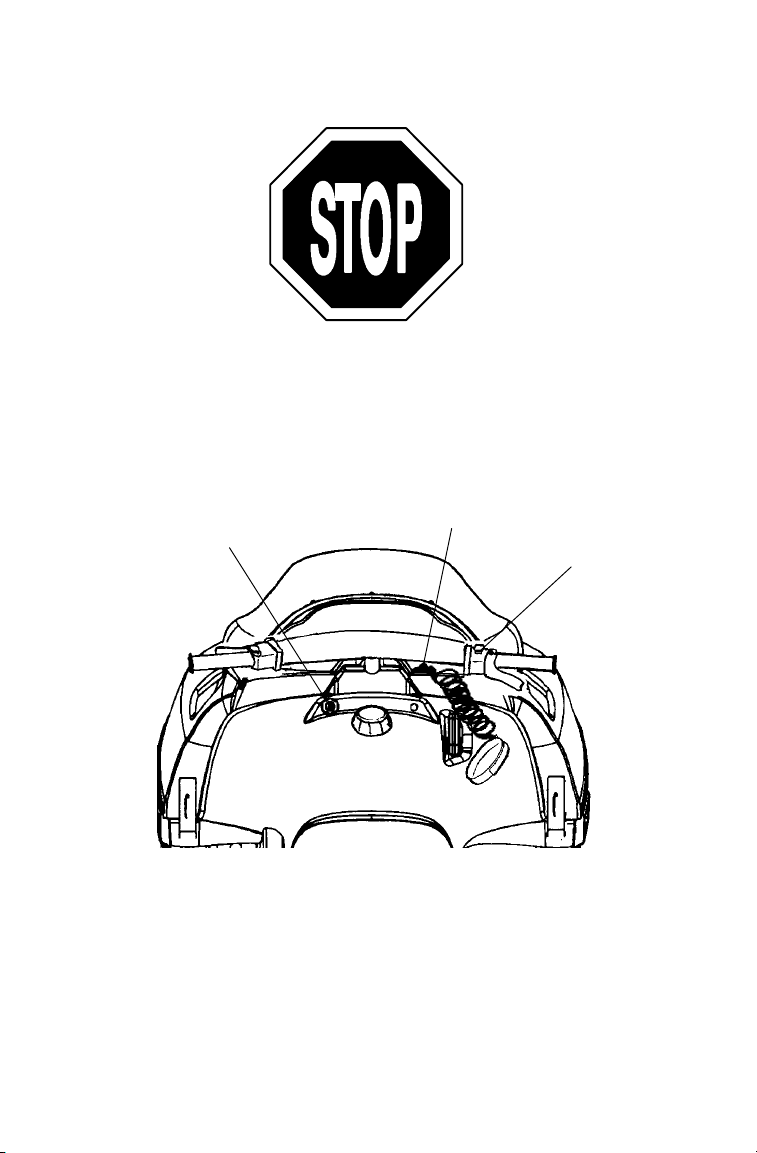
1. Engine Stop Switch - When the engine is running, you can push
this button down and the engine will stop. The stop switch must
be in the UP position to start the engine again.
2. Throttle Control - The throttle control makes your snowmobile go
forward when you press it with your thumb. You must always
make sure the throttle control does not stick before you operate
your snowmobile. Read more about it on page 19.
3. Recoil Starter Handle - Pull the recoil starter handle to start your
snowmobile. An adult will help you start it the first time.
4. Choke Knob - You may need to use the choke to help start your
snowmobile if the engine is cold. Read more about it on page 48.
5. Gas Cap - The gas cap has to be taken off when an adult puts gas in
your snowmobile. Never take the gas cap off. Always make sure
it’s tightly closed.
14
Always have an adult put gas in your snowmobile.
Never try to do it yourself.
Page 17
YOUTH SECTION
Know Your Snowmobile
6. Brake Lever - Squeeze the brake lever toward the handlebar to
make your snowmobile slow down or stop.
Always take your thumb off the throttle lever when you
squeeze the brake lever.
7. Ignition Switch - The ignition switch key must be turned ON
before pulling on the recoil starter handle to start your snowmobile.
You can also use t his key to turn off the engine.
8. Tether Strap/Switch - The tether strap must always be attached
snugly to your right wrist and to your snowmobile every time you
drive. If you fall off your snowmobile, the tether strap will pull away
from the switch and the engine will stop.
Never ride without the tether strap attached to your
right wrist and to your snowmobile. Be careful not
to let the cord get tangled around the handlebars or
any part of your body.
9. Hood Hold-Down Strap - There are two straps to hold down the
hood of your snowmobile. They must always be latched before you
start your machine.
Always make sure the hood hold-down straps are
latched before you ride.
15
Page 18
YOUTH SECTION
Know Your Snowmobile
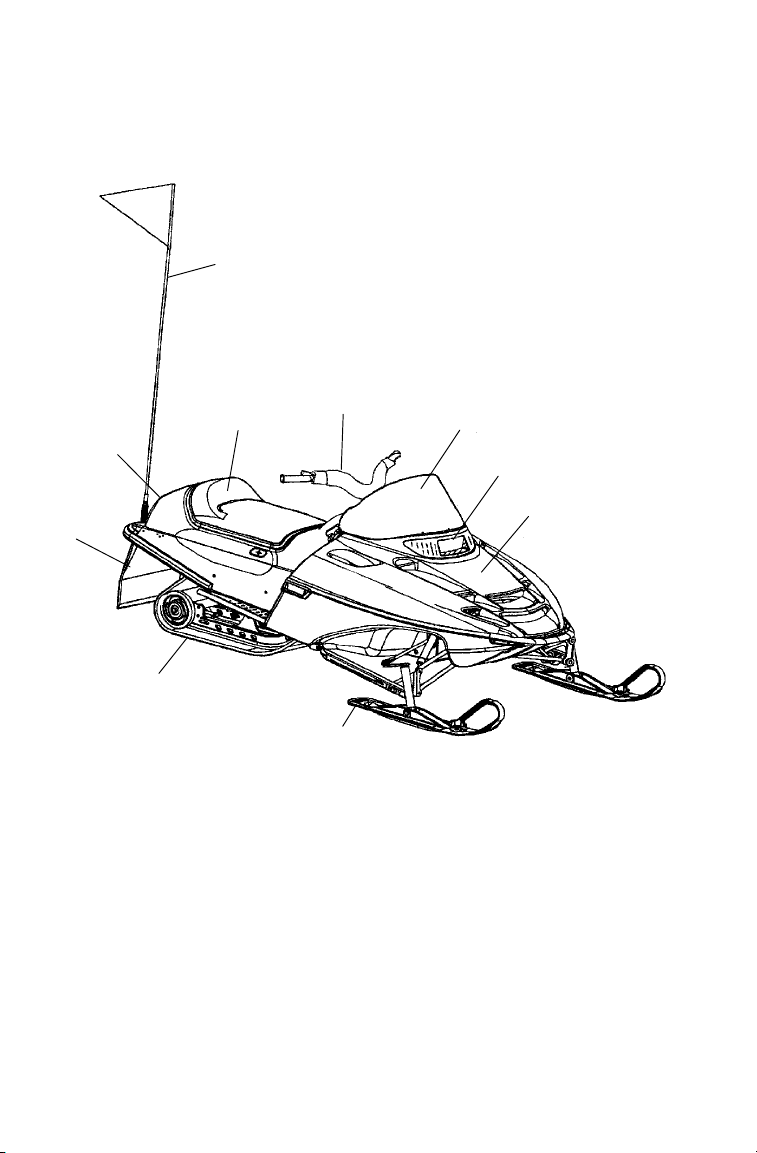
Let’s learn more about the parts of your snowmobile before we talk
about riding.
5
6
7
8
9
4
3
2
1
10
16
Page 19

YOUTH SECTION
Know Your Snowmobile
1. Hood - The hood covers the moving and hot parts of the engine
and must be securely latched before you ride the snowmobile.
2. Headlight - The headlight is always on when the engine is
running. It helps others see you when you’re riding during
daylight, but it’s not supposed to be strong enough to help you see
in the dark. Drive your snowmobile only in the daylight.
3. Windshield - Always keep your windshield clean so you can see
where you’re driving.
4. Handlebar - The handlebar is connected to the skis. When you
turn the handlebar, the skis turn in the same direction.
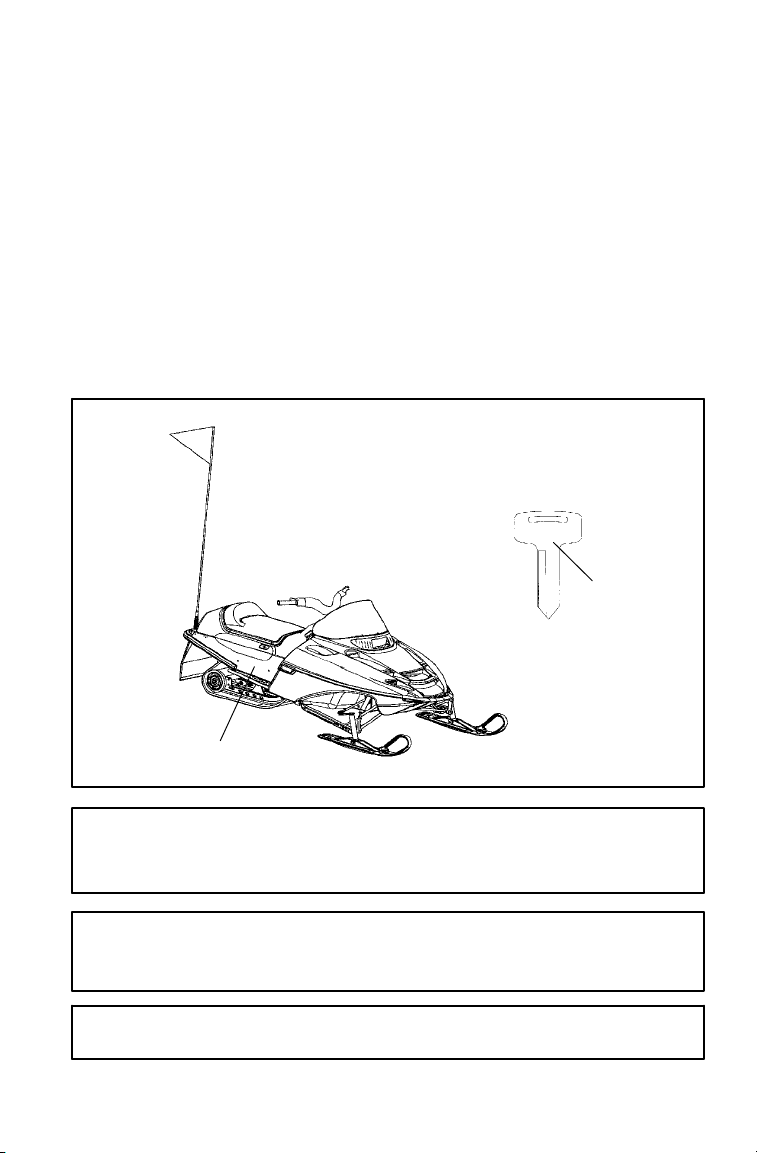
5. Flag - The flag helps other people see where you’re riding. Your
snowmobile is smaller than an adult snowmobile, so it’s harder to
see. Never remove the flag from your snowmobile.
6. Seat and Storage - When the engine isn’t running, you can take
the seat cushion off and put things under the seat in the special
compartment.
7. Taillight - The taillight is always on when the engine is running.
It will help others see you when you’re riding.
8. Snow Flap - The snow flap keeps s now, ice or other things from
flying out behind your snowmobile.
9. Track - The engine makes the track turn. The turning track makes
your snowmobile go forward.
Never get close to a moving track. Never wear clothing
that could get caught in a moving track, like a long scarf
or baggy clothing. Tie up long hair.
10. Skis - The skis turn your snowmobile in the same direction that
you turn the handlebar.
17
Page 20
YOUTH SECTION
Know Your Snowmobile
Let’s review the three ways to stop your snowmobile:
1. Push the stop switch down.
2. Pull off the tether strap.
3. Turn the key off.
3
2
1
18
Page 21
YOUTH SECTION
Pre-Ride Check
You’re almost ready to have an adult start your snowmobile. Before
the snowmobile is started for the first time, you must do a PRE-RIDE
CHECK. In fact, every time you ride your snowmobile you must have
an adult help you check these things before starting it. Let’s learn
about these things now.
n Make sure the throttle doesn’t stick. Push the throttle lever toward
the handlebar and then let it go. The lever should come right back
to where it was before you pushed it. If it comes back slowly or
stays close to the handlebar, you have a sticky throttle. This means
that something is wrong or broken. Don’t start the snowmobile
until an adult fixes the sticky throttle.
Never start the engine if you have a sticky throttle. You
could get hurt if you ride with a sticky throttle. Have an
adult or your Polaris dealer fix the throttle before you ride.
n Make sure the brakes don’t stick. Squeeze the brake lever toward
the handlebar and then l et it go. It should come right back to
where it was before you squeezed it. If it goes back slowly or stays
close to the handlebar, your brakes are sticking.
Never start the engine if you have sticky brakes. You
could get hurt if you ride with sticky brakes. Have an
adult or your Polaris dealer fix the brakes before you ride.
n If you’ve used the storage area under the seat, make sure the seat
locking tabs are in place.
n Make sure your hood is latched tight before starting your machine.
n Make sure your track and skis are not frozen to the snow. S tand
behind the machine and lift up on the back of the sled. This will
free the track if it is frozen to the ground. Turn the handlebars to
move the skis back and forth to make sure they aren’t frozen. If
any of this is hard to do, have an adult help you.
Never check the track or skis when the engine is running.
You could get hurt. Never stand behind or in front of any
snowmobile when the engine is running.
19
Page 22

YOUTH SECTION
Pre-Ride Check
n Have an adult check the gas level to see if your snowmobile needs
more. Children should never add their own gasoline. This must
always be done by an adult. Before anyone adds gasoline to your
snowmobile they must read the instructions and warnings on page
46 in this Owner’s Manual.
Always have an adult put gas in your snowmobile.
Never try to do it yourself.
n Have an adult check the engine oil level when the engine is cold.
The engine is very hot after it has been running. It could burn your
skin. Children should never check the oil. Only an adult should
be responsible for keeping the gas and oil levels to the full marks.
n The last check is done with the engine running. Always check to
make sure that ALL THREE WAYS TO STOP THE
SNOWMOBILE are working the way they should. Do you
remember what they are? If you can’t list them, go back to page
18 and review.
20
Page 23

YOUTH SECTION
Riding Rules
Now you’re ready to learn about driving your Polaris snowmobile.
There are some things you can do and there are some things you must
never do. Rules are very important when you’re driving a snowmobile.
Adults have riding rules, too. The rules help keep us safe when we
ride.
You must be at least six (6) years old before you can ride this
snowmobile. The adult with you is your teacher . Always pay attention
to what your teacher says so you can learn how to always drive safely.
Let’s learn how to ride!
Always follow the safe riding rules found on the next
pages. You or others around you could be seriously
hurt or killed if you don’t follow the safe riding rules.
" Your snowmobile is made for one person. Never carry a passenger.
A passenger will make the snowmobile harder to drive. You may
lose control and hurt yourself and your passenger.
" Never pull anything behind your snowmobile.
" Make sure you know where you’re going to drive when your snow-
mobile is started. Make sure the area is safe all around your snowmobile.
" Never ride alone. An adult should always be watching you in case
you need help. Always drive within the sight of an adult.
" Never ride on public trails.
" When you’re a beginner, always stay on level ground.
" Don’t ride your snowmobile on roads or over railroad tracks. Your
snowmobile makes noise that will keep you from hearing cars,
trucks or trains that may be coming towards you.
" Fences and snowmobiles don’t mix. Make sure you know where all
the fences are before you ride. If you drive into a fence, you could
get hurt.
" Don’t ride at night. The headlight on your snowmobile is there only
so others can see you driving during the day.
21
Page 24
YOUTH SECTION
Riding Rules
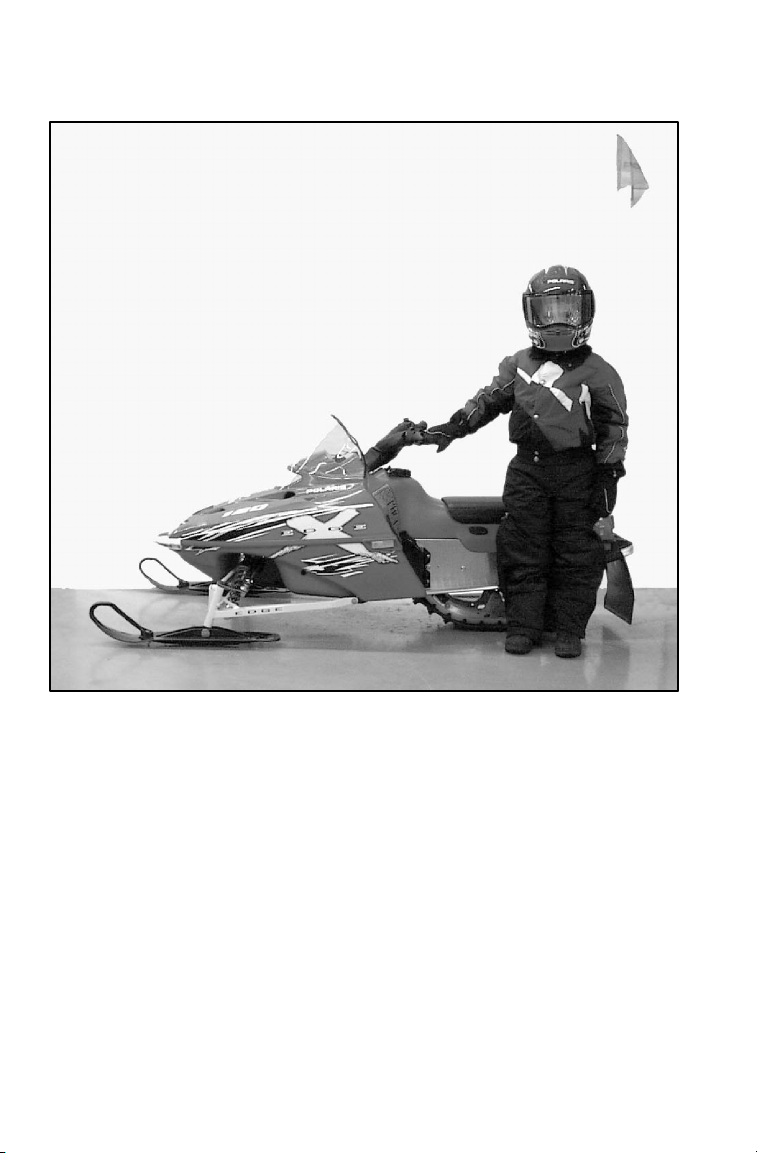
Helmet
Face Shield
Jacket
Gloves
Pants
Boots
" Always wear the right kind of clothing when you’re riding your
snowmobile. You’ll need a good helmet with a face shield or
goggles. Wear a warm jacket and snowpants. Make sure your clothing fits properly. If it’s too small, it could keep you from moving
easily. If it’s too big, it could hang down and get caught in the track
or another moving part. Never, ever wear a long scarf. Wear warm
snowmobile boots and gloves, and make sure your boot laces are
tied. If you have long hair, be sure to tie it up.
" Learn where there are lakes, rivers, ponds and ditches in your driv-
ing area. Stay away from them. Never ride on frozen water. You
could get hurt or you could even die. All ice can be dangerous!
" Always be alert and pay attention to where you’re driving. Pay
attention to other drivers and be even more careful around them because you don’t know what they’re going to do.
22
Page 25
Riding Rules
YOUTH SECTION
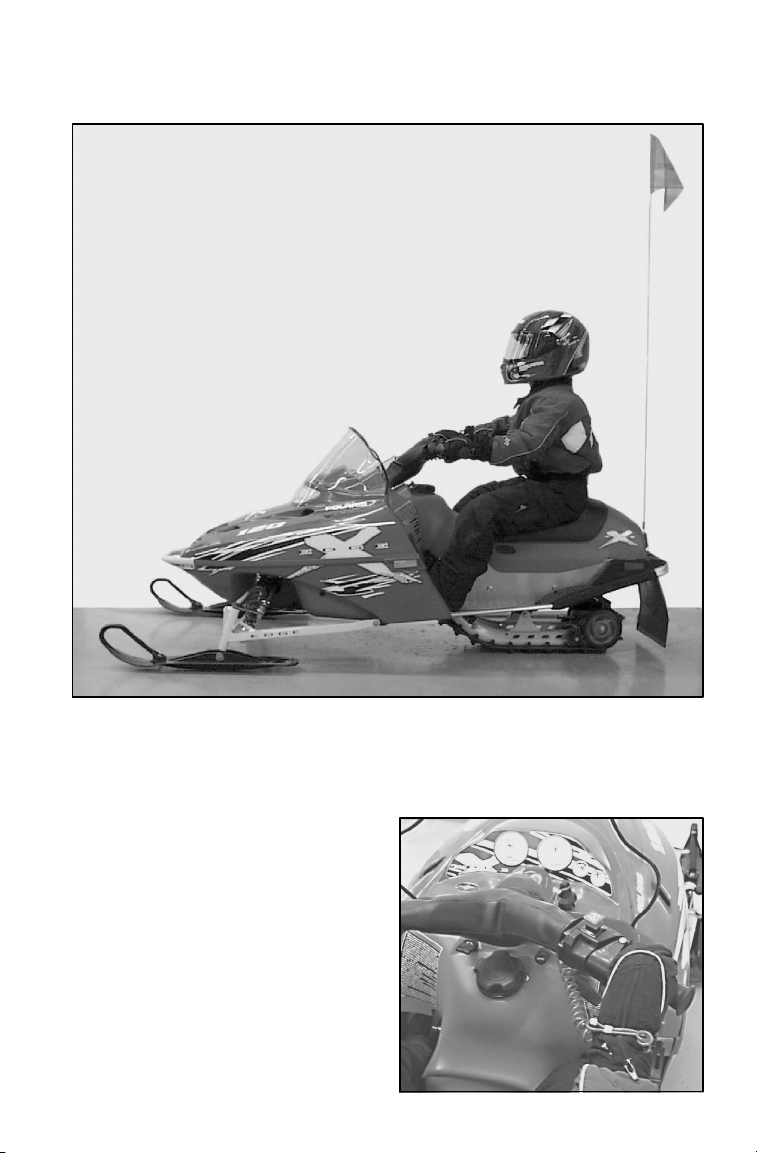
Both Hands on
Handlebars
Sit Down
Feet on Running Boards
" Always drive your snowmobile while sitting down. Keep both
hands on the handlebars and keep both feet on the running boards.
" Never follow another snowmobile too closely. Always allow lots of
time and space to stop your snowmobile.
" Ride your snowmobile only
where you know it’s safe to
drive and where you have permission to drive. Be careful of
the things around you.
" Always be a polite driver. (No
To Machine
driving t hrough the flower garden or over the little trees you
planted.)
" Always attach the tether strap to
To Wr i st
your wrist and machine before
riding.
23
Page 26
YOUTH SECTION
Riding Rules
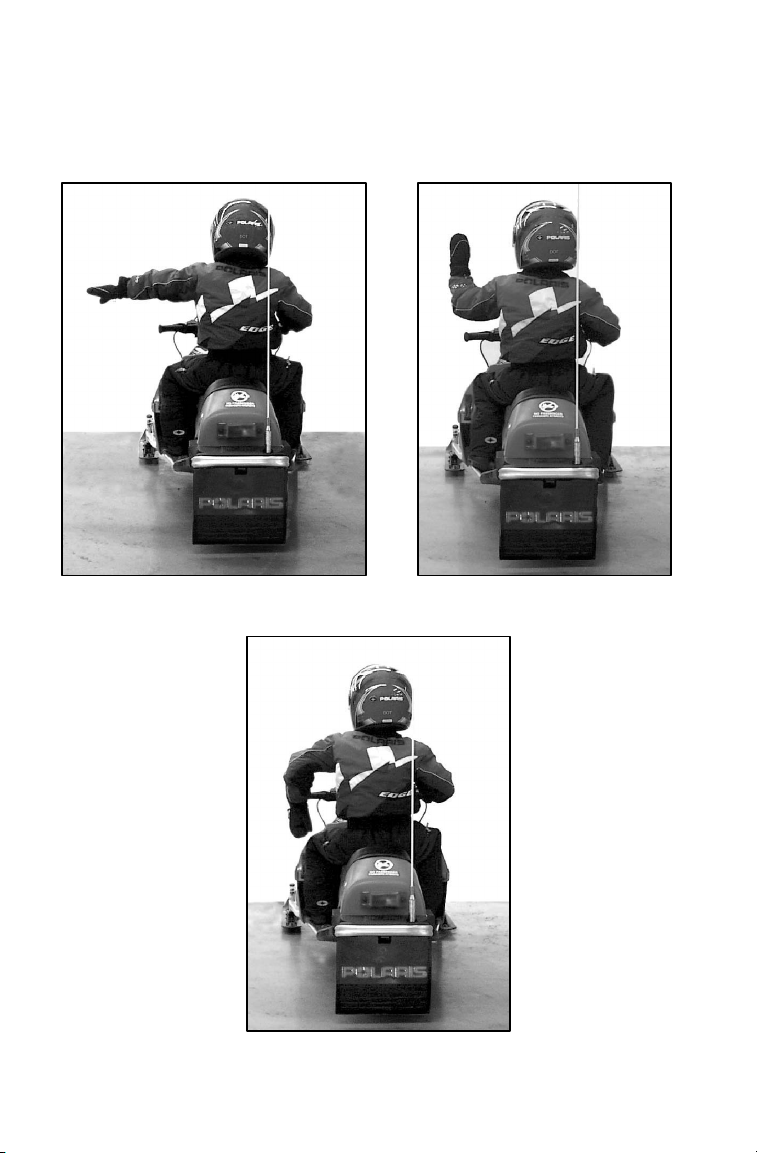
Learn how to ride safely and correctly. Learn how to use your hands
and arms as signals. Read and understand your Owner’s Manual.
Left Turn Right Turn
24
Stop
Page 27

ADULT SECTION
Pre-Ride Check
It’s up to you, the adult, to teach your child the proper and safe way to
ride a snowmobile. You must set boundaries and adhere to them,
keeping your child’s safety foremost in your mind. Never allow your
child to operate this machine without adult supervision.
WARNING
Teach the operators to perform the following Pre-Ride Check
before each use of the snowmobile. Serious injury or death could
result if they do not check the machine properly before riding.
n Check the throttle for proper operation.
n Check the brake for proper operation.
n Check for proper operation of steering system.
n Check the throttle safety switch for proper operation.
n Make sure all three ways to stop the engine are functioning.
n Inspect the track.
n Make sure the seat is locked into place.
n Make sure the track and skis are not frozen to the ground.
n An adult should check the gas and oil levels for the rider and add
more if necessary.
n Make sure the hood is latched.
n Make sure headlight and taillight are working properly.
These checks should become automatic for your children before each
ride. It’s up to you, the adult, to instill in your children the importance
of performing this Pre-Ride Check before they operate the
snowmobile.
25
Page 28

ADULT SECTION
Pre-Ride Check
Before Starting The Engine
n Read and Understand Your Owner’s Manual
Read and make sure the operators understand the Owner’s Manual
completely before allowing anyone to operate this snowmobile. It’s
also a good idea to review it periodically to reinforce the information.
It’s very important to familiarize the operator and guests with the
cautions and warnings pertaining to the machine as well as safe
operating procedures. We’ve attempted to provide you with as much
information as possible to alert you to the safety requirements of
snowmobiling.
WARNING
The throttle and brake are the primary controls of the snowmobile.
If either should malfunction, the operator could lose control, which
could lead to serious injury or death. Always check the throttle
and brake levers for proper operation before operating the vehicle.
n Check throttle for proper operation
When checking the throttle, make sure the control l ever compresses
evenly and smoothly. When the lever is released, it should
immediately return to the idle position without binding or hesitation.
If the throttle does not function smoothly, do not attempt to start the
engine. Have the throttle serviced before starting the engine.
n Check brake for proper operation
The need for a properly functioning brake is critical. The brake must
be checked for correct operation before starting the engine. See page
31 for brake lever travel specifications.
n Check for proper operation of steering system
Check for proper operation of the steering system by manually turning
the skis completely to the right and to the left. If difficulty is
encountered, check for ice and snow buildup which may be obstructing
the steering linkage. Make sure all greasable components are properly
lubricated.
26
Page 29

ADULT SECTION
Pre-Ride Check
n Check throttle safety switch
Test the throttle safety switch system
on a daily basis before the machine
is used.
While seated in a normal riding
position, and with the engine idling,
hold the throttle lever pin stationary
by exerting pressure on the pivot pin
in the direction shown in the
illustration (A). Apply a slight
amount of throttle opening. A properly functioning switch must shut
down the engine.
The throttle safety switch is designed to stop the engine whenever all
pressure is removed from the throttle lever and the throttle cable or
valve does not return to the normal closed position.
If excessive play develops in the
throttle cable, the safety switch may
be activated and will prevent the
engine from starting. If the engine
doesn’t start and throttle safety switch
malfunction is suspected, return the
machine to an authorized Polaris
dealer for service. If an adult must
start the engine in an emergency situation, the throttle safety switch
and engine stop switch may be disconnected from the wire harness. In
this situation, the i gnition key switch must be used to shut off the
engine. Be sure to reconnect the safety switches and have the
snowmobile serviced before operating the vehicle again.
A
.03 in.
WARNING
Do not continue to operate the machine with the throttle safety switch
disconnected as serious injury or death could result. Return the
machine to an authorized Polaris dealer for service before operating.
27
Page 30

ADULT SECTION
Pre-Ride Check
n Check engine stop switch
Test the engine stop switch before
each use of the snowmobile. T o
stop the engine in an emergency,
push down on the stop switch (A).
This will ground out the ignition
and bring the engine to a quick stop.
To restart the engine, the switch
mustbepulleduptotheON
position.
n Inspect the track
Driving for extended periods of time with marginal lubrication could
severely damage the track. Driving on icy trails or driving when there
is little or no snow are two examples of situations that would provide
marginal lubrication and are not recommended.
A
WARNING
Operating the snowmobile with a damaged track will increase
the possibility of additional track damage and/or failure. This
could cause loss of control, resulting in severe injury or death.
Always inspect for damage before using the snowmobile.
NOTE: Track damage or failure caused by operation under poor lubrication conditions will void the track warranty.
28
Page 31

ADULT SECTION
Operation Warnings
n Do not carry passengers
This snowmobile is designed for a single operator.
n Do not operate with intake silencer removed
CAUTION
If the engine is operated with the intake silencer removed,
damage to the engine may occur. Do not operate the engine
with the intake silencer removed.
n Stay clear of track
WARNING
During warm-up and operation, stand clear of the rotating track.
Entanglement and serious injury or death may result. Use just
enough throttle to rotate the track and warm up the engine.
n Do not operate with drive chain guard removed
WARNING
The drive chain guard is designed to protect the operator from
metal parts in the event of a drive chain failure. Although the
chance of failure is extremely remote, do not defeat the purpose of
the guard by removing it. It is provided for the safety of the child.
29
Page 32

ADULT SECTION
Operation Warnings
n Do not touch the engine after it’s been running
WARNING
Hot components can cause serious burns to skin. Do not
touch engine and exhaust parts after the engine has been
running.
n Disabled operators
WARNING
Safe operation of this rider-active vehicle requires good judgement
and physical skills. Persons with cognitive or physical disabilities
who operate this vehicle have an increased risk of overturns and
loss of control, which could result in serious injury or death.
30
Page 33

ADULT SECTION
Operation Warnings
n Check brake lever travel
Measure the clearance
between the lever and brake
block. Inspection should be
made with the lever
firmly depressed.
Distance A should be no
more than 3/4″ (1.9 cm).
Excessive travel indicates
a need to adjust the brake cable.
Refer to the mechanical brake adjustment information on page 59.
n Make sure the hood is securely latched
The hood of the snowmobile protects the operator from moving and hot
parts as well as aiding in sound emission control and various other functions. Under no circumstances should your snowmobile be operated with
the hood open or removed.
n Test stop switch operation
Start the engine and push the stop switch down to test for proper
operation. The engine should immediately stop running.
A
n Test tether switch operation
Start the engine and disconnect the tether switch to test for proper
operation. The engine should immediately stop running.
n Remove the ignition key
Don’t tempt someone to steal or ride your snowmobile without
permission by leaving the key in the ignition.
n Check lights
Start the engine and check that both the headlight and taillight are
operating.
31
Page 34

ADULT SECTION
Operation Warnings
n Check surroundings to verify clear operating area
It’s important to make sure there’s a clear area all around the
snowmobile, including an area clear of bystanders. Some sideways
movement is possible when starting out, and debris may be thrown by
the track. Teach the operator to check the operating area before riding.
n Sit properly on the snowmobile
Improper operator position on the snowmobile can be the source of
serious injury. Operating a snowmobile does require skill and balance
for proper control, and an improper position can seriously reduce the
child’s ability to control the snowmobile. The riding position may
vary as the operator becomes more skilled, but under most conditions
the proper position is to be seated with both feet on the running boards,
in a comfortable position for proper throttle, brake and steering control.
WARNING
Never hold the snowmobile up or
stand behind it while warming up
the track. A loose track or flying
debris could cause serious personal
injury or death.
This snowmobile is propelled by a revolving track, which must be
partially exposed for proper operation. Serious injuries may be caused
by operator carelessness, resulting in hands, feet, hair or clothing
becoming entangled in the track. Teach your child to respect this
machine and all the moving parts. Stress that being properly seated
keeps the child clear of the track.
32
Page 35

ADULT SECTION
Operation Warnings
n Stop engine before attempting adjustments
WARNING
The snowmobile engine compartment contains moving parts.
Shields and guards have been provided for safety, but it is still
possible to carelessly get your hands or fingers into a moving chain
or a rotating shaft. For this reason never attempt adjustments with
the engine running. Serious personal injuries can result. The
proper method is to turn off the ignition, raise the hood, make the
adjustment, secure shields and guards, secure the hood, and then
re-start the engine to check its operation. The same is true of track
alignment. If the track must be re-aligned, it is recommended that
this service be performed by your dealer.
n Always wear clothing designed for snowmobiling
Clothing designed for snowmobiling is warm, comfortable and safe.
WARNING
Always make sure the operator is wearing an approved helmet
and eye protection. Do not allow the child to wear loose clothing
or long scarves because they can easily become entangled in
moving parts. If your child has long hair, be sure it is always tied
up securely and tucked into the helmet or jacket.
Extremely cold weather can cause frostbite and/or hypothermia.
Always be aware of weather conditions, especially the wind chill.
See the table on page 36.
33
Page 36

ADULT SECTION
Operation Warnings
n Know limitations of machine and skills of driver
The operator should be aware that there are state and local laws
governing snowmobile operation and that these laws should be
followed. They have been established for the protection of all
snowmobile riders. Most states offer a snowmobile safety course for
children. Check your state or county agencies for this service.
This vehicle is intended for daylight use only. Check both the
headlight and taillight of the machine to ensure proper operation.
IMPORTANT: The headlight and taillight are intended only to
increase the visibility of the 120 XC SP during daylight operation. Do
not operate the snowmobile in the dark.
34
Page 37

ADULT SECTION
Operation Warnings
Wire fences are a serious hazard. Teach
your child to always be on the alert for
fences. Single strands are especially
dangerous, since there can be a great
distance between posts. Guy wires on
utility poles are also difficult to
distinguish. Teach your child to
reduce speed when traveling near
poles, posts, or other obstacles.
T each your child that the sound of the
machine will make it difficult to hear
the sound of approaching vehicles. Do
not allow your child to operate the snowmobile on or near roads and
railroad tracks.
T each your child what it means to drive defensively. Never tailgate
and always allow ample stopping distances.
Your child must be taught to always be alert and pay attention to the
driving area ahead.
When teaching inexperienced operators to ride, set up a nearby
predetermined course. Establish boundaries and make sure the
operator(s) know and understand them. Make sure they know how to
drive and control the snowmobile before you allow them to make
supervised longer distance runs. Teach them proper snowmobile
courtesy.
It’s a good idea to predetermine some hand signals as a way to
communicate with your child while giving instruction. It may be
difficult for your child to hear your voice over t he sound of the
snowmobile and through a helmet.
35
Page 38

ADULT SECTION
d
40MPH
Operation Warnings
Windchill/Temperature Charts
The following information is provided as a guide to determine what
temperatures are dangerous when riding your snowmobile.
WIND CHILL CHART (°F)
Esti-
mate
Wind
Speed
in MPH
Calm 50 40 30 20 10 0 -10 -20 -30-40-50-6
10 40 28 16 4 -9 -21 -33 -46 -58-70-83-9
15 36 22 9 -5 -18 -36 -45 -58 -72-85-99-1
20 32 18 4 -10 -25 -39 -53 -67 -82-96-110-1
25 30 16 0 -15 -29 -44 -59 -74 -88-104-118-1
30 28 13 -2 -18 -33 -48 -63 -79 -94-109-125-1
35 27 11 -4 -20 -35 -49 -67 -82 -98-113-129-1
40 26 10 -6 -21 -37 -53 -69 -85 -100-116-132-1
Wind
Speeds
Greater
Than
40 MPH
Have
Little
Added
Effect
50 40 30 20 10 0 -10 -20 -30-40-50-6
5 48 37 27 16 6 -5 -15 -26 -36-47-- 57-6
Little Danger
(For Properly
Clothed Person)
Actual Thermometer Reading (°F)
Equivalent Temperature (°F)
Increasing
Danger
Danger From Freezing of Exposed Flesh
Great
Danger
0
0
8
5
12
24
33
40
45
48
36
Page 39

Operation Warnings
d
S
d
K
70KPH
WIND CHILL CHART (°C)
ADULT SECTION
Esti-
mate
Wind
pee
in KPH
0 5 0 -5 -10 -15 -20 -25 -30 -35 -40
10 1 -4 -11 -16 -22 -27 -33 -38 -45 -50
20 -4 -9 -17 -23 -29 -36 -42 -48 -54 -61
30 -7 -13 -21 -28 -35 -42 -48 -55 -63 -69
40 -9 -16 -24 -32 -39 -47 -53 -61 -69 -76
50 -11 -18 -26 -34 -41 -49 -57 -64 -73 -80
60 -12 -19 -27 -35 -43 -51 -59 -66 -75 -82
70 -13 -20 -28 -36 -44 -52 -60 -68 -76 -84
Wind
Speeds
Greater
Than
70
Have
Little
Added
Effect
5 0 -5 -10 -15 -20 -25 -30 -35 -40
Little Danger
(For Properly
Clothed Person)
PH
Actual Thermometer Reading (°C)
Equivalent Temperature (°C)
Increasing
Danger
Danger From Freezing of Exposed Flesh
Great
Danger
37
Page 40

ADULT SECTION
Operation Warnings
Cold Weather Drive-Away
Whenever the machine has been parked for some l ength of time,
especially overnight, always shake loose the skis and track for the
operator before attempting to put the machine into motion. The
throttle will require some pressure to move the machine. Teach the
operator not to be afraid of applying pressure to the throttle but at the
same time, teach them not to be too forceful with the throttle which
could cause the machine to lurch forward.
Powder Snow Operation
This snowmobile is designed to operate best on snow. Maneuverability
is attained by the steering, skis, and the shifting of the driver’s body
weight. M aximum control will be attained by shifting body weight.
Maneuverability will change for lighter operators.
If the machine becomes stuck in snow, free the running board area and
step down the snow in front of the machine so that when the throttle is
opened the machine will be able to climb out. The operator can then
get back on the machine and continue. It is best to encourage the
operator to stay on established riding areas to avoid the possibility of
getting stuck.
Track Lubrication
Do not operate for prolonged periods in conditions of marginal
lubrication.
CAUTION
It’s essential that this machine be operated under conditions with
adequate snow cover, as snow provides the only lubrication for the
track. Failure to do so will result in excessive wear and damage to
the slide rail and track.
38
Page 41

ADULT SECTION
Operation Warnings
Snow and Ice Build-Up
Snow and ice buildup in the underhood area can interfere with the
steering.
WARNING
Before allowing your child to drive the machine, be sure that ice
and snow are not interfering with the steering. Manually turn the
skis to the left and right. If difficulty is encountered, check for
ice and snow buildup which may be obstructing the steering
linkage.
Hard Packed Snow
T each your child to reduce speed as required to maintain control in all
driving conditions. If necessary, maximum speed may be regulated by
using the procedure outlined on page 47.
WARNING
Steering and braking control are substantially reduced when
operating on on hard surfaces, hard-packed snow or icy surfaces.
39
Page 42

ADULT SECTION
Operation Warnings
Driving on Ice
It is dangerous to operate on ice or under slippery conditions. If ice or
slippery conditions are unavoidable, use extreme caution and operate at
speeds no faster than a walk. Never attempt an abrupt change of
direction on a slippery surface. The chance of “spin-out” increases
under these conditions. Being able to turn a snowmobile depends
primarily on the skis being in snow. On hard surfaces, such as ice, the
ability to turn is reduced and the machine will not turn very well. In
this situation it may be best to dismount and move either the front or
rear of the machine to point it in the proper direction.
T each your child to respect the unknown. Children must be taught that
they are not to venture out on their own in unapproved territory. They
must learn that they must never ride a snowmobile on a frozen body of
water. You and the driver of the machine should know and understand
that severe injury or death can result if the snowmobile and its
occupant break through the ice.
Driving in Hilly Terrain
WARNING
Traveling on hilly terrain is not recommended. It takes some
maneuvering of body weight that a child may not be capable of,
which will leave the child at risk. If traveling on hilly terrain is
unavoidable, teach your child to exercise extreme caution as well
as the proper operating procedure as outlined below.
Driving Uphill
Riding uphill requires extreme caution and should be attempted only
by experienced operators. The operator should assume a standing
position with body weight kept low and forward, accelerating before
the start of the climb and then releasing throttle pressure enough to
prevent track slippage.
When reaching the crest of the hill, the operator must slow down and
be prepared to react to obstacles, sharp drops, or other people or
vehicles which may be on the other side of the hill.
40
Page 43

ADULT SECTION
Operation Warnings
Driving Downhill
When riding downhill, the operator m ust keep the speed at a minimum.
It is important to apply just enough throttle to keep the clutch engaged
while descending the hill. This will allow use of the engine’s
compression to help slow the machine, and keep the snowmobile from
rolling freely downhill.
WARNING
Teach your child to never stand or get off the machine on the
downhill side of the machine. Serious injury or death could result.
Driving Responsibly
It is up to you, the adult, to teach your child the proper and safe way to
ride a snowmobile. You must set boundaries and adhere to them,
keeping your child’s safety foremost in your mind. Never allow your
child to operate this machine without adult supervision.
41
Page 44

ADULT SECTION
Component Identification
4
3
10
14
13
5,6
7
8
8
9
1. Hood 8. Rear Suspension
2. Headlight 9. Nosepan
3. Windshield 10. Trailing Arm
4. Handlebar 11. Skis
5. Seat 12. Front Bumper
6. Storage (under seat) 13. R ear Bumper
7. Taillight 14. Snow Flap
8. Track
2
1
12
11
42
Page 45

Component Identification
10
ADULT SECTION
11
1
2
9
5
1. Stop Switch
2. Tether Strap
3. Throttle Control
4. Recoil Starter Handle
5. Hood Hold-Down
6. Choke Button
7. Gas Cap
8. Ignition Switch
9. Console
10. Brake Lever
11. Tether Switch
3
4
7
8
6
5
43
Page 46

ADULT SECTION
Break-In Period
Engine Break-In
The break-in period for your new snowmobile is defined as the first ten
hours of operation, or the time it takes t o use the first two tanks full of
gasoline. No single action on your part is as important as a proper
break-in period. Careful treatment of a new engine will result in more
efficient performance and longer life for the engine. Perform the
following procedures carefully.
1. Drive slowly at first. Select an area that’ s open and will allow room
to familiarize yourself with vehicle operation and handling.
2. Vary the throttle positions. Do not operate at sustained idle.
3. Perform regularchecks on fluid levels, controls and all important areas
on the vehicle, as outlined in the maintenance section.
4. Break in the oil. Change the oil after the first 20 hours of operation.
CAUTION
S Never mix brands of oil. Serious chemical reactions can cause
oil passage blockage, resulting in severe engine damage and
voiding of engine warranty. The only oil recommended for this
system is Polaris Premium 4 All Season Synthetic oil. This oil
has been specially formulated for all temperatures and has
extreme cold flow characteristics.
S Do not operate at prolonged full throttle for the first three hours
of operation. Vary the throttle openings and machine speeds.
This will reduce friction on all close fitting machined parts and
allow them to break in slowly without damage.
S Avoid operating on ice or hard-packed surfaces, roads, etc.
The absence of lubrication and cooling by snow will lead to
overheating of the slide rail and track resulting in premature
wear and failure. Reduce speeds and frequently drive into
fresh snow to allow adequate cooling and lubrication of the
slide rail and track surfaces.
S Drive with extra caution during the break-in period. Perform
regular checks on fluid levels, lines, and all important areas of
the machine.
44
Page 47

ADULT SECTION
Break-In Period
CAUTION
Mixing brands or using a non-recommended oil may cause serious
engine damage. We recommend the use of Polaris Premium 4 All
Season Synthetic oil. Never substitute or mix oil brands.
Checking Engine Oil
Before checking or refilling engine
oil, be sure the engine is stopped and
the vehicle is positioned on a stable,
level surface.
NOTE: Always change the oil if it’s
become contaminated.
1. Remove the dipstick and wipe it
dry with a clean shop towel.
2. Insert the dipstick (A) into the oil
fill hole, then remove it and read
the oil level. NOTE: Do not
thread the dipstick into the hole
to perform the oil check.
3. If the oil level is below the lower
level mark (B) on the dipstick,
add the recommended oil to the
upper mark (C).
NOTE: Always use Polaris Premium 4 All Season Synthetic Oil or
any class SE, SF (API classification) or higher grade oil. If
multi-grade oil is used, oil consumption will increase when the
ambient temperature is high.
A
C
B
45
Page 48

ADULT SECTION
Operation
Fuel
When refueling, use either leaded or unleaded gasoline with a
minimum pump octane number of 87=(R+ M/2) octane.
Fuel Safety
WARNING
Gasoline is highly flammable and explosive under certain
conditions.
S Always exercise extreme caution whenever handling gasoline.
S Always refuel with the engine stopped, and outdoors or in a
well ventilated area.
S Do not smoke or allow open flames or sparks in or near the
area where refueling is performed or where gasoline is stored.
S Do not overfill the tank. Do not fill the tank neck.
S If gasoline spills on your skin or clothing, immediately wash it
off with soap and water and change clothing.
S If you get gasoline in your eyes or if you swallow gasoline, see
your doctor immediately.
S Never start the engine or let it run in an enclosed area. Engine
exhaust fumes are poisonous and can cause loss of consciousness or death in a short time.
S Turn the fuel valve off whenever the vehicle is stored or
parked.
WARNING
The engine exhaust from this product contains chemicals known
to cause cancer, birth defects or other reproductive harm.
Operate this vehicle only outdoors or in well-ventilated areas.
46
Page 49

ADULT SECTION
Operation
Speed/Performance Regulation
Adults have the responsibility for teaching children the proper and safe
way to ride a snowmobile. Please set boundaries and adhere to them,
keeping your child’s safety foremost in your mind. Never allow a child
to operate this machine without adult supervision.
Under certain circumstances it may be necessary for an adult to
regulate the speed and acceleration of the snowmobile by moving the
governor lever spring. Use the following procedure to set the
performance level.
CAUTION
Hot engine components can cause serious burns to skin. Always
perform the following procedures when the engine is cool.
For maximum performance,
move governor spring (A) to
hole #3.
For minimum performance
move governor spring to hole
#1.
3
1
A
47
Page 50

ADULT SECTION
Operation
Starting the Engine
Never start the snowmobile without checking all components to be sure
of proper operation. Refer to the Pre-Ride Check beginning on page
25.
Starting a Cold Engine
1. Turn the key to ON.
2. Pull the engine stop switch (shut-off switch) up to the RUN
position.
3. Pull the choke lever completely outward to the FULL ON position.
NOTE: Do not depress the throttle while starting.
4. Grasp the starter handle and pull slowly until the recoil engages,
then pull abruptly to start.
CAUTION
Extending the starter rope too far or allowing it to snap back into
the housing will cause damage to the recoil assembly. Do not
extend the starter rope to its maximum length, and do not drop
the rope handle during starting.
5. If the engine slows or stops, position the choke knob half way in t o
allow proper engine warm-up.
6. Apply the brakes and vary the engine RP M slightly with the
throttle to aid in warm-up. When the engine idles smoothly, push
the choke all the way in. NOTE: To prevent excessive wear on
the clutch components, don’t engage the clutch while performing
the warm-up.
Starting a Warm Engine
1. Turn the key to ON.
2. Pull the engine stop switch (shut-off switch) up to RUN.
3. Grasp the starter rope handle and pull slowly until the recoil
engages, then pull abruptly to start.
48
Page 51

ADULT SECTION
Operation
Emergency Stopping Procedures
The following chart lists methods for stopping the engine in the event
of an emergency.
SYSTEM WHAT IT DOES THROTTLE
CONDITION
Engine Stop Switch Interrupts ignition circuit All
Ignition Switch Interrupts ignition circuit All
Tether Switch Interrupts ignition circuit All
Throttle Safety Switch Interrupts ignition circuit All
Choke Floods engine 1/2 throttle or less
Brake Slows drive shaft All
Daily Storage
Whenever the machine is placed in
overnight or daily storage the
following steps must be taken:
1. Park the snowmobile on a level
surface and support it at the rear
so the track is suspended
approximately 4″ (20 cm) from
the ground.
2. Remove the key and cover the
machine using the Polaris cover
available for your model. See
your dealer for more information.
49
Page 52

ADULT SECTION
Operation
Pre-Ride Warm-Up
Always warm up the engine, drive train and track before operating the
snowmobile. With the snowmobile securely supported by the rear
bumper with a minimum clearance of 4″ (10 cm) from the ground, use
the following procedure to properly warm up the snowmobile.
WARNING
A loose track or flying debris could cause serious personal injury or
death. Be sure the rear support is stable. Stand clear of the front
of the machine and the moving track. Never hold the snowmobile
up or stand behind it while performing this procedure. Do not use
too much throttle during warm-up or when the track is free-hanging.
1. Start t he engine and allow it to warm up two to three minutes.
2. Engage the drive system abruptly and allow it to rotate the track
several revolutions. NOTE: The outside temperature will
determine the amount of track warm-up required.
3. Shut off the engine and remove the rear support.
4. Grasp the skis by their front loops and move from side to side.
This will loosen frozen snow from the ski bottoms, allowing the
machine to move forward more easily.
5. The engine, drive system and track are now properly warmed up
and the machine can be driven following normal safety practices.
50
Page 53

ADULT SECTION
Maintenance
Polaris Recommended Maintenance Program
Your Polaris snowmobile has been engineered and manufactured by
skilled P olaris personnel to the highest degree of performance and
reliability possible. In order t o m aintain this level of quality, your
machine must have regular service and maintenance inspections.
The Polaris Recommended Maintenance Program is intended to assist
you in performing routing maintenance that will ensure trouble-free
enjoyment of your Polaris snowmobile. If the recommended regular
maintenance and service checks are followed, you will be doing your
part in keeping this snowmobile in excellent operating condition at all
times.
The recommended maintenance schedule for your snowmobile calls for
a service and maintenance inspection at 50 hours, at 100 hours and at
150 hours. These inspections should be performed by a qualified
service technician.
NOTE: Any replacement parts and labor incurred, with the exception
of authorized warranty repairs, are the responsibility of the registered
owner. If parts failures occur during the course of the warranty period
as a result of owner neglect in performing the recommended periodic
maintenance, the cost of repairs shall be the responsibility of the
owner.
Please read and follow the recommended maintenance program
illustrated on the following pages to maintain the performance and
reliability of your Polaris snowmobile.
51
Page 54

ADULT SECTION
Maintenance
Careful periodic maintenance will help keep your vehicle in the safest,
most reliable condition. Inspection, adjustment and lubrication of
important components are explained in the following chart and in the
maintenance section of this manual.
Service and adjustments are critical. If you’re not familiar with safe
service and adjustment procedures, have a qualified dealer perform
these operations.
NOTE: The following chart is a guide based on average riding
conditions. You may need to increase frequency based on riding
conditions. When inspection reveals the need for replacement parts,
we recommend the use of genuine Polaris parts, available from your
Polaris dealer.
ITEM DAILY WEEKLY OR
Check brake operation and
adjustment
Test engine stop switch
(auxiliary shut-off switch)
Test throttle safety switch X 27
Test tether switch X 31
Test throttle lever operation X 26
Test brake lever operation X 26
Check steering system
operation
Check operation of headlight
and taillight
Clean dust and chaff from
engine
Check ski skags, replace when
worn to 1/2 original diameter
Inspect fuel lines, replace if
needed
Check engine oil level X 62
Oil the drive chain Every10Hrs
Check track tension, tighten if
necessary
Grease the clutch Every15Hrs 61
Change oil At 20 Hrs X X X 62
X 58-59
X 28
X 26
X 31
X
X 76
X 56
BEFORE
EXTENDED
PERIOD OF
OPERATION
Every10Hrs 67
50
HRS
100
HRS
150
HRS
SEE
PAG E
52
Page 55

ADULT SECTION
Maintenance
ITEM DAILY WEEKLY OR
Check track alignment X 69
Check drive chain tension X 60
Check and tighten any loose
suspension mounting bolts
Tighten ski saddle and spindle
bolts if loose
Check front and rear limiter
strap condition, tighten loose
bolts
Check hi-fax thickness, replace
when worn (see dealer)
Tighten rear idler wheel bolts if
loose
Check spark plug condition X 61
Check for brake cable wear
and adjustment
Throttle cable pivot slug X X X 58
Lubricate steering post support
bracket and pivot (aerosol)
Grease ski spindles X X X 63
Lubricate ski bushings to
spindle area
Grease lower steering post
pivot
Grease rear suspension pivot
shafts
Lubricate throttle cable X X 58
Lubricate choke slide and cable X X 58
Inspect exhaust pipe for cracks
or damage
BEFORE
EXTENDED
PERIOD OF
OPERATION
X 77
X 74
X 78
X 72
X 69
X 58
50
100
HRS
HRS
X X X 63
X X X 63
X X X 77
X X X 77
X X X 56
150
HRS
SEE
PAG E
53
Page 56

ADULT SECTION
Maintenance
Present this section of your manual to your dealer each time your
snowmobile is serviced. This will provide you and future owners with
an accurate log of maintenance and services performed on the
snowmobile.
50 Hour Initial Maintenance Inspection
Authorized Polaris Servicing Dealer
Servicing Technician
Date Mileage
100 Hour Maintenance Inspection
Authorized Polaris Servicing Dealer
Servicing Technician
Date Mileage
150 Hour Maintenance Inspection
Authorized Polaris Servicing Dealer
Servicing Technician
Date Mileage
Additional Services Performed
Authorized Polaris Servicing Dealer
Servicing Technician
Date Mileage
Type of Service
Additional Services Performed
Authorized Polaris Servicing Dealer
Servicing Technician
Date Mileage
Type of Service
54
Page 57

ADULT SECTION
Maintenance
Spark Plugs
A new engine can cause temporary spark plug fouling even though the
heat range is proper, due to the preservative which has been added
during assembly of the engine to combat rust and corrosion. Avoid
prolonged idle speeds, as plug fouling and carbonization will result.
CAUTION
Using non-recommended spark plugs can result in serious engine
damage. Always use Polaris-recommended spark plugs.
S Use BR6ES spark plugs.
S Proper electrode gap is .028″ (.70 mm).
S Spark plug torque is 12-14 ft. lbs. (16.6-19.3 Nm).
S Always carry spare spark plugs
Spark plug condition is indicative of engine operation. The spark plug
firing end condition should be read after the engine has been warmed
up and the vehicle has been driven. Immediately check the spark plug
for correct color .
WARNING
A hot exhaust system and engine can cause serious burns. Wear
protective gloves when removing a spark plug for inspection.
1. Normal
The normal insulator tip is gray, tan or light brown. There will be few
combustion deposits. The electrodes are not burned or eroded. This
indicates the proper type and heat range for the engine and the service.
NOTE: The tip should not be white. A white insulator tip indicates
overheating, caused by use of an improper spark plug or incorrect
carburetion adjustments.
2. Wet Fouled
The wet fouled insulator tip is black. A damp oil film covers the firing
end. There may be a carbon layer over the entire nose. Generally, the
electrodes are not worn. General causes of fouling are excessive oil,
use of non-recommended oil, improper use of the choke, or incorrect
carburetion adjustments.
55
Page 58

ADULT SECTION
Maintenance
Spark Plugs
Spark Plug Removal and Replacement
1. Remove the spark plug cap.
2. Using the special wrench provided in the tool pouch, rotate the
spark plug counterclockwise to remove.
3. Reverse the procedure for spark plug installation. Torque to 12-14
ft. lbs. (16.6-19.3 Nm).
Fuel Valve/Fuel Lin es
The fuel valve and the fuel lines should be
inspected regularly. Special attention
should be given to the system’s fuel line
condition after periods of storage. Normal
deterioration from weather and fuel
compounds can occur.
Exhaust System
At approximately 50 hours, check the
exhaust system for wear or damage. To
inspect, allow the engine and exhaust
system to cool completely. Open the hood and i nspect the muffler and
pipes for cracks or damage. Check for weak or missing retaining
springs or damper/support grommets.
CAUTION
Serious burns may occur if this inspection is performed without
allowing adequate time for the exhaust system to cool. Exhaust
system temperatures can exceed 900° F (500° C). Never perform
this procedure with the engine running or shortly after it’s been
running.
56
Page 59

ADULT SECTION
Maintenance
Carburetor
Proper carburetor adjustment is critical, since a mixture too lean (too
much air, too little fuel) will result in overheating of the combustion
chamber causing pre-ignition of the fuel. This results in piston
burning, bearing failure, or complete engine failure. A lean mixture
can be the result of fuel line restrictions, foreign matter in the
carburetor, etc. A mixture too rich (too much fuel, too little air) is also
unfavorable because it can foul plugs and cause generally poor engine
performance.
All carburetors have been pre-set at the factory for adequate fuel
supply. Higher altitude operation may require different adjustment and
settings. The number stamped in the end of the main jet indicates the
jet size that was installed at the time of manufacture. For questions
about optional jetting for conditions in your area, see your Polaris
dealer.
1. Engine
2. Carburetor
Correct setup provides engine RPM
within its given power band at full
throttle settings and also provides
maximum efficiency and operation
at all other throttle openings. See
your dealer for carburetor
adjustments, which may include the following:
S Carburetor component changes for specific altitude and ambient
temperatures;
S Choke adjustment;
S Air screw settings, if applicable;
S Idle RPM adjustments;
S Throttle safety switch checks and servicing;
S Throttle block to throttle flipper clearance adjustment
1
2
CAUTION
Improper carburetor adjustments can result in safety hazards as
well as serious engine damage. We recommend that all
carburetor adjustments be performed by your Polaris dealer.
57
Page 60

ADULT SECTION
Maintenance
Throttle Cable Lubrication
With the engine off, lubricate the throttle
cable occasionally. Turn the handlebars
to the left and lubricate liberally with
Polaris All Season Grease.
Choke/Cable Lubrication
Lubricate the choke slide and cables
occasionally as shown. Operate the choke
intermittently before turning the machine
off. This draws moisture out of the choke
plunger area and reduces the possibility of
the choke becoming frozen.
Throttle Cable Pivot Slug
Lubricate the throttle cable pivot
slug (A) every 50 hours or twice
a year using an aerosol lubricant.
Brake Lever Travel
Measure the clearance between the lever
and brake block. Inspection s hould be
made with the lever firmly depressed.
Distance B should be no more than 3/4″
(1.9 cm)
Excessive travel indicates a need for brake
cable adjustment.
58
A
B
Page 61

ADULT SECTION
A
Maintenance
Brake Adjustment
If excessive brake lever to brake block clearance is evident, the brake
cable should be adjusted. If proper adjustment cannot be achieved by
using the following methods, check the brake band for excessive wear.
Your snowmobile dealer can install a new brake band when necessary.
WARNING
Improper brake adjustment can result in brake failure, which could
result in severe injury or death. Perform the adjustment procedures
exactly as outlined or see your Polaris dealer for service.
1. Slide the two rubber protector
covers (A) back to expose the cable
adjuster.
2. Using an 8mm wrench to hold the
barrel nut (B), loosen the jam nut
(C) with a 10mm wrench.
3. With your left hand, grasp the
cables (D) as close to the adjuster
as possible. Use your right hand to
rotate the barrel nut until you have
reached the proper brake lever adjustment.
4. Check the actuator linkage to
ensure there is adequate freedom
of movement for positive brake
operation and that all floating parts
move freely and that all parts are
mounted securely. Tighten
hardware as required.
5. Tighten the adjuster jam nut and
slide the rubber protectors back onto the adjuster.
6. The brake band is adjusted correctly when there’ s 1/4” - 3/8”
(6-10mm) brake lever freeplay and clearance between the brake
lever and block with the lever fully depressed is no more than 3/4”
(1.9cm). Torque the band bolt nut to 6 ft. lbs. (83 kg 2-m)
D
Torque
1/4-3/8″ (6-10 mm)
D
A
BC
59
Page 62

ADULT SECTION
Maintenance
Chain Tensioner
Inspect the chain. The chain should have 1″ of deflection as shown. If
not, loosen the nut on the chain tensioner (A) and raise until 1″ (B) of
deflection is attained. Tighten nut to 15-18 ft. lbs.
When the chain comes within 1/8″ (C) of the muffler mount bracket
(D) on the chassis, the chain has stretched and must be replaced.
Inspect the sprockets as they also become worn and often need
replacement when the chain is replaced.
D
C
A
B
60
Page 63

ADULT SECTION
Maintenance
Lubrication
NOTE: Driveline noise is normal and inherent in a chain drive system
such as this machine uses.
To ensure long life of the snowmobile’s driveline, lubricate as follows:
S Lubricate Point A every 15 hours of operation with a small amount
of Polaris Premium All Season Grease.
S Lubricate Point B every 10 hours of operation with aerosol chain
lube or SAE 30 oil.
1. Engine
2. Torque Converter
(Centrifugal Clutch)
3. Chain
4. Drive S haft
5. Track
6. Carburetor
1
2
A
6
3
B
5
4
61
Page 64

ADULT SECTION
Maintenance
Oil Level
Maintain the oil level between the
safe marks (A) on the dipstick.
A
Oil Change
Change the oil after the initial 20
hours of operation and again after each 50 hours.
Washing Your Snowmobile
Keeping your snowmobile clean will not only improve its appearance
but it can also extend the life of various components. With a few
precautions, your sled can be cleaned much like an automobile.
The best and safest way to clean your sled is with a garden hose and a
pail of mild soap and water. Use a professional type washing mitten,
cleaning the upper body first and the lower parts last. R inse with water
frequently and dry with a chamois to prevent water spots. NOTE: If
warning labels are damaged, contact your a Polaris dealer for free
replacement.
If a high pressure type car wash system is used, extreme care must be
taken to avoid water damage to the hood, console, nosepan, decals, and
warning labels. Many expensive repair bills can result from using high
pressure detergent systems.
NOTE: If a high pressure car wash is used, grease all zerk fittings
immediately after washing. Also run the vehicle to evaporate any
water that might have entered the engine or exhaust system.
Waxing Your Snowmobile
Your snowmobile can be waxed with any high quality brand of
automotive paste wax. Avoid the use of harsh cleaners since they can
scratch the body finish.
62
Page 65

ADULT SECTION
Maintenance
Controls and Linkage
All bushings, spindle shafts, and tie rod ends should be coated with a
light coat of oil or grease. Throttle and brake controls and cables
should be lubricated with Polaris Premium All Season Grease. Force a
small amount of lubricant down the cable.
Bearings
To prevent corrosion which will destroy the bearings, always grease
drive shaft clutch side bearings with a high quality bearing grease.
Electrical Connections
Separate electrical connector blocks and clean corrosive build up from
connectors. Lubricate or pack connector blocks with Nyogelt grease
and re-connect. Replace worn or frayed electrical wire and connectors.
Be sure wiring harness is properly secured away from sharp edges,
steering linkage, moving parts, and hot exhaust.
Front Suspension
To minimize fatigue on the front shocks and springs during extended
storage, it is recommended that the front end of the machine be safely
blocked off the ground to remove tension from the shocks and s prings.
63
Page 66

ADULT SECTION
Maintenance
Engine
Proper off-season preparation of the engine and fuel system is vital to
the prevention of rust and corrosion formation on precision engine
parts during storage.
Without proper storage, jet restriction can cause lean conditions and
very poor slow speed driving quality.
When preparing your snowmobile for off-season storage, we
recommend that you add fuel conditioner/stabilizer or Premium Carbon
Clean (PN2871326) to the fuel tank. Follow the instructions on the
can. Run the engine for five minutes to get additives through the entire
fuel system. Then top off the tank with fresh fuel.
NOTE: This procedure is performed best when the front of the
machine is elevated and the engine is tilted rearward.
Storage
Off season or extended storage of your snowmobile requires you to
take preventative measures to aid against deterioration and to prolong
the useful life of many components.
Your snowmobile should be stored in a dry garage or shed, out of
direct sunlight, and covered with a fabric snowmobile cover. Plastic
tarp can cause condensation to form and may damage some
snowmobile components.
64
Page 67

ADULT SECTION
Maintenance
Carburetor Protection During Off-Season Storage
When preparing your snowmobile for off-season storage we
recommend that you add a fuel conditioner/stabilizer or Premium
Carbon Clean (2871326) to the fuel tank. Follow the instructions on
the can. Run the engine for five minutes to get additives through the
entire fuel system. Then top off with fresh fuel and turn the fuel valve
to OFF.
If stabilizer is not used, make sure the fuel valve is OFF and drain the
carburetor. Catch fuel in a container or shop cloth.
Remove the spark plug and pour approximately 5cc of engine oil into
cylinder. Slowly pull the recoil starter so the engine turns over two or
three times. Reinstall plug securely. Position piston at bottom dead
center (BDC). Observe all fire safety rules when draining carburetor.
See gasoline warnings on page 46.
Slowly pull t he recoil starter handle until resistance is felt. Leave it in
that position. Clean the engine thoroughly with an oiled cloth.
If stabilizer is not used, turn the fuel valve to OFF. Remove the
strainer cup, place the strainer over a container, and open the strainer
cock to discharge fuel from the fuel tank. Remove the carburetor float
chamber bolt from the bottom and discharge fuel from the carburetor.
Replace bolt.
65
Page 68

ADULT SECTION
Maintenance
Transporting the Snowmobile
Whenever the snowmobile is transported the following measures
should be taken:
1. Turn the fuel valve off.
2. Be sure the fuel cap is installed correctly.
3. Always tie the snowmobile to the transporting unit securely using
suitable straps.
NOTE: Transportation to and from a Polaris dealer is the
responsibility of the snowmobile owner. Any expenses involved will
not be reimbursed.
Fall Tune-Up
To obtain maximum performance and use from your snowmobile, we
encourage you to arrange for a fall service tune-up with your Polaris
dealer. He has an experienced and trained service technician who is
interested in keeping your machine in peak operating condition.
Towing
Do not use this snowmobile to tow.
If a situation arises requiring the snowmobile to be towed by another
snowmobile, attach the tow rope to the spindles, not to the ski toe
loops.
For Your Protection
For your added protection it is a good idea to carry the following items
in your snowmobile when traveling farther than a five-minute walk
from home.
S Extra Spark Plugs
S First Aid Kit
S Winter Survival Kit
S Extra Gloves
S Owner’s Manual
66
Page 69

ADULT SECTION
Maintenance
WARNING
Your snowmobile is propelled by a revolving track, which must be
partially exposed for proper operation. Serious injuries may be
caused by the operator’s hands, feet or clothing becoming
entangled in the track. Be alert. Always sit properly on the seat.
Track and Suspension
Under normal conditions
moderate track tension should
be maintained during summer
storage. The rear of the
machine should be supported
off the ground to allow free
hanging of the track.
Track Tension
Track adjustment is critical for
proper handling. Always
maintain correct tension and
alignment.
Tension adjustments should be
made only after the track is
warmed up and limber.
Hi-fax
1. Turn the m achine off.
2. Lift the rear of the machine
and safely support it off the
ground.
Weight
Track
C
B
8″
D
3. Hang a 10 pound weight 8
inches from the center of the
rear idler wheel. The deflection at this point with this amount of
weight should measure 3/4″ between the bottom of hi-fax and the
inside of the track.
NOTE: Measure at the point where the weight is hanging.
4. Check for specified slack between the wear surface of the track clip
and the plastic hi-fax (C).
67
Page 70

ADULT SECTION
Maintenance
Track Adjustment
If the track needs adjustment:
1. Loosen rear idler shaft bolt (D).
2. Tighten or loosen the track adjusting screws (B) as necessary to
provide equal adjustment on both sides of the track.
3. Repeat measurement on the other side of the track.
NOTE: Check more frequently when the machine is new.
4. Start machine and slowly rotate the track at least five revolutions,
let the track stop rotating by itself (do not apply brakes).
5. Check track alignment (side to side) by comparing the distance
from the drive lug to the Hi-fax on both sides. Readjust until
centered.
6. Tighten Idler Shaft Bolt (D).
7. Readjust the toe block to proper spacing and tighten.
68
Page 71

ADULT SECTION
Maintenance
Track Alignment
A periodic check should be made to see that the track is centered and
running evenly on the slide rails. Misalignment will cause excessive
wear to the track and slide rail.
WARNING
When performing the following checks and adjustments, stay clear
of all moving parts to avoid serious personal injury.
Before checking track tension, make sure the track contains no
objects that could be thrown out while the track is rotating. Keep
clear of track. This includes but is not limited to hands, tools, feet
and clothing. Make sure no one is standing close to the machine
while the track is rotating.
1. Safely support the rear of the m achine
with the t rack off the ground using a
jackstand.
2. Start the engine and apply a small
amount of throttle until the track
turns slowly at least five complete
revolutions. Stop the engine.
3. Inspect track alignment by
looking through the track
windows to make sure the rails
are evenly spaced on each side.
If the track runs to the l eft,
loosen left idler wheel
mounting bolt and tighten the
left track adjusting bolt. If the
track runs to the right, loosen
right idler wheel mounting bolt
and tighten the right track
adjusting bolt.
4. After adjustments are complete,
be sure to tighten locknuts and
idler shaft bolts. Torque to 35-40 ft. lbs. (4.8-5.5 kg/m).
5. Repeat step 2 to verify proper alignment.
Rail
Looking through
track window,
make sure the rails
are evenly spaced
on each side.
Hi-fax
69
Page 72

ADULT SECTION
Maintenance
Track Warm Up
When storing your snowmobile
outside overnight, it i s
recommended that the track be
warmed up prior to driving the
snowmobile. This reduces drive
clutch wear. To warm up the track,
safely support the rear of the
snowmobile off the ground, start
the engine and abruptly engage the
clutch. Allow the track to turn for a
short time. Release the throttle,
apply the brakes and shut the
engine off prior to lowering it to the
ground.
Never hold the snowmobile up or
stand behind it while warming up
the track. A loose track or flying
debris could cause serious personal
injury or death.
WARNING
70
Page 73

ADULT SECTION
Maintenance
Track Inspection
WARNING
Inspecting the track while the engine is running can result in serious
personal injury if the track should being to move. Never inspect the
track with the engine running
Using a hoist or jackstand,
safely lift and support the
rear of the snowmobile off
the ground. Rotate the track
by hand to check for any
possible damage.
To inspect track rods,
carefully examine the track
along the entire length of
each rod, bending the track
and inspecting for breakage.
The three most common
places where breakage
occurs are shown in the
illustration.
Check the track clips and tighten if loose. If any rod damage is found,
the track should be replaced.
Lug
21312
Track window
WARNING
Serious personal injury or death may occur if the snowmobile is
operated with a damaged track. Broken track rods are a serious
hazard, since they can cause a rotating track to come off the
machine. Never operate the snowmobile or rotate under power a
track that’s torn or damaged.
NOTE: The 120 XC SP track has molded in track clips. It is common
for a thin layer of rubber to detach from clip area and peel off during
initial use.
71
Page 74

ADULT SECTION
Maintenance
Hi-Fax Replacement
The 120 XC SP uses XTRA
Lite style Hi-Fax. When any
area of the Hi-Fax is worn to
7/16″ (1.1 cm), it should be
replaced. This will save wear
on other vital components.
Thesliderailisdesignedto
operate in conditions with
adequate snow cover to
provide sufficient lubrication. Excessive wear may be due to improper
alignment, improper track adjustment or machine operation on surfaces
without snow. Take the machine to your dealer for Hi-fax replacement.
Hi Fax Wear Limit
7/16″ (1.1 cm)
XTRA Lite
72
Page 75

ADULT SECTION
Maintenance
Track Lubrication
Track failure, loss of vehicle control and braking ability can result from
extended use of this vehicle on surfaces providing marginal lubrication
between hi-fax and track guide clips. Examples of marginal lubrication
would include lakes without snow cover, icy trails and no-snow
conditions.
The slide rail is designed to operate in conditions with adequate snow
cover in order to provide sufficient lubrication. Excessive wear
indicates insufficient lubrication. New hi-fax can cause faster heat
build up in limited lubrication than used hi-fax, resulting in excessive
wear .
NOTE: Track damage or failure caused by operation on ice or poor
lubrication conditions may void the track warranty.
Steering System
WARNING
Improper alignment or adjustment may cause loss of steering
control, resulting in serious injury or death. Do not attempt to
change the ski alignment. Contact your Polaris dealer.
The steering systems on Polaris snowmobiles can be adjusted with ski
toe alignment. Improper toe alignment can cause erratic steering.
Consult your dealer if a need for adjustment should become necessary.
73
Page 76

ADULT SECTION
Maintenance
Steering Inspection and Adjustment
The steering assembly of the
machine should be checked
periodically for loose nuts and
bolts. See A,B,C,D,E, F, and
G in illustration at right.
With handlebars in straight
ahead position and measuring
from the straight edge of the
skis, the measurement
between the skis at point H
should be 1/8 inches greater
than point I, as shown on the
following page. NOTE: This
measurement should be taken
with the vehicle weight
compressing the suspension.
If the skis are misaligned, we
recommend that your dealer
make the necessary
adjustments.
E
G
F
D
C
A
B
74
H
I
Page 77

ADULT SECTION
Maintenance
Handlebar Adjustment
6. Slide the handlebar pad
upward to access the adjuster
bolts. If additional room is
required, unzip one of the
handlebar pad zippers and roll
the pad to the side.
7. To adjust, remove the upper
flange nut and carriage bolt.
8. Loosen the lower flange nut
only enough so the bracket can
move freely.
9. Position the handlebar to the desired height and re-install the upper
carriage bolt and flange nut.
10. Torque the flange nuts to 15-17 ft. lbs.
11. R einstall the handlebar pad.
75
Page 78

ADULT SECTION
Maintenance
Ski Skags
The skag (A) is a replaceable bar
attached to the underside of
the ski. The purpose of the
skag is to assist in turning
the snowmobile and to
prevent the wearing away of the
ski caused by contact with roads
and other bare terrain. We
recommend that skags be checked
once a week to maintain positive
steering characteristics. Skags must be replaced when worn to half
their original diameter.
NOTE: See dealer track studding and skag chart for recommended
skags.
A
WARNING
Worn skis and/or skags will adversely affect handling and can
cause loss of vehicle control, which can lead to serious injury
or death. Replace worn skis and/or skags when inspection
reveals wear.
Skag Replacement
1. Raise and support the front of the machine s o the skis are
approximately 6″ (15.2 cm) from the ground.
2. Remove the attaching nuts and pry the skag downward.
3. Remove the forward portion of the skag.
Reverse this procedure for new skag installation.
NOTE: If the rear idler wheel
assembly (1) washers are removed,
be sure they are reinstalled with the
domed side of the washer facing
out (2) as shown.
76
1
2
Page 79

ADULT SECTION
Maintenance
Suspension Lubrication
To maintain rider comfort and to retard wear of the pivot shafts, the
suspension pivot shafts should be lubricated with Polaris Premium All
Season Grease several times during the season and again before
summer storage each year. The riding characteristics of the
snowmobile will be affected by lack of lubrication of these shafts.
NOTE: A grease gun kit complete with grease and adaptors is
available to lubricate all fittings on Polaris snowmobiles. See page
82.
IMPORTANT: Make it a weekly practice to check for loose bolts and
nuts on the suspension system. If any loose bolts are found on the rail
be sure to clean the threads and apply Loctite 262 before tightening.
77
Page 80

ADULT SECTION
Maintenance
Suspension Components
Suspension Lubrication points are indicated by a L.
1. Front Limiter Strap 8. Rail Bumper
2. Torsion Spring Sleeves 9. Torque Arm
3. Torsion Spring 10. Rail
4. Carrier Wheel 11. Hi-fax
5. Rear Limiter Strap 12. Toe Guard
6. Spacer 13. Idler Wheel
7. Adjuster Bolts
4
3
2
1
L
8
9
10
L
5
6
13
12
11
7
78
Page 81

ADULT SECTION
Accessories
Maintenance Items and Accessories
The tools and maintenance items mentioned in this book, as well as a
long line of other Polaris accessories, are available at your Polaris
dealer.
Paint Codes
Color Description Polaris “P” No. Raw Material No.
Indy Red P293 8520297
Indy Black P067 8520246
Paints can be ordered direct from Midwest Industrial Coatings (612)
942-1836. Mix as directed.
T roubleshooting
Contact your Polaris dealer for service if you’re unable to identify
solutions using the following chart.
Engine Turns Over, Fails to Start
Possible Cause Solution
Tether switch not engaged Install tether switch/strap
Engine stop switch not on Pull stop switch up to RUN position
Throttle safety switch malfunction See your Polaris dealer
Out o f fuel Refuel
Clogged fuel valve or filter Inspect and clean or replace
Water is present in fuel Drain the fuel system and refuel
Fuel valve is turned off Turn the fuel valve on
Old or non-recommended fuel Replace with new fuel
Fouled or defective spark plug(s) Inspect plug(s), replace if necessary
No spark to spark plug Inspect plug(s), verify stop switch is on
Overuse of choke Inspect, clean and/or replace spark plugs
Mechanical failure See your Polaris dealer
79
Page 82

SPECIFICATIONS
Met
Jetting Chart
Altitude Ambient
(Feet)
ers
Temperature
0-600
(0-2000)
600-1200
(2000-- 4000)
1200-- 1800
(4000-6000)
1800-2400
(6000-8000)
2400-3000
(8000-10000)
3000-3600
(10000-12000)
Below
-30_F
Below
-34_C
75 72.5 72.5 72.5 70 70
75 72.5 72.5 72.5 70 70
72.5 70 70 70 67.5 67.5
70 67.5 67.5 67.5 65 65
67.5 65 65 65 62.5 62.5
65 62.5 62.5 62.5 60 60
-30_ to
-10_F
-34_ to
-23_C
-10_ to
+10_F
-23_ to
-12_C
+10_ to
+30_F
-12_ to
-1_C
Clutching Chart DELETE CHART, N/A
Altitude
Meters (Feet)
0-900
(0-3000)
900-1800
(3000-6000)
1800-2700
(6000-9000)
2700-3700
(9000-12000)
Shift
Weight
Drive
Clutch
Spring
Driven
Clutch
Spring
Driven
Helix
10-62 Yellow Black R-11
#2
10-62 Yellow Black R-11
#2
10-58 Yellow Black R-11
#2
10-56 Yellow Black R-11
#2
+30_ to
+50_ F
-1_ to
+10_C
Above
+50_F
Above
+10_C
Chaincase
Gearing
18:39 72P
HYVO
18:39 72P
HYVO
17:41 72P
HYVO
17:41 72P
HYVO
80
Page 83

SPECIFICATIONS
Capacities and Dimensions
Body Style Mini Indy
Riders/Weight 1/150 lbs./68 kg maximum
Engine Oil .6 qts./.57 l
Dry Weight (est.) 147.5 lbs./67 kg
Fuel Tank .5 gal./1.9 l
Height 31 in./78.7 cm
Length 75 in./190.5 cm
Ski Center Distance 30 in./76.2 cm
Width 34 in./86.4 cm
Brake Type Mechanical
Clutch Type Centrifugal
Track Length 69 in./175.3 cm
Track Width 10 in./25.4 cm
Drive Chain Length #40
Suspension
Front Type IFS
IFS Shock Type Mini
Rear Type Mini Indy
Engine and Cooling
Engine Model Number EH122PM013
Alternator Output 50 watt @ 3600 rpm
Bore x Stroke 60x43mm
Displacement 121 cc
Carburetor Model Mikuni BV18
Main Jet 72.5
Pilot Jet 50
Cutaway 170 Throttle Valve
Fuel Screw 1.5 Turns
Pilot Air Jet 1.3
Idle RPM 1600 +/- 200
Cooling Air
Cylinders 1
Ignition Timing 23_ BTDC @ 3600 rpm
Ignition Type Flywheel Magneto (solid state)
Oil Injection 0W-40 Synthetic
Spark Plug NGK BR6ES
SparkPlugGap .70 mm/.028 in.
Minimum Fuel Requirement 87 Octane Non -Oxygenated or 89 Octane Oxygenated
81
Page 84

POLARIS RECOMMENDED PRODUCTS
Part No. Description
Engine Lubricant
2871281 Premium 4 Synthetic 0W-40 Engine Oil (4-Cycle)(qt.)
Gearcase / Transmission Lubricants
2873602 Premium Synthetic Gearcase Lubricant (qt.)
2871653 Premium Front Gearcase Lube (8 oz.)
2871654 Premium Drive Hub Fluid (8 oz.)
Grease / Specialized Lubricants
2871312 Grease Gun Kit, Premium All Season (3 oz.)
2871322 Premium All Season Grease (3 oz. cartridge)
2871423 Premium All Season Grease (14 oz. cartridge)
2871460 Starter Drive Grease (2 oz.)
2871515 Premium U-Joint Lube (3 oz.)
2871551 Premium U-Joint Lube (14 oz.)
2871329 Dielectric Grease (Nyogelt)
Coolant
2871323 60/40 Coolant (gal.)
2871534 60/40 Coolant (qt.)
Additives / Miscellaneous
2870791 Fogging Oil (12 oz. Aerosol)
2871326 Carbon Clean Plus (12 o z.)
2870652 Fuel Stabilizer (16 oz.)
2870990 DOT3 Brake Fluid (12 oz.)
2872893 Engine Degreaser (12 oz.)
82
Page 85

SERVICE AND WARRANTY
Polaris Anti-Theft System
The P olaris anti-theft system monitoring program (PATS) is designed
to aid owners of registered snowmobiles in recovery of their machines,
if stolen.
Administration
1 Polaris snowmobile owner reports theft.
A. In addition to notifying the proper law enforcement officials, the owner must call the Polaris warranty department in
the United States and Canada.
US #763-542-0500
Canada #204-925-7100
B. Owners must provide their name, address, telephone number and model and serial number of stolen machines.
2 Polaris warranty will provide all dealerships with a monthly
updated list of all stolen units, to further monitor thefts.
3 Polaris warranty will aid in notification of recovered units to their
proper owner.
Obtaining Service and Warranty Assistance
Read carefully and understand the service data and t he Polaris
Warranty contained in this manual. Contact your Polaris dealer in
matters pertaining to replacement parts, service or warranty. He is
constantly kept up to date on changes, modifications and tips on
snowmobile maintenance, which may supersede information contained
in this manual. He is familiar with our policies and procedures and
will be happy to assist you.
83
Page 86

SERVICE AND WARRANTY
When writing about parts, service or warranty, always include the
following information:
1. Serial number 5. Details of trouble experienced
2. Model number 6. Length of time and conditions of operation
3. Dealer name 7. Indicate previous correspondence
4. Date of purchase
Use the following space to record the model and serial numbers of your
machine and engine.
Machine Model No.
Machine Serial No.
Engine Model No.
Engine Serial No.
84
Page 87

WARRANTY
LIMITED WARRANTY
Polaris Industries Inc., 2100 Highway 55, Medina, Minnesota 55340,
gives a ONE YEAR LIMITED WARRANTY on all components of the
Polaris snowmobile against defects in material or workmanship. This
warranty covers the parts and labor charges for repair or replacement of
defective parts which are covered by this warranty. This warranty
begins on the date of purchase. This warranty is transferrable to
another consumer during the warranty period through a Polaris dealer.
REGISTRATION
At the time of sale, the Warranty Registration Form must be completed
by your dealer and submitted t o Polaris within ten days. Upon receipt
of this registration, Polaris will record the registration for warranty. No
verification of registration will be sent to the purchaser as the copy of
the Warranty Registration Form will be the warranty entitlement. If
you have not signed the original registration and received the
“customer copy”, please contact your dealer immediately. NO
WARRANTY COVERAGE WILL BE ALLOWED UNLESS YOUR
SNOWMOBILE IS REGISTERED WITH POLARIS.
Initial dealer preparation and set-up of your snowmobile is very
important in ensuring trouble-free operation. Purchasing a machine in
the crate or without proper dealer set-up will void your warranty
coverage.
WARRANTY COVERAGE AND EXCLUSIONS:
LIMITATIONS OF WARRANTIES AND REMEDIES
The warranty excludes any failures that are not caused by a defect in
material or workmanship. This warranty does not cover accidental
damage, normal wear and tear, abuse or improper handling. This
warranty also does not cover any snowmobile that has been altered
structurally, neglected, improperly maintained, used for racing, or used
for purposes other than for which it was manufactured, or for any
damages which occur during trailer transit or as a result of
unauthorized service or the use of unauthorized parts. In addition, this
warranty does not cover physical damage to paint or finish, stress
cracks, tearing or puncturing of upholstery material, corrosion, or
defects in parts, components or snowmobile due to fire, explosions or
any other cause beyond Polaris’ control.
85
Page 88

WARRANTY
This warranty does not cover the use of unauthorized lubricants,
chemicals, or fuels that are not compatible with the snowmobile.
The exclusive remedy for breach of this warranty shall be, at Polaris’
exclusive option, repair or replacement of any defective materials, or
components or products. THE REMEDIES SET FORTH IN THIS
WARRANTY ARE THE ONLY REMEDIES AVAILABLE TO ANY
PERSON FOR BREACH OF THIS WARRANTY. POLARIS SHALL
HAVE NO LIABILITY TO ANY PERSON FOR INCIDENTAL,
CONSEQUENTIAL OR SPECIAL DAMAGES OF ANY
DESCRIPTION, WHETHER ARISING OUT OF EXPRESS OR
IMPLIED WARRANTY OR ANY OTHER CONTRACT,
NEGLIGENCE, OR OTHER TORT OR OTHERWISE. Some states
do not permit the exclusion or limitation of incidental or consequential
damages or implied warranties, so the above limitations or exclusions
may not apply to you if inconsistent with controlling state law.
ALL IMPLIED WARRANTIES (INCLUDING BUT NOT LIMITED
TO THE IMPLIED WARRANTIES OF MERCHANTABILITY AND
FITNESS FOR A PARTICULAR PURPOSE) ARE LIMITED IN
DURATION TO THE ABOVE ONE YEAR WARRANTY PERIOD.
POLARIS FURTHER DISCLAIMS ALL EXPRESS WARRANTIES
NOT STATED IN THIS WARRANTY. Some states do not allow
limitations on how long an implied warranty lasts, so the above
limitation may not apply to you if inconsistent with controlling state
law.
86
Page 89

WARRANTY
HOW TO OBTAIN WARRANTY SERVICE
If your snowmobile requires warranty service, you must take it to a
Polaris dealer authorized to repair Polaris snowmobiles. When
requesting warranty service you must present your copy of the
Warranty Registration form to the dealer. (THE COST OF
TRANSPORTATION TO AND FROM THE DEALER IS YOUR
RESPONSIBILITY). Polaris suggests that you use your original
selling dealer; however, you may use any Polaris Servicing Dealer to
perform warranty service.
Please work with your dealer to resolve any warranty issues. Should
your dealer require any additional assistance they will contact the
appropriate person at P olaris.
This warranty also gives you specific legal rights, and you may also
have other rights which vary from state to state.
If any of the above terms are void because of state or federal law, all
other warranty terms will remain in effect.
Engine Oil
1. Mixing oil brands or using non-recommended oil may cause engine
damage. We recommend the use of Polaris engine oil.
2. Damage resulting from the use of non-recommended lubricants may
not be covered by warranty.
87
Page 90

WARRANTY
Polaris Extended Service Contract
Polaris now is offering an extended engine service contract which provides the following benefits:
S Additional engine protection beyond the original twelve month war-
ranty.
S Backed by the strength of Polaris - no third party involvement.
S Repairs use only genuine top quality Polaris parts.
S Peace of mind. The Polaris Extended Service Contract is honored
by all authorized Polaris snowmobile dealers in North America.
However, where possible we urge you to contact the selling dealer.
There are no cards for you to carry as repair authorization for your
dealer is only a phone call away.
S The Polaris Extended Service Contract is very affordable and can be
financed with the P olaris Star Card.
Conditions:
S The Polaris Extended Service Contract must be purchased within 90
days from the date of the unit’s registration.
S Each repair visit it subject to a $50.00 deductible.
S The Extended Service Contract applies to the first 5000 miles or two
calendar years from date of registration, whichever comes first.
Tampering with the odometer shall void t he Extended Service Contract. No extensions to coverage under the Extended Service Contract will be given.
S Snowmobiles used in commercial purposes or for racing are ex-
cluded from coverage.
88
Page 91

A
Accessories 79.....................
Auto Chain Tensioner 60.............
B
Brake Adjustment 59................
Brake Lever Travel 58...............
Break-In Period 44-45..............
INDEX
P
Paint Codes 79.....................
Pre-Ride Warm Up 50...............
Pre-Ride Check 19-20..............
Preservation of the Environment 7-8...
R
Riding Rules 21-24.................
C
Carburetor 57.....................
Carburetor Protection 65.............
Checking Engine Oil 45.............
Choke and Cable Lubrication 58.......
Clutching Chart 80.................
Component Identification 42-43.......
E
Electrical Connections 63............
Emergency Stopping Procedure 49.....
Engine Break-In 44.................
Engine Stop Switch 28..............
Equipment Modifications 10..........
Exhaust System 56.................
F
Fall Tune-Up 66...................
Front Suspension 63................
Fuel Safety 46.....................
H
Hi-Fax Inspection, Replacement 72....
J
Jetting Chart 80....................
K
Know Your Snowmobile 14-18.......
L
Lubrication 61.....................
M
Maintenance Inspection 54...........
Maintenance Program 11, 51.........
O
Oil 45............................
Oil Change 62.....................
Oil Level 62.......................
Operation 46-50...................
Operation Warnings 29-41...........
Oxygenated Fuels 46................
S
Safety 10-13......................
Safety Decals 12...................
Service and Warranty Information 83-84
Signal words 13....................
Skag Replacement 76...............
Ski Skags 76......................
Spark Plugs 55-56..................
Specifications 80-81................
Speed Regulation 4 7................
Starting a Cold Engine 48............
Starting a Warm Engine 48...........
Starting the Engine 48...............
Steering Inspection and Adjustment 74.
Steering System 73.................
Storage 49, 63-64..................
Maintenance 51-78.................
Suspension Components 78..........
Suspension Lubrication 77...........
Symbols 13.......................
T
Throttle Cable Lubrication 58.........
Throttle Cable Pivot Slug 58..........
Throttle Safety Switch 27............
Towing 66........................
Track Adjustment 68................
Track Alignment 69.................
Track and Suspension 67.............
Track Inspection 71.................
Track Lubrication 73................
Track Tension 67...................
Track Warm-Up 70.................
Transporting 6 6....................
Troubleshooting 79.................
V
Vehicle Identification Numbers 9......
W
Warranty 85-88....................
Wash i n g 62.......................
Waxing 62........................
Welc o m e 4........................
Windchill/Temperature Charts 36......
89
Page 92

Part No. 9917595
PRINTED IN THE USA
 Loading...