

Polario 4 ML, 7 ML, 10 ML, 15 ML, 22 ML Booklet
WARNING! Buyer/user assumes all responsibility
for safety and proper use not in accordance with
the directions and safety labels.
Drip Loop
GFCI
ONLY
YES
NO
Drip Loop
UL Listed
Transformer
UL Listed
Transformer
Controller
Controller
Drip Loop
6 ft.
5 ft.
6 ft.
5 ft.
3 ft.
GFCI
ONLY
GFCI
ONLY
4ML
7ML & 10ML
GFCI
ONLY
GFCI
ONLY
4ML
21 3 4
1110-11
7-10ML
6
5
7
10
9
9
8
FUSE
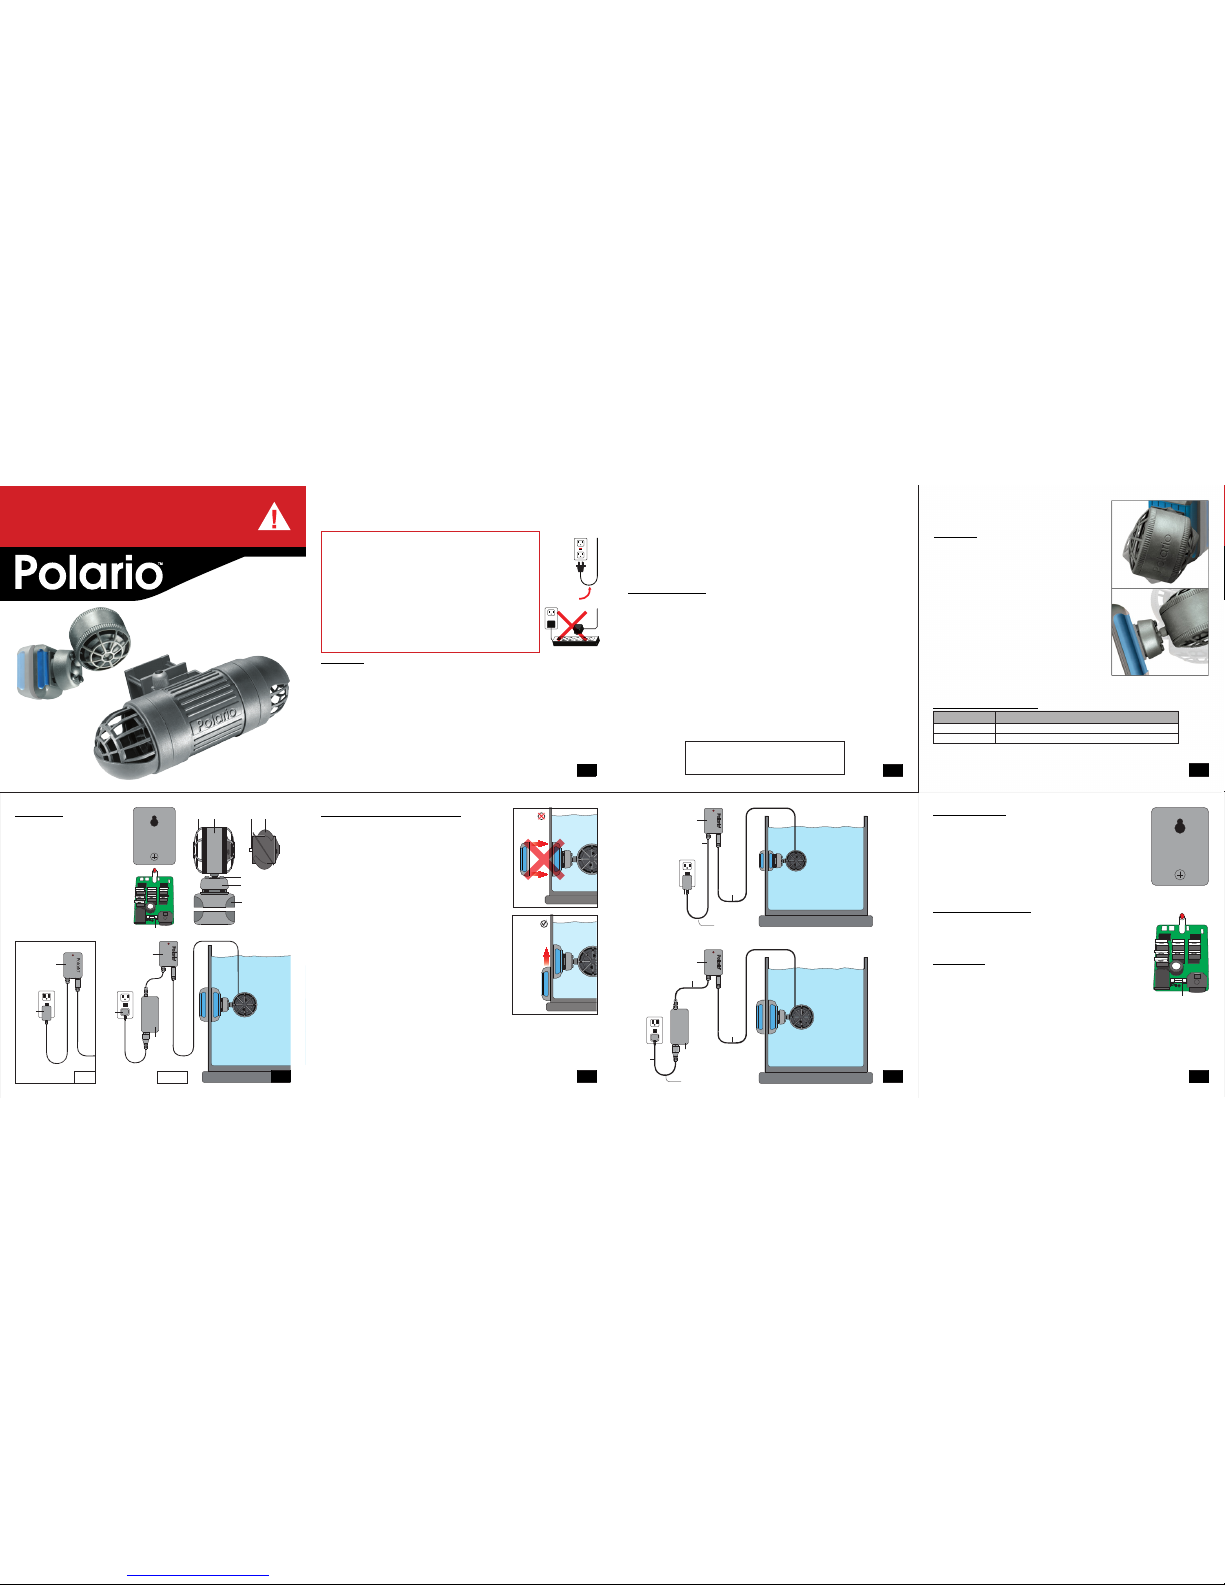
1a. Back Plate
1
2
3
4 75 6
WARNINGS AND SAFEGUARDS
Before installat ion of the Polario™, read and follow t hese important Warni ngs and Safeguards.
This product may cont ain chemicals known to the s tate of California to caus e
cancer and or birt h defects or other reproduc tive harm. Wash your hand af ter
handling this produ ct.
It is your sole respons ibilities to verify th at the plug and the receptac le are
clean and free of mois ture and salt build up at all t imes. The receptacle
must be free of water, salt, c alcium, magnesium and dus t. Failure to do so
can cause fire, damag e to property, permanen t damage to the product and
personal injur y not limited to loss of life.
Do not plug into extens ion cord/power strip .
A drip loop must be used w hen plugging all electr ical aquarium devices . A drip
loop is that part of th e cord hanging below the rec eptacle.
The national code re quires that a GFCI (Ground fa ult circuit interru pter) be
used in the branch cir cuit supplying all powe r to water pumps and electric al
aquarium equipmen t. If you do not have a GFCI, have an ele ctrician install
one prior to operati ng any aquarium component .
POLARIO
• Do not mount control ler or transformer whe re it will come in contac t with moisture or water.
• Never plug Polario™ into any othe r power supply.
• Do not mount the contr oller or transformer i nside the stand.
• Do not operate the pump o ut of water.
• Do not put your hands or fi ngers in the propeller w ell.
• Intended for indoor u se only.
• Mount the controll er above the aquarium.
• If the controller o r transformer comes i n contact with water, do not reac h for it. Disconnect pow er
first, then retr ieve.
• Prior to maintenanc e on any electrical aqua rium appliance or mainte nance to the aquarium, you
4ML, 7ML & 10ML
FEATURE
TURBINE DUAL ACTION
RANDOM FLOW WATER
PATENT PENDING
• Energy efficient, high flow l ow voltage water pump
• Bi-directional outputs to si mulate natural wave and
currents of the ocean
• Pre-set random flow and altern ating outputs
• Random flow rates from approximatel y 600 GPH to
2600 GPH (2,300 LPH to 10,000LPH) depending on
the model
• 360° degree directional pump mo unting bracket with
magnet mount
must disconnect al l electrical aquar ium devices.
• Routine maintenanc e is required to ensure the ma ximum performanc e and the longevity of the
Polario™ water pump. See mainte nance guidelines.
• The use of a computer gra de surge suppressor is st rongly recommended.
• Always use the large st rainers to prevent small fi sh, anemones, and/or smal l invertebrates from
entering the pump.
• If the controller o r transformer comes i n contact with water or moi sture, the warranty is voi d!
• If the Polario™ is used with any o ther power supply, the warrant y is void!
MAGNET MOUNT ! DANGER !
• Very strong magnet! N ot a toy! Keep out of reach of childr en! Failure to do so will cause se rious
injury and/or per manent damage to your aquar ium.
• Keep out of reach of child ren.
• Due to the strength of t he magnets, they will attr act other metals or magnet s with force. When
installing or handli ng magnets, there must not be a ny other magnets or metals in c lose proximity to
the magnet holders . Failure to do so can cause ser ious injury.
• Keep away from devices se nsitive to magnetic fiel ds, such as pacemakers, dat a carriers, credit
cards, electron ic equipment and medica l devices. Failure to do so may resu lt in permanent
damage to such device s.
• Never allow magnets to sna p together.
• Always handle magnet s one at a time. Once separate d keep a minimum of 12in (30cm) apart.
• Hold magnets only by th e sides. Never get your finge rs or hands between the c ontact surfaces.
• When using as an algae c leaner, keep the algae pad free of any a brasive materials to avoid any
damage to the aquariu m.
Note: magnets are very s trong and will attrac t other metals and magnets that w ill embed themselves
in the algae pad, thus dama ging the aquarium.
TECHNICAL SER VICE DEPARTMENT
Monday to Friday 9 am - 5 pm PST
(805) 383- 3566 ext. 102, e-mai l: info@riopump.net
DIRECTIONS FOR INSTALLING
Read and follow all war ning and safeguards!
1. Choose a location for the p ump
2. Install magnet mount
a.Read all warnings! Handl e this product with care,
failure to do so will cause inj ury, damage to the
aquarium and or livestock .
b.Choose desired positio n of magnetic holder
c.Separate the magnet hol ders by twisting units apart
d.Place the magnet in the de sired position in the
aquarium, verify tha t the magnet is flat on the glass
e.Place the pump and magnet f lat on the inside glass
and slide the inner magnet unt il they engage.
3. Mount and secure the contr oller in an area that is dry,
will stay dry and away from th e aquarium.
4. Mount and secure the transf ormer in an area that is dry,
will stay dry and away from th e aquarium.
5. Plug pump into the transform er
6. Connect the transfor mer to the controller
7. While the unit is in the off po sition plug in transformer
directly to a GFCI outlet
8. Turn unit ON.
PART LIST
1. Strainers
2. Main Pump Housing
3. Ceramic Shaft
4. Propeller
5. 4x rubber tension bands
6. 360° degree mounting br acket
7. Magnet mount
8. Fuse
9. Controller
10. Transformer
11. Receptable plug
REPLACEMENT PARTS
Part Number Description
3-4 PolarioTM 4ML Propeller
3-4 PolarioTM 7ML-10ML Propeller
MAINTENANCE:
It is the utmost impor tance to clean and maint ain the pump monthly. Remove
the strainers to access the propelle r. Remove the propeller which should slide
off the mot or easily. Now rein stall and verif y that the pr opeller rotates easily
around the motor. If the propell er binds or there is too much drag create d: the
motor, propeller and ceramic shaft need to be cleaned well. These hig h speed
motors attract c alcium build up, let the pump soa k in a water/vinegar soluti on
for a minimum of 1 hour. (3 parts water to 1 part vinega r) Then clean well with
a small b rush. If the pump has not been mai ntained on a regular basi s or if
high amount of calcium is add ed this process may be needed to be re peated.
If there is any noticea ble damage to the propell er replace immediately.
Verify the intake stra iners are free and clean of a ll debris at all times
TROUBLE SHOOTING
Controller will not p ower up and/o r pump will not turn on: It is imperative to
keep th e pump clean and well maint ained to ensure the pump is in good
working order and the prope ller and strainer clean at all times, failur e to do so
will cause the 4 ML , 7 ML and 10 ML controlle r to shut down. At that time t he
fuse will have to be replac ed.
SOLUTION:
1. Turn off t he unit and unplug the trans former
2. Remove t he back plate of the contro ller (1a).
3. Loc ate fuse and with a flat head s crewdriver remove the blow n fuse
4. Repl ace 1.6 amp fast bl ow fuse for 4ML and 2.5 amp fast blow fuse for
7ML and 10ML.
5. Inst all back plate of the unit.
6. Verif y that the i mpeller is cle an and free of all debris, the pump is p laced
back into the aquariu m and that the strainers are f ree of all debris.
7. Rest art the unit.

GFCI
ONLY
Drip Loop
Controller
UL Listed
Transformer
Mini Sun Moon Light
(Optional part)
1 1
7
8
9
10
11 12 13 14
15
16
3 6
4
5
2
YES
NO
8
9
10
11 12
13
the screen will now read 15 and the b lue/second LED will be lit. If set on th e LEFT or
RIGHT setting, the sc reen, will not be lit and pump will run co ntinually.
13. Press the SET butto n until the desired time parameter is set . (a) Blue LED is
seconds. (b) Yellow LED is minutes
14. Once the desired ti me is set. Press the ENTER button.
15. To change time, press the SET but ton to desired set time and then pres s the ENTER
button.
16. When feeding, press t he desired feeding time 8 or 16 minutes.
Note: Polario™ pumps are equ ipped with an automatic saf ety SHUT-OFF.
If the pump is on and is remove d from water, it will automatica lly shut off. To reset, secure t he pump
back on the magnet moun t, then turn controller O FF then ON to reset.
MAINTENANCE:
It is the utmost importan ce to clean and maintain the pump monthl y. Remove the Large intake strainers
and the endcaps to acc ess the propeller. Remove th e propeller which shoul d slide off the motor easi ly.
Now reinstall and verif y that the propeller rotates easily ar ound the motor. If the propeller binds or there
is too much dr ag created: the mo tor, propeller and c eramic shaft ne ed to be cleaned well. These high
speed motors a ttract calcium build up, let the pump soak in a w ater/vinegar solut ion for a minimum of
1 hour. (3 part s water to 1 par t vinegar) Then clean well wit h a small brush . If the pump has not been
maintained on a re gular basis or if hig h amount of calcium i s added this proce ss may be needed to be
repeated. If there is any n oticeable damage to the p ropeller replace imm ediately.
Verify the intake stra iners are free and clean of a ll debris
TROUBLE SHOOTING
Controller will not power up and/or pump will not turn on: It is imperative to keep the pump clean and well
maintained to ensure the pump is in good wo rking order and the impeller and stra iner clean at all times,
failure to do so will c ause the 15 ML & 22 ML contr oller to shut down until t he problem or problems are
rectified. At that time th e unit may just go to default setting where as the cont roller is plugged in and the
green transfo rmer light wi ll be on howeve r the contro ller will not power up or may power up for just a
few seconds the n shut down. In som e instances the c ontroller’s fuse h as blown in additi on to going to
default setting. Rep lace fuse with a 22ML 3. 5a/250v and 15ML 3.5 a/250v slow blow fuse .
SOLUTION:
1. Chec k all intake strainers ver ifying that they are free o f all debris.
2. Remove the Large intake st rainers and the e ndcaps to access the propeller. Verif y that there is not
anything blocki ng the propellers rota tion.
3. Remove the Large int ake strainers and the endcaps to access the p ropeller. Remove the propeller
it should sl ide off the motor easily. Now reinstall and verify that the propeller rotates easily around
the motor. If the prop eller binds or there is too much drag creat ed: the motor, propeller a nd ceramic
shaft need to be c leaned well. These hi gh speed motors attr act calcium build up, let the pump soak
in a water/vinegar solution for a minimu m of 1 hour. (3 p arts water to 1 part vineg ar) Then clean
well with a small br ush. If the pump has not b een maintained on a re gular basis or if high a mount of
calcium is ad ded this proces s may be needed to be repeated. I f there is any no ticeable damage to
the propeller repl ace.
15ML & 22ML
FEATURE
TURBINE DUAL ACTION
PROGRAMMA BLE AQUA PUMP
• Energy efficient , high flow low voltage water pump
• Bi-direction al outputs to simulate natural wave and
current actions of the o cean
• Variable time and output set tings
• Flow rates up to 5,500G PH/22,000LPH
(on selected models)
• Single or dual outputs
• Preset feeding settings a t 8 and 16 min.
• Magnet mount Included to se cure pump
• Pre-programme d in all settings to gradually
Increase flow
• In “Auto” mode, pump initially alter nates 15 sec.,
left and right
• The alternating water cur rents can be set to switch
every 15 sec. to 30 min.
• Mini sun moon light adapter inc luded
• 16 volt UL listed transforme r included
PART LIST
1. Couplers
2. Propeller
3. Large strainers
4. Main pump housing
5. Endcaps
6. Water diverters
7. Controller
8. Magnet Mount
9. Pump extension
10. O-Ring
11. Power supply connect ion
12. Pump connection
13. Fuse
14. Mini sun moon light adapter
15. UL listed transform er
16. Transformer power
supply cord
REPLACEMENT PARTS
Part Number Description
2 PolarioTM 15ML Propeller
2 PolarioTM 22ML Propeller
8 PolarioTM 15ML MM300 Magn et Mount
8 PolarioTM 22ML MM500 M agnet Mount
10 PolarioTM O-Ring
15 PolarioTM 15ML UL Listed Transformer
15 PolarioTM 22ML UL Listed Transfor mer
DIRECTIONS FOR INSTALLING
1. Selec t the mode on the controll er in which the pump will
operate. There are three op tions: (a) “Auto” or alternating
discharge from left t o right. (b) Left. (c) Right.
2. Choose a location for the pu mp.
3. Attach pump extension to th e pump.
4. Install magnet mount: (a) Read all warnings! Ha ndle this
product with care, fai lure to do so will cause injury and/or
damage to your aquarium. (b) Remove from b ox.
(c) Choose the desired placement f or the magnetic
holder. (d) Separate the magnet holders by t wisting units
apart. (e) Place the magnet in the des ired location in the
aquarium.The magnet must be flat on t he glass.
f. Place the outer magnet flat o n the glass and slide it to
the inner magnet until they eng age.
5. Attach the pump to the magnet m ount.
6. Mount and secure the contr oller above and away from the
aquarium in an area that is dr y and will stay dry.
7. Mount and secure the transf ormer in an area that is dry
and that will stay dry.
8. Plug the transformer into th e controller.
9. Plug the pump into the control ler.
10. Set the flow rate. It is rec ommended to set the flow at low
flow rate then adjust acc ordingly.
11. While the unit is OFF, plug the transfo rmer into a GFCI
electrical rec eptacle.
12. Turn the controller ON. If th e controller is set on AUTO
SPECIFICATIONS
Item # Watt
Pump Size
L x Dia. (Approx.)
Flow Rate (Approx.)
Aquarium Size
(Approx.)
Output O.D. Transformer Fuse Glass Thickness
UPC #
0006760
LPH GPH
4ML 7w
1.9 x 2 in
(4.8 x 5 cm)
2300-4000 600-1000
10-20 Gal.
(35-80 Ltr.)
2 in (50 mm)
9v
1.6 amp
fast blow fuse
0.27 in
(7 mm)
1024 2
7ML 23w
2.1 x 2.4 in
(5.4 x 6 cm)
5000-7000 1300-1800
30-50 Gal.
(115-190 Ltr.)
2.4 in (60 mm)
2.5 amp
fast blow fuse
0.7 in
(18 mm)
1025 9
10ML 25w 6000-10000 1500-2600
40-100 Gal.
(150-380 Ltr.)
1026 6
15ML 30w
9.5 x 3in
(24 x 7.7 cm)
12000-15000 3000-3500
50-150 Gal.
(190-570 Ltr.)
2.55 in (65 mm) 16v
3.5 amp
slow blow fuse
0.5 in
(12 mm)
1015 0
22ML 50w 18000-22000 4500-5500
90-250 Gal.
(340-950 Ltr.)
3.5 amp
slow blow fuse
0.75 in
(20 mm)
1016 7
LIMITED WARRANTY
T.A.A.M. Inc .
®
warrants that the Polario™ is free from defec ts for a period of six months from the initial date
of purchase shown on t he original cash re gister receipt. T.A .A.M. Inc.® disclaims all othe r warranties of merc hantability
and/or fitnes s for a particu lar purpose. Al though this limi ted warranty may g ive you specifi c rights, you may h ave other
rights t hat may vary from st ate to state. This war ranty i s void if th e failur e of the co ntroller or any part, sealant or
component the re of is due to (i) mis use, (ii) tamper ing, (iii) neglige nce, (iv) misappl ication, (v) abuse, (vi) accident and /
or (vii) failure to properly (a) m aintain, (b) clean , (c) keep free fro m water and moi sture and/or us e the controll er with a
Ground Fault Circui t Interrupter (GFCI).
CONSUMER REMEDIES
T.A.A.M. Inc.
®
’s entire lia bility and your sole and exclusive remedy sha ll be eithe r repair or replacemen t
of the Polario™ on ly if you retur n the defective unit directly to T.A.A.M. Inc.® with the or iginal receipt in its origin al box
along wit h twenty dollars ($20.00) for shippi ng and handling. Do not send Polar io™ by ins ured mail. You may send
your returns or replacem ents by UPS if requirin g a signature upon arri val. Any repl aced unit w ill be warr anted for th e
remaining tim e of the or iginal warra nty period. In no event shall any shi pping charge s be reimbur sed. In no event will
T.A.A.M. Inc .® be liable for any c onsequential or i ncidental dama ges, including bu t not limited to, lost sea life, persona l
injury, proper ty damage, equipment dama ge, lost prof its, lost wa ges, lost savi ngs, lost inc ome, etc., ar ising out of the
use of the Polario™. Some sta tes do not a llow for the limitation or exclusion of liability for inciden tal or cons equential
damages, so the above e xclusion may not apply t o you.
RETURNS
Please contac t our service cente r at (805) 383-356 6 ext. 102 or fax (805) 383 -3565 to arrange re pair and/
or replacement. P lease allow 4- 6 weeks for all returns .
WARRANTY CARD
Please go to our website, to download Warranty Card.
http://www.r iopump.net/Res ources_folder/ Warranty.html
Fill out this warranty card and mail it with PROOF OF PURCHASE
within 15 days of purchase
 Loading...