


HEART RATE MONITORS
POLAR ELECTRO OY
Professorintie 5, FIN-90440 Kempele, Finland
Tel.:
358-81-5202100.
Telefax: 358-81-5202300
m-r
Am
rwr,Irm
SPORT
TESTERTM
Heart Rate Monitor
User’s Instruction Manual
Pursuit

LIMITED ONE
-
YEAR WARRANTY
POLAR warrants to the original
consumeripurchaserthat
the
product will be free from defects in material or workmanship
for one year from date of purchase with the exception of
battery and the elastic belt.
. Warranty does’not cover damages due to misuse, abuse,
or accidents, negligence of the precautions; improper
malntenanceor commercial use; cracked or broken cases.
. Warranty is voided if repairs are made by persons not
authorized by POLAR.
. This warranty gives the purchaser specific legal rights, and
the purchaser may also have other rights depending on
state law.
. The warranties contained heretn are expressly in lieu of
any other warranties, includmg ImplIed warranty of
merchantabilltly and/or fitness for purpose.
. During this warranty period (one year), the product will be
either repaired or replaced (at POLAR’s option) without
charge in the country where it was originally purchased.
DISCLAIMER
The material in this manual is for informational purposes only.
The product it describes is subject to change without notice.
POLAR Electra Oy makes no representations or warranties
with respect to this manual or with respect to the product
described hereln.
All nghts reserved. No part of this manual may be used or
reproduced in any form or by any means without prior written
permlssion of POLAR.
You have just purchased the essential equipment
for scientific training based on today’s most
advanced athletic concepts --the Polar Sport
Tester Heart Rate Monitor. Now, with the most
accurate, sophisticated performance monitor
available, you are ready to control your training to
reach your fullest competitive potential.
Modern athletic training, designed to eliminate
hit-or-miss activity and to optimize the time spent,
requires precise measurements. The Polar Sport
Tester is the preffered measuring technology used
by winning world-class International teams in
track and field, cross-country skiing, bicycling,
triathlon, swimming, and other events.
For today’s competitive athlete, a carefully
planned personal training program includes, of
course, measuring of time: intervals, intermediate
and lap times, etc. But added to these now are
critical measurements related to testing of
baseline physiological functions such as:
l Heart rate
l Efficiency in oxygen use (maximal aerobic
capacity - V02 max)
l Accumulation of lactic acid (anaerobic
threshold - AT)
When these internal stresses are accurately
measured, areas for improvement can be
identified and this allows for a planned approach
to ovecroming weaknesses through controlled
uses of intensity, duration and frequency in
training. For modern interval training, stress levels
(work intensity) and recovery levels can be
predetermined so you can reach your peak in time
for competition, and avoid injury through
overstress.
2

As you develop a long-term plan of training,
tapering off, competition and rest, your Polar
Sport Tester Heart Rate Monitor will give you an
unerring method for controlling your work
intensity, precisely tracking, and analysing and
storing records of your progress.
You are now the owner of a powerful measuring
tool designed to meet all the requirements of the
new scientific training for overcoming weaknesses
and improving performance. With the Polar Sport
Tester you can:
l Tell time and set alarm
l Set two different timers to track workout
intervals
l Program two different personal heart rate
target zones
l Measure your heart rate with ECG accuracy
’ &cord
performance information during
training for later analysis
l Choose between
5, 15
and
60second
intervals
for heart rate recording
’
Measure elapsed time
l Download performance data into a computer
for detailed long-term analysis
l Record up to 8 different training sessions
‘Record up to 33 hours of training information
If you are a coach or trainer, you will have more
control than ever over your team’s progress,
This owner’s manual is designed to show
precisely what the Polar Sport Tester performance
monitor can do and how you can use each feature
to best accomplish personal, professional or team
fitness and performance goals,
Note.
Before
partlclpatlng In
this
or any other exercise programme
please consult your physIcIan If in doubt. If you use a
pacemaker. do not use the heart rate monitor before
consultlng the manufacturer of the pacemaker
and#or
your
doctor
4
Polar Sport Tester
..............................................
3
Polar Sport Tester components
...........................
6
How to Wear your Sensor/Transmitter
.................
7
Guidelines for Programming your
Polar Sport Tester
..............................................
9
Program Functions Chart
....................................
10
Programming your Polar Sport Tester
..................
1 1
Time
........................................................
11
Set ..........................................................
14
Measure ..................................................
18
Recall ......................................................
21
Exercising with the Polar Sport Tester
..................
24
Care and Maintenance
.......................................
26
Precautions
.......................................................
28
Troubleshooting your Polar Sport Tester
..............
30
Service
............................................................
32
Accessories
...................................................
32
Technical Specifrcatrons
.....................................
33
5

This package includes
ALL NEW POLAR TRANSMITTER
. fully sealed . lightweight
. ultra slim design
l comfortable to use
Transmitter with elastic belt
Belt
lock
Wrist Monitor
Three line dipslay
a. Time of day
b. Elapsed time
c. Heart Rate
Set/start-stop
\/
1. Attach the POLAR Transmitter onto the elastic
belt.
2. Adjust the belt length so that the fit is snug,
but not too tight.
3.
With the Transmitter facing outward, and the
POLAR-logo in the right position, insert the round
end of the belt lock into the buckle to secure the
belt around your chest.
4. Center the Transmitter on your chest below
the pectoral muscles (breasts) as shown in the
illustration.
6
Selection status line
CORRECT POSITION OF
THE
LOGO:
=Giril
7

5.
Pull the Transmitter away from chest
stretching the belt and moisten the conductive
electrode strips located on both sides. Using the
transmitter against the skin is best. However, if
you wish to wear the Transmitter over a shirt,
moisten the shirt heavily in the electrode areas.
6.
Put the POLAR Wrist Monitor on as you
would an ordinary watch.
Note: The Transmitter
WIII
switch on automatically when
vou’re wearina
It.
It will also turn itself off when it’s not
connected to
>our
body. However, moisture can activate
the Transmitter and reduce battery life, so remember to
dry it thoroughly after the exercise.
Your Polar Sport Tester Heart Rate Monitor is a
highly sophisticated computer that allows you to
get the most from exercising by monitoring your
workouts accurately and in great detail. While the
Polar Sport Tester is a state-of-the-art instrument,
it’s not complicated to use if you keep the
following principles in mind:
Principle
I.Two
levels of operations are available
to you when you want to program your Sport
Tester for workouts: a. Four basic selections;
b. Various functions within
each selection,
Principle
2.The
four basic selections you can
access with your sport Tester are:
Time
-
This selection lets you set the watch to
the correct time of day and set an alarm.
Set -You can use this selection to set two
different timers to track your workout
periods, and you can choose two different
heart rate target zones.
Measure
-
This selection allows you to choose
the time intervals at which your heart rate will
be recorded during exercise. You can also
see how much memory you have left, erase
files and activate the measuring, recording,
and Stopwatch functions in Measure.
Recall
-
Use this selection either to manually
recall the recorded data to the display for
reviewing your previous workouts, or
download the recorded data through a Polar
Interface to a computer for further results
analysing.
Principle RTo access the basic selection you
want, cycle through the four available selections
by pressing the SELECT button.
9
8

Principle
4.To
enter a basic selection, and use its
various functions, press the SET/START-STOP
button to move from function to function within
each of the four selections.
Principle 5. Once you have entered a selection,
using the SET button, the SELECT button
assumes a different role - and you can’t get back
to the selection cycle by simply pushing that
button again (if not done immediately).
Instead, you must cycle through all the features of
the selection, using the SET button. When you
come to the last function in a particular selection,
you can get back to the selection cycle using the
SELECT button again.
The diagram below provides a “road map” for
basic Sport Tester programming.
TIME
What the selection does: Allows you to set the
watch to the correct time and to set an alarm.
\
Why you might use this selection: To set the
correct time when you begin using the Wrist
Monitor, or to change the time if you travel to
other time zones. You may use the alarm function
to time your total workout, to wake you up, or as a
reminder. You can also use the Polar Sport Tester
as a wristwatch.
Setp-by-step Instructions for
setting the time
1.
When the time is
displayed on the face of
the watch, press the
SET/START-STOP button.
The word TIME should
now appear at the top
of the display and the
AM or PM indicator will
be flashing.
2.
Press the SELECT button to select AM or PM.
t
3.
When the correct choice appears on the
display, press the STORE/RECALL button to lock
in your selection.
11

4. At this point, the first two digits (representing
the hours) will be flashing.
5. Set the correct hour by moving up with the
SELECT
:
button or down with the
SIGNAL : button.
6.
When the correct hour is displayed, press the
STORE/RECALL button to lock in your selection.
7. The first minutes digit should now be flashing.
__
Again use the SELECT t button to move up or
the SIGNAL : button to move down.
8.
When the correct number is displayed, press
the STORE/RECALL button to lock in your
selection.
9.
The next minutes digit should now be flashing.
Again use the SELECT 2 button to move up or
the SIGNAL : button to move down.
10.
When the number you want is displayed,
press the STORE/RECALL button to lock in your
selection.
11.
The two digits representing seconds will now
be flashing. To set them precisely, listen for a
radio or telephone timing tone or watch the sweep
hand of your clock; when it reaches 12 or you hear
the tone, press the STORE/RECALL button. You’ll
see the seconds start counting.
12. At this point, the AM/PM indicator will begin
flashing again. Now, you can move to the next
*
function, which is setting the alarm. If you wish to
change anything you’ve just set, begin again at
Step 1.
Step-by-step instructions for
setting the alarm
I
I
1.
Once you have set
the time, press the SET
button. If first time,
the letters ALM and
the time, 10:00 AM, will
appear on the display,
as shown.
2. The AM indicator
shoud now be flashing.
3. At this point, select AM or PM as you did
above, by pressing the SELECT : button.
4. Press STORE/RECALL to lock in your choice.
5.
At this point, the two first digits, representing
the hours, will be flashing.
6. Set the correct hour by moving up with the
SELECT
:
button or down with the SIGNAL
:
button.
7. When the correct hour is displayed, press the
STORE/RECALL button to lock in your selection.
8. The first minutes digit should now be flashing.
again, use the SELECT : button to move up, or
the SIGNAL
:
button to move down.
9.
When the correct number is displayed, press
the SORE/RECALL button to lock in your
selection.
10.
The next minutes digit should now be
flashing. Again, use the SELECT : button to
move up or the SIGNAL : button to move down.
11. When the correct number is displayed, press
the STORE/RECALL button to lock in your choice.
12
13

12. The alarm symbol should now be flashing. To
activate the alarm, press the SIGNAL : button
twice until the alarm symbol appears without
flashing. To turn the alarm off, press the
SIGNAL :button until the alarm symbol
disappears.
13. At this point, you are ready to leave the alarm
function. Press SET to return to the time display.
Note: The alarm will sound for one minute, but you
can turn it off by pressing the STORE/RECALL
button.
SET
Step-by-step instructions
for setting the timers
1. With the time of
;ay
appearing on the screen,
press the SELECT .
button once. The word
SET should appear on the selection status line,
and the display will be cycling (at 1.6 second
intervals) through TIME 1, LIM 1 and LIM 2, as
shown below:
What the selection does: Allows you to set two
different timers to track your workout periods, and
to choose two sets of different heart rate target
zones.
Why you might use this selection: The two timers
allow you to segment your exercise periods.
Example 1- Warm Up and Cool Down:
You could set Timer 1 to sound at 10 minutes
for your warm-up period, Timer 2 at 20
minutes for full-strength exercising, and then
use the lo-minute timer again for your
cooldown
period.
.
Example 2 -Interval Training:
YOU could set Timer 1 to sound at l-minute
intervals for all-out running and Timer 2 to
sound at
2-minute
intervals for rest periods.
The two sets of heart rate target zones allow you
to monitor your heart rate and compare it against
two different scales. The two heart rate target
zones also can let you monitor your heart rate in
two different athletic activities,
14
Note: Timer 2 may also be displayed at this point,
if Timer 1 has already been set.
2. At any point, you can press the SET button and
the word TIME 1 will remain on the display.
15

3. The first minute’s digit should now be flashing.
As in the TIME selection, use the SELECT
:
button to move up, or the SIGNAL : button to
move down.
4.
When the number you want is displayed, press
the STORE/RECALL button to lock in your
selection.
5.
The next minute’s digit should now be
flashing. Again, use the SELECT : button to
move up, or the SIGNAL : button to move
down.
6.
When the correct number is displayed, press
the STORE/RECALL button to lock in your choice.
7. The first digit representing the seconds should
now be flashing. Move up : or down : to
select the desired number.
8.
When the correct number is displayed, press
the STORE/RECALL button to lock in your choice.
9.
The last digit representing the seconds should
now be flashing. Move up : or down : to
select the desired number.
10. When the correct number is displayed, press
the STORE/RECALL button to lock in your choice.
11.
You have now set Timer 1, and the first digit
will be flashing again. At this point you can
access Timer 2 by pressing the SET button. The
phrase TIME 2 will appear on the screen.
12.
If you wish to program in a second timer,
repeat steps 3 through 10 again, programming in
the desired times.
13.
If you do not wish to program a second timer
now, or to change the existing programming of
Timer 2, simply press the SET button.
Note: If Timer 2 is programmed to OO:OO, it is
inactive.
16
.
Step-by-step instructions
for setting limits
1. The phrase LIM 1 will now appear and the
upper position heart rate limit will be flashing. Set
your desired maximum heart rate at the top of
your
“targzt
zone” for this limit by using the
SELECT
. and SIGNAL
:
buttons to move up
or down in increments of 5.
2. When your desired maximum heart rate
appears on the display, press the STORE/RECALL
button to lock in your choice.
3.
The lower heart rate limit will now be flashing.
Set your desired minimum heart rate by using the
SELECT : and SIGNAL : buttons to move up
or down in increments of 5.
4. When your desired minimum heart rate
appears on the display, press the STORE/RECALL
button to lock in your choice.
5.
The top number will again start flashing. At
this point you are ready to leave the Limit 1
function by pressing the SET button.
6.
The phrase LIM 2 will now appear and the
upper position heart rate limit will be flashing.
7.
If you wish to program in a second target zone,
repeat steps 1 through 4 again, programming in
the desired limits.
8. If
you do not wish to program a second target
zone now, simply press the SET/START-STOP
button. The selection functions will start cycling
again at 1.6 second intervals (TIME 1, TIME 2, LIM
1, LIM 2, TIME 1 .) At this point you are back in
the selection cycle and you can use the
SELECT
:
button to access the next selection,
MEASURE.
17
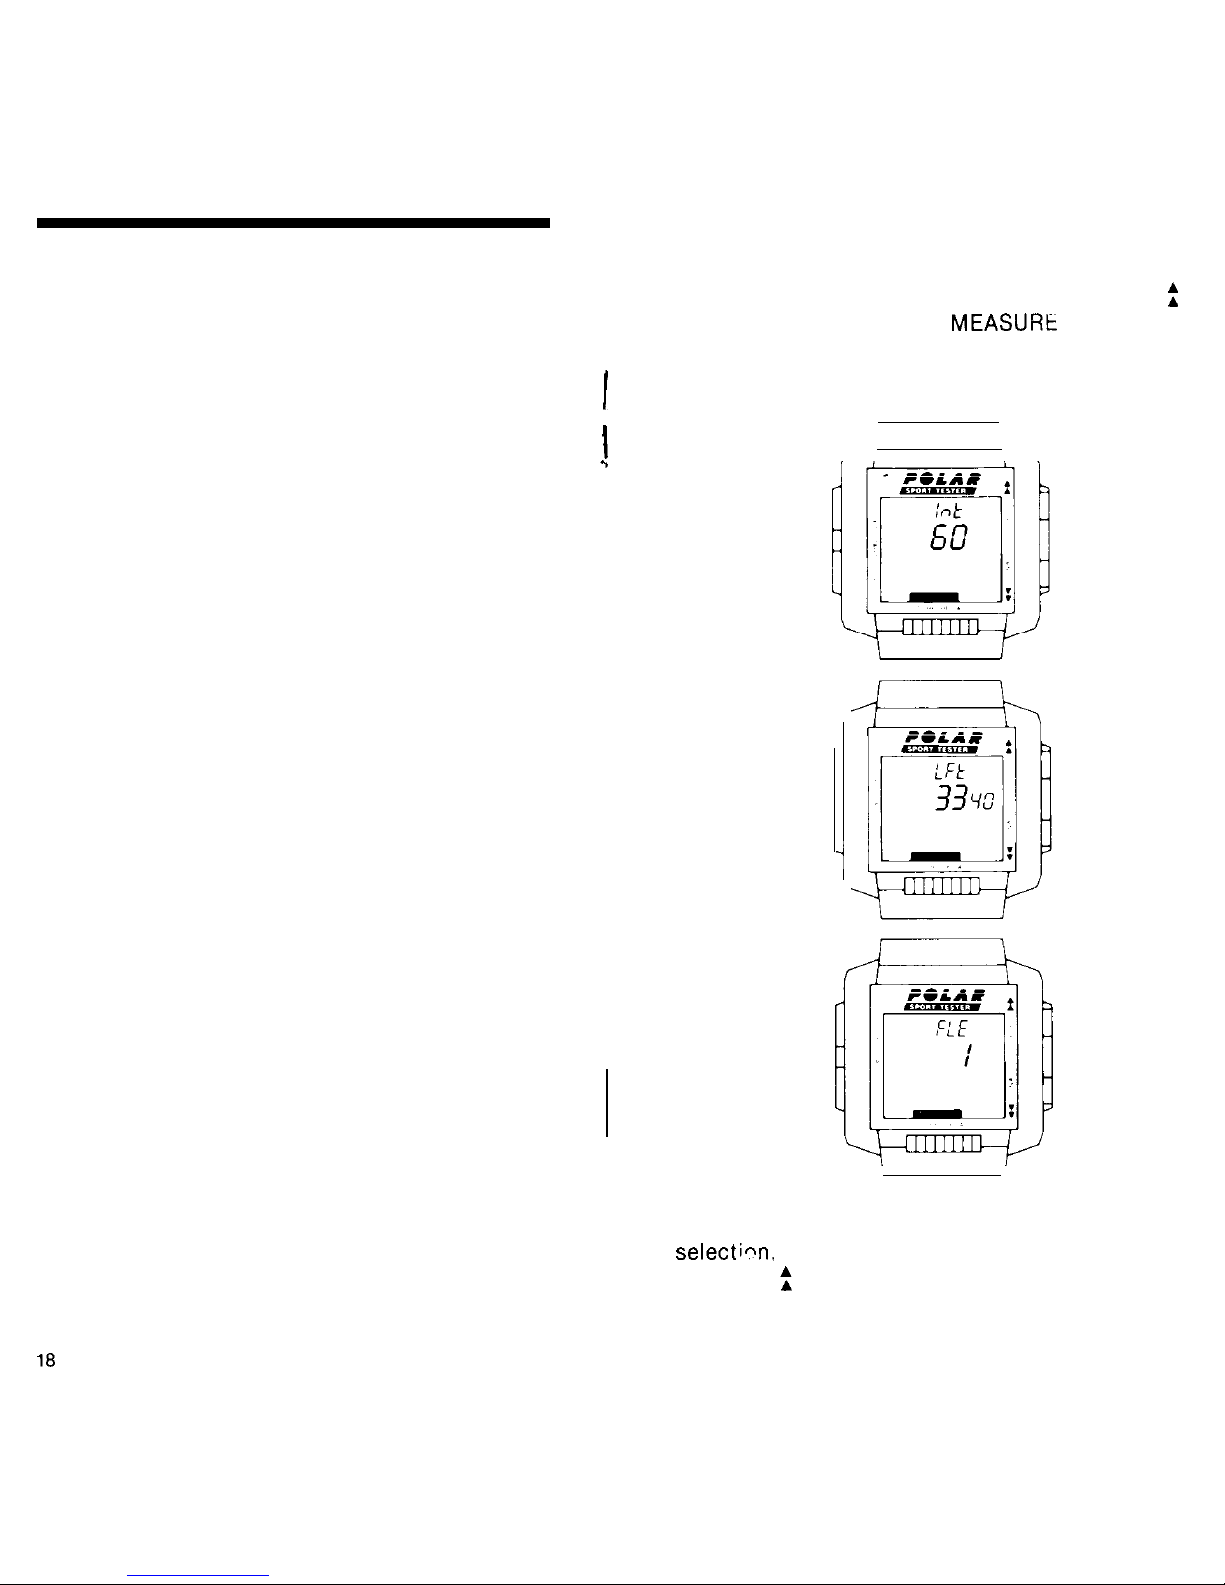
Step-by-step instructions
1.
If you have just finished using the SET
selection, you need only to press the SELECT
:
button once, ant the word
MEASURk
appears on
the selection status line. The display will begin
cycling (at 1.6 second intervals) through INT, LFT
and FLE, as shown below:
MEASURE
What the selection does: Allows you to measure
your heart rate and set the interval at which your
heart rate will be recorded during exercise for
playback in the Recall selection. It also permits
you to see how much time you have left in memory
I
for recording information and lets you remove
files, if you wish to make more room in memory.
I
3
Why you might use this selection: Your heart rate
can be recorded during exercise for playback in
the Recall selection, at intervals of 5, 15 or 60
seconds. If you select 60 seconds, you will have
more hours of memory for recording, since more
memory capacity is used when data is being
entered at faster rates. This selection allows you
to choose the desired recording interval.
Each time you start the stopwatch, you create a
new memory file. MEASURE also keeps track of
how many different files you have created (up to 8)
and how much memory is left. If you find you have
too little memory left to record your next exercise
period, you may wish to remove some files from
memory to increase capacity. You can do that in
the MEASURE selection.
i
Note: If you wish to access the MEASURE
selection, and you have not just finished the SET
selectinn, you can do so by pressing the
SELECT
:
button twice when the time of day
appears on the screen.
19
18

2. At any point you can press the
SETISTART-
STOP button and the letters INT will remain on the
display.
3. You will also see one of three numbers on the
screen: 05, 15 or 60. These represent 5, 15 and 60
seconds recording intervals. You may choose to
have your heart rate information recorded at any
of these intervals. The shorter the interval, the
more memory each workout will use, so the
interval you select will affect the training sessions
you can store in memory.
4. To select the interval you want, press the
SELECT
:
button to cycle through the three
possible choices.
5. When the desired interval appears, press
SET/START-STOP button to verify how much
memory is left. At this point, LFT, (representing
the tim left in memory) will cycle alternately with
FLE. (This shows the number of the next file you
will create when you begin recording. So, if the
number 8 appears, it means you have seven files
already in memory and will be recording into file 8
in your next session).
6.
You can look at the time left and decide
whether or not you wish to remove any files at this
point to make room for recording your next
workout.
7. If you wish to remove a file or files, simply
press the SIGNAL
:
button for each file you
,,
want to erase. The highest file number will always
be shown, and the Sport Tester’s computer will
remove the last file in line each time you press the
SIGNAL
:
button. So, if the number 8 is
displayed (representing the next file you’ll record
into), the first file you’ll remove by pressing the
SIGNAL
:
button is the previously recorded
file 7, then file 6, and so on.
8.
If you do not wish to erase any files at this
time, you can press the SET/START-STOP button
to return to the beginning of the Measure
selection or press STORE/RECALL to start
measuring your heart rate. Remember that
recording begins automatically when you activate
the stopwatch.
Note: For instructions on activating stop watch
and using measuring operations please refer to
page 25, Exercising with Polar Sport Tester.
RECALL
What the selection does: It allows you to view and
analyze (either manually or via a computer
interface) the data on:
l heart rate target zones
l starting time
l sampling intervals
l heart rates at each interval
l intermediate times
l finishing time
Why you might use this selection: To review your
heart rates recorded during exercise and to
analyze and compare them against previous
exercise periods, also stored in memory. The
Polar Sport Tester Heart Rate Monitor gives you
ample high-quality data, precisely measured and
recorded by state-of-the-art technology. Analyzing
this information can show you when you are
exercising most efficiently, and how you can
improve your workouts. Such information is
invaluable - both to athletes training for
competition, and to athletes who want to learn
how to maximize the value of their time spent
exercising.
20
21

Step-by-step instructions
1.
Cycle through the
selections using the
SELECT f button
until the word RECALL
appears on the
selection status line.
The letter MA should
also be at the top of
the screen.
Note:lf
the word END appears at the top of the
screen, it means that you have no recorded files in
memory at this time.
2.
You do not need the SET/START-STOP button
to enter the selection at this point. You are already
in the Manual Recall selection, and can press the
STORE/RECALL button to review the files you
have recorded during workouts.
3. When
you
press the
STORElRiCAiL
button, the number of
the file you recorded
most recently will
appear on the display.
4. You can look at this
file or review others
bv
pressing the SELECT
‘:
I
button or the SIGNAL : button.
5. When the number of the file you wish to review
appears on the display, press STORE/RECALL.
6. The LIM 1 setting during that workout will now
be displayed.
7. Pressing the STORE/RECALL button again, will
display LIM 2.
22
8. If you press the STORE/RECALL button again,
you will see the time of day at which you began
exercising and your starting heart rate.
9.
Pressing STORE/RECALL again will display
your heart rate after first recording interval that
will be displayed as well, and successive use of
the STORE/RECALL button will show your heart
rate at each interval, any intermediate or lap times
you marked (designated by letters INT for interme-
diate) and any switching you may have done between LIM 1 and LIM 2 during exercise.
10. When you have reviewed all the information
in the file, the word END will appear at the top of
the display, along with your finishing time and
heart rate.
11. At this point you can press the
STOREIRE-
CALL button to return to the top of the RECALL
selection with MA appearing on the display.
12.
If you wish to review more files, repeat steps
4 through 10.
13. If you wish to scroll quickly through a file,
press the STORE/RECALL button when the number of the file you want to review appears on the
display. LIM 1 will appear on the display. Then, or
later, press the SIGNAL : button and hold it
down. The Sport Tester will cycle quickly through
the file data.
TRANSFERRING
INFORMATION TO
A
C6MPlJTER
With the Polar Sport Tester Heart Rate Monitor
you can download your exercise data directly into
a computer for further analysis, using the Polar
Interface. To access the computer communica-
tions function, simply enter the Recall selection
as described in Step 1 above, and then press the
SET button. The letters COM will appear on the
display. Then follow the instructions included with
the Polar Interface.
23

After you’ve programmed in the heart rate limits
and timers, you’re ready to use your Polar Sport
Tester Heart Rate Monitor to monitor your exerci-
se periods.
Step-by-step insturctions
1. Put on the Wrist Monitor and Chest Band as
described on pages 8 and 9.
2.
With the time of day appearing on the screen,
access the Measure selection by pressing the
SELECT
:
button twice. The word MEASURE
should appear on the selection status line. The
display will begin cycling (at 1.6 second intervals)
through INT, LFT and FLE
3. At any point you may
press the STORE/
RECALL button and the
display will change to
as shown beside.
At this point your heart
rate may be displayed
without being recorded.
4. To begin the stop watch and recording functions, press the SET/START-STOP button. The
stopwatch on the middle line will begin counting
and your heart rate will be shown on the bottom
line of the display.
5.
If you hear a beeping sound, and it occurs
easily, it
menas
that you are exercising above or
below your target zone. Limit 1 or Limit 2 is
displayed in the upper right-hand corner blinking
next to the time of day display.
6. At various points during exercise, if you hear a
chirping sound, a single chirp indicates that Timer
1 has sounded and a double chirp indicates Timer
2.
During recording,
if you want to.
. .
Turn of the heart rate beep:
Press the SIGNAL : button.
Change from Limit 1 to Limit 2:
Press the SELECT : button.
Mark a lap while exercising or enter an
intermediate time:
Press the STORE/RECALL button.
Stop the recording operations:
Press the SET/START-STOP button.
Exit the selection and return to the
selection cycle:
After you have stopped the recording operations with the SET/START-STOP button, press
the SELECT
2
button. The RECALL selection will now appear. You can enter the RECALL selection or cycle through to the others
by repeatedly pressing the SELECT : button.
25

The Batteries
Should your HRM need battery replacement or
service we strongly recommend it be done by
a POLAR authorized center only in order to
make sure that the unit is adequately tested for
water resistance. This is particularly important
when the unit is used under heavy sweat
conditions or for swimming. If you service the
unit yourself, you will void the warranty. The
rubber gasket that insures water resistance will
deteriorate over time and needs to be replaced
every time the seal is broken.
To conserve battery life, the Wrist Monitor is
programmed to automatically return to the TIME
selection after ten minutes when no buttons have
been pushed and no pulse has been received
from the Transmitter.
The Wrist Monitor
Water Resistance: Due to the many variables
involved, water resistance cannot be regarded as
a permanent characteristic of any Monitor. We do
recommend that the Wrist Monitor is tested for
water resistance every l-2 years (depending on
use) to check for natural deterioration of
lubricants and seals as well as possible damage
to glass and case which may impair the optimum
water resistance characteristics. This is particularly
important if you are using your POLAR Wrist
Monitor for swimming. It is also important to be
careful not to operate the buttons while under
water, as the pressure can cause the Wrist
Monitor to leak.
The Transmitter
The Transmitter automatically activates when it is
attached to your chest and will shut off when it
is removed from your skin. However sweat and
moisture can keep it activated so it is important
to wipe off and dry the Transmitter when taking it
off. To maximize the life of the Transmitter it is
also important to clean it with mild soap and
water regularly to remove any buildup that could
weaken it’s strength. Be sure not to use any
abrasives or chemicals such as steel wool or
alcohol, they can cause permanent damage to
the electrodes.
The transmitter battery is not replaceable,
however it is estimated to last 2500 hours of use
when handled according to this care and
maintenance instruction. Do not throw out your
old Transmitter, it is a recycleable item. Return it
to POLAR when purchasing new.
Important: Do not stretch or bend the electrode
strips of the Transmitter, especially when storing
it, this can damage their conductivity.
26
27

To lengthen the useful life of your Polar Sport
Tester Heart Rate Monitor, keep the following in
mind:
l Your Polar Sport Tester is water resistant but
not waterproof. You can wear it for swimming,
go off a diving board with it on, wear it in a
rainstorm, or perspire heavily while exercising
without demaging it. You should not, however,
wear it underwater at any great depth; if you go
deepsea
diving, leave your Polar Sport Tester
behind.
. If your Polar Sport Tester does get wet, it is
important to dry it thoroughly before putting it
away. (Never put a wet Polar Sport Tester into
an athletic bag or a locker).
l The Polar Sport Tester needs to “breathe”.
Never store it in any kind of “nonbreathing”
material, such as a plastic bag, where moisture
from humid air might become trapped. Put it in
its store case, and leave it in a warm and dry
place.
l The Polar Sport Tester Wrist Monitor picks up
transmitter signals within 90 to 110 cm.
Therefore, when you are using your Wrist
Monitor, make sure no other Transmitter is
within that range. Signals from more than one
Transmitter picked up simultaneously can cause
an incorrect readout.
l When your Transmitter and Wrist Monitor are
in use, strong electromagnetic sources such as
television sets, electric motors, vehicles, radio
and TV antennas and high voltage power lines
can cause erratic heart rate reception. This can
also happen if you attempt to use the heart
rate monitor aboard an aircraft.
. Avoid exposing your Polar Sport Tester to
extremes of hot and cold, and keep it out of
direct sunlight.
l Don’t pull clothing on or off over your Polar
Sport Tester Wrist Monitor. Movement of cloth
over the monitor may cause static electrocity
which can interfere with its performance.
28
29
What if there is any irregularity
in the performance of your
Polar Sport Tester?
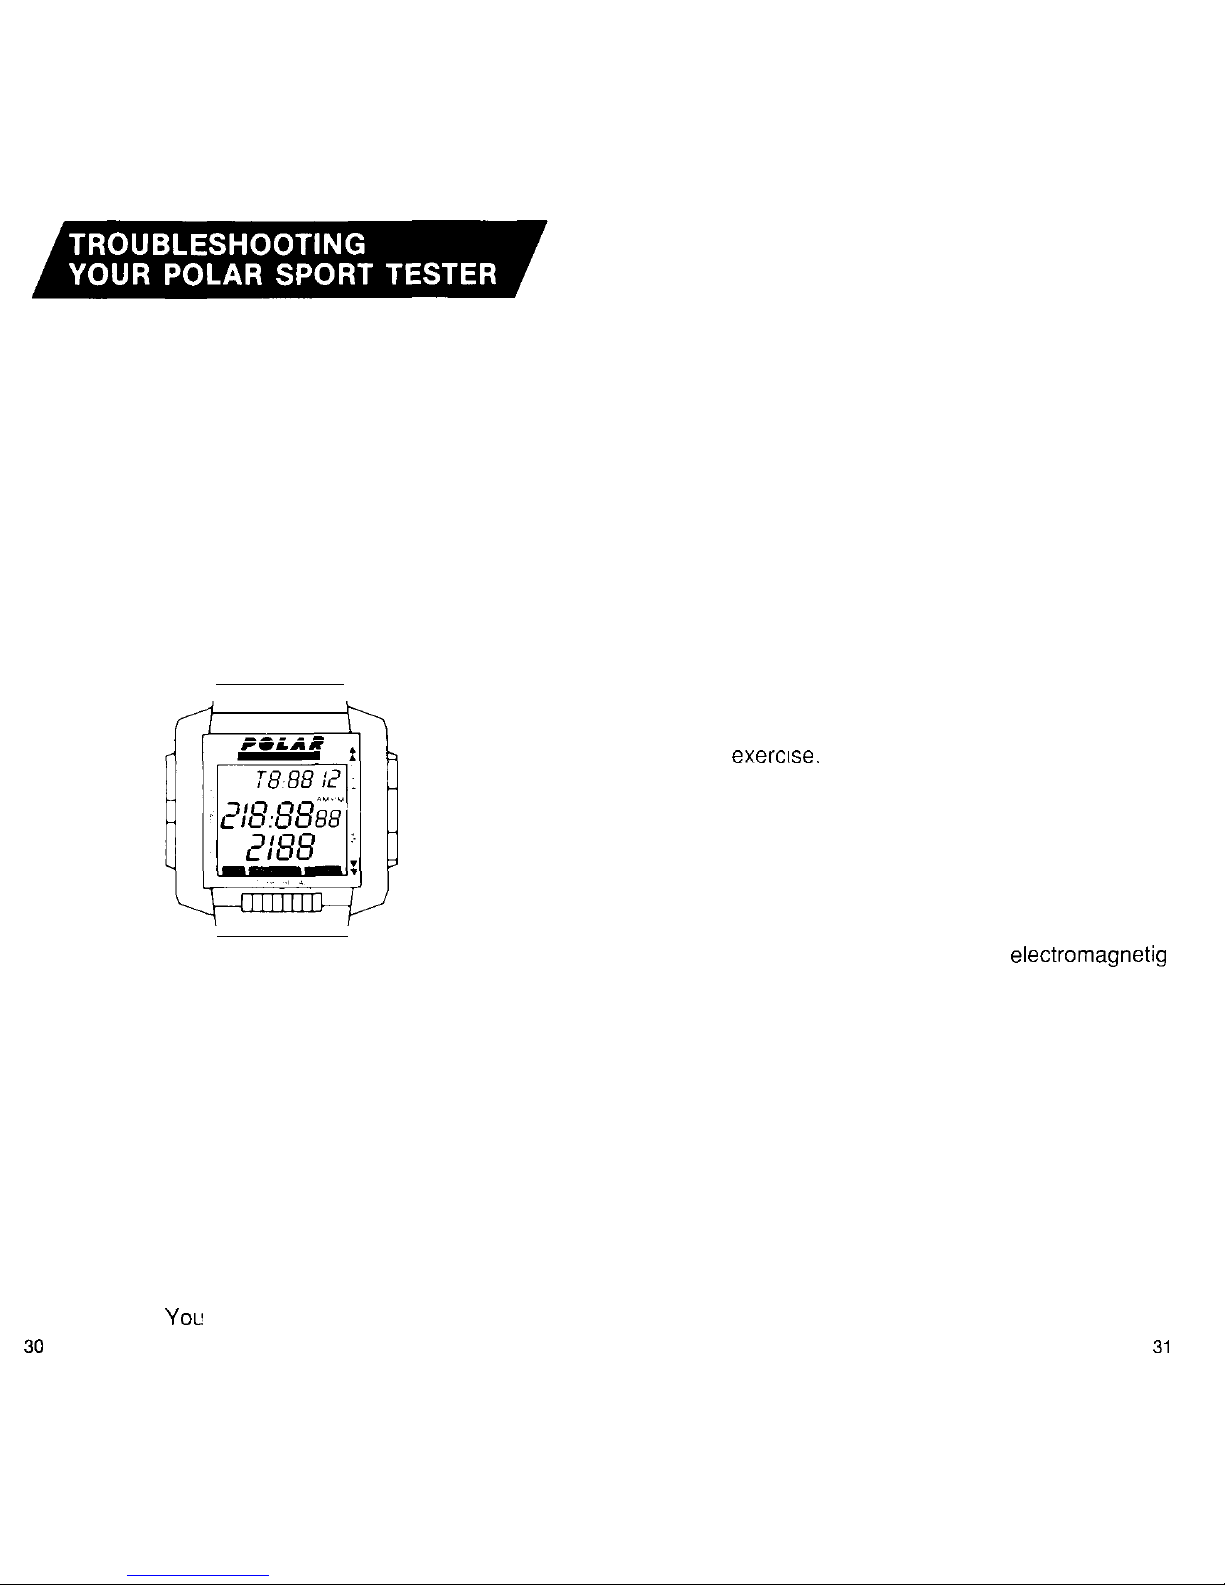
In case of any irregularity in performance, to begin
troubleshooting your Polar Sport Tester, push all
four of the Polar Sport Tester buttons at once and
start programming the Wristh Monitor from
scratch.
This is called Global Clear. When a three-line
display appears, press the STORE/RECALL button,
and 10 o’clock will appear. Start the programming
cycle here with TIME setting.
Note: Global Clear clears all memory
The Global Clear setting is also very useful if for
any reason, you want to start from a zero state
to enter information into the Wrist Monitor’s
memory.
What if the heart rate symbol is
not flashing?
Check to see that the elastic belt is tight enough.
The belt should be adjusted so that the
electrodes are flat against your skin and the
tightness is correct, when without stretching, the
ends of the belt are about 15 cm apart from
each others. You may have to move the belt one
30
way or another to find the best position for the
Transmitter. Make sure that the POLAR-logo on
the Transmitter is in the correct position.
Check that the electrode strips are thoroughly
moistened. The Transmitter will not function
properly without moisture to make good electrical
contact.
Accumulated sweat and dirt
clear reception of the signal
Transmitter. Check to see if
needs washing.
may interfere with
from the skin to the
your Transmitter
What if the heart flashes
become irregular?
Check to see if your Wrist Monitor is outside the
90 to 110 cm (three and a half foot) range of heart
rate transmission from the Transmitter.
Make sure the elastic belt has not loosened
during exercrse.
If you are wearing the Transmitter over a shirt,
make sure there is moisture to make the needed
contact with the electrodes.
Check your surroundings by taking off your
Transmitter and checking if the heart symbol is
still flashing. If it is, you are in a
electromagnetig
field created by other equipment (such as a radio
or television set), move away. If you are near
another person using a heart monitor, move
away.
If none of the above mentioned situations is valid,
consult your physician, because it may be your
heart causing the irregularities.
What do I do if the unit goes
blank?
Try to cross-check both the Transmitter and Wrist
Monitor to locate the reason. Contact your dealer
or distributor for further actions.
31

. Should your Polar Sport Tester need service
during or after the warranty period, we highly
recommend that you send it to your dealer or
distributor for repair. If you service the unit
yourself, you will void the warranty.
. Carefully pack the Polar Sport Tester
Transmitter and Wrist Monitor in a shipping
carton so it will not be damaged.
Enclose proof of purchase (or a photocopy).
Please include a statement stating why the unit
is being returned for repair.
Mail postage prepaid to your dealer or
distributor.
The following Polar accessories are available for
use in conjunction with Polar Sport Tester:
l Computer Interface/Software
l Bike mount
l POLAR Transmitter with the elastic belt
l Separate Transmitter for use with disposable
electrodes
l “Heart Rate Monitoring Book” by Sally Edwards
l “Training, Lactate, Heart Rate” book by Dr. Peter
G.J.M Janssen
Transmitter:
Operating temperature: -10” to +50” C
(14” to 122”
F)
Battery:
Estimated average
battery life: 2500 hours
of use when handled
according to the care
and maintenance
instructions.
Receiver/Monitor Microcomputer
Type:
CMOS 4 bit.
Display:
LCD 10 digits +
18 symbols
Case:
47 mmx43 mmxll mm
(lVg” x
161,”
x ‘I,,“)
Operating temperature:
-200 to
+50” C
(--4” to +122” F)
Power consumption:
~FA
(TIME) min
70p.A (HR) max
Battery:
160 mAh Lithium battery
(BR 2325)
Expected battery life in
average use:
more than 1 year’
Memory/Capacity:
H.R. Interval Capacity
5 seconds 2h 40 min
15 seconds 8h 20 min
60 seconds 33h 40 min
Number of files: 8 max
l Average use: Two hours of day, 7 days a week, one
computer recall operation per workout, normal use of
sound signal.
Patented U.S. Pat. No 4625733
32
33
 Loading...