

Page 1
17928167.00 ENG/FRA A ENG
User Manual
Polar F6™
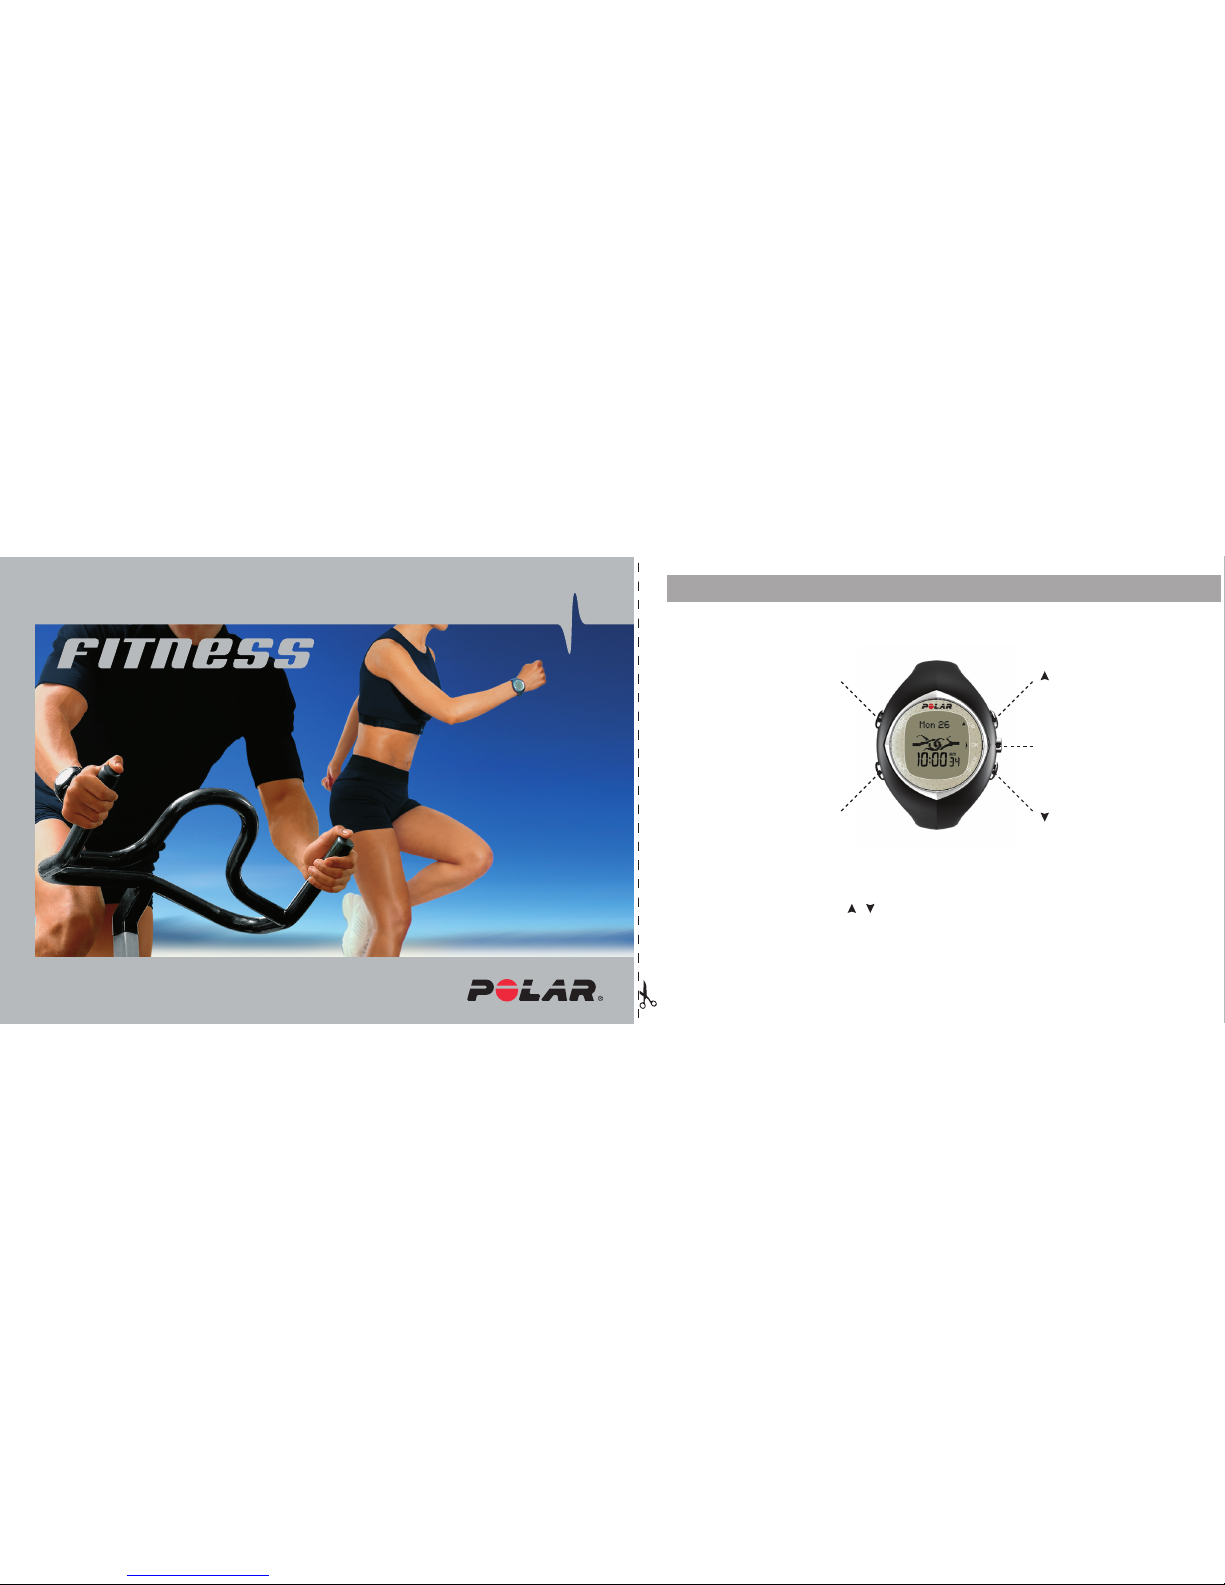
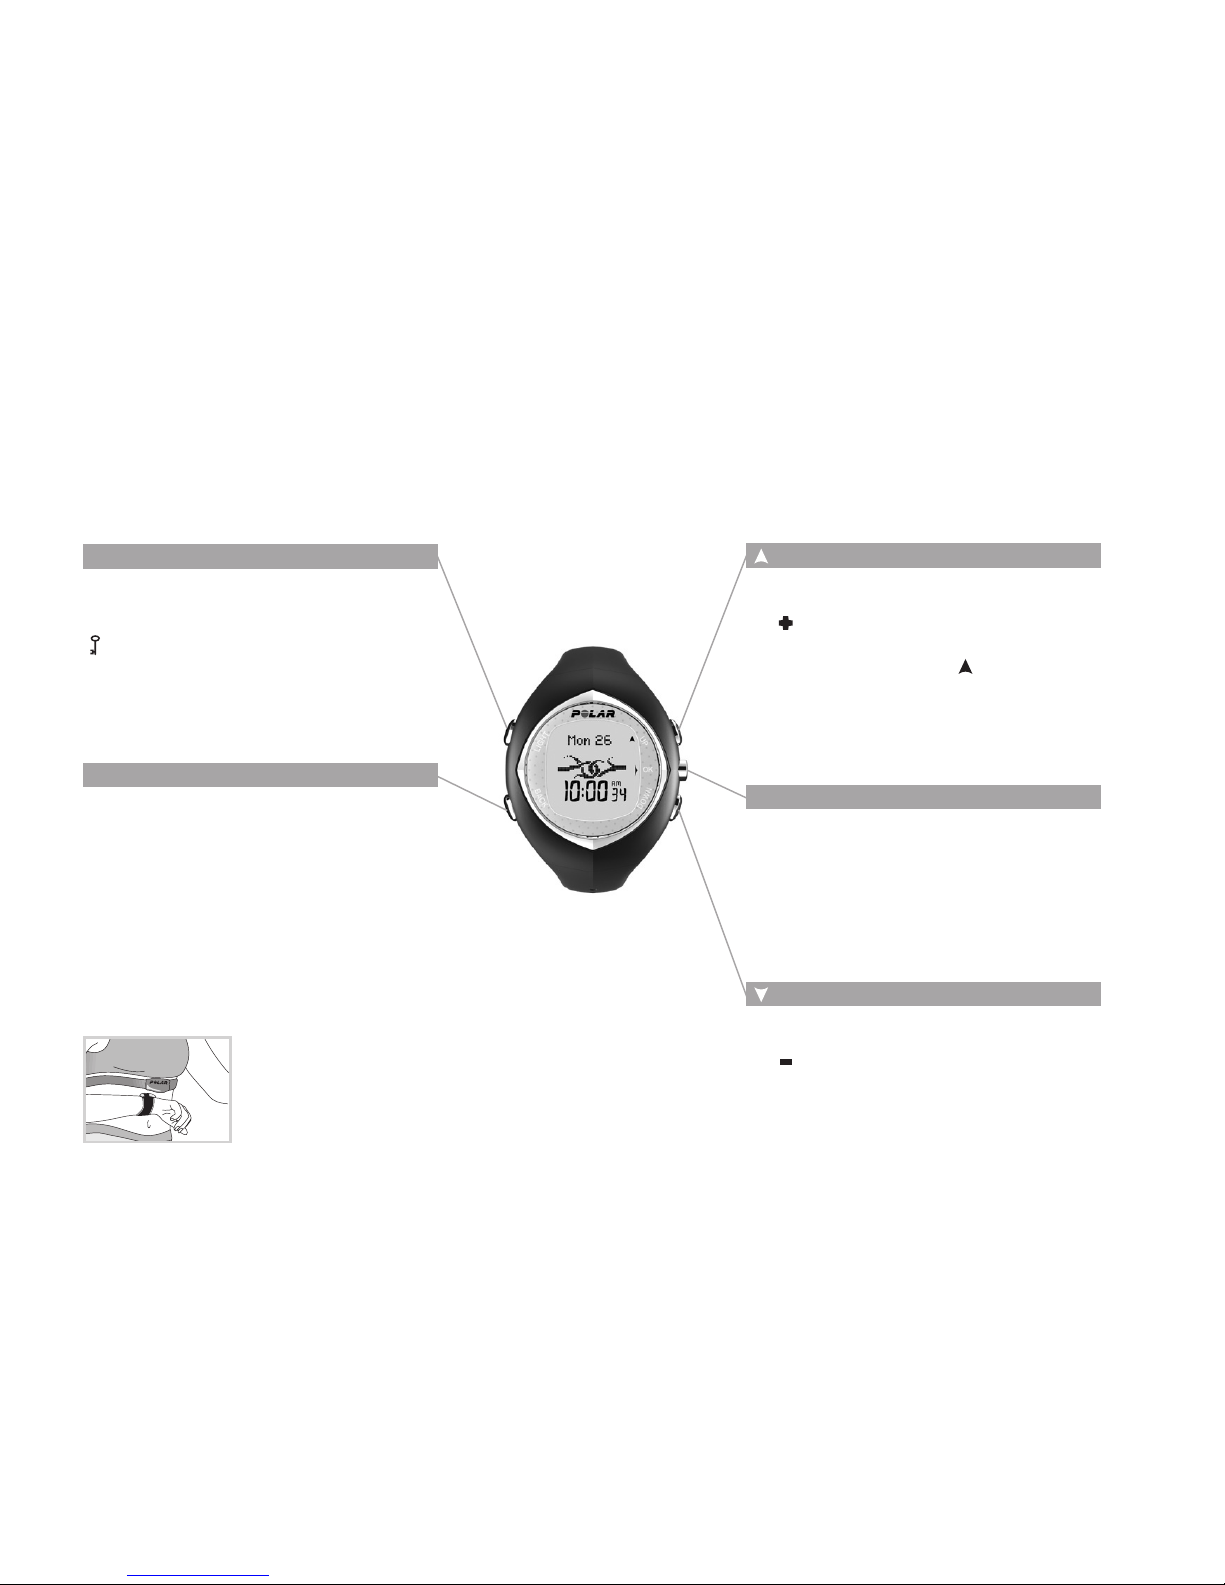
BUTTONS
Press OK to enter the menu.
Press the / buttons to move forward in the menus.
Press and hold the Back button to return to the Time of Day
display.
Back
Light
OK
Page 2
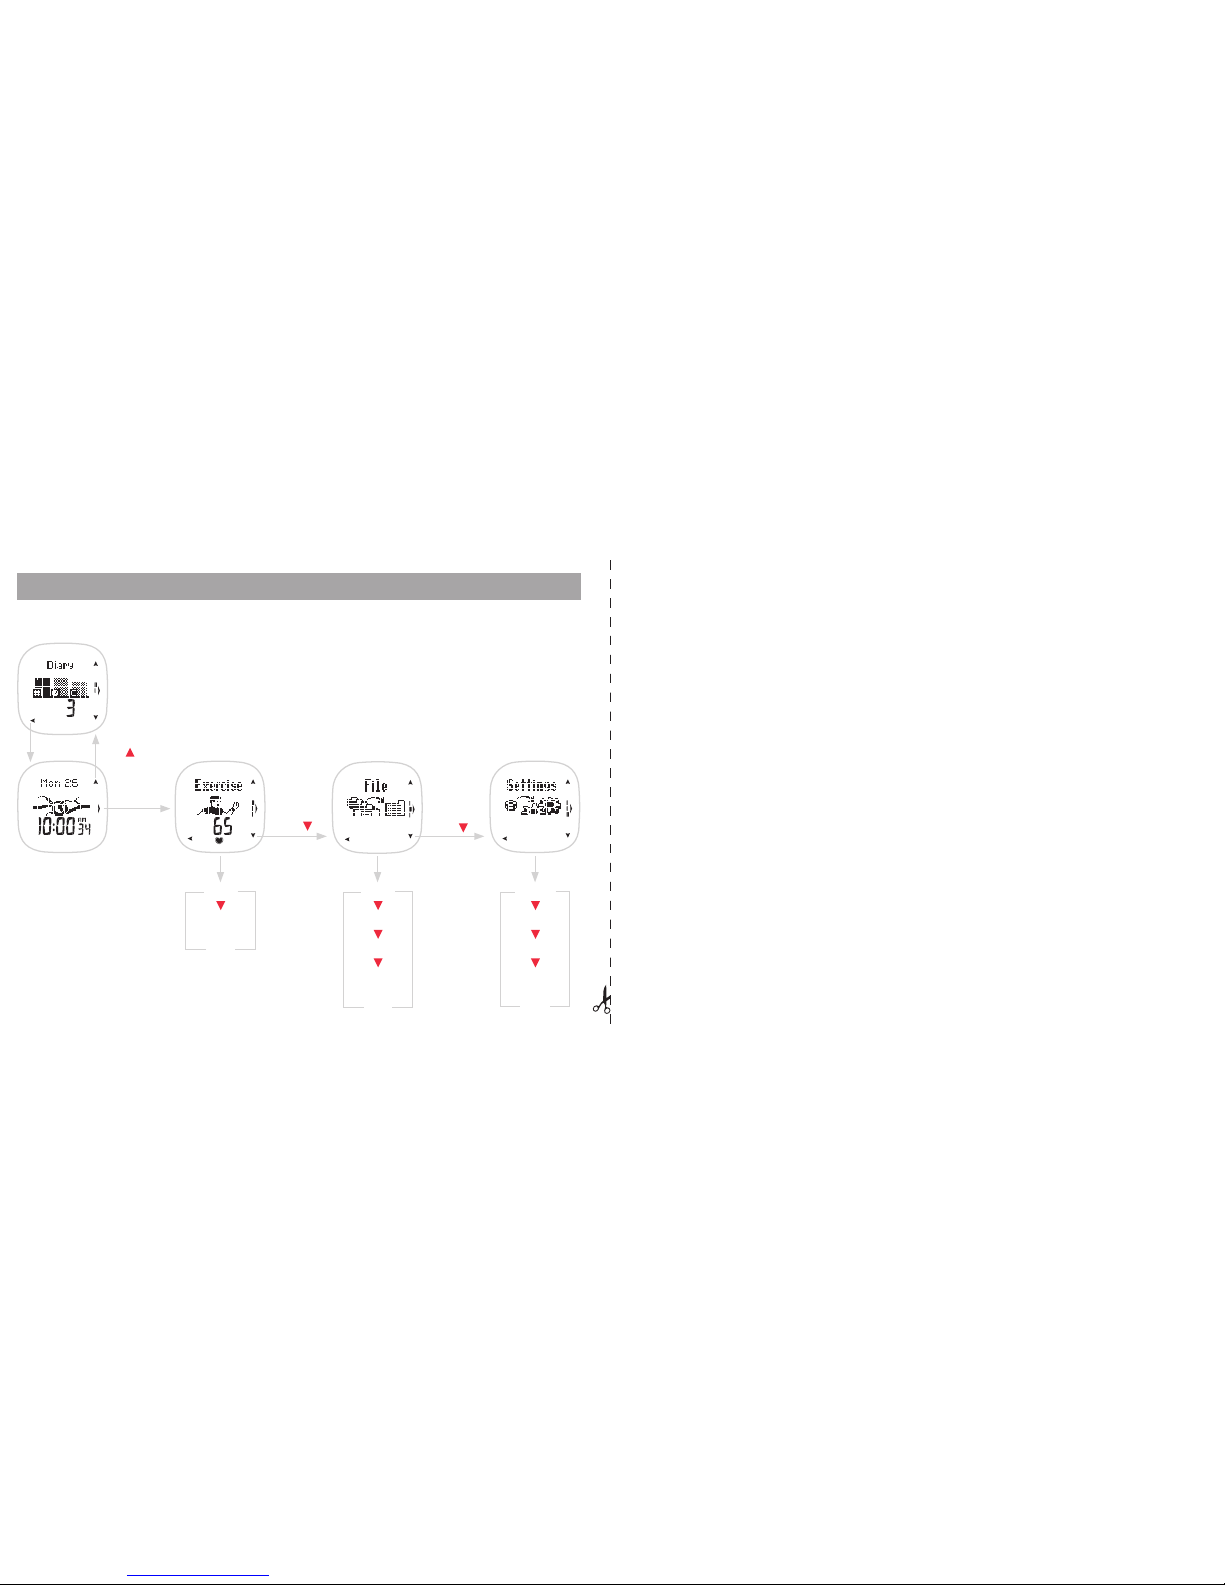
POLAR F6 QUICK GUIDE
OK
Press
START
SETTINGS
Back
DAILY
WEEKLY
TOTALS
SEND
Back
WATCH
HR SET
USER
GENERAL
Back
Press
OK
Press
Monitor information such
as your heart rate and
calories burned during
your exercise sessions.
View detailed
information
on your latest exercise
sessions, as well as the
long-term information on
your exercises.
Change alarm, time of
day, and other settings.
View exercise information on
current week.
Press
Back
OK OK
Dear customer,
Congratulations on your purchase of a new Polar F6™ Fitness Heart Rate Monitor!
Why should you use a heart rate monitor?
• A heart rate monitor helps you to train at your ideal pace.
• A heart rate monitor maximizes the benefits of exercise in a limited amount of time.
• A heart rate monitor provides you with objective information. Are you on the right track with your training?
Are you improving?
• A heart rate monitor provides you with immediate feedback; this is why it is an ideal training partner for you!
The Polar F6 heart rate monitor provides you a reliable and convenient way to measure your heart rate wirelessly.
It measures the electrocardiogram (ECG). You can use the wrist unit to conveniently view your heart rate and other
information while walking, cycling, cross-country skiing, or performing any other exercise without disturbing your
exercise rhythm. Professional athletes and amateurs alike have relied on the information provided by their Polar
heart rate monitor for decades, so why shouldn’t you?
This manual contains the information you need to use and maintain your product. Please read this through to
understand how to use the functions and to get the most out of your Polar heart rate monitor.
Please also check our web sites for the best product and training tips and other value adding services:
www.PolarFitnessTrainer.com and www.polar.fi
Page 3
5
ENGLISH
1. GETTING STARTED - PERSONALIZE YOUR POLAR F6 ........................................................................................................ 7
1.1 PRODUCT ELEMENTS ..............................................................................................................................................7
1.2 WRIST UNIT BUTTONS AND SYMBOLS ......................................................................................................................8
1.3 BASIC SETTINGS ...................................................................................................................................................10
1.4 MEASURING YOUR HEART RATE ............................................................................................................................ 12
2. START EXERCISING ........................................................................................................................................................14
2.1 STARTING EXERCISE RECORDING ..........................................................................................................................14
2.2 FUNCTIONS DURING EXERCISE .............................................................................................................................15
2.3 STOPPING THE EXERCISE ......................................................................................................................................20
2.4 EXERCISE SETTINGS .............................................................................................................................................21
2.5 OWNZONE ............................................................................................................................................................. 24
3. FOLLOW-UP YOUR ACHIEVEMENTS ................................................................................................................................ 27
3.1 DAILY FILE .............................................................................................................................................................27
3.2 WEEKLY FILE .........................................................................................................................................................30
3.3 TOTALS FILE .......................................................................................................................................................... 32
3.4 DIARY .................................................................................................................................................................... 34
3.5 WEEKLY FOLLOW-UP ............................................................................................................................................. 37
4. GET EXTRA BENEFIT FROM POLAR APPLICATIONS - DATA COMMUNICATION ..................................................................38
CONTENTS
Page 4

6
ENGLISH
5. SETTINGS .......................................................................................................................................................................39
5.1 WATCH SETTINGS .................................................................................................................................................. 39
5.2 HEART RATE SETTINGS ..........................................................................................................................................43
5.3 USER SETTINGS ....................................................................................................................................................44
5.4 GENERAL SETTINGS ..............................................................................................................................................47
6. CARE AND MAINTENANCE ...............................................................................................................................................49
7. PRECAUTIONS ................................................................................................................................................................ 50
7.1 INTERFERENCE DURING EXERCISE .......................................................................................................................50
7.2 MINIMIZING POSSIBLE RISKS WHEN EXERCISING .................................................................................................. 51
8. FREQUENTLY ASKED QUESTIONS ....................................................................................................................................52
9. TECHNICAL SPECIFICATION ........................................................................................................................................... 54
10. LIMITED POLAR INTERNATIONAL GUARANTEE ................................................................................................................56
11. DISCLAIMER ................................................................................................................................................................... 57
12. INDEX ............................................................................................................................................................................. 58
Page 5
7
ENGLISH
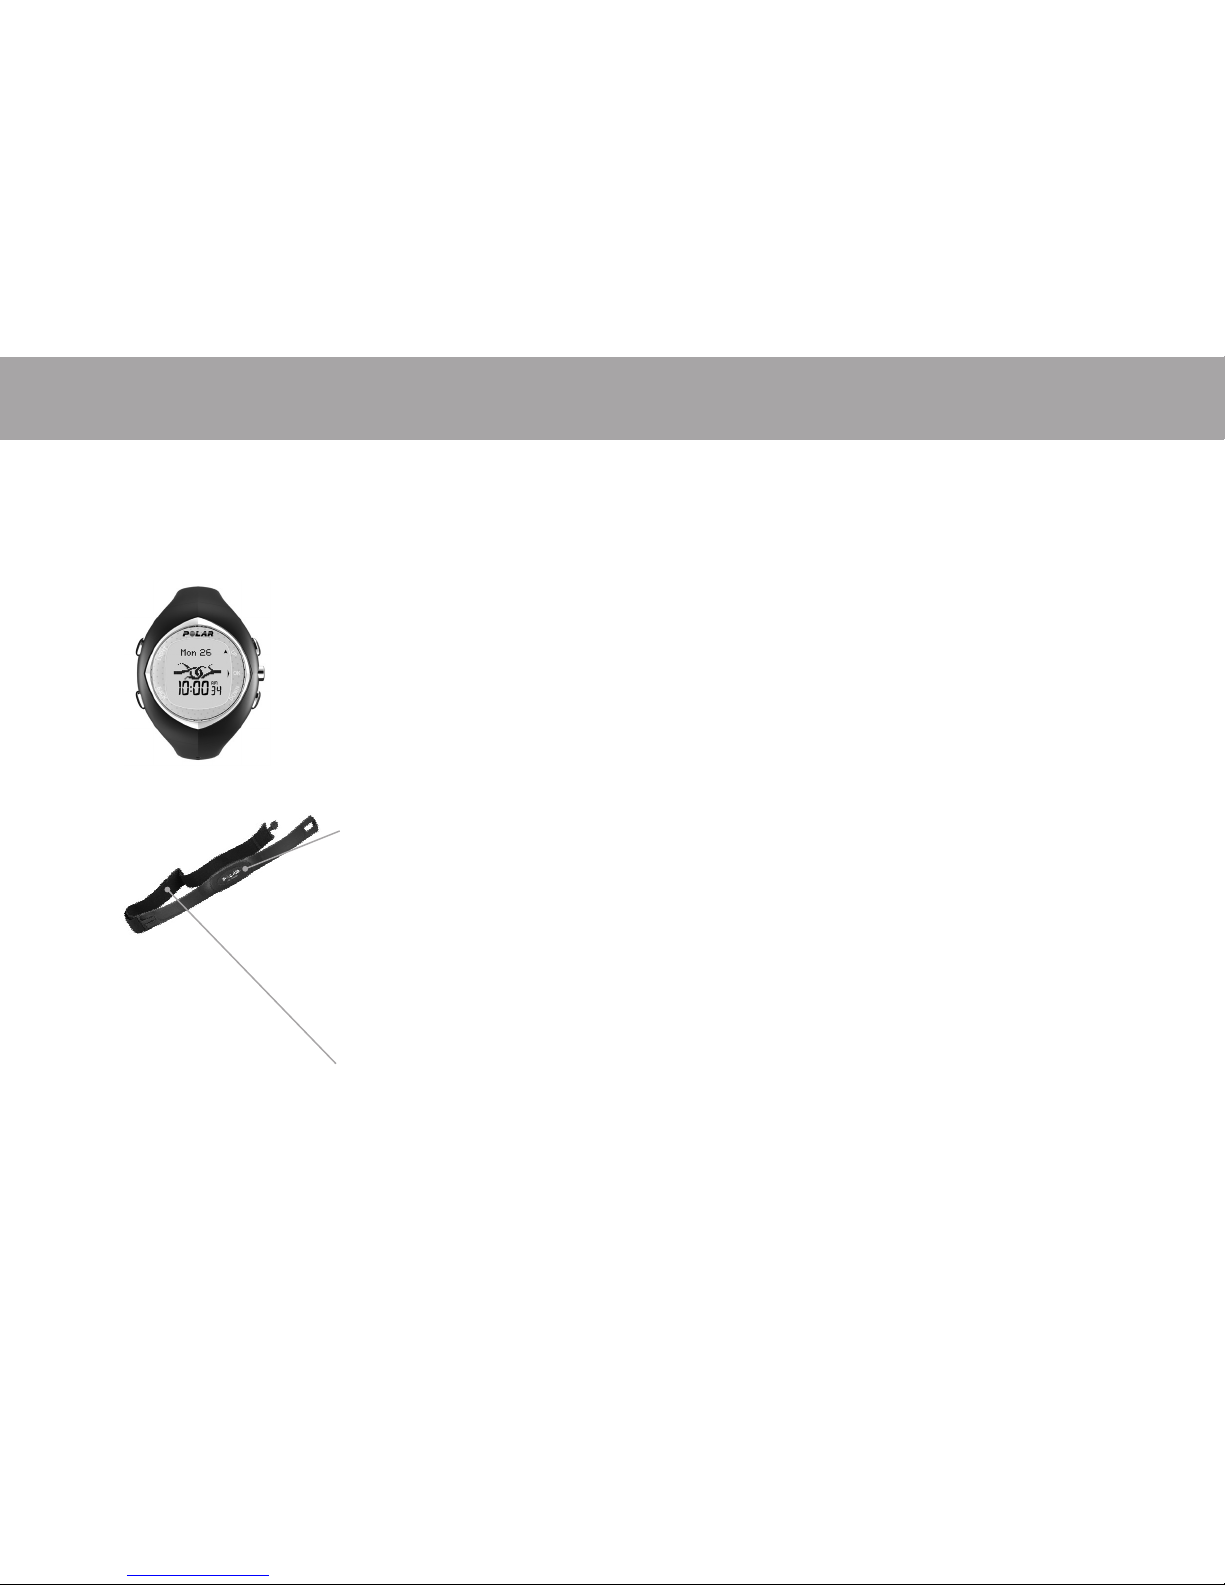
1.1 PRODUCT ELEMENTS
The Polar fitness heart rate monitor set consists of the
following items:
1. GETTING STARTED - PERSONALIZE YOUR POLAR F6
Wrist Unit
The wrist unit displays your
heart rate, burned calories,
exercise time, and other exercise
information while exercise
recording. You can also wear it
as a watch.
Polar Coded Transmitter
Wear the transmitter while
exercising. The electrode areas
are on the back of the transmitter.
The electrodes detect your heart
rate continuously and transmit it
to the wrist unit.
Elastic Strap
The elastic strap holds the
transmitter around your chest.
User Manual with Quick Guide
This User Manual contains the necessary information on
using your Polar fitness heart rate monitor. For a quick
reference, take the function map included in the Quick
Guide with you when exercising.
Data Communication
Your Polar fitness heart rate monitor offers you the option
of transferring data between your wrist unit and PC. For
further information, see the chapter Get Extra Benefit From
Polar Applications - Data Communication.
Page 6
8
ENGLISH
1.2 WRIST UNIT BUTTONS AND SYMBOLS
Note: Pressing a button briefly (approximately one second) has a different effect than pressing and holding the button for a longer period of
time (at least two seconds).
Light
• Switch the backlight on.
By pressing and holding the Light button, you can:
Lock and unlock all the buttons, except the
Light button, in the Time of Day display or while
recording your exercise. Press and hold the
Light button until Buttons Locked or Unlocked
is displayed.
Back
• Exit the displayed menu and return to the
previous level.
• Cancel the selection and leave the setting as
it was.
• Switch the alarm off.
By pressing and holding the Back button, you can:
• Return to the Time of Day display from any menu.
• Enter the Watch settings from the Time of Day
display.
• Move up in the menus and selection lists.
• Increase the selected flashing value when
is on the display.
By pressing and holding the button you can:
• Change the display logo in the Time of Day
display.
• Change the top row information in the Exercise
recording mode.
OK
• Enter the menu in the Time of Day display.
• Enter the displayed menu.
• Accept your selection.
By pressing and holding the OK button, you can
start exercise recording from the Time of Day
display.
• Move down in the menus and selection lists.
• Decrease the selected flashing value when
is on the display.
Heart Touch
In the Exercise mode, you can see the time
of day by bringing the wrist unit near the
Polar logo on the transmitter.
Page 7
9
ENGLISH
Symbols
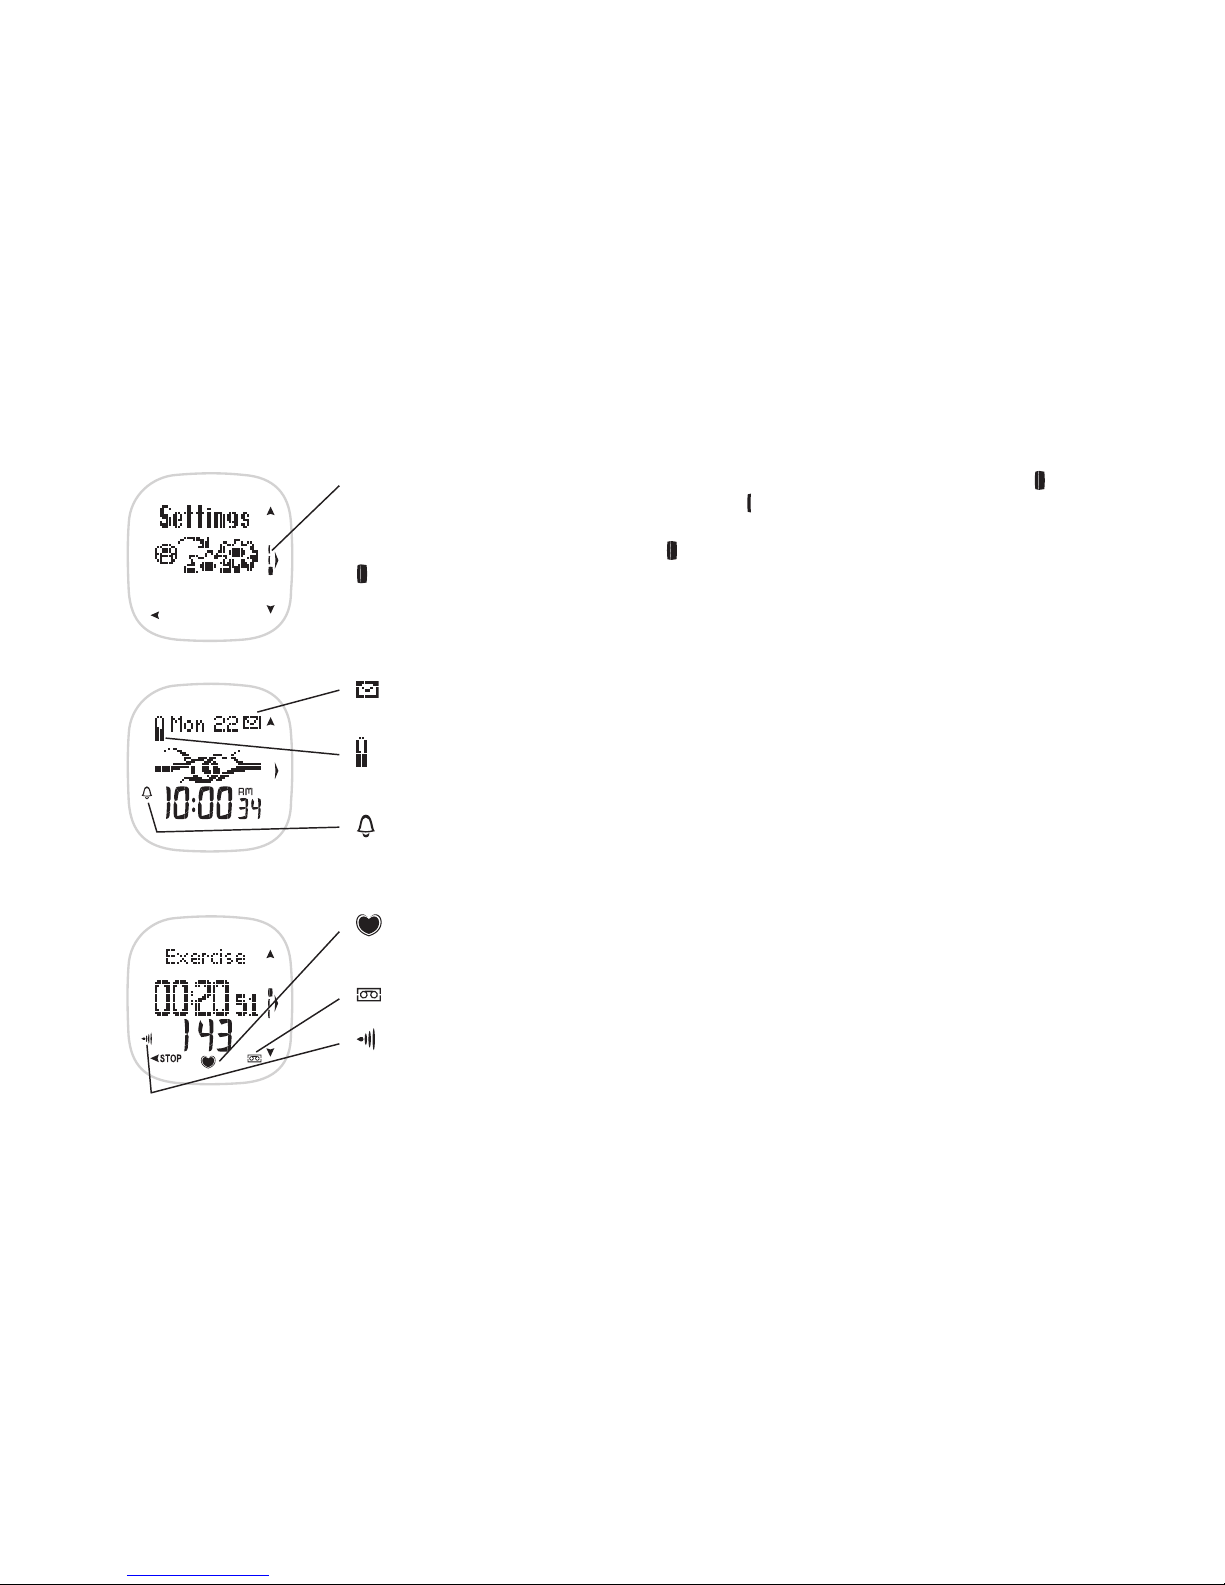
The menu level indicator shows you the number of menu items. When browsing the menus, the symbol
indicates where you are in the current menu level. The symbol shows you the total number of menu items.
In guided setting sequences the number of symbols indicates the total number of settings, and the flashing
symbol indicates the setting you are currently adjusting.
The envelope reminds you to check the exercises from last week. For further information, see the section
Weekly Follow-Up.
The battery symbol indicates that the wrist unit battery is low. For further information, see the chapter Care
and Maintenance.
The alarm symbol indicates that the alarm is switched on. For further information, see the section Watch
Settings.
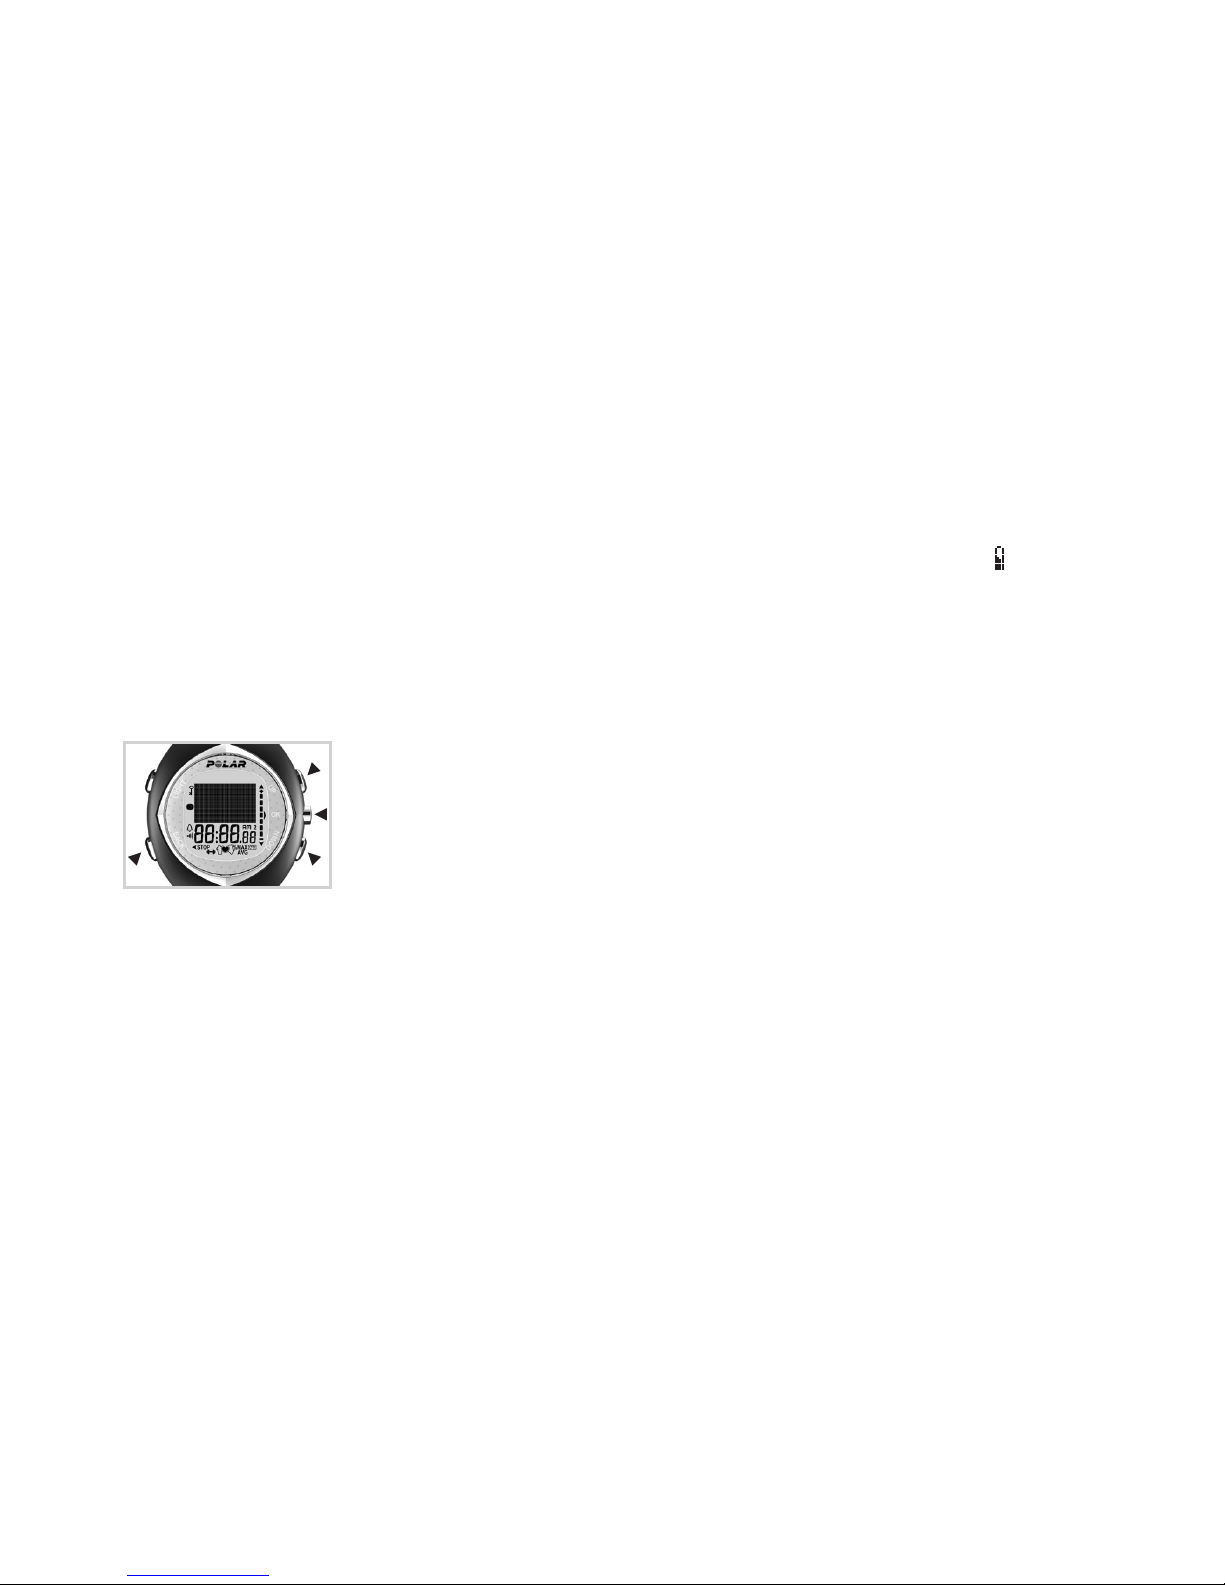
The framed heart indicates the coded transmission of your heart rate. For further information, see the
section Measuring Your Heart Rate.
The recording symbol indicates that exercise recording is on.
The sound symbol indicates that the heart rate zone alarm is switched on in the Exercise menu. For further
information, see the section Functions During Exercising.
Page 8
10
ENGLISH
1.3 BASIC SETTINGS
Start from the Basic Settings mode when you use your product for the first time. You only need to activate the blank wrist
unit once. Once activated, the wrist unit cannot be switched off.
Alternatively, you can transfer the Basic Settings to the wrist unit from your computer. For further information, see the
chapter Data Communication.
Note: It is important that you be precise with the Basic Settings, especially when setting your weight, height, birthday and gender, as they
have an impact on the accuracy of the measuring values, such as the target heart rate limits and calorie expenditure.
1. Activate the wrist unit by pressing any button. The display fills up with digits. Press OK.
2. WELCOME TO POLAR FITNESS WORLD is displayed. Press OK to start settings.
3. START WITH BASIC SETTINGS is displayed. Press OK to start the Basic Settings.
4. Time: Press the / buttons to select the 12 H or 24 H time mode. Press OK.
12 H: the time is displayed from 1 to 12 am or pm. In the date and birthday settings, the month is set first and
then the day (mm.dd).
• Press the / buttons to select AM or PM. Press OK.
• Press the / buttons to set the hours. Press OK.
• Press the / buttons to set the minutes. Press OK.
24 H: the time is displayed from 0 to 23 hours. In the date and birthday settings, the day is set first and
then the month (dd.mm).
• Press the / buttons to set the hours. Press OK.
• Press the / buttons to set the minutes. Press OK.
Page 9
11
ENGLISH
5. Date: Press the / buttons to select the month (mm) or day (dd). Press OK.
• Press the / buttons to select the day (dd) or month (mm). Press OK.
• Press the / buttons to select the year (yy). Press OK.
6. Units: Press the / buttons to select kilograms and centimeters (KG/CM) or pounds and feet (LB/FT). Press OK.
Note: The unit selection also affects how the calories are displayed. If you select lb/ft, calories are displayed as Cal. If you select kg/cm,
calories are displayed as kcal.
7. Weight: Press the / buttons to set your weight. Press OK.
Note: If you select the wrong units, you can still change them by pressing and holding the Light button.
8. Height: Press the / buttons to set your height. Press OK.
Note: If you select lb/ft as your units, you first set feet and then inches.
9. Birthday: Press the / buttons to select your birth month (mm) or day (dd). Press OK.
• Press the / buttons to select the day (dd) or month (mm). Press OK.
• Press the / buttons to select the year (yy). Press OK.
10. Sex: Press the / buttons to select MALE or FEMALE. Press OK.
11. SETTINGS OK? is displayed. Press the / buttons to select YES or NO. Press OK.
If you select Yes, your settings are accepted and you can start using your Polar heart rate monitor.
If you select No, you can change your Basic Settings. Press the Back button until you return to the setting you want to
change.
Page 10
12
ENGLISH
1.4 MEASURING YOUR HEART RATE
To measure your heart rate, you need to wear the transmitter.
Heart rate coding reduces interference from other heart rate monitors that are close by. To make sure that the code search
is successful and ensure trouble-free heart rate monitoring, keep the wrist unit within 3 feet/1 meter of your transmitter.
Check that you are not near other people with heart rate monitors or any source of electromagnetic disturbances (for further
information on interference, see the chapter Precautions).
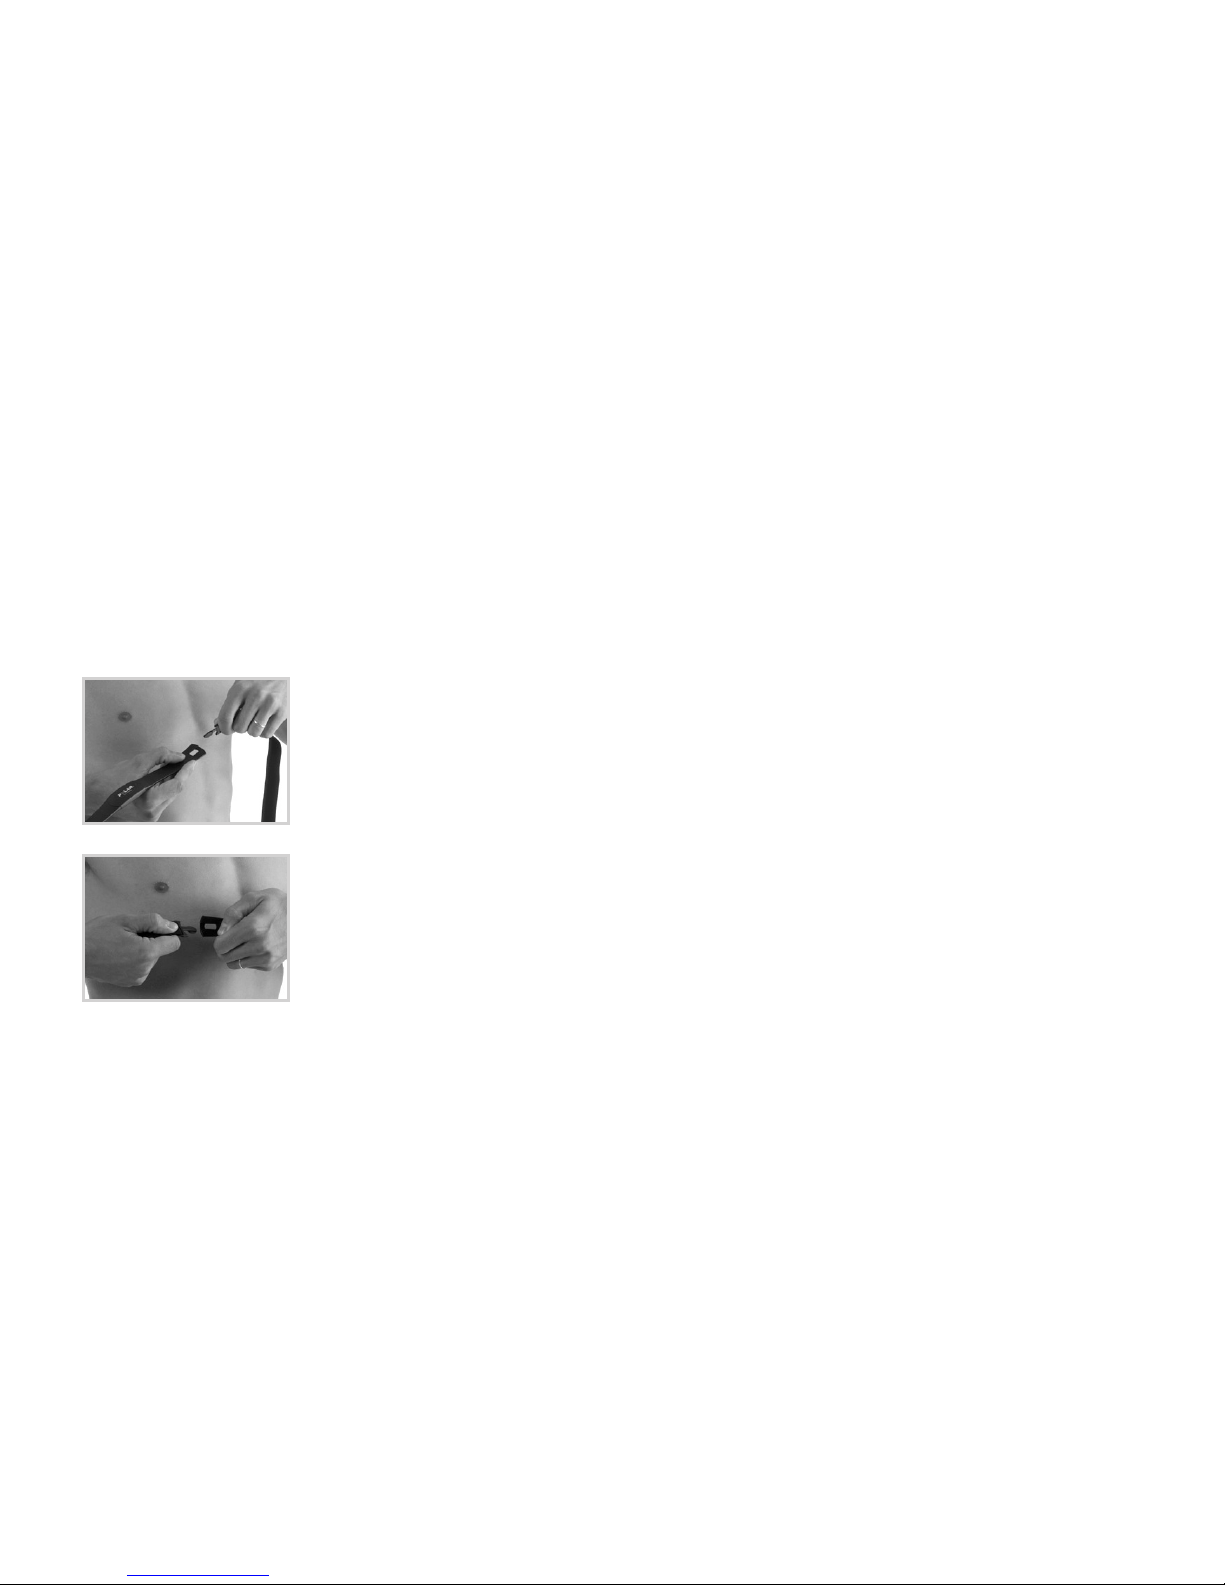
1. Attach one end of the transmitter to the elastic strap.
2. Adjust the transmitter’s strap length to fit snugly and comfortably. Secure the strap around
your chest, just below the chest muscles, and buckle the strap to the transmitter.
Page 11
13
ENGLISH
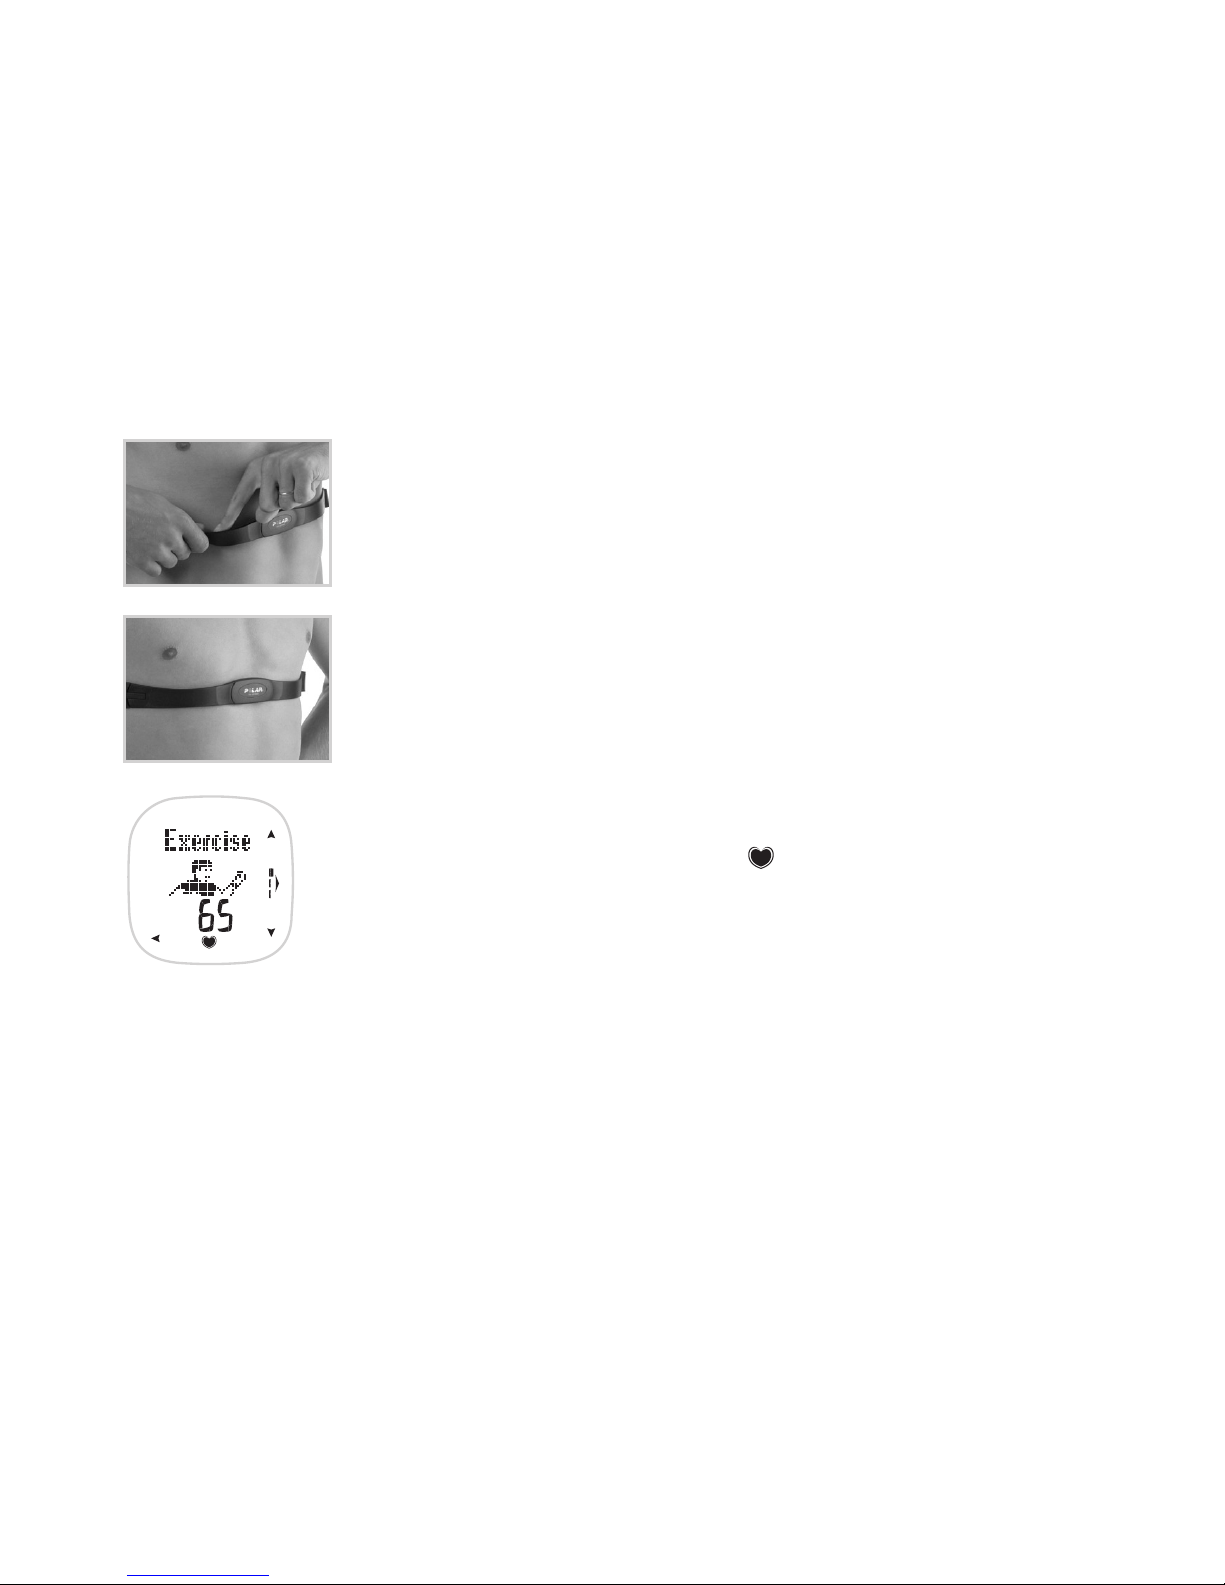
3. Lift the transmitter off your chest and moisten the two grooved electrode areas on the back.
4. Check that the wet electrode areas are firmly against your skin and that the Polar logo is in a
central, upright position.
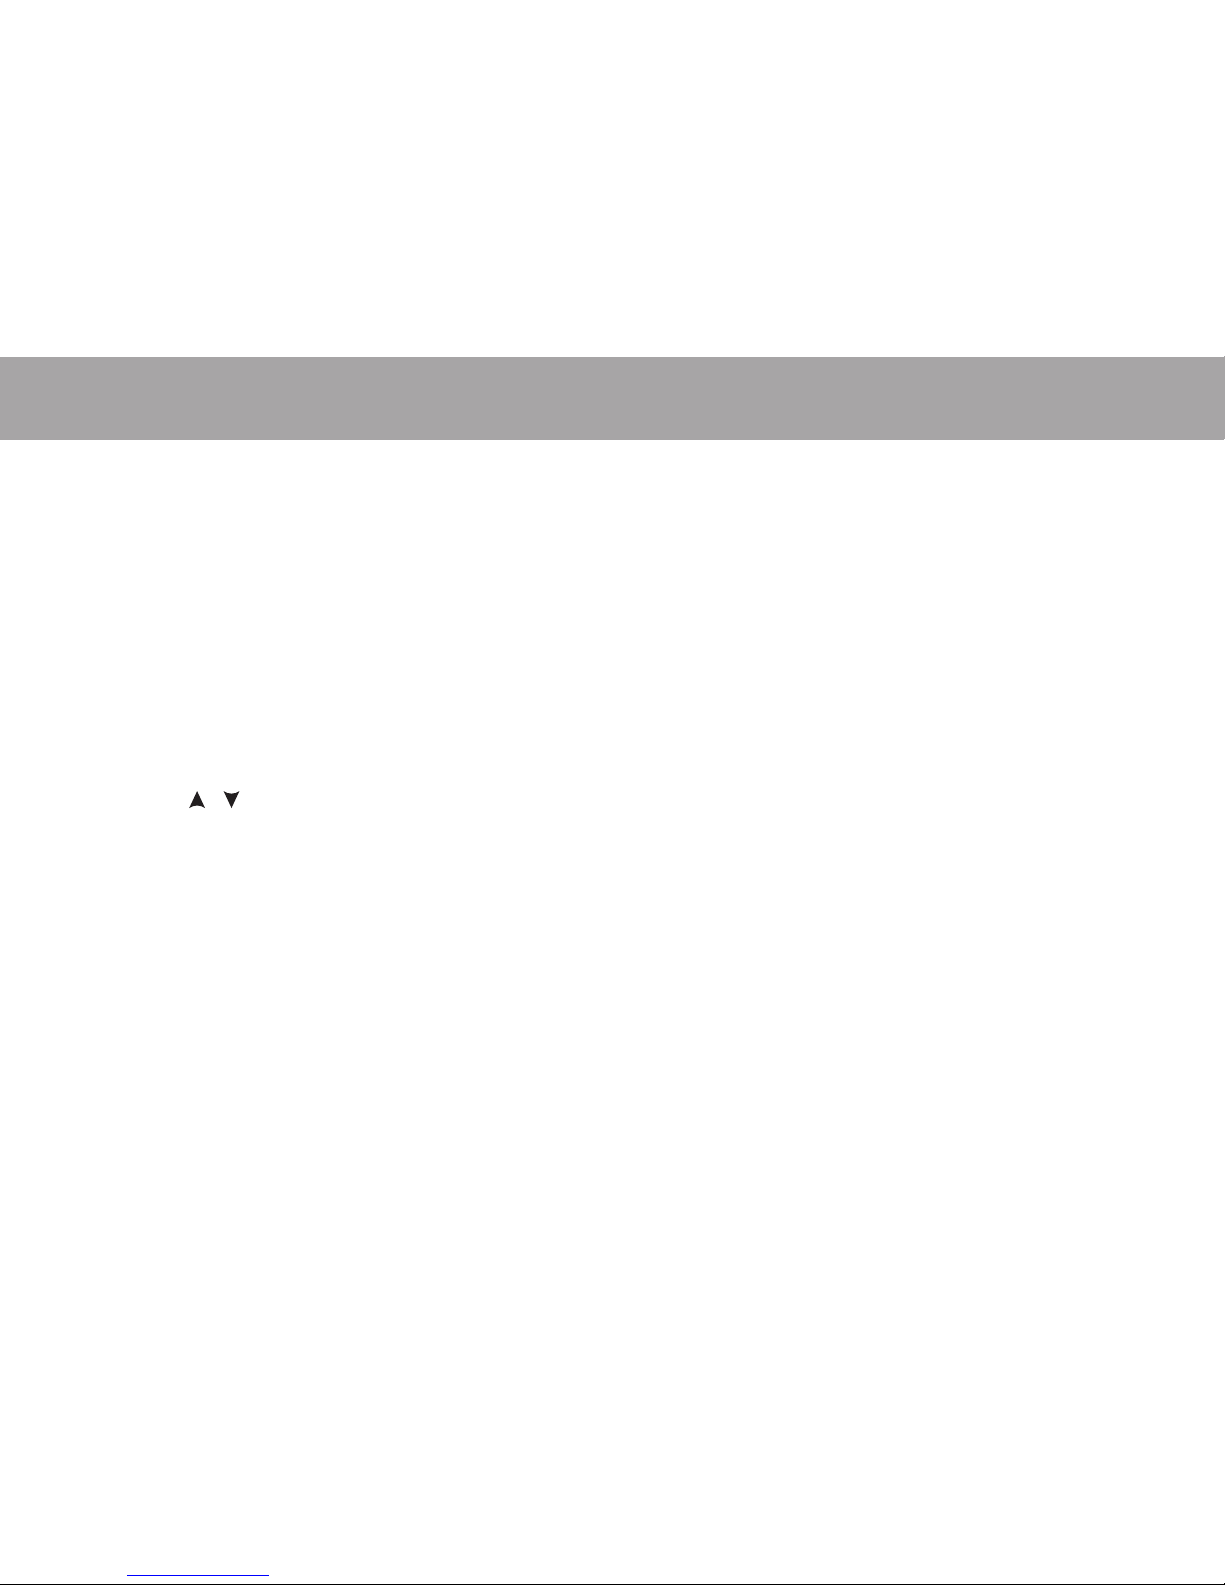
5. Wear the wrist unit as a watch. In the Time of Day display, press OK to enter the menu.
Exercise is displayed. The wrist unit automatically starts to search for your heart rate.
Your heart rate and the framed heart symbol appear in a maximum of 15 seconds.
The frame around the heart symbol indicates that your heart rate is coded.
Your heart rate is measured, but not recorded, until you have started to exercise. To record
your heart rate and other exercise data, see the chapter Start Exercising.
Note: If the wrist unit does not receive your heart rate - - /00 is displayed, check that the transmitter
electrodes are wet and that the strap is snug enough. Bring the wrist unit up to your chest near the Polar logo
on the transmitter. The wrist unit starts to seek the heart rate signal again.
Page 12
14
ENGLISH
2. START EXERCISING
In the Exercise menu you can view and record your exercise information, such as your heart rate, exercise time, and energy
expenditure.
2.1 STARTING EXERCISE RECORDING
1. Wear the transmitter as described in the section Measuring Your Heart Rate. When you wear your transmitter during an
exercise session the wrist unit automatically calculates the number of calories you have burned, as well as the other
exercise information based on your heart rate.
2. Start from the Time of Day display. Press OK.
3. Exercise is displayed. The wrist unit automatically starts to search for your heart rate. Press OK.
4. Press the / buttons to select START. Press OK to start recording your exercise session. Exercise time starts running.
• If OwnZone is displayed, see the section OwnZone.
• If you want to skip the OwnZone® determination and use the previously determined OwnZone, press OK. In this case,
if you have not determined your OwnZone before, your age-based heart rate limits are used.
• If START WITH BASIC SETTINGS appears, some of the Basic Settings are missing. Press OK to complete all your settings.
For further information, see the section Basic Settings.
Page 13
15
ENGLISH
2.2 FUNCTIONS DURING EXERCISE
Note: Your exercise information is saved only if the stopwatch has been on for more than one minute.
Checking the Time of Day
Bring the wrist unit near the Polar logo on the transmitter. The time of day and your current heart rate are displayed.
Checking Exercise Information
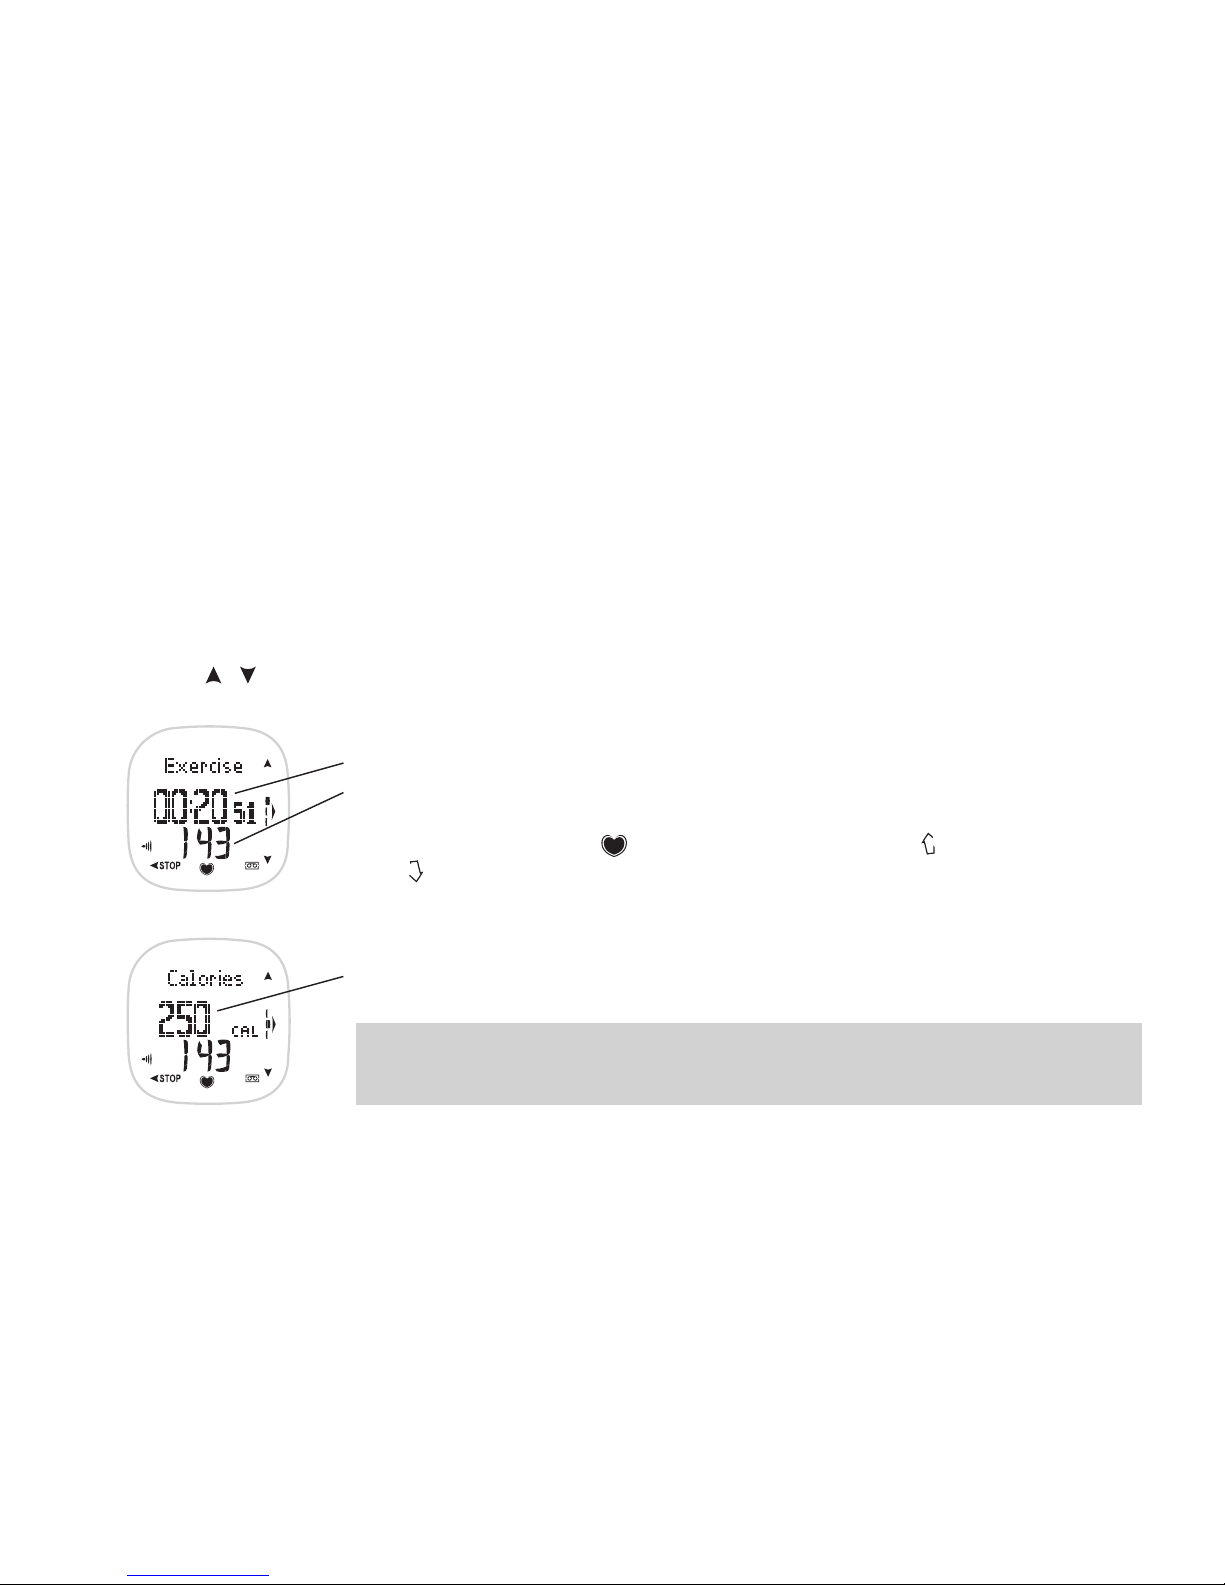
Press the / buttons to view the following options:
Exercise
Exercise duration
Heart rate as beats per minute (bpm) or as a percentage of your
maximum heart rate (%HR
max
), depending on your settings.
The arrow symbols beside the symbol indicate that you are below or
above your target heart rate zone.
Calories (displayed as Cal/kcal, depending on your units settings)
The calories you have burned until now.
Polar calorie calculation shows your energy expenditure while exercising. You can use the feature to set daily and
weekly exercise goals in terms of calories (Cal/kcal). Monitor your energy expenditure by following the calories of one
exercise session, accumulated weekly calories, or your total calories for as many exercise sessions as you choose.
Page 14
16
ENGLISH
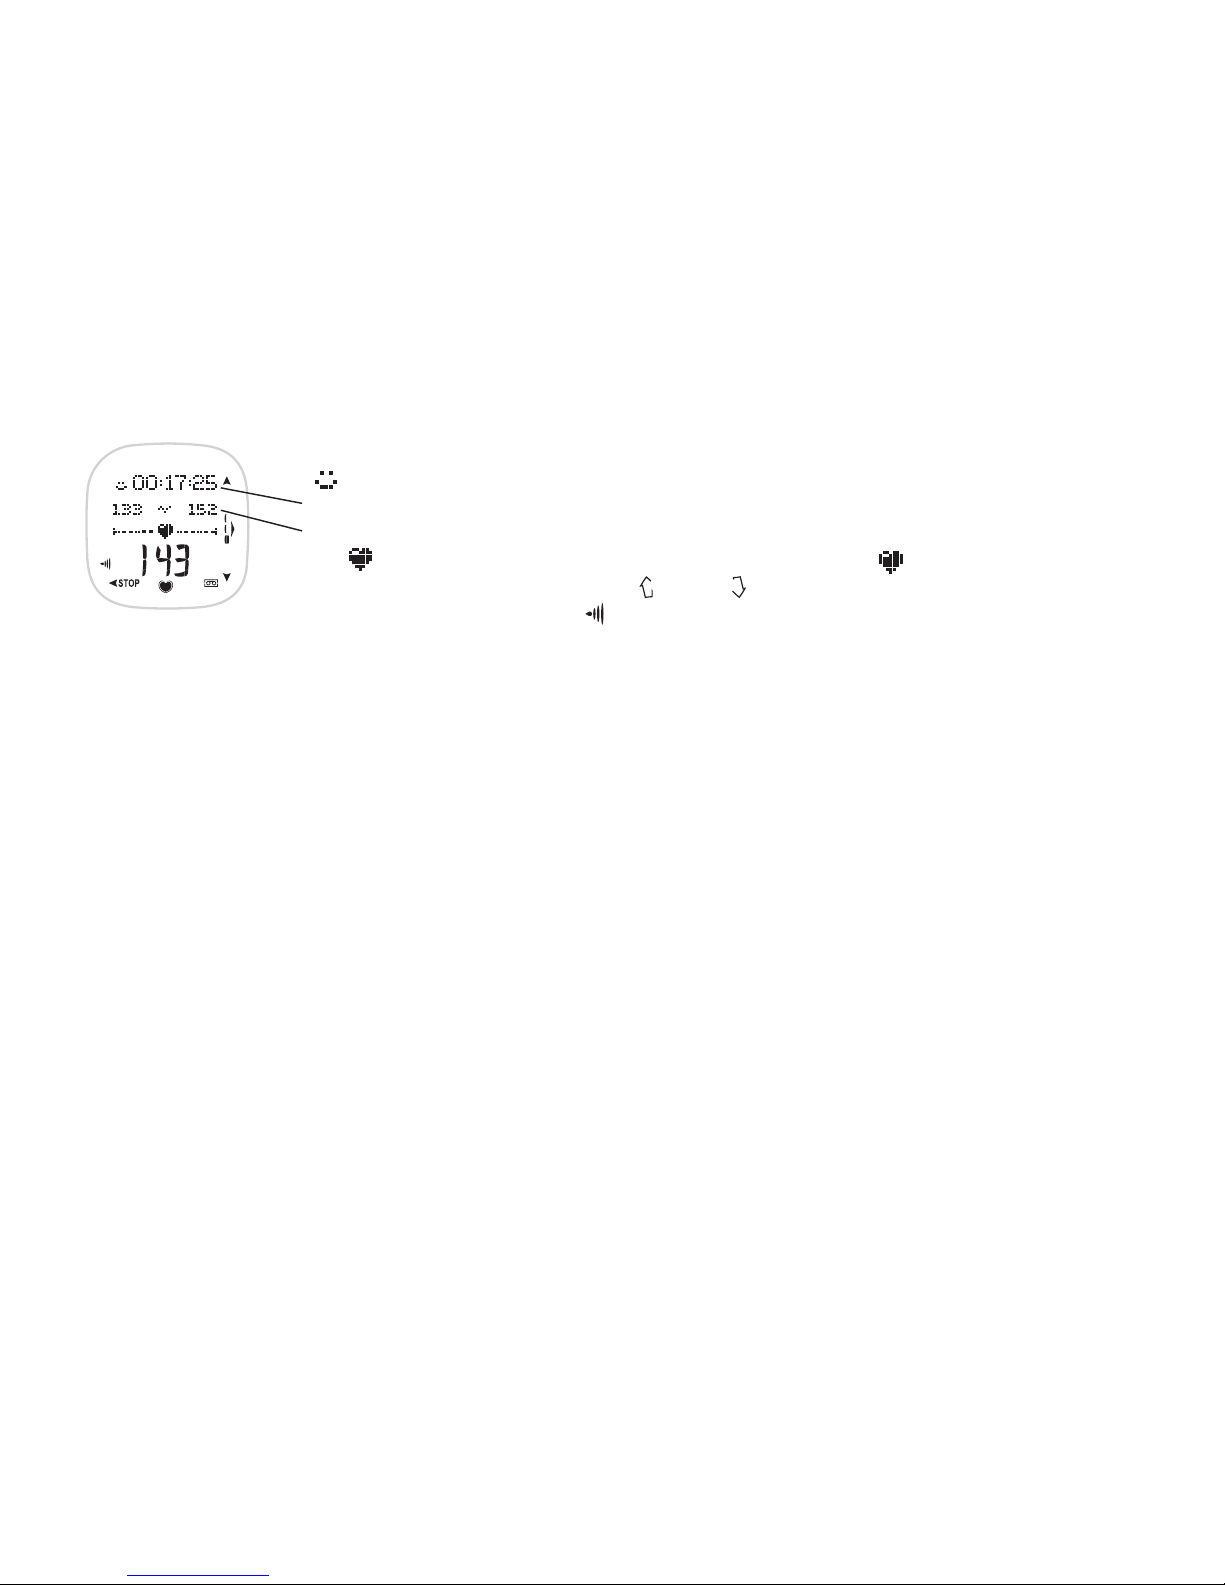
In Zone (displayed if HR limits is on)
symbol is displayed if your OwnZone determination succeeds
Exercise duration between target heart rate limits
Target heart rate limits as bpm or as %HR
max
, depending on your settings
The symbol moves left or right according to your heart rate. If the symbol is not visible,
it means your heart rate is either below or above your target heart rate limits. The alarm
sounds, provided the zone alarm is switched on.
Page 15
17
ENGLISH
Changing the Displayed Exercise Information
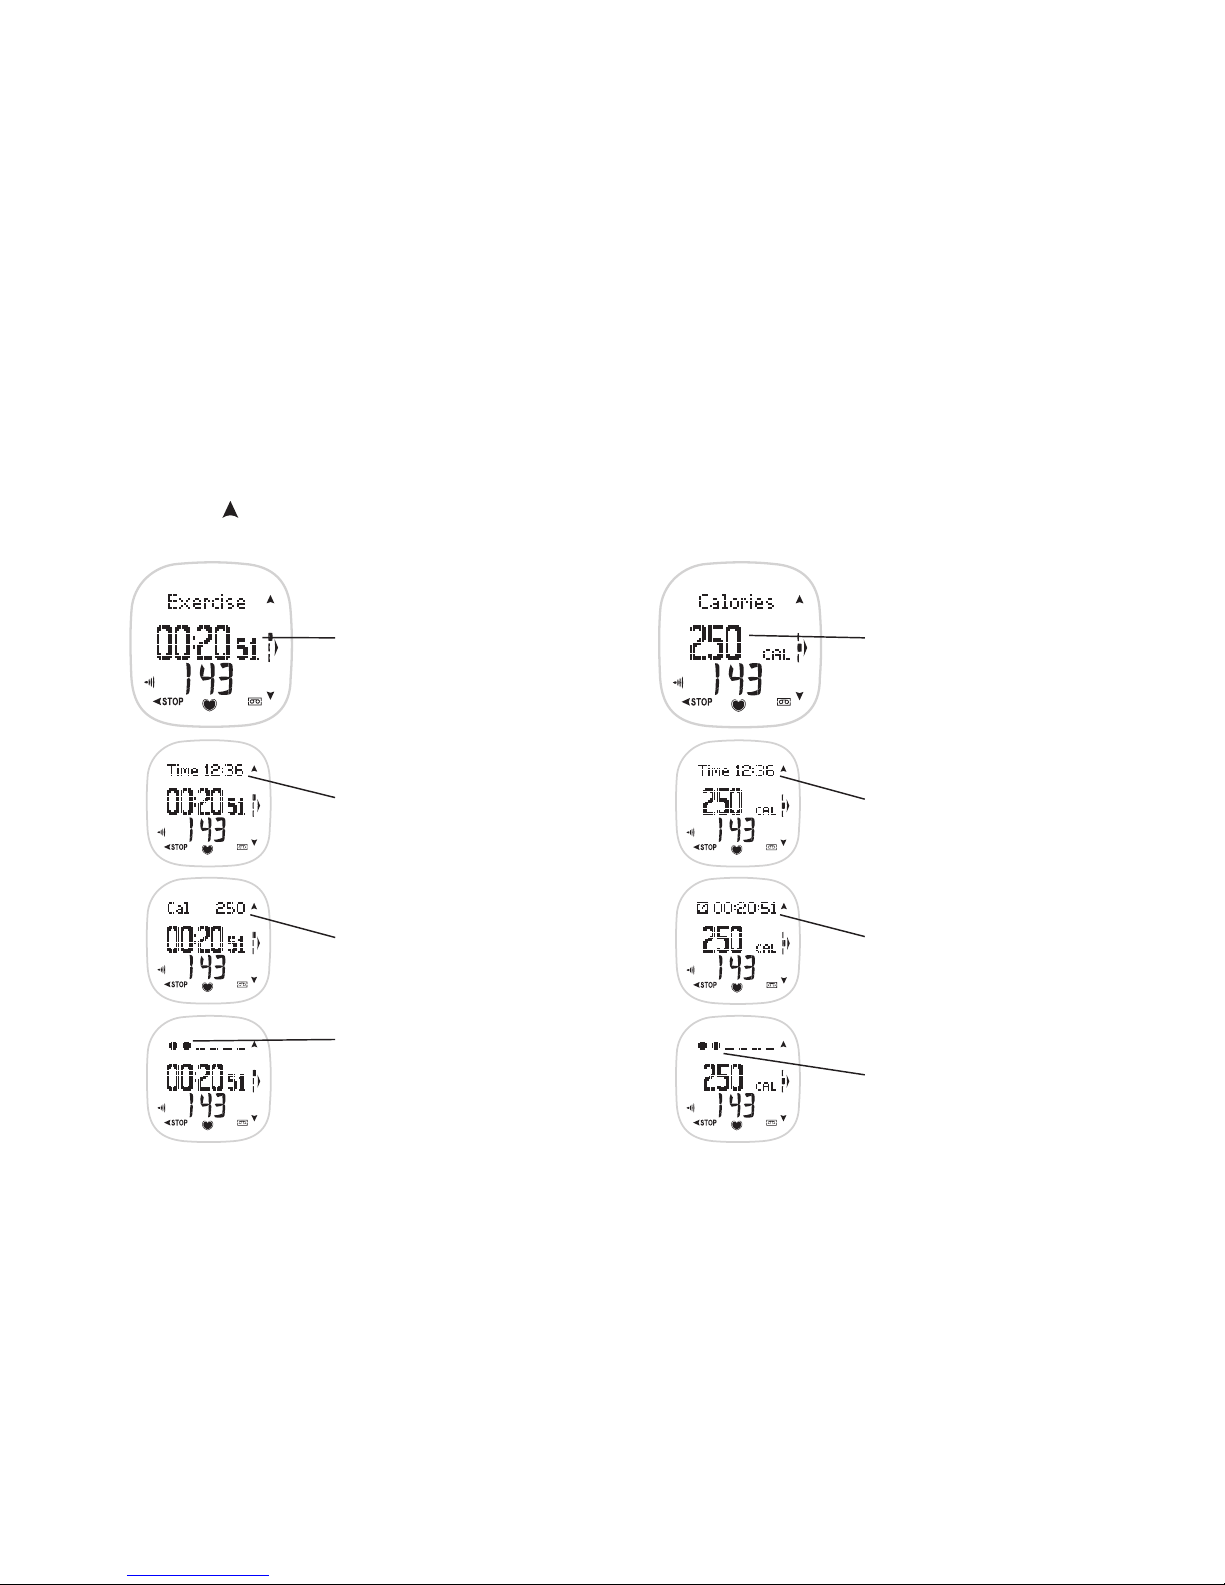
In the Exercise and Calories display, you can change the upper row information to personalize the display by pressing and
holding the button.
Exercise duration
Time of Day
Calories (Cal/kcal)
Fitness bullets - a bullet
appears for every 10 minutes
in the target heart rate zone
equaling one hour in total if all
the bullets appear.
Calories (Cal/kcal)
Time of Day
Exercise duration
Fitness bullets
Page 16

18
ENGLISH
Switching the Backlight On
Press the Light button and the display is illuminated for a few seconds.
After you have illuminated the display once while exercising night mode symbol appears in the display. The display
automatically illuminates each time you press any button or bring the wrist unit near the Polar logo on the transmitter, until
you stop recording the exercise.
Switching Keylock On or Off
Press and hold the Light button to lock and unlock all the buttons, except the Light button. BUTTONS LOCKED or BUTTONS
UNLOCKED is displayed.
Pausing the Exercise
You can pause your exercise recording while taking a break to drink water or some other activity.
1. Press the Back button. Your current heart rate is displayed. The recording of the exercise is paused. instead of is
displayed.
2. Select CONTINUE by pressing the / buttons. Press OK to continue recording your exercise.
Page 17
19
ENGLISH
Changing Settings During Exercise
You can change the settings while recording your exercise or you can pause the exercise recording while modifying your
settings.
1. If you want to change the settings without pausing the exercise recording, press and hold OK.
Alternatively, if you want to pause the exercise recording, press the Back button and select SETTINGS with
the / buttons. Press OK.
2. HR ALARM, HR LIMITS, and HR VIEW are displayed. Press the / buttons to select HR Alarm, HR Limits, or HR View.
Press OK.
HR alarm: Select VOL 2 (loud), VOL 1 (quiet), or alarm OFF with the / buttons. Press OK.
HR limits: If you are using OwnZone or Automatic HR limits, select HARD, MODERATE, LIGHT, or BASIC with
the / buttons. Press OK. Your limits are displayed for a few seconds.
Alternatively, if you are using Manual limits your target heart rate limits are displayed for a few seconds.
HR view: Select HR (beats per minute) or HR% (percentage of your maximum heart rate) with the / buttons. Press OK.
When you have modified the settings, the wrist unit returns to either Exercise mode or Exercise pause mode.
For further information, see the section Exercise Settings.
Note: The wrist unit shows the exercise or exercise pause mode if you do not press any of the buttons within one minute.
Page 18
20
ENGLISH
2.3 STOPPING THE EXERCISE
1. Press the Back button. Your current heart rate is displayed. Exercise recording is paused. is displayed.
2. Select EXIT with the / buttons and press OK.
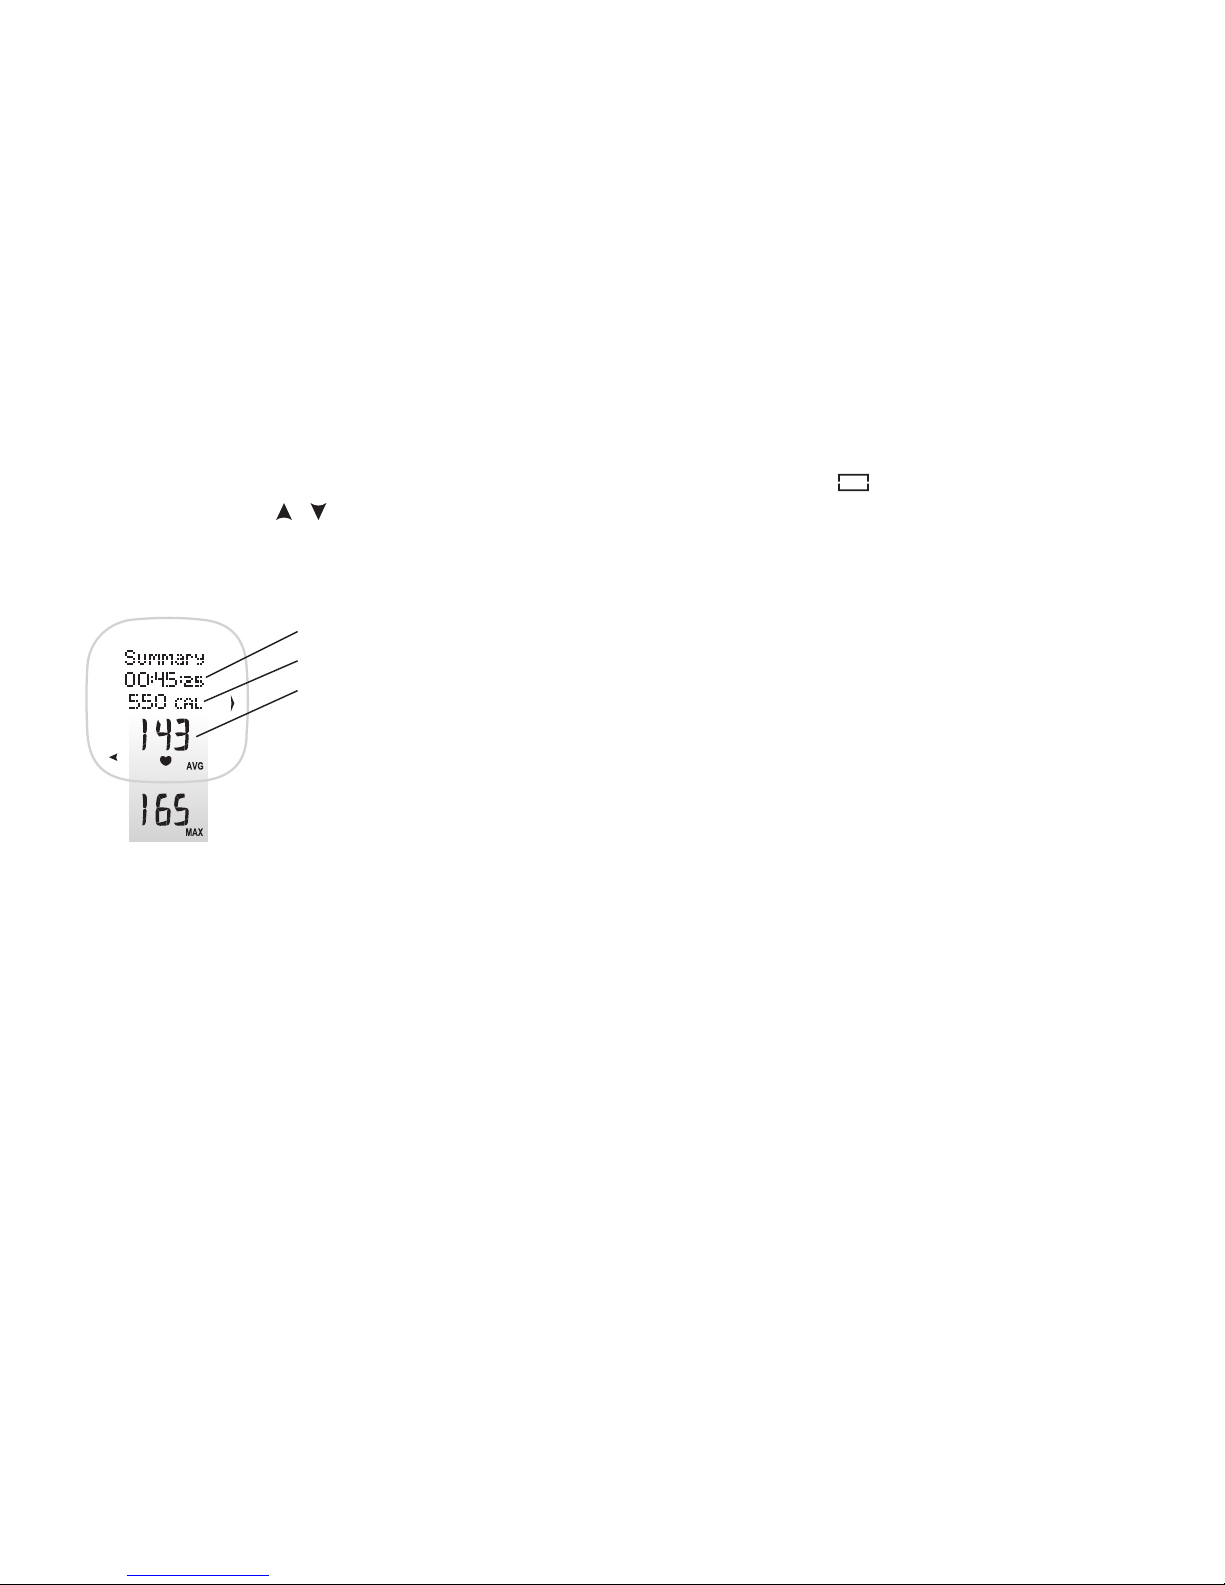
Summary of your exercise is displayed.
Exercise duration (hh.mm.ss)
Calories burned during the exercise (Cal/kcal)
The maximum (max) and average (avg) heart rate of the exercise
session (bpm/%HR
max
) alternate.
3. Press OK to enter the Exercise menu or press and hold the Back button to return to the Time of Day display.
Note:
• The wrist unit shows the Time of Day display after five minutes if you forget to stop the heart rate measurement after you pause the
exercise recording and remove the transmitter from your chest.
• To check how to take care of your transmitter after exercising, see the chapter Care and Maintenance.
Page 19
21
ENGLISH
2.4 EXERCISE SETTINGS
In the Exercise Settings menu you can view and edit settings used during exercise.
1. Start from the Time of Day display. Press OK.
2. Exercise is displayed. Press OK.
3. Press the / buttons to select SETTINGS. Press OK.
4. Press the / buttons to select HR ALARM, HR LIMITS, or HR VIEW. Press OK.
HR Alarm Setting
Select VOL 2 (loud), VOL 1 (quiet), or alarm OFF with the / buttons. Press OK.
If you select Vol 2 or Vol 1 the alarm sounds if you are not within your target heart rate zone while exercising.
HR View Setting
Press the / buttons to select HR (beats per minute), or HR% (a percentage of your maximum heart rate). Press OK.
HR Limits Setting
Press the / buttons to select OWNZONE, AUTOMATIC, MANUAL, or OFF. Press OK.
OWNZONE: The wrist unit determines your individual target heart rate limits automatically in the beginning of the exercise.
For further on how to determine your OwnZone limits, see the section OwnZone.
Press the / buttons to select HARD, MODERATE, LIGHT, or BASIC limits for OwnZone. Press OK.
The wrist unit displays your previously determined OwnZone limits in the selected zone. If you have not performed the
OwnZone, your age-based limits are displayed. These limits are used if your next OwnZone determination fails.
Page 20
22
ENGLISH
AUTOMATIC: Automatically calculated age-based heart rate limits.
Press the / buttons to select HARD, MODERATE, LIGHT, or BASIC. Press OK. The wrist unit displays the heart rate limits
based on the birth date you have entered.
MANUAL: Instead of determining your target heart rate zone by using OwnZone or Automatic limits, you can determine your
target heart rate limits manually by using the age formula.
The wrist unit displays your previously determined heart rate limits. Alternatively, if you have not determined the manual
limits before your age-based limits are displayed.
Press the / buttons to set the upper limit. Press OK.
Press the / buttons to set the lower limit. Press OK.
OFF: The function is switched off and there are no target heart rate limits during the exercise session.
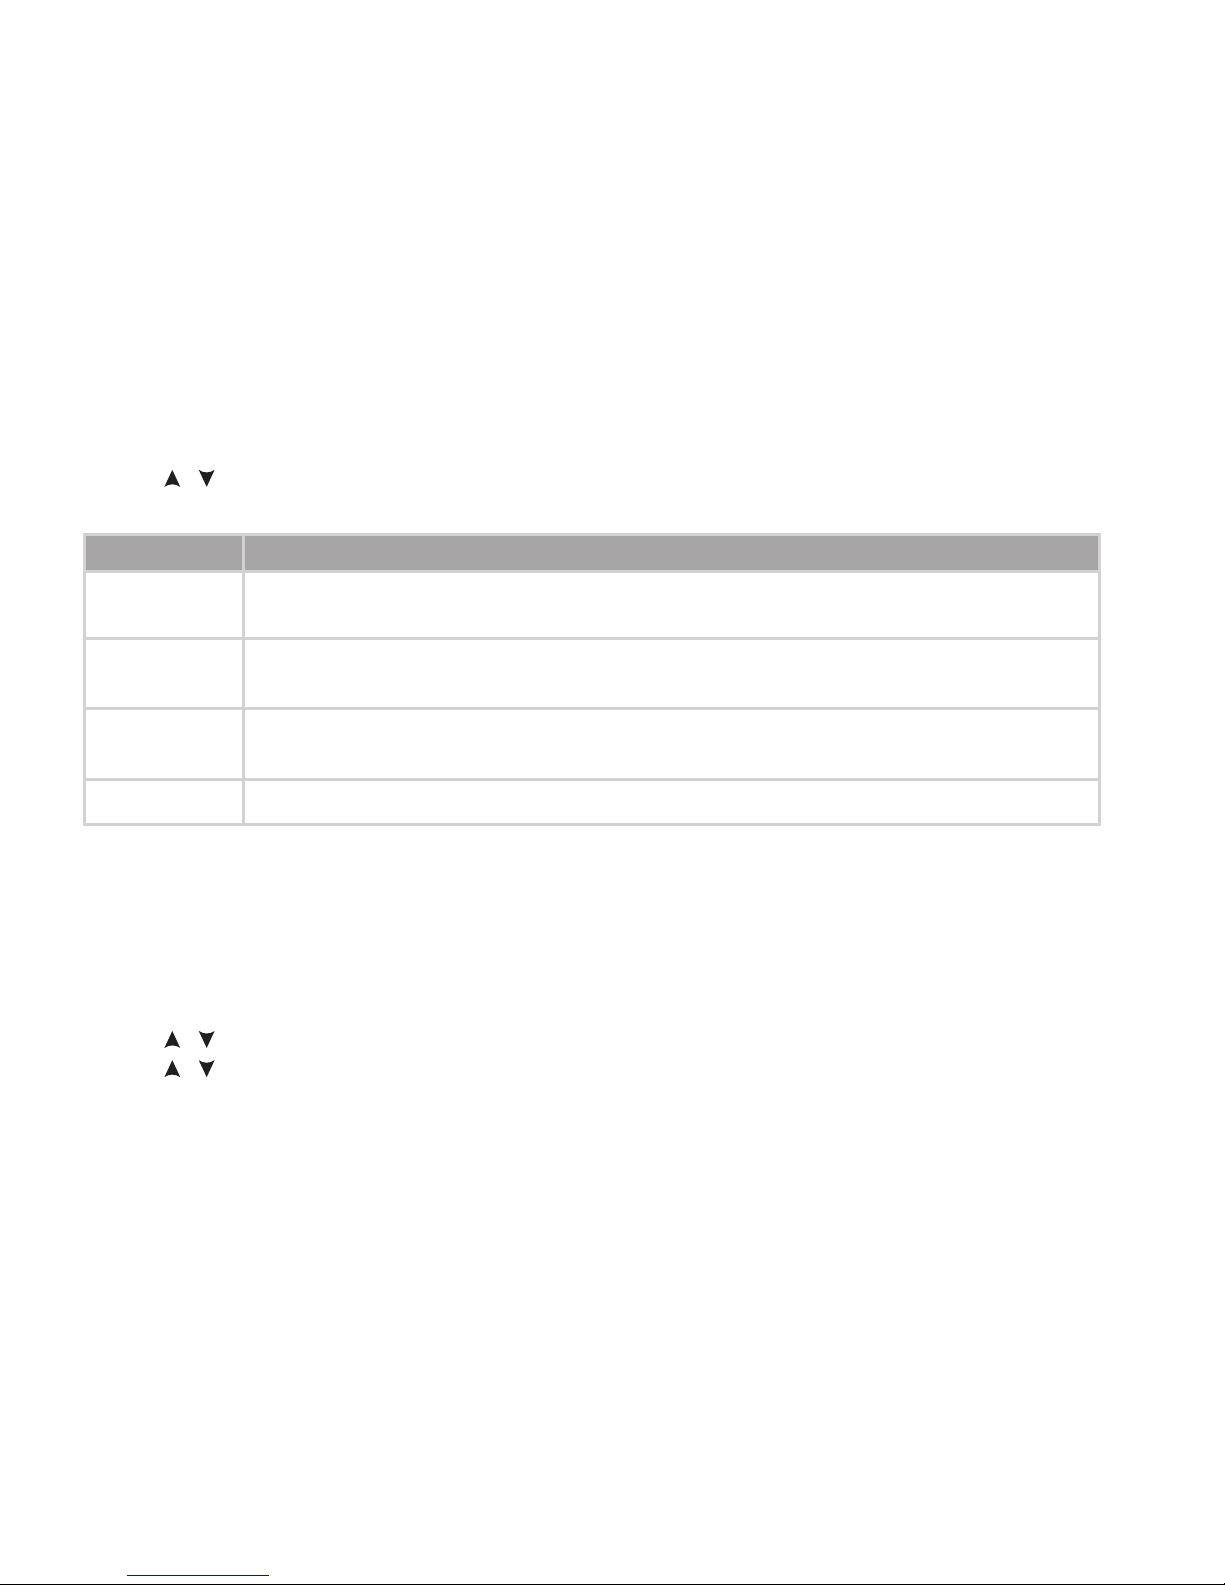
HARD
MODERATE
LIGHT
BASIC
Exercise
The Hard intensity zone (80-90% HR
max
) is for relatively short exercise at high intensity. Exercising in this zone
causes heavy breathing, muscle tiredness, and fatigue. It increases maximum performance capacity.
Exercising in the Moderate intensity zone (70-80% HR
max
) is effective particularly for improving aerobic fitness.
It is recommended for people exercising regularly.
Exercising in the Light intensity zone (60-70% HR
max
) is good for improving health and fitness. It also improves
basic endurance and helps you to recover from heavier exercise.
Limits for basic exercise (65-85% HR
max
). This intensity zone is suitable for aerobic intensity exercise.
Limits
Page 21
23
ENGLISH
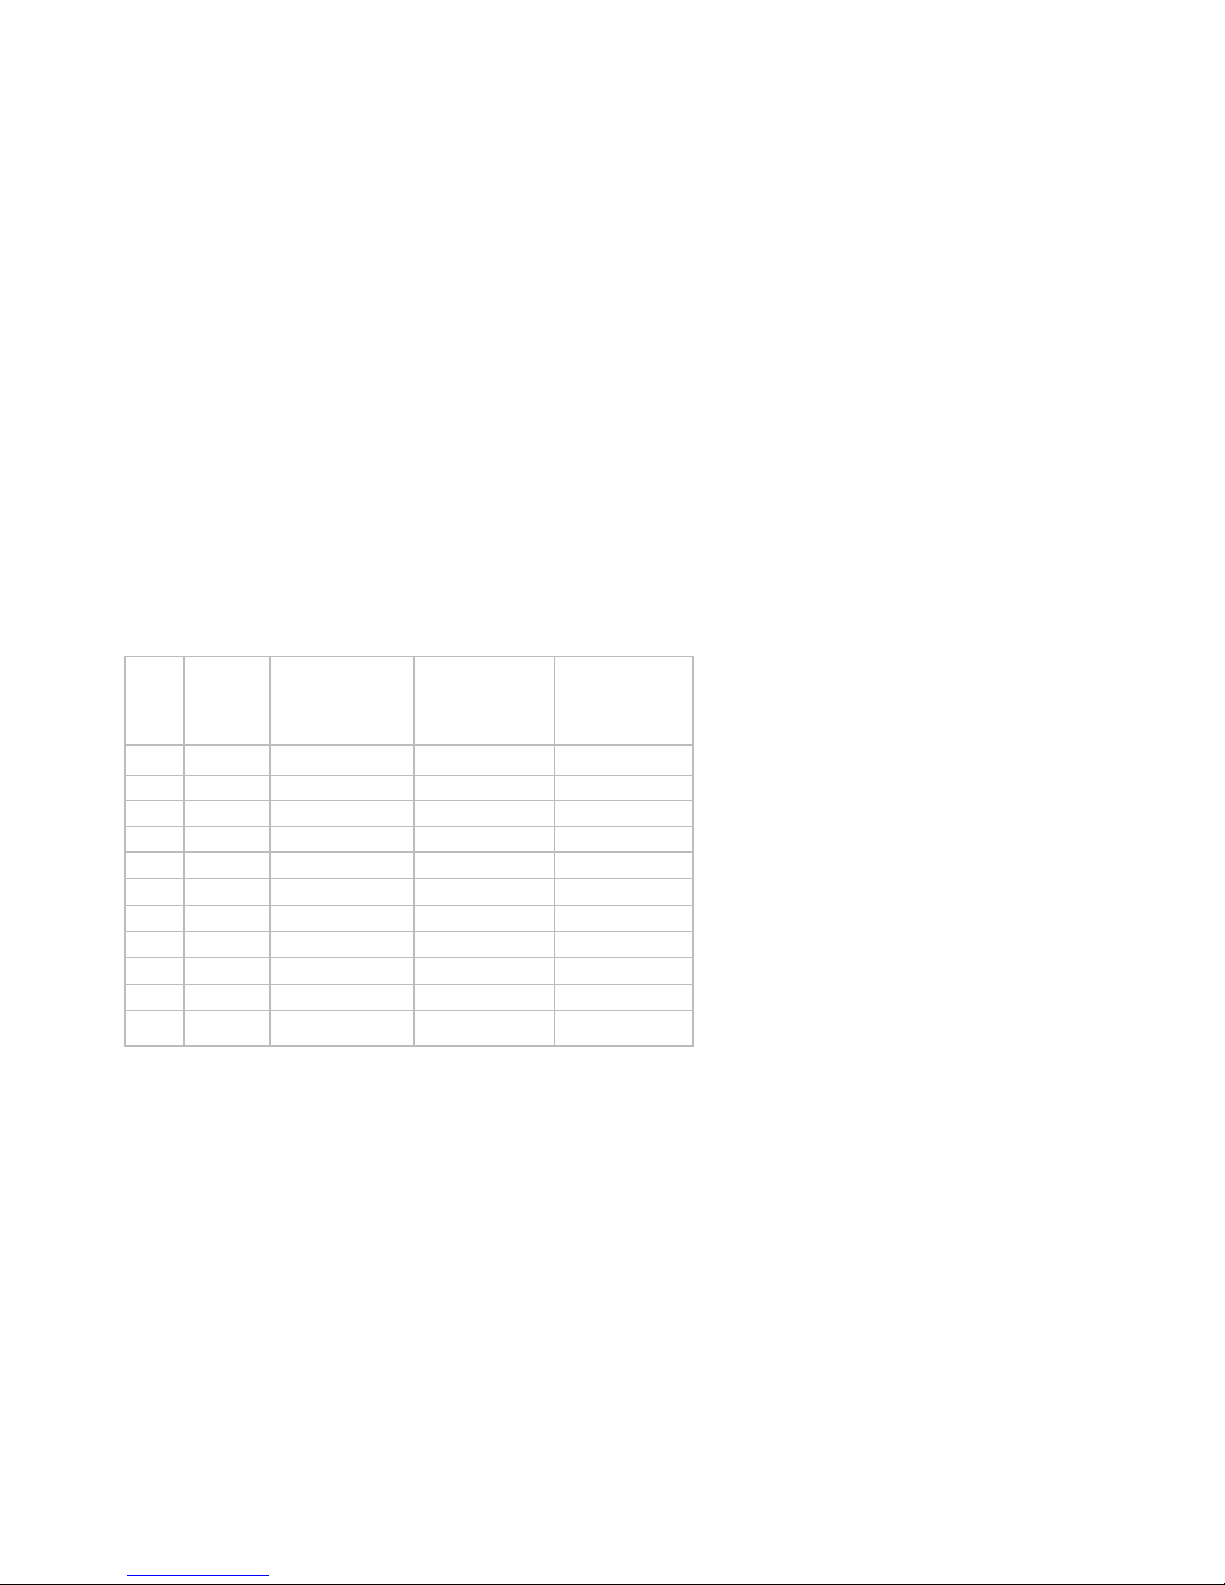
Your target heart rate zone is a range between lower and upper heart rate limits expressed as percentages of your maximum
heart rate (HR
max
) or as beats per minute (bpm). HR
max
is the highest number of heartbeats per minute during maximum
physical exertion. The wrist unit calculates your HR
max
according to your age: Maximum heart rate = 220–age. For more
accurate measurement of your HR
max
, visit your doctor or exercise physiologist for an exercise stress test.
The table below contains target heart rate zones in beats per minute (bpm) estimated by age in 5-year intervals. Calculate
your own HR
max
, write down your own target heart rate zones and select the ones suitable for your exercise.
20 200 120-140 140-160 160-180
25 195 117-137 137-156 156-176
30 190 114-133 133-152 152-171
35 185 111-130 130-148 148-167
40 180 108-126 126-144 144-162
45 175 105-123 123-140 140-158
50 170 102-119 119-136 136-153
55 165 99-116 116-132 132-149
60 160 96-112 112-128 128-144
65 155 93-109 109-124 124-140
Age HR
max
(220–age)
Light*
Intensity
60-70% of HR
max
Moderate
Intensity
70-80% of HR
max
Hard
Intensity
80-90% of HR
max
*Polar target heart rate intensity definition is modified from international exercise science authorities’ recommendations in which Light
intensity can reach lower than 60% HR
max
.
Page 22

24
ENGLISH
2.5 OWNZONE
Your Polar fitness heart rate monitor is able to determine your individual exercise heart rate zone automatically. This is called
OwnZone (OZ) and it can be determined during a warm-up period lasting 1-5 minutes by walking, jogging, or in other exercise
modes. The main idea is that you start exercising slowly at a light intensity. You then gradually increase the intensity of your
exercise to raise your heart rate. Using OwnZone makes exercise easier and more enjoyable. You do not have to worry about
calculations or guesswork for your exercise intensity determination.
You can use OwnZone for effective and versatile training. There are four different exercise intensity zones, which you can
select in the Settings for the OwnZone function: OwnZone Light, Moderate, Hard, and Basic.
The OwnZone method ensures that you get versatile training. OwnZone is based on measuring changes in heart rate
variability during your warm-up for exercise. Heart rate variability reflects changes in your body’s physiology. If your heart
rate variability decreases either too slowly or too fast or if your heart rate exceeds the safety limit during the OwnZone
determination, the wrist unit selects your most recent OwnZone. Alternatively, if there is no previous OwnZone determination
in memory and your OwnZone determination fails; your age-based heart rate zone is used.
OwnZone has been developed for healthy people. Some health conditions may cause heart rate variability based OwnZone
determination to fail, for example high blood pressure, some cardiac arrhythmias, and some medications.
Page 23
25
ENGLISH
Determining Your OwnZone Heart Rate Limits
Check the following before you start to determine your OwnZone:
• You have set your user information correctly.
• You have switched the OwnZone function on. Each time you start saving exercise information and have the OwnZone
function on, the wrist unit starts finding your OwnZone. For further information, see the section Exercise Settings.
You should always redefine your OwnZone:
• When changing your exercise environment or exercise mode.
• If you feel unusual about the physical state of your body when starting to exercise. For example you are stressed,
not recovered from the previous training or not feeling well.
• After changing your settings.
1. If you start from the Time of Day display, press OK.
2. Exercise is displayed. Press OK.
3. Press the / buttons to select START and press OK. OwnZone appears in the display.
If you want to skip OwnZone determination and use the previously determined OwnZone, press OK and go to a step 5.
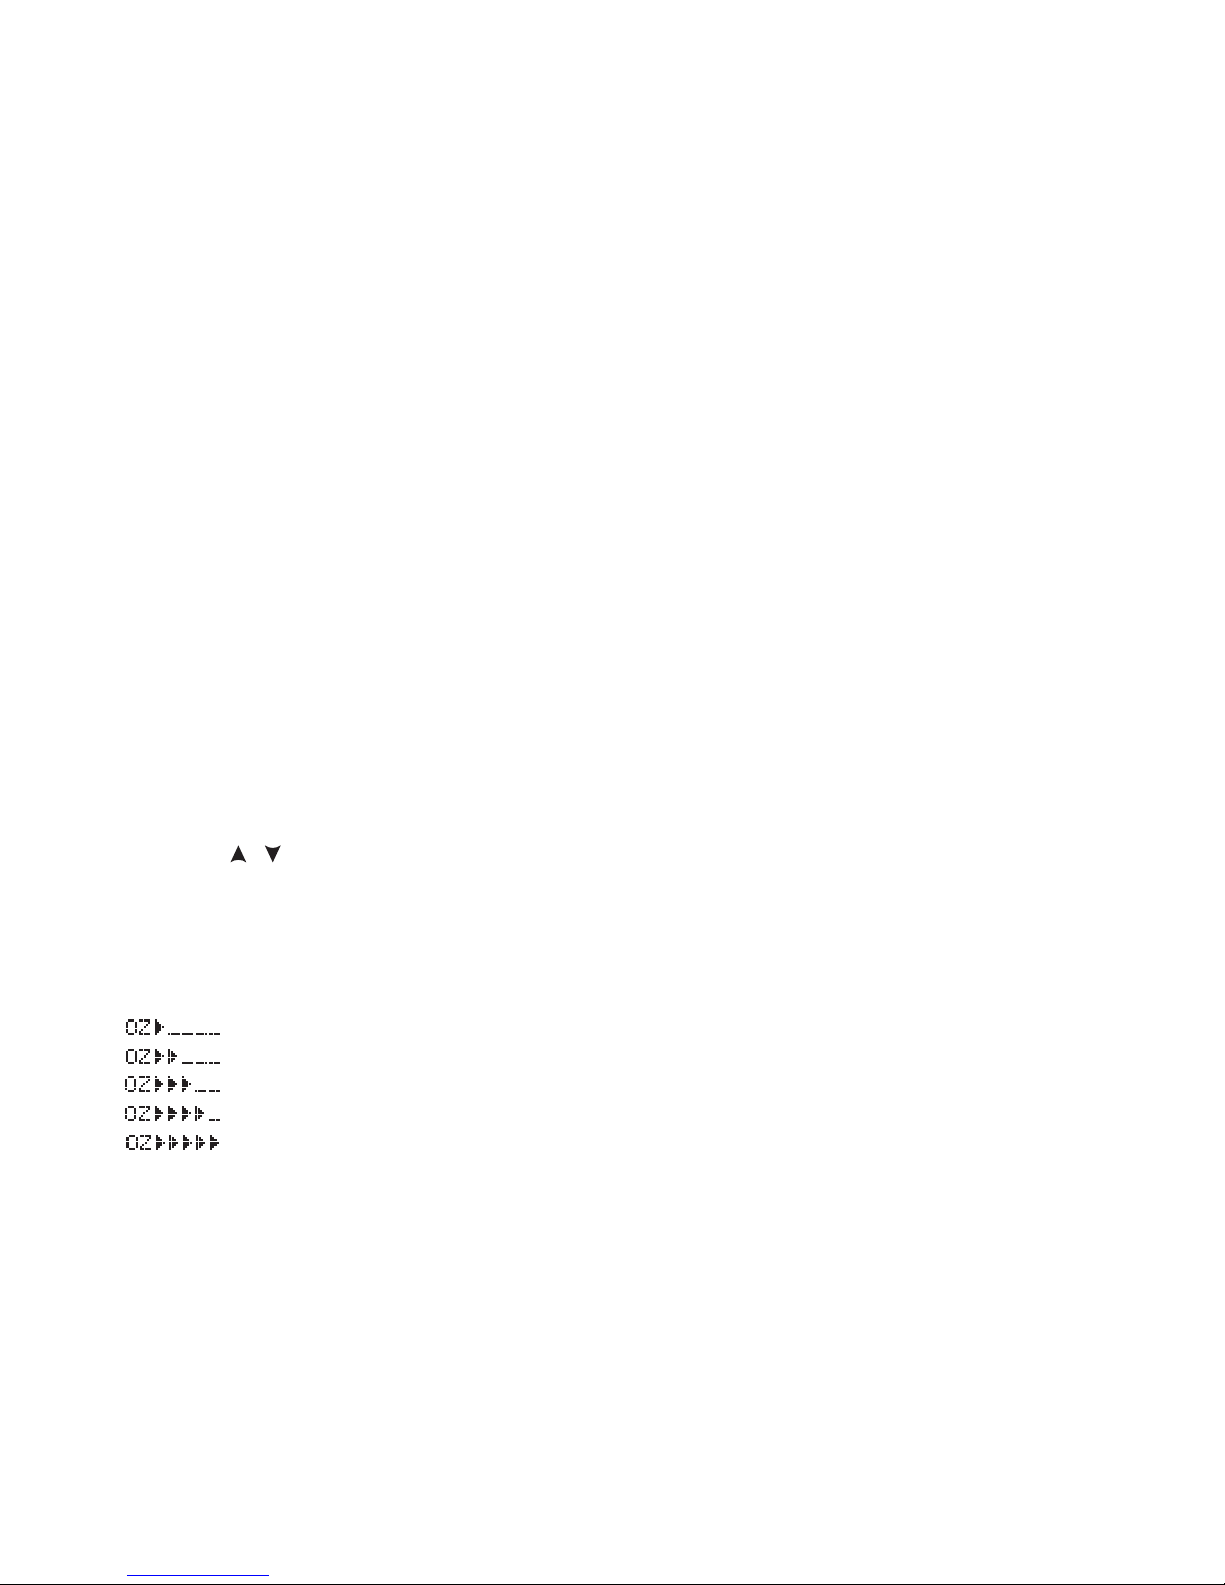
4. OwnZone determination starts. Determine your OwnZone in five stages. After each stage you hear a beep (if the sound
settings are on) and the display automatically illuminates (if you have switched the backlight on once before),
indicating the end of the stage.
Walk at a slow pace for 1 min. Keep your heart rate below 100 bpm/ 50% HR
max
during this first stage.
Walk at a normal pace for 1 min. Smoothly increase your heart rate about 10 bpm/ 5% HR
max
.
Walk at a brisk pace for 1 min. Smoothly increase your heart rate about 10 bpm/ 5% HR
max
.
Jog at a slow pace for 1 min. Smoothly increase your heart rate about 10 bpm/ 5% HR
max
.
Jog at brisk pace or run for 1 min.
Page 24
26
ENGLISH
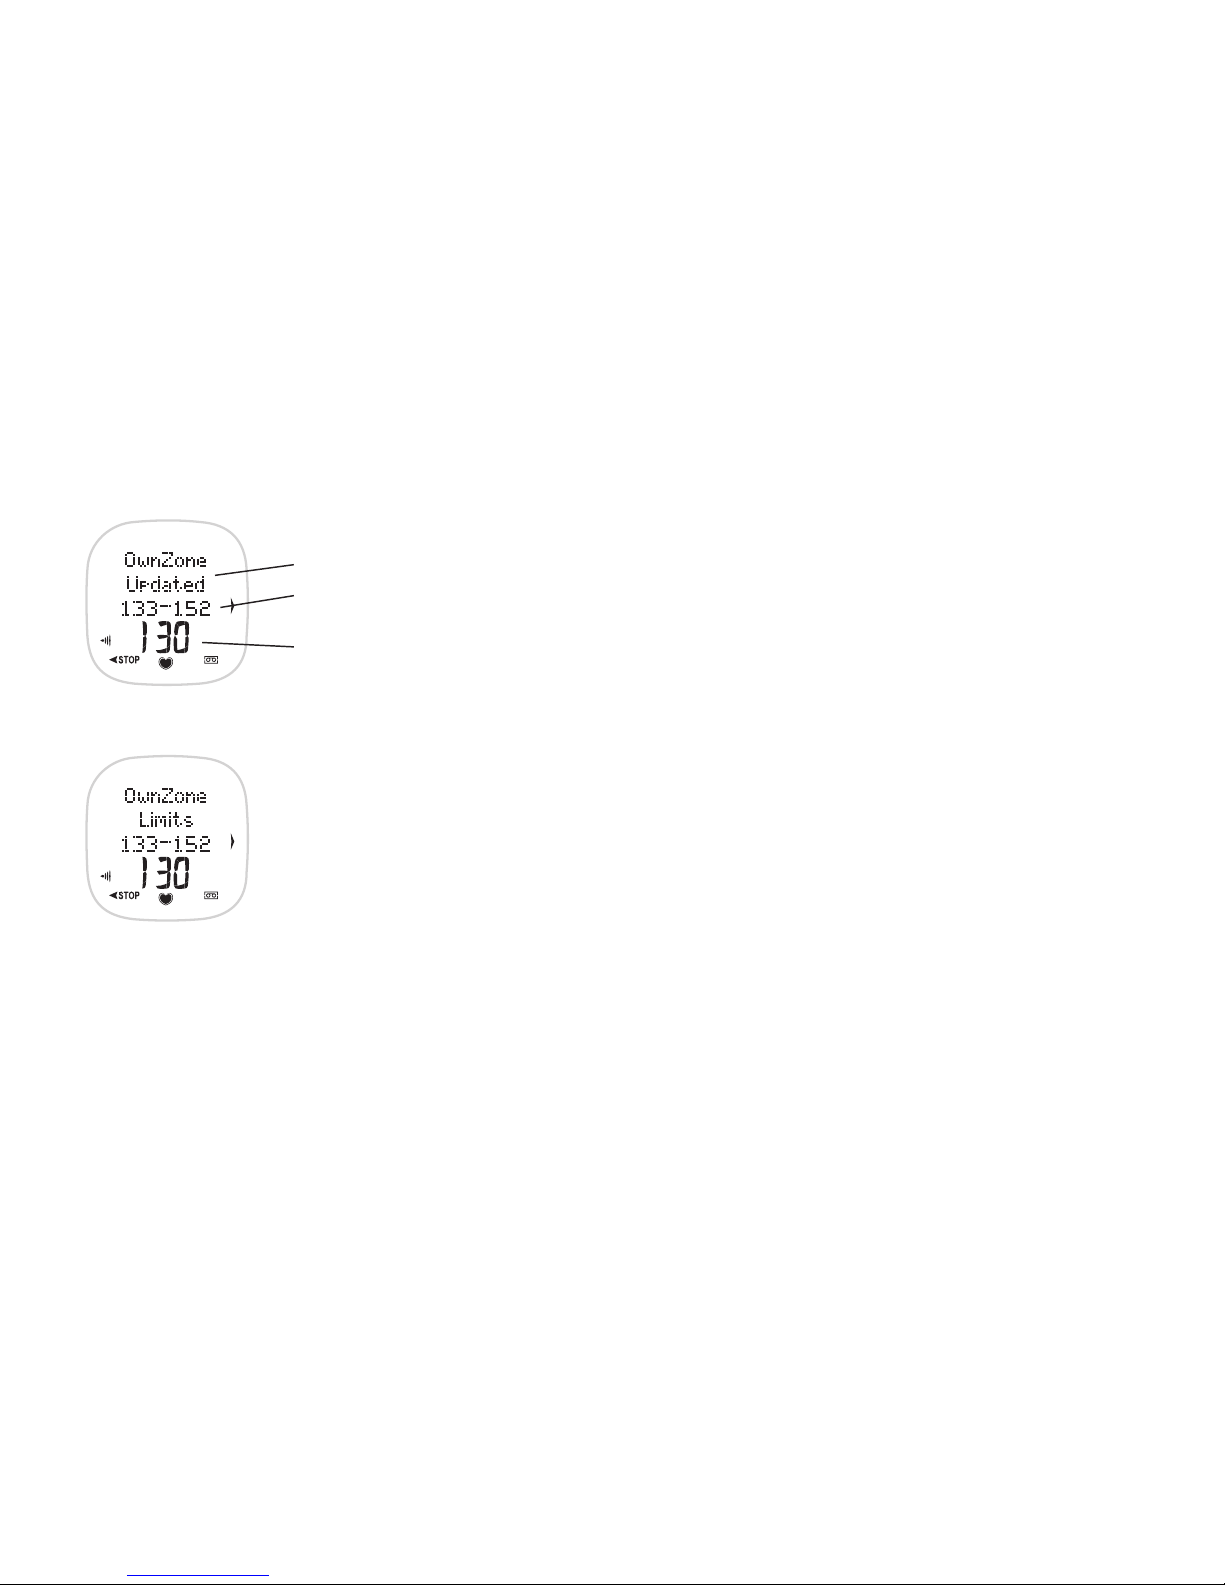
5. At some point during the five stages, you hear two beeps. Your OwnZone has been determined.
If the OwnZone determination succeeds, the following information is displayed:
OwnZone Updated
OwnZone heart rate limits as beats per minute (bpm) or as a percentage of
your maximum heart rate (%HR
max
) depending on your settings
Your current heart rate
If the OwnZone determination did not succeed, OwnZone Limits and your previously determined
OwnZone limits (bpm/%HR
max
), are displayed. If you have not determined your OwnZone before,
your age-base limits are used.
You can now continue with your exercise. Try to stay within the given heart rate zone to maximize
the benefits of the exercise session.
Page 25
27
ENGLISH
3. FOLLOW-UP YOUR ACHIEVEMENTS
3.1 DAILY FILE
In the Daily File you can view detailed exercise information from your 12 most recent exercise sessions, such as exercise
duration, calories burned, maximum and average heart rate and exercise time in different intensity zones.
When the File becomes full, the oldest File information is replaced by the most recent. If you want to save the exercise
data for a longer period, transfer the File to the Polar Fitness Trainer web service by using the File Send menu. For further
information, see the chapter Data Communication.
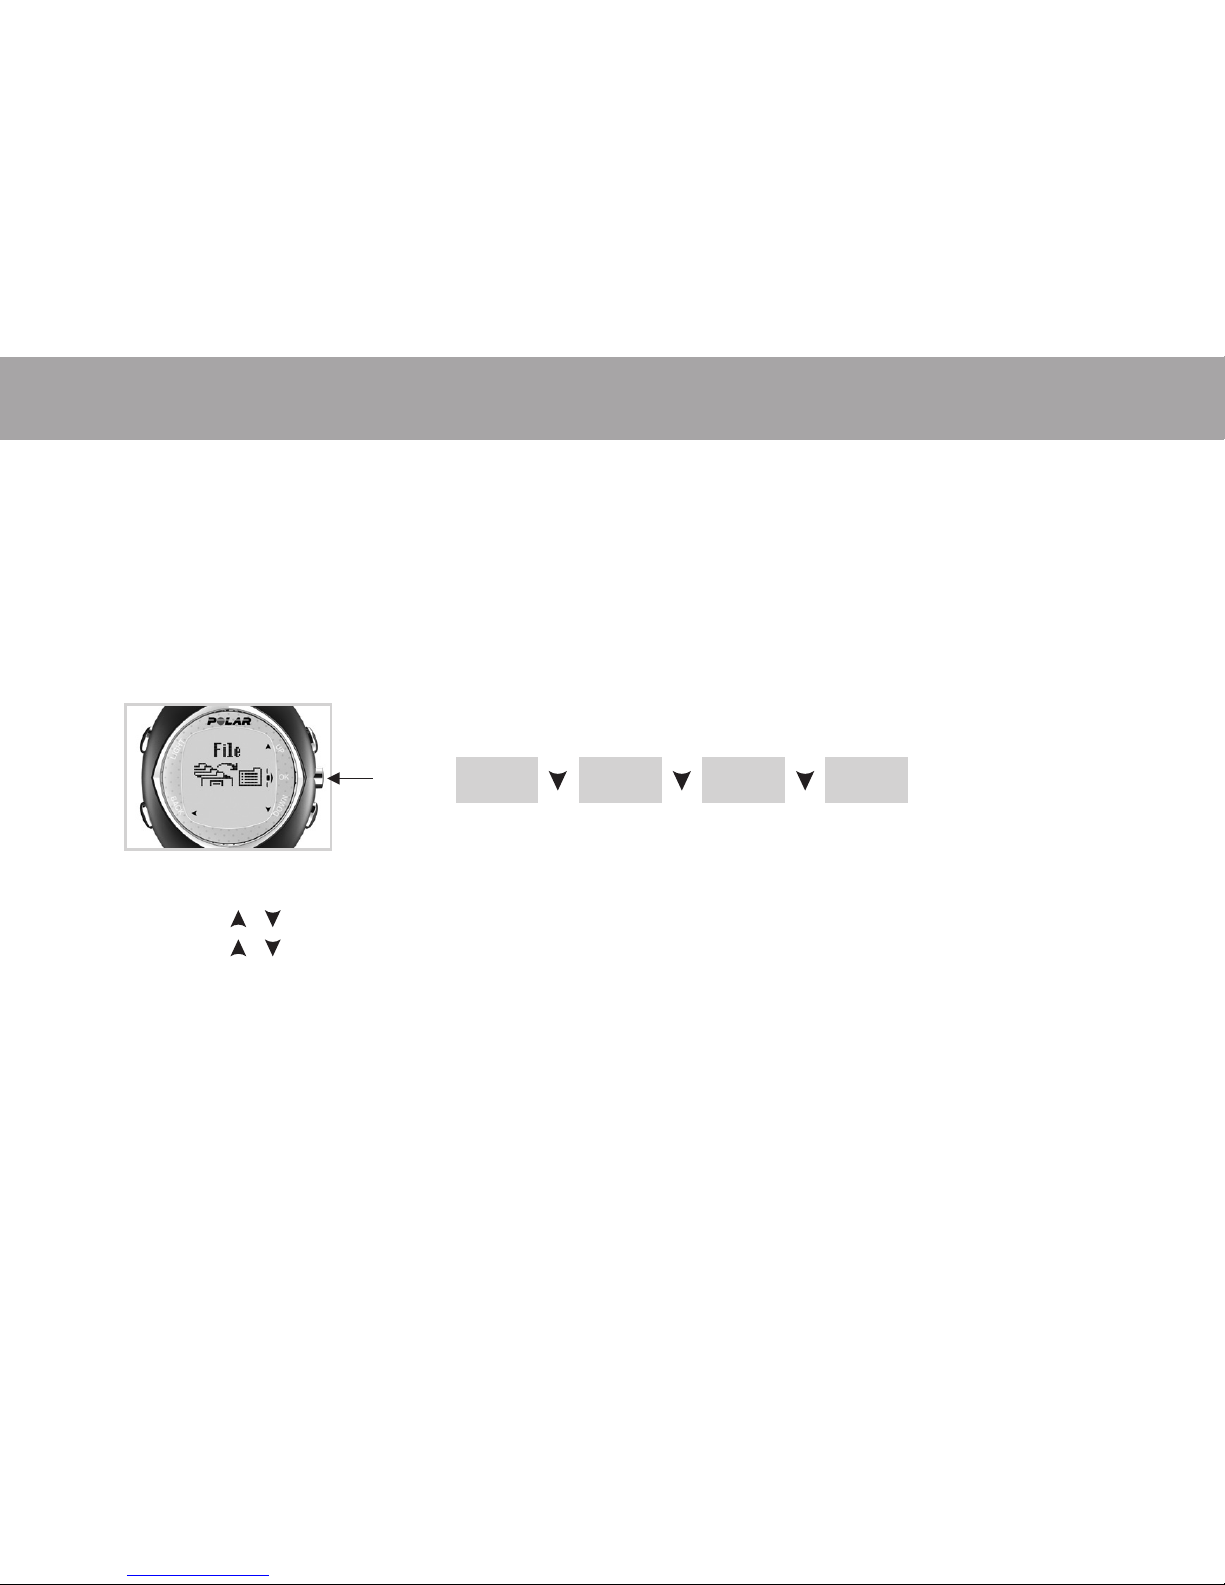
1. Start from the Time of Day display. Press OK.
Exercise is displayed.
2. Press the / buttons until File is displayed. Press OK.
3. Press the / buttons to select DAILY. Press OK.
Note: If Empty is displayed, no exercise information has been recorded in the File.
Press
SendTotalsWeeklyDaily
Press Press
Press
Page 26
28
ENGLISH
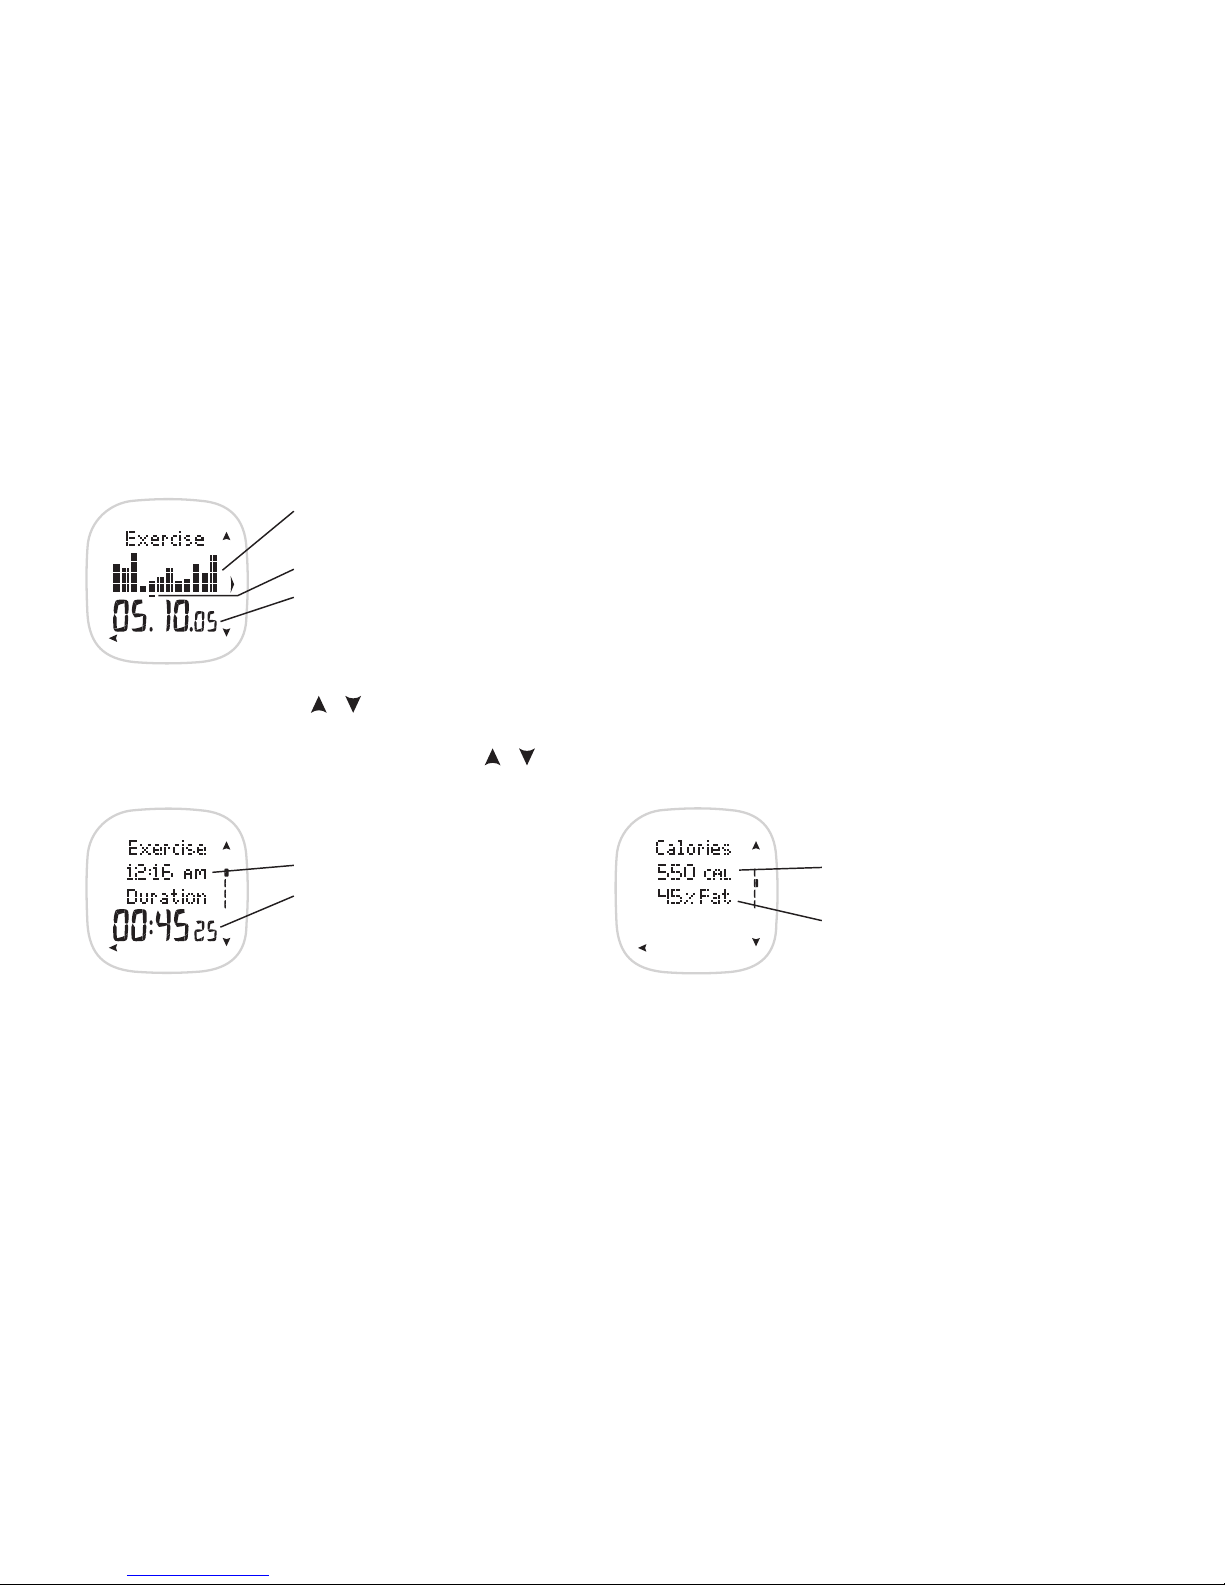
The following information is displayed:
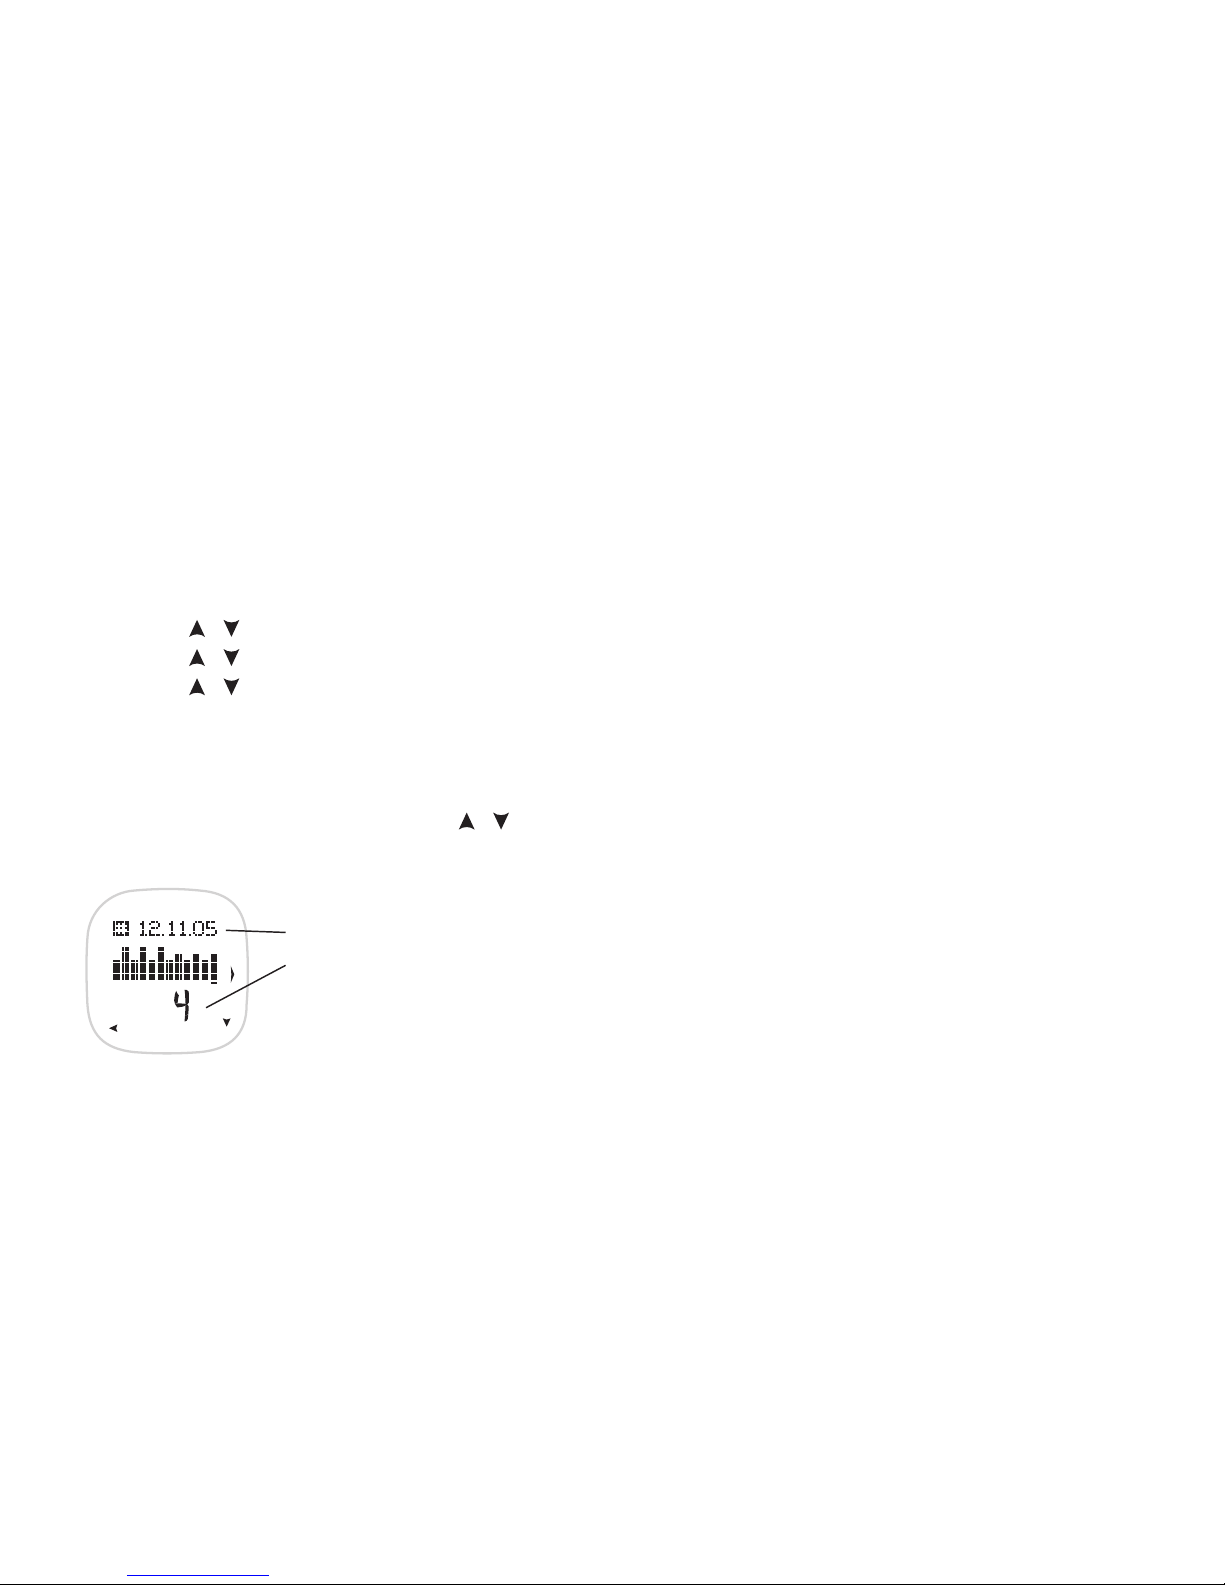
Graphic bars indicate the amount of exercise performed. The height of the bar indicates
the exercise duration.
The selected exercise is shown by a cursor
Date of the selected exercise
Duration
Time of day the exercise started
Exercise duration (hh.mm.ss)
Calories
Calories burned while exercising
(Cal/kcal)
Fat percentage of the burned
calories*
Select the exercise with the / buttons. Press OK.
Scroll through the following information with the / buttons.
* An estimate of fat consumption is calculated using total calories
(Cal)/kilocalories (kcal) expended during an exercise session. Fat
percentage can vary between 0% and 60% and is shown with a
percentage accuracy of 5%.
Page 27
29
ENGLISH
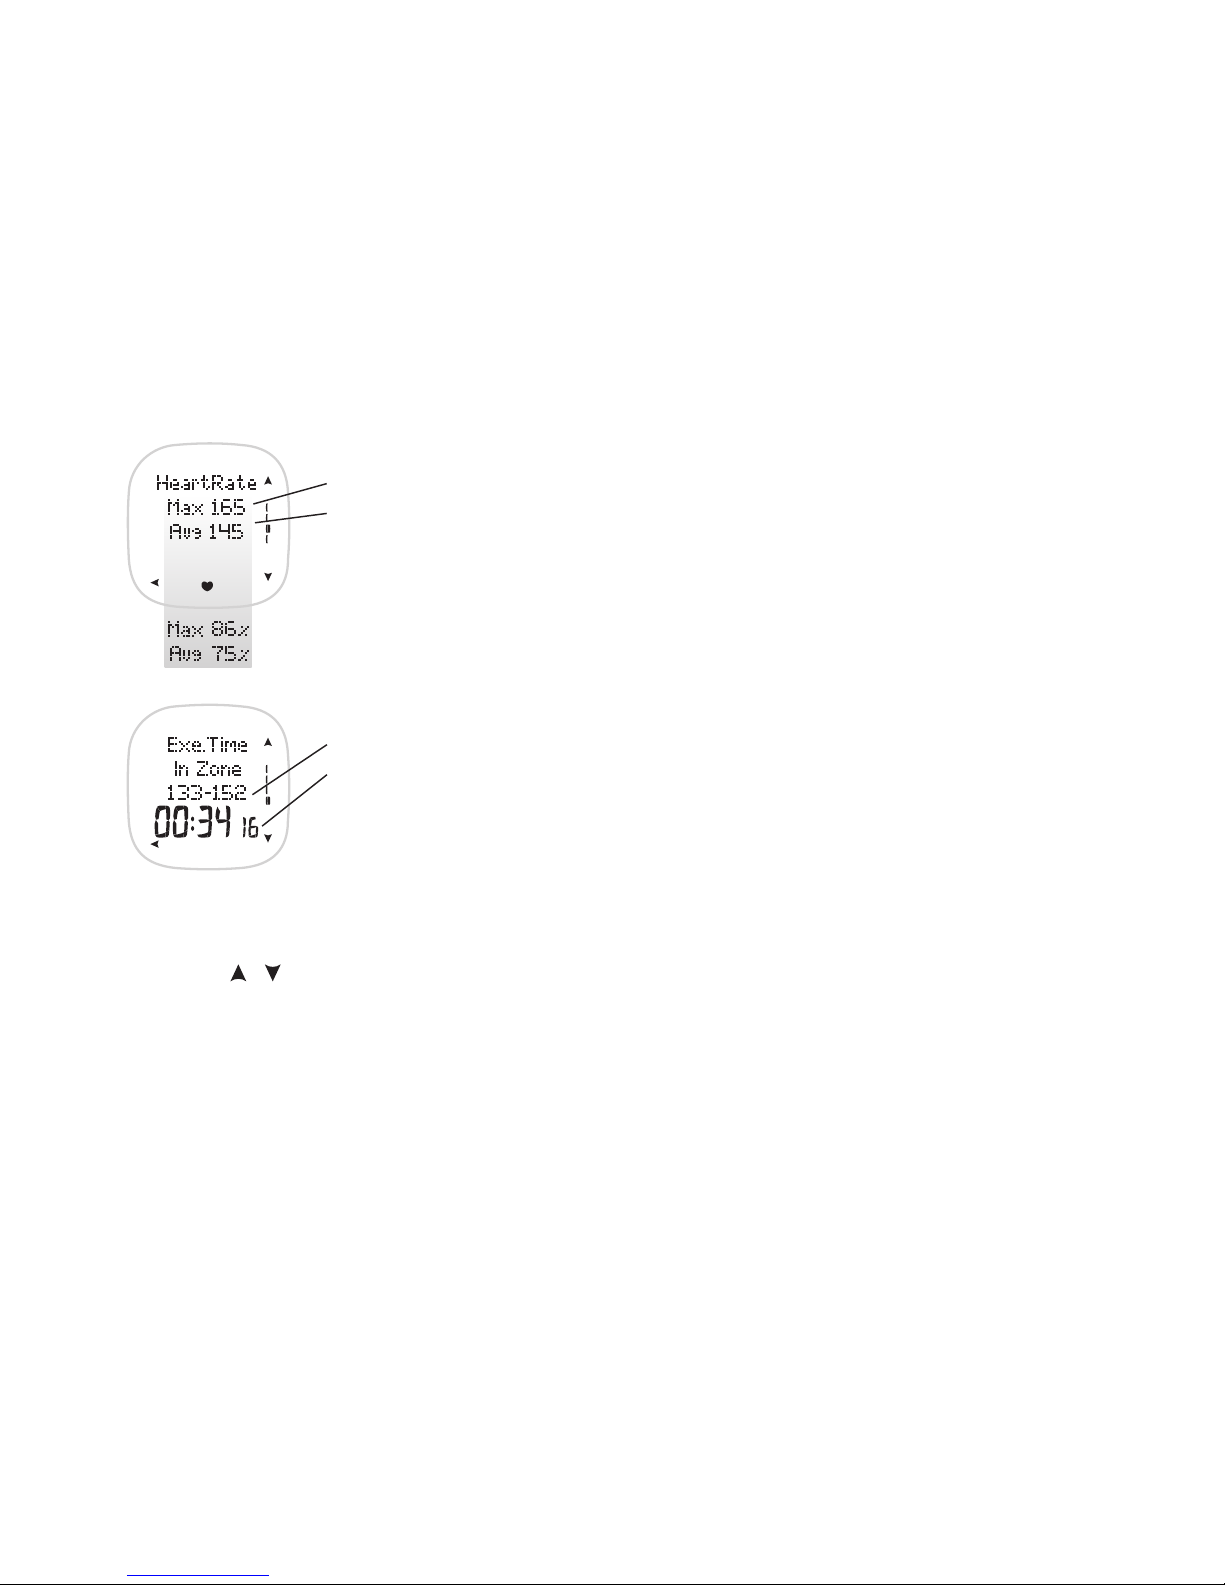
Heart Rate
Maximum (Max) and
average (Avg) heart rate in beats per minute alternate with
the percentage of maximum heart rate reading.
Time in Zone (displayed if the HR limits were on while exercising)
Heart rate limits
Exercise duration between heart rate limits
Press the Back button to return to the Daily File.
Alternatively, press and hold the Back button to return to the Time of Day display.
Deleting File
1. In the Duration display, press and hold the Light button until DELETE FILE? is displayed.
2. Press the / buttons to select YES or NO. Press OK.
3. If you select Yes, the wrist unit displays ARE YOU SURE? If you do not want to delete the file, select NO. Select YES to
delete the file. Press OK. Note! After deleting the file you cannot restore it.
Page 28
30
ENGLISH
3.2 WEEKLY FILE
You can check the automatically saved weekly Diary information in the Weekly File. The Weekly File includes information for
the 12 most recent weeks. When the Weekly File becomes full, the next week’s information replaces the oldest. The Diary is
saved in the Weekly File on Sunday at midnight. At the same time, the current Diary is reset.
1. If you start from the Time of Day display, press OK.
2. Press the / buttons until File is displayed. Press OK.
3. Press the / buttons to select WEEKLY. Press OK
4. Press the / buttons to select EXE.COUNT (exercise count), EXE.TIME (exercise duration), CALORIES, or HR ZONES.
Press OK.
Note: If Empty is displayed, no exercise information has been recorded in the File.
Scroll through the saved information with the / buttons. The black cursor moves according to the week.
Press Back to return to the Weekly view.
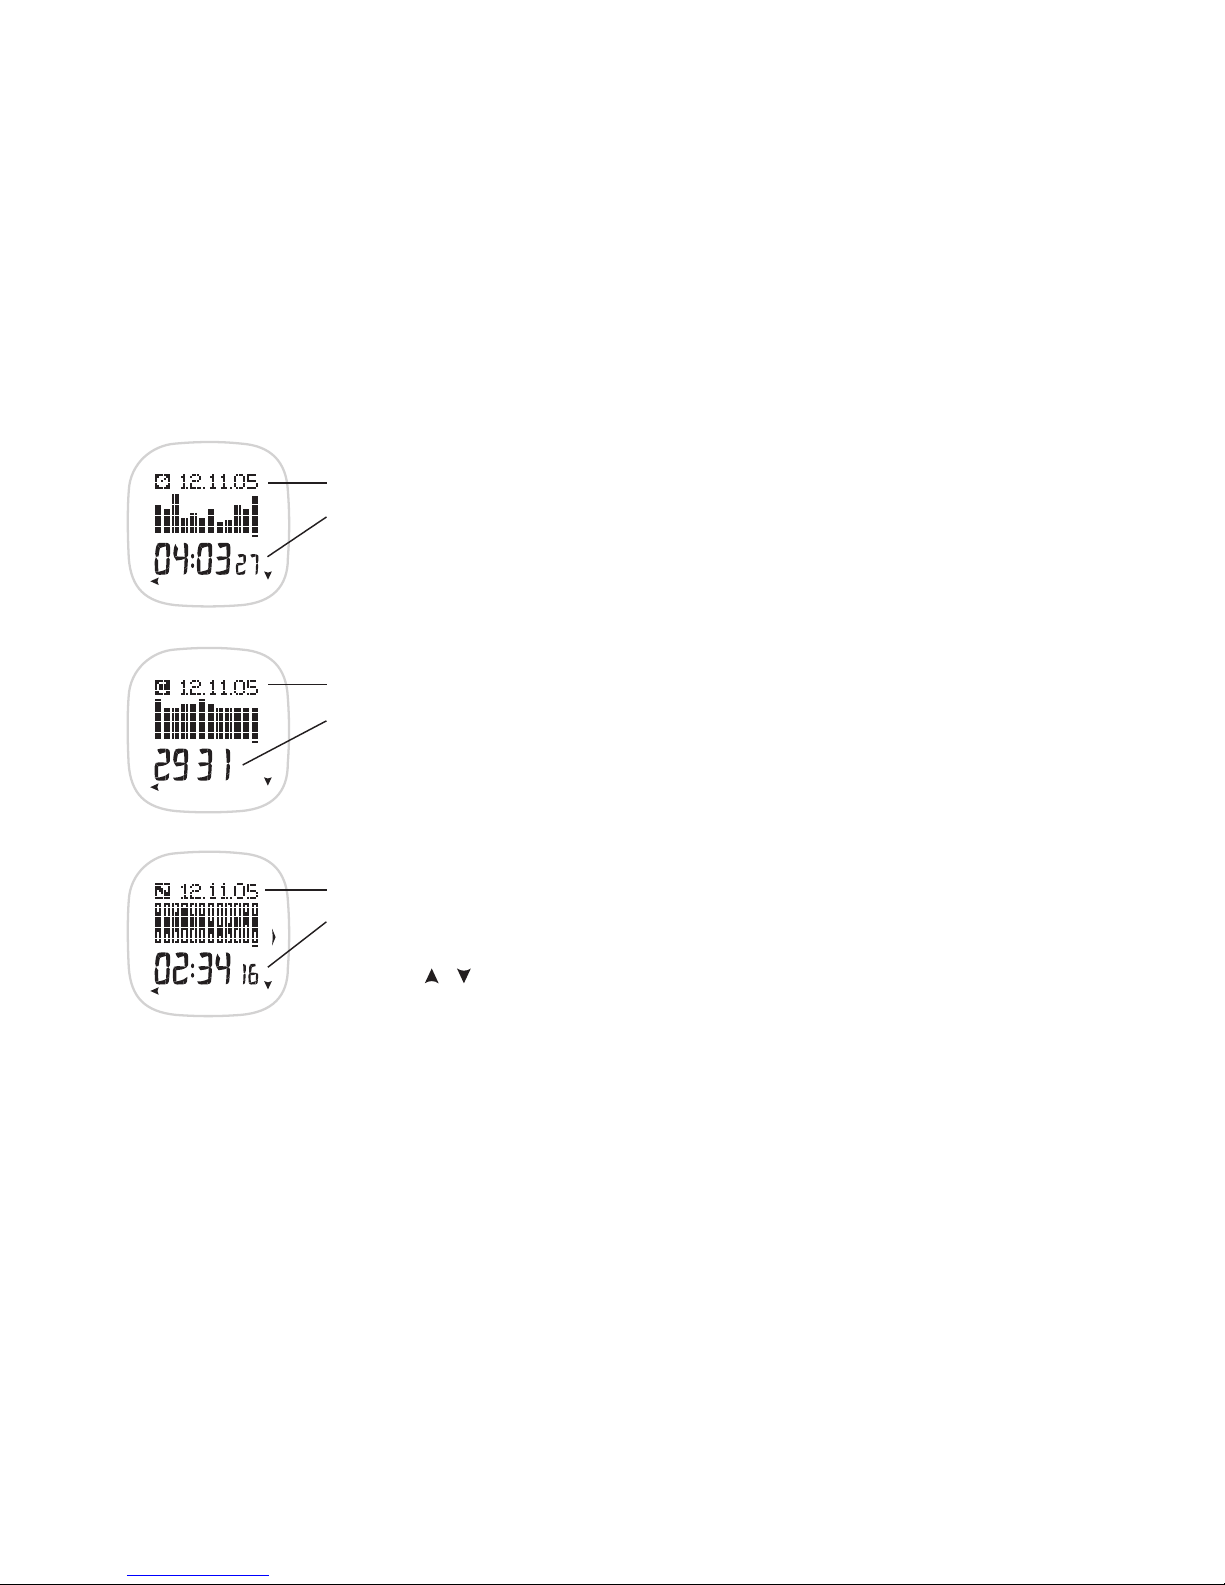
Exe.Count (exercise count)
The last day of the selected week (Sunday)
Cumulative exercise count
Page 29
31
ENGLISH
Exe.Time (exercise duration)
The last day of the selected week
Cumulative exercise duration (hh.mm.ss)
Calories
The last day of the selected week
Cumulative exercise calories (Cal/kcal)
HR Zones
The last day of the selected week
Cumulative exercise duration in the Moderate intensity zone
Press OK to view the exercise duration in different intensity zones.
Press the / buttons to move between intensities. Press Back to return to the HR zones view.
Alternatively, press and hold the Back button to return to the Time of Day display.
Page 30
32
ENGLISH
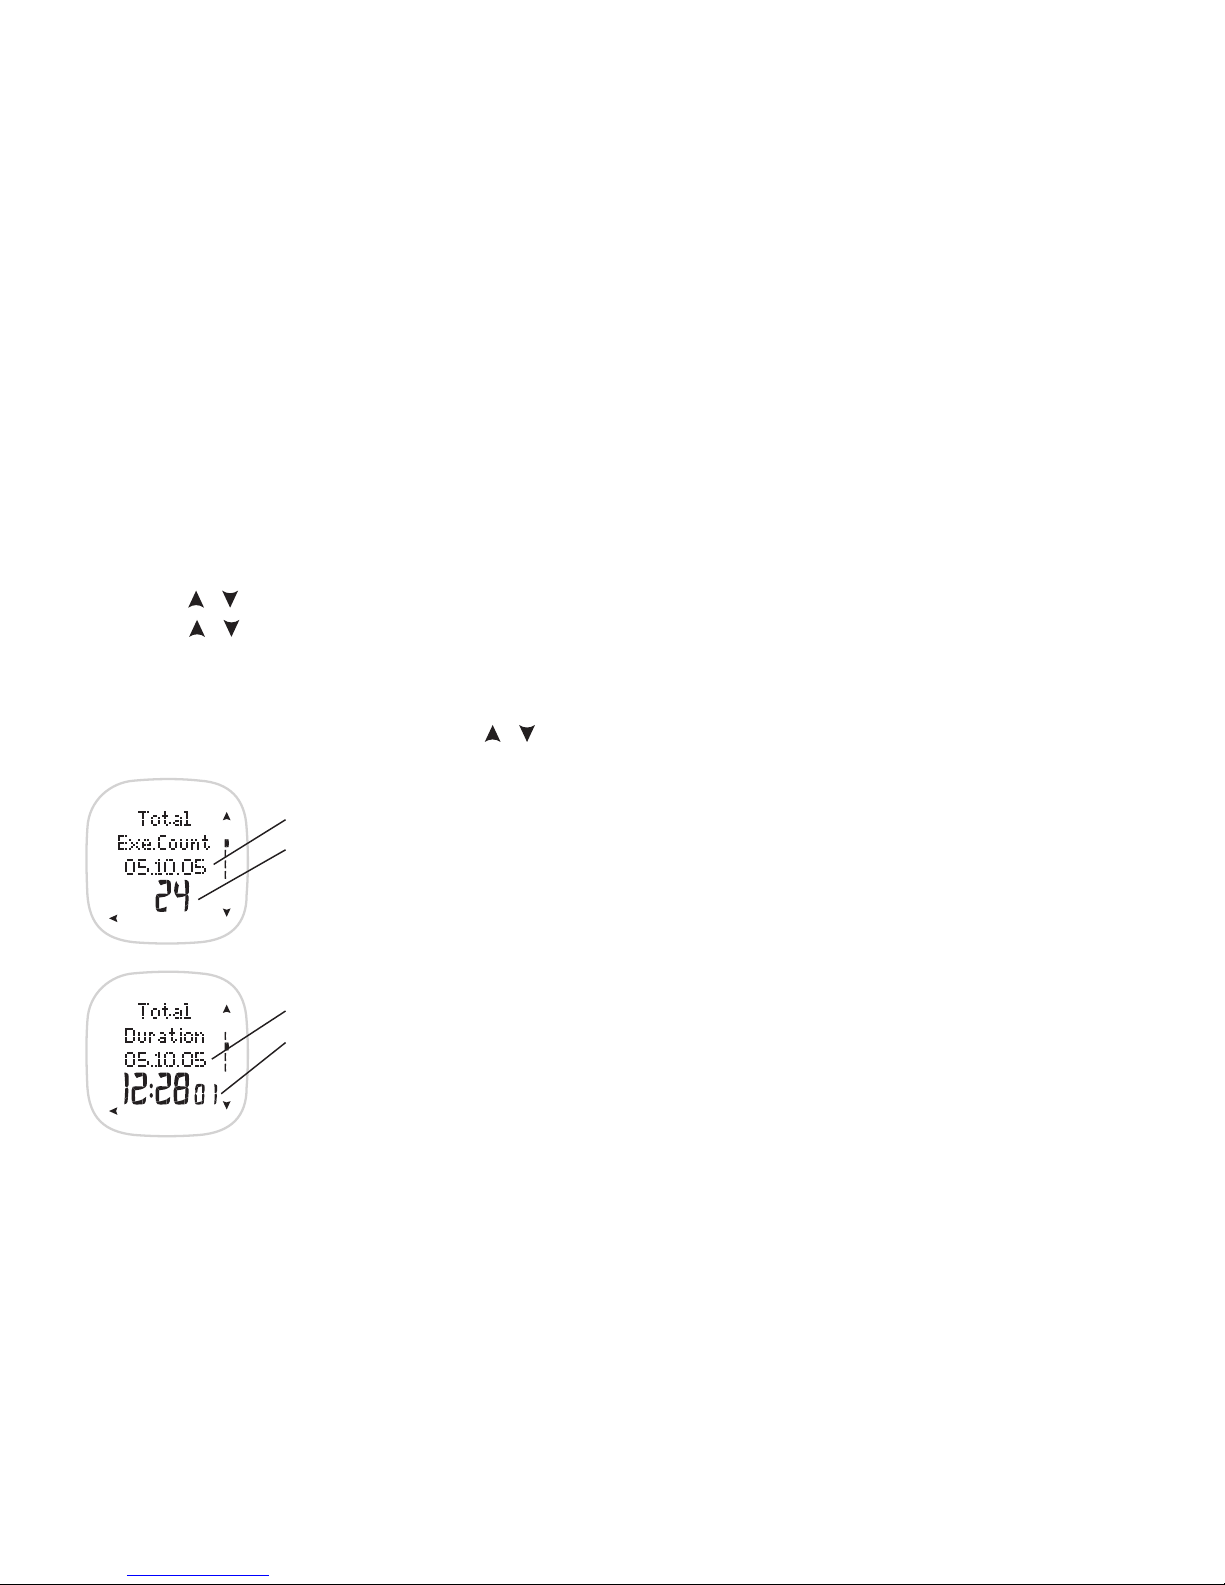
Total Duration
The last reset date of the total cumulative exercise duration.
Total cumulative exercise duration for several exercise sessions, starting from the previous reset.
Note: Your total exercise duration is displayed in hours and minutes until you reach 99 hours and 59 minutes.
After this, your cumulative exercise duration is displayed in hours until 9999 hours is reached and the total
exercise duration is automatically reset to zero.
3.3 TOTALS FILE
In the Totals File you can view your total cumulative exercise count, duration, and burned calories in several exercises,
starting from the previous reset.
1. If you start from the Time of Day display, press OK.
2. Press the / buttons until File is displayed. Press OK.
3. Press the / buttons to select TOTALS. Press OK.
Note: If Empty is displayed no exercise information has been recorded in the File.
Scroll through the following information with the / buttons.
Total Exe.Count
(exercise count)
The last reset date of the total cumulative count.
Total cumulative exercise count, starting from the previous reset.
Note: When you have recorded 65 535 exercise sessions, the total cumulative exercise count is automatically
reset to zero.
Page 31
33
ENGLISH
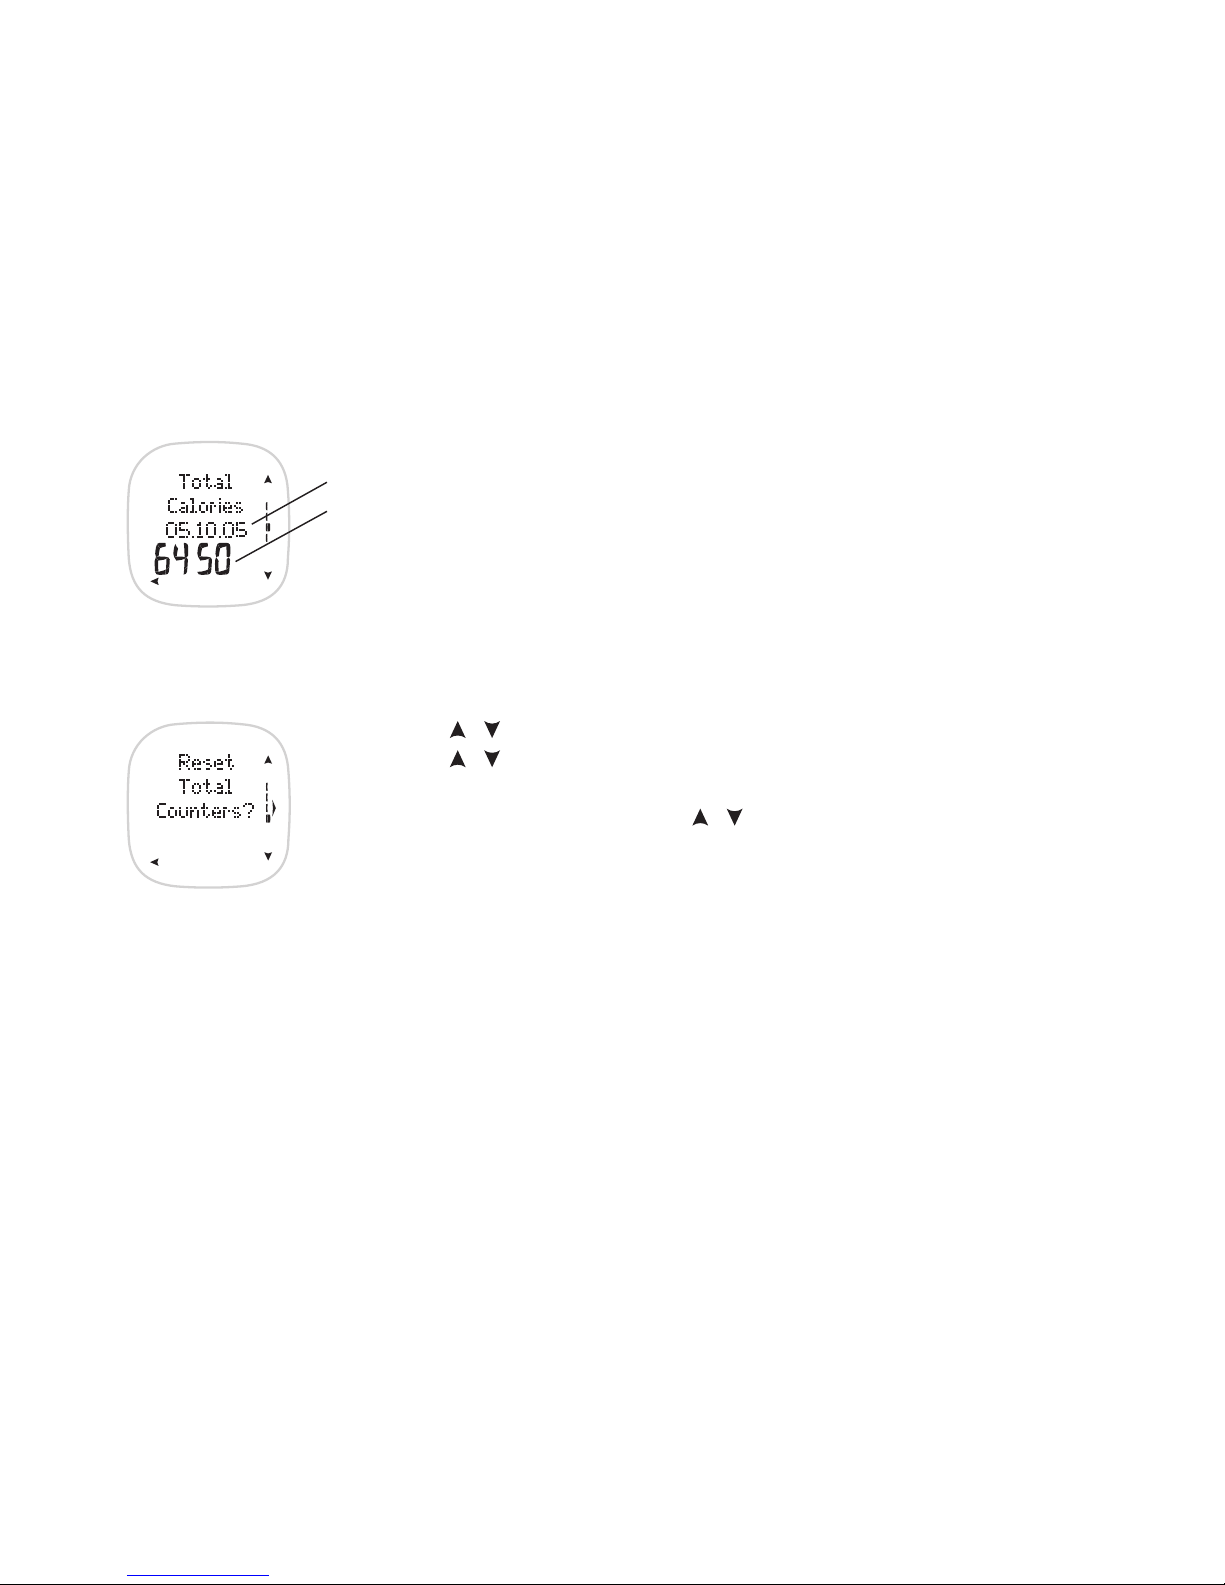
Total Calories
The last reset date of the total cumulative calories (Cal/kcal).
Total cumulative calories burned during several exercise sessions,
starting from the previous reset.
Note: When you have burned 999 999 Cal/kcal, the total cumulative calories are automatically reset to zero.
Resetting Total Counters
If you start from the Time of Day display, repeat steps 1-3.
4. Press the
/ buttons to select Reset Total Counters? Press OK.
5. Press the / buttons to select reset ALL (all total counters), EXE.COUNT (total count),
DURATION (total duration), or CALORIES (total Cal/kcal). Press OK.
6. ARE YOU SURE? is displayed. Press the / buttons to select YES or NO. Press OK.
Press and hold the Back button to return to the Time of Day display.
Page 32
34
ENGLISH
3.4 DIARY
With the help of electronic Diary, you can view your exercise duration, count, calories, and duration in different intensity
zones of the current calendar week.
Diary includes follow-up information for the current calendar week.
Your exercise information is saved in the Diary if the exercise session has lasted at least ten minutes.
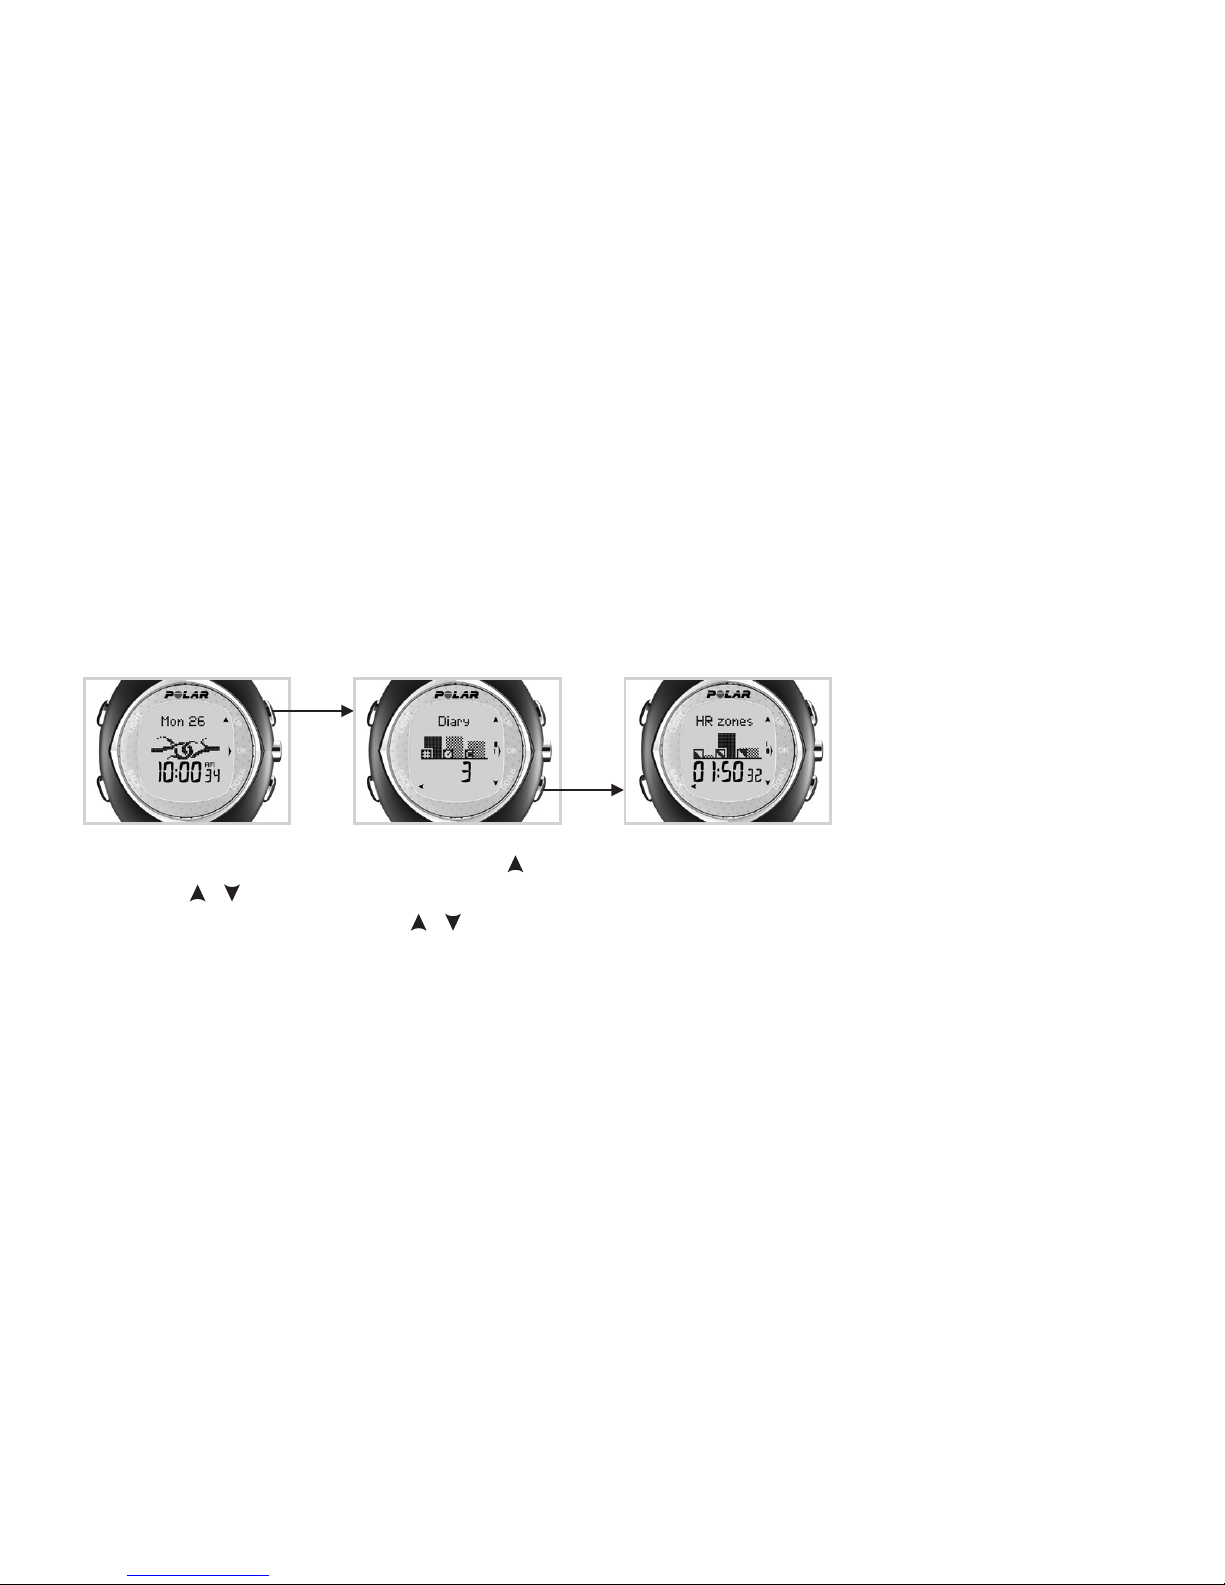
1. Start from the Time of Day display and press the button.
2. Press the / buttons to move between diaries.
3. Press OK to enter the view. Press the / buttons to scroll through the values.
Note: The wrist unit automatically resets the Diary and HR zones views to zero between Sunday and Monday at midnight. At the same time,
the previous Diary week is saved in the Weekly File.
Diary HR zones
Page 33
35
ENGLISH
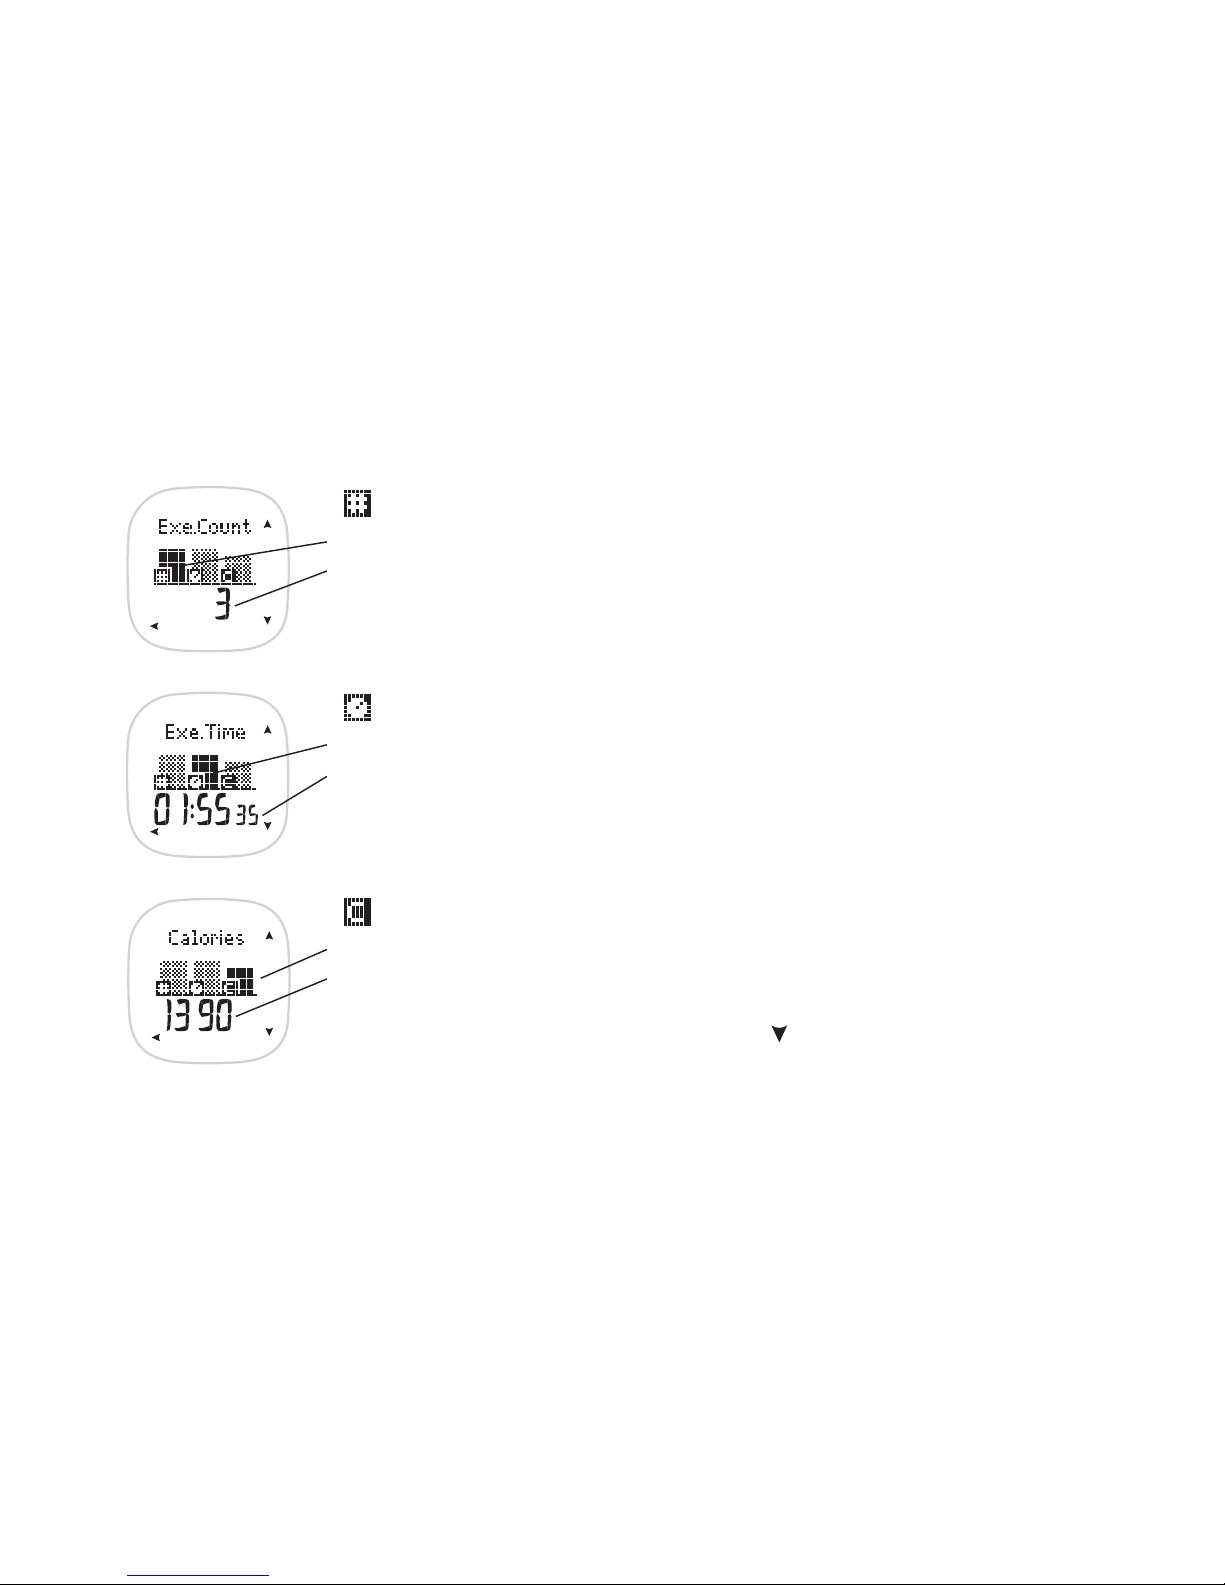
Diary
Exe.Count (exercise count)
The exercise count bar is highlighted
The total exercise counts you have achieved
Exe.Time (exercise duration)
The exercise duration bar is highlighted
The total exercise duration you have achieved
Calories (Cal/kcal)
The calories bar is highlighted
The total calories burned during exercising
Press Back to return to the Diary view and press the button to proceed to the HR zones view.
Press OK.
Alternatively, press and hold Back to return to the Time of Day display.
Page 34
36
ENGLISH
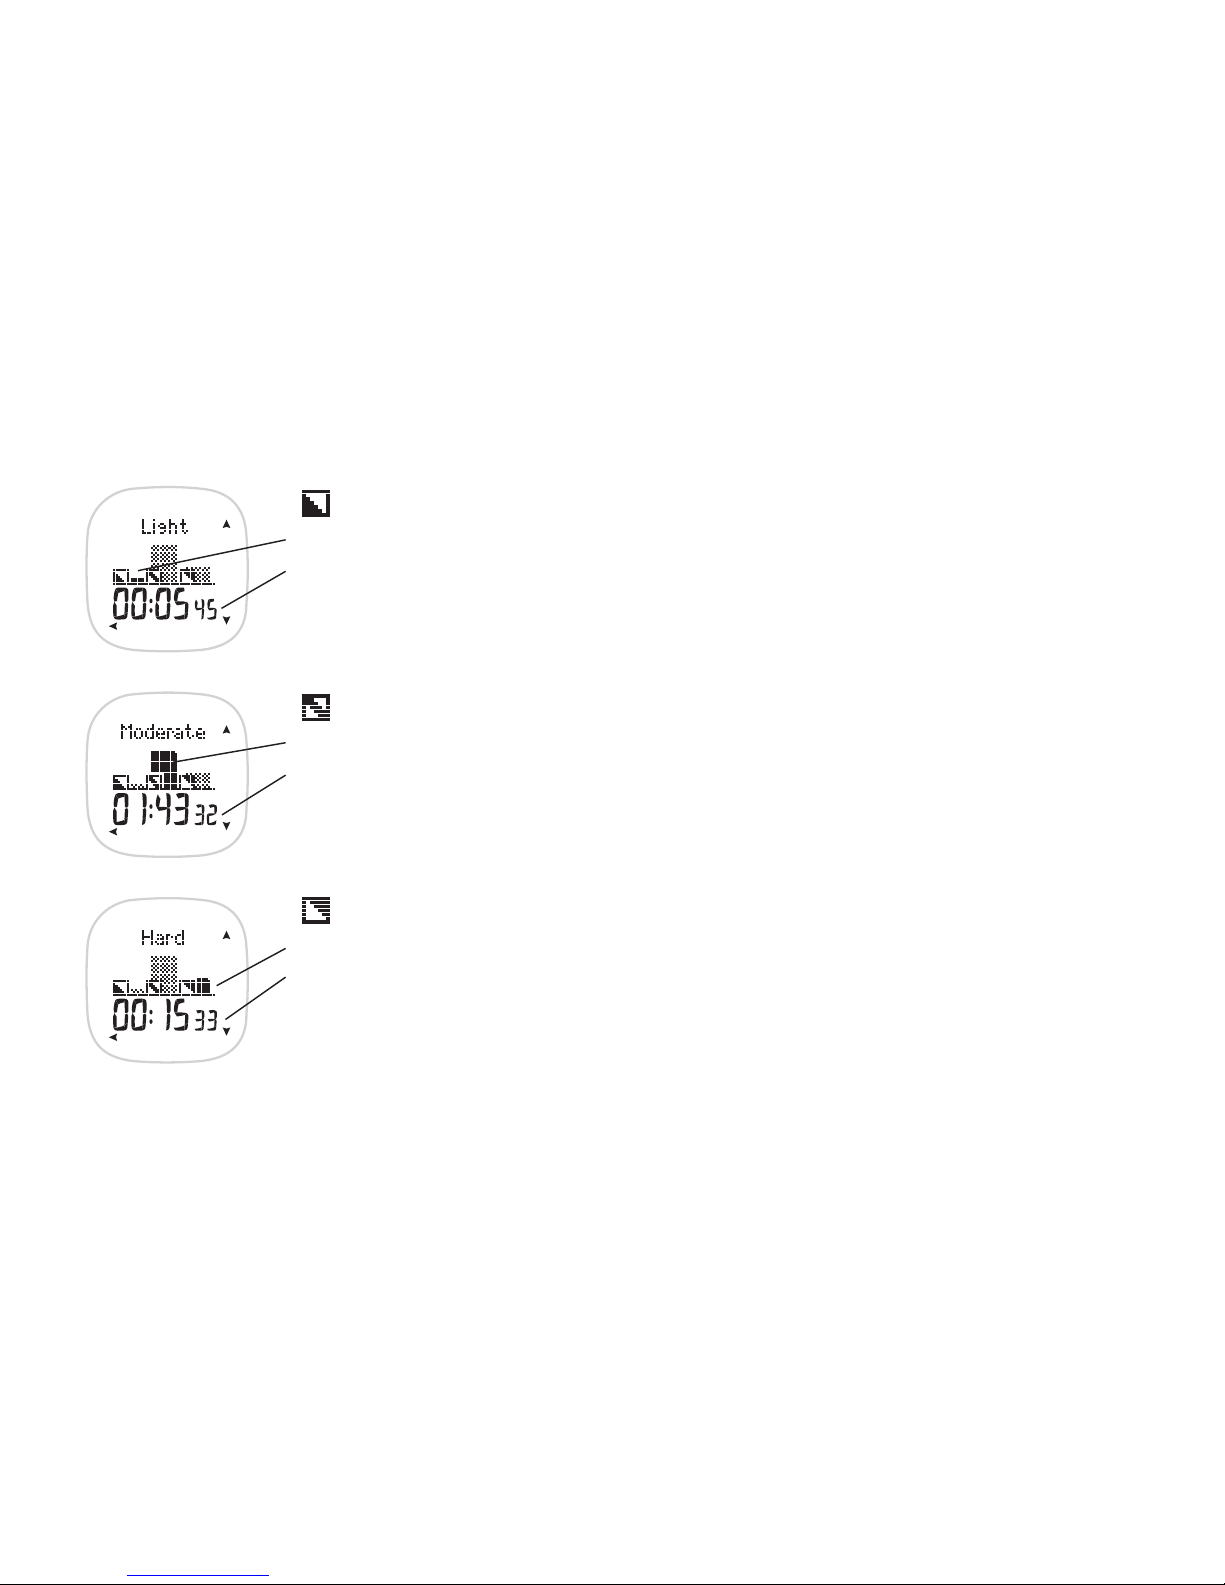
HR Zones
Hard
The Hard intensity zone bar is highlighted
The exercise duration in the zone you have achieved
Press Back to return to the HR zones view. Alternatively, press and hold Back to return to the Time
of Day display.
Light
The Light intensity zone bar is highlighted
The exercise duration in the zone you have achieved
Moderate
The Moderate intensity zone bar is highlighted
The exercise duration in the zone you have achieved
Page 35
37
ENGLISH
3.5 WEEKLY FOLLOW-UP
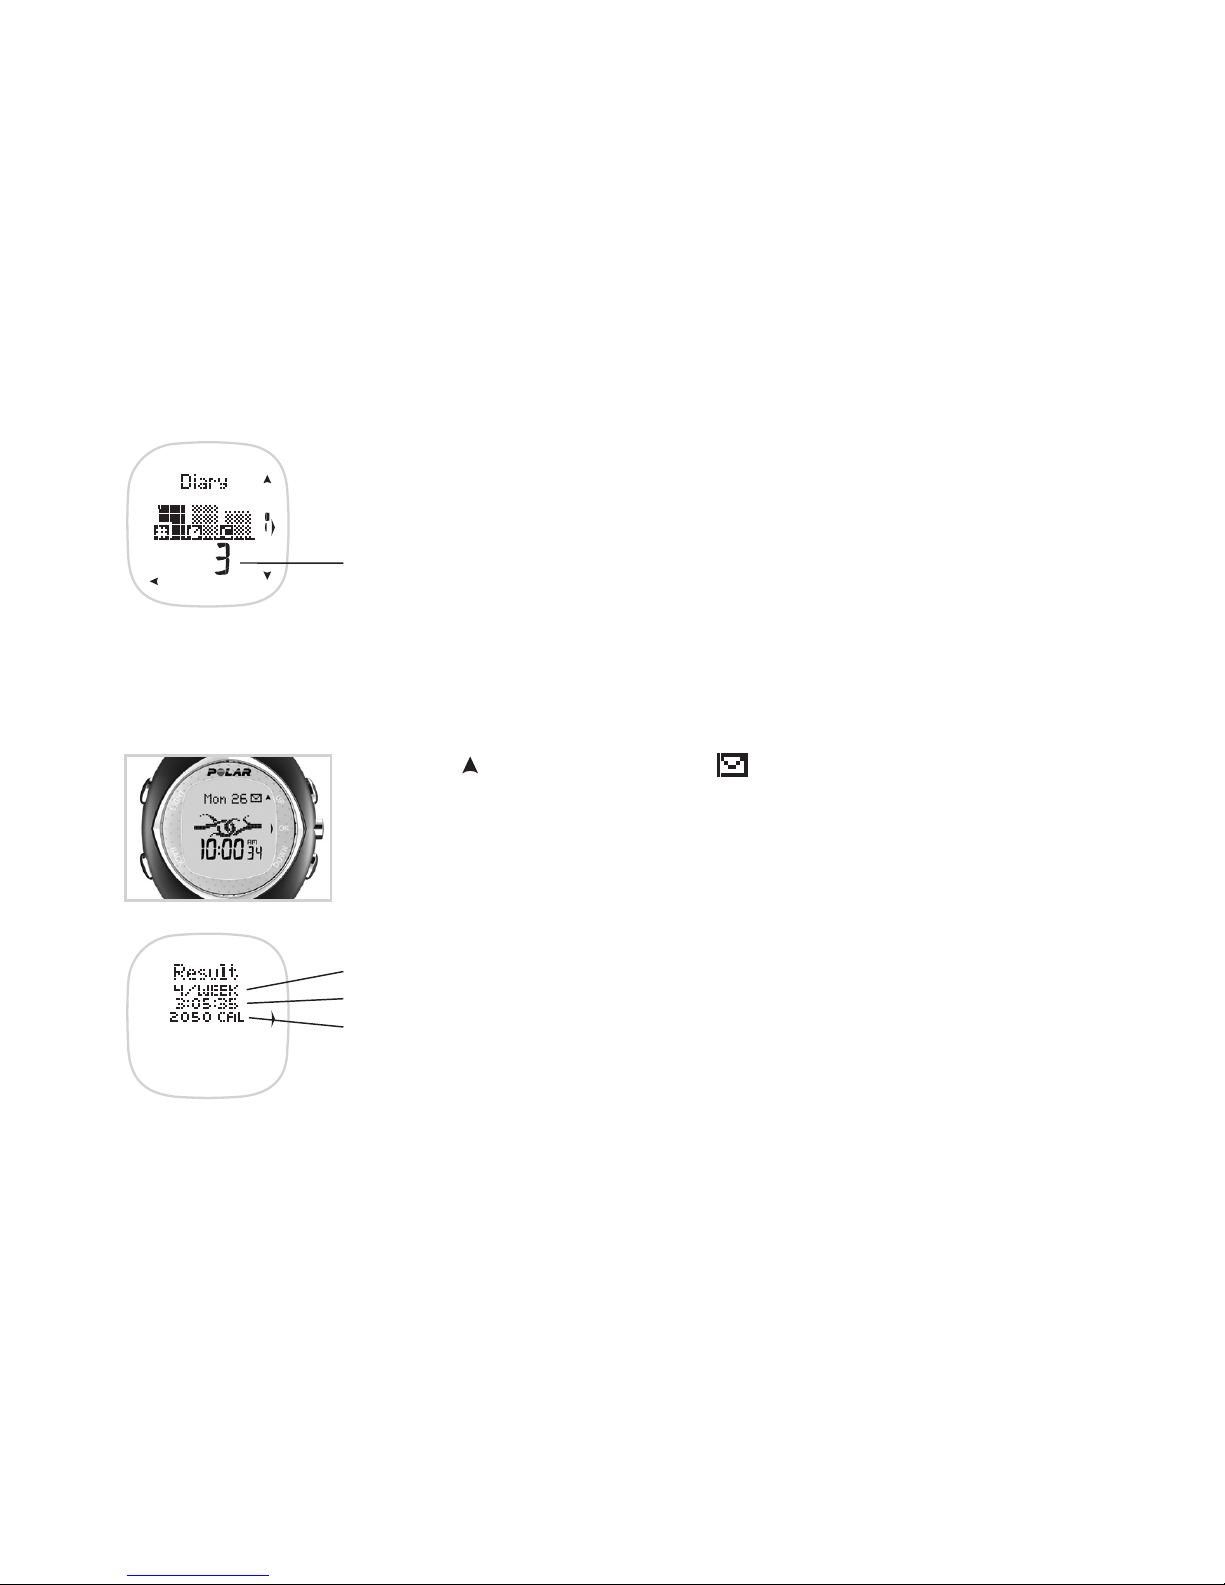
The weekly follow-up function automatically reviews your progress and reminds you to check the previous week’s exercises.
The reminder appears between Sunday and Monday at midnight.
1. Press the
button to open the reminder .
2. CHECKING YOUR WEEKLY EXERCISES is displayed. Press OK to check the previous week’s
exercises or press and hold Back to return to the Time of Day display.
Result and the following information is displayed:
Total exercise count of the last week
Total exercise duration
Total calories burned while exercising (Cal/kcal)
3. Return to the Time of Day display by pressing OK.
Changing the Default Diary View
When you press Back to return to the Diary or HR zones view, the previously viewed value will be
set as a default value.
Next time you enter the Diary or HR zones view the default value will be displayed.
Default value
Page 36
38
ENGLISH
4. GET EXTRA BENEFIT FROM POLAR APPLICATIONS - DATA COMMUNICATION
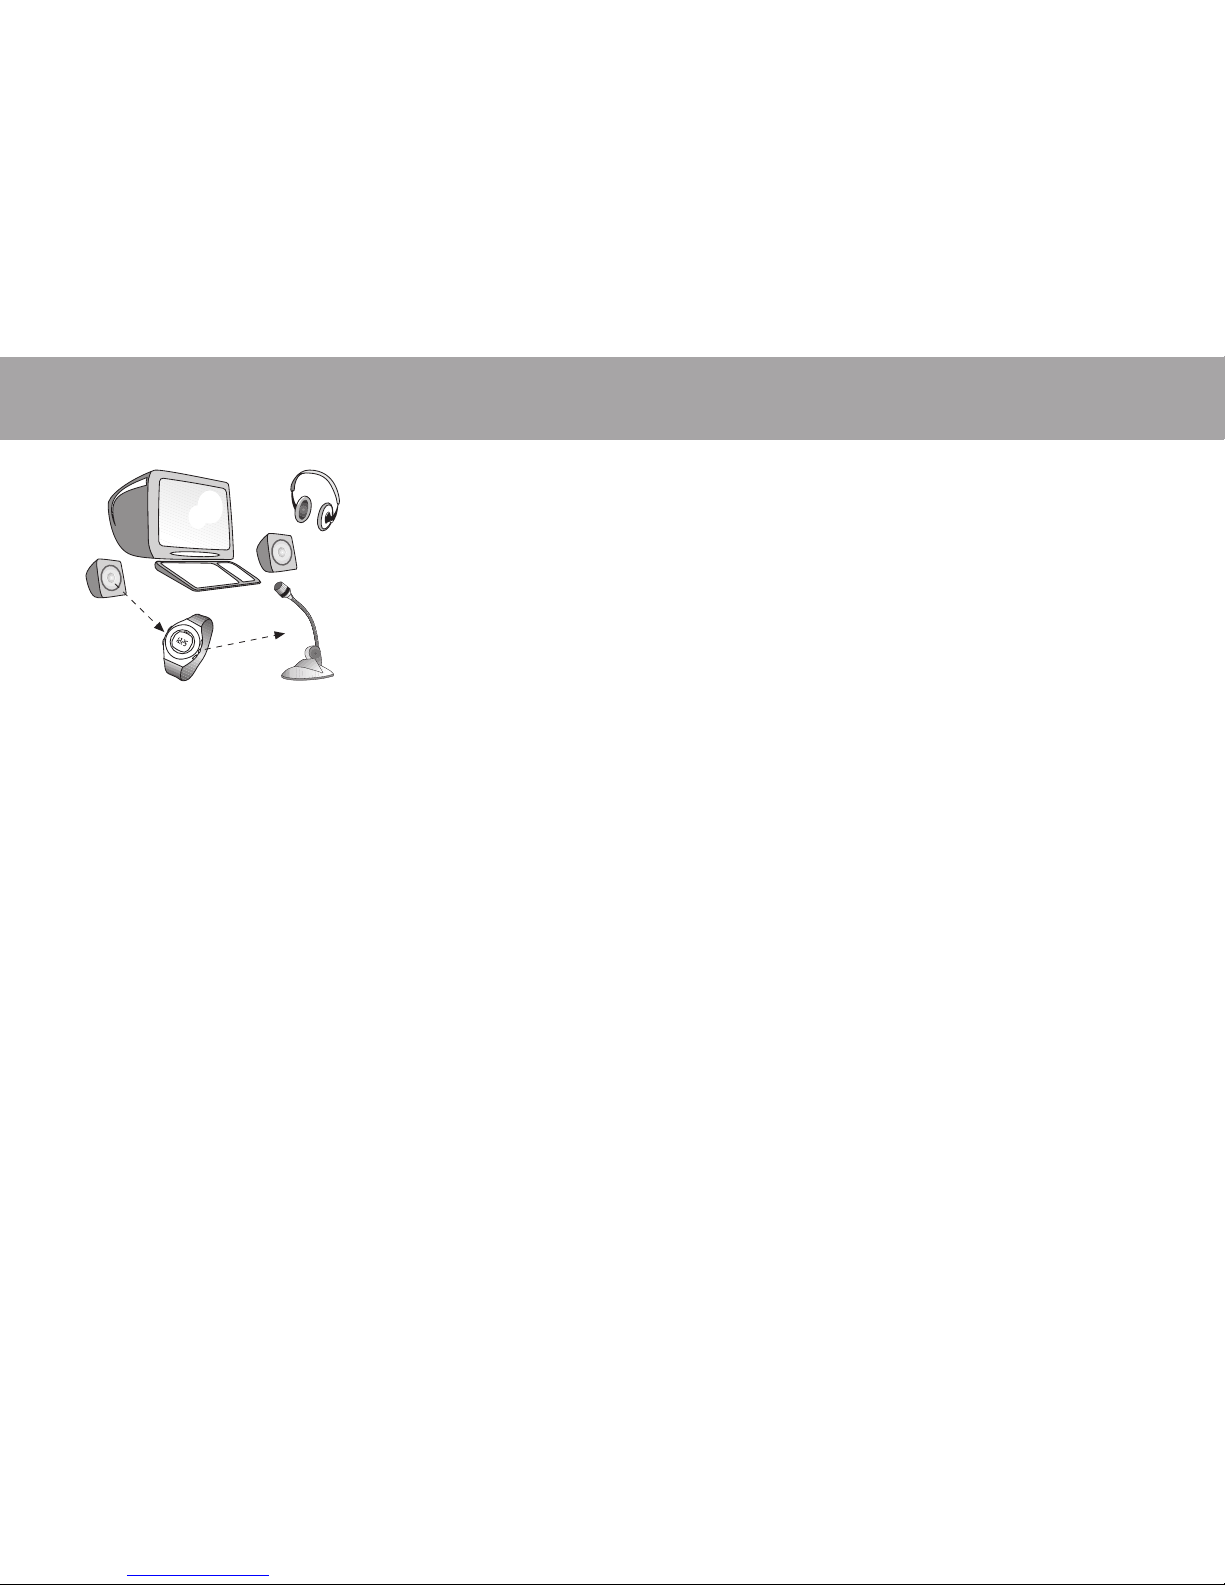
Your Polar fitness heart rate monitor offers you the option of transferring data between
your wrist unit and PC. You can edit and transfer your wrist unit settings easily from
your PC to your wrist unit via the Polar UpLink Tool™. Moreover, you can design your
own logo to personalize your wrist unit, or select one from the Polar Logo Gallery. For
further information on system requirements, see the chapter Technical Specifications.
The Polar WebLink™ application offers you the option of transferring exercise data from
your wrist unit to your personal training diary on the Polar Fitness Trainer web service
for graphical analysis and long-term follow-up. The Polar Fitness Trainer is a complete
web service tailored to support your exercising. Free registration gives you access to a
personalized exercise program, diary, test and calculators, useful articles, and much
more. You can gain access and start the registration process for the web service at
www.PolarFitnessTrainer.com. For further information on system requirements, see the
chapter Technical Specifications.
See www.polar.fi and www.PolarFitnessTrainer.com for further instructions.
Page 37
39
ENGLISH
5. SETTINGS
In the Settings menu, you can view or change the information you have set earlier, such as the time of day and date, or you
can set information, such as heart rate limits, volume, and alarm settings.
5.1 WATCH SETTINGS
Note that there are two ways that the time and date can be presented. Select the presentation mode when setting the 12 h
(date: month, day, year) or 24 h (date: day, month, year) time.
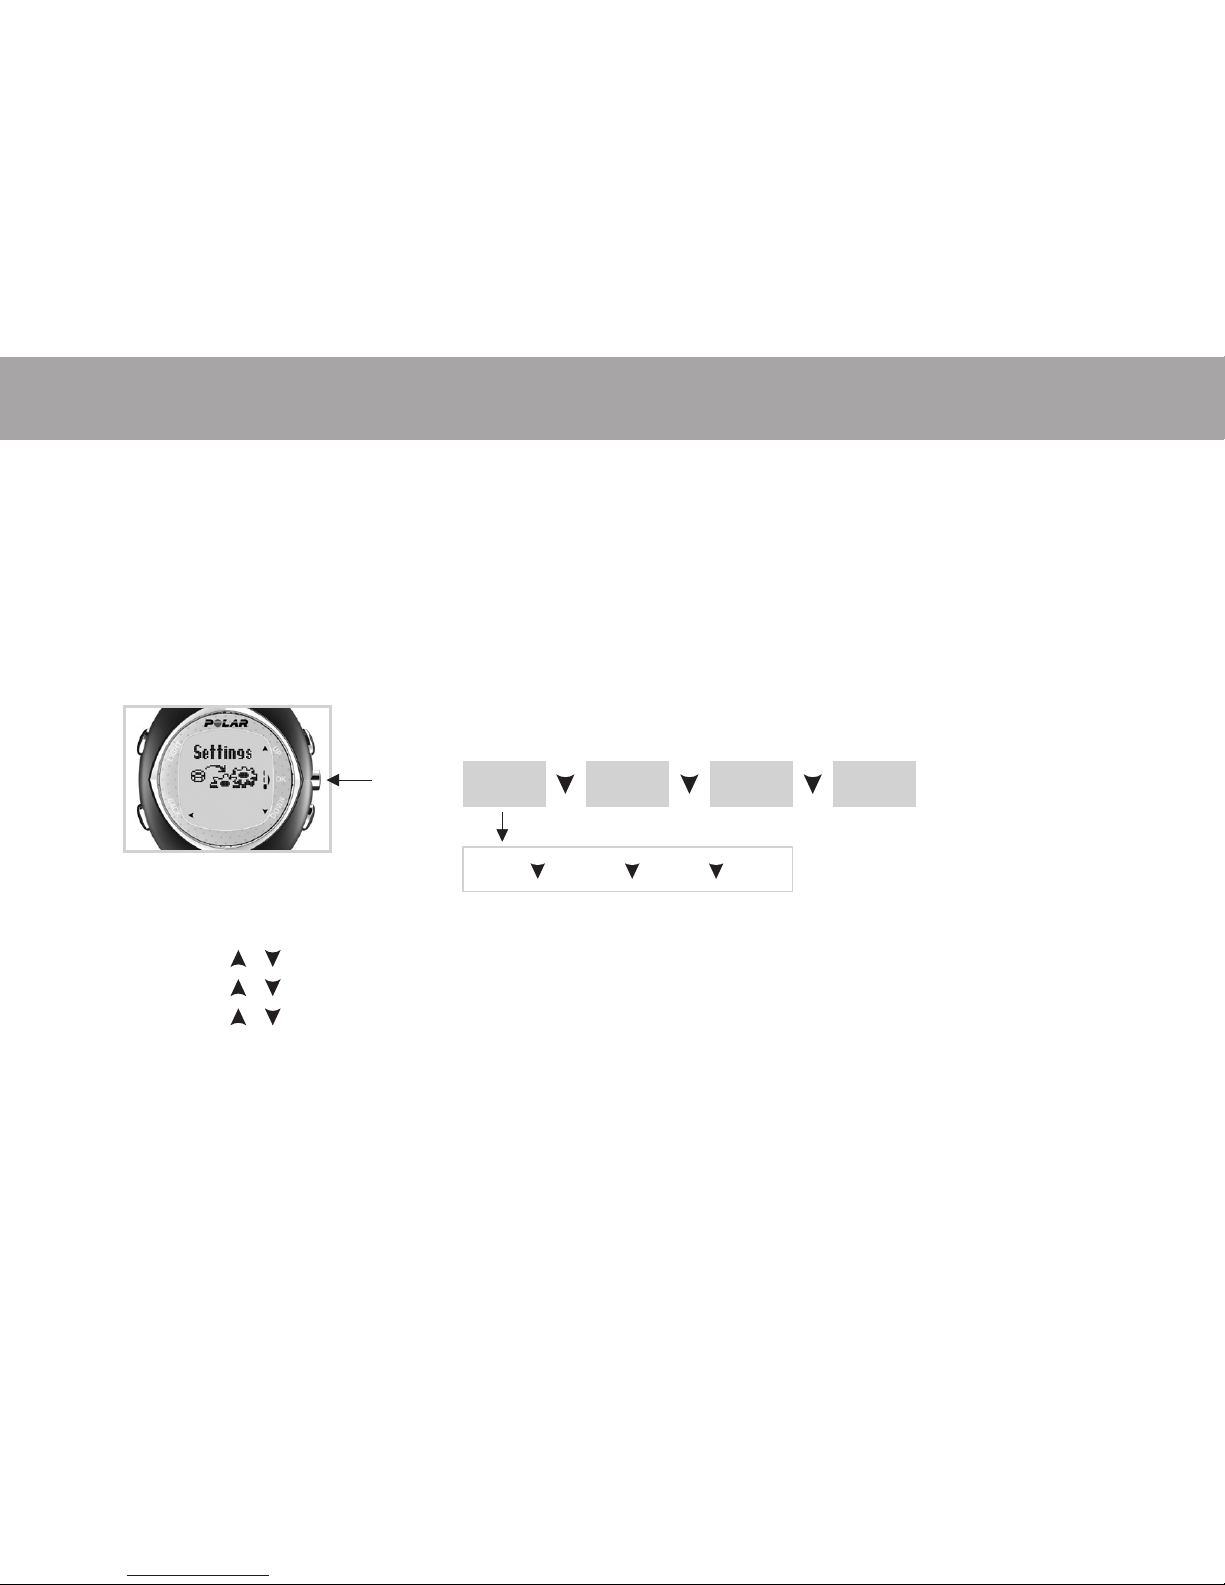
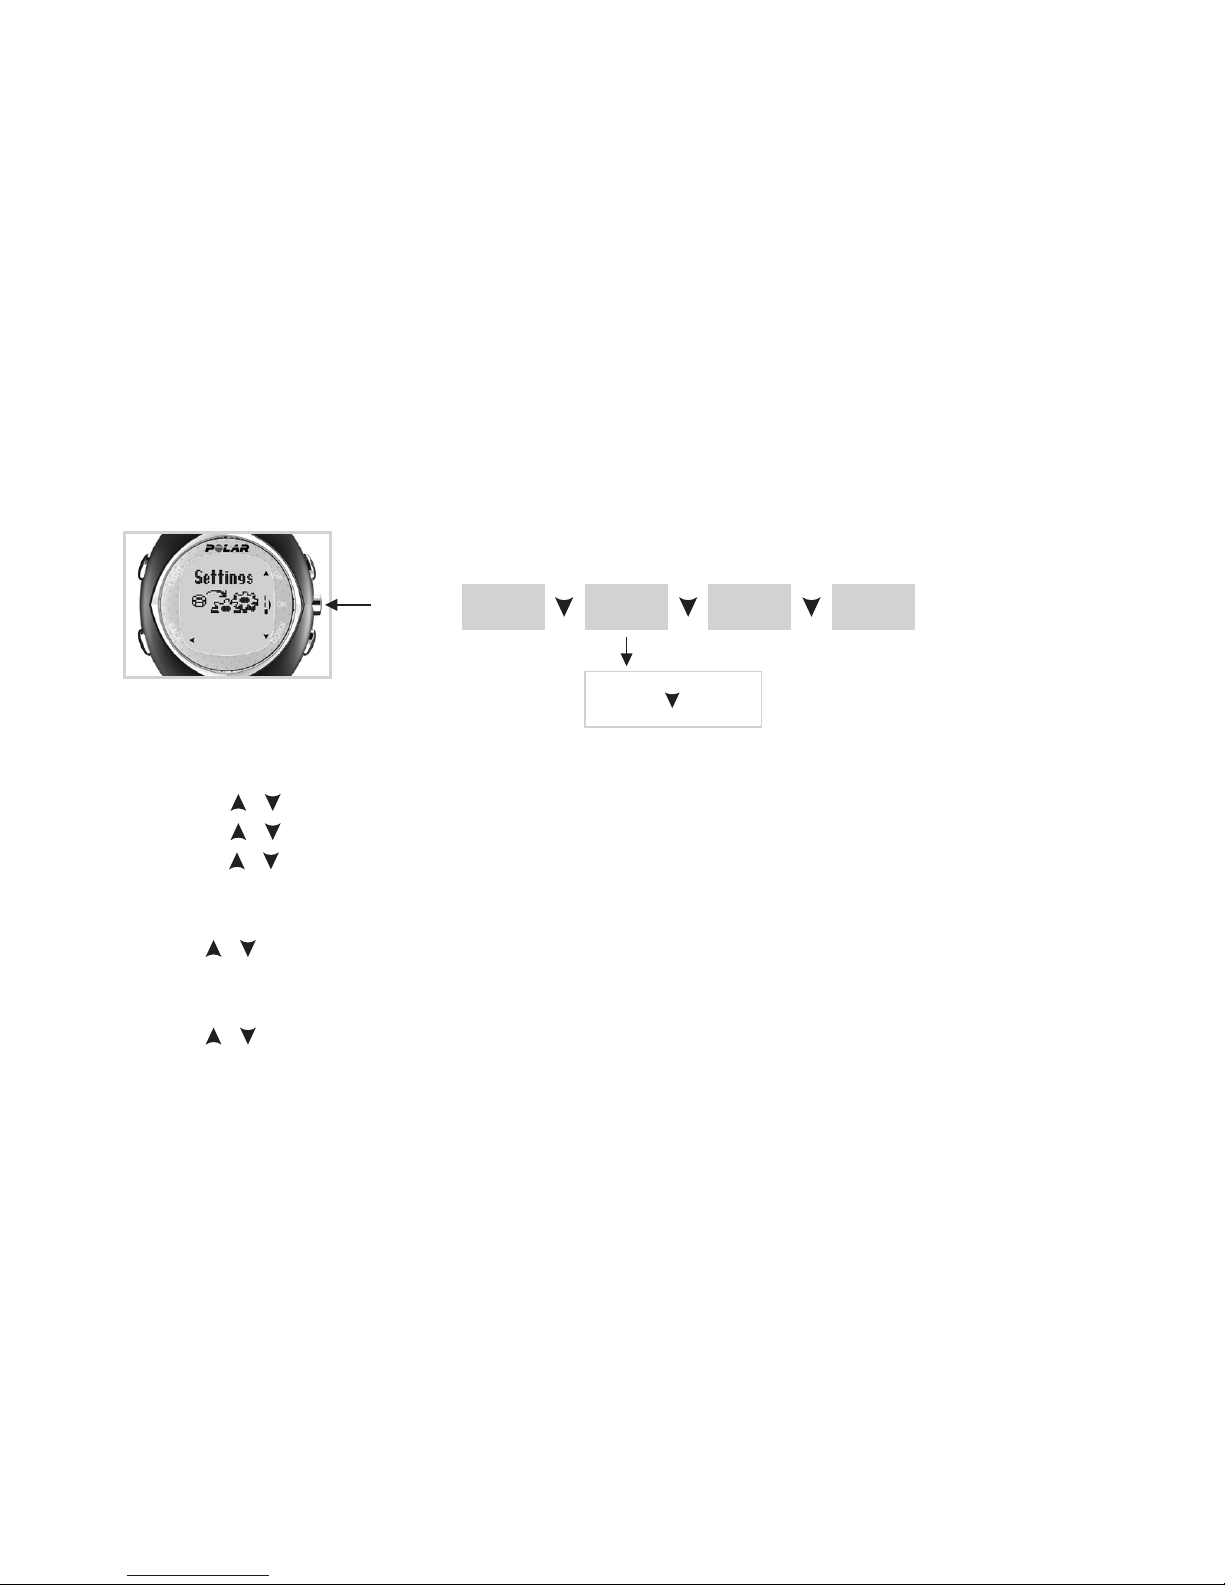
1. Start from the Time of Day display. Press OK.
Exercise is displayed.
2. Press the / buttons until Settings is displayed. Press OK.
3. Press the / buttons to select WATCH. Press OK.
4. Press the / buttons to select TIMER, ALARM, TIME, or DATE settings. Press OK to enter the desired settings.
Note:
• You can return to the Time of Day display from any menu by pressing and holding the Back button.
• You can also enter the Watch settings by pressing and holding the Back button in the Time of Day display.
• You can skip the time and date settings and accept them as they are by pressing and holding the OK button.
Press
Watch
Timer Alarm Time
Press OK
Date
Press Press
GeneralUserHR Set
Press
Page 38
40
ENGLISH
Timer Setting
You can set the countdown timer to sound an alarm once after a set time.
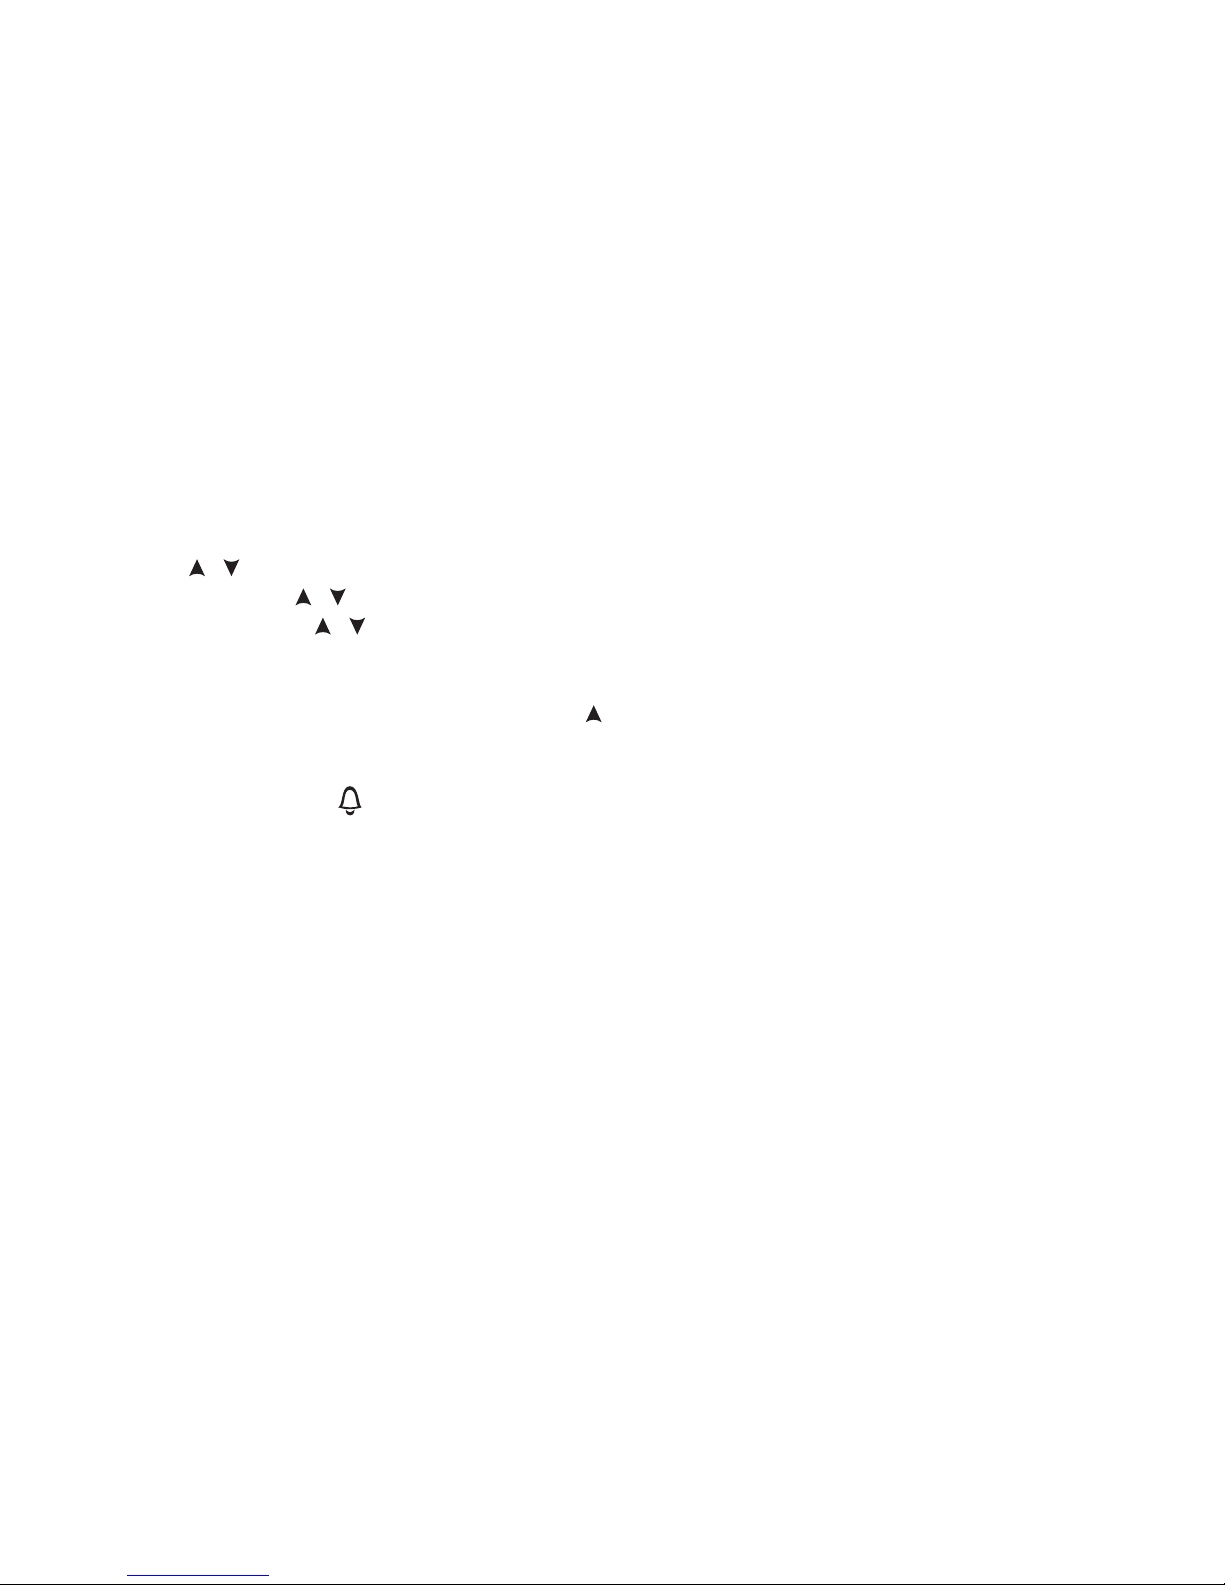
If you start from the Time of Day display, repeat steps 1-3.
4. Press the / buttons to select TIMER. Press OK.
5. Set the hours with the / buttons. Press OK.
6. Set the minutes with the / buttons. Press OK. The countdown timer starts running and Timer is displayed.
While the timer is running, you can restart the timer by pressing and holding OK, or you can stop the timer by pressing Back.
You can change the display view by pressing and holding the button. The timer is still running even if it is not on the
display.
Switching the Timer Alarm Off
When Timer blinks in the display and the alarm sounds, press the Back button to stop the alarm. When the alarm is stopped,
the display automatically illuminates and the wrist unit returns to the Time of Day display. If you do not stop the alarm, it
sounds for one minute and the wrist unit returns to the Time of Day display.
Note:
• The timer alarm will be activated in all menus except the Exercise menu. When the alarm sounds and you are in some of the other menus,
the wrist unit displays the Timer Alarm view.
• If the buttons are locked and the alarm sounds, the buttons will function normally.
Page 39
41
ENGLISH
Alarm Setting
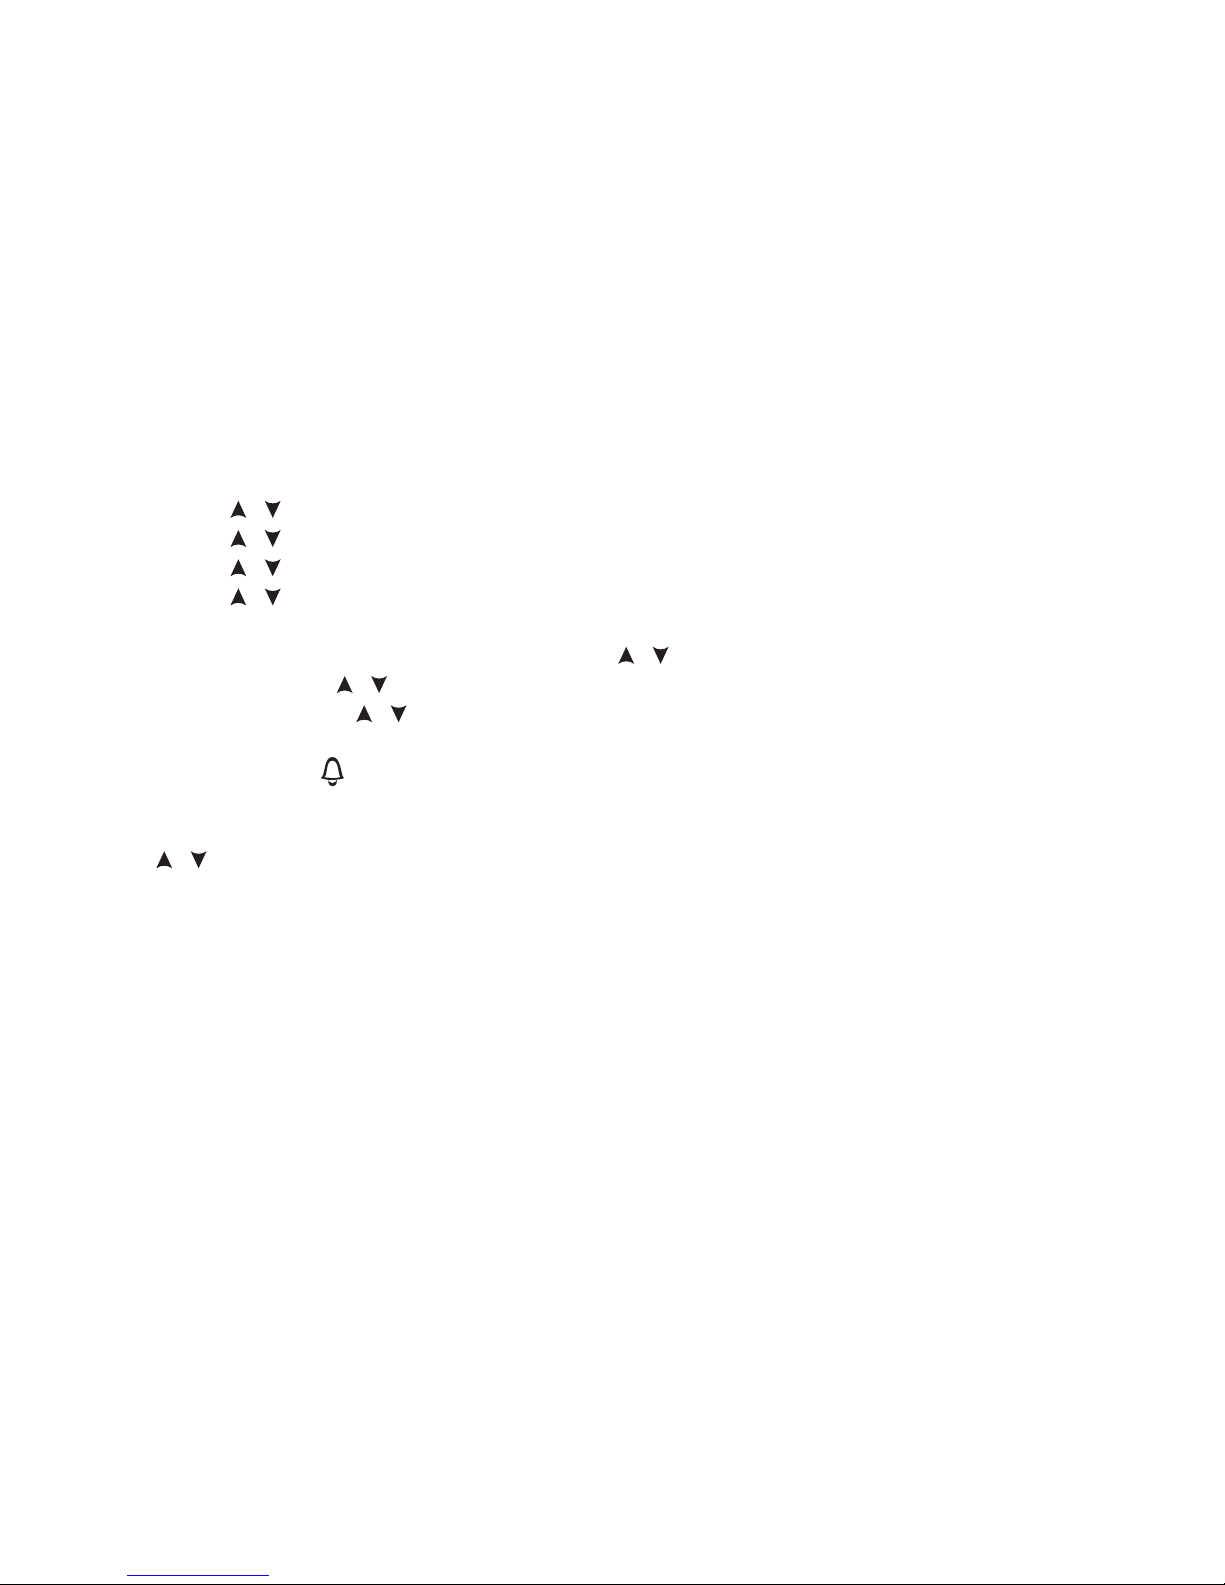
1. If you start from the Time of Day display, press OK.
2. Press the / buttons until Settings is displayed. Press OK.
3. Press the / buttons to select WATCH. Press OK.
4. Press the / buttons to select ALARM. Press OK.
5. Press the / buttons to select alarm DAILY, MON-FRI, or OFF. Press OK.
If you select off, press OK and continue from following setting.
If you are using 12 hours mode: select AM or PM with the / buttons. Press OK.
6. Set the hours with the / buttons. Press OK.
7. Set the minutes with the / buttons. Press OK.
Switching the Alarm Off
When SNOOZE? is displayed, the alarm sounds and backlight blinks, press the Back button to stop the alarm. When the
alarm is stopped, the display automatically illuminates and the wrist unit returns to the Time of Day display. Press OK, or
the / buttons to snooze the alarm for 10 minutes and to start the countdown timer. If you do not stop the alarm, it
sounds for one minute and the wrist unit returns to the Time of Day display.
Note:
• The alarm will be activated in all menus except the Exercise menu. When the alarm sounds and you are in some of the other menus,
the wrist unit displays the Alarm view.
• If the buttons are locked and the alarm sounds, the buttons will function normally.
Page 40
42
ENGLISH
Time Setting
If you start from the Time of Day display, repeat steps 1-3.
4. Press the / buttons to select TIME. Press OK.
5. Press the / buttons to select 12 H or 24 H time mode. Press OK.
If you chose 12 h mode, select AM or PM with the / buttons. Press OK.
6. Set the hours with the / buttons. Press OK.
7. Set the minutes with the / buttons. Press OK.
Date Setting
If you start from the Time of Day display, repeat steps 1-3.
4. Press the / buttons to select DATE. Press OK.
5. Press the / buttons to select the month (mm) or day (dd). Press OK.
6. Press the / buttons to select the day (dd) or month (mm). Press OK.
7. Press the / buttons to select the year (yy). Press OK.
Press and hold the Back button to return to the Time of Day display.
Page 41
43
ENGLISH
5.2 HEART RATE SETTINGS
In the HR (Heart Rate) Set menu, you can edit the settings used during exercise sessions, alarm setting and view mode.
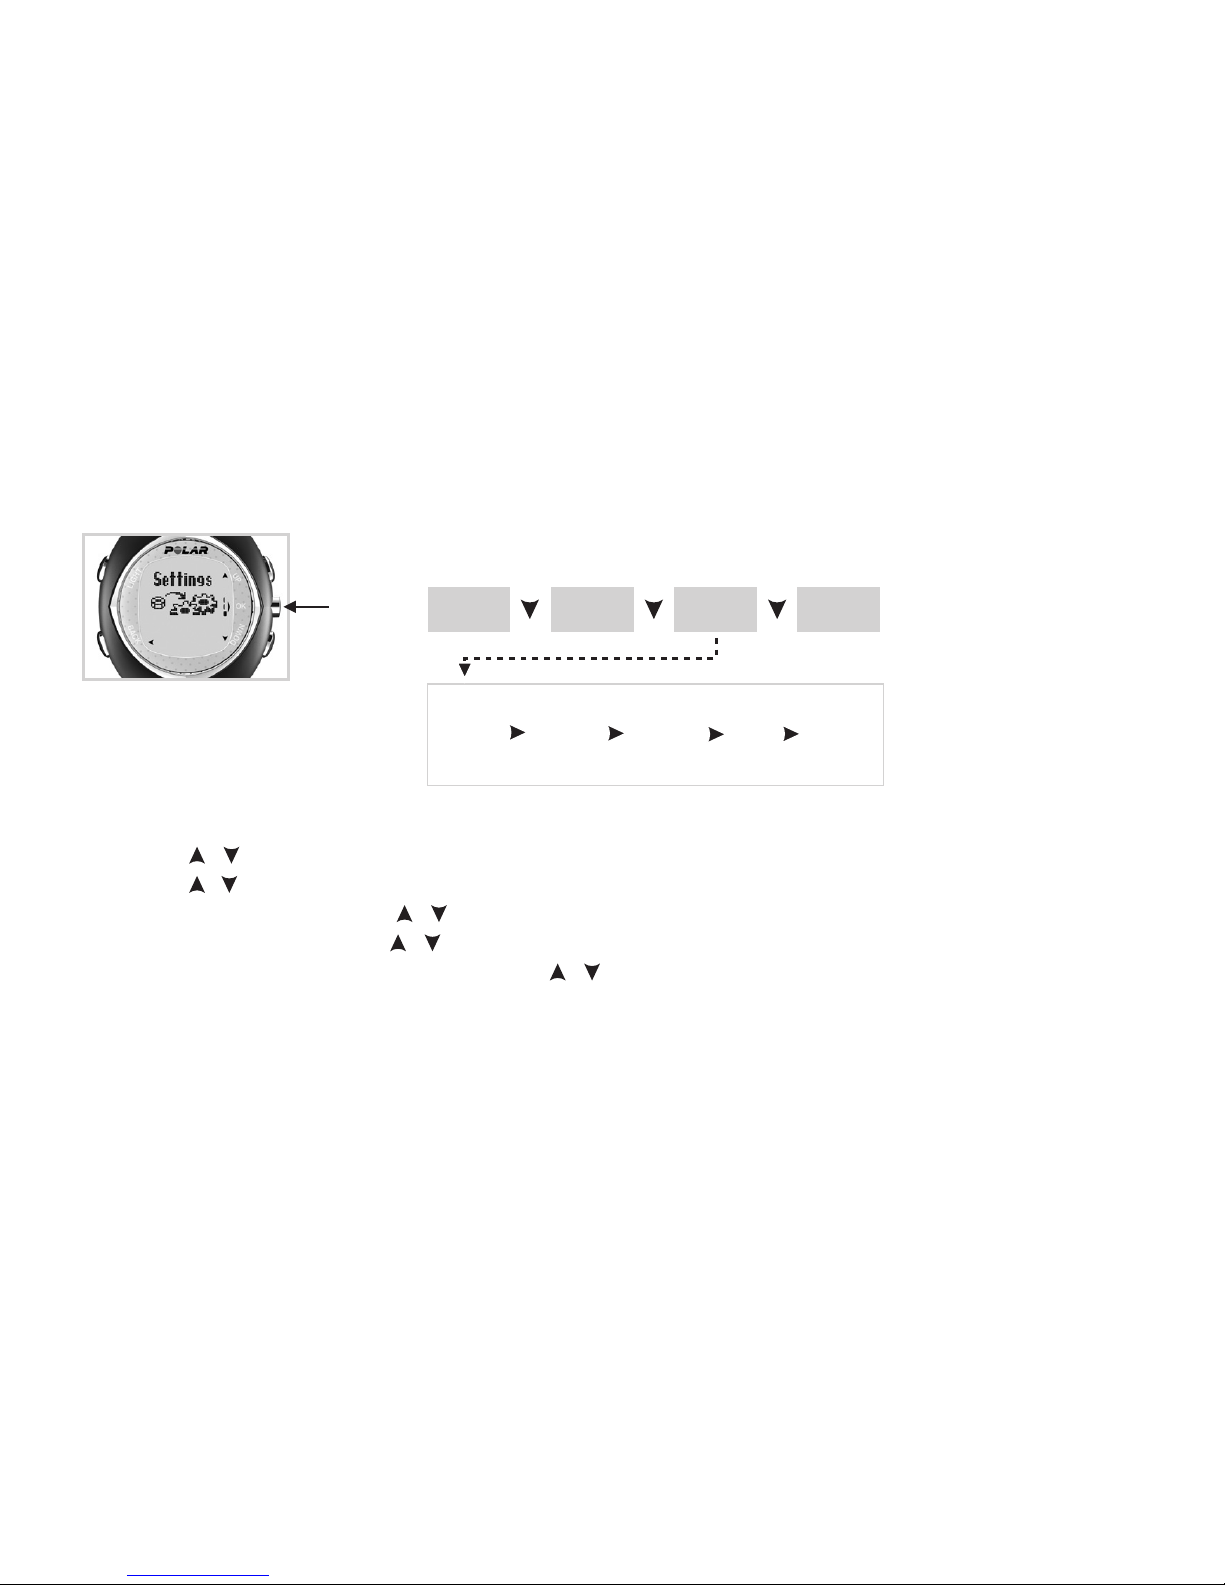
1. Start from the Time of Day display. Press OK.
Exercise is displayed.
2. Press the / buttons until Settings is displayed. Press OK.
3. Press the / buttons to select HR SET. Press OK.
4. Press the / buttons to select HR ALARM or HR VIEW. Press OK.
HR Alarm Volume Setting
Press the / buttons to select VOL 2 (loud), VOL 1 (quiet), or alarm OFF. Press OK.
HR View Setting
Press the / buttons to select HR (beats per minute), or HR% (a percentage of you maximum heart rate). Press OK.
Press and hold the Back button to return to the Time of Day display.
Press Press Press
GeneralUserHR SetWatch
Press OK
HR
Alarm
HR
View
Press
Page 42
44
ENGLISH
5.3 USER SETTINGS
In the User Settings menu, you can edit your personal data, weight, height, birthday, gender, and extra user settings.
1. Start from the Time of Day display. Press OK.
Exercise is displayed.
2. Press the / buttons until Settings is displayed. Press OK.
3. Press the / buttons to select USER. Press OK.
4. Weight: Adjust the weight with the / buttons. Press OK.
5. Height: Adjust the height with the / buttons. Press OK.
6. Birthday: Adjust the month (mm) or day (dd) with the / buttons. Press OK.
Note: You can skip the date of birth date setting and accept it as it is by pressing and holding OK.
Press OK
Press
Watch
View
Extra
User
Settings
Weight
Birth-
day
SexHeight
OK OK OK OK
Press Press
GeneralUserHR Set
Press
Page 43
45
ENGLISH
7. Adjust the day (dd) or month (mm) with the / buttons. Press OK.
8. Adjust the year (yy) with the / buttons. Press OK.
9. Sex: Select MALE or FEMALE with the / buttons. Press OK.
10. View Extra User Settings: It is recommended that you change the following settings (HR
max
, VO
2max
) only if you know your
laboratory-measured value. Press OK to enter Extra User Settings. Alternatively, press and hold the Back button to
return to the Time of Day display.
11. Maximum heart rate value (HR
max
): Press the / buttons to set your maximum heart rate. Press OK.
HR
max
is the highest number of heartbeats per minute (bpm) during maximum physical exertion. The most accurate way of
determining your individual HR
max
is to perform a maximal exercise stress test in a laboratory. HR
max
is a useful tool for
determining the intensity of exercise. HR
max
is used in the estimation of energy expenditure.
12. Heart rate value in a sitting position (HR
sit
): Press the / buttons to set your heart rate value in a sitting position.
Press OK.
HR
sit
should be your typical heart rate when you are not doing any physical activity (while sitting). HR
sit
is used in the
estimation of energy expenditure. To easily determine your HR
sit
, sit down and put on your wrist unit and transmitter. Start
the measurement to show your heart rate value on the display. Look at your wrist unit after 2 to 3 minutes. This is your
HR
sit
. To more precisely calculate your HR
sit
, wear your Polar heart rate monitor for one normal day. Occasionally when you sit
and do not engage in any physical activity for 2-3 minutes, write down your heart rate value. In the evening, calculate the
average value.
Page 44

46
ENGLISH
13. Maximal oxygen uptake value (VO
2max
, ml/kg/min): Press the / buttons to set your maximal oxygen uptake value.
Press OK.
VO
2max
is the maximum capacity for oxygen consumption by your body during maximum exertion. This is also known as
aerobic power or maximal oxygen intake/consumption. VO
2max
is a commonly used determinant of aerobic (cardiovascular)
fitness. The most accurate way of determining your individual VO
2max
is to perform a maximal exercise stress test in a
laboratory. Aerobic fitness relates to how well your cardiovascular system works to transport and utilize oxygen in your body.
VO
2max
is used in the estimation of energy expenditure.
Note: If you have accidentally changed the Extra User Settings, you can return to the default settings by pressing and holding the Light
button. RESTORE DEFAULT is displayed. Press the / buttons to select YES or NO. Press OK.
Page 45
47
ENGLISH
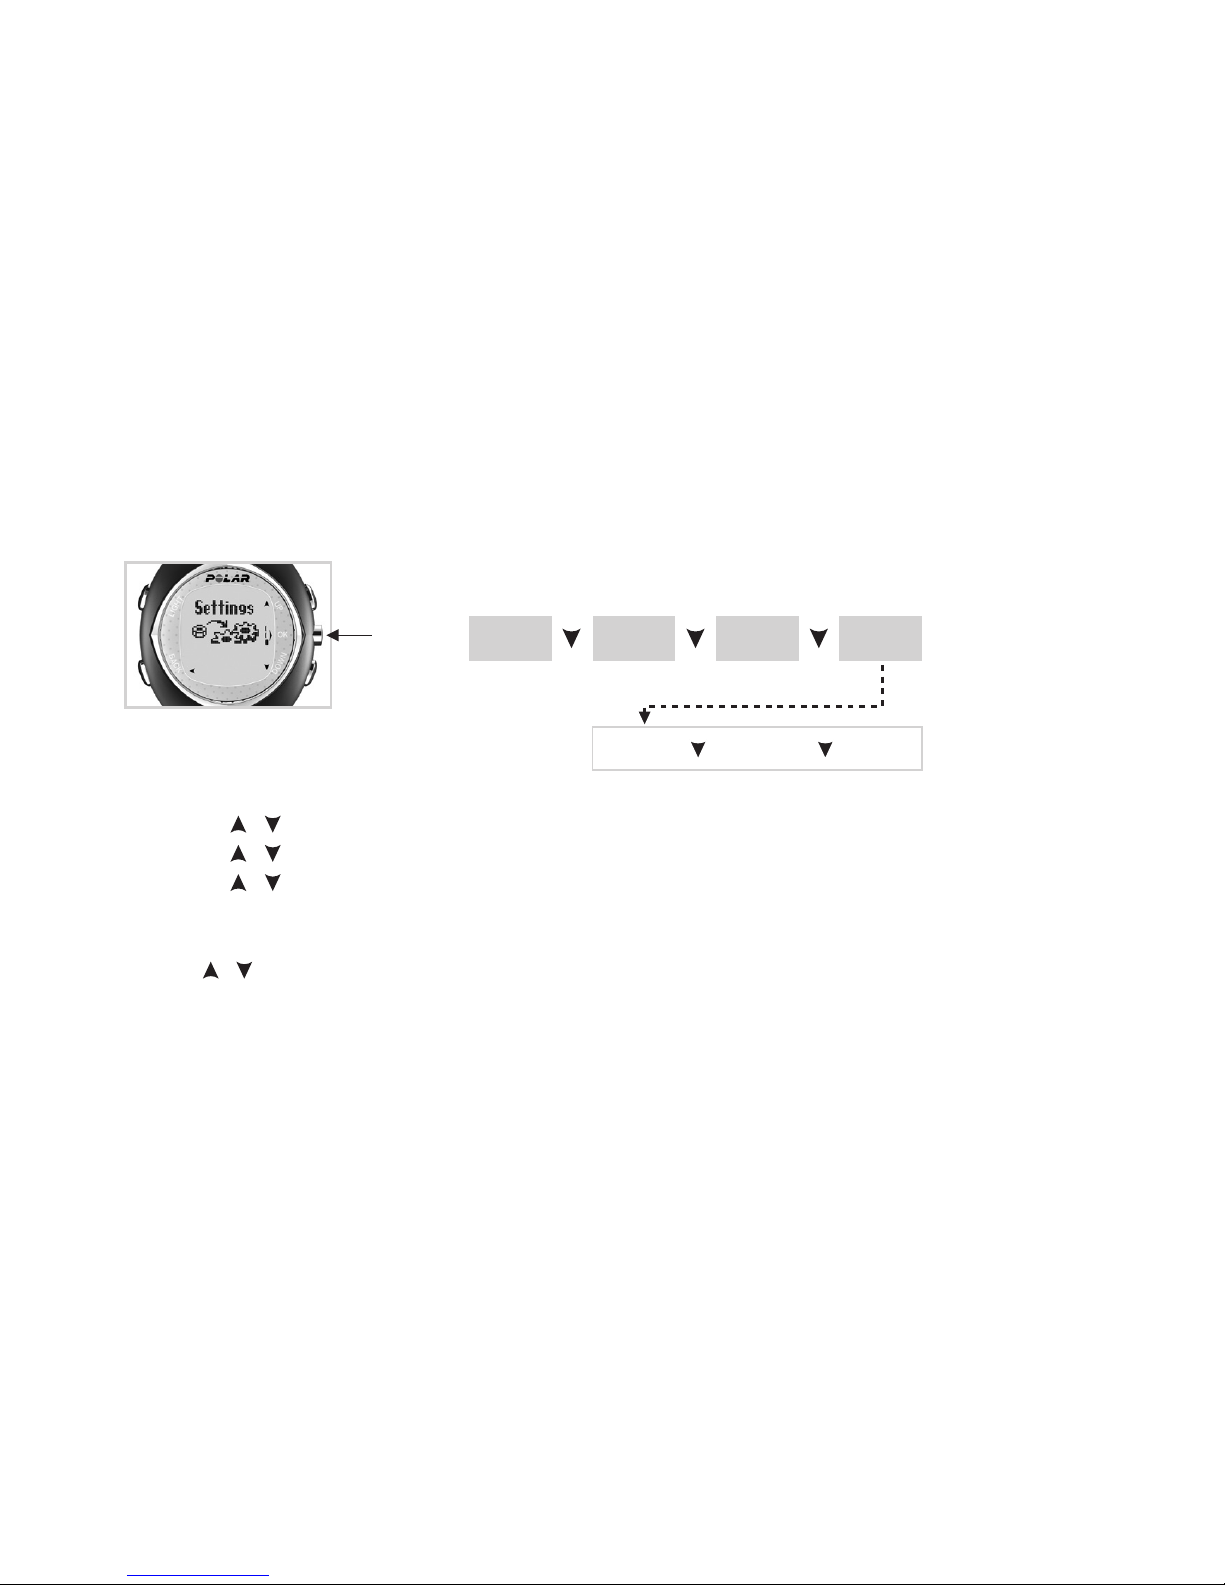
5.4 GENERAL SETTINGS
In the General Settings menu, you can edit general settings for the wrist unit. The general settings include volume, keylock,
and units.
1. Start from the Time of Day display. Press OK.
Exercise is displayed.
2. Press the / buttons until Settings is displayed. Press OK.
3. Press the / buttons to select GENERAL. Press OK.
4. Press the / buttons to select SOUND, KEYLOCK, or UNITS. Press OK.
1. Volume for Sounds
Press the / buttons to select VOL 2 (loud), VOL 1 (quiet), or sounds OFF. Press OK.
If you change the Vol 2 or Vol 1 setting, the following wrist unit tones are not affected: HR alarm, watch, and timer alarms.
If you select sounds off, the button and activity sounds are switched off. The alarm sounds can be switched on or off in the
Watch Settings. The heart rate zone alarms can also be switched on or off in the Exercise Settings and during your exercise
session.
Press OK
Press
Watch
Press Press
GeneralUserHR Set
Sound Keylock Units
Press
Page 46
48
ENGLISH
2. Button Lock Setting ( Keylock)
Button lock can be activated in the Time of Day display and during exercise recording.
If you start from the Time of Day display, repeat steps 1-4.
Press the / buttons to select MANUAL or AUTOMATIC. Press OK.
Automatic The wrist unit automatically locks all the buttons, except the Light button, if you do not press any button
within one minute. You can switch the button lock off by pressing and holding the Light button until BUTTONS
UNLOCKED is displayed.
Manual You can switch the button lock on or off by pressing and holding the Light button until is displayed or
disappears.
3. Units Settings
If you start from the Time of Day display, repeat steps 1-4.
Press the / buttons to select KG/CM or LB/FT. Press OK.
Weight
Height
Calories
lb/ft
Pounds
Feet/inches
Cal
kg/cm
Kilograms
Centimeters
kcal
Page 47
49
ENGLISH
Your Polar heart rate monitor is a high-tech instrument and should
be treated with care. The suggestions below will help you fulfill the
guarantee obligations.
Store your heart rate monitor in a cool and dry place. Do not store it
in a damp environment, in non-breathable material (i.e. plastic bag)
or with conductive material such as a wet towel.
Service
During the two-year guarantee/warranty period we recommend that
you have service done by an authorized Polar Service Center only.
The warranty does not cover damage or consequential damage
caused by service not authorized by Polar Electro.
Taking Care of Your Heart Rate Monitor
• Keep your unit clean. Clean it with a mild soap and water
solution. Dry it carefully with a soft towel. Never use alcohol or
any abrasive material such as steel wool or cleaning chemicals.
• Keep your heart rate monitor out of extreme cold and heat.
The operating temperatures are 14 °F to 122 °F/ -10 °C to 50 °C.
• Do not expose the heart rate monitor to direct sunlight for
extended periods, such as by leaving it in a car.
• Do not bend or stretch the transmitter. This may damage the
electrodes.
• Do not dry the transmitter in any other way than with a towel.
Mishandling may damage the electrodes.
Wrist Unit Battery
The estimated average battery life of the wrist unit is one and half
year in normal use. Please note that excessive use of the backlight
and the alarm signals drain the battery more rapidly. The
symbol
indicates low battery and that the battery should be replaced.
Do not open the wrist unit yourself. To ensure the water resistance
properties and the use of qualified components, the wrist unit
battery should be replaced by an authorized Polar Service Center
only. At the same time, a full periodic check of the Polar heart rate
monitor will be done.
Transmitter Battery
The estimated average battery life span of the transmitter is 2500
hours of use. If you suspect that the transmitter battery has run
out, contact your authorized Polar Service Center for a replacement
transmitter. Polar recycles used transmitters.
Note:
• If the
symbol is displayed and you have switched the alarm on,
the alarm will still activate one more time. After that the alarm
symbol
disappears. If you try to reset the alarm, the wrist
unit displays Battery Low. You cannot reset the alarm until the
battery is changed.
• In cold conditions the low battery indicator may appear,
but the indicator is deactivated when you return to a normal
temperature.
• Water resistance cannot be guaranteed after unauthorized
service.
6. CARE AND MAINTENANCE
Page 48
50
ENGLISH
7.1 INTERFERENCE DURING EXERCISE
Electromagnetic Interference
Disturbances may occur near high voltage power lines, traffic lights,
overhead lines of electric railways, electric bus lines or trams,
televisions, car motors, bike computers, some motor driven exercise
equipment, cellular phones, or when you walk through electric
security gates.
Exercise Equipment
Several pieces of exercise equipment with electronic or electrical
components such as LED displays, motors, and electrical brakes
may cause interfering stray signals. To try to tackle these problems,
relocate the wrist unit as follows:
1. Remove the transmitter from your chest and use the exercise
equipment as you would normally.
2. Move the wrist unit around until you find an area in which it
displays no stray reading or does not flash the heart symbol.
Interference is often worst right in front of the display panel of
the equipment, while the left or right side of the display is
relatively free of disturbance.
3. Put the transmitter back on your chest and keep the wrist unit in
this interference-free area as far as it is possible.
4. If the Polar heart rate monitor still does not work with the
exercise equipment, this piece of equipment may be electrically
too noisy for wireless heart rate measurement.
Crosstalk
When in non-coded mode the wrist unit picks up transmitter
signals within 3 feet/1 meter. Simultaneous non-coded signals from
more than one transmitter can cause an incorrect readout.
Using the Polar Heart Rate Monitor in a Water Environment
Your Polar heart rate monitor is water resistant and can be used
when swimming. To maintain the water resistance, do not press the
buttons of the wrist unit under water.
Users measuring their heart rate in water may experience
interference for the following reasons:
• Pool water with a high chlorine content and seawater are very
conductive. The electrodes of a transmitter may short-circuit,
which prevents ECG signals from being detected by the
transmitter.
• Jumping into water or strenuous muscle movement during
competitive swimming may cause water resistance that shifts
the transmitter on the body to a location where it is not possible
to pick up ECG signals.
• The ECG signal strength depends on the individual and also
varies depending on an individual’s tissue composition.
The percentage of people who have problems in heart rate
measuring is considerably higher in water than in other use.
7. PRECAUTIONS
Page 49

51
ENGLISH
7.2 MINIMIZING POSSIBLE RISKS WHEN
EXERCISING
Exercise may include some risk. Before beginning a regular
exercise program, it is recommended that you answer the following
questions concerning your health status. If you answer yes to any
of these questions, we recommend that you consult a doctor before
starting any training program.
• Have you been physically inactive for the past 5 years?
• Do you have high blood pressure or high blood cholesterol?
• Do you have symptoms of any disease?
• Are you taking any blood pressure or heart medication?
• Do you have a history of breathing problems?
• Are you recovering from a serious illness or medical treatment?
• Do you use a pacemaker or another implanted electronic device?
• Do you smoke?
• Are you pregnant?
Note that in addition to exercise intensity, medications for heart,
blood pressure, psychological conditions, asthma, breathing etc.
as well as some energy drinks, alcohol and nicotine may affect your
heart rate.
It is important to be sensitive to your body’s responses during
exercise. If you feel unexpected pain or excessive fatigue when
exercising, it is recommended that you stop the exercise or continue
at a lighter intensity.
Notice to individuals with pacemakers, defibrillators or other
implanted electronic devices. Individuals who have a pacemaker
use the Polar fitness heart rate monitor at their own risk. Before
starting use, we always recommend a maximal exercise stress test
under a doctor’s supervision. The test is to ensure the safety and
reliability of the simultaneous use of the pacemaker and the Polar
fitness heart rate monitor.
If you are allergic to any substance that comes into contact with
your skin or if you suspect an allergic reaction due to using the
product, check the listed materials on Technical Specifications
chapter. To avoid any skin reaction to the transmitter, wear it over a
shirt. However, moisten the shirt well under the electrodes to ensure
flawless operation.
The combined impact of moisture and intense abrasion may cause a
black color to come off the transmitter’s surface, which might stain
light-colored clothes especially.
Page 50
52
ENGLISH
What should I do if...
...I don’t know where I am in the menu?
Press and hold the Back button until the time of day is displayed.
...there is no heart rate reading (00 / - -)?
1. Check that the electrodes of the transmitter are moistened and that you are wearing it as instructed.
2. Check that you have kept the transmitter clean.
3. Check that there are no sources of electromagnetic radiation in close vicinity to the Polar wrist unit, such as TV sets, cellular phones,
CRT monitors etc.
4. Cardiac arrhythmia may cause irregular readings or a cardiac event may have altered your ECG waveform. In these cases, consult your
physician.
...heart symbol flashes irregularly?
1. Check that your wrist unit is inside the transmission range and not further that 3 feet/1 meter from the Polar transmitter you are wearing.
2. Check that the elastic strap has not become loose during exercise.
3. Make sure that the electrodes of the transmitter are moistened.
4. Make sure that there is no other heart rate transmitter within the reception range (3 feet/1 meter).
5. Cardiac arrhythmia may cause irregular readings. In this case, consult your physician.
...the heart rate reading becomes erratic or extremely high?
Strong electromagnetic signals can cause erratic readings. So move away from possible sources of disturbance such as high-voltage power
lines, traffic lights, overhead lines of electric railways or trams, car motors, bike computers, some motor-driven exercise equipment (like
fitness testers) or cellular phones.
If moving away does not help and the heart rate reading remains erratic, slow down your speed and check your pulse manually. If you feel it
corresponds to the high reading on the display, you may be experiencing cardiac arrhythmia. Most cases of arrhythmia are not serious, but
consult your doctor nevertheless.
8. FREQUENTLY ASKED QUESTIONS
Page 51
53
ENGLISH
...the display is blank?
The Polar heart rate monitor is in battery saving mode when it is dispatched from the factory. To activate it, press any of the buttons twice.
WELCOME TO POLAR FITNESS WORLD is displayed. See the section Basic Settings.
...the display is fading?
Usually the first sign of an expired battery is the fading of the digits when using the backlight or the low battery indicator
. Have the
batteries checked.
...the wrist unit battery needs to be changed?
We recommend that all service should be done by an authorized Polar Service Center. The 2-year International Guarantee does not cover
damage or consequential damage caused by service not authorized by Polar Electro. The Polar Service Center will test your wrist unit for water
resistance after battery replacement and makes a full periodic check of your complete Polar heart rate monitor.
...the buttons do not react?
Reset the wrist unit. Resetting clears the date and time settings.
Press all buttons except the Light button at the same time until the display is filled with digits. Press OK.
For further information, see the section Basic Settings. If you have already set the Basic Settings once, you
can skip them after setting the date by pressing and holding the Back button. If you do not press any button
after you reset the wrist unit, within one minute the wrist unit goes to the Time of Day display.
If this does not work, have the batteries checked.
...the Updated OwnZone limits vary a lot?
Heart rate variability reacts sensitively to all changes taking place in your body and environment. The OwnZone heart rate limits are affected
by, amongst other things, your state of fitness, the time of day of the OwnZone determination, the type of exercise and your state of mind.
The lower limit of the OwnZone can vary for the same person by 5-10 beats but as much as 30 beats is possible. However it is important
that the exercise carried out in the OwnZone feels light or moderate. For example, if you raise your heart rate too rapidly after the first stage,
you may receive OwnZone heart rate limits that are too high. If the OwnZone limits seem to be too high, we recommend that the OwnZone
determination be repeated.
Page 52
54
ENGLISH
9. TECHNICAL SPECIFICATION
Your Polar fitness heart rate monitor is designed to
• help users to achieve their personal fitness goals
• indicate the level of physiological strain and intensity during an exercise session
No other use is intended or implied.
Water resistance of Polar products is tested according to International Standard ISO 2281. Products are divided into three different categories
according to their water resistance. Check the back of your Polar product for the water resistance category and compare it to the chart below.
Please note that these definitions do not necessarily apply to products of other manufacturers.
Marking on the
case back
Water resistant
Water resistant 50m
Water resistant 100m
Wash splashes, sweat,
raindrops etc.
X
X
X
Bathing and
swimming
X
X
Skin diving with
snorkel (no air tanks)
X
SCUBA diving
(with air tanks)
Water resistant
characteristics
Splashes,
raindrops etc.
Minimum for bathing
and swimming
For frequent use in water
but no SCUBA diving
Page 53

55
ENGLISH
WRIST UNIT
Battery type: CR 2032
Battery life: Average 1.5 years
(1 h/day, 7 days/week exercise)
Operating temperature: 14 °F to 122 °F/ -10 °C to +50 °C
Wrist strap material: Polyurethane
Back cover and
wrist strap buckle: Stainless steel complying with
the EU Directive 94/27/EU and
amendment 1999/C 205/05 on
the release of nickel from products
intended to come into direct and
prolonged contact with the skin.
Watch accuracy: better than ± 0.5 seconds/day
at 77 °F/ 25 °C temperature.
Accuracy of heart rate
measurement: ± 1% or ± 1 bpm, whichever larger,
definition applies to steady state
conditions
TRANSMITTER
Battery life: Average 2500 hours of use
Battery type: Built-in Lithium Cell
Operating temperature: 14 °F to 122 °F/-10 °C to +50 °C
Transmitter material: Polyurethane
Waterproof
ELASTIC STRAP
Buckle material: Polyurethane
Fabric material: Nylon, polyester, and natural rubber
including a small amount of latex
LIMIT VALUES
Chronometer 23 h 59 min 59 s
Heart rate limits 30 - 199 bpm
Total time 0 - 9999 h 59 min 59 s
Total calories 0 - 999999 kcal
Total exercise count 65 535
Birthday 1921 - 2020
SYSTEM REQUIREMENTS
Polar WebLink using SonicLink™ data communication
• PC
• Windows® 98/98SE/ME/2000/XP
• Sound card
• Microphone
Polar UpLink Tool
• PC
• Windows® 98/98SE/ME/2000/XP
• Sound card
• Dynamic loudspeakers or headphones
Page 54
56
ENGLISH
10. LIMITED POLAR INTERNATIONAL GUARANTEE
• This limited Polar international guarantee is issued by Polar Electro Inc. for the consumers who have purchased this product in the USA or
Canada. This limited Polar international guarantee is issued by Polar Electro Oy for the consumers who have purchased this product in
other countries.
• Polar Electro Inc. / Polar Electro Oy guarantees to the original consumer/purchaser of this product that the product will be free from defects
in material or workmanship for two years from the date of purchase.
• Please keep the receipt or International Guarantee Card, which is your proof of purchase!
• The guarantee does not cover battery, damage due to misuse, abuse, accidents or non-compliance with the precautions;
improper maintenance, commercial use, cracked or broken cases and elastic strap.
• The guarantee does not cover any damage/s, losses, costs or expenses, direct, indirect or incidental, consequential or special, arising out of,
or related to the product. During the guarantee period the product will be either repaired or replaced at an authorized service center free of
charge.
• This guarantee does not affect the consumer’s statutory rights under applicable national or state laws in force, or the consumer’s rights
against the dealer arising from their sales/purchase contract.
This CE marking shows compliance of this product with Directive 93/42/EEC.
This crossed out wheeled bin marking shows that Polar products are electronic devices and are in the scope of Directive 2002/96/EC
of the European Parliament and of the Council on waste electrical and electronic equipment (WEEE). These products should thus be
disposed of separately in EU countries. The products have been put on the market after 13 August 2005. Polar encourages you to
minimize possible effects of waste on the environment and human health also outside the European Union by following local waste
disposal regulations and, where possible, utilize separate collection of electronic devices.
Copyright © 2005 Polar Electro Oy, FIN-90440 KEMPELE, Finland.
Polar Electro Oy is a ISO 9001:2000 certified company.
All rights reserved. No part of this manual may be used or reproduced in any form or by any means without prior written permission of
Polar Electro Oy.
The names and logos marked with a ™ symbol in this user manual or in the package of this product are trademarks of Polar Electro Oy.
The names and logos marked with a ® symbol in this user manual or in the package of this product are registered trademarks of Polar Electro
Oy, except that Windows is a registered trademark of Microsoft Corporation.
0537
Page 55
57
ENGLISH
11. DISCLAIMER
• The material in this manual is for informational purposes only. The products it describes are subject to change without prior notice,
due to the manufacturer’s continuous development program.
• Polar Electro Inc. / Polar Electro Oy makes no representations or warranties with respect to this manual or with respect to the products
described herein.
• Polar Electro Inc. / Polar Electro Oy shall not be liable for any damages, losses, costs or expenses, direct, indirect or incidental,
consequential or special, arising out of, or related to the use of this material or the products described herein.
This product is protected by one or several of the following patents:
FI55293, FI88223, US5491474, DE4215549, GB2257523B, FR92.06120, HK113/1996, SG9591671-4, FI110303, WO96/20640, EP 0748185,
US6104947, US6714812, FI114202, US 6537227, EP 1055158, US5719825, US58048027.
Other patents pending.
Manufactured by:
Polar Electro Oy
Professorintie 5
FIN-90440 KEMPELE
Tel +358 8 5202 100
Fax +358 8 5202 300
www.polar.fi
www.PolarFitnessTrainer.com
Page 56
58
ENGLISH
12. INDEX
12h/24h time mode ................................................................. 10, 42
Alarm setting ........................................................................... 41
Backlight ............................................................................. 8, 18
Basic settings ............................................................................... 10
Battery replacement ...................................................................... 49
Buttons ...........................................................................................8
Care and maintenance .................................................................. 49
Data communication ..................................................................... 38
Date settings ................................................................................ 42
Diary ............................................................................................. 34
Daily file ........................................................................................
27
Disclaimer ..................................................................................... 57
Exercise settings ........................................................................... 21
File ................................................................................................ 27
Fitness bullets .............................................................................. 17
Frequently asked questions ........................................................... 52
Functions during the exercise ....................................................... 15
General settings ............................................................................ 47
Guarantee .....................................................................................56
Heart rate ............................................................................... 12
Heart touch function .......................................................................8
Heart rate settings ........................................................................ 43
Heart rate zones .......................................................................21-23
HR
max
............................................................................................ 45
Keylock ................................................................................... 8, 48
Low battery indication ................................................................ 49
Follow-up Your Achievements ........................................................
27
OwnZone .......................................................................................24
Pause an exercise ................................................................... 18
Precautions ................................................................................... 50
Reset the wrist unit ....................................................................... 53
Resetting totals file .......................................................................
33
Return to the time of day display ....................................................8
Settings ........................................................................................ 39
Starting exercise recording ..................................................... 14
Stop an exercise ............................................................................ 20
Technical specifications ................................................................
54
Time of day setting ........................................................................
42
Timer setting .................................................................................
40
Totals file ......................................................................................
32
Transmitter .............................................................................
12, 49
Units setting .................................................................................48
User settings ................................................................................. 44
Volume setting ..............................................................................
47
Watch settings ..............................................................................
39
Weekly follow-up
..................................................................... 37
Weekly file .....................................................................................
30
 Loading...