

Page 1

B
B
o
o
d
d
y
y
A
A
g
g
e
e
M
TTM
S
S
©Polar/HealthFirst Corporation 1989-2006. All rights reserved.
y
stt
y
s
SSeettuupp G
VVeerrssiioonn 44..88
005511220077
e
e
Guuiiddee
m
m
Polar/HealthFirst Corporation
Voice (505) 344-1400
Fax (505) 998-0622
Technical Support (505) 344-9679
www.polarusa.com
1
Page 2

Table of Contents a
SECTION 1: SETTING UP YOUR BODYAGETM SYSTEM....... 3
REQUIREMENTS AND RECOMMENDATIONS.................................................................................. 4
UNPACKING YOUR BODYAGE SYSTEM....................................................................................... 5
ACCESSORIES .............................................................................................................................. 6
Hardware Upgrades...............................................................................................................7
Software Upgrades................................................................................................................. 8
Available Accessories............................................................................................................. 8
TriFIT Interface Connections................................................................................................. 9
Printer .................................................................................................................................... 9
Monark Bike......................................................................................................................... 10
Magnum Bike & Trackmaster Treadmill..............................................................................10
Tanita BF-350 Bioimpedance............................................................................................... 10
SECTION 2: OPERATION OF YOUR BODYAGETM SYSTEM
...................................................................................................................................................... 11
RECOMMENDATIONS FOR STAFF ............................................................................................... 12
TURNING ON THE POWER .......................................................................................................... 13
START UP.................................................................................................................................. 14
SHUTTING DOWN ...................................................................................................................... 15
SETUP DEFAULTS FOR FIRST TIME USE..................................................................................... 16
General Defaults .................................................................................................................. 16
Blood Pressure Defaults....................................................................................................... 17
Body Composition Defaults.................................................................................................. 17
Cardiovascular Defaults....................................................................................................... 18
CALIBRATION............................................................................................................................19
Platform Calibration............................................................................................................20
Skinfold Calipers.................................................................................................................. 22
Range of Motion................................................................................................................... 24
Monark 828 Bike .................................................................................................................. 25
SECTION 3: TRAINING & REGISTRATION..................................... 27
TESTING RECOMMENDATIONS................................................................................................... 28
TEP BY STEP TRAINING FOR THE BODYAGE............................................................................29
S
O
N-SCREEN TUTORIAL AND VIDEO TRAINING .......................................................................... 29
RACTICAL TESTING ................................................................................................................. 29
P
WARRANTY AND TECHNICAL SUPPORT INFORMATION............................................................. 29
RANSPORTING YOUR BODYAGE
T
TM
SYSTEM............................................................................ 31
SECTION 4: SUPPORT.......................................................................................... 32
TROUBLESHOOTING .................................................................................................................. 33
Computer will not turn on .................................................................................................... 33
Computer comes on, but the monitor does not ..................................................................... 33
Printer will not come on or print.......................................................................................... 34
On-Line Peripherals.............................................................................................................35
T
ECHNICAL SUPPORT ................................................................................................................ 37
ETURN AUTHORIZATION ......................................................................................................... 38
R
P
OLAR/HEALTHFIRST CORPORATION WARRANTY....................................................................39
ICENSE AGREEMENT ............................................................................................................... 40
L
2
Page 3

Section 1: Setting Up Your BodyAgeTM System
In this section
• The BodyAge System
• Facility Requirements
• Packing Lists
• Unpacking the System
• Assembling the System
3
Page 4
Requirements and Recommendations
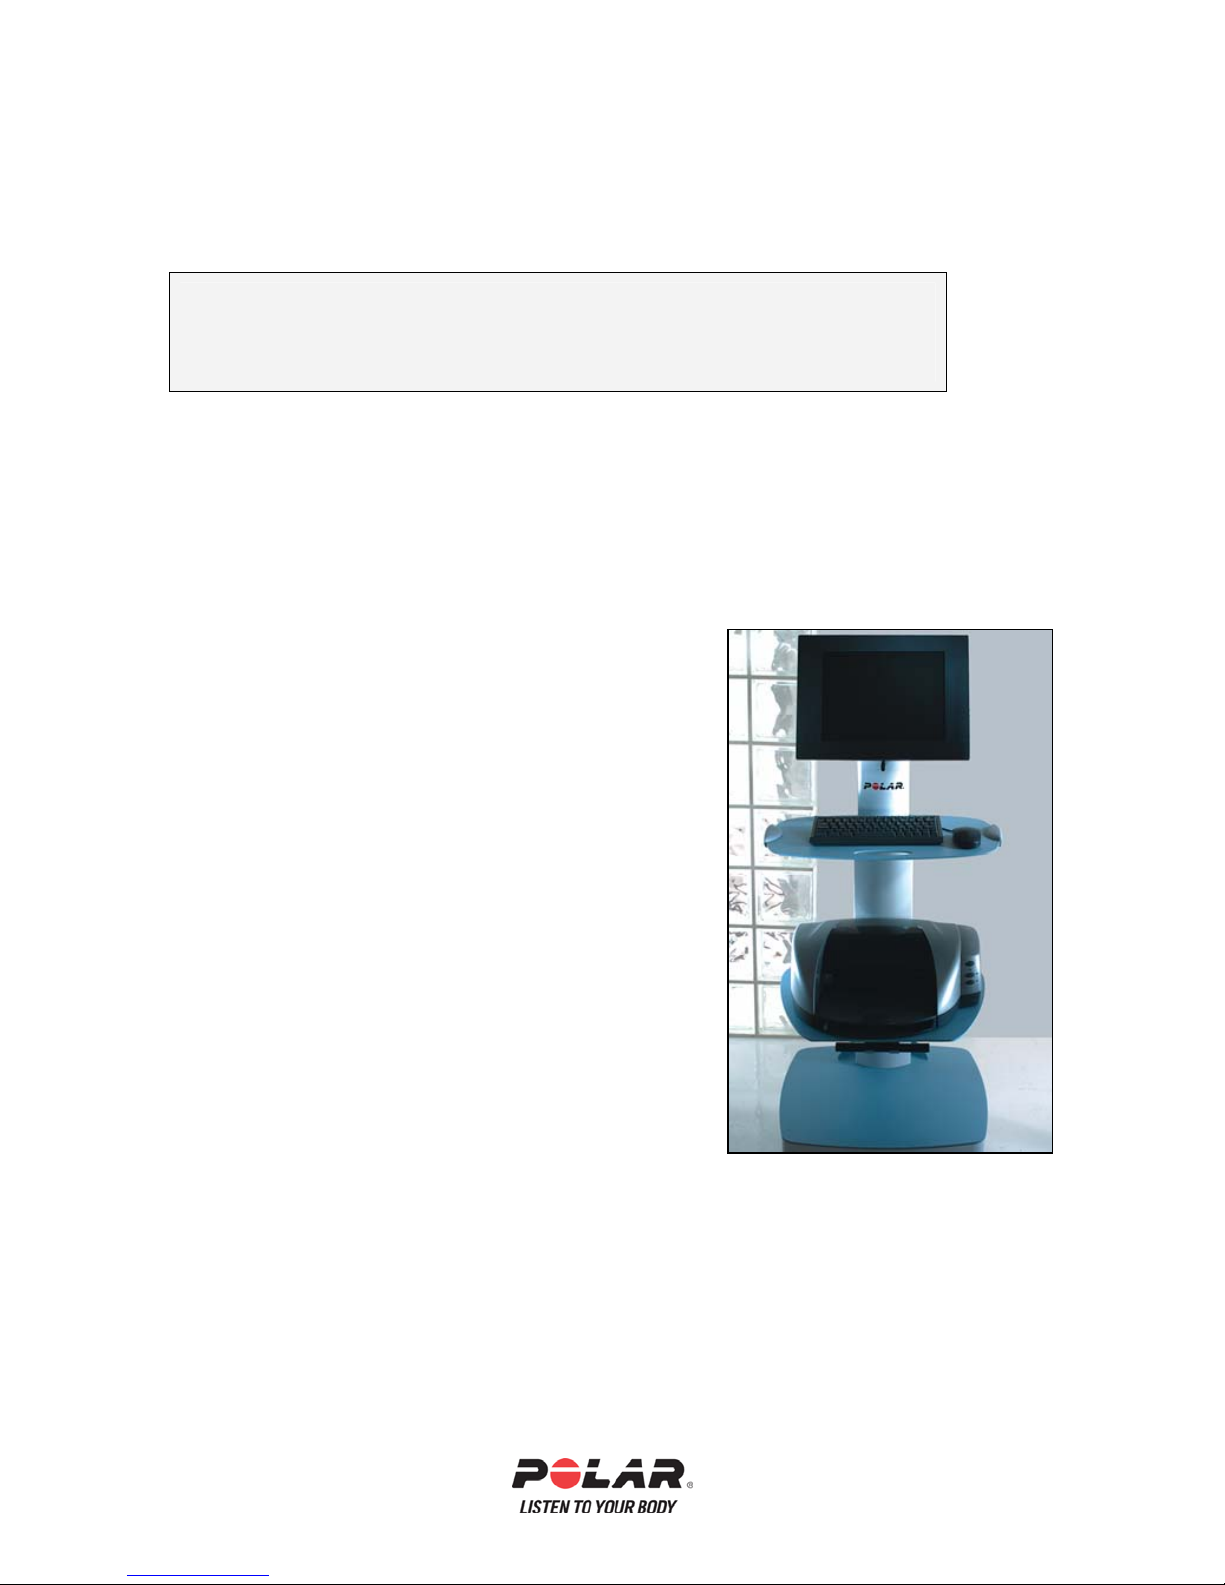
The BodyAge System is designed to gather, process, interpret and display
fitness and wellness data. The BodyAge System was designed to be used
by exercise professionals and physical educators.
These items are necessary to operate the BodyAge System :
• 120 Volt Power outlet, highly recommended to be a dedicated line. A
dedicated line is where only one circuit is servicing the outlet.
These items are recommended:
• Private/quiet environment for fitness testing.
• Cool temperature (72°F), moderate humidity and
good air circulation (fan recommended for bike &
treadmill testing).
• Telephone with outside line for emergency access
and technical support.
• Flat, firm surface for the platform/scale.
4
Page 5
IMPORTANT !
If any item was damaged in shipment, report the
damage within 24 hours to the shipping agent that
delivered your system. You must hold the original
carton and damaged item for inspection – otherwise no
claim can be honored by the shipping agent or by
Polar/HealthFirst.
Unpacking Your BodyAge System
Once the system is out of the shipping container and on the floor;
• Remove all packing materials.
• Move the scale and any boxes off of the cart.
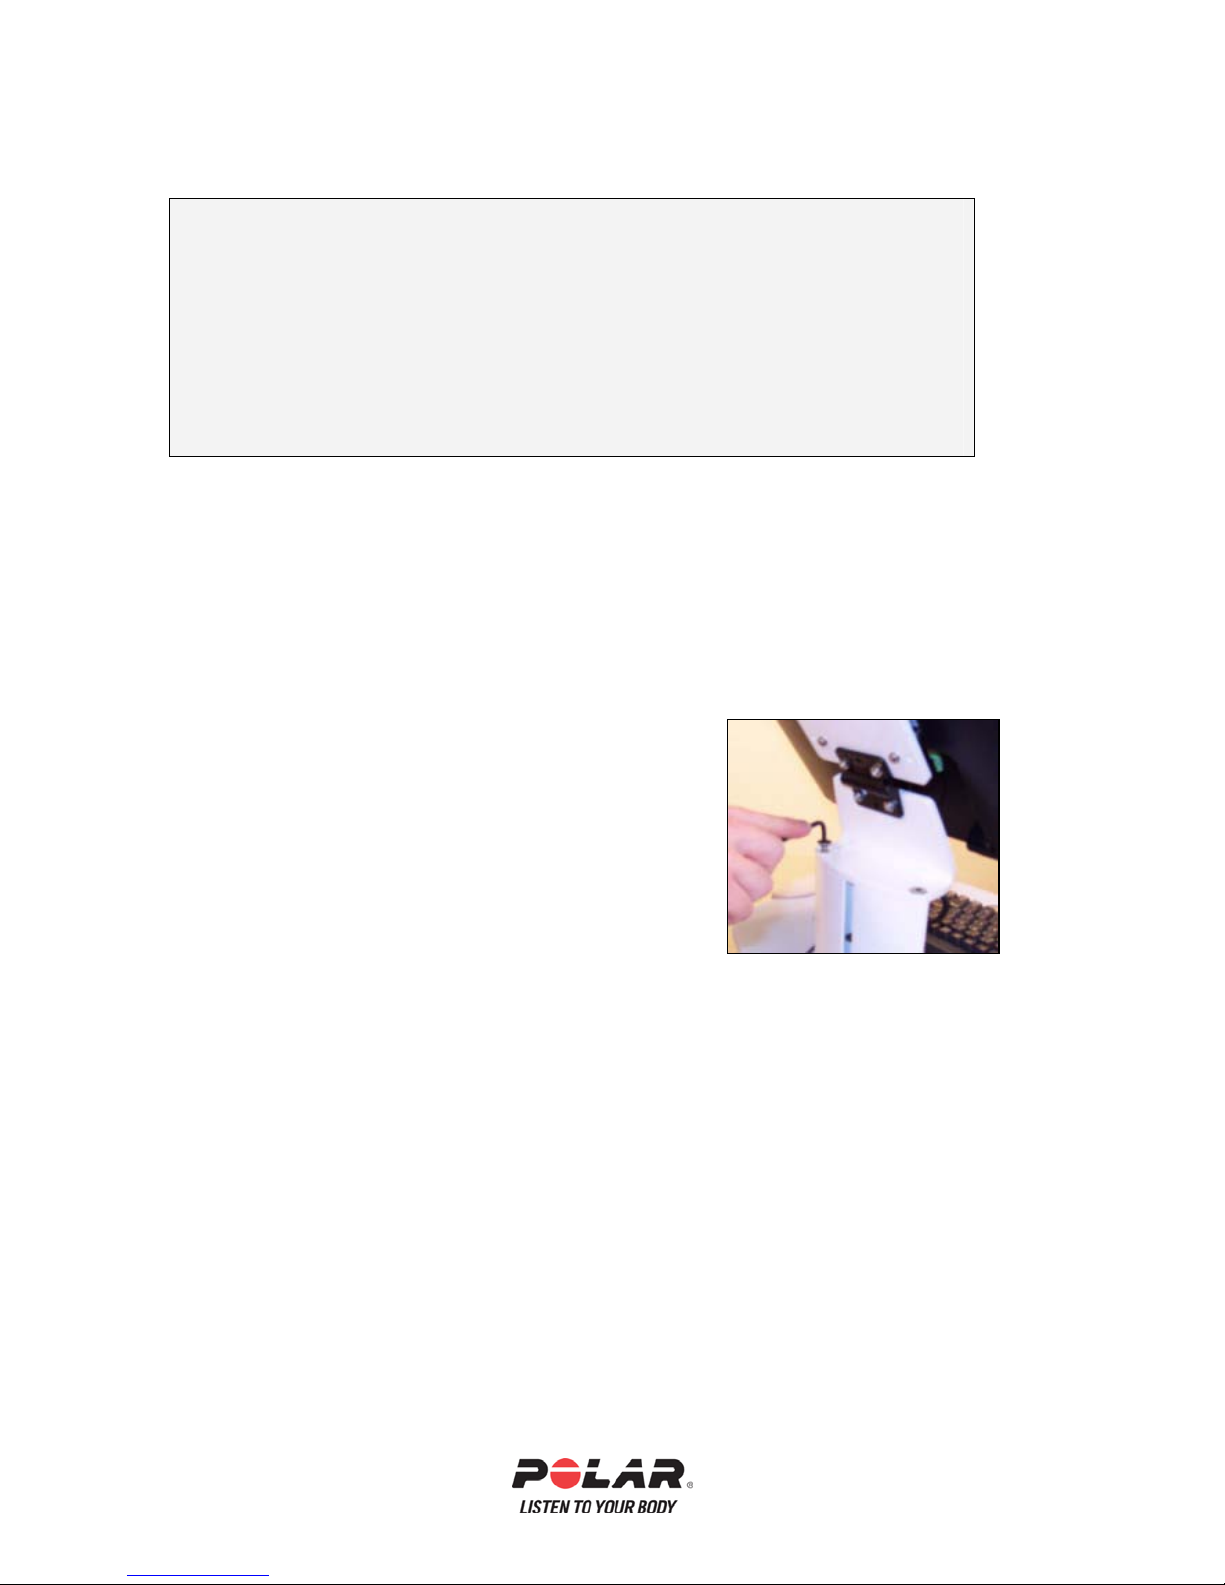
• Mount the monitor onto the main post, being
careful not to pinch any of the cables (see
photo).
5
Page 6
Accessories
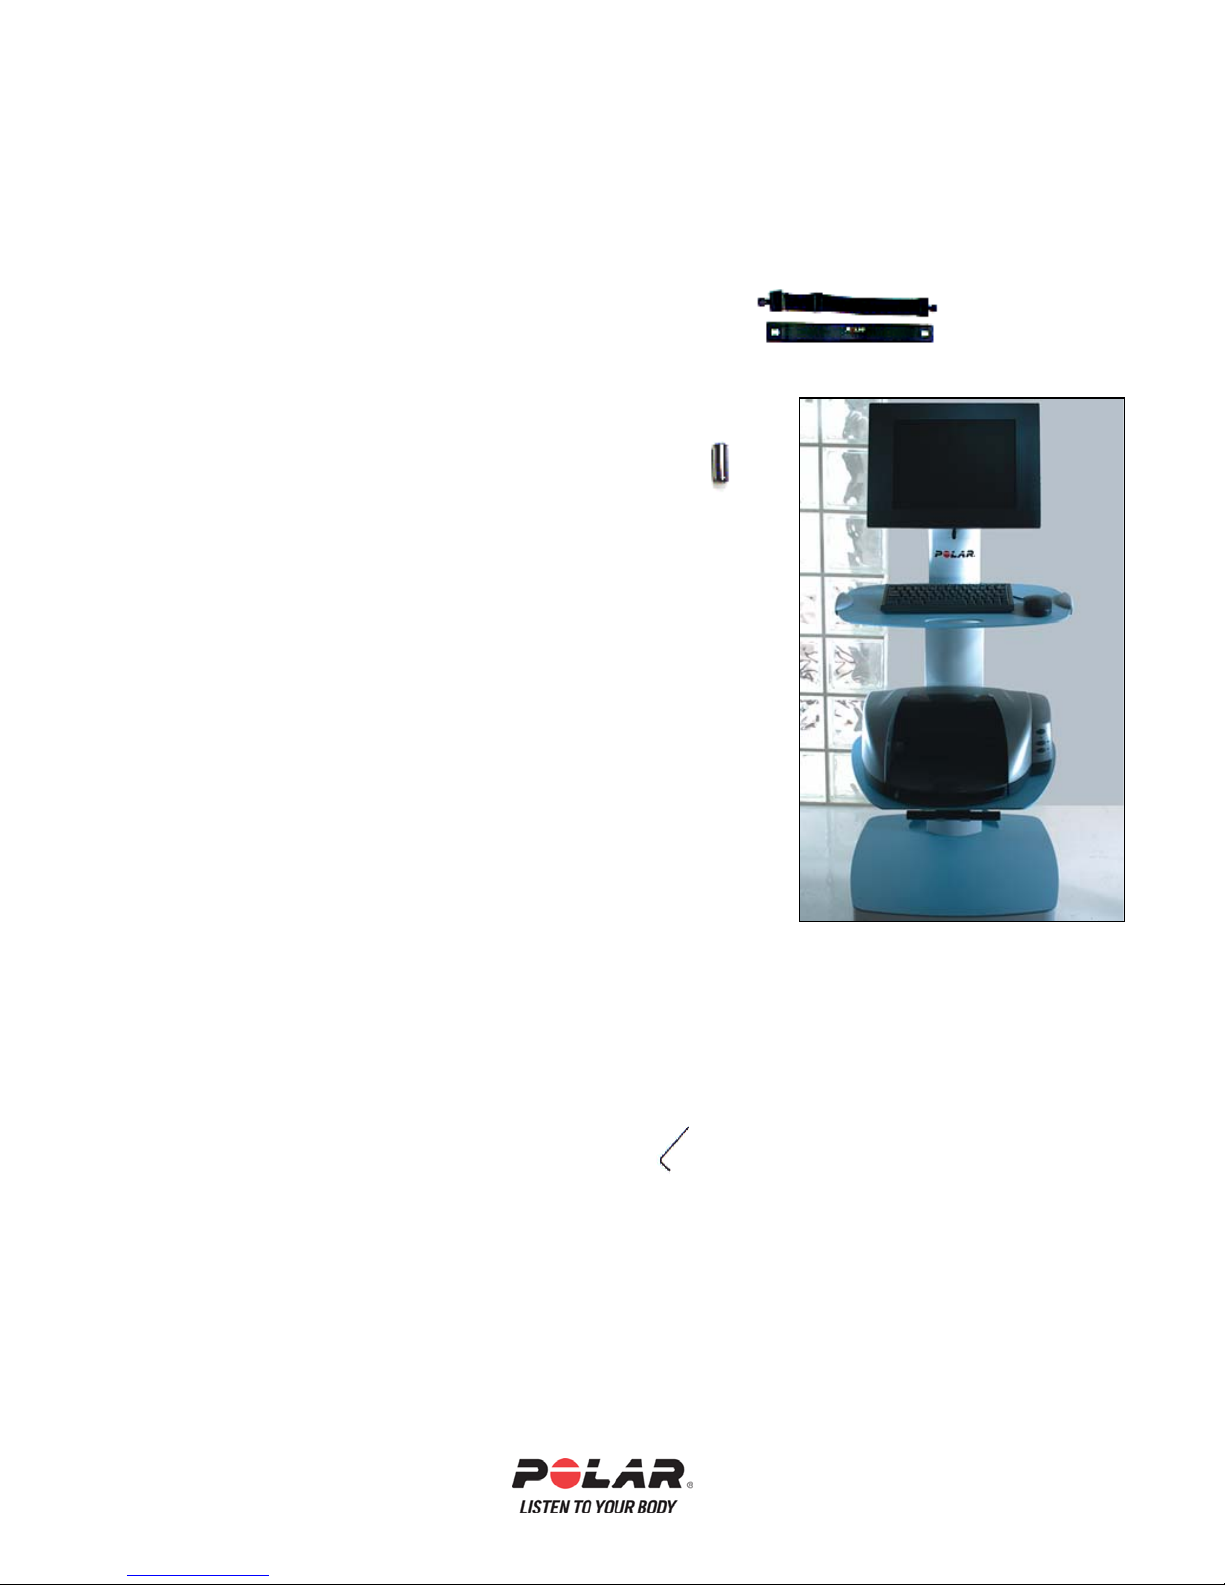
The following is a list of all the items included with your system. These are
standard items included with every system. You may have other items as part of
you individual order.
1. Polar heart rate transmitter belt and elastic strap
2. Strength handle and strength strap assembly
3. On-line Skyndex Skinfold calipers w/calibration
dowel as shown on the caliper hanger on the
monitor tray. (Lange calipers are an optional
upgrade)
4. 15” Flat Panel LCD monitor w/speakers
5. Keyboard
6. Mouse
7. Hewlett Packard DeskJet printer
8. 6 foot power cord attached for the cart power
9. BodyAge System computer installed in the cart (if
ordered)
10. BodyAge System cart with integrated range
of motion (ROM) unit
11. Heart rate receiver and 8’ HR cable
(if no bike was purchased).
If bike was purchased, a split receiver/RPM cable is included
12. Platform/scale
13. 2 Allen wrenches for assembly/repair.
14. BodyAge System Fitness Assessment software
6
Page 7
Hardware Upgrades
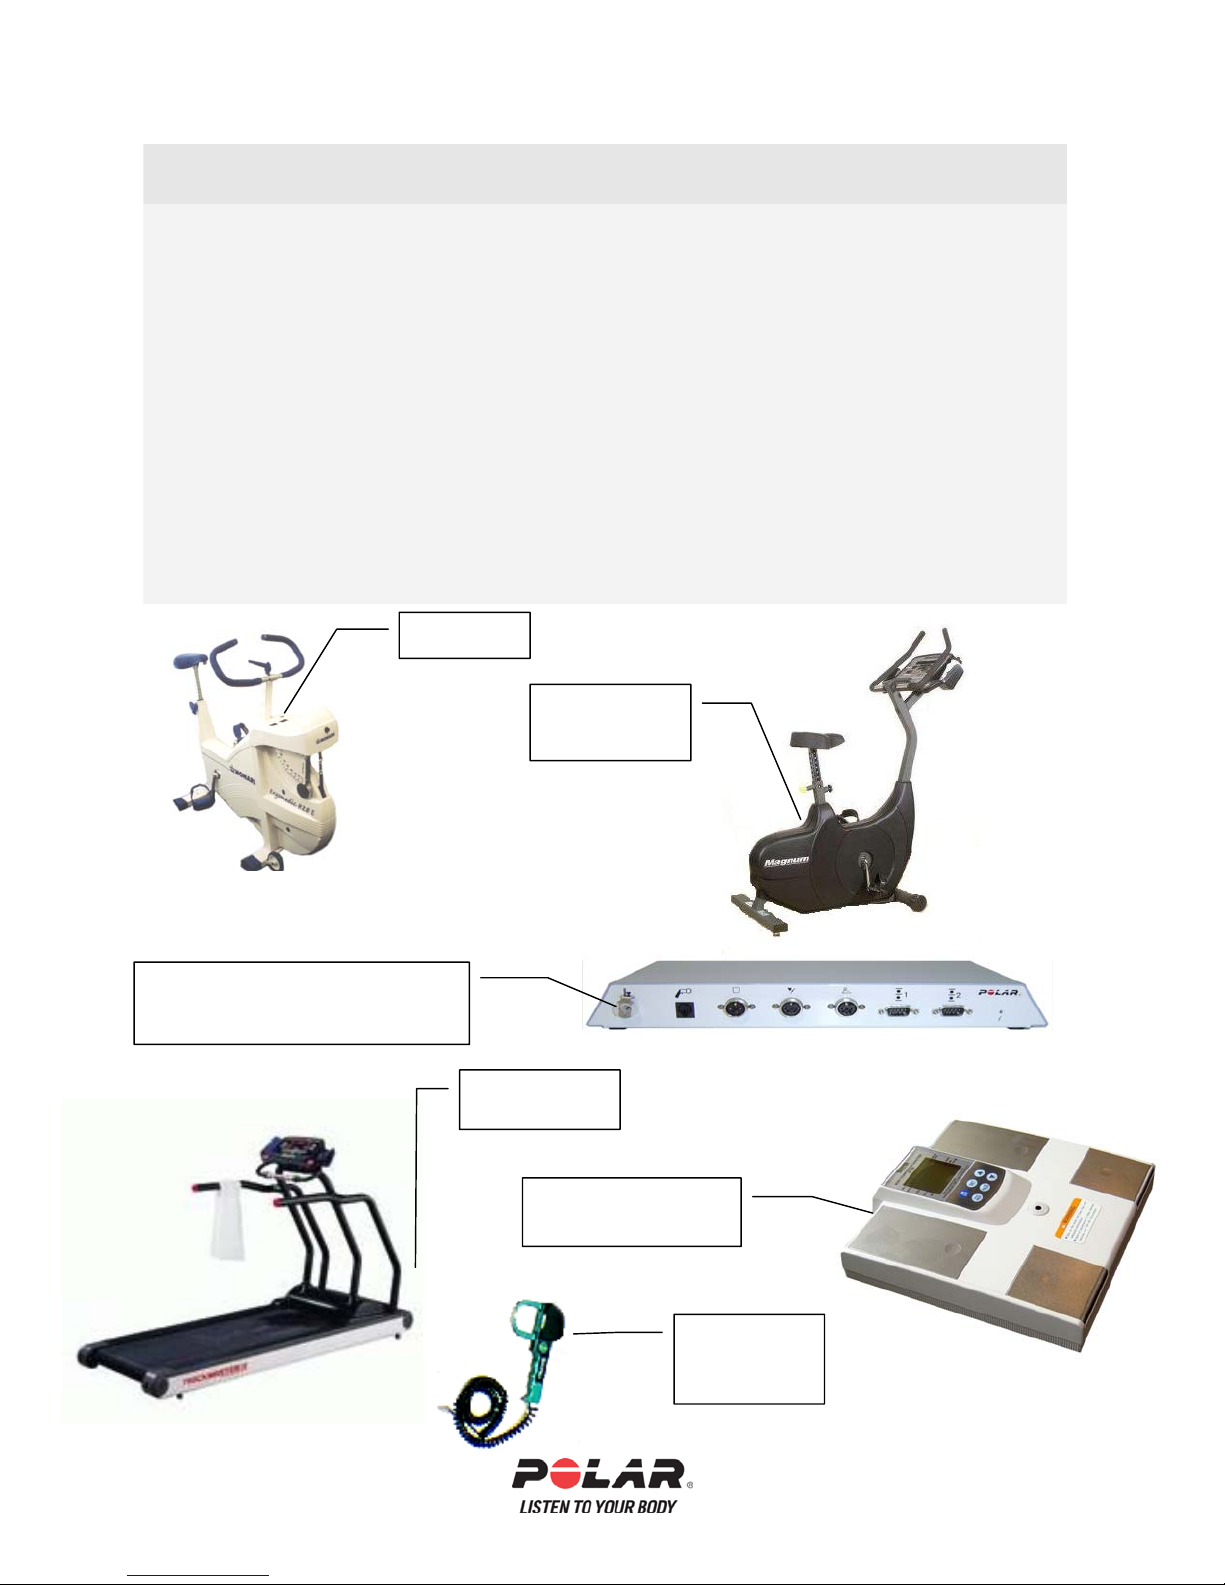
• Monark 828E Bicycle Ergometer
(includes custom Polar Heart Rate Receiver/RPM interface cable)
• Magnum Bike (with serial hook up into computer)
• Trackmaster treadmill (includes 15 foot treadmill interface cable)
• Lange skinfold calipers
• Blood pressure. Includes a blood pressure device factory installed in the TF700IU
interface, factory installed software and three blood pressure cuffs (small, medium, large)
• Network ready (includes PCI network card or onboard NIC, factory installed in computer,
and a 15’ twisted pair network cable)
• Networked systems of 2 or more (includes network hub specified at time of purchase and
a 15’ twisted pair network cable per system)
• Hewlett Packard printer upgrade (laser or upgraded color)
Monark 828
Blood Pressure
The Polar BodyAge Blood Pressure Unit
is factory installed in the TF700IU.
Magnum
Upright Bike
TrackMaster
Treadmill
Tanita BF-350
Bioimpedance scale
Lange Skinfold
Calipers
7
Page 8

Software Upgrades
• Health Risk Appraisal (HRA) module
• Group Report module
• Meal Planner
• Template Builder
• Network Version (2-5, 10, 25, 99 user license)
• Nutritional Analysis (Nutritionist Pro)
Available Accessories
• Additional Polar heart rate transmitter belt
• Additional Polar elastic belts (available in small and XL)
• Marketing program for Fitness Centers/Health Clubs
8
Page 9
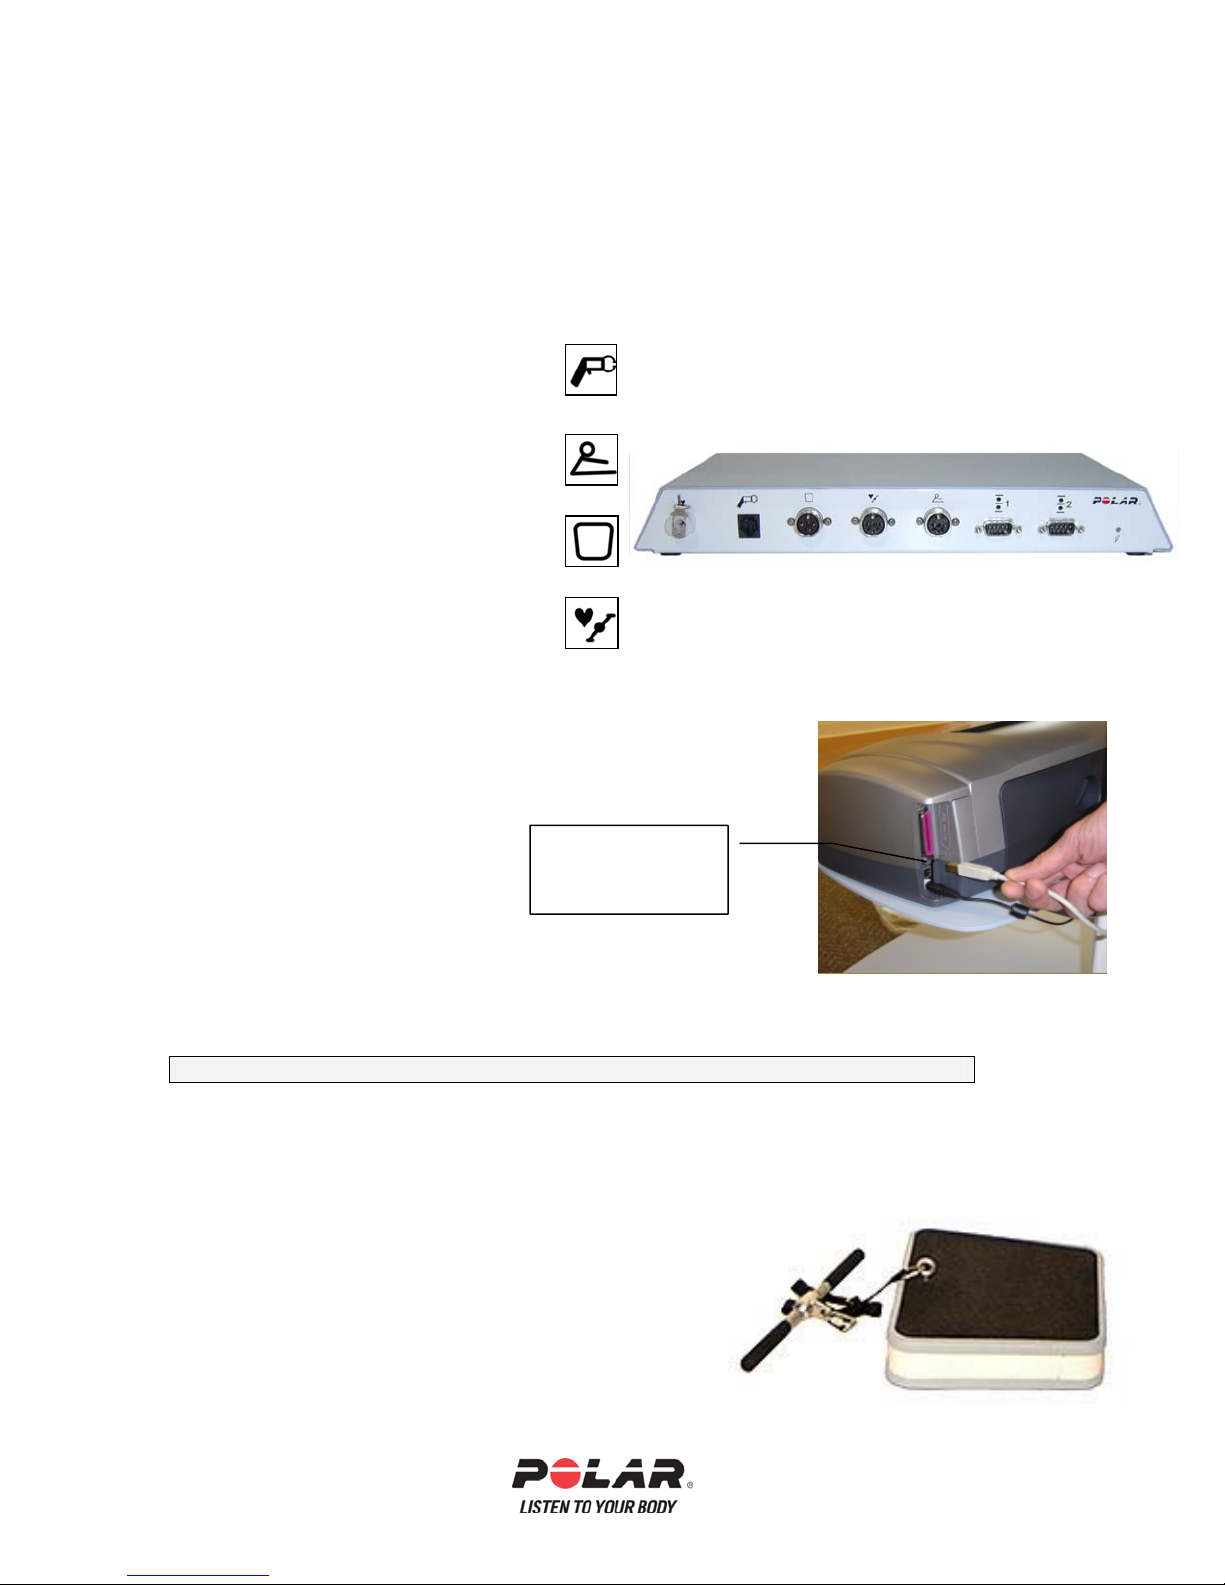
ASSEMBLING THE BodyAge System
TriFIT Interface Connections
Noting that the interface box is secured to the top of the computer with a velcro
strip, verify that the following peripherals are connected to the TF700IU
interface:
• Skinfold Calipers
• ROM (Range of Motion)
• Platform
• Heart Rate Cable/RPM
cable interface
Printer
• Plug the power and data cables into the printer.
Plug in Printer
Power and USB
Cables
Using the main power cable, plug the system into a 120VAC wall
outlet. Power is applied to the system via the switch located on
the left rear of the cart.
Always use the System Main Power Switch to turn the entire system on and off.
PLATFORM/SCALE
• Attach the “C” connector on the strength strap
assembly to the strength handle. Make sure it is
tightened all the way.
• Check the strap for any wear or defects before
each use, as this could cause injury to the client
being tested on the Biceps Strength Test.
9
Page 10
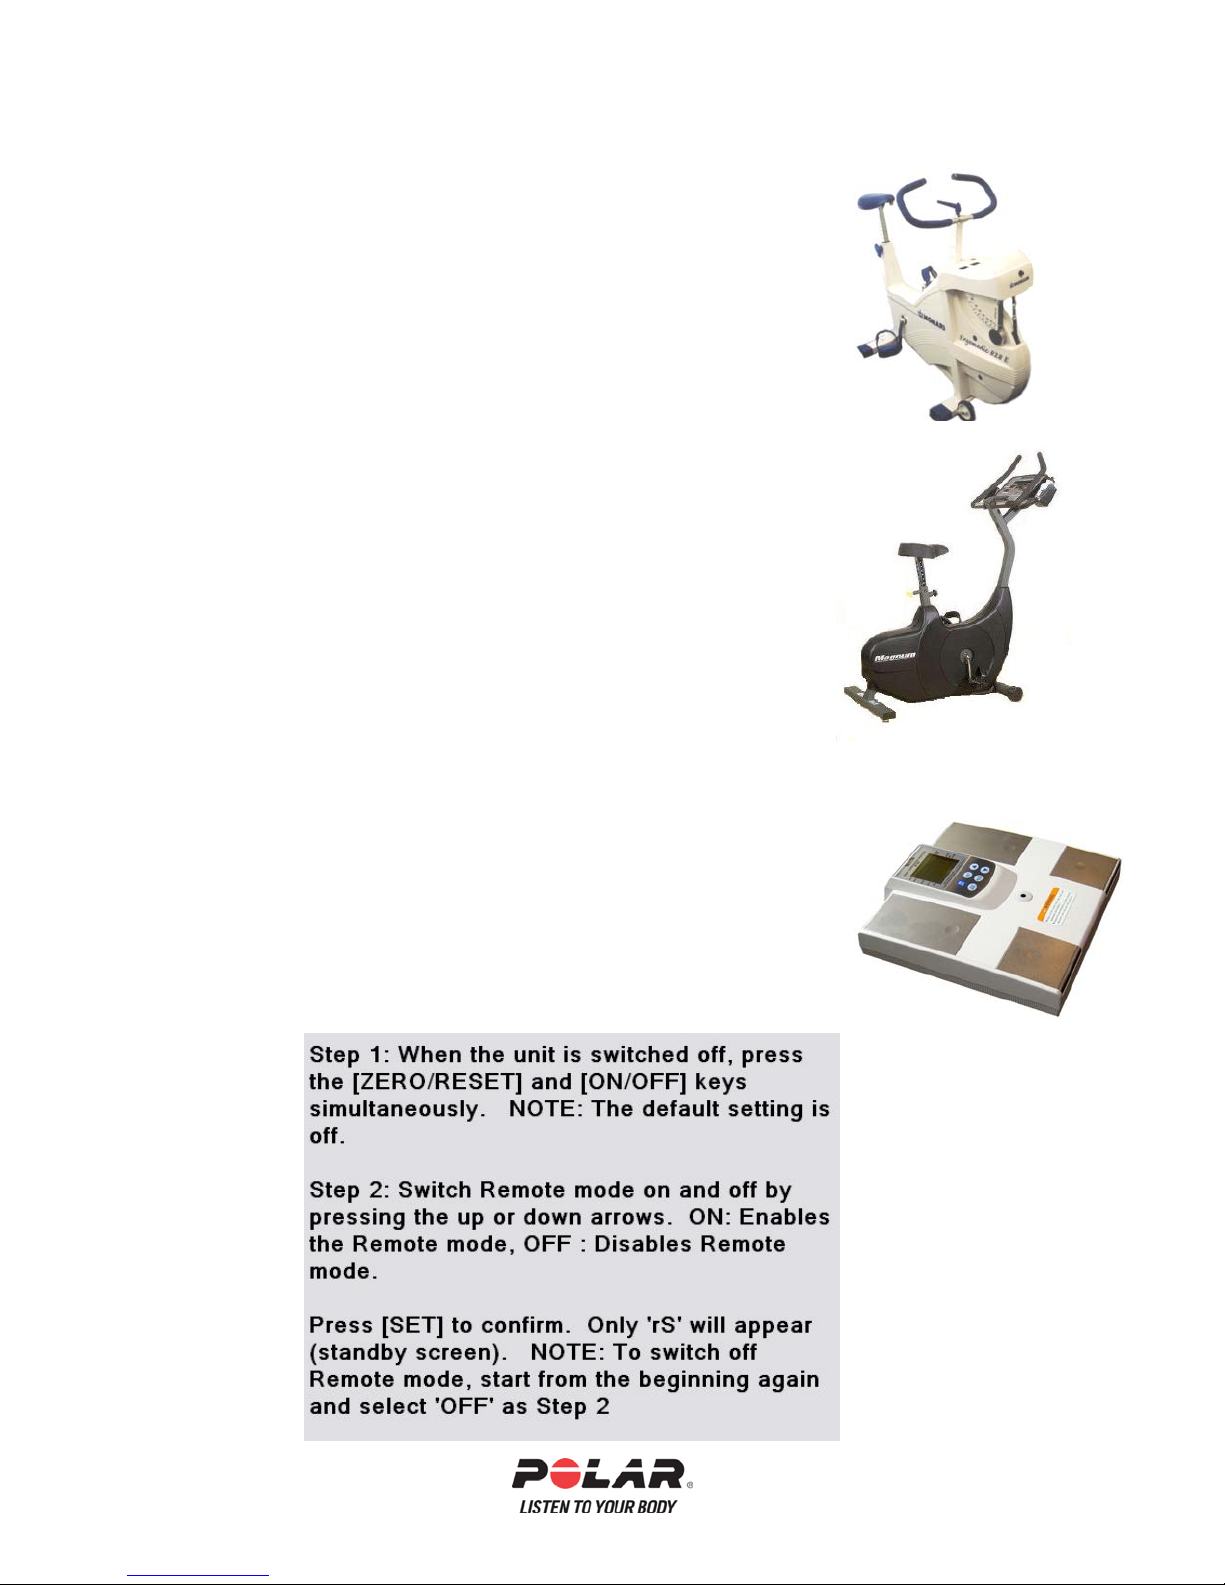
Monark Bike
If a Monark 828E was purchased with your TriFIT 700 system, you
will receive a Bike interface split cable. This cable plugs into the
TriFIT 700 interface unit where it is labeled with the heart and
pedals icon. Position the split end that holds the Polar receiver per
the set up instructions included with the cable. Refer to the
Instruction manual that came with the Monark 828 for assembly
instructions. To setup the cardiovascular defaults and/or calibrate
the Monark bike, see the next sections.
Magnum Bike & Trackmaster Treadmill
If a Magnum Upright bike was purchased with your TriFIT 700
system, you will receive a serial cable that plugs into the back of
the computer. You will need to set the Cardiovascular Defaults
under Environments to Magnum and the correct serial port, see
the section on Cardiovascular Defaults. the same steps apply for
the TrackMaster Treadmill.
Tanita BF-350 Bioimpedance
If a Tanita BF-350 Bioimpedance scale is purchased with your
TriFIT 700 system, you will receive a null modem serial cable that
plugs into either one of the device ports on the 700 interface box or
the back of the computer. You will need to set the Body
Compostion Defaults under Environments (they only appear if you
are licensed for Tanita) to the correct serial port (or device Port),
see the section on Body Composition Defaults. Before using the
Tanita with the TriFIT System it will need to be in Remote mode:
10
Page 11

Section 2: Operation of Your BodyAgeTM System
In this section:
• Recommendations for the operating staff
• Turning on the system power
• Shutting down the system
• Setting up for first time use
• Calibration
• Testing recommendations
• Training of the staff
• Transporting the system
11
Page 12

Recommendations for Staff
• It is recommended that ALL OPERATORS have a basic understanding of
Windows operating system. If not, it is recommended that the primary
operator take a course in the basic operation of Windows.
• Polar/HealthFirst Corporation recommends that ALL OPERATORS
complete the entire BodyAge System 4 tutorials (formerly known as TriFIT
tutorials). The tutorials can be accessed from the icons that are installed on
the desktop of the BodyAge System computer.
• Polar/HealthFirst Corporation recommends that the operator of the BodyAge
System be certified in CPR and hold a certification from the American
College of Sports Medicine (ACSM), American Council on Exercise (ACE),
or another national fitness certification organization.
12
Page 13
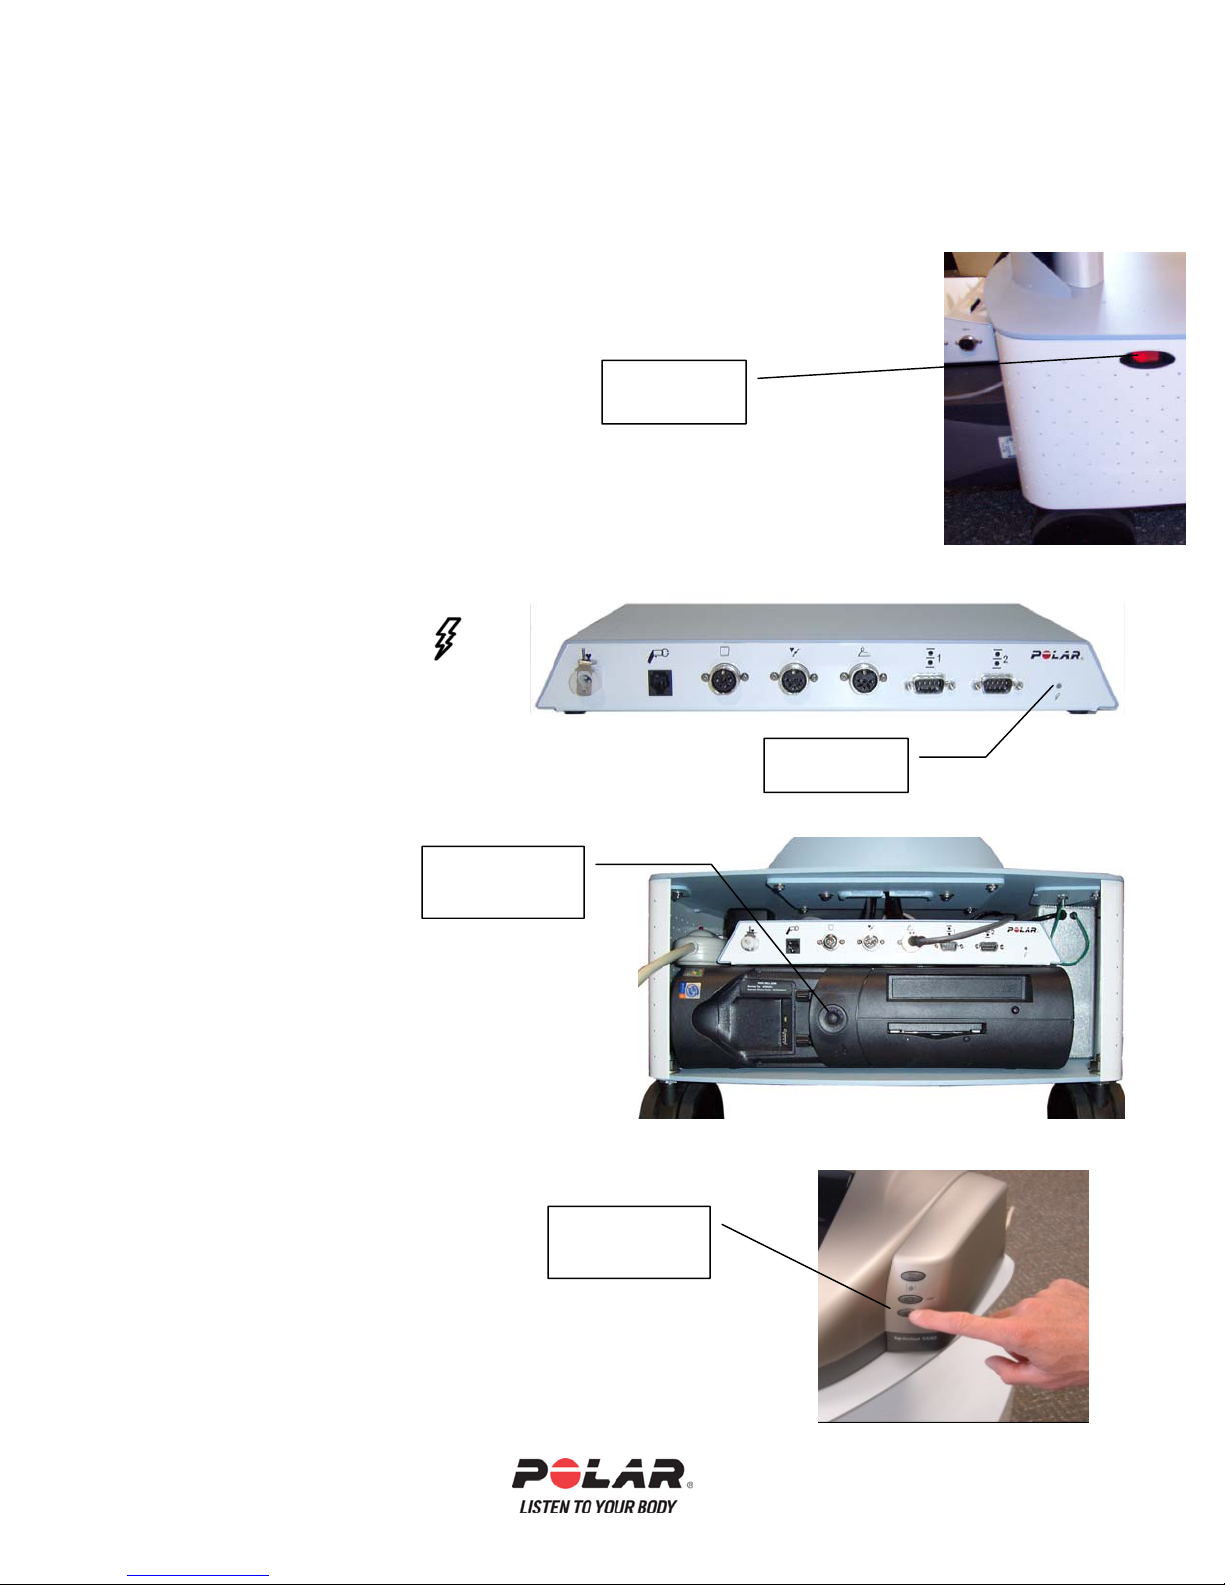
Turning on the Power
• After checking all the cable connections as outlined previously, you are ready
to turn on your system.
• Turn on the System Main Power switch located at the left side of the cart.
Main Power
switch
• When the power is applied to the unit, a green light should be on the
TF700iu above the power indicator and the box will make a start up
verification sound.
Green Light
• Turn on the CPU.
CPU Power
Button
• Turn the power to the printer on.
Printer Power
Button
• Turn on the monitor.
13
Page 14
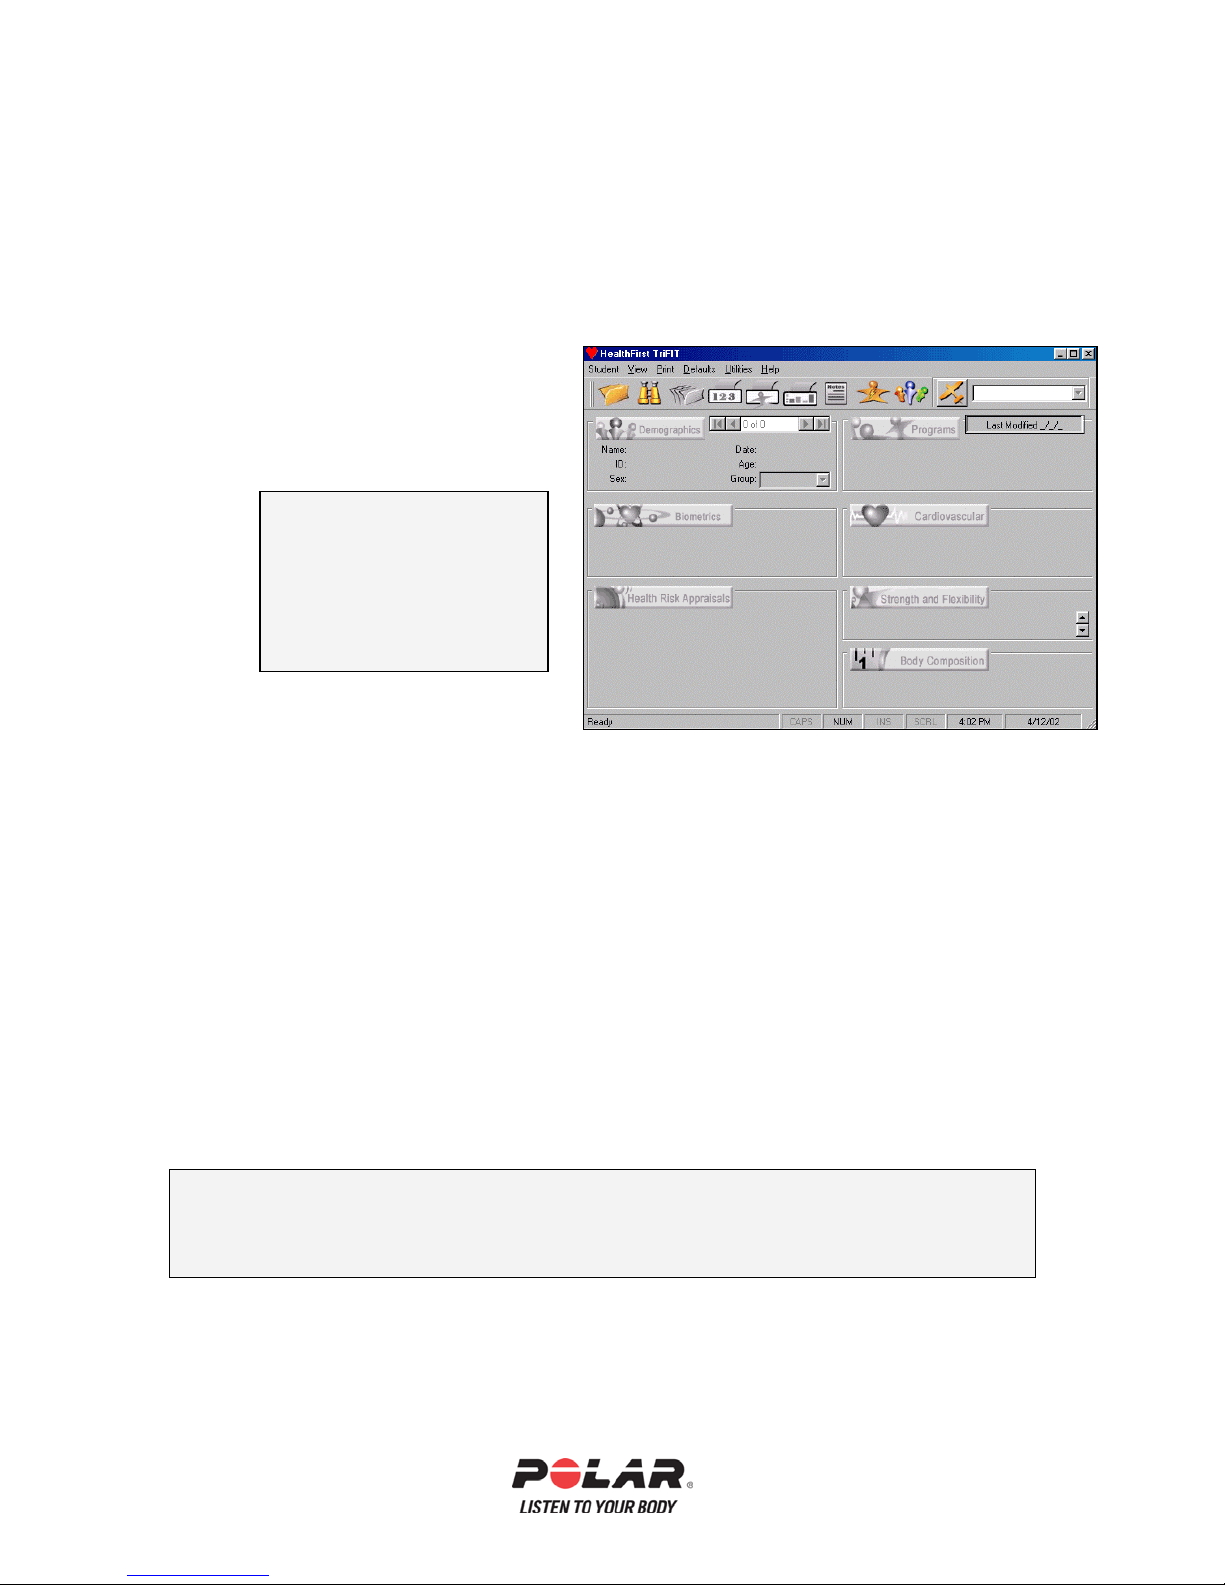
Start Up
F
You will see the BodyAge System software main screen after the BodyAge
System “boots up”. You can close or minimize the screen to open other
programs.
Personal View Main Screen
For testing individuals and
accessing the Wellness
Encyclopedia Topics.
This is the default view for
itness Center BodyAge System
DO NOT INSTALL ANY SOFTWARE OTHER THAN THE SOFTWARE
PROVIDED OR RECCOMMENDED BY Polar/HealthFirst Corporation, AS
THIS MAY CAUSE THE SYSTEM TO FAIL AND VOID THE WARRANTY.
14
Page 15
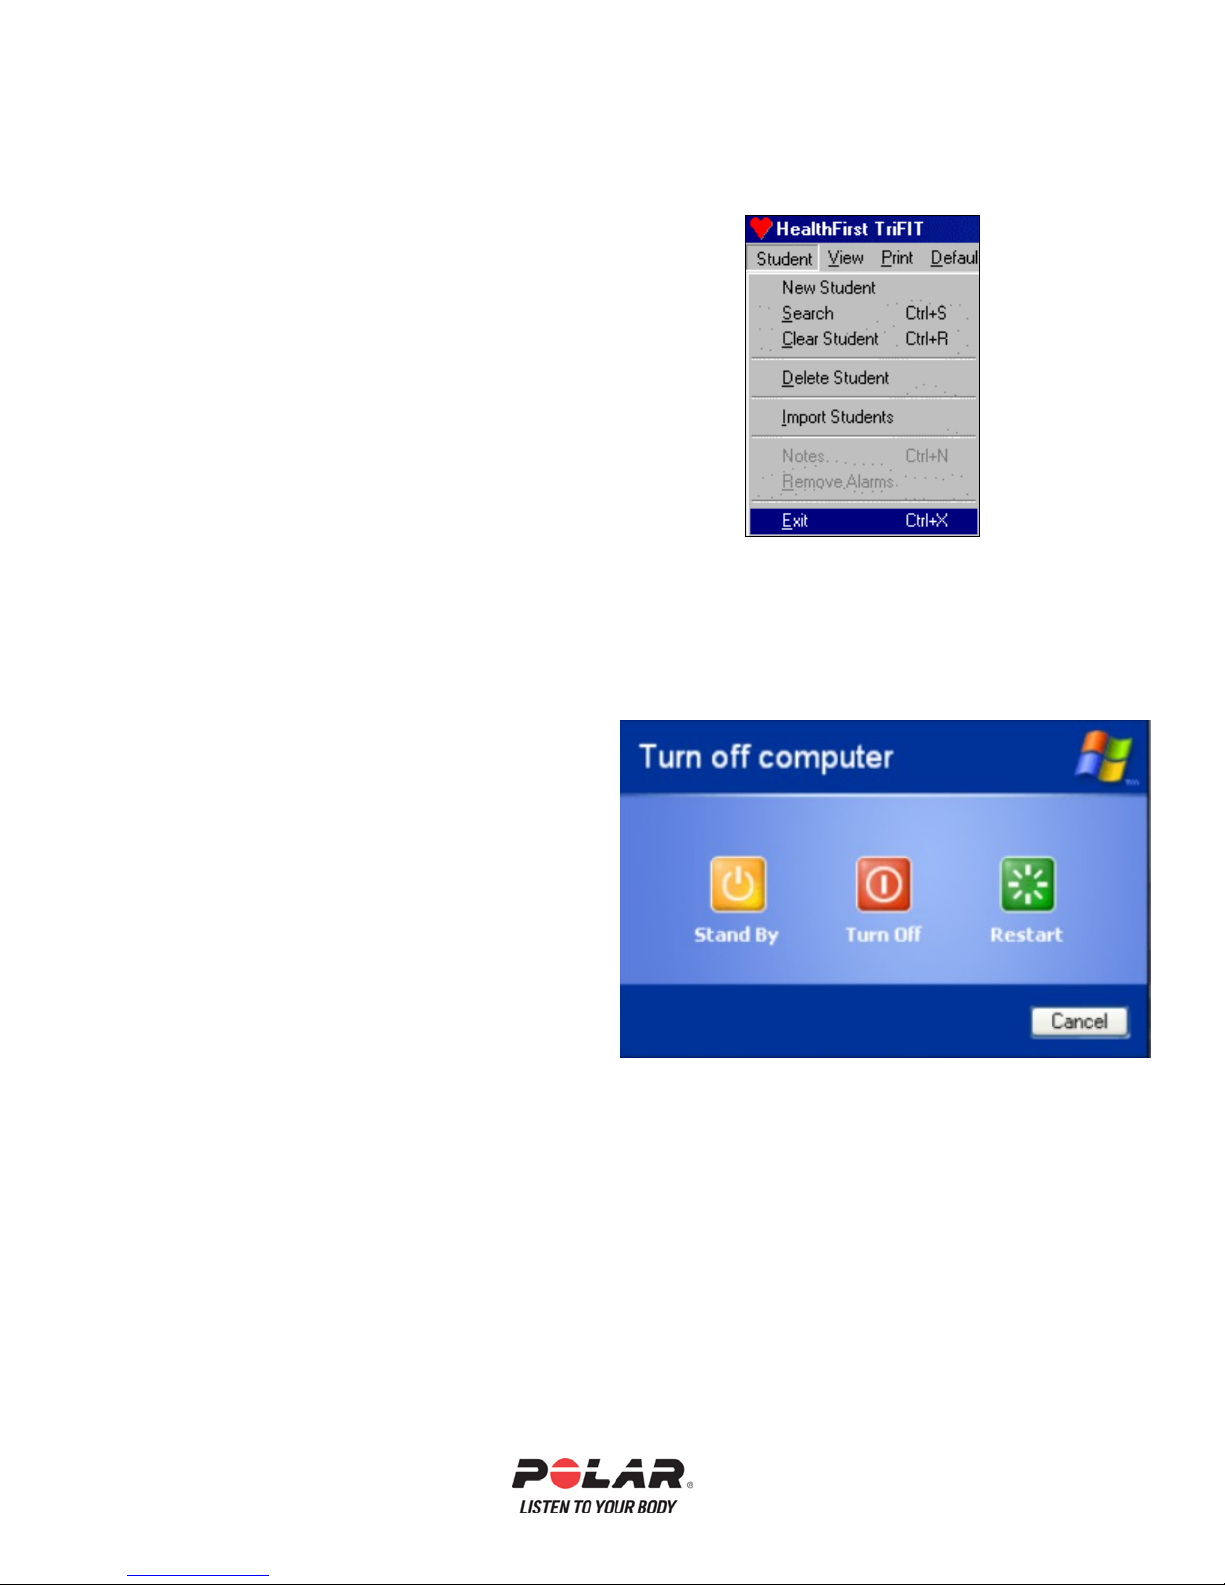
Shutting Down
To shut down the BodyAge System software, click the
“x” in the upper right corner, or go to “Client or
Student” and “Exit”.
Before turning off the power to the system, it is
important to shut down BodyAge System properly:
• Click the “x” in the upper right corner, or go to
“Client or Student” and “Exit” to Exit the BodyAge
System software.
• Go to Start at the bottom taskbar and go
to “Turn off”, click OK. The computer
will turn itself off.
• Now, turn off the power to the printer,
by pressing the printer power button
located on the front of the printer (if
you do not do this, you will get an error
when you turn the system on next
time).
• Turn off the main power on the left side
of the cart.
15
Page 16
N
Setup Defaults for First Time Use
General Defaults
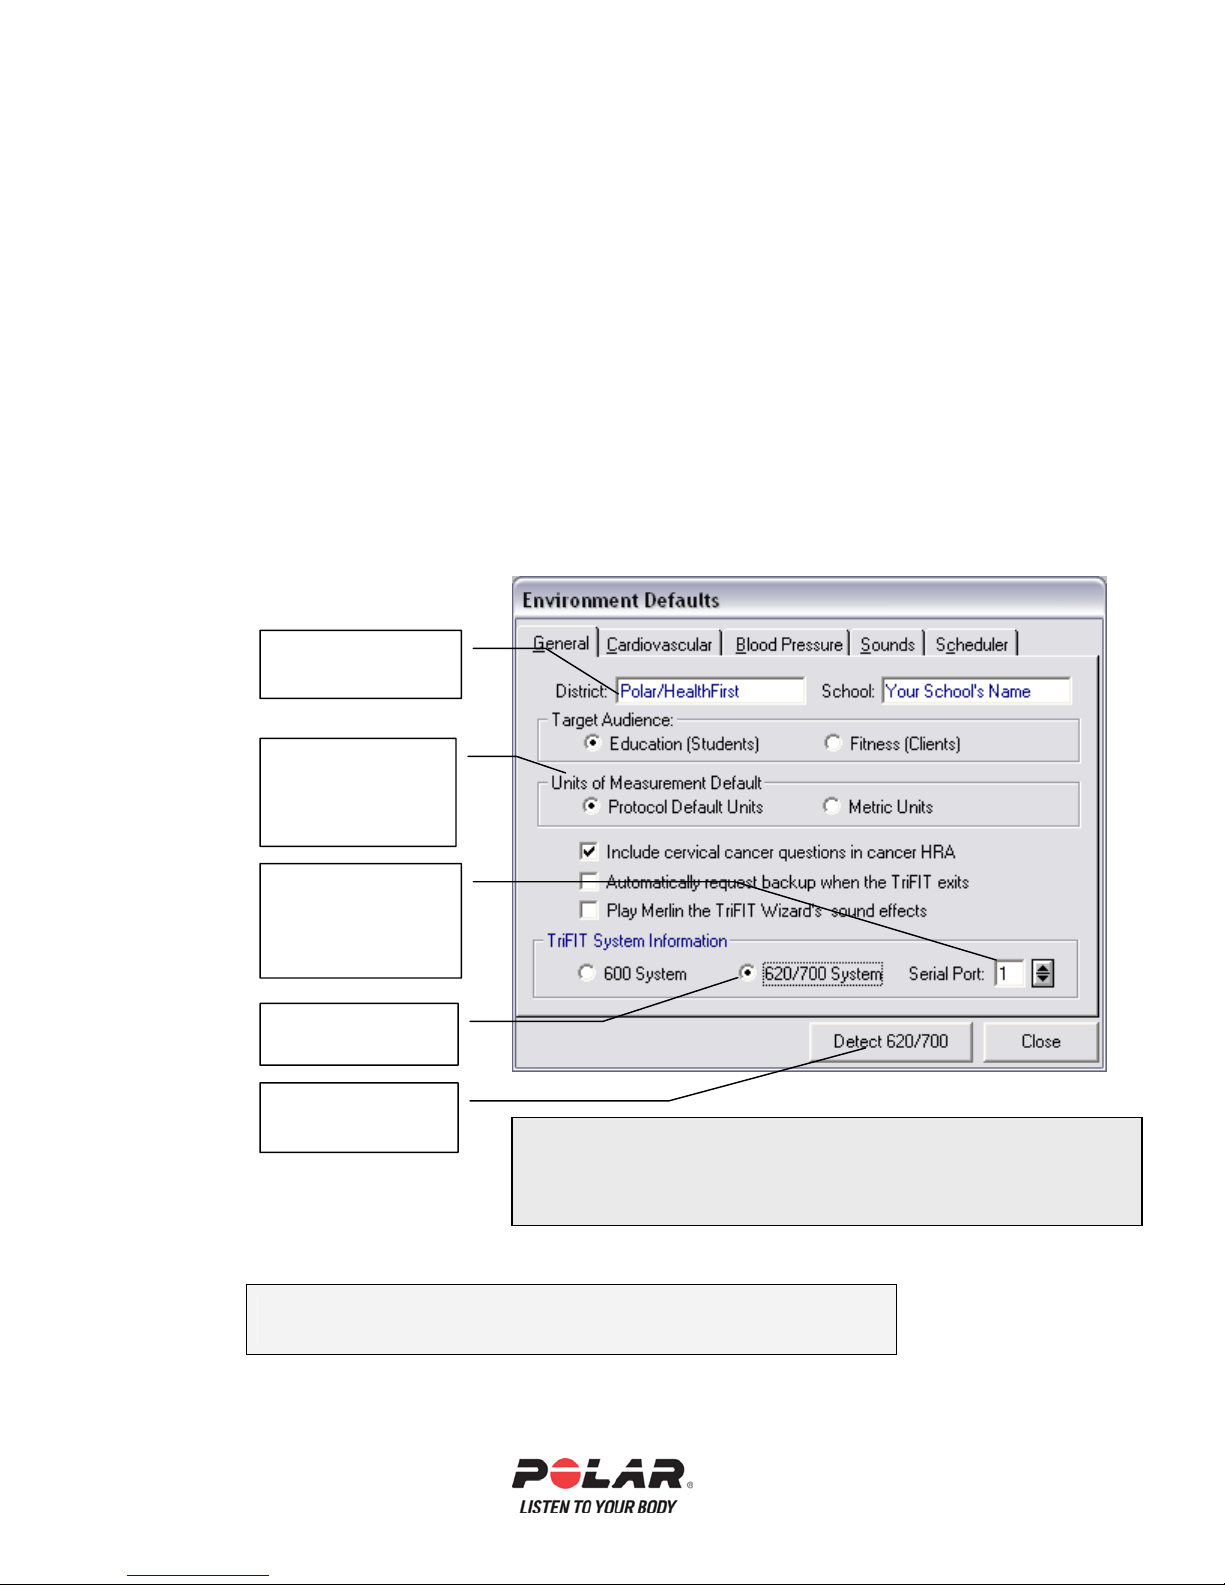
• 620/700 System should be selected, NOT 600.
• Complete the Company Name or District Name and Facility Name or
School Name. These will be printed on the Cover Sheet of the reports
you generate and at the bottom of each report page.
• The units of measurement can also be changed to strictly Metric units or
the default units for each test protocol.
• Click the Detect 620/700 button.
ames that print on
reports
Choose which units
of measurement you
would like to use
The Serial Port that
the TF700IU is using
620/700 System
should be selected
Detect 700IU and
Version #
Target Audience: Switching between Education and Fitness changes terms from
Students to Clients and User Field descriptions from Teacher and Period to Trainer
and Referral, etc. WARNING: This will change the fields and may prevent
sorting. Change this only if you are sure this is what you want.
Pressing F1 at any time while in the BodyAge
software will activate the on-line help.
16
Page 17
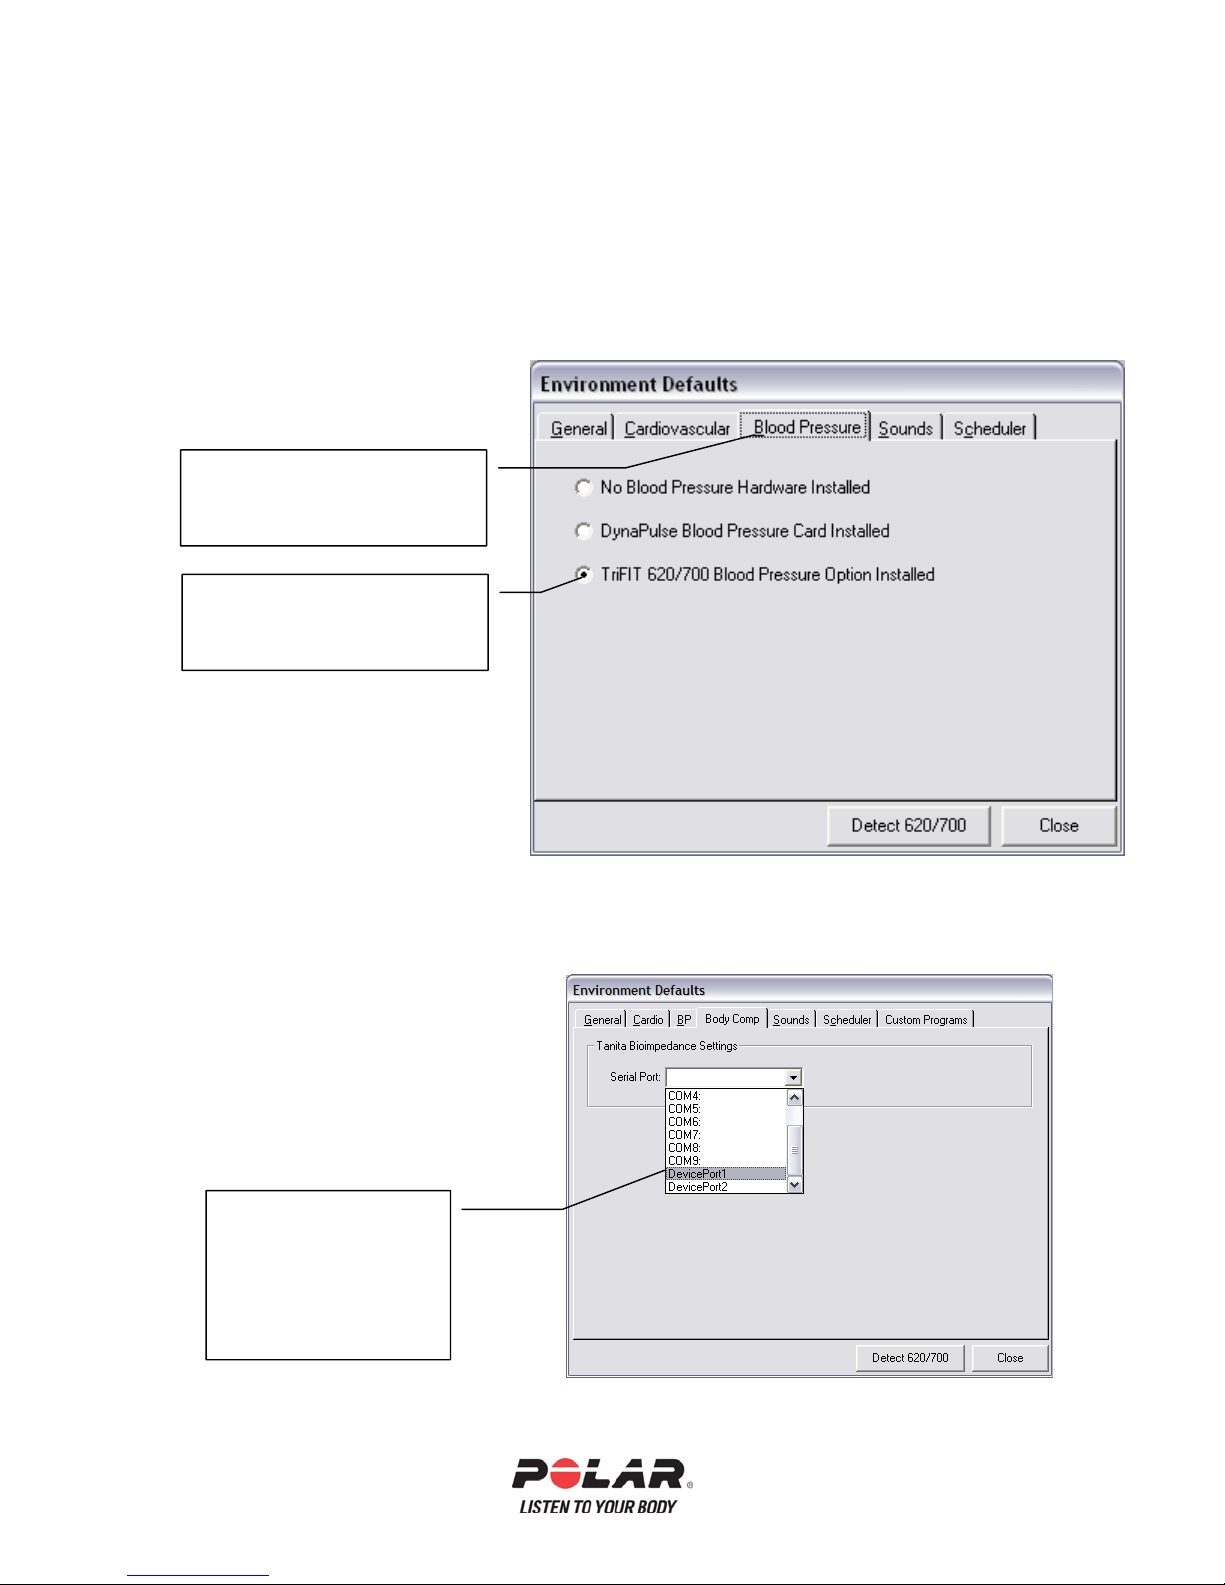
Blood Pressure Defaults
B
I
S
P
f
The Blood Pressure Defaults have been factory set, but if for some reason they
have been re-set, follow these instructions. If you do not have the Blood
Pressure option, go to the next section.
Step 1
While still in
Defaults/Environment, click
on the Blood Pressure Tab.
Select TriFIT 620/700
lood Pressure Option
nstalled.
Body Composition Defaults
If you are licensed for the Tanita Bioimpedance, another tab will appear called
Body Composition:
Make sure the Tanita scale is
set to Remote Mode (see the
TriFIT Assembly section for
more info) and turned on.
elect the Device
ort # or Com port
that the null modem
cable
rom the Tanita
is plugged into.
17
Page 18
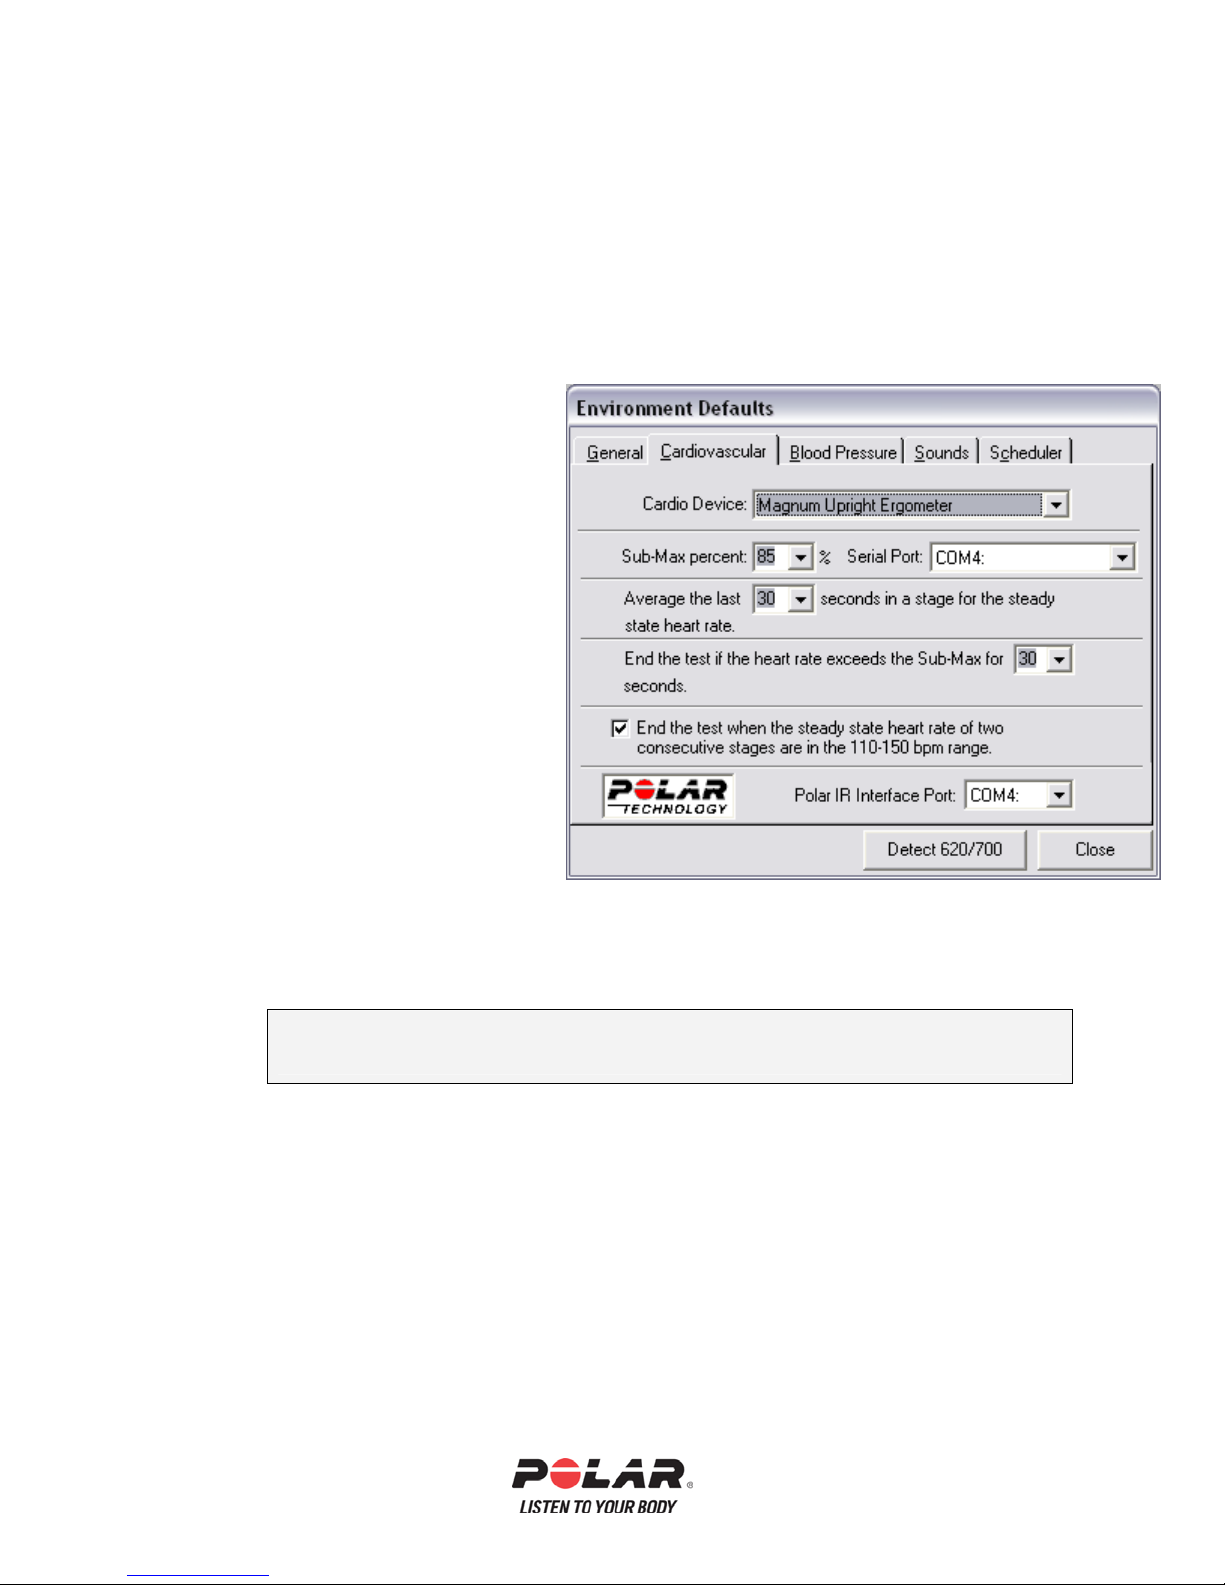
Cardiovascular Defaults
While still in the Environment Defaults, click on the Cardiovascular Tab. Select
the Cardio Device that you will be using and select the Serial Port that it is
connected to. It is recommended to keep all other defaults.
• The Sub-Max Percent
default is 85%. The test will
end when the client achieves
85% of their max heart rate as
estimated from 220-age.
• Average the last 30 seconds
in a stage for the steady state
heart rate is default. This is to
get as close to the clients
steady state HR by taking the
last 30 seconds rather than the
entire 3 minute stage.
• End the test if the heart rate
exceeds the Sub-Max for 30
seconds is default. This is a
buffer system to account for
spikes in the heart rate and to
avoid stopping the test before
the client actually gets to the
85% of the estimated Max HR.
The Monark bike may need to be mechanically calibrated and will be
covered in the next section, or refer to the Monark 828 Instruction Manual.
18
Page 19
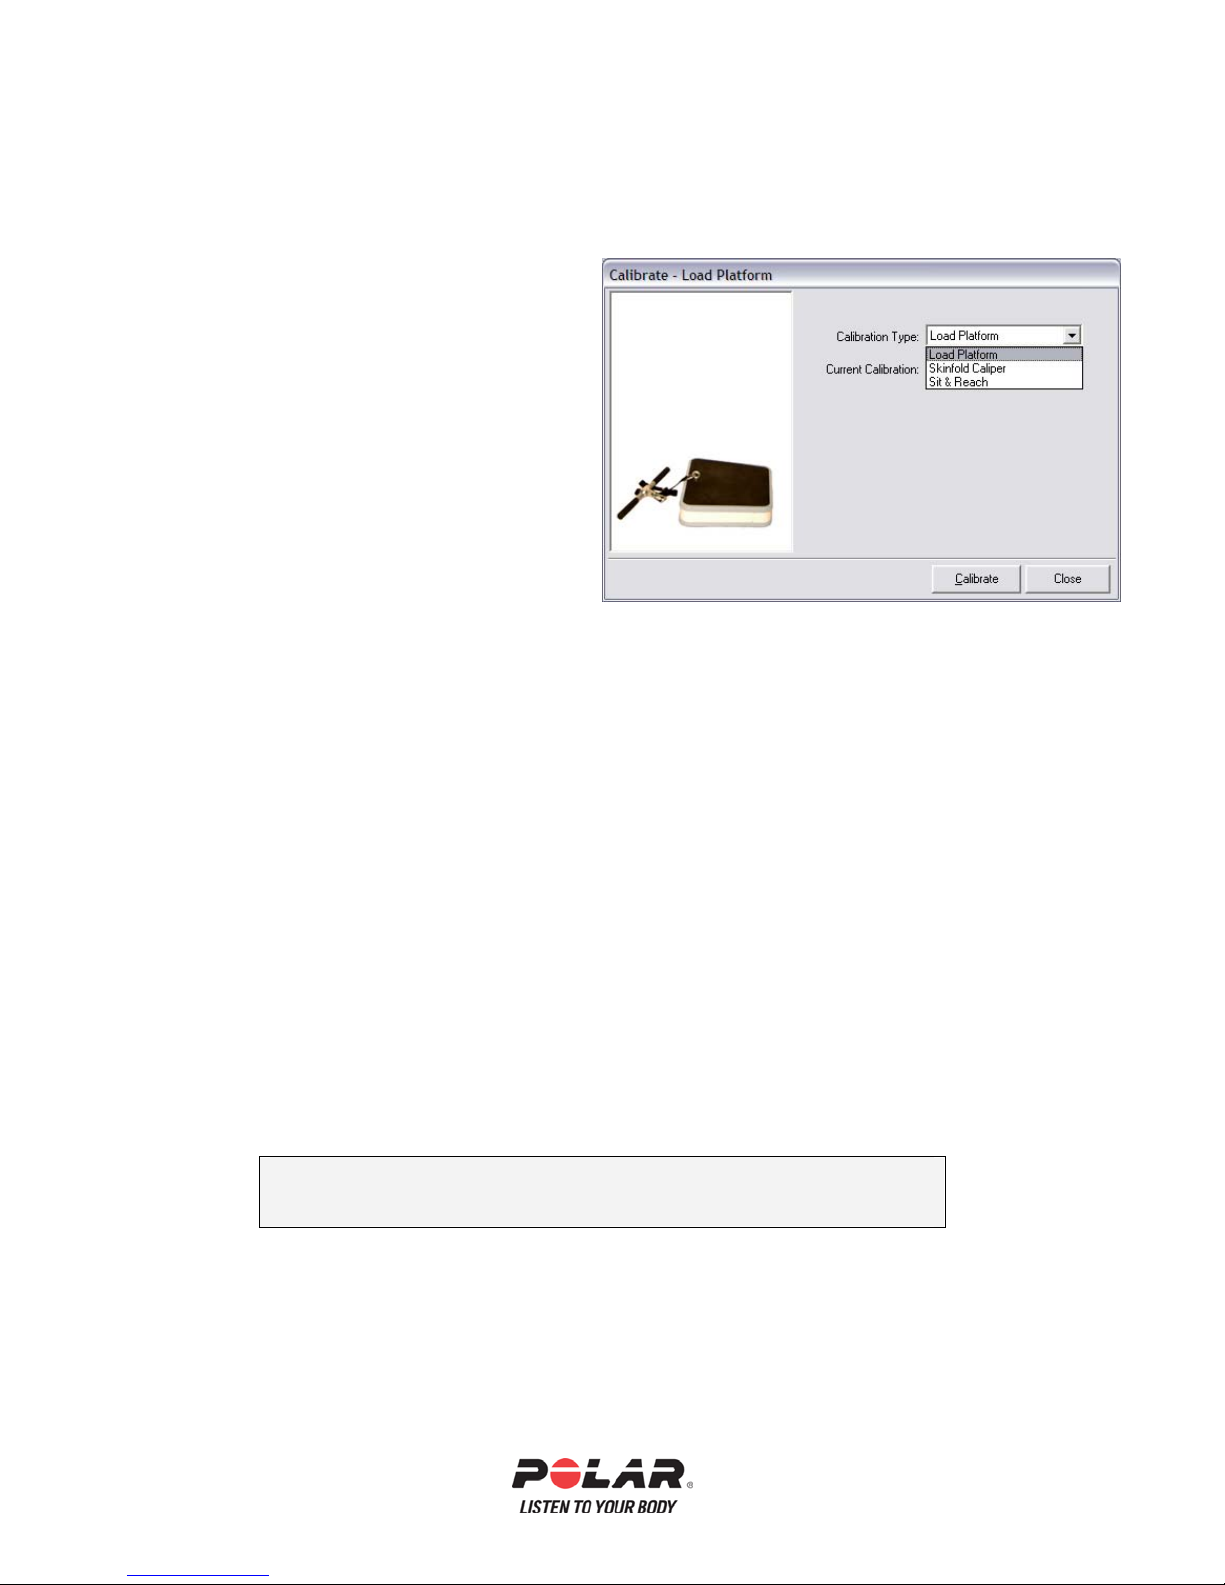
Calibration
There are 3 components to calibrate on the Standard TriFIT 700 system:
• Load Platform (which calibrates both
scale and strength test)
• Skinfold caliper
• Sit & Reach
The Monark 828 Bike is an optional
upgrade that may need to be calibrated. It
will be covered at the end of this section.
*Pressing F1 at any time while in the TriFIT software will
activate the on-line help.
19
Page 20
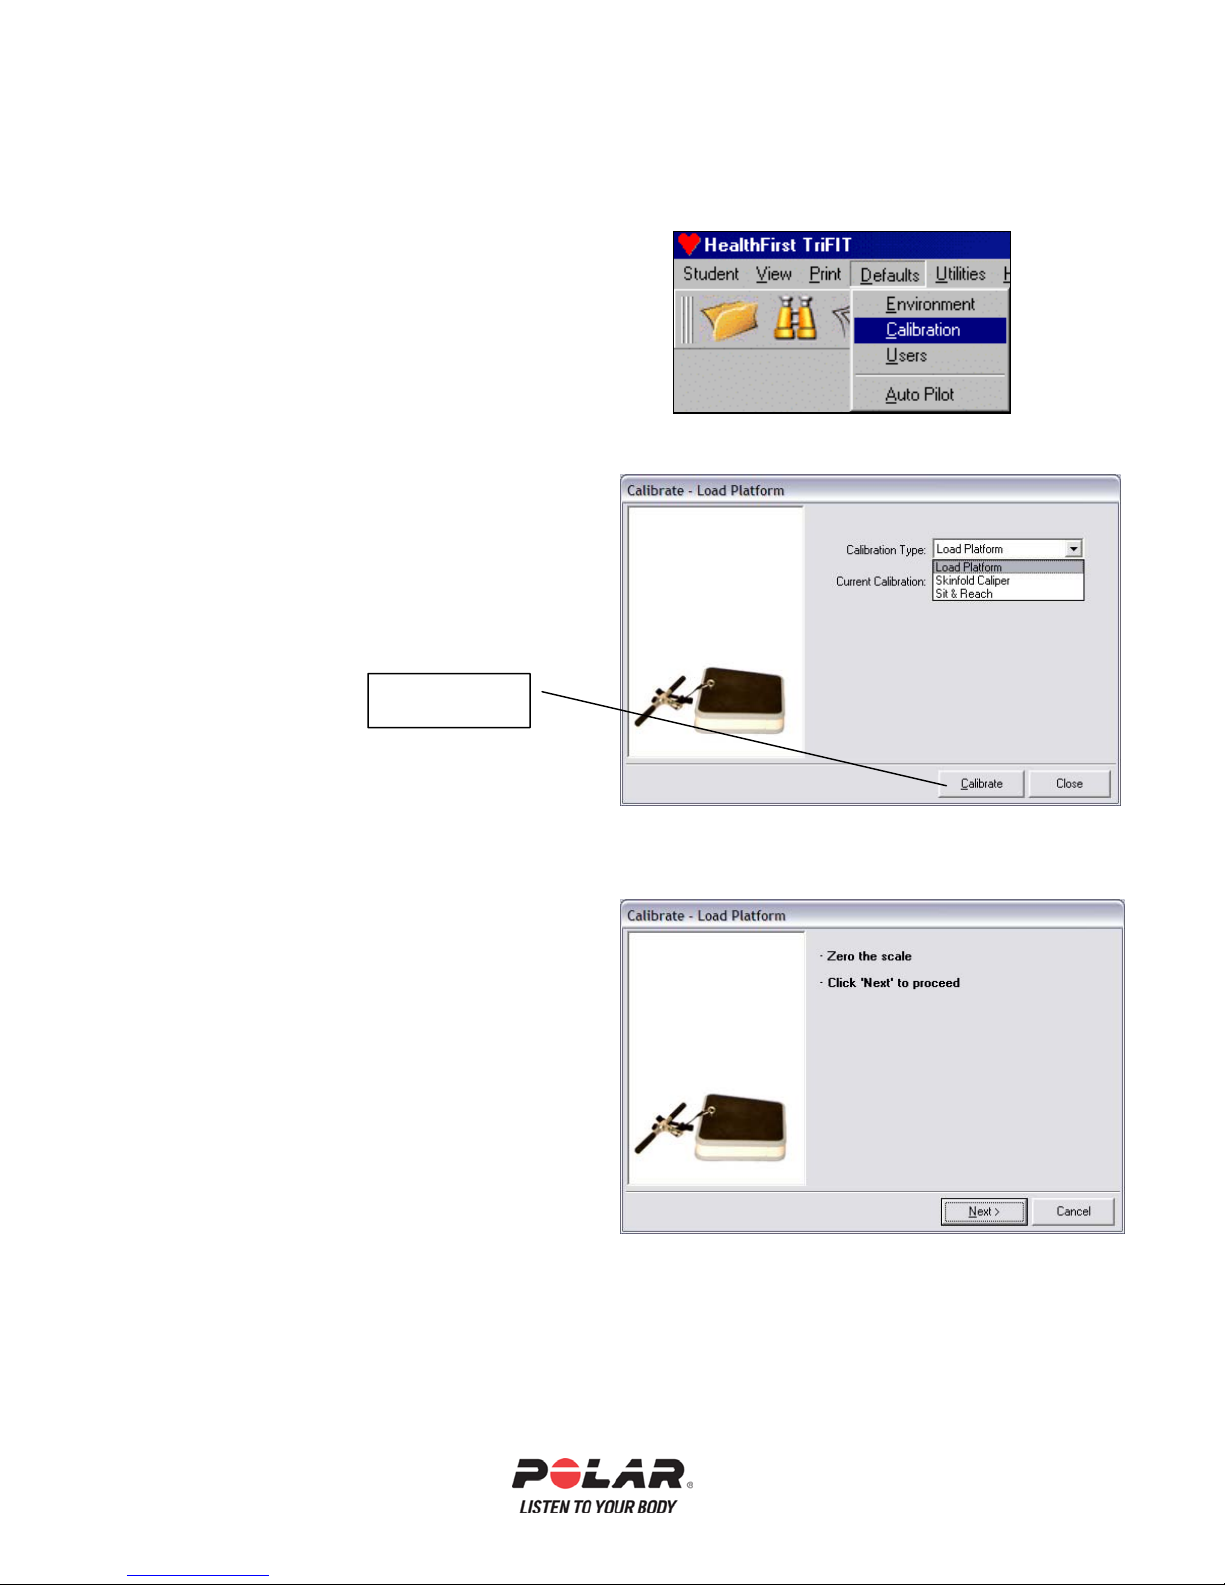
Platform Calibration
1. Select “Defaults” from the Main Menu
2. Select “Calibration”
3. Select Load Platform
click Calibrate
4. Make sure nothing is on the scale and
click Next>
Click Calibrate
20
Page 21
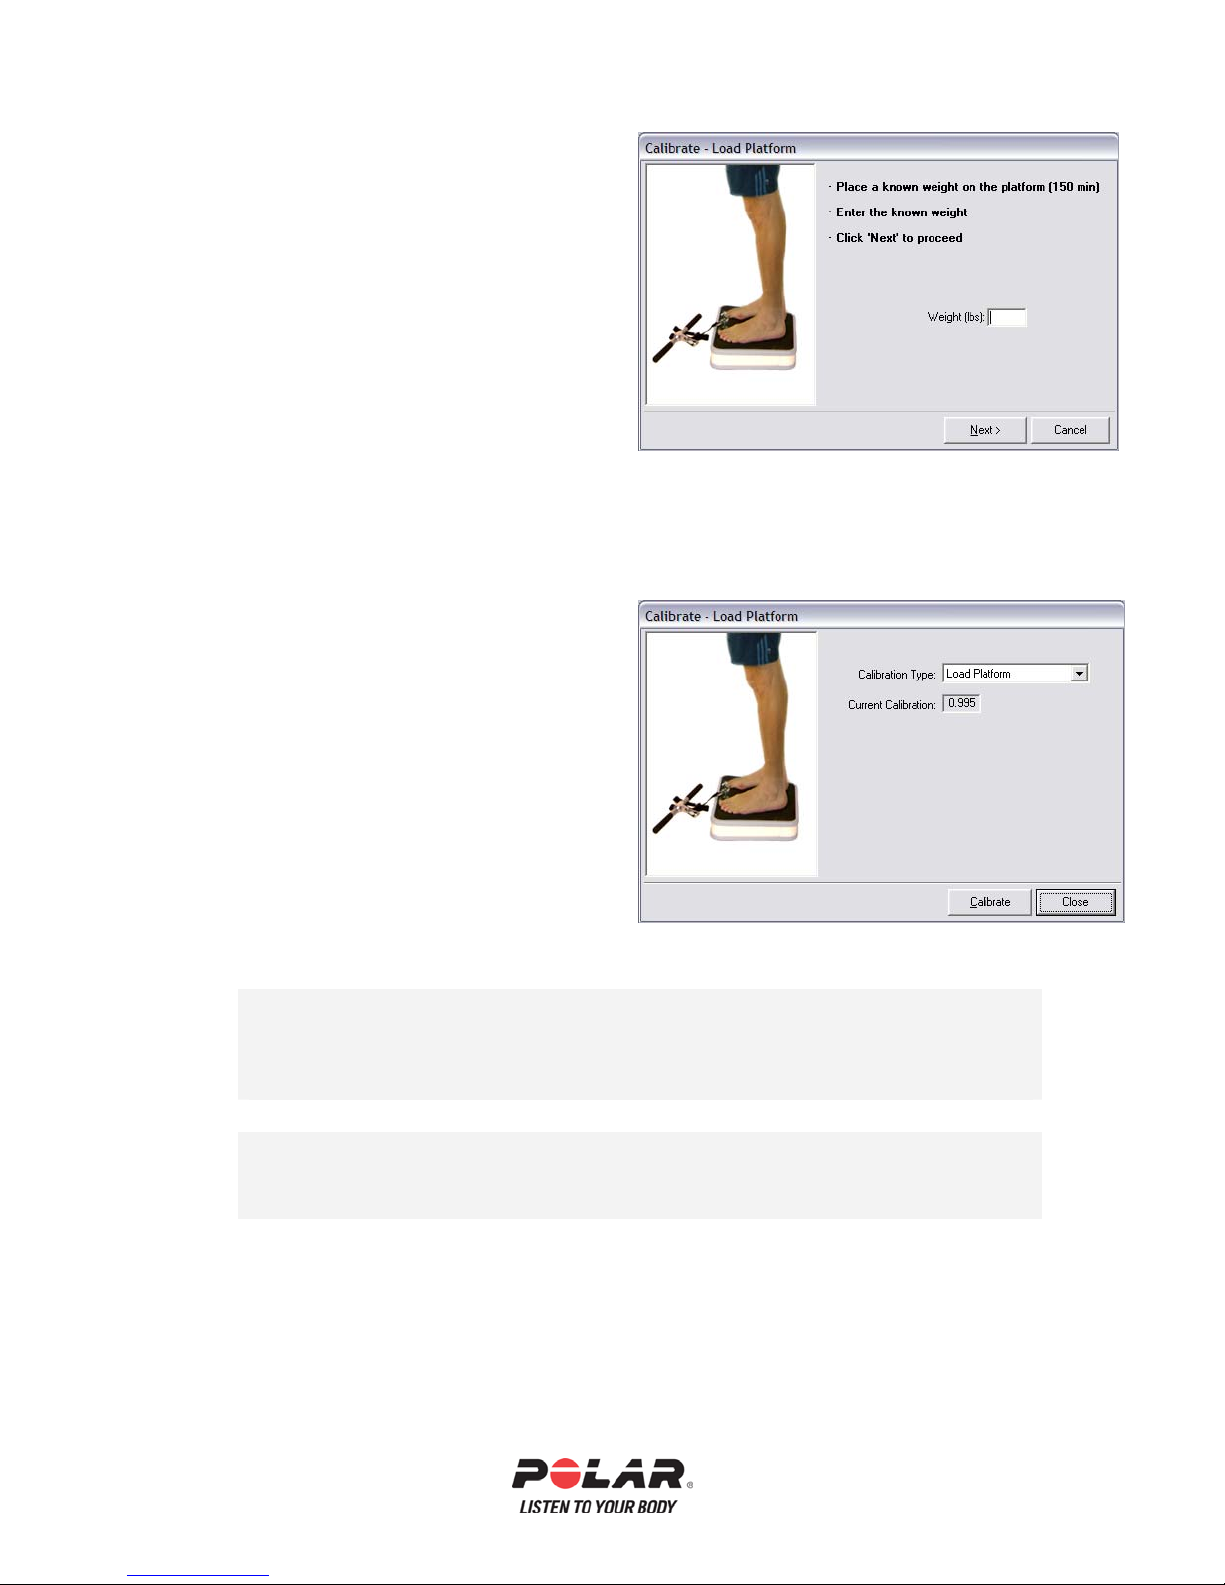
5. Have someone step on the scale that
knows their exact weight. (For instance,
have someone who weighs between 150
lbs. and 190 lbs. * weigh themselves on a
known good scale. Use them and their
recorded weight as the ‘Known weight’
for calibrating the Healthfirst scale.)
6. The correct calibration constant is
between 0.40 and 2.0. Select another
item to calibrate or click the close button.
*It is best to use a person that knows their exact weight and weighs
between 150 and 190lbs to calibrate the scale, as weight plates are not
always the exact weight as printed on them. The weight scale is accurate
to within 1lb.
**A better calibration will result if two people calibrate the platform-one
standing on the platform and the other types in the weight.
21
Page 22
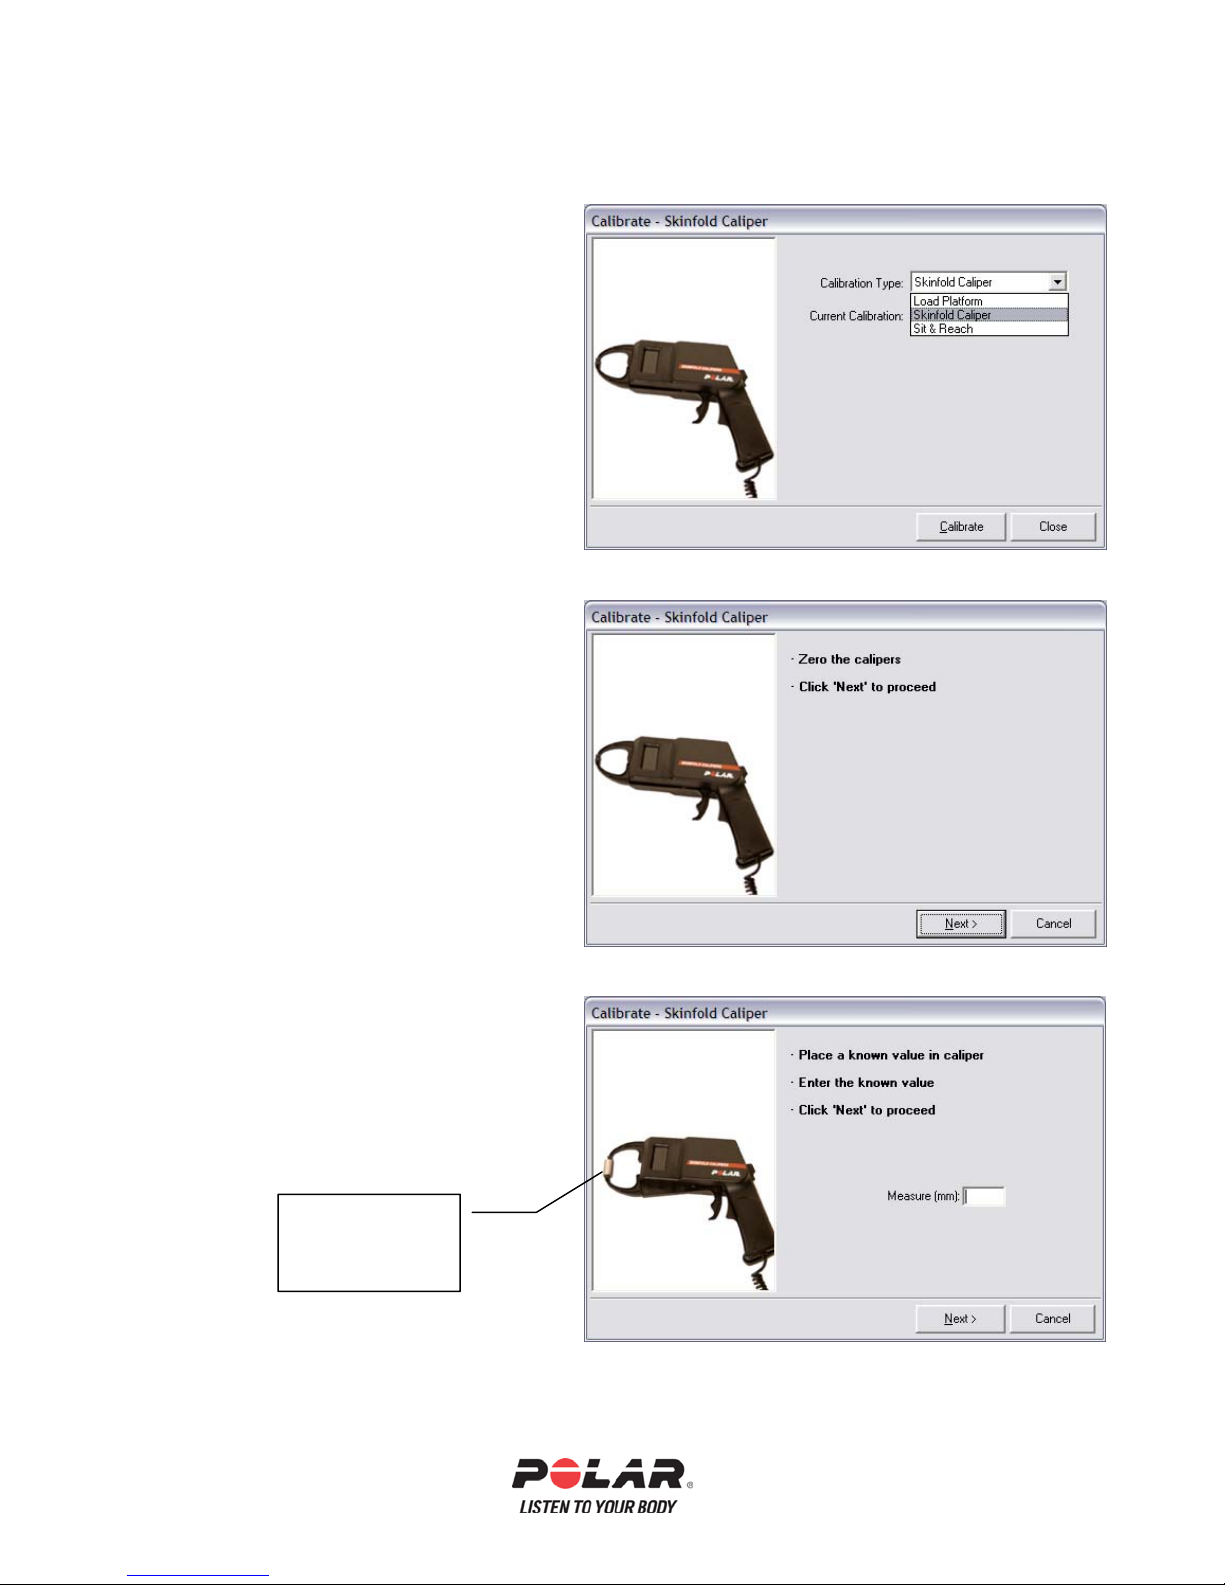
Skinfold Calipers
1. Select Skinfold Caliper
2. Make sure the caliper jaws are
closed and click next.
(An upgraded Lange caliper is
shown in the calibration wizard)
3. Put the calibration dowel in the
jaws of the calipers lengthwise.
The length of the calibration
dowel is 25.4mm. Type this
value in the box and click Next>
Calibration dowel
lengthwise
(25.4mm)
22
Page 23
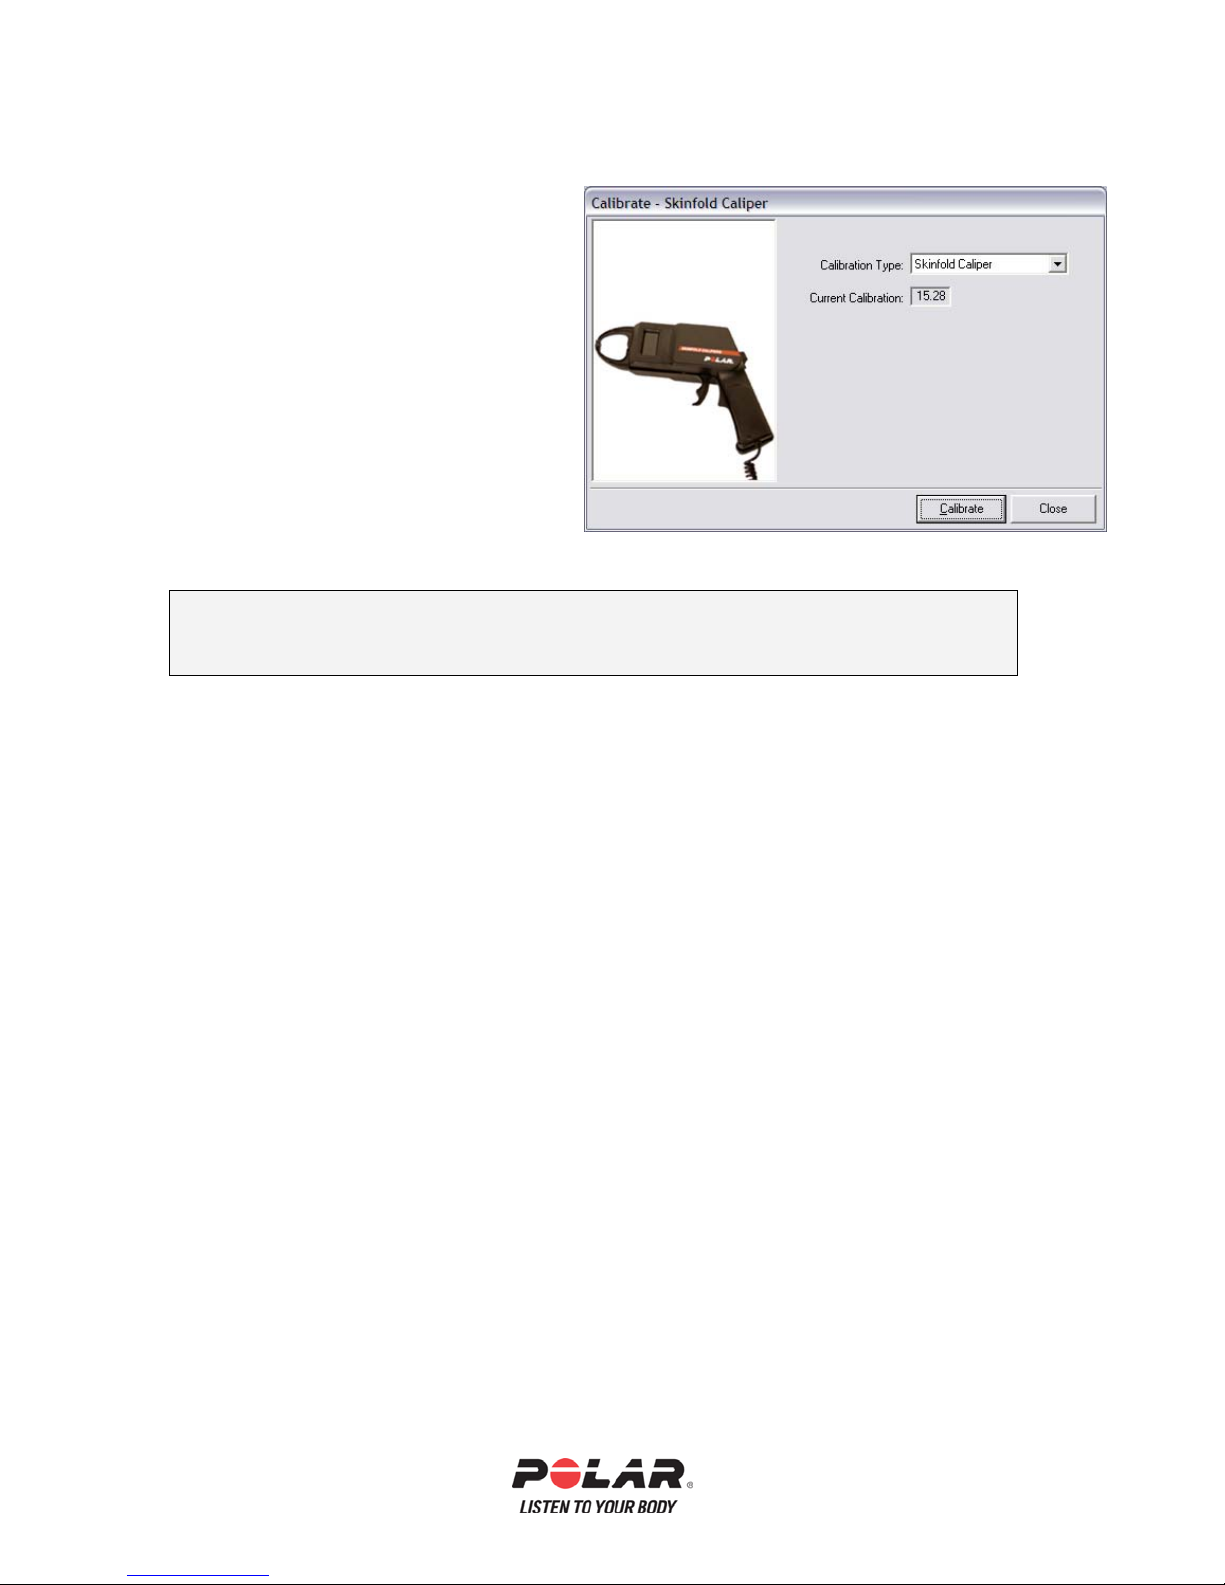
4. The correct calibration constant
is between 14.00 and 17.00 for
the Skyndex and between 18.00
and 22.00 for the Lange
calipers.
MORE INFORMATION: For more information on how to properly perform an accurate
skinfold measurement, see the “Taking Accurate Skinfolds” Tutorial.
23
Page 24
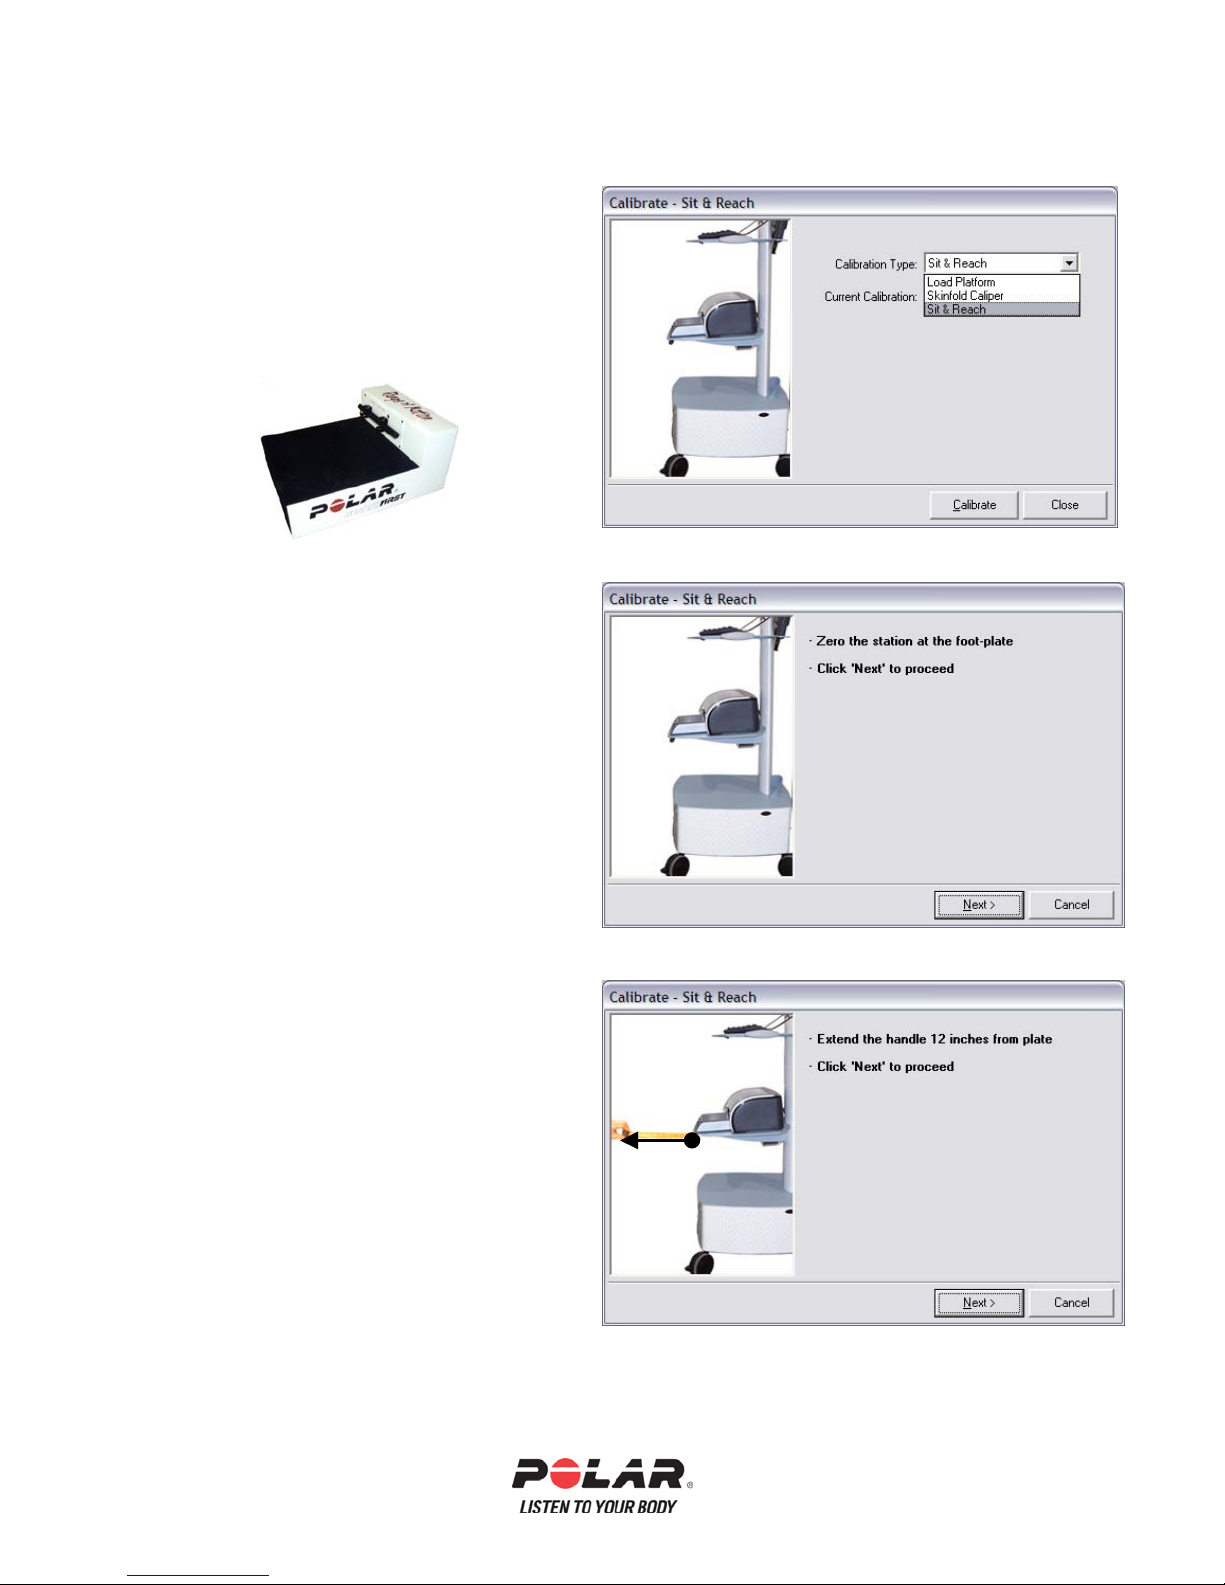
Range of Motion
1. Select Sit & Reach
Click Calibrate.
The portable Sit & Reach station
calibrates the exact same as the 700
system.
2. Pull the handle slowly out to the foot
plate and click the Next> button.
3. Pull the handle out exactly 12” (30cm
if using metric units) PAST the
footplate*, then click Next>.
The correct calibration constant is
between 0.35 and 0.75.
* You must have a 12” ruler when
performing this calibration.
Note: It is easier and typically more accurate
to use two people when calibrating the Range
of Motion.
WARNING: Use care when pulling out and
returning the handle. Do not pull the handle out too far and when a client has finished the
test be careful they do not let go of the handle and let it snap back. This is a delicate
measurement device.
12”
24
Page 25
Monark 828 Bike
N
t
NOTE: Monark Bikes are carefully calibrated at the
factory. The need for the end user to calibrate the bike is
RARE!
Once the bike is assembled, there are 2 adjustments that need to be made to
insure accuracy of a sub-max bike ergometer assessment.
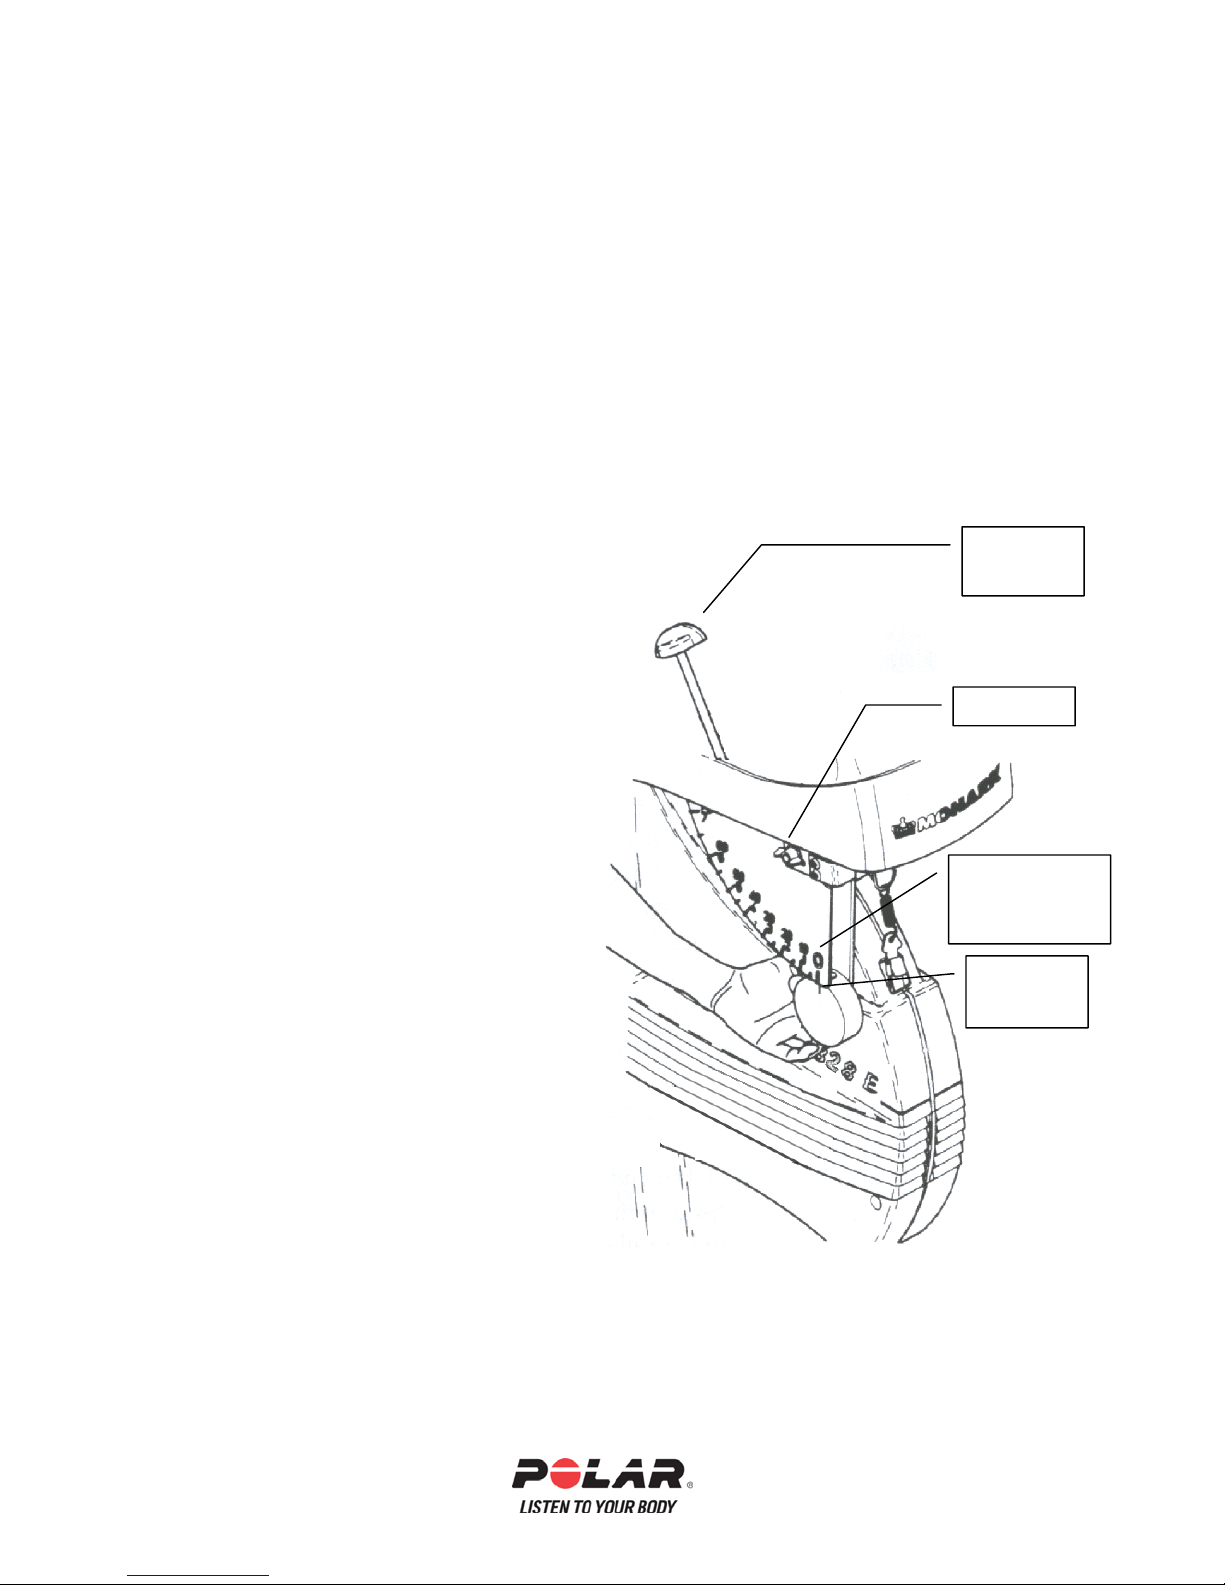
1. Zero Adjustment of the Pendulum Scale
2. Calibration of Pendulum Scale
Zero adjustment of the Pendulum Scale
1. Remove the transport tape from the
pendulum. Loosen the tension device
so the brake belt feels loose. Check
that the pendulum is hanging in a
vertical position. The notch on the
pendulum weight should now be
aligned with the “0” on the Pendulum
Scale.
2. If the pendulum notch does not line up
with the “0” on the Pendulum Scale,
loosen the lock nut and change the
position of the Pendulum Scale so that
it lines up with the notch on the
pendulum weight. Tighten the lock
nut after the adjustment.
3.
When adjusting the resistance during a
bike test, always use the side scale and
not the one on top of the unit next to
the electronic speedometer.
Tension
Device
Lock Nu
“0” Mark on
Pendulum
Scale
otch on
Pendulum
25
Page 26
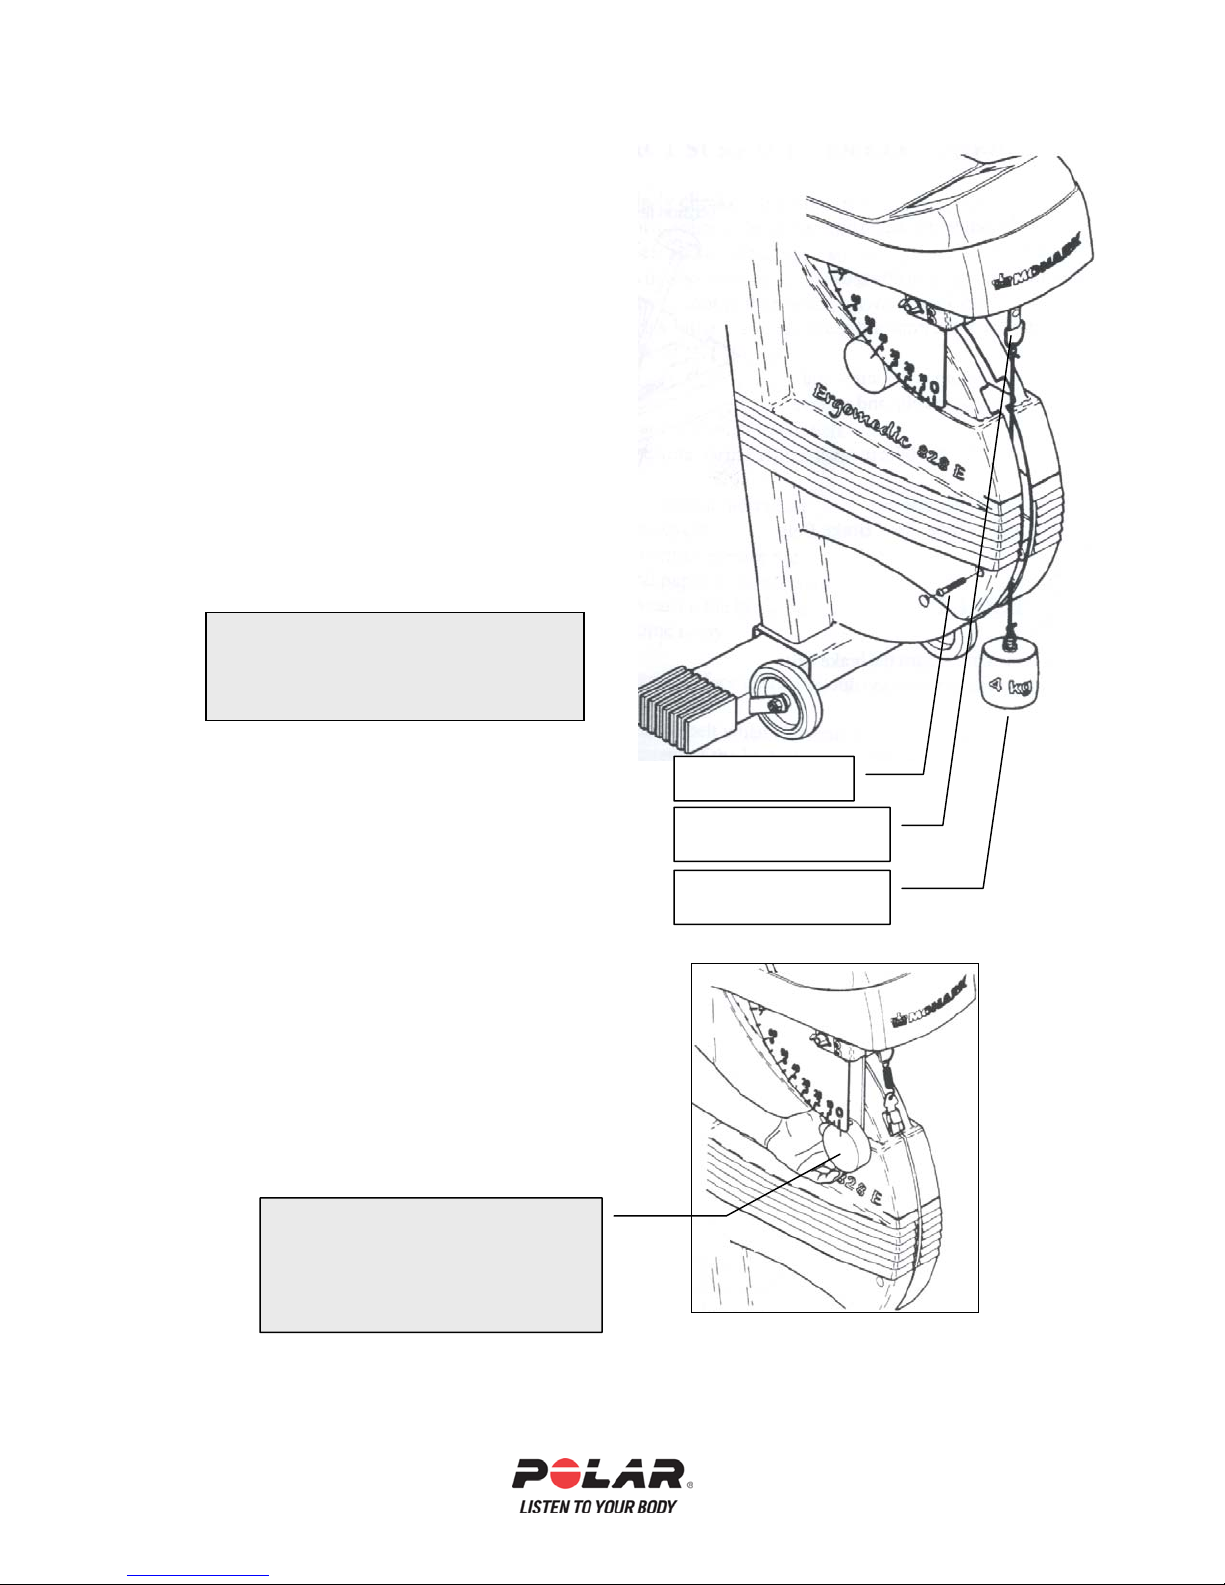
Calibration of Pendulum Scale
(
(
)
1. Loosen the tension device so the brake
belt feels loose.
2. Make sure the “0” on the pendulum scale
lines up with the notch in the Pendulum.
(see previous page)
3. Detach the front screw in the frame
covers.
4. Fasten a 4KG weight at the balancing
spring. A 10 lb.weight plate is 4.5KGand this can be used if a 4KG weight is
not available.
NOTE: The weight should not be less
than 3KG. Take the left cover a little to
the side so the weight cord hangs between
the covers.
5. When correctly set, the Pendulum Scale
Frame Cover Screw
should read the same as the weight.
If using a 10 lb. weight, the scale
should read 4.5 KP.
Balancing spring
attach the weight here)
4KG Weight
10 lbs = 4.5 KG
6. If the pendulum scale is not lining up with the
weight being hung (4.5KP), adjust the
pendulum weight so that the notch on the
pendulum lines up exactly with the scale
(4.5KP). To adjust the pendulum weight, use
the hex key provided with the bike. Loosen the
screw at the back of the pendulum and slide the
small adjustment weight up or down.
Pendulum Adjustment Weight
Loosen the hex screw on the back side
of the pendulum. Loosen the screw
and slide the adjustment weight up or
down then tighten the screw.
Check the calibration of the pendulum weight once a year or when needed.
26
Page 27

Section 3: Training & Registration
In this section
• Testing Recommendations
• Training Recommendations
• Registration
• Transporting Your BodyAgeTM System
27
Page 28

Testing Recommendations
When exercise testing a client or student you must consider the testing battery
order. For example: if a cardiovascular test is given first, then a blood pressure
measurement is taken, the blood pressure measurement will be affected by the
cardiovascular test.
The following is the recommended testing order:
• Enter client data: ID #, Name, age, address, and User field information.
• Medical History Questionnaire
• Par-Q (Physical Activity Readiness Questionnaire)
• Informed Consent
• Resting blood pressure and heart rate
• Body weight and height
• Girth Measurements
• HRA (Health risk appraisal questions)
• Body fat assessment
• Strength test
• Flexibility test
• Cardiovascular test
28
Page 29

Step By Step Training for the BodyAge
The following training steps are mandatory before testing any clients, students or patients.
The operator should have a thorough understanding of the function of the system before
exercise testing. Any new BodyAge operators should follow the procedures o u tlined below.
On-Screen Tutorial and Video Training
For on-screen training of the BodyAge system, simply open the BodyAge
Tutorials on the desktop of your computer. These separate tutorials walk you
through the main aspects of the program step-by-step. These will be very helpful
in understanding the system and how to administer a proper and safe exercise
test.
Practical Testing
Once you have completed the entire Tutorial and Video Training, you are ready
to begin practicing using the equipment:
1. Write down the tests your facility wants to provide for its members
or clients. Carefully consider which assessments to use and the order
they will be administered. When the member or client returns for a
re-test, it is important to use the same battery of assessments for
comparing the data. Also, the data gathered in Group Reporting and
Statistical Summary is more useful if the clients have been
administered the same tests.
2. Test a minimum of three people on the BodyAge using the same
protocols that will be used during an actual test. It is best to test
individuals that will also be using the BodyAge System, so that you
may share any new information and test administration tips.
Warranty and Technical Support Information
Your Technical Support and Warranty will be activated once
Polar/HealthFirst ships the BodyAge. You will by contacted by a
Polar/HealthFirst customer service representative to answer any initial questions
you may have.
It is strongly recommended that each person using the BodyAge follow the
recommendations for staff operation guidelines BEFORE testing any clients or
members.
On-Site Training
29
Page 30

Training at your facility is available by a Polar/HealthFirst trainer. For more
information on training programs at your facility, call Polar/HealthFirst at 800
841-8333 or visit the website at
http://www.polarusa.com
FITNESS TRAINING
HealthClub, Government, Fitness Center
Don’t get by with using the BodyAge System just
for fitness testing. Learn everything it can do for
you from marketing, sales and member retention to
increasing personal training sales, corporate
membership sales, and customer service.
This training course is held at your facility and
will:
• 4 ACE National Continuing Education
Credits
• Prepare your staff to use the BodyAge
System immediately
• Qualify your staff to perform skilled
fitness assessments
• Introduce your staff to the BodyAge
System marketing program
• Create confidence in your staff’s ability to
use the BodyAge System
• Get your staff excited about using
BodyAge System
• Save time!
Director of Fitness Training Services
Polar/HealthFirst
30
Page 31

Transporting Your BodyAge
Before transporting your system;
• Unplug the following peripherals: Skinfold Calipers, Platform. Leave
the bike cable plugged in; coil and store next to the CPU.
• Secure the CPU with foam or other materials such as wadded paper or
bubble wrap to prevent shifting.
• Consider dismounting the monitor and wrapping with bubble wrap.
• Secure the printer on its’ tray with an elastic cord around the top of
the printer or use stretch wrap.
• Avoid laying the system on its side. The CPU is not secured with
anything except the materials you place in the compartment. If you
must lay it down, make sure the CPU compartment opening is facing
upwards.
TM
System
31
Page 32

Section 4: Support
In this section
• Troubleshooting
• Technical Support
• Returns
• Warranty
• Software license agreement
32
Page 33

Troubleshooting
If an error message appears on the screen during normal operation, print the error and fax to
HealthFirst Corporation Technical Support at 505/998-0622.
Computer will not turn on
1. Turn the main power switch, located on the left side of the computer compartment, off and
on. If power is applied, the switch will glow red.
2. Hold the power button on the front of the CPU down for 2 seconds. If the switch glows
green, power is applied.
3. Unplug the unit and test the wall power outlet with an electrical appliance (such as a lamp).
If outlets were changed, repeat Steps 1 and 2.
4. Place a box or something that is about the same height as the bottom of the cart and slowly
pull the pc out onto the box to check all connections. Make sure the power cable is securely
plugged in on the back of the case as well as the surge protector.
5. Repeat steps 1 and 2.
6. If the CPU still does not come on, call the HealthFirst Corporation Technical Support Line
(505-344-9679).
Computer comes on, but the monitor does not
1. Check the power cable on the back of the monitor. Make sure it is secure.
2. If no lights are on the monitor, press the monitor power switch again. Wait for 30 seconds.
Note the color of the monitor lights.
3. If there is power to the monitor, but you have no video (amber light), reseat the VGA cable
on the back of the monitor.
4. If there power is still not applied (no lights) turn off the main power switch on the left rear of
the cart. Place a box or something that is about the same height as the bottom of the cart and
slowly pull the pc out onto the box to check all connections. Make sure the AC adapter for
the monitor is securely plugged in on the surge protector and the body of the adapter.
5. Turn on the main power switch and check again.
6. If you have power to the monitor (lights on the front) and still no video, verify that the VGA
cable is securely connected on the rear of the computer.
7. If there is still nothing on the monitor screen, note the color o f light on the monitor if any
and call the HealthFirst Corporation Technical Support Line (505-344-9679).
33
Page 34

Printer will not come on or print
Hardware checks
1. Check the power cable going into the right side of the back of the Hewlett Packard printer.
2. Check the data cable (USB) going into the right side on the back of the Hewlett Packard
printer.
3. Turn off the main power switch on the left rear of the cart. Place a box or something that is
about the same height as the bottom of the cart and slowly pull the pc out onto the box to
check all connections. Verify that the AC adapter for the printer is securely connected to the
surge protector.
4. Check the back of the computer to see that the USB cable is securely connected.
5. Check the printer cartridges as described in the Hewlett Packard material, which came with
the printer (located in the accessories box).
Software Checks
1. Close BodyAge.
2. Click Start.
3. Go to Printers.
4. With the mouse, highlight the printer you are using and click the right mouse button.
5. Go to Properties and click the left mouse button.
6. The printer should be checked as being the default printer. If it is not, click on the default.
7. Write down any error codes, as this will be help ful in identifying any problem.
34
Page 35

On-Line Peripherals
PLATFORM
Platform is giving low or high readings
1. Re-calibrate (Defaults/Calibration) being sure to follow the instructions on
the screen exactly.
2. Use a person who has a known weight between 150 and 190lbs.
3. Make sure the person DOES NOT step on the scale before it is zeroed. This
will cause the platform to be mis-calibrated.
4. Make sure the person stands very still. Any movement from side to side will
cause a mis-calibration.
5. Go to a test and perform an actual body weight with the same person that was
used to calibrate the scale. The weight should be within two pounds.
6. If the weight is not within two pounds, re-calibrate and re-measure the body
weight.
7. If the weight is still varying by more than two pounds, call the
Polar/HealthFirst Corporation Technical Support Line (505-344-9679).
8. Write down any error codes, as this will be helpful in correcting the problem.
CALIPERS
On-Line Calipers are giving inaccurate readings
1. Re-calibrate as instructed on the screen. (Defaults/Calibration).
2. Go into a 3-site Skinfold test.
3. Zero the calipers.
4. Place the 25.4mm calibration dowel in the jaws of the calipers lengthwise.
5. Press the “Measure” switch on the calipers.
6. The reading on the screen should be within 24.5mm and 26.0mm. Do this 3
times and note each reading.
7. If the readings are not within 24.5mm and 26.0mm, re-calibrate and repeat.
8. If the dial on the calipers do not read exactly 25.4mm when the dowel is in
the calipers, do not worry! The dial on the caliper is not as accurate as the
digital reading being sent to the computer.
9. If still not within the above values, call the Polar/HealthFirst Corporation
Technical Support Line (505-344-9679).
35
Page 36

SIT & REACH (Range of Motion)
Range of Motion handle is not retracting
1. If the ROM handle is not retracting, the internal mechanism needs to be
repaired by Polar/HealthFirst service personnel.
2. Remove the ROM unit from the Sit & Reach station using a 5/32” Allen
wrench provided with your system.
3. Remove the only the 2 silver colored upper screws, DO NOT remove the
smaller lower black colored screws.
4. Unplug the ROM cable from the BodyAge unit.
5. Remove the ROM unit.
6. Contact Tech Support for information on repairing your Range of Motion.
Range of Motion is inconsistent
1. Re-calibrate ROM (Defaults/Calibration) according to the instructions on the
screen.
*It is much easier and more accurate to calibrate the ROM with two people.
2. Enter into a client test and perform another Sit and Reach test.
3. When the screen prompts to “Zero the System”, pull the handle out exactly
12” from the foot plate and press the Enter key.
4. Return the handle slowly to the foot plate and allow the BodyAge to take the
reading.
5. The measurement should be within ½ “ of 12”.
6. If the measurement is not within ½”, re-calibrate and repeat.
7. If still not within ½”, call the Polar/HealthFirst Corporation Technical
Support Line (505-344-9679).
If an error message appears on the screen during normal operation, print the error
and fax to Polar/HealthFirst Corporation Technical Support at 505/344-1200. To
print a fax technical request form from BodyAge, go to Help and Technical
Support. Complete the form and click print. You can then fax this form for
quicker response to your question.
For additional technical support, check on the web at
www.healthfirstusa.com
36
Page 37

Technical Support
During the first year after delivery, you are entitled to physiology and software
technical support. After the first year, you can purchase the Priority Plan,
entitling you to unlimited tech support and any software updates that become
available. After the first year of free technical support, non-Priority Plan
members will be charged $40.00 per incident plus hardware or software costs.
Our staff is fully knowledgeable on physiology, testing protocols and procedures
as well as operation of the BodyAge system.
Contacting HealthFirst Corporation Technical Support
You can find some answers to questions on any of our software by going to :
www.polarusa.com/education/teachercorner/tutorial.asp
You can also reach us by phone, but before calling Technical Support:
1. Be able to tell us your facility name and product.
2. Have your question or problem written down as clearly as possible along
with the exact error codes, which may appear on your screen. Be sure to
explain exactly which tests or screens you were using before this error
occurred.
3. It is helpful to fax any data in question (i.e.; results from tests, specific
printing questions, etc.)
4. Be at your system when you call.
Voice (505) 344-9679
Fax (505) 344-1200
E-mail
37
Page 38

Return Authorization
Before sending any parts back to Polar/HealthFirst Corporation for return, repair
or warranty, you must arrange for Return of Materials Authorization. Credit card
information or Purchase Order with a completed Polar credit application must
accompany the part(s) being returned.
• Call 505-344-9679, to obtain a Polar Return for Repair Form.
• You will be issued an RMA number.
• Write this number on the address label next to your return address. Be sure
to include the completed Polar Credit Application form.
• Write down a brief description of the problem, your name, return address and
include it in the box.
• Also, please read the next paragraph on packing returns properly.
Packing Returns
It is very important to pack any item being returned to Polar/HealthFirst
properly. Most items are electronic and somewhat fragile, especially the
computer and monitor. Please follow these guidelines when returning any part to
Polar/HealthFirst:
• For all items, pack in a corrugated box and pad with Styrofoam peanuts,
wadded papers or foam.
• UPS and other commercial shippers may require double boxing electronic
components for insurance claims to be honored. Check with your shipping
agent for more information.
38
Page 39

Polar/HealthFirst Corporation Warranty
Warranty
Polar/HealthFirst Corporation, warrants its equipment for one year from the date
of shipment. This warranty is limited and is in lieu of all other warrants
expressed or implied. Within the warranty period, Polar/HealthFirst Corporation
will repair or replace, without charge, any parts, which become defective due to
material or workmanship.
Accessories, components and major sub-assemblies of Polar/HealthFirst
Corporation’s systems not manufactured by Polar/HealthFirst Corporation (i.e.,
Bike Ergometer) will be warranted according to the terms of the original
manufacturer. This warranty shall not apply to any part or parts of the system if
it has been altered, repaired or misused through negligence; nor does this
warranty cover replacements or repairs necessitated by loss or damage resulting
from any cause beyond the control of Polar/HealthFirst Corporation, including
but not limited to acts of God, acts of Government and labor disputes.
The above warranty provisions do not apply to any “consumer products” in that
the products described herein should not and are not normally used for personal
family or household purposes as same is defined in the Maganison-Moss
Warranty – Federal Trade Commission Improvement Act, 15 U.S.C. 2301, et
seg,.
Extended Warranty
The warranty may be extended an additional year (total of two) within 30 days of
the equipment delivery for ten percent (10%) of the purchase price.
Priority Plan
Polar/HealthFirst Corporation provides one year of free technical support for
BodyAge customers. Customers have the option of renewing their Priority Plan
subscription which guarantees on-going support and technical assistance
annually. As a Polar/HealthFirst Corporation Priority Plan subscriber, you get
the following benefits:
• Automatic software maintenance upgrades.
• A 15% or more discount on all NEW Polar/HealthFirst Corporation software
product releases.
• PRIORITY TOLL FREE telephone assistance for Polar/HealthFirst
Corporation hardware, software and physiology questions.
Non-plan members will be charged a minimum of $40.00 per incident for
support questions. Enrollment Fee: BodyAge $490
39
Page 40

License Agreement
Important
By using this software you accept the following terms of this License
Agreement. If you do not agree with these terms, you should not use the
software and promptly return it for a refund.
Ownership
Polar/HealthFirst Corporation retains the ownership of this copy of the enclosed
software package. It is licensed to you for use under the following conditions.
Grant of License
You may only concurrently use the enclosed software on the number of
computers for which this license grants (for example, single-user version licenses
one concurrent usage; five-user network version licenses five concurrent usages).
If the number of users of the software exceeds the licenses, you must have a
reasonable process in place to assure that the number of persons concurrently
using the software does not exceed the number of licenses.
Network versions of the software may be combined to build larger networks (for
example, two five-user versions may be combined to form a ten-user network).
You may add a single-user version to an existing network configuration to
increase the number of network licenses (for example, you may add a single-user
version to a five-user network version to build a six-user network).
Restrictions
You may not copy the documentation or software except as described in the
installation section of this manual. You may not distribute, rent, sub-license or
lease the software or documentation, including translating, decompiling,
disassembling, or creating derivative works. You may not reverse-engineer any
part of this software, or produce any derivative work. You may not make
telecommunication transmittal of this software.
Termination
This license and your right to use this software automatically terminates if you
fail to comply with any provision of this license agreement.
Rights
Polar/HealthFirst Corporation retains all rights not expressly granted. Nothing in
this license agreement constitutes a waiver of Polar/HealthFirst Corporation’s
rights under the U.S. copyright laws or any other Federal or State law.
Limited Warranty (software)
If you discover physical defects in the media, Polar/HealthFirst Corporation will
replace the media or documentation at no charge to you, provided you return the
40
Page 41

item to be replaced with proof of payment to Polar/HealthFirst Corporation
during the 90-day period after having taken delivery of the software.
Polar/HealthFirst Corporation excludes any and all implied warranties, including
warranties of merchantability and fitness for a particular purpose and limits your
remedy to return the software and documentation to Polar/HealthFirst
Corporation for replacement.
Although Polar/HealthFirst Corporation has tested the software and reviewed the
documentation, POLAR/HEALTHFIRST CORPORATION MAKES NO
WARRANTY OF REPRESENTATION, EITHER EXPRESSED OR IMPLIED,
WITH RESPECT TO THIS SOFTWARE OR DOCUMENTATION, ITS
QUALITY, PERFORMANCE, MERCHANTABILITY, OR FITNESS FOR A
PARTICULAR PURPOSE. AS A RESULT, THIS SOFTWARE AND
DOCUMENTATION ARE LICENSED “AS IS” AND YOU, THE LICENSEE,
ARE ASSUMING THE ENTIRE RISK AS TO ITS QUALITY AND
PERFORMANCE.
IN NO EVENT WILL POLAR/HEALTHFIRST CORPORATION BE LIABLE
FOR DIRECT, INDIRECT, SPECIAL, INCIDENTAL OR CONSEQUENTIAL
DAMAGES ARISING OUT OF THE USE OR INABILITY TO USE THE
SOFTWARE OR DOCUMENTATION, even if advised of the possibility of
such damages. In particular, Polar/HealthFirst Corporation shall have no liability
for any data stored or processed with this software, including the costs of
recovering such data.
THE WARRANTY AND REMEDIES SET FORTH ABOVE ARE
EXCLUSIVE AND IN LIEU OF ALL OTHERS, ORAL OR WRITTEN,
EXPRESSED OR IMPLIED. No Polar/HealthFirst Corporation dealer, agent, or
employee is authorized to make any modifications or additions to this warranty.
Information in this document is subject to change without notice and does not represent a
commitment on the part of Polar/HealthFirst Corporation. The software described in this
document is furnished under this license agreement. The software may be used or copied only in
accordance with the terms of the agreement. It is against the law to copy the software on any
medium except as specifically allowed in the license agreement. No part of this manual may be
reproduced or transmitted in any form or by any means, electronic or mechanical, including
photocopying and recording, for any purpose without the written permission of Polar/HealthFirst
Corporation.
Some states do not allow the exclusion of implied warranties or liability for
incidental or consequential damages, so the above limitation or exclusion may not
apply to you. This warranty gives you specific legal rights, and you may also have
other rights, which vary, from state to state.
41
 Loading...