

Page 1

17928534.00 ENG/FRA A
Polar RS200sd™
Polar RS200™
Manuel d’Utilisation
FRA
ENG
User Manual
Polar RS200™
Polar RS200sd™
17928534.00 ENG/FRA A
Page 2
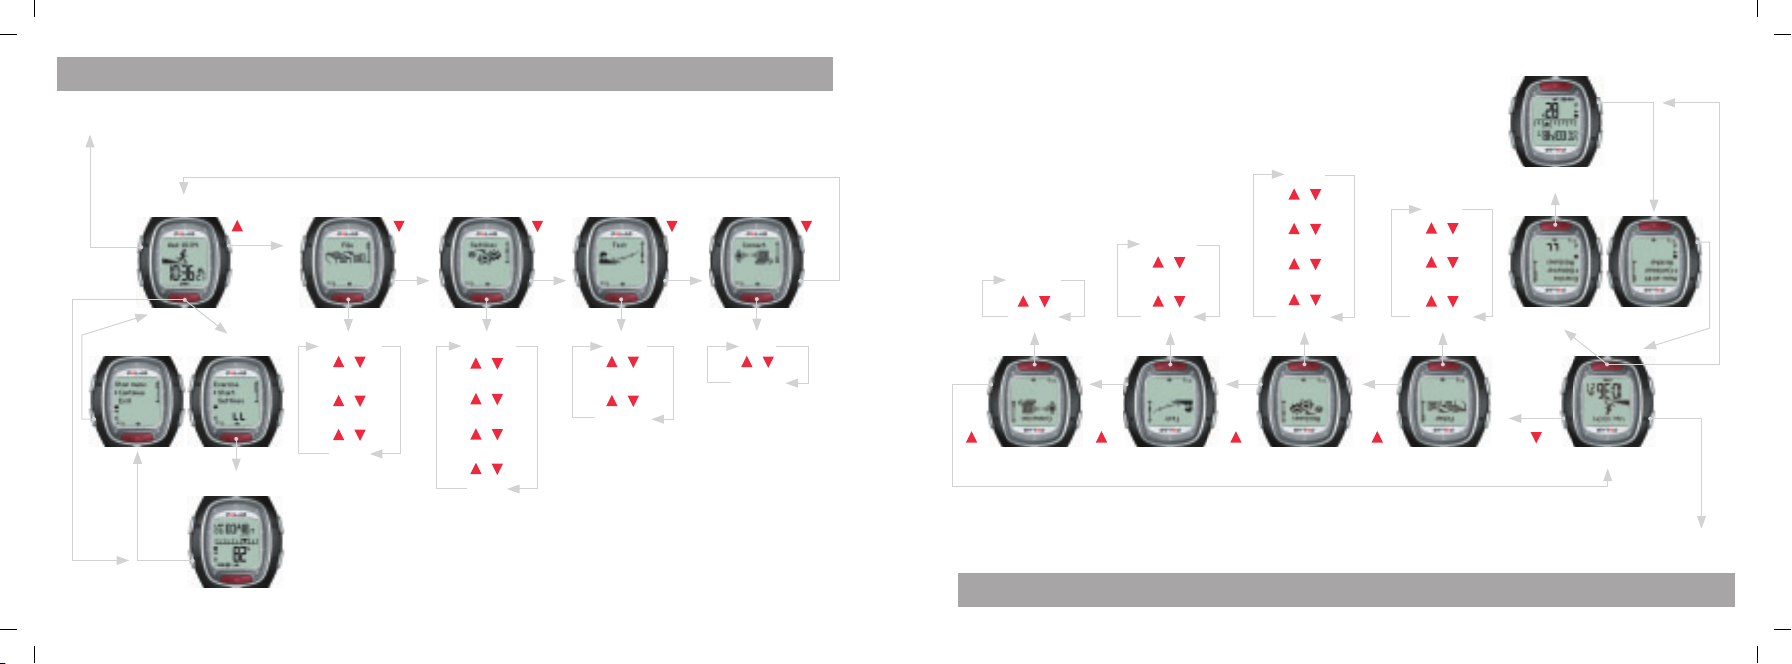
RS200 / RS200sd QUICK GUIDE
View Quick
menu
Press Light
Press Red button (long press)
View the date and
time of day.
Time mode File mode
(long press)
Press Stop
Stop mode Standby mode
Press Stop
Press
Press Red
button
Press Red
button
Exercise mode
View detailed long-term
information on your
exercises.
Press Red
button
ExerciseLog
/
Weekly
/
Tot als
/
Delete
Monitor information,
e.g., your heart rate and
calories burned during
your exercise sessions.
Change, e.g.,
exercise settings or
personal information.
Settings mode
Press Red
button
Exercise
/
Features
/
User
/
General
/
Watch
Perform the Polar
Fitness Test and
view your long-term
progress.
Test mode Connect mode
Press Red
button
Transfer the settings to
your running computer
from your PC and send
your exercise data to
the web service.
Start
/
Trend
/
HR max-p
Send
/
Receive
Press Press Press Press
Press Red
button
bouton Rouge
Appuyez sur le
sur
Appuyez
Réception
/
Emission
site Internet.
HR max-p
/
Graphe
/
Démarrer
bouton Rouge
Appuyez sur le
sur
Appuyez
vos données d’exercice sur le
Cardio Running et transférez
PC, transférez-les vers votre
Faites des réglages sur votre
le long terme.
Réalisez le Polar
bouton Rouge
Appuyez sur le
sur
Appuyez
votre progression sur
Fitness Test et suivez
Montre
/
/
/
/
Généraux
Personne
Fonctions
Exercice
sur
Appuyez
réglages personne.
d’exercices, ou les
Modifi ez les réglages
Effacer
/
Cumuls
/
Hebdo.
/
Fichier exe.
bouton Rouge
Appuyez sur le
pendant votre séance.
calories dépensées
cardiaque ou les
comme votre fréquence
Consultez des données
bouton Rouge
Appuyez sur le
bouton Rouge
Appuyez sur le
sur le long terme.
vos séances d’exercices
les données de toutes
Visualisez en détail
sur
Appuyez
Mode Exercice
Mode Heure Mode Fichier Mode Réglages Mode Test Mode Connexion
l’heure.
Appuyez sur Stop
Appuyez longuement sur le bouton Rouge
Menu Arrêt Mode Pré-exercice
s
ur Stop
Appuye
z
sur le bouton Lumière
Appuyez longuement
Visualisez la date et
Rapide
Voir le Menu
GUIDE RAPIDE RS200 / RS200sd
Page 3
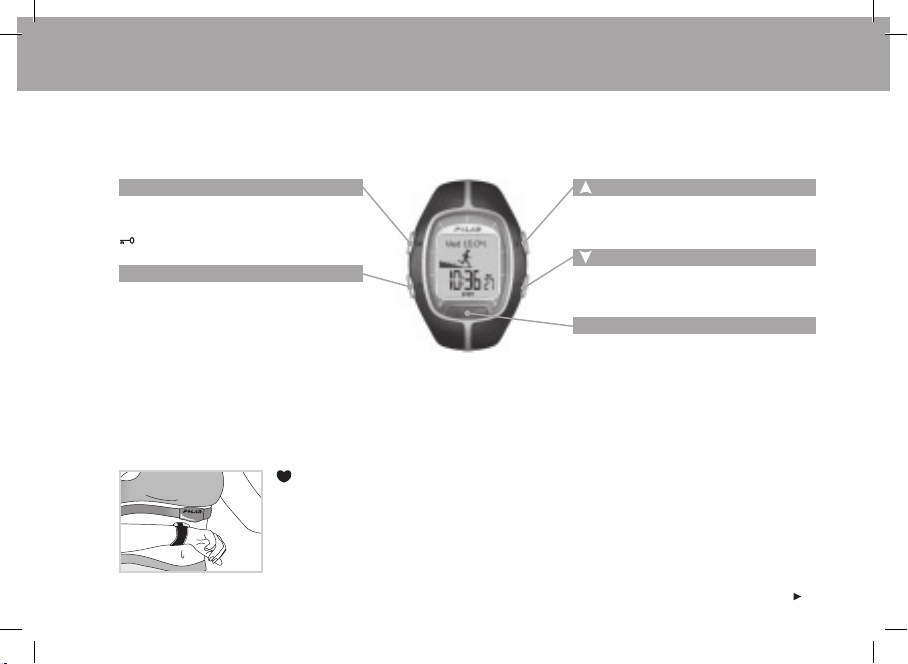
WRIST UNIT BUTTONS
Note: Pressing a button briefl y has a different effect than pressing and holding the button for a longer period of time:
• Normal press: press and release the button.
• Long press: press and hold the button (for at least one second).
Light
• Turn the backlight on.
• View Quick menu (long press).
• Unlock the buttons (long press).
Stop
• Stop, pause or cancel the function.
• Exit the menu and return to the previous
level of the menu.
• Return to the Time mode (long press) in all
modes except in the Exercise mode.
-Touch (hands free button)
To view information during exercise without
pressing buttons, bring the wrist unit near the
Polar logo on the transmitter.
• Move to the previous mode or menu level.
• Increase the selected value.
• Move to the next mode or menu level.
• Decrease the selected value.
Red button
• Start, enter or accept the function.
• Enter the displayed mode or menu and
move to a lower menu level.
• Enter the Standby mode.
• Enter the Exercise mode (long press).
• Record lap times in Exercise mode.
ENG
3
Page 4

CONTENTS
For RS200sd users: The information relevant to using the product with Polar S1™ Foot Pod is in blue text.
1. INTRODUCTION TO THE POLAR RS200 / RS200sd RUNNING COMPUTER ........................................................................... 6
1.1 PRODUCT ELEMENTS ...............................................................................................................................................6
1.2 USING YOUR RUNNING COMPUTER FOR THE FIRST TIME ..........................................................................................7
2. EXERCISING ......................................................................................................................................................................9
2.1 MEASURING YOUR HEART RATE ...............................................................................................................................9
2.2 POSITIONING THE POLAR S1 FOOT POD ..................................................................................................................11
2.3 EXERCISE RECORDING ...........................................................................................................................................13
2.4 FUNCTIONS DURING EXERCISE ..............................................................................................................................15
2.5 STOPPING THE EXERCISE .......................................................................................................................................22
3. FILE - VIEWING RECORDED INFORMATION .....................................................................................................................24
4. SETTINGS ........................................................................................................................................................................34
4.1 EXERCISE SETTINGS ..............................................................................................................................................35
4.2 FEATURE SETTINGS ................................................................................................................................................43
4.3 USER SETTINGS .....................................................................................................................................................47
4.4 GENERAL SETTINGS ...............................................................................................................................................51
4.5 WATCH SETTINGS ...................................................................................................................................................53
4.5.1 Event .......................................................................................................................................................... 53
4.5.2 Alarm ..........................................................................................................................................................54
4.5.3 Time Zones ................................................................................................................................................. 56
4.5.4 Date ............................................................................................................................................................57
4
ENG
Page 5

5. TARGET ZONE LIMITS ......................................................................................................................................................58
5.1 OWNZONE LIMITS ...................................................................................................................................................59
5.2 POLAR SPORT ZONES .............................................................................................................................................61
5.3 MANUAL LIMITS ......................................................................................................................................................64
6. TEST - POLAR FITNESS TEST ...........................................................................................................................................65
7. CONNECT - DATA COMMUNICATION ................................................................................................................................70
7.1 EDIT SETTINGS WITH A COMPUTER .........................................................................................................................70
7.2 TRANSFER YOUR TRAINING DATA TO THE TRAINING DIARY ON THE WEB ................................................................ 71
8. CARE AND MAINTENANCE ................................................................................................................................................72
9. PRECAUTIONS .................................................................................................................................................................75
10. FREQUENTLY ASKED QUESTIONS .....................................................................................................................................77
11. TECHNICAL SPECIFICATIONS ..........................................................................................................................................79
12. LIMITED POLAR INTERNATIONAL GUARANTEE .................................................................................................................81
13. POLAR DISCLAIMER ........................................................................................................................................................82
ENG
5
Page 6
1. INTRODUCTION TO THE POLAR RS200 / RS200sd RUNNING COMPUTER
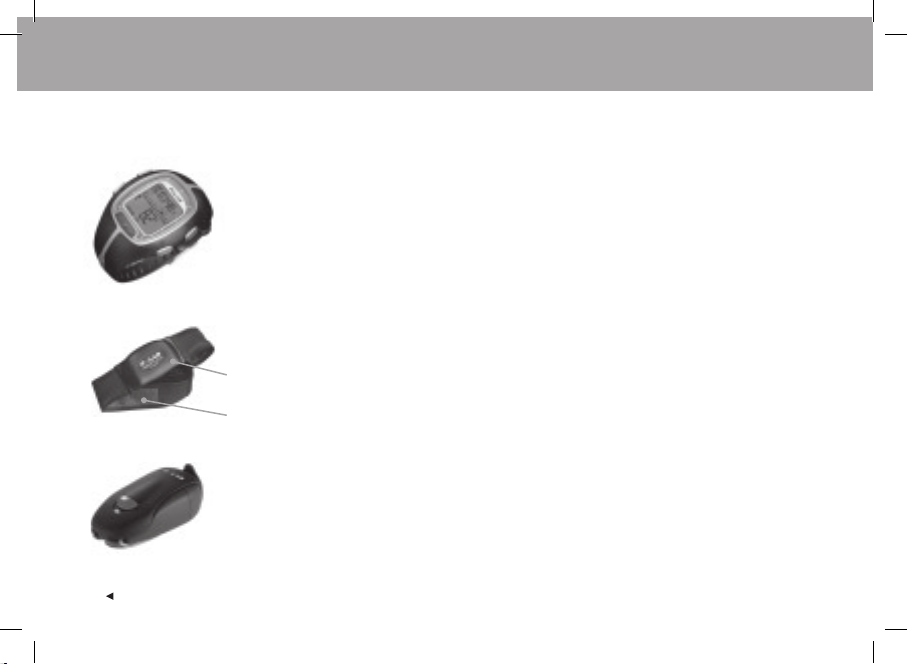
1.1 PRODUCT ELEMENTS
The Polar RS200 Running Computer package consists of the following parts:
Wrist Unit
The wrist unit displays and records
your heart rate and exercise data
during exercise. Enter your
personal settings into the wrist
unit and analyze the exercise
information after your workouts.
Polar WearLink™
Coded Transmitter
The connector transmits your
heart rate signal to the wrist unit.
The electrode areas of the strap
detect your heart rate.
Polar S1™ Foot Pod
The footpod transmits the running
speed and distance measurements
to your wrist unit.
6
Polar Web Services
www.PolarRunningCoach.com is a complete web service
tailored to support your exercise goals. Free registration
gives you access to the personalized training program,
training diary, useful articles, and much more. In addition,
you can get the latest product tips and support online at
www.polar.fi .
Customer Service, Registration, and
International Guarantee Information
If your running computer needs repair, send it with the
Return Card for service to your Polar Service Center.
By completing the Customer Registration Card you help us
ensure the quality of customer support and the development
of future Polar products and services.
The Polar two-year guarantee is issued to the original
customer / purchaser of the product. Keep the International
Guarantee Card as your proof of purchase.
ENG
Page 7
1.2 USING YOUR RUNNING COMPUTER FOR THE FIRST TIME
Enter your personal data in the Basic Settings mode (time, date, units, and personal settings). Entering accurate personal
information ensures that you receive correct feedback based on your performance.
Activate the blank wrist unit by pressing any button.
The display fi lls with numbers and letters.
1. Press the Red button. Welcome to Polar Running World! is displayed.
2. Press the Red button and choose the language you wish to use with the
Español or Français).
3. Press the Red button. Start with basic settings is displayed.
4. Continue by pressing the Red button and follow the steps below:
Note: The numbers scroll faster if you press and hold the / button as you adjust the value.
/ buttons (choose English, Deutsch,
5. Time: Press / to set the fl ashing value and then
the Red button to accept:
• 24h / 12h: select 12h or 24h format
• AM / PM (for 12h format): select AM or PM
• Hours: adjust the hours
• Minutes: adjust the minutes
Date: Press
/ to set the fl ashing value and then
the Red button to accept:
Note: The date will be displayed according to the time format
selected (24h: day - month - year / 12h: month - day - year).
ENG
• Day / Month: adjust the day (in 24h format) or
the month (in 12h format)
• Month / Day: adjust the month (in 24h format) or
the day (in 12h format)
• Year: adjust the year
Units: Press / to set the fl ashing value and then
the Red button to accept:
• kg/cm/km or lb/ft/mi: select the units
7
Page 8
Weight: Press / to set the fl ashing value and then
the Red button to accept:
• kg / lb: adjust your weight
Note: Press Light (long press) to change the units.
Height: Press / to set the fl ashing value and then
the Red button to accept:
• cm / ft, in: adjust your height
Note: Press Light (long press) to change the units.
Birthday: Press / to set the fl ashing value and then
the Red button to accept:
• Day / Month: adjust the day (in 24h format) or
the month (in 12h format)
• Month / Day: adjust the month (in 24h format) or
the day (in 12h format)
• Year: adjust the year
Sex: Press / to set the fl ashing value and then
the Red button to accept:
• Male / Female: select gender
6. Settings OK? No / Yes is displayed. To change your settings,
select No. Press the Stop button until you return to the
desired setting. To accept settings, choose Yes with
the Red button. The display automatically goes to the
Time mode.
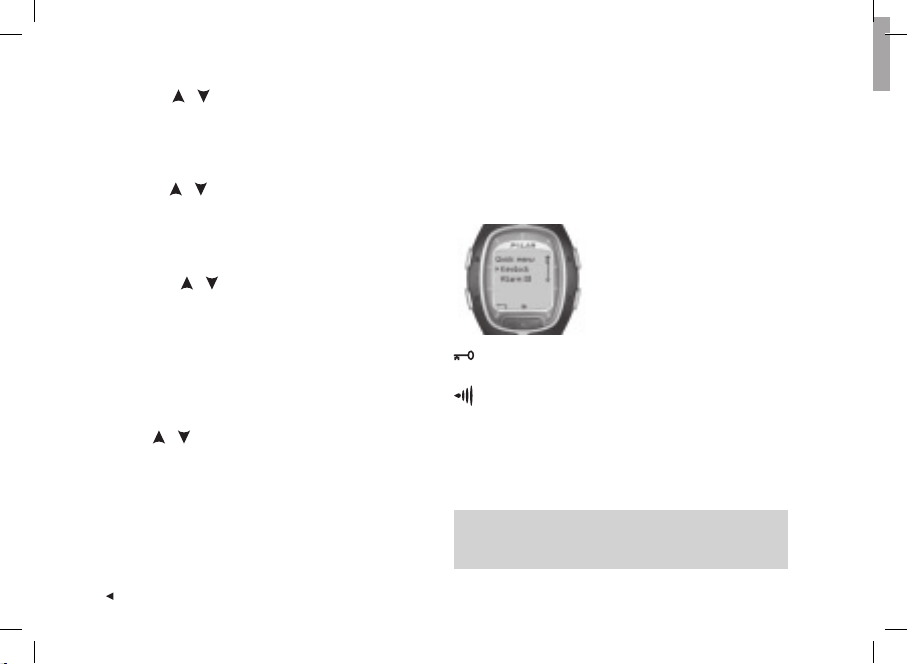
Quick menu:
When you press and hold the
Light button in the Time mode,
you can view the Quick menu.
The menu includes the following
functions:
Keylock: You can lock the buttons. Keylock prevents
accidental button presses. See page 20 for more information.
Alarm: You can turn the alarm on or off. See Watch
settings on page 53 for instructions.
Time Zone: For changing time zones, see Watch settings on
page 53 for more instructions.
Sleep: For activating the sleep function, see General
Settings on page 51 for instructions.
Tip: You can personalize the display of your running computer
by downloading logos. For more information, see Connect - Data
Communication on page 70.
8
ENG
Page 9
2. EXERCISING
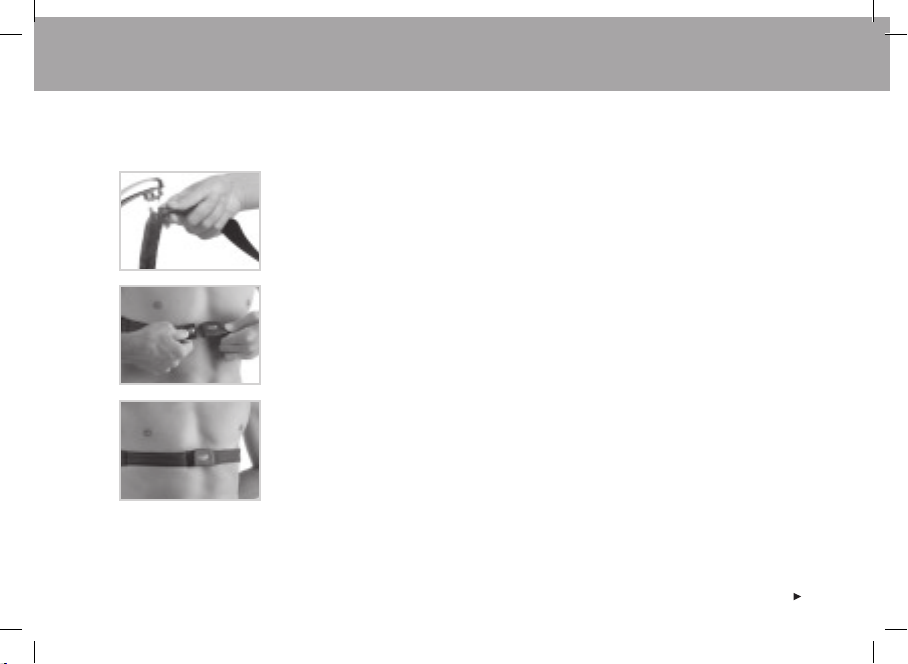
2.1 MEASURING YOUR HEART RATE
To measure your heart rate, you need to wear the transmitter.
1. Moisten the electrode areas of the strap under running water and make sure that they are
well moistened.
2. Attach the connector to the strap. Position the letter L on the connector next to the word
LEFT on the strap and snap the fastener. Adjust the strap length to fi t snugly and
comfortably. Secure the strap around your chest, just below your chest muscles, and snap
the second fastener.
3. Check that the wet electrode areas are fi rmly against your skin and that the Polar logo of the
connector is in a central, upright position.
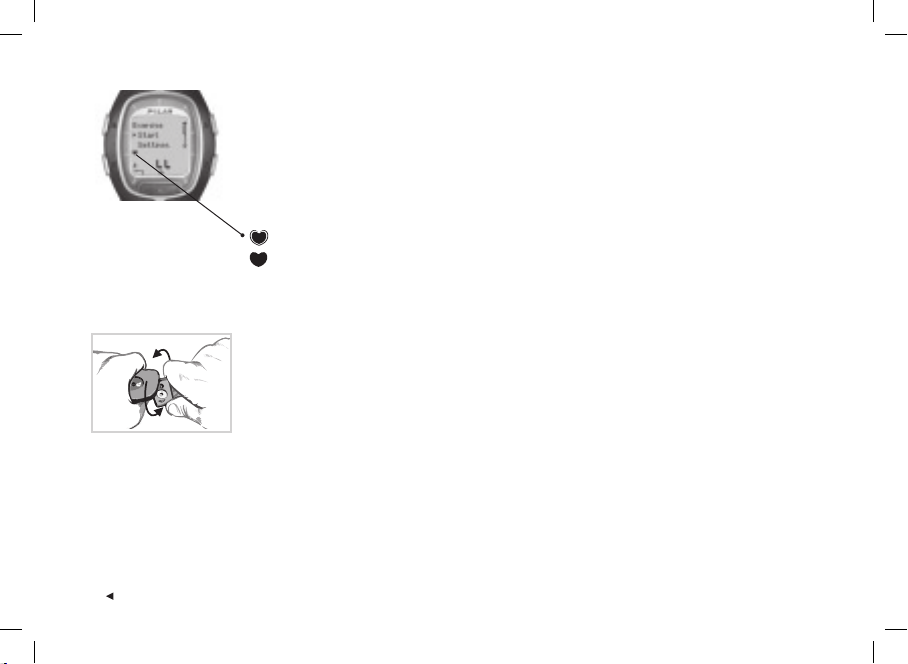
4. Wear your running computer like you would wear a watch. In the Time mode, press the Red
button. The running computer will automatically start searching for your heart rate.
The heart rate and the framed heart symbol appear in a maximum of 15 seconds. If you have
set the Help function on, the message HeartRate signal found is displayed. Your heart rate
is measured but not recorded until you have started the exercise. To record your heart rate
and other exercise data, see the chapter Exercise Recording on page 13.
ENG
9
Page 10
Coded Heart Rate Transmission
Coded heart rate transmission reduces interference from other heart rate monitors that are
close by. To make sure that the code search is successful and to ensure trouble-free heart rate
monitoring, keep the wrist unit within 1 meter/3 feet of your transmitter. Check that you are not
near other people with heart rate monitors or any source of electromagnetic disturbance
(for further information on interference, see Precautions on page 75).
A frame around the heart rate symbol indicates a coded heart rate transmission.
A heart rate symbol without a frame indicates a non-coded heart rate transmission.
The heart rate measurement functions also in non-coded mode, especially if there aren’t any
sources of interference nearby.
To detach the connector from the strap, apply pressure with your thumb and forefi nger and turn
your hand as indicated in the picture.
Note: If the wrist unit does not display your heart rate, or it displays Check WearLink!, make sure that the
transmitter electrodes are moist and that the strap is snug enough. Bring the wrist unit near the Polar logo on
the transmitter to restart heart rate detection.
10
ENG
Page 11

2.2 POSITIONING THE POLAR S1 FOOT POD
When using the footpod for the fi rst time, you have to insert the battery into the footpod. The battery comes with the product
set. In this case start from the chapter Assembling the S1 Foot Pod Battery on this page.
When changing the battery, check that there is suffi cient power in the footpod battery. You can check this by pressing and
holding the red button on the footpod. If a green light starts to fl ash, you can start attaching the footpod onto your shoe. If
there is no light, the battery needs to be replaced.
Assembling the S1 Foot Pod Battery
The estimated average battery life span of the footpod is 20 hours of use. You can replace the battery yourself. If you do so,
follow the instructions below carefully. If you prefer Polar to replace the battery, you can send or take the sensor to a Polar
Service Center. There the sensor is tested after the battery is replaced.
1.
Fork
2.
Battery cover
ENG
Top cover
Battery case
1. Detach the footpod from the fork by unfastening the fl ap and lifting the foot pod from the fork.
2. Remove the black top cover from the footpod by lifting it from the battery cover. You can use
the front edge of the fork to remove the cover (see picture 1).
3. Open the battery cover carefully. Pull out the battery case (see picture 2). Replace the old
battery (AAA) with a new one.
4. Insert the battery case back inside the footpod. Make sure that the battery case slides into
the grooves of the sensor. Be careful not to touch the switch on the foot pod while sliding
the battery case in or out.
5. Check that the sealing ring is in the groove to secure water resistance. Close the battery
cover and place the black top cover on top of the footpod. Make sure that it is secured.
6. Test the footpod by checking that the green light starts to fl ash after you press and hold the
red button on the footpod. Press and hold the red button again to turn the footpod off.
7. Battery should be disposed of properly according to local regulations.
11
Page 12
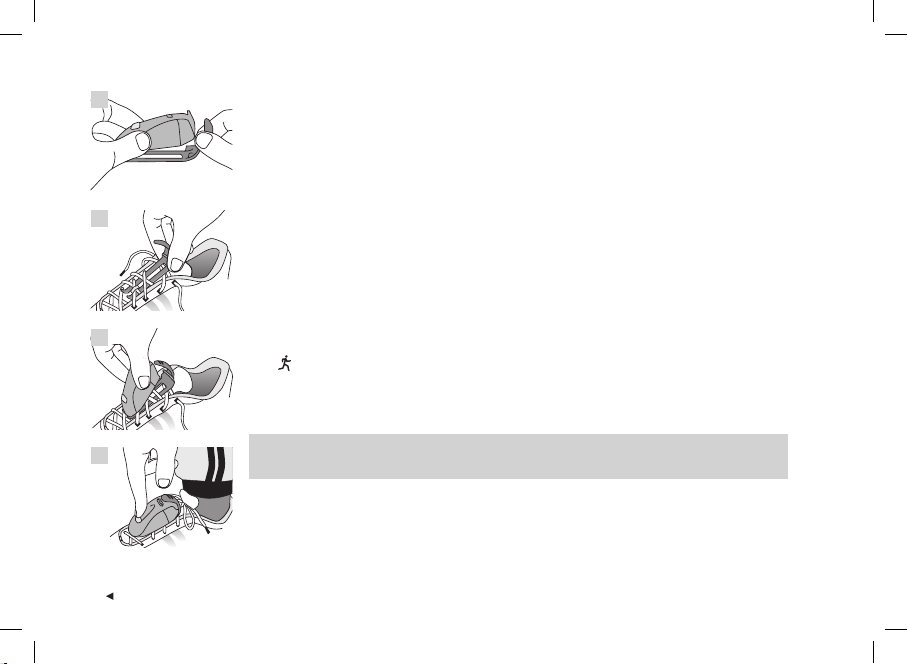
1.
Attaching the S1 Foot Pod on Your Shoe
1. Detach the fork from the footpod by unfastening the fl ap and lifting the footpod from the fork.
2. Loosen your shoelaces and place the fork under the laces, above the tongue of the shoe.
Tighten the laces.
3. Attach the footpod to the fork by fi tting the front part (closer to the red button) of the footpod
to the fork and pressing from the rear. Fasten the fl ap. Make sure that the footpod does not
2.
move and that it is aligned with your foot.
4. Turn the footpod on after your heart rate is displayed on your running computer. Press and
hold the red button on the footpod until the green light starts to fl ash.
After exercising, turn the footpod off by pressing and holding the red button until the green
light fades.
3.
Note:
• If you have turned on the Help function on your running computer, Footpod signal found and a symbol
are displayed when turning the footpod on.
• If the message Check Footpod! is displayed, the running computer cannot receive any information from
the footpod. See chapter Frequently Asked Questions on page 77 for further instructions.
• When the green light on the footpod turns red, you need to replace the battery before your next run.
4.
12
Tip: The more secure the footpod, the more accurate the speed and distance functions. Ensure the
maximum number of laces are holding the fork in place.
ENG
Page 13
Calibrating the Polar S1 Foot Pod
Calibrating the footpod improves the accuracy of speed / pace and distance measurements. It is recommended that you
calibrate the footpod when you use it for the fi rst time, if there are signifi cant changes in your running style or if the position
of the footpod on the shoe is dramatically changed (e.g., if you have changed your running shoes).
You can calibrate the S1 Foot Pod by running a preset distance at a steady pace. If you already know the calibration factor
(e.g., when moving from a fl at terrain to a hilly terrain), you can set the factor manually.
For more information on how to calibrate the footpod, see page 43.
2.3 EXERCISE RECORDING
By pressing Start in the Time mode, you can start your exercise.
1. Wear the transmitter as described in the chapter Measuring Your Heart Rate on page 9.
2. Start from the Time mode. Press the Red button.
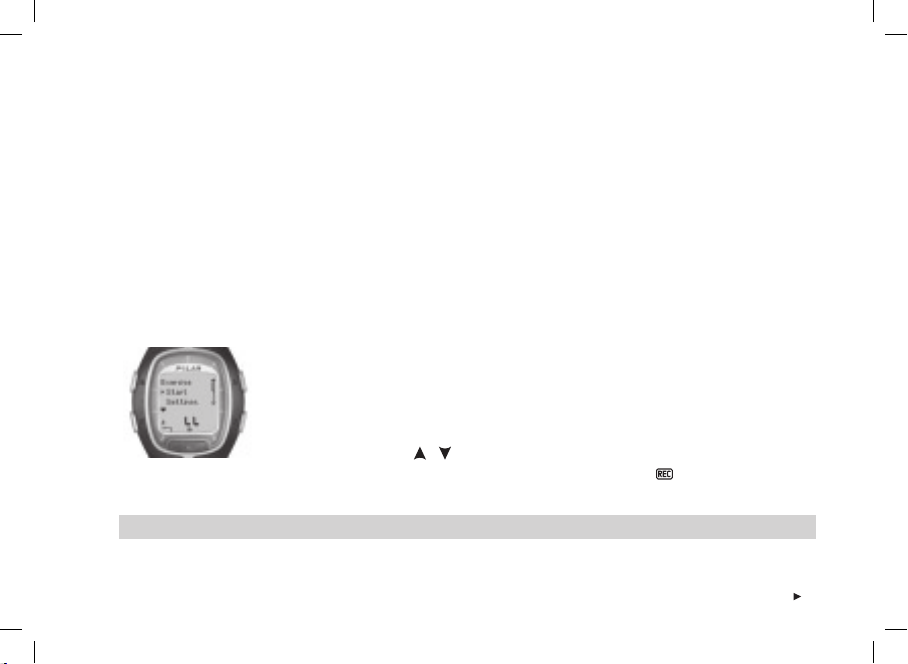
3. The running computer is in the Standby mode. Start and Settings are displayed. The default
exercise type fl ashes on the upper row. The wrist unit automatically starts searching for your
heart rate but your exercise is not recorded.
4. Select Start with the / buttons. Confi rm your selection by pressing the Red button.
The stopwatch starts running and the exercise recording symbol is displayed. The
stopwatch and calculations are activated and recording of the exercise starts.
Tip: Alternatively, you can quickstart exercise recording in Time mode by pressing and holding the Red button.
ENG
13
Page 14

Note:
• Before starting the exercise recording you can change the default exercise to another in the Settings mode. In the Settings mode select
Exercise with the Red button and choose the desired exercise with the
the Red button. The running computer returns automatically to the Standby mode.
• If you are starting an exercise that requires the footpod but you have not switched the footpod on, (Exercise name) requires Footpod
/ buttons. Confi rm with the Red button. Choose Select with
is displayed when starting the exercise. Switch on the footpod and activate the footpod setting on your running computer to continue the
exercise. For further information, see Feature Settings on page 43. If you do not change the footpod settings and press the Red button on
your running computer again, Exercise changed is displayed and the exercise will be automatically changed to Free exercise, which does
not require the footpod.
• If OwnZone is selected, the OwnZone determination procedure begins. For further information, see Determining Your OwnZone Heart
Rate Limits on page 59.
• The Battery Low message appears in the exercise mode when the battery of the running computer needs to be replaced. In that case,
see instructions in the chapter Care and Maintenance on page 72.
Tip: Use the Standby mode when you want to measure your heart rate but do not want to record it, e.g., when waiting for an event or
a competition to start.
• To return to the Time mode, press the Stop button twice.
14
ENG
Page 15

2.4 FUNCTIONS DURING EXERCISE
During your workout you can:
Store laps and view lap times.
View your current heart rate (in beats per minute or as a percentage of your maximum heart rate).
View the total duration of the exercise so far.
View how many calories you have burned during the exercise.
Check your speed / pace.
Check the distance you have run so far.
View the time of day.
Check with the timer or the distance alarm how much time is left of a particular phase before the phase
ends, and change to another phase.
Check your target heart rate zone and check whether you are within your target limits.
View your speed / pace limits.
View your heart rate intensity and lock the heart rate to a specifi c sport zone with ZoneLock. For more
information on Polar sport zones, see page 61.
Note:
• Your exercise information is saved only if the stopwatch has been on for more than one minute or if at least one lap has been stored.
• What you can view on the display during your workout depends on the display settings. See the next page for more information.
ENG
15
Page 16
Default views on the display:
Your running computer offers you a simultaneous view of three different lines of run information. During your exercise you
can view the following 5 default views of the display when using the footpod (only 3 display views when you do not use
the footpod). You can easily switch the display with the / buttons during your workout. The chance to view different
displays will help you view the desired information during your training.
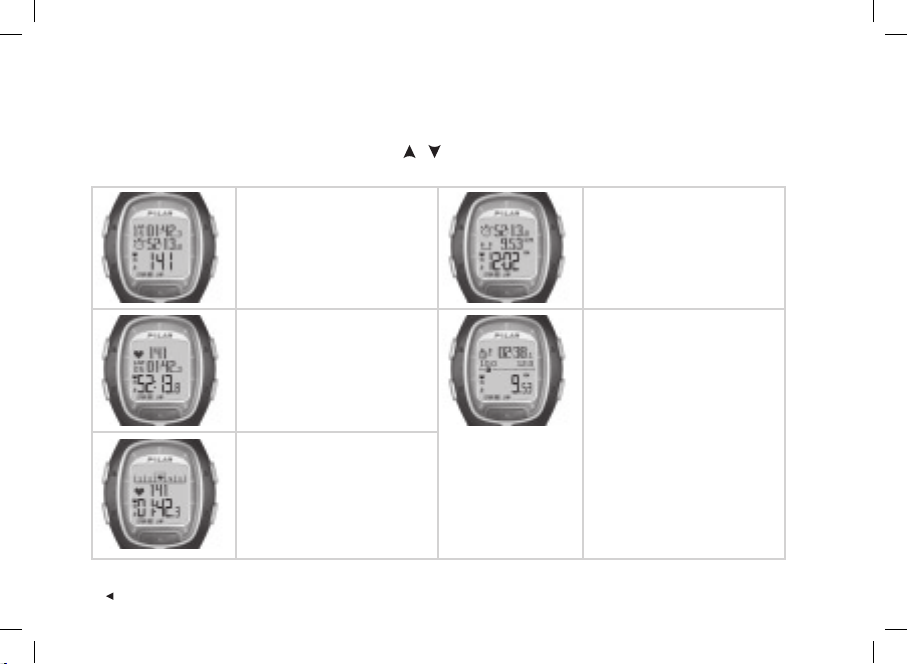
Heart Rate view
Speed / Pace / Lap time
•
(if footpod is off, lap time will
be displayed)
• Stopwatch
• Heart rate
Speed / pace view
displayed, if footpod is off)
• Stopwatch
• Distance
• Speed / pace (depending on
the selected speed view)
(will not be
Stopwatch view
• Heart rate
• Lap number and time
• Stopwatch
Lap time view
• Sport zones /
Target heart rate zone /
Target speed / pace zone
• Heart rate
• Lap time
Note: The display variations depend on your settings. See next page for instructions on how to change the displays.
16
Distance view (will not be
displayed, if footpod is off)
• Zone number and
countdown timer or distance /
Lap time
(Lap time will be displayed
if you have not set any timers
or distances to guide you to
change the zone)
• Sport zones /
Target heart rate zone /
Target speed or pace zone
• Distance
ENG
Page 17
Changing the information shown on the display during your exercise:
You can personalize the displays with the display settings. It is up to you to decide which display combination you want to view.
1. Press Stop to go to the Stop menu. During the time you adjust the display, your exercise recording is paused.
2. Choose Settings with the / buttons. Confi rm with the Red button.
3. From the Settings menu select Display. You can always change the displays Heart Rate, Stopwatch and Lap time.
When the footpod setting is on you can also change the Speed / Pace and Distance views. Select the view to be altered
with the / buttons.
4. When the Red button is pressed, the top row starts blinking. Browse the display information options with the /
buttons and confi rm your selection with the Red button:
Stopwatch
Lap time
Time of day
5. Secondly the middle row starts blinking. Repeat the same procedure as above.
6. Press Stop twice to return to the Stop menu and continue your workout by selecting Continue.
Note:
• To return the default display view, press and hold the Light button when the upper or middle row is blinking. Return Defaults? No / Yes
is displayed. Select Yes with the / buttons and confi rm with the Red button.
• In the Exercise mode you can select the display that you have most recently changed by pressing and holding the
• Displays can be changed also before the exercise in Standby mode. Select Settings in Standby mode and choose Display from the menu.
Proceed as specifi ed above.
Tip:
• Choose a display which corresponds to the feedback you require. For example, when training requires a set pace use a display with speed.
• Choose a display with Polar sport zones for an interval set. For a long run with a set distance, using a display with distance can be helpful.
Calories
Heart rate
Countdown timer / distance
Speed / Pace
Distance
Target zone limits
button.
ENG
17
Page 18
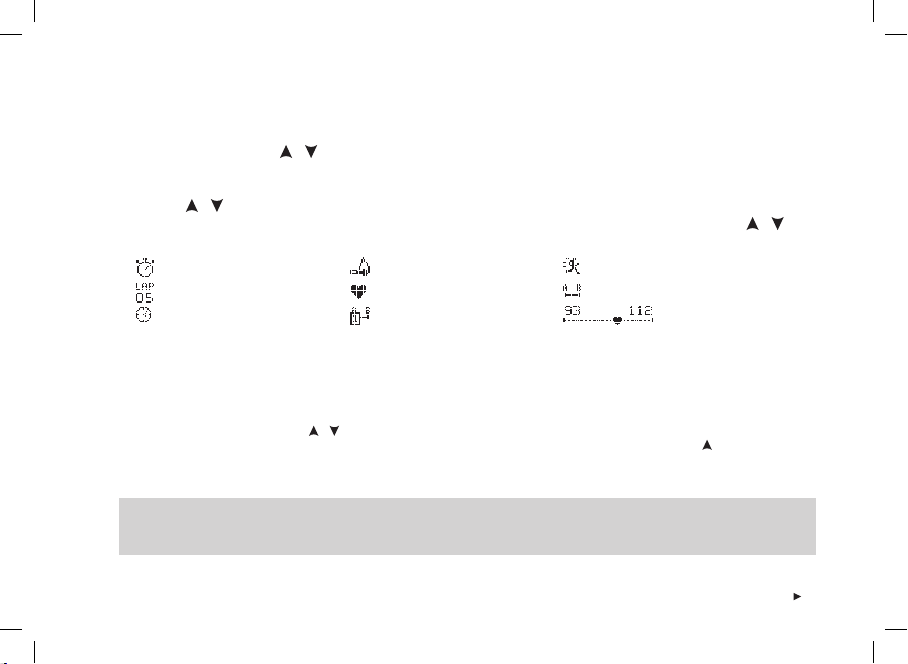
Storing lap and split time:
Press the Red button to
store lap time.
Lap number, average heart
rate for the lap, and lap
time are displayed.
You can zoom in the features on the display to bring out information:
In exercise mode press the button (long press). You can see the middle row information
zoomed in, and a defi nition of the feature is displayed on the upper row. If you press the button
(long press) again, the display with three rows returns.
Note: You cannot zoom the target zone graphs.
Tip: During a road race or a running event, for example, it is useful to monitor your heart rate as a
percentage of your maximum heart rate as well as time (lap time on the top row and split time on the
lowest row). This will help you to stay in the correct heart rate zone and make it to the fi nishing line.
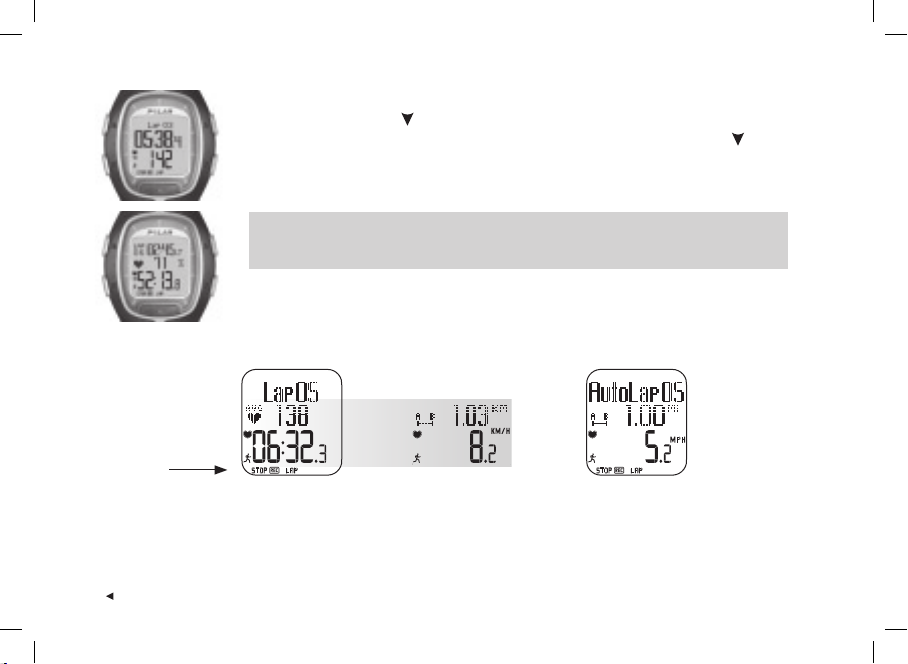
After a few seconds the
average speed / pace and
distance for the lap are
displayed if the footpod
function is on.
If you have switched on
the AutoLap function, your
running computer will
record laps automatically.
18
ENG
Page 19

The lap time indicates the elapsed time for one lap. The split time is the elapsed time from the beginning of the exercise
until storing a lap time (for example from the beginning of the exercise until the 4th lap was stored).
Note:
• When the running computer is able to store less than 42 laps, the running computer beeps and Memory Low appears on the display.
• If the memory of your running computer is full, the running computer beeps and Memory full is displayed. The exercise is recorded and
lap times are shown but not accumulated and saved to the File.
• When the maximum exercise time is reached, the running computer beeps and Maximum exercise time is displayed for 10 seconds.
The exercise timers are stopped and the exercise is not recorded anymore.
Locking the heart rate zone on a specifi c sport zone (ZoneLock): When exercising without
preset target zones you can lock your heart rate on a specifi c sport zone. If for example you are
running with a heart rate of 130 bpm which is 75% of your maximum heart rate and match
to the sport zone 3, you can press and hold the Red button to lock your heart rate to this zone.
SportZone 3 Locked 70%-79% is displayed and the graph will be displayed on the Lap Time
view (if you have not changed the displays before). When you continue with your exercise and
happen to fall below or go beyond the sport zone, the running computer will alert you by beeping (if the TZ Alarm function is
on). If your heart rate is lower than 50% or higher than 100% of your maximum heart rate, you cannot see the heart symbol
on the chart.
You can unlock the sport zone by pressing and holding the Red button. SportZone 3 Unlocked appears on the display.
For more information on how to apply Polar sport zones in your training, see page 61.
Tip: Locking your heart rate to a specifi c sport zone can be particularly helpful when on a recovery run. This will ensure full recovery before
your next hard training session.
Pausing exercise: Press the Stop button. Exercise recording, stopwatch, and other functions are paused. To continue, select
Continue from the menu and press the Red button.
Tip: When you need to stop for a drink or you are at a set of traffi c lights, you can pause the exercise recording.
ENG
19
Page 20
Exercising in the dark (Night mode): If you activate the backlight by pressing the Light button during an exercise recording,
the backlight will reactivate automatically during the same exercise every time you press any button or use the -Touch
function. The backlight activates also when AutoLap is saved.
Viewing the Settings menu: Press and hold the Light button. In the Settings menu you can change the following features of
your running computer:
• Keylock
• TZ Alarm*
• Change zone**
Note: For more information on the features, see the chapter Feature Settings on page 43.
*For more information on TZ Alarm, see the chapter Target Zone Limits on page 58.
**Displayed only when exercising in a mode with preset target limits. You can change the zone manually to another by selecting this.
Tip: When you are in an environment where you do not want to bother other people with beeping sounds, turn off the target zone alarm.
• HR view
•
-Touch
Speed view
•
• AutoLap
Keylock: You can lock or unlock all buttons except the Light button during exercise. Keylock is useful when engaging in
sports where you might accidentally press buttons. To lock the buttons, press and hold the Light button to go to the Quick
menu. Select the Keylock from the menu with the / buttons and press the Red button to confi rm. The symbol is
displayed. To unlock the buttons press and hold the Light button. Hold to unlock buttons is displayed. Press and hold the
Light button until the symbol disappears. Buttons unlocked is displayed.
20
ENG
Page 21
Changing settings during exercise:
In the exercise recording mode press the Stop button. Select Settings with the / buttons and confi rm with the Red
button. During the time you adjust the settings your exercise recording is paused. The Settings menu includes the following:
• TZ Alarm: Switch the Target Zone Alarm sound on / off.
TZ Alarm is for alarming when you do not stay within the
preset target zone limits, i.e., when your heart rate,
speed or pace is below the lower limit or above the
higher limit.
• Change zone: When exercising with more than one
target zone, you can change from one zone to another.
This is not displayed when exercising without target
zone limits.
• HR view: Choose whether you wish to see the heart rate
in beats per minute (HR) or percentage of the maximum
heart rate (HR%).
•
-Touch: View information during your exercise
recording without pressing any buttons. Just bring the
wrist unit near the Polar logo on the transmitter, and the
selected information shows on the display. You can
choose the -Touch function between:
• Show limits (View preset heart rate limits.)
• Take lap (Record lap times.)
• Change view (Change the display view to another.)
• Light (Illuminate the display.)
• Off (Set the -Touch function off.)
ENG
• Speed view: Select the way the speed is displayed. Your
options depend on your unit selection:
• km/h or mph (speed)
• min/km or min/mi (pace)
• AutoLap: Choose the automatic lap function on / off. If you
choose it to be on, your running computer records laps
automatically after the selected distance. To use the
AutoLap function, make sure that the footpod is
switched on and the footpod function is on in your
running computer.
• Display: Choose from different ways to display information
during exercise. You can select the desired information
for the upper row and the middle row. For instructions
see page 17.
Note: If you have set timers or distances to inform you to get to
another target zone, you will hear a timer /
need to change the zone. If you have turned the sound off, you will
see Timer (timer number)
display. For more information on how to use timers
guide your training, see Exercise Settings on page 35.
or Distance (distance number) on the
distance beep when you
or distances to
21
Page 22
2.5 STOPPING THE EXERCISE
Press the Stop button to pause the workout recording. The Stop menu is displayed. The recording
of your exercise is paused.
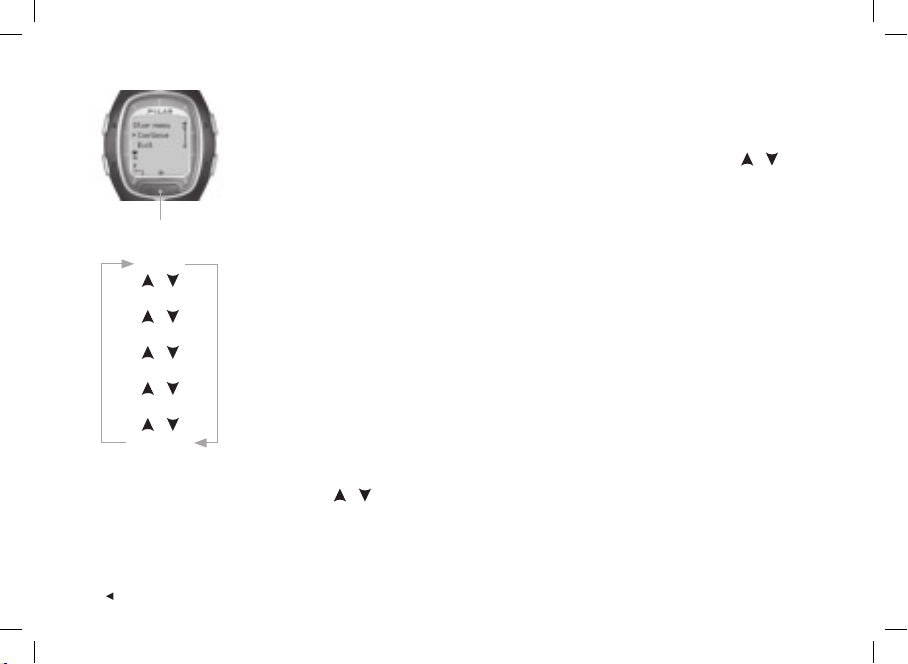
The Stop menu includes the following submenus. You can move in the menu by pressing / .
Confi rm with the Red button.
22
STOP MENU:
Continue
/
Exit
/
Summary
/
Settings
/
Reset
/
(Free mode)
• Continue: Continue your workout.
• Exit: Stop your workout recording.
• Summary: You can check summary information during the exercise and continue your
workout after that. See the next page for more information.
• Settings: Change the settings. See more on page 21.
• Reset: Reset your current exercise information and start your exercise from the beginning.
The exercise information you just reset will not be recorded in the File. Reset Exercise?
No / Yes is displayed. Confi rm your selection with the Red button.
• Free mode: You can move on to the Free mode when exercising in another exercise mode
than the Free mode. For more information on different preset exercises on your running
computer, see page 35.
(Note: When exercising in the Free mode, you cannot see this option in the Stop menu.)
To stop the recording press the Stop button again. Alternatively, you can choose Exit from the
menu with the / buttons.
ENG
Page 23
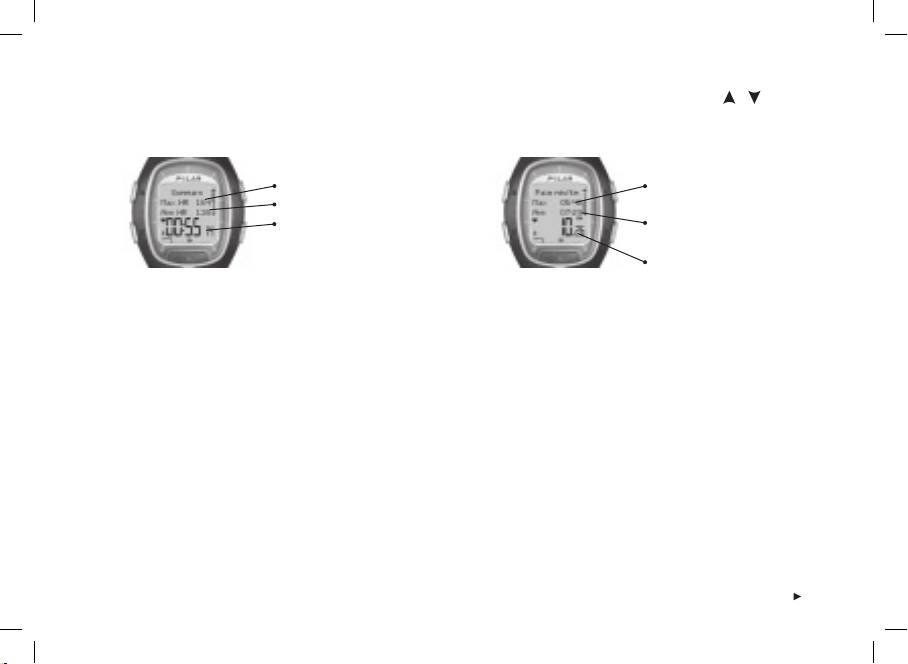
Summary: The following information is displayed when you select Summary. Scroll the information with the / buttons
or stop the review by pressing the Stop button. Detailed exercise information is placed in the File after the exercise, see the
next chapter for more information.
Summary
Max HR (maximum heart rate)
Avg HR (average heart rate)
Duration (total exercise time)
Pace / Speed
Max pace / Max speed
(maximum pace / speed)
Avg pace / Avg speed
(average pace / speed)
Distance (total amount of
kilometers / miles)
ENG
23
Page 24
3. FILE - VIEWING RECORDED INFORMATION
After training, it is good to review the details of your workout. Your exercise information is saved
in File. Note that the information is saved only if the stopwatch has been on for more than one
minute or if at least one lap has been stored.
Tip: You can transfer your exercises from your running computer to the www.PolarRunningCoach.com
web service for further analysis. For more information, see page 70.
ExerciseLog
ExerciseLog
24
FILE:
/
Weekly
/
Totals
/
Delete
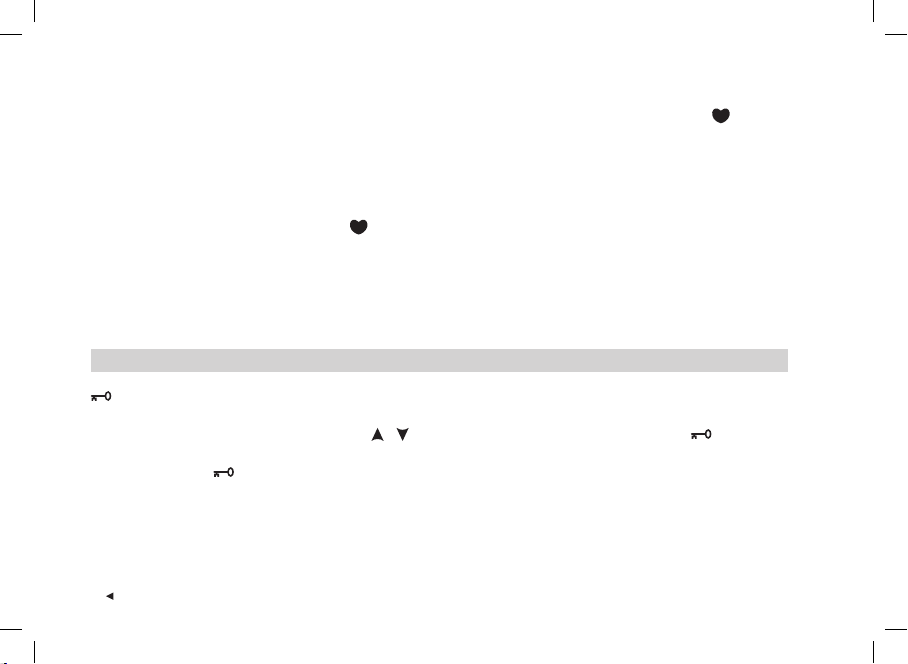
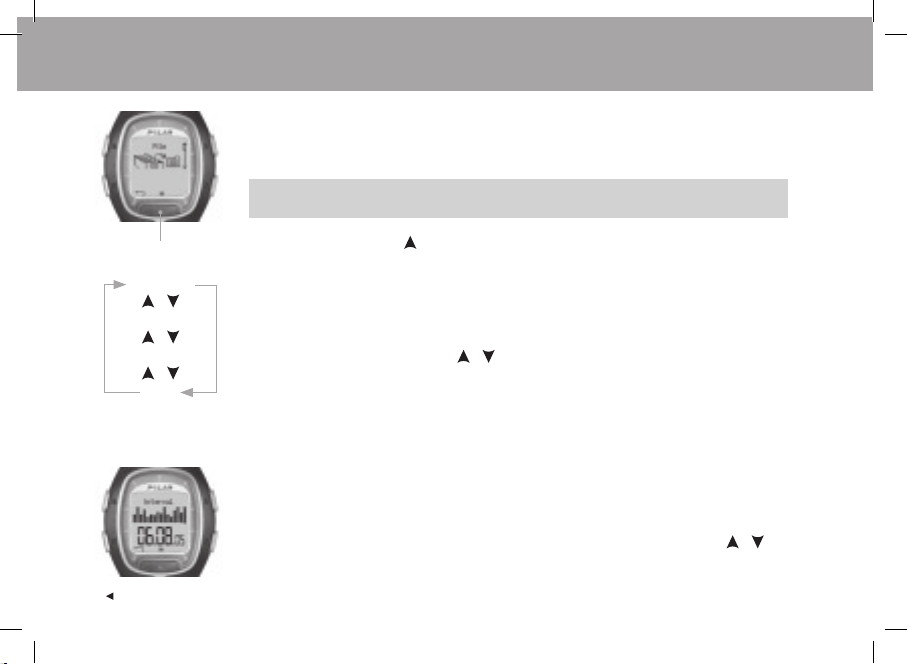
1. In the Time mode, press . File is displayed.
2. Press the Red button. The submenu includes the following:
• ExerciseLog
• Weekly
• Totals
• Delete
3. Select the desired option with the / buttons and enter with the Red button. Browse
through the recorded information.
4. To stop viewing information, press the Stop button.
• To return to the Time mode, press and hold the Stop button.
From ExerciseLog you can compare the relative duration of your exercises and recognize
patterns and overall trends.
The summary fi le includes max 16 of your latest exercises displayed as bars. The height of
the bar indicates the duration of the exercise. You can browse through them with the
/
buttons. Select one of the exercises with the Red button.
ENG
Page 25
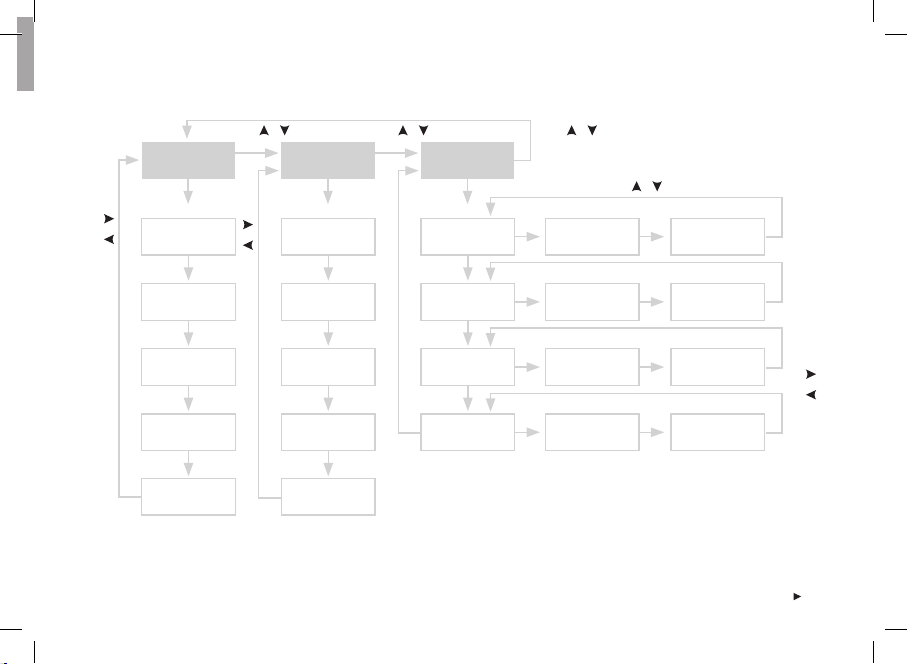
The process of viewing the recorded information for an exercise follows the pattern shown in the picture:
/ Press / Press /
Press
buttons.
/
Exercise name
and duration
Press
Red
HR
buttons.
/
Press
Red
Zone 1
Red button.
Press
Red
Lap 1 time
LapsSport zones
/
Press
Lap 2 time
Lap 3 time
Target zones
Time in zones
Speed / pace
Scroll the different values of the exercise with the
Calories
Press Stop to return
to the Exercise main
display.
ENG
Zone 2
Zone 3
Zone 4
Scroll the values of different sport zones with the
Zone 5
Press Stop to return
to the Sport zones
main display.
Lap 1 HR
Lap 1
speed / pace
Lap 1 distance
Press Stop to return
Scroll the different values of the lap by pressing the
to the Laps main
display.
Lap 2 HR
Lap 2
speed / pace
Lap 2 distance
The information shown on the display
is described in detail in this chapter.
Lap 3 HR
Lap 3
speed / pace
Lap 3 distance
buttons.
/
Compare the values of different laps with
the
25
Page 26
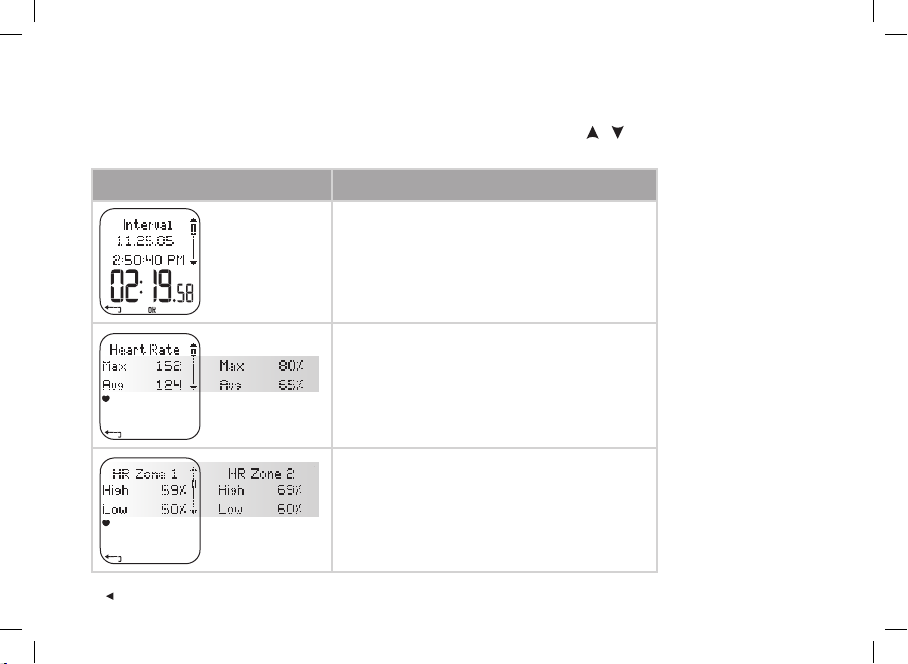
The recorded information shown on the display is described here in detail.
Press the Red button to enter the Exercise menu. View the recorded information with the / buttons. After reviewing the
information press Stop to return to the Exercise menu.
Recorded exercise fi le
information
Display reads:
• Name of the exercise
• Date
• Starting time of the exercise
• The total duration of the exercise
• Average and maximum heart rate
Alternation between:
- values in beats per minute
- percentage of maximum heart rate
Note: The alternating information switches automatically
on the display.
• Heart rate / pace / speed zones: High and low values*
Alternation between:
- different zones and values
*Not displayed when the target zones are off.
26
ENG
Page 27
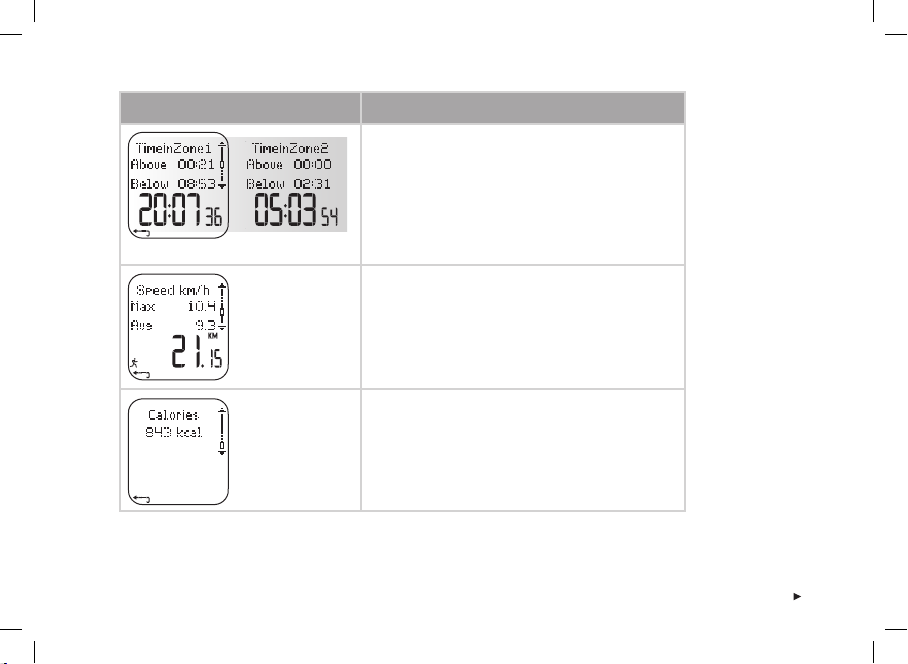
Recorded exercise fi le
information
Display reads:
• Time above, in, and below target zone*
Alternation between:
- different zones and values
Note: The alternating information switches automatically
on the display.
*Not displayed when the target zones are off.
• Maximum and average speed or maximum and
average pace, total distance
Press the Light button (long press) to alternate the speed
and pace values.
• Burned calories
ENG
27
Page 28
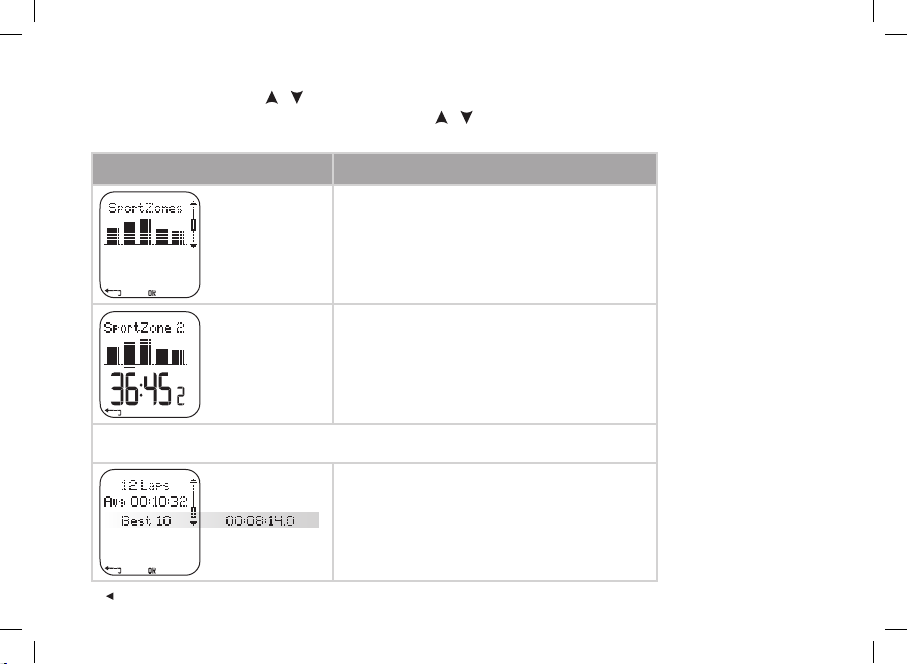
In the Exercise menu press the / buttons to enter the SportZones menu. Then press the Red button to enter the
SportZones submenu. View the recorded information with the / buttons. After reviewing the information press Stop to
return to the SportZones menu.
Recorded exercise fi le
information
Press the Red button to enter the Laps submenu. View the recorded information of one lap with the Red button.
After reviewing the information press Stop to return to the Laps menu.
Display reads:
• Sport zones
On the display you can see the distribution of time between
the fi ve Polar sport zones. The bar height indicates the
total time spent on the different sport zones. For more
information on Polar sport zones, see page 61.
• The total time spent on each of the fi ve sport zones
• Number of laps
• Average lap time
Alternation between:
- number of the best (shortest) lap
- lap time
28
ENG
Page 29

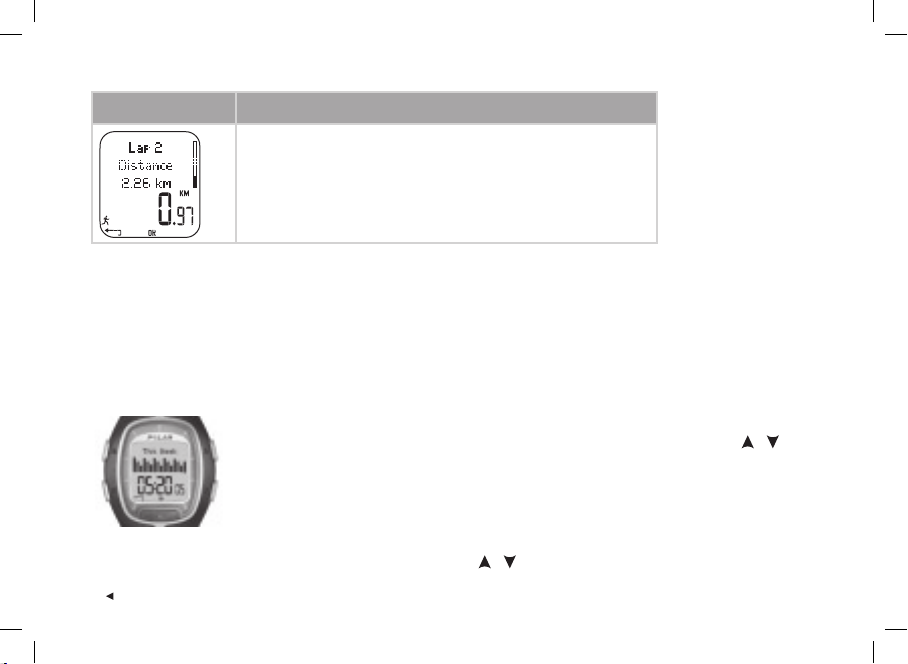
Recorded exercise fi le
information
Display reads:
Compare the information between different laps with the / buttons.
• Lap number
• Split time for the lap
• Lap time
• Lap number
• The average and maximum heart rate for the lap
Alternation between:
- values in beats per minute
- percentage of maximum heart rate
• The end heart rate of the lap
• Lap number
• The average speed / pace of the lap
• The maximum speed / pace of the lap
Press the Light button (long press) to alternate the speed
and pace values.
ENG
29
Page 30
Recorded exercise fi le
information
Note:
• The last lap will not be automatically selected as the best lap. If you wish to store the last lap before ending the exercise,
use the Red button to store the lap instead of the Stop button (e.g., at the fi nishing line in a competition).
• The lap information is displayed, when you have made at least one lap during your exercise. If you have made only one lap, there will be
two laps saved in the memory, because the last lap is saved automatically when fi nishing the exercise with the Stop button.
Display reads:
• Lap number
• Distance from the beginning of the exercise to the end of the lap
• Lap distance
• To return to Time mode, press and hold Stop.
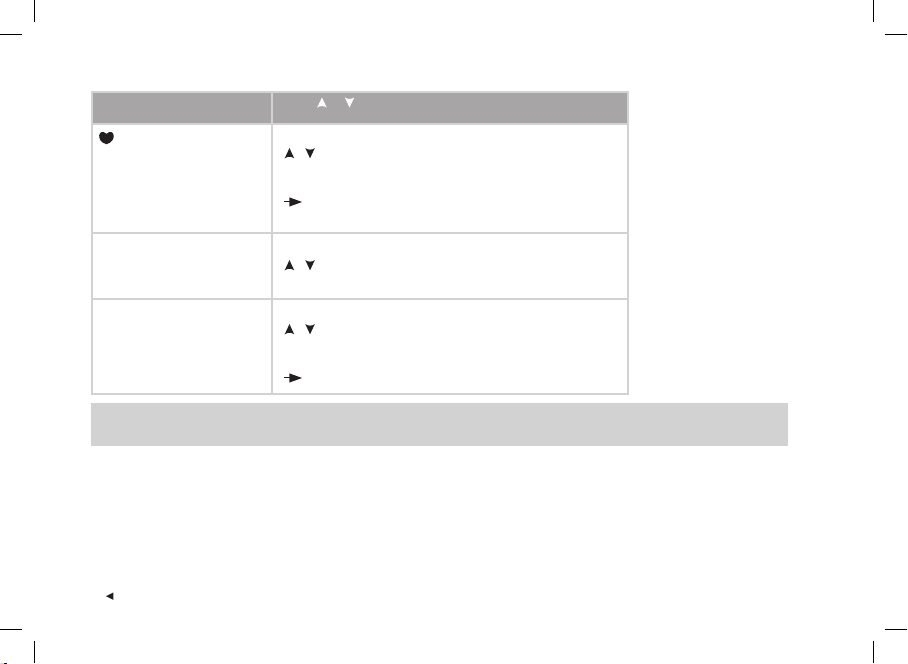
Weekly
In Weekly summary you can view accumulated data of your exercises for previous weeks. Use
this fi le as a weekly counter of your training results. Scroll the displayed weeks with the /
buttons and view the total duration for the exercises on the lower row. To choose the week,
press the Red button.
The fi rst bar named This week displays the exercise summary for the current week. The previous
bars (named after the Sunday of the week in question) display the summary for the past 15 weeks.
Press the Red button and scroll with the / buttons to view the information.
30
ENG
Page 31

Weekly exercise information
• Burned calories
• Kilometers or miles you have run
altogether
• Duration
• Weekly exercise time divided
into Polar sport zones
Press the Red button to enter:
• Total duration for each of
the fi ve sport zones (scroll with
/ buttons)
the
Totals
The total values include cumulative values of information recorded during your training sessions. Use the Total values fi le
as a seasonal (or monthly) counter of your training values. The values are updated automatically when exercise recording is
stopped. This function keeps track of your cumulative values starting from the last reset. For further information on how to
reset the values, see page 33.
Viewing Total Values
1. In the File menu, select Totals with the / buttons.
2. Press the Red button.
ENG
31
Page 32

3. Use the / buttons to scroll through the following information:
Total exercise information
Total Duration
• Total recorded exercise duration
• The date cumulation started
Total Distance
• Total distance
• The date cumulation started
Total Calories
• Total amount of calories burned
• The date cumulation started
Total Exe.Count
• Total count of exercises
• The date cumulation started
Note: If there are no Total values accumulated yet, Empty is displayed.
32
Reset Totals
• Reset the total values
ENG
Page 33

Resetting total values
1. In the File menu, select Totals with the / buttons. Press the Red button.
2. Select Reset Totals with the / buttons and press the Red button.
3. Choose the value you wish to reset from the menu and confi rm with the Red button.
• All
• Duration
• Calories
• Exe.Count
• Distance
4. Reset ... ? No / Yes is displayed. To reset the value, select Yes with the Red button. The deleted information cannot be
retrieved.
5. Alternatively you can reset all values by selecting All from the menu. Reset Totals? is displayed. By selecting Yes all
the total values will be reset. By selecting No you will go back to the Reset menu.
Note: When the Total values memory becomes full, the accumulation starts from 0 again. See the maximum values for Totals on page 80.
Delete
In Delete you can delete your previous exercises one by one, all exercises at the same time or just total values.
1. In the File menu, select Delete with the / buttons. Press the Red button to confi rm.
2. Scroll through the following information with the / buttons:
• Exercise: Select a single exercise you wish to delete.
• All Exes: Delete all exercises from the memory with one button press.
• Totals: Delete the total values one by one or all totals at the same time.
3. Delete Exercise? No / Yes is displayed. Select Yes and confi rm with the Red button.
• To return to the Time mode, press and hold the Stop button.
ENG
33
Page 34

4. SETTINGS
SETTINGS:
Exercise
/
Features
/
User
/
General
/
Watch
You can view or change the settings of your running computer in the Settings menu. Settings
can also be confi gured and transferred to your running computer by using PC. For further
information, see page 70.
To set values:
• Select or adjust using the / buttons.
• The numbers scroll faster if you press and hold the
/ buttons while adjusting values.
• Accept your selection and go deeper into the menu with the Red button.
• Cancel your selection or return to the previous mode or menu by pressing the Stop button.
Tip: Learn how your training can benefi t from your running computer’s features by consulting the running
and training tips at www.PolarRunningCoach.com.
34
ENG
Page 35

4.1 EXERCISE SETTINGS
Exercising with target zones produces different health benefi ts. Zoned exercise means that an
exercise has been divided into 1-3 zones according to your heart rate, speed or pace. The end of a
zone is marked with a timer. Alternatively, the end of a zone can be marked with a distance.
ENG
EXERCISE:
Free
/
Basic
/
Interval
/
OwnZone
/
Add new
An example of a heart rate-based
zoned exercise:
HR
max
100
90
80
70
60
50
Timer 1 /
Distance 1
Zone 2Zone 1 Zone 3
Timer 2 /
Distance 2
Timer 3 /
Distance 3
... Zones
1-3
repeat
An example of speed / pace-based
zoned exercise:
Speed
Pace
km/h
min/km
3:00
20
3:30
17
4:00
15
4:30
13
5:00
12
5:30
11
Timer 1 /
Distance 1
Zone 2Zone 1 Zone 3
Timer 2 /
Distance 2
... Zones
1-3
repeat
Timer 3 /
Distance 3
35
Page 36

Your running computer offers you three kinds of preset zoned exercises:
Basic Zone 1 Heart rate on sport zone 3 No Timer / Distance
Basic training with moderate intensity. Suggested duration, for example, 45 min.
Interval Zone 1 Heart rate on sport zone 2 Timer: 5 min
Zone 2 Heart rate on sport zone 4 Timer: 3 min
Basic interval training. Good for users who are not used to doing interval training.
Exercise starts with a 5-minute warm up followed by a 3-minute hard interval and a 5-minute light recovery period to be
repeated, for example, 4 times. The exercise is fi nished with a 5-minute cool down.
OwnZone OwnZone 65-85% of maximum heart rate No Timer /
Distance
Basic OwnZone-based (daily fi tness) training with moderate intensity. Suggested duration, for example, 45 minutes.
For more information on OwnZone, see page 59.
When you begin your workout, you can easily select a preset exercise from your running computer settings. For example,
if you run the same track every Tuesday, just select the exercise every time you go running.
36
ENG
Page 37

1. In Settings press the Red button and select Exercise from the menu. Confi rm with the Red button.
2. Select the desired exercise by choosing Select with the / buttons. Press the Red button.
• Free (No preset settings for the exercise. You can do any exercise you choose.)
• Basic
• Interval
• OwnZone
• Add new (You can add your own exercise.)
3. Once you have selected the desired exercise mode, you will have the following options for operating the exercise:
• Select
• View
• Edit
• Rename
• Default
Select an Exercise
By choosing Select you can set the exercise as a default when starting a new exercise.
1. In the Exercises menu select the exercise with the
2. Choose Select from the menu with the
/ buttons and confi rm with the Red button.
3. Selected as default exercise is displayed. Press the Red button to confi rm. When starting a new exercise this exercise
will act as a default.
/ buttons. Press the Red button to confi rm.
ENG
37
Page 38

View an Exercise
By choosing View you can check the preset exercise settings.
1. In the Exercises menu select the exercise with the / buttons. Press the Red button to
confi rm.
2. Choose View from the menu with the / buttons and confi rm with the Red button.
3. Scroll through the values with the / buttons:
• name for the exercise
• target heart rate / speed / pace limits for each zone
• timers
• time / distance for the zone
Note: The values differ according to the exercise you have chosen and its settings.
Edit an exercise
If you wish to modify a preset exercise (Basic or Interval) to fi t your needs, refer to the exercise adding process.
1. In the Exercises menu select the exercise with the / buttons. You cannot edit the Free exercise. Press the Red
button to confi rm.
2. Choose Edit from the menu with the / buttons and confi rm with the Red button.
3. Refer to the exercise adding process below.
Add a new exercise
You can also add your own exercise to your running computer settings. Firstly, you can set 0-3 zones for each exercise and
defi ne the heart rate limits or speed / pace limits for each zone. Secondly, you can set timers or distance values to guide you
during the exercise.
38
ENG
Page 39

See the diagram below to view the whole adding process:
New exercise added
Exercises
Add a new
exercise
Exercise
zone count
Set zones
for the
exercise
1-3 zones
0 zones
Zone type
Defi ne zone
type for the
exercise
- Heart rate
- Speed /
pace
Heart rate
Defi ne heart
rate limits
for the
exercise
- Polar
sport
zones
- Manual
Speed /
pace
Defi ne
speed /
pace limits
for the
exercise
Polar sport
zones
Defi ne the
heart rate
limits
Manual
limits
Defi ne the
heart rate
limits
Zone guide /
Guide type
Defi ne
timers /
distances for
the exercise
Timers
Defi ne
timers for
the exercise
Distances
Defi ne
distances
for the
exercise
To add a new exercise with 1-3 zones:
1. In the Exercises menu choose Add new with the / buttons and confi rm with the Red button.
2. Defi ne how many zones the exercise will include.
Zones 2-3
Repeat
limits and
timers /
distances
setting for
zones 2
and 3
ENG
39
Page 40

Exercise Zone Count
• 0-3 (If you choose 0 zones, see further information on the next page.*)
3. Defi ne the zone type for the exercise (heart rate-based exercise or speed/pace-based exercise).
Zone Type
• Heart Rate
• If you choose Heart Rate as the zone type, defi ne whether you wish to use Polar sport zones or manual limits to guide
your heart rate.
• SportZones
• Defi ne Polar sport zones as heart rate zones for the exercise.
• HR Zone 1: Choose the sport zone (e.g. Z1: 50-59% etc.) and confi rm with the Red button.
• Manual
• Defi ne the heart rate zone for the exercise manually.
• HR Zone 1: Set the high limit and low limit for the zone and confi rm with the Red button.
Continue from step 4.
• Speed / Pace (the option depends on the speed view selection)
• If you choose speed or pace for the zone type, the zones will be defi ned as speed or pace values.
• SpeedZone 1 or Pace Zone 1: Set the high and low limits for the zone and confi rm with the Red button.
Continue from step 4.
4. Defi ne whether you wish to hear a timer when you need to change from one zone to another or if you wish to change zone
after a specifi ed distance.
Continue from step 4.
40
ENG
Page 41

Zone Guide
• Timers
• Zone 1 timer: Set the timer for the zone (minutes and seconds).
• Distances
• Zone 1 distance: Set the distance for the zone (kilometers or miles, depending on your unit selection).
• Off
• Switch the timers and distances off. This means that you will not have guidance on when to change from one zone to
another during your workout.
5. When you have defi ned the fi rst zone, Zone 1 OK! is displayed. If you have defi ned more than 1 zone for the exercise,
repeat steps 3 and 4 until all zones have been defi ned.
6. When the exercise is ready, New exercise added is displayed. The running computer will return automatically to the
Exercises menu.
The new exercise will be added to the Exercises menu where you can select it for your workout.
*To add a new exercise without zones:
You can also add an exercise without zones. This means that you will not have guidance on when to change from one zone to
another during your workout. In this case you can change the zone during the exercise with ZoneLock. For more information
on ZoneLock, see page 19. You can still use timers or distances to guide your training.
1. In the Exercises menu choose Add new with the / buttons and confi rm with the Red button.
2. Exercise Zone Count
• Set the number of zones to 0.
ENG
41
Page 42

3. Defi ne whether you wish to hear a timer during the workout (e.g. as a reminder to drink) or set a distance (e.g. for
following lap times without recording them).
Guide type
• Timers
• Defi ne how many timers you wish to have for the exercise.
• Exercise Timer Count: 1-3
• Timer 1: Defi ne minutes and seconds for the timer.
• Distances
• Defi ne how many distances you wish to have for the exercise.
• Exercise Distance Count: 1-3
• Distance 1: Defi ne the distance (kilometers or miles, depending on your unit selection).
4. Repeat step 3 until you have defi ned timers or distances for the exercise.
When the exercise is ready, New exercise added is displayed and your running computer will return automatically to the
Exercises menu.
Note:
• Timer means that your running computer will alert you after a specifi ed time period.
• Distance means that your running computer will alert you after a specifi ed distance.
Tip:
• For more information on target zones and how to apply them in your workout, see Target Zone Limits on page 58.
• For training programs based on your heart rate, check www.PolarRunningCoach.com for more information.
• To return to the Time mode, press and hold the Stop button.
42
ENG
Page 43

ENG
FEATURES:
Footpod
/
Speed view
/
AutoLap
/
-Touch
/
HR view
/
SportZones
4.2 FEATURE SETTINGS
In Features you can set different functions on your running computer. The functions help you
get the most out of your exercise.
You can modify the following features:
• Footpod Select the footpod on or off and calibrate the footpod.
• Speed view Select whether you want to view speed or pace values.
• AutoLap Select if you wish your running computer to record laps automatically.
• -Touch Modify the -Touch function.
• HR view Select how your heart rate is displayed.
• SportZones Select the lowest value for each of the fi ve sport zones.
1. In the Time mode scroll with the / buttons until you reach Settings. Press the Red button.
2. Select Features with the / buttons and confi rm with the Red button.
3. Select the desired feature, press the Red button and follow the steps below:
The display reads: Press or to set and the Red button to accept
Footpod
• On / Off
• Calibrate
If you choose Calibrate:
Calibration
• Run
• Manual
/
• select the function
/
• select how to calibrate the footpod
43
Page 44

Calibration by running:
1. The display reads Calibration Distance 1.0 km. Adjust the distance how far you wish to run to calibrate the footpod and
press the Red button to confi rm. To measure the running distance accurately you can, for example, run a 400 m track on
a sports fi eld nearby you. It is important that you calibrate the footpod so that it matches the kind of terrain that you
normally run on. This ensures the accuracy of the calibration. The longer the distance you run the more accurate the
calibration result is.
2. Press Start And Run ...km is displayed. Turn the speed sensor on by pressing and holding the red button on the footpod
until the blinking green light activates.
3. Press the Red button and start the run by making the fi rst step with the sensor foot onto the starting line and run the preset
distance at a steady pace.
4. The display reads Press OK After ...km. Stop exactly on the stop line of the preset distance. Press the Red button.
5. Stand Still! Receiving Data. is displayed. Stand still with your arms down and wait until your running computer has
received the data.
6. When the calibration succees, Footpod Calibration Complete! Factor and a calibration value are displayed. The new
calibration factor is used.
7. If the calibration fails, Footpod Calibration Failed! is displayed. If you cancel the calibration by pressing the Stop button,
Footpod Calibration cancelled is displayed. When the calibration fails or you cancel the calibration the previous calibration
factor is used.
44
ENG
Page 45

Manual calibration:
When you know the calibration factor (i.e. you have calibrated the footpod previously) you can set the factor manually. The
calibration factor is calculated as a ratio of the actual distance to the uncalibrated distance. For example, if you run 1200
meters and the wrist unit shows a distance of 1180 meters, the calibration factor should be adjusted to 1200/1180 = 1.017.
1. The display reads Calibration Factor 1.000 and the number is fl ashing. Adjust the value and confi rm with the Red button.
2. Calibration Complete! Factor and the preset value is displayed. Press the Red button to get to the previous display.
Note:
• If your running computer has problems in fi nding the footpod signal, Footpod not detected! is displayed. Check that the footpod is on
and working and start the calibration process from the beginning. If further problems arise, see the chapter Frequently Asked Questions
on page 77.
• The calibration is done in metric units. This is because the most universal calibration location is a 400 m track, even in countries using
the imperial units.
Continue with the other settings:
The display reads: Press or to set and the Red button to accept
Speed view
• km/h or mph
• min/km or min/mi
AutoLap
• On
• Off
/
• select the speed or pace view (depending on your unit selection)
/
• select the distance after which your running computer records a
lap automatically (0.4-10.0 km / 0.2-6.2 mi)
ENG
45
Page 46
The display reads: Press or to set and the Red button to accept
-Touch
• Show limits
• Take Lap
• Change view
• Light
/
• select the function
(Feature) selected is displayed.
• Off
HR view
• HR
• HR%
SportZones
• Zone low limits
/
• select the value
/
• select the lowest value for each of the fi ve sport zones
SportZones OK is displayed.
Tip: Set AutoLap when running a race. A 1 km autolap is very helpful when running any events from 5 to 42 km because it will enhance
and speed up your event review.
• To return to the Time mode, press and hold the Stop button.
46
ENG
Page 47

USER:
Weight
/
Height
/
Birthday
/
Sex
/
Activity
/
Heart Rate
/
VO2 max
4.3 USER SETTINGS
Entering correct personal information ensures that the functions in your running computer
operate with the highest possible degree of accuracy. It is important that you give as realistic
values as possible.
1. In the Time mode, press the / buttons until Settings is displayed. Select with
the Red button.
2. Scroll with the / buttons until User is displayed and confi rm with the Red button.
3. Follow the steps below:
Note: The weight and height units depend on your unit selection. You can change the units in general
settings. To reach the general settings press Stop and select General > Units.
The display reads: Press or to set and the Red button to accept
4. Weight
• kg
• lb
5. Height
• cm
• ft / in
/
• adjust your weight
/
• adjust your height
ENG
47
Page 48

The display reads: Press or to set and the Red button to accept
6. Birthday
• Day / Month
• Month / Day
• Year
7. Sex
• Male / Female
8. Activity
• Top
• High
• Moderate
• Low
9. Heart Rate
• HR max
• HR sit
48
/
• adjust the day (in 24h format) or the month (in 12h format)
/
• adjust the month (in 24h format) or the day (in 12h format)
/
• adjust the year
/
• select gender
/
• select activity level
Note: Check your activity level on page 50.
/
• adjust the HR
current maximum heart rate value. Your age-predicted
value, if you know your laboratory measured
max
maximum heart rate value (220-age) is displayed as a
default setting when you set this value for the fi rst time.
• adjust your heart rate value in a sitting position.
and HR
Note: For more information on HR
max
, see the next page.
sit
ENG
Page 49

The display reads: Press or to set and the Red button to accept
10. VO2 max /
• adjust this, if you know your laboratory measured current
value. Your predicted value or your last value is
VO
2max
shown on the display as a default setting.
Note: For more information on VO
, see the next page.
2max
• To return to the Time mode, press and hold the Stop button.
Maximum heart rate value (HR
HR
is used to estimate energy expenditure. HR
max
physical exertion. HR
individual HR
is also useful when determining exercise intensity. The most accurate method for determining your
max
is to perform a maximal exercise stress test in a laboratory.
max
Heart rate value in a sitting position (HR
HR
is used to estimate energy expenditure. To determine your HR
sit
engage in any physical activity. After two or three minutes, press the Red button in the Time mode to view your heart rate.
This is your HR
ENG
. To calculate your HR
sit
)
max
more precisely, repeat the procedure several times and calculate your average.
sit
is the highest number of heartbeats per minute during maximum
max
)
sit
easily, wear your transmitter, sit down, and do not
sit
49
Page 50

Maximal Oxygen Uptake Value (VO
VO
is used in the estimation of energy expenditure. VO
2max
body during maximum exertion. It is also known as maximum aerobic power or maximal oxygen intake. VO
2max
)
is the maximum capacity for oxygen consumption by your
2max
is a commonly
2max
used determinant of aerobic (cardiovascular) fi tness. Aerobic fi tness relates to how well your cardiovascular system works
to transport and utilize oxygen in your body. The most accurate way of determining your individual VO
is to perform a
2max
maximal exercise stress test in a laboratory. If you know your exact clinically tested current maximal oxygen uptake value,
set the value by scrolling up or down. If you do not know this value, you can determine a comparable value, your OwnIndex,
by taking the Fitness Test. For further instructions, see page 65.
Activity level
The activity level is an assessment of your level of physical activity. Select the alternative that best describes the overall
amount and intensity of your physical activity in the past three months.
• Top You participate regularly in heavy physical exercise at least 5 times a week. E.g., you exercise to improve
performance for competitive purposes.
• High You participate regularly, at least 3 times a week, in heavy physical exercise. E.g., you run 10-20 km /
6-12 miles per week or spend 2-3 hours per week in comparable physical activity.
• Moderate You participate regularly in recreational sports. E.g., you run 5-10 km / 3-6 miles per week or spend
1/2-2 hours per week in comparable physical activity or your work requires modest physical activity.
• Low You do not participate regularly in programmed recreational sport or heavy physical activity. E.g.,
you walk only for pleasure or occasionally exercise suffi ciently to cause heavy breathing or perspiration.
50
ENG
Page 51

GENERAL:
Sound
/
Keylock
/
Help
/
Units
/
Language
/
Sleep
4.4 GENERAL SETTINGS
You can view and change the general settings of your running computer in the General Settings
mode. The functions help you handle the information on your running computer.
1. In the Time mode, press the / buttons until Settings is displayed. Press the Red button.
2. Select General from the menu and confi rm with the Red button.
3. Follow the steps below:
The display reads: Press or to set and the Red button to accept
4. Sound
• Volume
Vol 2 / Vol 1 / Off
• TZ Alarm
On / Off
Note: If you select TZ Alarm, your running computer’s alarm sounds with every heartbeat when your heart
rate is below or above your target heart rate zone. Even if you select volume off the TZ alarm and watch
alarm will work.
5. Keylock
• Manual / Automatic
Note: When choosing automatic keylock, the keylock activates when you have not pressed the buttons for
1 minute.
/
• select the volume level (concerning button, activity and
distance sounds)
timer /
/
• select the target zone alarm on / off
/
• select the value
ENG
51
Page 52

The display reads: Press or to set and the Red button to accept
6. Help
• On / Off
/
• select the value
Note: When the Help function is on you will get help notes to guide you through the functions. For example, you will be notifi ed that the
sensor signals have been found. Help notes will assist you with the use of your running computer.
7. Units
• kg/cm/km
/
• select the units
• lb/ft/mi
8. Language
• English
/
• select the language
• Deutsch
• Español
• Français
9. Sleep
• Activate sleep mode?
No / Yes
Note:
• You can activate the sleep mode in your running computer when not using the computer for a while. The sleep mode saves the
battery life. You can activate the running computer again by pressing any button. Turn Display on? No / Yes is displayed. When
choosing Yes with the Red button, the computer is activated and functions normally. To activate the sleep mode again, choose No
with the Red button or press the Stop button.
• The watch alarm is working also in the sleep mode.
/
• select the value
• To return to the Time mode, press and hold the Stop button.
52
ENG
Page 53

WATCH:
Event
/
Alarm
/
Time 1
/
Time 2
/
Time Zone
/
Date
4.5 WATCH SETTINGS
When you are not exercising you can wear your running computer as a watch. To change the
watch settings, follow the steps in this chapter.
4.5.1 EVENT
One key to keeping training motivation high is to have an event objective in mind. You can set
an event to the memory of your running computer. With the event counter you can track the
exact number of days until your next event. You can set the event counter on the display of your
running computer by pressing and holding the button in the Time mode.
1. In the Time mode, press the / buttons until Settings is
displayed. Press the Red button.
2. Select Watch with the / buttons and confi rm with
the Red button.
3. Choose Event with the / buttons and confi rm with
the Red button.
4. To view and change the event settings, follow the steps below:
The display reads: Press or to set and the Red button to accept
ENG
5. Event
• View
/
• view the event
53
Page 54

The display reads: Press or to set and the Red button to accept
• Date
- Day / Month or
- Month / Day
• Rename
• Delete
/
• adjust the date of the event (the order depends on your
unit settings)
/
• rename the event by selecting letters with the /
buttons and confi rming with the Red button
/
• delete the event
• To return to the Time mode, press and hold the Stop button.
4.5.2 ALARM
You can set an alarm to sound at a particular time:
1. In the Time mode, press the
2. Select Watch with the
/ buttons until Settings is displayed. Press the Red button.
/ buttons and confi rm with the Red button.
3. Select Alarm and confi rm with the Red button.
54
ENG
Page 55

4. To change the alarm settings, follow the steps below:
The display reads: Press or to set and the Red button to accept
5. Alarm
• Off
• Once
• Mon-Fri
• Daily
6. AM / PM (for 12h format)
7. Hours
8. Minutes
/
• select alarm mode
/
• select AM or PM
/
• adjust the hours
/
• adjust the minutes
The Alarm functions in all modes except in the Exercise mode. When the alarm sounds, Alarm! Snooze? with a fl ashing
backlight is displayed. The alarm will sound for a minute unless you press Stop and cancel the alarm. To delay the alarm an
extra 10 minutes, press the / buttons or the Red button: Snooze is displayed and the snooze time starts counting. The
alarm will sound again after 10 minutes. To cancel the snooze and Alarm, press Stop in the Snooze mode.
Alternatively, you can quick access Alarm settings in the Quick menu by pressing and holding the Light button in the Time mode.
Note:
• If the battery low symbol appears in the display, the alarm cannot be activated.
• The alarm will still sound even if you have turned the sound off in the general settings.
• To return to the Time mode, press and hold the Stop button.
ENG
55
Page 56

4.5.3 TIME ZONES
To help you follow the different time zones you can set two time zones to your running computer.
1. In the Time mode, press the / buttons until Settings is displayed. Press the Red button.
2. Select Watch with the / buttons and confi rm with the Red button.
3. Select Time 1 and confi rm with the Red button.
4. To change the settings, follow the steps below:
The display reads: Press or to set and the Red button to accept
5. Time 1
• 24 h / 12 h
6. Hours
7. Minutes
/
• select how the time is displayed.
/
• adjust the hours
/
• adjust the minutes
When you have set Time 1 continue to Time 2:
Time 2
/
• adjust the hours (how many hours behind or ahead you wish the Time 2 to be in comparison to Time 1)
You can select the time zone in the watch settings.
1. In the Time mode, press the
2. Select Watch with the
3. Select Time Zone from the menu with the
/ buttons until Settings is displayed. Press the Red button.
/ buttons and confi rm with the Red button.
/ buttons and choose Time 1 or Time 2. Time 1 in use or Time 2 in use is
displayed.
56
ENG
Page 57

In the Time mode you can change the time zone by pressing and holding the button. The number 2 besides the time
indicates that the Time 2 is in use.
• To return to the Time mode, press and hold the Stop button.
4.5.4 DATE
To set the date:
1. In the Time mode, press the
/ buttons until Settings is displayed. Press the Red button.
2. Select Watch from the menu with the / buttons and confi rm with the Red button.
3. Select Date from the Watch menu and confi rm with the Red button.
4. To change the settings, follow the steps below:
The display reads: Press or to set and the Red button to accept
Date
• Month / Day
• Day / Month
• Year
/
• adjust the day, month, and year (the order depends on
the unit settings)
• To return to the Time mode, press and hold the Stop button.
ENG
57
Page 58

5. TARGET ZONE LIMITS
In exercise, different heart rate zones produce different
fi tness and health benefi ts. The heart rate zones that suit
you depend on your goal and your basic physical condition.
Your running computer offers you three ways to use the
target heart rate zones: OwnZone, Polar sport zones, and
manual limits. Alternatively you can choose limits based on
your speed or pace (footpod required).
For further information on target zones and for a personalized
training program, see www.PolarRunningCoach.com.
To set the heart rate limits for your exercise, follow the
steps below:
1. In the Time mode, press the / buttons until
Settings is displayed. Press the Red button.
2. Select Exercise and confi rm with the Red button.
3. Select the exercise you wish to modify and press the Red
button. You cannot modify Free and OwnZone exercises.
4. Press the
/ buttons until Edit is displayed. Confi rm
with the Red button.
5. Continue with editing the exercise. For further instructions
see the chapter Exercise Settings on page 35.
58
Target Zone Alarm: With the target zone alarm you can
make sure that you exercise at the correct intensity. When
the target zone alarm is activated, the symbol
is
displayed in the Exercise mode. The running computer
sounds an alarm when you are above or below your limits.
When you have selected heart rate based target zone limits
and you are out of your target zone, the heart rate value
starts fl ashing and the wrist unit alarms with each heart
beat. When you have selected the speed or pace based
target zone limits and you do not stay within the limits,
your running computer starts beeping. You can activate
and deactivate the alarm in the Settings > General >
Sound > TZ Alarm menu or during the exercise by pressing
and holding the Light button and choosing TZ Alarm with
the / buttons. TargetZone Alarm On or TargetZone
Alarm Off is displayed (if the Help function is on).
Note:
• When target zone limits are not activated, no target zone alarm
in the exercise recording mode will sound, nor will target zone
information be placed in the File.
• The wrist unit sounds and backlight are turned off when the
low battery symbol
work once if it is set before the symbol appears.
is displayed. However, the alarm will
• To return to the Time mode, press and hold the Stop
button.
ENG
Page 59

5.1 OWNZONE LIMITS
Your running computer is able to determine your individual
aerobic (cardiovascular) heart rate zone automatically. This
is called OwnZone (OZ). OwnZone ensures that you exercise
within safe limits.
The OwnZone feature determines your personal training zone
primarily based on your heart rate variability. For most
adults, OwnZone corresponds to 65-85% of maximum
heart rate. The OwnZone varies daily, depending on your
physical condition and mental state (for example, if you are
not recovered from the previous training or feel stressed).
OwnZone limits can be determined in 1-5 minutes during
a warm-up period by walking, jogging, or doing some other
sport. The main idea is that you start exercising slowly at a
light intensity and then gradually increase the intensity by
raising your heart rate.
OwnZone has been developed for healthy people. Some health
conditions may cause heart rate variability based OwnZone
determination to fail, for example high blood pressure,
certain cardiac arrhythmias, and certain medications.
Determining Your OwnZone Heart Rate Limits
Before you start to determine your OwnZone, make sure that:
• You entered your user settings correctly.
• You select the OwnZone exercise. Every time you start the
OwnZone exercise, the running computer will automatically
determine your OwnZone.
You should redefi ne your OwnZone:
• When changing your exercise environment or the exercise mode.
• If you are returning to exercise after more than one week off.
• If you feel unusual about the physical state of your body
when starting to exercise. For example you are stressed,
not recovered from the previous training or not feeling well.
• After changing your settings.
1. Start your exercise as described in the chapter Exercising
on page 9.
2. When you have pressed the Red button and your exercise starts,
Finding OwnZone is displayed and the OwnZone determination
begins. The OwnZone symbol appears in the display.
Alternatively, to skip OwnZone determination and use the
previously determined OwnZone, press the Red button.
ENG
59
Page 60

Determination of your OwnZone happens in fi ve stages.
Walk at a slow pace for 1 min. Keep your heart
rate below 100 bpm / 50% HR
during this
max
fi rst stage. After each stage you will hear
a beep (if the sound settings are on) and the
display automatically illuminates (if you have
switched the backlight on once before),
indicating the end of the stage.
Walk at a normal pace for 1 min.
Slowly increase your heart rate by 10-20 bpm /
5% HR
Walk at a brisk pace for 1 min. Slowly increase
your heart rate by 10-20 bpm / 5% HR
max
.
.
max
Jog at a slow pace for 1 min. Slowly increase
your heart rate by 10-20 bpm / 5% HR
max
.
Jog at a brisk pace or run for 1 min.
3. At some point during the
fi ve stages, you will hear two
beeps. Your OwnZone has
now been determined. If the
determination was successful,
OwnZone Updated and the
limits are displayed. The limits are displayed as beats
per minute (bpm) or as a percentage of your maximum
heart rate HR%, depending on your settings.
4. If you cancel the OwnZone
determination by pressing
the Red button, or if the
determination was not
successful, your previously
determined OwnZone limits
will be used. OwnZone Limits appears with the limits
on the display. If you are determining your OwnZone for
the fi rst time and cancel the process, the limits based
on your age will be used.
You can now continue with your exercise. Try to stay inside
the given heart rate zone to maximize exercise benefi ts.
Note: The elapsed time used for OwnZone determination is included
in your exercise, so your exercise is recorded from when you fi rst
start it.
For further information on OwnZone, see www.polar.fi and
www.polarownzone.com.
60
ENG
Page 61

5.2 POLAR SPORT ZONES
You can also choose Polar sport zones to guide your workout. Polar sport zones mean a new level of effectiveness in heart rate
based training. The training is divided into fi ve sport zones based on percentages of your maximum heart rate. Sport zones
provide an easy way to select and monitor the intensity of your training and follow Polar’s sport zones based training programs.
Target Zone
5 MAXIMUM
4 HARD
3 MODERATE
2 LIGHT
1 VERY LIGHT
Intensity % of HR
90-100%
80-90%
70-80%
60-70%
50-60%
max
Example Durations
0-2 minutes
2-10 minutes
10-40 minutes
40-80 minutes
20-40 minutes
Physiological Benefi t / Training Effect
> Tones the neuromuscular system
> Increases maximum sprint race speed
> Increases anaerobic tolerance
> Improves high speed endurance
> Enhances aerobic power
> Improves blood circulation
> Increases metabolism > Increases aerobic
endurance > Strengthens body so that it
tolerates higher intensity training
> Helps and speeds up recovery after
heavier exercises
Running in sport zone 1 is done at a very low intensity. The main training principle is that your performance level improves
through recovery after training, not through the training itself. Sometimes the training may have been so strenuous that you
have not yet recovered even the next day! In that case, you can accelerate your recovery process with very light intensity training.
ENG
61
Page 62

Endurance training is done in sport zone 2. Running in this zone features an easy aerobic run. Endurance training is an
essential part of every runner’s training program. In fact, endurance training is the basis of any training plan. Long-duration
training in this light zone is effective for energy expenditure. Progress in endurance training requires persistence.
Aerobic power is enhanced in sport zone 3. The training intensity is higher than in sport zones 1 and 2 but still mainly aerobic.
Training in sport zone 3 can consist of intervals followed by recovery, for example. Running in this zone is especially effective
for improving the effi ciency of blood circulation in the heart and skeletal muscles.
If your goal is to compete at your top potential, you will have to go to sport zones 4 and 5. In these zones you run anaerobically,
in intervals of up to 10 minutes. The shorter the interval, the higher the intensity. Suffi cient recovery between intervals is
very important. The training pattern in zones 4 and 5 is designed to bring the runner to peak performance.
The Polar sport zones can be personalized by using the measured HR
. When running in a certain sport zone, the aim is to
max
use the whole zone. The mid-zone is a good target, but it is not necessary to keep your heart rate at that exact level all the time.
The heart rate gradually adjusts to the training intensity. For instance, when moving from sport zone 1 to 3, the adjustment
time of the circulatory system and heart rate can be 3-5 minutes.
The response of the heart rate to an exercise of a certain intensity varies according to training, recovery, environmental, and
other factors. This is why it is important to pay attention to your own feelings of exhaustion and adjust the training program
accordingly.
62
ENG
Page 63

Your Running Computer Guides Your Training with Polar sport zones
Your running computer offers you an option to take advantage of the sport zones in a very easy way. You can choose sport zones
as target heart rate zones. You can set timers or distancers to remind you when to change the zone to another one during an
exercise or you can change the zone manually. For more instructions, see the chapter Exercise Settings on page 35.
Polar sport zones work best when you know your maximum heart rate and your aerobic and anaerobic thresholds.
For determining your maximum heart rate you can use the age formula (as a default in your running computer),
Predicted Maximum Heart Rate (HR
sport performance goal (e.g., you train for a specifi c running event) or you want to target specifi c benefi ts in each of your
workouts.
You can download personalized training programs for running based on Polar sport zones at www.PolarRunningCoach.com
web service.
-p), or have the value measured in a laboratory. Use sport zones when you have a
max
ENG
63
Page 64

5.3 MANUAL LIMITS
Instead of determining your target heart rate zone by using OwnZone or Polar sport zones, you can defi ne your target heart rate
limits manually.
Your target heart rate zone is a range between the lower and upper heart rate limits expressed as percentages of your maximum
heart rate (HR
exertion. As a default, the wrist unit calculates your HR
HR
value can be obtained from the Predicted Maximum Heart Rate (HR
max
For the most accurate measurement of your HR
The table below contains target heart rate zones in beats per minute (bpm) estimated by age in 5-year intervals. Write down
your own HR
Age HR
HR
20 200 100-120 120-140 140-160 160-180 180-200
25 195 98-117 117-137 137-156 156-176 176-195
30 190 95-114 114-133 133-152 152-171 171-190
35 185 93-111 111-130 130-148 148-167 167-185
40 180 90-108 108-126 126-144 144-162 162-180
45 175 88-105 105-123 123-140 140-158 158-175
50 170 85-102 102-119 119-136 136-153 153-170
55 165 83-99 99-116 116-132 132-149 149-165
60 160 80-96 96-112 112-128 128-144 144-160
65 155 78-93 93-109 109-124 124-140 140-155
) or as beats per minute (bpm). HR
max
and target heart rate zones and select the ones suitable for your training.
max
50-60% of 60-70% of 70-80% of 80-90% of 90-100% of
max
HR
max
is the highest number of heartbeats per minute during maximum physical
max
using your age (Maximum heart rate = 220 - age). A more accurate
max
, visit your doctor or exercise physiologist for an exercise stress test.
max
HR
max
HR
max
-p) test (for more information, see the next page).
max
HR
max
max
64
ENG
Page 65

6. TEST - POLAR FITNESS TEST
The Polar Fitness Test is an easy, safe, and quick way to estimate individual maximal aerobic power and to obtain the
predicted maximum heart rate value. The Polar Fitness Test is targeted to healthy adults.
OwnIndex
OwnIndex is a value comparable to maximal oxygen uptake (VO
fi tness. Aerobic fi tness relates to how well your aerobic system works to transport and utilize oxygen in your body. The stronger
and more effi cient your heart, the better your aerobic fi tness. VO
If you want to improve your aerobic fi tness, it takes a minimum of 6 weeks on average to see a noticeable change in OwnIndex.
Less fi t individuals see progress even more rapidly, while for fi tter individuals more time is needed. The better the aerobic
fi tness of an individual, the smaller the improvements in OwnIndex. Aerobic fi tness is best improved by exercise types that
employ large muscle groups. Such activities include running, cycling, swimming, rowing, skating, cross-country skiing, and
walking. To monitor your fi tness progress start by measuring your OwnIndex a couple of times during the fi rst two weeks in
order to get a baseline value. Thereafter, repeat the test approximately once a month. OwnIndex is based on the resting heart
rate, heart rate variability at rest, age, gender, height, body weight, and self-assessed physical activity.
), a commonly used descriptor of aerobic (cardiovascular)
2max
is a good indicator of performance in endurance sports.
2max
Predicted Maximum Heart Rate (HR
The HR
-p defi nition is carried out simultaneously with the Polar Fitness Test. The HR
max
max
-p)
-p score predicts your individual
max
maximum heart rate value more accurately than the age-based formula (220 - age). The age-based method provides a rough
estimation and may not be very accurate, especially for people who have been fi t for many years or for older people. The most
accurate way of determining your individual maximum heart rate is to have it measured in a laboratory (in maximal treadmill
or bicycle stress test) by a doctor or an exercise physiologist.
ENG
65
Page 66

Your maximum heart rate changes to some extent in relation to your fi tness. Regular endurance exercise tends to decrease
the HR
. There may also be some variation according to the sport you participate in. For example, running HR
max
HR
> swimming HR
max
an exhaustive maximal stress test. HR
body weight, and maximal oxygen uptake, and VO
entering your clinically measured VO
. HR
-p gives the possibility of following maximum heart rate changes due to training, without
max
max
-p is based on resting heart rate, heart rate variability at rest, age, gender, height,
max
into your running computer.
2max
(measured or predicted). The most accurate HR
2max
max
> cycling
max
is obtained by
Fitness Test Settings
To be able to carry out the Polar Fitness Test you need to make the following settings in your running computer:
• Set your personal user information and long-term physical activity level in the user settings. See more information on
page 47.
• Set the HR
1. In the Time mode, press the
2. Scroll with the
-p on if you want to get a prediction of your maximum heart rate.
max
/ buttons until Test is displayed. Press the Red button.
/ buttons until HR max-p is displayed. Press the Red button.
3. Select On with the / buttons and confi rm with the Red button.
Carrying Out the Test
To get reliable test results, the following basic requirements apply:
• The test can take place anywhere - at home, at the offi ce, at a health club - as long as the testing environment is peaceful.
There should be no disturbing noises (e.g., television, radio, or telephone) and no other people talking to you.
• Keep the testing place, time of day, and environment the same every time the test is repeated.
• Avoid eating a heavy meal or smoking 2-3 hours prior to testing.
• Avoid heavy physical effort, alcoholic beverages, or pharmacological stimulants on the test day and the previous day.
• You should be relaxed and calm. Lie down and relax for 1-3 minutes before starting the test.
66
ENG
Page 67

Start the Test
It takes 3-5 minutes to carry out the test.
1. In the Time mode select Test with the / buttons. Press the Red button.
2. Lie down and relax yourself for 1-3 minutes before the test.
3. Press Start with the Red button. Your running computer starts searching for your heart rate.
Fitness test starts in 5 sec and your heart rate are displayed. The test begins. Fitness Test
Lay Down is displayed.
4. Lie relaxed. Keep your hands alongside your body and avoid body movements.
Don’t communicate with other people.
5. When the test is ready you will hear two beeps. Fitness test OwnIndex and the result are
displayed. The value is saved to Trend menu. For more information, see the section Fitness
Classes on page 69.
6. Press the
Heart Rate and the value are displayed. Press the Red button to confi rm.
7. Update to VO2 max? No / Yes is displayed. By selecting Yes the OwnIndex value is saved to
user settings.
8. Update to HR max? No / Yes is displayed. By selecting Yes the HR
user settings.
Note:
• After saving the OwnIndex and HR
• If you have not set your long-term physical activity level in User Settings, Set your personal activity level. is displayed. Press the
buttons to select Top, High, Moderate, or Low. For further information on activity levels, see page 50.
• If your running computer does not receive your heart rate at the beginning or during the test, the test fails. Fitness Test failed. Check
sensor. is displayed. Check that the transmitter electrodes are wet and that the textile strap is snug enough.
button to see the HR
-p values in user settings they will be used as a basis for calculating calorie consumption.
max
-p result (if HR
max
-p is on). The text Predicted maximum
max
-p value is saved to
max
/
ENG
67
Page 68

Interrupt the Test
• You can stop the determination any time during the test by pressing the Stop button. Fitness test cancelled is displayed
for a few seconds. The latest OwnIndex and HR
In the Trend menu you can see
how your OwnIndex value has been
developing. Trend menu includes 16
of your latest OwnIndex values.
-p are not replaced.
max
In the HR max-p menu you can set
the function on or off.
Deleting values in the Trend view
Select the value you wish to delete and press and hold the Light button. Delete value? No / Yes is displayed. Confi rm your
selection with the Red button.
68
ENG
Page 69

Fitness classes
The Polar Fitness Test result, your OwnIndex, is the most meaningful when comparing your individual values and changes in
them. OwnIndex can also be interpreted according to your gender and age. Locate your OwnIndex on the table to fi nd out your
current aerobic fi tness classifi cation, compared with those who are of the same age and gender.
Age 1 2 3 4 5 6 7
YEARS VERY LOW FAIR MODERATE GOOD VERY ELITE
LOW GOOD
20-24 < 32 32-37 38-43 44-50 51-56 57-62 >62
25-29 < 31 31-35 36-42 43-48 49-53 54-59 >59
MEN
30-34 < 29 29-34 35-40 41-45 46-51 52-56 >56
35-39 < 28 28-32 33-38 39-43 44-48 49-54 >54
40-44 < 26 26-31 32-35 36-41 42-46 47-51 >51
45-49 < 25 25-29 30-34 35-39 40-43 44-48 >48
50-54 < 24 24-27 28-32 33-36 37-41 42-46 >46
55-59 < 22 22-26 27-30 31-34 35-39 40-43 >43
60-65 < 21 21-24 25-28 29-32 33-36 37-40 >40
20-24 < 27 27-31 32-36 37-41 42-46 47-51 >51
25-29 < 26 26-30 31-35 36-40 41-44 45-49 >49
30-34 < 25 25-29 30-33 34-37 38-42 43-46 >46
35-39 < 24 24-27 28-31 32-35 36-40 41-44 >44
WOMEN
40-44 < 22 22-25 26-29 30-33 34-37 38-41 >41
45-49 < 21 21-23 24-27 28-31 32-35 36-38 >38
50-54 < 19 19-22 23-25 26-29 30-32 33-36 >36
55-59 < 18 18-20 21-23 24-27 28-30 31-33 >33
60-65 < 16 16-18 19-21 22-24 25-27 28-30 >30
ENG
The classifi cation is based on literature review of 62 studies where
was measured directly in healthy adult subjects in the USA,
VO
2max
Canada and 7 European countries. Reference: Shvartz E, Reibold
RC: Aerobic fi tness norms for males and females aged 6 to 75 years:
a review. Aviat Space Environ Med; 61:3-11, 1990.
Top athletes typically score OwnIndex values above 70 (men)
and 60 (women). Values as high as 95 can be reached by
Olympic level endurance athletes. OwnIndex is the highest
in sports that involve large muscle groups such as crosscountry skiing and cycling.
69
Page 70

7. CONNECT - DATA COMMUNICATION
7.1 EDIT SETTINGS WITH A COMPUTER
Your running computer offers you the option of editing the settings of your wrist unit with a computer. You can also
personalize the display of your running computer by downloading logos. For this you need the Polar UpLink Tool™. You can
download the Polar UpLink Tool from www.polar.fi or from www.PolarRunningCoach.com. In order to be able to use the
Polar UpLink Tool, you need a computer with a sound card and dynamic loudspeakers or headphones. See www.polar.fi or
www.PolarRunningCoach.com for further instructions.
To transfer settings from your PC to your running computer:
1. In the Time mode press the / buttons until Connect is displayed. Press the Red button.
2. Hold your running computer within less than 10 cm / 4” from the loudspeakers or headphones. Select Receive from the
menu and confi rm with the Red button.
3. Start the data transfer from your PC.
4. If the data transfer succeeded, UpLink Receive OK! is displayed. If the transfer fails, UpLink Receive Failed! is displayed.
70
ENG
Page 71

7.2 TRANSFER YOUR TRAINING DATA TO THE TRAINING DIARY ON THE WEB
The Polar Running Coach is a complete web service tailored to support your training goals. Free registration gives you access
to a personalized training program, diary, tests and calculators, useful articles, and much more. You can gain access and start
the registration process for the web service at www.PolarRunningCoach.com.
Your running computer with the SonicLink data communication feature offers you the option of transferring exercise fi les to
your personal training diary on the Polar Running Coach web service. For this you need the Polar WebLink™ software.
You can download the Polar WebLink to your PC at www.PolarRunningCoach.com.
In order to be able to transfer the recorded training information with Polar WebLink, you need a personal computer with a
sound card and microphone.
To transfer fi les from your running computer to the web service:
1. In the Time mode press the / buttons until Connect is displayed. Press the Red button.
2. Hold your running computer within 0-5 cm / 0-2” of the microphone. Select Send and confi rm with the Red button. You can
send separate exercises by selecting Exercise and choosing the exercise you wish to send. You can also send Follow-up
information.
3. If the data transfer succeeded, SonicLink Send OK! is displayed. If the transfer fails SonicLink Send Failed! is displayed.
See the help pages of the Polar WebLink software or www.PolarRunningCoach.com for further instructions.
ENG
71
Page 72

8. CARE AND MAINTENANCE
Like any electronic device, your running computer should be treated with care. The suggestions below will help you fulfi ll the
guarantee obligations and enjoy this product for many years to come.
Taking Care of Your Running Computer
• Store your wrist unit and transmitter in a cool and dry
place. Do not store them in a damp environment, in non breathable material (such as a plastic bag or a sports bag),
or with conductive material such as a wet towel. Sweat
and moisture can keep the transmitter electrodes wet and
the transmitter activated, shortening battery life.
• Keep your unit clean. Clean it with a mild soap and water
solution. Dry it carefully with a soft towel. Never use
alcohol or any abrasive material such as steel wool or
cleaning chemicals.
• The operating temperatures are -10 °C to +50 °C /
+14 °F to +122 °F.
• Do not expose the running computer to direct sunlight for
extended periods, such as by leaving it in a car.
72
Service
During the two-year guarantee / warranty period we
recommend that you service the product at an authorized
Polar Service Center only. The warranty does not cover
damage or consequential damage caused by service not
authorized by Polar Electro.
Wrist Unit Battery
The estimated average battery life of the wrist unit is two
years in normal use (1h/day, 7 days/week). Excessive use of
the backlight drains the wrist unit’s battery more rapidly.
The low battery indicator is displayed when 10-15%
of the wrist unit battery capacity is left and the battery
should be replaced. Do not open the wrist unit yourself. To
ensure water resistance properties and the use of qualifi ed
components, the wrist unit battery should be replaced by
an authorized Polar Service Center only. At the same time, a
full periodic check of the running computer will be done.
ENG
Page 73

Note:
• The backlight and wrist unit sounds are automatically
deactivated when
works once, if you have activated the Alarm before the
symbol appears. The alarm symbol
from the display.
• In cold conditions the low battery indicator
but the indicator disappears when you return to a normal
temperature.
• Water resistance cannot be guaranteed after unauthorized
service.
• After a battery change, re-enter the time and date settings in
Basic Settings. For further information, see page 7.
is displayed. However, the alarm sound
will also disappear
may appear,
Taking Care of Your Footpod
• Wipe dry the Polar S1 Foot Pod.
• Avoid hard hits to the S1 Foot Pod as these may cause
damage.
S1 Foot Pod Battery
The battery of the footpod needs to be replaced if the green
light on the footpod turns red or there is no light at all
when you press and hold the red button on the footpod.
Check the chapter Assembling the S1 Foot Pod Battery on
page 11 for replacing the battery.
Taking Care of Your WearLink Transmitter
Detach the connector from the strap when not in use. If you
use insect repellent on your skin, you must ensure that it
does not come into contact with the transmitter.
WearLink Connector
• Clean the connector regularly after use with a mild soap
and water solution.
• Never use alcohol or any abrasive material such as steel
wool or cleaning chemicals on any part of the transmitter.
• Do not dry the connector in any other way than with a
towel. Mishandling may damage it.
• Never put the connector in a washing machine or a drier!
WearLink Strap
• The strap can be washed in a washing machine at 40 °C /
104 °F. We recommend that you use a washing pouch.
• We recommend that you wash the strap after each use
in pool water with a high chlorine content.
• Do not spin-dry the strap or put the strap in a drier!
• Do not iron the strap!
ENG
73
Page 74

WearLink Transmitter Battery
The estimated average battery lifespan of the transmitter
is 2 years (usage: 1h/day, 7 days/week). If your transmitter
stops working, it might be due to the battery running out.
To change the battery, you need a coin, sealing ring, and
battery (CR 2025).
1. Open the battery cover of the
connector by turning it counter clockwise with a coin from
the CLOSE position to the OPEN
position.
2. Remove the battery cover, lift the battery and replace it
with a new battery.
3. Remove the sealing ring of the battery cover and replace
it with a new ring.
4. Place the negative (-) side of the battery against the
bottom and the positive (+) side against the cover.
5. Put the cover on so that the arrow points to the OPEN
position. Make sure that the cover’s sealing ring is
placed correctly in its groove.
6. Gently press the cover deep enough so that its exterior
surface is on the same level as the connector’s surface.
7. Turn the cover with the coin clockwise so that the arrow
on the cover turns from OPEN to CLOSE. Make sure that
the cover is closed properly!
Note:
• In order to ensure the maximum life span of the connector’s
battery cover, open it only when you need to change the
battery. We recommend that you change the sealing ring of
the battery cover every time you change the battery. You can
get the sealing ring / battery kits from well-equipped Polar
retailers and authorized Polar Services. In the USA and
Canada: Additional sealing rings are available from an
authorized Polar Service Center only.
• Keep the batteries away from children. If swallowed,
contact a doctor immediately.
• Batteries should be disposed of properly according to local
regulations.
74
ENG
Page 75

9. PRECAUTIONS
Interference During Exercise
Electromagnetic Interference
Disturbances may occur near high voltage power lines, traffi c
lights, overhead lines of electric railways, electric bus lines
or trams, televisions, car motors, bike computers, some
motor driven exercise equipment, cellular phones, or when
you walk through electric security gates.
Exercise Equipment
Several pieces of exercise equipment with electronic or
electrical components such as LED displays, motors, and
electrical brakes may cause interfering stray signals. To
tackle these problems, try the following:
1. Remove the transmitter from your chest and use the
exercise equipment as you would normally.
2. Move the wrist unit around until you fi nd an area in
which it displays no stray reading or does not fl ash the
heart symbol. Interference is often worst right in front of
the display panel of the equipment, while the left or right
side of the display is relatively free of disturbance.
3. Put the transmitter back on your chest and keep the wrist
unit in this interference-free area as much as possible.
4. If the running computer still does not work with the
exercise equipment, this piece of equipment may be
electrically too noisy for wireless heart rate measurement.
ENG
Crosstalk
When in the non-coded mode the wrist unit picks up
transmitter signals within 1 m / 3 ft. Simultaneous noncoded signals from more than one transmitter can cause
an incorrect readout.
Using Your Polar Running Computer in
a Water Environment
Your running computer can be worn when swimming. The
running computer is not, however, a diving instrument.
To maintain water resistance, do not press the buttons of
the wrist unit under water. When measuring the heart rate
in water you may experience interference for the following
reasons:
• Pool water with a high chlorine content and seawater
are very conductive. The electrodes of a transmitter may
short-circuit, preventing ECG signals from being detected
by the transmitter.
• Jumping into water or a strenuous muscle movement
during competitive swimming may cause water resistance
that shifts the transmitter to a location on the body
where ECG signals cannot be picked up.
• The ECG signal strength depends on the individual and
varies depending on the individual’s tissue composition.
The occurrence of problems when measuring the heart
rate is considerably higher in water.
75
Page 76

• The S1 Foot Pod can be used in any wet running
environment, including rain, but it is not intended for
underwater use.
Minimizing Possible Risks When Exercising
Exercise may include some risk. Before beginning a regular
exercise program, it is recommended that you answer the
following questions concerning your health status. If you
answer yes to any of these questions, we recommend that
you consult a doctor before starting any training program.
• Have you been physically inactive for the past 5 years?
• Do you have high blood pressure or high blood cholesterol?
• Do you have symptoms of any disease?
• Are you taking any blood pressure or heart medication?
• Do you have a history of breathing problems?
• Are you recovering from a serious illness or
medical treatment?
• Do you use a pacemaker or another implanted electronic
device?
• Do you smoke?
• Are you pregnant?
Note that in addition to exercise intensity, medications for
heart, blood pressure, psychological conditions, asthma,
breathing etc. as well as some energy drinks, alcohol, and
nicotine may affect your heart rate.
It is important to be sensitive to your body’s responses
during exercise. If you feel unexpected pain or excessive
fatigue when exercising, it is recommended that you stop
the exercise or continue at a lighter intensity.
Notice to individuals with pacemakers, defi brillators,
or other implanted electronic devices. Individuals who
have a pacemaker use the running computer at their own
risk. Before starting use, we always recommend a maximal
exercise stress test under a doctor’s supervision. The test is
to ensure the safety and reliability of the simultaneous use
of the pacemaker and the Polar Running Computer.
If you are allergic to any substance that comes into
contact with your skin, or if you suspect an allergic
reaction due to using the product, check the listed
materials on page 80. To avoid any skin reaction to the
transmitter, wear it over a shirt. However, moisten the shirt
well under the electrodes to ensure fl awless operation.
Your safety is important to us. The shape of the footpod is
designed to minimize the possibility of it getting caught in
something. In any case, be careful when running with the
footpod in brushwood, for example.
76
ENG
Page 77

10. FREQUENTLY ASKED QUESTIONS
What should I do if...
...I do not know where I am in the menu?
Press and hold the Stop button until the time of day is displayed.
...there are no reactions to any buttons?
Reset the wrist unit by pressing the four side buttons simultaneously
for 2 seconds. Set the time and date in the Basic Setting after the
reset. Other settings are saved. You can skip the rest of the settings
by pressing and holding the Stop button.
...the heart rate reading becomes erratic or extremely high?
Strong electromagnetic signals can cause erratic readings. So move
away from possible sources of disturbance such as high-voltage
power lines, traffi c lights, overhead lines of electric railways or
trams, car motors, bike computers, some motor-driven exercise
equipment (like fi tness testers), or cellular phones.
If moving away does not help and the heart rate reading remains
erratic, slow down your speed and check your pulse manually. If you
feel it corresponds to the high reading on the display, you may be
experiencing cardiac arrhythmia. Most cases of arrhythmia are not
serious, but consult your doctor nevertheless.
...the heart symbol fl ashes irregularly?
• Check that your wrist unit is not further than 1 m / 3 ft from
the transmitter.
• Check that the transmitter has not become loose during exercise.
• Make sure that the electrodes of the transmitter are moistened.
• Make sure that there is no other heart rate transmitter within
1 m / 3 ft.
ENG
• Cardiac arrhythmia may cause irregular readings. In this case,
consult your physician.
...there is no heart rate reading (- -)?
• Check that the electrodes of the transmitter are moistened and
that you are wearing it as instructed.
• Make sure the transmitter is clean.
• Check that you are not near high voltage power lines, televisions,
cellular phones or other sources of electromagnetic interference.
Also make sure that you are not near (1 m / 3 ft) other heart rate
monitor users, when starting you exercise recording.
• Cardiac arrhythmia may cause irregular readings or a cardiac event
may have altered your ECG waveform. In these cases, consult your
physician.
...another person with a running computer or a heart rate monitor
is causing interference?
Move away from that person and continue your exercise normally.
Alternatively,
1. Take the transmitter off your chest for 30 seconds. Stay away
from the person with the other device.
2. Put the transmitter back on and bring the wrist unit up to your
chest near the transmitter’s Polar logo. The wrist unit will start
looking for a heart rate signal again. Continue your exercise normally.
...the low battery symbol
Usually the fi rst sign of an expired battery is the low battery indicator
on the display. For further information, see page 72.
Note: In cold conditions the low battery indicator may appear, but the
indicator disappears when you return to a normal temperature.
appears?
77
Page 78

...the display is blank?
The running computer is in the battery saving mode when it is
dispatched from the factory. To activate it, press any button.
The Basic Settings starts. For further information, see page 7.
Alternatively the battery may be dead (see the next question for
further instructions).
...the battery of the wrist unit must be replaced?
We recommend having all service done by an authorized Polar
Service Center. This is especially necessary to ensure that the
guarantee remains valid and is not affected by incorrect repair
procedures performed by an unauthorized agent. The Polar Service
Center will test your wrist unit for water resistance after battery
replacement and make a full periodic check of the complete
Running Computer Set.
...Check Footpod! message appears on the display?
• Check that you have turned on the footpod function from
the wrist unit.
• Make sure that the footpod is turned on.
• If there is no light on the footpod the battery needs to be replaced.
For instructions on changing the battery, see the chapter
Assembling the S1 Foot Pod Battery on page 11.
• If you keep the wrist unit in front of you for longer than
15 seconds the speed and distance measurements stop.
You need to reactivate the measurements by moving your hand.
• If you are running on a treadmill and have attached the wrist
unit to a crossbar in front of you, try moving the wrist unit
sideways.
...I have replaced the battery of the footpod, but the sensor still
does not work?
Please contact your local Polar distributor. Check www.polar.fi for
the contact information of the local Polar distributors.
...there are no or irregular running speed readings on the display?
• Keep at a distance from other runners with footpods.
• If you keep the wrist unit in front of you for longer than
15 seconds the speed and distance measurements stop.
You need to reactivate the measurements by moving your hand.
78
ENG
Page 79

11. TECHNICAL SPECIFICATIONS
The Polar running computer displays your performance indicators and helps you achieve your personal training goals. It indicates the level of
physiological strain and intensity during your exercise. No other use is intended or implied.
The water resistance of Polar products is tested according to International Standard ISO 2281. Products are divided into three different
categories according to their water resistance. Check the back of your Polar product for the water resistance category and compare it to the
chart below. Please note that these defi nitions do not necessarily apply to products of other manufacturers.
Marking on the
case back
Water resistant
Water resistant 50m
Water resistant 100m
ENG
Wash splashes, sweat,
raindrops etc.
X
X
X
Bathing and
swimming
X
X
Skin diving with
snorkel (no air tanks)
X
SCUBA diving
(with air tanks)
Water resistant
characteristics
Splashes, raindrops
etc.
Minimum for bathing
and swimming
For frequent use in
water but no SCUBA
diving
79
Page 80

WRIST UNIT
Battery life: Average 2 years normal use
(1h/day, 7 days/week)
Battery type: CR 2032
Operating temperature: -10 °C to +50 °C / +14 °F to +122 °F
Wrist strap material: Polyurethane
Back cover and wrist strap buckle material: Stainless steel complying
with the EU Directive 94/27/EU and its amendment 1999/C 205/05 on
the release of nickel from products intended to come into direct and
prolonged contact with the skin.
Watch
Accuracy: better than ± _0.5 seconds/day
at 25 °C / 77 °F temperature.
Heart Rate Monitor
Accuracy: ± 1% or 1 bpm, whichever larger,
defi nition applies to steady-state conditions.
Heart rate measuring
range: 15-240
Totals
Maximum time stored to Total Duration: 9999 h
Maximum amount of calories stored to Total Calories: 999999 kcal
Maximum number of exercises stored to Total Exe.Count: 9999
Maximum number of km / mi stored to
Total Distance: 999999 km / 621370 mi
Maximum number of laps stored: 99
Maximum exercise time: 100 h
TRANSMITTER
Battery type: CR 2025
Battery sealing ring: O-ring 20.0 x 1.0 Material FPM
Battery life: Average 2 years (1 h/day, 7 days/week)
Operating temperature: -10 °C to +50 °C / 14 °F to 122 °F
Connector material: Polyamide
Strap material: Polyurethane, polyamide, nylon, polyester
and elasthane
S1 FOOT POD
Operating temperature: -10 °C to +50 °C / 14 °F to 122 °F
Battery: one AAA sized battery
Battery life: average 20 hours of use
Weight: 62 g / 2,2 oz (without a battery)
Accuracy: ±3% or better once calibrated,
defi nition applies to steady-state conditions.
80
ENG
Page 81

12. LIMITED POLAR INTERNATIONAL GUARANTEE
• This limited Polar international guarantee is issued by Polar Electro Inc. for the consumers who have purchased this product in the USA or
Canada. This limited Polar international guarantee is issued by Polar Electro Oy for the consumers who have purchased this product in
other countries.
• Polar Electro Oy / Polar Electro Inc. guarantees to the original consumer / purchaser of this device that the product will be free from defects
in material or workmanship for two years from the date of purchase.
• Please keep the receipt or International Guarantee Card. This is your proof of purchase!
• The guarantee does not cover the battery, damage due to misuse, abuse, accidents or non-compliance with the precautions;
improper maintenance, commercial use, cracked or broken cases and elastic strap.
• Guarantee does not cover any damage/s, losses, costs or expenses, direct, indirect or incidental, consequential or special, arising out of,
or related to the product. During the guarantee period the product will be either repaired or replaced at an authorized Service Center free of
charge.
• This guarantee does not affect the consumer’s statutory rights under applicable national or state laws in force, or the consumer’s rights
against the dealer arising from their sales / purchase contract.
This CE marking shows compliance of this product with Directive 93/42/EEC.
0537
Polar Electro Oy is a ISO 9001:2000 certifi ed company.
Copyright © 2005 Polar Electro Oy, FIN-90440 KEMPELE, Finland.
All rights reserved. No part of this manual may be used or reproduced in any form or by any means without prior written permission of
Polar Electro Oy.
The names and logos marked with a ™ symbol in this user manual or in the package of this product are trademarks of Polar Electro Oy.
The names and logos marked with a ® symbol in this user manual or in the package of this product are registered trademarks of
Polar Electro Oy.
ENG
81
Page 82

13. POLAR DISCLAIMER
• The material in this manual is for informational purposes only. The products it describes are subject to change without prior notice,
due to the manufacturer’s continuous development program.
• Polar Electro Inc. / Polar Electro Oy makes no representations or warranties with respect to this manual or with respect to the products
described herein.
• Polar Electro Inc. / Polar Electro Oy shall not be liable for any damages, losses, costs or expenses, direct, indirect or incidental,
consequential or special, arising out of, or related to the use of this material of the products described herein.
This product is protected by one or several of the following patents:
WO96/20640, US6104947, US6277080, WO97/33512, GB2326240, HK1016857, US 6361502, US 6418394, US 6537227, US 5719825,
US 5848027, EP 1055158, US6714812, FI88972, FR92.09150, GB2258587, HK306/1996, SG9592117-7, US5486818, FI96380, US5611346,
EP665947, DE69414362, FI 110915. Other patents pending.
Manufactured by:
Polar Electro Oy
Professorintie 5
FIN-90440 KEMPELE
Tel +358 8 5202 100
Fax +358 8 5202 300
www.polar.fi
82
ENG
Page 83

BOUTONS DU RÉCEPTEUR
Remarque : appuyer sur un bouton brièvement n’engendre pas les mêmes résultats que d’appuyer sur un bouton longuement.
• Pression normale : appuyez sur le bouton et relâchez.
• Pression longue : appuyez longuement (au moins une seconde) sur le bouton.
Lumière
• Active le rétro-éclairage de l’écran.
• Permet d’affi cher le Menu Rapide
(appuyez longuement sur le bouton).
• Active ou désactive tous les boutons
(appuyez longuement sur le bouton).
Stop
• Arrête, met en pause ou annule la fonction.
• Permet de sortir d’un menu et de revenir
à l’écran précédent.
• Permet de revenir au mode Heure (appuyez
longuement sur le bouton) depuis tout les
modes sauf le mode Enregistrement Exercice.
-Touch (Fonction HeartTouch : “mains libres”)
Pour voir, pendant l’exercice, l’heure et les limites
de zone cible sans utiliser les boutons, approchez le
récepteur du logo Polar sur l’émetteur. Ainsi aucune
pression sur les boutons n’est nécessaire.
• Passe au mode ou au menu précédent.
• Augmente la valeur sélectionnée.
• Passe au mode ou au menu suivant.
• Diminue la valeur sélectionnée.
Bouton Rouge
• Démarre, entre dans un menu ou valide une
fonction.
• Entre dans le mode ou le menu affi ché et accède au
sous-menu.
• Entre dans le mode Pré-exercice.
• Entre dans le mode Enregistrement Exercice
(appuyez longuement sur le bouton).
• Permet d’enregistrer des temps intermédiaires
dans le mode Enregistrement Exercice.
FRA
3
Page 84

TABLE DES MATIÈRES
Pour les utilisateurs du RS200sd : les informations concernant l’utilisation du produit avec l’Accéléromètre Polar S1™ sont
indiquées en bleu.
1. PRÉSENTATION DU CARDIO RUNNING POLAR RS200 / RS200sd ....................................................................................... 6
1.1 COMPOSANTS DU CARDIO RS200 / RS200sd ...........................................................................................................6
1.2 DÉMARRAGE FACILE ................................................................................................................................................7
2. PRATIQUER UNE ACTIVITÉ PHYSIQUE AVEC VOTRE CARDIO RUNNING ..............................................................................9
2.1 MESURER VOTRE FRÉQUENCE CARDIAQUE .............................................................................................................. 9
2.2 INSTALLATION DE L’ACCÉLÉROMÈTRE POLAR S1 ...................................................................................................11
2.3 COMMENCER L’ENREGISTREMENT DE VOTRE EXERCICE ........................................................................................13
2.4 FONCTIONS DISPONIBLES PENDANT L’EXERCICE ...................................................................................................15
2.5 ARRÊTER L’EXERCICE ............................................................................................................................................22
3. MODE “FICHIER” - REVOIR LES DONNÉES SAUVEGARDÉES ............................................................................................24
4. MODE “RÉGLAGES” .........................................................................................................................................................34
4.1 RÉGLAGES DES EXERCICES ...................................................................................................................................35
4.2 RÉGLAGES DES FONCTIONS ...................................................................................................................................43
4.3 RÉGLAGES PERSONNE ...........................................................................................................................................47
4.4 RÉGLAGES GÉNÉRAUX ...........................................................................................................................................51
4.5 RÉGLAGES DE LA MONTRE .....................................................................................................................................53
4.5.1 Evènement ..................................................................................................................................................53
4.5.2 Alarme ........................................................................................................................................................54
4.5.3 Fuseaux horaires ........................................................................................................................................ 56
4.5.4 Date ............................................................................................................................................................57
4
FRA
Page 85

5. LIMITES DE ZONE CIBLE .................................................................................................................................................58
5.1 LIMITES OWNZONE .................................................................................................................................................59
5.2 SPORTZONES POLAR ..............................................................................................................................................61
5.3 LIMITES MANUELLES ..............................................................................................................................................64
6. MODE “TEST” - FITNESS TEST POLAR ............................................................................................................................. 65
7. MODE “CONNEXION” - COMMUNICATION DES DONNÉES ................................................................................................70
7.1 EDITER DES RÉGLAGES DEPUIS UN PC ...................................................................................................................70
7.2 TRANSFÉRER VOS DONNÉES D’EXERCICE VERS LE CALENDRIER D’ENTRAÎNEMENT SUR INTERNET .......................71
8. ENTRETIEN ET RÉPARATIONS .......................................................................................................................................... 72
9. PRÉCAUTIONS D’EMPLOI ................................................................................................................................................75
10. QUESTIONS FRÉQUENTES ................................................................................................................................................77
11. CARACTÉRISTIQUES TECHNIQUES ...................................................................................................................................79
12. GARANTIE INTERNATIONALE POLAR ................................................................................................................................81
13. DÉCHARGE DE RESPONSABILITÉ .....................................................................................................................................82
FRA
5
Page 86

1. PRÉSENTATION DU CARDIO RUNNING POLAR RS200 / RS200sd
1.1 COMPOSANTS DU CARDIO RS200 / RS200sd
Le Cardio Running Polar RS200 se compose des éléments suivants :
Récepteur
Le récepteur affi che et enregistre
votre fréquence cardiaque ainsi
que vos données d’exercice pendant
votre séance d’entraînement.
Programmez vos données personnelles
dans le récepteur et analysez vos
données d’exercice après votre séance
d’entraînement.
Emetteur codé Polar WearLink™
L’émetteur détachable transmet le
signal de votre fréquence cardiaque au
récepteur.
Les électrodes intégrées dans la
ceinture élastique détectent votre
fréquence cardiaque.
Accéléromètre Polar S1™
L’Accéléromètre transmet la vitesse et
la distance parcourue en course à pied
au récepteur.
NB - Le RS200 est livré sans l’Accéléromètre
Polar S1. Ce dernier est cependant disponible
séparément, en tant qu’accessoire.
6
Le RS200sd est livré avec l’Accéléromètre
Polar S1.
Services Internet Polar
Le site Internet Polar Running Coach
(www.PolarRunningCoach.com) est un service Internet
complet conçu pour vous aider à atteindre vos objectifs
d’entraînement. L’inscription gratuite vous donne accès à
un programme d’entraînement personnalisé, à un calendrier
d’entraînement, à des articles utiles et bien plus encore.
Pour profi ter des dernières améliorations des produits Polar
et de conseils en ligne, consultez notre site : www.polar.fi .
Service Après-Vente, Questionnaire Consommateur
et Informations sur la Garantie Internationale.
Si vous rencontrez des problèmes d’utilisation avec votre
Cardio Running, retournez-le avec le Formulaire de Retour
à votre Service Après-Vente agréé Polar.
En complétant le Questionnaire Consommateur, vous nous
aidez à améliorer la qualité du Service Consommateur et
à développer des produits et des services répondant à vos
besoins.
La Garantie de 2 ans Polar est émise pour les clients
ayant fait l’acquisition de ce produit. Conservez la Carte
Internationale de Garantie, ainsi que votre preuve d’achat.
FRA
Page 87
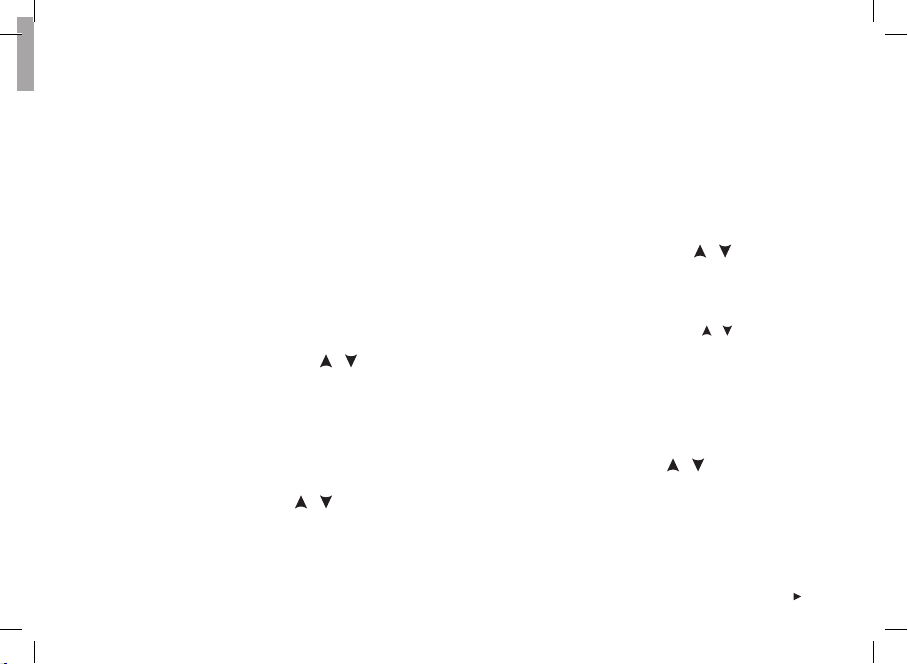
1.2 DÉMARRAGE FACILE
Lors de la première prise en main de votre Cardio, commencez par effectuer vos réglages dans le mode “Réglages de Base”
(Heure, Date, Unités et Réglages Personne). Soyez très précis lorsque vous effectuez vos “Réglages de Base”. En effet, ces
données infl uent sur l’exactitude des informations que vous recevez sur votre performance.
Le récepteur étant livré éteint, il suffi t de l’activer une fois lors de la première utilisation. Activez le récepteur en appuyant
sur n’importe quel bouton .
L’affi chage se remplit de symboles.
1. Appuyez sur le bouton Rouge. Welcome to Polar Running World! (Bienvenue dans l’Univers Running Polar !) s’affi che.
2. Appuyez sur le bouton Rouge et sélectionnez la langue que vous souhaitez utiliser avec les boutons
choisir : English, Deutsch, Español ou Français).
3. Appuyez sur le bouton Rouge. Démarrer par réglages initiaux s’affi che.
4. Continuez en appuyant sur le bouton Rouge et suivez les étapes ci-dessous :
Remarque : lorsque vous ajustez une valeur, les chiffres défi lent plus vite si vous appuyez longuement sur les boutons / .
5. Heure : Appuyez sur les boutons / pour régler
la valeur clignotante. Appuyez sur le bouton Rouge pour
valider :
• 24h / 12h : sélectionnez le format 12h ou 24h
• AM / PM (en format 12h) : sélectionnez AM ou PM
• Heures : ajustez les heures
• Minutes : ajustez les minutes
Date : Appuyez sur les boutons / pour régler la valeur
clignotante. Appuyez sur le bouton Rouge pour valider :
Remarque : le format d’affi chage de la date dépend du format
d’affi chage de l’heure (24h : jour - mois - année /
12h : mois - jour - année).
FRA
• Jour / Mois : ajustez le jour (en format 24h) ou le mois
(en format 12h)
• Mois / Jour : ajustez le mois (en format 24h) ou le jour
(en format 12h)
• Année : ajustez l’année
Unités : appuyez sur les boutons
valeur clignotante. Appuyez sur le bouton Rouge pour
valider :
• kg/cm/km ou lb/ft/mi : sélectionnez les unités
/ (vous pouvez
/ pour régler la
7
Page 88

Poids : appuyez sur les boutons / pour régler la valeur
clignotante. Appuyez sur le bouton Rouge pour valider :
• kg / lb : ajustez votre poids
Remarque : appuyez longuement sur le bouton Lumière pour
changer d’unités.
Taille : appuyez sur les boutons / pour régler la valeur
clignotante. Appuyez sur le bouton Rouge pour valider :
• cm / ft, in : ajustez votre taille
Remarque : appuyez longuement sur le bouton Lumière pour
changer d’unités.
Date naiss. (Date de naissance) : appuyez sur les boutons
/ pour régler la valeur clignotante. Appuyez sur le
bouton Rouge pour valider :
• Jour / Mois : ajustez le jour (en format 24h)
ou le mois (en format 12h)
• Mois / Jour : ajustez le mois (en format 24h)
ou le jour (en format 12h)
• Année : ajustez l’année
Sexe : appuyez sur les boutons / pour régler la valeur
clignotante. Appuyez sur le bouton Rouge pour valider :
• Masculin / Féminin : sélectionnez votre sexe
6. Réglages OK ? Non / Oui s’affi che. Pour modifi er vos
réglages, sélectionnez Non. Appuyez sur le bouton Stop
jusqu’à ce que vous reveniez aux réglages désirés.
8
Pour accepter vos réglages, sélectionnez Oui avec le
bouton Rouge. Le récepteur revient automatiquement
à l’affi chage de l’Heure.
Menu Rapide :
en appuyant longuement sur le
bouton Lumière vous pouvez
affi cher le Menu Rapide.
Le menu affi che les fonctions
suivantes :
Verrouiller : vous pouvez verrouiller tous les boutons.
Le verrouillage permet d’éviter le déclenchement accidentel
des boutons. Pour plus d’informations, reportez-vous à la
page 20.
Alarme : vous pouvez activer ou désactiver l’alarme.
Pour plus d’informations, reportez-vous au chapitre
“Réglages de la Montre’’, page 53.
Fuseau hor. : pour changer de fuseau horaire, reportezvous au chapitre “Réglages de la Montre’’, page 53.
Eco. énergie : pour mettre l’écran en mode économie
d’énergie, reportez vous au chapitre “Réglages Généraux’’,
page 51.
Conseil : vous pouvez personnaliser l’affi chage de votre Cardio
Running en téléchargeant des logos. Pour plus d’informations,
reportez-vous au chapitre “Mode Connexion - Communication
des Données’’, page 70.
FRA
Page 89

2. PRATIQUER UNE ACTIVITÉ PHYSIQUE AVEC VOTRE CARDIO RUNNING
2.1 MESURER VOTRE FRÉQUENCE CARDIAQUE
Pour mesurer votre fréquence cardiaque, vous devez porter l’émetteur.
1. Humidifi ez bien les électrodes de la ceinture élastique, en les passant sous l’eau.
2. Fixez l’émetteur détachable à la ceinture : positionnez la lettre L de l’émetteur détachable
sur le mot LEFT (Gauche) de la ceinture, puis fermez le bouton-pression. Réglez la longueur
de la ceinture afi n que celle-ci soit ajustée confortablement. Positionnez la ceinture autour
de votre poitrine, juste en dessous des muscles pectoraux, puis fermez le deuxième bouton pression.
3. Vérifi ez que les électrodes humidifi ées sont bien plaquées contre votre peau et que le
logo Polar de l’émetteur WearLink est positionné correctement (au centre de votre thorax et à
l’endroit).
4. Portez le récepteur comme une montre. Depuis l’affi chage de l’Heure, appuyez sur le bouton
Rouge. Le récepteur recherche automatiquement votre fréquence cardiaque. La fréquence
cardiaque et l’icône en forme de cœur entouré d’un cadre apparaissent dans les 15 secondes
qui suivent. Si vous avez activé la fonction Aide, le message FC détectée s’affi che. Votre
fréquence cardiaque s’affi che mais n’est pas enregistrée tant que vous n’avez pas démarré
l’exercice. Pour enregistrer votre fréquence cardiaque ainsi que les autres données de votre
exercice, reportez-vous au chapitre “Commencer l’Enregistrement de votre Exercice”, page 13.
FRA
9
Page 90
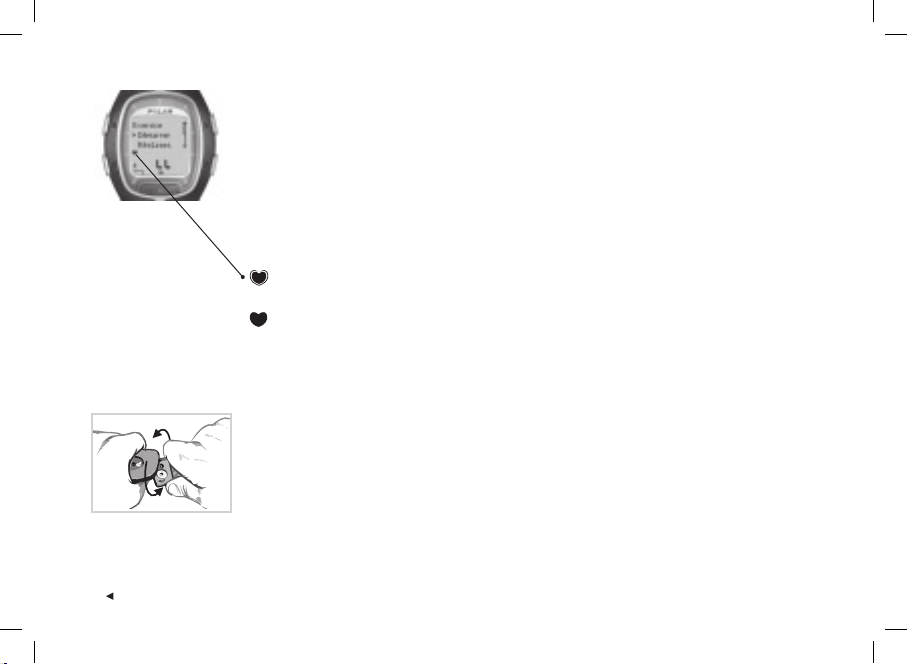
Transmission codée de la fréquence cardiaque
Le codage du signal de votre fréquence cardiaque réduit les risques d’interférences liés
à la présence d’autres cardios à proximité. Pour que la recherche du code soit effi cace et
assurer ainsi une réception sans interférences de votre fréquence cardiaque, gardez votre
récepteur dans un rayon de 1 mètre / 3 pieds de l’émetteur. Vérifi ez que vous ne vous trouvez
pas à proximité d’autres personnes portant des cardios ou d’autres sources d’interférences
électromagnétiques. Pour plus d’informations sur les interférences, reportez-vous au chapitre
“Précautions d’Emploi”, page 75.
Le cadre autour de l’icône en forme de cœur indique que le signal de votre fréquence
cardiaque est codé.
L’icône en forme de cœur sans cadre, indique que le signal de votre fréquence cardiaque
n’est pas codé. La mesure de la fréquence cardiaque ainsi que les fonctions qui y sont
associées fonctionnent cependant aussi en mode non-codé, à condition qu’il n’y ait pas de
sources d’interférences à proximité.
Pour détacher l’émetteur de la ceinture élastique, maintenez chaque élément entre le pouce et
l’index et effectuez une torsion comme indiqué sur l’illustration.
Remarque : si le récepteur n’affi che pas votre fréquence cardiaque, ou bien s’il affi che Vérifi er WearLink !,
vérifi ez que les électrodes sont bien humidifi ées et que la ceinture élastique est bien ajustée. Rapprochez le
récepteur du logo Polar de l’émetteur pour relancer une recherche du signal de la fréquence cardiaque.
10
FRA
Page 91

2.2 INSTALLATION DE L’ACCÉLÉROMÈTRE POLAR S1
Si vous utilisez l’Accéléromètre pour la première fois, vous devez tout d’abord en installer la pile. Celle-ci est livrée avec
l’Accéléromètre. Veuillez consulter le chapitre « Mise en place de la pile de l’Accéléromètre S1 » ci-dessous.
Si vous souhaitez par contre remplacer la pile de l’Accéléromètre, vérifi ez tout d’abord son niveau de charge en appuyant sur le
bouton rouge situé sur l’Accéléromètre. Si le voyant vert clignote, vous pouvez installer l’Accéléromètre sur votre chaussure.
Si le voyant vert ne s’allume pas, la pile doit être remplacée.
Mise en place de la pile de l’Accéléromètre S1
La durée de vie moyenne de la pile de l’Accéléromètre est estimée à 20 heures d’utilisation. Vous pouvez remplacer la pile vousmême. Cependant, vous pouvez aussi faire effectuer le changement de pile par Polar. Pour cela, renvoyez ou déposez l’Accéléromètre
à un Service Après-Vente agréé Polar. L’Accéléromètre y sera testé après le remplacement de la pile. Si vous remplacez vous-même
la pile, veuillez suivre attentivement les instructions suivantes :
1. Détachez l’Accéléromètre de son support en débloquant le rabat et en soulevant l’Accéléromètre par
1.
2.
FRA
Capot noir
Support
Capot
Boîtier de la pile
l’arrière.
2. Retirez le capot noir de l’Accéléromètre en le soulevant par l’arrière. Vous pouvez utiliser la partie avant
du support pour soulever l’arrière du capot (illustration 1).
3. Ouvrez délicatement le capot du boîtier de la pile (illustration 2). Remplacez l’ancienne pile (AAA) par
une pile neuve.
4. Replacez le boîtier de la pile à l’intérieur de l’Accéléromètre. Vérifi ez que le boîtier de la pile coulisse
dans les rainures du capot. Lorsque vous remplacez la pile, ne touchez pas au contacteur sous le
bouton rouge de l’Accéléromètre.
5. Vérifi ez que le joint d’étanchéité est bien positionné dans sa rainure pour assurer l’étanchéité de
l’Accéléromètre. Refermez le boîtier de la pile et replacez le capot noir au-dessus de l’Accéléromètre.
Vérifi ez qu’il est bien calé.
6. Testez l’Accéléromètre en vérifi ant que le voyant vert clignote lorsque vous appuyez longuement sur le
bouton rouge de celui-ci. Appuyez de nouveau longuement sur le bouton rouge pour éteindre l’Accéléromètre.
7. Ne jetez pas la pile usagée, mais apportez-là plutôt dans un point de collecte pour recyclage.
11
Page 92

1.
Installation de l’Accéléromètre S1 sur votre chaussure
1. Détachez le support de l’Accéléromètre en débloquant le rabat et en soulevant
l’Accéléromètre par l’arrière.
2. Desserrez vos lacets et placez le support sous ces derniers. Resserrez vos lacets.
3. Fixez l’Accéléromètre sur votre chaussure en attachant la partie frontale de celui-ci (près du
bouton rouge) au support, et en appuyant sur la partie arrière de l’Accéléromètre. Refermez
2.
le rabat. Vérifi ez que l’Accéléromètre ne peut pas bouger et qu’il est aligné avec votre pied.
4. Mettez l’Accéléromètre en marche en appuyant longuement sur le bouton rouge. Le voyant
vert clignote. Mettez l’Accéléromètre en marche une fois la fréquence cardiaque affi chée sur
le récepteur.
Après l’entraînement, arrêtez l’Accéléromètre en appuyant longuement sur le bouton rouge.
Le voyant vert s’éteint progressivement.
3.
4.
Remarque :
• Si vous avez activé la fonction Aide sur le récepteur, Capteur S1 détecté et l’icône
lorsque vous mettez l’Accéléromètre en marche.
• Si le message Vérifi er capteur S1 ! apparaît, le Cardio Running ne peut recevoir les données de
l’Accéléromètre. Reportez-vous au chapitre « Questions fréquentes », page 77.
• Lorsque le voyant vert de la pile devient rouge, vous devez remplacer la pile avant votre prochaine
séance de course à pied.
Conseil : moins l’Accéléromètre bougera, plus les mesures de vitesse et de distance seront précises.
Le support doit passer sous le plus grand nombre possible de lacets de façon à être fermement maintenu
en place.
s’affi chent
12
FRA
Page 93

Calibrage de l’Accéléromètre Polar S1
Le calibrage de l’Accéléromètre permet d’améliorer la précision des mesures de vitesse / allure et de distance. Il est
recommandé de calibrer l’Accéléromètre dans les cas suivants : lorsque vous l’utilisez pour la première fois ; lorsque vous
modifi ez de façon notable votre foulée ; lorsque vous changez la position de l’Accéléromètre sur votre chaussure (ou si vous
utilisez une autre paire de chaussures).
Vous pouvez calibrer l’Accéléromètre S1 en courant sur une distance prédéterminée à une allure régulière. Si vous
connaissez déjà le coeffi cient de calibrage (par exemple, lorsque vous passez d’une séance sur plat à une séance en terrain
varié), vous pouvez ajuster le coeffi cient manuellement.
Pour plus d’informations sur le calibrage de l’Accéléromètre, reportez-vous à la page 43.
2.3 COMMENCER L’ENREGISTREMENT DE VOTRE EXERCICE
En sélectionnant Démarrer dans le mode Heure, vous pouvez démarrer votre exercice.
1. Portez l’émetteur comme décrit dans le chapitre « Mesurer votre fréquence cardiaque », page 9.
2. Depuis l’affi chage de l’Heure, appuyez sur le bouton Rouge.
3. Le Cardio Running est en mode Pré-exercice. Démarrer et Réglages s’affi chent. L’exercice
affi ché par défaut clignote sur la ligne supérieure. Le récepteur recherche automatiquement
votre fréquence cardiaque mais l’exercice n’est pas encore enregistré.
4. Sélectionnez Démarrer avec les boutons / . Validez votre sélection en appuyant sur
le bouton Rouge. Le chronomètre démarre et l’icône de l’enregistrement de l’exercice
s’affi che. Le chronomètre et les autres fonctions sont alors activés et l’enregistrement de
l’exercice démarre.
Conseil : depuis l’affi chage de l’Heure, vous pouvez aussi faire un “Démarrage Rapide’’ de l’enregistrement de votre exercice en appuyant
longuement sur le bouton Rouge.
FRA
13
Page 94

Remarques :
• Avant de commencer à enregistrer votre exercice, vous pouvez sélectionner un autre exercice que celui affi ché par défaut, dans
le mode Réglages. Dans le mode Réglages, sélectionnez Exercice avec le bouton Rouge et sélectionnez l’exercice désiré avec les
boutons
automatiquement au menu Pré-exercice.
• Si vous commencez un exercice nécessitant l’utilisation de l’Accéléromètre mais que vous n’avez pas activé celui-ci, (Nom de l’exercice)
/ . Validez votre sélection avec le bouton Rouge, puis sélectionnez Valider avec le bouton Rouge. Le Cardio Running revient
Capteur S1 nécessaire s’affi che lorsque vous commencez l’exercice. Mettez l’Accéléromètre en marche et activez l’Accéléromètre dans
le mode Réglages de votre récepteur pour poursuivre votre exercice. Pour plus d’informations, reportez-vous au chapitre “Réglages des
fonctions”, page 43. Si vous n’activez pas l’Accéléromètre dans le mode Réglages du récepteur et que vous appuyez une nouvelle fois
sur le bouton Rouge, Exercice modifi é s’affi che et l’exercice passe automatiquement en mode Exercice Libre, qui ne nécessite pas
d’Accéléromètre.
• Si OwnZone est sélectionné, votre échauffement commence avec la procédure de détermination de la OwnZone. Pour plus
d’informations, reportez-vous au chapitre “Détermination de vos limites OwnZone’’, page 59.
• Le message Pile faible apparaît en mode Exercice lorsqu’il est temps de remplacer la pile de votre Cardio Running. Suivez alors les
instructions au chapitre « Entretien et Réparations », page 72.
Conseil : vous pouvez utiliser le mode Pré-exercice si vous souhaitez visualiser votre fréquence cardiaque sans enregistrer d’exercice,
comme par exemple en attendant le départ d’une course.
• Pour revenir à l’affi chage de l’Heure, appuyez 2 fois sur le bouton Stop.
14
FRA
Page 95

2.4 FONCTIONS DISPONIBLES PENDANT L’EXERCICE
De nombreuses fonctions sont accessibles au cours de votre entraînement. Vous pouvez ainsi :
Enregistrer et voir vos temps intermédiaires.
Voir votre fréquence cardiaque instantanée (en battements par minute ou en pourcentage de votre FC
Voir la durée écoulée de l’exercice en cours.
Voir le nombre de calories que vous avez dépensé au cours de votre exercice.
Voir votre vitesse / allure.
Voir la distance que vous avez parcouru jusqu’à présent.
Voir l’heure.
Voir avec les alarmes de minuteurs ou de distance, le temps qu’il reste avant la fi n d’une phase
d’entraînement particulière, et sélectionner la phase suivante.
Voir votre zone cible de fréquence cardiaque et vérifi er que vous restez bien dans vos limites.
Voir vos limites de vitesse / d’allure.
Voir à quelle intensité se situe votre fréquence cardiaque et attribuer celle-ci à une SportZone spécifi que.
Pour plus d’informations sur les SportZones, reportez-vous à la page 61.
Remarques :
• Vos données d’exercice ne sont sauvegardées que si le chronomètre a été déclenché depuis plus d’une minute ou si vous avez enregistré
au moins un temps intermédiaire.
• Pendant votre séance, les informations qui s’affi chent à l’écran dépendent de vos réglages d’affi chage. Pour modifi er ces réglages,
reportez-vous à la page suivante.
max
).
FRA
15
Page 96

Données affi chées par défaut :
Votre Cardio Running possède trois lignes d’affi chage, ce qui vous permet de consulter simultanément les différentes données de votre
séance. Pendant votre séance, vous pouvez consulter 5 modes d’affi chage réglés par défaut lorsque l’Accéléromètre est activé
(et 3 modes d’affi chage si vous n’utilisez pas l’Accéléromètre). Vous pouvez à tout moment changer de mode d’affi chage avec les
boutons / . L’information la plus pertinente de telle phase spécifi que de votre séance vous est ainsi toujours accessible.
Mode d’affi chage Fréquence Cardiaque
Vitesse / Allure / Temps intermédiaires
•
(si l’Accéléromètre est désactivé, seuls
les temps intermédiaires s’affi chent)
• Chronomètre
• Fréquence cardiaque
Mode d’affi chage Chronomètre
• Fréquence cardiaque
• Numéro du temps intermédiaire et
durée correspondante
• Chronomètre
Mode d’affi chage Temps
Intermédiaires
• SportZones / Zone cible de fréquence
cardiaque /
allure cible
• Fréquence cardiaque
• Temps intermédiaire
Remarque : les variations des modes d’affi chage dépendent de vos réglages. Reportez-vous à la page suivante pour modifi er les modes d’affi chage.
16
Vitesse cible / Zone
Mode d’affi chage Allure / Vitesse
(ne s’affi che pas si l’Accéléromètre est
désactivé)
• Chronomètre
• Distance
• Allure / Vitesse (suivant votre
sélection)
Mode d’affi chage Distance
(ne s’affi che pas si l’Accéléromètre est
désactivé)
• Numéro de la zone et compte à
rebours ou distance / Temps
intermédiaire (les temps inter médiaires s’affi chent si vous n’avez
réglé aucun minuteur ou aucune
distance, pour vous guider lorsque
vous souhaitez changer de zone)
• SportZones / Zone cible de fréquence
cardiaque /
allure cible
• Distance
Vitesse cible / Zone
FRA
Page 97

Changer les données qui s’affi chent à l’écran pendant votre exercice :
Les modes d’affi chage peuvent être réglés de façon à les personnaliser. Vous pouvez ainsi combiner les données pour obtenir
l’affi chage qui vous convient le mieux.
1. Appuyez sur le bouton Stop pour accéder au Menu arrêt. L’enregistrement de votre exercice est mis en pause, le temps
de réaliser vos réglages.
2. Sélectionnez Réglages avec les boutons / . Validez avec le bouton Rouge.
3. Depuis le mode Réglages, sélectionnez Affi chage. Vous pouvez modifi er les modes d’affi chage Fréquence cardiaque,
Chronomètre et Temps intermédiaires. Lorsque l’Accéléromètre est activé, vous pouvez aussi modifi er les modes
d’affi chage Vitesse / Allure et Distance.
4. En appuyant sur le bouton Rouge, la ligne supérieure clignote. Parcourez les différentes options disponibles avec les
boutons
/ et validez avec le bouton Rouge :
Chronomètre
Temps intermédiaires
Heure
5. La ligne médiane clignote ensuite. Répétez la procédure ci-dessus.
6. Appuyez deux fois sur le bouton Stop pour revenir au Menu arrêt. Vous pouvez reprendre votre séance en sélectionnant
Continuer.
Remarque :
• Pour revenir au mode d’affi chage par défaut, appuyez longuement sur le bouton Lumière lorsque la ligne supérieure ou la ligne médiane
clignote. Revenir par défaut ? Oui / Non s’affi che. Sélectionnez Oui avec les boutons / et validez avec le bouton Rouge.
• En mode Exercice, vous pouvez retrouver le mode d’affi chage modifi é le plus récent en appuyant longuement sur le bouton .
• Les modes d’affi chage peuvent aussi être modifi és avant l’exercice dans le mode Pré-exercice. Sélectionnez Réglages puis choisissez
Affi chage dans le menu. Répétez ensuite la procédure ci-dessus.
Conseil :
• Sélectionnez le mode d’affi chage le plus approprié en fonction des données qui vous intéressent le plus. Par exemple, lorsque vous
devez réaliser votre séance à une allure spécifi que, utilisez un mode d’affi chage permettant de visualiser la vitesse ou l’allure.
• Pour programmer une séance de fractionné, sélectionnez un mode d’affi chage permettant de visualiser les SportZones Polar. Pour les
courses longues sur une distance prédéfi nie, un mode d’affi chage permettant de visualiser la distance parcourue est idéal.
FRA
Sélectionnez le mode d’affi chage que vous souhaitez modifi er avec les boutons / .
Calories
Fréquence cardiaque
Compte à rebours / Distance
Vitesse / Allure
Distance
Limites de zone cible
17
Page 98

ZOOMER sur une ligne d’affi chage afi n de faire ressortir une donnée :
En mode Exercice, appuyez longuement sur le bouton . La donnée de la ligne médiane est
agrandie, et la ligne supérieure affi che le nom de la fonction correspondante. En appuyant
longuement sur le bouton , la fonction reprend son mode d’affi chage précédent (sur 3 lignes).
Remarque : il n’est pas possible de zoomer sur les graphes de zones cible.
Conseil : par exemple, il peut s’avérer utile lors d’une épreuve de course à pied d’affi cher à la fois votre
fréquence cardiaque en pourcentage de FC
supérieure et le cumul des temps intermédiaires sur la ligne inférieure). De cette façon il vous sera plus
facile de rester dans votre zone cible et d’atteindre sans diffi cultés la ligne d’arrivée.
ainsi que la durée (temps intermédiaire sur la ligne
max
Enregistrer des Temps intermédiaires et le Cumul des Temps intermédiaires :
Appuyez sur le bouton
Rouge pour enregistrer
un temps intermédiaire.
Le numéro du temps
intermédiaire, la FC
moyenne du temps
intermédiaire et le temps
intermédiaire s’affi chent.
18
Après quelques secondes,
la distance et la vitesse /
l’allure moyenne du temps
intermédiaire s’affi chent, si
l’accéléromètre est activé.
Si vous avez activé la
fonction AutoLap, votre
Cardio Running enregistrera
automatiquement des
temps intermédiaires.
FRA
Page 99

Le Temps intermédiaire (Lap) indique le temps écoulé au bout d’un temps intermédiaire. Le Cumul des temps
intermédiaires (split time) indique le temps écoulé entre le début de l’exercice et le dernier temps intermédiaire
(par exemple du début de l’exercice jusqu’au 4
Remarque :
•
Si votre Cardio Running ne peut enregistrer plus de 42 temps intermédiaires, il émet un bip sonore et Mémoire faible s’affi che.
• Si la mémoire de votre Cardio Running est pleine, celui-ci émet un bip sonore et Mémoire pleine s’affi che. L’exercice est enregistré et les temps
intermédiaires sont affi chés, mais ils ne sont cependant ni cumulés, ni enregistrés dans le Fichier.
• Lorsque la durée maximale d’exercice est atteinte, le Cardio Running émet un bip sonore et Durée maximum exercice s’affi che pendant 10
secondes. Le chronomètre ou les minuteurs sont arrêtés, et l’exercice n’est plus enregistré.
ème
temps intermédiaire).
Attribuer une valeur de fréquence cardiaque à une SportZone spécifi que :
Lorsque vous vous exercez sans zone(s) cible préréglée(s), vous pouvez attribuer une valeur de
fréquence cardiaque à une SportZone spécifi que. Par exemple, si vous courez avec une fréquence
cardiaque à 130 bpm, qui correspond à 75% de votre FC
vous pouvez attribuer cette valeur de fréquence cardiaque à cette zone en appuyant longuement
et qui correspond à la SportZone 3,
max
sur le bouton Rouge. SportZone 3 Activé 70%-79% s’affi che et le graphe apparaît dans le mode
d’affi chage temps intermédiaires (si vous n’avez pas modifi é les modes d’affi chage auparavant). En
poursuivant votre exercice, si votre fréquence cardiaque passe au-dessus ou en dessous de la SportZone, le Cardio Running
vous prévient en émettant des bips sonores (si la fonction Alarme ZC est activée). Si votre fréquence cardiaque est inférieure
à 50% ou supérieure à 100% de votre FC
Vous pouvez désactiver la SportZone en appuyant longuement sur le bouton Rouge. SportZone 3 Désactivé s’affi che. Pour
, l’icône en forme de cœur n’apparaît pas sur le graphe.
max
savoir comment utiliser les SportZones Polar dans votre programme d’entraînement, reportez-vous à la page 61.
Conseil : attribuer une fréquence cardiaque à une SportZone particulière peut être très utile lors d’une séance de récupération à faible
intensité. Une récupération optimale est essentielle avant chaque séance à forte intensité.
Mettre l’exercice en pause : appuyez sur le bouton Stop. L’enregistrement de l’exercice, le chronomètre et les autres fonctions
sont mis en pause. Pour reprendre votre séance, sélectionnez Continuer dans le menu et validez en appuyant sur le bouton Rouge.
Conseil : mettez l’exercice en pause si vous devez vous arrêter, par exemple à un carrefour ou encore pour vous ravitailler.
FRA
19
Page 100

Rétro-éclairage (mode Nuit) : si vous activez le rétro-éclairage en appuyant sur le bouton Lumière pendant l’enregistrement
d’un exercice, l’affi chage s’illuminera automatiquement à chaque fois que vous appuierez sur n’importe quel bouton ou que
vous utiliserez la fonction -Touch pendant le même exercice. L’affi chage s’illuminera aussi à chaque fois qu’un AutoLap
(temps intermédiaire automatique) sera enregistré.
Utiliser le Menu Réglages : appuyez longuement sur le bouton Lumière pour accéder au Menu Réglages. Dans celui-ci,
vous pouvez modifi er les réglages de votre Cardio Running :
• Verrouiller
• Alarme ZC*
• Modif. zone**
Remarque : pour plus d’informations sur ces fonctions, reportez vous au chapitre « Réglages des fonctions », page 43.
*Pour plus d’informations sur l’Alarme ZC, reportez-vous au chapitre « Limites de zone cible », page 58.
**S’affi che uniquement si vous réalisez votre séance dans un mode Exercice avec des zones cible préréglées. Cette fonction permet de passer
manuellement d’une zone cible à une autre.
Conseil : lorsque vous vous trouvez dans un lieu où vous ne souhaitez pas déranger d’autres personnes avec les bips sonores, désactivez
l’alarme de zone cible.
• Format FC
-Touch
•
• Format vit. (vitesse)
• AutoLap
Verrouiller : vous pouvez activer ou désactiver tous les boutons sauf le bouton Lumière pendant votre exercice.
Le verrouillage peut s’avérer utile lorsque vous pratiquez des activités sportives où vous risquez de déclencher les boutons
par accident. Pour désactiver les boutons, appuyez longuement sur le bouton Lumière afi n d’accéder au Menu Rapide.
Sélectionnez Verrouiller dans le menu avec les boutons / et validez en appuyant sur le bouton Rouge. L’icône
s’affi che. Pour activer les boutons, appuyez longuement sur le bouton Lumière. Maintenir pour activer boutons s’affi che.
Appuyez longuement sur le bouton Lumière jusqu’à ce que l’icône
disparaisse. Boutons activés s’affi che.
20
FRA
 Loading...