

Page 1

POLAR
RC3 GPS
User Manual
Page 2

ENGLISH
CONTENTS
1. INTRODUCTION ...... ....... ....... ....... ....... ....... ....... ....... ....... ....... ...................... . ....... ....... ....... ... 4
2. THE ALL-IN-ONE TRAINING SYSTEM . ....... ....... ....... ....... ....... ...................... . ....... ....... ....... ....... .... 5
Training Computer Parts.... ....... ....... ....... ....... ....... ....... ....... ....... ....... ....... ....... ....... ....... .......... 5
Training Software.... ....... ....... ....... ....... ....... ....... ....... ....... ....... ....... ....... ....... ...................... . .. 5
Available Accessories ....... ....... ....... ....... ....... ....... ....... ...................... . ....... ....... ....... ....... ....... 6
Button Functions . ....... ....... ....... ....... ....... ....... ....... ....... ....... ...................... . ....... ....... ....... ...... 7
Menu Structure ... ....... ....... ....... ....... ....... ....... ....... ....... ...................... . ....... ....... ....... ....... ..... 7
3. TRAINING COMPUTER BATTERY...... ....... ....... ....... ....... ....... ....... ....... ....... ....... ....... ....... ....... ...... 9
Charging Your Training Computer ..... ....... ....... ....... ....... ....... ....... ....... ....... ....... ....... ....... ....... .... 9
Battery operating time ..... ....... ....... ....... ....... ....... ....... ....... ....... ....... ....... ....... ...................... . .. 9
Battery Status Indication ..... ....... ....... ....... ....... ....... ....... ....... ....... ....... ....... ...................... . ...... 10
Low battery notifications .................................................................................................... 10
4. SETTING UP THE TRAINING COMPUTER... ....... ...................... . ....... ....... ....... ....... ....... ....... ....... ..... 12
Basic Settings.. ....... ....... ....... ....... ....... ....... ....... ....... ...................... . ....... ....... ....... ....... ....... . 12
Sport Profile Settings ..... ....... ....... ....... ....... ....... ....... ....... ....... ....... ...................... . ....... ....... ... 12
5. TRAINING... ....... ....... ....... ....... ....... ....... ....... ...................... . ....... ....... ....... ....... ....... ....... ...... 13
Wearing the Heart Rate Sensor ...... ....... ...................... . ....... ....... ....... ....... ....... ....... ....... ....... .... 13
Starting a Training Session ....... ....... ....... ....... ....... ....... ....... ....... ....... ....... ....... ....... ....... ....... ... 13
Train with Polar ZoneOptimizer ..... ....... ....... ....... ....... ....... ....... ....... ....... ....... ....... ....... .............. 16
Start Training Session with Polar ZoneOptimizer ........ ........................ ...................................... 16
Training Views . ....... ....... ....... ....... ....... ....... ....... ....... ....... ....... ....... ...................... . ....... ....... . 17
Button Functions During Training . ....... ....... ....... ....... ....... ....... ....... ....... ...................... . ....... ....... 21
Record a Lap ............. ........................ ........................ ................................................ ...... 21
Lock a Sport Zone......................................................................................... .................... 21
Night Mode ...................................................................................................... ............... 21
View Quick Menu .............................................................................................................. 22
Pause / Stop Training Recording.... ....... ....... ....... ....... ....... ....... ....... ....... ....... ....... ....... .............. 22
Back to Starting Point ... ....... ....... ....... ....... ...................... . ....... ....... ....... ....... ....... ....... ....... .... 22
6. AFTER TRAINING ..... ....... ....... ....... ....... ....... ....... ....... ....... ....... ...................... . ....... ....... ....... .. 23
Training Benefit ... ....... ....... ....... ....... ....... ....... ....... ....... ....... ....... ....... ....... ...................... . ..... 23
Training Files.... ....... ....... ....... ....... ....... ....... ....... ....... ....... ....... ....... ....... ....... ....... ................ 24
Delete Files ..................................................................................................................... 26
Week Summaries ... ....... ....... ....... ....... ...................... . ....... ....... ....... ....... ....... ....... ....... ....... ... 27
Reset Week Summaries............. ................................................ ........................ ................. 27
Totals Since xx.xx.xxxx ..... ...................... . ....... ....... ....... ....... ....... ....... ....... ....... ....... ....... ....... . 27
Reset Totals .............................................................................................................. ...... 27
7. POLARPERSONALTRAINER.COM ..... ....... ....... ....... ....... ....... ...................... . ....... ....... ....... ....... ..... 28
Analyze Your Training Data ................................................................................................. 28
Utilize Polar Endurance Training Programs ............................................................................. 28
8. SETTINGS .... ....... ....... ....... ....... ....... ....... ...................... . ....... ....... ....... ....... ....... ....... ....... .... 29
Sport Profile Settings ..... ....... ....... ....... ....... ....... ....... ....... ....... ....... ...................... . ....... ....... ... 29
Running Settings ....................................................................................................... ....... 29
Cycling Settings ............................................................................................................... 29
Other Sport Settings ....... ................................................ ................................................ ... 31
Heart Rate Settings... ....... ....... ....... ....... ....... ....... ....... ...................... . ....... ....... ....... ....... ....... . 31
User Information Settings ..... ....... ....... ....... ....... ....... ....... ....... ....... ....... ....... ....... ....... .............. 32
Maximum Heart Rate (HRmax) ....................................................... ..................................... 32
OwnIndex® ................................................ ................................................ ..................... 32
General Settings ..... ....... ....... ....... ....... ....... ....... ....... ....... ....... ....... ....... ...................... . ....... .. 32
Page 3

ENGLISH
Watch Settings.... ....... ....... ...................... . ....... ....... ....... ....... ....... ....... ....... ....... ....... ....... ..... 33
Quick Menu.. ....... ....... ....... ....... ....... ....... ....... ....... ...................... . ....... ....... ....... ....... ....... .... 33
Time Mode ....... ................................................ ................................................ ............... 33
Pre-training mode ......................................................................... .................................... 33
Training Mode......... ................................................ ................................................ ......... 33
9. POLAR FITNESS TEST .... ....... ....... ....... ....... ...................... . ....... ....... ....... ....... ....... ....... ....... .... 35
Before the Test..................................................................... ............................................ 35
Performing the Test........................................................................................... ................ 35
After the Test................................................................... ................................................ 36
10.NEW ACCESSORY .... ....... ...................... . ....... ....... ....... ....... ....... ....... ....... ....... ....... ....... ....... .. 38
Pairing a New Sensor with the Training Computer.... ....... ....... ....... ....... ....... ....... ....... ....... ....... ....... 38
Pairing a New Heart Rate Sensor with the Training Computer ... ....... ....... ....... ....... ....... ....... ....... ....... . 38
Pairing a New Speed Sensor with the Training Computer ...... ....... ....... ....... ....... ....... ....... ....... .......... 38
Pairing a New Cadence Sensor with the Training Computer ...... ....... ....... ....... ....... ....... ....... ....... ....... 39
Pairing a New Stride Sensor with the Training Computer ................. . ....... ....... ....... ....... ....... ....... ..... 39
Calibrate the Polar s3+ Stride Sensor ... ....... ....... ....... ....... ....... ...................... . ....... ....... ....... ...... 39
Calibration by Running Wizard ................................................ ............................................. 40
Set Calibration Factor Manually .............................................................. ........................ ..... 40
Calibrate Sensor by Running a Known Distance (on-the-fly calibration) ........................................ 40
11.POLAR SMART COACHING . ....... ....... ....... ....... ...................... . ....... ....... ....... ....... ....... ....... ....... .. 42
Polar Sport Zones ... ....... ....... ....... ....... ....... ....... ....... ....... ...................... . ....... ....... ....... ....... .. 42
Heart Rate Variability ....... ....... ....... ....... ....... ....... ....... ....... ....... ....... ....... ....... ....... ....... .......... 43
Polar ZoneOptimizer ... ....... ....... ....... ....... ....... ....... ....... ....... ...................... . ....... ....... ....... ...... 43
Maximum Heart Rate.. ....... ....... ....... ....... ....... ....... ....... ....... ....... ...................... . ....... ....... ....... 45
Running Cadence and Stride Length ... ....... ....... ....... ....... ....... ...................... . ....... ....... ....... ....... . 45
Polar Running Index... ....... ....... ....... ....... ....... ....... ....... ...................... . ....... ....... ....... ....... ....... 46
Polar Training Load Feature ..... ....... ....... ....... ....... ....... ....... ....... ....... ....... ....... ....... ....... ....... .... 48
Polar Endurance Training Program for Running and Cycling.... ....... ....... ....... ....... ....... ....... ....... ....... .. 48
12.IMPORTANT INFORMATION..... ....... ....... ....... ....... ....... ....... ....... ....... ....... ....... ............... . ....... .... 50
Caring for Your Product .. ....... ....... ....... ...................... . ....... ....... ....... ....... ....... ....... ....... ....... ... 50
Service ....... ........................ ................................................ ............................................ 51
Batteries ... ....... ....... ....... ....... ....... ....... ....... ....... ...................... . ....... ....... ....... ....... ....... ...... 51
Change the Heart Rate Sensor Battery ............................................................... .................... 51
Precautions.. ....... ....... ....... ....... ....... ....... ....... ....... ....... ...................... . ....... ....... ....... ....... .... 52
Interference During Training .................................................. ............................................. 52
Minimizing Risks When Training ...................................................................................... .... 53
Technical Specifications ... ....... ....... ....... ....... ....... ....... ....... ....... ....... ....... ....... ....... ................. 53
Frequently Asked Questions.... ....... ....... ....... ....... ....... ....... ....... ....... ....... ...................... . ....... .... 55
Limited International Polar Guarantee .... ....... ....... ....... ....... ....... ...................... . ....... ....... ....... ..... 58
Disclaimer .... ....... ....... ....... ....... ....... ....... ....... ....... ...................... . ....... ....... ....... ....... ....... ... 59
INDEX . ....... ....... ....... ....... ....... ....... ....... ....... ...................... . ....... ....... ....... ....... ....... ....... ..... 60
Page 4

ENGLISH
1. INTRODUCTION
Congratulations on the purchase of your Polar RC3 GPS™training computer! The training computer offers
you an all-in-one system to guide you in your training.
This user manual includes complete instructions to help you get the most out of your training computer.
The latest version of this user manual can be downloaded at www.polar.com/support
[http://www.polar.com/support]. For video tutorials, go to
http://www.polar.com/en/polar_community/videos.
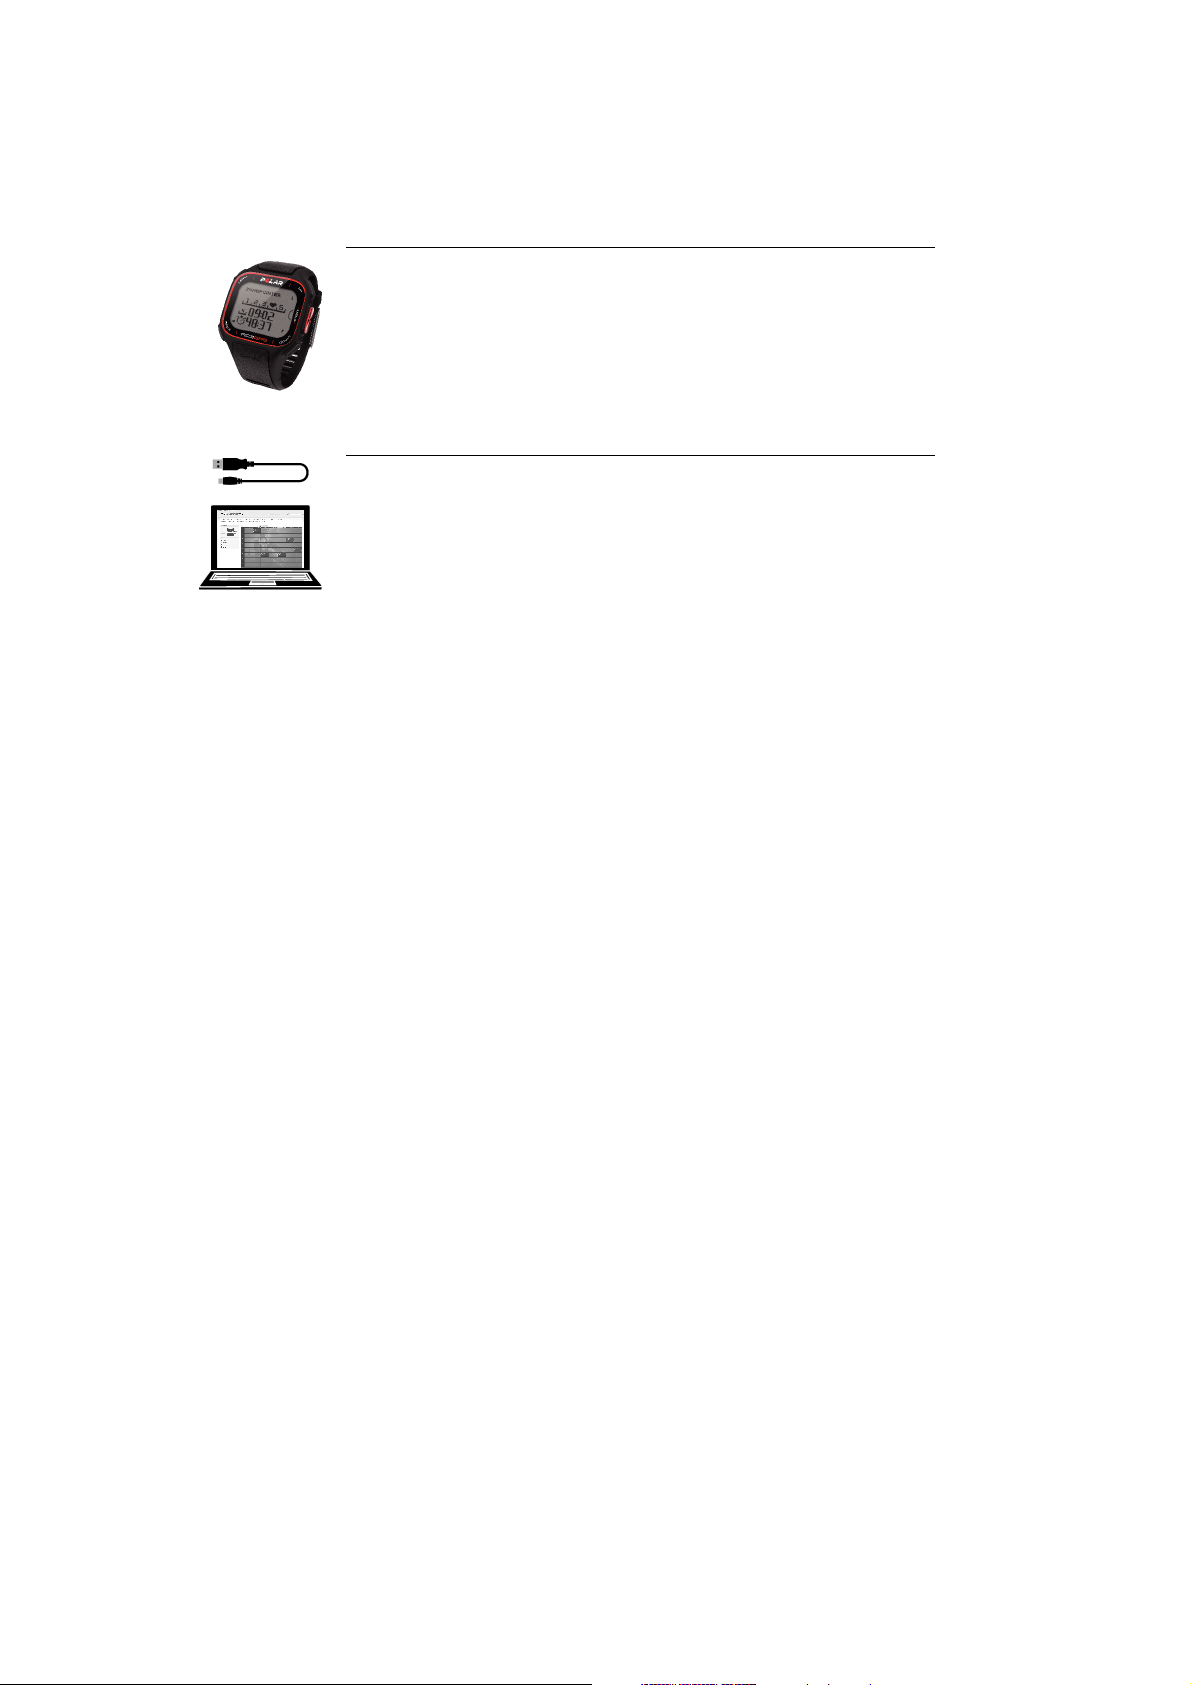
Key Features and Benefits
Slim Integrated GPS:RC3GPSisallyouneedfortrackingyourspeed,distanceandroute.Theslimand
lightweight training computer has a built-in GPS and rechargeable battery.
Back to starting point:Thisfeatureguidesyourwaybacktothestartingpointofyourtrip.
Tra i ning Be nef i t :Thisfeaturehelpsyoubetterunderstandthebenefitsofyourtrainingbygivinginstant,
textual feedback on your performance.
Web Training Diary :Shareyourrouteanddistancewithothersatpolarpersonaltrainer.com.
Running Index:Monitortheefficiencyofyourrunwiththisfeature.Runningindexiscalculated
automatically after every run, based on heart rate and speed data.
Sport Profile:Startyourtrainingsessionwithease:thetrainingcomputerprovidesfivesportprofiles;one
for running, two for cycling and two for other sports.
Polar Sport Zones:Tohelpyoutrainattherightintensity,lockyoutargetsportzoneforatrainingsession.
When your heart rate goes below or above the target sport zone, the RC3 GPS gives a visual and audible
alarm.
4 Introduction
Page 5
ENGLISH
2. THE ALL-IN-ONE TRAINING SYSTEM
Training Computer Parts
With an integrated GPS unit, the Polar RC3 GPS training computer provides
speed and distance data, as well as route information at polarpersonaltrainer.com
web service, in all outdoor sports using Global Positioning System (GPS) technology.
Signals that GPS satellites transmit to the earth indicate the location of the satellites.
The training computer receives the signals and determines your location by measuring
the distance between itself and the satellites. There are at least 24 active GPS
satellites orbiting around the earth. To get a reliable location reading, the training
computer combines the signals from at least four satellites.
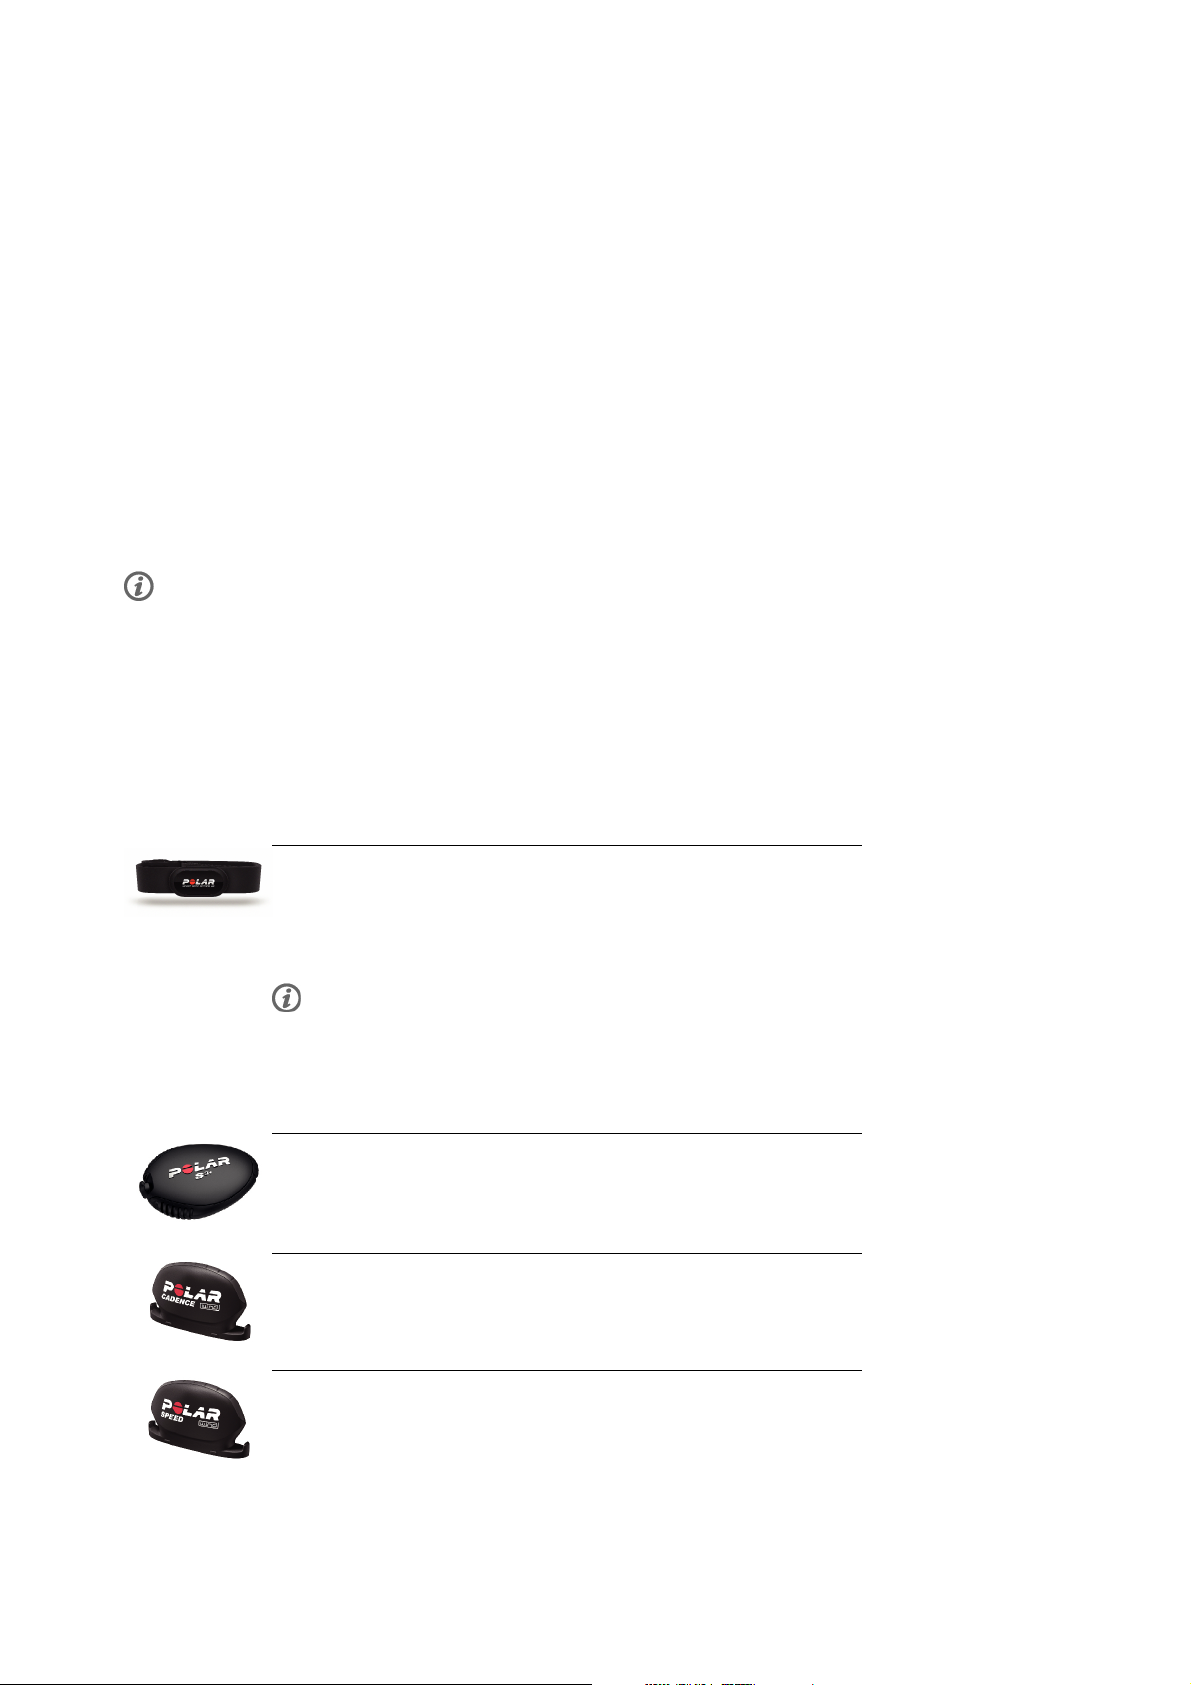
Connect the training computer to your computer with a USB cable to charge the
battery and to transfer data between the training computer and the
polarpersonaltrainer.com web service.
Register your Polar product at http://register.polar.fi/ to ensure we can keep improving our products and
services to better meet your needs.
Training Software
With WebSync software you can
• synchronize and transfer data between your training computer and
polarpersonaltrainer.com,
• adjust your training computer settings, and
• customize your training computer display for example with your own
logo.
For more information on data transfer and other functions in the WebSync software,
consult the full user manual at www.polar.com/support
[http://www.polar.com/support] or the online help for WebSync.
The WebSync software can be downloaded at www.polarpersonaltrainer.com
[http://www.polarpersonaltrainer.com].
The All-in-one Training System 5
Page 6
ENGLISH
Polarpersonaltrainer.com is your online training diary and interactive training
community that keeps you motivated. For a deeper analysis of your training, transfer
the training data to the polarpersonaltrainer.com web service using the USB cable
and WebSync software.
With the polarpersonaltrainer.com web service you can
• see your training route
• share your training result as your status update in a social network
• challenge your friends to virtual sports competitions
• get more detailed information on your training feedback
• store your training files and follow up your progress
• follow your training load and recovery in the training diary
• create and download the Polar Endurance training programs onto to
your training computer and utilize them in your training, and
• create your own training targets
For more information on the functions in the polarpersonaltrainer.com web service,
consult the online help for polarpersonaltrainer.com.
The username for your Polar Account is always your email address. The
same username and password are valid for Polar product registration,
polarpersonaltrainer.com, Polar discussion forum and Newsletter
registration.
Available Accessories
With the help of Polar accessories, you can enhance your training experience and achieve a more complete
understanding of your performance.
The RC3 GPS training computer is compatible with Polar H2 and H3 heart rate
sensors.Thecomfortableheartratesensordetectsyourheartrateaccuratelyfrom
the heart's electrical signals and sends the data to the training computer in real
time.
The heart rate sensor consists of a connector and a strap.
If you bought a set which does not include a heart rate sensor, turn it off in
settings for the Sport Profiles. For instructions, see Sport Profile
Settings (page 29).
Optional Polar s3+ stride sensor* helps you to improve your running technique. It
wirelessly measures speed/pace, distance, running cadence, running index and stride
length, whether you train indoors or out.
Optional Polar CS cadence sensor W.I.N.D.wirelessly measures cycling cadence,
i.e. your real-time and average pedaling rate as revolutions per minute.
Optional Polar CS speed sensor W.I.N.D.* wirelessly measures cycling distance
and your real-time, average and maximum speeds/paces.
6 The All-in-one Training System
Page 7
ENGLISH
Data from all compatible sensors is sent wirelessly to the training computer over the 2.4 GHz W.I.N.D.
technology, proprietary to Polar. This eliminates interference during training.
*When using the training computer with s3+ stride sensor or CS speed sensor W.I.N.D., the training
computer retrieves speed and distance data from the sensor and the GPS will only be used for location
and route tracking.
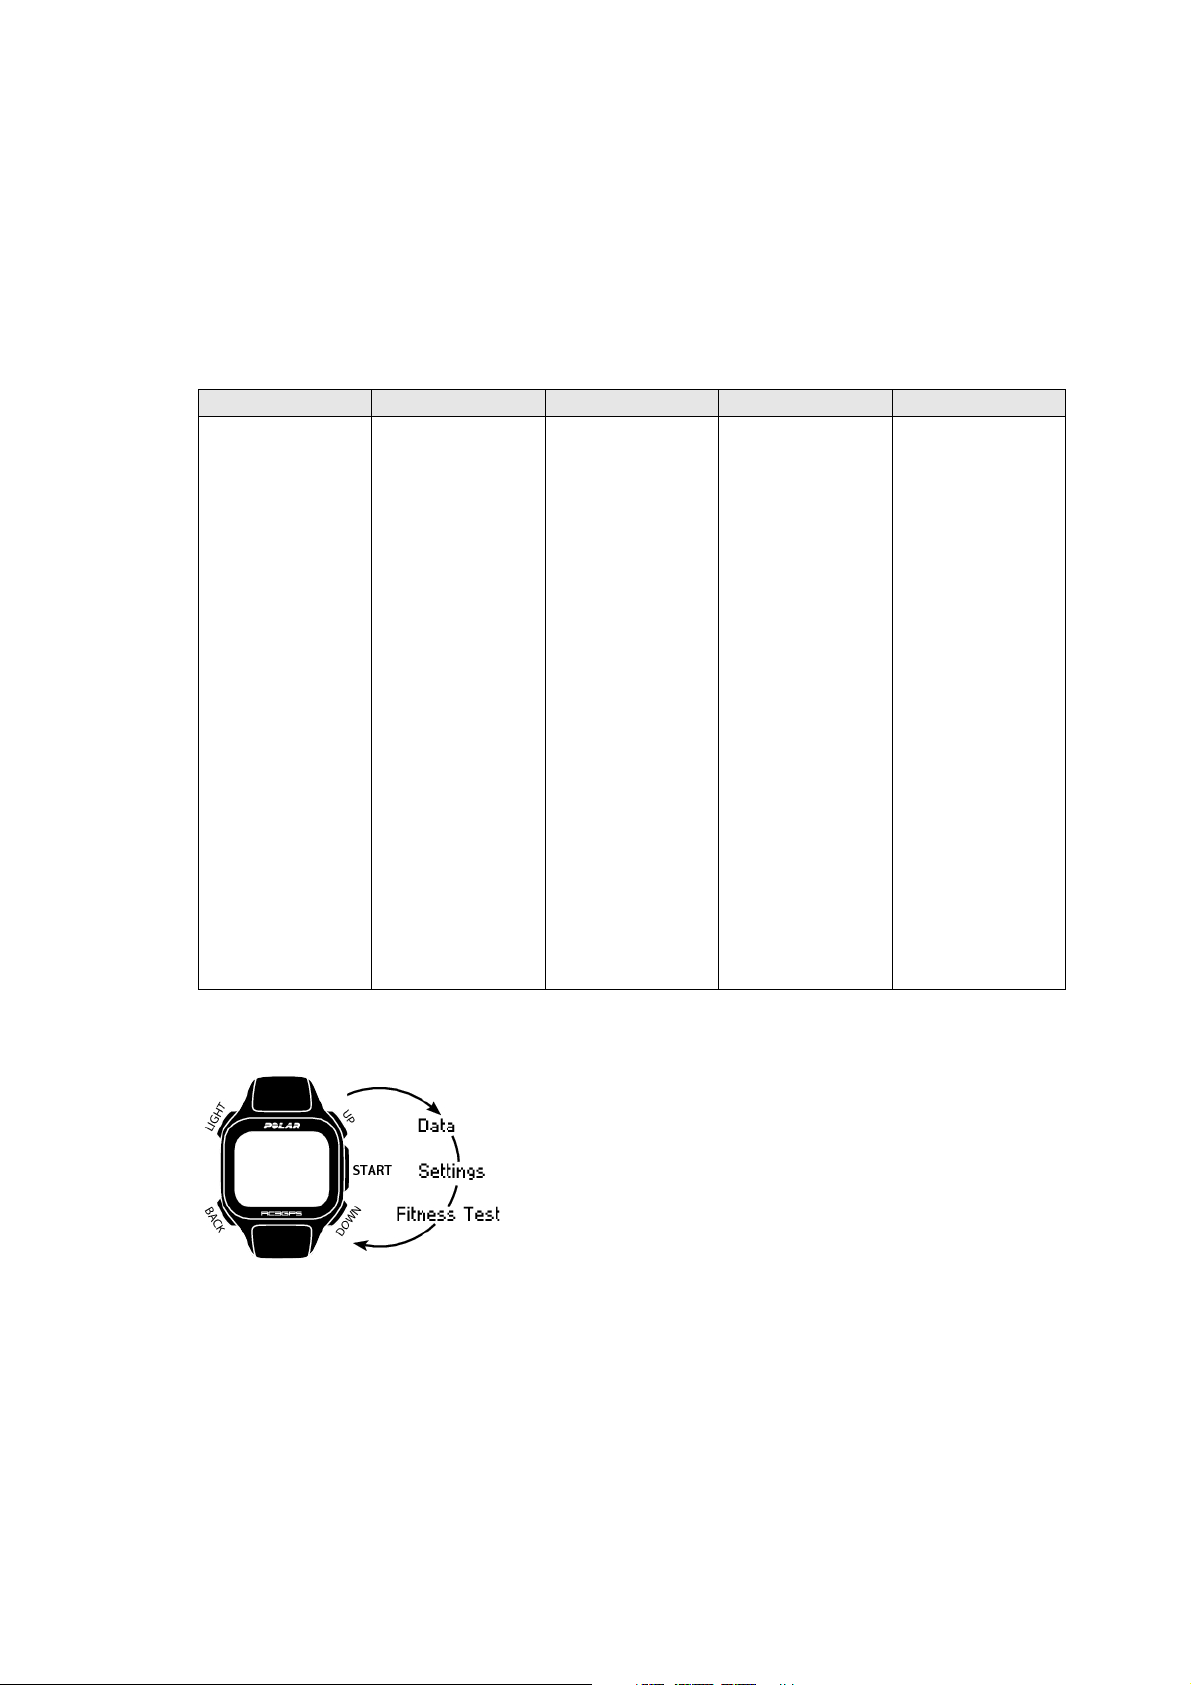
Button Functions
The training computer has five buttons that have different functionalities depending on the situation of
use.
LIGHT BACK START/OK UP DOWN
• Illuminate the
display
•
Press and hold
to enter QUICK
MENU: In time
view lock
buttons, set
alarm or select
time zone.
During training
lock buttons,
search sensor,
adjust training
sounds, set
automatic lap
on/off, show
GPS info or
show zone
limits.
• Exit the menu
• Return to the
previous level
• Leave settings
unchanged
• Cancel
selections
• Press and hold
to return to
time mode from
any other mode
• Confirm
selections
• Start a training
session
• Take a lap
• Press and hold
to set zone lock
on/off in
training mode.
• Move through
selection lists
• Adjust a
selected value
• Press and hold
to change the
watch face.
• Move through
selection lists
• Adjust a
selected value
• Press and hold
to switch
between Time
1/ Time 2.
For more
information on the
quick menu, see
Quick Menu
(page ? ).
Menu Structure
Data
Follow up on your training data. For more information, see After Training (page 23).
Settings
Customize your training computer and select the necessary features for each of the sport profiles to suit
your training. For more information, see Settings (page 29).
The All-in-one Training System 7
Page 8

ENGLISH
Fitness Test
To t r a i n r i g h t and to m o n i tor y o u r pr o g r e s s , it is i mportant t o k n o w your current fitness level. The P o l a r
Fitness Test is an easy and quick way to measure your cardiovascular fitness and aerobic capacity. The
test is performed at rest. The test result is a value called OwnIndex. OwnIndex is comparable to maximal
oxygen uptake (VO
), which is a commonly used aerobic capacity measure. For more information, see
2max
Polar Fitness Test (page 35).
8 The All-in-one Training System
Page 9
ENGLISH
3. TRAINING COMPUTER BATTERY
Charging Your Training Computer
The Polar RC3 GPS training computer has an internal, rechargable battery. Use the USB cable included in
the product set to charge the training computer via the USB connector on your computer. If you want to
plug the USB connector to a wall outlet, use a USB power adapter (not included in the product set).
1. Plug the micro USB connector into the USB port of the training
computer.
2. Plug the USB connector into the computer USB port. It is
recommended not to use USB hubs because a USB hub may not
supply enough power for the training computer.
Use a USB 2.0 compliant USB A-to-micro B cable included in the set
package. If you charge from a USB hub, for example, the charging time
might be prolonged.
If you use an AC adapter, make sure that the adapter is marked with
"output 5Vdc 0.5A - 2A max". Only use an AC adapter which is
adequately safety approved (marked with "LPS", "Limited Power
Supply" or "UL listed").
3. The charging animation appears on the display.
When you plug in the training computer for the first time, Windows
searches for drivers automatically. Wait for the driver search to
complete (it takes about one minute). Alternatively you can skip the
search. The charging animation / data transfer is disabled during the
search.
The battery will be 70-80% full after one hour of charging (if the
battery was low). Charging the battery fully takes up to one hour and a
half.
4. When the training computer is fully charged, Charging complete is
displayed. Disconnect the cable.
When you plug the micro USB connector into the USB port of the training computer, be careful not to
scratch the sealing surfaces of the back case. If sealing surface has deep scratches, it will cause loss of
IPx7 grade waterproof level.
After each time of using the USB port of the training computer, check visually that there is no hair, dust
or other dirt on the sealing surface area of the lid/back case. Gently wipe to remove any dirt. Do not use
any sharp tools or equipment for cleaning, which could cause which can cause scratches to the plastic
parts.
Battery operating time
In continuous use When recording a training
session on average 1h/day,
7days/week
with the GPS function ON:
with the GPS function ON:
When only time view is used
4months
up to 12 hours
with the GPS function OFF:
up to 1700 hours
Battery operating time depends on many factors, such as the temperature of the environment in which you
11 days
with the GPS function OFF:
120 days
Training Computer Battery 9
Page 10
ENGLISH
use your training computer, the features you select and use, and battery aging. The operating time is
significantly reduced in temperatures well below freezing. Wearing the training computer under your
overcoat helps to keep it warmer and to increase the operating time.
You ca n increas e t he bat tery operating time sig nificantly by using Available Accesso ries ( page 6) instead
of the GPS function for measuring speed and distance when you do not need route information.
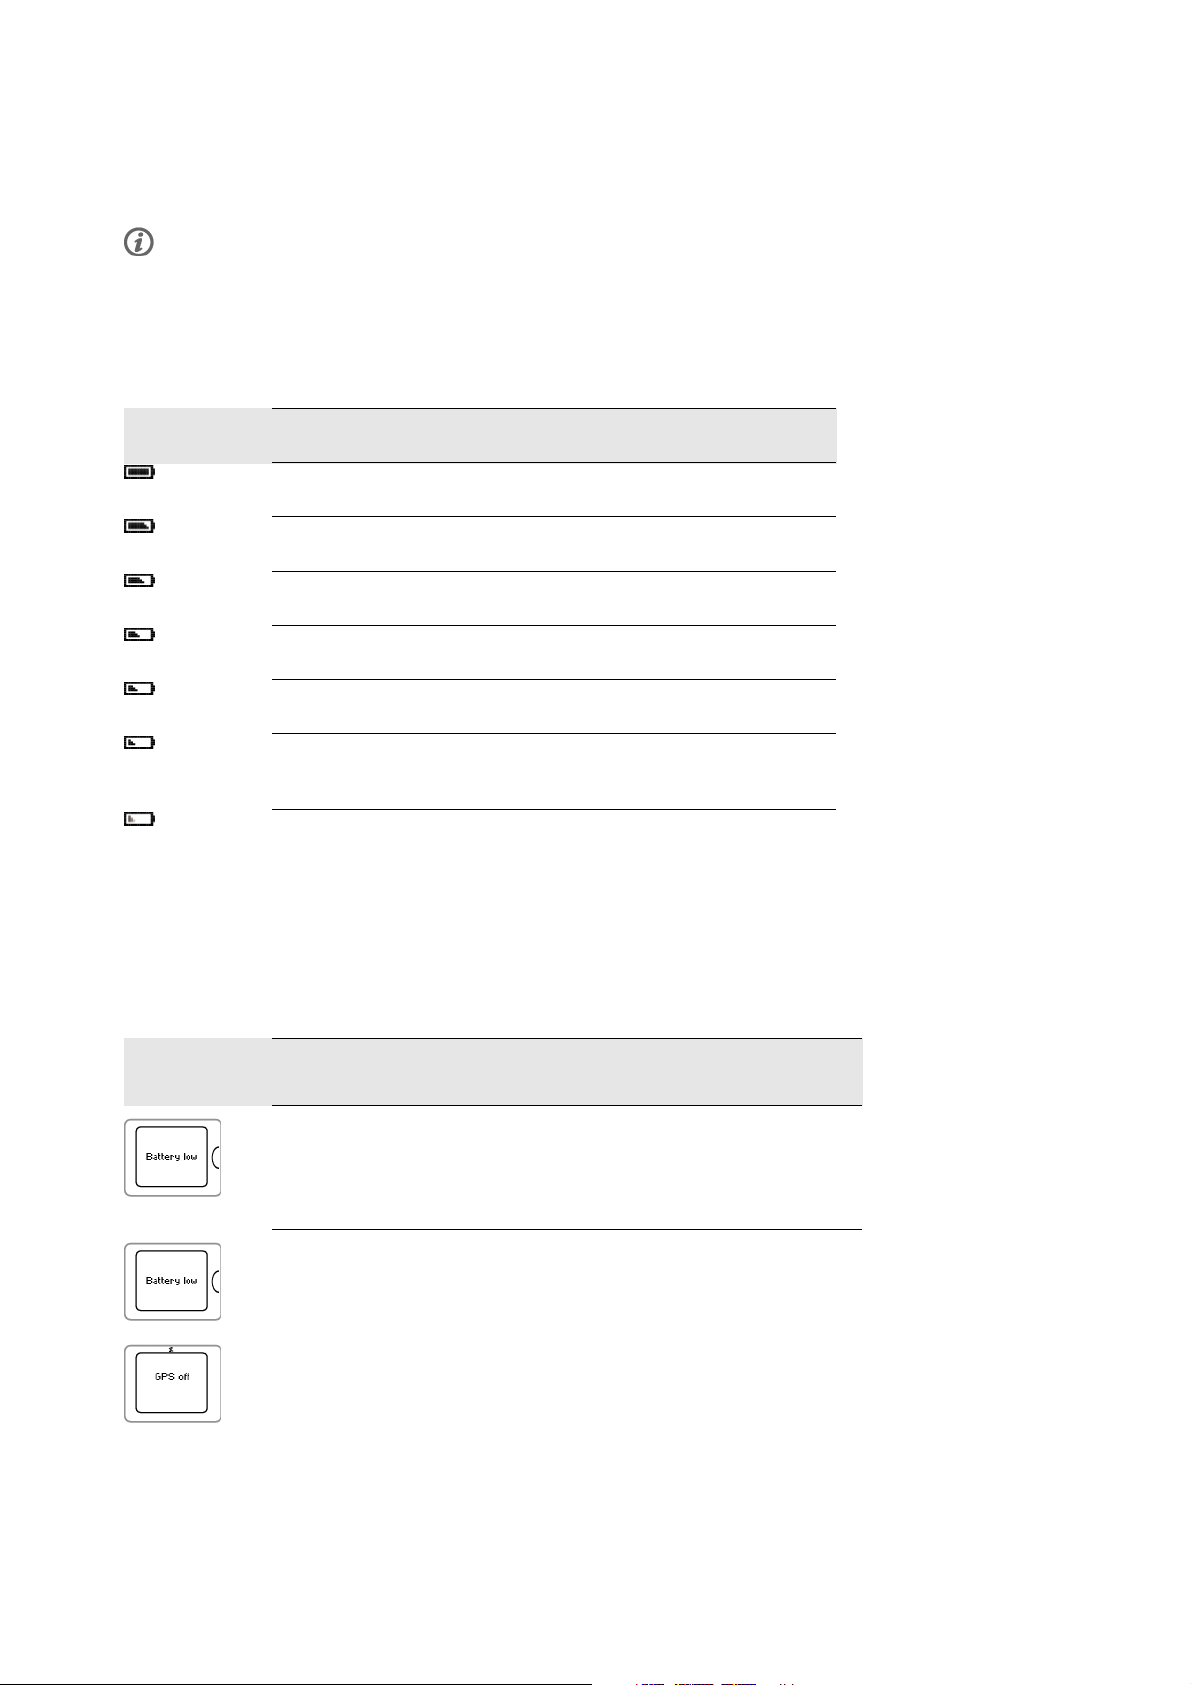
Battery Status Indication
The battery icon in the upper right hand corner of the display shows the battery charging status and
approximately how much charge is left in the battery.
Battery icon
Charge left
80 - 100%
60 - 80%
40 - 60%
20 - 40%
8-20%
The training computer has enough charge for one hour of training with the GPS
function on.
The remaining charge in the battery icon is blinking. The training computer charge
is too low for recording a new training session with the GPS function on. At this
point, the training computer switches the GPS function off. The training computer
sounds and backlight are also automatically deactivated.
Anewtrainingrecordingcannotbestartedbeforechargingthetrainingcomputer.
Low battery notifications
When the charge is getting low, the training computer notifies you with a message and an alarm.
Low battery
notification
Battery status
Battery low
This notification is displayed when the training computer has enough charge for one
hour of training with the GPS function on.
Battery low , GPS off
This notification is only displayed in training mode.
The training computer charge is too low for continuing the recording of the training
session with the GPS function on. At this point, the training computer switches the
GPS function off. You can still use Av ailab le Accessories (pa ge 6) and carry
out the training session. The training computer sounds and backlight are
automatically deactivated.
Anewtrainingrecordingcannotbestartedbeforechargingthetrainingcomputer.
10 Training Computer Battery
Page 11

ENGLISH
Low battery
notification
Battery status
Charge before training
The charge is too low for recording a training session.
Anewtrainingrecordingcannotbestartedbeforechargingthetrainingcomputer.
Recording stopped, Battery Empty
The charge is critically low. The training computer stops recording the training
session, saves the training data and then goes to sleep mode.
When the training computer display is blank, the battery is empty and the training
computer has gone to sleep mode. Charge the training computer. If the battery is
totally drained, it may take a while for the charging animation to appear on the
display.
Training Computer Battery 11
Page 12

ENGLISH
4. SETTING UP THE TRAINING COMPUTER
Basic Settings
Before using your training computer for the first time, customize the basic settings. Enter as accurate data
as possible to ensure correct feedback based on your performance.
Activate your training computer by pressing START. Select language is displayed. You can select from
Dansk, Deutsch, English, Español, Français, Italiano, Nederlands , Norsk, Português, Suomi or Svenska
and accept with START. Please enter basic settings is displayed. Press START and adjust the following
data:
1. Time: Select 12h or 24h. With 12h, select AM or PM. Enter the local time.
2. Date: Enter current date.
3. Units: Select metric (kg/cm) or imperial (lb/ft) units.
4. Weight: Enter your weight.
5. Height: Enter your height. In LB/FT format, first enter feet then inches.
6. Date of birth: Enter your date of birth.
7. Sex: Select Male or Female.
8. Settings OK? is displayed. To change your settings, press BACK until you return to the desired setting. To
accept the settings, press START and the training computer goes to the time mode.
It is important that you are precise with the Basic Settings, especially when setting your weight, height, date of
birth and sex, as they have an impact on the accuracy of the measuring values, such as the heart rate limits and
calorie expenditure.
Sport Profile Settings
The Sport Profile feature helps you start your training session with ease. The training computer provides
five sport profiles; one for running, two for cycling and two for other sports.
Adjust the settings for the sport profiles to suit your training needs in MENU > Settings > Sport Profiles.
You c an, for e xample, a ctivate t he sens ors you w ant to us e in the sp ort. Th en when y ou start a trainin g
session using the sport profile, the training computer detects the needed sensors automatically.
The heart rate sensor is on by default in every sport. Due to this, the training computer will automatically start
searching for the heart rate sensor signal once you press START in time view. If you bought a set which does not
include a heart rate sensor, turn it off in MENU > Settings > Sport Profiles > Sport > Heart rate sensor >
Off.
For more information on the sport profile settings, see Sport Profile Settings (page 29).
When you activate an optional sensor (s3+ stride sensor, CS speed sensor W.I.N.D. or CS cadence sensor
W.I . N.D. ) f or the fir s t t ime, it needs to be p a ire d with the tr aini ng c omp u ter. For mo re info rmat ion on
pairing a sensor with the training computer, see New Accessory (page 38).
12 Setting Up the Training Computer
Page 13
5. TRAINING
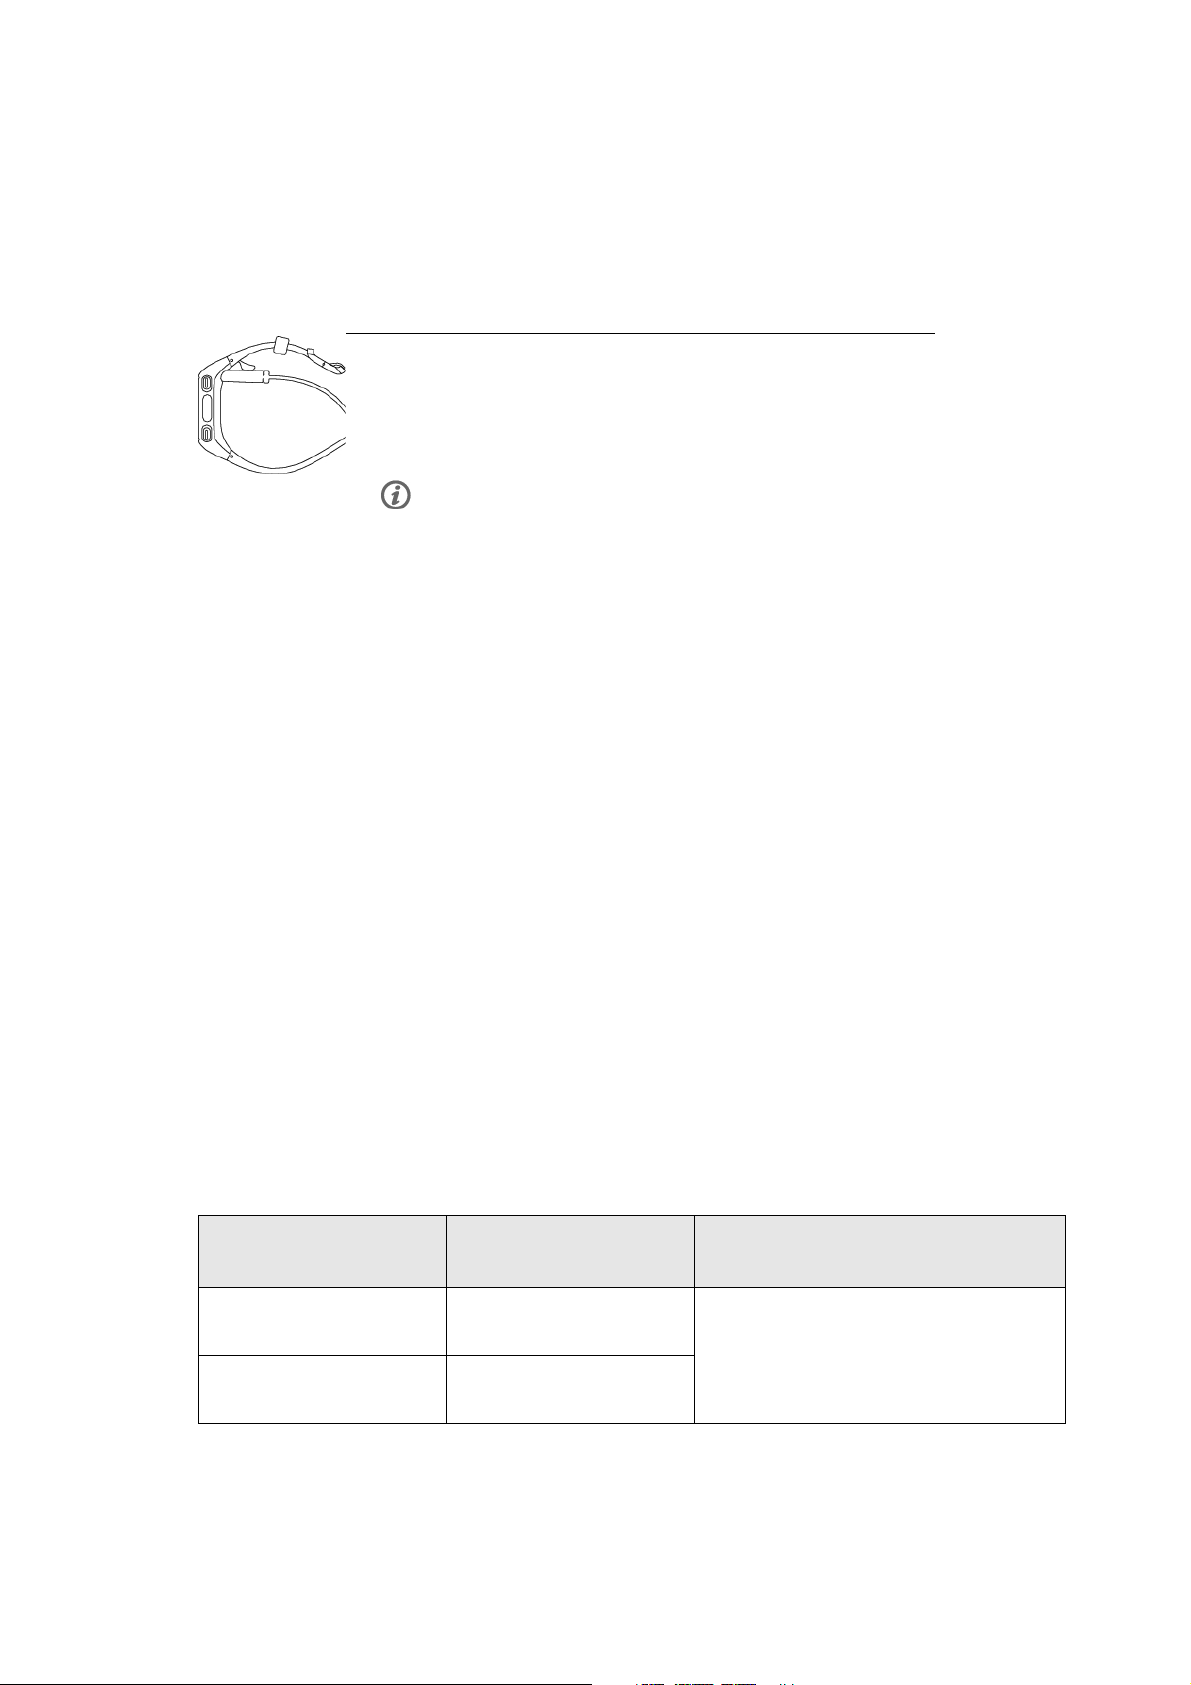
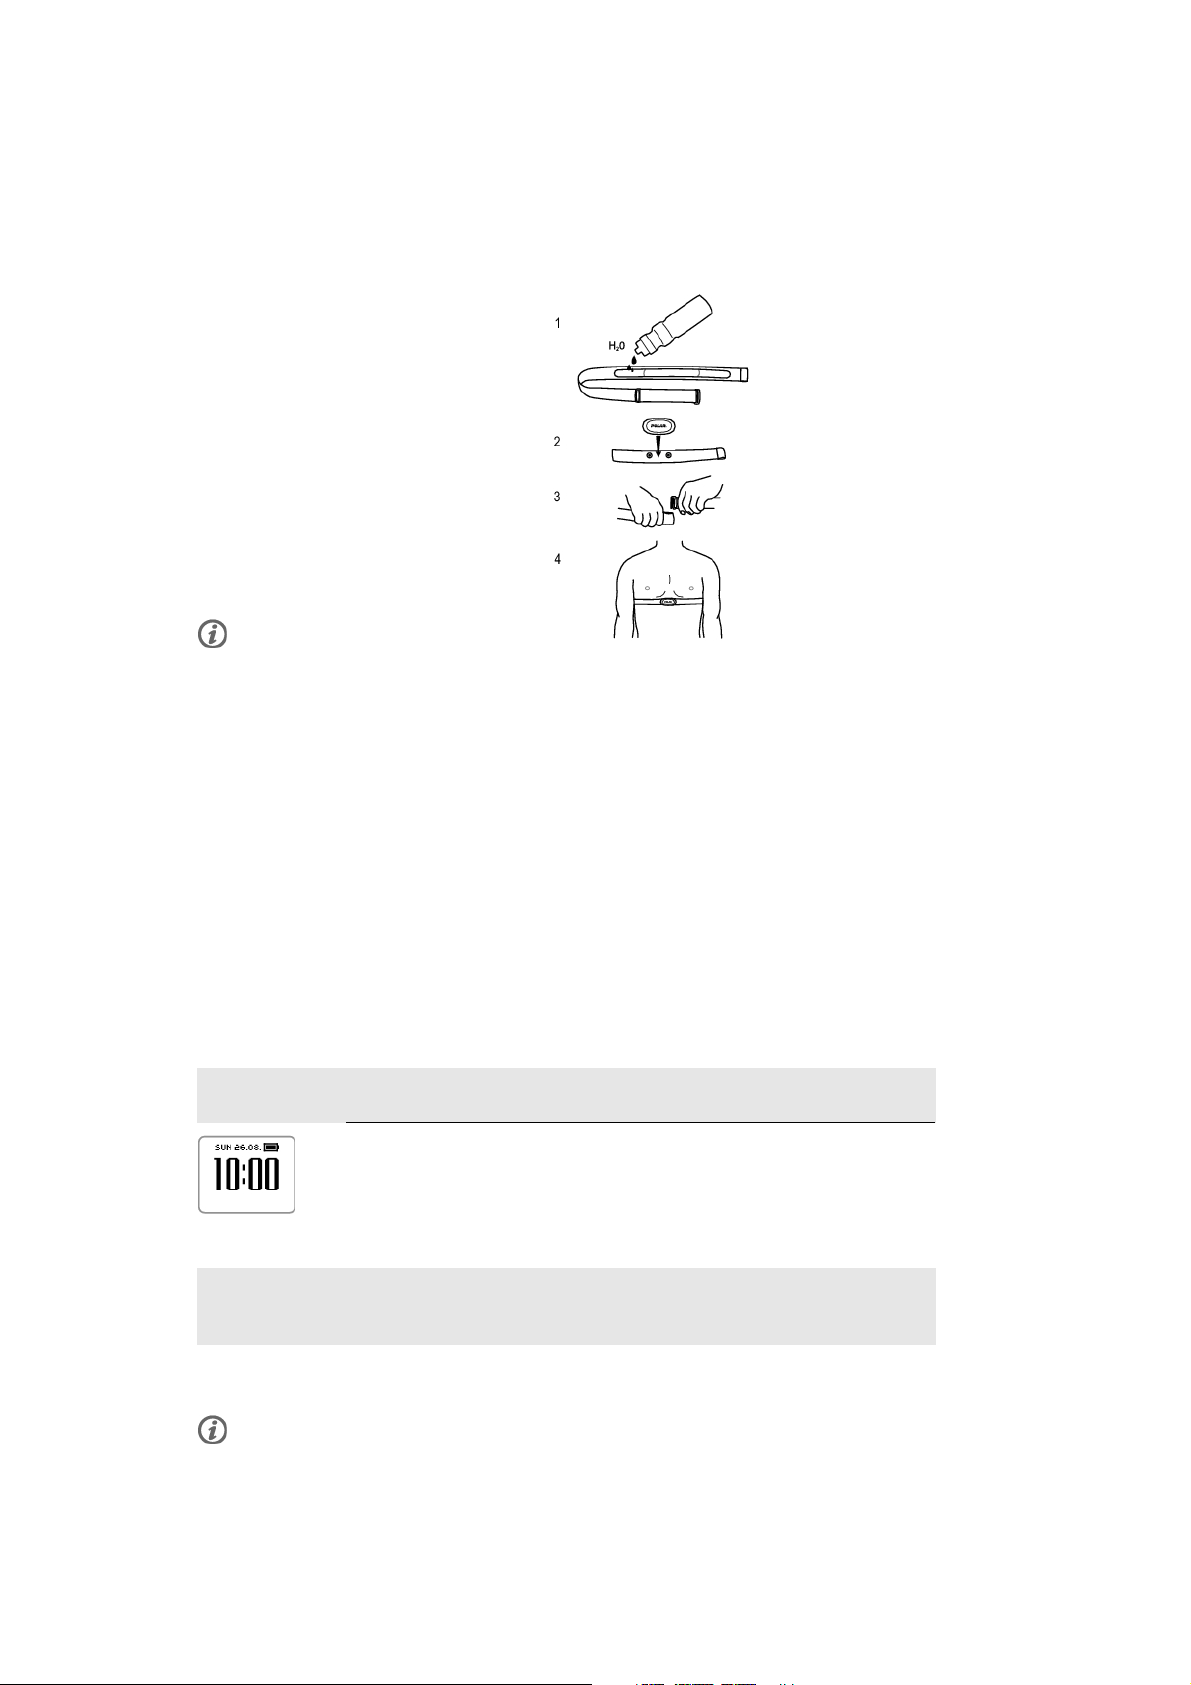
Wearing the Heart Rate Sensor
Wear the heart rate sensor to measure heart rate.
1. Moisten the electrode area of the
strap.
2. Attach the connector to the strap.
3. Tie the strap around your chest,
just below the chest muscles, and
attach the hook to the other end of
the strap.
4. Adjust the strap length to fit tightly
but comfortably. Check that the
moist electrode areas are firmly
against your skin and that the Polar
logo of the connector is in a central
and upright position.
Detach the connector from the strap
after every use, to maximize the
battery lifetime. Sweat and moisture
may keep the electrodes wet and the
heart rate sensor activated. This will
reduce the battery life. For more
detailed washing instructions, see
Important Information
(page ? ).
ENGLISH
For video tutorials, go to http://www.polar.com/en/polar_community/videos.
Starting a Training Session
Wear the heart rate sensor and make sure you have set up an optional sensor* as instructed in the sensor's
user manual. If you are using a speed, cadence, or stride sensor for the first time, see New Accessory
(page 38). To use Polar ZoneOptimizer feature for your training session, see Train with Polar ZoneOptimizer
(page 16).
1. Start by pressing START
1. In time view, press START to enter the pre-training mode.
2. Pair the heart rate sensor with the training computer
(pairing is performed only once)
Pairing ensures that your training computer receives signal from your heart rate sensor only and enables
interference-free training when there are other training computers around.
If you purchased a set which does not include a heart rate sensor, and you have set the heart
rate sensor off in the Sport Profile settings, skip step two and go straight to step three.
Training 13
Page 14
ENGLISH
2. Pair the heart rate sensor with the training computer
(pairing is performed only once)
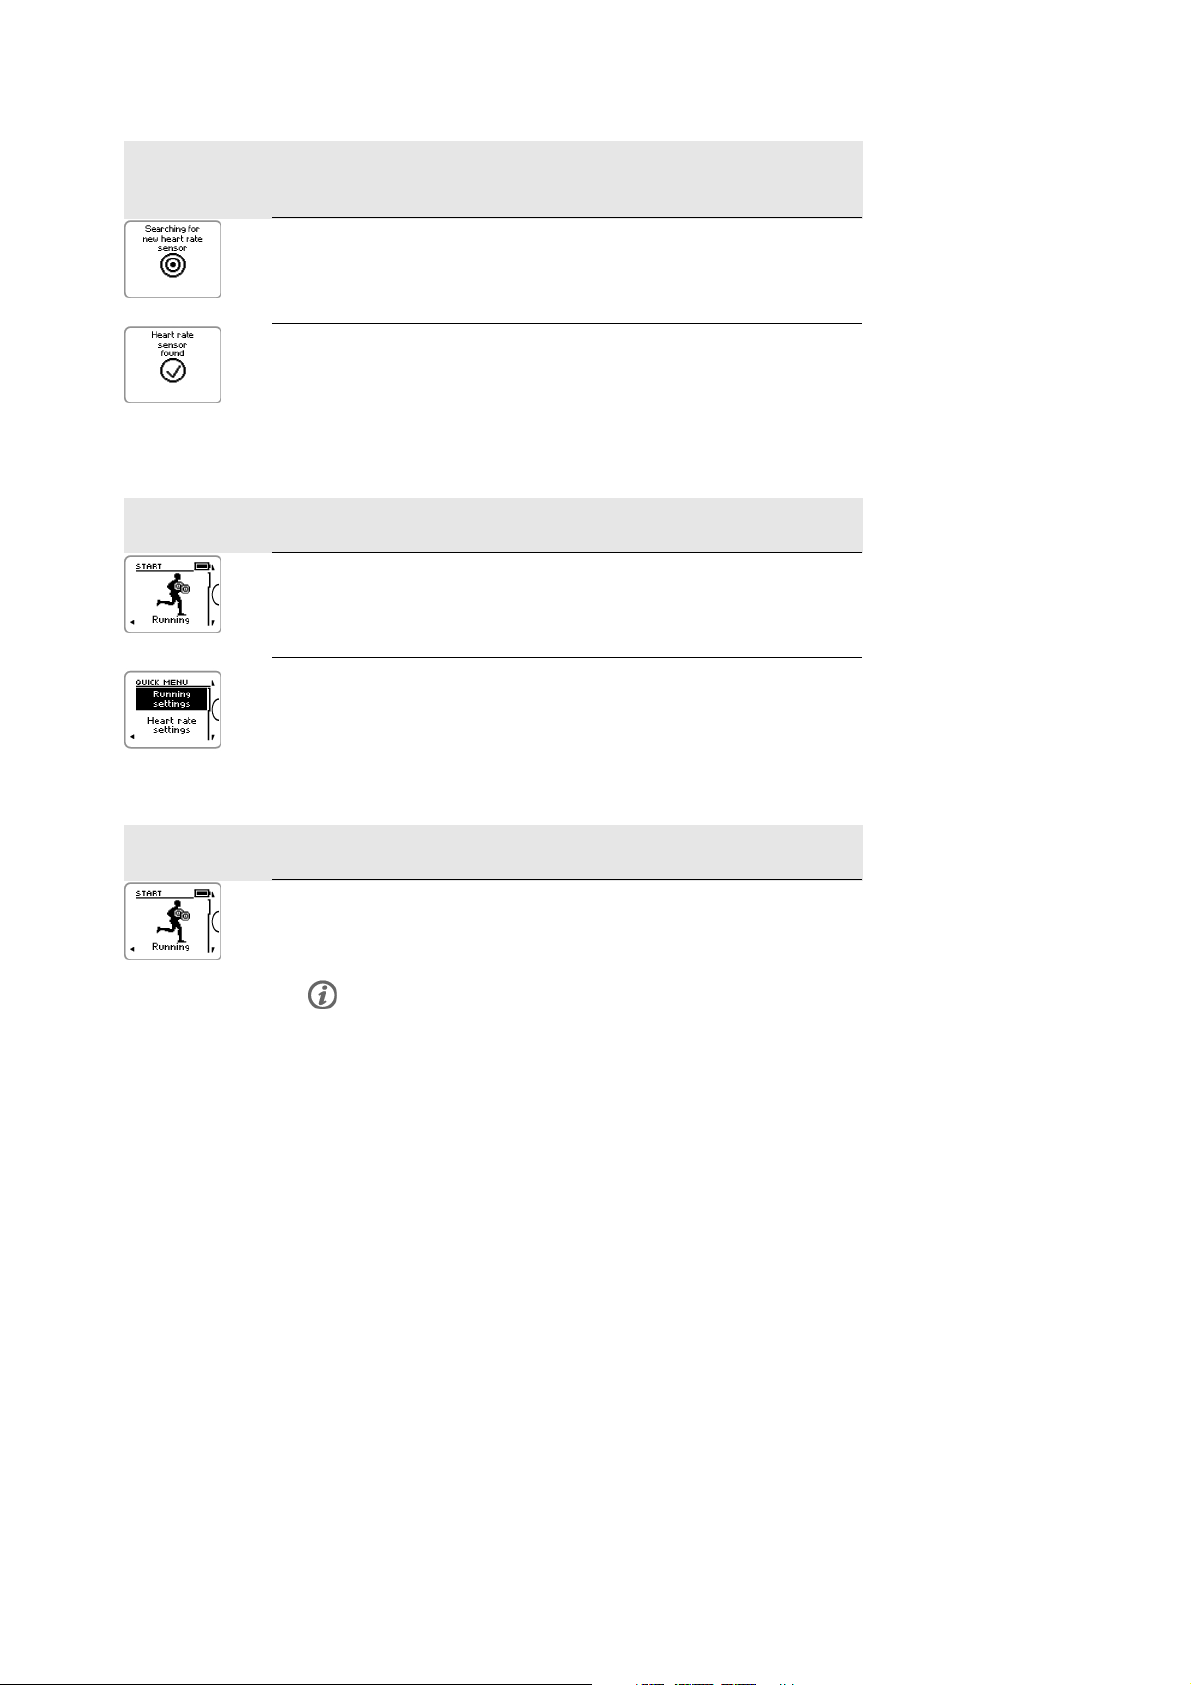
1. Searching for new heart rate sensor is displayed. The training
computer searches for the heart rate sensor signal.
2. Heart rate sensor found is displayed when the training computer
finds the signal.
If the training computer cannot find the heart rate sensor, make sure
the heart rate sensor strap has not loosened and the electrodes of the
heart rate sensor are wet.
3. Select the sport profile
1. Select the sport profile you want to use by browsing with UP/DOWN.
2. To change the sport profile settings or heart rate settings before the
training recording is started (in pre-training mode), press and hold
LIGHT to enter QUICK MENU. To return to the pretraining mode, press
BACK.
For sport profile settings, see Sport Profile Settings (page 29).
4. The training computer searches the GPS satellite signals / sensor signals
1. If you have activated the GPS function and/or an optional sensor* in
this sport profile, the training computer will automatically start
searching for the signals.
Stay in the pre-training mode until the training computer has found
the signals.
14 Training
Page 15
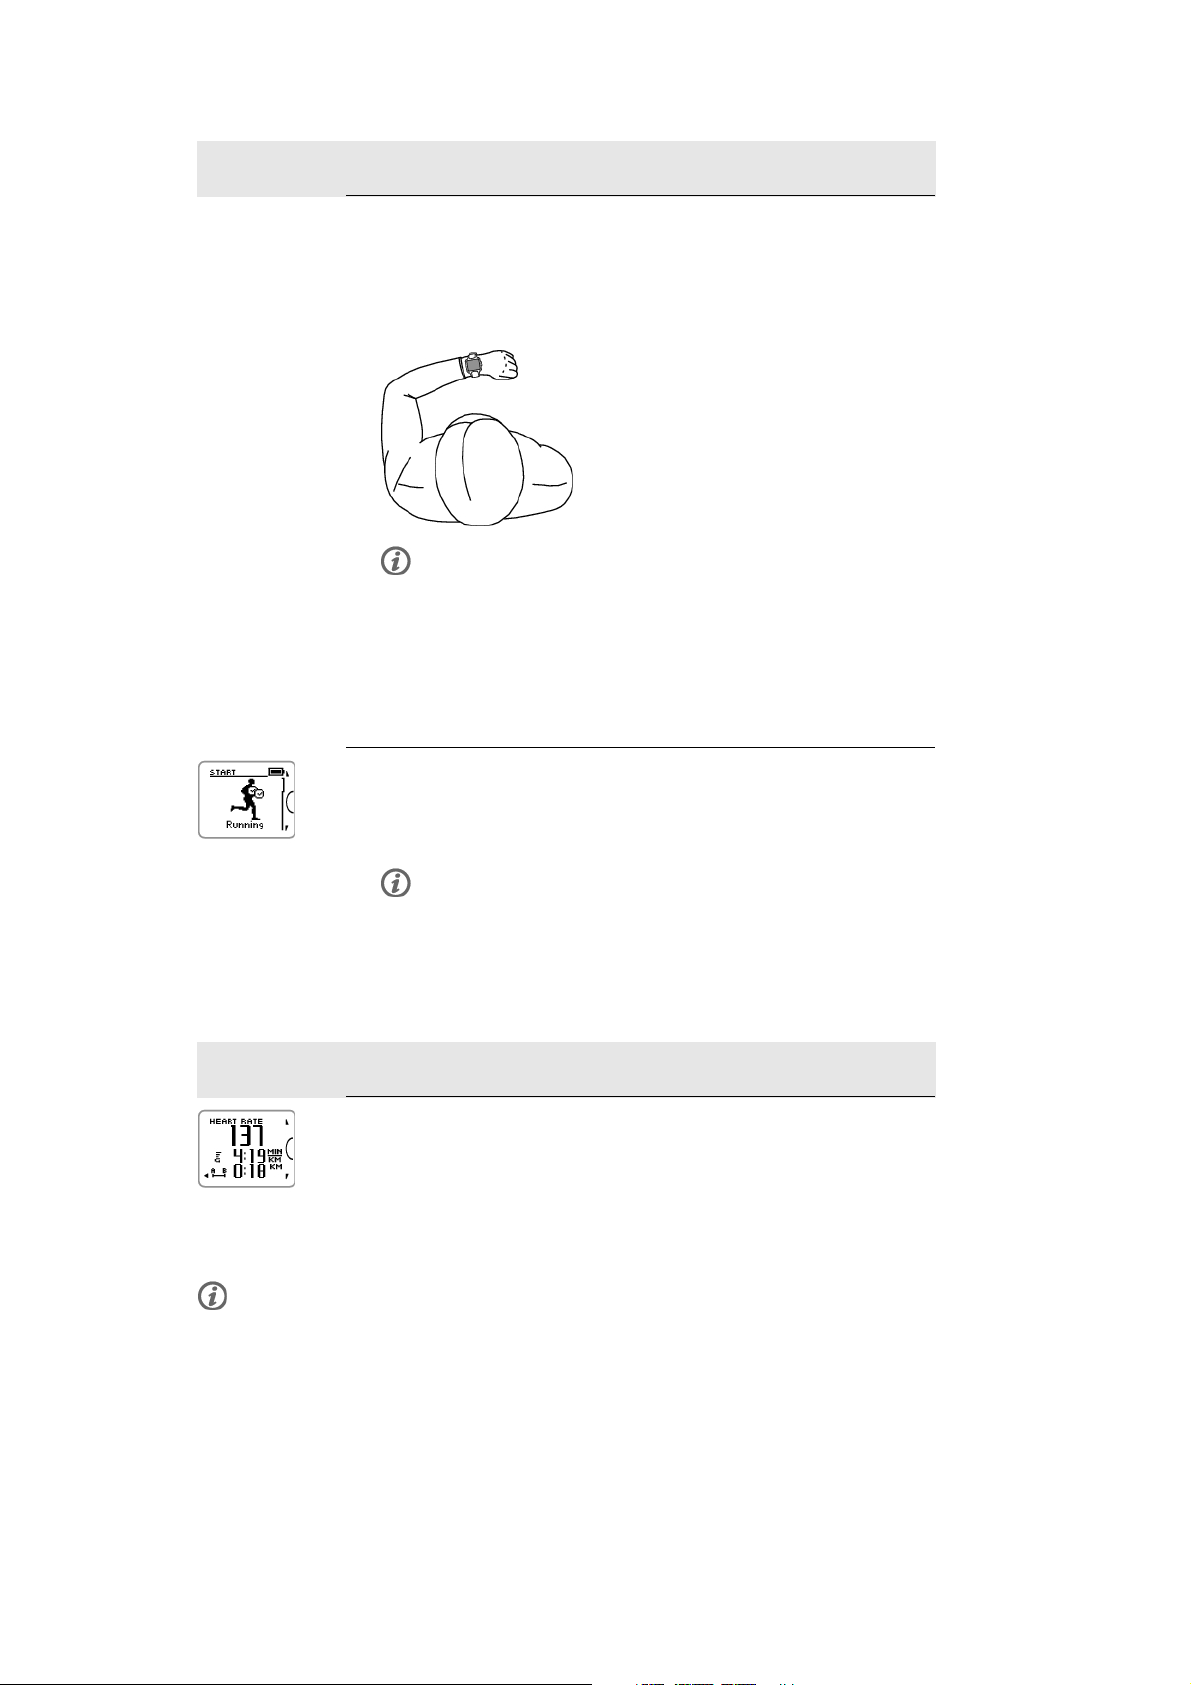
4. The training computer searches the GPS satellite signals / sensor signals
2. To catch the GPS satellite signals, go outdoors and away from tall
buildings and trees.
Wear the training computer with the face upwards on your wrist. Keep
the training computer in a horizontal position in front of you and away
from your chest (see the image below). Keep your arm stationary and
raised above the level of your chest during the search.
Do not move your arm during the search. Keep still!
Stand still and hold the position until the training computer has found
the satellite signals (an alarm sounds and a check mark appears on
the arm of the figure once the signal is found).
In good conditions, finding the satellite signals for the first time
typically takes 30-60 seconds.
ENGLISH
3. The check mark indicates that the signal is found. In this image, the
training computer has found the heart rate sensor signal and the GPS
signal. The training computer determines your location and marks the
location as your starting point.
The Back to Starting Point (page 22) feature requires accurate
starting point information in order to function properly.
If the training computer does not find a sensor signal, the display
shows a triangle with an exclamation mark.
5. Start recording the training session
1. Once the training computer has found all the signals, press START .
Recording started is displayed and you can start training.
During training recording you can change the training view by
browsing with UP/DOWN. To change settings without stopping the
training recording, press and hold LIGHT to enter QUICK MENU. For
more information, see Quick Menu (page 33).
Before you start recording a training session, make sure that the training computer has found
the GPS satellites signals / sensor signals. This ensures that
• you get the speed/pace and distance data from the beginning of the training session.
• the training computer has defined your starting point (only if you have set the GPS
function on). The Back to Starting Point (page 22) feature requires accurate
starting point information in order to function properly.
Training 15
Page 16
ENGLISH
*Optional sensors include Polar s3+ stride sensor, Polar CS speed sensor W.I.N.D. or Polar CS cadence
sensor W.I.N.D.
Train with Polar ZoneOptimizer
The ZoneOptimizer function determines your personalized sport zones (heart rate zones) for your aerobic
training session. It measures your heart rate variability during the warm-up and determines your personal
sport zones. For more information, see Polar ZoneOptimizer (page 43).
To u s e th e Zon e O p t i m i z e r f u n c t i o n in your trainin g , set i n o n by s e l ecting MENU > Settings > Heart rate
settings > ZoneOptimizer > On .
The ZoneOptimizer function defines the personalized target heart rate zones for you in the beginning of
every training session. If there is less than an hour since your last ZoneOptimizer definition, the given
target heart rate zones are not necessarily valid, because you may have not recovered from previous
training, and during instant recovery, heart rate variability returns to normal state slower than heart rate.
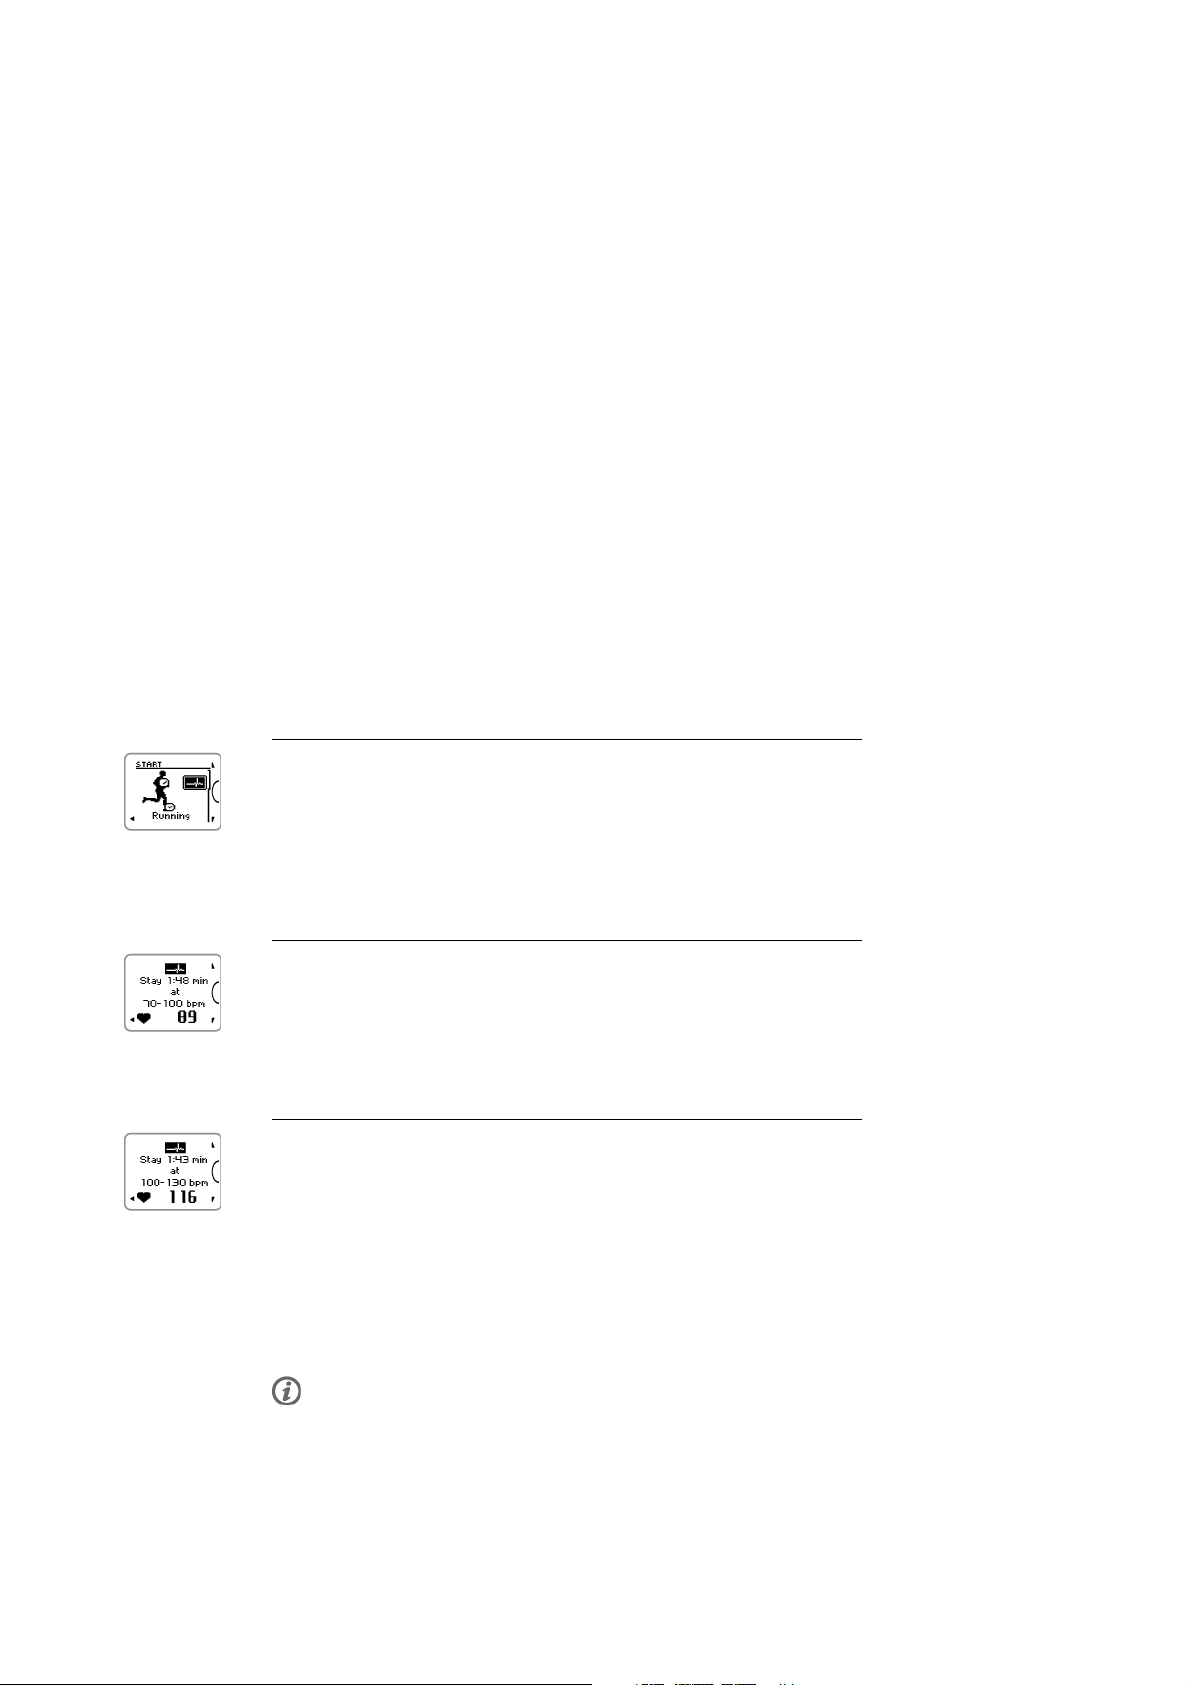
Start Training Session with Polar ZoneOptimizer
Before ZoneOptimizer determination, make sure that you have the Polar default sport zone heart rate
limits in use i.e. you have not modified the heart rate limits manually. If you want to modify the Sport
Zone heart rate limits manually, set the ZoneOptimizer function off.
To s e t th e Zon e O p t i m i z e r f u n c t i o n on , sel e c t MENU > Settings > Heart rate settings > ZoneOptimizer > On.
The ZoneOptimizer determination will start in the background already when you are in pre-training mode.
When you see the ECG-curve on the top right hand corner on the display, you will know that the heart rate
measurement and ZoneOptimizer are on.
1. To start the training session with ZoneOptimizer press OK.
The display will show the sport used in the previous training session
and the count down timer will start running in the background as soon
as the heart rate has reached 70 beats per minute. An ECG-curve will
appear in the top right had corner of the display.
Select the sport profile you want to use for your training session with
UP/DOWN and press OK to start training.
2. Keep your heart rate between 70 and 100 beats per minute for two
minutes.
This can be achieved by standing or with very light training intensity,
for example, walking slowly.
The alarm will sound, when the first part of the determination is
finished.
3. The second part of the determination will start when your heart rate
has risen above 100 beats per minute.
Continue training at light intensity. Increase heart rate gradually, and
keep it between 100 – 130 bpm for two minutes.
This can be achieved, for example, by walking briskly, or by
cycling/jogging at low intensity during warm up.
If you have a very low HR
,thetrainingcomputerwillgiveyouspeciallimits.
max
The alarm will sound when the second part of the ZoneOptimizer determination is
finished.
16 Training
The ZoneOptimizer determination may already finish here, if the heart rate
variation limit is reached .
Page 17
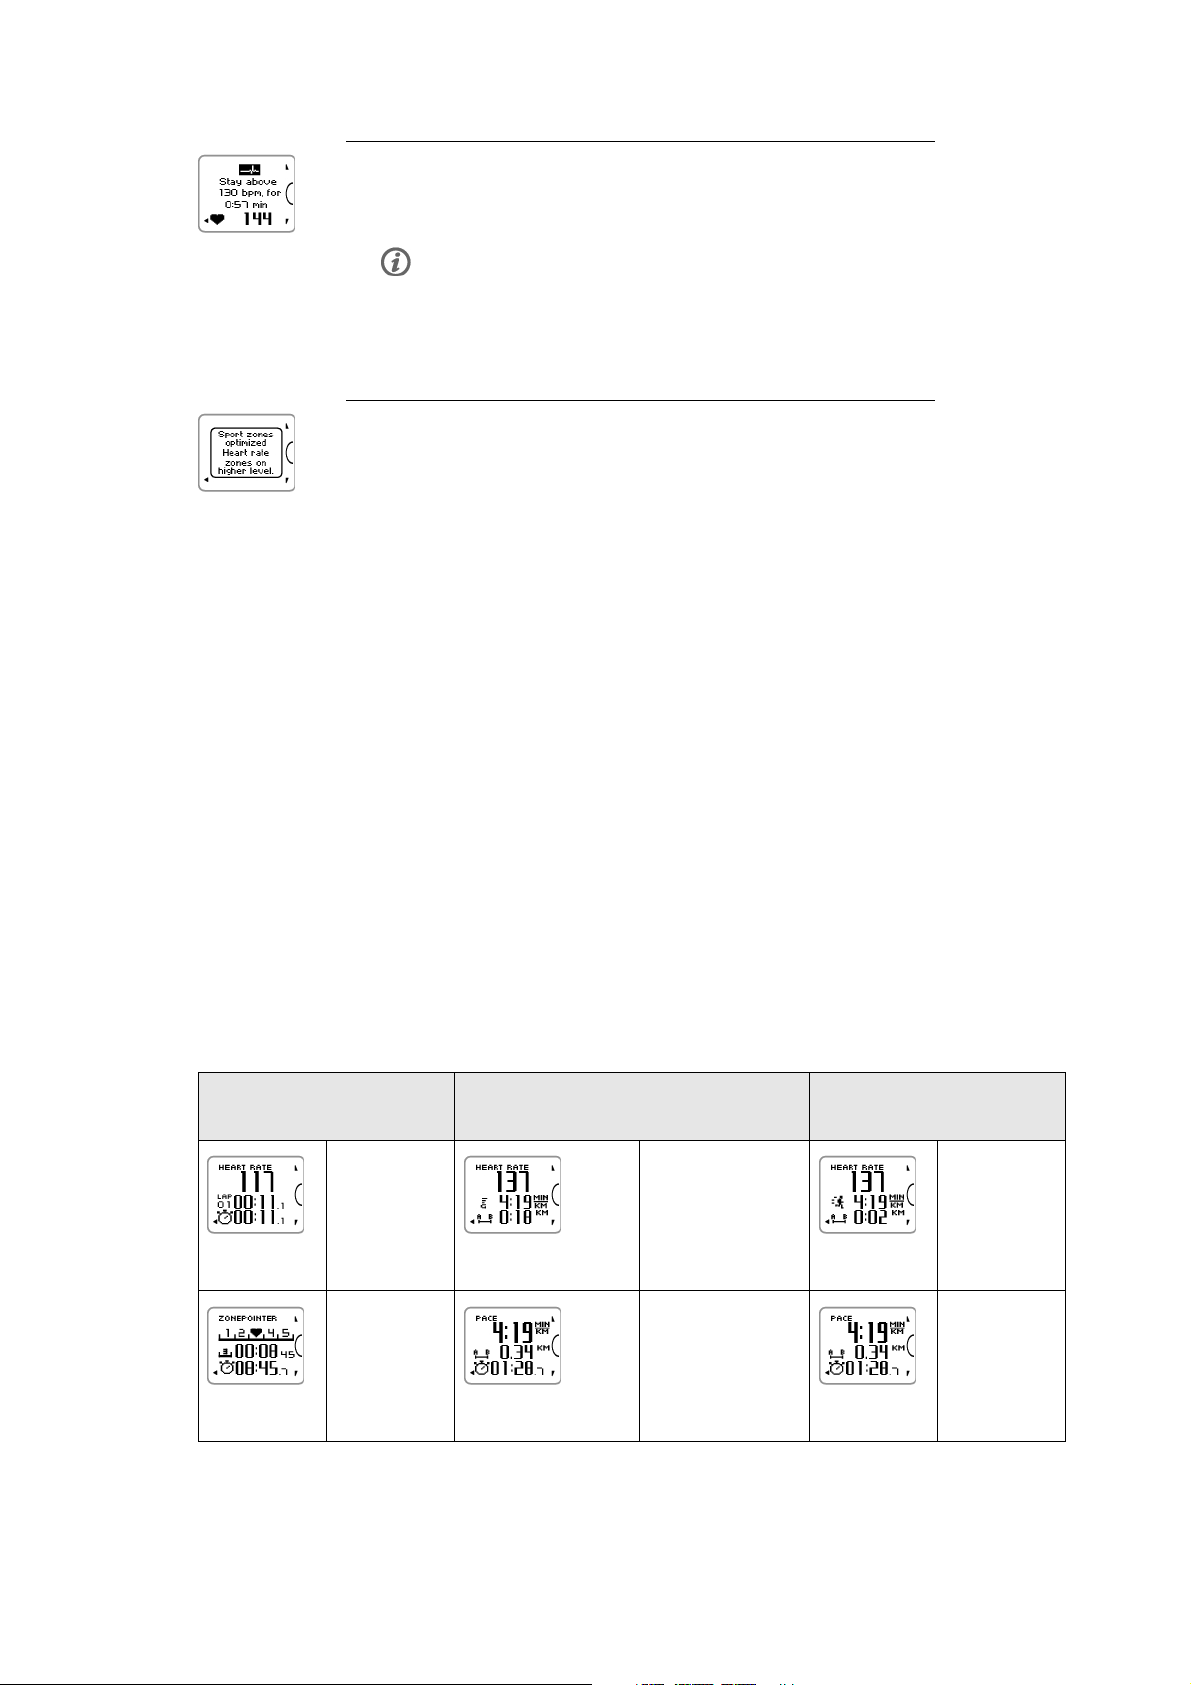
4. The third part of the determination will start when your heart rate has
risen above 130 beats per minute.
Gradually increase your heart rate above 130 bpm and keep it there.
The ZoneOptimizer determination will be finalized when the heart rate
has been above 130 beats per minute for more than half a minute.
The alarm will sound, when the third and final part of the
determination is finished.
5. After the determination is finished, the training computer displays one
of the following:
• Default sport zones (heart rate zones) in use. The determination was
not successful. The Polar sport zone (heart rate) limits will be used.
• Sport zones optimized. Heart rate zones on higher level. The limits
have been raised compared to your average ZoneOptimizer limits.
• Sport zones optimized. Heart rate zones on normal level. The limits
have been raised or lowered only slightly compared to your average
ZoneOptimizer limits.
• Sport zones optimized. Heart rate zones on lower level. The limits
have been lowered compared to your average ZoneOptimizer limits.
6. After you have received and read the feedback, press any button,
except LIGHT, to exit the message display and continue your training
session.
ENGLISH
Training Views
You c an view d ifferent trainin g views b y pressin g UP or DOWN.Thenumberofthetrainingviewappears
for a few seconds.
The information displayed varies depending on the sensors you have installed, which features are set on
and what kind of sport you are performing.
The below tables present available training views for some different sensor combinations. In these
examples, the training information is shown on three rows. You can set the training information to be
shown on two or three rows in MENU > Settings > Sport profiles > Sport > Training view.
Heart rate sensor Heart rate sensor
GPS function on
HEART RATE
Heart rate
Lap time
Duration
ZONEPOINTER
ZonePointer
Time i n Zo n e
HEART RATE
Heart rate
Speed/Pace
Distance
SPEED/PACE
Speed/Pace
Distance
Heart rate sensor
s3+ stride sensor
HEART RATE
Heart rate
Speed/Pace
Distance
SPEED/PACE
Speed/Pace
Distance
Duration
Duration
Duration
Training 17
Page 18
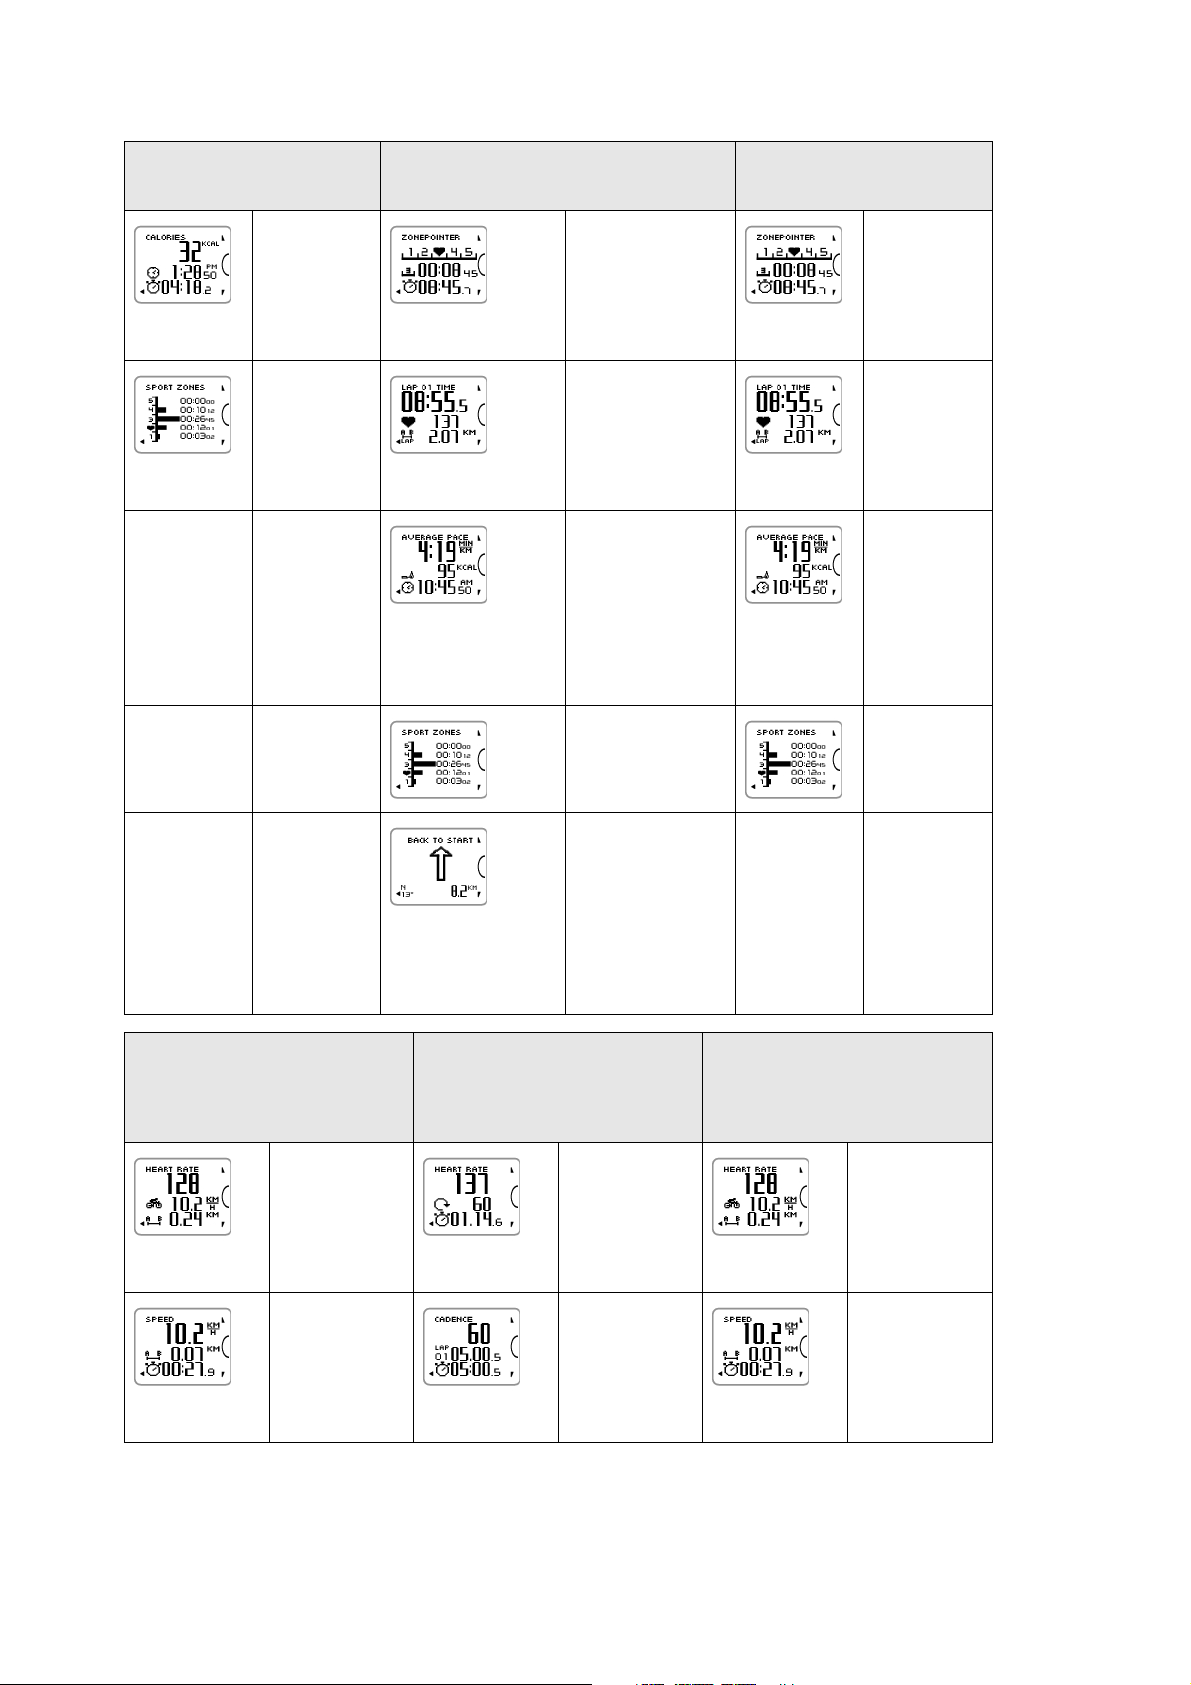
ENGLISH
Heart rate sensor Heart rate sensor
GPS function on
CALORIES
Calories
Time o f da y
Duration
SPORT ZONES
Time i n ea c h
zone
ZONEPOINTER
ZonePointer
Time i n Zo n e
Duration
LAP 01 TIME
Lap time
Heart rate
Lap distance
AVERAGE
SPEED/PACE
Avera ge
Speed/Pace
Calories
Time o f da y
SPORT ZONES
Heart rate sensor
s3+ stride sensor
ZONEPOINTER
ZonePointer
Time i n Zo n e
Duration
LAP 01 TIME
Lap time
Heart rate
Lap distance
AVERAGE
SPEED/PACE
Avera ge
Speed/Pace
Calories
Time o f da y
SPORT ZONES
Heart rate sensor
CS speed sensor W.I.N.D.
HEART RATE
Heart rate
Speed/Pace
Distance
SPEED/PACE
Time i n ea c h zo n e
BACK TO START
An arrow points
the direction of
your starting
point. For more
information, see
Back to Starting
Point (page 22)
Heart rate sensor
CS cadence sensor W.I.N.D.
HEART RATE
Heart rate
Cadence
Duration
CADENCE
Time o n
each zone
Heart rate sensor
CS cadence sensor W.I.N.D.
GPS function on
HEART RATE
Heart rate
Speed/Pace
Distance
SPEED/PACE
18 Training
Speed/Pace
Distance
Duration
Cadence
Lap time
Duration
Speed/Pace
Distance
Duration
Page 19
ENGLISH
Heart rate sensor
CS speed sensor W.I.N.D.
ZONEPOINTER
ZonePointer
Time i n Zo n e
Duration
LAP 01 TIME
Lap time
Heart rate
Lap distance
AVERAGE
SPEED/PACE
Avera ge
speed/pace
Calories
Time o f da y
SPORT ZONES
Heart rate sensor
CS cadence sensor W.I.N.D.
ZONEPOINTER
ZonePointer
Time i n Zo n e
Duration
HEART RATE
Heart rate
Calories
Time o f da y
SPORT ZONES
Time i n ea c h
zone
Heart rate sensor
CS cadence sensor W.I.N.D.
GPS function on
ZONEPOINTER
ZonePointer
Time i n Zo n e
Duration
LAP 01 TIME
Lap time
Heart rate
Lap distance
AVERAGE
SPEED/PACE
Avera ge
speed/pace
Calories
Time o f da y
CADENCE
Time i n ea c h
zone
Symbols on the display / Explanation
Cadence
Cadence
Speed/Pace
Heart rate
SPORT ZONES
Time o n ea c h
zone
BACK TO START
An arrow
points the
direction of
your starting
point. For more
information,
see Back to
Starting Point
(page 22)
Speed at which you turn the cranks of your bicycle
Training 19
Page 20

ENGLISH
Symbols on the display / Explanation
Calories
The expended calories so far. The cumulation of calories
starts when your heart rate is displayed.
Distance
Cumulative distance
Duration
Total d u ration o f th e tra i n i n g se s s i o n so far
Heart rate
Your current h eart rate
Lap distance
Manual lap distance
Lap time
Manual lap number and lap time
Speed/Pace
Current pace (min/km or min/mi) or current speed (km/h
or mph)
This symbol is displayed when the GPS function is on.
The amount of bars above the letter G indicates the GPS
signal strength.
This symbol is displayed when the s3+ stride sensor is in
use.
This symbol is displayed when the CS speed sensor
W.I . N.D. is i n use.
You c an select the speed view in sport p rofile se ttings.
See Sport Profile Settings (page 12)forinstructions.
20 Training
Page 21
Symbols on the display / Explanation
ZonePointer
Target z one i n d i c a t or w i t h a heart s y m b o l t h a t mov e s left
or right on the sport zone scale according to your heart
rate.
Tim e in Z o ne
Time s p e nt i n the target z o n e
Tim e of d a y
Button Functions During Training
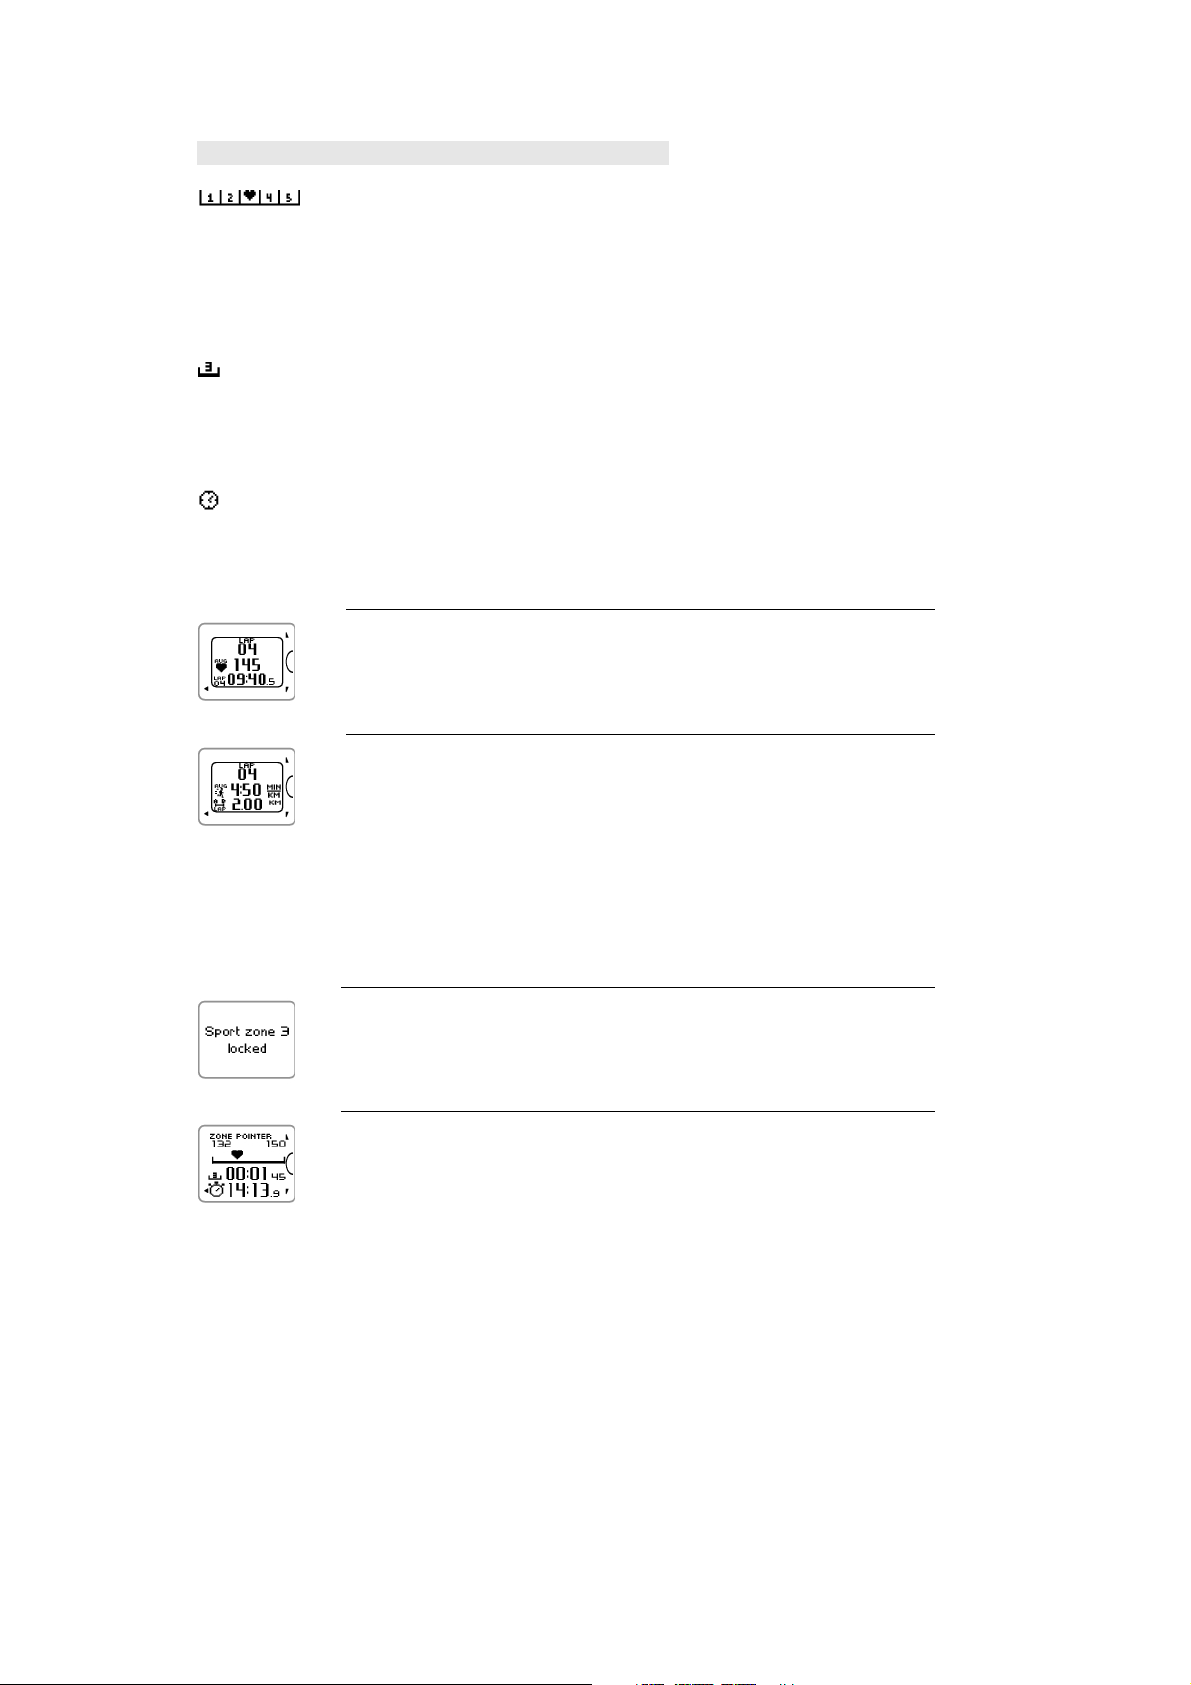
Record a Lap
Press START to record a lap. The display will show:
Lap number
Average heart rate of the lap
Lap time
ENGLISH
If a speed sensor is activated, the following will also appear:
Lap number
Average speed/pace of the lap
Lap distance
Lock a Sport Zone
You c an lock/u nlock you r heart r ate to th e curre nt sport zone.
To l o c k / unlock t h e sp o r t zo n e , pr e s s and h old START .
If, for example, you are running with a heart rate of 130 bpm which is
75% of your maximum heart rate, and matches sport zone 3, you can
press and hold START to lock your heart rate into this zone. Sport zone3
Lockedis displayed.
An alarm sounds if you are below or above the sport zone. Unlock the sport zone by
pressing and holding START again: Sport zone3 Unlocked is displayed.
Night Mode
There is a night mode function in the training computer. Press the LIGHT button once during pre-training
mode, training recording mode or pause mode. The backlight will be activated every time you press any of
the buttons.
The display will also light up if a message, for example, Check heart rate sensor ,isdisplayed.
Night mode will be switched off when you finish the training recording.
Training 21
Page 22
ENGLISH
View Quick Menu
Press and hold LIGHT. QUICK MENU is displayed. You can change certain settings without pausing the
training recording. For further information, see Quick Menu (page 33).
Pause / Stop Training Recording
1. To pause training recording, press BACK once. To continue training recording, press START.
2. To stop recording completely, press BACK twice. The following summary of your training information is
displayed
• Textual feedback, for example Steady state training+, is displayed if you trained at least a total of
10 minutes in the sport zones. See the feedback in more detail in Training Files . For more
information, see After Training (page 23)
• Duration and Calories
• Average heart rate and Maximum heart rate
• Sport zones (Time in each zone)
• Average pace and Maximum pace or Average speed and Maximum speed (visible if the GPS function
is on or s3+ stride sensor/CS speed sensor is in use)
• Distance (visible if the GPS function is on or s3+ stride sensor/CS speed sensor is in use) and
Running Index (visible if the GPS function is on or s3+ stride sensor is in use)
Care for your heart rate sensor after training. Detach the connector from the strap and rinse the strap under
running water after every use. For complete care and maintenance instructions, see Caring for Your Product
(page 50).
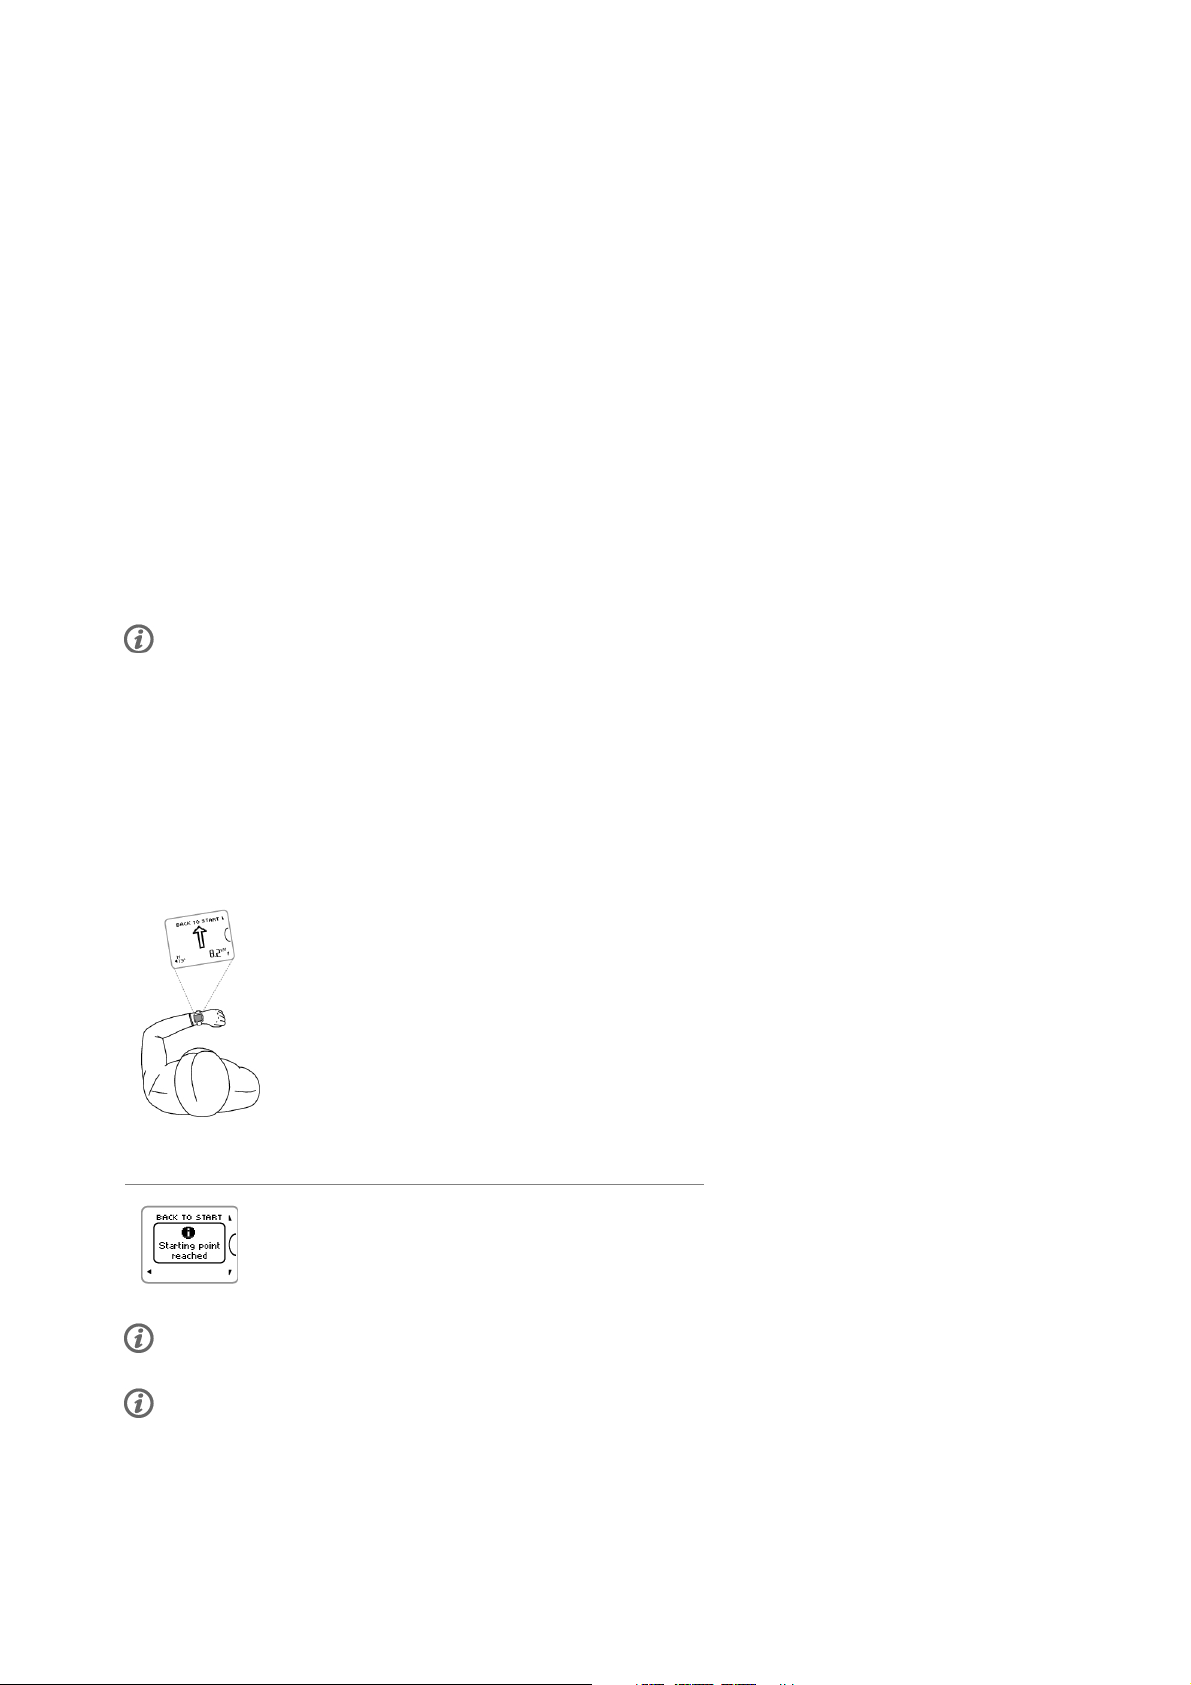
Back to Starting Point
The Back to starting point feature guides your way back to the starting point. When the training computer
finds the GPS satellite signals in the beginning of the training session, your location is saved as a starting
point.
When it is time to return to your starting point, do the following:
• Browse to the BACK TO START-view.
• Keep the RC3 GPS in a horizontal position in front
of you ("POLAR" logo facing forward).
• Keep moving in order for the RC3 GPS to
determine which direction you are going. An arrow
will point in the direction of your starting point.
• To get back to the starting point, always turn in
the direction of the arrow.
• The RC3 GPS also shows direction coordinates
and the direct distance (beeline) between you and
the starting point.
When you reach the starting point, Starting point reached
is displayed.
Always keep a map at hand in case the RC3 GPS loses the satellite signal or the battery runs out.
This feature uses the GPS function. Set GPS function on in Sport Profile Settings (page 29).
22 Training
Page 23
ENGLISH
6. AFTER TRAINING
Training Benefit
The Tr ain i ng Bene fit feature helps you better understand the effectiveness of your training. This feature
requires the use of the heart rate sensor. After each training session you get textual feedback on your
performance providing that you have trained at least a total of 10 minutes in the sport zones. The
feedback is based on training time distribution on sport zones, calorie expenditure and duration. In
Training Files you get the feedback in more detail. The descriptions of different training benefit options
are listed in the table below.
Transfer your traini ng data t o t he www.pol arpersonalt rainer.co m web servic e t o see the benefits of the training
with more physiological approach.
Feedback Tra i ning be nef i t
Maximum training+ That was a hard session! You improved your sprint
speed and the nervous system of your muscles,
which make you more efficient. This session also
increased your resistance to fatigue.
Maximum training That was a hard session! You improved your sprint
speed and the nervous system of your muscles,
which make you more efficient.
Maximum & Tempo training What a session! You improved your speed and
efficiency. This session also significantly
developed your aerobic fitness and your ability to
sustain high intensity effort for longer.
Tempo & Maximum training What a session! You significantly improved your
aerobic fitness and your ability to sustain high
intensity effort for longer. This session also
developed your speed and efficiency.
Tempo training+ Great pace in a long session! You improved your
aerobic fitness, speed, and ability to sustain high
intensity effort for longer. This session also
increased your resistance to fatigue.
Tempo training Great pace! You improved your aerobic fitness,
speed, and ability to sustain high intensity effort
for longer.
Tempo & Steady state training Good pace! You improved your ability to sustain
high intensity effort for longer. This session also
developed your aerobic fitness and the endurance
of your muscles.
Steady state & Tempo training Good pace! You improved your aerobic fitness and
the endurance of your muscles. This session also
developed your ability to sustain high intensity
effort for longer.
Steady state training+ Excellent! This long session improved the
endurance of your muscles and your aerobic
fitness. It also increased your resistance to
fatigue.
Steady state training Excellent! You improved the endurance of your
muscles and your aerobic fitness.
Steady state & Basic training, long Excellent! This long session improved the
endurance of your muscles and your aerobic
fitness. It also developed your basic endurance
and your body's ability to burn fat during exercise.
After Training 23
Page 24
ENGLISH
Feedback Tra i ning be nef i t
Steady state & Basic training Excellent! You improved the endurance of your
muscles and your aerobic fitness. This session also
developed your basic endurance and your body's
ability to burn fat during exercise.
Basic & Steady state training, long Great! This long session improved your basic
endurance and your body's ability to burn fat
during exercise. It also developed the endurance
of your muscles and your aerobic fitness.
Basic & Steady state training Great! You improved your basic endurance and
your body's ability to burn fat during exercise. This
session also developed the endurance of your
muscles and your aerobic fitness.
Basic training, long Great! This long, low intensity session improved
your basic endurance and your body's ability to
burn fat during exercise.
Basic training Well done! This low intensity session improved
your basic endurance and your body's ability to
burn fat during exercise.
Recovery training Very nice session for your recovery. Light exercise
like this allows your body to adapt to your training.
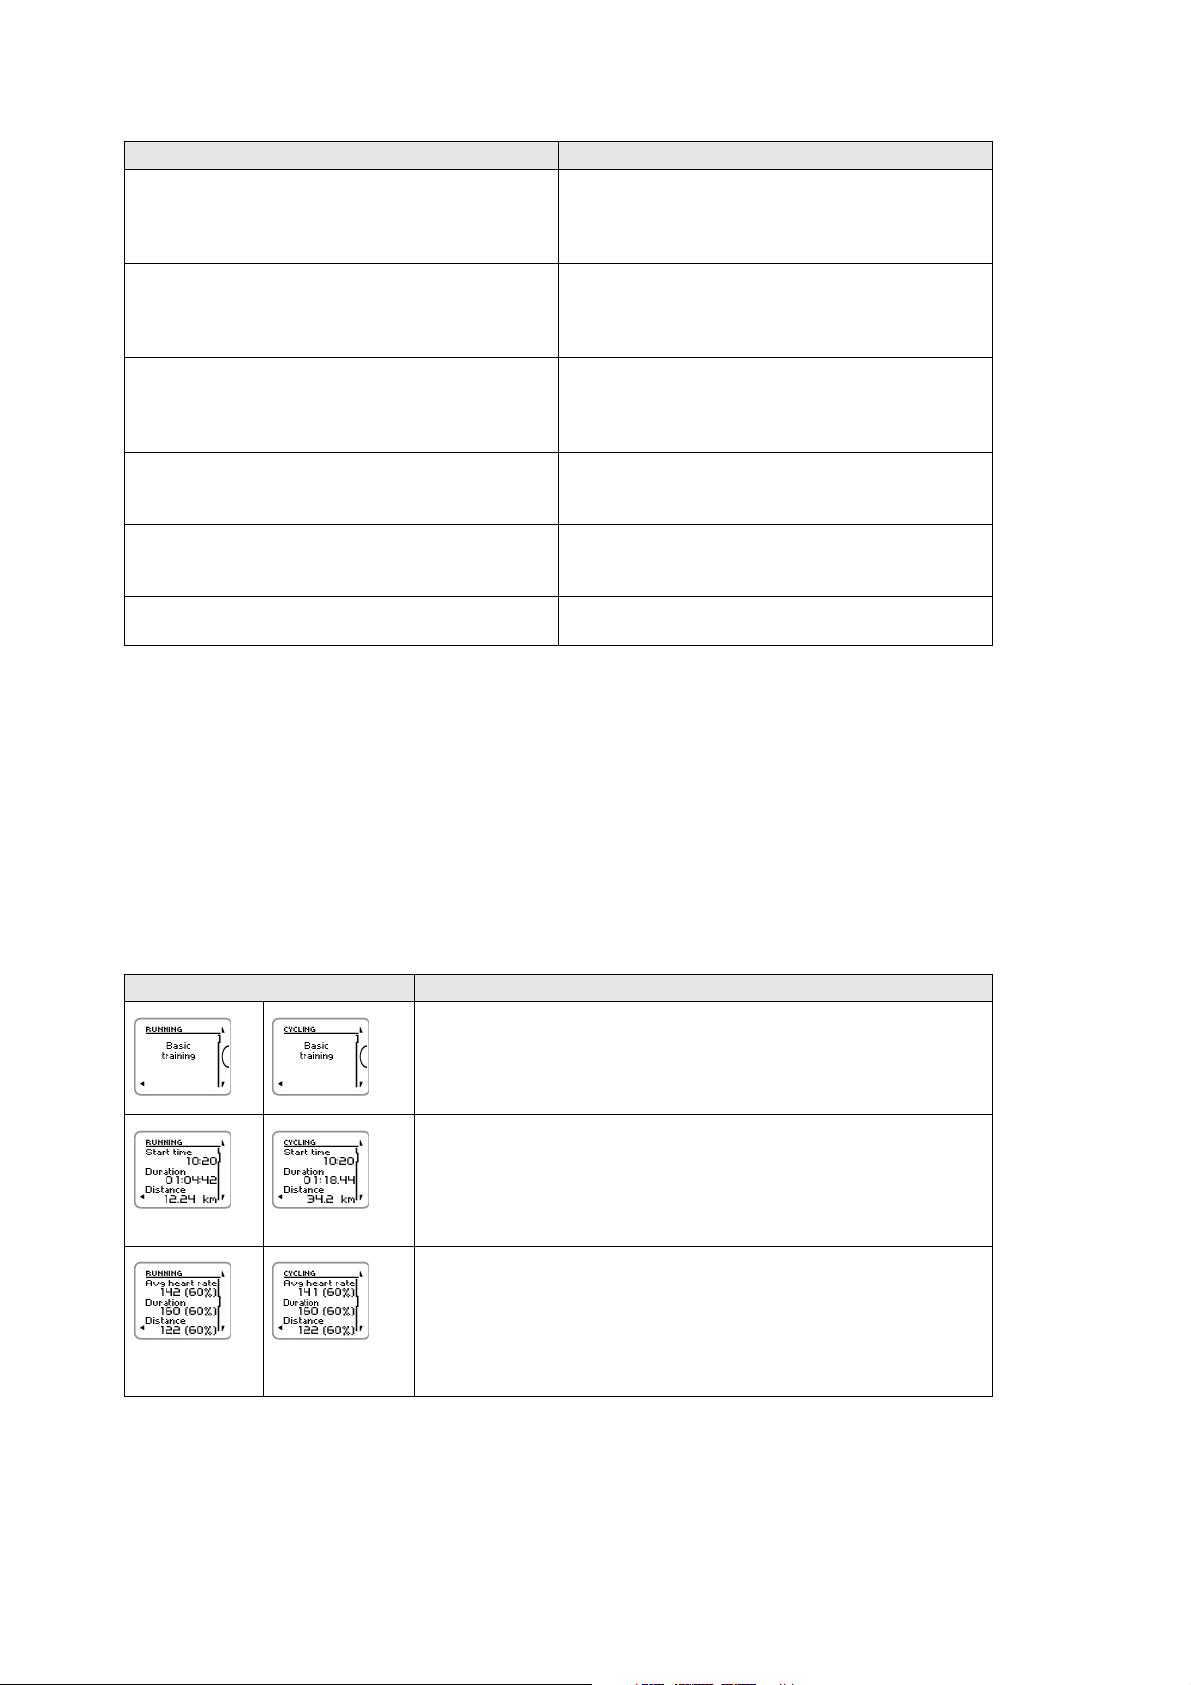
Training Files
The training computer records your training data in Training files when the training session has lasted at
least one minute.
To v i e w ba s i c da t a on y our p e r f o r m ance, s e e MENU > Data > Training files .
For deeper analysis, transfer the data to polarpersonaltrainer.com with the USB cable and WebSync
software. The web service offers various options to analyze the data with.
In Training files ,browsewithUP / DOWN buttons to select the file you want to review and press START .
The information stored in a training file depends on the sport profile and the sensors in use. The below
table presents examples of training file views for running and cycling sports.
TRAINING FILE VIEWS INFORMATION DISPLAYED
Textual feedbac k on y o u r p e r f o r m a n c e, f o r ex a m p l e Steady state
training+,isdisplayedifyoutrainedatleastatotalof10minutes
in the sport zones.
To v i e w th e tr a i n i n g be n e f i t , se l e c t More details by pressing START.
Start time
Duration
Distance (visible if the GPS function is on or s3+ stride sensor/CS
speed sensor is in use)
Avg heart rate
24 After Training
Max heart rate
Min heart rate
(visible if the heart rate sensor is in use)
Page 25
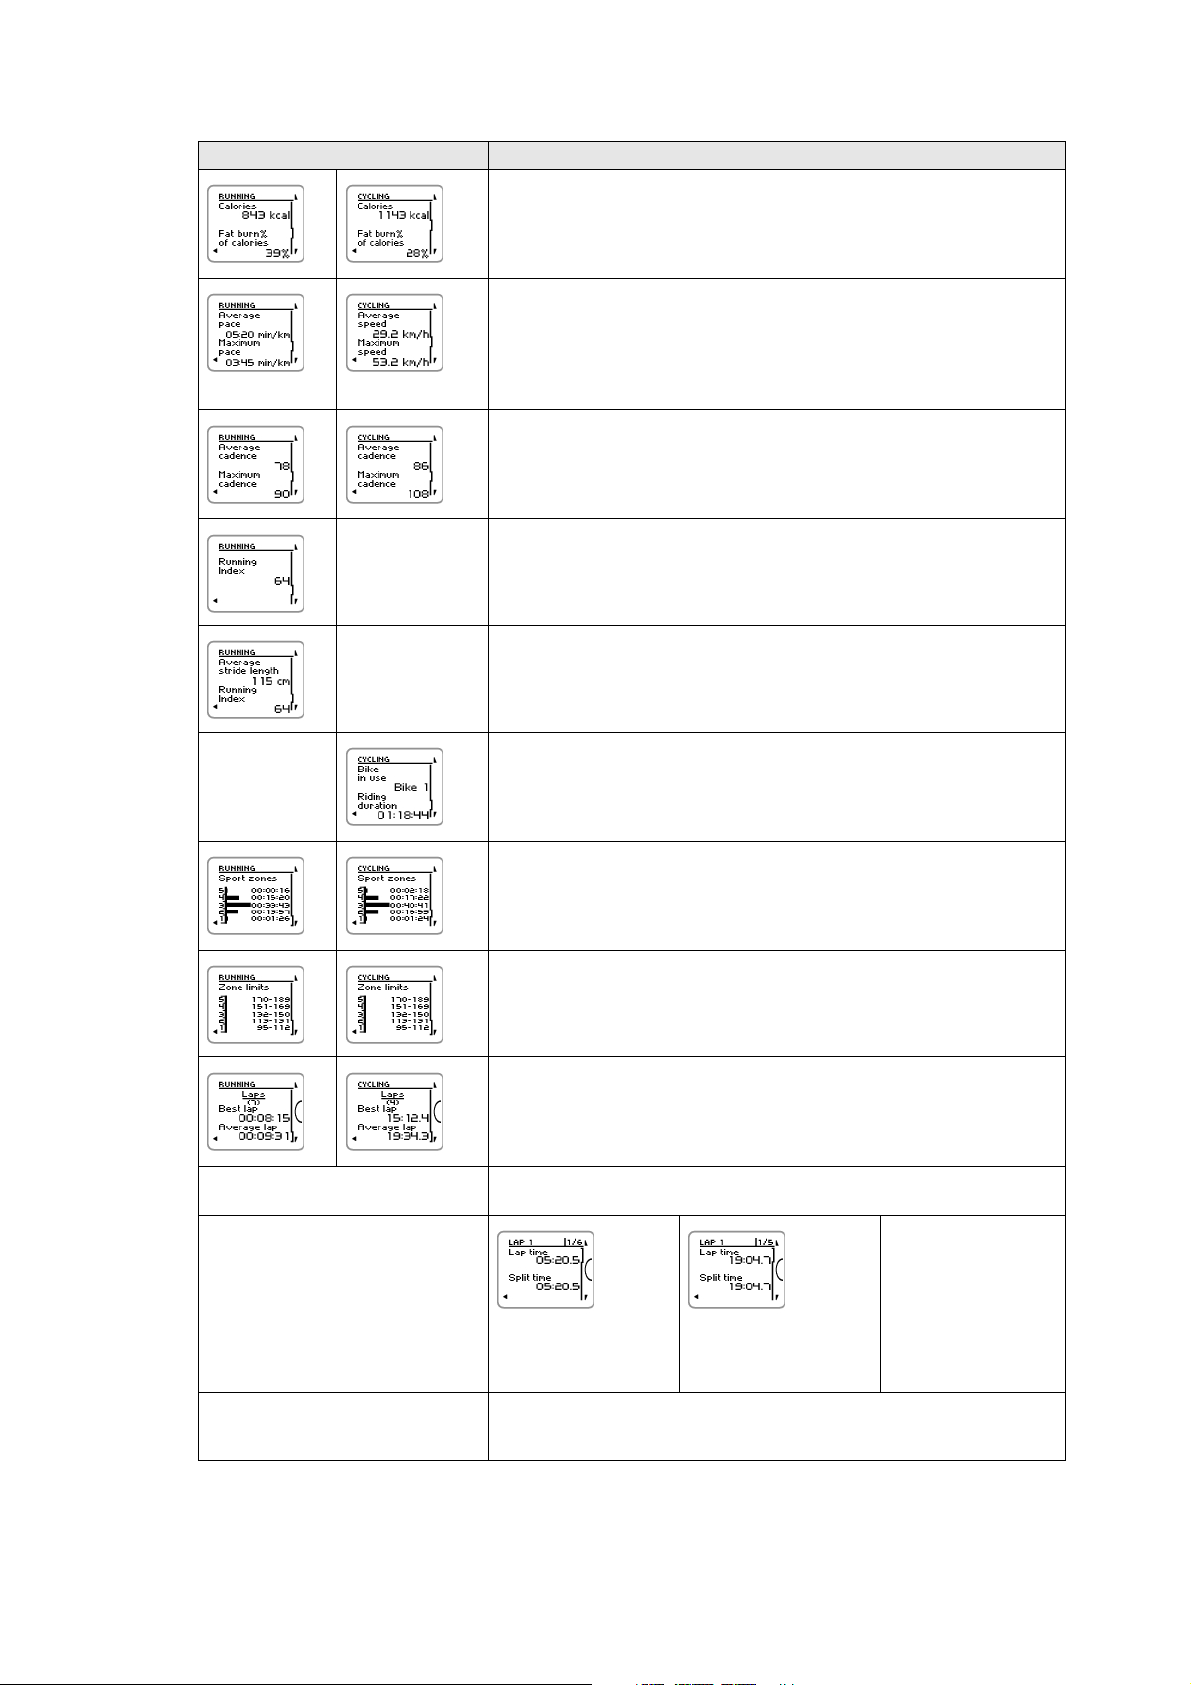
TRAINING FILE VIEWS INFORMATION DISPLAYED
Calories
Fat burn% of calories
(visible if heart rate sensor in use)
Average pace / Average speed
Maximum pace / Maximum speed
(visible if the GPS function is on or s3+ stride sensor/CS speed
sensor is in use)
Average cadence
Maximum cadence
(visible if s3+ stride sensor or CS cadence sensor is in use)
Running index
(visible if the GPS function is on or s3+ stride sensor is in use)
Average stride length (visible if s3+ stride sensor is in use)
ENGLISH
Running index (visible if the GPS function is on or s3+ stride sensor
is in use)
Bike in use
Riding duration
(visible if training file sport is cycling)
Sport zones
Time o n ea c h zo n e
(visible if heart rate sensor is in use)
Zone limits
(visible if ZoneOptimizer used and heart rate sensor is in use)
Laps/Automatic laps (number of the laps)
Best lap
Average lap
To v i e w de t a i l e d l a p info r m a t i o n , se l e c t More details by pressing
START .
The following
information on LAP
1/ A. LAP 1 is
displayed:
Lap time
Split time
You c an browse the laps with UP or DOWN.
To b r o w s e t h e foll o w i n g in f o r m a t i o n o n a c e r t ain l a p , pr e s s START .
After Training 25
Page 26

ENGLISH
TRAINING FILE VIEWS INFORMATION DISPLAYED
Average heart rate
Maximum heart rate
Average pace /
Average speed
Maximum pace /
Maximum speed
(visible if the GPS
function is on or
s3+ stride
sensor/CS speed
sensor is in use)
Lap distance
Split distance
(visible if the GPS
function is on or
s3+ stride
sensor/CS speed
sensor is in use)
Average cadence
Maximum cadence
(visible if s3+ stride
sensor or CS
cadence sensor is in
use)
Average stride
length
(visible if s3+ stride
sensor is in use)
Delete Files
The training file memory becomes full once either the maximum recording time or the maximum number
of files is reached. For more information on the limit values, see Technical Specifications (page 53).
When the training file memory becomes full, the oldest training file is overwritten by the most recent one.
To s a v e th e tr a i n i n g fi l e for a l o n g e r pe r i o d of time, t r ansfer i t to the P olar w e b se r v i c e at
www.polarpersonaltrainer.com. For more information, see polarpersonaltrainer.com (page 28).
To d e l e t e a traini n g file :
1. Select MENU > DATA > Delete files > Training file and press START . Browse the files with the UP/DOWN
buttons and select the file you want to delete. Press START Delete file? YES/NO is displayed.
Alternatively, you can delete a file in MENU > Data > Training files . Browse with UP/DOWN to the file you
want to delete, then press and hold LIGHT. Delete file? YES/NO is displayed
2. Select YES, File deleted is displayed. After that Remove file from totals? is displayed. If you select YES,
File deleted from totals is displayed. If you select NO, the training computer returns to the training file
menu. Note! Deleting a file from totals does not delete data from Week summaries. Week summaries can
be only reset
To d e l e t e a l l file s :
26 After Training
Page 27
ENGLISH
1. Select MENU > DATA > Delete files > All files and press START . Delete all files? YES/NO is displayed.
2. Select YES and All files deleted is displayed. If you select NO the training computer returns to the
training all files menu.
Week Summaries
To v i e w we e k su m m a r i e s of the t raining f i l es g o to MENU > Data > Week summaries > Summary and press
START .
SUMMARY
This week
The dates on which the data was collected
Duration
Duration
Distance
Calories
Number of sessions
Sport zones 1, 2, 3, 4 and 5
Time p e r z o n e
Reset Week Summaries
To r e s e t w e e k s sum m a r i e s se l e c t MENU > DATA > Reset week summaries?.SelectYes and Week summaries
reset is displayed or No and the training computer returns to Data menu.
Totals Since xx.xx.xxxx
To v i e w to t a l s of the t raining f i l es g o to MENU > Data > Totals since and press START .
Duration
Distance
Calories
Number of sessions
Sport zones 1, 2, 3, 4 and 5
Time p e r z o n e
Reset Totals
To r e s e t t o t a l s se l e c t MENU > DATA > Reset totals? Select Yes and Totals reset is displayed or No and the
training computer returns to Data menu.
After Training 27
Page 28

ENGLISH
7. POLARPERSONALTRAINER.COM
Analyze Your Training Data
For a long-term follow-up, store your training files in the polarpersonaltrainer.com web service. There you
can view detailed information on your training sessions and get a better understanding of your training.
With the USB cable and Polar WebSync software, it is easy to transfer training files to the
polarpersonaltrainer.com web service.
Use the USB cable included in the set package for data transfer. If you use another USB cable, make sure that it is
aUSB2.0compliantUSBA-to-microBcable.
How to set up your computer for data transmission
1. Register at polarpersonaltrainer.com
2. Download and install WebSync software on your computer at polarpersonaltrainer.com.
3. Plug the micro USB connector into the USB port in the training computer and the USB connector into
the computer USB port.
4. WebSync software starts automatically and the welcome window opens (you can also double-click the
WebSync icon on your task bar/menu bar to start Websync).
If you want to transfer training data, select Synchronize. If you want to connect to your training computer
to modify settings and to transfer them to the training computer, select Training Computer.
For more information on transfering data and modifying training computer settings, see WebSync Help
[https://www.polarpersonaltrainer.com/help/websync2/en/Polar_WebSync_2.x_Help_EN.htm].
Utilize Polar Endurance Training Programs
Utilize the ready-made Polar Endurance Program for running or cycling, or create your own phased training
sessions in polarpersonaltrainer.com. Transfer them to the training computer by using the USB cable and
WebSync software. For more information, see polarpersonaltrainer.com Help
[https://www.polarpersonaltrainer.com/help/en/index.html].
Once you have transferred the program onto to your training computer, go to MENU > PROGRAM and press
START .YoucanbrowsethroughtheplannedtrainingsessionswithUP/DOWN buttons and select the
training session you want to do (for example Thu 26.8.Long run 20km). To start training press START.
For more information on Endurance programs, see Polar Endurance Training Program for Running and
Cycling (page 48).
28 polarpersonaltrainer.com
Page 29

ENGLISH
8. SETTINGS
Sport Profile Settings
Adjust the settings for the sport profiles to suit your training needs in MENU > Settings > Sport Profiles.
You c an, for e xample, a ctivate t he sens ors you w ant to us e in diff erent spo rts. Wh en you st art a tra ining
session using the sport profile, the training computer detects the needed sensors automatically.
There are four sport profiles shown in the pre-training mode by default: Running, Cycling (Bike 1), Other
sport 1 and Other sport 2.Thefifthsportprofile,Cycling (Bike 2),isnotshowinthepre-trainingmodeby
default. You can set Cycling (Bike 2) to be shown in the pre-training mode in Cycling Settings.
The heart rate sensor is on by default in every sport, and the training computer automatically starts searching for
the heart rate sensor signal once you press START in time mode. If you bought a set which does not include a
heart rate sensor, turn it off in MENU > Settings > Sport Profiles > Sport > Heart rate sensor > Off.
Running Settings
To v i e w or mod i f y spor t profil e settin g s for r unning, s e l e ct MENU > Settings > Sport profiles > Running
• Training sounds : Select Off, Soft, Loud or Very loud.
• Heart rate sensor : Select On, Off or Search new .
• GPS: Select On or Off.
• Stride sensor: Select Off or Search new . If you have already paired one stride sensor, the option On is
also visible.
• Stride sensor calibration: Select Calibrate > By running or Set factor. For more information on
calibration, see Calibrate the Polar s3+ Stride Sensor (page 39).
Stride sensor calibration is visible only if the stride sensor has been set on previously.
• Speed View: Select Kilometers per hour or Minutes per kilometer. If you have chosen imperial unit,
select Miles per hour or Minutes per mile .
• Automatic lap: Select On or Off. If you set the automatic lap On, Set automatic lap distance is displayed.
Set the distance in kilometers or miles.
• Show in pre-training mode? Select YES, and Sport shown in pre-training mode is displayed. When you
press START in time mode, the sport will be visible in the list of sports in pre-training mode. Select No
and Sport not shown in pre-training mode is displayed.
• Training view numbering : Select On or Off. If you set the Training view numbering On , the number of the
training view appears for a few seconds when you browse the training views with UP/DOWN.
• Training view : Select 3rowsor 2rows. The training information will be displayed on three or two rows
according to your selection.
All new sensors must be paired with the training computer before they can be activated.
For more information on pairing a new sensor with the training computer, see New Accessory (page 38).
Cycling Settings
To v i e w or mod i f y spor t profil e settin g s for c ycling, s e l e ct MENU > Settings > Sport profiles > Cycling
(Bike1)/Cycling2 (Bike 2)
• Training sounds : Select Off, Soft, Loud or Very loud.
• Heart rate sensor : Select On, Off or Search new .
• GPS: Select On or Off.
• Bike 1 settings For more information, see Bike Settings.
• Speed View: Select Kilometers per hour or Minutes per kilometer. If you have chosen imperial unit,
Settings 29
Page 30

ENGLISH
select Miles per hour or Minutes per mile .
• Automatic lap is set off as default. Press START and Set distance is displayed. Set the distance in
kilometers or in miles and confirm with START . Automatic lap set to x.x km is displayed. After this, you
can select to have the Automatic lap Off or On.
• Show in pre-training mode? Select YES, and Sport shown in pre-training mode is displayed. When you
press START in time mode, the sport will be visible in the list of sports in pre-training mode. Select No
and Sport not shown in pre-training mode is displayed.
• Training view numbering : Select On or Off. If you set the Training view numbering On , the number of the
training view appears for a few seconds when you browse the training views with UP/DOWN.
• Training view : Select 3rowsor 2rows. The training information will be displayed on three or two rows
according to your selection.
Bike Settings
To v i e w or mod i f y bike setting s , selec t MENU > Settings > Sport profiles > Cycling (Bike1)/Cycling2 (Bike 2)
> Bike 1 settings/Bike 2 settings
• Speed sensor: Select Off or Search new . If you have already paired one speed sensor, the option On is
also visible.
• Wheel size : Set the wheel size to xxxx mm. For more information on measuring the wheel size, see
Measuring Wheel Size.
• Cadence sensor: Select Off or Search new . If you have already paired one cadence sensor, the option On
is also visible.
• Autostart: Set Off or On. If you select On, Activate speed sensor YES/NO is displayed. Select YES and
Autostart on is displayed. If you have not paired a speed sensor with your training computer, Speed
sensor for bike required is displayed and the training computer returns to Bike 1 settings/Bike 2
settings. If you select NO, Activation canceled is displayed.
All new sensors must be paired with the training computer before they can be activated.
For more information on pairing a new sensor to the training computer, see New Accessory (page 38).
Measuring Wheel Size
Select MENU > Settings > Sport profiles > Cycling (Bike 1)/Cycling 2 (Bike 2) > Bike 1 settings > Wheel
size > Set wheel size
Wheel size settings are a prerequisite for correct cycling information. There are two ways of determining
the wheel size of your bike:
Method 1
Look for the diameter in inches or in ETRTO printed on the wheel. Match it to the wheel size in
millimeters in the right column of the chart.
ETRTO Wheel size diameter (inches) Wheel size setting (mm)
25-559 26 x 1.0 1884
23-571 650 x 23C 1909
35-559 26 x 1.50 1947
37-622 700 x 35C 1958
47-559 26 x 1.95 2022
20-622 700 x 20C 2051
52-559 26 x 2.0 2054
23-622 700 x 23C 2070
30 Settings
Page 31

ENGLISH
ETRTO Wheel size diameter (inches) Wheel size setting (mm)
25-622 700 x 25C 2080
28-622 700 x 28 2101
32-622 700 x 32C 2126
42-622 700 x 40C 2189
47-622 700 x 47C 2220
Wheel sizes on the chart are advisory as wheel size depends on the wheel type and air pressure.
Method 2
Measure the wheel manually for the most accurate result.
Use the valve to mark the point where the wheel touches the ground. Draw a line on the ground to mark
that point. Move your bike forward on a flat surface for one complete rotation. The tire should be
perpendicular to the ground. Draw another line on the ground at the valve to mark a full rotation. Measure
the distance between the two lines.
Subtract 4 mm to account for your weight on the bike to get your wheel circumference. Enter this value in
the training computer.
Other Sport Settings
To v i e w or mod i f y spor t profil e settin g s for o ther s p o r t , s e l e c t MENU > Settings > Sport profiles > Other
sport 1/ Other sport 2
• Training sounds : Select Off, Soft, Loud or Very loud.
• Heart rate sensor : Select On, Off or Search new .
• GPS: Select On or Off.
• Speed View: Select Kilometers per hour or Minutes per kilometer. If you have chosen imperial unit,
select Miles per hour or Minutes per mile
• Automatic lap: Set On or Off. If you set the automatic lap On, Set automatic lap distance is displayed. Set
the distance in kilometers or miles.
• Show in pre-training mode? Select YES, and Sport shown in pre-training mode is displayed. When you
press START in time mode, the sport will be visible in the list of sports in pre-training mode. Select No
and Sport not shown in pre-training mode is displayed.
• Training view numbering : Select On or Off. If you set the Training view numbering On , the number of the
training view appears for a few seconds when you browse the training views with UP/DOWN.
• Training view : Select 3rowsor 2rows. The training information will be displayed on three or two rows
according to your selection.
All new sensors must be paired with the training computer before they can be activated.
For more information on pairing a new sensor with the training computer, see New Accessory (page 38).
Heart Rate Settings
To v i e w an d ch a n g e hea r t rate s ettings, s e lect MENU > SETTINGS > Heart rate settings .
• ZoneOptimizer: Set On or Off.
• Heart rate view : Select Beats per minute (BPM) or Percent of maximum (% of maximum).
• Heart rate zone lock : Select Heart rate zone lock OFF , or lock one of the zones by selecting Zone 1,
Zone 2, Zone 3, Zone 4 or Zone 5. Zone X locked is displayed.
• Sport zones: Set zone 1, 2, 3, 4 and 5 heart rate limits. For more information on sport zones, see Polar
Settings 31
Page 32

ENGLISH
Sport Zones (page 42).
Before modifying the zone limits you need to set the ZoneOptimizer off. To modify zones, first set
ZoneOptimizer off is displayed. Set ZoneOptimizer off? YES/NO? Select YES. Zone optimizer off is
displayed. You can start modifying the zone limits.
User Information Settings
Enter accurate user information in the training computer to receive the correct feedback on your
performance.
To v i e w an d mo d i f y use r inform a t i o n se t t i n g s , se l e c t MENU > Settings > User information > USER INFORMAT..
Browse the selection with UP/DOWN and accept the value with START.
• Weight: Set your weight in kilograms (kg) or pounds (lbs).
• Height: Set your height in centimeters (cm) or in feet and inches (if you chose imperial units)
• Date of Birth: Set your birthday. The order in which date settings are depends on which time and date
format you have chosen (24h: day - month - year / 12h: month - day - year).
• Sex: Select Male or Female.
• Activity level : Select Low (0-1 h/week), Moderate (1-3 h/week) , High (3-5 h/week) or Top (5+ h/week)
Activity level is an assessment of your level of long-term physical activity. Select the alternative that best
describes the overall amount and intensity of your physical activity during the past three months. Your
activity level is used in calculating your energy expenditure.
• Top (5+ h/week): You participate in heavy physical exercise at least 5 times a week, or you exercise to
improve performance for competitive purposes.
• High (3-5 h/week): You participate at least 3 times a week in heavy physical exercise, e.g. you run
20-50 km/12-31 miles per week or spend 3-5 hours per week in comparable physical activity.
• Moderate (1-3 h/week) : You participate regularly in recreational sports, e.g. you run 5-10 km or 3-6
miles per week or spend 1-3 hours per week in comparable physical activity, or your work requires
modest physical activity.
• Low (0-1 h/week): You do not participate regularly in programmed recreational sport or heavy physical
activity, e.g. you walk only for pleasure or exercise hard enough to cause heavy breathing or
perspiration only occasionally.
• Maximum heart rate : Set your maximum heart rate, if you know your laboratory measured current
maximum heart rate value. Your age-predicted maximum heart rate value (220-age) is displayed as a
default setting when you set this value for the first time. For more information, see Maximum Heart Rate
(HR
).
max
• OwnIndex(VO
): Set your OwnIndex (VO
2max
value). For more information, see OwnIndex.
2max
Maximum Heart Rate (HR
HR
is used to estimate energy expenditure. HR
max
during maximum physical exertion. HR
accurate method for determining your individual HR
max
)
is the highest number of heartbeats per minute
is also useful when determining training intensity. The most
max
max
is to perform a maximal exercise stress test in a
max
laboratory.
OwnIndex
Polar OwnIndex, the result of Polar Fitness Test (page 35), predicts your maximal oxygen uptake (VO
OwnIndex usually ranges from 20 to 95 and is comparable to VO
®
,commonlyusedtoevaluateaerobic
2max
2max
fitness. Your long-term level of physical activity, heart rate, heart rate variability at rest, gender, age,
height, and body weight all influence OwnIndex. The higher the OwnIndex value is, the better your aerobic
fitness is.
General Settings
To v i e w an d ch a n g e you r genera l settin g s , sele c t MENU > Settings > General settings .
• Sounds: Select On or Off
• Button lock: Select either Manual lock or Automatic lock
32 Settings
).
Page 33

ENGLISH
• Units: Select Metric units (kg, m) or Imperial units (lbs, ft)
• Language: Select Dansk, Deutsch, English, Español, Français, Italiano, Nederlands, Norsk,Português,
Suomi or Svenska and accept with START.
Watch Settings
To v i e w an d ch a n g e you r Watch settings select MENU > Settings > Watch settings
• Alarm: Set alarm repetition Off, Once, Monday to Friday or Every day
• Time: Select Time 1, Time 2 or Time in use
• Date: Set date, Date format and Date separator
• Week' starting day: Select Monday, Saturday or Sunday
• Watch face: Select Time only, Time and logo or Time and event (visible if you have set an event in
polarpersonaltrainer.com and transfered the data to your training computer with the USB cable and
WebSync software).
Quick Menu
Some settings can be modified with a shortcut button. You can enter Quick menu by pressing and holding
LIGHT in time mode, pre-training mode or training mode. Depending on which mode you enter the Quick
menu from, you will find different selections.
Time Mode
In time mode, press and hold LIGHT to enter Quick menu.
• Select Lock buttons and press START. To unlock buttons, press and hold LIGHT again.
• Select alarm repetition Alarm > Off, Once, Monday to Friday or Every day .
• Select Time in use > Time 1 or Time 2.
Pre-training mode
To e n t e r p r e - t r a i n i ng m o d e , pr e s s START in time mode. In pre-training mode, press and hold LIGHT to
enter Quick menu.
• Edit sport profile settings. For more information, see Sport Profile Settings (page 29).
• Edit heart rate settings. For more information, see Heart Rate Settings (page 31).
Training Mode
In training mode, press and hold LIGHT to enter Quick menu.
• Select Lock buttons and press START. To unlock buttons, press and hold LIGHT again.
• Select Search sensor and the training computer starts searching for the sensor.
This selection is available only if the connection to any of the sensors has been lost.
• Select Calibrate stride sensor to calibrate s3+ stride sensor.
The option is only available when s3+ stride sensor is in use.
• Select Training sounds and set training sounds Off, Soft, Loud or Very loud
• Select Set automatic lap off or On.
This selection is only available if speed information is available i.e. GPS function or optional CS speed
sensor/s3+ stride sensor has been set on for the sport profile.
Settings 33
Page 34

ENGLISH
• Select GPS info to view the number of visible satellites.
• Select Show zone limits if you want to see the sport zone heart rate limits.
This selection is only available if heart rate sensor is set on.
34 Settings
Page 35

ENGLISH
9. POLAR FITNESS TEST
The Polar Fitness Test is an easy, safe, and quick way to measure your aerobic (cardiovascular) fitness at
rest. The result, Polar OwnIndex, is comparable to maximal oxygen uptake (VO
used to evaluate aerobic fitness. Your long-term level of physical activity, heart rate, heart rate variability
at rest, gender, age, height, and body weight all influence OwnIndex. The Polar Fitness Test is developed
for use by healthy adults.
Aerobic fitness relates to how well your cardiovascular system works to transport oxygen to your body. The
better your aerobic fitness, the stronger and more efficient your heart is. Good aerobic fitness has many
health benefits. For example, it helps in decreasing high blood pressure and your risk of cardiovascular
diseases and stroke. If you want to improve your aerobic fitness it takes, on average, six weeks of regular
training to see a noticeable change in your OwnIndex. Less fit individuals see progress even more rapidly.
The better your aerobic fitness, the smaller the improvements in your OwnIndex.
Aerobic fitness is best improved by training types that use large muscle groups. Such activities include
running, cycling, walking, rowing, swimming, skating, and cross-country skiing.
To m o n i t or y o u r pr o g r e s s , st a r t by measur i n g your OwnInde x a c o u p le o f time s during the f i r s t t w o wee k s
in order to get a baseline value, and then repeat the test approximately once a month.
To m a k e su r e th e test r esults a r e re l i a b l e , t h e foll o w i n g ba s i c req u i r e m e n t s a p p l y :
), which is commonly
2max
• You can perform the test anywhere - at home, at the office, at a health club - provided the testing
environment is peaceful. There should be no disturbing noises (e.g. television, radio, or telephone) and no
other people talking to you.
• Always take the test in the same environment and at the same hour.
• Avoid eating a heavy meal or smoking 2-3 hours prior to testing.
• Avoid heavy physical exertion, alcohol, and pharmacological stimulants on the test day and the previous
day.
• You should be relaxed and calm. Lie down and relax for 1-3 minutes before starting the test.
Before the Test
Wear the heart rate sensor
For further information, see Wearing the Heart Rate Sensor (page 13)
Enter User Information
Select MENU > Settings > User information
To c a r r y o u t the P olar F i t n e s s Te s t , ent e r your p ersonal u s e r i n f o r m a t i on a n d lon g - t e r m ph y s i c a l ac t i v i t y
level in User settings.
Performing the Test
Select MENU > Fitness test > Start test
The test starts once the training computer detects your heart rate. The progress bar indicates that the test
is ongoing. Stay relaxed and limit body movements and communication with other people.
If you have not set your long-term physical activity level in User information settings, Set activity level of
past 3 months is displayed. Select Top, High, Moderate ,orLow.Forfurtherinformationonactivitylevels,
see User Information Settings (page 32).
If your training computer does not receive your heart rate at the beginning or during the test, the test fails
and Test failed , Check heart rate sensor is displayed. Check that the heart rate sensor electrodes are wet
and that the strap is snug enough, and start the test again.
Polar Fitness Test 35
Page 36

ENGLISH
When the test is over, you hear two beeps. OwnIndex is displayed with a numerical value and level
evaluation. For further information on evaluations, see Fitness Level Classes.
Update to VO
• Select Yes to save the OwnIndex value to your user settings and OwnIndex results menu.
• Select No only if you know your laboratory-measured VO
level class from the OwnIndex result. Your OwnIndex value is saved only to the OwnIndex results menu.
For further information on fitness trend see OwnIndex results.
You c an stop t he test a t any tim e by pres sing BACK. Test canceled is displayed for a few seconds.
2max
?
value, and if it differs more than one fitness
2max
After saving the OwnIndex value, it will be used for calculating calorie consumption.
After the Test
Fitness Level Classes
Men
Age / Years Very low Low Fair Moderate Good Very good Elite
20-24 <32 32-37 38-43 44-50 51-56 57-62 >62
25-29 <31 31-35 36-42 43-48 49-53 54-59 >59
30-34 <29 29-34 35-40 41-45 46-51 52-56 >56
35-39 <28 28-32 33-38 39-43 44-48 49-54 >54
40-44 <26 26-31 32-35 36-41 42-46 47-51 >51
45-49 <25 25-29 30-34 35-39 40-43 44-48 >48
50-54 <24 24-27 28-32 33-36 37-41 42-46 >46
55-59 <22 22-26 27-30 31-34 35-39 40-43 >43
60-65 <21 21-24 25-28 29-32 33-36 37-40 >40
Women
Age / Years Very low Low Fair Moderate Good Very good Elite
20-24 <27 27-31 32-36 37-41 42-46 47-51 >51
25-29 <26 26-30 31-35 36-40 41-44 45-49 >49
30-34 <25 25-29 30-33 34-37 38-42 43-46 >46
35-39 <24 24-27 28-31 32-35 36-40 41-44 >44
40-44 <22 22-25 26-29 30-33 34-37 38-41 >41
45-49 <21 21-23 24-27 28-31 32-35 36-38 >38
50-54 <19 19-22 23-25 26-29 30-32 33-36 >36
55-59 <18 18-20 21-23 24-27 28-30 31-33 >33
60-65 <16 16-18 19-21 22-24 25-27 28-30 >30
The classification is based on a literature review of 62 studies where VO
36 Polar Fitness Test
was measured directly in
2max
Page 37

ENGLISH
healthy adult subjects in the USA, Canada and 7 European countries. Reference: Shvartz E, Reibold RC.
Aerobic fitness norms for males and females aged 6 to 75 years: a review. Avia t Space E nviron Me d ;
61:3-11, 1990.
Ownindex results
Select MENU > Fitness test> OwnIndex results
In the OwnIndex results menu you can see how your OwnIndex value has been developing. Up to 60 latest
OwnIndex values and respective dates are included in the display. When the latest results file becomes
full, the oldest result is automatically deleted.
Delete OwnIndex Value
Select MENU > Fitness test> OwnIndex results
Select the value you wish to delete and press and hold LIGHT > Delete OwnIndex (xx) value? No/Yes is
displayed. Confirm with START.
Analyzing OwnIndex Results with Software
Downloading test results to polarpersonaltrainer.com offers you the possibility of analyzing results in
various ways, as well as accessing more detailed information about your progress.
Polar Fitness Test 37
Page 38

ENGLISH
10. NEW ACCESSORY
Pairing a New Sensor with the Training Computer
Before taking a new sensor into use, it has to be introduced to the training computer. This is called
pairing and only takes a few seconds. Pairing ensures that your training computer receives signals from
your sensor only, and enables disturbance-free training in a group.
Before entering an event or race, make sure that you do the pairing at home. This is to prevent
interference due to the long-range data transmission. When pairing new sensor make sure you are not near
(40 m/131 ft) other similar sensors.
Pairing a New Heart Rate Sensor with the Training Computer
If you have not paired your training computer with a heart rate sensor before, pairing is performed
automatically when you start a training session. Wear the training computer and the heart rate sensor and
start by pressing START. Searching for new heart rate sensor is displayed. The training computer
searches for a heart rate sensor signal. Heart rate sensor found is displayed when the the training
computer finds the signal.
Wear the heart rate sensor and make sure that you are not near (40 m/131 ft) other heart rate sensors.
1. Go to Menu > Settings > Sport profiles > Sport > Heart rate sensor > Search new and press START .
2. The training computer starts searching for the sensor signal, Searching for new heart rate sensor is
displayed.
3. Once the new sensor is identified, Heart rate sensor found is displayed. Pairing is completed.
4. If the search is not successful, Heart rate sensor not found or Other heart rate sensors interfering.
Move further., Try again? YES / NO is displayed.
5. Select YES to start the search again.
6. Select NO to cancel the searching.
7. To return to time mode, press and hold the BACK button.
Only one heart rate sensor can be paired with your training computer at a time. However, the training
computer remembers the last three pairings. If the most recently paired heart rate sensor is not available,
but the previous is, the training computer receives the heart rate signal from the previous sensor.
Pairing a New Speed Sensor with the Training Computer
Make sure the speed sensor has been correctly installed. For more information on installing the speed
sensor refer to the user manual of the speed sensor or for video tutorial at
http://www.polar.com/en/polar_community/videos [http://www.polar.com/en/support/video_tutorials].
You c an have t wo bikes on the tr aining co mputer. Each bik e has to have the sensors s eparate ly taug ht.
You c an only t each one speed sen sor to on e bike. I f you hav e two bik es, bot h of them c an use th e same
speed sensor. Or, they can have their own set of sensors. When you pair a new sensor to a bike that
already has a previously taught sensor in the memory, the new sensor replaces the previous one.
1. Go to MENU > Settings > Sport profiles > Cycling (Bike 1)/Cycling (Bike 2) > Bike 1 settings/Bike 2
settings > Speed sensor > Search new and press START.
2. Press OK (START) to start test drive is displayed.
3. Press START and Searching for new speed sensor is displayed. The training computer starts searching
for the speed sensor signal. Rotate the wheel a few times to activate the sensor. The flashing red light on
the sensor indicates that the sensor is activated.
4. Once the new speed sensor is identified, Speed sensor found is displayed. Pairing is complete.
5. If the search is not successful, Speed sensor not found or Other speed sensors interfering. Move
further., Try again? YES / NO is displayed.
6. Select YES to start the search again.
7. Select NO to cancel the searching.
38 New Accessory
Page 39

ENGLISH
8. To return to time mode, press and hold the BACK button.
Pairing a New Cadence Sensor with the Training Computer
Make sure the cadence sensor has been correctly installed. For more information on installing the cadence
sensor refer to the user manual of the cadence sensor or to the video tutorial at
http://www.polar.com/en/polar_community/videos [http://www.polar.com/en/support/video_tutorials].
You c an have t wo bikes on the tr aining co mputer. Each bik e has to have the sensors s eparate ly taug ht.
You c an only t each one cadence s ensor to one bike. If you hav e two bik es, both of them c an use th e same
cadence sensor. Or, they can have their own set of sensors. When you pair a new sensor to a bike that
already has a previously taught sensor in the memory, the new sensor replaces the previous one.
1. Go to MENU > Settings > Sport profiles > Cycling (Bike 1)/Cycling (Bike 2) > Bike 1 settings/Bike 2
settings > Cadence sensor > Search new and press START.
2. Press OK (START) to start test drive is displayed.
3. Press START and Searching new cadence sensor is displayed. The training computer starts searching
for the cadence sensor signal. Rotate the wheel a few times to activate the sensor. The flashing red light
on the sensor indicates that the sensor is activated.
4. Once the new cadence sensor is identified, Cadence sensor found is displayed. Pairing is complete.
5. If the search is not successful, Cadence sensor not found or Other cadence sensors interfering. Move
further., Try again? YES / NO is displayed.
6. Select YES to start the search again.
7. Select NO to cancel the searching.
8. To return to time mode, press and hold the BACK button.
Pairing a New Stride Sensor with the Training Computer
Make sure the stride sensor has been correctly attached to your shoe. For more information on setting up
the stride sensor refer to the user manual of the stride sensor or to the video tutorial at
http://www.polar.com/en/polar_community/videos [http://www.polar.com/en/support/video_tutorials].
You c an only p air one s tride sen sor to th e trainin g compu ter at a ti me. If yo u pair a new sen so r, the new
sensor always replaces the previous one you had paired. The stride sensor can only be paired to the
Running sport profile.
1. Go to MENU > Settings > Sport profiles > Running > Stride sensor > Search new and press START.
2. Searching for new stride sensor is displayed. The training computer starts searching for the stride
sensor signal.
3. Once the new stride sensor is identified, Stride sensor found is displayed. Pairing is complete.
4. If the search is not successful, Stride sensor not found or Other stride sensors interfering. Move
further., Try again? YES / NO is displayed.
5. Select YES to start the search again.
6. Select NO to cancel the searching.
7. To return to time mode, press and hold the BACK button.
Calibrate the Polar s3+ Stride Sensor
Polar s3+ stride sensor can be set on only for the Running sport profile.
Calibration of the stride sensor improves the accuracy of speed/pace and distance measurements. It is
recommended that you calibrate the stride sensor before using it for the first time, if there are significant
changes in your running style, or if the position of the stride sensor on the shoe is dramatically changed
(e.g. if you have new shoes or if you switch the sensor from your right shoe to your left one). You can
calibrate the stride sensor by running a known accurate distance, or by setting the calibration factor
manually. The calibration should be done at the speed you normally run. If you run at different speeds,
the calibration should be done at your average speed.
New Accessory 39
Page 40

ENGLISH
Calibration by Running Wizard
Before calibration the stride sensor needs to be paired with the training computer. For more information on pairing
the stride sensor and training computer, see New Accessory (page 38).
Make sure the stride sensor function in the training computer is on. Press UP to enter MENU and select
Settings > Sport profiles > Running> Stride sensor > On.
To c a l i b rate a cer t a i n di s t a n c e wi t h a s t e p-by-step g uidance, s e lect
1. MENU > Settings > Sport profiles > Running > Stride sensor calibration > By running. Set distance is
displayed.
2. Adjust the distance, how far you wish to run, to calibrate the stride sensor (minimum calibration distance
is 400 meters / 0.3 miles). Press START . Stand still until stride sensor is found is displayed.
3. Press OK (START) and run xx.x km/mi is displayed. On the starting line, press START and start your run
by taking the first step with your sensor foot and run the preset distance at a steady pace.
4. Press OK (START) after xx.x km/mi is displayed. Stop exactly on the finish line of the preset distance,
stand still and press START.
Once you reach the preset distance, stop exactly on the finish line of the preset distance and stand still for
calibration. If you move before Calibrated to x.xxx is displayed, the calibration fails.
5. When the calibration succeeds, Calibrated to x.xxx is displayed. The new calibration factor is used.
Continue recording? is displayed. If you wish to continue the training session recording, select Yes.
Otherwise, select No.
6. To cancel the calibration press BACK, Calibration canceled is displayed.
Set Calibration Factor Manually
The calibration factor is calculated as a ratio of the actual distance to the uncalibrated distance. Example:
you run 1200m, and the training computer shows a distance of 1180m, the calibration factor is 1.000.
Calculate the new calibration factor as follows: 1.000*1200/1180 = 1.017. The range of the calibration
factor during manual calibration is 0.500-1.500. If you define the calibration factor below or above these
values, calibration fails.
To c a l i b rate t h e st r i d e se n s o r ma n u a l l y be f o r e tr a i n i n g , se l e c t
1. Settings > Sport profiles > Running> Stride sensor > Set factor.
2. Adjust the factor. Calibareted to x.xx is displayed.
The calibration factor can also be set during training, when the stride sensor is in use. Press and hold
LIGHT to enter the Quick menu and then select Calibrate stride sensor > Set factor . Calibareted to x.xx
is displayed and you can continue running.
Calibrate Sensor by Running a Known Distance (on-the-fly calibration)
Before calibration the stride sensor needs to be paired with the training computer. For more information on pairing
the stride sensor and training computer, see New Accessory (page 38).
Set correct lap distance
You c an calibr ate the s ensor at any phase of your tr aining wi th lap di stance correctio n, prov ided you are
not training with distance-based targets. Just run a known distance, preferably more than 1000 meters /
0,62 miles.
Make sure the stride sensor function in the training computer is on. In time mode press UP to enter MENU
and select Settings > Sport profiles > Running> Stride sensor > On.
40 New Accessory
Page 41

ENGLISH
1. In time mode press START and select Running as your sport profile. Press START again and start
running.
2. At the starting point of a known lap distance, press START (minimum calibration distance is 400 meters
/ 0.3 miles). When you have run the whole lap distance, press START.
3. Then calibrate the sensor: Press and hold LIGHT to go enter Quick menu. Select Calibrate stride
sensor.
4. Select Set correct lap distance. Fix the displayed lap distance with the distance you just ran, and press
START . Calibrated to x.xxx is displayed. The sensor is now calibrated and ready for action.
Set correct distance
Alternatively, you can calibrate the stride sensor by fixing the whole distance gathered.
1. In time mode press START and select Running as your sport profile. Press START again and start
running.
2. Press and hold LIGHT to enter the Quick menu. Select Calibrate stride sensor.
3. Select Set correct distance. Fix the displayed distance with the distance you just ran, and press
START . Calibrated to x.xxx is displayed. The sensor is now calibrated and ready for action.
New Accessory 41
Page 42

ENGLISH
11. POLAR SMART COACHING
Polar Sport Zones
Polar sport zones introduce a new level of effectiveness in heart rate-based training. Training is divided
into five sport zones based on percentages of maximum heart rate. With sport zones, you can easily select
and monitor training intensities.
Target zone Intensity % of
HR
,bpm
max
VERY HARD
90–100%
171–190 bpm
HARD
80–90%
152–172 bpm
MODERATE
70–80%
133–152 bpm
LIGHT
60–70%
114-133 bpm
Example
durations
less than 5
minutes
2–10 minutes
10–40
minutes
40–80
minutes
Training benefit
BENEFITS: develops maximum performance and
speed
FEELS LIKE: very exhausting for breathing and
muscles
RECOMMENDED FOR: fit persons and for athletic
training
BENEFITS: increases maximum performance
capacity
FEELS LIKE: muscular fatigue and heavy
breathing.
RECOMMENDED FOR: everybody for shorter
exercises
BENEFITS: improves aerobic fitness
FEELS LIKE: light muscular strain, easy
breathing, moderate sweating
RECOMMENDED FOR: everybody for moderately
long exercises
BENEFITS: improves basic endurance and fat
burning
FEELS LIKE: comfortable, easy breathing, low
muscle load, light sweating
RECOMMENDED FOR: everybody for longer and
frequently repeated shorter exercises
VERY LIGHT
50–60%
104–114 bpm
20–40
minutes
BENEFITS: improves overall health and helps
recovery
FEELS LIKE: very easy for breathing and muscles
RECOMMENDED FOR: weight management and
active recovery
HR
=Maximumheartrate(220-age).Example:30yearsold,220–30=190bpm.
max
Trainin g in heart rate zone 1 is done at a very low intensity. The main training principle is that
performance improves when recovering after, and not only during training. Accelerate the recovery process
with very light intensity training.
Trainin g in heart rate zone 2 is for endurance training, an essential part of any training program. Training
sessions in this zone are easy and aerobic. Long-duration training in this light zone results in effective
energy expenditure. Progress will require persistence.
Aerobic power is enhanced in heart rate zone 3.Thetrainingintensityishigherthaninsportzones1and
2, but still mainly aerobic. Training in sport zone 3 may, for example, consist of intervals followed by
recovery. Training in this zone is especially effective for improving the efficiency of blood circulation in
the heart and skeletal muscles.
42 Polar Smart Coaching
Page 43
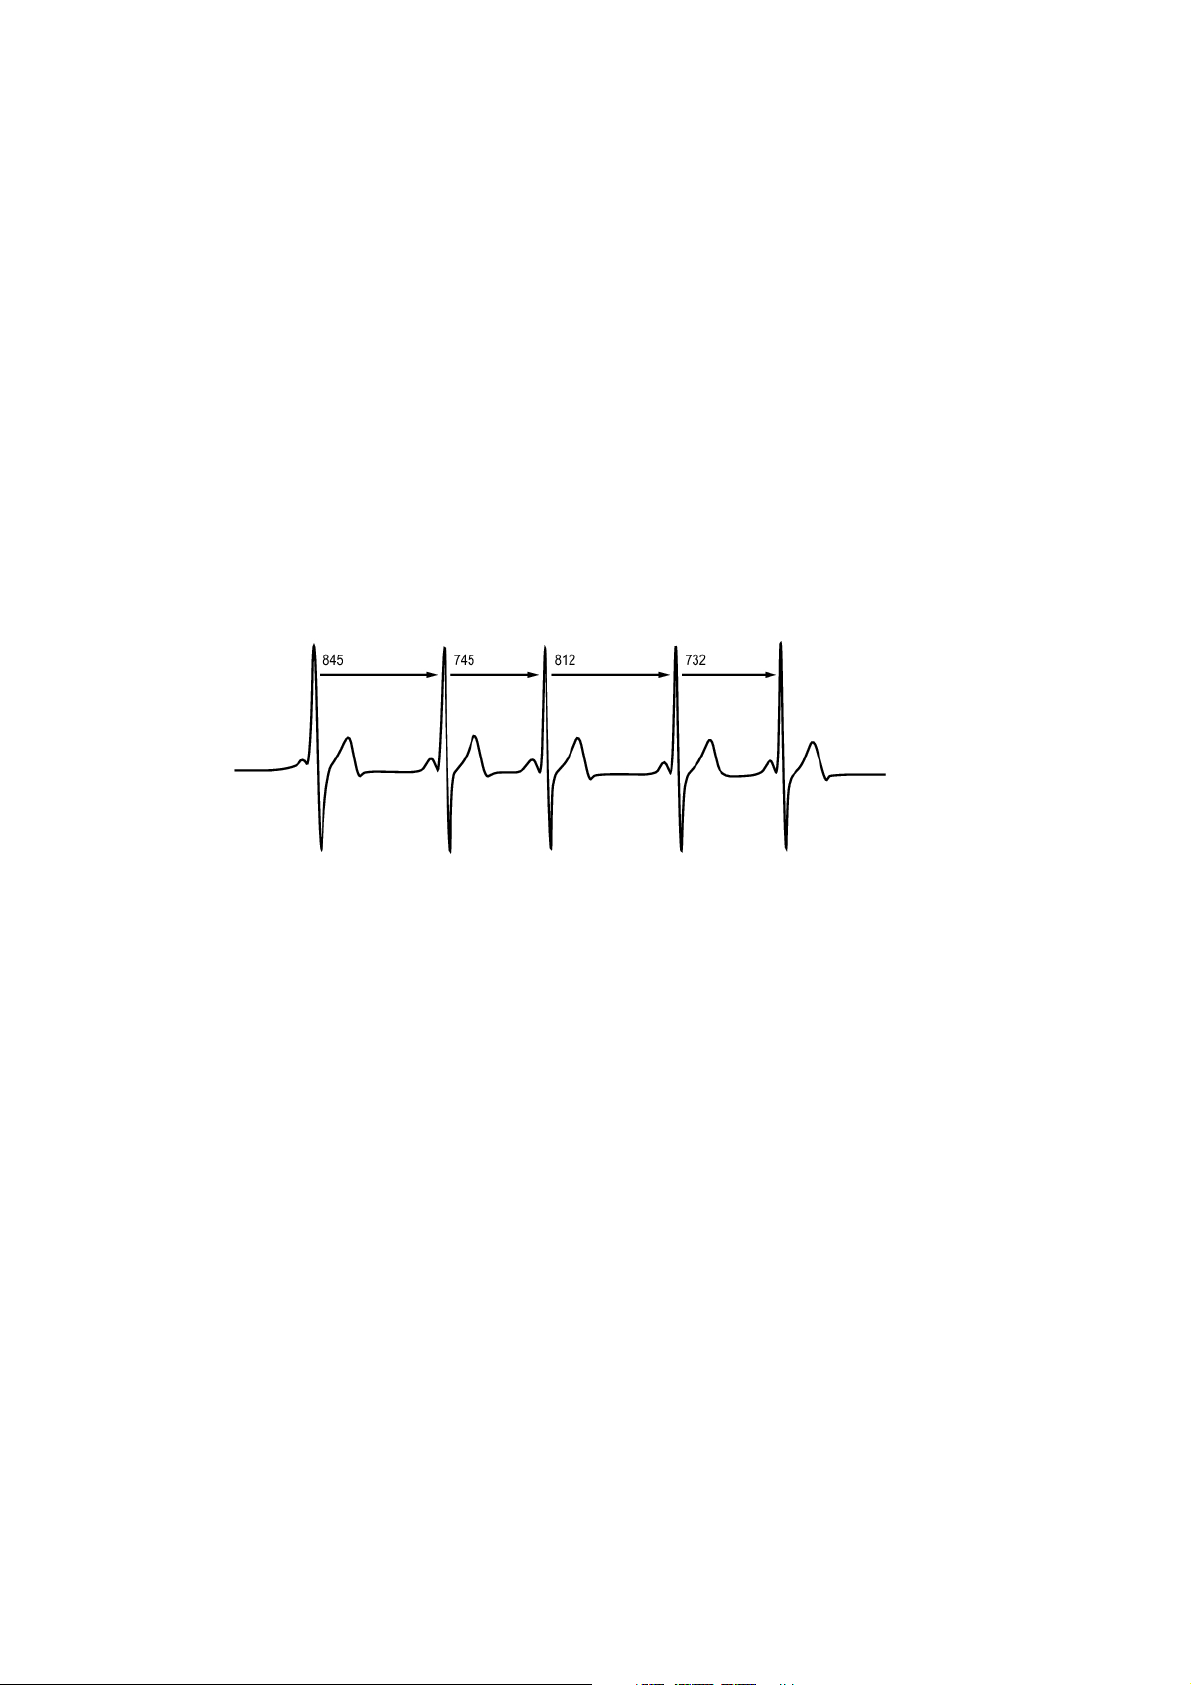
ENGLISH
If your goal is to compete at top potential, you will have to train in heart rate zones 4 and 5.Inthese
zones, you exercise anaerobically in intervals of up to 10 minutes. The shorter the interval, the higher the
intensity. Sufficient recovery between intervals is very important. The training pattern in zones 4 and 5 is
designed to produce peak performance.
The Polar target heart rate zones can be personalized by using a laboratory measured HR
taking a field test to measure the value yourself. When training in a target heart rate zone, try to make use
of the entire zone. The mid-zone is a good target, but keeping your heart rate at that exact level all the
time is not necessary. Heart rate gradually adjusts to training intensity. For instance, when crossing from
heart rate target zone 1 to 3, the circulatory system and heart rate will adjust in 3-5 minutes.
Heart rate responds to training intensity depending on factors such as fitness and recovery levels, as well
as environmental factors. It is important to look out for subjective feelings of fatigue, and to adjust your
training program accordingly.
value, or by
max
Heart Rate Variability
Heart rate varies with every heartbeat. Heart rate variability (HRV) is the variation of beat to beat intervals,
also known as R-R intervals.
HRV indicates the fluctuations of heart rate around an average heart rate. An average heart rate of 60
beats per minute (bpm) does not mean that the interval between successive heartbeats would be exactly
1.0 sec, instead they may fluctuate/vary from 0.5 sec up to 2.0 sec.
HRV is affected by aerobic fitness. HRV of a well-conditioned heart is generally large at rest. Other factors
that affect HRV are age, genetics, body position, time of day, and health status. During exercise, HRV
decreases as heart rate and exercise intensity increase. HRV also decreases during periods of mental
stress.
HRV is regulated by the autonomic nervous system. Parasympathetic activity decreases heart rate and
increases HRV, whereas sympathetic activity increases heart rate and decreases HRV.
HRV is used in the OwnIndex and ZoneOptimizer features.
Polar ZoneOptimizer
The Polar ZoneOptimizer feature adjusts your sport zones based on your personal information including
heart rate variability. It recommends lower intensity training when little heart rate variability is detected
and higher intensity training when plenty of heart rate variability is detected. It also gives you feedback on
your heart rate zones in comparison to your normal level.
Benefits of the ZoneOptimizer feature
Each Sport Zone has a different physiological response which is described briefly in the Polar Sport Zones
Polar Smart Coaching 43
Page 44

ENGLISH
(page 42). The ZoneOptimizer measurement takes your personal information, including your heart rate
variability, into account and personalizes your sport zones before every training session.
ZoneOptimizer measurement
Polar ZoneOptimizer recommends lower intensity training when little heart rate variability is detected and
higher intensity training, when plenty of heart rate variability is detected at a given heart rate. It also gives
you feedback if your current limits are higher, normal or lower than your normal level, when compared to
your earlier measurements. You may get feedback on your daily physiological status by paying attention to
how fast and how easily you can do training at the recommended heart rates.
Action Heart rate in beats per
Duration How to achieve
minute
Keep your heart rate
between 70 and 100
beats per minute.
70 - 100 bpm 2minutes Standing or training
with very light training
intensity, for example,
walking slowly.
Increase heart rate
gradually from 100 to
130 beats per minute
within two minutes.
Gradually increase your
heart rate above 130
beats per minute.
100 - 130 bpm 2minutes Walking briskly or
cycling/ jogging at low
intensity during warm
up.
130 bpm < At least 30 seconds Gradually increase your
heart rate and continue
as planned. The
ZoneOptimizer
determination will
finalize in one minutes
time.
Measurement phases
Target z one l i m i t de t e r m i n a tion i s do n e in t h ree p h a s e s .
1. Preparing for training session and plenty of heart rate variability exists. As there is a lot of heart rate
variability, this is a very good and sensitive phase to detect daily changes. In absolute figures this means
heart rates from 70 to 100 beats per minute.
2. Warming up, heart rate rises slowly and heart rate variability drops. During this phase heart rate
variability starts dropping, and the body prepares for higher intensities. In absolute figures this means
heart rates from 100 to 130 beats per minute.
3. Heart rate variability levels off. After this phase heart rate variability stays at a very low level or almost
disappears. This usually takes place at around 130 beats per minute and higher. All Zone limits are
updated after heart rate has been continuously, for at least 30 seconds, above the upper limit of Phase2
(130 beats pre minute / 75% of HR
max
).
ZoneOptimizer guidance normally uses absolute figures (70-100-130 beats per minute), but the two
uppermost figures change if personal HR
130 beats per minute, is limited not to exceed 75% of HR
is very low. The second phase upper limit, which is normally
max
.Thisisdoneautomaticallywithoutactions
max
from you.
ZoneOptimizer allows different durations of Phase1 (preparing for training session, heart rate in between
70-100 beats per minute) and Phase2 (warming up, heart rate in between 100-130 beats per minute).
The recommended minimum durations to get the limits successfully determined are 2 minutes at Phase1,
2minutesatPhase2andhalfaminuteormoreinPhase3.
ZoneOptimizer function is developed for the use of healthy people. Some health conditions may cause heart rate
variability-based ZoneOptimizer determination to fail or give lower intensity targets. These conditions include high
blood pressure, cardiac arrhythmia, and certain medications.
44 Polar Smart Coaching
Page 45

ENGLISH
Maximum Heart Rate
Maximum heart rate (HR
physical exertion. It is individual and depends on age, hereditary factors, and fitness level. It may also
vary according to the type of sport performed. HR
Determining Maximum Heart Rate
)isthehighestnumberofheartbeatsperminute(bpm)duringmaximum
max
is used to express training intensity.
max
Your HR
• The most accurate way is to have your HR
can be determined in several ways.
max
clinically measured, usually on a maximal treadmill or by
max
taking a bicycle stress test supervised by a cardiologist or an exercise physiologist.
• You can also determine your HR
• HR
can also be estimated by using the commonly used formula: 220 - age, although research shows
max
by taking a field test together with a training partner.
max
that this method is not very accurate, especially for older persons or those who have been fit for many
years.
If you have done some hard training in recent weeks and know that you can safely reach maximum heart
rate, you can safely take a test to determine your HR
yourself. Having a training buddy with you during
max
the test is recommended. If you are uncertain, consult your physician before undertaking the test.
Here is an example of a simple test.
Step 1: Warm up for 15 minutes on a flat surface, building up to your usual training pace.
Step 2: Choose a hill or stairwell that will take more than 2 minutes to climb. Run up the hill/steps once,
building to as hard a pace as you can hold for 20 minutes. Return to the base of the hill/steps.
Step 3: Run up the hill/steps again, building towards a pace you could just about hold for 3 kilometers.
Note your highest heart rate. Your maximum is approximately 10 beats higher than the noted value.
Step 4: Run back down the hill, allowing your heart rate to drop 30-40 beats per minute.
Step 5: Run up the hill/steps once again at a pace that you can only hold for 1 minute. Try to run halfway
up the hills/steps. Note your highest heart rate. This brings you close to your maximum heart rate. Use this
value as your maximum heart rate to set training zones.
Step 6: Make sure you get a good cool-down, a minimum of 10 minutes.
Running Cadence and Stride Length
Cadence* is the number of times the foot with the stride sensor* hits the ground per minute.
Stride length* is the average length of one step. That is the distance between your right and left foot
contacting the ground.
Running speed = 2 * stride length * cadence
There are two ways to run faster: moving your legs at a higher cadence or taking longer steps.
Elite long distance runners typically run with a high cadence of 85-95. On uphills, typical cadence values
are lower. On downhills they are higher. Runners adjust stride length to gather speed: stride length
increases as speed increases.
Yet o ne of the m ost com mon mista kes novic e runne rs make i s over-str iding. The most efficient stride
length is the natural one – the one that feels most comfortable. You will run faster in races by
strengthening your leg muscles so they take you forward with a longer stride.
You s hould als o work on max imizing cadence ef ficienc y. Ca dence doe s not pro gress e asily, but if properl y
trained, you will be able to sustain it throughout your runs and maximize your performance. To develop
cadence, the nerve-muscle connection needs to be trained - and reasonably frequently. A session of
cadence training a week is a good start. Incorporate some cadence work into the rest of your week. During
long easy runs, you could include some faster cadence every now and then.
Polar Smart Coaching 45
Page 46

ENGLISH
Agoodwayofimprovingstridelengthistoundertakespecificstrengthwork,likerunninghills,runningin
soft sand, or running up steps. A six-week training period including strength work should result in
noticeable improvements in stride length, and if combined with some faster leg speed work (such as short
strides at best 5km pace), noticeable improvements should be seen in overall speed, as well.
*Optional s3+ stride sensor required.
Polar Running Index
Running Index offers an easy way to monitor performance changes. Performance (how fast/easily you run
at a given pace) is directly influenced by aerobic fitness (VO
body is at running), and Running Index is a measurement of this influence. By recording your Running
Index over time, you can monitor progress. Improvement means that running at a given pace requires less
of an effort, or that your pace is faster at a given level of exertion. The Running Index feature calculates
such improvements. Running Index also gives you daily information on your running performance level
which may vary from day to day.
Benefits of Running Index:
• emphasizes the positive effects of good training sessions and resting days.
• monitors fitness and performance development at different heart rate levels - not only during maximal
performance.
• you can determine your optimal running speed by comparing running indexes from different kinds of
training sessions.
• stresses progress through better running technique and fitness level.
)andtrainingeconomy(howefficientyour
2max
Running Index is calculated during every training session when heart rate and the GPS function is on /
s3+ stride sensor is in use, and when the following requirements apply:
• speed should be 6 km/h / 3,75 mi/h or faster and duration 12 minutes minimum.
• heart rate should be at least 40% of your HRR (heart rate reserve). Heart rate reserve is the difference
between maximum heart rate (HR
), and resting heart rate (HR
max
rest
)
Example:
A person with HR
190 bpm and HR
max
rest
60 bpm
40% (190-60) + 60 = 112 bpm (heart rate should be at least 112 bpm)
For a precise exercise heart rate, you need your exact HR
max
and HR
.WhenusingestimatedHRmax,exercise
rest
heart rate values are always estimates.
Make sure that the stride sensor is calibrated. Calculation begins when you start recording the session.
During the session, you may stop once at traffic lights, for example, without interrupting the calculation.
In the end, your training computer displays a Running Index value and stores the result in the Training
files section. Compare your result to the table below. Using the software, you can monitor and analyze
your progress in Running Index values against time and different running speeds. Or compare values from
different training sessions and analyze them in short and long term.
Short-term analysis
Men
Age / Years Very low Low Fair Moderate Good Very good Elite
20-24 <32 32-37 38-43 44-50 51-56 57-62 >62
25-29 <31 31-35 36-42 43-48 49-53 54-59 >59
30-34 <29 29-34 35-40 41-45 46-51 52-56 >56
35-39 <28 28-32 33-38 39-43 44-48 49-54 >54
46 Polar Smart Coaching
Page 47

Age / Years Very low Low Fair Moderate Good Very good Elite
40-44 <26 26-31 32-35 36-41 42-46 47-51 >51
45-49 <25 25-29 30-34 35-39 40-43 44-48 >48
50-54 <24 24-27 28-32 33-36 37-41 42-46 >46
55-59 <22 22-26 27-30 31-34 35-39 40-43 >43
60-65 <21 21-24 25-28 29-32 33-36 37-40 >40
Women
Age / Years Very low Low Fair Moderate Good Very good Elite
20-24 <27 27-31 32-36 37-41 42-46 47-51 >51
25-29 <26 26-30 31-35 36-40 41-44 45-49 >49
30-34 <25 25-29 30-33 34-37 38-42 43-46 >46
35-39 <24 24-27 28-31 32-35 36-40 41-44 >44
40-44 <22 22-25 26-29 30-33 34-37 38-41 >41
ENGLISH
45-49 <21 21-23 24-27 28-31 32-35 36-38 >38
50-54 <19 19-22 23-25 26-29 30-32 33-36 >36
55-59 <18 18-20 21-23 24-27 28-30 31-33 >33
60-65 <16 16-18 19-21 22-24 25-27 28-30 >30
The classification is based on a literature review of 62 studies where VO
healthy adult subjects in the USA, Canada and 7 European countries. Reference: Shvartz E, Reibold RC.
Aerobic fitness norms for males and females aged 6 to 75 years: a review. Avia t Space E nviron Me d ;
61:3-11, 1990.
There may be some daily variation in the Running Indexes due to running circumstance changes, for
example different surface, hills, wind or temperature.
Long-term analysis
The single Running Index values form a trend that predicts your success in running certain distances.
The following chart estimates the duration that a runner can achieve in certain distances when performing
maximally. Use your long-term Running Index average in the interpretation of the chart. The prediction is
best for those Running Index values that have been received at speed and running circumstances similar
to the target performance.
Running Index Cooper test (m) 5km(h:mm:ss) 10 km (h:mm:ss) 21.098 km
was measured directly in
2max
(h:mm:ss)
42.195 km
(h:mm:ss)
36 1800 0:36:20 1:15:10 2:48:00 5:43:00
38 1900 0:34:20 1:10:50 2:38:00 5:24:00
40 2000 0:32:20 1:07:00 2:29:30 5:06:00
42 2100 0:30:40 1:03:30 2:21:30 4:51:00
44 2200 0:29:10 1:00:20 2:14:30 4:37:00
Polar Smart Coaching 47
Page 48

ENGLISH
Running Index Cooper test (m) 5km(h:mm:ss) 10 km (h:mm:ss) 21.098 km
(h:mm:ss)
42.195 km
(h:mm:ss)
46 2300 0:27:50 0:57:30 2:08:00 4:24:00
48 2400 0:26:30 0:55:00 2:02:00 4:12:00
50 2500 0:25:20 0:52:40 1:57:00 4:02:00
52 2600 0:24:20 0:50:30 1:52:00 3:52:00
54 2700 0:23:20 0:48:30 1:47:30 3:43:00
56 2800 0:22:30 0:46:40 1:43:30 3:35:00
58 2900 0:21:40 0:45:00 1:39:30 3:27:00
60 3000 0:20:50 0:43:20 1:36:00 3:20:00
62 3100 0:20:10 0:41:50 1:32:30 3:13:00
64 3200 0:19:30 0:40:30 1:29:30 3:07:00
66 3300 0:18:50 0:39:10 1:26:30 3:01:00
68 3350 0:18:20 0:38:00 1:24:00 2:55:00
70 3450 0:17:50 0:36:50 1:21:30 2:50:00
72 3550 0:17:10 0:35:50 1:19:00 2:45:00
74 3650 0:16:40 0:34:50 1:17:00 2:40:00
76 3750 0:16:20 0:33:50 1:14:30 2:36:00
78 3850 0:15:50 0:33:00 1:12:30 2:32:00
Polar Training Load Feature
The training load feature in the calendar view in polarpersonaltrainer.com will conveniently tell you how
hard your training session was, and how much time is needed for complete recovery.This feature tells you
if you have recovered enough for your next session, helping you find the balance between rest and
training. In polarpersonaltrainer.com you can control your total workload, optimize your training, and
monitor your performance development.
Trainin g load t a kes i n t o co n s i d e r a t ion d i f f e r e nt f a c t o r s wh i c h af f e c t yo u r trai n i n g loa d and r e covery t i m e ,
such as heart rate during training, duration of training, and your individual factors, e.g. sex, age, height,
and weight. Continuous monitoring of training load and recovery will help you recognize personal limits,
avoid over or under training, and adjust training intensity and duration according to your daily and weekly
targets.
Trainin g Load f e ature h e l p s y o u to c o ntrol t o t a l w o r k l o a d , op t i m i z e y o u r trai n i n g , an d monito r your
performance development. The feature makes different kinds of training sessions comparable with each
other, and helps you to find the perfect balance between rest and training.
For more information on Training load, see polarpersonaltrainer.com Help.
Polar Endurance Training Program for Running and Cycling
Polar has created tailored Endurance training programs for running and cycling, which are available for
you in polarpersonaltrainer.com. You get a personalized training program to best suit your current fitness
level.
48 Polar Smart Coaching
Page 49

ENGLISH
Endurance training programs are ideal for you, if running or cycling is incorporated in your main fitness
routine. Endurance programs improve cardiovascular fitness and are not targeted to any sport event.
Endurance training programs are continual i.e. the program will continue as long as you want to stop it.
The program guides you to train in the correct way by defining the training volume, training intensity and
training placement on weekdays, for the optimal fitness improvement.
The training program works together with the ZoneOptimizer feature, which means that the training
program sessions are modified according to your personal sport zones determined by the ZoneOptimizer.
For more information, see Polar ZoneOptimizer (page 43).
Suitable Program Starting Level for Everybody
Program level must be known before a suitable training module can be selected. The determination of the
program level can be done:
• automatically using your previous training history in polarpersonaltrainer.com
• or using a short questionnaire which you will have to fill in.
General programs are compiled of 4 week long training modules. Training module in level 1 is the least
demanding and the module in level 20 is the most demanding. Steps between 1-20 are linear, which
means that you can improve your fitness step by step (for example from level 7 to level 8 et cetera).
Trainin g module s and y o u r t r a i n i n g ac t i v i t y a r e link e d toget h e r so t h at t r a i n i n g m o d u l e s ge t more
challenging as your training activity increases, and also less challenging if your training activity decreases.
Beginner stage consists of levels 1-5. At this stage the 4 weeks training module contains mainly medium
and long training sessions; interval training sessions are given from level 5 onwards.
Moderate stage consists of levels 6-10. At this stage the 4 weeks training module contains mainly
medium, long and interval training sessions; tempo training sessions are given from level 11 onwards.
Advanced stage consists of levels 11-20. At this stage the 4 weeks training module contains mainly
medium, long, interval and tempo training sessions; easy training sessions are given from level 12
onwards.
For more information on Polar Endurance training programs see polarpersonaltrainer.com Help.
Polar Smart Coaching 49
Page 50

ENGLISH
12. IMPORTANT INFORMATION
Caring for Your Product
Like any electronic device, the Polar training computer should be treated with care. The suggestions below
will help you fulfil guarantee obligations and enjoy this product for many years to come.
Tra i ning co mpu t er
Keep your training computer clean. Use a damp paper towel to wipe dirt from the training computer. To
maintain the water resistance, do not wash the training computer with a pressure washer. Do not immerse
the training computer in water.Neverusealcoholoranyabrasivematerialsuchassteelwoolorcleaning
chemicals.
After each time of using the USB port of the training computer, check visually that there is no hair, dust
or other dirt on the sealing surface area of the lid/back case. Gently wipe to remove any dirt. Do not use
any sharp tools or equipment for cleaning, which could cause scratches to the plastic parts.
Not suitable for bathing or swimming. Protected against wash splashes and raindrops. Do not immerse the
training computer in water. Using the training computer in excessive rainfall may cause interference on GPS
reception.
Operating temperatures are -10 °C to +50 °C / +14 °F to +122 °F.
If you use the RC3 GPS unit in extreme conditions (high humidity and big temperature changes), some
water might condensate inside the unit. This does not damage the unit and water will evaporate after a
while. If you want to speed up the evaporation, open the USB lid to ventilate the unit. Please remember to
close the USB lid properly afterwards to secure waterproofness.
Heart rate sensor
Connector: Detach the connector from the strap after every use and dry the connector with a soft towel.
Clean the connector with a mild soap and water solution when needed. Never use alcohol or any abrasive
material (eg. steel wool or cleaning chemicals).
Strap: Rinse the strap under running water after every use and hang to dry. Clean the strap gently with a
mild soap and water solution when needed. Do not use moisturizing soaps, because they can leave residue
on the strap. Do not soak, iron, dry clean or bleach the strap. Do not stretch the strap or bend the
electrode areas sharply.
Check the washing instructions on the label of the strap.
CS speed sensor, CS cadence sensor and s3+ stride sensor
Clean the sensors with a mild soap and water solution and rinse them with clean water. To maintain the
water resistance, do not wash the sensors with a pressure washer. Do not immerse the CS speed sensor,
CS cadence sensor or s3+ stride sensor in water.Neverusealcoholoranyabrasivematerialsuchassteel
wool or cleaning chemicals.
Avoid har d hits to the sensor s, as the se may da mage th e sensor units.
Storing
50 Important Information
Page 51

ENGLISH
Keep your training computer and sensors in a cool and dry place. Do not keep them in a damp
environment, in non-breathable material (a plastic bag or a sports bag) nor with conductive material (a wet
towel). Do not expose the training computer to direct sunlight for extended periods, such as by leaving it
in a car or mounted on the bike mount.
It is recommended to store the training computer partially or fully charged. The battery slowly loses its
charge when it is stored. If you are going to store the training computer for several months, it is
recommended to recharge it after a few months. This will prolong the battery lifetime.
Dry and store the strap and the connector separately to maximize the heart rate sensor battery lifetime.
Keep the heart rate sensor in a cool and dry place. To prevent snap oxidation, do not store the heart rate
sensor wet in non-breathing material, such as a sports bag. Do not expose the heart rate sensor to direct
sunlight for extended periods.
Service
During the two-year guarantee/warranty period we recommend that you have service done by an authorized
Polar Service Center only. The warranty does not cover damage or consequential damage caused by service
not authorized by Polar Electro. For further information, see Limited International Polar Guarantee
(page ? ).
For contact information and all Polar Service Center addresses, visit www.polar.com/support
[http://www.polar.com/support] and country-specific websites.
Register your Polar product at http://register.polar.fi/ to ensure we can keep improving our products and
services to better meet your needs.
The username for your Polar Account is always your email address. The same username and password are valid for
Polar product registration, polarpersonaltrainer.com, Polar discussion forum and newsletter registration.
Batteries
The Polar RC3 GPS training computer has an internal, rechargable battery. Rechargeable batteries have a
limited number of charge cycles. You can charge and discharge the battery over 300 times before a
notable decrease in its capacity. The number of charge cycles also varies according to use and operating
conditions.
At the end of the working life of the product Polar encourages you to minimize possible effects of waste on
the environment and human health by following local waste disposal regulations and, where possible,
utilizing separate collection of electronic devices. Do not dispose of this product as unsorted municipal
waste.
The Polar H2/H3 heart rate sensor has a user changeable battery. To change the battery yourself, please
follow the instructions carefully as instructed in chapter Change the Heart Rate Sensor Battery.
The batteries for the CS speed sensor W.I.N.D. and CS cadence sensor W.I.N.D. cannot be replaced. Polar
has designed the sensors to be sealed in order to maximise mechanical longevity and reliability. The
sensors have long-life batteries inside. To purchase a new sensor contact your authorized Polar Service
Center or retailer.
For battery information of the Polar s3+ stride sensor,consulttheusermanualfortheproductinquestion.
Keep the batteries away from children. If swallowed, contact a doctor immediately. Batteries should be disposed of
properly according to local regulations.
Change the Heart Rate Sensor Battery
To c h a n g e t h e batt e r y of t he h e a r t ra t e sens o r yours e l f , ca r e f u l l y fo l l o w th e instr u c t i o n s be l o w :
When changing the battery, make sure the sealing ring is not damaged, in which case you should replace
it with a new one. You can purchase the sealing ring/battery kits at well-equipped Polar retailers and
authorized Polar Services. In the USA and Canada, the additional sealing rings are available at authorized
Important Information 51
Page 52

ENGLISH
Polar Service Centers. In the USA the sealing ring/battery kits are also available at www.shoppolar.com.
When handling a new, fully charged battery, avoid clasp-like contact, i.e. simultaneously from both sides,
with metal or electrically conducting tools, like tweezers. This may short circuit the battery, causing it to
discharge more rapidly. Typically, short circuiting does not damage the battery, but it may decrease the
capacity and the lifetime of the battery.
Changing Heart Rate Sensor Battery
1. Lever the battery cover open by using the clip on
the strap.
2. Insert the battery inside the cover with the
negative (-) side outwards. Make sure the sealing
ring is in the groove to ensure water resistance.
3. Align the ledge on the battery cover with the slot
on the connector and press the battery cover
back into place. You should hear a snap.
Danger of explosion if the battery is replaced with wrong type.
Precautions
The Polar RC3 GPS training computer shows your performance indicators. The training computer is
designed to indicate the level of physiological strain and recovery during and after an exercise session. It
measures heart rate, speed and distance. It also measures running cadence when used with s3+ stride
sensor and cycling cadence when used with a CS cadence sensor W.I.N.D.. No other use is intended or
implied.
The training computer should not be used for obtaining environmental measurements that require
professional or industrial precision.
Interference During Training
Electromagnetic Interference and Training Equipment
Disturbance may occur near electrical devices. Also WLAN base stations may cause interference when
training with the training computer. To avoid erratic reading or misbehavior, move away from possible
sources of disturbance.
Trainin g equipm e n t with electro n i c or e lectrical c omponents s uch a s LED display s , motor s and e l ectrical
brakes may cause interfering stray signals. To solve these problems, try the following:
1. Remove the heart rate sensor strap from your chest and use the training equipment as you would
normally.
2. Move the training computer around until you find an area in which it displays no stray reading or does not
flash the heart symbol. Interference is often worst directly in front of the display panel of the equipment,
while the left or right side of the display is relatively free of disturbance.
3. Put the heart rate sensor strap back on your chest and keep the training computer in this
interference-free area as much as possible.
If the training computer still does not work with the training equipment, it may be electrically too noisy for
wireless heart rate measurement. For further information, see www.polar.com/support
[http://www.polar.com/support].
Parts of RC3 GPS are magnetic. It may attract metallic materials and it's magnetic field may interfere with
acompass.Toavoidinterference,itisrecommendedtowearyourcompassononearm(atthelevelof
your chest) and your RC3 GPS on the other arm's wrist. Do not place credit cards or other magnetic
52 Important Information
Page 53

ENGLISH
storage media near RC3 GPS, because information stored on them may be erased.
Minimizing Risks When Training
Trainin g may i n c lude s o m e ri s k . Be f o r e be g i n n i n g a regular t r aining p r o g ram, i t is recomm e n d e d th a t you
answer the following questions concerning your health status. If you answer yes to any of these questions,
we recommend that you consult a doctor before starting any training program.
• Have you been physically inactive for the past 5 years?
• Do you have high blood pressure or high blood cholesterol?
• Are you taking any blood pressure or heart medication?
• Do you have a history of breathing problems?
• Do you have symptoms of any disease?
• Are you recovering from a serious illness or medical treatment?
• Do you use a pacemaker or other implanted electronic device?
• Do you smoke?
• Are you pregnant?
Note that in addition to training intensity, medications for heart conditions, blood pressure, psychological
conditions, asthma, breathing, etc., as well as some energy drinks, alcohol, and nicotine may also affect
heart rate.
It is important to be sensitive to your body’s responses during training. If you feel unexpected pain or
excessive fatigue when training, it is recommended that you stop the training or continue at a lighter
intensity.
Note! If you are using a pacemaker, you can use Polar training computers. In theory interference to
pacemaker caused by Polar products should not be possible. In practice no reports exist to suggest anyone
ever having experienced interference. We cannot however issue an official guarantee on our products'
suitability with all pacemakers or other implanted devices due to the variety of devices available. If you
have any doubts, or if you experience any unusual sensations while using Polar products, please consult
your physician or contact the implanted electronic device manufacturer to determine safety in your case.
If you are allergic to any substance that comes into contact with your skin or if you suspect an allergic
reaction due to using the product, check the listed materials in Technical Specifications (page 53). To
avoid any skin reaction to the heart rate sensor, wear it over a shirt, but moisten the shirt well under the
electrodes to ensure flawless operation.
Your safety is imp ortant to us. Th e shape o f the s3+ s tride s ensor is designe d to mini mize the possibili ty
of it getting caught in something. In any case, be careful when running with the stride sensor in
brushwood, for example.
The combined impact of moisture and intense abrasion may cause a black color to come off the heart rate sensor’s
surface, possibly staining light-colored clothes. If you use perfume or insect repellent on your skin, you must
ensure that it does not come into contact with the training computer or the heart rate sensor.
WARNING: This product and its packaging contain chemicals known to the State of California to cause
cancer, birth defects or reproductive harm. This notice is provided in accordance with California’s
Proposition 65. More information: http://www.polar.com/regulatory_information
Technical Specifications
Training computer
Battery type:
250 mAH Li-Pol rechargeable battery
The battery is not replaceable
Operating time: up to 12 hours in continuous use with the GPS function on
Operating temperature: -10 °C to +50 °C / 14 °F to 122 °F
Important Information 53
Page 54

ENGLISH
Training comp uter materials: PMMA le ns wi th ha rd coating in top sur face, training com puter body
(ABS+GF)+TPU / (PC+ABS)+GF / (TPU+PC) +TPU / ABS+PC / Aluminium
/Stainlesssteel
Wrist strap and buckle materials: Polyurethane (TPU) and stainless steel
Watch accuracy: Better than ± 0.5 seconds / day at 25 °C / 77 °F temperature
GPS accuracy: distance +/-2%, speed +/-2km/h
Sample rate: 1 sample/sec
Accuracy of heart rate monitor: ± 1% or 1 bpm, whichever larger. Definition applies to stable conditions.
Heart rate measuring range: 15-240 bpm
Current speed display range: 0-36 km/h or 0-22.5 mph (when measuring speed with s3+ stride
sensor)
0-127 km/h or 0-79 mph (when measuring speed with CS speed sensor)
0-303 km/h or 0-188.5 mph (when measuring speed with GPS)
Water resistance: Water proof IPX7
Not suitable for bathing or swimming. Protected against wash splashes
and raindrops. Do not immerse the training computer in water. Using the
training computer in excessive rainfall may cause interference on GPS
reception.
Training computer limit values
Maximum number of files:
99
Maximum time recorded to one file: 99 h 59 min 59 s
Maximum time recorded to files with different sensor combinations:
Heart rate 253 h
Heart rate + stride sensor 52 h
Heart rate + GPS 31 h
Heart rate + CS speed sensor 63 h
Heart rate + CS cadence sensor 139 h
Heart rate + stride sensor + GPS 28 h
Heart rate + GPS+ CS speed sensor 31 h
Heart rate + GPS + CS cadence sensor 28 h
Heart rate + CS speed sensor + CS cadence
52 h
sensor
Heart rate + GPS + CS speed sensor + CS
28 h
cadence sensor
Stride sensor 63 h
Stride sensor + GPS 31 h
GPS 35 h
GPS + CS speed sensor 35 h
GPS + CS cadence sensor 31 h
GPS+ CS speed sensor + CS cadence sensor 31 h
CS speed sensor 79 h
CS cadence sensor 253 h
CS speed sensor + CS cadence sensor 63 h
The training computer stores the data in one second intervals.
Maximum number of laps recorded in one training session: 99
Maximum number of automatic laps recorded in one training session: 99
Total di stanc e: 99999.99 km / 999 99.99 mi
Total du ratio n: 9999 h 59 min 59 s
Total ca lorie s: 999 999 kcal
Total tr ainin g fil es co unt: 65535
Heart rate sensor
Battery life:
1600 h
Battery type: CR2025
Battery sealing ring: O-ring 20.0 x 0.90 Material Silicone
Operating temperature: -10 °C to +50 °C / 14 °F to 122 °F
Connector material: ABS
Strap material: 38% Polyamide, 29% Polyurethane, 20% Elastane, 13% Polyester
54 Important Information
Page 55

ENGLISH
Water resistance: 30 m (Suitable for bathing and swimming).
The Polar H3 heart rate sensor does not measure heart rate in water.
The Polar RC3 GPS training computer applies the following patented technologies, among others:
• OwnIndex®technology for fitness test.
• OwnCal®personal calorie calculation.
Polar WebSync Software and USB Cable
System Requirements:
Operating system: Microsoft Windows XP/Vista/7 or Mac OS X 10.5 (Intel) or
newer
Internet connection
Free USB port for the USB cable
Water resistance
Water resistance of Polar products is tested according to International IEC 60529 IPX7 (1m, 30min,
20ºC). Products are divided into four different categories according to water resistance. Check the back of
your Polar product for the water resistance category and compare it to the chart below. Please note that
these definitions do not necessarily apply to products of other manufacturers.
Marking on case back Water resistant characteristics
Water resistant IPX7 Not suitable for bathing or swimming. Protected
against wash splashes and raindrops. Do not wash
with a pressure washer.
Water resistant Not suitable for swimming. Protected against wash
splashes, sweat, raindrops etc. Do not wash with a
pressure washer.
Water resistant 30 m/50 m Suitable for bathing and swimming
Water resistant 100 m Suitable for swimming and snorkeling (without air
tanks)
Frequently Asked Questions
Question/Problem Answer/Solution
How can I best catch satellite signals? Wear the training computer with its face upwards
on your wrist. Keep your wrist stationary and raised
above the level of your chest during the search.
Stand still and hold the position until the training
computer has found the satellite signals. See
Starting a Training Session (page 13)formore
information.
How do I ensure a good GPS signal reception in
RC3 GPS?
The best GPS signal reception can be reached
when training in an open area where there are no
obstructions for the satellite signals. Due to the
nature of the GPS signal, for example hills, tall
buildings, and trees may block the satellite signal.
Rain, fog, and snow may also affect the signal
quality. Wear the training computer with its face
upwards on your wrist.
Important Information 55
Page 56

ENGLISH
The training computer does not find or it takes
long time to find the satellite signals
Something in your surroundings may be blocking
GPS satellite signal reception (e.g. underpasses,
tall buildings, terrain or forested areas). Go
outdoors and away from tall buildings and trees. In
good conditions, acquiring satellite signals for the
first time typically takes 30-60 seconds. Note that
the GPS reception does not work indoors.
The speed or distance readings are incorrect or
irregular
Something in your surroundings may be blocking
GPS satellite signal reception (e.g. underpasses,
tall buildings, terrain or forested areas). If the
training computer cannot locate the satellite
signals, it will not be able to calculate its location.
Distance is measured between the last location
before the shadow area and the first location after
the shadow area in a straight line.
What is the measurement accuracy of Polar RC3
GPS?
Polar RC3 GPS training computer measurement
accuracy is +/- 2% for distance and +/- 2km/h for
speed. When moving at low speeds (below 3km/h)
accuracy of this level can sometimes cause
relatively big errors. However, with higher speeds
the measurement is more accurate.
In order to improve the accuracy of the position
calculation, Polar RC3 GPS utilizes the Wide Area
Augmentation System (WAAS). WAAS is an
extremely accurate navigation system in North
America. It is widely used e.g. in aviation to
enable precision approaches for airplanes. WAAS
Wide-area Reference Stations, which are located
on the earth, monitor and collect information on
the GPS signals and send correction messages to
the two Wide-area Master Stations. These two
master stations then send the message forward to
geostationary satellites, which in turn send the
correction signals to WAAS-enabled GPS receivers,
like Polar RC3 GPS.
Low battery is displayed This notification is displayed when the training
computer has enough charge for one hour of
training with the GPS function on. It is
recommended to charge the training computer
before starting a new training session. For more
information, see Training Computer Battery
(page 9).
Low battery, GPS switched off is displayed The training computer charge is too low for
continuing the recording of the training session
with the GPS function on. The training computer
sounds and backlight are automatically
deactivated and the training computer switches
the GPS function off. You can still use Available
Accessories (page 6)andcarryoutthetraining
session. A new training recording cannot be
started before charging the training computer. For
more information, see Training Computer Battery
(page 9).
56 Important Information
Page 57

ENGLISH
Recording stopped, Battery Empty is displayed The charge is critically low. The training computer
stops recording the training session and saves the
training data and then goes to sleep mode. Charge
the training computer. For more information, see
Trainin g Comput e r Batte r y (page 9).
The training computer display is blank The training computer battery is empty and it has
gone to sleep mode. Charge the training computer.
If the battery is totally drained, it may take a while
for the charging animation to appear on the
display. For more information on charging the
battery, see Training Computer Battery (page 9).
Check heart rate sensor! is displayed
• Make sure the heart rate sensor strap has not
loosened during exercise.
• Make sure the electrodes of the heart rate sensor
are wet.
• Make sure the electrodes of the heart rate sensor
are clean and undamaged.
If you have done all of the above-mentioned
actions, and the message still appears and heart
rate measurement does not work, the battery of
your heart rate sensor may be empty. For further
information, see Batteries (page 51).
Check speed sensor! is displayed Make sure the position and distance of the sensor
to the magnet are appropriate. If the message still
appears you may have exceeded 3000 riding hours
and the battery is empty.
Check cadence sensor! is displayed Make sure the position and distance of the
cadence sensor to the crank magnet are
appropriate. If the message still appears, you may
have exceeded 3000 riding hours and the battery
is empty.
Check stride sensor! is displayed Make sure the sensor is correctly positioned on
your foot. If the message still appears, the battery
may be empty. See the user manual for Polar s3+
stride sensor for instructions on changing the
battery.
The heart rate reading becomes erratic, extremely
high or shows nil (00)
• Make sure the heart rate sensor strap has not
loosened during exercise.
• Make sure the textile electrodes in the sports
apparel fit snugly.
• Make sure the electrodes of the heart rate sensor
strap are moistened.
• Make sure the heart rate sensor is clean. Strong
electromagnetic signals can cause erratic
readings. For further information, see
Precautions (page 52).
• If the erratic heart rate reading continues despite
moving away from the source of disturbance,
slow down your speed and check your pulse
manually. If you feel it corresponds to the high
reading on the display, you may be experiencing
cardiac arrhythmia. Most cases of arrhythmia are
not serious, but consult your doctor nevertheless.
• A cardiac event may have altered your ECG
waveform. In this case, consult your doctor.
Important Information 57
Page 58

Page 59

ENGLISH
by following local waste disposal regulations and, where possible, utilize separate collection of electronic
devices for products, and battery and accumulator collection for batteries and accumulators.
This marking shows that the product is protected against electric shocks.
Polar Electro Oy is a ISO 9001:2008 certified company.
©2013PolarElectroOy,FI-90440KEMPELE,Finland.Allrightsreserved.Nopartofthismanualmay
be used or reproduced in any form or by any means without prior written permission of Polar Electro Oy.
The names and logos in this user manual or in the package of this product are trademarks of Polar Electro
Oy. The names and logos marked with a®symbol in this user manual or in the package of this product are
registered trademarks of Polar Electro Oy. Windows is a registered trademark of Microsoft Corporation and
Mac OS is a registered trademark of Apple Inc.
Disclaimer
• The material in this manual is for informational purposes only. The products it describes are subject to
change without prior notice, due to the manufacturer’s continuous development program.
• Polar Electro Inc./Polar Electro Oy makes no representations or warranties with respect to this manual or
with respect to the products described herein.
• Polar Electro Inc./Polar Electro Oy shall not be liable for any damages, losses, costs or expenses, direct,
indirect or incidental, consequential or special, arising out of, or related to the use of this material or the
products described herein.
This product is covered by the following patent documents: FI 111514B, DE19781642T1, GB2326240,
HK1016857, US6277080, US20070082789, EP1795128, US20090278734, EP2116862, FI114202,
US6537227, EP1147790, HK1040065, FI115289, EP1127544, US6540686, HK1041188, FI
110303, US6104947, EP0748185, JP3831410, FI20105796, US20120010478, EP2407217,
EP08879081.1, US13/139541, WO2010072883, US6584344, US2011021419, EP2280770. Other
patents pending.
Manufactured by:
Polar Electro Oy
Professorintie 5
FI-90440 KEMPELE
Tel + 3 5 8 8 5202 1 0 0
Fax +358 8 5202 300
www.polar.com [http://www.polar.com]
07/2013
Important Information 59
Page 60

ENGLISH
INDEX
Basic settings . . . . . . . . . . . . . . . . .. . . . . . . . . . .. . . . . .. . . . . . . . . . .. . . . . 12
Batteries . . . . .. . . . . .. . . . . . . . . . .. . . . . . . . . . . . . . . . .. . . . . . . . . . .. . . . . 51
Battery operating time . . . . . .. . . . . . . . . . .. . . . . .. . . . . . . . . . .. . . . . . . . 9
Battery status . .. . . . . . . . . . .. . . . . .. . . . . . . . . . .. . . . . . . . . . . . . . . . .. . . 10
Bike settings . . . . . .. . . . . . . . . . .. . . . . .. . . . . . . . . . .. . . . . . . . . . . . . . . . . 30
Button functions . .. . . . . . . . . . .. . . . . .. . . . . . . . . . .. . . . . .. . . . . . . . 7, 21
Buttons do not react ... . . . . .. . . . . . . . . . . . . . . . .. . . . . . . . . . .. . . . . .. . 58
Cadence sensor pairing . . . . . . . . . . . . .. . . . . . . . . . .. . . . . .. . . . . . . . . . 39
Calibration .... . . . . .. . . . . . . . . . .. . . . . .. . . . . . . . . . .. . . . . . . . . . . . . . . . 39
Calibration by running . . . . . . . . . . .. . . . . .. . . . . . . . . . .. . . . . .. . . . . . . 40
Calibration manually . . . . . . . . . . .. . . . . .. . . . . . . . . . .. . . . . . . . . . .. . . . 40
Care instructions . . . . . . . . . . . . . . . . .. . . . . . . . . . .. . . . . .. . . . . . . . . . .. . 50
Charging .... . . . . .. . . . . . . . . . .. . . . . . . . . . . . . . . . .. . . . . . . . . . .. . . . . .. . 9
Cycling settings . .. . . . . . . . . . .. . . . . . . . . . .. . . . . .. . . . . . . . . . .. . . . . .. 29
Delete files . . . . . .. . . . . . . . . . .. . . . . .. . . . . . . . . . .. . . . . .. . . . . . . . . . .. . 26
Endurance program . . . . . . . . . . . . . . . . .. . . . . . . . . . .. . . . . .. . . . . . . . . . 48
Erratic readings . .. . . . . . . . . . .. . . . . . . . . . .. . . . . .. . . . . . . . . . .. . . . . .. 57
Fitness Level Classes for men . . . .. . . . . .. . . . . . . . . . .. . . . . .. . . . . . . 36
Fitness Level Classes for women .. . . . . . . . . . .. . . . . .. . . . . . . . . . .. . 36
General settings . . . . . . . . .. . . . . . . . . . .. . . . . .. . . . . . . . . . .. . . . . .. . . . . 32
Heart rate sensor . . . . . . . . .. . . . . .. . . . . . . . . . .. . . . . . . . . . .. . . . . . 13, 38
Heart rate settings . .. . . . . . . . . . .. . . . . .. . . . . . . . . . .. . . . . .. . . . . . . . . 31
HR
.. . . . . . . . . . .. . . . . .. . . . . . . . . . .. . . . . . . . . . . . . . . . .. . . . . . . . . . .. . 45
max
Interference . . . . .. . . . . .. . . . . . . . . . .. . . . . . . . . . . . . . . . .. . . . . . . . . . .. . 52
Measure wheel size .. . . . . .. . . . . .. . . . . . . . . . .. . . . . .. . . . . . . . . . .. . . . 30
Menu .... . . . . .. . . . . . . . . . .. . . . . .. . . . . . . . . . .. . . . . .. . . . . . . . . . .. . . . . . 7
Minimizing risks . . .. . . . . .. . . . . . . . . . .. . . . . .. . . . . . . . . . .. . . . . .. . . . . 53
User information settings . .. . . . . . . . . . .. . . . . .. . . . . . . . . . .. . . . . . . . 32
Using a new accessory .. . . . . . . . . . .. . . . . .. . . . . . . . . . .. . . . . .. . . . . . 38
Watch face .. . . . . .. . . . . . . . . . . . . . . . .. . . . . . . . . . .. . . . . .. . . . . . . . . . .. 33
Watch settings .. . . . . .. . . . . . . . . . . . . . . . .. . . . . . . . . . .. . . . . .. . . . . . . . 33
Water resistance . . .. . . . . .. . . . . . . . . . .. . . . . .. . . . . . . . . . .. . . . . .. . . . 55
Week summaries .. . . . . .. . . . . .. . . . . . . . . . .. . . . . . . . . . . . . . . . .. . . . . . 27
Zonelock .. . . . . . . . . . .. . . . . .. . . . . . . . . . .. . . . . . . . . . .. . . . . .. . . . . . . . . . 21
ZoneOptimizer . . . . . . . .. . . . . .. . . . . . . . . . .. . . . . .. . . . . . . . . . . 16, 16, 43
Night mode . . . . . . . . . . . . . . . . .. . . . . . . . . . .. . . . . .. . . . . . . . . . .. . . . . .. . 21
On-the-fly calibration . . . . . . . . . . .. . . . . .. . . . . . . . . . .. . . . . .. . . . . . . . 40
Other sport settings . . . . . .. . . . . . . . . . .. . . . . . . . . . . . . . . . .. . . . . . . . . . 31
OwnIndex . . . . . . . .. . . . . .. . . . . . . . . . .. . . . . .. . . . . . . . . . .. . . . . . . . . . .. . 35
Pause recording . .. . . . . . . . . . .. . . . . . . . . . .. . . . . .. . . . . . . . . . .. . . . . .. 22
Precautions . . . . . . . . .. . . . . . . . . . .. . . . . .. . . . . . . . . . .. . . . . .. . . . . . . . . . 52
Quick menu .. . . . . .. . . . . .. . . . . . . . . . .. . . . . .. . . . . . . . . . .. . . . . . . . . . . . 33
Quick menu in Pre-training mode . . . . . . . .. . . . . . . . . . . . . . . . .. . . . . 33
Quick menu in Time mode .. . . . . .. . . . . .. . . . . . . . . . .. . . . . .. . . . . . . . 33
Quick menu in Training mode .. . . . . .. . . . . .. . . . . . . . . . .. . . . . .. . . . 33
Reset totals . .. . . . . . . . . . . . . . . . .. . . . . . . . . . .. . . . . .. . . . . . . . . . .. . . . . 27
Reset week summaries . . . . . . . . .. . . . . .. . . . . . . . . . .. . . . . .. . . . . . . . . 27
Running Cadence . .. . . . . . . . . . .. . . . . . . . . . . . . . . . .. . . . . . . . . . .. . . . . 45
Running Index . . . . . . . . . . .. . . . . .. . . . . . . . . . .. . . . . . . . . . . . . . . . .. . . . . 46
Running settings . . . . . . . . . . .. . . . . .. . . . . . . . . . .. . . . . .. . . . . . . . . . .. . 29
Service . . . . .. . . . . . . . . . . . . . . . .. . . . . . . . . . .. . . . . .. . . . . . . . . . .. . . . . .. 51
Set heart rate view .. . . . . . . . . . . . . . . . .. . . . . . . . . . .. . . . . .. . . . . . . . . . 31
Set zone lock . . . . . .. . . . . . . . . . .. . . . . .. . . . . . . . . . .. . . . . . . . . . . . . . . . . 31
Set ZoneOptimizer . . . . . . . . . . .. . . . . .. . . . . . . . . . .. . . . . .. . . . . . . . . . .. 31
Speed sensor pairing . . .. . . . . .. . . . . . . . . . .. . . . . .. . . . . . . . . . .. . . . . . 38
Sport profile settings . . . . . . . . .. . . . . . . . . . .. . . . . .. . . . . . . . . . .. . . . . . 29
Sport Zones .. . . . . .. . . . . .. . . . . . . . . . .. . . . . .. . . . . . . . . . .. . . . . . . . . . . . 42
Start training . . .. . . . . .. . . . . . . . . . .. . . . . .. . . . . . . . . . .. . . . . .. . . . . . . . 13
Stop recording . . . . . . . . .. . . . . . . . . . .. . . . . .. . . . . . . . . . .. . . . . .. . . . . . . 22
Stride length . .. . . . . . . . . . .. . . . . .. . . . . . . . . . .. . . . . .. . . . . . . . . . .. . . . 45
Stride sensor pairing . . . . . . . . . . .. . . . . .. . . . . . . . . . .. . . . . .. . . . . . . . . 39
Time 1 . . . .. . . . . . . . . . .. . . . . .. . . . . . . . . . .. . . . . .. . . . . . . . . . .. . . . . . . . . 33
Training load ... . . . . . . . . . . . . . . . .. . . . . . . . . . .. . . . . .. . . . . . . . . . .. . . . 48
Transfer data . . . . . . .. . . . . .. . . . . . . . . . .. . . . . .. . . . . . . . . . .. . . . . . . . . . 28
60 Index
Page 61

POLAR
RC3 GPS
Gebrauchsanleitung
Page 62

DEUTSCH
INHALTSVERZEICHNIS
1. EINFÜHRUNG ..................................................................................... ................................ 4
2. DAS KOMPLETT-TRAININGSSYSTEM .......................................................................................... 5
Bestandteile des Trainingscomputers......................................................................................... 5
Trainingssoftware................................................................................................. ................ 5
Erhältliches Zubehör ............................................................................................. ................ 6
Tastenfunktionen ................................................................................................................. 7
Menüstruktur ...................................................................................................................... 7
3. BATTERIE DES TRAININGSCOMPUTERS ............................................. ......................................... 9
Aufladen des Trainingscomputers ............................................................................................. 9
Batteriebetriebszeit .................................................................................. ............................ 10
Ladezustandsanzeige ............................................................................................................ 10
Meldungen bei schwacher Batterie ....................................................................................... 10
4. EINRICHTEN DES TRAININGSCOMPUTERS ................................................................................ ... 12
Basiseingaben......................................................................................... ............................ 12
Sportprofil-Einstellungen................................................................................ ........................ 12
5. TRAINING ........ .................................................................................................................. 13
So tragen Sie den Herzfrequenz-Sensor
....................................................................................................................................... 13
Starten einer Trainingseinheit.................................................................................. ................ 13
Training mit dem Polar ZoneOptimizer ........................................................................................ 16
Trainingseinheit mit dem Polar ZoneOptimizer starten ........................................... ................... 16
Trainingsansichten
....................................................................................................................................... 18
Tastenfunktionen während des Trainings .................................................................................... 22
Rundenzeit nehmen ..................................... ........................ ............................................. 22
SportZone sperren............................................................................................................. 22
Nacht-Modus ....... ................................................ ................................................ ............ 22
Schnell-Menü anzeigen ...................................................................................................... 22
Unterbrechen oder Beenden des Trainings................................................................................... 22
Zurück z. Start .................................................................................. .................................. 23
6. NACH DEM TRAINING ..................................................... ....................................................... 24
Trainingsnutzen...................................................................................................... ............. 24
Trainingsdateien............................................................................................... ................... 25
Dateien löschen........... ................................................ ........................ ............................. 28
Wochenzusammenfassungen .......................................................................... ......................... 28
Wochenzusammenfassungen zurücksetzen ............................................................................. 29
Gesamtwerte seit dem xx.xx.xxxx .............................................................................................. 29
Gesamtwerte zurücksetzen.......................................................................... ........................ 29
7. POLARPERSONALTRAINER.COM ............................................................................................... 30
Analysieren Sie Ihre Trainingsdaten ... ........................ ........................ ................................... 30
Verwenden der Ausdauertrainingsprogramme von Polar . ................................................ ............ 30
8. EINSTELLUNGEN ......................................................................................... ......................... 31
Sportprofil-Einstellungen................................................................................ ........................ 31
Einstellungen zum Laufen ........................................................... ....................................... 31
Einstellungen zum Rad fahren ...................... ................................................ ....................... 31
Einstellungen für andere Sportarten...................................................................................... 33
Herzfrequenz-Einstellungen..................................................................................................... 34
Einstellungen für die Benutzerdaten .......................................................................... ................ 34
Maximale Herzfrequenz (HFmax).................................................. ........................................ 35
Page 63

DEUTSCH
OwnIndex® ................................................ ................................................ ..................... 35
Allgemeine Einstellungen ................................................................................................. ...... 35
Uhreinstellungen......................................................................................... ......................... 35
Schnell-Menü ........................................................................... .......................................... 35
Uhrzeitanzeige ................................................. ................................................ ................ 35
Vorstartmodus............. ................................................ ........................ ............................. 36
Trainingsmodus......... ........................ ................................................ ........................ ....... 36
9. POLAR FITNESS TEST ......................................................... .................................................. 37
Vor dem Test ................................................. ........................ .......................................... 37
Durchführen des Fitness Tests ..................................................................... ........................ 37
Nach dem Fitness Test ......... ................................................ ........................ ..................... 38
10.NEUES ZUBEHÖR .... ............................................................................................................. 40
Koppeln eines neuen Sensors mit dem Trainingscomputer ............................................................... 40
Koppeln eines neuen Herzfrequenz-Sensors mit dem Trainingscomputer .............................................. 40
Koppeln eines neuen Geschwindigkeitssensors mit dem Trainingscomputer .......................................... 40
Koppeln eines neuen Rad-Trittfrequenzsensors mit dem Trainingscomputer........................................... 41
Koppeln eines neuen Laufsensors mit dem Trainingscomputer........................................................... 41
Polar s3+ Laufsensor kalibrieren................................................................ .............................. 42
Kalibrierung durch Laufen ..................................................................................... ............. 42
Kalibrierungsfaktor manuell einstellen................................................................................. .. 42
Sensor durch Laufen einer bekannten Distanz kalibrieren (direkte on-the-fly Kalibrierung) ...... ......... 43
11.POLAR SMART COACHING .......................... ............................................................................ 44
Polar SportZonen ........................................................................................................ ......... 44
Herzfrequenz-Variabilität........................................................................................................ 45
Polar ZoneOptimizer ................................................................................. ............................ 46
Maximale Herzfrequenz ................................................................................................ ......... 47
Schrittfrequenz und Schrittlänge ................................................................... ........................... 48
Polar Running Index.......................................................................... .................................... 48
Polar Training Load/Trainingsbelastungsfunktion........................................................................... 51
Polar Ausdauer-Trainingsprogramm zum Laufen und Rad fahren......................................................... 51
12.WICHTIGE INFORMATIONEN .... ................................................................................................ 53
Pflege Ihres Produktes ................................................................................. ......................... 53
Service ....... ........................ ................................................ ............................................ 54
Batterien ........................................................................... ................................................ 54
Batterie des Herzfrequenz-Sensors wechseln .......................................................................... 55
Wichtige Hinweise ........................................................................... .................................... 55
Störungen während des Trainings .............................................. ........................ ................... 55
Gehen Sie beim Training auf Nummer sicher .......................................................................... 56
Technische Spezifikationen .................................................................................................... 57
Häufig gestellte Fragen (FAQ) ................ .................................................................................. 59
Weltweite Garantie des Herstellers .................................. ......................................................... 62
Haftungsausschluss ........................................................................................................... ... 64
STICHWORTVERZEICHNIS ............................................................................ ........................... 65
Page 64
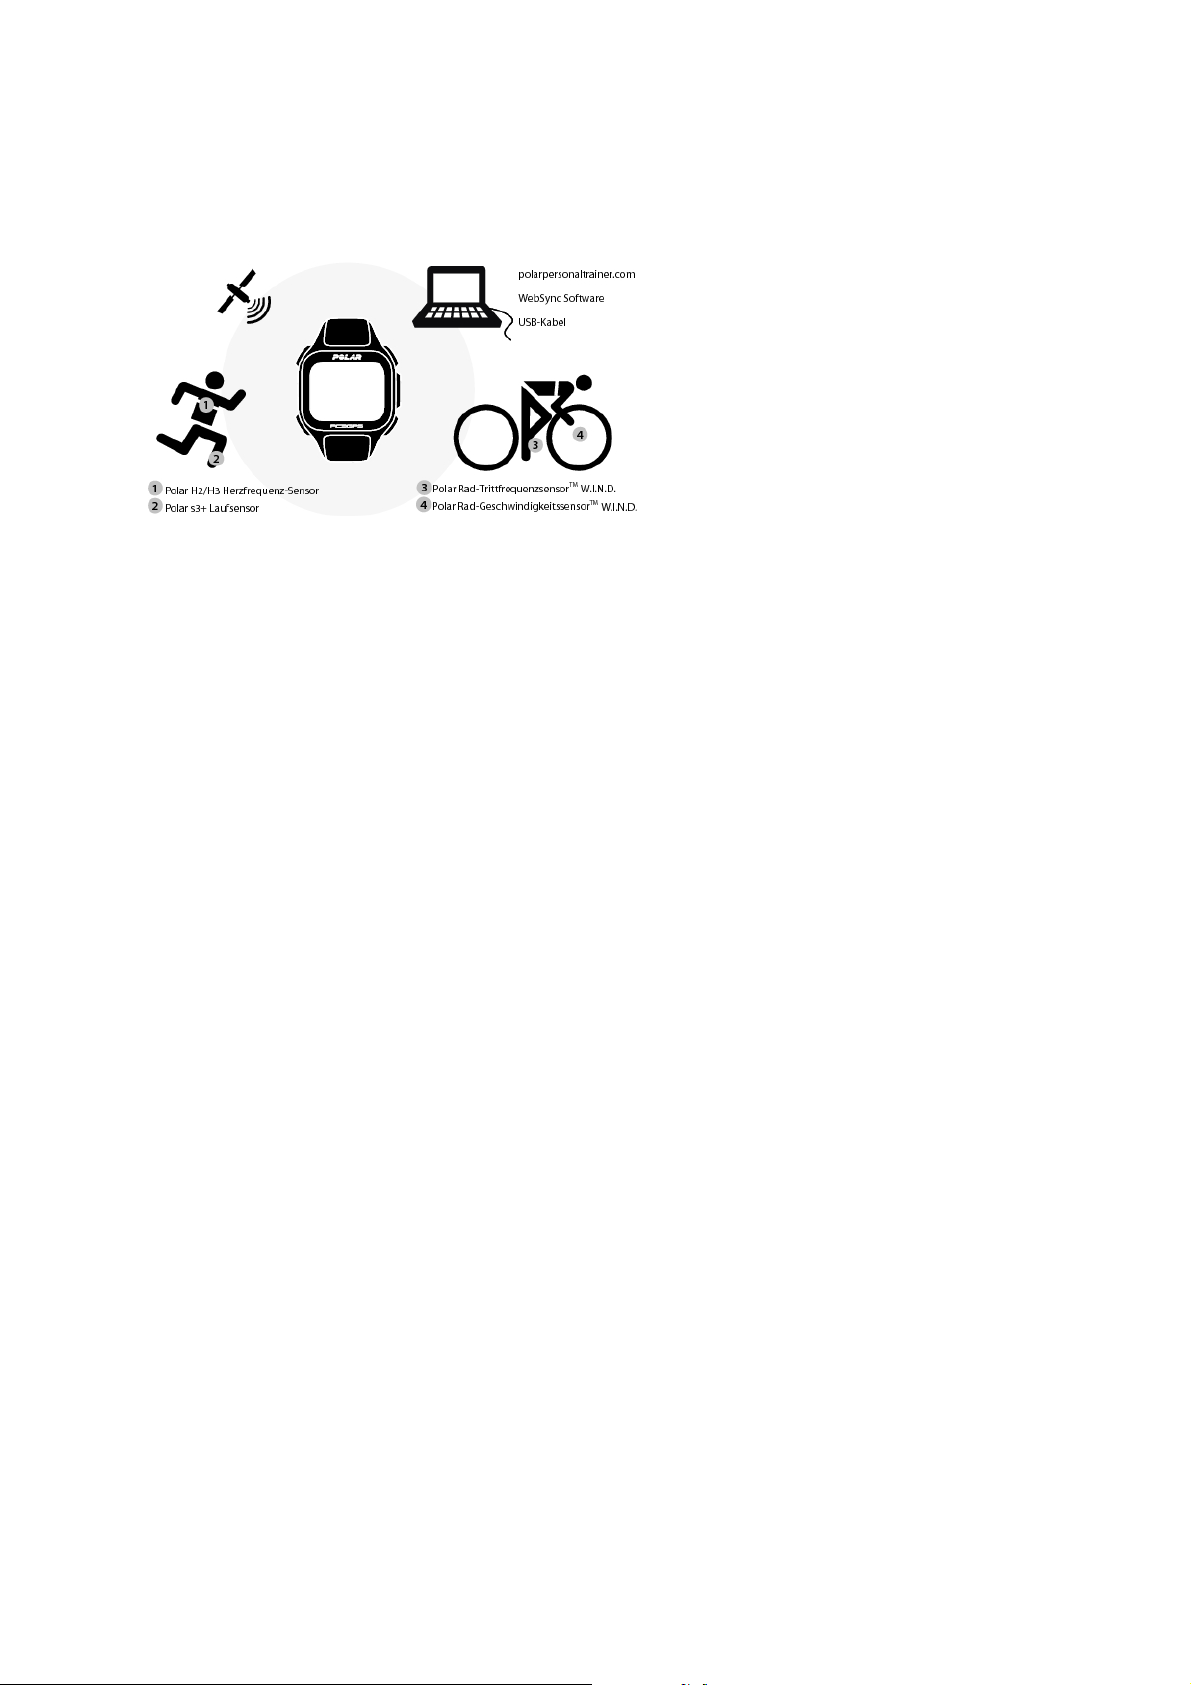
DEUTSCH
1. EINFÜHRUNG
Wir gratulieren Ihnen zum Kauf Ihres neuen Polar RC3 GPS™Trainin g s c o m p u t e rs! D e r Tra i n i n g s c o m puter
bietet Ihnen ein Komplettsystem, das Sie bei Ihrem Training anleitet.
Diese Gebrauchsanleitung bietet umfassende Informationen, um die bestmögliche Nutzung Ihres
Trainin g s c o m p u t e r z u ermög l i c h e n .
Die aktuellste Version dieser Gebrauchsanleitung kann unter www.polar.com/support
[http://www.polar.com/support] heruntergeladen werden. Video-Lernprogramme finden Sie unter
http://www.polar.com/en/polar_community/videos.
Die wichtigsten Funktionen und Vorteile
Schlankes, integriertes GPS:DerRC3GPSbietetIhnenalles,wasSiebenötigen,umIhre
Geschwindigkeit, Distanz und Route aufzuzeichnen. Der schlanke und leichte Trainingscomputer verfügt
über ein integriertes GPS und eine aufladbare Batterie.
Zurück z. Start:DieseFunktionführtSiezurückzuIhremStartpunkt.
Tra i ning snut zen :DieseFunktionhilftIhnen,dieEffektivitätIhresTrainingsbesserzubeurteilen,indem
sie Ihnen in Echtzeit Feedback in Textform zu Ihrer Leistung gibt.
Online-Trainingstagebuch:TauschenSieIhreRoutenundDistanzenaufpolarpersonaltrainer.commit
anderen aus.
Running Index:MitdieserFunktionüberwachenSiedieEffizienzIhresLaufs.DerRunningIndexwird
nach jedem Lauf automatisch basierend auf den gemessenen Herzfrequenz- und Geschwindigkeitsdaten
berechnet.
Sportprofil:StartenSieIhreTrainingseinheiteinfachundbequem:DerTrainingscomputerbietetfünf
Sportprofile: eines für Laufen, zwei fürs Radfahren und zwei für andere Sportarten.
Polar SportZonen:UmmitderrichtigenIntensitätzutrainieren,könnenSieIhreZiel-SportZonefüreine
Trainin g s e i n h e i t s p e r r e n . We n n Ih r e He r z f r e q u e n z u n t e r od e r über d er Z i e l - S p o rtZone l i e g t, g i b t de r RC3
GPS einen visuellen und akustischen Alarm aus.
4 Einführung
Page 65

2. DAS KOMPLETT-TRAININGSSYSTEM
Bestandteile des Trainingscomputers
Der Polar RC3 GPS Trainingscomputer mit integriertem GPS bietet Daten zu
Geschwindigkeit und Distanz sowie über den Web-Service polarpersonaltrainer.com
Routendaten für alle Outdoor-Aktivitäten mithilfe der Global Positioning System
(GPS)-Technologie.
Signale, die von GPS-Satelliten an Empfänger am Boden übertragen werden, geben
den Standort der Satelliten an. Der Trainingscomputer empfängt die Signale und
bestimmt Ihren Standort durch Messung der Entfernung zwischen dem Sensor und
den Satelliten. Es umkreisen mindestens 24 aktive GPS-Satelliten die Erde. Um eine
zuverlässige Standortbestimmung zu erhalten, kombiniert der Trainingscomputer die
Signale von mindestens vier Satelliten.
Schließen Sie den Trainingscomputer über ein USB-Kabel an Ihren Computer an, um
die Batterie zu laden und die Daten zwischen dem Trainingscomputer und dem
Web-Service polarpersonaltrainer.com zu übertragen.
DEUTSCH
Registrieren Sie Ihr Polar Produkt unter http://register.polar.fi/, damit wir unsere Produkte und unseren
Service noch besser auf Sie abstimmen können.
Trainingssoftware
Mit der Polar WebSync Software* können Sie
• Daten zwischen Ihrem Trainingscomputer und polarpersonaltrainer.com
übertragen und synchronisieren,
• die Einstellungen Ihres Trainingscomputers festlegen und
• die Anzeige Ihres Trainingscomputers personalisieren, z. B. mit Ihrem
Logo.
Weitere Informationen zur Datenübertragung und anderen Funktionen der WebSync
Software finden Sie in der vollständigen Gebrauchsanleitung unter
www.polar.com/support [http://www.polar.com/support] oder in der Online-Hilfe für
WebSync.
Sie können die WebSync Software von www.polarpersonaltrainer.com [
http://www.polarpersonaltrainer.com] kostenlos herunterladen.
Das Komplett-Trainingssystem 5
Page 66

DEUTSCH
polarpersonaltrainer.com ist Ihr kostenloses Online-Trainingstagebuch und Ihre
interaktive Trainings-Community, die Sie immer wieder neu motiviert. Um eine
detailliertere Analyse Ihres Trainings zu erhalten, übertragen Sie die Trainingsdaten
mit dem USB-Kabel und der WebSync Software an den Web-Service
polarpersonaltrainer.com.
Mit dem Web-Service polarpersonaltrainer.com können Sie
• Ihre Trainingsstrecke ansehen
• Ihre Trainingsergebnisse als Statusaktualisierungen in einem sozialen
Netzwerk teilen
• Ihre Freunde zu virtuellen Sportwettkämpfen herausfordern
• ausführlichere Informationen zu Ihrem Trainingsfeedback erhalten
• Ihre Trainingsdateien speichern und Ihre Fortschritte verfolgen
• Ihre Trainingsbelastung und Erholung im Trainingstagebuch verfolgen
• Polar Ausdauer-Trainingsprogramme erstellen und auf Ihren
Trainingscomputer herunterladen, um diese für Ihr Training zu
verwenden und
• eigene Trainingsziele erstellen
Weitere Informationen zu den Funktionen des Web-Services polarpersonaltrainer.com
finden Sie in der Online-Hilfe für polarpersonaltrainer.com.
Der Benutzername für Ihr Polar Konto ist immer Ihre E-Mail-Adresse. Für die
Polar Produktregistrierung, für polarpersonaltrainer.com, das Polar
Diskussionsforum und die Newsletter-Registrierung gelten der gleiche
Benutzername und das gleiche Kennwort.
Erhältliches Zubehör
Mit dem Polar Zubehör können Sie Ihr Training optimieren und Ihre Leistung noch umfassender
beurteilen.
Der RC3 GPS Trainingscomputer ist mit Polar H2 und H3
Herzfrequenz-Sensoren kompatibel.DerkomfortableHerzfrequenz-Sensor
bestimmt anhand der elektrischen Signale des Herzens Ihre Herzfrequenz und sendet
die Daten in Echtzeit EKG-genau an den Trainingscomputer.
Der Herzfrequenz-Sensor besteht aus der Sendeeinheit und dem elastischen
Elektrodengurt.
Wenn Sie ein Modell ohne Herzfrequenz-Sensor gekauft haben, deaktivieren
Sie diese Funktion in den Einstellungen für die Sportprofile. Anweisungen
finden Sie unter Sportprofil-Einstellungen (Seite 31).
Mit dem optionalen Polar s3+ Laufsensor können Sie Ihre Lauftechnik optimieren.
Er misst beim Training im Freien oder in der Halle drahtlos Geschwindigkeit, Tempo,
Distanz, Schrittfrequenz und -länge sowie Ihren Running Index.
Der optionale Polar CS Rad-Trittfrequenzsensor W.I.N.D. misst beim
Radfahren drahtlos Ihre aktuelle und durchschnittliche Trittfrequenz in Umdrehungen
pro Minute.
6 Das Komplett-Trainingssystem
Page 67
DEUTSCH
Der optionale Polar CS Rad-Geschwindigkeitssensor W.I.N.D. misst beim
Radfahren drahtlos die Strecke sowie Ihre aktuelle, durchschnittliche und maximale
Geschwindigkeit.
Die Daten aller kompatiblen Sensoren werden drahtlos mit der Polar 2,4 GHz W.I.N.D.-Technologie an den
Trainin g s c o m p uter ü b e r t r agen. H i e r d urch w e r d e n St ö r u n g en wä h r e nd de s Trai n i n g s ve r m i e d e n.
Tastenfunktionen
Der Trainingscomputer verfügt über fünf Tasten, die je nach Situation verschiedene Funktionen haben
können.
LIGHT (LICHT) BACK (ZURÜCK) START/OK UP
(AUFSTEIGEND)
• Displaybeleuchtung
aktivieren
•
Durch
Gedrückthalten
dieser Taste
können Sie das
SCHNELL-MENÜ
aufrufen: In der
Uhrzeitanzeige
können Sie im
Schnell-Menü
Tasten sperren,
den Wecker
einstellen oder
die Zeitzone
auswählen.
Während des
Trainings
können Sie im
Schnell-Menü
Tasten sperren,
den Sensor
suchen,
Trainingssignaltöne
einstellen oder
Zonenlimits
anzeigen.
• Menü verlassen
• Zur vorherigen
Ebene
zurückkehren
• Eingaben
unverändert
lassen
• Auswahl
abbrechen
• Durch
Gedrückthalten
dieser Taste
kehren Sie aus
jedem Modus
zur
Uhrzeitanzeige
zurück.
• Auswahl /
Eingaben
bestätigen
• Trainingseinheit
starten
• Rundenzeit
nehmen
• Durch
Gedrückthalten
dieser Taste
aktivieren /
deaktivieren Sie
die Zonensperre
im
Trainingsmodus.
• Durch
• Ausgewählten
• Durch
Auswahllisten
blättern
Wert einstellen
/ erhöhen
Gedrückthalten
dieser Taste
können Sie die
Darstellung der
Uhrzeitanzeige
ändern.
DOWN
(ABSTEIGEND)
• Durch
Auswahllisten
blättern
• Ausgewählten
Wert einstellen
/ verringern
• Durch
Gedrückthalten
dieser Taste
können Sie in
der
Uhrzeitanzeige
zwischen
Uhrzeit 1 /
Uhrzeit 2
umschalten.
Weitere
Informationen zum
Schnell-Menü
finden Sie unter
Schnell-Menü
(Seite 35).
Menüstruktur
Das Komplett-Trainingssystem 7
Page 68

DEUTSCH
Daten
Zum Nachverfolgen Ihrer Trainingsdaten. Hier können Sie Ihre Trainingsdateien,
Wochenzusammenfassungen und Gesamtwerte einsehen und abrufen sowie Dateien löschen. Weitere
Informationen finden Sie unter Nach dem Training (Seite 24).
Eingaben
Nehmen Sie alle gewünschten Einstellungen vor und passen Sie Ihren Trainingscomputer gemäß Ihren
Anforderungen an. Wählen Sie die gewünschten Funktionen für jedes der Sportprofile entsprechend Ihrem
Trainin g aus. Weitere I nformatione n finde n Sie u n t er E i n s t e l l ungen ( S e i t e 31).
Fitness Test
Damit Sie richtig trainieren und Ihren Fortschritt überwachen können, ist es wichtig, Ihren aktuellen
Fitnesslevel zu kennen, den Sie hier ermitteln und nachverfolgen können. Der Polar Fitness Test bietet ein
einfaches und schnelles Verfahren, um Ihre kardiovaskuläre Fitness und aerobe Ausdauer zu messen. Der
Test w i r d i n Ruhe durchgeführ t . Der Te st e r g i b t ei n e n We r t , de r als O wnIndex b e z eichnet w i r d. D e r
OwnIndex ist mit der maximalen Sauerstoffaufnahmekapazität (VO
)vergleichbar,dieallgemein
2max
verwendet wird, um die aerobe Fitness zu messen. Weitere Informationen finden Sie unter Polar Fitness
Test ( S e ite 37).
8 Das Komplett-Trainingssystem
Page 69

DEUTSCH
3. BATTERIE DES TRAININGSCOMPUTERS
Aufladen des Trainingscomputers
Der Polar RC3 GPS Trainingscomputer verfügt über eine eingebaute aufladbare Batterie. Verbinden Sie
das mit dem Produkt-Set gelieferte USB-Kabel, um den Trainingscomputer über den USB-Anschluss Ihres
Computers aufzuladen. Wenn Sie den USB-Stecker an eine Steckdose anschließen möchten, verwenden
Sie einen USB-Netzadapter (nicht im Lieferumfang).
1. Stecken Sie den Micro-USB-Stecker in den USB-Anschluss am
Trainingscomputer.
2. Stecken Sie den USB-Stecker in einen USB-Anschluss an Ihrem
Computer. Von der Verwendung von USB-Hubs wird abgeraten, da ein
USB-Hub möglicherweise nicht genügend Strom für den
Trainingscomputer liefert.
Verwenden Sie ein USB 2.0-kompatibles USB A/Micro B-Kabel (im
Lieferumfang enthalten). Beim Laden über einen USB-Hub kann sich
die Ladezeit beispielsweise verlängern.
Sollten Sie ein Netzteil verwenden, muss dieses vom Typ „Ausgang 5V
DC 0,5 A – 2 A MAX“ sein. Verwenden Sie nur ein Netzteil mit den
erforderlichen Sicherheitszulassungen (Beschriftung LPS, Limited
Power Supply (Strombegrenzung) oder UL-gelistet).
3. Das Display zeigt die Ladeanimation.
Wenn Sie den Trainingscomputer zum ersten Mal anschließen, sucht
Windows automatisch nach den Treibern. Warten Sie, bis die Suche
nach den Treibern abgeschlossen ist (dies kann bis zu einer Minute
dauern). Alternativ können Sie die Suche abbrechen. Die
Lade-Animation und die Datenübertragung sind während der Suche
deaktiviert.
Die Batterie ist nach einer Stunde Aufladen zu 70 bis 80 % geladen
(wenn sie komplett entladen war). Das vollständige Laden der Batterie
dauert bis zu 1,5 Stunden.
4. Wenn der Trainingscomputer vollständig geladen ist, wird Der Akku
ist voll geladen angezeigt. Ziehen Sie das Kabel ab.
Stecken Sie den Micro-USB-Stecker in den USB-Anschluss am Trainingscomputer. Achten Sie darauf, die
Dichtflächen an der Rückseite nicht zu beschädigen. Wenn die Dichtfläche tiefe Kratzer aufweist, ist die
Schutzart IPx7 bzgl. der Wasserbeständigkeit nicht mehr gegeben.
Prüfen Sie jedes Mal, nachdem Sie den USB-Anschluss des Trainingscomputers verwendet haben, dass
sich auf den Dichtflächen der Abdeckung und der Rückseite keine Haare, Verschmutzungen oder
sonstigen Fremdkörper befinden. Wischen Sie Verschmutzungen vorsichtig ab. Verwenden Sie bei der
Reinigung keine scharfen Werkzeuge oder Hilfsmittel, um die Kunststoffteile nicht zu zerkratzen.
Batterie des Trainingscomputers 9
Page 70

DEUTSCH
Batteriebetriebszeit
Bei kontinuierlichem
Gebrauch
Mit eingeschalteter
GPS-Funktion:
bis zu 12 Stunden
Mit ausgeschalteter
GPS-Funktion:
bis zu 1700 Stunden
Die Batteriebetriebszeit hängt von vielen Faktoren ab, z. B. die Umgebungstemperatur, in der Sie den
Computer verwenden, die Funktionen, die Sie verwenden und der Alterung der Batterie. Die Betriebsdauer
verringert sich deutlich bei Temperaturen weit unter dem Gefrierpunkt. Wenn Sie den Trainingscomputer
unter der Kleidung tragen, ist er besser vor Kälte geschützt, sodass sich die Betriebsdauer verlängert.
Wenn Sie im Durchschnitt
1Std./Tag,7Tage/Woche
eine Trainingseinheit
aufzeichnen
Mit eingeschalteter
GPS-Funktion:
ca. 11 Tage
Mit ausgeschalteter
GPS-Funktion:
ca. 120 Tage
Wenn nur die Uhrzeitanzeige verwendet
wird
ca. 4 Monate
Sie können die Lebensdauer der Batterie deutlich erhöhen, indem Sie zur Messung der Geschwindigkeit und Distanz
Erhältliches Zubehör (Seite 6) anstatt der GPS-Funktion verwenden, wenn Sie keine Routendaten
benötigen.
Ladezustandsanzeige
Das Batteriesymbol rechts oben im Display zeigt den Ladezustand der Batterie und die ungefähre
verbleibende Batteriekapazität an.
Batteriesymbol
Verbleibende Batteriekapazität
80 - 100%
60 - 80%
40 - 60%
20 - 40%
8-20%
Die Batteriekapazität des Trainingscomputers reicht aus, um eine Stunde Training
mit aktivierter GPS-Funktion aufzuzeichnen.
Die Anzeige der verbleibenden Ladung im Batteriesymbol blinkt. Die
Batteriekapazität des Trainingscomputers reicht nicht aus, um eine neue
Trainingseinheit m it ak tivie rter GPS-F unkti on aufzuzeichnen. An di esem Punkt
deaktiviert der Trainingscomputer die GPS-Funktion. Die Signaltöne und
Displaybeleuchtung des Trainingscomputers werden ebenfalls automatisch
ausgeschaltet.
Um eine neue Trainingsaufzeichnung zu starten, muss der Trainingscomputer
aufgeladen werden.
Meldungen bei schwacher Batterie
Wenn die Batteriekapazität nachlässt, informiert Sie der Trainingscomputer mit einer Meldung und einem
10 Batterie des Trainingscomputers
Page 71

Alarm.
DEUTSCH
Meldung bei
schwacher Batterie
Batteriestatus
Der Akku ist schwach
Diese Meldung wird angezeigt, wenn die Batteriekapazität des Trainingscomputers
ausreicht, um eine Stunde Training mit aktivierter GPS-Funktion aufzuzeichnen.
Der Akku ist schwach , GPS ist ausgeschaltet
Diese Meldung wird nur im Trainingsmodus angezeigt.
Die Batteriekapazität des Trainingscomputers reicht nicht aus, um die Aufzeichnung
der Trainingseinheit mit aktivierter GPS-Funktion fortzusetzen. An diesem Punkt
deaktiviert der Trainingscomputer die GPS-Funktion. Sie können weiterhin
Erhältliches Zubehör (Seite 6) verwenden und die Trainingseinheit
durchführen. Die Signaltöne und Displaybeleuchtung des Trainingscomputers werden
automatisch ausgeschaltet.
Um eine neue Trainingsaufzeichnung zu starten, muss der Trainingscomputer
aufgeladen werden.
Laden Sie den Akku vor dem Training!
Die Batteriekapazität des Trainingscomputers reicht nicht aus, um eine
Trainingseinheit a ufzuz eichn en.
Um eine neue Trainingsaufzeichnung zu starten, muss der Trainingscomputer
aufgeladen werden.
Aufzeichnung wurde gestoppt, Die Batterie ist leer
Die Batterie ist nahezu vollständig entladen. Der Trainingscomputer beendet die
Trainingseinheit, speic hert die Tr ainin gsdat en und w echse lt in den
Energiesparmodus.
Wenn der Trainingscomputer nichts anzeigt, ist die Batterie leer, und der
Trainingscomputer hat s ich i n den En ergie sparm odus gesch altet . Lad en Sie d en
Trainingscomputer auf. We nn di e Batterie vo llstä ndig entla den i st, daue rt es
möglicherweise ein wenig, bevor die Lade-Animation angezeigt wird.
Batterie des Trainingscomputers 11
Page 72

DEUTSCH
4. EINRICHTEN DES TRAININGSCOMPUTERS
Basiseingaben
Bevor Sie Ihren Trainingscomputer zum ersten Mal benutzen, müssen Sie die Basiseingaben vornehmen.
Geben Sie die Daten so genau wie möglich ein, damit das Feedback tatsächlich Ihrer Leistung entspricht.
Aktivieren Sie Ihren Trainingscomputer durch Drücken der START -Taste. Select language bzw. Sprache
wählen wird angezeigt. Wählen Sie mit der UP- oder DOWN-Taste zwischen
Dansk, Deutsch, English, Español, Français, Italiano, Nederlands , Norsk, Português, Suomi und Svenska.
Bestätigen Sie die Auswahl mit der START-Taste. Nehmen Sie die Basiseingaben vor wird angezeigt.
Drücken Sie die START-Taste. Stellen Sie mit der UP- oder DOWN-Taste die folgenden Daten ein und
bestätigen Sie die Eingaben mit der START-Taste:
1. Zeitformat/Uhrzeit: Wählen Sie 24 Std. oder 12 Std. als Zeitformat. Wenn Sie 12 Std. ausgewählt haben,
wählen Sie AM (vormittags) oder PM (nachmittags). Geben Sie dann die Uhrzeit ein.
2. Datum: Geben Sie das aktuelle Datum ein.
3. Maßeinheiten: Wählen Sie Metrische (kg, m) oder Imperische (lbs, ft) Einheiten.
4. Gewicht: Geben Sie Ihr Gewicht ein.
5. Größe: Geben Sie Ihre Größe ein. Wenn Sie sich für das lb/ft-Format entschieden haben, geben Sie
zuerst die Fuß und danach die Zoll ein.
6. Geburtsdatum: Geben Sie Ihr Geburtsdatum ein.
7. Geschlecht: Wählen Sie Männlich oder Weiblich aus.
8. Eingaben OK? wird angezeigt. Um die Eingaben zu ändern, drücken Sie kurz so oft die BACK-Taste, bis
Sie bei der gewünschten Einstellung angelangt sind. Drücken Sie die START -Taste, um die Eingaben zu
übernehmen. Der Trainingscomputer kehrt in die Uhrzeitanzeige zurück.
Die Basiseingaben müssen so exakt wie möglich eingegeben werden, insbesondere die Daten zu Gewicht,
Körpergröße, Geburtsdatum und Geschlecht, da diese sich auf die Genauigkeit von Werten wie Herzfrequenz-Limits
und Kalorienverbrauch auswirken.
Sportprofil-Einstellungen
Mit der Funktion Sportprofile können Sie Ihre Trainingseinheit einfach und bequem starten. Der
Trainin g s c o m p u t e r b i e t e t fü n f Spor t p r o f i l e : e i n e s für Laufen, zwei f ü r R a d fahr e n und z w ei f ü r an d e r e
Sportarten.
Passen Sie die Einstellungen für die Sportprofile unter MENÜ > Eingaben > Sportprofile an Ihre
Trainin g s a n f o r d e rungen a n . Si e kön n e n beis p i e l s w e i s e d i e Sens o r e n akt i v i e r e n , di e Si e für I h r e S p o r t a r t
verwenden möchten. Wenn Sie dann eine Trainingseinheit mithilfe des Sportprofils starten, erkennt der
Trainin g s c o m p u t e r d i e benö t i g t e n Se n s o r e n au t o m a t i s ch.
Der Herzfrequenz-Sensor ist in jeder Sportart standardmäßig aktiviert. Der Trainingscomputer startet daher
automatisch die Suche nach dem Signal des Herzfrequenz-Sensors, wenn Sie in der Uhrzeitanzeige die
START -Taste drücken. Wenn Sie ein Modell ohne Herzfrequenz-Sensor gekauft haben, deaktivieren Sie diese
Funktion unter MENÜ > Eingaben > Sportprofile > Laufen > Herzfrequenz-Sensor > Aus.
Weitere Informationen zu den Einstellungen für Sportprofile finden Sie unter Sportprofil-Einstellungen
(Seite 31).
Wenn Sie einen optionalen Sensor (s3+ Laufsensor, CS Rad-Geschwindigkeitssensor W.I.N.D. oder CS
Rad-Trittfrequenzsensor W.I.N.D.) zum ersten Mal aktivieren, muss er mit dem Trainingscomputer
gekoppelt werden. Weitere Informationen zum Koppeln eines neuen Sensors mit dem Trainingscomputer
finden Sie unter Neues Zubehör (Seite 40).
12 Einrichten des Trainingscomputers
Page 73

5. TRAINING
So tragen Sie den Herzfrequenz-Sensor
Legen Sie den Herzfrequenz-Sensor an, um die Herzfrequenz zu messen.
1. Befeuchten Sie die Elektroden des
Gurtes mit Wasser.
2. Befestigen Sie die Sendeeinheit
am elastischen Gurt.
3. Legen Sie den Gurt so um die
Brust, dass er bei Herren unter
dem Brustmuskel, bei Damen
unter dem Brustansatz sitzt und
hängen Sie den Haken in die
Schlaufe am anderen Ende des
Gurtes ein.
4. Stellen Sie die Gurtlänge so ein,
dass der Gurt fest, jedoch nicht zu
eng anliegt. Stellen Sie sicher,
dass die befeuchteten Elektroden
flach auf Ihrer Haut aufliegen und
das Polar Logo der Sendeeinheit
mittig und aufrecht sitzt.
DEUTSCH
Entfernen Sie die Sendeeinheit nach
jeder Verwendung vom Gurt, um die
Lebensdauer der Batterie zu
verlängern. Schweiß und Feuchtigkeit
können bewirken, dass die Elektroden
feucht bleiben und der
Herzfrequenz-Sensor aktiviert bleibt.
Dies verkürzt die Lebensdauer der
Batterie. Ausführliche Anweisungen
zur Reinigung und Pflege finden Sie
unter Wichtige Informationen
(Seite 53).
Video-Lernprogramme finden Sie unter http://www.polar.com/en/polar_community/videos.
Starten einer Trainingseinheit
Legen Sie den Herzfrequenz-Sensor an und stellen Sie sicher, dass Sie einen optionalen Sensor wie in der
Gebrauchsanleitung des Sensors beschrieben eingestellt haben. Wenn Sie einen Geschwindigkeits- oder
Laufsensor erstmals verwenden, lesen Sie unter Neues Zubehör (Seite 40)nach.Erläuterungenzur
Verwendung der Polar ZoneOptimizer Funktion für Ihre Trainingseinheit finden Sie unter Training mit dem
Polar ZoneOptimizer (Seite 16).
1. Von der Uhrzeitanzeige ausgehend drücken Sie die START
1. Drücken Sie in der Uhrzeitanzeige die START-Taste, um den
Vorstartmodus aufzurufen.
Training 13
Page 74
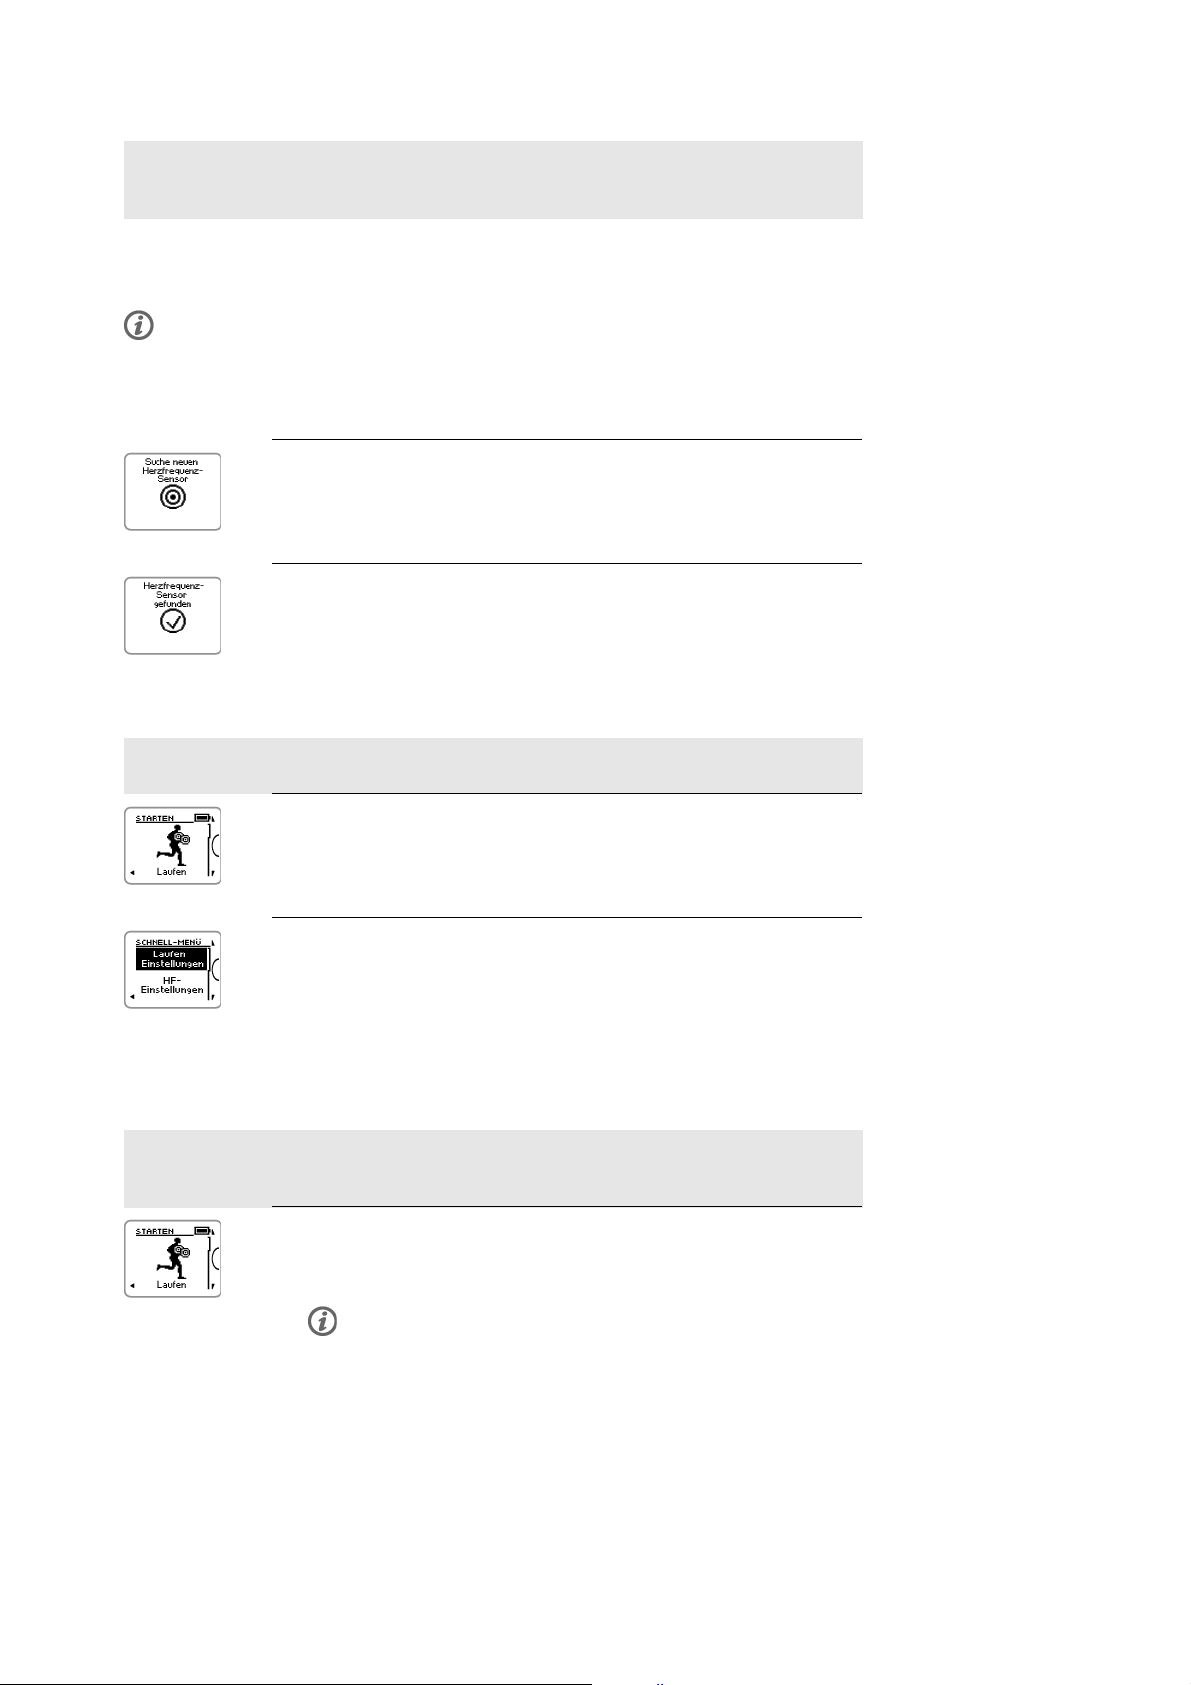
DEUTSCH
2. Koppeln Sie den Herzfrequenz-Sensor mit dem Trainingscomputer
(das Koppeln ist nur einmal erforderlich).
Durch die Kopplung wird sichergestellt, dass Ihr Trainingscomputer ausschließlich Signale von Ihrem
Herzfrequenz-Sensor empfängt. Dies ermöglicht das störungsfreie Training in einer Gruppe, wenn weitere
Trainingscomputer verwe ndet werde n.
Wenn Sie ein Modell ohne Herzfrequenz-Sensor gekauft haben und die Funktion in den
Sportprofil-Einstellungen deaktiviert haben, überspringen Sie Schritt 2 und beginnen Sie direkt
mit Schritt 3.
1. Suche neuen Herzfrequenz-Sensor wird angezeigt. Der
Trainingscomputer beginnt nach dem Signal des
Herzfrequenz-Sensors zu suchen.
Sobald der Trainingscomputer das Signal gefunden hat, wird
2. Herzfrequenz-Sensor gefunden angezeigt.
Wenn der Trainingscomputer den Herzfrequenz-Sensor nicht finden
kann, vergewissern Sie sich, dass sich der Gurt des Sensors nicht
gelöst hat und die Elektroden des Herzfrequenz-Sensors feucht sind.
3. Wählen Sie das Sportprofil aus.
1. Wählen Sie mit der UP- oder DOWN-Taste das gewünschte Sportprofil
aus.
2. Um die Sportprofil- oder Herzfrequenz-Einstellungen zu ändern, bevor
die Aufzeichnung der Trainingseinheit beginnt (im Vorstartmodus),
halten Sie die LIGHT-Taste gedrückt, um das SCHNELL-MENÜ
aufzurufen. Um zum Vorstartmodus zurückzukehren, halten Sie die
BACK-Taste gedrückt.
Hinweise zu Einstellungen für Sportprofile finden Sie unter
Sportprofil-Einstellungen (Seite 31).
4. Der Trainingscomputer beginnt nach den GPS-Satellitensignalen bzw. den Signalen des
Sensors zu suchen.
1. Wenn Sie die GPS-Funktion oder einen optionalen Sensor für dieses
Sportprofil aktiviert haben, sucht der Trainingscomputer automatisch
nach den Signalen.
Bleiben Sie im Vorstartmodus, bis der Trainingscomputer die Signale
gefunden hat.
14 Training
Page 75
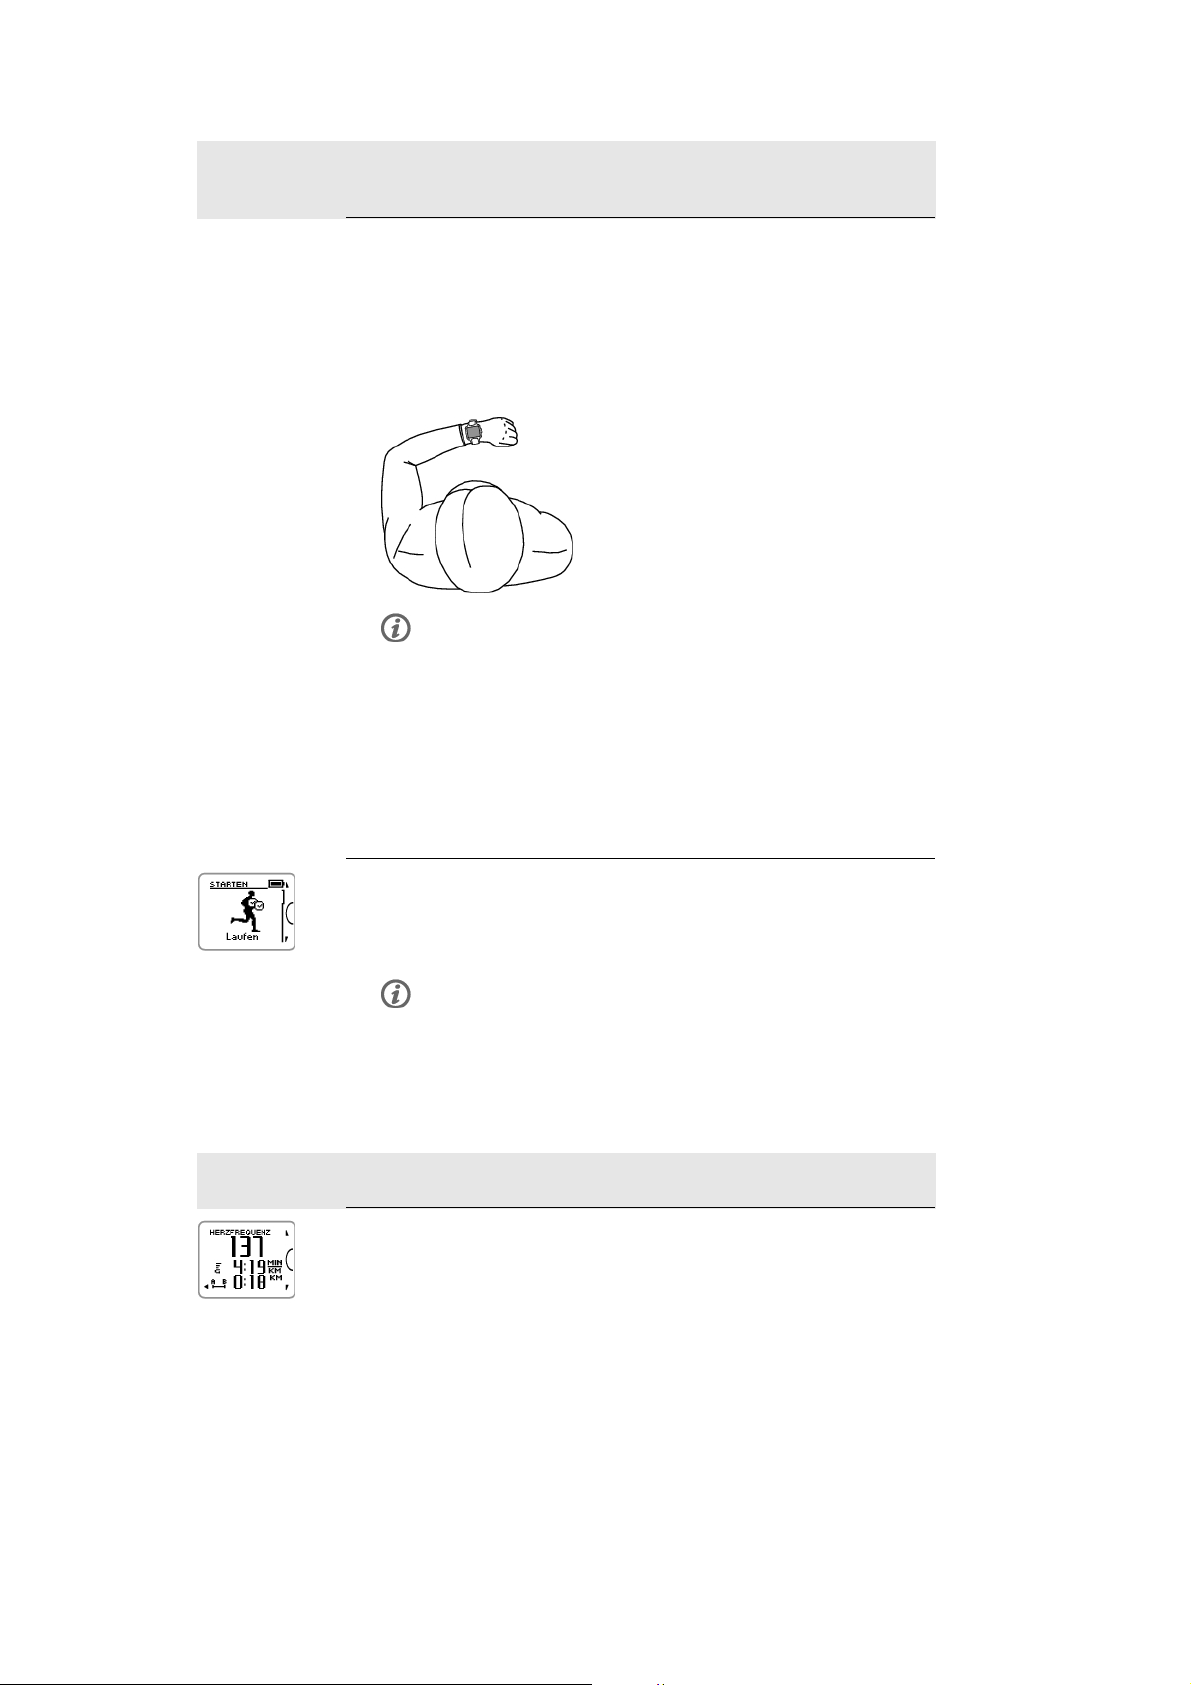
4. Der Trainingscomputer beginnt nach den GPS-Satellitensignalen bzw. den Signalen des
Sensors zu suchen.
2. Gehen Sie zum Empfang der GPS-Satellitensignale nach draußen an
eine Stelle, in deren Nähe sich keine hohen Gebäude und Bäume
befinden.
Tragen Sie den Trainingscomputer am Handgelenk mit dem Display
nach oben. Halten Sie den Trainingscomputer waagerecht vor sich
und von der Brust weg (siehe Bild unten). Bewegen Sie Ihren Arm
während der Suche nicht und halten Sie ihn über Brusthöhe
angehoben.
Bewegen Sie Ihren Arm während der Suche nicht. Bewegen Sie sich
nicht!
DEUTSCH
Bleiben Sie stehen und halten Sie die Position, bis der
Trainingscomputer die Satellitensignale gefunden hat (ein Alarm
ertönt und ein Häkchen wird am Arm der Figur auf dem Display
angezeigt, wenn das Signal gefunden wurde).
Bei guten Empfangsbedingungen dauert die Suche nach den
Satellitensignalen in der Regel 30 bis 60 Sekunden.
3. Das Häkchen gibt an, dass das Signal gefunden wurde. In dieser
Abbildung hat der Trainingscomputer das Herzfrequenz-Sensorsignal
und das GPS-Signal gefunden. Der Trainingscomputer bestimmt Ihren
Standort und speichert ihn als Startpunkt.
Damit die Funktion Zurück z. Start (Seite 23) ordnungsgemäß
arbeitet, werden präzise Startpunktdaten benötigt.
Wenn der Trainingscomputer das Sensor-Signal nicht findet, wird ein
Dreieck mit einem Ausrufezeichen angezeigt.
5. Starten Sie die Aufzeichnung der Trainingseinheit.
1. Sobald der Trainingscomputer alle Signale gefunden hat, drücken Sie
die START-Taste. Aufzeichnung wurde gestartet wird angezeigt, und
Sie können mit dem Training beginnen.
Während der Aufzeichnung einer Trainingseinheit können Sie die
Trainingsanzeige mit der UP- oder DOWN-Taste ändern/wechseln.
Wenn Sie während des Trainings Einstellungen ändern möchten, ohne
die Aufzeichnung der Trainingseinheit zu stoppen, halten Sie die
LIGHT-Taste gedrückt, um das SCHNELL-MENÜ aufzurufen. Weitere
Informationen finden Sie unter Schnell-Menü (Seite 35).
Training 15
Page 76

DEUTSCH
5. Starten Sie die Aufzeichnung der Trainingseinheit.
Bevor Sie mit der Aufzeichnung einer Trainingseinheit beginnen, stellen Sie sicher, dass der
Trainingsco mputer die Signale der GPS-Sa tteliten/de s S ensors ge funden hat. Dadurch wir d
gewährleistet, dass Sie
• zu Beginn der Trainingseinheit Daten zu Geschwindigkeit, Tempo und Distanz
erhalten.
• der Trainingscomputer Ihren Startpunkt ermittelt (nur bei aktivierter GPS-Funktion).
Die Funktion Zurück z. Start (Seite 23) erfordert präzise Startpunktdaten, um
ordnungsgemäß zu funktionieren.
*DieoptionalenSensorenumfassendenPolars3+Laufsensor,PolarCSGeschwindigkeitssensorW.I.N.D.
und den Polar CS Trittfrequenzsensor W.I.N.D.
Training mit dem Polar ZoneOptimizer
Die ZoneOptimizer Funktion bestimmt Ihre persönlichen Sportzonen (Herzfrequenzzonen) für Ihre aerobe
Trainin g s e i n h e i t . S i e miss t währen d des A u fwärmens I h r e H e r z f r e q u enz-Va r i a b i l i t ä t u n d best i m m t Ihr e
persönlichen Sportzonen. Weitere Informationen finden Sie unter Polar ZoneOptimizer (Seite 46).
Um die ZoneOptimizer Funktion in Ihrem Training zu verwenden, schalten Sie sie ein, indem Sie MENÜ >
Eingaben > HF-Einstellungen > ZoneOptimizer > Ein wählen.
Die ZoneOptimizer Funktion definiert zu Beginn jeder Trainingseinheit die persönlichen
Herzfrequenz-Zielzonen für Sie. Wenn weniger als eine Stunde seit der letzten ZoneOptimizer Definition
vergangen ist, sind die angegebenen Herzfrequenz-Zielzonen möglicherweise nicht anwendbar, da Sie sich
vom vorherigen Training nicht vollständig erholt haben und sich während der Erholung die
Herzfrequenz-Variabilität, auf der der ZoneOptimizer basiert, langsamer normalisiert als die Herzfrequenz.
Trainingseinheit mit dem Polar ZoneOptimizer starten
Stellen Sie vor der Ermittlung der Herzfrequenz-Zonen mit ZoneOptimizer sicher, dass Sie die Polar
Standard-Herzfrequenz-Trainingsbereiche verwenden, d. h. die Herzfrequenz-Trainingsbereiche nicht
manuell geändert haben. Wenn Sie die SportZonen-Herzfrequenzbereiche manuell ändern möchten,
schalten Sie die ZoneOptimizer Funktion aus.
Um die ZoneOptimizer Funktion einzuschalten, wählen Sie MENÜ > Eingaben > HF-Einstellungen >
ZoneOptimizer > Ein.
Die Bestimmung der Herzfrequenz-Bereiche durch den ZoneOptimizer wird im Hintergrund gestartet, auch
wenn Sie sich im Vorstartmodus befinden. Wenn die EKG-Kurve rechts oben auf dem Display angezeigt
wird, wissen Sie, dass die Herzfrequenz-Messung und der ZoneOptimizer eingeschaltet sind.
1. Um die Trainingseinheit mit ZoneOptimizer zu starten, drücken Sie in
der Uhrzeitanzeige die OK-Taste.
Auf der Anzeige erscheint die Sportart, die Sie in der vorherigen
Trainingseinheit verwendet haben und der Countdown-Timer beginnt
im Hintergrund zu laufen, sobald die Herzfrequenz 70 Schläge pro
Minute erreicht hat. Eine EKG-Kurve erscheint oben rechts in der
Anzeige.
Wählen Sie das gewünschte Sportprofil mit der UP- ODER
DOWN-Taste aus und drücken Sie die OK-Taste, um mit dem Training
zu beginnen.
16 Training
Page 77
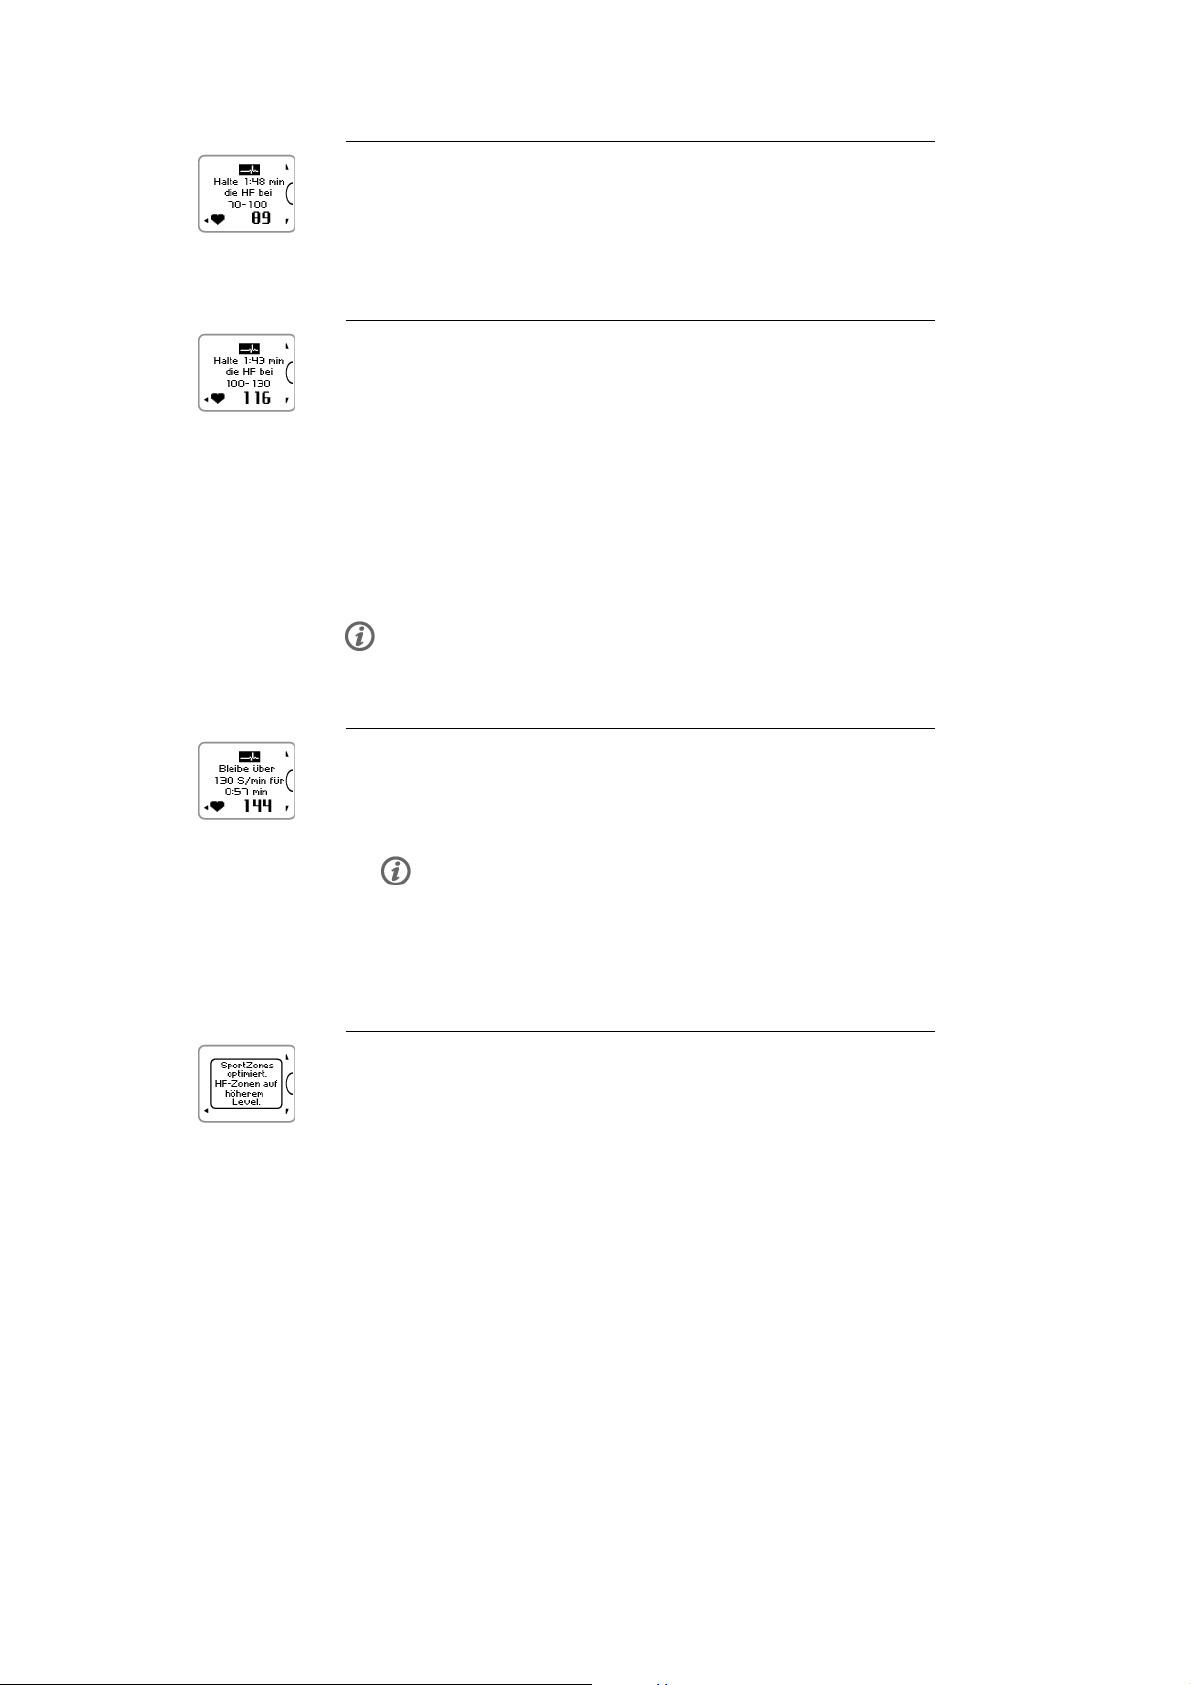
2. Halten Sie Ihre Herzfrequenz zwei Minuten lang zwischen 70 und
100 Schlägen pro Minute.
Bleiben Sie dazu stehen oder trainieren Sie mit sehr geringer
Intensität, indem Sie z. B. gehen oder langsam laufen.
Wenn der erste Teil der Bestimmung abgeschlossen ist, ertönt ein
Signalton.
3. Der zweite Teil der Bestimmung beginnt, wenn Ihre Herzfrequenz
über 100 Schläge pro Minute angestiegen ist.
Fahren Sie mit dem Training mit sehr niedriger Intensität fort.
Erhöhen Sie Ihre Herzfrequenz allmählich, und halten Sie sie zwei
Minuten lang zwischen 100 und 130 Schlägen pro Minute.
Dazu können Sie z. B. während des Aufwärmens zügig laufen oder mit
niedriger Intensität Rad fahren/Joggen.
Wenn Sie eine niedrige maximale HF besitzen, zeigt der Trainingscomputer Ihnen
spezielle Limits an.
Wenn der zweite Teil der ZoneOptimizer Bestimmung abgeschlossen ist, ertönt ein
weiterer Signalton.
Evtl. ist die ZoneOptimizer Bestimmung bereits jetzt abgeschlossen, wenn
das angestrebte Limit für die Herzfrequenz-Variabilität erreicht ist.
DEUTSCH
4. Der dritte Teil der Bestimmung beginnt, wenn Ihre Herzfrequenz über
130 Schläge pro Minute angestiegen ist.
Erhöhen Sie Ihre Herzfrequenz allmählich über 130 Schläge pro
Minute und halten Sie das Level.
Die ZoneOptimizer Bestimmung ist abgeschlossen, wenn die
Herzfrequenz länger als eine halbe Minute über 130 Schläge pro Minute
bleibt.
Wenn der dritte und letzte Teil der Bestimmung abgeschlossen ist,
ertönt ein Signalton.
5. Nachdem die Bestimmung abgeschlossen ist, zeigt der
Trainingscomputer eine der folgenden Meldungen an:
• Standard-SportZonen (HF-Zonen) in Gebrauch. Die Bestimmung war
nicht erfolgreich. Die Polar Standard-SportZonen (Herzfrequenz-Zonen)
werden verwendet.
• SportZonen optimiert. HF-Zonen auf höherem Level. Die Limits
wurden im Vergleich zu Ihren durchschnittlichen ZoneOptimizer Limits
angehoben.
• SportZonen optimiert. HF-Zonen auf normalem Level. Die Limits
wurden im Vergleich zu Ihren durchschnittlichen ZoneOptimizer Limits
nur etwas angehoben oder abgesenkt.
• SportZonen optimiert. HF-Zonen auf niedrigerem Level. Die Limits
wurden im Vergleich zu Ihren durchschnittlichen ZoneOptimizer Limits
herabgesetzt.
6. Nachdem Sie die Rückmeldungen erhalten und gelesen haben,
drücken Sie eine beliebige Taste außer der LICHT-Taste, um die
Hinweisanzeige zu schließen und Ihre Trainingseinheit fortzusetzen.
Training 17
Page 78
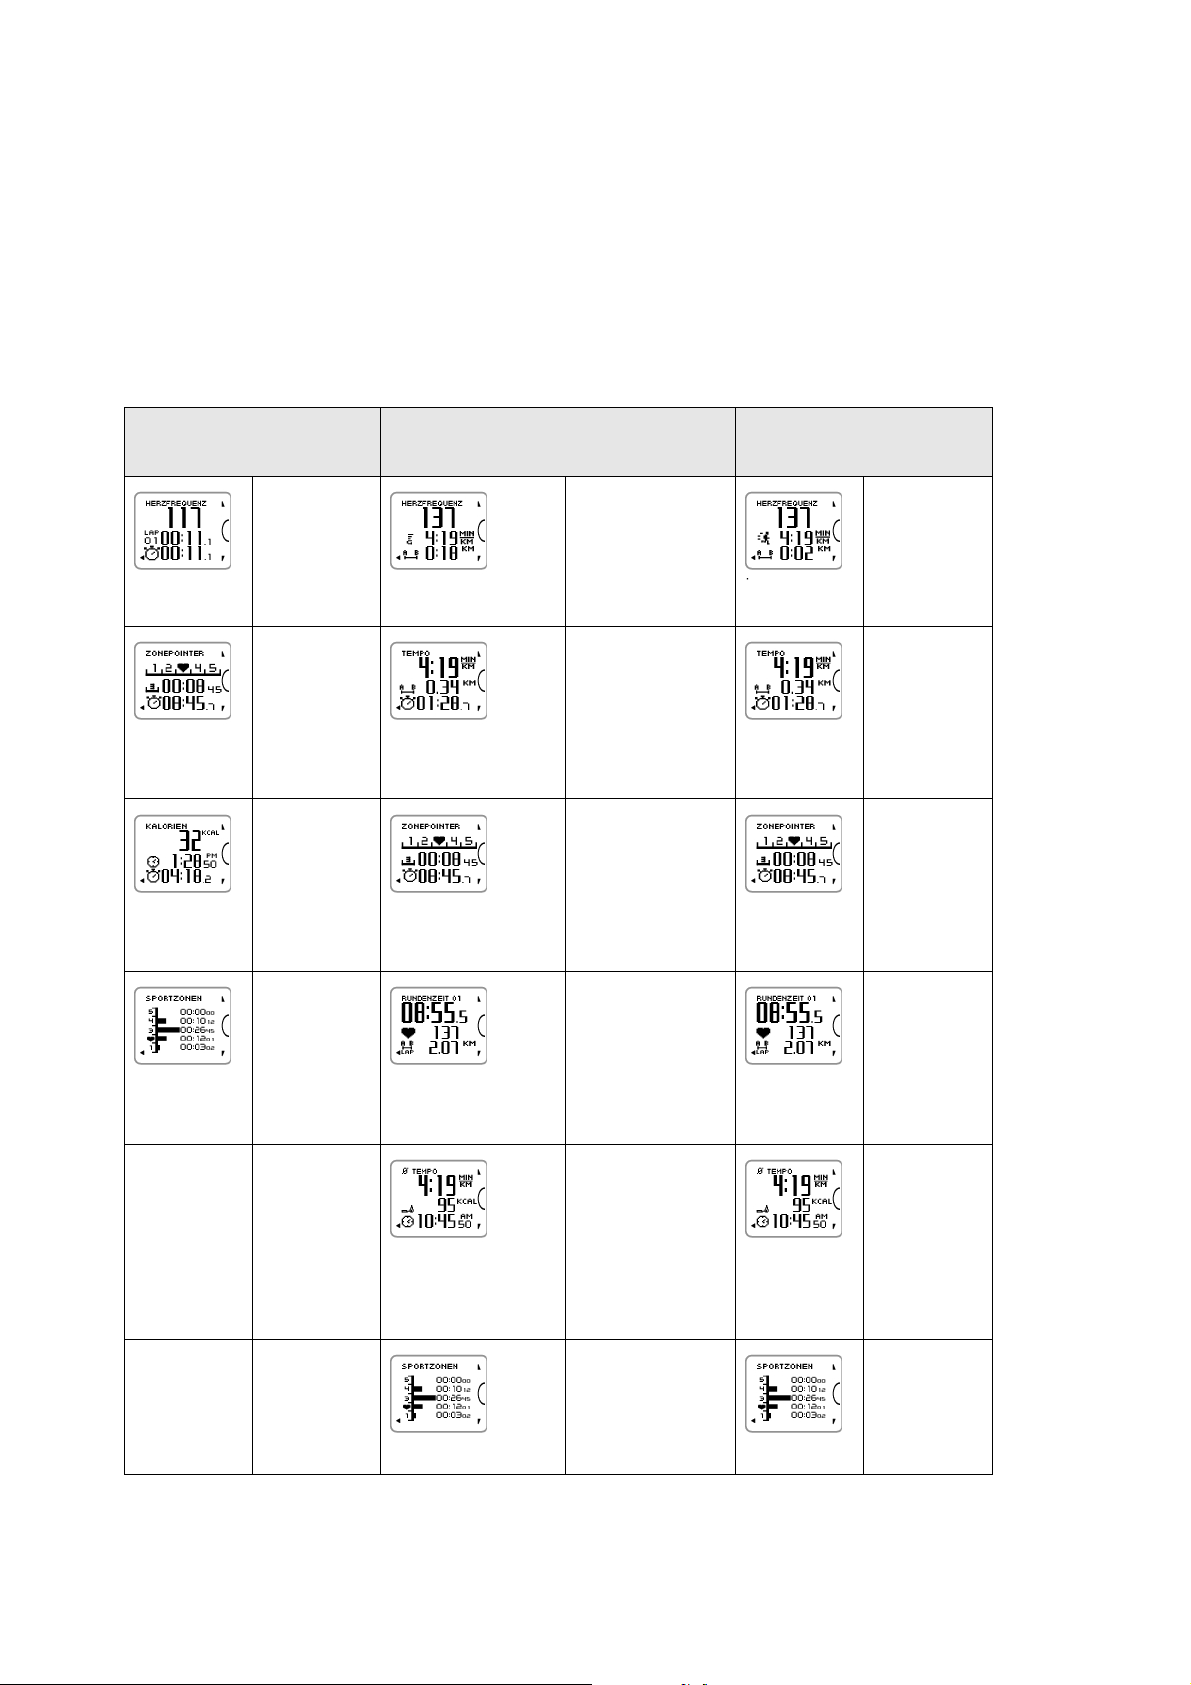
DEUTSCH
Trainingsansichten
Sie können durch Drücken der UP- oder DOWN-Taste die Trainingsansichten wechseln. Für einige
Sekunden wird die Nummer der Trainingsansicht angezeigt.
Die angezeigten Informationen variieren abhängig von den verwendeten Sensoren, den aktivierten
Funktionen und der ausgeübten Sportart.
In den folgenden Tabellen werden die für unterschiedliche Sensorkombinationen verfügbaren
Trainin g s a n s i c h ten d a r g e s t ellt. I n di e s e n Bei s p i e l e n we r d e n di e Traini n g s i n f o r mationen i n dr e i Ze i l e n
angezeigt. In MENÜ > Eingaben > Sportprofile > Sportart > Trainingsansicht können Sie festlegen, ob die
Trainin g s i n f o r m ationen i n zw e i ode r drei Z eilen a n g e z eigt w e r d e n .
Herzfrequenz-Sensor Herzfrequenz-Sensor
GPS-Funktion eingeschaltet
HERZFREQUENZ
Herzfrequenz
Rundenzeit
Dauer
ZONEPOINTER
ZonePointer
Zeit in der
Zone
Dauer
KALORIEN
Kalorien
Uhrzeit
Dauer
SPORTZONEN
Zeit, die in
jeder Zone
verbracht
wurde
Herzfrequenz-Sensor
s3+ Laufsensor
HERZFREQUENZ
Herzfrequenz
Geschwindigkeit/Tempo
Distanz
GESCHWINDIGKEIT/TEMPO
Geschwindigkeit/Tempo
Distanz
Dauer
ZONEPOINTER
ZonePointer
Zeit in der Zone
Dauer
RUNDENZEIT 01
Rundenzeit
Herzfrequenz
Rundendistanz
Ø
GESCHWINDIGKEIT/TEMPO
HERZFREQUENZ
Herzfrequenz
Geschwindigkeit/Tempo
Distanz
GESCHWINDIGKEIT/TEMPO
Geschwindigkeit/Tempo
Distanz
Dauer
ZONEPOINTER
ZonePointer
Zeit in der
Zone
Dauer
RUNDENZEIT
01
Rundenzeit
Herzfrequenz
Rundendistanz
Ø
GESCHWINDIGKEIT/TEMPO
18 Training
Ø
Geschwindigkeit/Tempo
Kalorien
Uhrzeit
SPORTZONEN
Zeit, die in jeder
Zone verbracht
wurde
Ø
Geschwindigkeit/Tempo
Kalorien
Uhrzeit
SPORTZONEN
Zeit, die in
jeder Zone
verbracht
wurde
Page 79
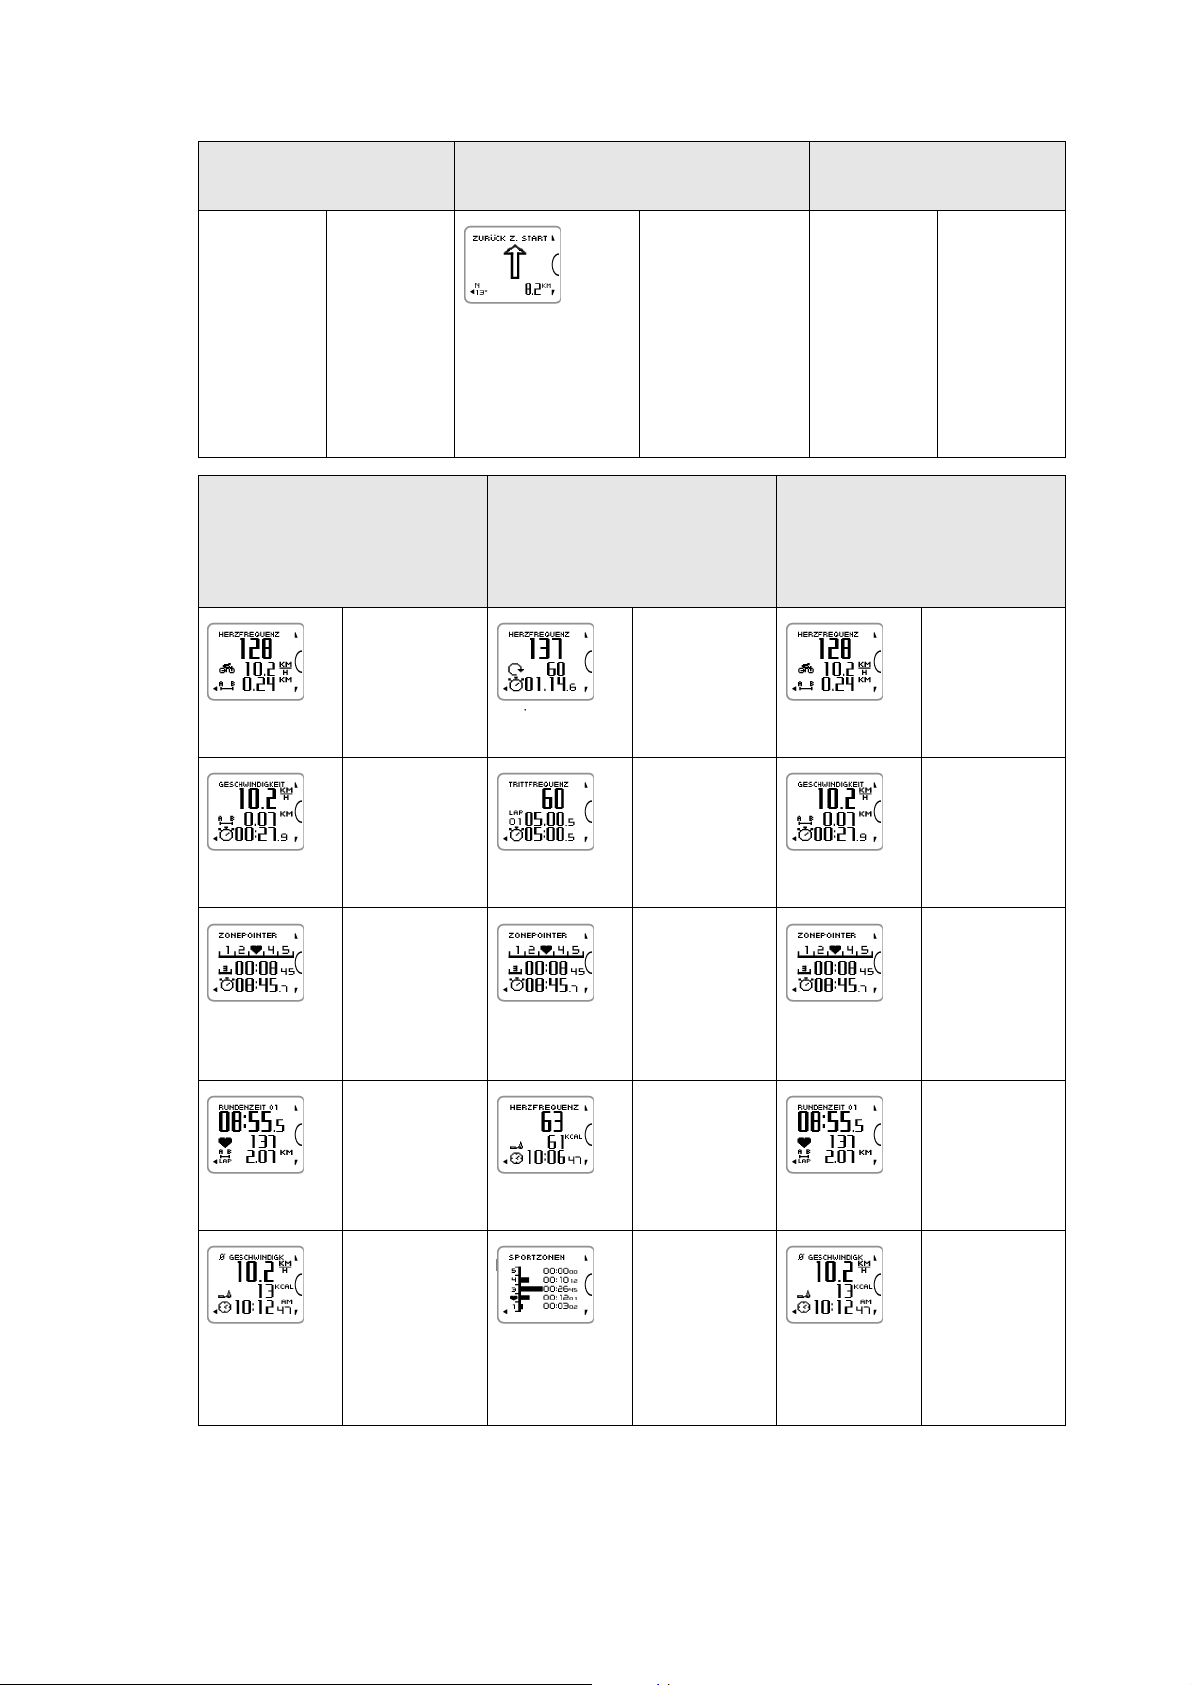
DEUTSCH
Herzfrequenz-Sensor Herzfrequenz-Sensor
GPS-Funktion eingeschaltet
Herzfrequenz-Sensor
CS Rad-Geschwindigkeitssensor
W.I.N .D.
HERZFREQUENZ
Herzfrequenz-Sensor
CS Rad-Trittfrequenzsensor
W.I.N .D.
Herzfrequenz
Geschwindigkeit/Tempo
ZURÜCK Z. START
Ein Pfeil weist in
Richtung Ihres
Startpunkts.
Weitere
Informationen
finden Sie unter
Zurück z. Start
(Seite 23)
.
HERZFREQUENZ
Herzfrequenz
Trittfr e q u e n z
Herzfrequenz-Sensor
s3+ Laufsensor
Herzfrequenz-Sensor
CS Rad-Trittfrequenzsensor
W.I.N .D.
GPS-Funktion eingeschaltet
HERZFREQUENZ
Herzfrequenz
Geschwindigkeit/Tempo
Distanz
GESCHWINDIGKEIT/TEMPO
Geschwindigkeit/Tempo
Distanz
Dauer
ZONEPOINTER
ZonePointer
Zeit in der
Zone
Dauer
RUNDENZEIT 01
Rundenzeit
Herzfrequenz
Rundendistanz
Ø
GESCHWINDIGKEIT/TEMPO
Ø
Geschwindigkeit/Tempo
Kalorien
Dauer
TRITTFREQUENZ
Trittfr e q u e n z
Rundenzeit
Dauer
ZONEPOINTER
ZonePointer
Zeit in der
Zone
Dauer
HERZFREQUENZ
Herzfrequenz
Kalorien
Uhrzeit
SPORTZONEN
Zeit, die in
jeder Zone
verbracht
wurde
Distanz
GESCHWINDIGKEIT/TEMPO
Geschwindigkeit/Tempo
Distanz
Dauer
ZONEPOINTER
ZonePointer
Zeit in der
Zone
Dauer
RUNDENZEIT 01
Rundenzeit
Herzfrequenz
Rundendistanz
Ø
GESCHWINDIGKEIT/TEMPO
Ø
Geschwindigkeit/Tempo
Kalorien
Uhrzeit
Uhrzeit
Training 19
Page 80

DEUTSCH
Herzfrequenz-Sensor
CS Rad-Geschwindigkeitssensor
W.I.N .D.
SPORTZONEN
Zeit, die in
jeder Zone
verbracht
wurde
Herzfrequenz-Sensor
CS Rad-Trittfrequenzsensor
W.I.N .D.
Herzfrequenz-Sensor
CS Rad-Trittfrequenzsensor
W.I.N .D.
GPS-Funktion eingeschaltet
TRITTFREQUENZ
Trittfr e q u e n z
Geschwindigkeit/Tempo
Herzfrequenz
SPORTZONEN
Zeit, die in
jeder Zone
verbracht
wurde
ZURÜCK Z.
START
Ein Pfeil weist
in Richtung
Ihres
Startpunkts.
Weitere
Informationen
finden Sie
unter Zurück z.
Start (Seite 23)
.
Symbole in der Anzeige und Erklärung
Tri t tfre quen z
Geschwindigkeit der Kurbelumdrehungen am Fahrrad
Kalorien
Die bisher verbrauchten Kalorien. Die Messung des
Kalorienverbrauchs wird gestartet, sobald Ihre
Herzfrequenz angezeigt wird.
Distanz
Die kumulierte Distanz
Dauer
Gesamtdauer der Trainingseinheit bisher
20 Training
Page 81

Symbole in der Anzeige und Erklärung
Herzfrequenz-Sensor
Ihre aktuelle Herzfrequenz
Rundendistanz
Die Rundendistanz der manuell genommenen/gestoppten
Runde
Rundenzeit
Die manuell genommene/gestoppte Rundenanzahl und
Rundenzeit
Geschwindigkeit/Temp o
DEUTSCH
Aktuelles Tempo (min/km) oder Aktuelle Geschwindigkeit
(km/h)
Dieses Symbol wird angezeigt, wenn die GPS-Funktion
eingeschaltet ist. Die Anzahl von Balken über dem
Buchstaben G gibt die Stärke des GPS-Signals an.
Dieses Symbol wird angezeigt, wenn der s3+ Laufsensor
verwendet wird.
Dieses Symbol wird angezeigt, wenn der CS
Rad-Geschwindigkeits W.I.N.D. verwendet wird.
Sie können in den Einstellungen für die Sportprofile die
Geschwindigkeitsansicht auswählen. Anweisungen finden
Sie unter Sportprofil-Einstellungen (Seite 12).
ZonePointer
Zielzonenanzeige mit einem Herzsymbol, das sich auf der
SportZonenskala je nach Ihrer Herzfrequenz nach links
oder nach rechts bewegt.
Zeit in der Zone
Zeit in der Zielzone
Uhrzeit
Training 21
Page 82

DEUTSCH
Symbole in der Anzeige und Erklärung
Tastenfunktionen während des Trainings
Rundenzeit nehmen
Drücken Sie während des Trainings die START -Taste, um eine Rundenzeit zu
nehmen. In der Anzeige wird Folgendes angezeigt:
Rundenanzahl
Durchschnittliche Herzfrequenz der Runde
Rundenzeit
Wenn ein Geschwindigkeitssensor aktiviert ist, wird außerdem Folgendes angezeigt:
Rundenanzahl
Durchschnittliche(s) Geschwindigkeit/Tempo der Runde
Rundendistanz
SportZone sperren
Sie können Ihre Herzfrequenz auf die aktuelle SportZone festlegen (sperren).
Um die SportZone zu sperren oder freizugeben, drücken und halten Sie die START-Taste.
Wenn Sie z. B. mit einer Herzfrequenz von 130 Schlägen pro Minute
laufen, was z. B. 75 % Ihrer maximalen Herzfrequenz und somit
SportZone 3 entspricht, können Sie Ihre Herzfrequenz auf diese Zone
festlegen (die Zone sperren), indem Sie die START-Taste gedrückt halten.
SportZone 3 gesperrt wird angezeigt.
Wenn Sie unterhalb oder oberhalb der SportZone trainieren, ertönt ein Alarmton. Um
die SportZone freizugeben, halten Sie die START -Taste erneut gedrückt: SportZone
3freigegebenwird angezeigt.
Nacht-Modus
Der Trainingscomputer bietet einen Nacht-Modus. Drücken Sie im Vorstartmodus, im
Trainin g s a u f z e i c hnungsmodus oder i m P a u s e m o d u s e i n m a l di e LIGHT-Taste. Bei jedem Drücken einer der
Tasten w ird d i e nu n die D i splaybeleuc h t u n g ak t i v i e r t .
Die Anzeige wird auch beleuchtet, wenn eine Meldung, z. B. Herzfrequenz-Sensor überprüfen,angezeigt
wird.
Der Nacht-Modus wird deaktiviert, wenn Sie die Aufzeichnung des Trainings beenden.
Schnell-Menü anzeigen
Halten Sie die LIGHT-Taste gedrückt. SCHNELL-MENÜ wird angezeigt. Sie können bestimmte Einstellungen
ändern, ohne die Aufzeichnung der Trainingseinheit zu unterbrechen. Weitere Informationen finden Sie
unter Schnell-Menü (Seite 35).
Unterbrechen oder Beenden des Trainings
1. Um die Aufzeichnung des Trainings zu unterbrechen, drücken Sie einmal die BACK-Taste. Um die
Aufzeichnung des Trainings fortzusetzen, drücken Sie die START -Taste.
2. Um die Aufzeichnung komplett zu stoppen, drücken Sie zweimal die BACK-Taste. Die folgende
Zusammenfassung Ihrer Trainingsinformationen wird angezeigt.
• Feedback in Textform. Beispielsweise wird Herz-Kreislauf-Training+ angezeigt, wenn Sie mindestens
22 Training
Page 83

DEUTSCH
10 Minuten lang in den SportZonen trainiert haben. In den Trainingsdateien finden Sie die
gespeicherten Dateien und Sie erhalten ein ausführlicheres Feedback. Weitere Informationen finden
Sie unter Nach dem Training (Seite 24).
• Dauer und Kalorien
• ØHerzfrequenz und Maximale Herzfrequenz
• SportZonen (Zeit in jeder Zone)
• ØTempound Maximales Tempo oder ØGeschwindigkeitund Maximale Geschwindigkeit (wird
angezeigt, wenn die GPS-Funktion eingeschaltet ist oder der s3+ Laufsensor/CS
Rad-Geschwindigkeitssensor verwendet wird)
• Distanz (wird angezeigt, wenn die GPS-Funktion eingeschaltet ist oder der s3+ Laufsensor/CS
Rad-Geschwindigkeitssensor verwendet wird) und Running Index (wird angezeigt, wenn die
GPS-Funktion eingeschaltet ist oder der s3+ Laufsensor verwendet wird)
Pflegen Sie Ihren Herzfrequenz-Sensor nach dem Training. Trennen Sie die Sendeeinheit nach dem Training vom
Gurt und waschen Sie den Gurt nach jedem Gebrauch unter fließendem Wasser aus. Ausführliche Informationen zur
Pflege und Wartung finden Sie unter Pflege Ihres Produktes (Seite 53).
Zurück z. Start
Die Funktion Zurück z. Start führt Sie zurück zu Ihrem Startpunkt. Während der Trainingscomputer zu
Beginn der Trainingseinheit die GPS-Satellitensignale findet, wird Ihr Standort als Startpunkt gespeichert.
Wenn Sie zu Ihrem Startpunkt zurückkehren möchten, gehen Sie folgendermaßen vor:
• Wechseln Sie zur ZURÜCK Z. START-Anzeige.
• Halten Sie den RC3 GPS waagerecht vor sich
(„POLAR“ Logo nach vorn).
• Bewegen Sie sich weiter, damit der RC3 GPS Ihre
Bewegungsrichtung bestimmen kann. Ein Pfeil
weist in Richtung Ihres Startpunkts.
• Um zu Ihrem Startpunkt zurückzukehren, folgen
Sie dem Pfeil.
• Der RC3 GPS zeigt außerdem Ihre aktuellen
Koordinaten und die direkte Distanz (Luftlinie)
zwischen Ihnen und dem Startpunkt an.
Wenn Sie Ihren Startpunkt erreicht haben, wird Startpunkt
err e icht angezeigt.
Halten Sie stets eine Karte für den Fall bereit, dass der RC3 GPS das Satellitensignal verliert oder die Batterie sich
entlädt.
Diese Funktion verwendet die GPS-Funktion. Schalten Sie die GPS-Funktion unter Sportprofil-Einstellungen
(Seite 31) ein.
Training 23
Page 84

DEUTSCH
6. NACH DEM TRAINING
Trainingsnutzen
Die Funktion Tra i ning snut zen hilft Ihnen, die Effektivität Ihres Trainings besser zu verstehen. Diese
Funktion erfordert die Verwendung des Herzfrequenz-Sensors. Sie erhalten nach jeder Trainingseinheit
Feedback in Textform zur Ihrer Leistung, sofern Sie für mindestens 10 Minuten in den SportZonen
trainiert haben. Das Feedback basiert auf der Trainingszeitverteilung in SportZonen, dem
Kalorienverbrauch und der Dauer. In den Trainingsdateien werden Ihre Trainingsdaten gespeichert und Sie
erhalten hier ausführlicheres Feedback. Die Beschreibungen der verschiedenen Optionen für den
Trainin g s n u t z e n si n d in der f o l genden Ta b e l le a u f g e f ü h r t.
Übertragen Sie Ihre Trainingsdaten an den Web-Service www.polarpersonaltrainer.com, um den Nutzen Ihres
Trainings noch detaillierter zu analysieren.
Feedback Tra i ning snut zen
Maximaltraining+ Das war eine harte Einheit! Sie haben Ihr
Wettkampftempo und die neuronale Ansteuerung
Ihrer Muskeln verbessert, was Ihre
Bewegungsökonomie steigert. Sowie Ihre
Beständigkeit gegen Ermüdung verbessert.
Maximaltraining Das war eine harte Einheit! Sie haben Ihr
Wettkampftempo und die neuronale Ansteuerung
Ihrer Muskeln verbessert, was Ihre
Bewegungsökonomie steigert.
Maximal- & Tempotraining Was für eine Einheit! Sie haben Ihr Tempo und
Ihre Effizienz gesteigert. Diese Einheit hat auch
Ihre aerobe Fitness und Toleranz gegen lange,
intensive Belastungen deutlich verbessert.
Tempo- & Maximaltraining Was für eine Einheit! Sie haben Ihre aerobe
Fitness und Ihre Toleranz gegen lange, intensive
Belastungen deutlich verbessert. Diese Einheit hat
auch Ihre Geschwindigkeit und Effizienz
gesteigert.
Tempotraining+ Sehr gutes Tempo in einer langen Einheit! Sie
haben Ihre aerobe Fitness, Geschwindigkeit und
Toleran z gegen l ange, i n t e n sive B e l a s t ungen s o w i e
Ihre Beständigkeit gegen Ermüdung verbessert.
Tempotraining Klasse Tempo! Sie haben Ihre aerobe Fitness,
Geschwindigkeit und Toleranz gegen lange,
intensive Belastungen verbessert.
Tempo- & Herz-Kreislauf-Training Gutes Tempo! Sie haben Ihre Toleranz gegen
lange, intensive Belastungen verbessert. Diese
Einheit hat auch Ihre aerobe Fitness und Ihre
Muskelausdauer entwickelt.
Herz-Kreislauf- & Tempotraining Gutes Tempo! Sie haben Ihre aerobe Fitness und
Muskelausdauer sowie Ihre Toleranz gegen lange,
intensive Belastungen verbessert.
Herz-Kreislauf-Training+ Sehr gut! Diese lange Einheit hat Ihre
Muskelausdauer und Ihre aerobe Fitness sowie
Ihre Beständigkeit gegen Ermüdung verbessert.
Herz-Kreislauf-Training Sehr gut! Sie haben Ihre Muskelausdauer und Ihre
aerobe Fitness verbessert.
24 Nach dem Training
Page 85

DEUTSCH
Feedback Tra i ning snut zen
Herz-Kreislauf- & Basistraining, lang Exzellent! Diese lange Einheit hat die Ausdauer
Ihrer Muskeln und Ihre aerobe Fitness sowie Ihre
Grundlage und den Fettstoffwechsel Ihres Körpers
gesteigert.
Herz-Kreislauf- & Basistraining Exzellent! Sie haben Ihre Muskelausdauer und
Ihre aerobe Fitness verbessert. Diese Einheit hat
auch Ihre Grundlage und den Fettstoffwechsel
Ihres Körpers gesteigert.
Basis- & Herz-Kreislauf-Training, lang Super! Diese lange Einheit hat Ihre Grundlage und
die Fähigkeit Ihres Körpers, beim Training Fette
als Energiequelle zu nutzen sowie Ihre
Muskelausdauer und aerobe Fitness verbessert.
Basis- & Herz-Kreislauf-Training Super! Sie haben Ihre Grundlage und den
Stoffwechsel Ihres Körpers zum Verbrennen von
Fett verbessert. Diese Einheit hat auch Ihre
Muskelausdauer und aerobe Fitness verbessert.
Basistraining, lang Super! Diese lange Einheit mit geringer Intensität
hat Ihre Grundlage und die Fähigkeit Ihres
Körpers, beim Training Fette als Energiequelle zu
nutzen, verbessert.
Basistraining Sehr gut! Diese Einheit mit geringer Intensität hat
Ihre Grundlage und die Fähigkeit Ihres Körpers
verbessert, während des Trainings Fett zu
verbrennen.
Erholungstraining Sehr gute Einheit für Ihre Erholung. Leichte
Belastungen wie diese ermöglichen Ihrem Körper,
sich von intensivem Training zu erholen.
Trainingsdateien
Wenn die Trainingseinheit mindestens eine Minute gedauert hat, zeichnet der Trainingscomputer Ihre
Trainin g s d a t e n in den Trainingsdateien auf.
Um die Zusammenfassung Ihrer Trainingsdaten aufzurufen, wählen Sie MENÜ > Daten > Trainingsdateien .
Um eine ausführlichere Analyse vorzunehmen, übertragen Sie die Daten mit dem USB-Kabel und der
WebSync Software auf polarpersonaltrainer.com. Der Web-Service bietet verschiedene Optionen für die
Datenanalyse.
Blättern Sie in Trainingsdateien mit der UP- oder DOWN-Taste, um die Datei auszuwählen, die Sie
ansehen möchten, und drücken Sie die START-Taste.
Die in einer Trainingsdatei gespeicherten Informationen hängen vom Sportprofil und den verwendeten
Sensoren ab. Die folgende Tabelle enthält Beispiele für Trainingsdatei-Ansichten zu den Sportarten
Laufen und Rad fahren.
TRAININGSDATEI-ANSICHTEN ANGEZEIGTE INFORMATIONEN
Feedback in Textform zu Ihrer Leistung. Beispielsweise wird
Herz-Kreislauf-Training+ angezeigt, wenn Sie für mindestens 10
Minuten in den SportZonen trainiert haben.
Um den Trainingsnutzen anzusehen, wählen Sie durch Drücken der
START -Taste Mehr Details aus.
Nach dem Training 25
Page 86

DEUTSCH
TRAININGSDATEI-ANSICHTEN ANGEZEIGTE INFORMATIONEN
Startzeit
Dauer
Distanz (wird angezeigt, wenn die GPS-Funktion eingeschaltet war
oder der s3+ Laufsensor/CS Rad-Geschwindigkeitssensor verwendet
wurde)
Durchschnittliche Herzfrequenz
Maximale Herzfrequenz
Minimale Herzfrequenz
(wird angezeigt, wenn der Herzfrequenz-Sensor verwendet wurde)
Kalorien
%FettanteilderKalorien
(wird angezeigt, wenn der Herzfrequenz-Sensor verwendet wurde)
ØTempo/ØGeschwindigkeit
Maximales Tempo/Maximale Geschwindigkeit
(wird angezeigt, wenn die GPS-Funktion eingeschaltet war oder der
s3+ Laufsensor/CS Rad-Geschwindigkeitssensor verwendet wurde)
ØTrittfrequenz
Maximale Trittfrequenz
(wird angezeigt, wenn der s3+ Laufsensor oder CS
Rad-Trittfrequenzsensor verwendet wurde)
Running Index
(wird angezeigt, wenn die GPS-Funktion eingeschaltet war oder der
s3+ Laufsensor/CS Rad-Geschwindigkeitssensor verwendet wurde)
ØSchrittlänge(wird angezeigt, wenn der s3+ Laufsensor verwendet
wurde)
Running Index (wird angezeigt, wenn die GPS-Funktion eingeschaltet
war oder der s3+ Laufsensor verwendet wurde)
Rad in Gebrauch
Radfahrdauer
(wird angezeigt, wenn die Sportart der Trainingsdatei Rad fahren ist)
SportZonen
Zeit in jeder Zone
26 Nach dem Training
(wird angezeigt, wenn der Herzfrequenz-Sensor verwendet wurde)
Zonenlimits
(werden angezeigt, wenn ZoneOptimizer und Herzfrequenz-Sensor
verwendet wurden)
Page 87

TRAININGSDATEI-ANSICHTEN ANGEZEIGTE INFORMATIONEN
Runden/Auto. Runden (Anzahl der Runden)
Beste Runde
ØRunde
Um ausführliche Rundeninformationen aufzurufen, wählen Sie
durch Drücken der START-Taste Mehr Details.
Sie können mit der UP-oderDOWN-Taste in den Runden blättern.
Drücken Sie die START-Taste, um die folgenden Informationen für
eine bestimmte Runde anzuzeigen.
DEUTSCH
Die folgenden
Informationen zu
RUNDE 1/A. RUNDE 1
werden angezeigt:
Rundenzeit
Zwischenzeit
ØHerzfrequenz
Maximale
Herzfrequenz
ØTempo/Ø
Geschwindigkeit
Maximales
Tempo/Maximale
Geschwindigkeit
(wird angezeigt,
wenn die
GPS-Funktion
eingeschaltet war
oder der s3+
Laufsensor/CS
Rad-Geschwindigkeitssensor
verwendet wurde)
Rundendistanz
Zwischenzeitdistanz
(wird angezeigt,
wenn die
GPS-Funktion
eingeschaltet war
oder der s3+
Laufsensor/CS
Rad-Geschwindigkeitssensor
verwendet wurde)
Nach dem Training 27
Page 88

DEUTSCH
TRAININGSDATEI-ANSICHTEN ANGEZEIGTE INFORMATIONEN
ØTrittfrequenz
Maximale
Trittfrequenz
(wird angezeigt,
wenn der s3+
Laufsensor oder CS
Rad-Trittfrequenzsensor
verwendet wurde)
ØSchrittlänge
(wird angezeigt,
wenn der s3+
Laufsensor
verwendet wurde)
Dateien löschen
Der Speicher für Trainingsdateien ist voll, wenn die maximale Aufzeichnungsdauer oder die maximale
Anzahl von Dateien erreicht wurde. Weitere Informationen zu den Grenzwerten finden Sie unter
Technis c h e Spez i f i k a t i o n en ( S e i t e 57).
Wenn der Speicher für Trainingsdateien voll ist, wird die älteste Trainingsdatei mit der neuesten
Trainin g s d a t e i üb e r s c h r i eben. U m di e Traini n g s d a t e i e n f ü r eine n länger e n Zeit r a u m zu s peichern,
übertragen Sie sie in den Polar Web-Service auf www.polarpersonaltrainer.com. Weitere Informationen
finden Sie unter polarpersonaltrainer.com (Seite 30).
So löschen Sie eine Trainingsdatei:
1. Wählen Sie MENÜ > Daten > Dateien löschen > Einzelne Trainingsdatei und drücken Sie die
START -Taste. Blättern Sie mit der UP- oder DOWN-Taste durch die Dateien und wählen Sie die Datei
aus, die Sie löschen möchten. Drücken Sie die START-Taste. Datei löschen? JA/NEIN angezeigt.
Alternativ können Sie eine Datei über MENÜ > Daten > Trainingsdateien löschen. Blättern Sie mit der UPoder DOWN-Taste durch die Dateien, wählen Sie die zu löschende Datei aus und halten Sie die
LIGHT-Taste gedrückt. Datei löschen? JA/NEIN wird angezeigt.
2. Wählen Sie JA. Die Datei wurde gelöscht wird angezeigt. Danach wird Die Datei aus Gesamtwerten
löschen? angezeigt. Wenn Sie JA wählen, wird Datei aus Gesamtwerten gelöscht angezeigt. Wenn Sie
NEIN wählen, kehrt der Trainingscomputer zum Menü Trainingsdateien zurück. Hinweis: Durch das
Löschen einer Datei aus den Gesamtwerten werden keine Daten aus den Wochenzusammenfassungen
gelöscht. Wochenzusammenfassungen können nur zurückgesetzt werden.
So löschen Sie alle Dateien:
1. Wählen Sie MENÜ > Daten > Dateien löschen > Alle Dateien und drücken Sie die START-Taste. Alle
Dateien löschen?
JA/NEIN angezeigt.
2. Wählen Sie JA. Anschließend wird Alle Dateien wurden gelöscht angezeigt. Wenn Sie NEIN wählen, kehrt
der Trainingscomputer zum Menü Alle Dateien zurück.
Wochenzusammenfassungen
Um die Wochenzusammenfassung der Trainingsdateien abzurufen, wählen Sie MENÜ > Daten >
Wochenzusammenfass. > ZUSAMMENFASS.,unddrückenSiedieSTART-Taste.
28 Nach dem Training
Page 89

DEUTSCH
ZUSAMMENFASS.
Aktuelle Woche
Die Daten der Woche, in der die
Trainin g s e i n h e i t en g e s p e i c h ert w u r d e n .
Dauer
Distanz
Kalorien
Trainin g s e i n h e i t enanzahl
SportZonen 1, 2, 3, 4 und 5
Zeit, die in jeder Zone trainiert wurde
Wochenzusammenfassungen zurücksetzen
Um Wochenzusammenfassungen zurückzusetzen, wählen Sie MENÜ > Daten > Wochenzusammenfassung
zurücks.?.WennSieJa wählen, wird Wochenzusammenfassung zurückgesetzt angezeigt, und wenn Sie
Nein wählen, wird wieder das Menü Daten angezeigt.
Gesamtwerte seit dem xx.xx.xxxx
Um die Gesamtwerte der Trainingsdateien anzuzeigen, wählen Sie MENÜ > Daten > Gesamtwerte seit dem
und drücken Sie die START -Taste.
Dauer
Distanz
Kalorien
Trainin g s e i n h e i t enanzahl
SportZonen 1, 2, 3, 4 und 5
Zeit, die in jeder Zone trainiert wurde
Gesamtwerte zurücksetzen
Um die Gesamtwerte zurückzusetzen, wählen Sie MENÜ > Daten > Gesamtwerte zurücksetzen? .Wählen
Sie JA und Gesamtwerte wurden zurückgesetzt wird angezeigt. Wenn Sie NEIN wählen, kehrt der
Trainin g s c o m p u t e r z u m Menü Daten z u rück.
Nach dem Training 29
Page 90

DEUTSCH
7. POLARPERSONALTRAINER.COM
Analysieren Sie Ihre Trainingsdaten
Speichern Sie für eine langfristige Nachverfolgung alle Trainingsdateien in unserem kostenlosen
Web-Service polarpersonaltrainer.com. Sie können dort detaillierte Informationen zu Ihren
Trainin g s e i n h eiten a b r u f en un d sic h einen besseren Überblick über d i e Train i n g s e r gebnisse v e rschaffen.
Mit dem USB-Kabel und der Polar WebSync Software können Sie Trainingsdateien bequem an den
Web-Service polarpersonaltrainer.com übertragen.
Verwenden Sie für die Datenübertragung das USB-Kabel (im Lieferumfang enthalten). Wenn Sie ein anderes
USB-Kabel verwenden, stellen Sie sicher, dass es sich um ein USB 2.0-kompatibles USB A/Micro B-Kabel handelt.
Einrichten Ihres PCs für die Datenübertragung
1. Registrieren Sie sich bei polarpersonaltrainer.com.
2. Laden Sie die Polar WebSync Software von polarpersonaltrainer.com auf Ihren Computer herunter und
installieren Sie diese.
3. Stecken Sie den Micro-USB-Stecker in den USB-Anschluss am Trainingscomputer und den USB-Stecker
in den USB-Anschluss Ihres PCs.
4. Die WebSync Software wird automatisch gestartet und das Begrüßungsfenster wird geöffnet (Sie können
auch in der Taskleiste/Menüleiste auf das WebSync Symbol doppelklicken, um die Software zu starten).
Wenn Sie Trainingsdaten übertragen möchten, wählen Sie Synchronisierung . Wenn Sie eine Verbindung
mit Ihrem Trainingscomputer herstellen möchten, um Einstellungen zu ändern und auf den
Trainingscomputer zu übertragen, wählen Sie Trainingscomputer .
Weitere Informationen zum Übertragen von Daten und Ändern der Einstellungen des Trainingscomputers
finden Sie in der WebSync Hilfe
[https://www.polarpersonaltrainer.com/help/websync2/de/Polar_WebSync_2.x_Help_DE.htm].
Verwenden der Ausdauertrainingsprogramme von Polar
Nutzen Sie entweder das vorgefertigte Polar-Ausdauerprogramm für Laufen oder Radfahren oder erstellen
Sie Ihre eigenen abgestuften Trainingseinheiten auf polarpersonaltrainer.com. Übertragen Sie diese Daten
mit dem USB-Kabel und der WebSync-Software auf den Trainingscomputer. Weitere Informationen finden
Sie im Hilfebereich auf polarpersonaltrainer.com
[https://www.polarpersonaltrainer.com/help/de/index.html].
Öffnen Sie nach dem Übertragen des Programms in den Trainingscomputer MENÜ > PROGRAMM und drücken
Sie START.MitdenTastenUP/DOWN können Sie die geplanten Trainingseinheiten ansehen und die
gewünschte Trainingseinheit aussuchen (beispielsweise Do 26.8. Langlauf 20 km). Drücken Sie zum
Starten des Trainings auf START .
Weitere Informationen zu Ausdauerprogrammen finden Sie unter Polar Ausdauer-Trainingsprogramm zum
Laufen und Rad fahren (Seite 51).
30 polarpersonaltrainer.com
Page 91

DEUTSCH
8. EINSTELLUNGEN
Sportprofil-Einstellungen
Passen Sie die Einstellungen für die Sportprofile unter MENÜ > Einstellungen > Sportprofile an Ihre
Trainin g s a n f o r d e rungen a n . Si e kön n e n beis p i e l s w e i s e d i e Sens o r e n akt i v i e r e n , di e Si e für v e r schiedene
Sportarten verwenden möchten. Wenn Sie dann eine Trainingseinheit mithilfe des Sportprofils starten,
erkennt der Trainingscomputer die benötigten Sensoren automatisch.
Standardmäßig sind im Vorstartmodus vier Sportprofile verfügbar: Laufen, Rad fahren (Rad 1), And. Sport 1
und And. Sport 2.DasfünfteSportprofil,Rad fahren (Rad 2) wird im Vorstartmodus standardmäßig nicht
angezeigt. Sie können unter Rad fahren Einstellungen festlegen, dass Rad fahren (Rad 2) im
Vorstartmodus angezeigt wird.
Der Herzfrequenz-Sensor ist in jeder Sportart standardmäßig aktiviert. Der Trainingscomputer startet die Suche
nach dem Signal des Herzfrequenz-Sensors automatisch, wenn Sie in der Uhrzeitanzeige die START-Taste
drücken. Wenn Sie ein Modell ohne Herzfrequenz-Sensor gekauft haben, deaktivieren Sie diese Funktion unter MENÜ
> Eingaben > Sportprofile > Sportart > Herzfrequenz-Sensor > Aus.
Einstellungen zum Laufen
Um die Sportprofil-Einstellungen zum Laufen anzuzeigen oder zu bearbeiten, wählen Sie MENÜ > Eingaben
> Sportprofile > Laufen
• Trainingstöne: Wählen Sie Aus, Leise, Laut oder Sehr laut.
• Herzfrequenz-Sensor: Wählen Sie Ein, Aus oder Neuen suchen.
• GPS: Wählen Sie Ein oder Aus.
• Laufsensor: Wählen Sie Aus oder Neuen suchen. Wenn Sie bereits einen Laufsensor gekoppelt haben,
wird auch die Option Ein angezeigt.
• Laufsensor Kalibrierung: Wählen Sie Kalibrieren > Durch Laufen oder Kalibr. Faktor eingeben. Weitere
Informationen zur Kalibrierung finden Sie unter Polar s3+ Laufsensor kalibrieren (Seite 42).
Die Option zur Kalibrierung des Laufsensors wird nur angezeigt, wenn der Laufsensor zuvor eingeschaltet
wurde.
• Geschwind.-Ansicht:: Wählen Sie Kilometer pro Stunde oder Minuten pro Kilometer. Wenn Sie
imperische Einheiten gewählt haben, wählen Sie Meilen pro Stunde oder Minuten pro Meile.
• Automatische Rundennahme: Wählen Sie Ein oder Aus. Wenn Sie Automatische Rundennahme auf Ein
gestellt haben, wird Distanz eingeben angezeigt. Geben Sie die Distanz in Kilometern oder Meilen ein.
• Im Vorstartmodus zeigen: Wählen Sie JA und Sportart ist im Vorstartmodus aktiviert wird angezeigt.
Wenn Sie in der Uhrzeitanzeige die START-Taste drücken, wird die Sportart in der Liste der Sportarten im
Vorstartmodus angezeigt. Wählen Sie NEIN und Sport nicht im Vorstartmodus verfügbar wird angezeigt.
• Trainingsansicht nummerieren : Wählen Sie Ein oder Aus. Wenn Sie Trainingsansicht nummerieren auf Ein
stellen, wird beim Blättern in den Trainingsansichten mit der UP- oder DOWN-Taste für einige Sekunden
die Nummer der Trainingsansicht angezeigt.
• Trainingsansicht: Wählen Sie 3ZEILENoder 2ZEILEN. Die Trainingsinformationen werden je nach Ihrer
Auswahl in drei oder zwei Zeilen angezeigt.
Alle neuen Sensoren müssen mit dem Trainingscomputer gekoppelt werden, bevor sie aktiviert werden können.
Weitere Informationen zum Koppeln eines neuen Sensors mit dem Trainingscomputer finden Sie unter
Neues Zubehör (Seite 40).
Einstellungen zum Rad fahren
Um die Sportprofil-Einstellungen zum Rad fahren anzuzeigen oder zu bearbeiten, wählen Sie MENÜ >
Eingaben > Sportprofile > Rad fahren (Rad 1) /Rad fahren (Rad 2)
Einstellungen 31
Page 92

DEUTSCH
• Trainingstöne: Wählen Sie Aus, Leise, Laut oder Sehr laut.
• Herzfrequenz-Sensor: Wählen Sie Ein, Aus oder Neuen suchen.
• GPS: Wählen Sie Ein oder Aus.
• Rad 1 Einstellungen Weitere Informationen finden Sie unter Radeinstellungen.
• Geschwind.-Ansicht: Wählen Sie Kilometer pro Stunde oder Minuten pro Kilometer. Wenn Sie imperische
Einheiten gewählt haben, wählen Sie Meilen pro Stunde oder Minuten pro Meile.
• Automatische Rundennahme ist automatisch ausgeschaltet. Drücken Sie die START-Taste und Distanz
eingeben wird angezeigt. Geben Sie die Distanz in Kilometern oder in Meilen ein und bestätigen Sie mit
der START -Taste. Auto. Runde eingestellt auf x.x km wird angezeigt. Danach können Sie durch Drücken
der START-Taste nochmals festlegen, ob die Automatische Rundennahme ausgeschaltet oder
eingeschaltet werden soll.
• Im Vorstartmodus zeigen: Wählen Sie JA und Sportart ist im Vorstartmodus aktiviert wird angezeigt.
Wenn Sie in der Uhrzeitanzeige die START-Taste drücken, wird die Sportart in der Liste der Sportarten im
Vorstartmodus angezeigt. Wählen Sie NEIN und Sport nicht im Vorstartmodus verfügbar wird angezeigt.
• Trainingsansicht nummerieren : Wählen Sie Ein oder Aus. Wenn Sie Trainingsansicht nummerieren auf Ein
stellen, wird beim Blättern in den Trainingsansichten mit der UP- oder DOWN-Taste für einige Sekunden
die Nummer der Trainingsansicht angezeigt.
• Trainingsansicht: Wählen Sie 3ZEILENoder 2ZEILEN. Die Trainingsinformationen werden je nach Ihrer
Auswahl in drei oder zwei Zeilen angezeigt.
Radeinstellungen
Um die Radeinstellungen anzuzeigen oder zu bearbeiten, wählen Sie MENÜ > Eingaben > Sportprofile >
Rad fahren (Rad 1)/Radfahren (Rad 2) > Rad 1 Einstellungen /Rad 2 Einstellungen .
• Geschwindigkeitssensor: Wählen Sie Aus oder Neuen suchen. Wenn Sie bereits einen
Geschwindigkeitssensor gekoppelt haben, wird auch die Option Ein angezeigt.
• Reifenumfang: Stellen Sie den Reifenumfang auf xxxx mm ein. Weitere Informationen zum Messen des
Reifenumfangs finden Sie unter Reifenumfang messen.
• Trittfrequenzsensor: Wählen Sie Aus oder Neuen suchen. Wenn Sie bereits einen Trittfrequenzsensor
gekoppelt haben, wird auch die Option Ein angezeigt.
• Autostart: Wählen Sie Ein oder Aus. Wenn Sie Ein wählen, wird Geschwindigkeitssensor aktivieren?
JA/NEIN angezeigt. Wählen Sie JA. Autostart eingeschaltet wird angezeigt. Wenn Sie Ihren
Trainingscomputer noch nicht mit einem Geschwindigkeitssensor gekoppelt haben, wird
Rad-Geschw.-sensor wird benötigt angezeigt und der Trainingscomputer kehrt zu Rad 1
Einstellungen /Rad 2 Einstellungen zurück. Wenn Sie NEIN wählen, wird Aktivierung abgebrochen
angezeigt.
Alle neuen Sensoren müssen mit dem Trainingscomputer gekoppelt werden, bevor sie aktiviert werden können.
Weitere Informationen zum Koppeln eines neuen Sensors mit dem Trainingscomputer finden Sie unter
Neues Zubehör (Seite 40).
Reifenumfang messen
Wählen Sie MENÜ > Eingaben > Sportprofile > Rad fahren (Rad 1)/Rad fahren (Rad 2) > Rad 1/2
Einstellungen > Reifenumfang > Reifenumfang einstellen
Die Einstellungen für den Reifenumfang sind für korrekte Radfahrdaten unbedingt erforderlich. Es gibt
zwei Verfahren, um den Reifenumfang Ihres Fahrrades zu ermitteln:
Methode 1
Suchen Sie nach dem Durchmesser in Zoll oder ETRTO auf dem Reifen. Bestimmen Sie den
Reifenumfang anhand der rechten Spalte in der Tabelle.
ETRTO Reifendurchmesser (Zoll) Reifenumfang (mm)
25-559 26 x 1,0 1884
32 Einstellungen
Page 93

ETRTO Reifendurchmesser (Zoll) Reifenumfang (mm)
23-571 650 x 23C 1909
35-559 26 x 1.50 1947
37-622 700 x 35C 1958
47-559 26 x 1.95 2022
20-622 700 x 20C 2051
52-559 26 x 2.0 2054
23-622 700 x 23C 2070
25-622 700 x 25C 2080
28-622 700 x 28 2101
32-622 700 x 32C 2126
42-622 700 x 40C 2189
47-622 700 x 47C 2220
DEUTSCH
Bei den Reifenumfangswerten in der Tabelle handelt es sich um Durchschnittswerte, weil der tatsächliche Umfang
von der Art des Reifens und dem Luftdruck abhängt.
Methode 2
Das genaueste Ergebnis erzielen Sie, wenn Sie den Reifenumfang manuell messen.
Markieren Sie mithilfe des Ventils den Punkt, an dem der Reifen den Boden berührt. Ziehen Sie eine Linie
auf dem Boden, um diesen Punkt festzulegen. Bewegen Sie Ihr Rad auf der flachen Oberfläche um eine
komplette Umdrehung vorwärts. Der Reifen sollte lotrecht zum Boden stehen. Ziehen Sie eine weitere
Linie auf dem Boden, um eine volle Umdrehung zu markieren. Messen Sie den Abstand zwischen den
beiden Linien.
Subtrahieren Sie 4 mm, damit das Gewicht Ihres Körpers auf dem Rad bei der Bestimmung des
Reifenumfangs berücksichtigt wird. Geben Sie diesen Wert in den Trainingscomputer ein.
Einstellungen für andere Sportarten
Um die Sportprofil-Einstellungen für andere Sportarten anzuzeigen oder zu bearbeiten, wählen Sie MENÜ >
Eingaben > Sportprofile > Anderer Sport 1 / Anderer Sport 2
• Trainingstöne: Wählen Sie Aus, Leise, Laut oder Sehr laut.
• Herzfrequenz-Sensor: Wählen Sie Ein, Aus oder Neuen suchen.
• GPS: Wählen Sie Ein oder Aus.
• Laufsensor: Wählen Sie Kilometer pro Stunde oder Minuten pro Kilometer. Wenn Sie imperische
Einheiten gewählt haben, wählen Sie Meilen pro Stunde oder Minuten pro Meile
• Automatische Rundennahme: Stellen Sie Ein oder Aus ein. Wenn Sie Automatische Rundennahme auf Ein
gestellt haben, wird Distanz eingeben angezeigt. Geben Sie die Distanz in Kilometern oder Meilen ein.
• Im Vorstartmodus zeigen: Wählen Sie JA und Sportart ist im Vorstartmodus aktiviert wird angezeigt.
Wenn Sie in der Uhrzeitanzeige die START-Taste drücken, wird die Sportart in der Liste der Sportarten im
Vorstartmodus angezeigt. Wählen Sie NEIN und Sport nicht im Vorstartmodus verfügbar wird angezeigt.
• Trainingsansicht nummerieren : Wählen Sie Ein oder Aus. Wenn Sie Trainingsansicht nummerieren auf Ein
stellen, wird beim Blättern in den Trainingsansichten mit der UP- oder DOWN-Taste für einige Sekunden
die Nummer der Trainingsansicht angezeigt.
• Trainingsansicht: Wählen Sie 3ZEILENoder 2ZEILEN. Die Trainingsinformationen werden je nach Ihrer
Einstellungen 33
Page 94

DEUTSCH
Auswahl in drei oder zwei Zeilen angezeigt.
Alle neuen Sensoren müssen mit dem Trainingscomputer gekoppelt werden, bevor sie aktiviert werden können.
Weitere Informationen zum Koppeln eines neuen Sensors mit dem Trainingscomputer finden Sie unter
Neues Zubehör (Seite 40).
Herzfrequenz-Einstellungen
Um Herzfrequenz-Einstellungen anzuzeigen und zu bearbeiten, wählen Sie MENÜ > Eingaben >
HF-Einstellungen .
• ZoneOptimizer: Wählen Sie Ein oder Aus.
• HF-Ansicht: Wählen Sie Schläge pro Minute (SCHLÄGE/MIN.) oder Prozent von HFmax (% DER HFMAX).
• Herzfrequenz-Zonensperre : Wählen Sie Herzfrequenz-Zonensperre AUS oder sperren Sie eine der
Zonen, indem Sie Zone 1, Zone 2, Zone 3, Zone 4 oder Zone 5 wählen. Zone X ist gesperrt wird dann
beispielsweise angezeigt.
• SportZonen: Stellen Sie die HF-Limits für Zone 1, 2, 3, 4 und 5 ein: Weitere Informationen zu
SportZonen finden Sie unter Polar SportZonen (Seite 44).
Bevor Sie die Zonenlimits ändern, müssen Sie die ZoneOptimizer Funktion deaktivieren. Zur
Zonenänderung erst ZoneOptimizer ausschalten wird angezeigt. ZoneOptimizer ausschalten? JA/NEIN?
Wählen Sie JA. ZoneOptimizer ist ausgeschaltet wird angezeigt. Sie können mit der Bearbeitung der
Zonenlimits beginnen.
Einstellungen für die Benutzerdaten
Geben Sie Ihre Benutzerdaten für den Trainingscomputer sorgfältig ein, um korrekte Leistungswerte zu
erhalten.
Um die Benutzerdaten anzuzeigen und zu bearbeiten, wählen Sie MENÜ > Eingaben > Benutzerdaten >
BENUTZERDATEN.BlätternSiemitderUP- oder DOWN-Taste durch die Auswahl und übernehmen Sie den
Wert mit der START-Taste.
• Gewicht: Geben Sie Ihr Gewicht in kg oder Pfund (lb) ein.
• Größe: Geben Sie Ihre Größe in Zentimetern (cm) oder in Fuß und Zoll ein (wenn Sie imperische Einheiten
gewählt haben).
• Geburtsdatum: Geben Sie Ihr Geburtsdatum ein. Die Reihenfolge, in der Sie die Datumseinstellungen
eingeben, hängt davon ab, welches Uhrzeit- und Datumsformat Sie gewählt haben (24 Std.: Tag - Monat Jahr / 12 Std.: Monat - Tag - Jahr).
• Geschlecht: Wählen Sie Männlich oder Weiblich.
• Aktivitätsniveau: Wählen Sie Niedrig (0-1 Std. Training/Woche), Mittel (1-3 Std./Woche), Hoch (3-5
Std./Woche) oder Top (5+ Std./Woche).
Beim Aktivitätsniveau handelt es sich um Ihr langfristiges physisches Aktivitätsniveau. Wählen Sie das
Niveau, das Umfang und Intensität Ihrer physischen Aktivitäten während der letzten drei Monate am
besten beschreibt. Das Aktivitätsniveau wird zur Bestimmung Ihres Kalorienverbrauchs verwendet.
• Top (5+ Std./W.): Sie trainieren regelmäßig, mindestens 5-mal wöchentlich bei intensiver körperlicher
Bewegung. Sie trainieren z. B., um Ihre Leistung für Wettkämpfe zu steigern.
• Hoch (3-5 Std./W.): Sie trainieren mindestens 3-mal wöchentlich bei intensiver körperlicher Belastung.
Sie laufen z. B. 20-50 km pro Woche oder verbringen 3-5 Stunden wöchentlich mit einer
vergleichbaren sportlichen Aktivität.
• Mittel (1-3 Std./W.) : Sie betreiben regelmäßig Freizeitsport. Sie laufen z. B. 5-10 km pro Woche oder
verbringen 1-3 Stunden wöchentlich mit einer vergleichbaren körperlichen Aktivität, oder Ihre Arbeit
erfordert eine mäßige körperliche Bewegung.
• Niedrig (0-1 Std./W.): Sie betreiben nicht regelmäßig Freizeitsport und sind körperlich nicht sehr aktiv.
Sie gehen z. B. nur zum Vergnügen spazieren oder trainieren nur gelegentlich intensiv genug, um zu
schwitzen.
• Maximale Herzfrequenz: Geben Sie Ihre maximale Herzfrequenz ein, wenn Sie Ihren Labormesswert für
34 Einstellungen
Page 95

die maximale Herzfrequenz kennen. Ihre altersabhängig vorhergesagte maximale Herzfrequenz (220 minus
Alter) wird als Standardeinstellung angezeigt, wenn Sie diesen Wert erstmals eingeben. Weitere
Informationen finden Sie unter Maximale Herzfrequenz (HF
• OwnIndex(VO
): Geben Sie Ihren OwnIndex (VO
2max
2max
Wert) ein, wenn Sie Ihren Labormesswert kennen.
max
).
Weitere Informationen finden Sie unter OwnIndex.
DEUTSCH
Maximale Herzfrequenz (HF
Die HF
Herzfrequenz in Schlägen pro Minute während einer maximalen physischen Belastung. Die HF
wird zur Bestimmung des Kalorienverbrauchs verwendet. Die HF
max
max
)
ist die höchste erreichte
max
max
ist auch
zur Bestimmung der Trainingsintensität nützlich. Die genaueste Methode zur Messung der individuellen
HF
ist eine Leistungsdiagnostik in einem Labor.
max
OwnIndex
®
Der Polar OwnIndex, das Ergebnis des Polar Fitness Test (Seite 37), sagt Ihre maximale
Sauerstoffaufnahmekapazität (VO
ist mit dem VO
Wert vergleichbar, dem Standard zur Bestimmung der aeroben Fitness. Der OwnIndex
2max
)voraus.DerOwnIndexliegtinderRegelzwischen20und95und
2max
wird durch das Langzeitniveau Ihrer physischen Aktivität, Ihre Herzfrequenz und Herzfrequenz-Variabilität
in Ruhe, Ihr Geschlecht, Alter, Größe und Ihr Körpergewicht beeinflusst. Je höher der OwnIndex Wert,
desto besser ist Ihre aerobe Fitness.
Allgemeine Einstellungen
Um die allgemeinen Einstellungen anzuzeigen und zu bearbeiten, wählen Sie MENÜ > Eingaben >
Allgemeine Einstellungen .
• Töne: Wählen Sie Ein oder Aus.
• Tastensperre: Wählen Sie Manuelle Tastensperre oder Automatische Tastensperre.
• Maßeinheiten: Wählen Sie Metrische Einh. (kg, m) oder Imperische Einh. (lbs, ft)
• Sprache: Wählen Sie Dansk, Deutsch, English, Español, Français, Italiano, Nederlands, Norsk,
Português, Suomi oder Svenska und bestätigen Sie die Auswahl mit der START -Taste.
Uhreinstellungen
Um die Uhreinstellungen anzuzeigen und zu ändern, wählen Sie MENÜ > Eingaben > Uhreinstellungen
• Wecker: Stellen Sie das Weckintervall auf Aus, Einmal, Montag bis Freitag oder Täglich.
• Uhrzeit: Wählen Sie Uhrzeit 1, Uhrzeit 2 oder Verwendete Uhrzeit .
• Datum: Datum einstellen , Datumsformat und Datumstrennzeichen.
• Starttag der Woche: Wählen Sie Montag, Samstag oder Sonntag.
• Uhrzeitanzeige: Wählen Sie für die Darstellung in der Uhrzeitanzeige Nur Uhrzeit, Uhrzeit und Logo oder
Uhrzeit und Event (wird angezeigt, wenn Sie im Web-Service www.polarpersonaltrainer.com ein Event
festgelegt und die Daten mit dem USB-Kabel und der WebSync Software auf den Trainingscomputer
übertragen haben).
Schnell-Menü
Einige Einstellungen können mit einer Funktionstaste geändert werden. Sie können das Schnell-Menü
aufrufen, indem Sie in der Uhrzeitanzeige, im Vorstartmodus oder im Trainingsmodus die LIGHT-Taste
gedrückt halten. Je nachdem, aus welchem Modus Sie das Schnell-Menü aufrufen, werden
unterschiedliche Optionen angezeigt.
Uhrzeitanzeige
Halten Sie in der Uhrzeitanzeige die LIGHT-Taste gedrückt, um das Schnell-Menü aufzurufen.
• Wählen Sie Tasten sperren und drücken Sie die START-Taste. Halten Sie zum Entsperren der Tasten
erneut die LIGHT-Taste gedrückt.
• Wählen Sie für das Weckintervall Wecker > Aus, Einmal, Montag bis Freitag oder Täglich.
• Wählen Sie Verwendete Uhrzeit > Uhrzeit 1 oder Uhrzeit 2.
Einstellungen 35
Page 96

DEUTSCH
Vorstartmodus
Um den Vorstartmodus zu aktivieren, drücken Sie in der Uhrzeitanzeige die START-Taste. Halten Sie im
Vorstartmodus die LIGHT-Taste gedrückt, um das Schnell-Menü aufzurufen.
• Bearbeiten Sie die Sportprofil-Einstellungen. Weitere Informationen finden Sie unter
Sportprofil-Einstellungen (Seite 31).
• Bearbeiten Sie die Herzfrequenz-Einstellungen. Weitere Informationen finden Sie unter
Herzfrequenz-Einstellungen (Seite 34).
Trainingsmodus
Halten Sie in der Uhrzeitanzeige die LIGHT-Taste gedrückt, um das Schnell-Menü aufzurufen.
• Wählen Sie Tasten sperren und drücken Sie die START-Taste. Um die Tasten zu entsperren, halten Sie die
LIGHT-Taste erneut gedrückt.
• Wählen Sie Sensor suchen und der Trainingscomputer beginnt nach dem Sensor zu suchen.
Diese Auswahl ist nur verfügbar, wenn die Verbindung mit einem der Sensoren unterbrochen wurde.
• Wählen Sie Laufsensor kalibrieren, um den s3+ Laufsensor zu kalibrieren.
Diese Option ist nur verfügbar, wenn der s3+ Laufsensor verwendet wird.
• Wählen Sie Trainingstöne und stellen Sie die Trainingstöne auf Aus, Leise, Laut oder Sehr laut.
• Wählen Sie Auto. Runde ausschalten oder Auto. Runde einschalten.
Diese Auswahl ist nur verfügbar, wenn Geschwindigkeitsinformationen zur Verfügung stehen, d. h. die
GPS-Funktion eingeschaltet ist oder der optionale CS Rad-Geschwindigkeitssensor/s3+ Laufsensor für das
Sportprofil aktiviert wurde.
• Wählen Sie GPS-Info, um die Koordinaten Ihrer Position und die Anzahl sichtbarer Satelliten anzuzeigen.
• Wählen Sie Zonenlimits anzeigen, wenn Sie die SportZonen Herzfrequenz-Limits anzeigen möchten.
Diese Auswahl ist nur verfügbar, wenn der Herzfrequenz-Sensor eingeschaltet ist.
36 Einstellungen
Page 97

DEUTSCH
9. POLAR FITNESS TEST
Mit dem Polar Fitness Test können Sie Ihre aerobe (kardiovaskuläre) Fitness in Ruhe leicht, sicher und
schnell messen. Das Ergebnis, der Polar OwnIndex, ist mit der maximalen Sauerstoffaufnahme (VO
vergleichbar, die allgemein verwendet wird, um die aerobe Fitness zu bewerten. Der OwnIndex wird durch
das Langzeitniveau Ihrer physischen Aktivität, Ihre Herzfrequenz und Herzfrequenz-Variabilität in Ruhe,
Ihr Geschlecht, Alter, Größe und Ihr Körpergewicht beeinflusst. Der Polar Fitness Test ist für gesunde
Erwachsene bestimmt.
Die aerobe Fitness gibt Auskunft darüber, wie gut das kardiovaskuläre System arbeitet und Sauerstoff im
Körper transportiert. Je besser Ihre aerobe Fitness, desto kräftiger und effizienter arbeitet Ihr Herz. Eine
gute aerobe Fitness bietet viele Vorteile für die Gesundheit. Sie hilft z. B. hohen Blutdruck zu senken und
Ihr Risiko für kardiovaskuläre Erkrankungen und Schlaganfälle zu verringern. Wenn Sie Ihre aerobe Fitness
verbessern möchten, erfordert es im Durchschnitt sechs Wochen regelmäßigen Trainings, bis sich der
OwnIndex merklich verbessert. Weniger trainierte Personen verzeichnen noch schneller Fortschritte. Je
besser Ihre aerobe Fitness, desto geringer fällt die Verbesserung Ihres OwnIndex aus.
Die aerobe Fitness wird am besten durch Sportarten verbessert, die die großen Muskelgruppen trainieren.
Dazu zählen Aktivitäten wie Laufen, Rad fahren, Rudern, Schwimmen, Skaten und Skilanglauf.
Um Ihren Fortschritt zu überwachen, beginnen Sie damit, Ihren OwnIndex in den ersten zwei Wochen
einige Male zu messen, um einen Ausgangswert zu erhalten. Wiederholen Sie dann den Test ca. einmal im
Monat.
2max
)
Um zuverlässige Testergebnisse erzielen zu können, müssen die folgenden Voraussetzungen erfüllt sein:
• Sie können den Fitness Test überall durchführen – zu Hause, im Büro, im Fitnessstudio – sofern die
Testumgebung ruhig ist. Es sollten keine störenden Geräusche (z. B. Fernseher, Radio oder Telefon)
vorhanden sein und es sollte auch niemand mit Ihnen reden.
• Die Testvoraussetzungen sollten möglichst immer die selben sein: Führen Sie den Test immer in derselben
Umgebung und zur selben Uhrzeit durch.
• 2-3 Stunden vor dem Test sollten Sie keine schweren Mahlzeiten zu sich nehmen und nicht rauchen.
• Vermeiden Sie am Vortag und am Tag des Tests schwere körperliche Aktivitäten, alkoholische Getränke
und pharmakologische Stimulanzien.
• Sie sollten entspannt und ruhig sein. Legen Sie sich vor Beginn des Tests hin und entspannen Sie sich
1-3 Minuten lang.
Vor dem Test
Herzfrequenz-Sensor anlegen
Weitere Informationen finden Sie unter So tragen Sie den Herzfrequenz-Sensor
(Seite 13).
Benutzerdaten eingeben
Wählen Sie MENÜ > Eingaben > Benutzerdaten
Um den Polar Fitness Test durchzuführen, geben Sie in den Benutzereinstellungen Ihre persönlichen
Benutzerdaten und Ihr langfristiges physisches Aktivitätsniveau ein.
Durchführen des Fitness Tests
Wählen Sie MENÜ > Fitness Test > Test starten
Der Test beginnt, sobald der Trainingscomputer das Herzfrequenz-Signal erkannt hat. Die
Fortschrittsleiste gibt an, dass der Test durchgeführt wird. Bleiben Sie entspannt, bewegen Sie sich
möglichst wenig und vermeiden Sie es, mit anderen Personen zu kommunizieren.
Wenn Sie nicht schon in den Benutzerdaten Ihr langfristiges physisches Aktivitätsniveau eingegeben
Polar Fitness Test 37
Page 98

DEUTSCH
haben, wird Ihr Aktivitätsniveau der letzten 3 Monate angezeigt. Wählen Sie Top, Hoch, Mittel oder
Niedrig.WeitereInformationenzumAktivitätsniveaufindenSieunterEinstellungenfürdieBenutzerdaten
(Seite 34).
Wenn Ihr Trainingscomputer Ihre Herzfrequenz zu Beginn oder während des Tests nicht empfängt, schlägt
der Test fehl und Test ist fehlgeschlagen, Herzfrequenz-Sensor überprüfen wird angezeigt. Vergewissern
Sie sich, dass die Elektroden des Herzfrequenz-Sensors feucht sind und der Gurt richtig sitzt, und starten
Sie den Test erneut.
Wenn der Test abgeschlossen ist, ertönen zwei Signaltöne. Der OwnIndex wird als numerischer Wert und
mit einer Beurteilung Ihres Fitnesslevels angezeigt. Weitere Informationen zu den Beurteilungen finden
Sie unter Fitnessklassen.
VO
• Wählen Sie Ja, um den OwnIndex Wert in Ihren Benutzereinstellungen und im Menü OwnIndex
• Wählen Sie nur Nein, wenn Sie Ihren VO
Sie können den Test jederzeit durch Drücken der BACK-Taste stoppen. Test wurde abgebrochen wird
einige Sekunden lang angezeigt.
aktualisieren?
2max
Ergebnisse zu speichern.
Labormesswert kennen und er um mehr als eine Fitnessklasse
vom ermittelten OwnIndex Ergebnis abweicht. Ihr OwnIndex Wert wird dann nur im Menü OwnIndex
Ergebnisse gespeichert. Weitere Informationen zum Fitnesstrend finden Sie unter OwnIndex Ergebnisse.
2max
Nachdem Sie den OwnIndex Wert gespeichert haben, wird er zur Ermittlung des Kalorienverbrauchs verwendet.
Nach dem Fitness Test
Fitnessklassen
Männer
Alter/Jahre Schwach Niedrig Na ja Mittel Gut Sehr gut Exzellent
20-24 <32 32-37 38-43 44-50 51-56 57-62 >62
25-29 <31 31-35 36-42 43-48 49-53 54-59 >59
30-34 <29 29-34 35-40 41-45 46-51 52-56 >56
35-39 <28 28-32 33-38 39-43 44-48 49-54 >54
40-44 <26 26-31 32-35 36-41 42-46 47-51 >51
45-49 <25 25-29 30-34 35-39 40-43 44-48 >48
50-54 <24 24-27 28-32 33-36 37-41 42-46 >46
55-59 <22 22-26 27-30 31-34 35-39 40-43 >43
60-65 <21 21-24 25-28 29-32 33-36 37-40 >40
Frauen
Alter/Jahre Schwach Niedrig Na ja Mittel Gut Sehr gut Exzellent
20-24 <27 27-31 32-36 37-41 42-46 47-51 >51
25-29 <26 26-30 31-35 36-40 41-44 45-49 >49
30-34 <25 25-29 30-33 34-37 38-42 43-46 >46
35-39 <24 24-27 28-31 32-35 36-40 41-44 >44
38 Polar Fitness Test
Page 99

DEUTSCH
Alter/Jahre Schwach Niedrig Na ja Mittel Gut Sehr gut Exzellent
40-44 <22 22-25 26-29 30-33 34-37 38-41 >41
45-49 <21 21-23 24-27 28-31 32-35 36-38 >38
50-54 <19 19-22 23-25 26-29 30-32 33-36 >36
55-59 <18 18-20 21-23 24-27 28-30 31-33 >33
60-65 <16 16-18 19-21 22-24 25-27 28-30 >30
Die Klassifizierung basiert auf einer Auswertung von 62 Studien, bei denen eine Direktmessung des
VO2max an gesunden erwachsenen Probanden aus den USA, Kanada und sieben europäischen Ländern
durchgeführt wurde. Literatur: Shvartz E, Reibold RC. Aerobic fitness norms for males and females aged 6
to 75 years: a review. Aviat Sp ace Envir on Med ;61:3-11,1990.
OwnIndex Ergebnisse
Wählen Sie MENÜ > Fitness Test> OwnIndex Ergebnisse.
Im Menü OwnIndex Ergebnisse können Sie sehen, wie sich Ihr OwnIndex Wert entwickelt hat. Es werden
bis zu 60 OwnIndex Werte mit dem dazugehörigen Datum gespeichert und angezeigt. Wenn die Datei voll
ist, werden die ältesten Ergebnisse automatisch mit den neuen überschrieben.
OwnIndex Wert löschen
Wählen Sie MENÜ > Fitness Test > OwnIndex Ergebnisse.
Wählen Sie den Wert aus, den Sie löschen möchten, und halten Sie die LIGHT-Taste gedrückt. OwnIndex
Wert (xx) löschen? Nein/Ja wird angezeigt. Bestätigen Sie mit der START-Taste.
Analysieren von OwnIndex Ergebnissen mit der Software
Wenn Sie Testergebnisse auf polarpersonaltrainer.com hochladen, können Sie diese auf verschiedene
Weise analysieren und auf ausführlichere Informationen zu Ihrem Fortschritt zugreifen.
Polar Fitness Test 39
Page 100

DEUTSCH
10. NEUES ZUBEHÖR
Koppeln eines neuen Sensors mit dem Trainingscomputer
Wenn Sie einen neuen Sensor in Betrieb nehmen, muss er mit dem Trainingscomputer „bekannt gemacht“
werden. Dies wird als Koppeln bezeichnet und der Vorgang dauert nur einige Sekunden. Durch die
Kopplung wird sichergestellt, dass Ihr Trainingscomputer ausschließlich Signale von Ihrem Sensor
empfängt. Dies ermöglicht ein störungsfreies Training in einer Gruppe.
Koppeln Sie den Sensor zu Hause, bevor Sie an einem Event oder Wettkampf teilnehmen. Dadurch wird
vermieden, dass bei der Datenübertragung Störungen auftreten. Stellen Sie beim Koppeln eines neuen
Sensors sicher, dass Sie sich nicht in der Nähe (40 m) von anderen ähnlichen Sensoren befinden.
Koppeln eines neuen Herzfrequenz-Sensors mit dem Trainingscomputer
Wenn Sie Ihren Trainingscomputer noch nicht mit einem Herzfrequenz-Sensor gekoppelt haben und Sie
eine Trainingseinheit beginnen, erfolgt die Kopplung automatisch. Legen Sie den Trainingscomputer und
den Herzfrequenz-Sensor an und drücken Sie die START -Taste. Suche neuen Herzfrequenz-Sensor wird
angezeigt. Der Trainingscomputer beginnt nach dem Signal des Herzfrequenz-Sensors zu suchen. Sobald
der Trainingscomputer das Signal gefunden hat, wird Herzfrequenz-Sensor gefunden angezeigt.
Legen Sie den Herzfrequenz-Sensor an und stellen Sie sicher, dass Sie sich nicht in der Nähe (40 m) von
anderen Sensoren befinden.
1. Wählen Sie Menü > Eingaben > Sportprofile > Sportart > HF-Sensor > Neuen suchen und drücken Sie
die START -Taste.
2. Der Trainingscomputer beginnt nach dem Signal des Sensors zu suchen, und Suche neuen
Herzfrequenz-Sensor wird angezeigt.
3. Nachdem der neue Sensor erkannt wurde, wird Herzfrequenz-Sensor gefunden angezeigt. Die Kopplung
ist abgeschlossen.
4. Wenn die Suche erfolglos bleibt, wird Herzfrequenz-Sensor nicht gefunden oder Andere
Herzfrequenz-Sensoren stören. Weiter laufen.Nochmal probieren? JA/NEIN angezeigt.
5. Wählen Sie JA, um die Suche erneut zu starten.
6. Wählen Sie NEIN, um die Suche abzubrechen.
7. Halten Sie die BACK-Taste gedrückt, um zur Uhrzeitanzeige zurückzukehren.
Es kann jeweils nur ein Herzfrequenz-Sensor mit Ihrem Trainingscomputer gekoppelt werden. Der
Trainin g s c o m p u t e r s p e i c h e r t j e d o c h di e drei l e tzten K o p p l ungen. Wenn d e r zu l e t z t ge k o p p e l t e
Herzfrequenz-Sensor nicht verfügbar ist, jedoch der vorherige, empfängt der Trainingscomputer das
Herzfrequenz-Signal vom vorherigen Sensor.
Koppeln eines neuen Geschwindigkeitssensors mit dem Trainingscomputer
Stellen Sie sicher, dass der Rad-Geschwindigkeitssensor ordnungsgemäß installiert wurde. Weitere
Informationen zum Installieren des Rad-Geschwindigkeitssensors finden Sie in der Gebrauchsanleitung
des Rad-Geschwindigkeitssensors. Ein Video-Lernprogramm finden Sie unter
http://www.polar.com/en/polar_community/videos.
Sie können Ihren Trainingscomputer für zwei Fahrräder verwenden. Für jedes Rad müssen die Sensoren
separat gekoppelt werden. Sie können nur einen Rad-Geschwindigkeitssensor mit einem Rad koppeln.
Wenn Sie zwei Fahrräder verwenden, kann für beide derselbe Rad-Geschwindigkeitssensor verwendet
werden. Oder für jedes Rad kann ein eigener Sensor verwendet werden. Wenn Sie einen neuen Sensor mit
einem Rad koppeln, das zuvor mit einem Sensor gekoppelt wurde, wird der vorherige Sensor durch den
neuen Sensor im Speicher ersetzt.
1. Gehen Sie zu MENÜ > Eingaben > Sportprofile > Rad fahren (Rad 1)/Rad fahren (Rad 2) > Rad 1
Einstellungen /Rad 2 Einstellungen > Geschwindigkeitssensor > Neuen suchen und drücken Sie die
START -Taste.
2. OK (START) drücken, um den Testlauf zu starten wird angezeigt.
40 Neues Zubehör
 Loading...