

Page 1
LJ FULL CAGE KIT INSTALL
6
3
16 17
6
14
8
15
15
8
Thank you for purchasing a Poison Spyder
Full Cage Kit for your Jeep TJ Unlimited (LJ).
Poison Spyder’s innovative Lazer-Fit technology
provides for the easiest, fastest installation
of any aftermarket full cage kit on the market.
Installation does require specialized skills and
tools, such as welding. If you are not condent
in your mechanical skills, please seek the help of
a professional to perform the installation. Please
read through these entire instructions before
proceeding with installation.
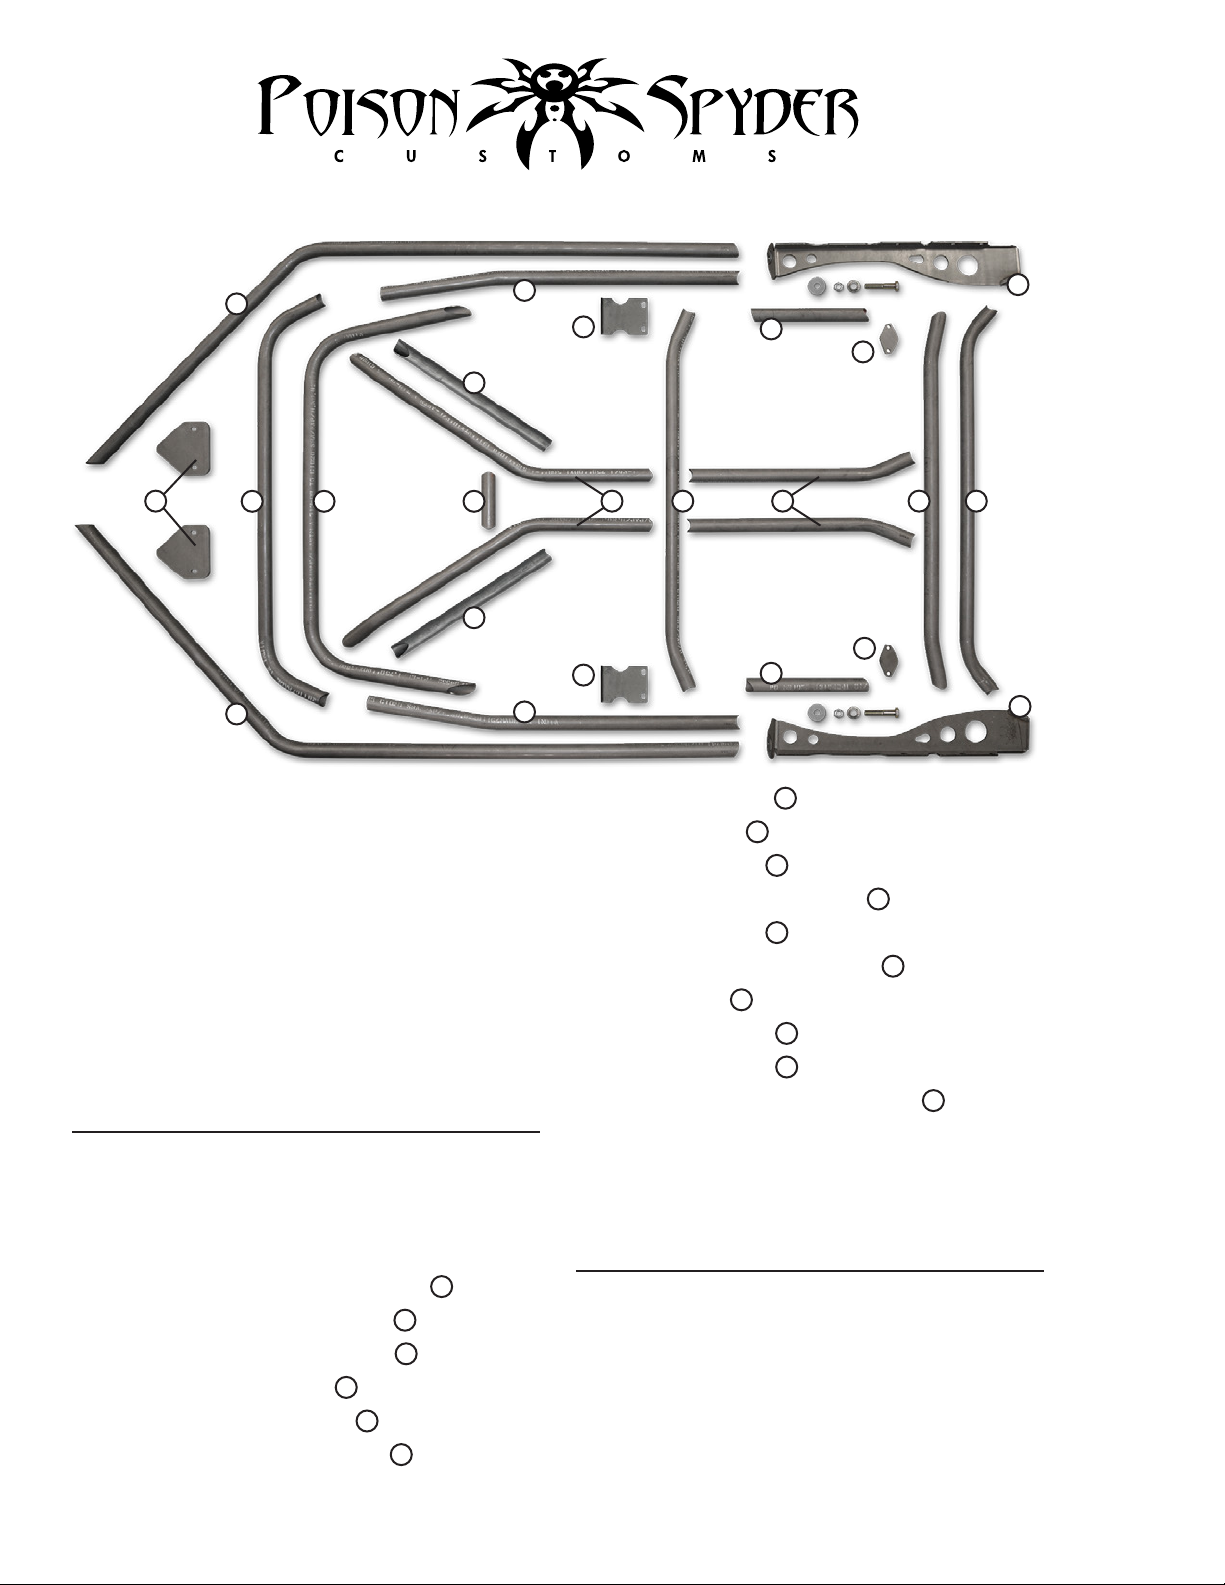
PARTS LIST
Please check your packages immediately upon
arrival to ensure that everything listed is included,
and to check for damage during shipping. If
anything is missing or damaged, call Poison
Spyder at (951) 849-5911 as soon as possible.
(2) Windshield Mount Plate L&R
(2) B-Pillar Mount Plate L&R
(2) C-Pillar Mount Plate L&R
(2) Lower A-Pillar L&R
(2) Main Side Hoop L&R
5
6
(2) Upper A-Pillar Tube L&R
1
2
3
7
2
12
2
(2) B-Pillar L&R
(1) Dash Bar
(1) A-Crossbar
(2) Forward Stringer L&R
(1) B-Crossbar
(2) Rearward Stringer L&R
(1) C-Hoop
(2) C-Pillar L&R
(1) Seatbelt Bar
(1) Rear Stringer Spreader Bar
14
7
1
1113
7
8
9
10
12
15
16
10
1
11
13
9
17
(2) 1/2-13 X 2-1/2 Gr8 Hex Head Cap Screw
(2) Washer Plate
(2) 1/2-13 nylon insert lock nut
TOOLS NEEDED
• Mechanic’s tool set including Torx bit set
• T-50 “Tamper-Proof” Torx bit
• Ratchet straps
• Welder and proper welding equipment
• Protective welding blankets
5
5
©2013 POISON SPYDER CUSTOMS, INC. • 951-849-5911 • WWW.POISONSPYDER.COM
INSTALLATION INSTRUCTIONS
Page 2
Poison Spyder Customs •
INSTALLATION NOTES
The Full Cage Kit will work with the factory
Jeep soft top. The sound bar can be modied
(read: ‘cut up’) to t. Duster rear deck covers,
“windjammers” and short stile bikini tops will
work. However, “safari” style bikini tops will not
t. Children can ride in the back seat but the
Poison Spyder Full Cage Kit was NOT designed
to accommodate adult passengers in the OE
back seat.
Installation of the Full Cage Kit can take up to 8
hours. This kit requires welding, which should be
done by a certied welder. You will need a friend
or two to assist with the installation. A good set
of Torx bits is required for removal of the factory
cage, including a T-50 “tamper-proof” Torx bit.
IMPORTANT: It is imperative that the top, doors,
seats, plus any other components that are going
to be reinstalled after the cage install be test-
tted BEFORE nal welding of the cage! Poison
Spyder Customs is not liable for tment issues
due to negligent install.
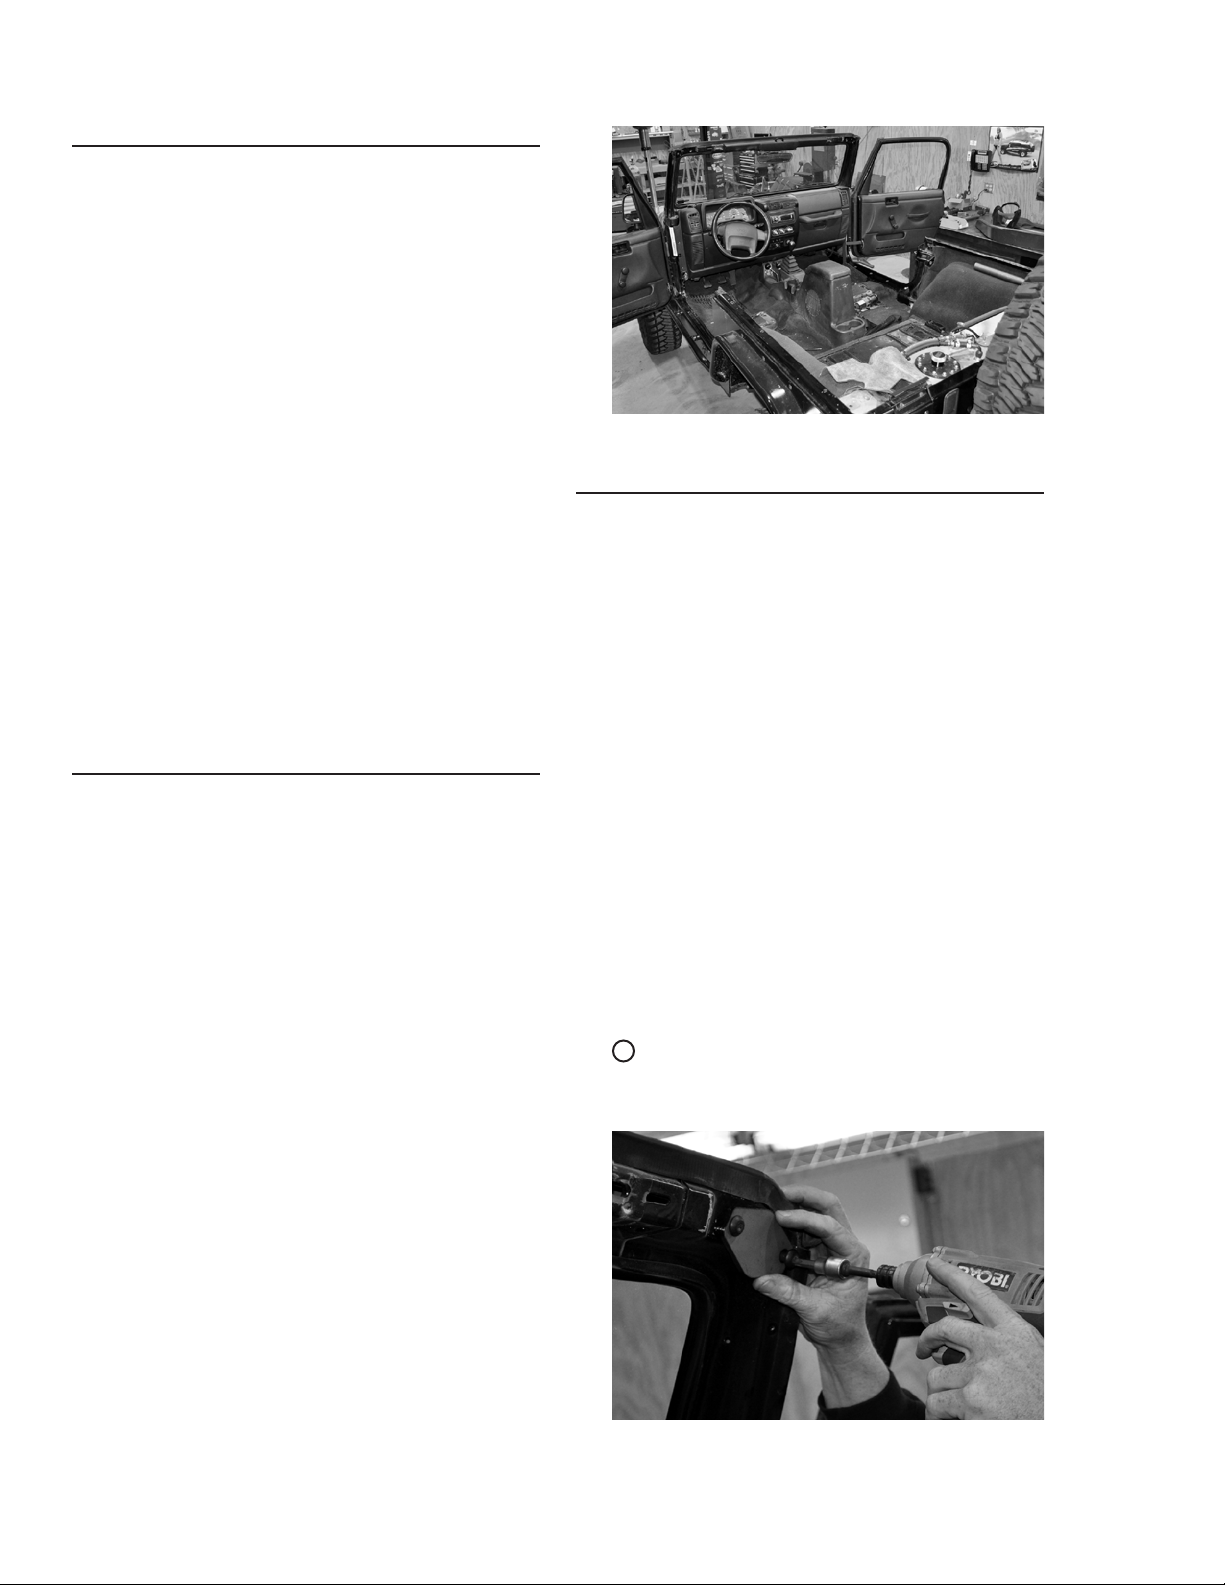
REMOVAL OF THE FACTORY CAGE
1. Park vehicle on a level surface and set the
emergency brake. You will want to wear eye
protection beyond this point.
2. Remove the front factory spreader bars
from the cage main hoop and the windshield.
Save the four bolts that were used to fasten
the bars to the windshield (two on each side),
they will be re-used later.
3. Remove the factory roll bar from the vehicle.
Be careful to not strip the Torx bolts, as they
will be re-used. Remove the seatbelts from
the roll bar.
4. On Jeeps with factory soft tops, remove the
soft top brackets located on the factory roll
bar. These can be re-attached to the new roll
bar.
5. Inside the body tub on each side, there are
triangular-shaped sheetmetal tabs that the
factory roll bar mounted to using the tamperproof Torx bolts. Cut these two pieces off.
6. Along the front of the door jamb, there are
three Torx bolts positioned in a vertical line,
going into the rewall. Remove all three
bolts from both sides.
LJ FULL CAGE KIT INSTALL
Page 2
FIGURE 1
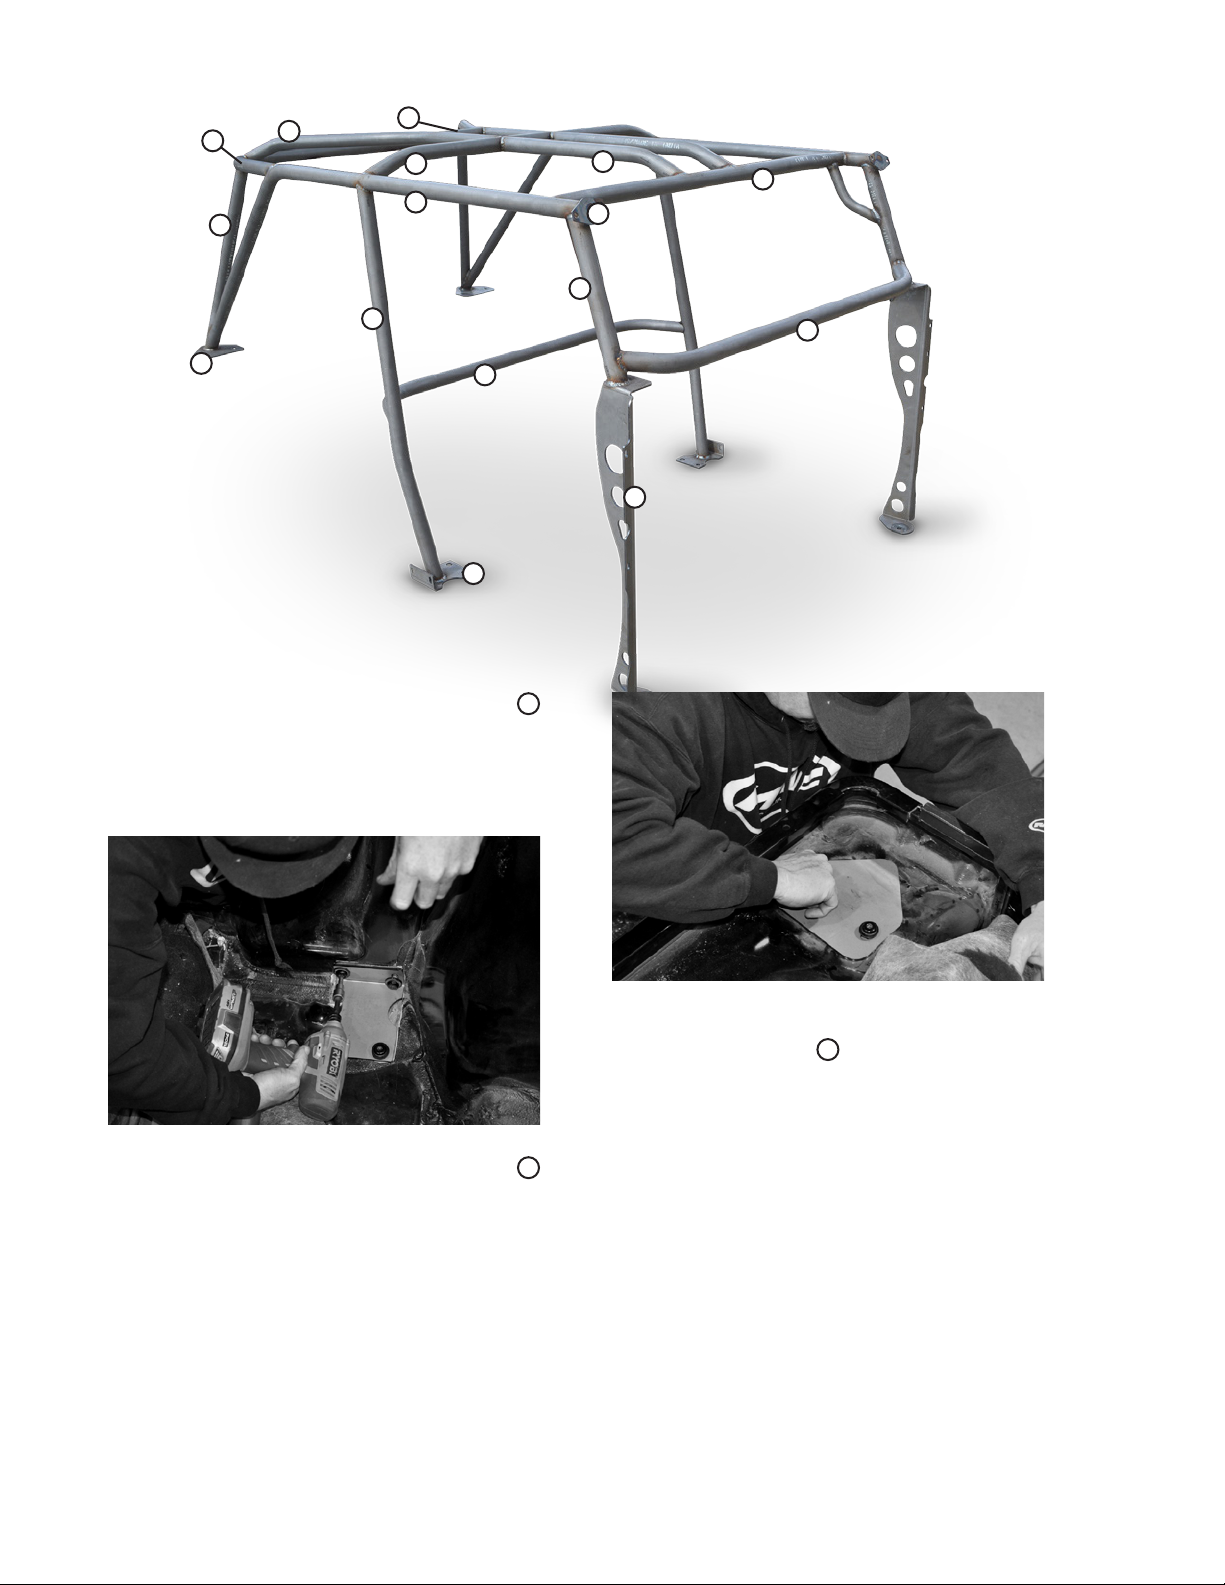
INSTALL PROCEDURE
NOTE: Throughout these procedures, refer to
the assembled cage diagram at the top of Page 3
for reference identication and in proper general
orientation of cage components. In most cases,
the laser-cut notches and laser-etched assembly
marks will eliminate all guesswork. Regardless,
carefully inspect each part and its placement
prior to tacking and nish-welding. Also, each
step should be extrapolated for both sides,
where any procedure is to be duplicated on both
sides of the cage. Also NOTE that the photos
depict an installation in a TJ. The LJ installation
is identical with the exception of the shape of the
rear stringer bars and the addition of the Rear
Stringer Spreader Bar.
1. Clean ALL bare metal pieces provided in the
kit, using a clean rag and brake cleaner. This
will ensure an easier, cleaner installation and
better welds later in the installation.
2. Install the Windshield Mount Plates L&R
1
on either side of the windshield, using the
factory hardware that held the OE spreader
bars in place.
FIGURE 2
©2013 POISON SPYDER CUSTOMS, INC. • 951-849-5911 • WWW.POISONSPYDER.COM
INSTALLATION INSTRUCTIONS
Page 3
Poison Spyder Customs •
14
15
3
13
17
12
6
8
LJ FULL CAGE KIT INSTALL
11
1
7
16
5
2
Page 3
10
9
3. Install the B-Pillar Mount Plates L&R 2
in the locations where the main hoop of the
factory roll bar bolted in, just behind the door
opening on either side. Re-use the factory
hardware.
FIGURE 3
4. Install the C-Pillar Mount Plates L&R 3
where the factory roll bar bolted in at the rear
corners. Orient the plates with the rounded
point edge facing the rear of the Jeep.
Secure them using the OE hardware.
FIGURE 4
5. Weld the gusset seam on each of the
Lower A-Pillars L&R 5. This seam was left
un-welded so that you may weld it to match
the weld style of the rest of your cage. For
instance, if you are TIG welding your cage,
you would likely prefer to have your own TIG
weld in such a highly visible spot as this.
©2013 POISON SPYDER CUSTOMS, INC. • 951-849-5911 • WWW.POISONSPYDER.COM
INSTALLATION INSTRUCTIONS
Page 4

Poison Spyder Customs •
LJ FULL CAGE KIT INSTALL
Page 4
FIGURE 5
6. Install the Lower A-Pillars L&R 4. Bolt
each Lower A-Pillar into place using the
three Torx bolts you removed during Step 5
of the Factory Cage Removal process. Note
that once installed, the Lower A-Pillars will
NOT be oriented perpendicular to the Jeep.
They will angle slightly inward. Be sure to
test-t the doors for proper closing, before
proceeding.
FIGURE 6
7. Install the Main Side Hoops L&R 6, one
side at a time. Have a friend hold the Main
Side Hoop in place with the front portion
of the tube in contact with the Windshield
Mount Plate, with the tube end centered on
the plate. Hold the rearward end of the tube
so that it lands centered within the curvedpoint area of the C-Pillar Mount Plate. Tackweld the Main Side Hoop to each plate
FIGURE 7
8. Install the B-Crossbar 12 between the two
Main Side Hoops. Reference the laseretched markings to correctly locate the
C-Crossbar along the inner side of each
Main Side Hoop.
FIGURE 8
9. Install the B-Pillars L&R 8 between the
B-Pillar Mount Plate and the Main Side Hoop
on either side. Reference the laser-etched
markings to correctly locate the B-Pillar tube
along the Main Side Hoop. Tack the B-Pillar
into place.
10. Install the A-Crossbar 10 and the Forward
Stringers L&R 11 at the same time. Have
a friend help with holding the three pieces
©2013 POISON SPYDER CUSTOMS, INC. • 951-849-5911 • WWW.POISONSPYDER.COM
FIGURE 9
INSTALLATION INSTRUCTIONS
Page 5

Poison Spyder Customs •
LJ FULL CAGE KIT INSTALL
Page 5
in place. Start by holding the A-Crossbar
in place between the two Main Side Hoops,
toward the front of the Jeep. Next, hold the
two Forward Stringers in place between the
A-Crossbar and the B-Crossbar. Use the
laser-etched marks on each of the tubes to
properly locate the tube junctions. Use the
Forward Stringers to locate the A-Crossbar
the proper distance forward from the
B-Crossbar. While holding them in place
correctly located, tack the A-Crossbar and
Forward Stringers into place. Ratchet straps
may be useful in holding everything together
while aligning and tacking.
FIGURE 10
11. Install the C-Hoop 14 and the C-Pillars L&R
15
at the same time. Have a friend help
with holding the three pieces in place. Start
by holding the C-Hoop in place, extended
rearward from the downward bend on each
Main Side Hoop. Next, hold the two C-Pillars
in place vertically between the C-Hoop and
the lower ends of the Main Side Hoop. While
holding them in place correctly located, tack
the C-Hoop and C-Pillars into place.
bends of the C-Hoop. Use the laser-etched
assembly marks to properly locate and align
the tube junctions. While holding these in
place, also insert the Rear Stringer Spreader
Bar between them. Tack weld all of these
pieces once they are properly aligned. Note
that the image below depicts a TJ, which
differs slightly from the LJ in terms of the
shape of the Rearward Stringers, and it also
does not show the Rear Stringer Spread Bar.
FIGURE 12
13. Install the Upper A-Pillar Tubes L&R 7
and the Dash Bar 9 at the same time. Have
a friend help with holding the three pieces in
place. Start by holding the Upper A-Pillar
Tubes in place between the Lower A-Pillar
and the Main Side Hoop. Next, hold the two
Dash Bar in place horizontally between the
C-Hoop and the lower ends of the Main Side
Upper A-Pillar Tubes. Use the laser-etched
assembly marks as guides to properly locate
the tube junctions. While holding them
in place correctly located, tack the Upper
a-Pillar Tubes and Dash Bar into place.
FIGURE 11
12. Install the Rearward Stringers L&R
between the B-Crossbar and the inside
©2013 POISON SPYDER CUSTOMS, INC. • 951-849-5911 • WWW.POISONSPYDER.COM
14. Install the Seatbelt Bar 16 to the rearward
13
side of the B-Pillars. Use the laser-etched
assembly marks as guides to properly locate
FIGURE 13
INSTALLATION INSTRUCTIONS
Page 6

Poison Spyder Customs •
the tube junctions. If using custom seats and
belts, you may adjust the height of the Seat
Belt Bar (ignoring the laser etched assembly
guides)toproperlylocateitforyourspecic
setup. Tack the Seatbelt Bar into place.
15. Install any optional equipment at this time,
such as Entry Grab Handles, Seat Belt Bung
Kit, etc.
16.Fullytest-t all equipment that is located
within, near or around the cage or any
portion of the cage. This includes soft tops,
doors, seats, etc. Test each component for
both t and operation. It is EXTREMELY
IMPORTANT that you verify proper tment
of all components at this time. If any tube
placement needs to be adjusted, it is a
simple matter of grinding the small tack
welds to make any adjustments. Making
these adjustments will be impossible once
the cage is fully welded.
17. Finish-weld each joint in the cage. Before
you begin, you may wish to place welding
blankets or some other suitable protection
for your Jeep’s interior. You may not be able
to easily reach every area you need to weld
while the cage is still installed in the Jeep,
but we recommend doing as much as you
can while the Cage is still in the Jeep, to
discourage deformation during welding.
LJ FULL CAGE KIT INSTALL
FIGURE 14
Page 6
FIGURE 15
18. Remove the cage from thevehicletonish
any welds that couldn’t be reached before.
FIGURE 16
19. Paint or powder-coat your cage to protect
it from rust. If painting it yourself, use a good
quality self-etching primer on the bare steel
of your cage prior to painting in the color of
your choice.
20. Re-install the cage into the Jeep and
properly tighten all fasteners. Use the
supplied 1/2-13 Gr8 hex head cap screws,
washer plates and nylon-insert lock nuts to
secure the bottom foot of each Lower A-Pillar
to the existing hole in the oorboard of the
Jeep.
Congratulations, you have completed the
installation of your Poison Spyder Full Cage Kit!
©2013 POISON SPYDER CUSTOMS, INC. • 951-849-5911 • WWW.POISONSPYDER.COM
INSTALLATION INSTRUCTIONS
Page 7

Poison Spyder Customs •
LJ FULL CAGE KIT INSTALL
Page 7
WARRANTY
Poison Spyder Customs™ warranties all of
the products we sell and distribute for one (1)
year from the date of sale. These products will be
free from defects in material and workmanship
under normal installation, and use. Due to the
intended use the powder coat nish is warranted
for ninety (90) days. The nish warranty will not
cover a product if it has been damaged in any
way. Warranty is limited to repair or replacement.
Poison Spyder Customs™ does not offer any
type of labor or shipping allowance and all
warranty claims are subject to inspection by
Poison Spyder Customs™.
At the discretion of Poison Spyder Customs™,
the products in question can be repaired or
replaced when found defective. Prior to any
replacement or repair, written authorization must
be obtained from Poison Spyder Customs™.
Failure to contact us prior to having warranty work
preformed will immediately void all applicable
warranties; and it is then the sole responsibility
of the customer to remit any payment incurred.
The warranty expressed above is the sole
warranty of Poison Spyder Customs™, and
any other expressed or implied warranties are
hereby specically excluded and disclaimed.
HOLD HARMLESS AGREEMENT
1. In purchasing a Poison Spyder Customs
Product™ I release, waive, discharge and
covenant not to sue Poison Spyder Customs
ofcers, servants, agents, or employees
(hereinafter referred to as Releasees) from
any and all liability, claims, demands, actions
and causes of action whatsoever arising out
of or related to any loss, damage, or injury,
including death, that may be sustained by
me (or anyone else), any property belonging
to me (or anyone else), whether caused by
the negligence of the releasees or otherwise,
while working on, using or any activity related
to this product.
2. I am fully aware of risks and hazards connected
with the use of a this product and I elect to
voluntarily engage in such use of this product
knowing that the use may be hazardous to
me and my property. I voluntarily assume full
responsibility for any risks of loss, property
damage or personal injury, including death,
that may be sustained by me (or anyone
else), or any loss or damage to property
owned by me (or anyone else), as a result
of using this product, whether caused by the
negligence of releasees or otherwise.
3. I further agree to indemnify and hold harmless
the releasees from any loss, liability, damage
or costs, including court cost and attorney
fees, that they may incur due to my use of a
this product, whether caused by negligence
of releasees or otherwise.
4. It is my express intent that this Release and
Hold Harmless Agreement shall bind the
members of my family and spouse, if I am
alive, and my heirs assigns and personal
representative, if I am deceased, and shall
be deemed as a release, waiver, discharge,
and covenant not to sue the above named
releasees. I further agree that this Waiver of
Liability and Hold Harmless Agreement shall
be construed in accordance with the laws of
the State of California.
By accepting this product, I acknowledge and
represent that I have read the above Waiver
and Liability and Hold Harmless Agreement,
understand it and accept it voluntarily as my
own free act and deed; no oral presentations,
statements, or inducements, apart from the
foregoing written agreement, have been made;
I am at least eighteen (18) years of age and
fully competent; and I execute this Release for
full, adequate and complete consideration fully
intending to be bound by same.
If you do not agree with the preceding Hold
Harmless Agreement, you may return the product
and receive a full refund. Please, contact a
Poison Spyder Customs™ sales representative
and they will issue a call tag for the product in
question. Once the product has been received
by Poison Spyder Customs™ a full refund will
be issued.
©2013 POISON SPYDER CUSTOMS, INC. • 951-849-5911 • WWW.POISONSPYDER.COM
INSTALLATION INSTRUCTIONS
 Loading...