

Poison Spyder JK ROCKBRAWLER II REAR BUMPER WITH TIRE CARRIER User Manual
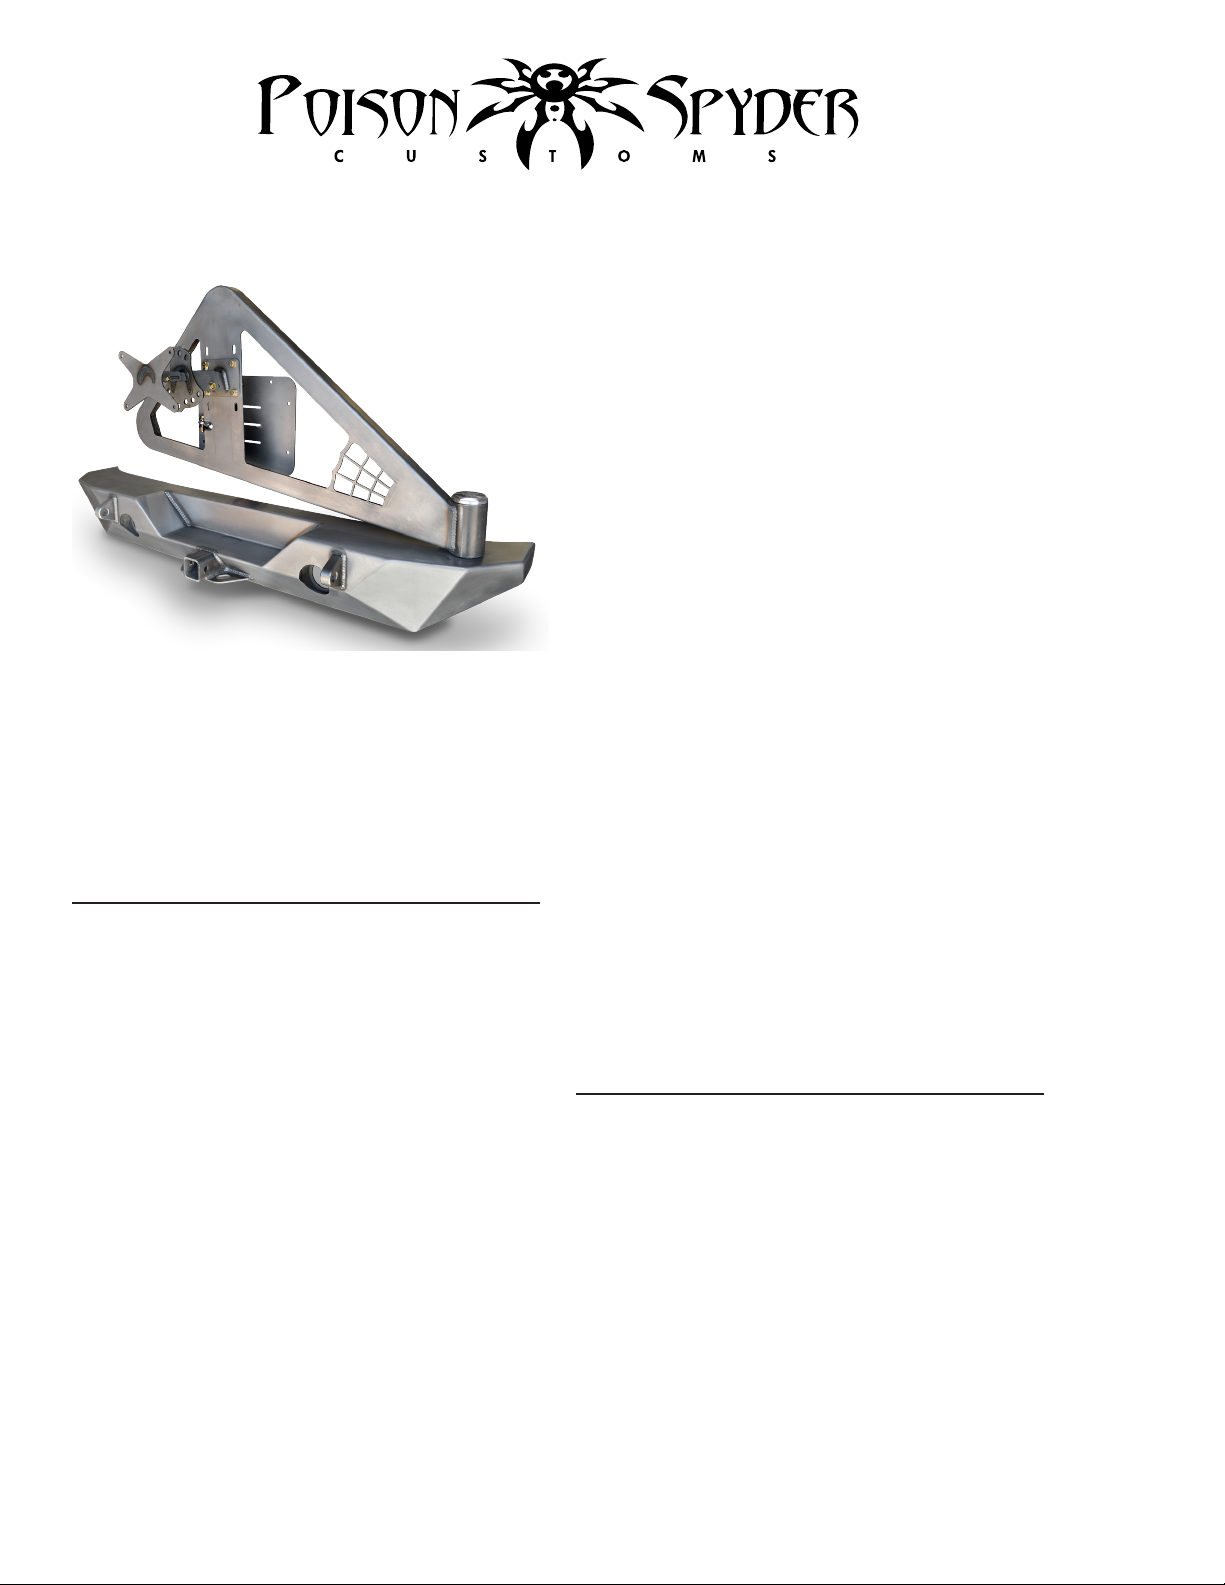
JK RockBrawler™ II REAR BUMPER WITH TIRE
CARRIER INSTALLATION
(1) Pivot Housing Cap O-Ring
(1) 1”-14 GrC All Metal Lock Nut
(1) 1” Flat Washer
(5) 3/8-16 X 3/4 Gr8 Hex Head Cap Screw
(2) 3/8-16 X 1 Gr8 Hex Head Cap Screw
(2) 3/8-16 X 1-3/4 Gr8 Hex Head Cap Screw
(8) 3/8 SAE Gr8 Flat Washer
(6) 3/8-16 Gr8 Nylon Insert Lock Nut
(2) 3/8-16 Clip Nut
(2) 1/2-13 X 4-1/4 Gr8 Hex Head Cap Screw
(2) 1/2-13 Gr8 Nylon Insert Lock Nut
The Poison Spyder Customs RockBrawler™II
Rear Bumper is easy to install with the right
tools and good mechanical abilities. If you are
not condent in your mechanical skills, please
seek the help of a professional to perform the
installation. Please read through these entire
instructions before proceeding with installation.
PARTS LIST
(1) JK RockBrawler™ II Rear Bumper
(1) RockBrawler™ II Tire Carrier
(1) JK RockBrawler™ II Tailgate Plate
(1) RockBrawler™ II V-Alignment Plate
(1) 1/2” Black UHMW V-Alignment Bushing
(1) Tire Mount - Carrier Side
(1) Tire Mount - Tire Side
(1) License Plate Mount
(1) 3/8-24 LH/RH X 1-5/8 Alum Turnbuckle
(1) 3/8-24 X 2-1/8 RH Spherical Rod End
(1) 3/8-24 X 2-1/8 LH Spherical Rod End
(1) 3/8-24 SS Hex Nut RH Thread
(1) 3/8-24 SS Hex Nut LH Thread
(2) Tapered Roller Bearing with Race
(1) Grease Seal - Timken #5121
(1) Billet Pivot Housing Cap
(1) Pivot Housing Cap Wrench
(4) 1/2 Gr8 Flat Washer
(8) 7/16-14 X 1 Gr8 Hex Head Cap Screw
(16) 7/16 SAE Gr8 Flat Washer
(8) 7/16-14 Gr8 Nylon Insert Lock Nut
(4) 1/4-20 X 3/4 SS Button Head Cap Screw
(4) 1/4-20 X 1 SS Button Head Cap Screw
(2) 1/4-20 X 3/4 Gr8 Hex Head Cap Screw
(8) 1/4 Flat Washer
(4) 1/4 X 5/8 OD SS Flat Washer
(10) 1/4-20 Nylon Insert Lock Nut
(3) 12MM-1.5 Open Wheel Lug Nut
(3) 12MM-1.5 X 1-1/2” Wheel Lug Stud
TOOLS NEEDED
• Primer, paint, cleaners and masking
materials (if painting)
• Mechanic’s tool set with a full assortment
of SAE and metric end wrenches, sockets,
ratchets, hex keys, etc.
• Torque wrench
• Drill Motor with 1/4” & 1/2” drill bits
• Measuring tape or ruler
• Felt-tipnepointmarker,scribeorpunch
©2014 POISON SPYDER CUSTOMS, INC. • 951-849-5911 • WWW.POISONSPYDER.COM
INSTALLATION INSTRUCTIONS
Poison Spyder Customs •
JK ROCKBRAWLER II REAR BUMPER Page 2
BEFORE YOU BEGIN
The Poison Spyder Customs RockBrawler™ II
Rear Bumper comes as unpainted, bare steel.
You will want to either powder coat or paint the
bumper prior to nal installation. If painting
yourself, careful preparation will make a big
difference in the quality and longevity of your
paint job, even using “rattle can” aerosol paints.
Begin by thoroughly cleaning the bumper with
solvent or de-greaser, then make sure all residue
is removed. Even if you use cheap paint, try to
use a good quality primer. “Etching” primers are
best to use on bare, unpainted metal. Allow it to
properly dry before painting, and between paint
coats.
INSTALLATION PROCEDURE
1. Park the Jeep on a at, levelsurfaceand
set the parking brake.
2. Remove existing rear bumper and
disconnect the rear sway bar where it bolts
to the outside of the frame rails. Keep the
OE hardware that attached the bumper to
the frame rails, as some of it will be re-used.
3. With the help of a friend, pre-install the
RockBrawler™ II rear bumper on to the
Jeep.TheboltangeoftheRockBrawler™
II bumper will mount between the outside
of the frame rail and the sway bar bracket.
Note that there are three bolt holes in the
boltangeoneachsideofthebumper.Two
of these bolt holes will align with the stock
bolt holes in the frame rail, where the sway
bar bracket attaches. Use the OE hardware
to secure the bumper in place using these
two bolt locations on either side. On the
driver side with the Floating Mount Plate,
tighten the hardware attaching the plate to
the bumper, after ensuring that the bumper
is properly centered and aligned.
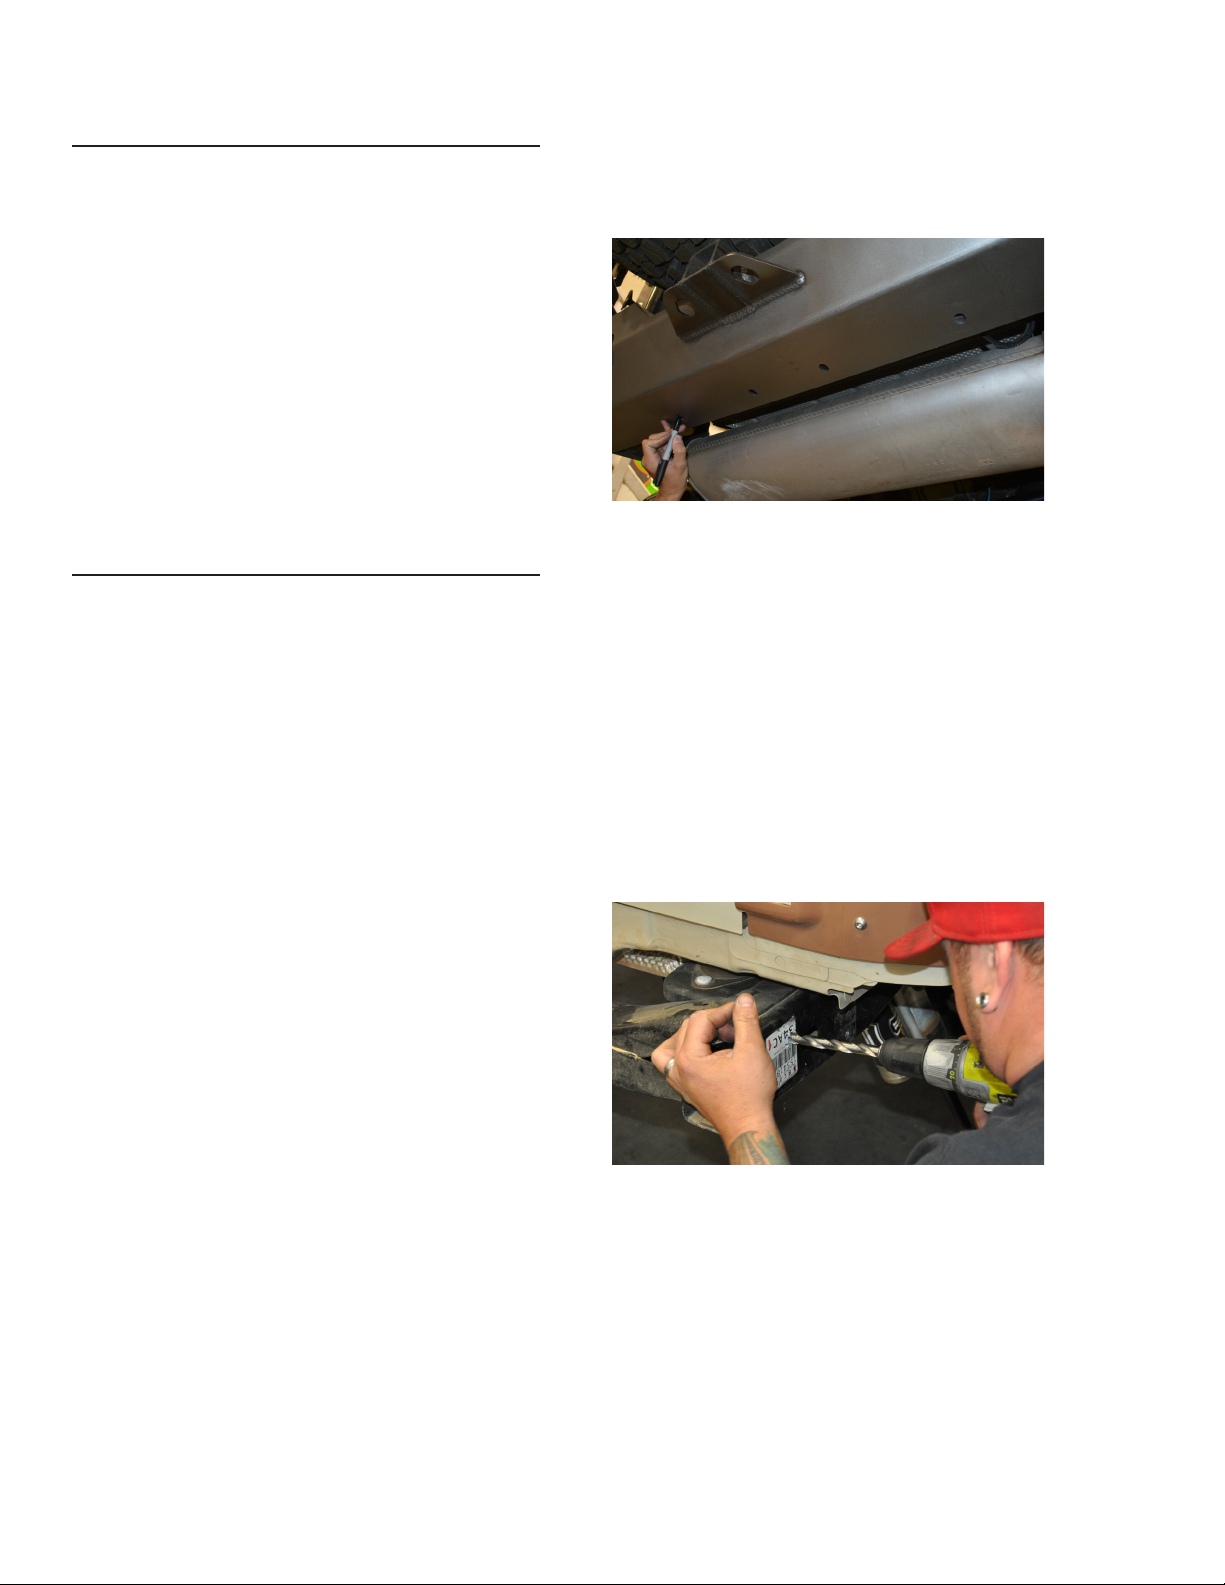
4. Use a felt-tip pen or 3/8 center punch to
mark the location of the third bolt hole on the
frame rail, for each side.
5. Look underneath the bumper, note that
there are 4 bolt holes along the bottom
surface of the bumper. The driver’s side,
outside hole will need to be marked to drill a
corresponding hole in the crossmember that
sits just behind it. Use a center-punch or
ne-tipfeltmarkertomarktheholelocation.
©2014 POISON SPYDER CUSTOMS, INC. • 951-849-5911 • WWW.POISONSPYDER.COM
You may notice that the outside passenger
side already has a through-hole through the
crossmember. Disregard the two center
holes.
FIGURE 3
6. Remove the bumper from the Jeep.
7. Drill upward through the crossmember,
at the hole location marked in the previous
step. Start with a smaller drill size such as
1/4”,thenstepuptothe1/2”bitforthenal
hole size. Drill through both the bottom and
top surfaces of the bumper, trying to hold the
drill perpendicular so the holes are vertically
aligned.
8. Drill the third bolt hole on the sides of each
frame rail to 1/2”. It is best to start with a
smaller drill size such as 1/4”, then step up to
the 1/2” size bit.
FIGURE 3
9. Apply touch-up paint to the bare metal
around the edge of the holes that were drilled
in the previous steps. Properly coating these
areas at this time will help to prevent rust in
the future.
10. Insert a 3/8-16 Clip Nut through the oblongshaped hole in the frame rail, and clip it into
the new hole just drilled. Make sure the
extruded thread barrel of the clip nut points
inward. Do this on both frame rails.
INSTALLATION INSTRUCTIONS

Poison Spyder Customs •
11. Reinstall the RockBrawler™ II bumper
using the OE hardware in the two original bolt
locations on the sides of the frame rail, and a
supplied 3/8-16 X 1 Gr8 Hex Head Cap Screw
with 3/8 Flat Washer in each of the new bolt
locations on the outside of the frame rails.
Note that both the bumper’s mount anges
are inserted between the outside of the frame
rail and the sway bar bracket.
12. Insert the 1/2-13X4-1/4 Gr8 Hex Head Cap
Screws into the two outside holes along the
underside of the bumper, with a 1/2 Gr8 Flat
Washer under the bolt head. Insert the bolt
up through the holes in the bumper and both
top and bottom surfaces of the crossmember.
Secure them with a 1/2-13 Gr8 Nylon Insert
Lock Nut and 1/2 Gr8 Flat Washer, where they
protrude through the top of the crossmember.
You may have to do this by feel, as the nuts
and washers will be threaded on inside the
bumper shell,
13. If the optional 2-1/2” LED backup lamps
were purchased, use the provided rubber
grommets to mount them into the recessed
mounting anges inside the backup lamp
buckets. Use the electrical pigtails that
came with the lamps, along with wire and
JK ROCKBRAWLER II REAR BUMPER Page 3
FIGURE 4
FIGURE 5
connectors (not included) to wire the backup
lamps in to your Jeep’s backup lamp circuit.
14. Use the OE Spare Tire Mount hardware
to attach the Tailgate Plate to the tailgate.
The TailGate Plate must be oriented so the
welded-on brackets are toward the top and
driver side.
15. Wearing latex or nitrile gloves, “Pack” the
two tapered roller bearings with a quality
wheel bearing grease by hand or with a
bearing packing tool. The two matching
bearing races are already pressed in to the
tire carrier hinge housing.
16. Wearing a latex or nitrile glove, use your
ngerstoapplyalightsheenofgreasetothe
bare metal surfaces of the inside of the tire
carrier hinge housing and bearing races, as
well as the hinge spindle on the bumper (do
not coat the threads for the spindle nut). This
will help discourage rust formation on these
bare metal surfaces.
17. Insert a Tapered Roller Bearing into the
pre-installed Lower Race, inside the Hinge
Housing. Ensure that it seats correctly and
“feels right” in the race. Excess grease may
hold it in place temporarily, but it may be
helpful to turn the tire carrier upside down
until the next step is completed.
18. Use a bearing seal driver tool to carefully
install the grease seal into the bottom of the
hinge housing. If the proper tool is not available,
the step may be performed by carefully using
a large socket of the approximate diameter
of the seal and a soft dead-blow hammer to
work the seal into its seat. Be very careful
to drive the seal in evenly, do not let it get
misaligned while driving it in.
19. Install the Tire Carrier onto the bumper,
carefully guiding the hinge housing down
over the hinge spindle. Be careful not to
damage the grease seal when lowering the
tire carrier on to the spindle. There is a very
tight-toleranceslip-tbetweeninnerdiameter
of the tapered roller bearing and its seating
surface on the spindle. Be careful not to
let the bearing get misaligned as you lower
the carrier onto the bumper. Have a friend
support the opposite end of the tire carrier
during this and the next two steps.
©2014 POISON SPYDER CUSTOMS, INC. • 951-849-5911 • WWW.POISONSPYDER.COM
INSTALLATION INSTRUCTIONS
 Loading...