

Page 1

JK LED LICENSE PLATE & 3RD BRAKE LIGHT
TOOLS NEEDED
• Picks (90-degree and straight)
• Small needle-nose pliers
• Electrical tape
• Zip-ties
INSTALLATION PROCEDURE
It is assumed that the LED Taillight Harness
installation is already in progress, the Jeep is
parked and secured, and the passenger side
taillight has already been removed as detailed
in the instructions that come with that harness.
41-06-040 • LED License Plate & 3rd Brake Light - PSC Connectors
Thank you for purchasing Poison Spyder’s JK
LED License Plate & 3rd Brake Light - PSC
Connectors. This installation assumes the use
of Poison Spyder’s JK LED Taillight Harness
- Passenger Side and 4” round LED taillights
sold separately by Poison Spyder Customs.
The following installation procedure is to be
performed in conjunction with the installation of
the LED Taillight Harness, instructions for which
are included with that product.
Installation is fairly simple with the right tools
and good mechanical abilities. If you are not
condent in your mechanical skills, please
seek the help of a professional to perform the
installation. Please read through these entire
instructions before proceeding with installation.
PARTS LIST
Please check your packages immediately upon
arrival to ensure that everything you ordered
is included, and to check for damage during
shipping. If anything is missing or damaged,
call Poison Spyder at (951) 849-5911 as soon
as possible.
(1) LED License Plate & 3rd Brake Light -
PSC Connectors
(1) JK Third Brake Light Jumper Wire
(1) 1/4” OD Air Brake Hose - 18” long
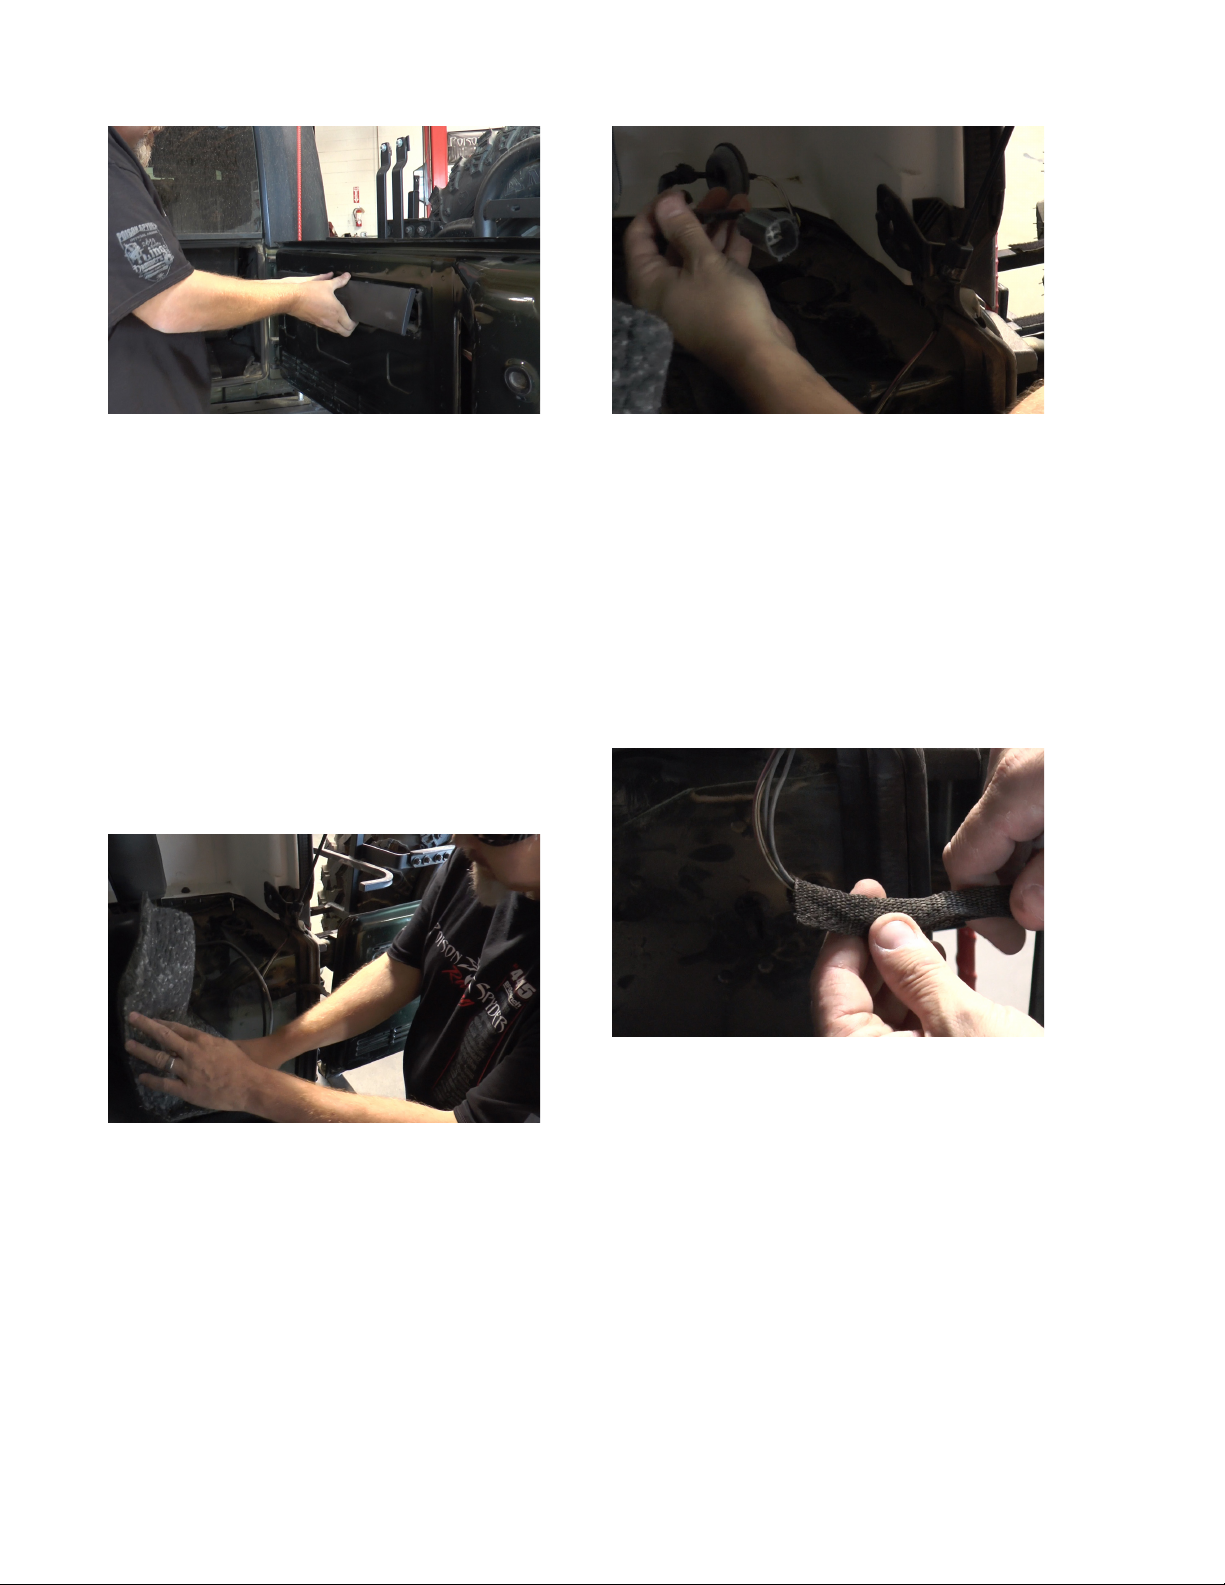
1. Open the tailgate and remove the two
plastic covers on the inside surface of the
tailgate. For the small vertical cover, grip it
along the forward edge (facing the tailgate
hinge) and squeeze to release the tangs
while pulling the cover away.
2. Remove the long horizontal cover by
gripping the bottom edge, and squeeze to
release the tangs while pulling the bottom
edge of the cover away. With the lower
tangs released, slide the cover downward to
release the upper tabs and remove the cover.
FIGURE 3
©2014 POISON SPYDER CUSTOMS, INC. • 951-849-5911 • WWW.POISONSPYDER.COM
INSTALLATION INSTRUCTIONS
Page 2
Poison Spyder Customs •
JK LED License Plate & 3rd Brake Light Install
Page 2
FIGURE 4
3. Just inside the small vertical cover, nd
the small rectangular plug where the Jeep’s
OE third brake light wiring connects to the
chassis harness. Unplug the OE third brake
light wiring if it is present. The OE third brake
light should also be removed, if still present
(instructions for doing so are not included
here).
4. Inside the Jeep, peel back the carpet at
the rear passenger side corner of the Jeep’s
interior, to expose the areas where the wiring
from the tailgate runs. On some Jeeps there
may be a speaker enclosure which will have
to be removed to gain access.
FIGURE 6
6. Where the tailgate wiring transitions from
the tailgate to the Jeep’s body, it passes
throughaexiblesheathofnylonwebbing.
Both ends of the sheath are secured by plastic
zip style wire loom holders. These may be
released by using a pick to carefully depress
the small tang inside the zip housing, and
pulling on the strap. Each end of the sheath
is also secured to the wires with electrical
tape, which will also need to be removed so
that both ends of the sheath are open.
FIGURE 5
5. Follow the wiring from the tailgate up into
the corner of the Jeep’s interior, to where it
passes through the body tub with a rubber
grommet. Grip the grommet along the edges
to dislodge it, then pull it and the taillight
connector plug through the hole into the
Jeep’s interior.
©2014 POISON SPYDER CUSTOMS, INC. • 951-849-5911 • WWW.POISONSPYDER.COM
FIGURE 7
7. Find and uncoil the white brake light
jumper wire that was included in the kit with
the passenger side harness. Also nd the
18” length of 1/4” air brake hose that was
included. At one end of the jumper wire, a
metal pin and rubber seal have already been
installed. Push this metal pin into one end
of the hose until the rubber seal is just inside
theendofthehose,sothatitisrmlygripped
by the hose.
INSTALLATION INSTRUCTIONS
Page 3

Poison Spyder Customs •
JK LED License Plate & 3rd Brake Light Install
Page 3
FIGURE 8
8. Insert the other end of the air hose into the
open end of the nylon wire sheath, from the
tailgate end. Push it through the sheath until
it comes out the other end, then grip the hose
and pull it, along with the brake light jumper
wire, through the sheath. After a few inches
of the jumper wire are through the sheath,
gently remove the air hose from the end of
the wire.
FIGURE 9
9. The pin end of the brake light jumper wire
must now be passed through the rubber
grommet alongside the OE taillight wiring.
Be sure you are passing the wire through in
the correct direction. A squirt of WD-40 into
the narrow neck of the grommet will help it
pass through easily.
FIGURE 10
10. Pull enough of the jumper wire through the
grommet that it can reach the OE taillight
plug. Then push the taillight plug and the
end of the jumper wire back through the hole
in the body tub, into the cavity behind the
taillight, and press the grommet back into
place.
FIGURE 11
11. Route the other end of the brake light
jumper wire alongside the existing wiring
harness across the tailgate. Either coil it
around the existing wiring or use zip-ties to
hold it in place.
12. The square plug on the end of the jumper
wire is passed through the hole in the
©2014 POISON SPYDER CUSTOMS, INC. • 951-849-5911 • WWW.POISONSPYDER.COM
FIGURE 12
INSTALLATION INSTRUCTIONS
Page 4

Poison Spyder Customs •
sheet metal to the interior of the tailgate,
then plugged into the OE third brake light
receptacle.
13. Follow along the length of the jumper wire
making sure it is secured in place. Used zipties wherever needed. Use black electrical
tape to re-tape the ends of the nylon webbing
sheath where the wiring jumps from the
tailgate to the Jeep’s body. Re-close the
wire holders at either end of the nylon sheath
to lock it and the wiring harness in place.
14. Put the carpet back into place in the interior
corner of the Jeep, then reinstall both plastic
covers on the tailgate.
JK LED License Plate & 3rd Brake Light Install
FIGURE 13
Page 4
FIGURE 15
16. Observe the back of the OE taillight
connector, where there are six pin slots but
wires going into only four of them. The empty
corner slot is the one we are going to use.
Down inside the slot is a small rubber plug
that was inserted at the factory to keep the
elements out. Use small needle-nose pliers
to grip the nub on the end of the plug and
pull it out.
FIGURE 14
15. Close the tailgate and move back to the
taillight location. Reach inside the taillight
hole and pull out the OE taillight connector
and the pinned end of the brake light jumper
wire. Inside the open end of the taillight
connector is a white plastic pin lock, which
needs to be removed. There is a small slot
on one side, where it can be gripped with a
90-degree pick and pulled out.
©2014 POISON SPYDER CUSTOMS, INC. • 951-849-5911 • WWW.POISONSPYDER.COM
FIGURE 16
17. Observe the pin on the end of the brake
light jumper wire. Note there is a small metal
tang, or tab, protruding from one side of the
pin. This tang should be oriented away from
the wire in the adjacent slot, as the pin is
inserted into the empty corner slot in the back
of the plug. Push the pin into the connector
until it locks into place.
INSTALLATION INSTRUCTIONS
Page 5

Poison Spyder Customs •
18. Reinstall the white plastic pin lock into the
open end of the taillight connector. Use a
pick or screwdriver to push it in until it locks
into place.
JK LED License Plate & 3rd Brake Light Install
FIGURE 17
Page 5
This hole can be used to route the wiring to
the exterior of the Jeep.
21. Use hardware of your own choosing to
mount the License Plate & 3rd Brake Light
along with the license plate in the location
you have chosen. Use zip-ties to secure
the wiring lead along its path. Make sure it
has enough slack at the tire carrier hinge to
provide for full movement of the tire carrier.
22. Continue with the remaining steps of the
JK LED Taillight Harness installation from the
instructions included with that product.
Congratulations, you have completed the
installation of your Poison Spyder JK LED
Taillight Harness!
FIGURE 18
19. Plug the Poison Spyder LED Taillight
Harness into the OE taillight connector.
FIGURE 19
20. Route the long gray license plate light
lead to wherever you are going to mount the
license plate light, typically at the center of
the spare tire on the spare tire carrier. To
route the wire to the exterior of the Jeep,
reach inside the Jeep’s corner cavity, down
tothe“oor”inside.There is a holeinthis
oorunderathick pieceoffoaminsulation.
©2014 POISON SPYDER CUSTOMS, INC. • 951-849-5911 • WWW.POISONSPYDER.COM
INSTALLATION INSTRUCTIONS
Page 6

Poison Spyder Customs •
JK LED License Plate & 3rd Brake Light Install
Page 6
WARRANTY
Poison Spyder Customs™ warranties all of the
products we sell and distribute for one (1) year
from the date of sale. These products will be
free from defects in material and workmanship
under normal installation, and use. Due to the
intended use the powder coat nish is warranted
for ninety (90) days. The nish warranty will not
cover a product if it has been damaged in any
way. Warranty is limited to repair or replacement.
Poison Spyder Customs™ does not offer any
type of labor or shipping allowance and all
warranty claims are subject to inspection by
Poison Spyder Customs™.
At the discretion of Poison Spyder Customs™,
the products in question can be repaired or
replaced when found defective. Prior to any
replacement or repair, written authorization must
be obtained from Poison Spyder Customs™.
Failure to contact us prior to having warranty work
preformed will immediately void all applicable
warranties; and it is then the sole responsibility
of the customer to remit any payment incurred.
The warranty expressed above is the sole
warranty of Poison Spyder Customs™, and
any other expressed or implied warranties are
hereby specically excluded and disclaimed.
HOLD HARMLESS AGREEMENT
1. In purchasing a Poison Spyder Customs
Product™ I release, waive, discharge and
covenant not to sue Poison Spyder Customs
ofcers, servants, agents, or employees
(hereinafter referred to as Releasees) from
any and all liability, claims, demands, actions
and causes of action whatsoever arising out
of or related to any loss, damage, or injury,
including death, that may be sustained by
me (or anyone else), any property belonging
to me (or anyone else), whether caused by
the negligence of the releasees or otherwise,
while working on, using or any activity related
to this product.
2. I am fully aware of risks and hazards
connected with the use of a this product
and I elect to voluntarily engage in such
use of this product knowing that the use
may be hazardous to me and my property. I
voluntarily assume full responsibility for any
risks of loss, property damage or personal
injury, including death, that may be sustained
by me (or anyone else), or any loss or damage
to property owned by me (or anyone else),
as a result of using this product, whether
caused by the negligence of releasees or
otherwise.
3. I further agree to indemnify and hold
harmless the releasees from any loss,
liability, damage or costs, including court cost
and attorney fees, that they may incur due to
my use of a this product, whether caused by
negligence of releasees or otherwise.
4. It is my express intent that this Release
and Hold Harmless Agreement shall bind
the members of my family and spouse, if I
am alive, and my heirs assigns and personal
representative, if I am deceased, and shall
be deemed as a release, waiver, discharge,
and covenant not to sue the above named
releasees. I further agree that this Waiver of
Liability and Hold Harmless Agreement shall
be construed in accordance with the laws of
the State of California.
By accepting this product, I acknowledge and
represent that I have read the above Waiver
and Liability and Hold Harmless Agreement,
understand it and accept it voluntarily as my
own free act and deed; no oral presentations,
statements, or inducements, apart from the
foregoing written agreement, have been made;
I am at least eighteen (18) years of age and
fully competent; and I execute this Release for
full, adequate and complete consideration fully
intending to be bound by same.
If you do not agree with the preceding Hold
Harmless Agreement, you may return the product
and receive a full refund. Please, contact a
Poison Spyder Customs™ sales representative
and they will issue a call tag for the product in
question. Once the product has been received
by Poison Spyder Customs™ a full refund will
be issued.
©2014 POISON SPYDER CUSTOMS, INC. • 951-849-5911 • WWW.POISONSPYDER.COM
INSTALLATION INSTRUCTIONS
 Loading...