

Page 1
www.point-sourceaudio.com
SERIES8 | CO-8WD | CR-8D
Headset Microphone
Owner’s Manual
Read the enclosed instructions and cautions thoroughly before
using this product. Failure to observe the proper use of this
product could result in voiding your warranty.
www.point-sourceaudio.com
Windscreen, body clip,
storage box
INCLUDED ACCESSORIES:
135dB SPLMAXIMUM SPL:
0.6 ozNET WEIGHT:
4 ft .077 in. + connectorCABLE LENGTH:
1 ~ 10 VOPERATING VOLTAGE:
5000 Ω (at 1kHz)
OUTPUT IMPEDANCE:
-70dB ±3dB
(0dB = 1V/microbar at 1kHz)
SENSITIVITY:
160 Hz ~ 14 kHzFREQUENCY RESPONSE:
Uni-directionalPOLAR PATTERN:
Back Electret Condenser ELEMENT:
Cardioid Headset Microphone
CR-8D SpecificationsCO-8WD Specifications
Windscreen, body clip,
storage box
INCLUDED ACCESSORIES:
148dB SPLMAXIMUM SPL:
0.6 ozNET WEIGHT:
4 ft .077 in. + connectorCABLE LENGTH:
1 ~ 10 VOPERATING VOLTAGE:
1400 Ω (at 1kHz)
OUTPUT IMPEDANCE:
-54dB ±3dB
(0dB = 1V/microbar at 1kHz)
SENSITIVITY:
20 Hz ~ 20 kHzFREQUENCY RESPONSE:
Omni-directional POLAR PATTERN:
Back Electret Condenser ELEMENT:
Omnidirectional Headset Microphone
Page 2
www.point-sourceaudio.com
www.point-sourceaudio.com www.point-sourceaudio.com
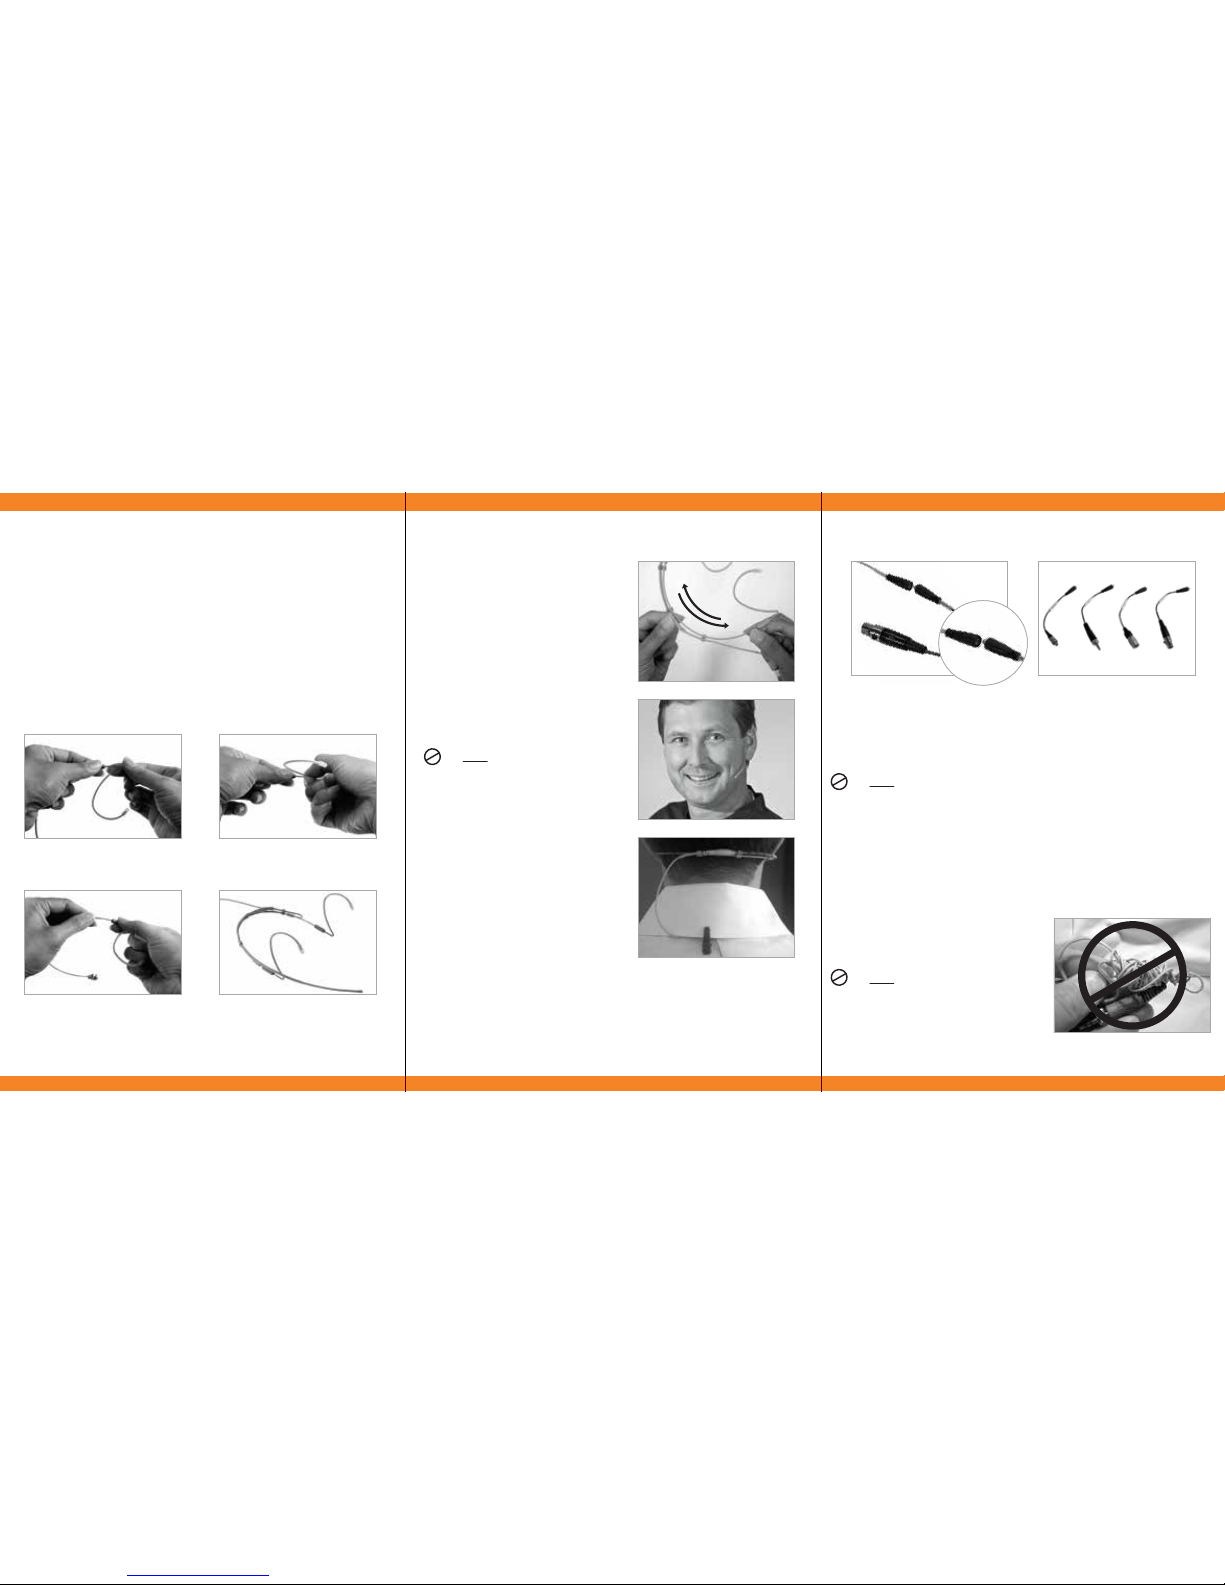
Your microphone is equipped with an interchangeable X-Connector
of a termination as specified at the time of purchase. To remove,
simply grasp the end of the microphone cable firmly with one hand
and twist off the X-Connector end until separated.
Do NOT attempt to re-terminate the microphone yourself. Making
physical changes to the microphone electronics or wiring will void
your warranty.
To prolong the life of your cable, always remove the microphone
by grasping the connector - NEVER tug on the cable to disconnect
the microphone from the body-pack.
X-Connectors are interchangeable
Using with Your Wireless System
Threaded screw connection
When storing your microphone, use
care to coil the cable so that it rests
flat.
Do NOT wrap the cable around the
body pack or coil the cable in any
way that creates serious bends or
strain on the cable.
Storing Your Microphone
Carefully adjust the boom portion of
the mic to curve around the face.
Curve the boom so that the
microphone capsule (tip of the
boom) is located as closely as
possible to the corner of the mouth
5.
For CARDIOID model microphones,
follow these same directions.
It is not necessary to position the
capsule directly in front of the
mouth as with other cardioid
microphones. Proper positioning
will provide for an optimal
signal-to-noise ratio and will also
minimize popping and the effects
of breath noise.
Gently curve the boom portion
of the mic around the face so
that the microphone capsule (tip
of the boom) is located as closely
as possible to the corner of the
mouth without touching anything.
6.
Attach the cable to the clip and secure the cable to an area of
clothing near the neck. This will provide strain relief to the
microphone so that movement of the boom is minimized to ensure
a consistent audio level.
7.
Do NOT grab the capsule to
make the adjustments as this
will cause damage to the
capsule.
Microphone Placement
Turn ear hook into upright
position. Release to snap
lock in place.
2.
Your headset microphone is
now ready to use.
4.
Gently pull ear hook from
the headband about 1/8”
to unlock.
1.
Slide the headband on both
sides to adjust evenly for a
proper fit.
3.
Remove your microphone from its case and carefully uncoil the
cable so that it is fairly straight and without kinks or bends.
For video instructions, go to
www.point-sourceaudio.com/manuals.html
Adjusting the Earhooks
Read the enclosed instructions and cautions thoroughly before using
this product. Failure to observe the proper use of this product could
result in voiding your warranty.
Note: The products pictured here are for illustration purposes and
may not look exactly like the product you have purchased.
Read Before Use
 Loading...