

Page 1

Copyright © 2006 – 2017
Point Mobile Co., Ltd. All rights reserved
Enterprise Mobility
PM66
User Manual
For Android 6.0.1
Page 2
PM66 Android 6.0.1 User Manual
1
©2006 – 2017 POINTMOBILE Co., Ltd. All rights reserved
User Manual
Please note your phone is battery-embedded design with removable battery and battery cover. Unauthorized
personnel are strictly prohibited from disassembling the phone. Make sure to use only the power adapter (5V
2A Output AC/DC) that came with PM66.
In case your phone does not work as expected, you are strongly recommended to restart it by pressing and
holding the power button for at least 12 seconds until the startup screen appears. If your phone has
encountered a serious error and cannot be recovered, you should reset your phone to factory settings by using
the menu, either “Backup & Reset”, or “Factory Reset”. For more details, please refer to “Factory data reset”
section on page 42
Note: Please be cautious while performing the factory data reset. Because this will erase personalized
settings and data saved in your phone, such as SMS, Contacts, Music, etc.
Body-worn Operation
This device was tested for typical body-worn operations with the front
& back of the phone kept 0.2 inches (0.5 cm) between the user’s body
and the front & back of the phone. A minimum separation distance of
0.2 inches (0.5 cm) must be maintained between the user’s body and
the front & back of the phone. Any belt clips, holsters, and similar
accessories containing metallic components may not be used. Bodyworn accessories that cannot maintain 0.2 inches (0.5 cm) separation
distance between the user's body and the front & back of the phone,
and have not been tested for typical body-worn operations should be
avoided.
PROTECT YOUR HEARING
To prevent possible hearing damage, do not listen at high volume
levels for long periods. Exercise caution when holding your device near
your ear while the loudspeaker is in use.
Rev 01
Page 3

PM66 Android 6.0.1 User Manual
2
©2006 – 2017 POINTMOBILE Co., Ltd. All rights reserved
Table of Contents
User Manual .......................................................................................................................................................................... 1
Table of Contents ................................................................................................................................................................. 2
Getting Started ...................................................................................................................................................................... 3
Major Parts ........................................................................................................................................................................ 3
Accessary .......................................................................................................................................................................... 5
Setup PM66 ....................................................................................................................................................................... 6
Charge PM66 .................................................................................................................................................................... 9
Turn On/Off PM66 .......................................................................................................................................................... 10
Hot swap the battery ...................................................................................................................................................... 11
Learning the basics ............................................................................................................................................................ 12
Use a keypad .................................................................................................................................................................. 12
Use a touch screen ........................................................................................................................................................ 14
Home Screen, Apps and Widget.................................................................................................................................. 16
Status & Notifications Icons .......................................................................................................................................... 20
Make a call ...................................................................................................................................................................... 22
Add to a contact .............................................................................................................................................................. 24
Send a message ............................................................................................................................................................. 25
Connect to your Wi-Fi network ..................................................................................................................................... 27
Scanner Settings ................................................................................................................................................................ 29
Use a Scanner ................................................................................................................................................................ 29
Scan a Barcode .............................................................................................................................................................. 36
OS Update ........................................................................................................................................................................... 38
OS Image update from a Storage ................................................................................................................................ 38
OS Image update from the FOTA ................................................................................................................................ 40
Factory data reset .............................................................................................................................................................. 42
Factory data reset from Settings .................................................................................................................................. 42
Force Factory data reset ............................................................................................................................................... 44
EmKit .................................................................................................................................................................................... 47
EmKit Secure .................................................................................................................................................................. 48
EmKit Remote ................................................................................................................................................................. 49
EmKit Tools ..................................................................................................................................................................... 51
Page 4
PM66 Android 6.0.1 User Manual
3
©2006 – 2017 POINTMOBILE Co., Ltd. All rights reserved
Getting Started
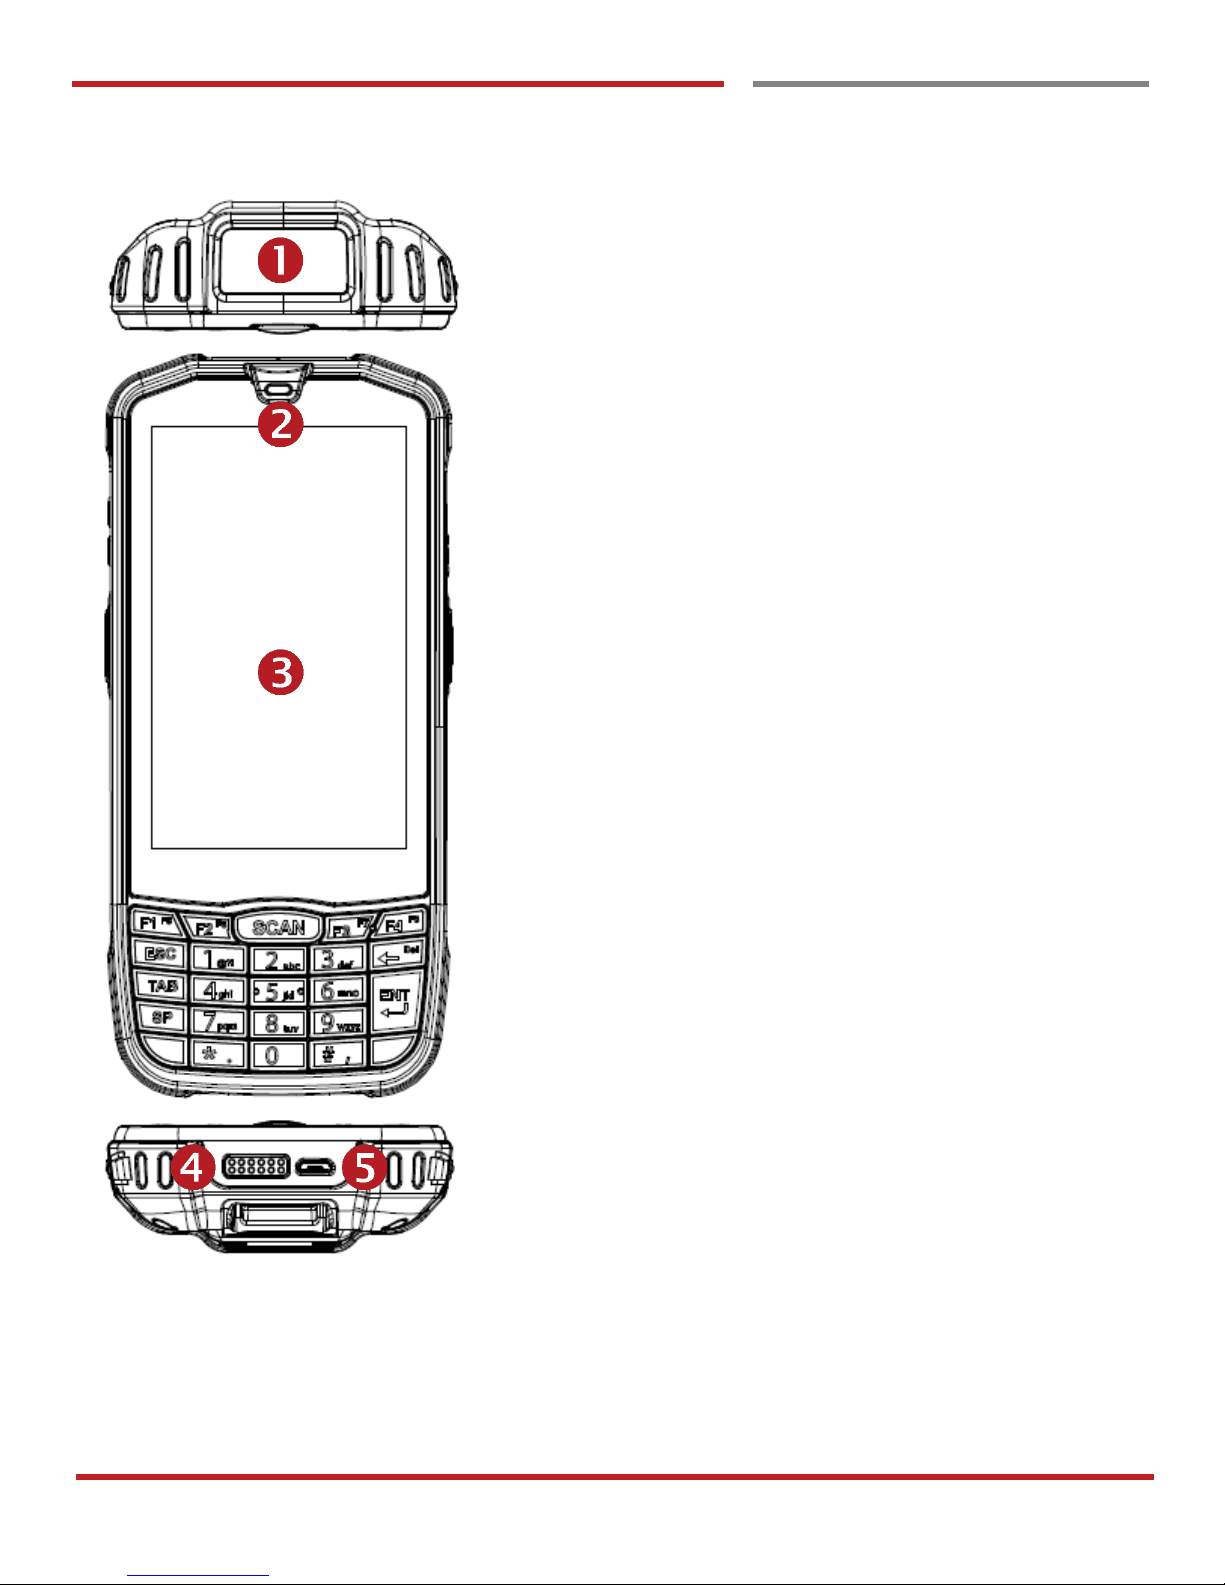
Major Parts
Major Parts
Getting Started
1. Barcode Scanner
2. Speaker
3. Touch Screen
4. Pogo pin connector
5. micro USB
Page 5
PM66 Android 6.0.1 User Manual
4
©2006 – 2017 POINTMOBILE Co., Ltd. All rights reserved
Getting Started
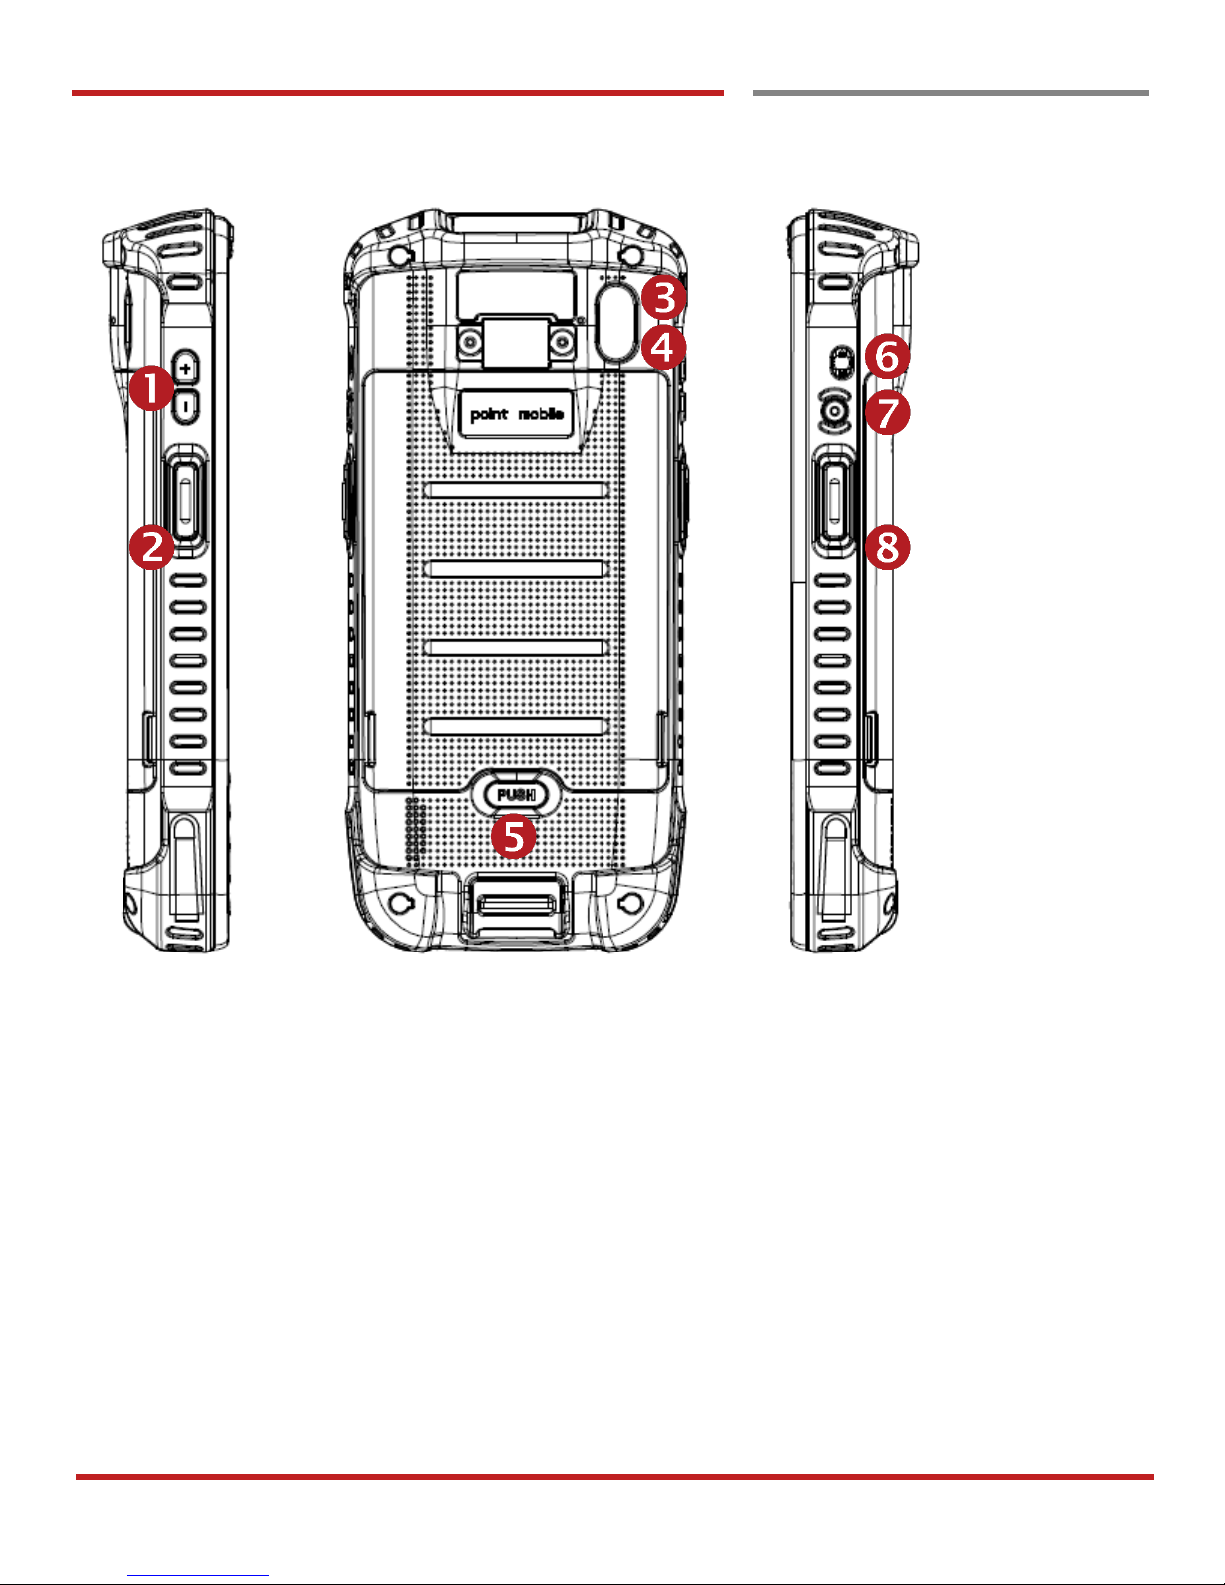
Major Parts
Getting Started
1. Volume Key
2. Scanner Trigger
3. Flash Light
4. Camera
5. Battery Cover Lock
6. 3.5mm Audio Jack
7. Power Key
8. Scan Trigger Key
Page 6
PM66 Android 6.0.1 User Manual
5
©2006 – 2017 POINTMOBILE Co., Ltd. All rights reserved
Getting Started
Accessary
Accessary
Getting Started
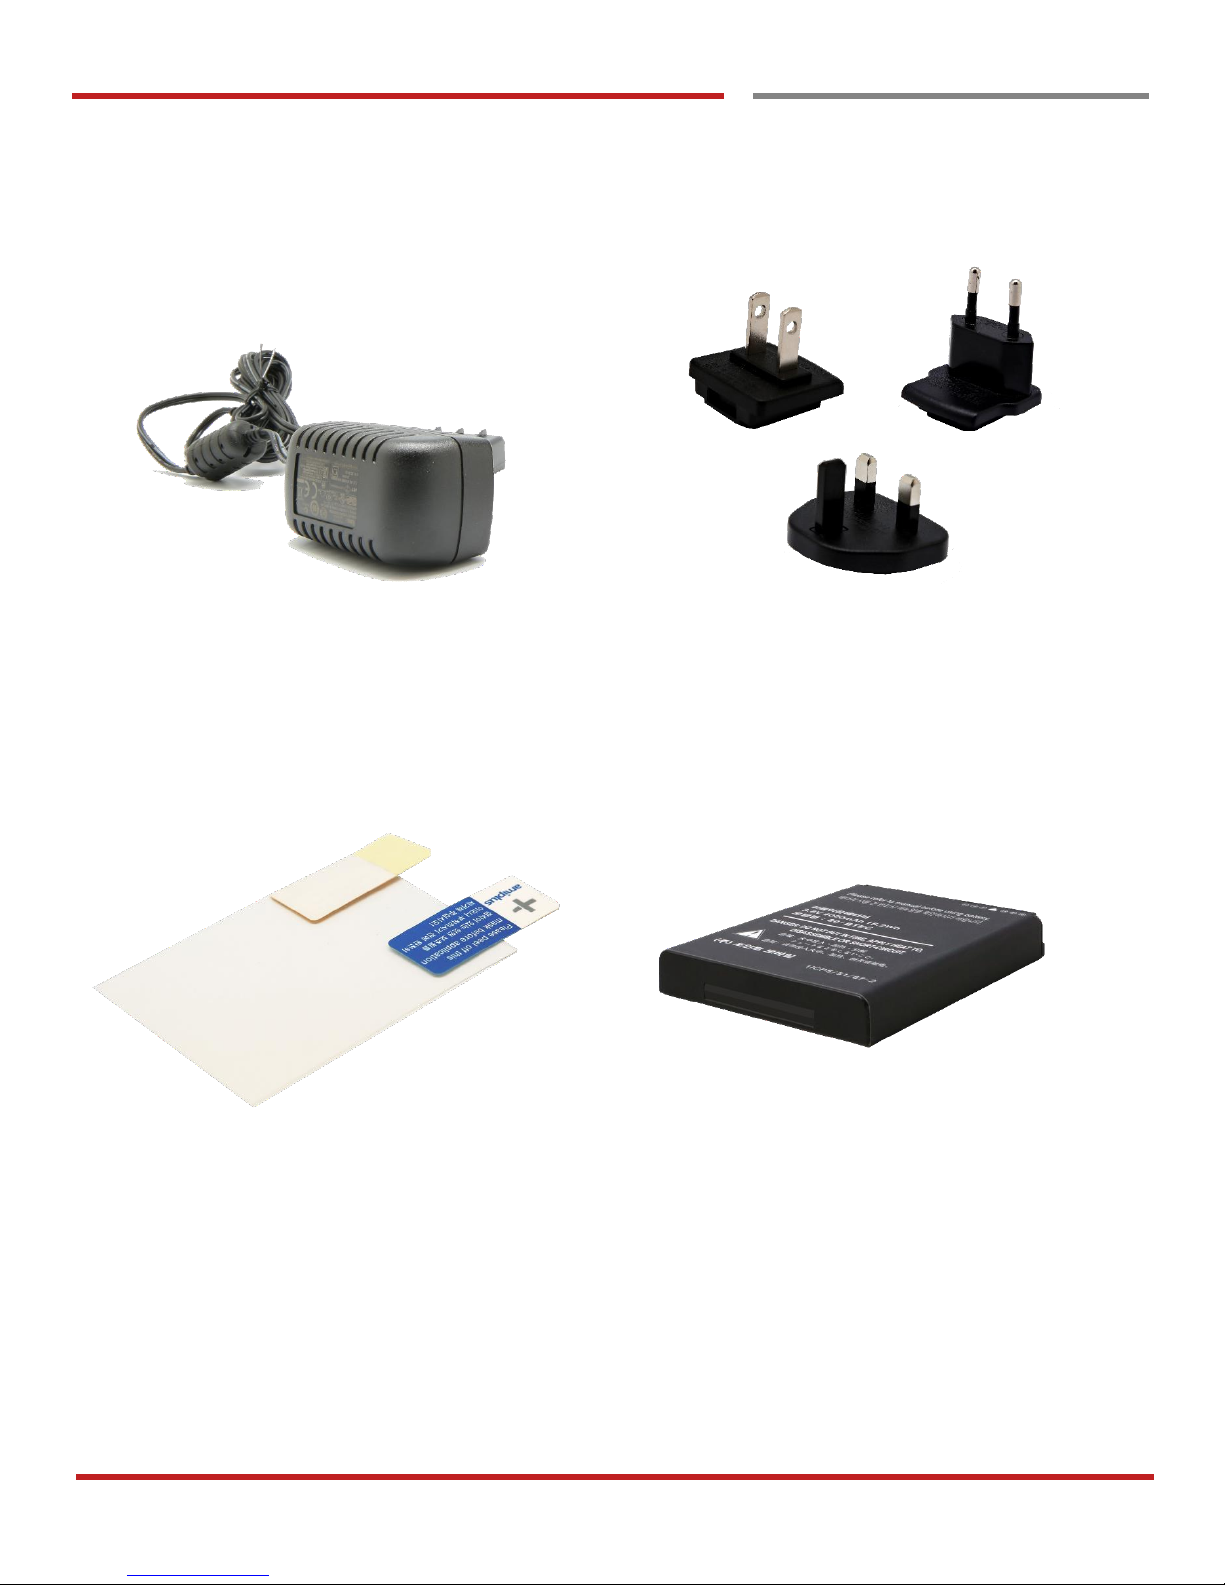
AC/DC adapter Plug (US/ EU/ UK)
LCD protection film Li-ion battery
Page 7
PM66 Android 6.0.1 User Manual
6
©2006 – 2017 POINTMOBILE Co., Ltd. All rights reserved
Getting Started
Setup PM66
Setup PM66
Getting Started
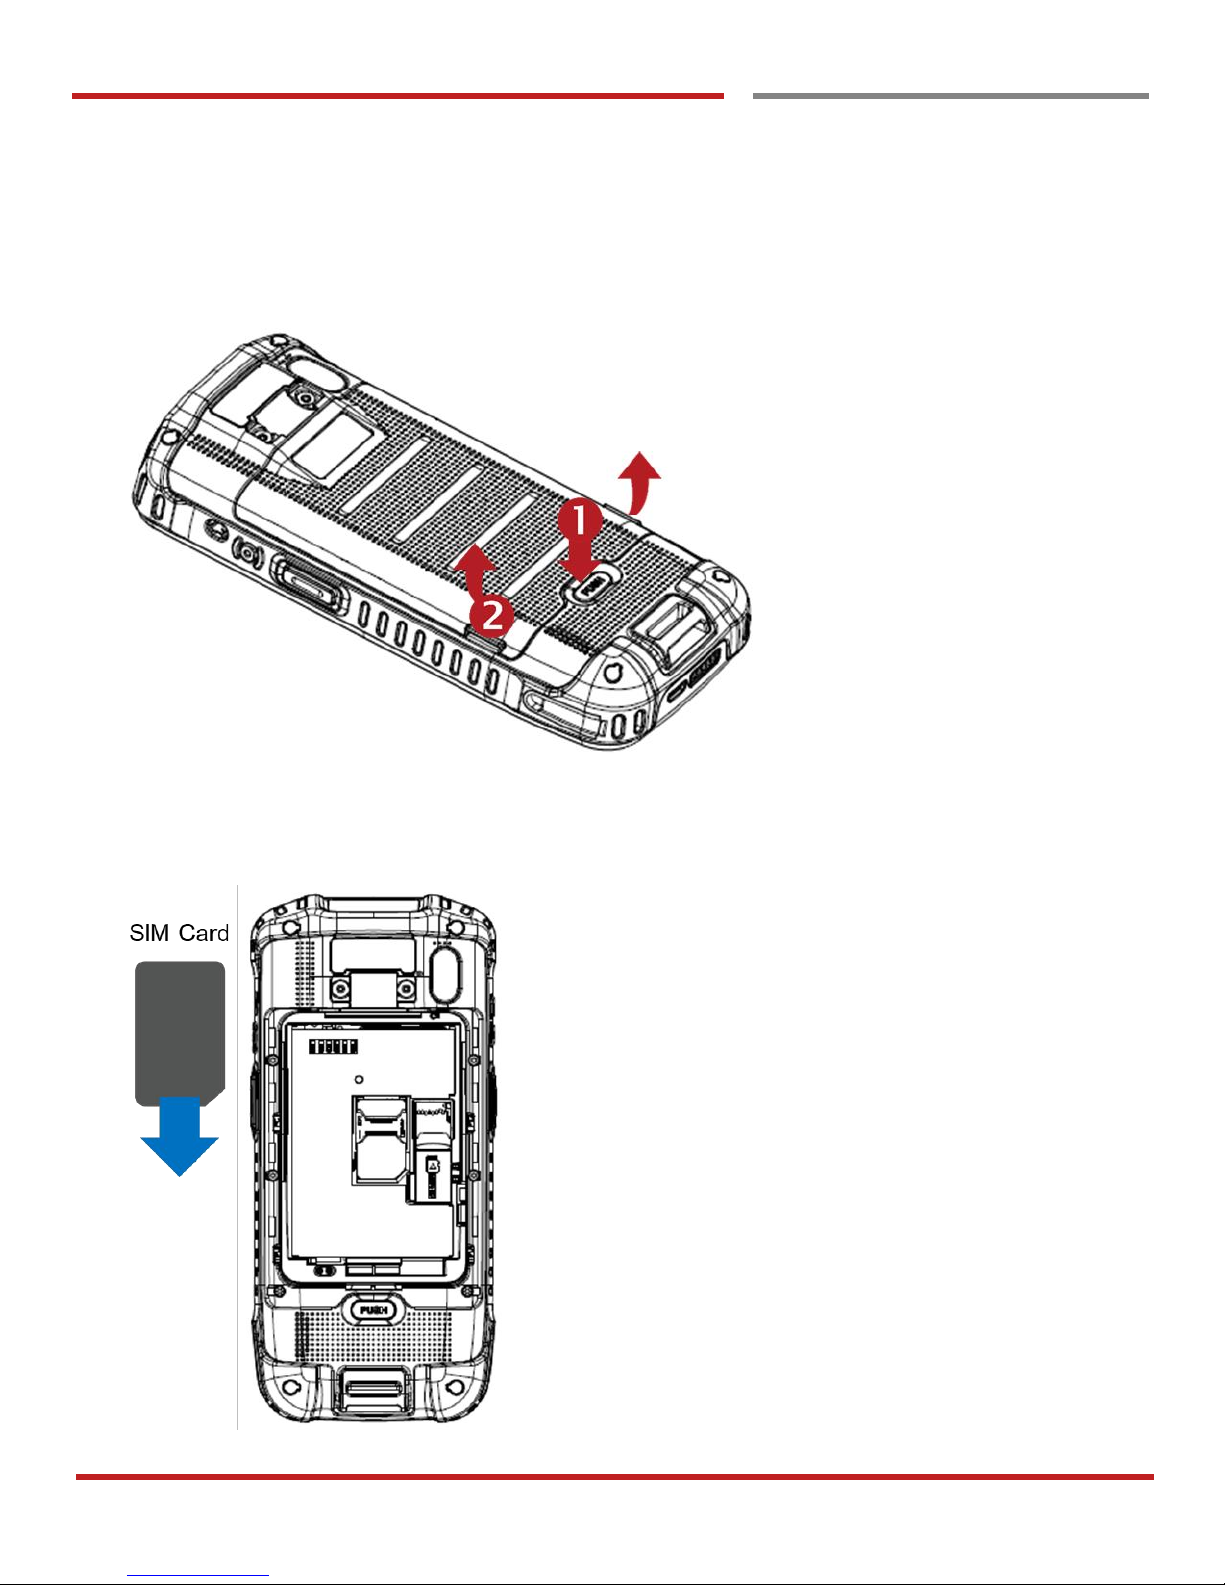
Remove the Battery Cover
1. Press “Battery Cover Lock” button
2. Pull up the Battery Cover from bottom side area
Insert SIM card
1. Insert the SIM card into the slot. (Gold plate should face down)
2. To remove the card, gently slide it out of the slot.
Page 8
PM66 Android 6.0.1 User Manual
7
©2006 – 2017 POINTMOBILE Co., Ltd. All rights reserved
Getting `Started
Setup PM66
Getting Started
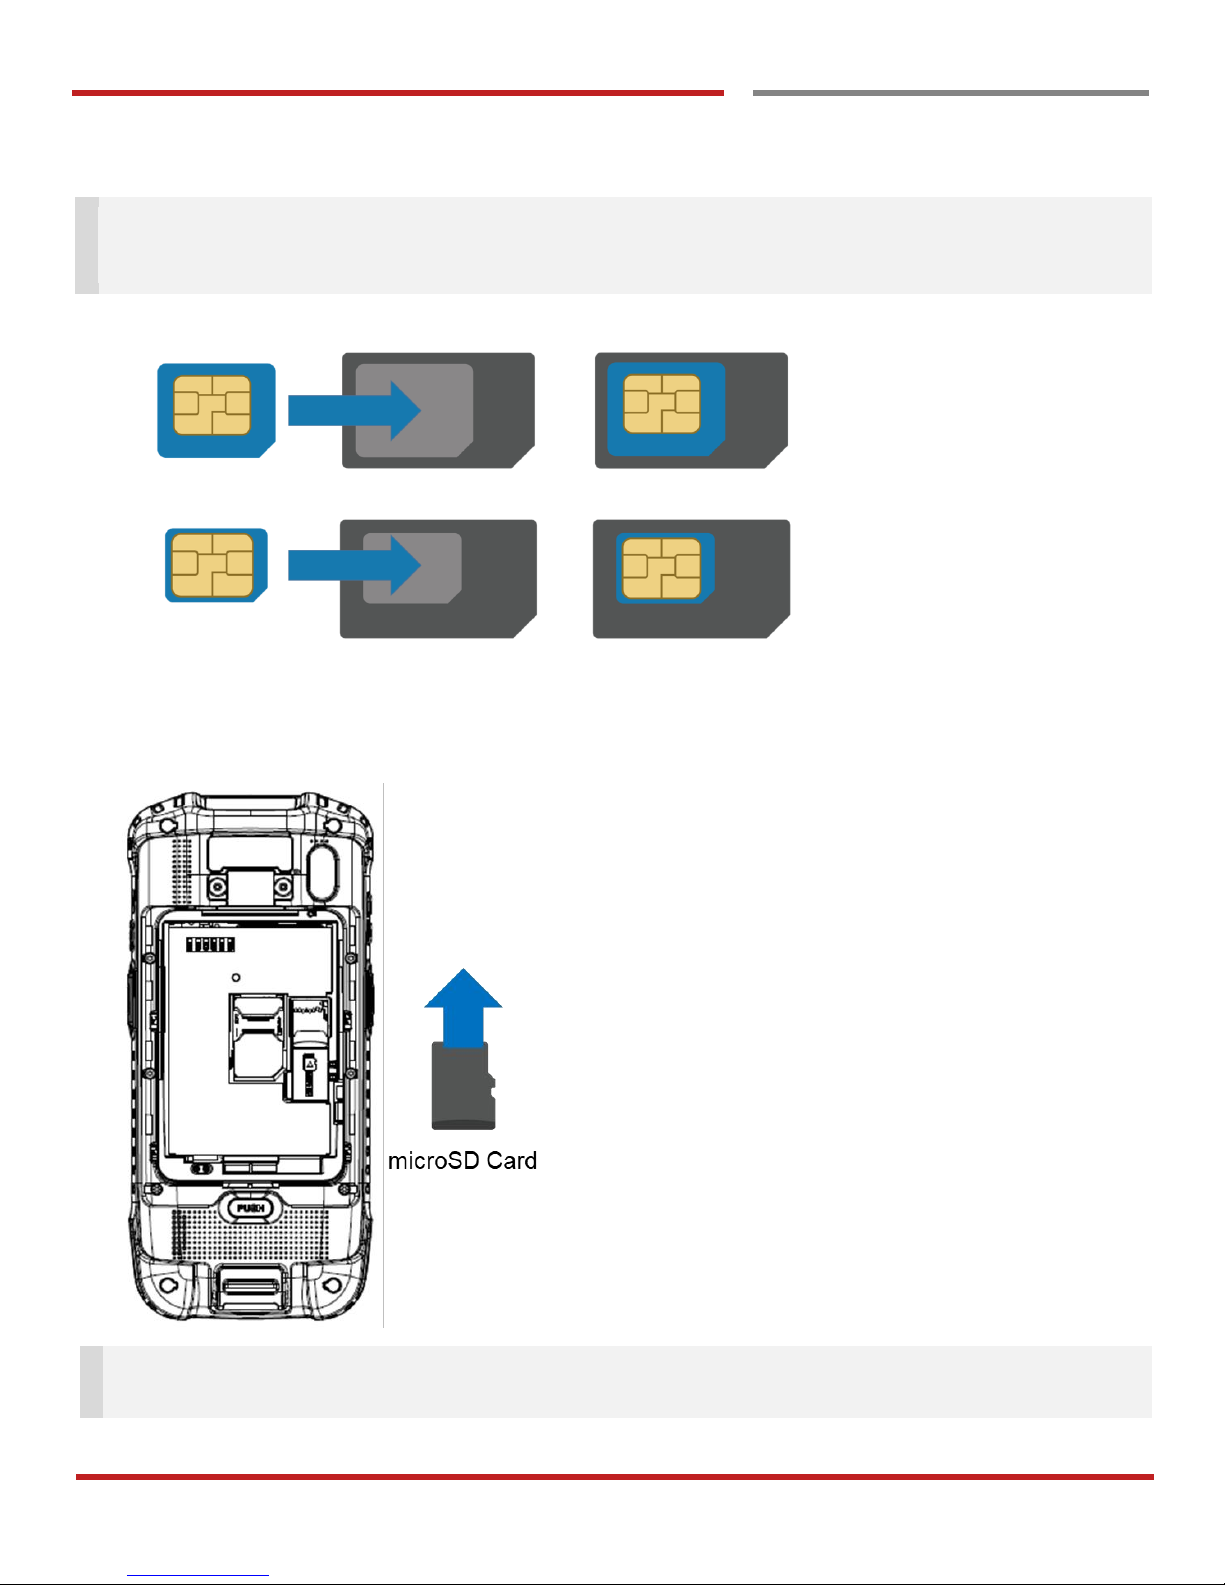
Note: Your device only supports SIM cards. Do not attempt to insert other SIM types such as “Micro” and
“Nano” SIM card, this may cause damage to your device. If you have to use different SIM card types,
please use “SIM adaptor”.
Install and Remove the microSD card
1. Insert the microSD card into the slot (Gold plate should face down).
2. To remove the microSD card, gently slide it out of the slot.
Note: To avoid data loss and SD card damage, please ensure the SD card is unmounted from Android
system “Settings – Storage - Unmount SD card”
Getting Started
Page 9
PM66 Android 6.0.1 User Manual
8
©2006 – 2017 POINTMOBILE Co., Ltd. All rights reserved
Setup PM66
Getting Started
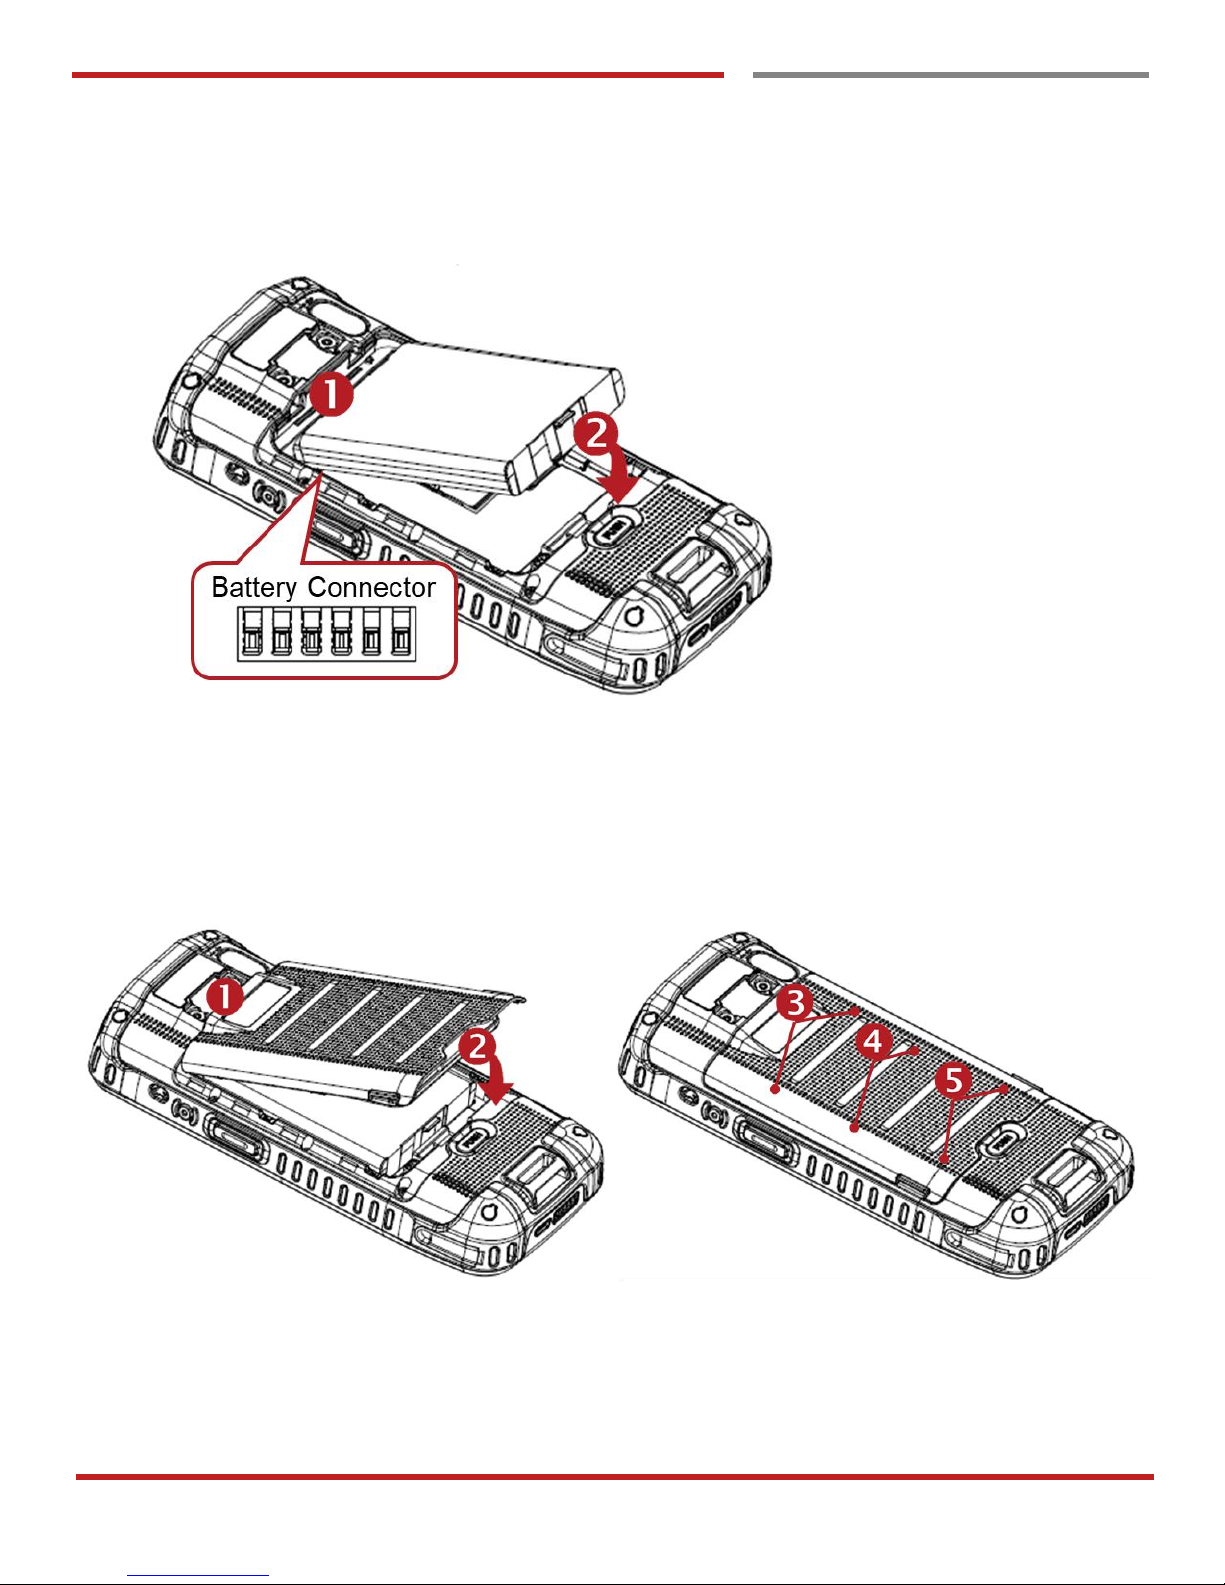
Insert the Battery
Insert “Battery” from top area first and then put in bottom area. Make sure battery contact “Battery Connector”
Close the Battery Cover
Insert “Battery Cover” from the top area first and then put in bottom area. Press battery cover with both hand
firmly
Page 10
PM66 Android 6.0.1 User Manual
9
©2006 – 2017 POINTMOBILE Co., Ltd. All rights reserved
Getting Started
Charge PM66
Charge PM66
Getting Started
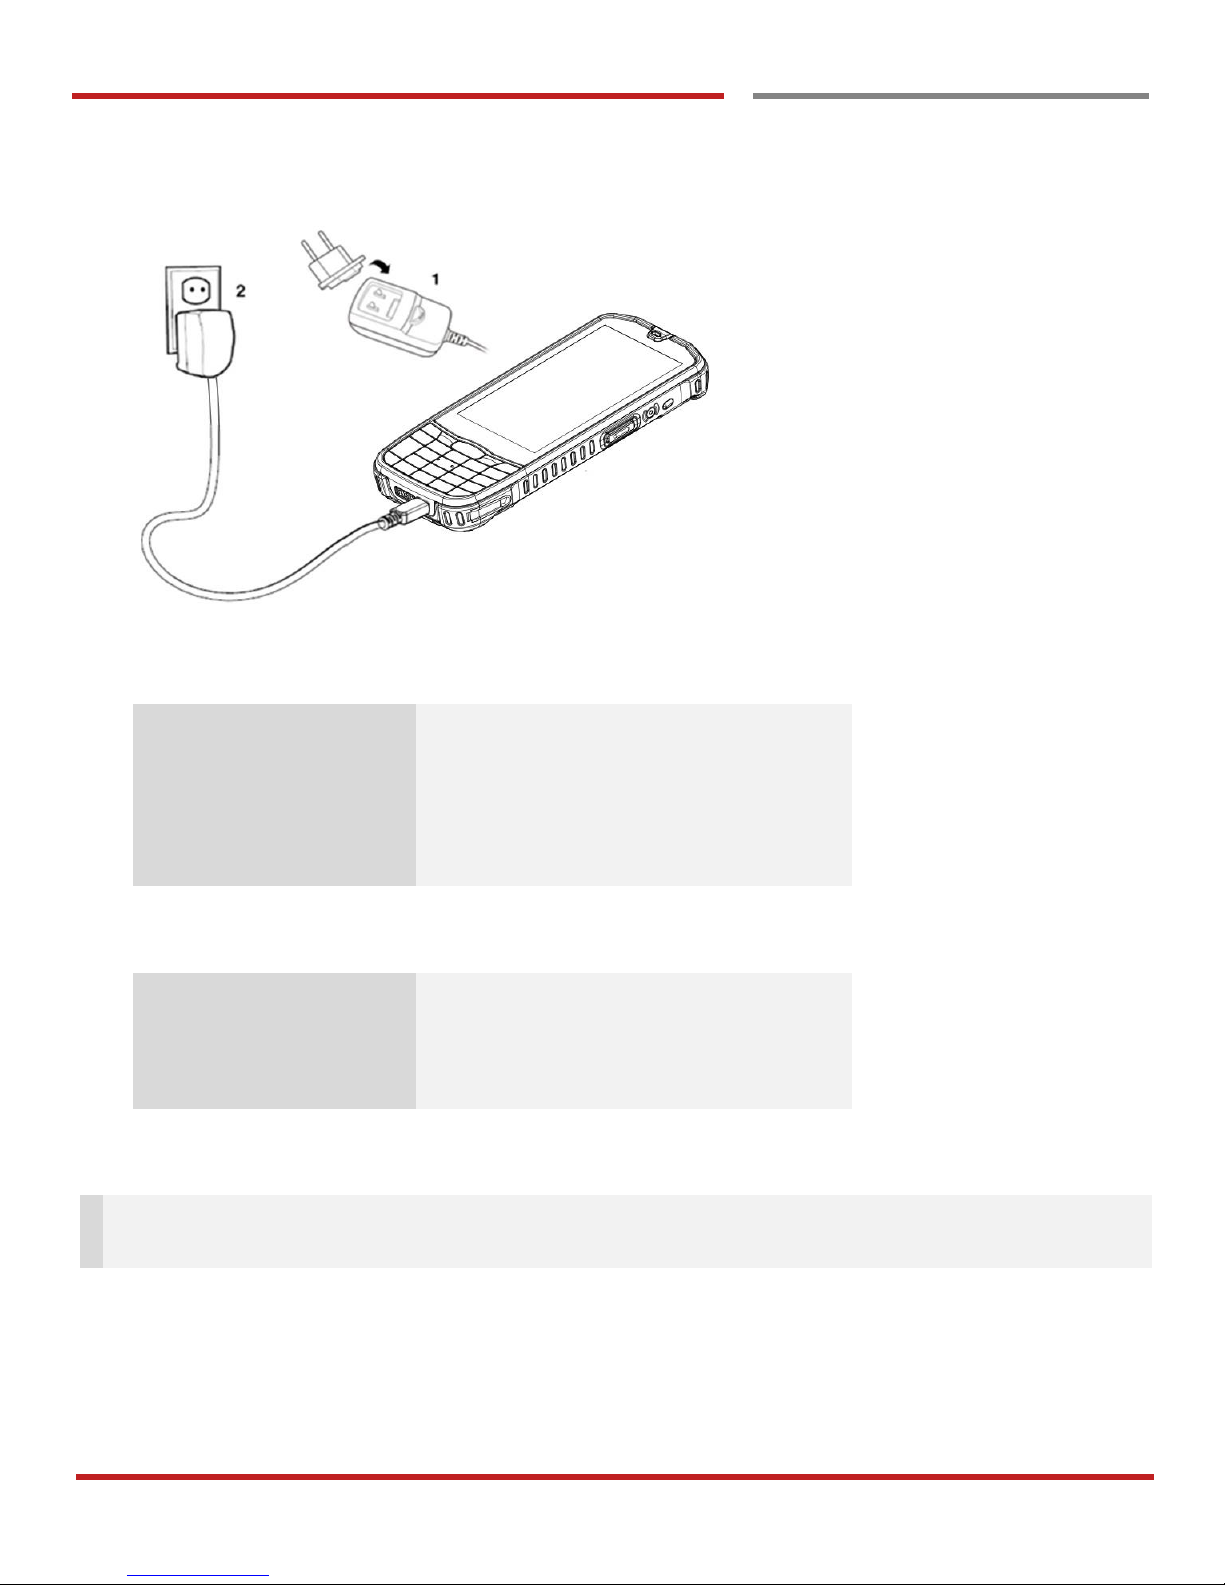
1. Connect the AC/DC adaptor to your device and wall socket respectively
2. LED indicator will display charging status.
Steady Red
Battery is charging or Battery level is low
Blinking Red
Battery level is critical low
Steady Green
Battery is fully charged
Blinking Red and Green
Battery is removed or fail to recognize
PM66 Battery Specification
Standard Battery
3.85V, 4,100mAh
Backup Battery
3.7V, 60mAh
Charging time
Standard Battery : About 6hours
Note: Always use an original charger and cable from the Point Mobile. Other chargers and cables may
damage PM66. In addition, make sure connector, charger, cables are not wet.
Page 11
PM66 Android 6.0.1 User Manual
10
©2006 – 2017 POINTMOBILE Co., Ltd. All rights reserved
Getting Started
Turn On/Off PM66
Turn On/Off PM66
Getting Started
Turn On
1. Press and hold down the “Power Key” for a few seconds.
2. When PM66 enter to the boot mode, it will display “SMART BEYOND RUGGED” logo with short
vibration
3. Release the “Power Key” and wait until PM66 finish booting
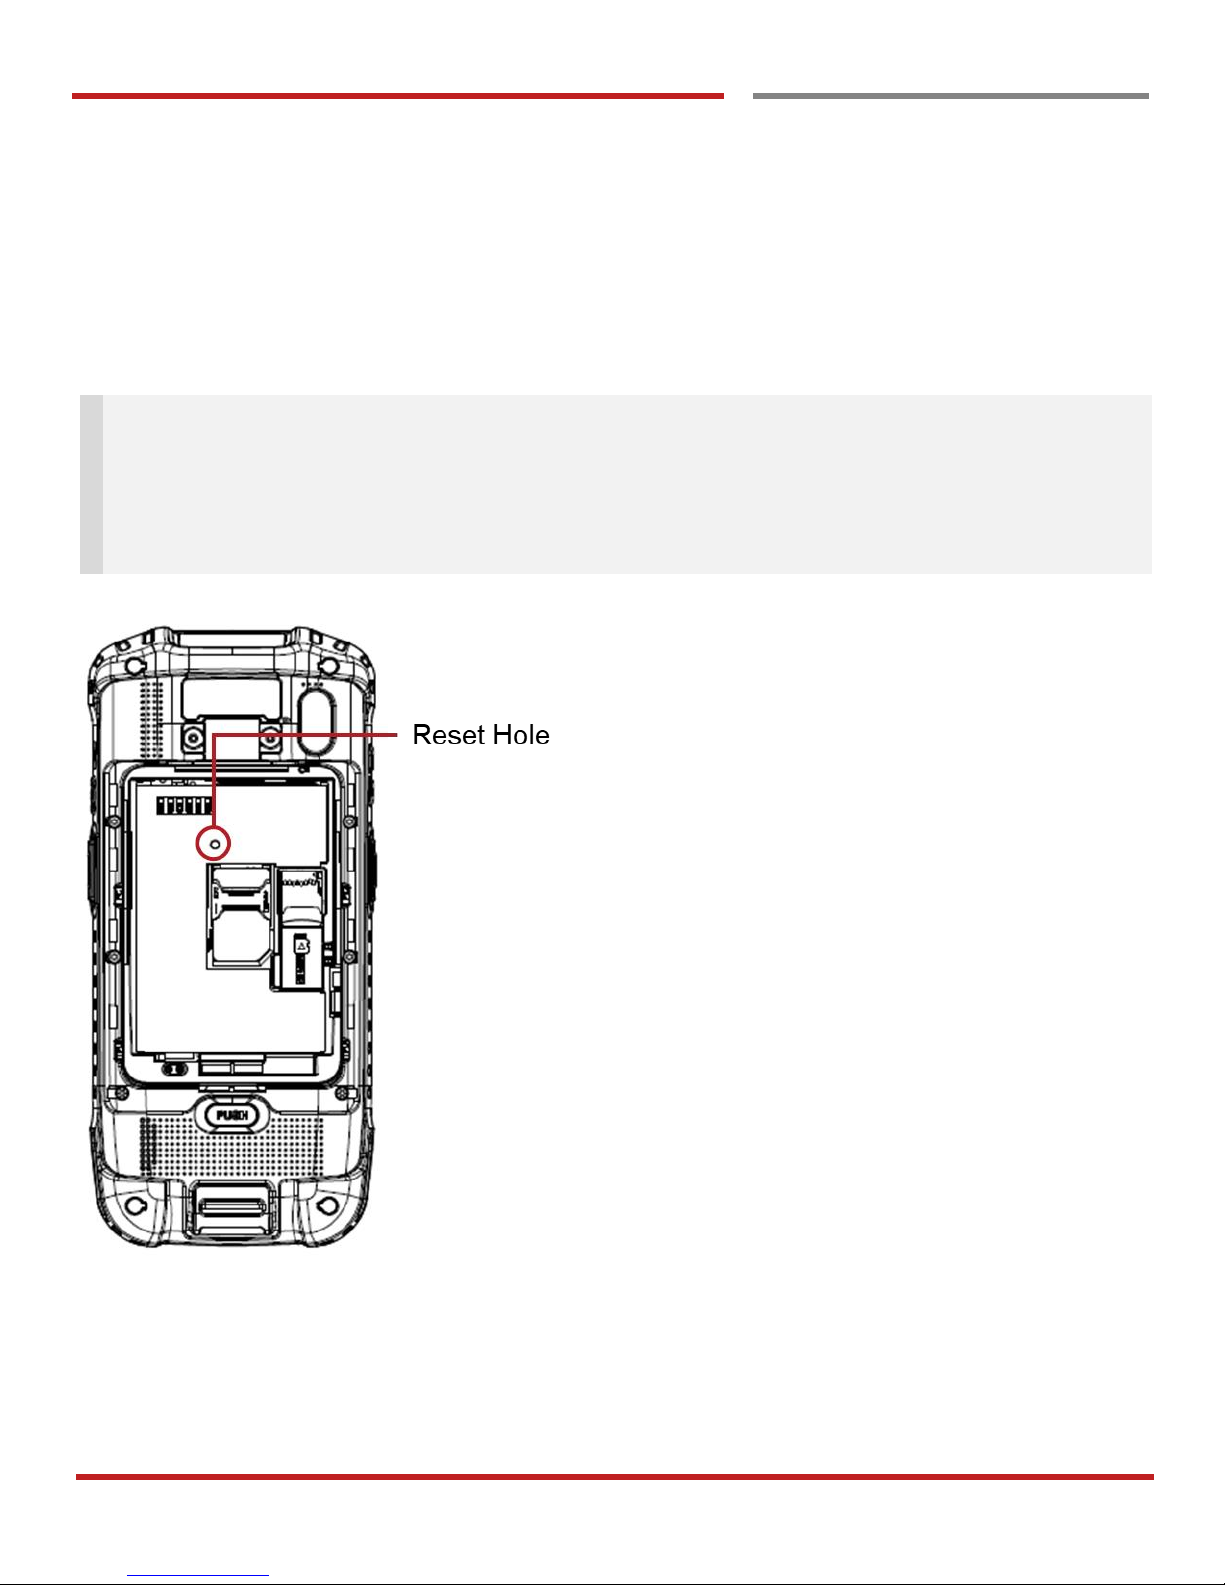
Note: If you cannot turn on your PM66, try below steps
- To turn on PM66, battery needs to be charged certain level. Please charge first
- Press and hold the “Power key” for 12 seconds to force reboot
- Press and release the “Reset Hole” and then turn on PM66 again
Turn Off
1. Press and hold the “Power Key” until you see the power menu
2. Among the menu, tap “Power Off”
Getting Started
Page 12
PM66 Android 6.0.1 User Manual
11
©2006 – 2017 POINTMOBILE Co., Ltd. All rights reserved
Hot swap the battery
Hot swap the battery
Getting Started
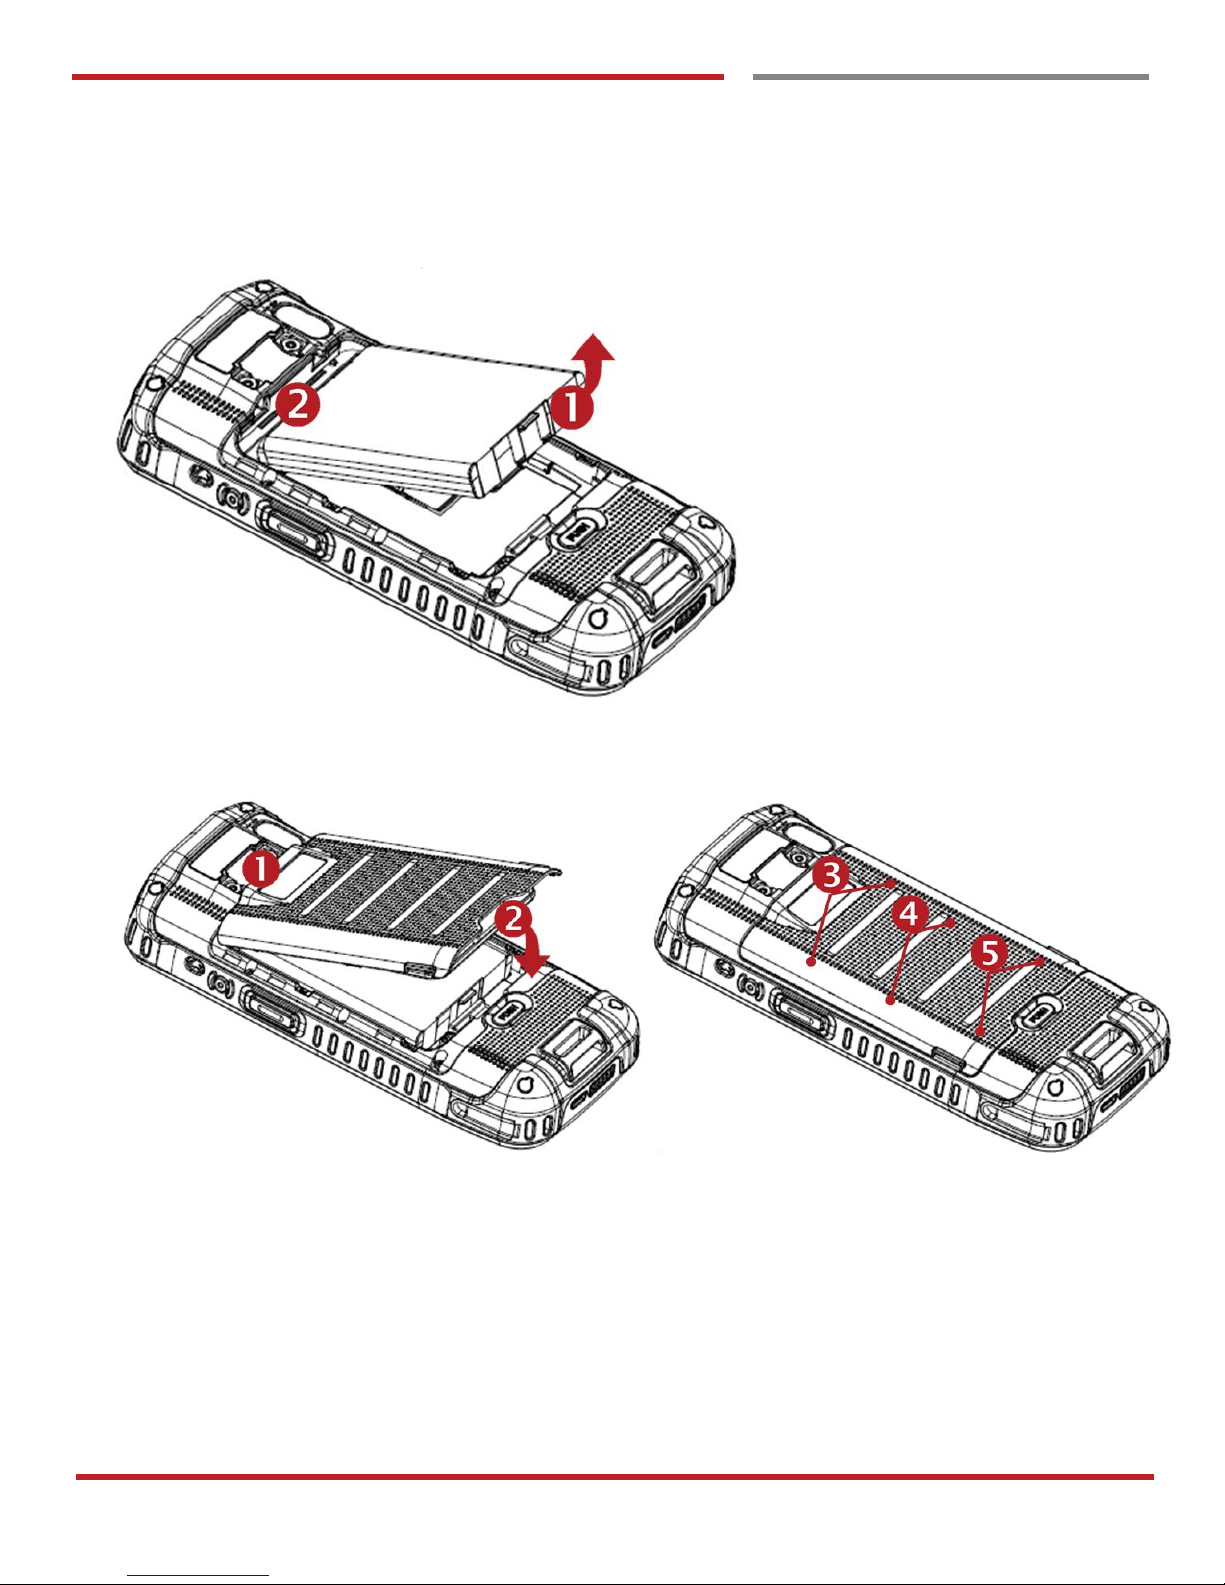
When battery level is low, you can replace the battery without turning off and on PM66.
- Remove the Battery and replace to another one.
- Make sure the battery cover closed firmly.
- Press the Power Key to use PM66 again.
Page 13
PM66 Android 6.0.1 User Manual
12
©2006 – 2017 POINTMOBILE Co., Ltd. All rights reserved
Learning the basics
Use a keypad
Use a keypad
Learning the basics
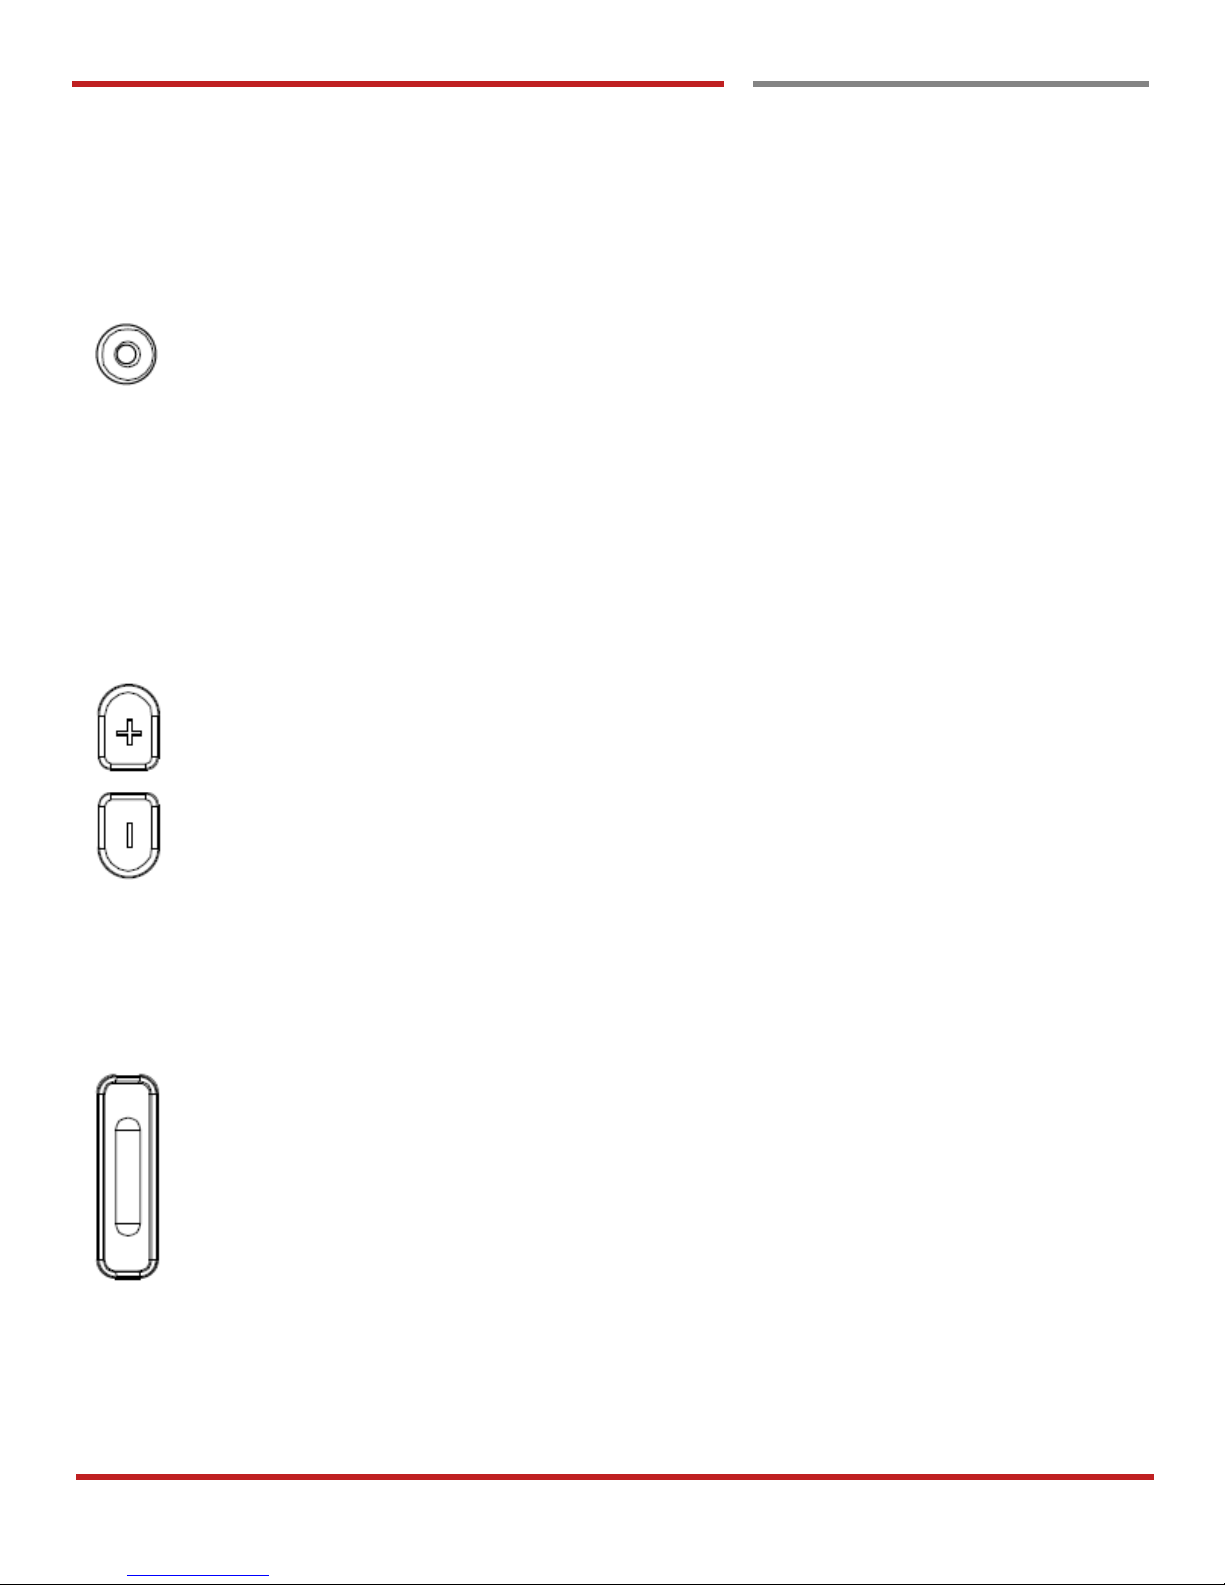
Power key
Press
- Lock the screen / Light up the screen.
Press and hold
- Display the power menu “Power Off / Reboot / Airplane mode”
Press and hold for 12seconds
- Forced to reboot
Press the “Power” key and “Volume Down” key together
- Screen capture
Volume keys
In general
- Adjusts the ringtone volume or “Mute” the ringtone of an incoming call.
In call mode
- Adjusts the earpiece or headset volume.
In Music / Video / Streaming
- Adjusts the media volume.
In camera preview
- Take the photo by pressing Volume Up or Down key.
Scanner Triggers
When “Scan Wedge” mode is activated
- By pressing, PM66 scan the barcode.
Page 14
PM66 Android 6.0.1 User Manual
13
©2006 – 2017 POINTMOBILE Co., Ltd. All rights reserved
Learning the basics
Using a keypad
Learning the basics
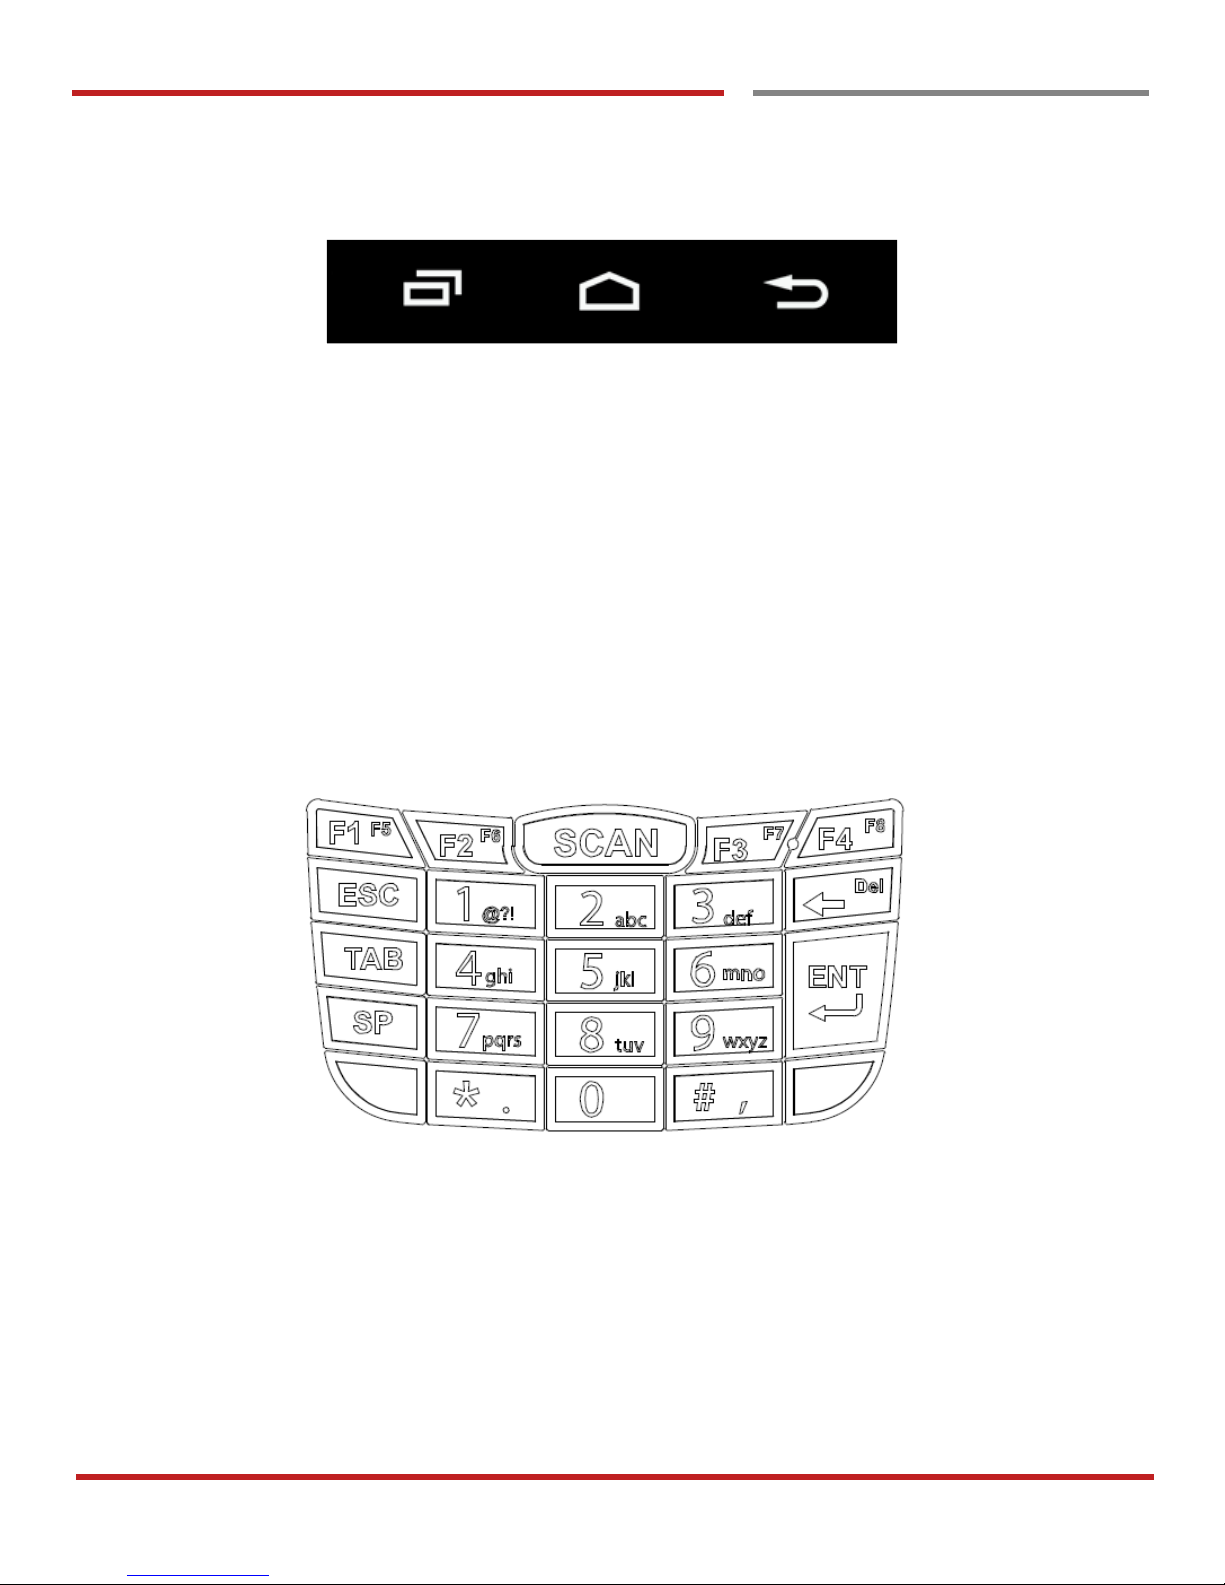
Front panel (Touch Key)
Recent Apps key
- Press to see recently used apps.
Home key
- From any apps or screens, press to return to the Home screen.
Back key
- Press to go back to the previous screen, or to close a dialog box, options menu, notification panel,
etc.
Key Pad
Page 15
PM66 Android 6.0.1 User Manual
14
©2006 – 2017 POINTMOBILE Co., Ltd. All rights reserved
Learning the basics
Use a touch screen
Use a touch screen
Learning the basics
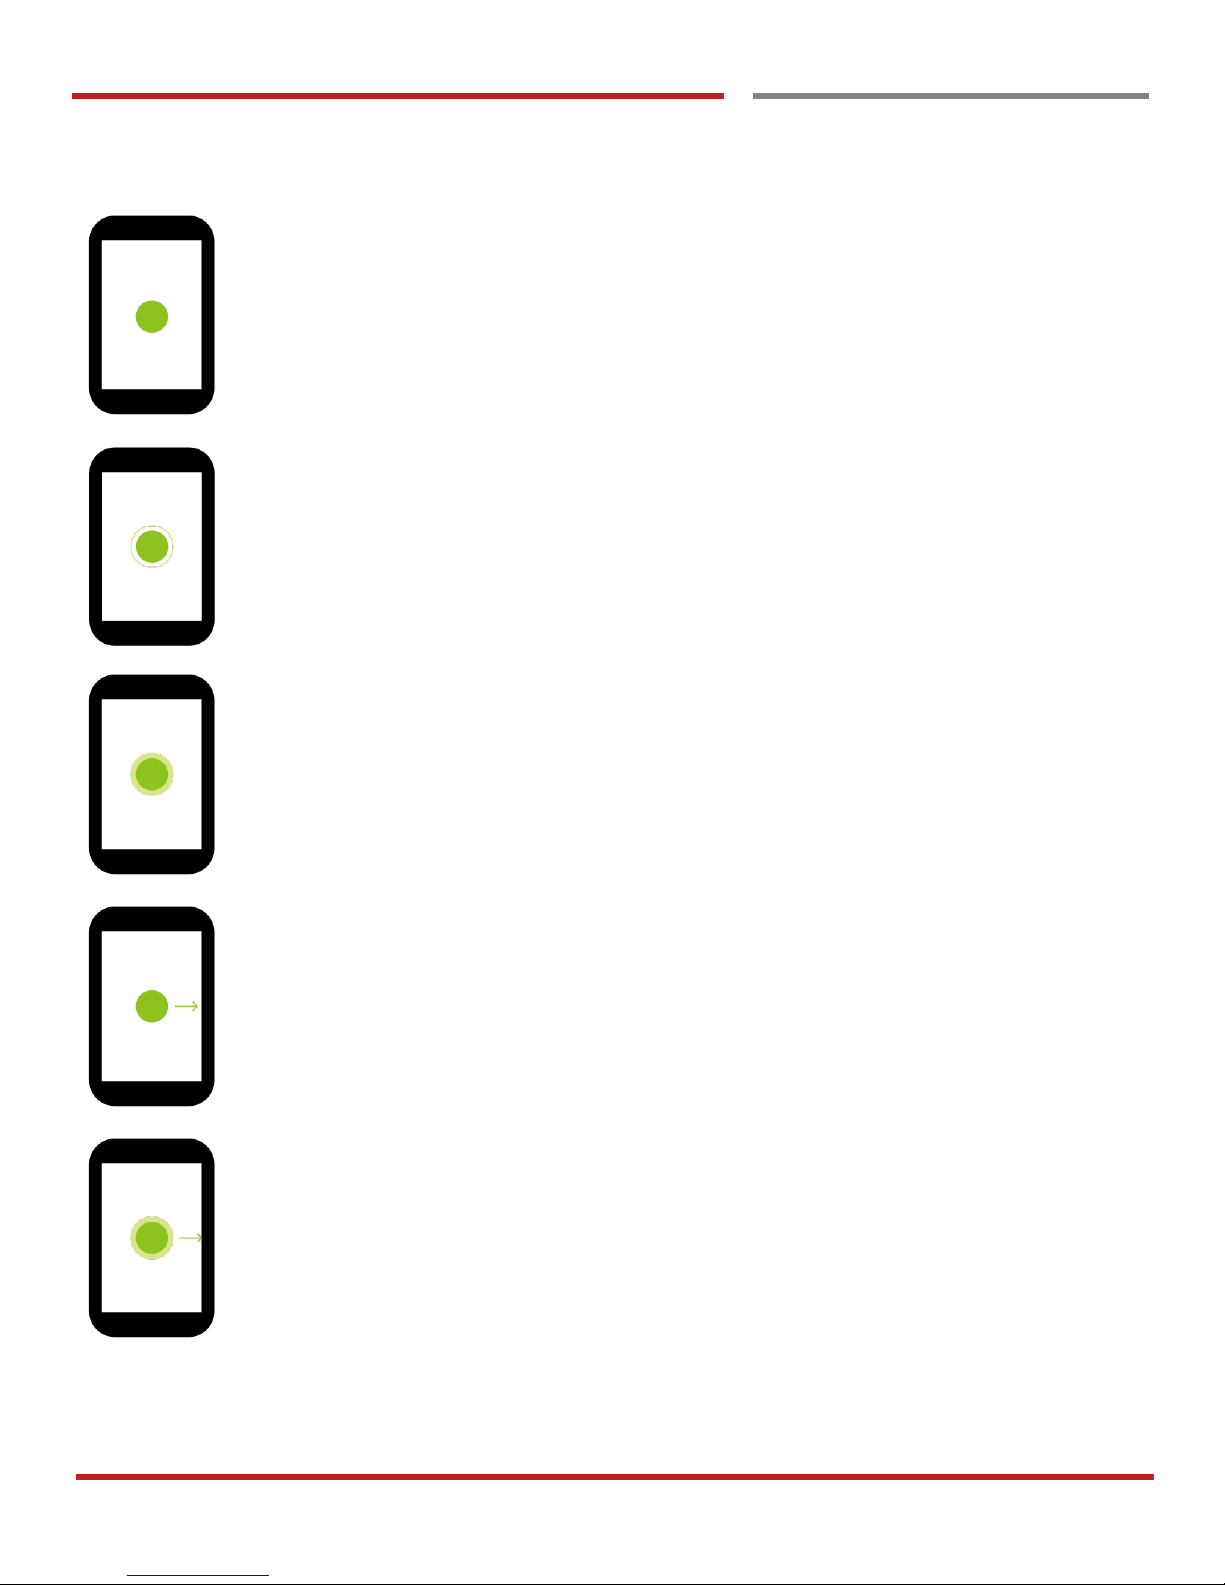
Touch
One-finger press
Double touch
One-finger press, lift, one-finger press, lift for “Zoom in”
Long press
One-finger press, wait, lift for “Select an item”
Drag, Swipe, or Fling
One-finger press, move, lift for “Scroll” or “Tilt”
Long-press drag
One-finger press, wait, move, lift for “Pick up and move” or “select multiple items”
Page 16
PM66 Android 6.0.1 User Manual
15
©2006 – 2017 POINTMOBILE Co., Ltd. All rights reserved
Learning the basics
Use a touch screen
Learning the basics
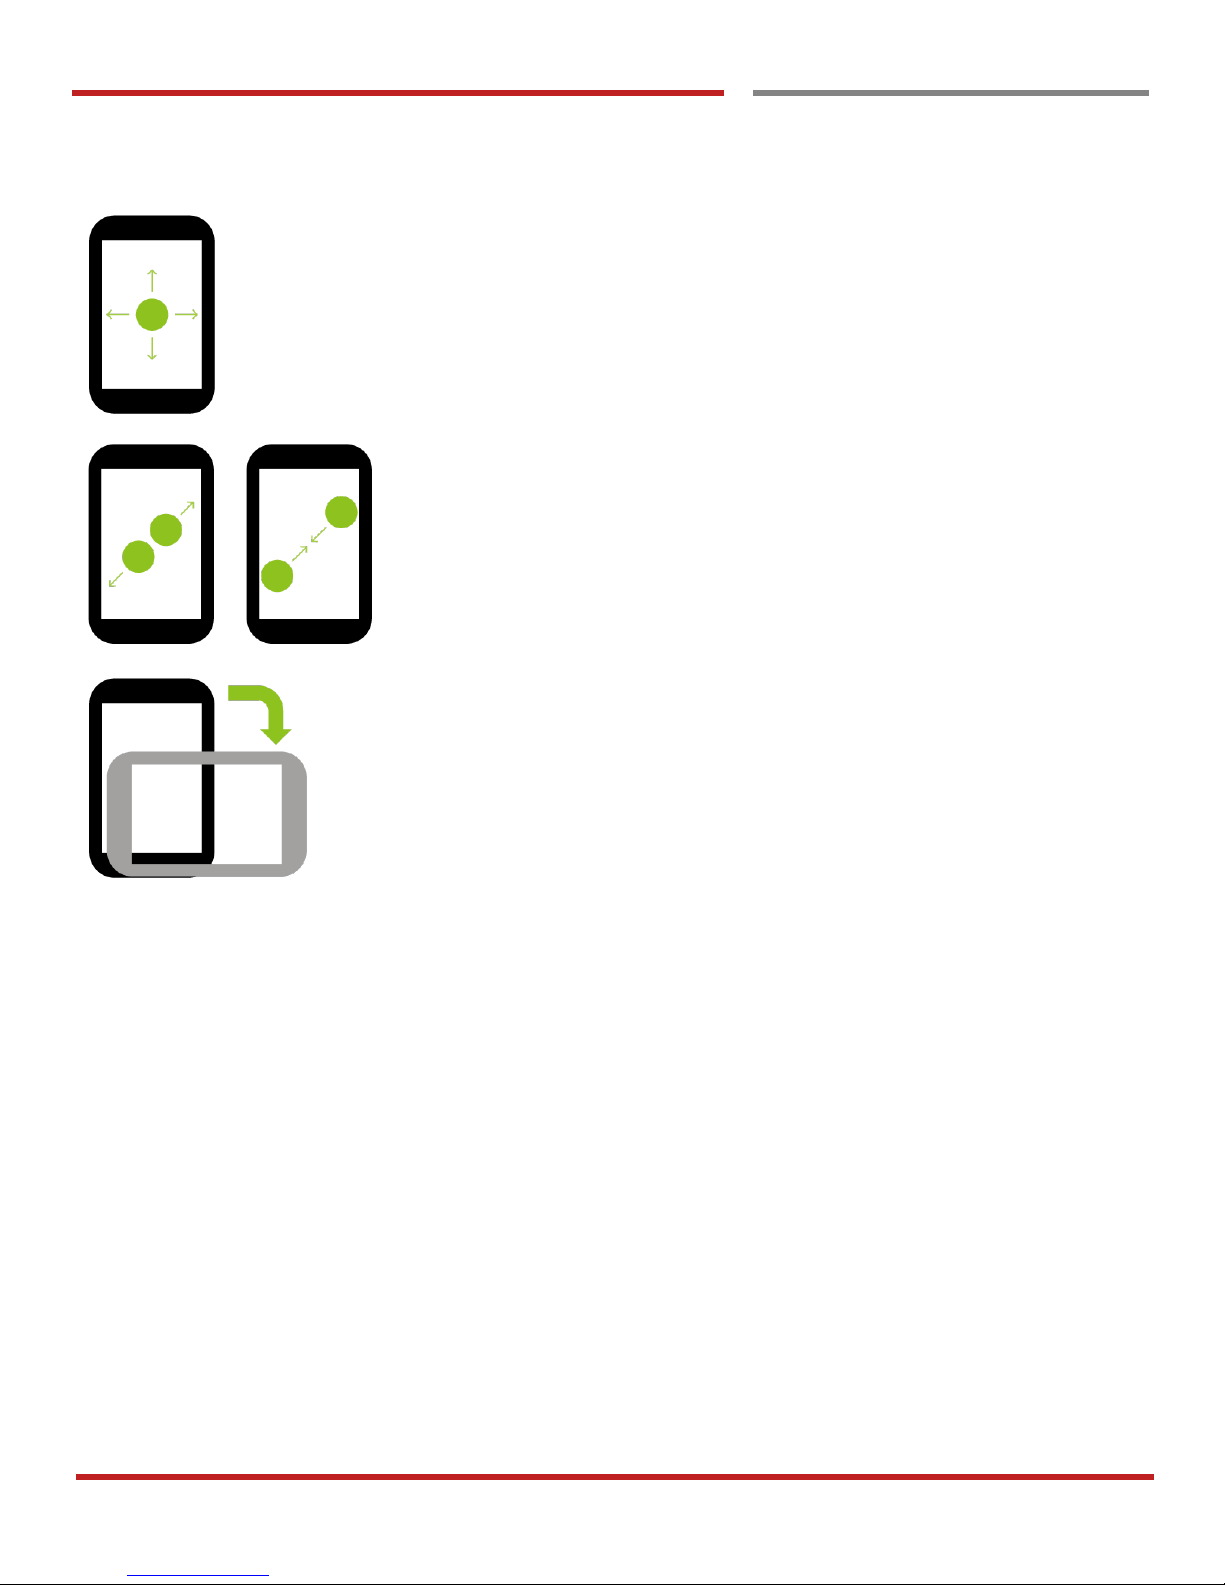
Scroll
Vertical or horizontal swipe in a single direction
Pinch Open & Close
Two-finger press, move outwards and inwords, lift for “Zoom in and out”
Rotate
When PM66 is turning sideways, screen orientation is changing
Page 17
PM66 Android 6.0.1 User Manual
16
©2006 – 2017 POINTMOBILE Co., Ltd. All rights reserved
Learning the basics
Home Screen, Apps and Widget
Home Screen, Apps and Widget
Learning the basics
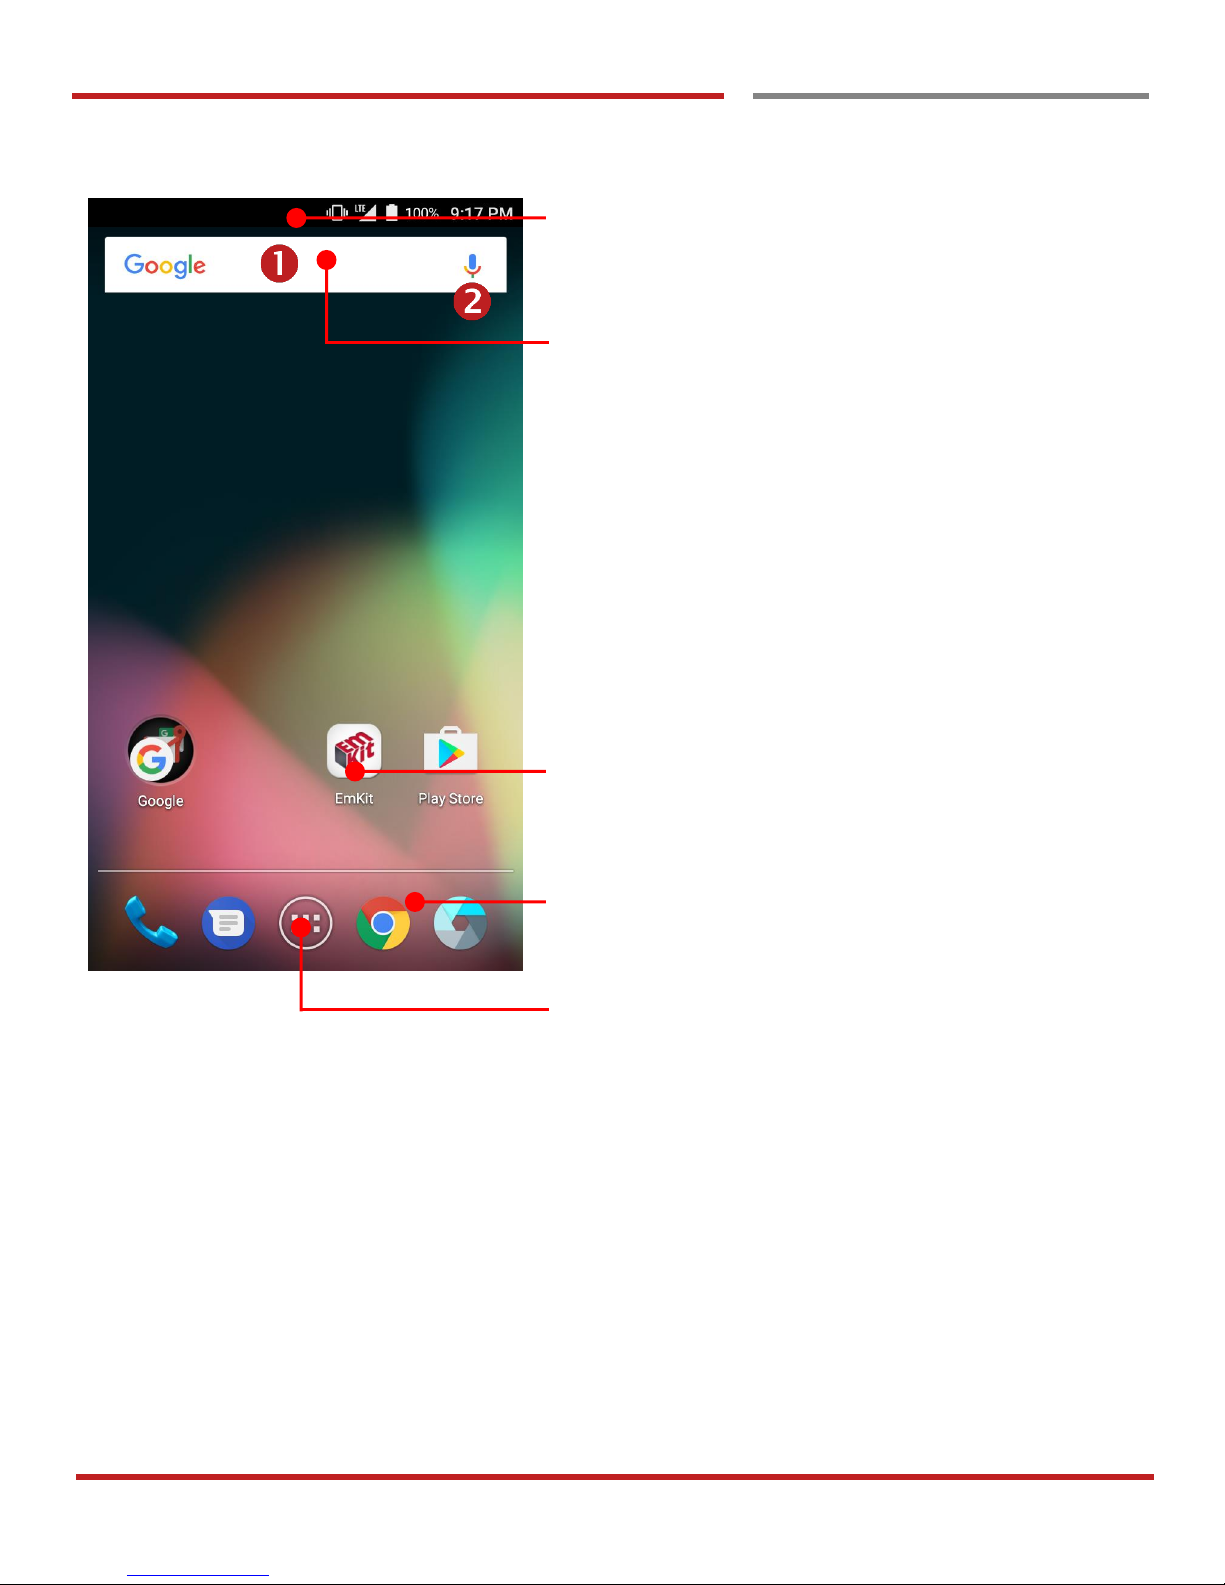
Status Bar
- Status / Notification
- Drag down to open the “Quick Setting Panel”
Search Bar
- Touch 1 to search by text
- Touch 2 to search by voice
Touch an icon to run an app, open folder, etc
Favorite tray apps
- Touch to run an app
- Touch and hold to reorganize
App Drawer
Touch to enter “Apps and Widget”
Page 18
PM66 Android 6.0.1 User Manual
17
©2006 – 2017 POINTMOBILE Co., Ltd. All rights reserved
Learning the basics
Home Screen, Apps and Widget
Learning the basics
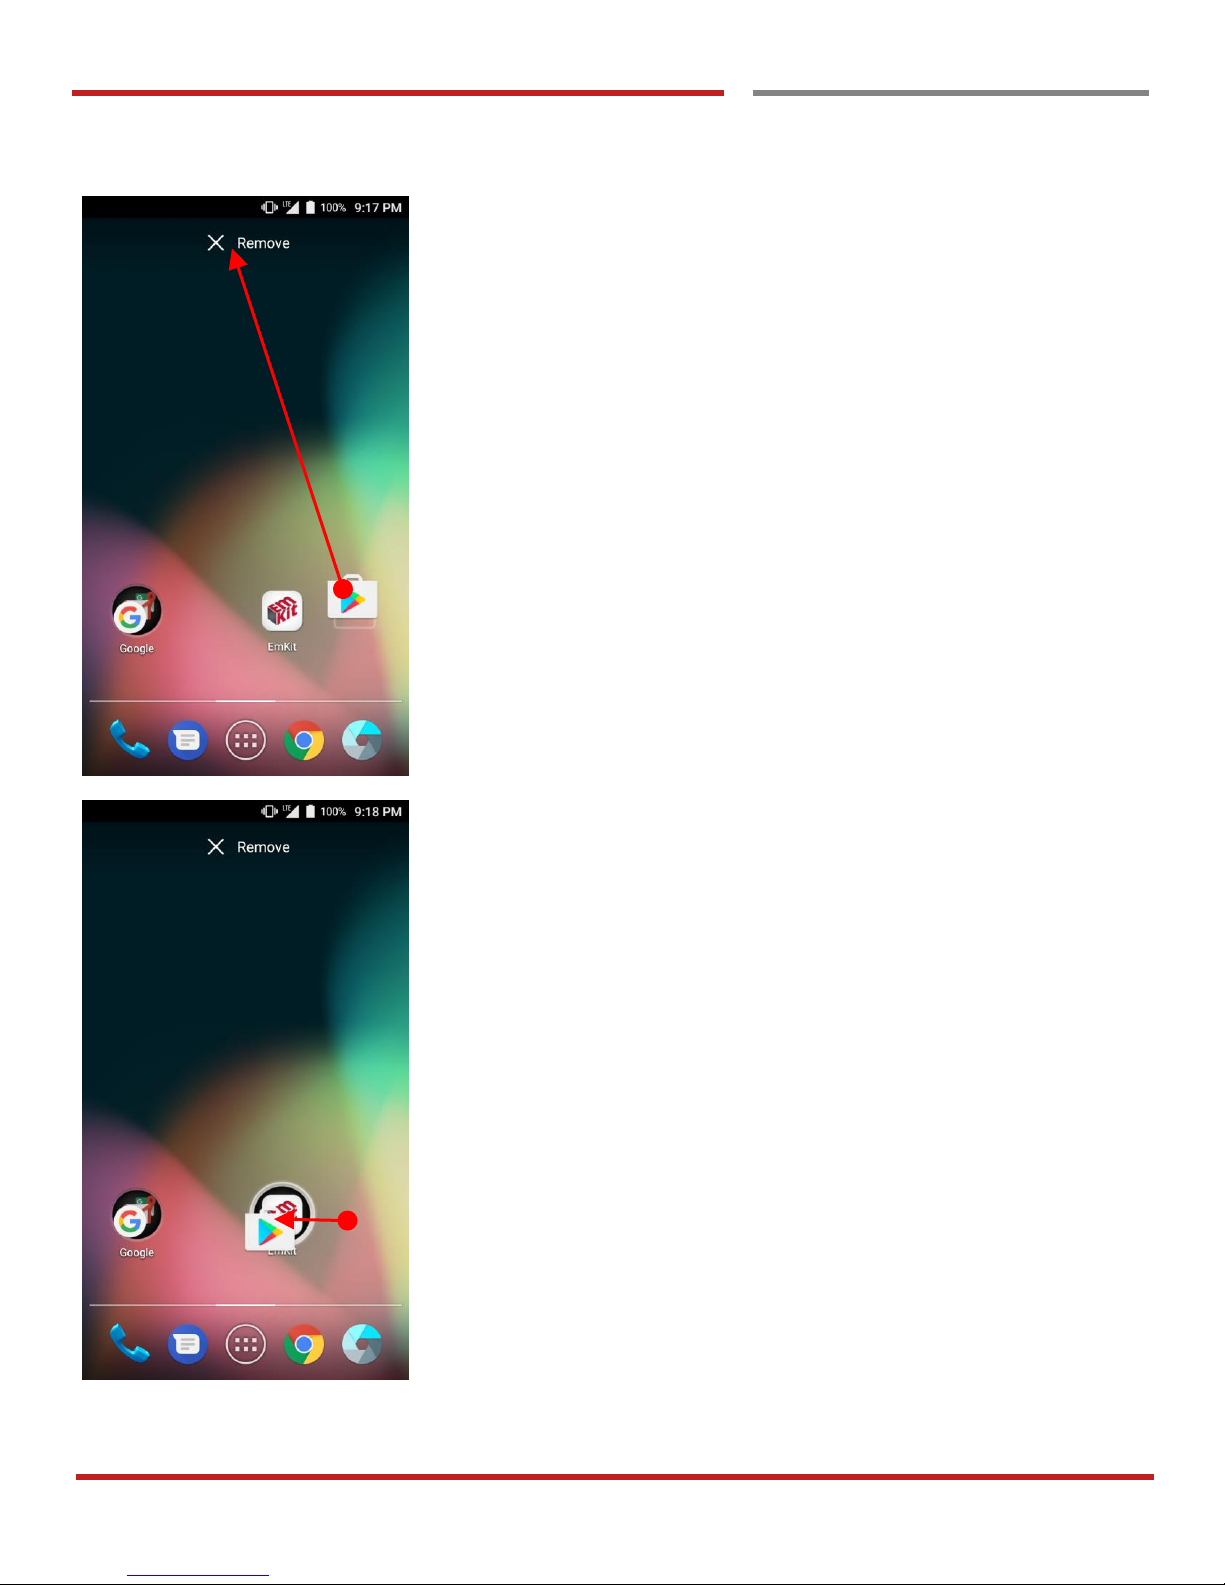
Remove the app icon from home screen
- Long press the app icon and then drag it to the
“Remove” area and then release
Create “App Folder”
- Long press the app icon to other app icon. This will
create the “App Folder”
- To set the folder name, touch the “Unnamed Folder”
and rename it
Page 19
PM66 Android 6.0.1 User Manual
18
©2006 – 2017 POINTMOBILE Co., Ltd. All rights reserved
Home Screen, Apps and Widget
Learning the basics
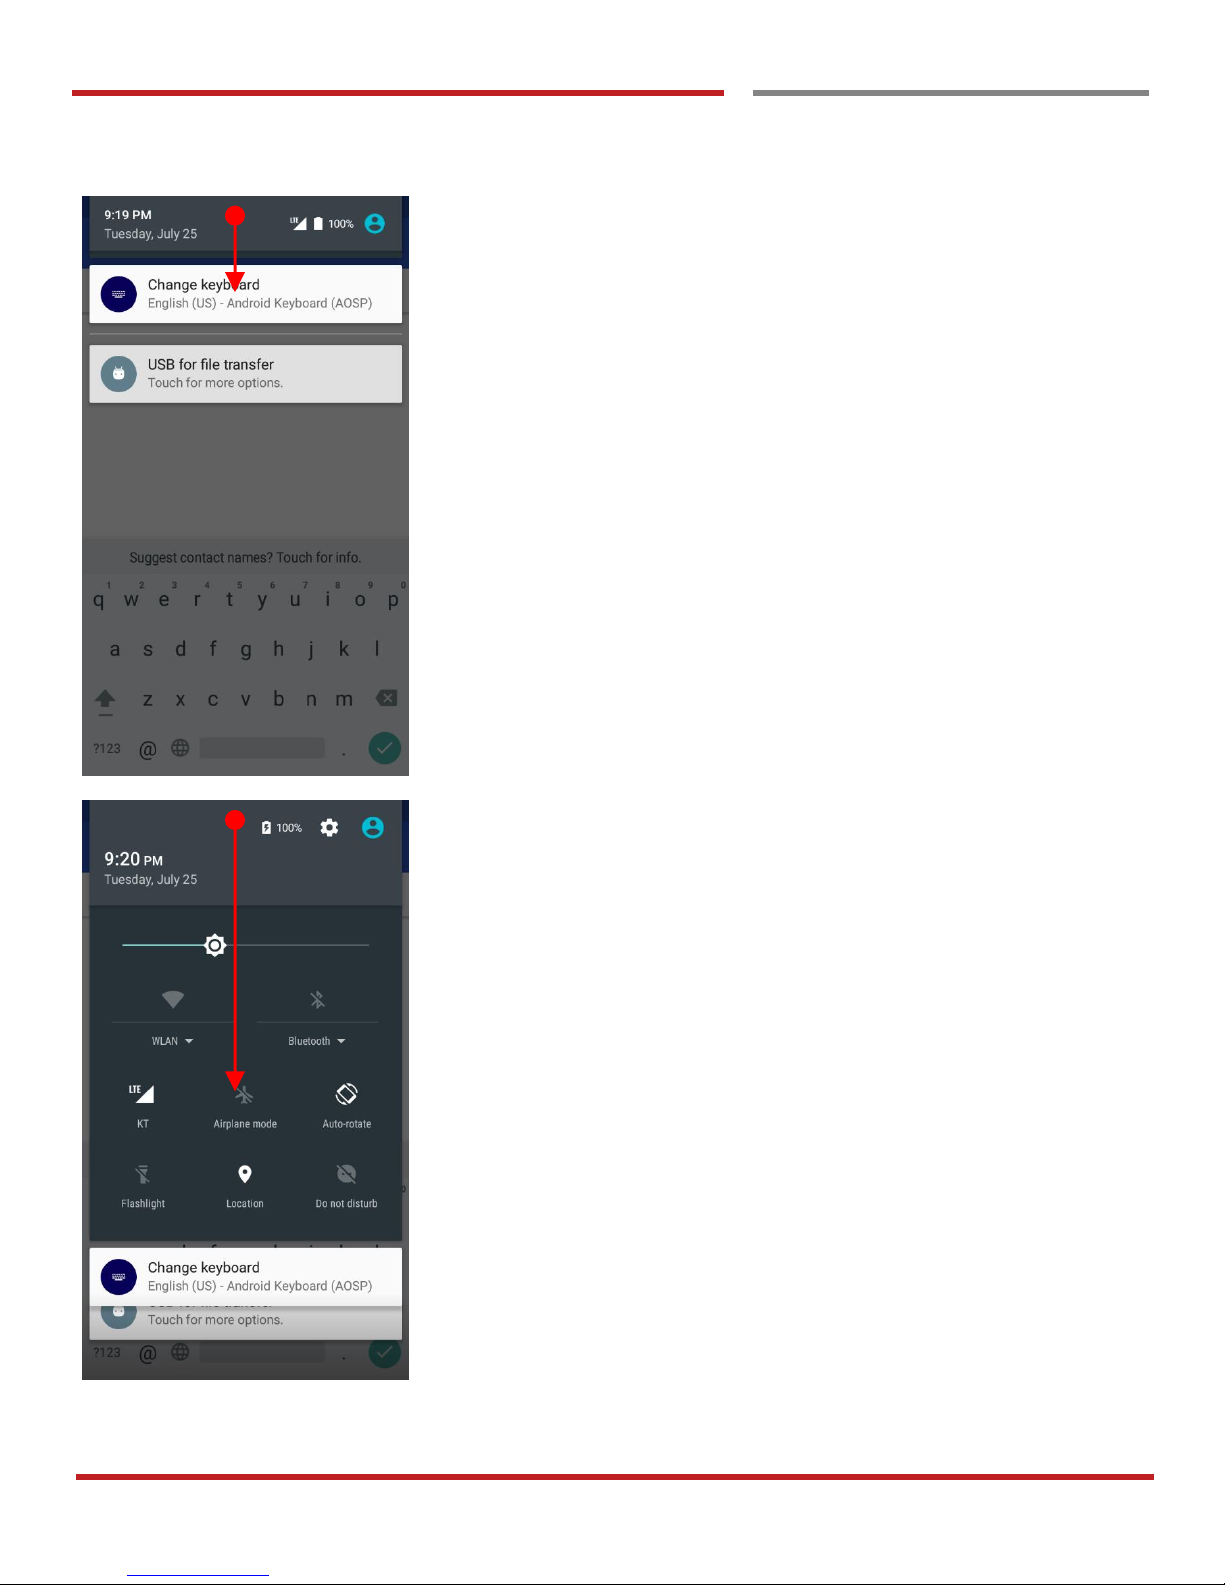
Notification panel
When there are notifications from the Android (system) or
the App, you can check details by drag down the “Status
Bar”.
Quick setting panel
You can access “Quick setting panel” by drag down the
“Notification panel”. You can enable / disable functions or
change modes easily.
Page 20
PM66 Android 6.0.1 User Manual
19
©2006 – 2017 POINTMOBILE Co., Ltd. All rights reserved
Learning the basics
Home Screen, Apps and Widget
Learning the basics
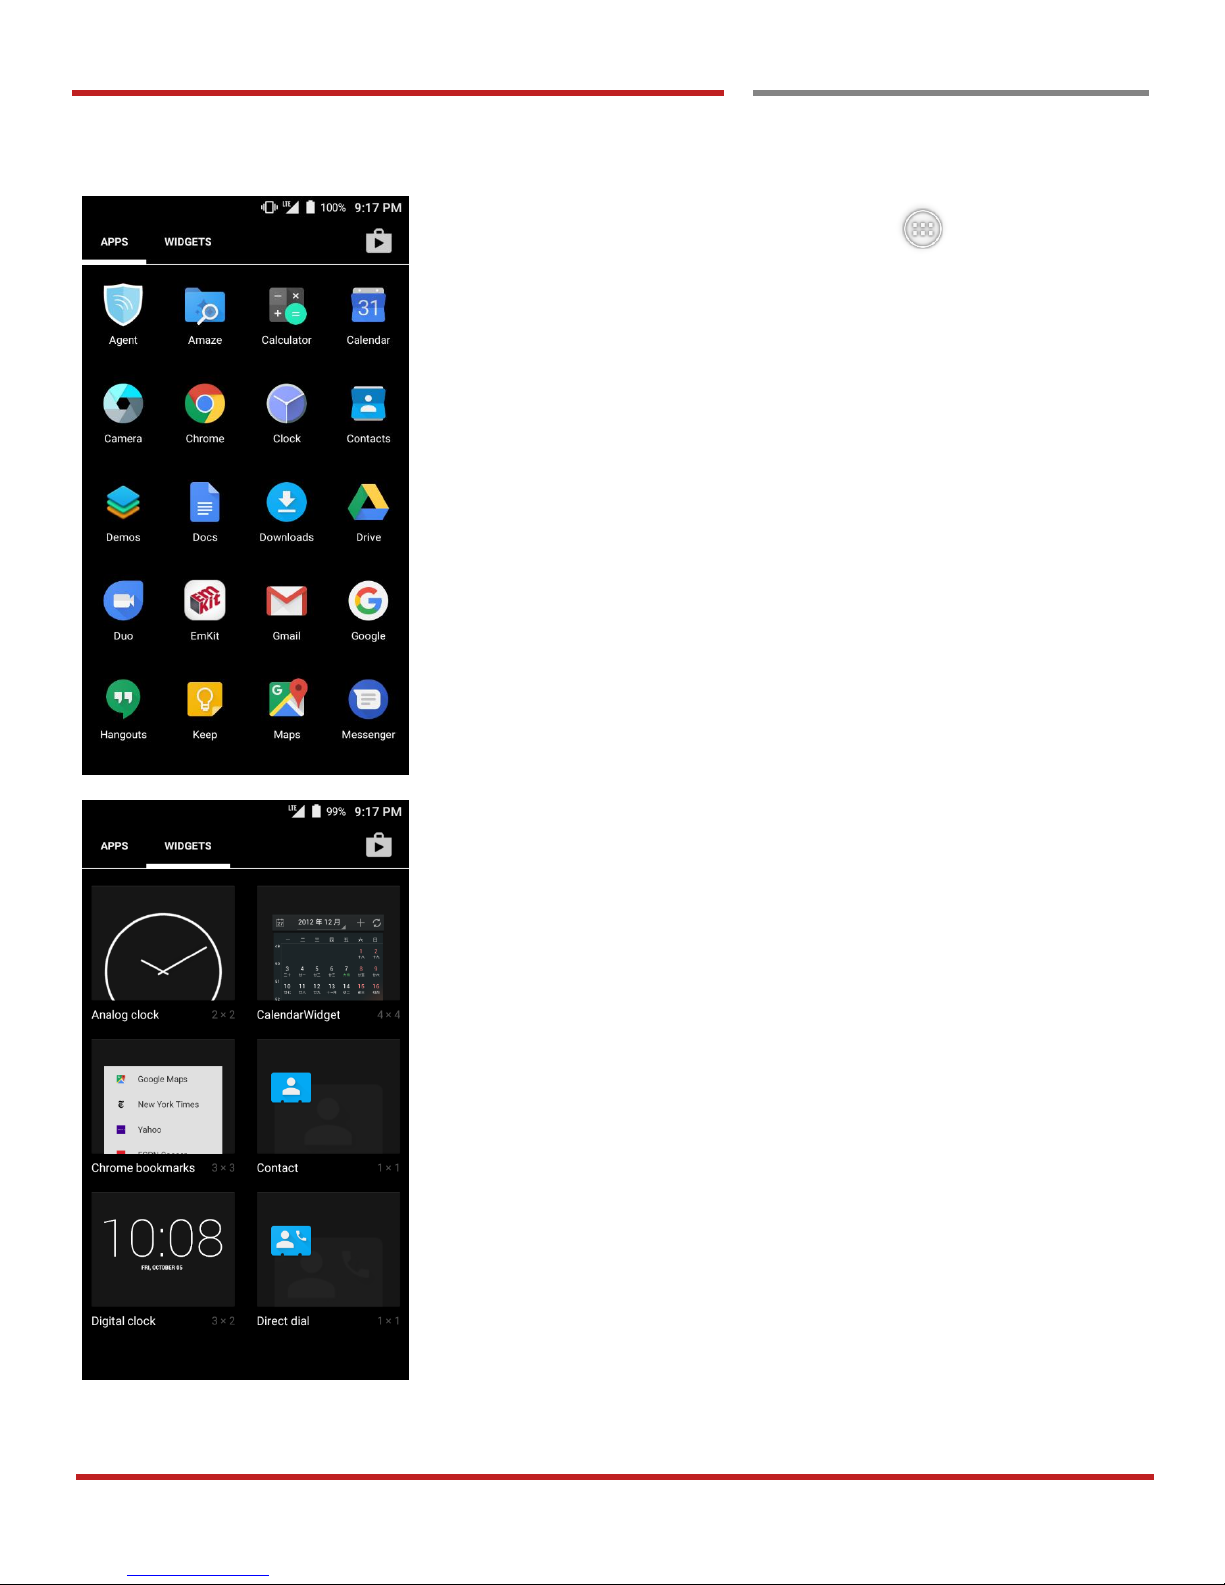
By touching the “App drawer” icon, you can enter to
the “Apps” and “Widgets”
All installed apps are listed in the “Apps” tab, alphabetically
- Tap app icon to run.
- Long press, specific app icon to place to the “Home
Screen”.
All available widgets are listed in the “Widgets” tab,
alphabetically.
- Long press, specific widget to place to the “Home
Screen”.
Page 21
PM66 Android 6.0.1 User Manual
20
©2006 – 2017 POINTMOBILE Co., Ltd. All rights reserved
Learning the basics
Status & Notifications Icons
Status & Notifications Icons
Learning the basics
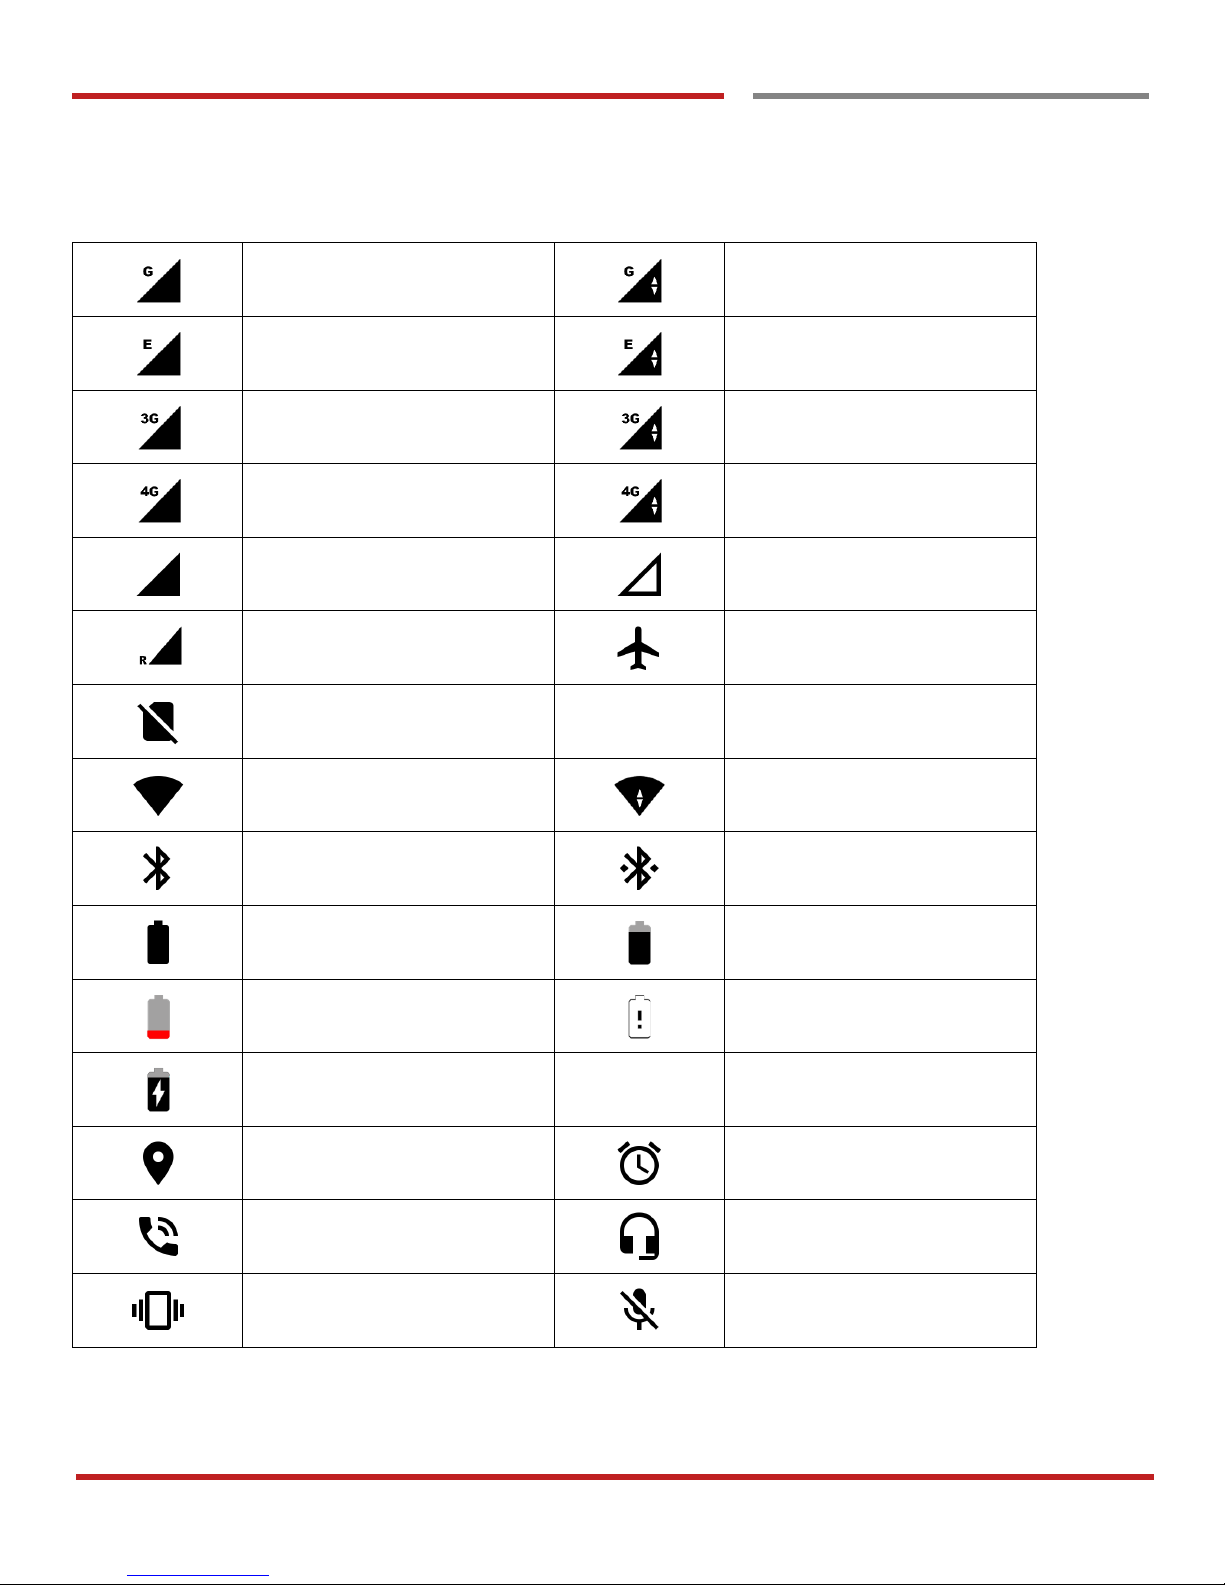
Status icons
GPRS connected
GPRS in use
EDGE connected
EDGE in use
3G connected
3G in use
4G connected
4G in use
Signal strength
No signal
Roaming
Airplane mode
No SIM card installed
WLAN is on
Connected to a WLAN
network
Bluetooth is on
Connected to a Bluetooth
device
Battery is full
Battery is partially drained
Battery is low
Battery is very low
Battery is charging
GPS is on
Alarm is set
Speaker phone is on
Headset connected
Vibrate mode/ Mute
Phone mic is mute
Page 22
PM66 Android 6.0.1 User Manual
21
©2006 – 2017 POINTMOBILE Co., Ltd. All rights reserved
Learning the basics
Status & Notifications Icons
Learning the basics
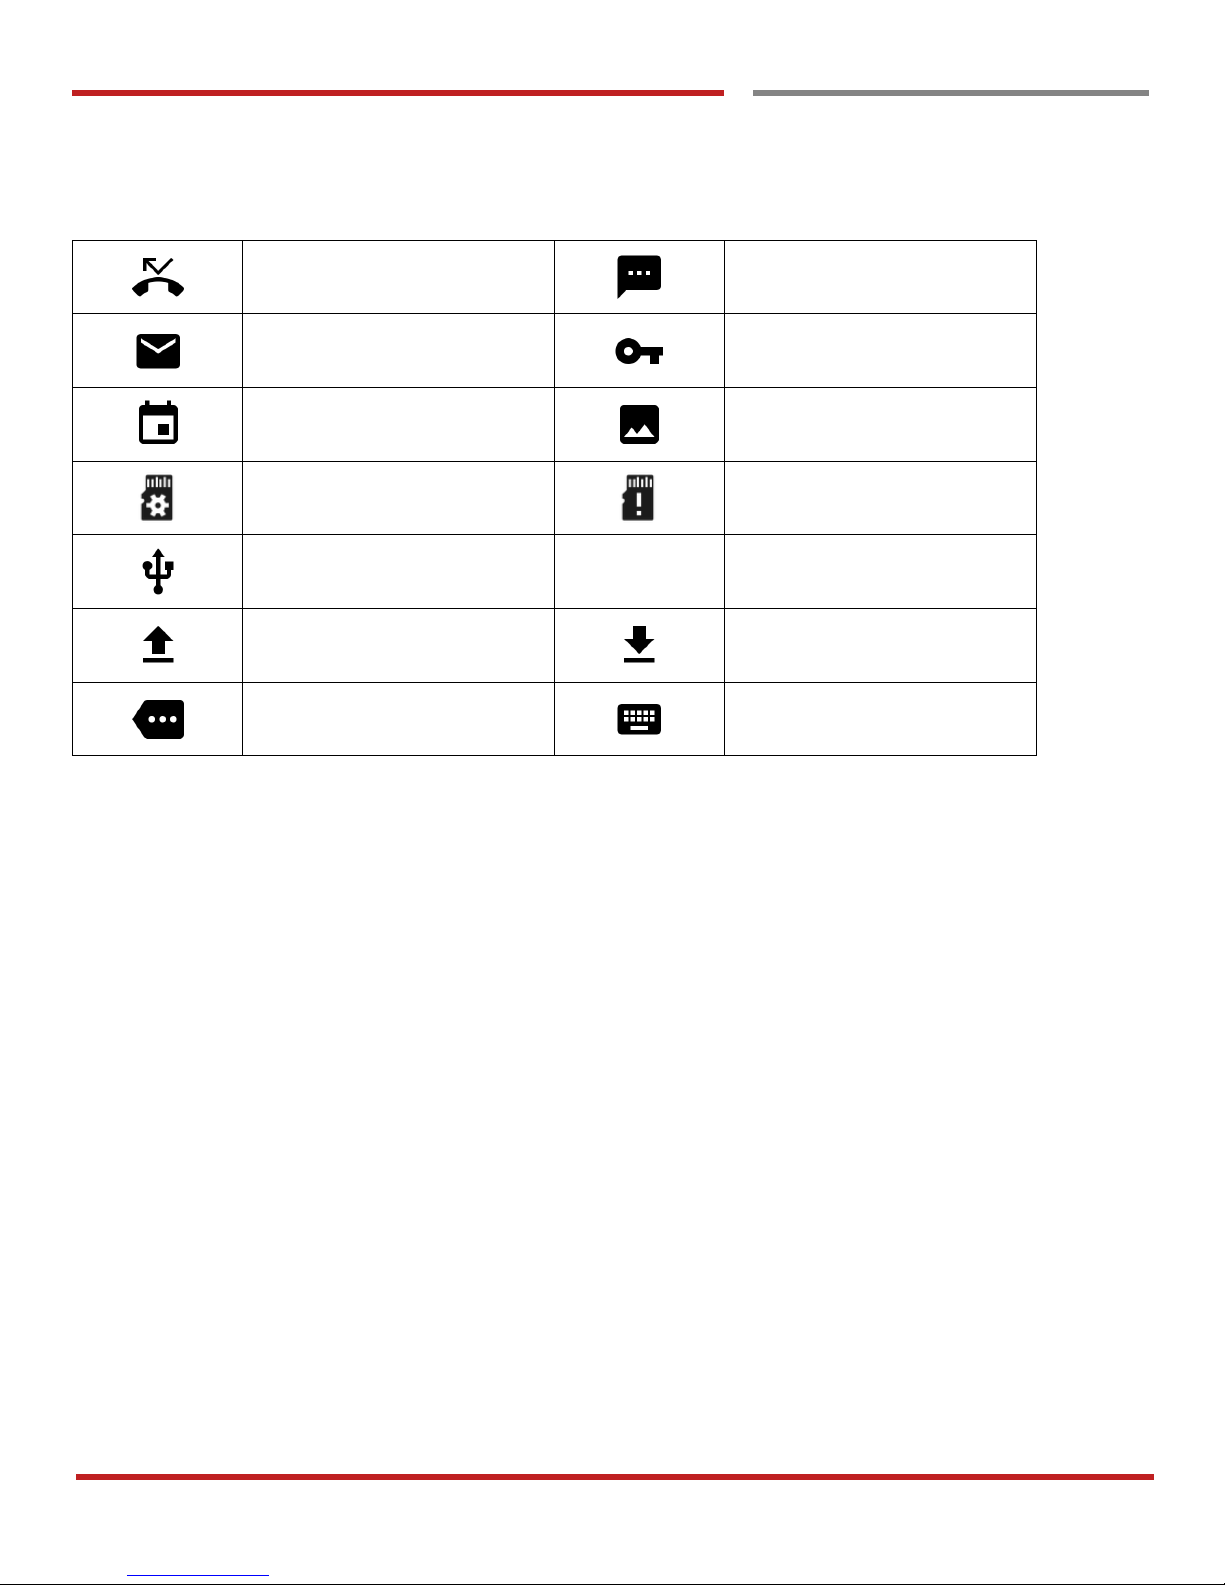
Notification icons
Missed call
New SMS or MMS message
New Email
Connected to VPN network
Upcoming event
Screenshot captured
Preparing SD card
SD card removed,
unexpectedly
OTG device connected
File uploaded
File downloaded
There are more notification
Other input method available
Page 23
PM66 Android 6.0.1 User Manual
22
©2006 – 2017 POINTMOBILE Co., Ltd. All rights reserved
Learning the basics
Make a call
Make a call
Learning the basics
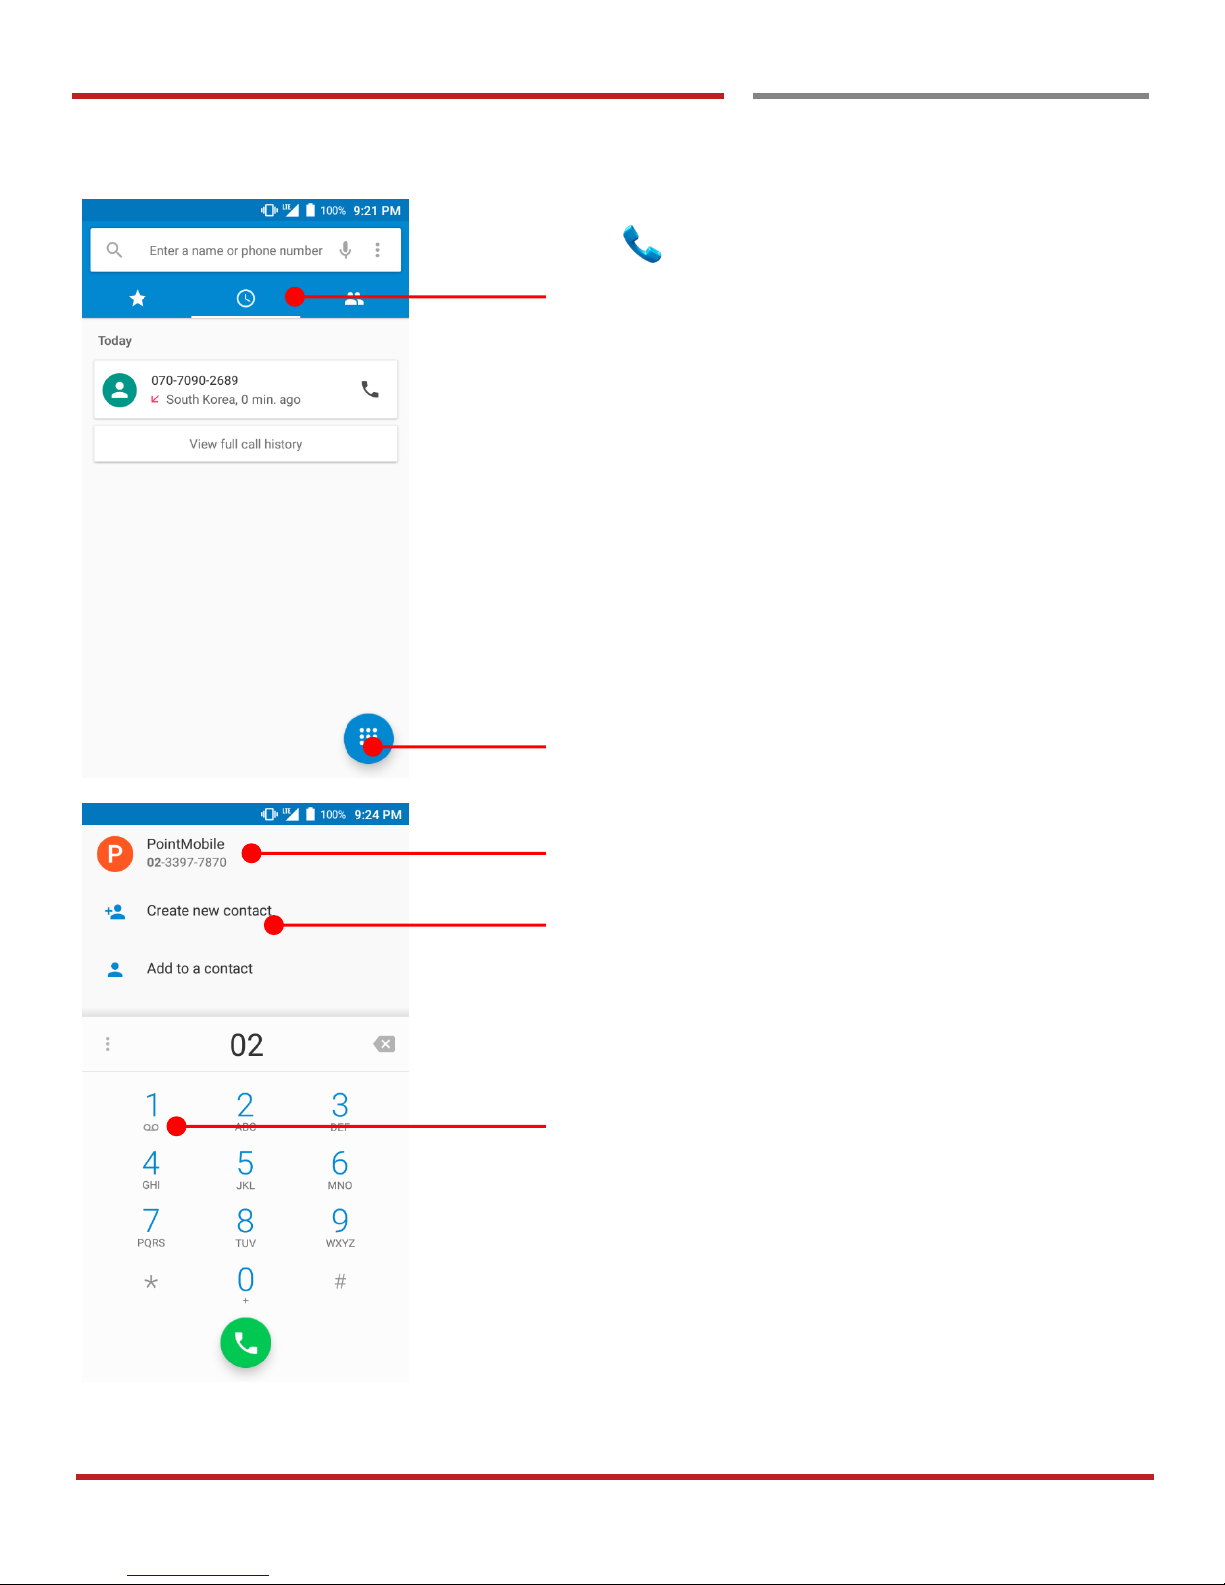
Touch icon in the Favorite tray apps
Slide to access the “FAVORITE”, “RECENTS” and
“CONTACTS”.
- To make a call from recent call list or missed call,
select “RECENTS” tab
- To make a call from your contact list, select
“CONTRACTS”
Touch to use a dialer
Suggested phone number(s)
Phone number can be saved to “CONTACTS”
Touch and hold the dial pad #1, to access voicemail.
Page 24
PM66 Android 6.0.1 User Manual
23
©2006 – 2017 POINTMOBILE Co., Ltd. All rights reserved
Learning the basics
Make a call
Learning the basics
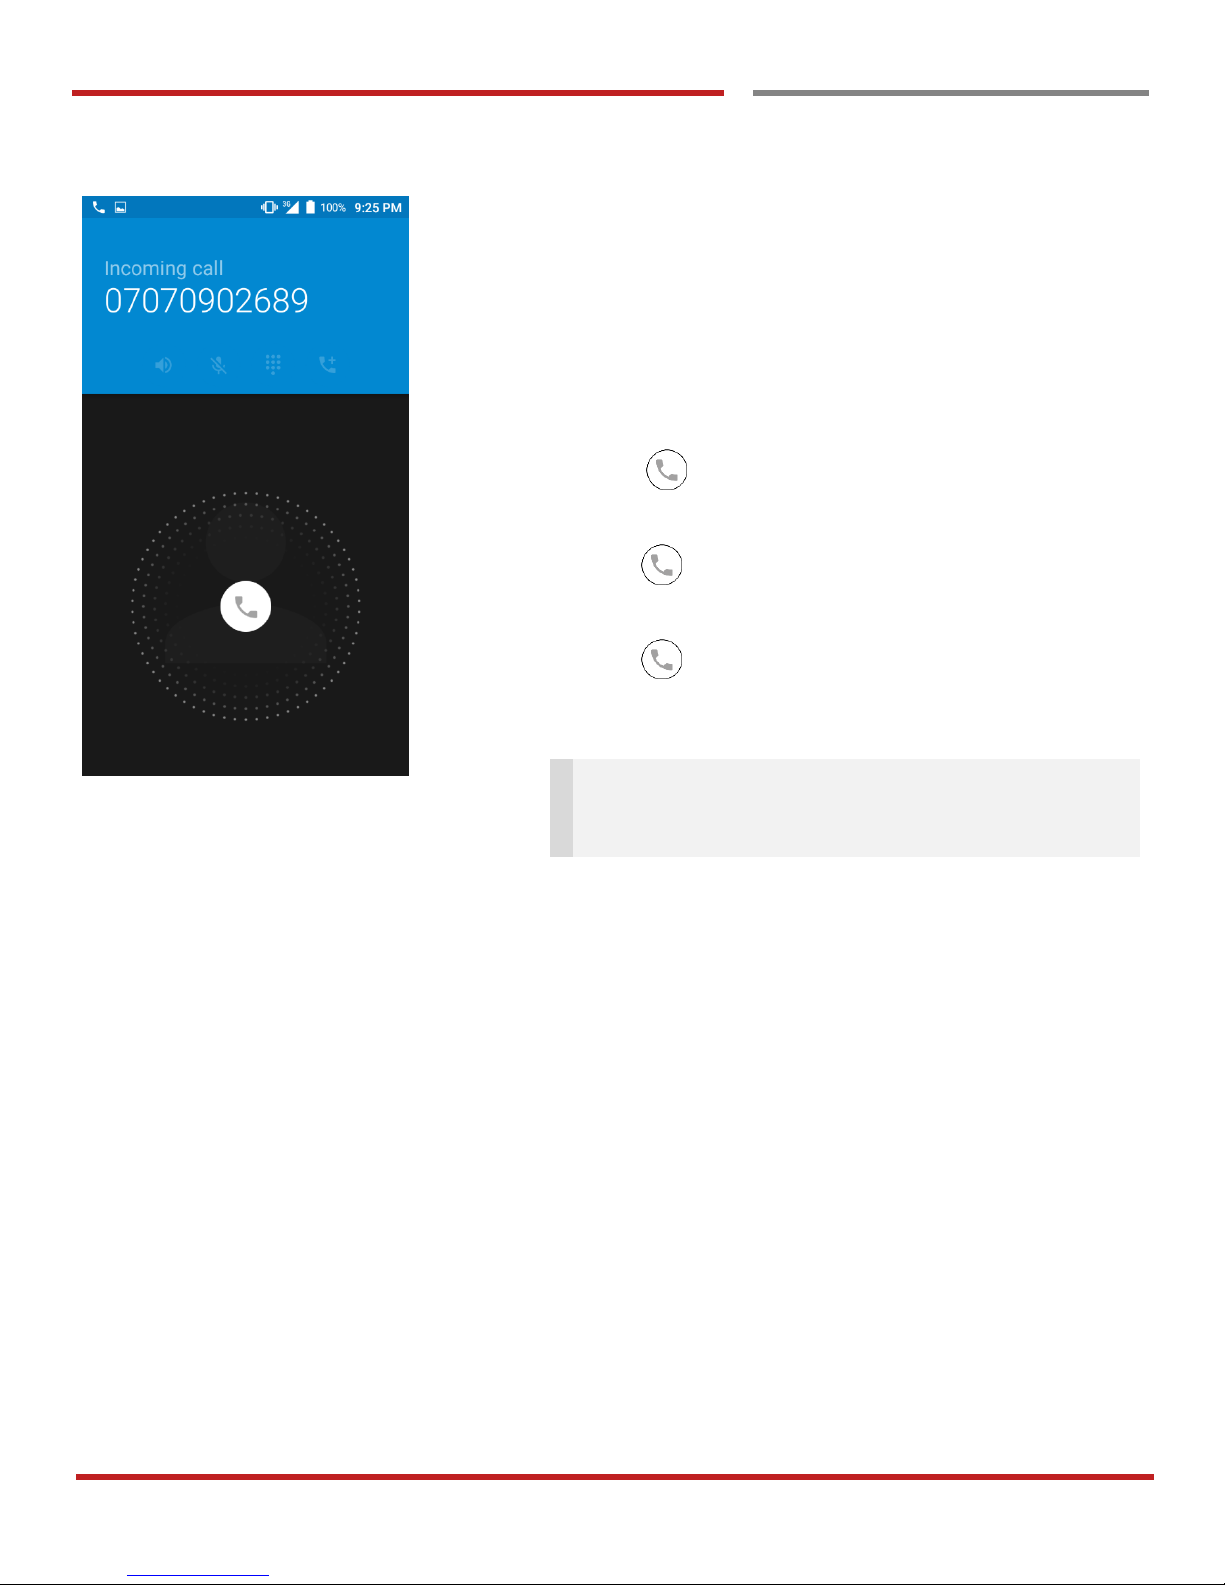
You can answering or rejecting a call by sliding the phone
icon
Slide the icon to the right direction in order to answer
the call
Slide the icon to the left direction in order to reject the
call
Slide the icon upwards to reject the call and send a
preset message to the caller.
Tip: To mute the ringtone volume of an incoming call,
keep press the “Volume down” key or turn your PM66
over.
Page 25
PM66 Android 6.0.1 User Manual
24
©2006 – 2017 POINTMOBILE Co., Ltd. All rights reserved
Learning the basics
Add to a contact
Add to a contact
Learning the basics
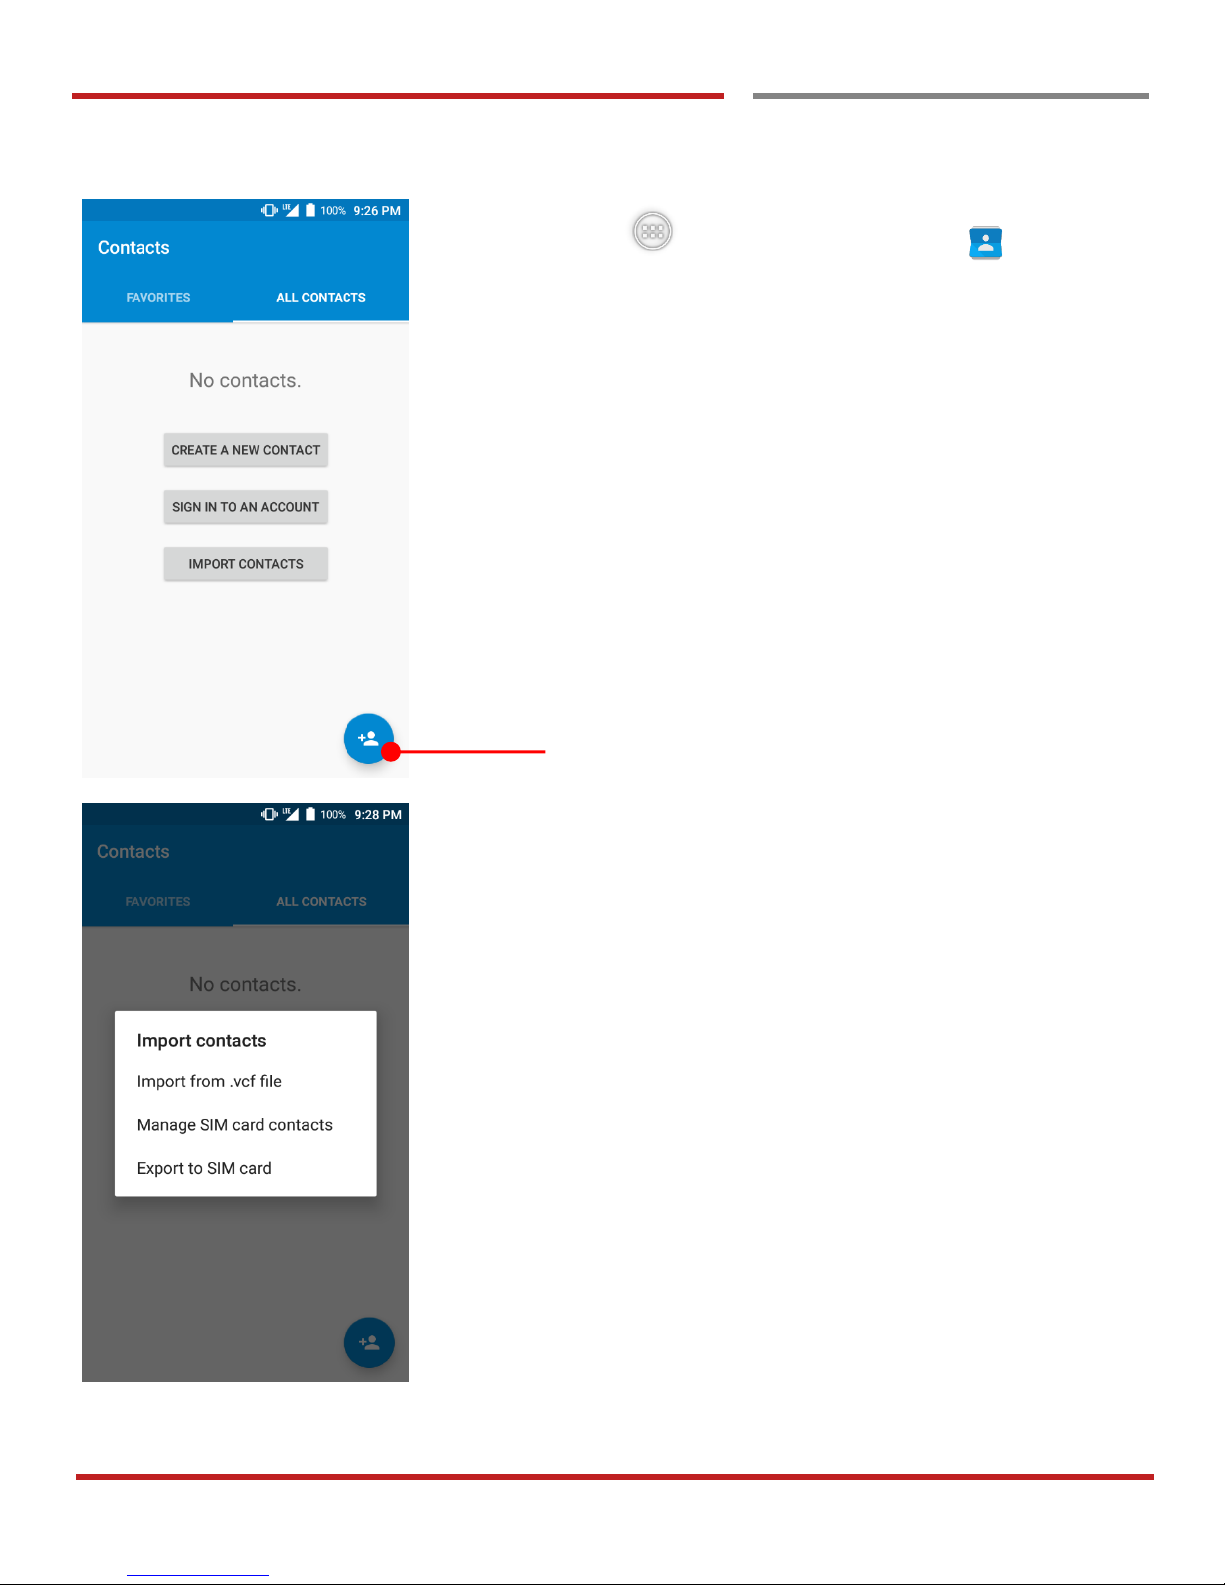
Touch “App Drawer” icon and then icon
CREATE A NEW CONTACT
- You can manually create the new contact
SIGN IN TO AN ACCOUNT
- You can sync with your contacts in the Google
account.
IMPORT CONTACTS
- You can import contact in the storage (.vcf file) or
SIM card
Touch to add a new contact
Page 26
PM66 Android 6.0.1 User Manual
25
©2006 – 2017 POINTMOBILE Co., Ltd. All rights reserved
Learning the basics
Send a message
Send a message
Learning the basics
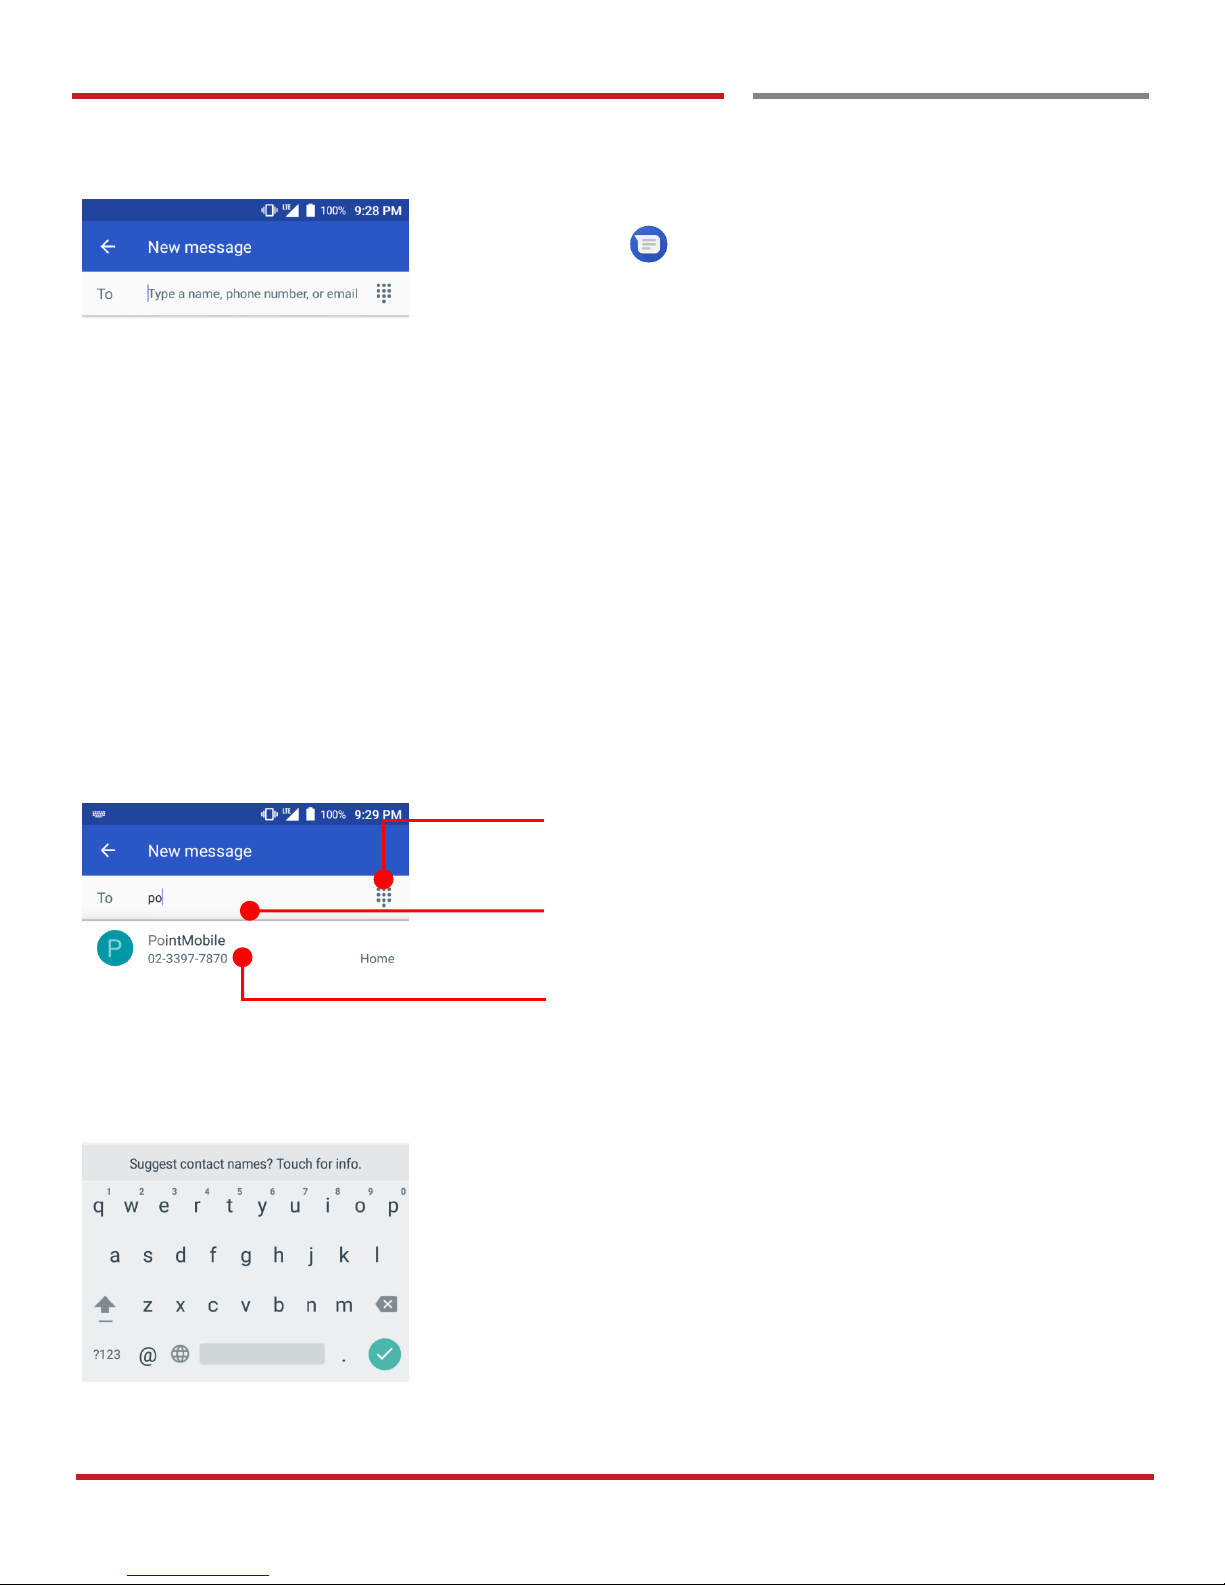
Touch icon in the Favorite tray apps
Touch to use a dialer
Touch to type a name, phone number or email
Suggest contact display here. Touch “Contacts” to compose
a message
Page 27
PM66 Android 6.0.1 User Manual
26
©2006 – 2017 POINTMOBILE Co., Ltd. All rights reserved
Learning the basics
Send a message
Learning the basics
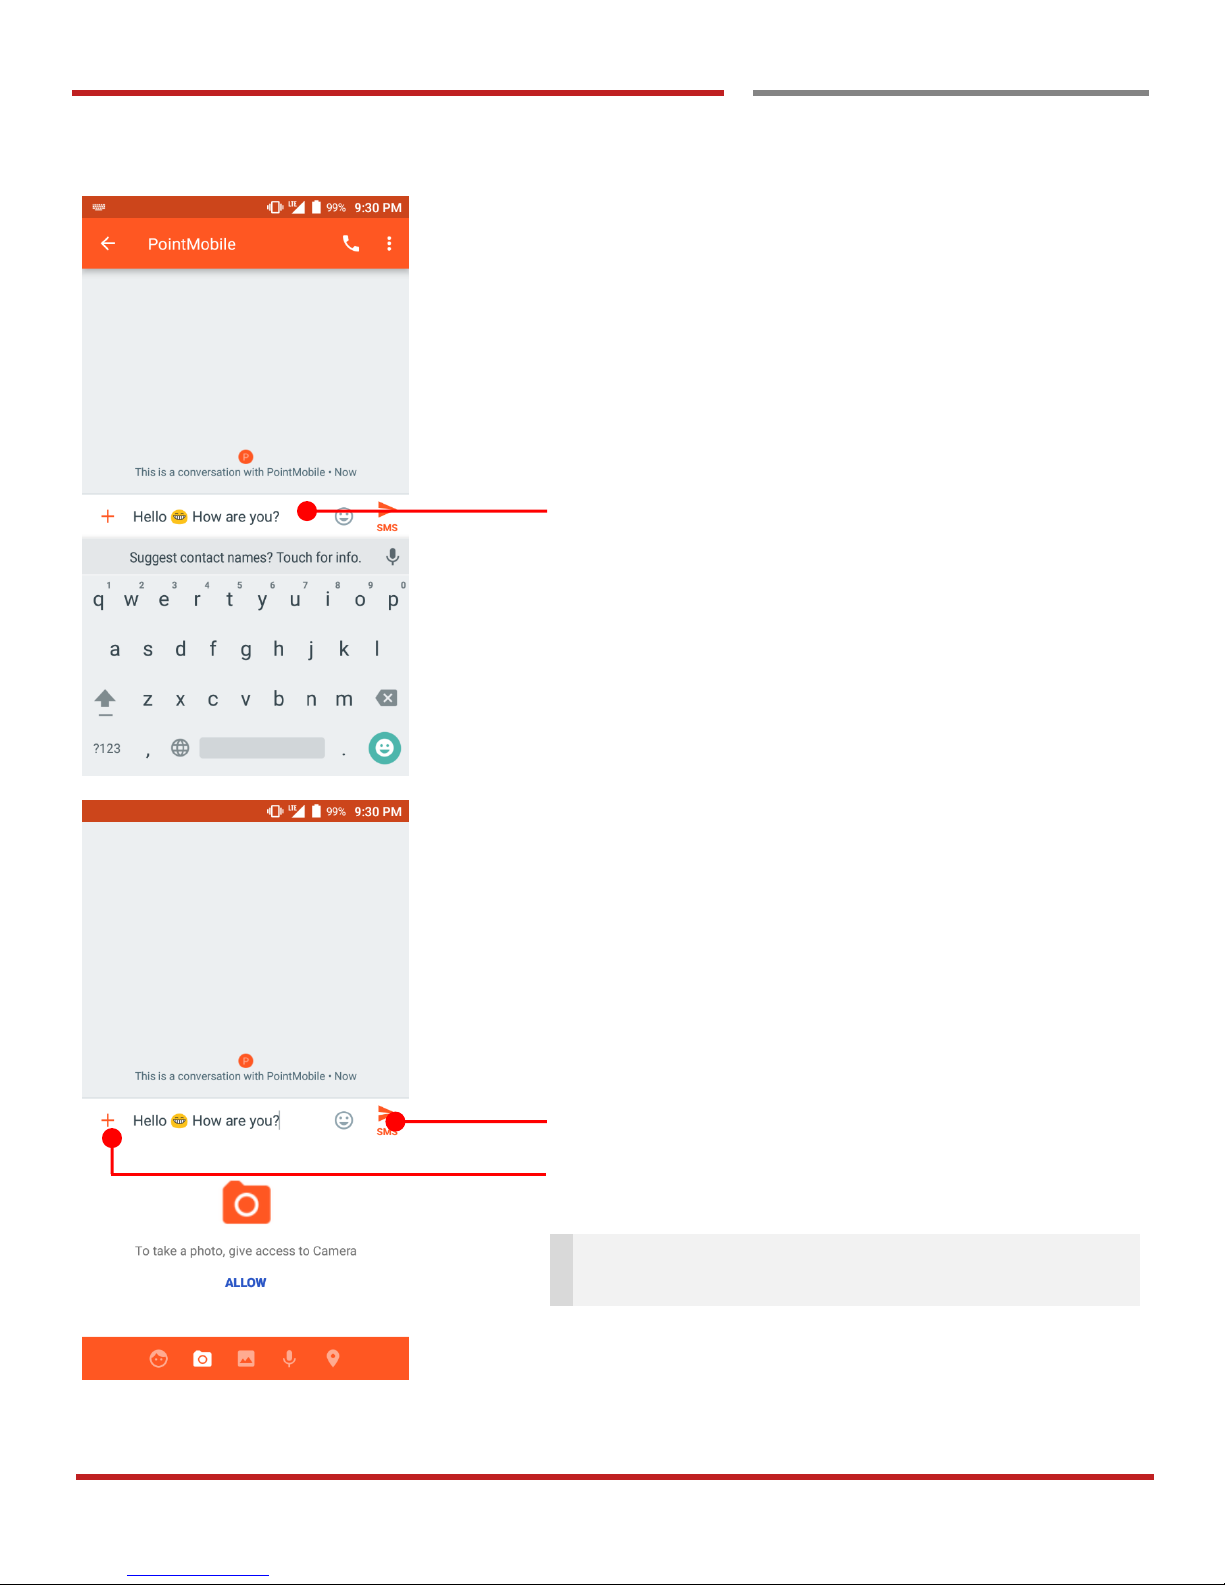
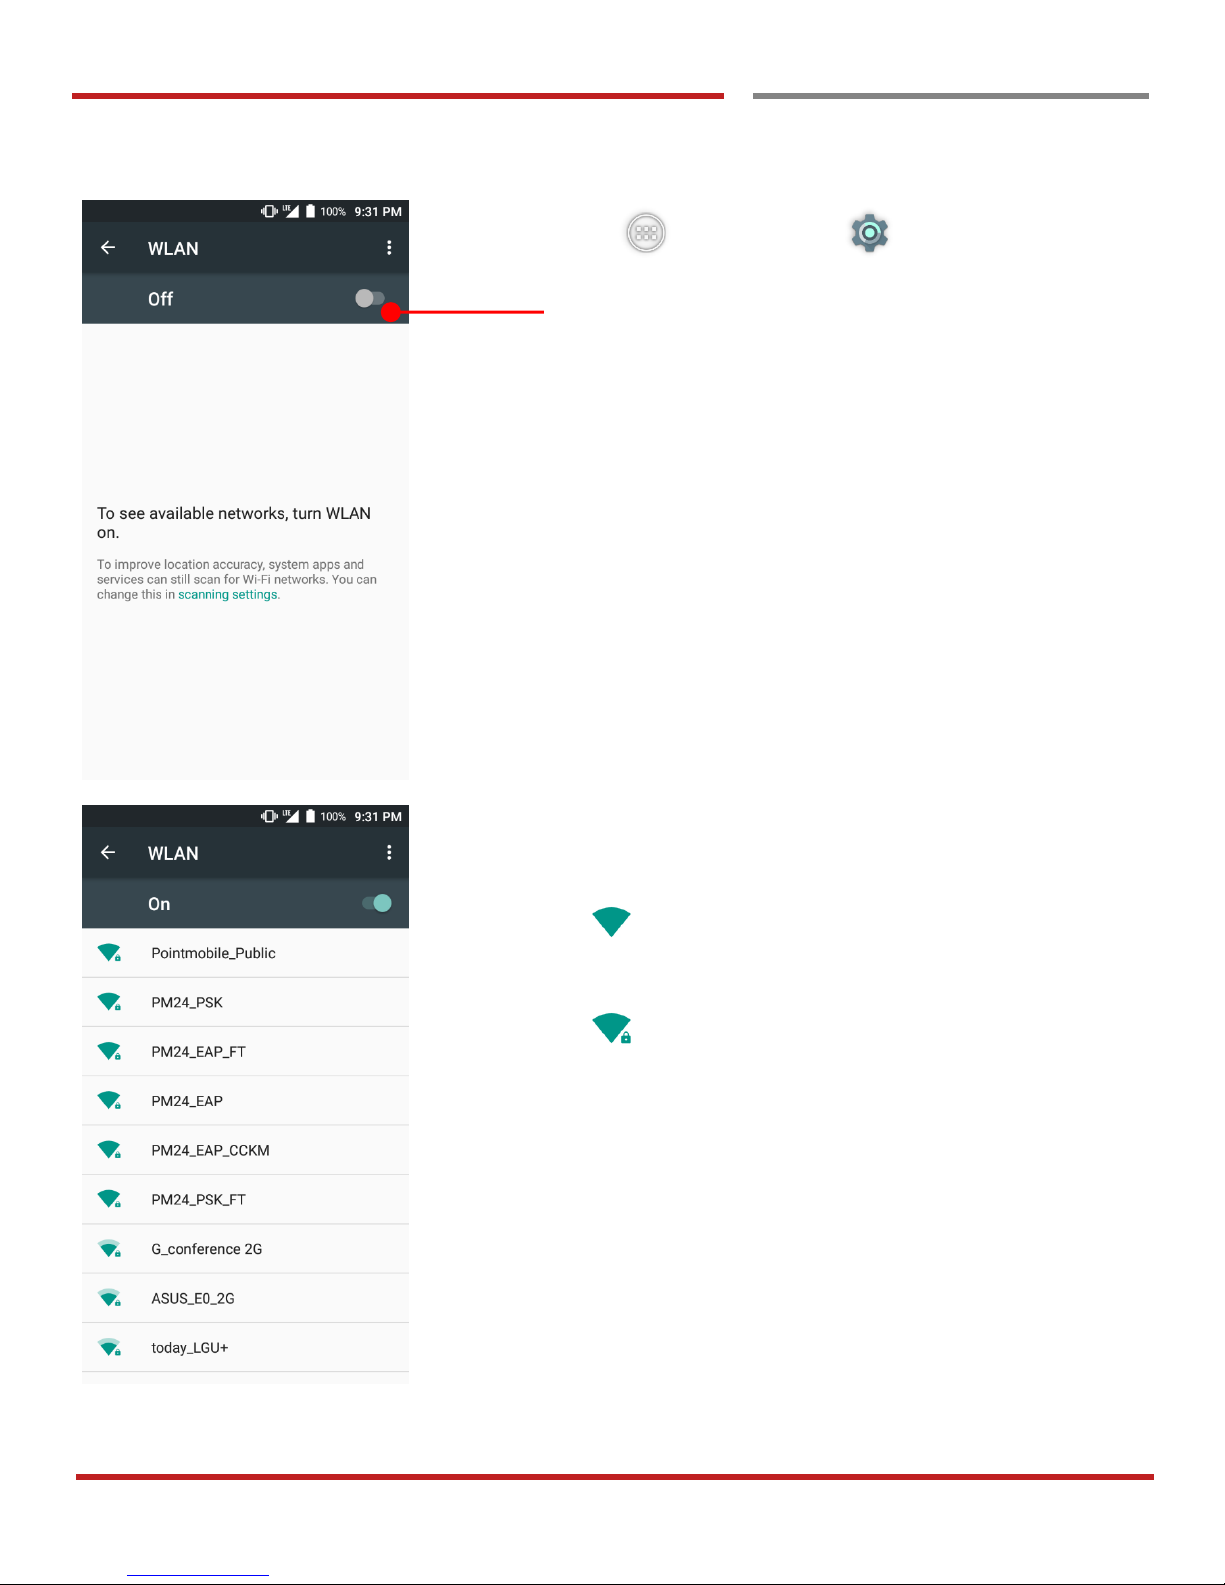
Your message display here
Touch to send the composed message
You can attach photo, saved picture, voice or location
Note: You may allow granting “Message App” access
specific app or service.
Page 28
PM66 Android 6.0.1 User Manual
27
©2006 – 2017 POINTMOBILE Co., Ltd. All rights reserved
Learning the basics
Connect to your Wi-Fi network
Connect to your Wi-Fi network
Learning the basics
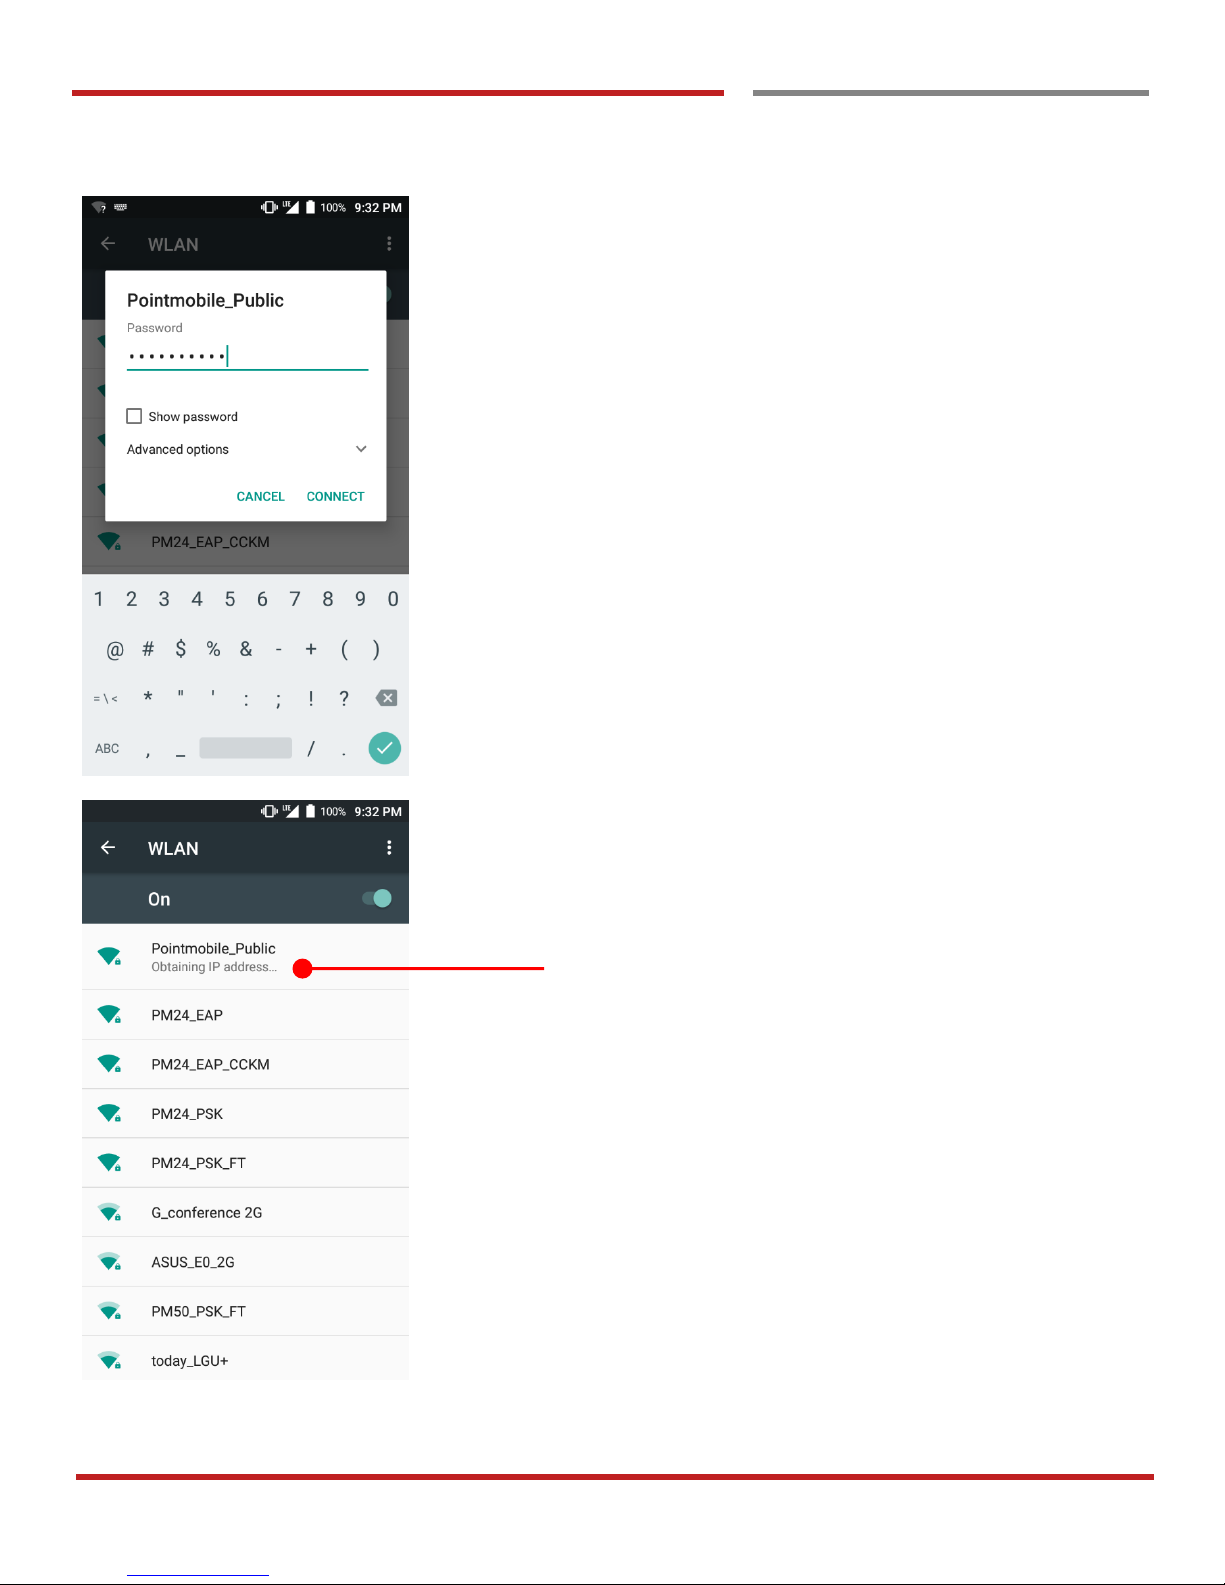
Touch “App Drawer” - “Settings” and then
“WLAN”
Touch to turn On / Off the W-Fi
You can see nearby Wi-Fi network. Each AP’s SSID
information listed by signal strength
Icon means: Open Wi-Fi network. You don’t need
to enter the password
Icon means: Secured Wi-Fi network. To connect
this Wi-Fi, you need to enter the password
Page 29
PM66 Android 6.0.1 User Manual
28
©2006 – 2017 POINTMOBILE Co., Ltd. All rights reserved
Learning the basics
Connect to your Wi-Fi network
Learning the basics
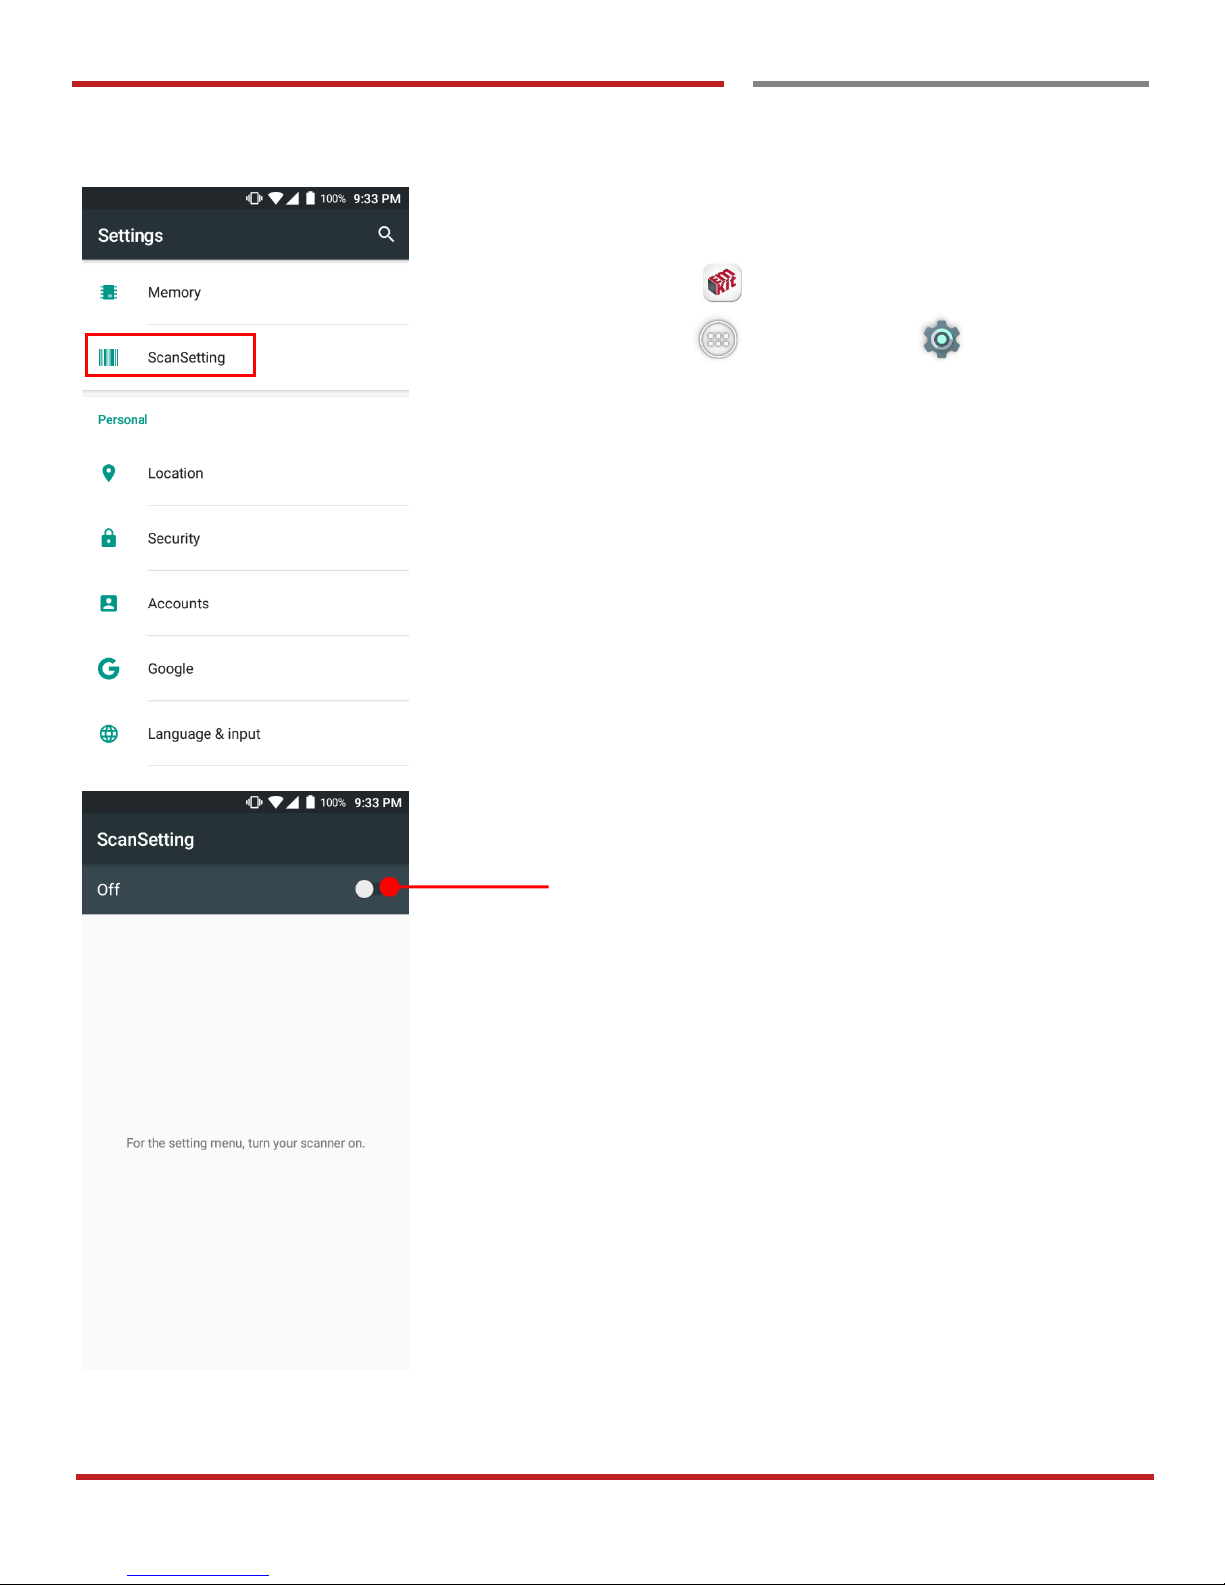
Touch SSID, which you want to connect.
To connect to secured network, enter the password
Your PM66 is obtaining the IP address from selected AP
Page 30
PM66 Android 6.0.1 User Manual
29
©2006 – 2017 POINTMOBILE Co., Ltd. All rights reserved
Scanner Settings
Use a Scanner
Use a Scanner
Scanner Settings
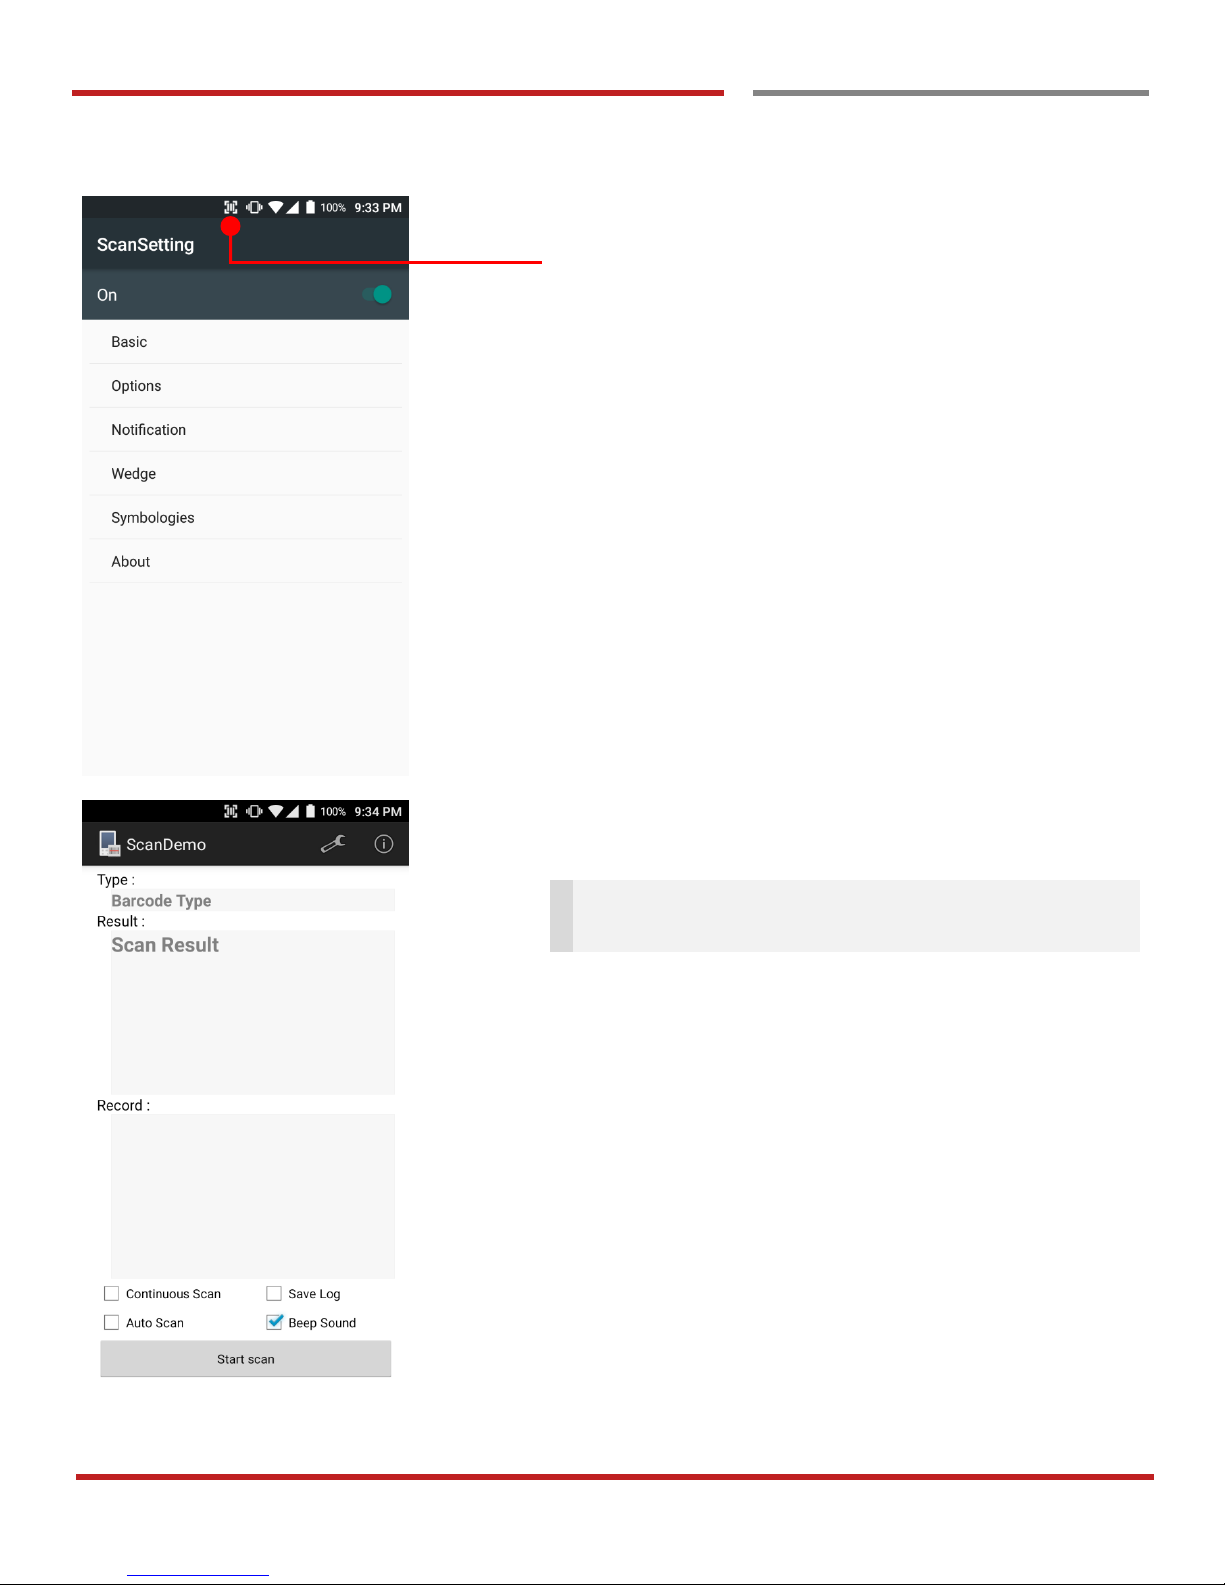
Default setting of Scanner is “Off”
To use the Scanner,
- Touch EmKit and then “ScanSetting”
- Touch “App Drawer” - “Settings” and
then “ScanSettings”
Touch to turn on the Scanner
Page 31
PM66 Android 6.0.1 User Manual
30
©2006 – 2017 POINTMOBILE Co., Ltd. All rights reserved
Scanner Settings
Use a Scanner
Scanner Settings
Now you can see “Scanner” icon in the “Status Bar”
Note: When “Scanner” turned on, you can scan the
barcode with “ScanDemo” in the EmKit
Page 32
PM66 Android 6.0.1 User Manual
31
©2006 – 2017 POINTMOBILE Co., Ltd. All rights reserved
Scanner Settings
Use a Scanner
Scanner Settings
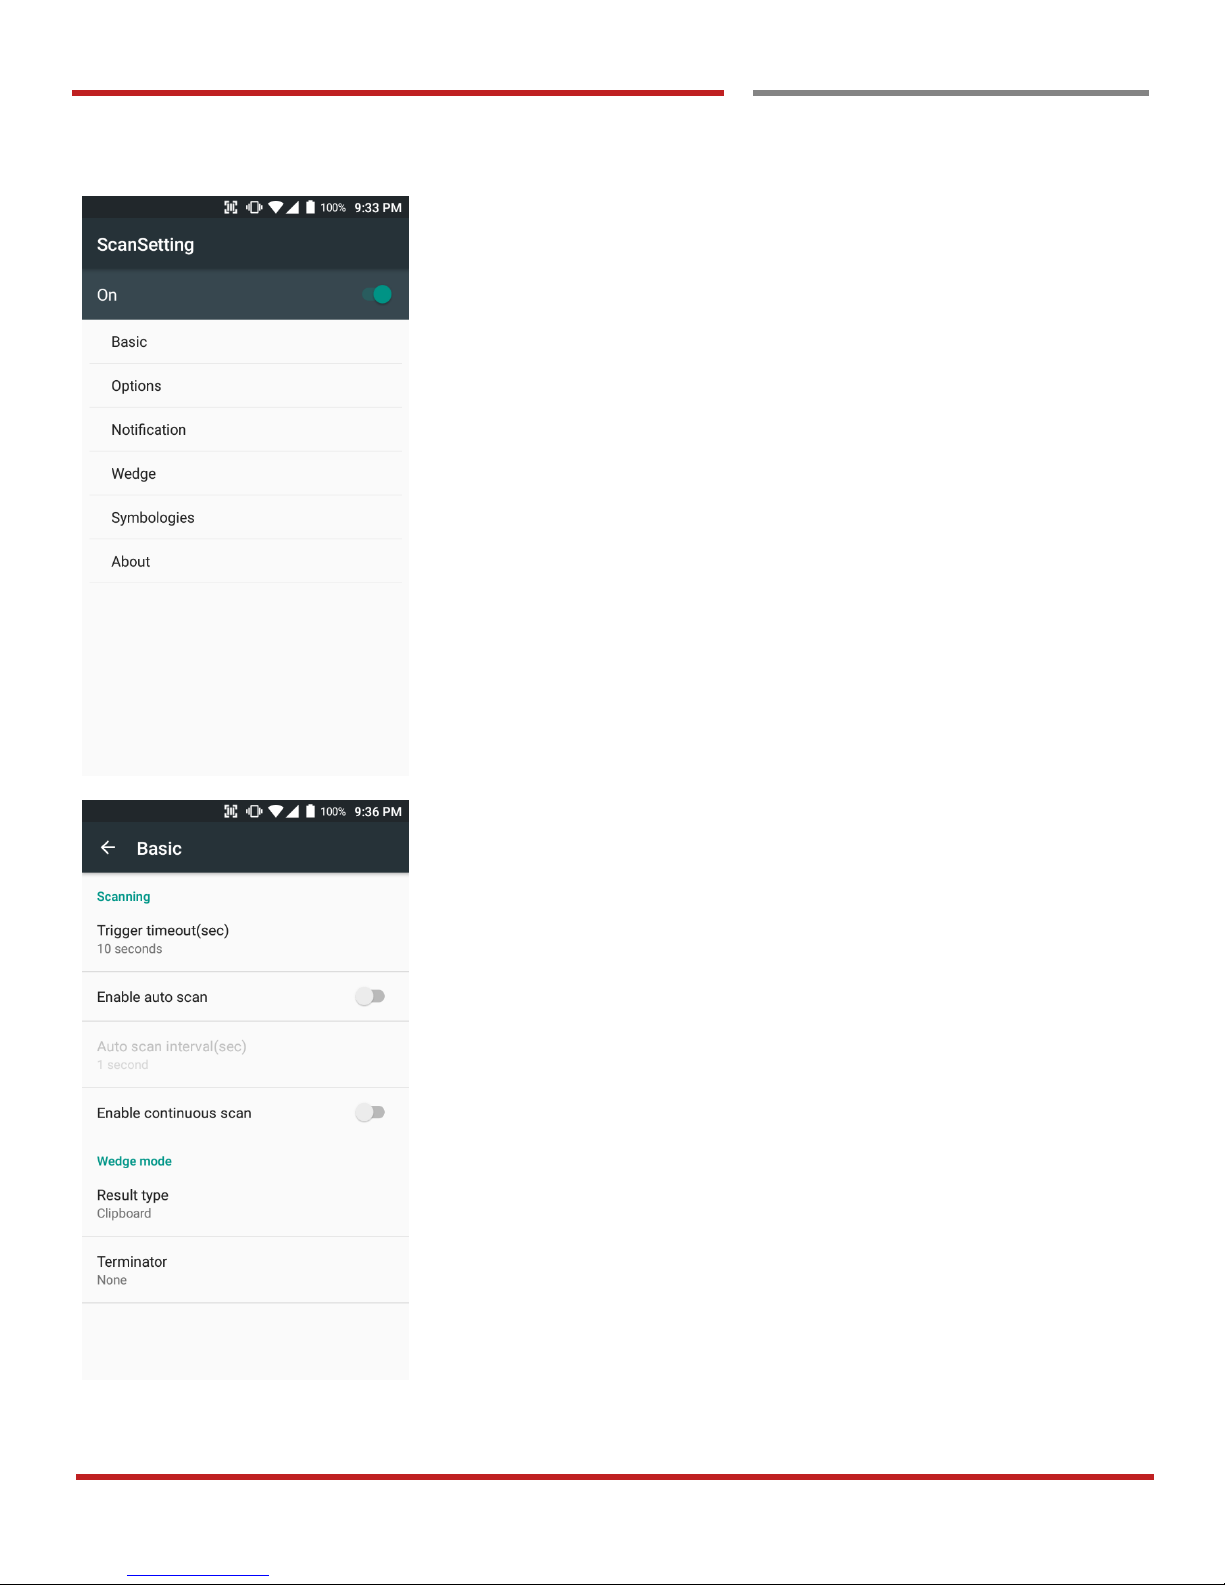
Scanner setting details
Scanner setting consist with “Basic”, “Options”,
“Notification”, “Wedge”, “Symbologies”, and “About”
In the “Basic”, you can set “Scanning” option and “Wedge”
mode option
In the “Scanning menu”, you can change Scanner’s trigger
time out and set “Auto scan” & “Continues scan”
In the Wedge menu you can change, decode scan data’s
result type handling “User Message”, “Keyboard Event”,
“Clipboard’ or ‘Intent Broadcast’. Also you can set
“Terminator” – “Space”, “Tab”, “LF” or “Tab & LF”
Page 33
PM66 Android 6.0.1 User Manual
32
©2006 – 2017 POINTMOBILE Co., Ltd. All rights reserved
Scanner Settings
Use a Scanner
Scanner Settings
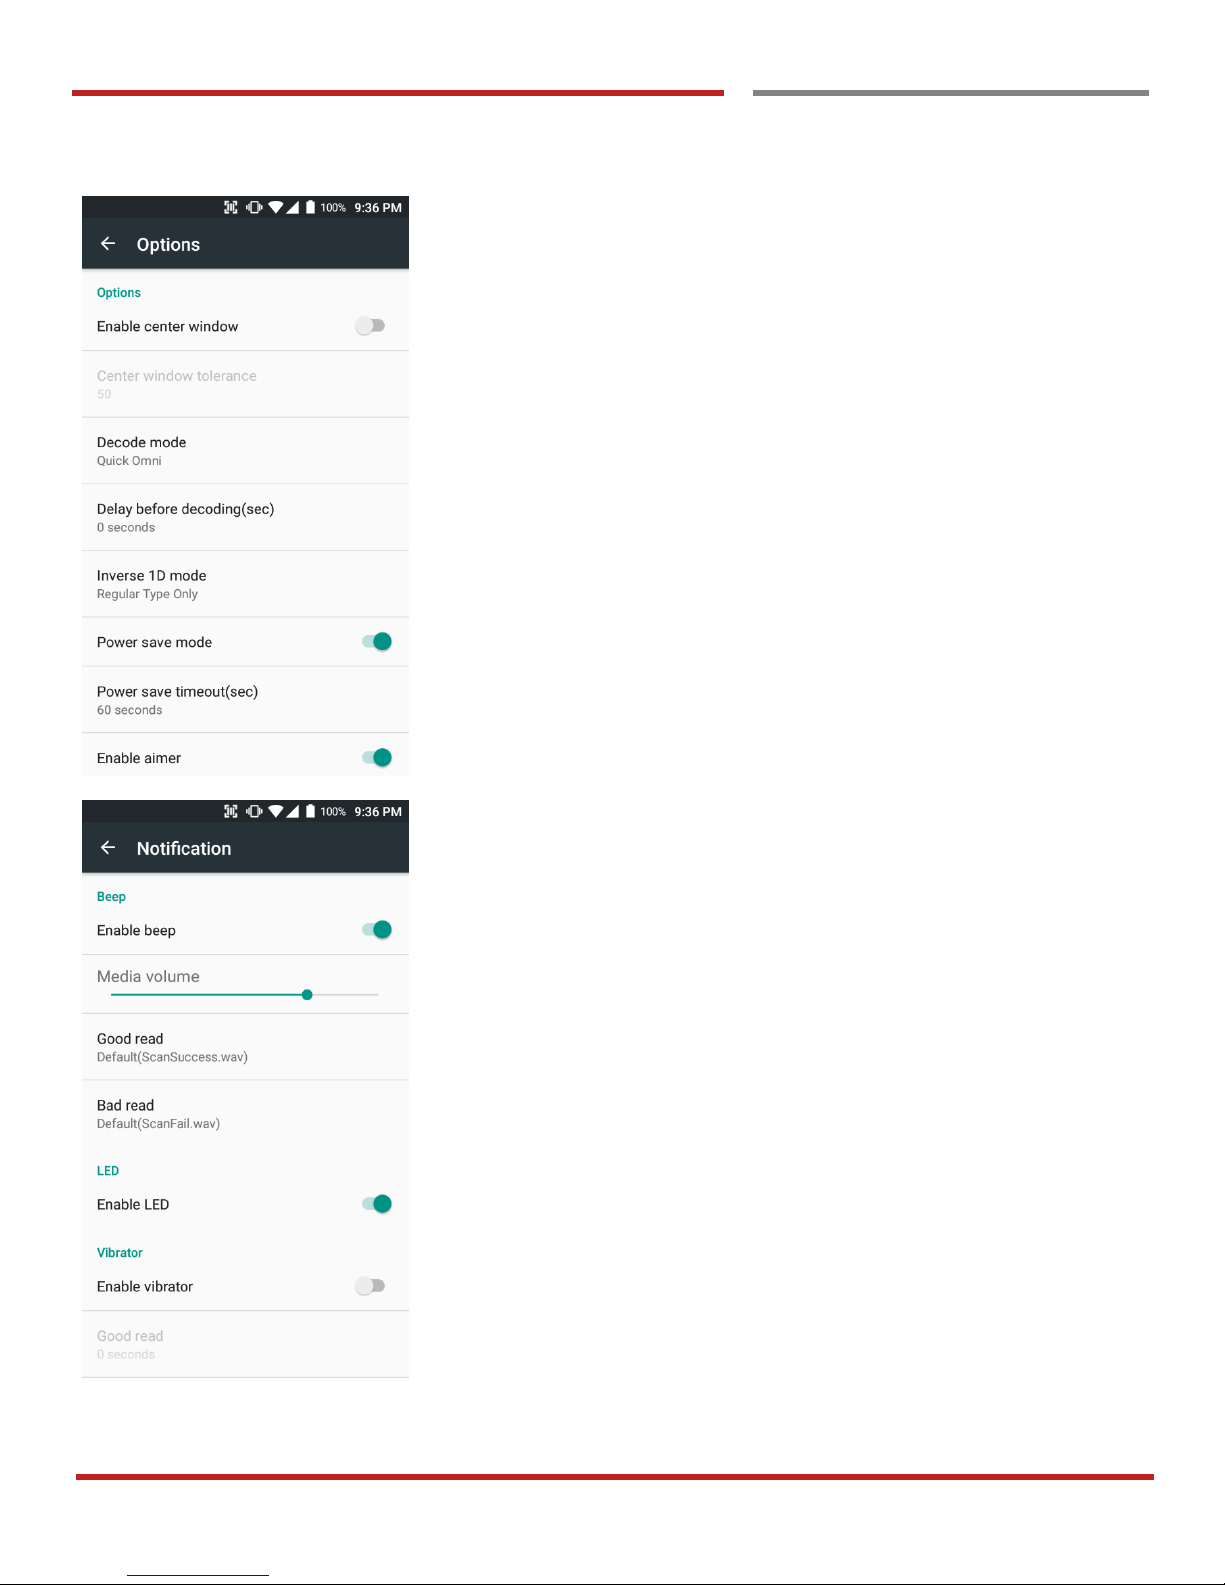
In the “Options”, you can enable / disable the “Center
Window”, set “Decode mode”, “Power save mode” and
enable / disable “Aimer” & “Illumination”
In the “Notification”, you can set notification option. You can
change the volume level, notification sound, LED and
vibration option
Page 34
PM66 Android 6.0.1 User Manual
33
©2006 – 2017 POINTMOBILE Co., Ltd. All rights reserved
Scanner Settings
Use a Scanner
Scanner Settings
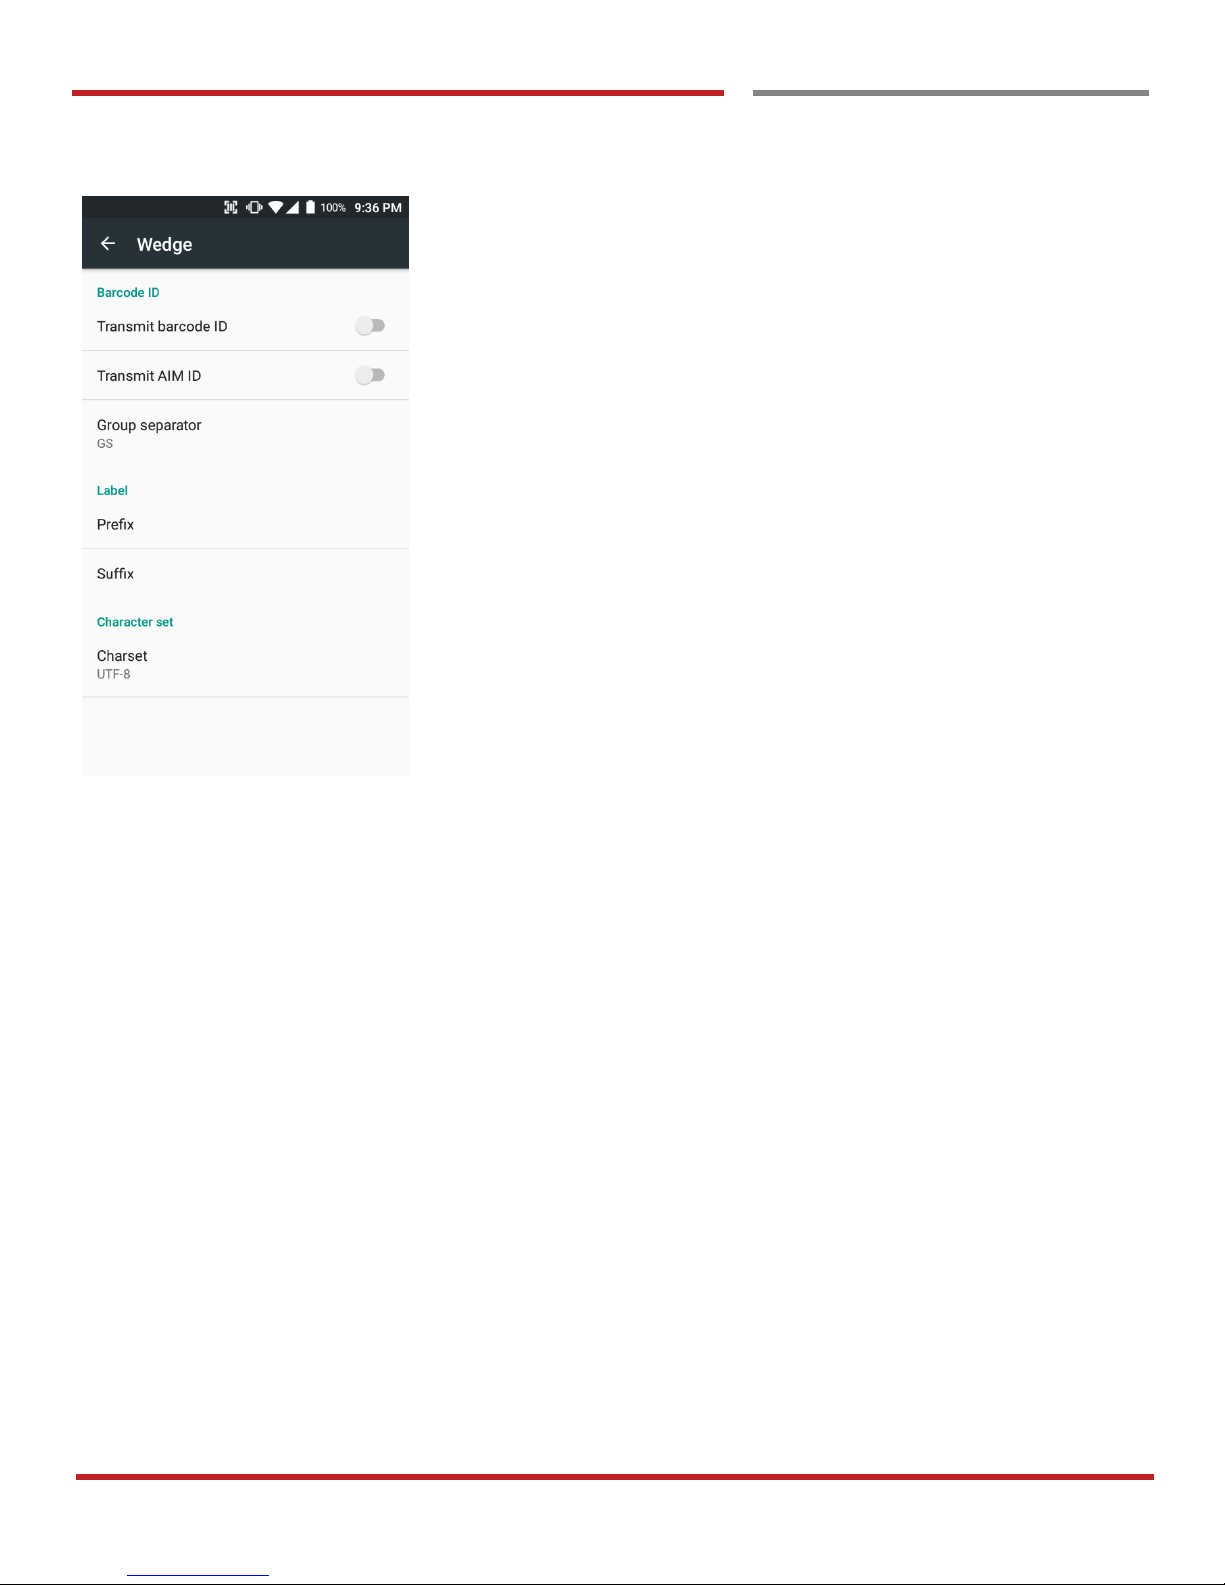
In the “Wedge”, you can enable / disable “Barcode ID” and
“Aim ID”, set “Group separator”, “Prefix” & “Suffix” and
“Character set”
Page 35
PM66 Android 6.0.1 User Manual
34
©2006 – 2017 POINTMOBILE Co., Ltd. All rights reserved
Scanner Settings
Use a Scanner
Scanner Settings
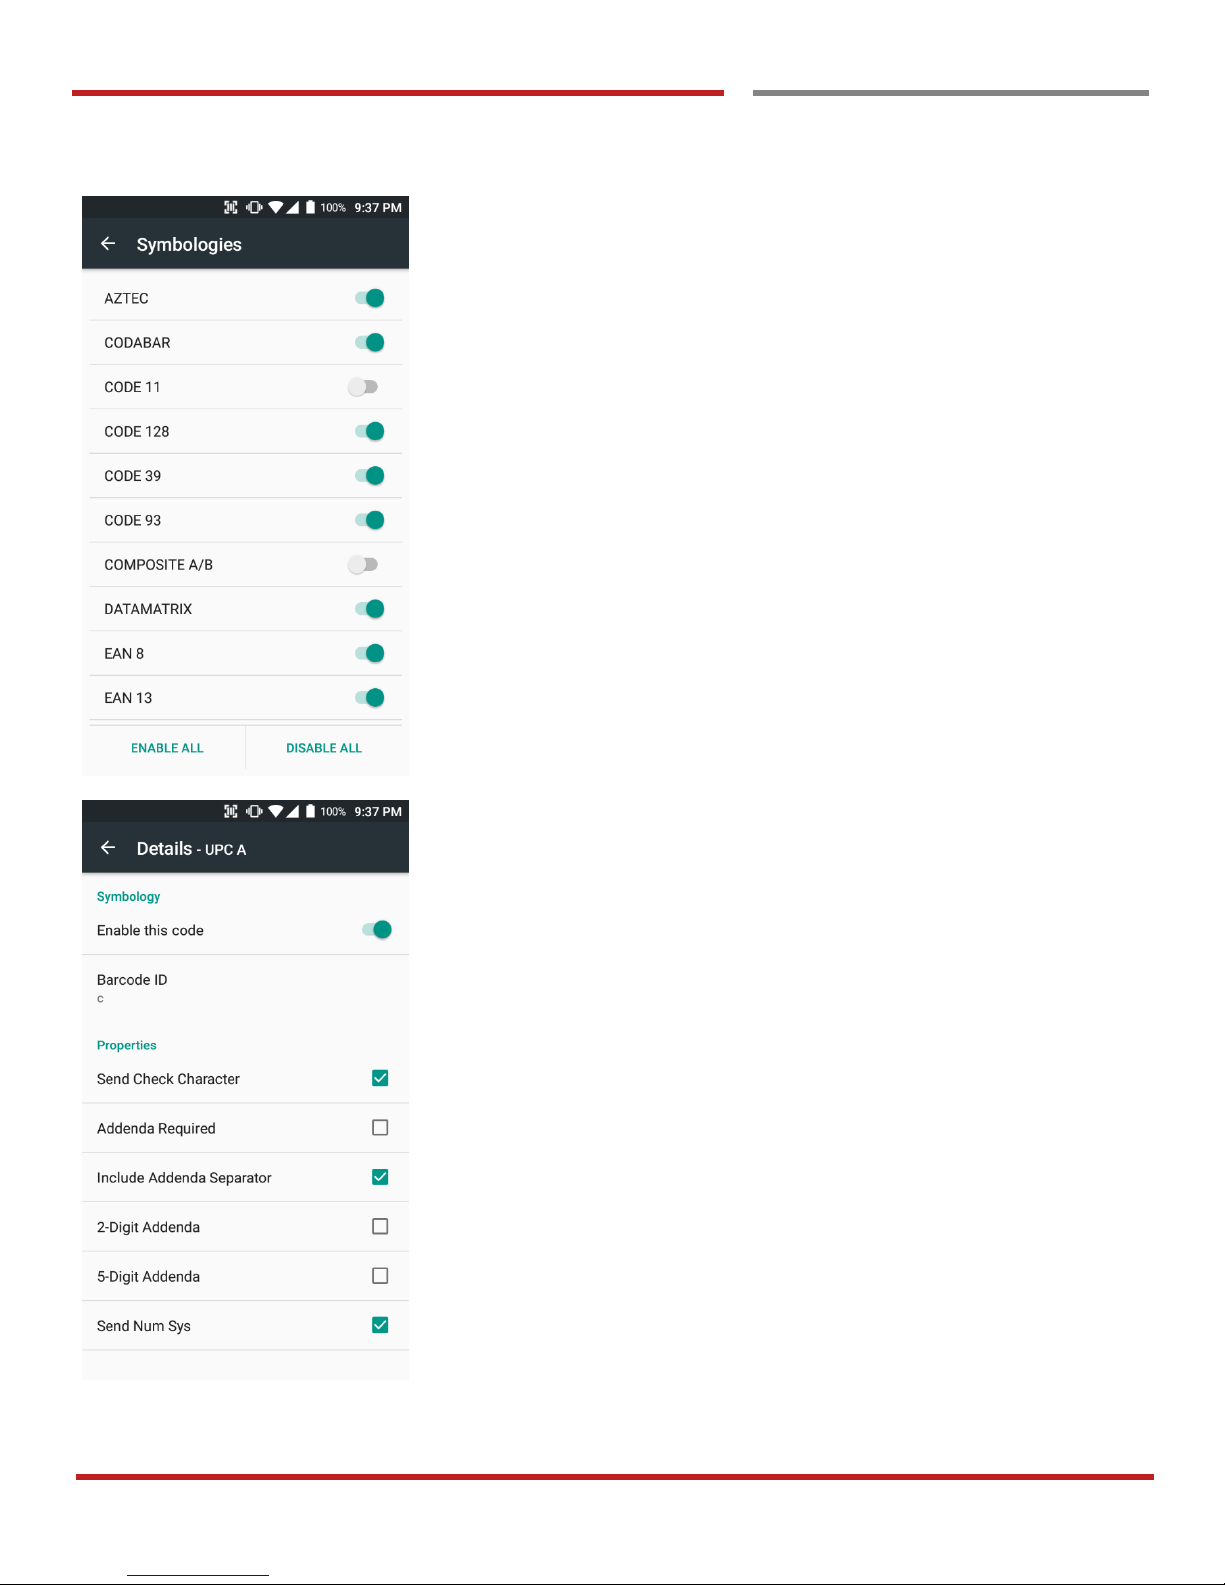
In the “Symbologies”, you can enable / disable specific
barcode.
By touching each “Symbology” name, you can set detail
option.
Page 36
PM66 Android 6.0.1 User Manual
35
©2006 – 2017 POINTMOBILE Co., Ltd. All rights reserved
Scanner Settings
Use a Scanner
Scanner Settings
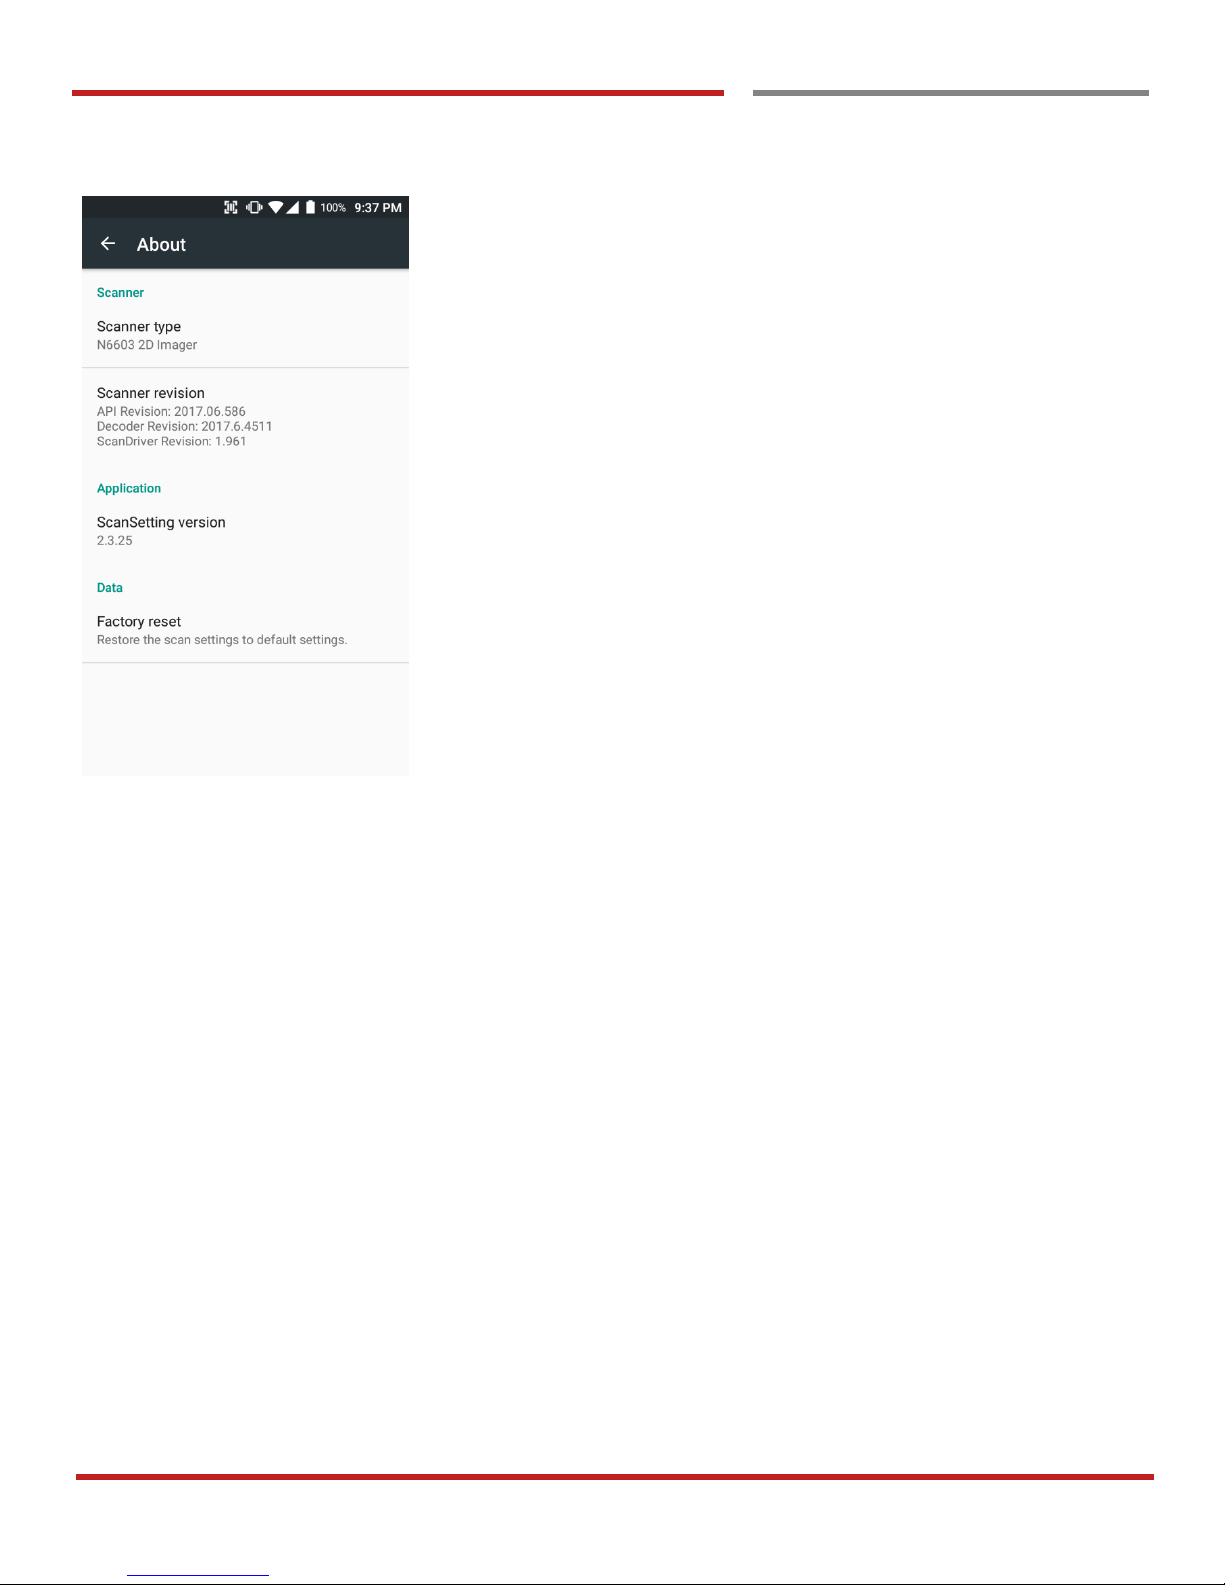
In the ‘About’, you can check your Scanner’s information
and restore Scanner’s settings to default
Page 37
PM66 Android 6.0.1 User Manual
36
©2006 – 2017 POINTMOBILE Co., Ltd. All rights reserved
Scan a Barcode
Scan a Barcode
Scanner Settings
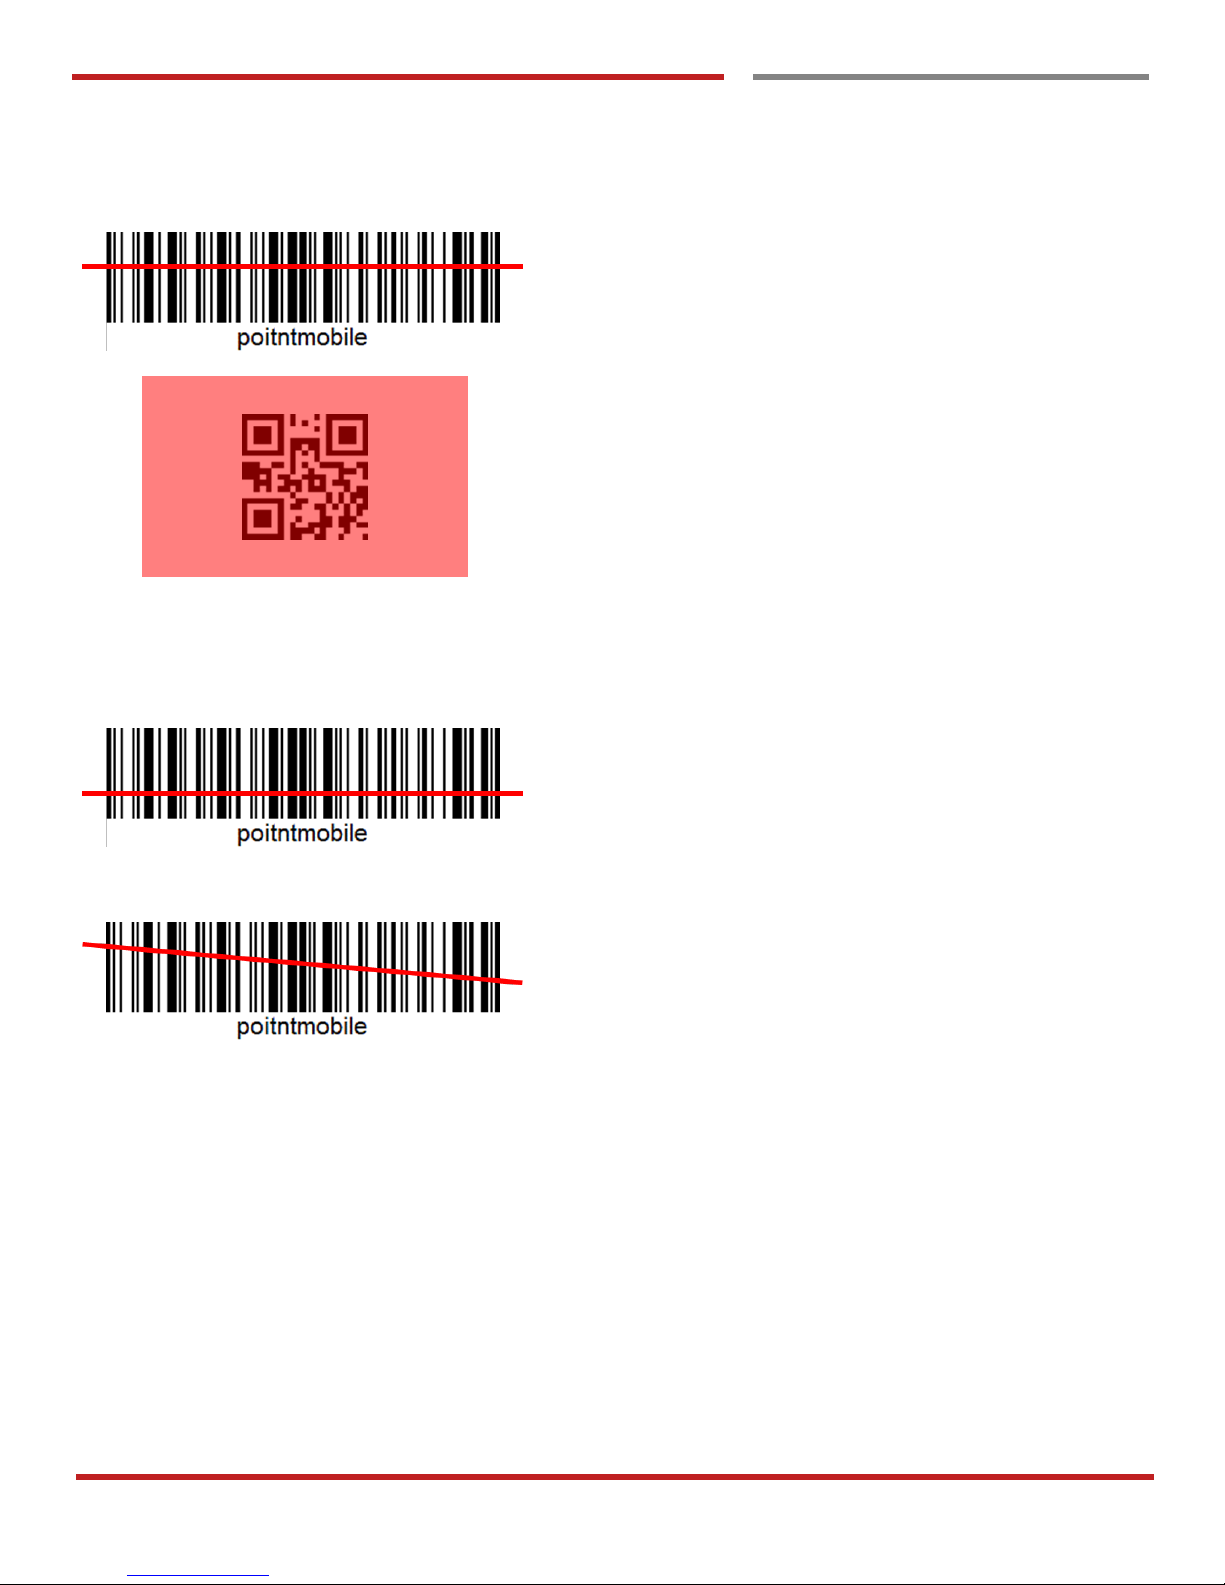
Example of good Barcode reading
Idle barcode scan
Please aim the middle of barcode
Even you aim the barcode slightly upper or down area or
angle is tilted, you can read the barcode
Page 38
PM66 Android 6.0.1 User Manual
37
©2006 – 2017 POINTMOBILE Co., Ltd. All rights reserved
Scan a Barcode
Scan a Barcode
Scanner Settings
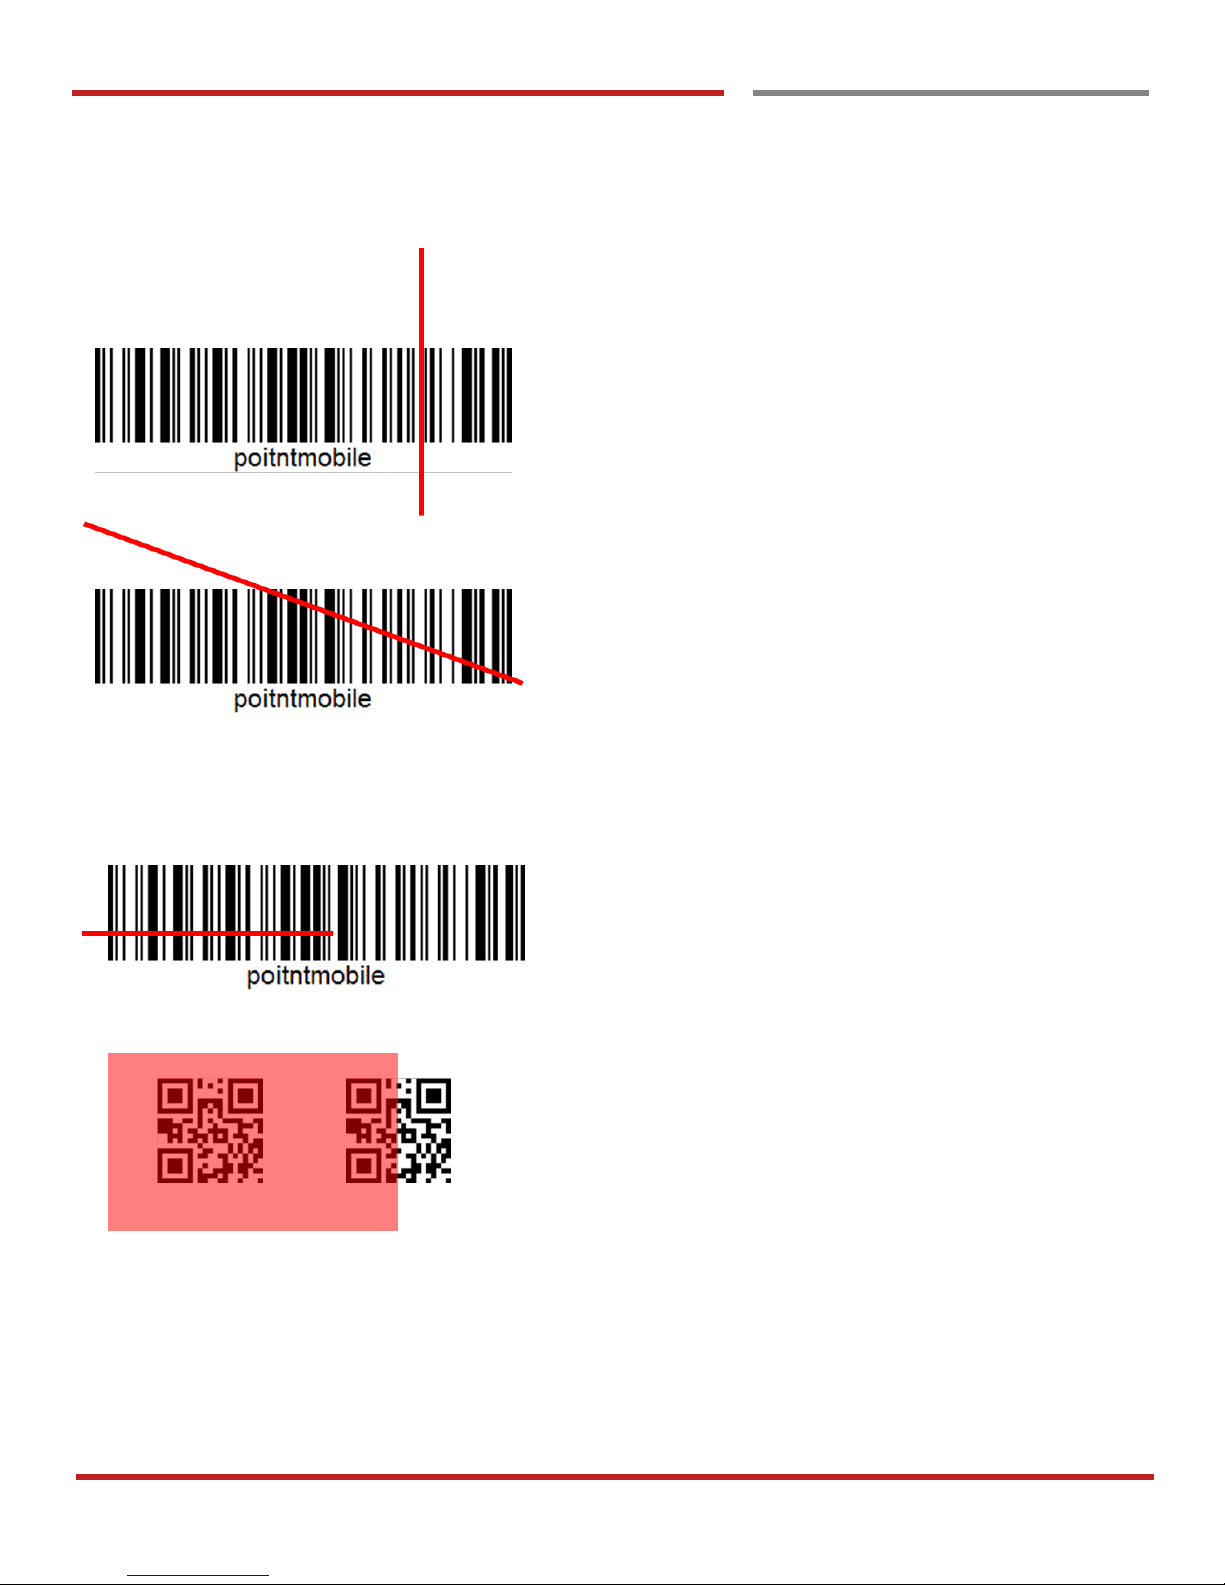
Example of bad Barcode reading
If you aim the barcode wrong direction or tilt too much, you
can’t read the barcode
If you aim part of Barcode or aim two barcode together, you
can’t read the barcode
Page 39
PM66 Android 6.0.1 User Manual
38
©2006 – 2017 POINTMOBILE Co., Ltd. All rights reserved
OS Update
OS Image update from a Storage
OS Image update from a Storage
OS Update
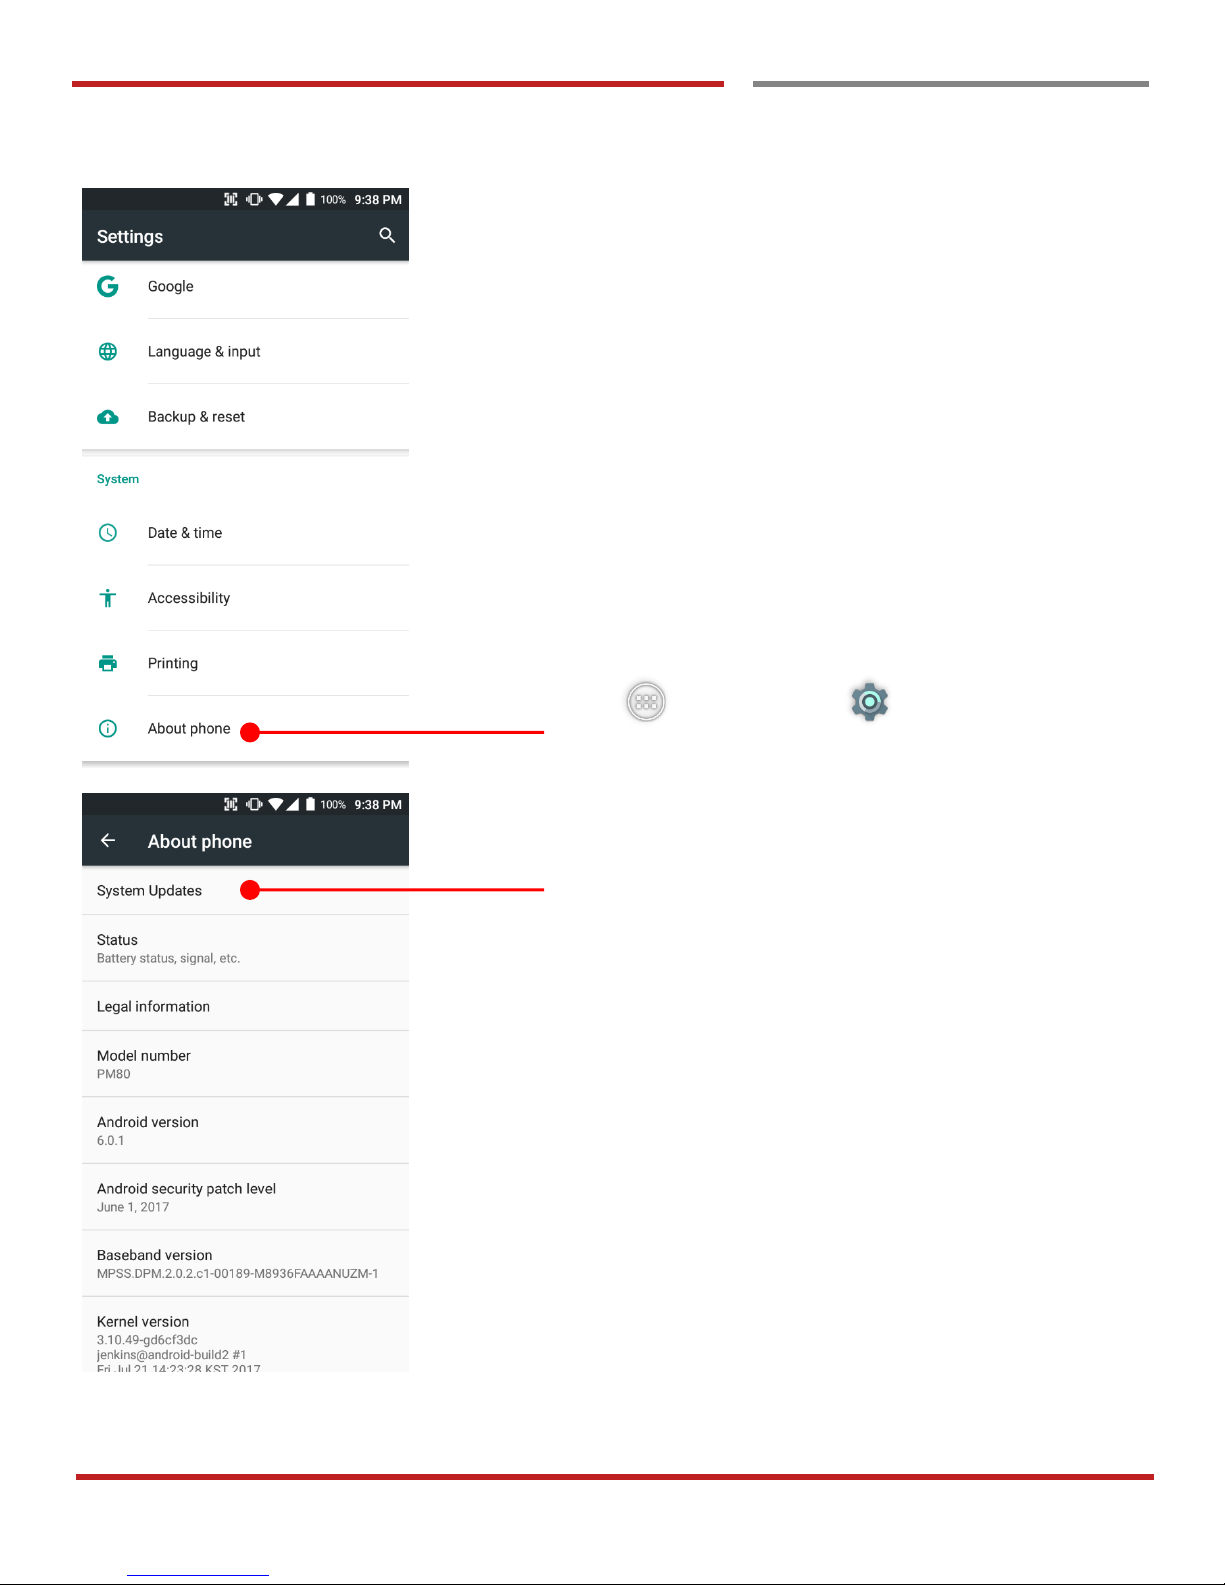
To update OS image, copy or place OS image file into
the root folder of “Internal Storage” or “External
Storage”
Touch “App Drawer” - “Settings” and then
“About phone”
Touch “System Updates”
Page 40
PM66 Android 6.0.1 User Manual
39
©2006 – 2017 POINTMOBILE Co., Ltd. All rights reserved
OS Update
OS Image update from a Storage
OS Update
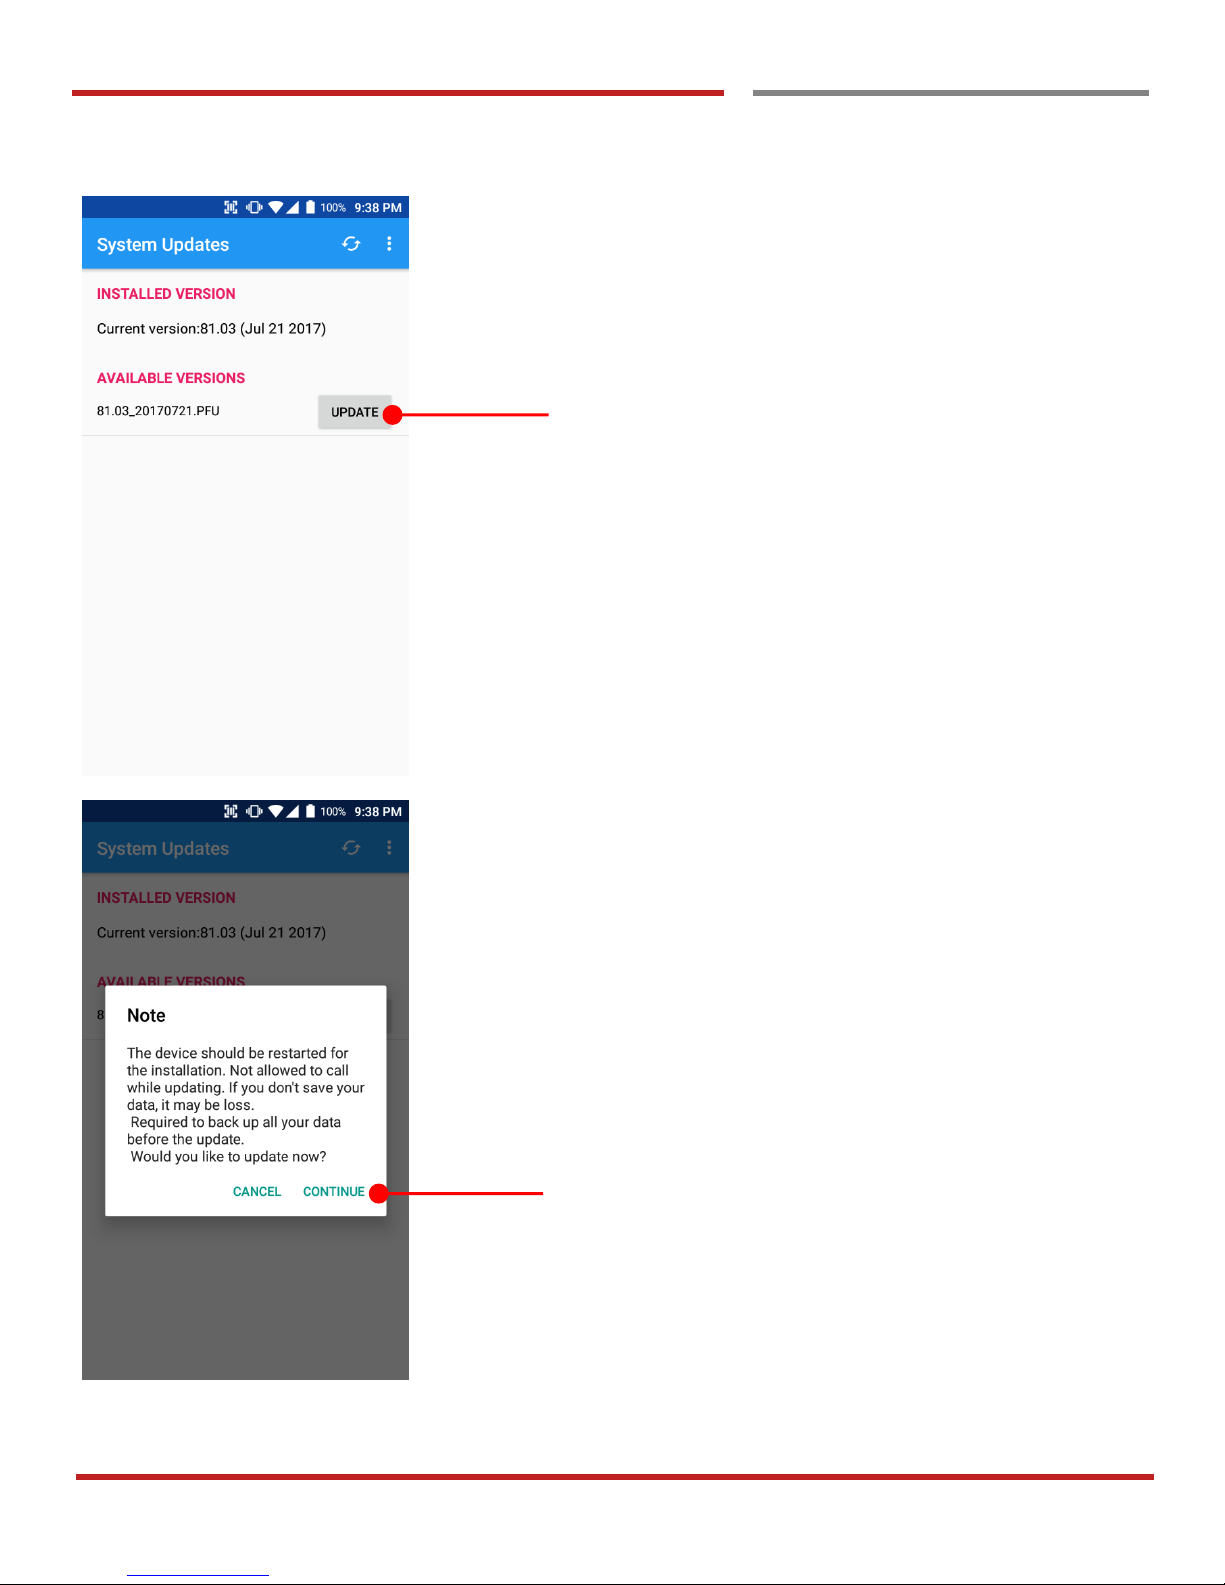
Your PM66 will check storage and display available OS
image
Touch “Update” button
By touching the “CONTINUE” button, your PM66 start to
update the OS image. During this time, you cannot use your
PM66. Please save the data before start, the OS update
process.
Page 41
PM66 Android 6.0.1 User Manual
40
©2006 – 2017 POINTMOBILE Co., Ltd. All rights reserved
OS Update
OS Image update from the FOTA
OS Image update from the FOTA
OS Update
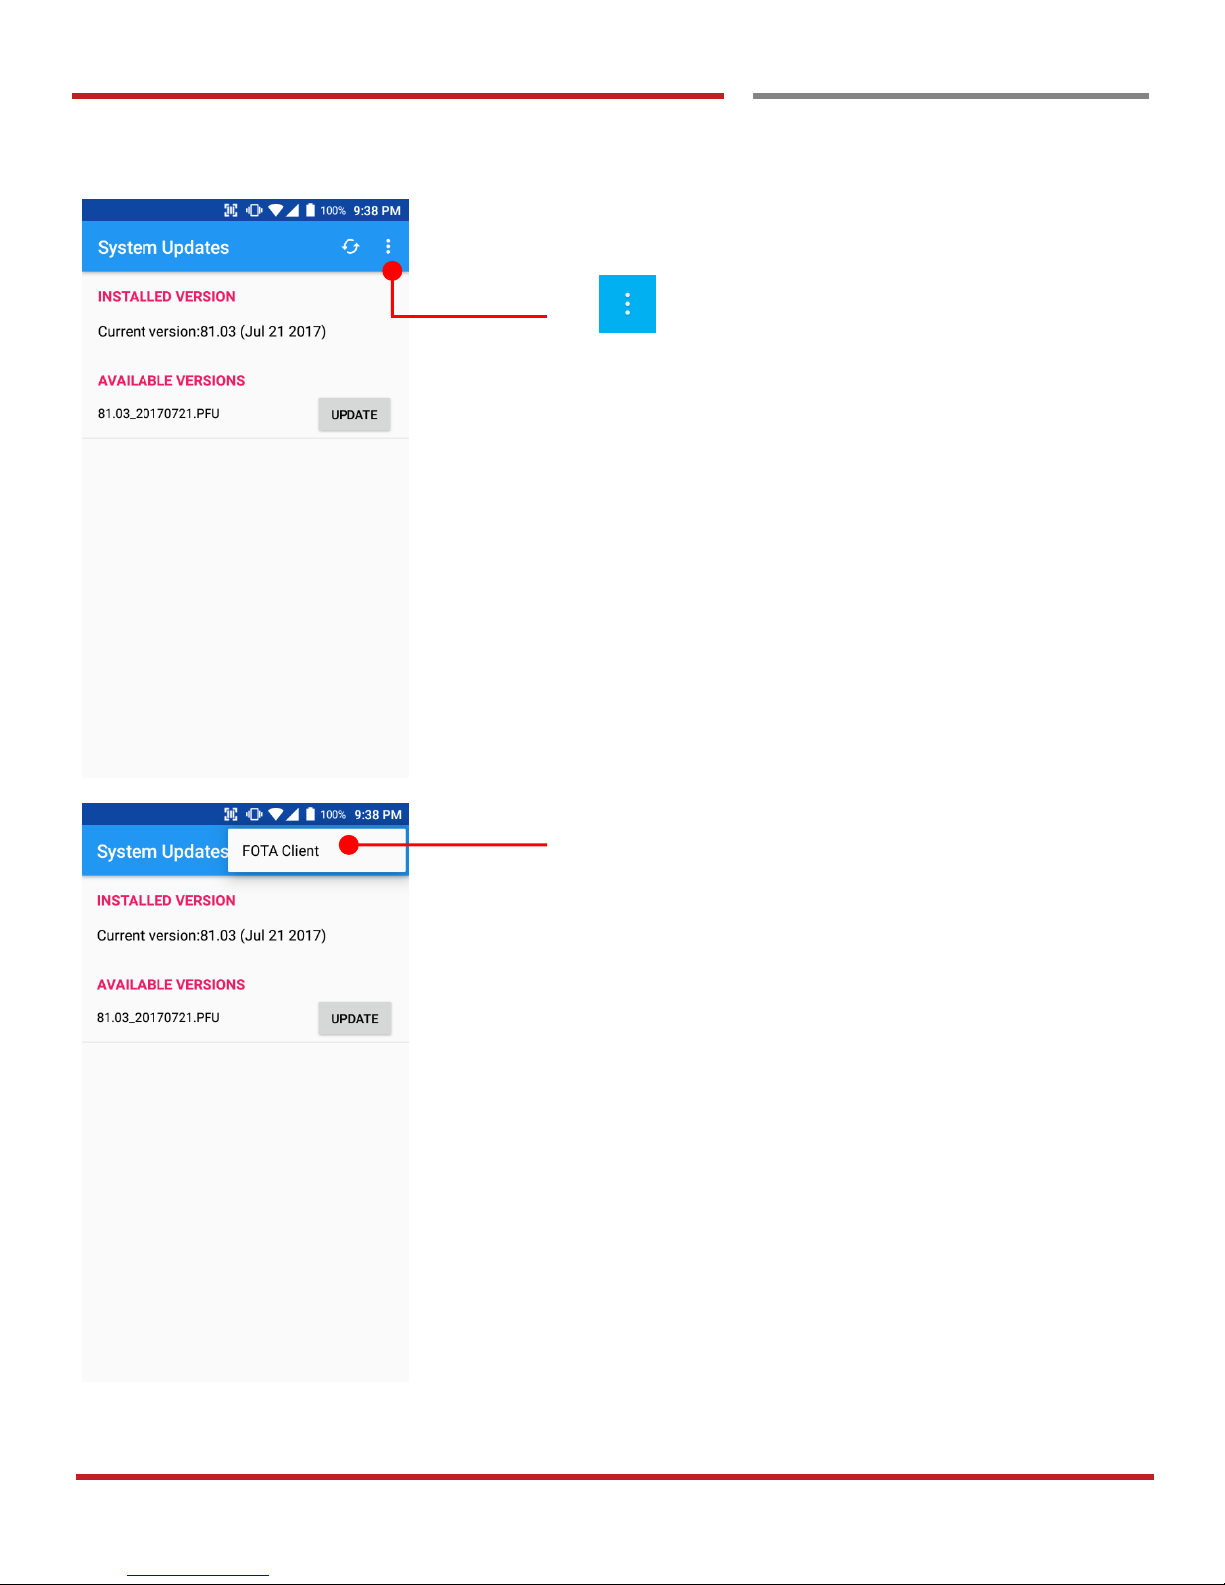
Tap icon for the advanced option
Touch “FOTA Client”
Page 42
PM66 Android 6.0.1 User Manual
41
©2006 – 2017 POINTMOBILE Co., Ltd. All rights reserved
OS Update
OS Image update from the FOTA
OS Update
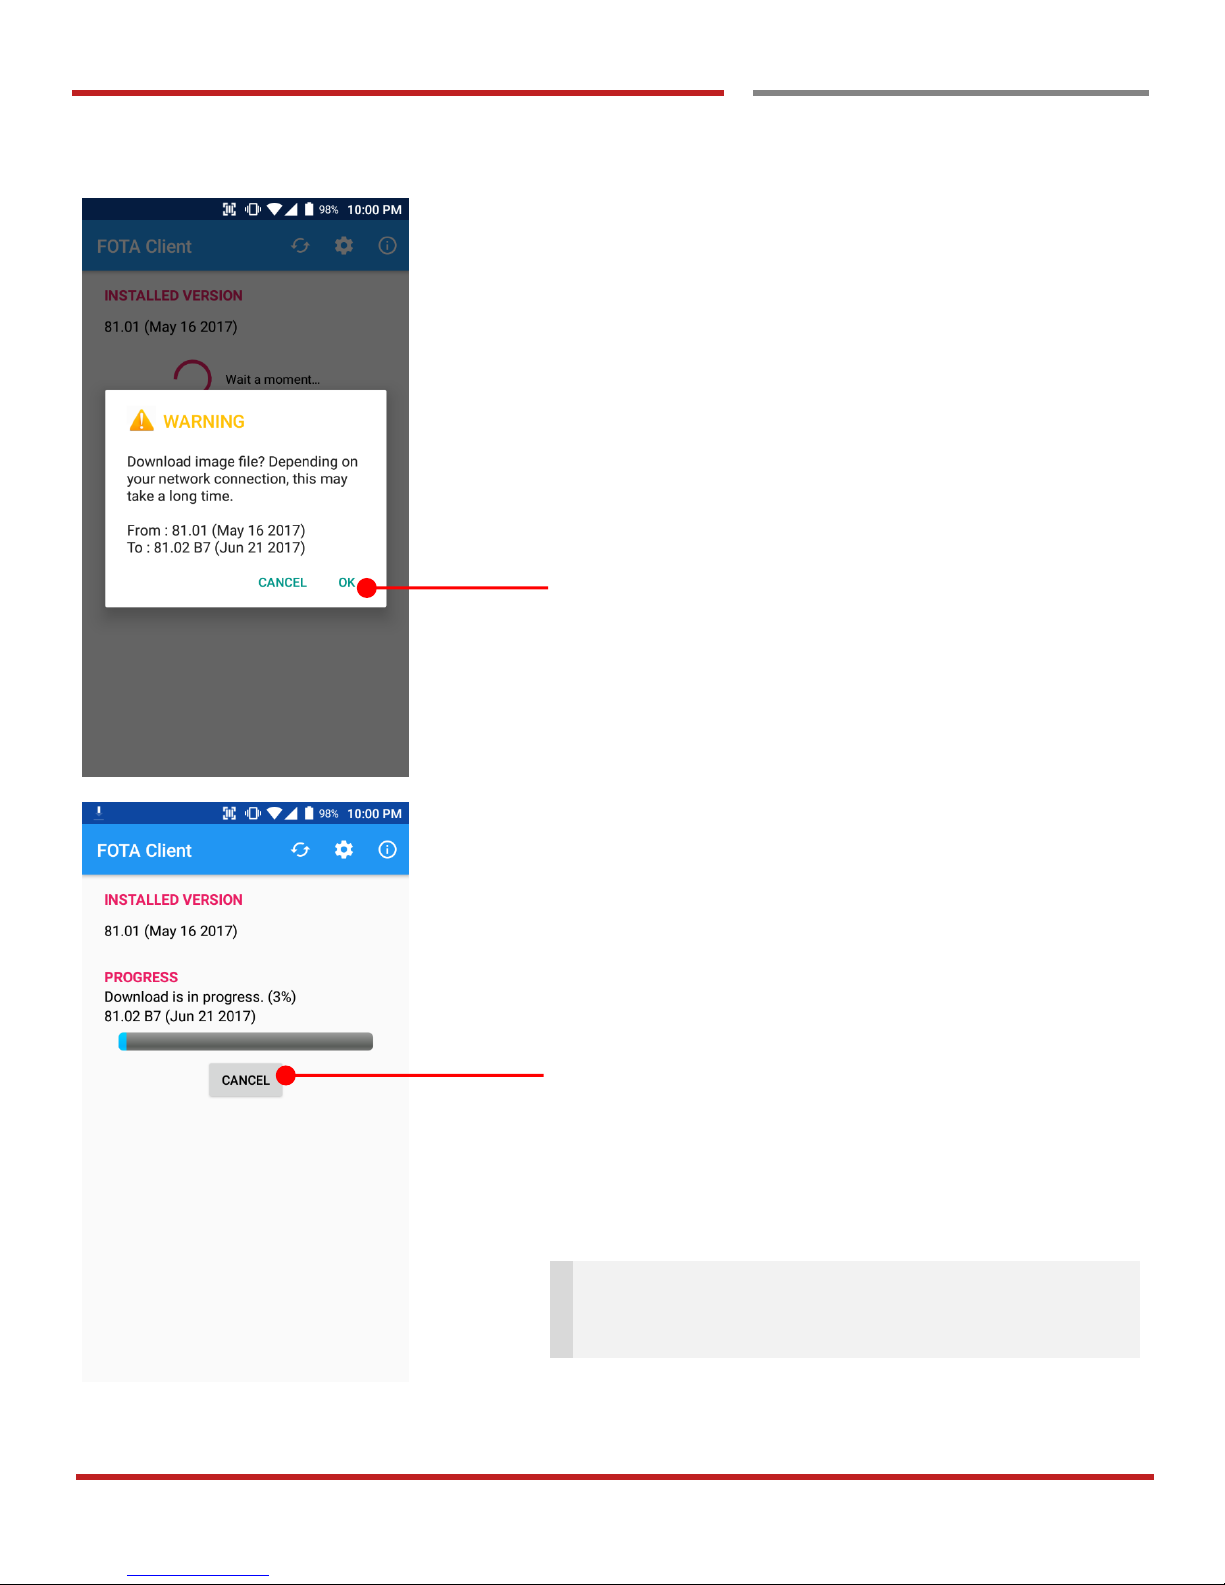
PM66 will compare the OS image between FOTA server
and current OS image. If there is newer OS image in the
FOTA server, FOTA server will suggest downloading.
Touch “OK” to start download the image in the FOTA server
You can cancel OS image download process
Note: Default OS image download setting of FOTA
Client is “Download over Wi-Fi only” Please connect to
the nearby Wi-Fi network for FOTA service
Page 43
PM66 Android 6.0.1 User Manual
42
©2006 – 2017 POINTMOBILE Co., Ltd. All rights reserved
Factory data reset
Factory data reset from Settings
Factory data reset from Settings
Factory data reset
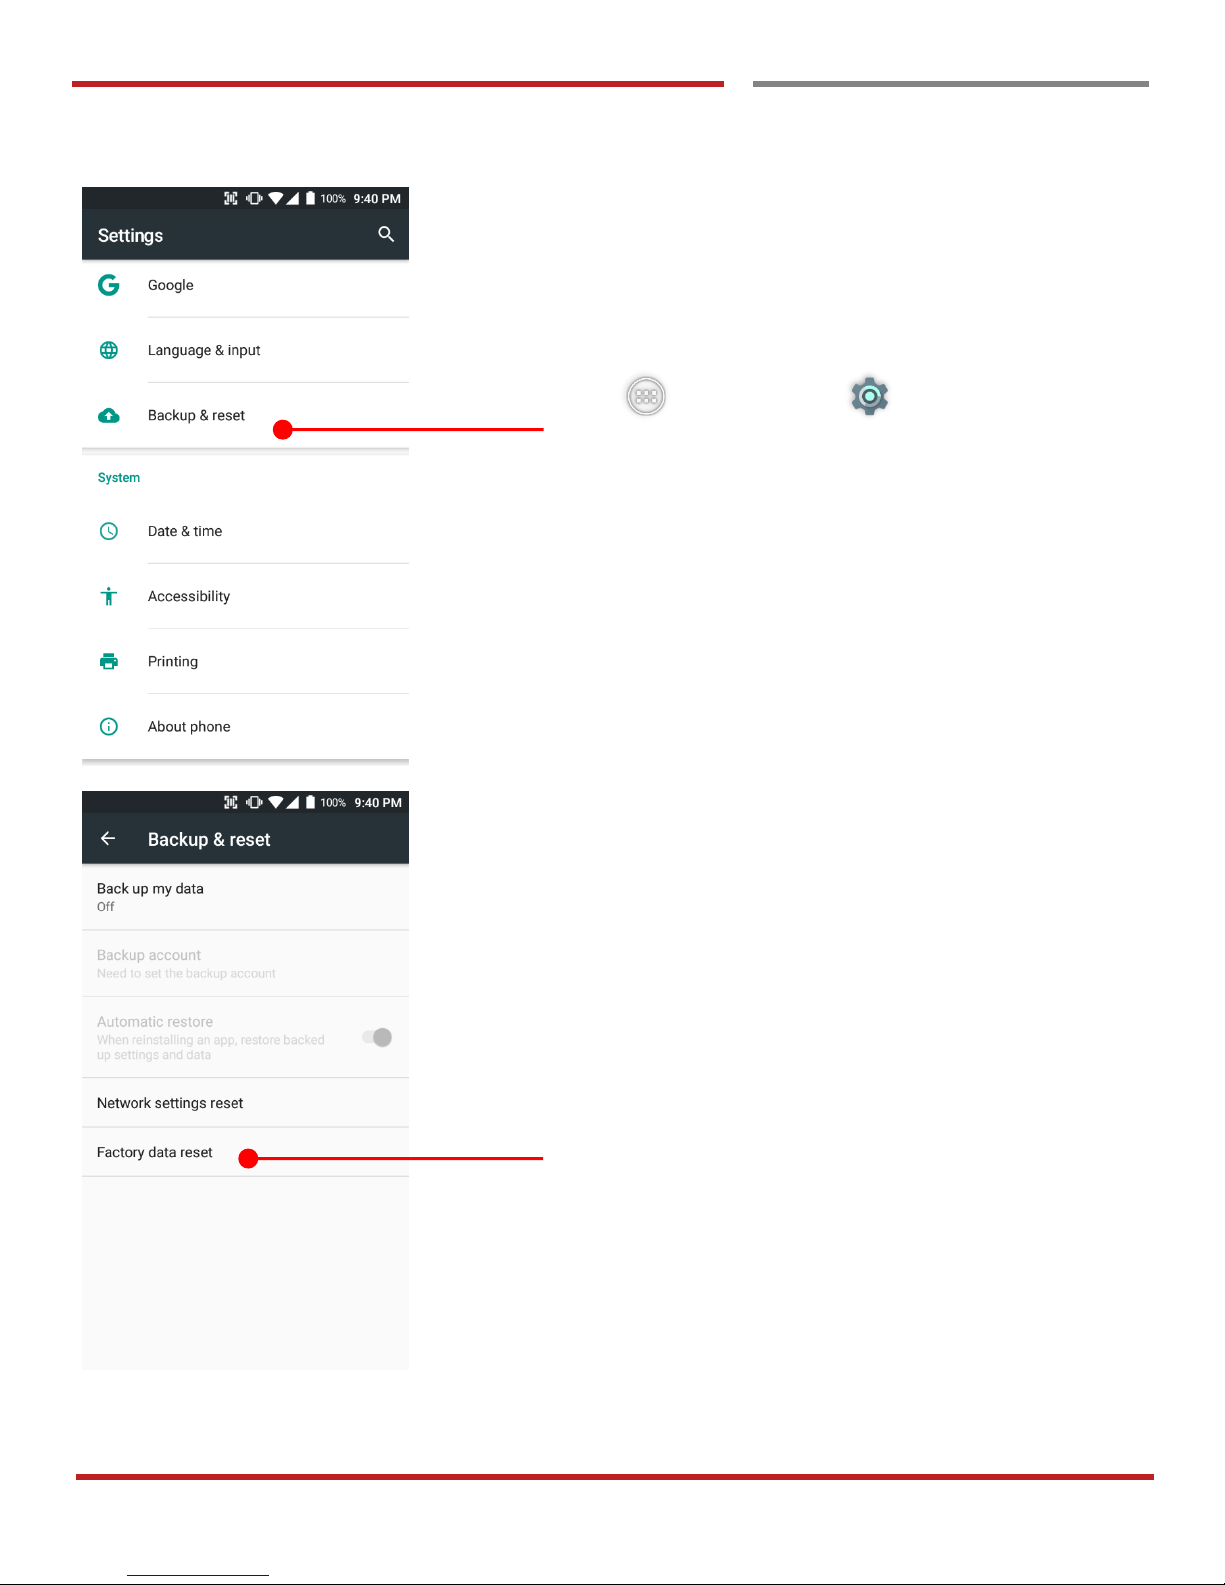
When your PM66 system is unstable and abnormal behavior
occur but could not recover by rebooting, you may need to
“Factory data reset” your PM66
Touch “App Drawer” - “Settings” and then
“Backup & reset”
Touch “Factory data reset”
Page 44
PM66 Android 6.0.1 User Manual
43
©2006 – 2017 POINTMOBILE Co., Ltd. All rights reserved
Factory data reset from Settings
Factory data reset
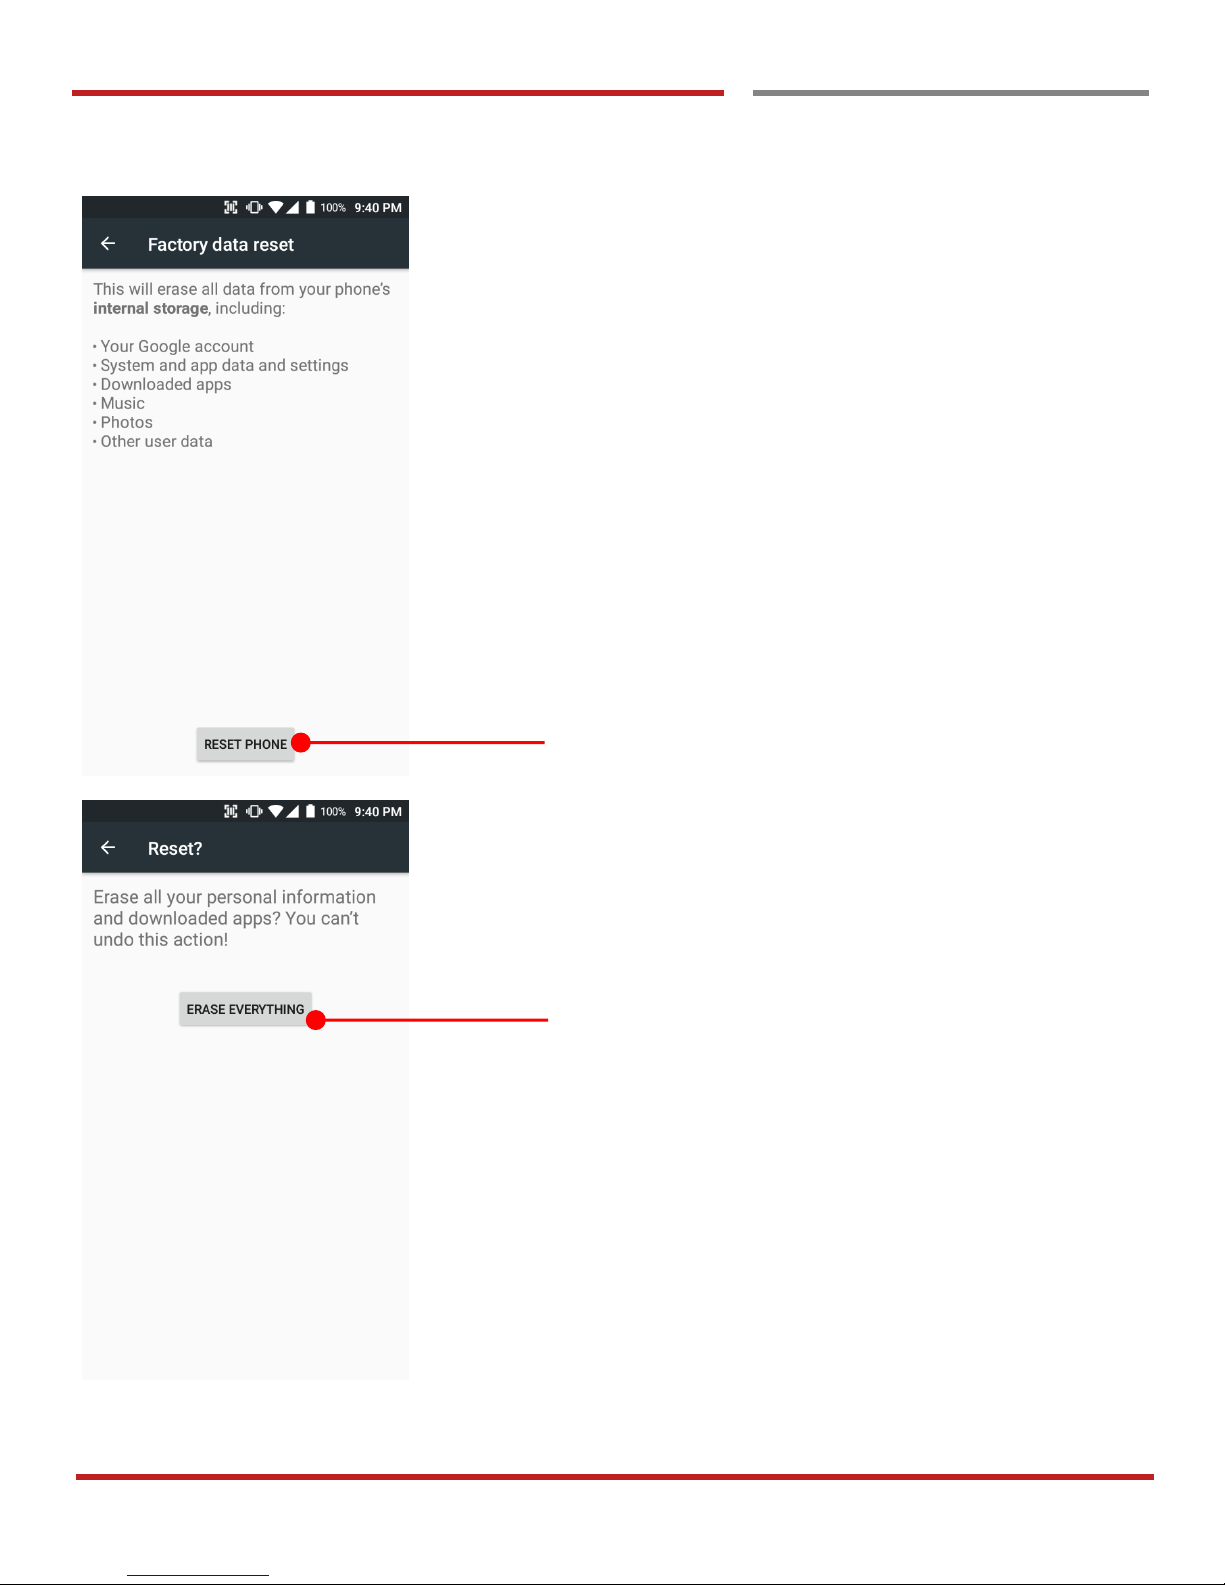
Please note, all apps and data in the internal storage will be
deleted and restored to “Factory default” and this process
cannot “Undo”
Touch to start “Factory Reset” process
Touch to confirm erase of “Apps and Data”
Page 45
PM66 Android 6.0.1 User Manual
44
©2006 – 2017 POINTMOBILE Co., Ltd. All rights reserved
Factory data Reset
Force Factory data reset
Force Factory data reset
Factory data reset
Force Factory data reset your PM66
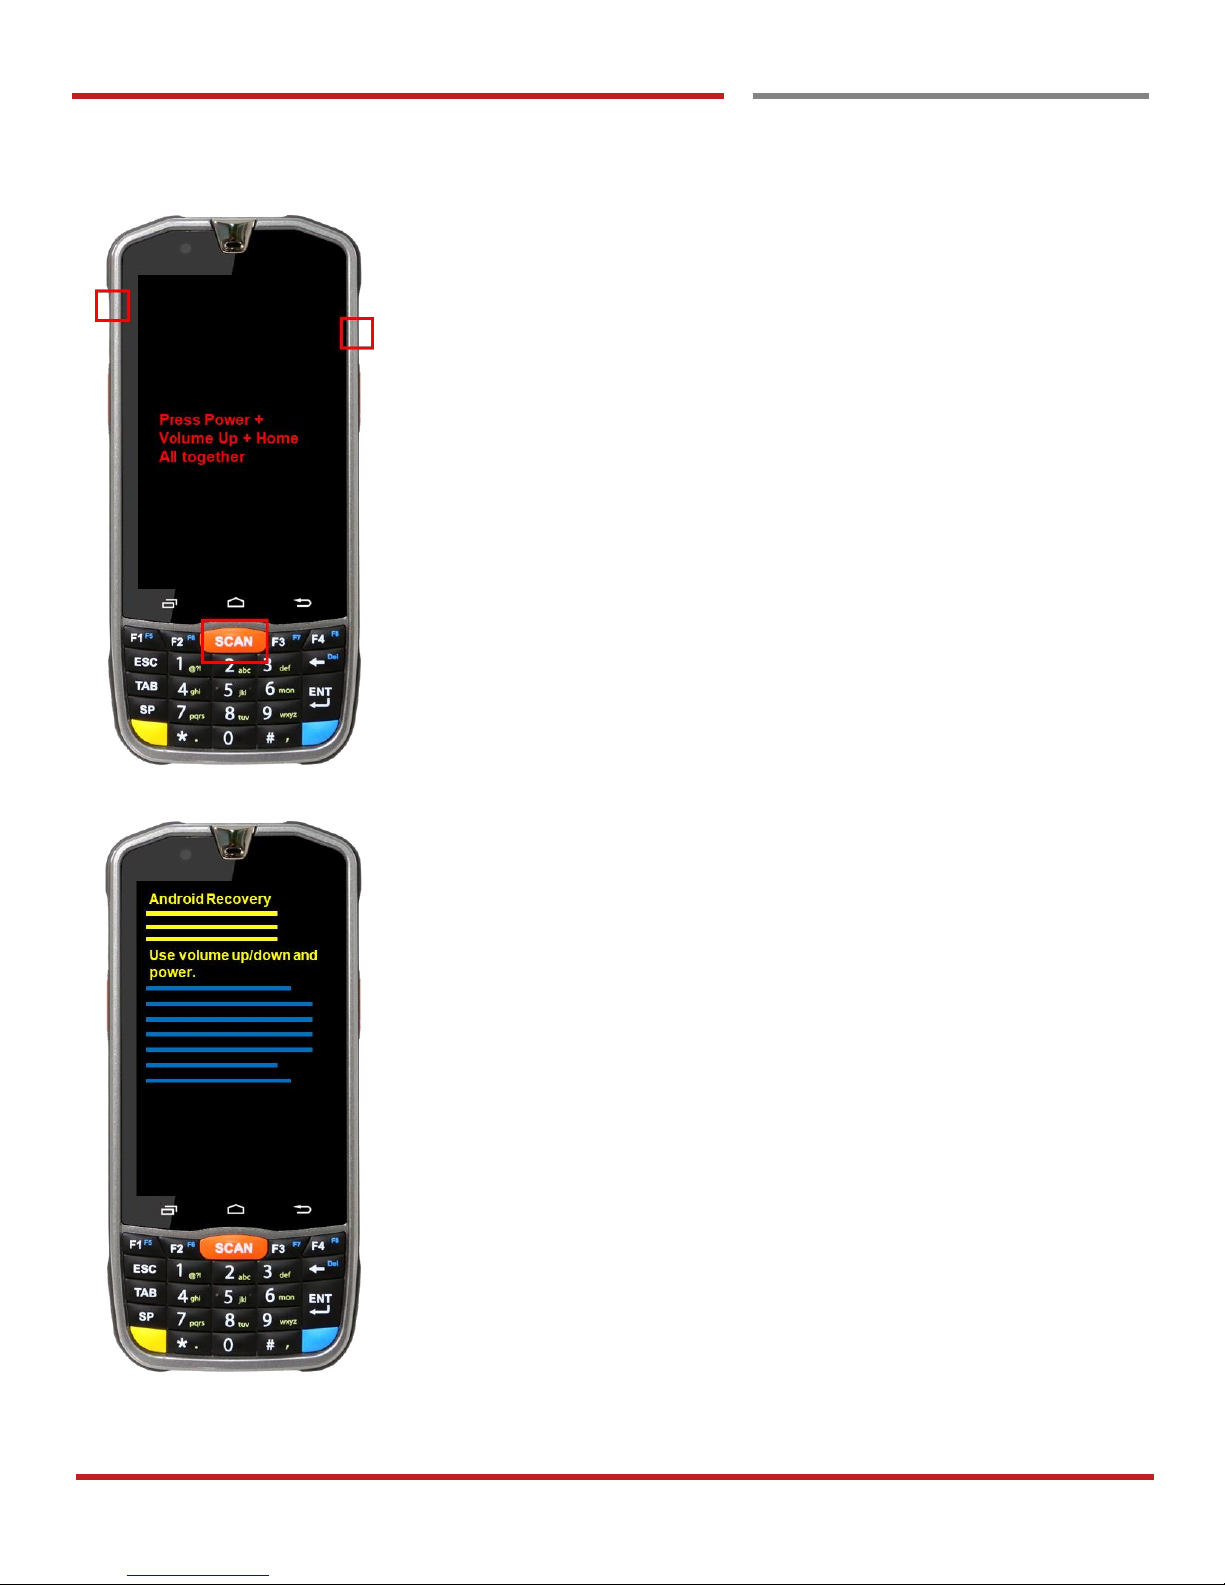
You can perform “force” factory data reset your PM66.
When your PM66 turned off, press “Power” + “Volume up” +
“Home” button all together. After short vibration from your
PM66, you may release the buttons.
PM66 enter to the “Android Recovery” mode. In this mode,
“Volume up” is “Move Up” in the menu tree and “Volume
down” is “Move Down” in the menu tree. “Power Button” is
“Select”
Page 46
PM66 Android 6.0.1 User Manual
45
©2006 – 2017 POINTMOBILE Co., Ltd. All rights reserved
Factory data Reset
Force Factory data reset
Factory data reset
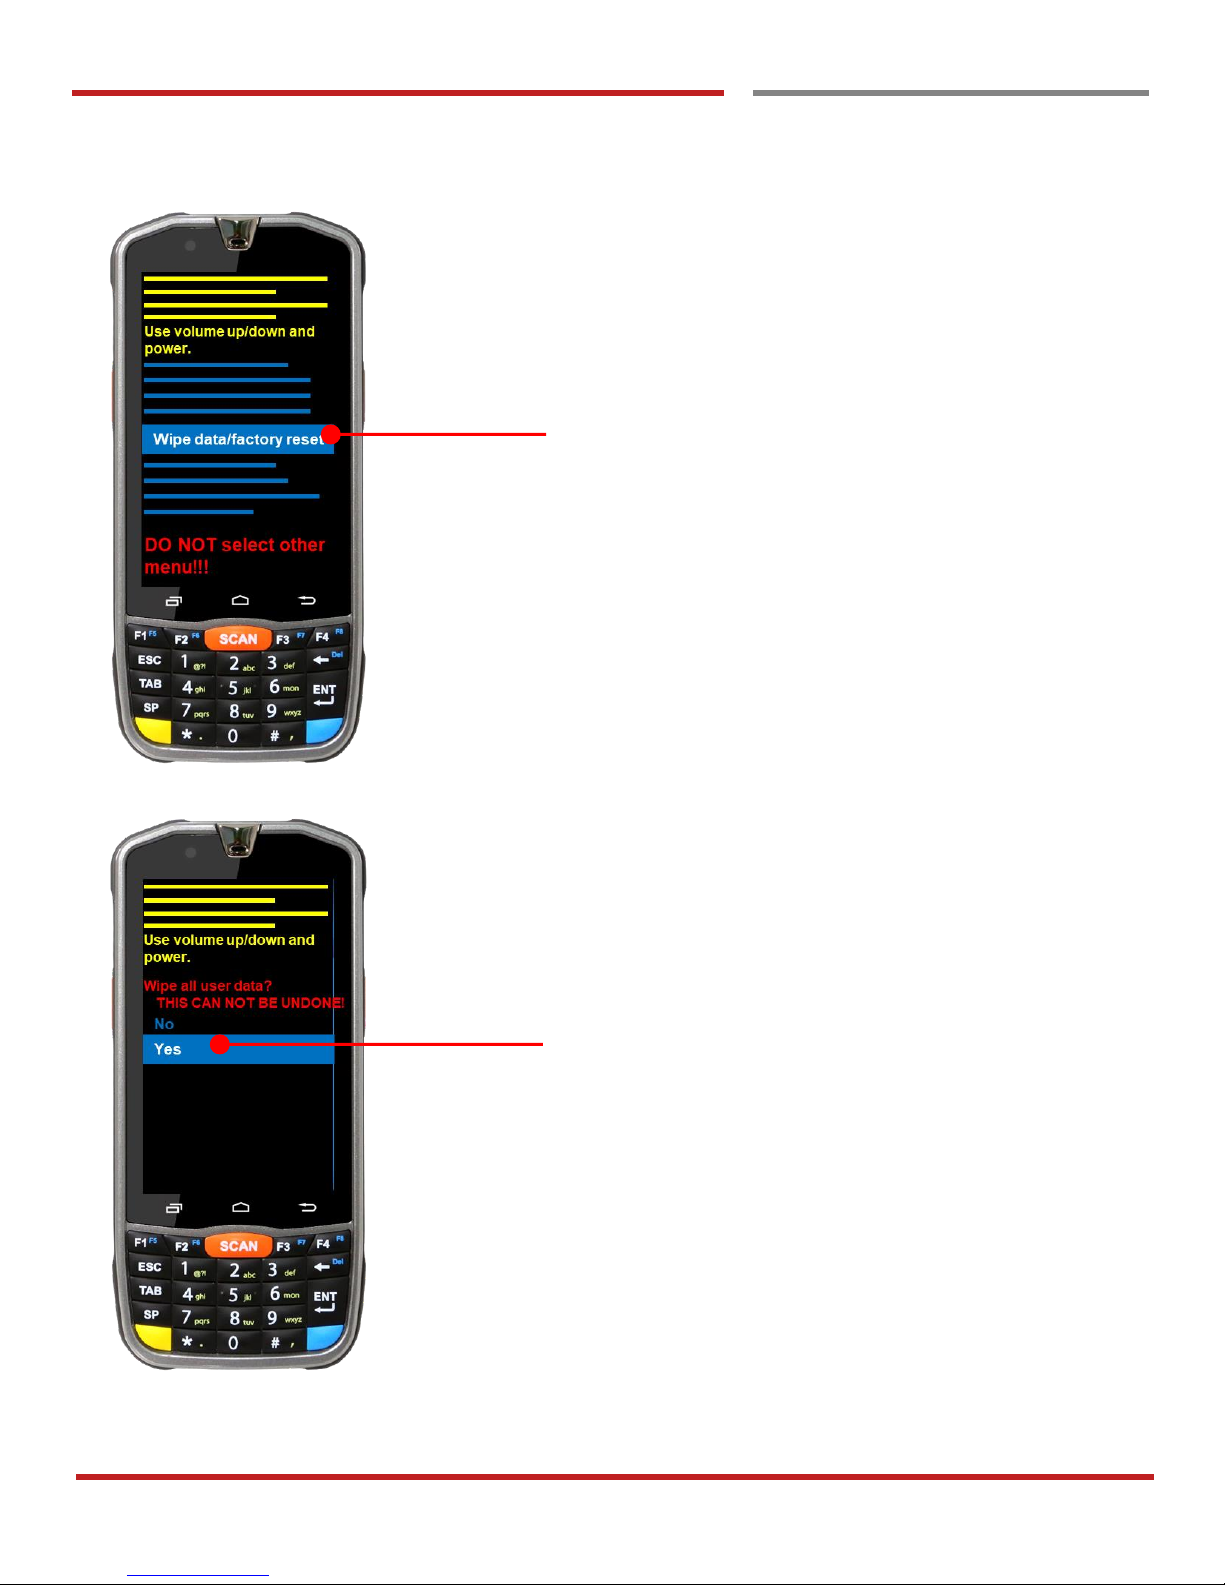
Select “Wipe data/factory reset”
Select “Yes” to perform the “Factory data reset”
After that, your PM66 start wiping the data
Page 47
PM66 Android 6.0.1 User Manual
46
©2006 – 2017 POINTMOBILE Co., Ltd. All rights reserved
Factory data Reset
Force Factory data reset
Factory data reset
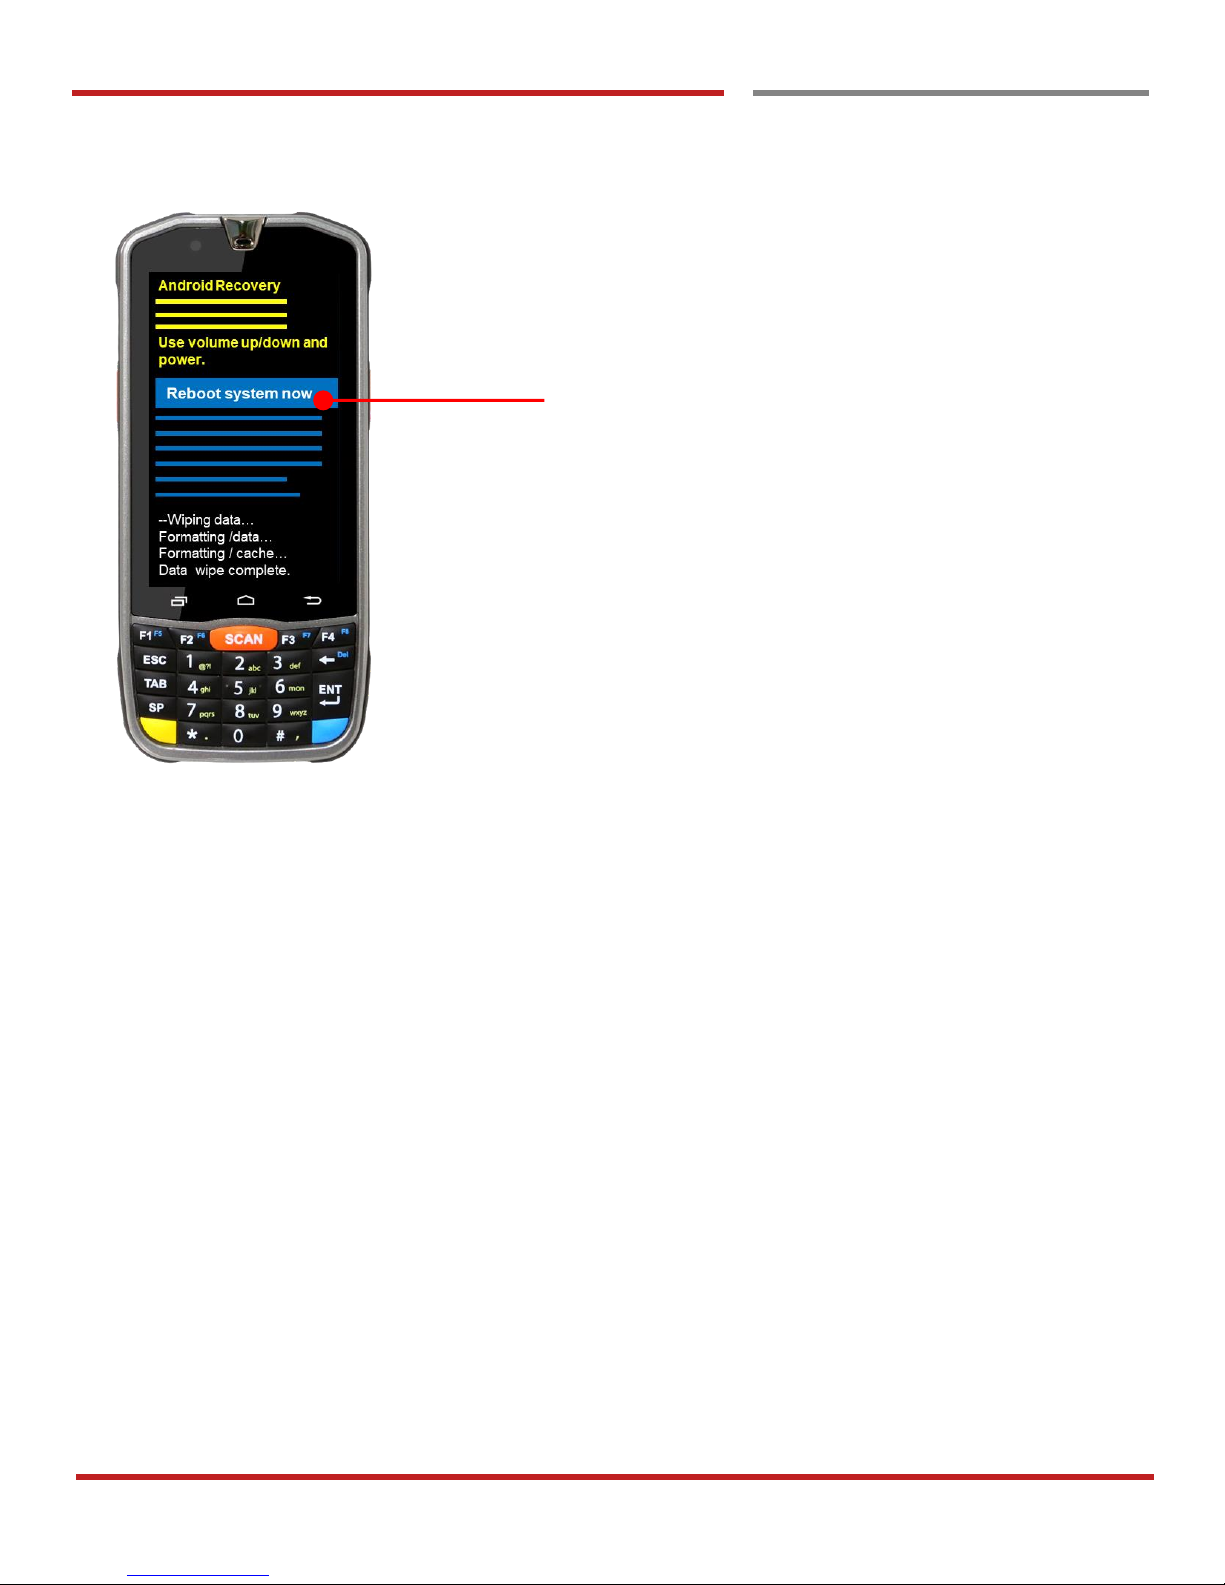
After data wiping, please select “Reboot system now” to
finish the “Force Factory data reset” process
Page 48
PM66 Android 6.0.1 User Manual
47
©2006 – 2017 POINTMOBILE Co., Ltd. All rights reserved
EmKit
Enterprise Mobility Kit
EmKit
Enterprise Mobility Kit – Truly, what Enterprise needs
Point Mobile announces new software solution – called “EmKit” is new software solution for enterprise mobility
users. Our every Android device shall have EmKit pre-installed and every use can access them for free of
charge*. EmKit offers truly-value-added advantages, for enterprise users, which are against consumer-centric
& non-customizable smartphones. Every solution in EmKit is 100% compatible with Point Mobile Android GMS
certified devices.
* Necessary MDM license subjects upon individual subscribers
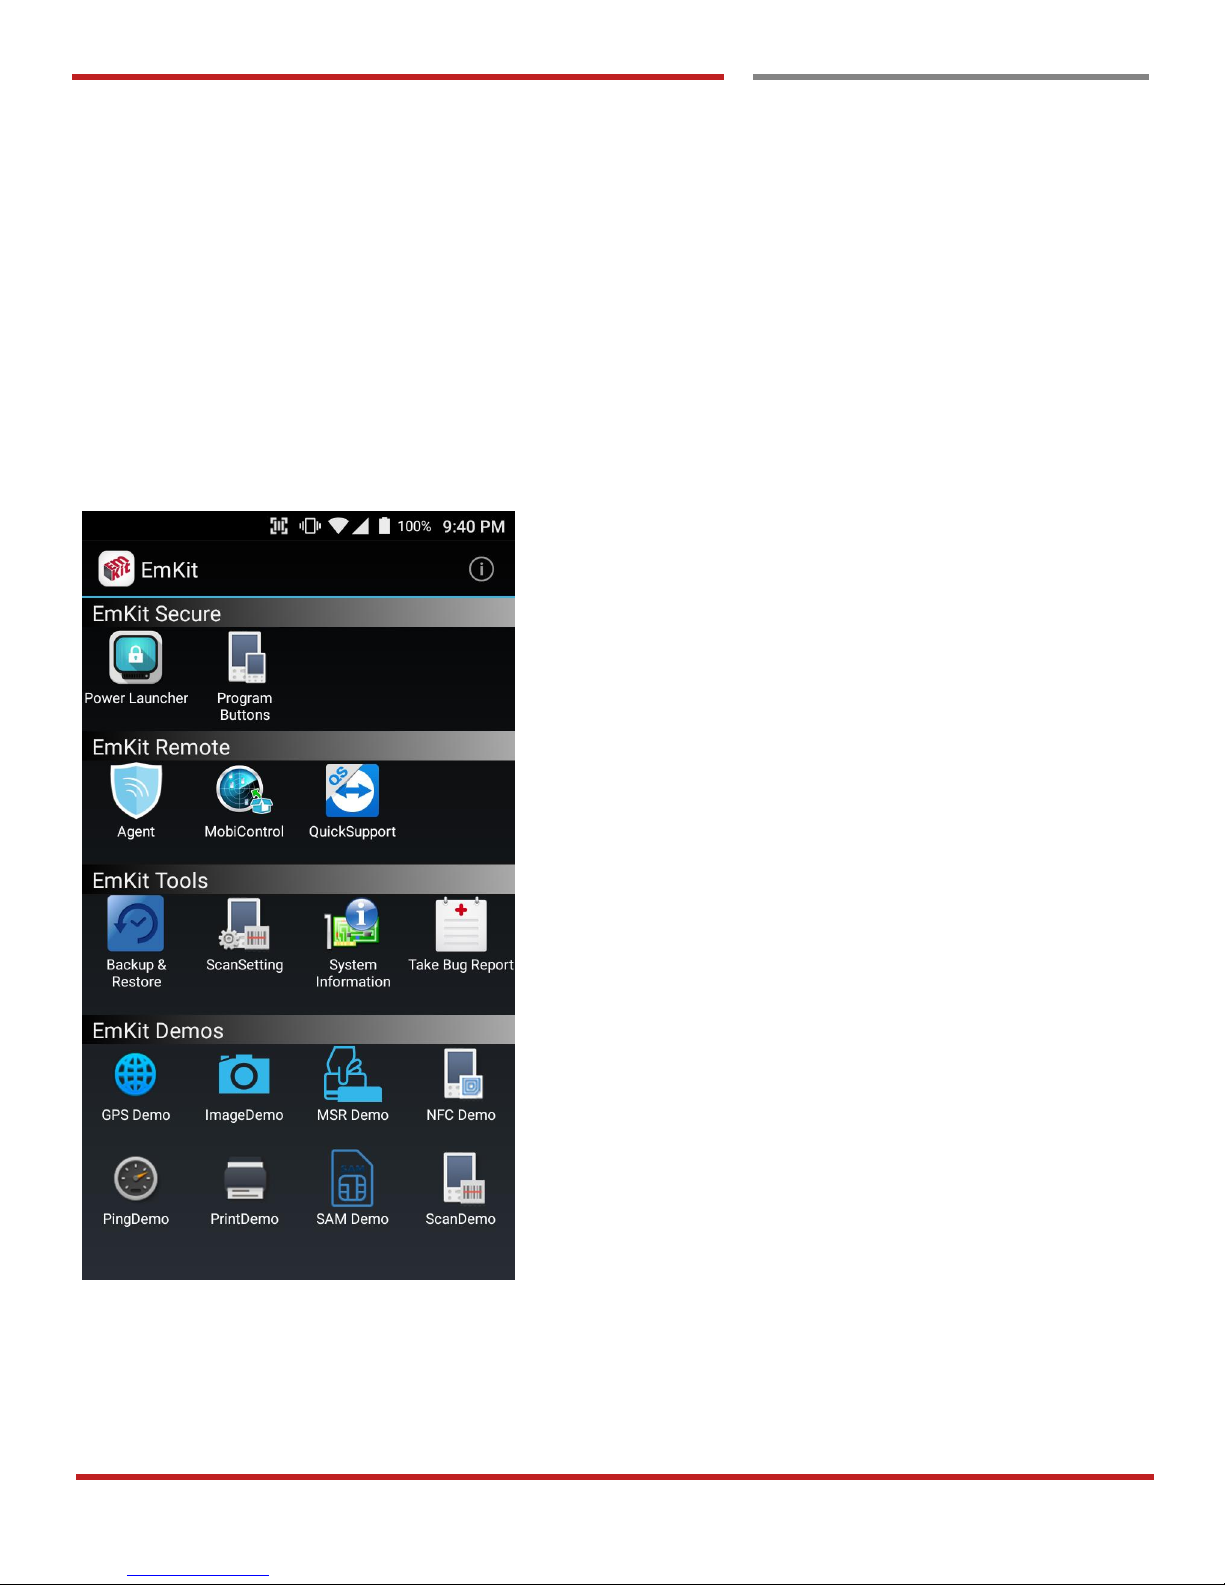
EmKit consist with “EmKit Secure”, “EmKit Remote”, “Emkit
Tools” and “EmKit Demos”
- EmKit Secure “Lock Your Device”
- EmKit Remote “Mobile Device Management”
- EmKit Tools “Smarty Tools Ease Enterprise”
- EmKit Demos “Friendly For Programmers”
Page 49
PM66 Android 6.0.1 User Manual
48
©2006 – 2017 POINTMOBILE Co., Ltd. All rights reserved
EmKit Secure
EmKit Secure
EmKit
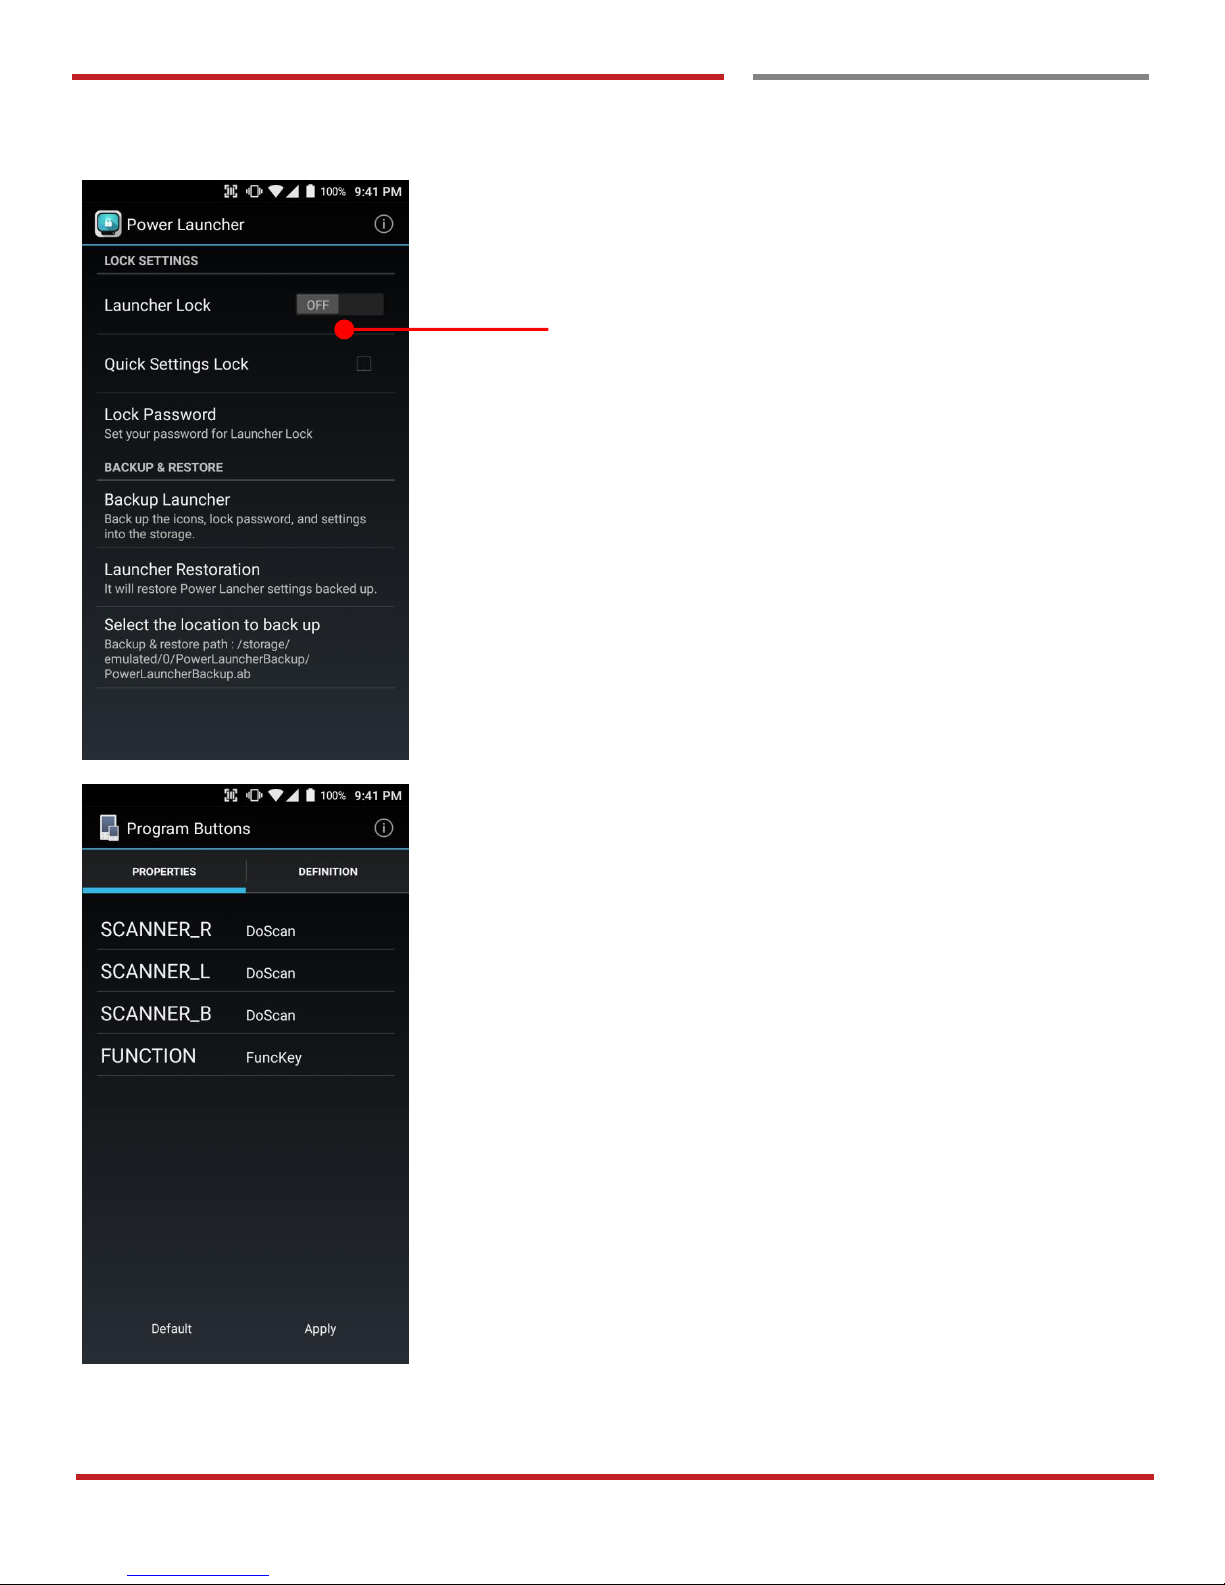
Power Launcher
You can lock your PM66’s “Home Screen” and limit to
access “Settings” from “Quick Setting” panel. This function
as known as “Kiosk” mode
Program Buttons
You can assign Hardware buttons function to rich preassigned functions.
Also you can applying the customized KCM file (Key
Character Map Files) here
Page 50
PM66 Android 6.0.1 User Manual
49
©2006 – 2017 POINTMOBILE Co., Ltd. All rights reserved
EmKit Remote
EmKit Remote
EmKit
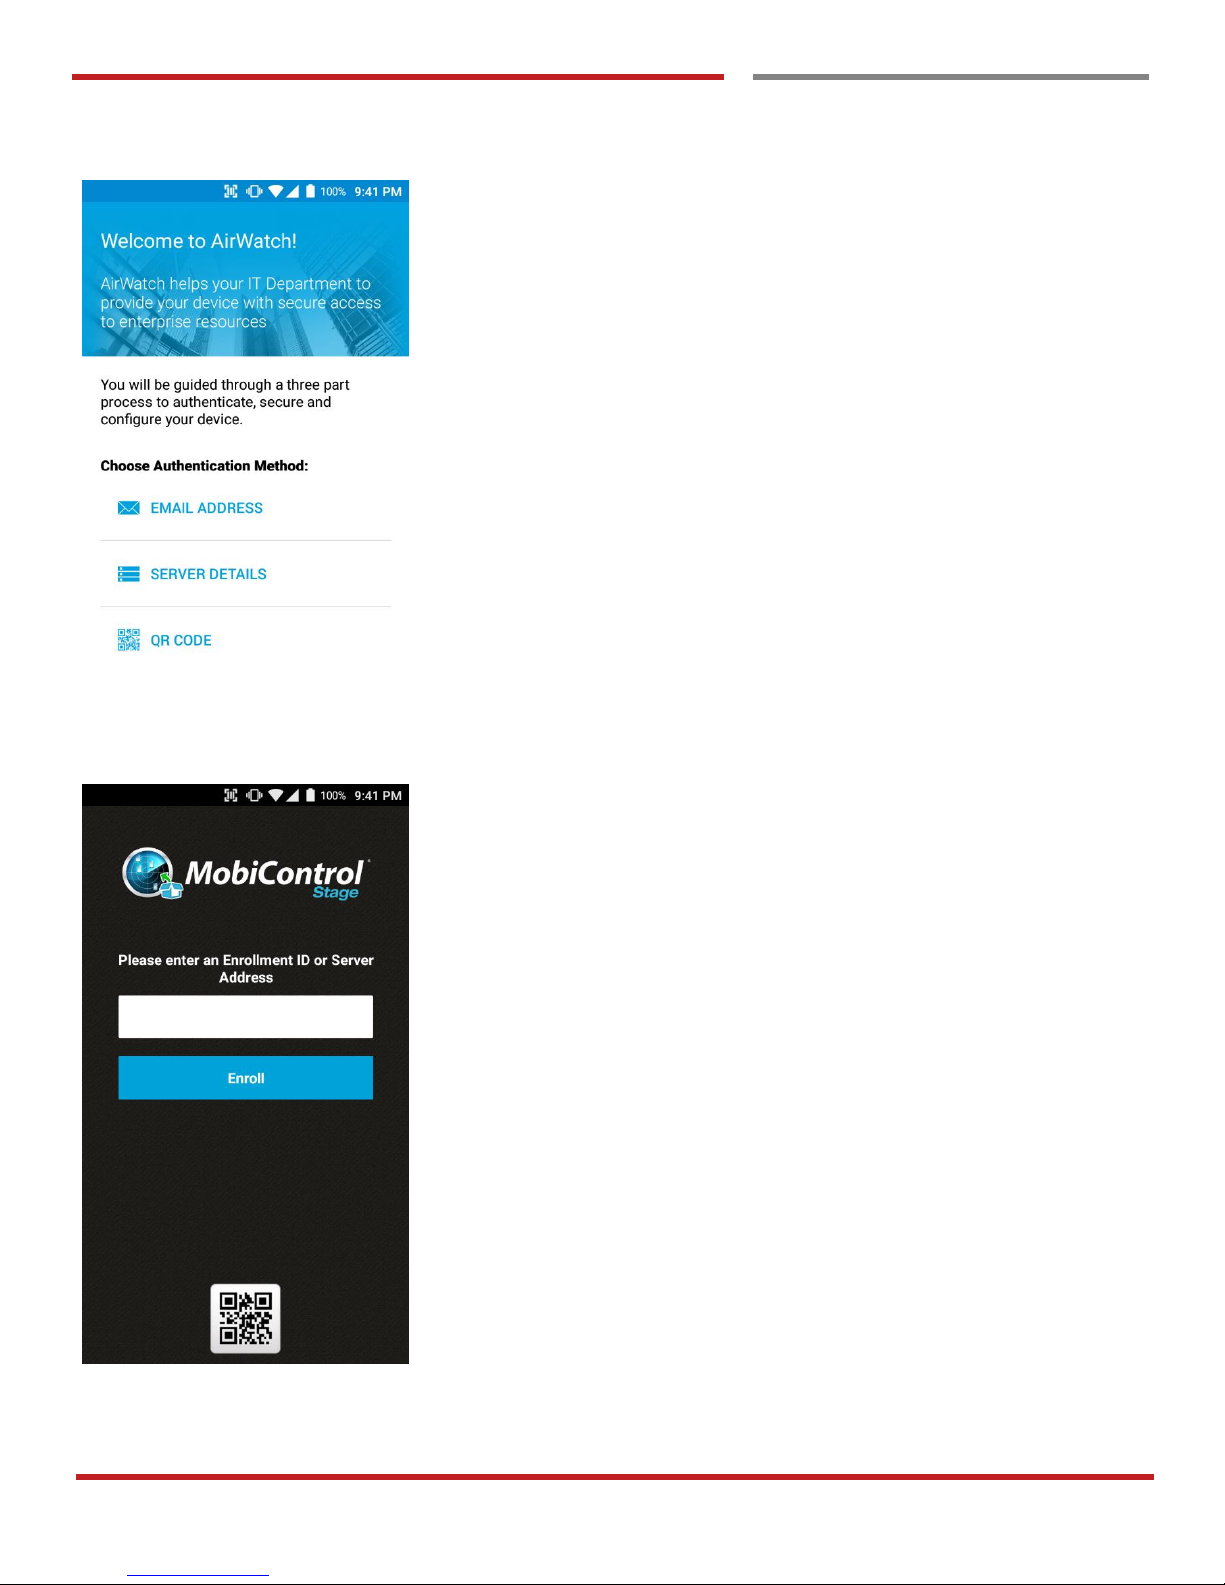
Airwatch Agent preinstalled.
Select option for enrollment process
SOTI Mobi Control preinstalled
Enter enrollment information for the next process
Page 51
PM66 Android 6.0.1 User Manual
50
©2006 – 2017 POINTMOBILE Co., Ltd. All rights reserved
EmKit Remote
EmKit Remote
EmKit
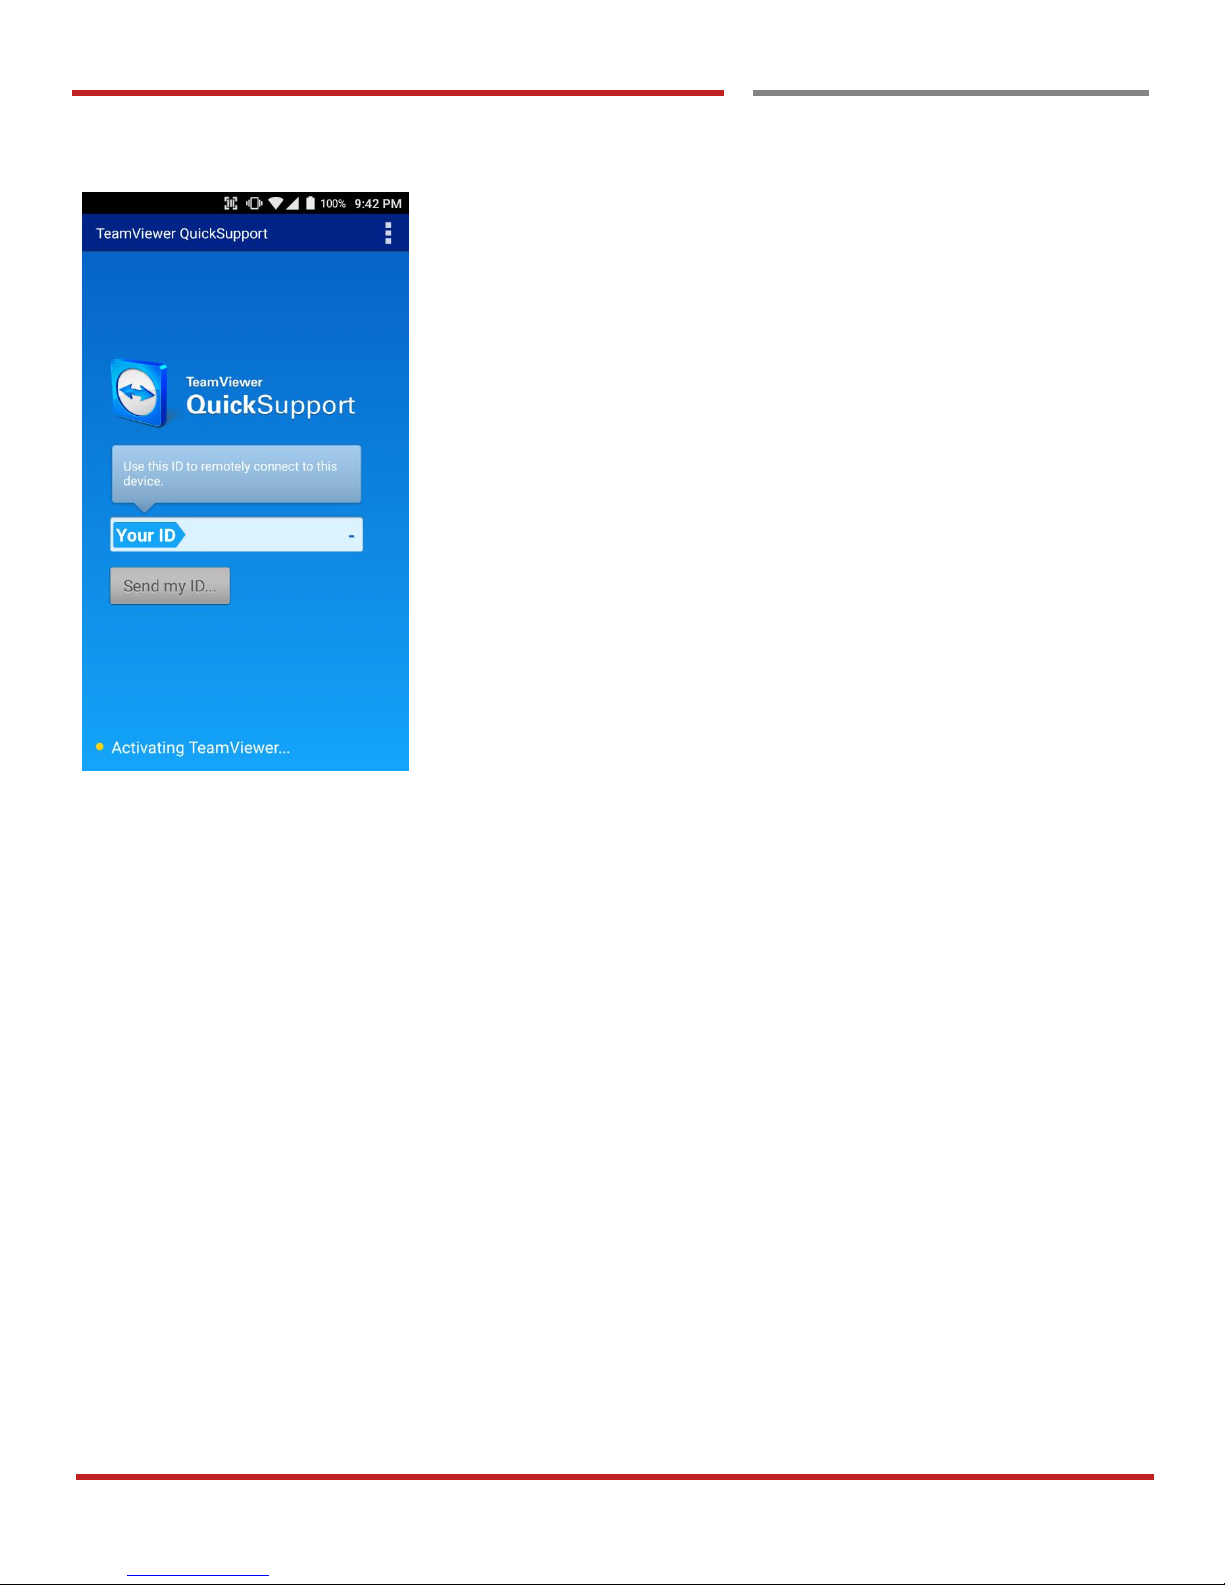
Teamviewer Quick Support App and Plugin, preinstalled.
You may need to purchase “Teamviewer” license during
remote access and control
Page 52
PM66 Android 6.0.1 User Manual
51
©2006 – 2017 POINTMOBILE Co., Ltd. All rights reserved
EmKit Tools
EmKit Tools
EmKit
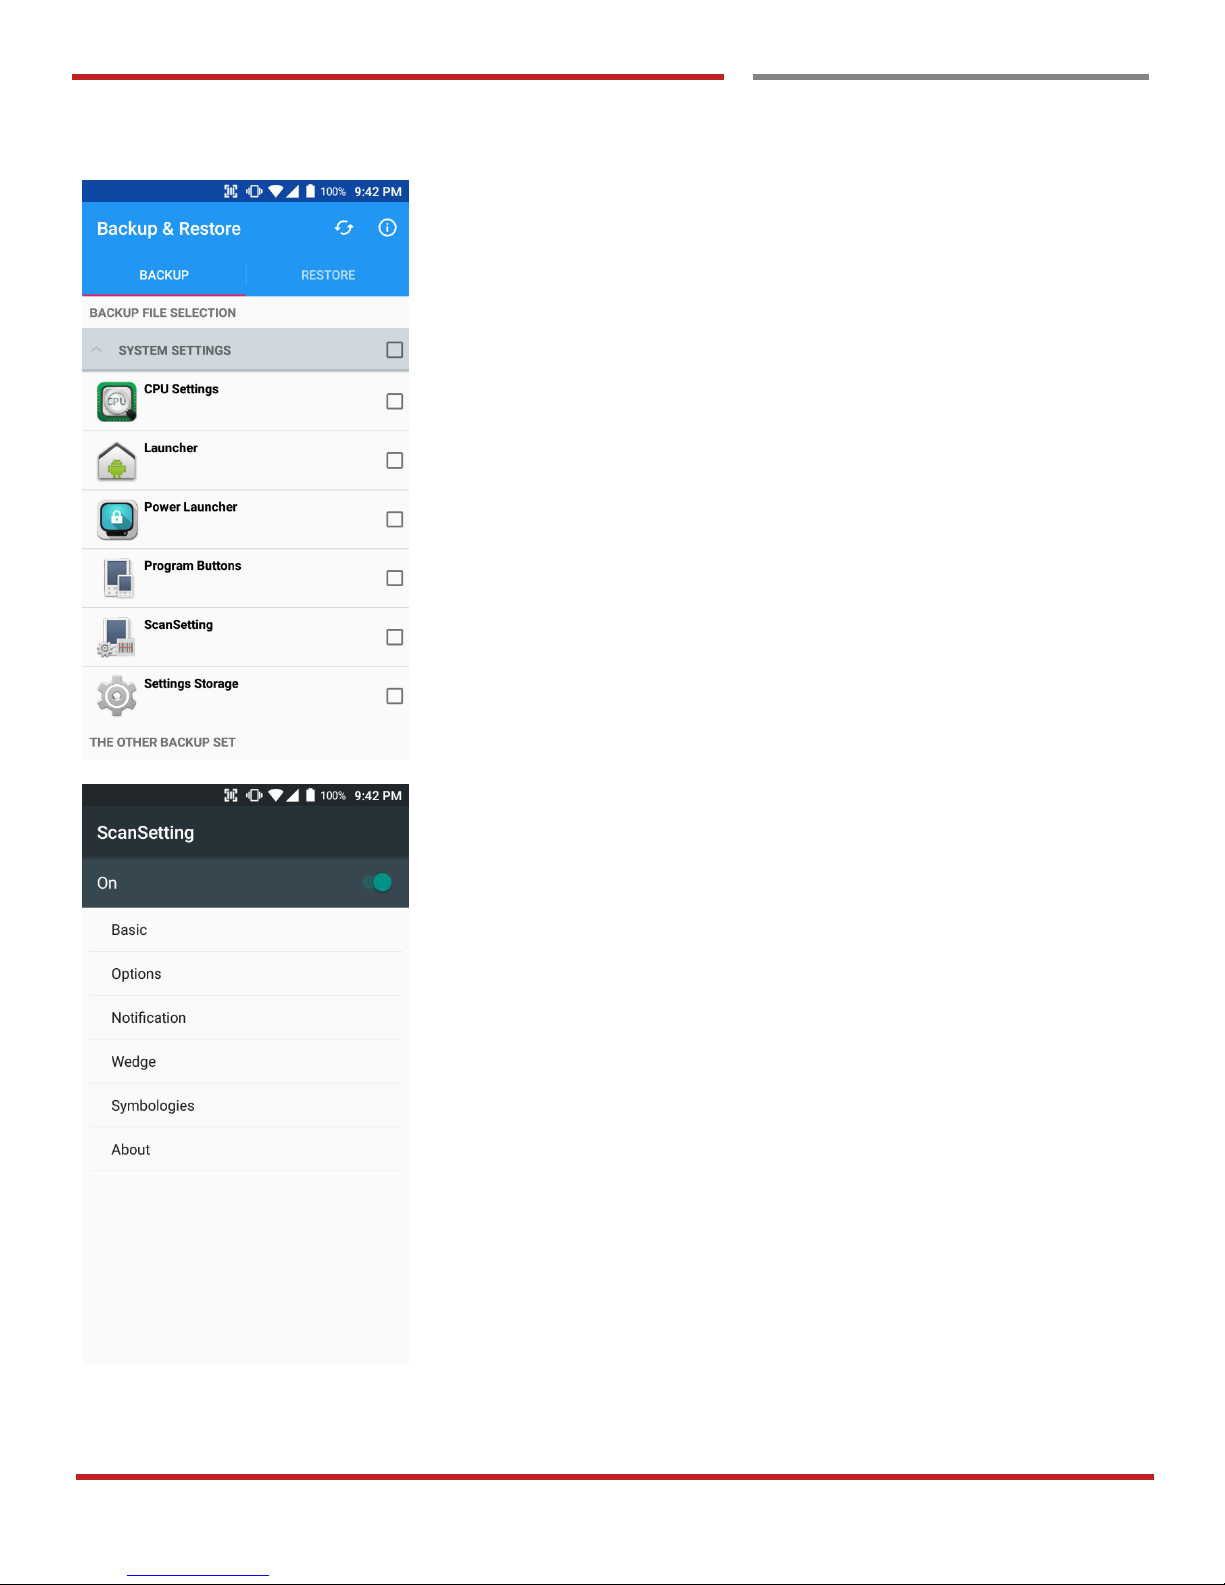
Backup & Restore
You can create the “Golden sample” and then “Restore” I to
other PM66 easily
ScanSetting
You can set your PM66’s scanner option with intuitive menu
Page 53
PM66 Android 6.0.1 User Manual
52
©2006 – 2017 POINTMOBILE Co., Ltd. All rights reserved
EmKit Tools
EmKit Tools
EmKit
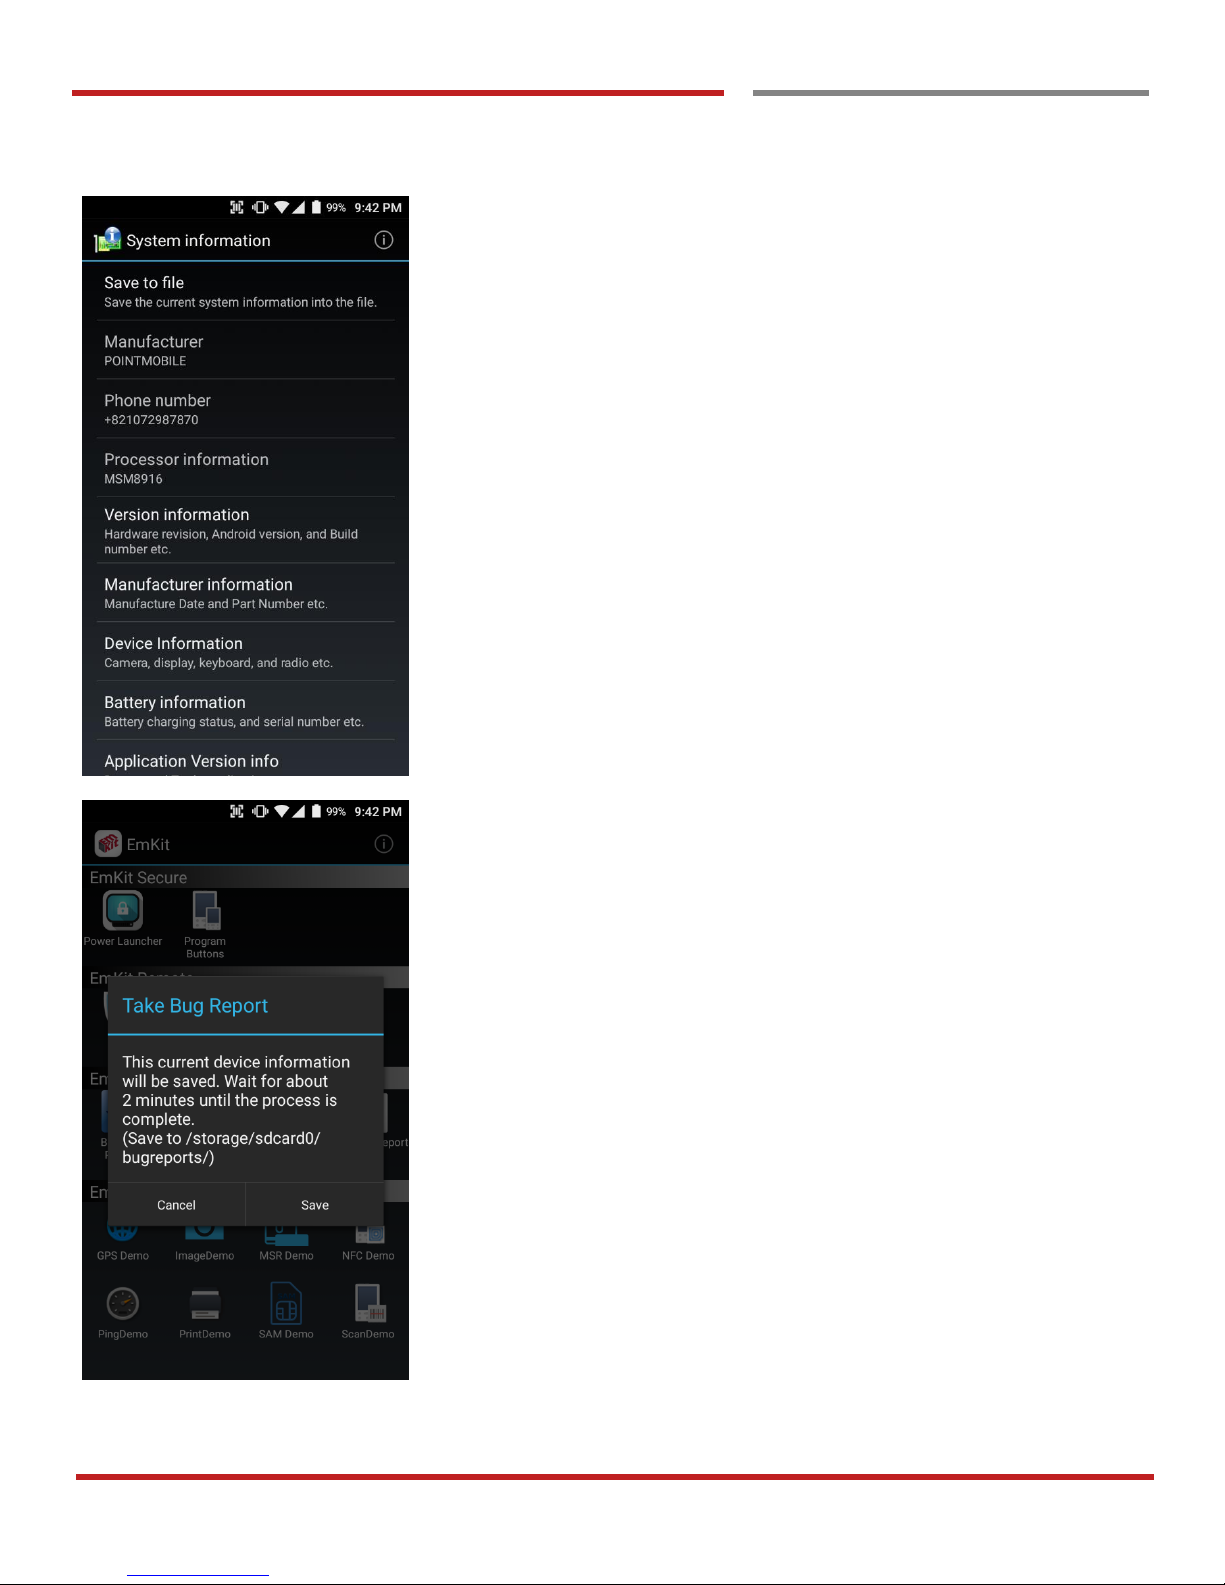
System information
All of SW and HW information available here and can save it
to the file.
- Touch “Save to file”
- devinfo.html file saved to root folder of the internal
storage.
Take Bug Report
This function save logs and event to the internal storage.
When you have a field issue, and need to contact service
center, please find the reproduce step first.
- Reproduce the issue.
- After issue, reproduce, please run “Take bug report”
- File will be saved to “bugreports” folder.
- Copy the file to the PC and then zip it to reduce the
file size
- Share bug report file to the service center with
“reproduce” steps.
Page 54

POINT MOBILE. CO., LTD.
Offline
Tel: +82-2-3397-7870~1
ARS: 1800-3010
Fax: +82-2-3397-7872
Address: B-9F Kabul Great Valley, 32, Digital-ro 9-gil,
Geumcheon-gu, Seoul, Korea 08512
Copyright © 2006-2017 Point Mobile Co., Ltd. All rights reserved. Point Mobile Co., Ltd. is the designer and manufacturer of handheld mobiles.
Point Mobile Co., Ltd. Logo are registered trademarks and symbols of Point Mobile Co., Ltd. Features and specifications are subject to change without prior notice.
Online
Website: http://www.pointmobile.co.kr/
E-mail: [email protected]
 Loading...