

Page 1
CONTENTS
BLUETOOTH SCANNER
PM3
PM3
User Guide
Page 2

2
1. INTRODUCTION ··························································································· 3
About the PM3 Bluetooth Scanner ···························································· 3
Accessories ···························································································· 3
2. SAFETY REGULATIONS ·················································································· 4
2.1. General Safety Rules ········································································· 5
2.2. Power Supply ·················································································· 5
2.3. Laser Safety ···················································································· 6
2.4. LED Safety······················································································ 7
2.5. CB Scheme ····················································································· 7
2.6. Radio Compliance ············································································· 7
2.7. WEEE Compliance············································································· 8
3. GETTING STARTED ························································································ 9
3.1. Charge the Device ··············································································· 9
3.2. LED Indicators ···················································································· 9
3.3. Turn Your Device On ·········································································· 10
3.4. Turn Your Device Off ·········································································· 10
4. GET TO KNOW YOUR DEVICE ········································································· 10
4.1. Feature of Your Device ···································································· 10
4.2. PM3 Bluetooth scanner ···································································· 10
4.3. Front Panel Layout ·········································································· 11
4.4. Back Panel Layout ·········································································· 12
4.5. Left Side Panel Layout ····································································· 12
4.6. Top Panel Layout ··········································································· 13
4.7. Bottom Panel Layout ······································································· 13
4.8. USB Cable ···················································································· 14
4.9. Battery Power ················································································ 14
4.10. Resetting the Terminal ····································································· 14
4.11. Sleep Mode ··················································································· 14
4.12. PM3 Technical Specifications ····························································· 14
5. USING THE KEYS ························································································· 15
5.1. Scan Key ······················································································ 16
5.2. Up Key ························································································ 16
5.3. Down Keys ··················································································· 16
6. USING THE IMAGE ENGINE ··········································································· 16
6.1. Overview ······················································································ 16
6.2. Available Image Engines ·································································· 17
6.3. Depth of Field ················································································ 18
6.4. Supported Bar Code Symbologies ······················································· 18
6.5. To Decode a Bar Code ····································································· 19
6.6. Sample Bar Codes ·········································································· 19
7. USING THE LASER/CCD ENGINE ···································································· 19
7.1. Overview ······················································································ 19
Page 3

3
7.2. Available Laser Engines ···································································· 19
7.3. Depth of Field ················································································ 20
7.4. Supported Bar Code Symbologies ······················································· 21
7.5. Decoding a Bar Code ······································································· 22
7.6. Sample Bar Code ············································································ 22
7.7. Scanning Positions ·········································································· 22
8. BLUETOOTH ································································································ 23
8.1. Enabling the Bluetooth ····································································· 23
8.2. Pairing Bluetooth Devices ································································· 23
9. CONNECTING PM3 WITH SMARTPHONE ·························································· 23
10. RECONNECTING HID ···················································································· 24
11. PM3 USER'S MENU AND FUNCTIONS ······························································ 24
12. PM3 ADMINISTRATOR'S MENU AND FUNCTIONS ············································· 25
13. FUNCTION OF THE KEYS ··············································································· 28
14. INITIALIZING THE MEMORY ········································································· 28
15. USING THE USB MEMORY IN CONNECTION WITH PC ········································ 28
16. TROUBLE SHOOTING AND NOTE ···································································· 29
Page 4
4
1. Introduction
Thank you for purchasing PM3 Bluetooth Scanner.
This manual generally provides you with the safety information and basic features and operations of
the PM3 device. Please read all safety precautions and this manual carefully before using your device
and peripherals to ensure safe and proper use.
About PM3 Bluetooth Scanner
The new PM3 is the latest generation Bluetooth scanner, combining a pocket sized form factor.
The PM3 is designed for retail warehousing and logistics applications where maximum performance
and durability is required in compact Handheld device.
The PM3 is available in different models depending on the options.
Accessories
Power Supply
AC Adaptor
INPUT: AC100~240V 50/60Hz, OUTPUT: DC5V 0.7A Power Supply
Cables
Packed with the Power Supply
Others
Customized necklace String (when requested)
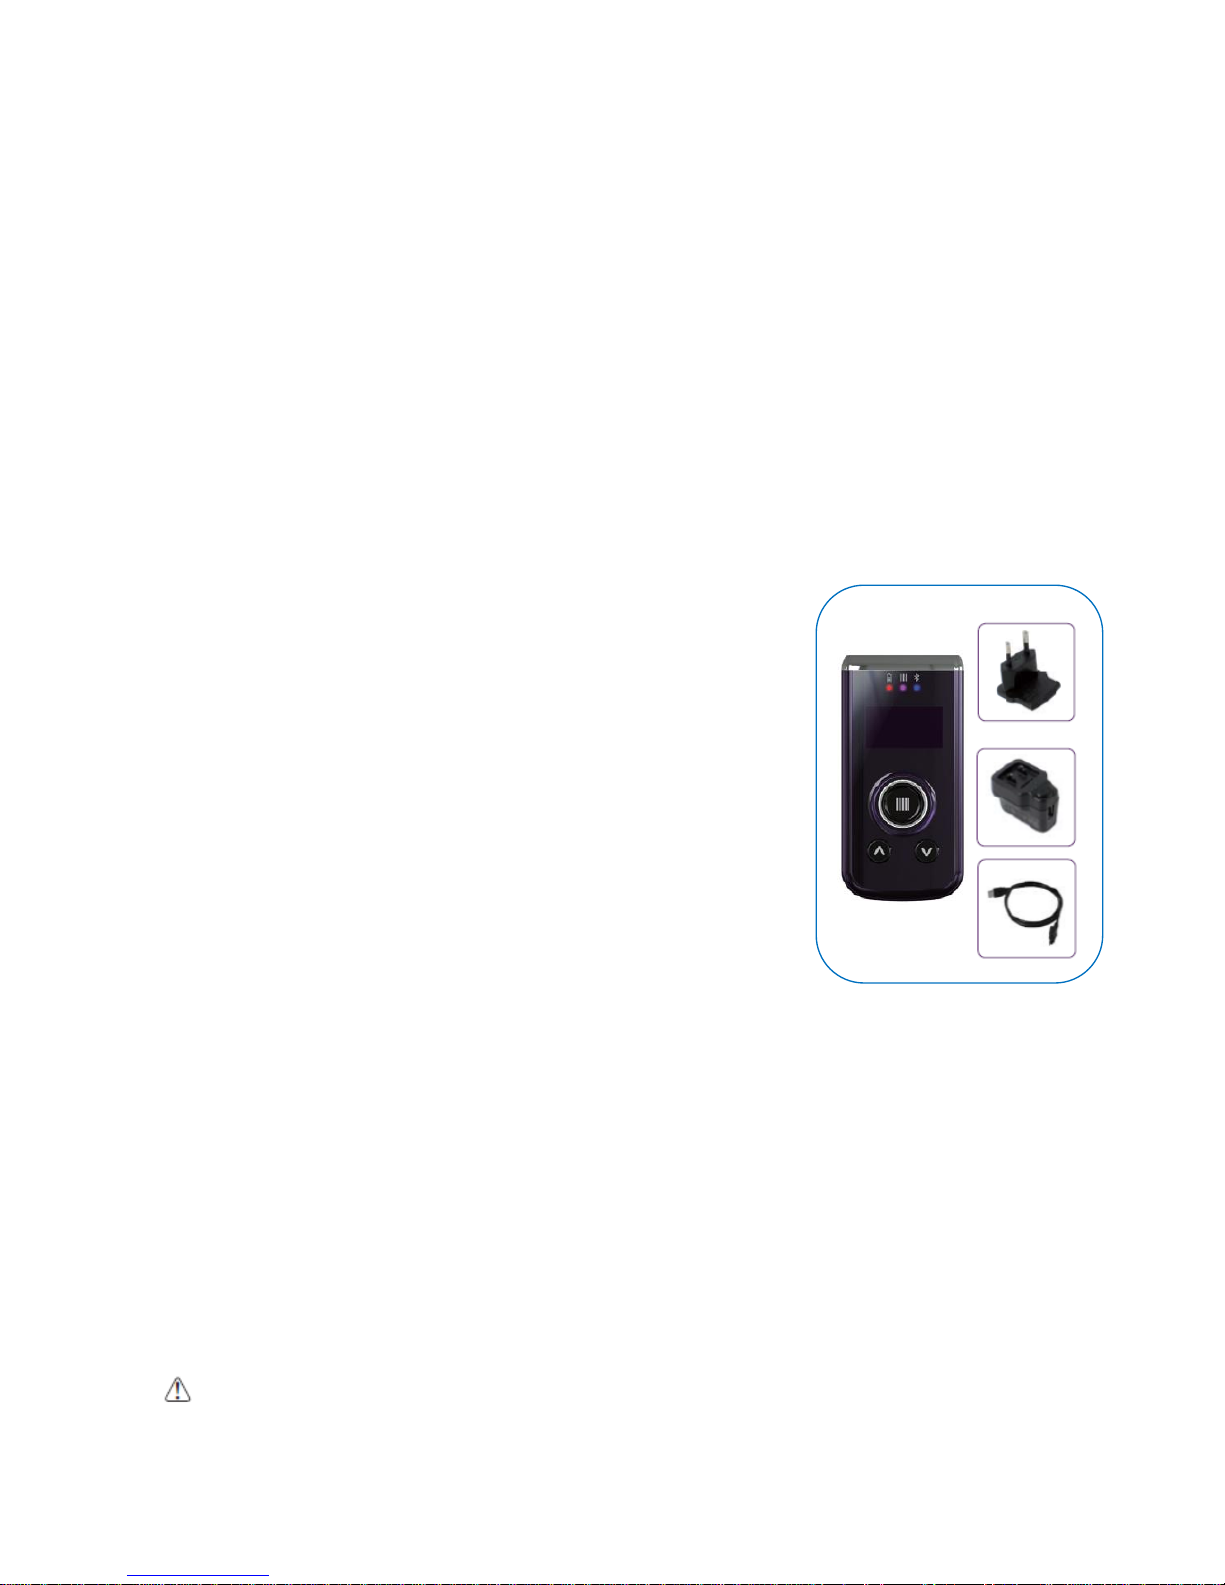
PM3 Bluetooth Scanner contains the following items basically:
• Bluetooth scanner
• 5V/0.7A AC Adaptor with USB Cable
• AC Plugs
☞NOTE: Keep the original packaging for use when sending products to the technical assistance center. Damage
caused by improper packaging is not covered under the warranty
2. Safety Regulations
Symbols in this manual
In this manual, some important items are described with the symbols shown below. Be sure to read
these items before using this equipment.
WARNING
Indicates a potentially hazardous situation which, if not avoided, could result in death
serious injury, or serious damage, or fire in the equipment or surrounding objects.
Page 5

5
AVERTISSEMENT Le terme AVERTISSEMENT indique une situation potentiellement dangereuse qui, si elle n'est pas
évitée, peut entraîner la mort, des blessures graves, des dommages importants ou l'incendie d’objets et biens d’équipement
environnants.
CAUTION
Indicates a potentially hazardous situation which, if not avoided, may result in minor or moderate
injury, partial damage to the equipment or surrounding objects, or loss of data.
ATTENTION Le terme ATTENTION indique une situation potentiellement dangereuse qui, si elle n'est pas évitée, peut
entraîner des blessures mineures ou modérées, des dégâts partiels à l'équipement, aux objets environnants ou la perte de
données.
☞NOTE
Indicates information to which you should pay attention when operating the equipment.
This section outlines the safety precautions associated with using PM3 Bluetooth scanner.
☞NOTE: PM3 Bluetooth scanners meet or exceed the requirements of all applicable standards organizations for safe
operation. However, as with any electrical equipment, the best way to ensure safe operation is to read this manual
carefully before performing any type of connection to the Bluetooth scanner and operate them according to the agency
guidelines described in the manual.
General Safety Rules
CAUTION
Use only the components supplied by the manufacturer for the specific PM3 being used.
Do not attempt to disassemble the PM3 Bluetooth scanner, as it does not contain parts that can
be repaired by the user. Any tampering will invalidate the warranty.
When replacing the battery or at the end of the operative life of the PM3 Bluetooth scanner,
disposal must be performed in compliance with the laws in force in your country.
Before using the devices, read this manual carefully.
Do not submerge the PM3 Bluetooth scanner in liquid products.
CAUTION
ATTENTION
Utilisez uniquement les composants fournis par le fabricant pour l’utilisation du PM3.
Ne tentez pas de démonter le PM3. Ce produit ne contient aucune pièce ne pouvant être réparée par l'utilisateur. Toute
manipulation fera perdre la garantie au produit.
Lors du remplacement de la batterie ou en fin de vie du terminal portatif PM3, l'élimination et le recyclage doit être effectuée
en conformité avec les lois en vigueur dans votre pays.
Avant d'utiliser les appareils et les batteries, lire attentivement ce manuel.
Ne pas plonger le PM3 dans des produits liquides.
Power Supply
The power supply for this device has met applicable FCC/CE/CCC/UL /safety requirements.
Please adhere to the following safety instructions per UL guidelines:
• FAILURE TO FOLLOW THE INSTRUCTIONS OUTLINED MAY LEAD TO SERIOUS PERSONAL
INJURY AND POSSIBLE PROPERTY DAMAGE.
• IMPORTANT SAFETY INSTRUCTIONS – SAVE THESE INSTRUCTIONS.
WARNING
• DANGER – TO REDUCE THE RISK OF FIRE OR ELECTRIC SHOCK, CAREFULLY FOLLOW THESE
INSTRUCTIONS.
Page 6
6
WARNING
AVERTISSEMENT
DANGER - POUR RÉDUIRE LES RISQUES D'INCENDIE OU DE CHOC ÉLECTRIQUE, VEUILLEZ SUIVRE
ATTENTIVEMENT CES INSTRUCTIONS.
Use only Pointmobile-approved power supply. Use of a non-Pointmobile-approved power supply may
be dangerous and the warranty does not cover damage to the device caused by non-Pointmobileapproved power supply. The package includes international AC plugs. The AC plugs must be plugged
in the power supply before the power supply itself is plugged on the wall outlet. The power supply is
intended to be correctly oriented in a vertical or horizontal or floor mount position.
N'utilisez que l'alimentation fournie et approuvée par Pointmobile. L'utilisation de toute autre alimentation peut être
dangereuse. La garantie ne couvre pas les dommages causés à l'appareil par une autre alimentation que celle fournie par
Pointmobile. L’alimentation est livrée avec des adaptateurs AC pour les différentes prises Internationales. Ces prises
adaptateur doivent être installées à l'alimentation électrique avant que cette dernière soit elle-même branchée sur la prise
murale. L'alimentation est destinée à être orientée en position verticale ou horizontale.
Laser Safety
CAUTION
A Class 2 laser is safe because the blink reflex limit the exposure to no more than 0.25 seconds. It
only applies to visible-light lasers (400–700 nm). Class-2 lasers are limited to 1mW continuous wave,
or more if the emission time is less than 0.25 seconds or if the light is not spatially coherent. Although
staring directly at the laser beam momentarily causes no known biological damage, avoid staring at
the beam as one would with any very strong light source, such as the sun. Avoid that the laser beam
hits the eye of an observer, even though reflective surfaces such as mirrors, etc.
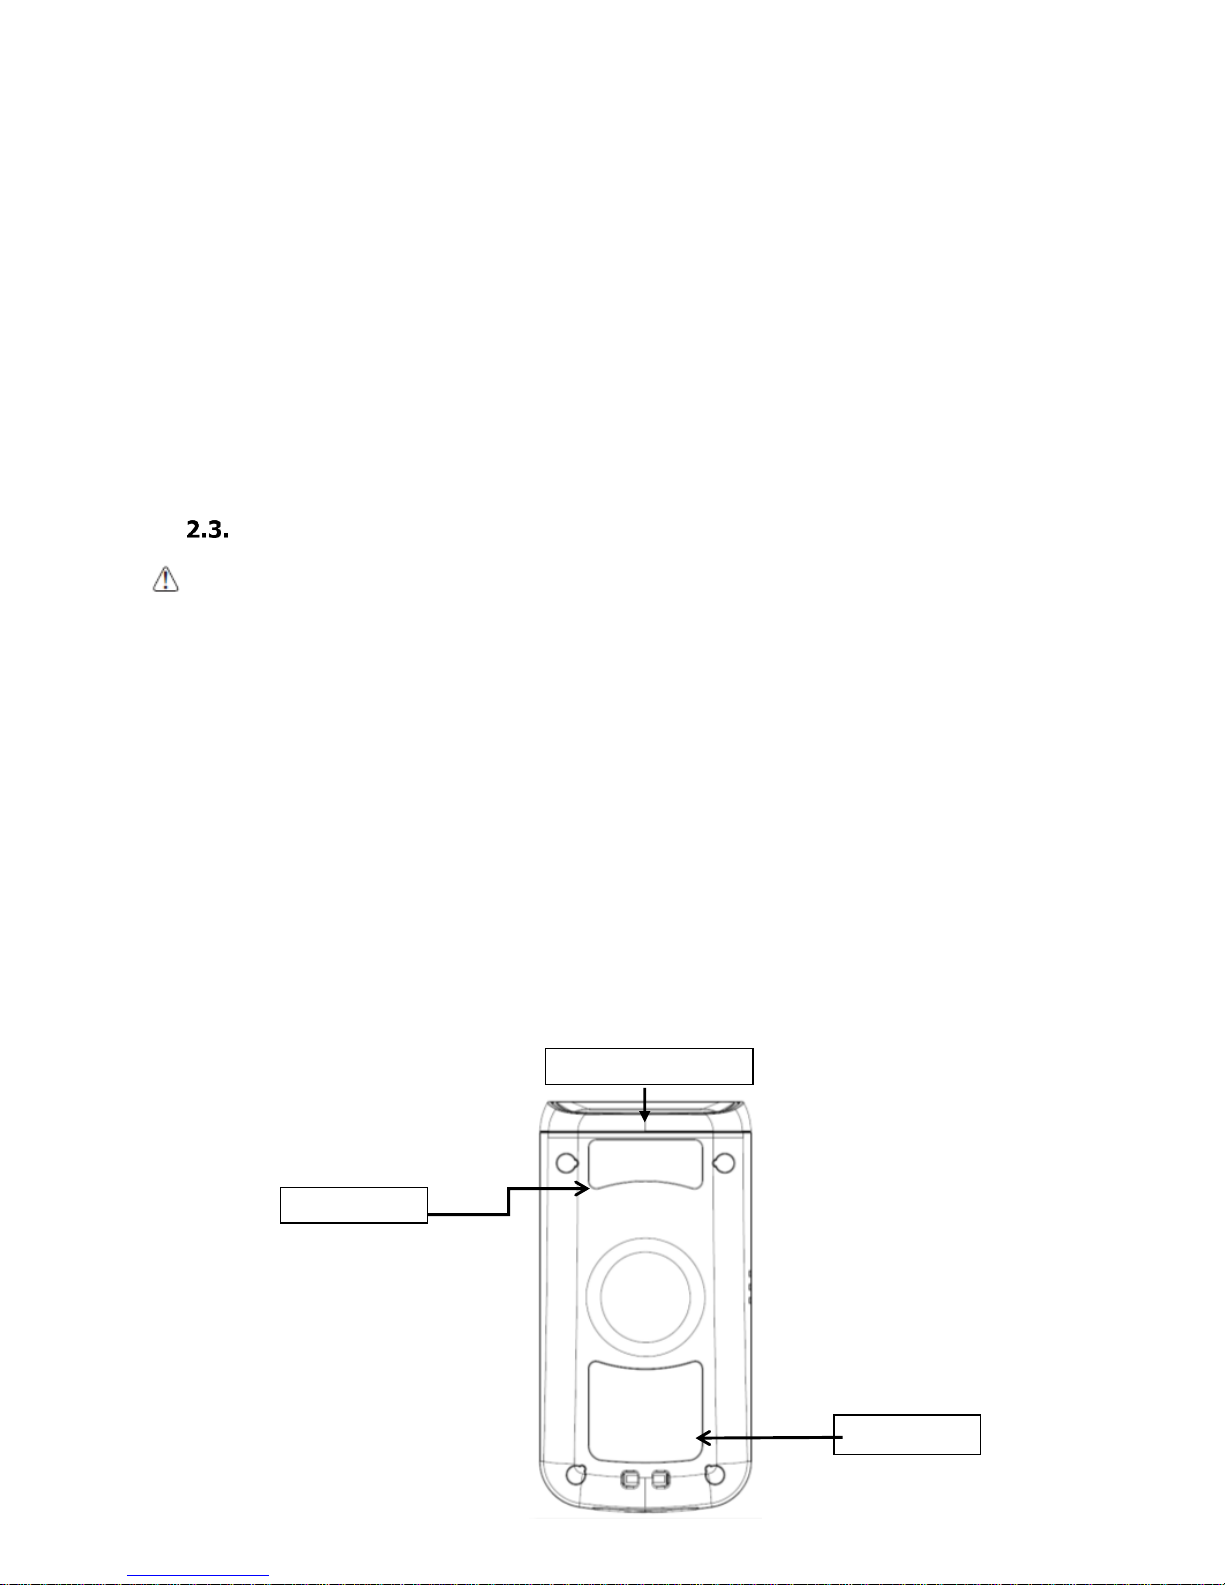
The laser light is visible to the human eye and is emitted from the window indicated in the figure.
ATTENTION
Un laser de classe 2 reste inoffensif pour les yeux. Le réflexe de clignement de l’œil limite l'exposition à 0,25 secondes au
plus. Ceci s’applique uniquement aux lasers de lumière visible (400-700 nm). Les Lasers de Classe 2 sont limités à 1 mW
(onde continue), ou davantage si le temps d'émission est inférieur à 0,25 secondes ou encore si la lumière n'est pas
cohérente dans l'espace. Bien que le fait de regarder directement le faisceau laser ne cause pas de dommage biologique
momentané, il est conseillé d’éviter de regarder le faisceau ainsi que n'importe quelle source de lumière très forte, comme
le soleil. Évitez également que le faisceau laser frappe l'œil d'un observateur, ainsi que toutes surfaces réfléchissantes
environnantes, telles que des miroirs, etc
La lumière laser est visible pour l'œil humain et est émise à partir de la fenêtre indiquée sur la figure.
Laser output window
S/N label
Caution Label
Page 7

7
If the above laser light label is attached to your device, it indicates the product contains a
laser engine or laser aimer that emits the laser light. The following information is provided to
comply with the rules imposed by international authorities and refers to the correct use of
PM3 Bluetooth scanner.
Laser Safety Statement
This product has been tested in accordance with and complies with CDRH 21 CFR 1040.10 and
1040.11 and IEC 450825-1 Ed 2 (2007) except for deviations pursuant to Laser Notice No 50, dated
June 24, 2007. LASER LIGHT. DO NOT STARE INTO BEAM. CLASS 2 LASER PRODUCTS. 1 mW MAX
OUTPUT: 650nm.
For installation, use and maintenance, it is not necessary to open the device.
WARNING: Do not attempt to open or otherwise service any components in the optics cavity. Opening or servicing
any part of the optics cavity by unauthorized personnel may violate laser safety regulations. The optics system
is a factory only repair item.
AVERTISSEMENT : Ne tentez pas d'ouvrir ou d’intervenir de quelque manière que ce soit sur les composants de la
cavité optique. L'ouverture ou l'entretien d'une partie de la cavité optique par des personnes non autorisées pourrait
enfreindre les règlementations liées aux normes de sécurité laser. La réparation du système optique ne peut être
prise en charge que par le personnel qualifié du fabricant.
WARNING: Use of controls or adjustments or performance of procedures other than those specified herein may
result in exposure to hazardous visible laser light.
AVERTISSEMENT : Toute manipulation, réglage, ou l'exécution des procédures autres que ceux spécifiés ici
peuvent entraîner une exposition dangereuse à la lumière visible du laser.
WARNING: Use of optical systems with the scanner will increase eye hazard. Optical instruments include binoculars,
microscopes, eye glasses and magnifying glasses.
AVERTISSEMENT : L'utilisation du scanner avec des systèmes optiques tels que jumelles, microscopes, lunettes
de vue et autres loupes, augmente les risques de dommages pour les yeux.
LED Safety
The LED output on this device has met IEC62471 LED safety and certified to be under the limits of a
CLASS 1 LED product.
CB Scheme
This device complies with CB Scheme IEC 60950-1
Radio Compliance
PM3 RF terminals are in conformity with all essential requirements of the R&TTE Directive (1999/5/EC).
This device is marked with in accordance with the Class II product requirements
specified in the R&TTE Directive, 1999/5/EC. The device is intended for use throughout the European
Community; PAN European Frequency Range: 2.402 ~ 2.480 GHz.
Restrictions for use in France are as follows:
• Indoor use: maximum power (EIRP*) of 100 mW for the entire 2.400 ~ 2.4835 GHz
• Outdoor use: Maximum power (EIRP*) of 100 mW for the 2.400 ~ 2.454 GHz band and
maximum power (EIRP*) of 10 mW for the 2.454 ~ 2.483 GHz band.
Page 8

8
The CE mark on the device indicates that the system has been tested to and confirm with the
provisions noted within the 2004/108/EC Electromagnetic Compatibility Directive and the
2006/95/EC Low Voltage Directive, 1999/5/EC (R&TTE), and 2011/65/EU (RoHS).
Pointmobile shall not be responsible for use of our product with equipment (i.e., power
supplies, personal computers, etc.) that is not CE marked and does not comply with the Low
Voltage Directive.
WEEE Compliance
Information for the user in accordance with the European Commission Directive
2012/19/EU of the European Parliament and of the Council of 4 July 2012 on Waste
Electrical and Electronic Equipment (WEEE)
This product has required the extraction and use of natural resources for its production. It may contain
hazardous substances that could impact health and the environment, if not properly disposed. In
order to avoid the dissemination of those substances in our environment and diminish the pressure
on the natural resources, we encourage you to reuse, recycle and recover the product. If the product
is disposed according to the Directive, it will avoid potentially negative consequences to the
environment and human health which otherwise could be caused by incorrect disposal.
The product marked with crossed out wheeled bin must be disposed separately from municipal
waste.
For more detailed information about disposal, reuse, and recycle system, contact your local or regional
waste administration.
Page 9
9
3. Getting Started
3.1. Charge the Device
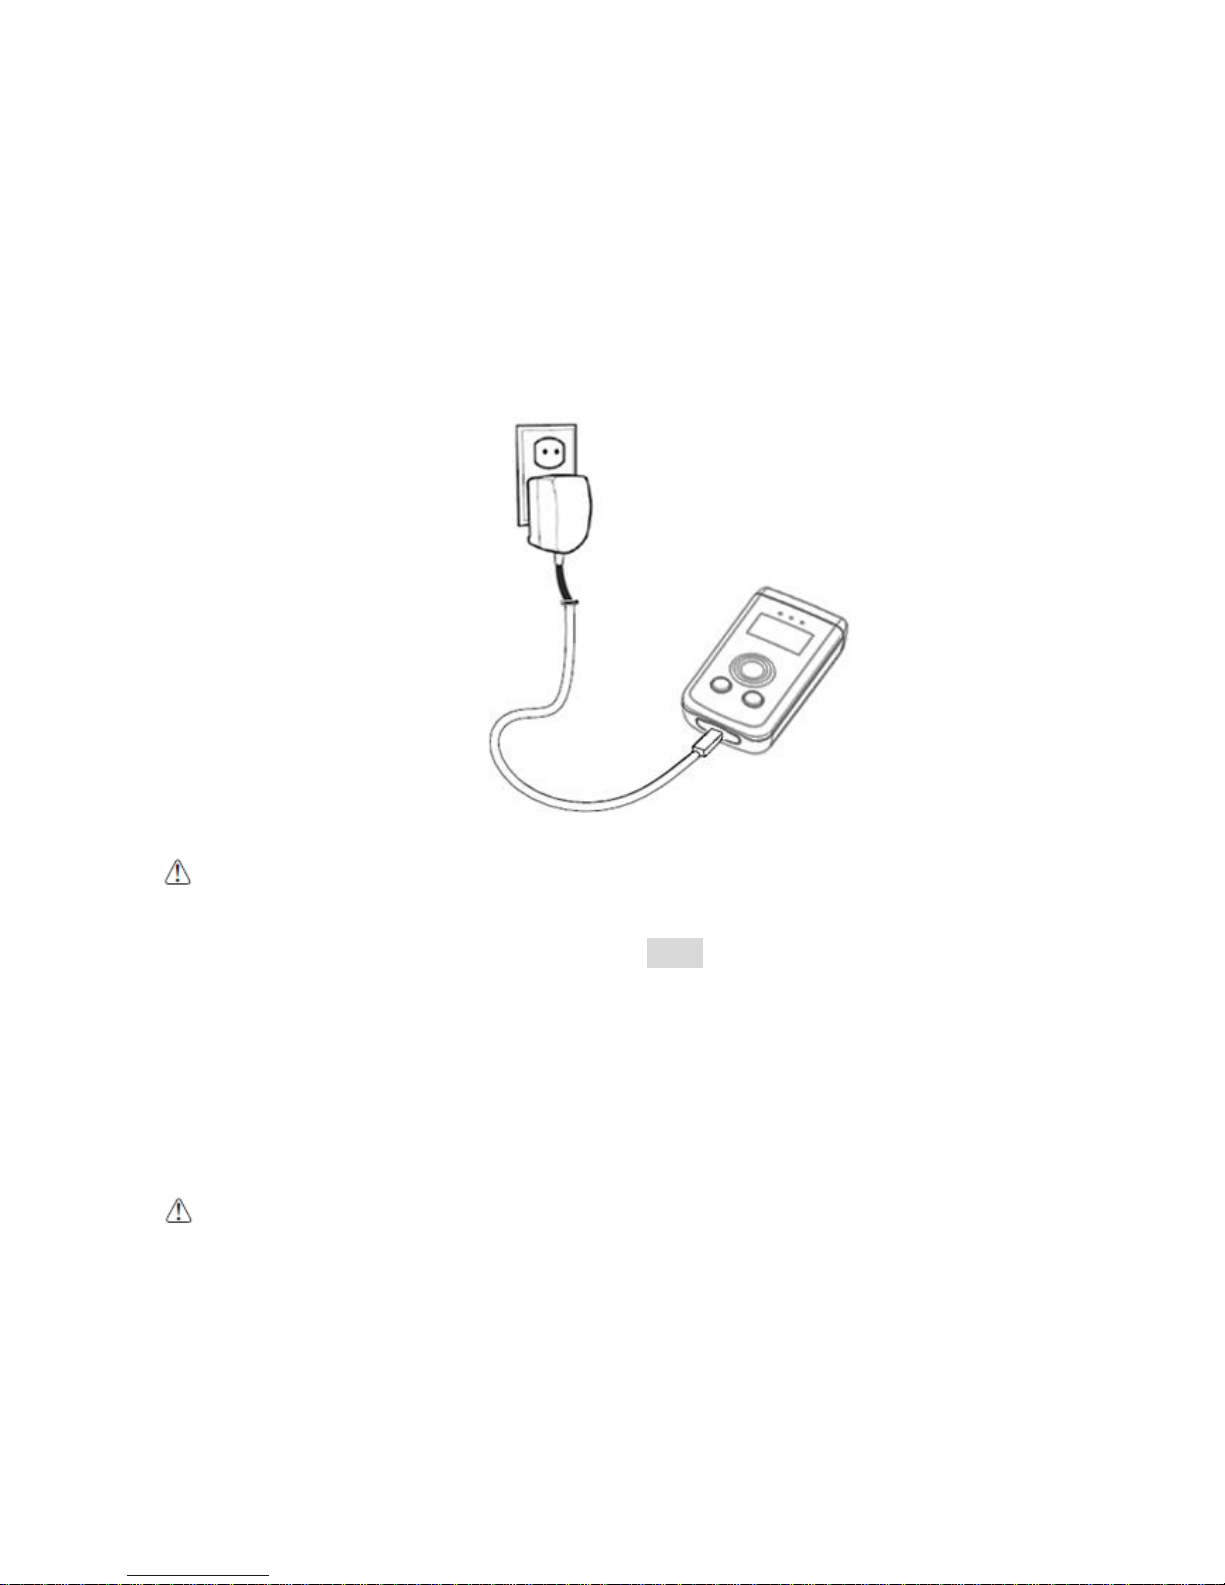
Battery pack is assembled inside of the PM3 Bluetooth scanner. Charge the device with the charging
cable for a minimum of 4 or 6 hours before initial use.
1. Attach the appropriate plug adapter to the plug of the power cable.
2. Insert the plug into the appropriate power source.
Plug the Bluetooth scanner power cable into the USB Jack on the side end of the unit.
WARNING: Use only Pointmobile-approved peripherals, power cables, and power adapters. Unauthorized
peripherals, cables, or power adapters may cause explosion or damage on your device.
DO NOT attempt to charge damp/wet Bluetooth scanners or batteries. All components must be dry before
connecting to an external power source.
Batteries must be charged at a temperature ranging from 0~45℃ (±3℃). If you don’t follow the guide, it might
have a harmful effect on the battery life.
AVERTISSEMENT : Veillez à n’utiliser que les périphériques approuvés par Pointmobile (câbles d'alimentation et
adaptateurs électriques). Tout périphérique non autorisé (câble ou adaptateur) peut provoquer l’explosion de la
batterie ou endommager votre appareil.
NE PAS tenter de recharger les terminaux ou les batteries encore humides lorsqu’ils ont été mouillés. Tous les
composants doivent être impérativement séchés avant la connexion à une source d'alimentation externe.
Les batteries doivent être chargées à une température allant de 0~45°C (± 3°C). Le non-respect de ces
recommandations pourrait avoir un effet néfaste sur la durée de vie de la batterie.
CAUTION: After the device has been charged, disconnect the DC Power Jack. If you stay on that plug in use, it is
possible to break the power cord.
ATTENTION: Après une période de charge de la batterie, veillez à débrancher le connecteur du chargeur. Une
utilisation prolongée de celui-ci risquerait d’endommager le cordon d’alimentation.
3.2. LED Indicators
The red LED is ON while charging the battery and the green LED is ON when the battery is fully
charged.
Page 10

10
During the charging process, the LED positioned at the upper-left side of the display is red constant.
Once the charging process has been completed this LED is green constant.
3.3. Turn Your Device On
Press the UP key for 1 second.
3.4. Turn Your Device Off
Press the UP key for 5 seconds.
4. Get to Know Your Device
Feature of Your Device
The following list outlines a few of the feature included in your device.
PM3 Bluetooth scanner
Micro Processor: 32-bit ARM® Cortex® -M4 RISC processor 120Mhz
RAM Memory: 128KB
FLASH Memory: 1MB, 4MB Storage
0.96” OLED Display: 128x64 Dot Passive Matrix/Monochrome(Blue)
Keyboards: 3 Keys(1 Scan key, 2 Menu keys)
Power Supply : AC power adaptor
HandyLink connector: USB 2.0 Full speed Client,
Scan Engine:
• 1D engine: SE965HP
• 1D engine: N4313
• 1D CCD engine : SE655
• 2D engine : SE4710
Battery: Lithium Polymer battery, Standard 3.7V/900mAh
IP54(IEC 60529)
Audio: Built-in speaker
BT: Bluetooth Radio 2.1+EDR with Internal Antenna
Notification LEDs
1) Power indications, 2) Scan reading indications 3)BT pairing indication
Notification Vibration Motor
NFC : 13.56MHz HF, ISO14443A, ISO14443B & ISO15693 are supportive, Mifare
GPS: Stand-alone GPS
Page 11
11
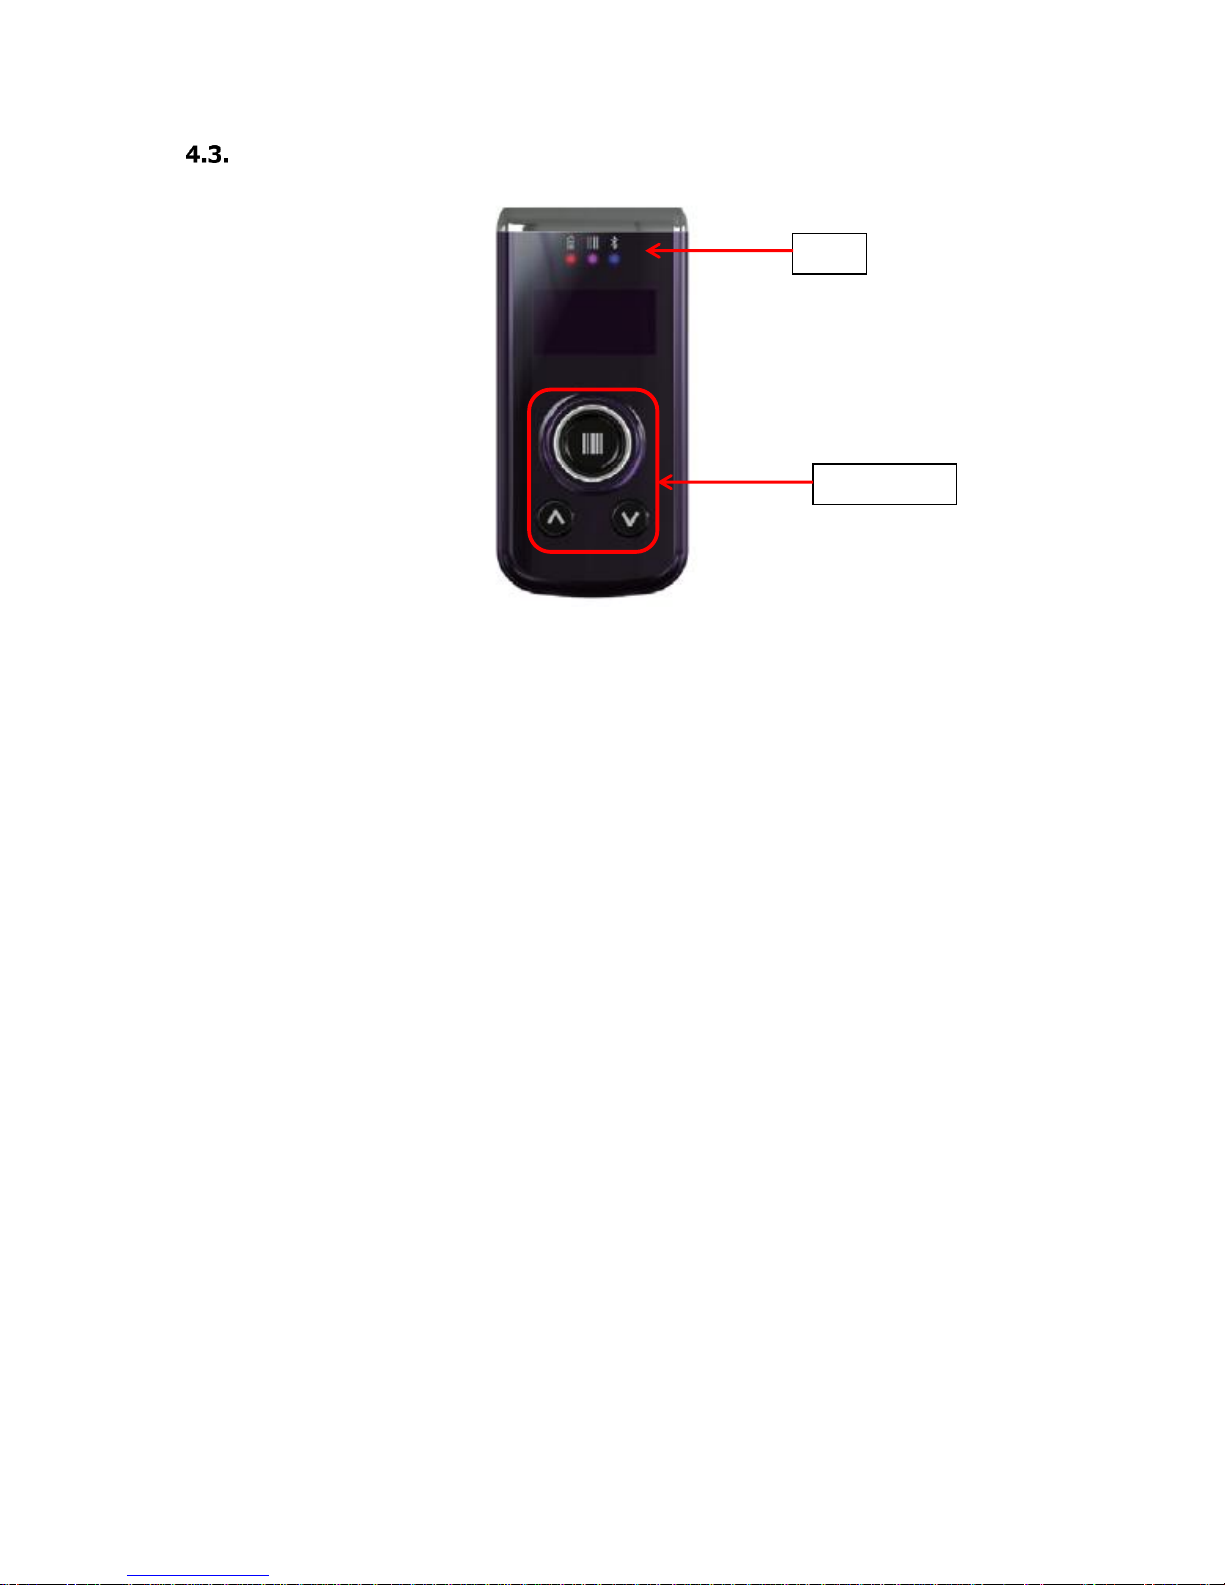
Front Panel Layout
LED Indicator
Shows the information needed to operate your device as follows:
LED Color Meaning
Front Left
Red Lights when main battery is charging
Green Lights when main battery charging has completed.
Front Middle
Red Light when a scan fails
Blue Light when a scan pass
Front Right
Blue Light when Bluetooth pairing has completed
LED
Key Pad
Page 12
12
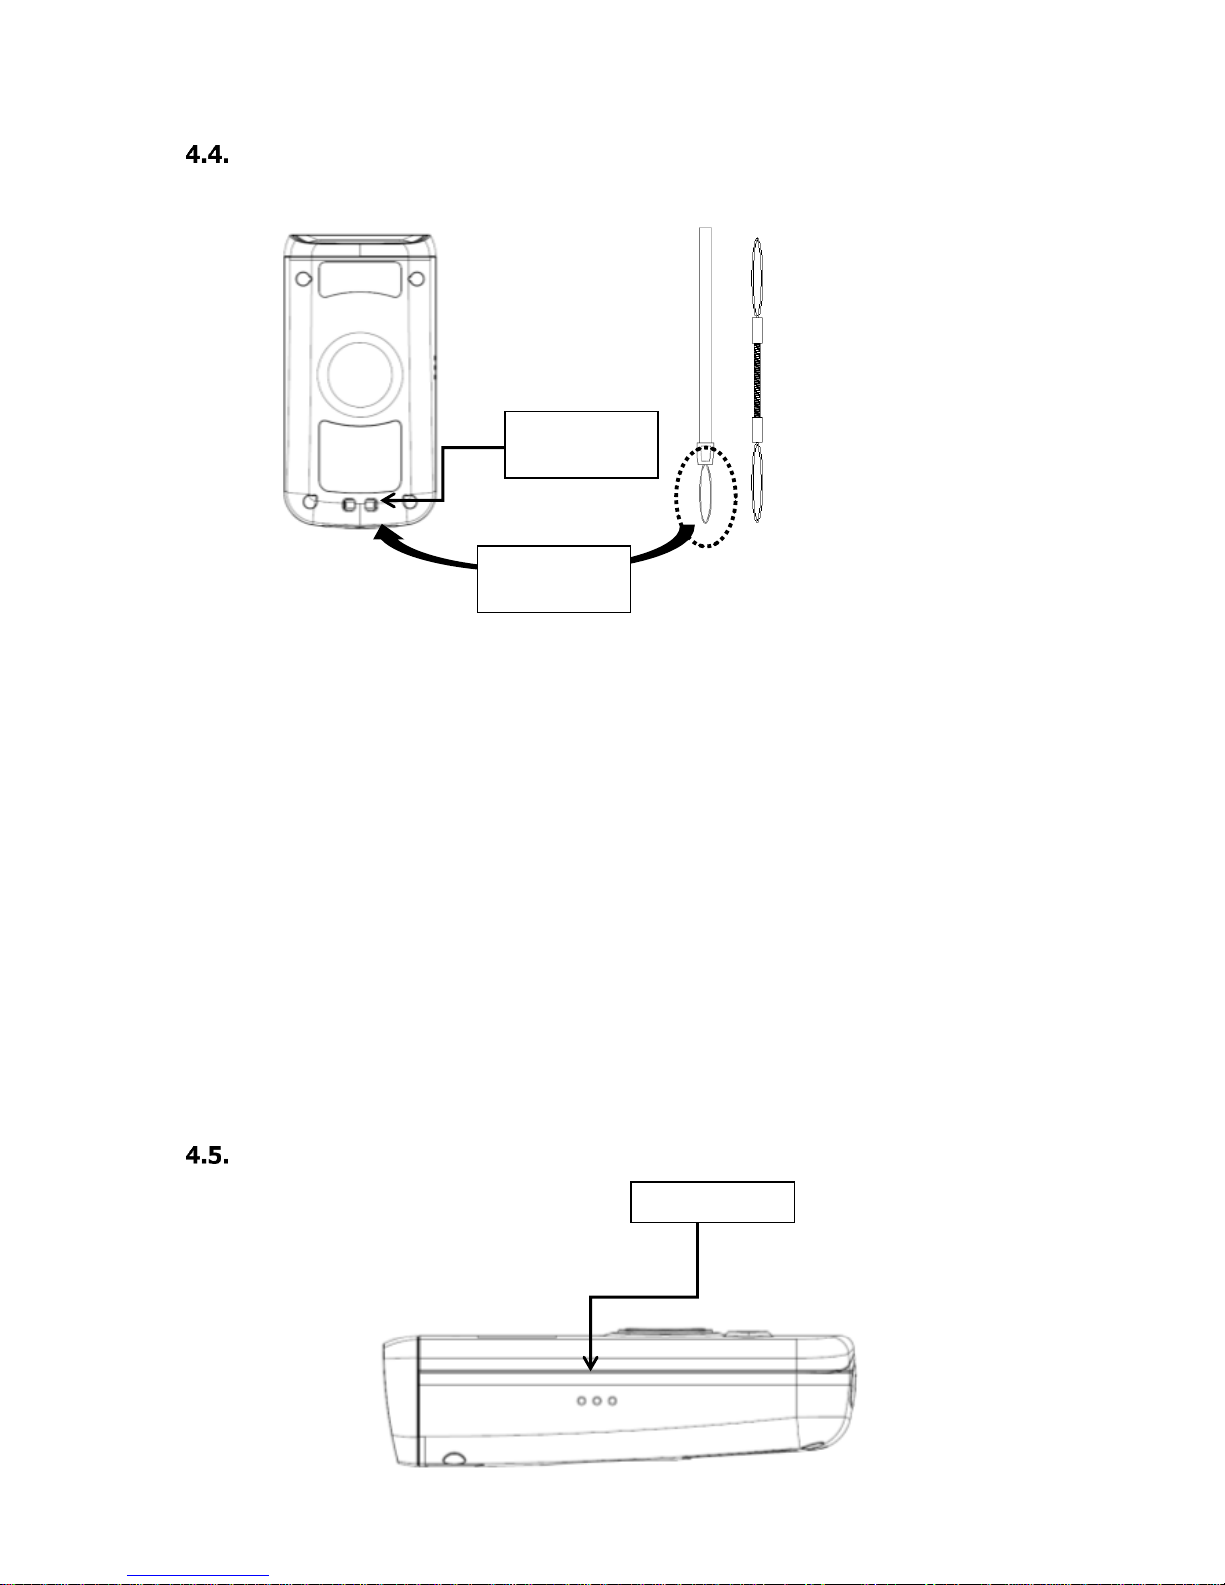
Back Panel Layout
Battery Installed Inside of the Device
For information about battery power, see Battery Power on paragraph 4.12.
Speaker
The integrated speaker sounds audio signals as you scan bar code labels and enter data,
The speaker meets the following SPL levels at 10cm:
• 500Hz–70dB
• 1kHz–80dB
• 4kHz–80dB
Left Side Panel Layout
Wire spring
mount hole
Lanyard
mount hole
Speaker
Page 13
13
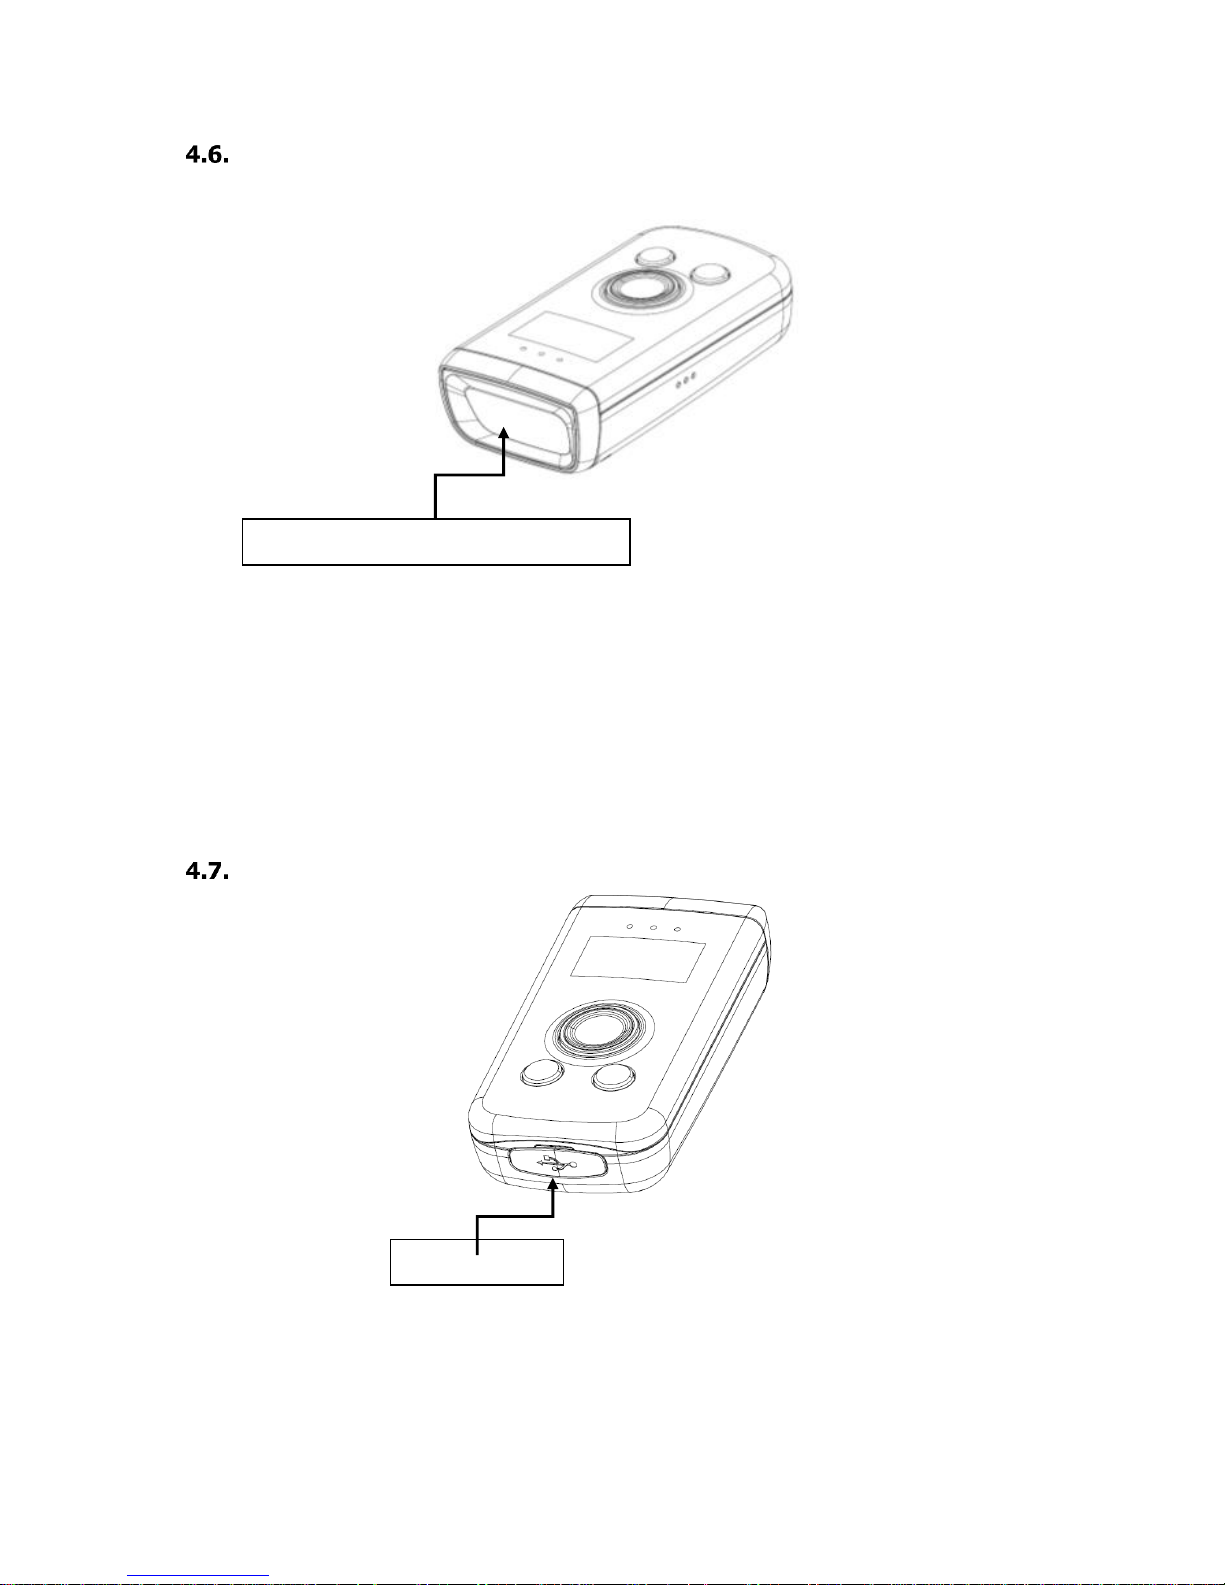
Top Panel Layout
Image Engine Window
The angled image engine reads and decodes most popular bar code symbolizes.
For more information, see Using the Image Engine on paragraph 6.
Bottom Panel Layout
USB Port
This connector supports full speed USB 2.0 communication
Also external power from the MicroUSB Adaptor that is included with the terminal. When
connected to the MicroUSB Adaptor, the terminal is powered and the main battery pack is
charging.
Image engine window (with engine)
USB Connector
Page 14

14
USB Cable
The Micro USB Cable is used when communicating between the terminal and a host computer to
transfer data via the USB interface.
Battery Power
The battery works to prevent data loss when the terminal is used over long periods of time.
The battery must be charged to full capacity before using the BLUETOOTH SCANNER AC
Adaptor for the first time!
Charge the main battery pack with the Bluetooth scanner AC Adaptor for a minimum of 4 or 6
hours depending on your battery before initial use.
Resetting the Terminal
The device is reset when pressing the SCAN, UP, and DOWN Key at the same time, and press
The UP key for 1 second to turn it on.
Sleep Mode
Sleep Mode suspends terminal operation. The terminal appears to be “off” when in Sleep Mode. The
terminal is programmed to go into Sleep Mode automatically when inactive for a specified period of
time. You can set this time period in the “Sleep Timeout” menu.
PM3 Technical Specifications
Model
PM3
Operating System
Firmware
Processor
ATMEL SAM4S16C, 32-bit ARM® Cortex® -M4 RISC processor 120Mhz
Memory
1MB(PGM), 4MB Storage Flash, 128KB RAM
Storage Expansion
N/A
Display
Bright OLED/ 0.96 inch(21.74mm x 11.18mm Active Area)
Scan Engine
1D engine: SE-965HP, N4313
2D engine: SE4710
CCD: SE655
Keypad
3 keys [ 1 scan key, 2 menu Keys (Up & Down) ]
Audio
Built-in speaker
I/O
Full Speed USB v2.0(12Mbps) Client.
support USB Disk Mode & USB to Serial mode
Page 15
15
Battery
3.7V, 910mAh
Expected Charge Time
< 4 hours (from Low-Battery Shutdown level)
Charging Peripherals
USB Cable
Operating
Temperature
-10°C to 50°C
Charging Temperature
0~45℃ (±3℃))
Storage Temperature
-20°C to 60°C
Humidity
95% humidity, non-condensing
Construction
High impact resistant PC housings
Drop
1.5m multiple drops to concrete, MIL-STD-810G
ESD
Air: ± 15kV
Direct: ± 8kV
Environmental
Independently certified to meet IP54 standards for moisture and particle resistance
Dimensions
78.5mm x 39.0mm x 19.4mm
Weight
N4313 : 67g
SE655 : 61g
SE965 : 65g
SE4710 : 65g
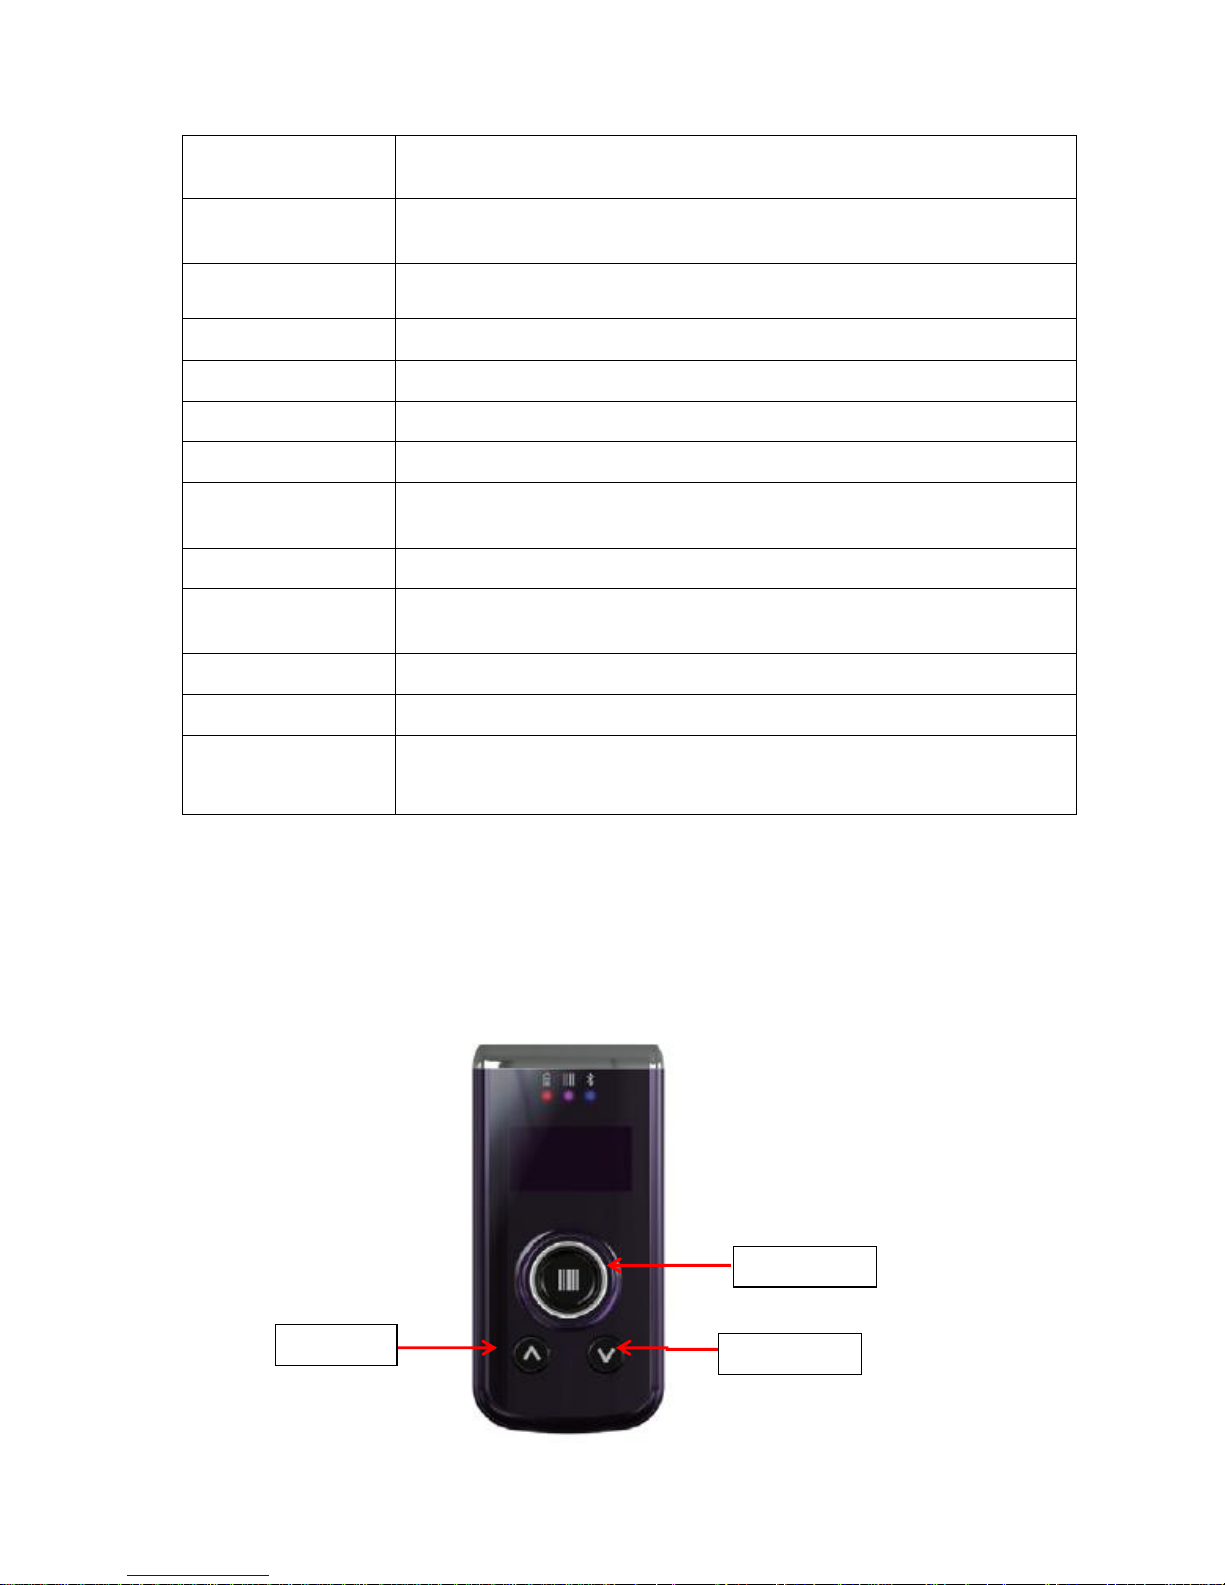
5. Using the Keys
Scan key
Up key
Down key
Page 16

16
Scan Key
Located at the center of the keypad for easy access with either hand
Scanning Barcodes or choosing options in menu.
Up Key
Located at the bottom left
Moving up in the menu
☞NOTE: Press the UP and DOWN Key at the same time to move to the main menu
Down Keys
Located at the bottom right
Moving down in the menu
☞NOTE: Press the UP and DOWN Key at the same time to move to the main menu
6. Using the Image Engine
Overview
The BLUETOOTH SCANNER contains an SE4710 2D image engine that instantly reads all popular 1D
and 2D bar codes and supports omni-directional aiming and decoding or a SE965HP, SE655, N4313
1D laser engine that reads all popular 1D bar codes. The image engine can also capture digital
images, such as signatures and pictures.
☞NOTE: It may not read the barcode due to specular reflection if scanning from directly above. Try again after
changing angle.
☞NOTE: It may not read the barcode, if this Bluetooth scanner is too close to or too far from the barcode even if the
barcode is within the aiming range. Move the Bluetooth scanner toward or away from the barcode slowly and try again.
The aiming range is for reference only.
☞NOTE: It may not read the barcode if the barcode surface is curved. Scan the barcode at the center of the aiming
range.
☞NOTE: It may not read the barcode if the barcode surface is dirty. Try again after cleaning the barcode.
☞NOTE: It may not read the barcode if the image engine window is dirty. Try again after wiping the window with a
cotton swab or similar soft object gently.
☞NOTE: It may not read the barcode according to the direct sunlight or the brightness of the surrounding. Try again
away from the direct sunlight. Try again after adjusting the brightness of the surrounding if indoors.
☞NOTE: It may not read the barcode if it is blue on white background. Try again after changing angle or
adjusting the brightness of the surrounding.
☞NOTE:
It may not read the barcode if it is black on silver background. Try again after changing angle or
adjusting the brightness of the surrounding.
Page 17
17
☞NOTE:
Bar codes printed on glossy or laminated paper are best read at angles greater than 5° in relation
to the Laser Engine. This prevents bright illumination reflections from being returned to the Laser Engine..
☞NOTE:
Performance may be impacted by bar code quality and environmental conditions
☞NOTE:
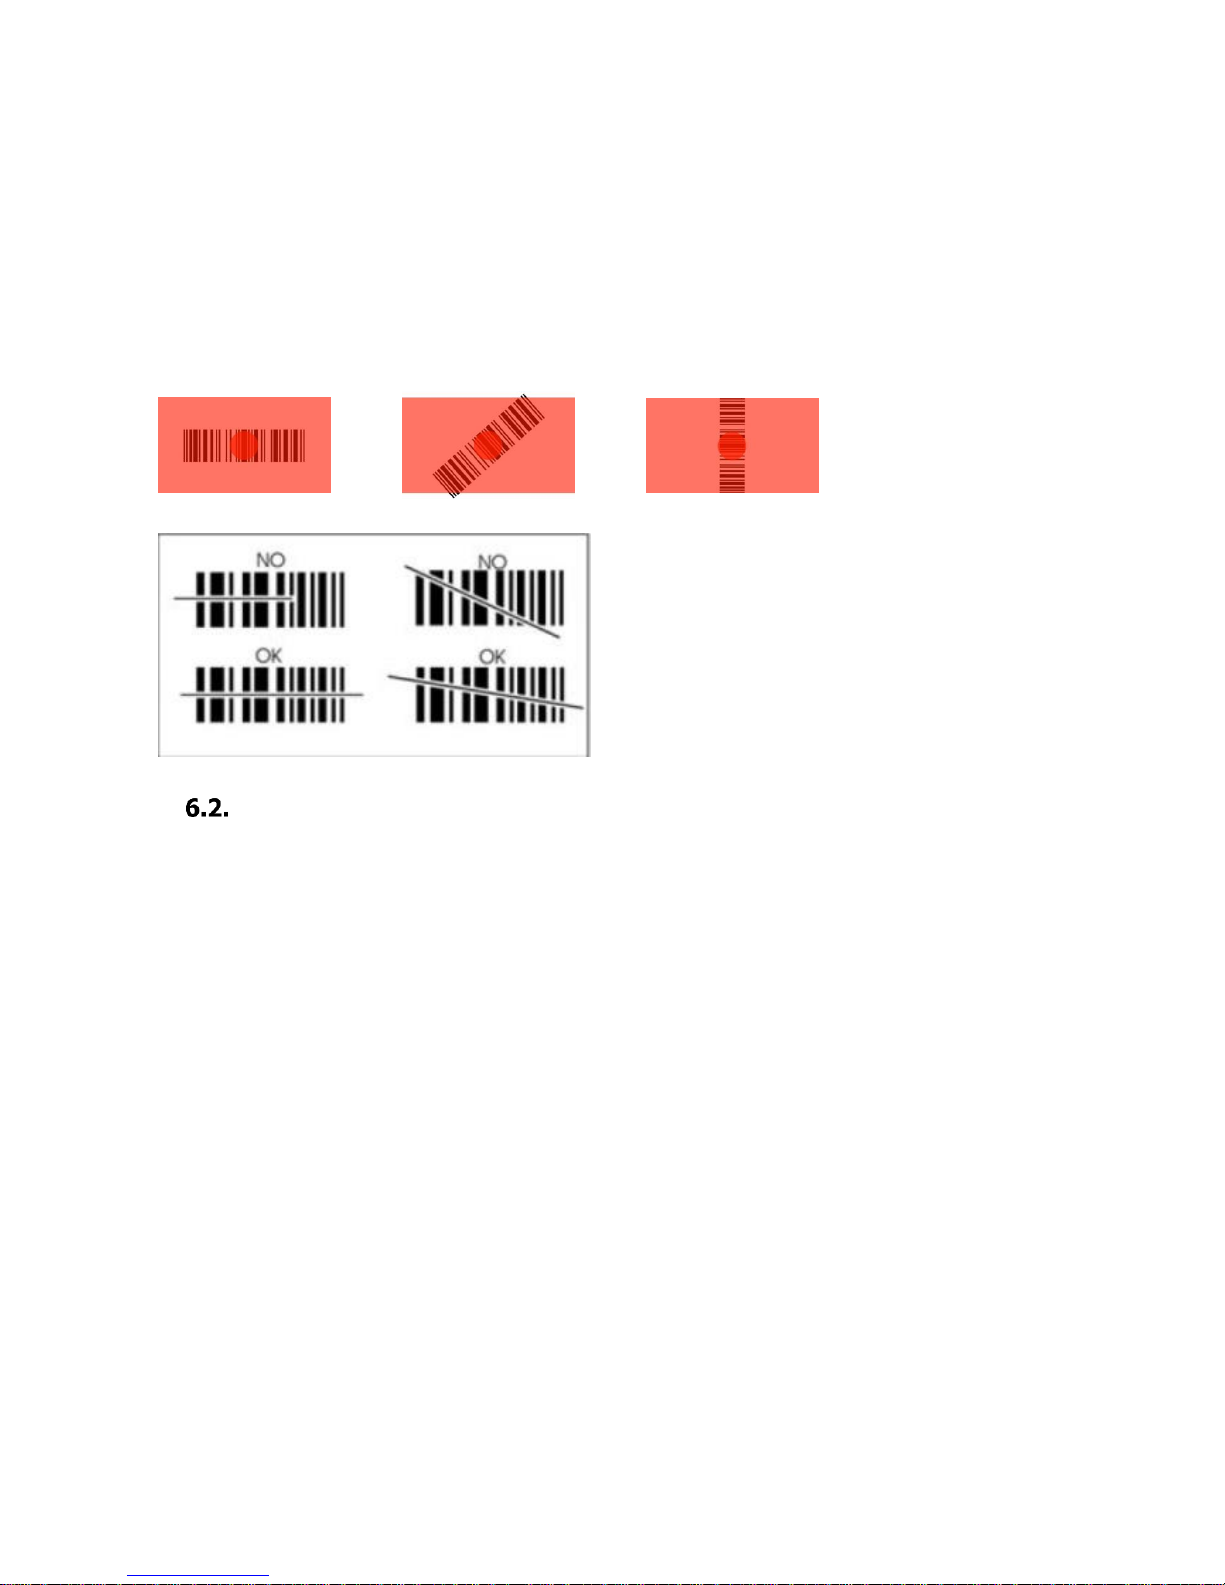
Misreading may occur, if the bar code isn’t positioned correctly. Recommended scanner beam
positions are as follows
Available Image Engines
The BLUETOOTH SCANNER is equipped with an SE4710.
Page 18
18
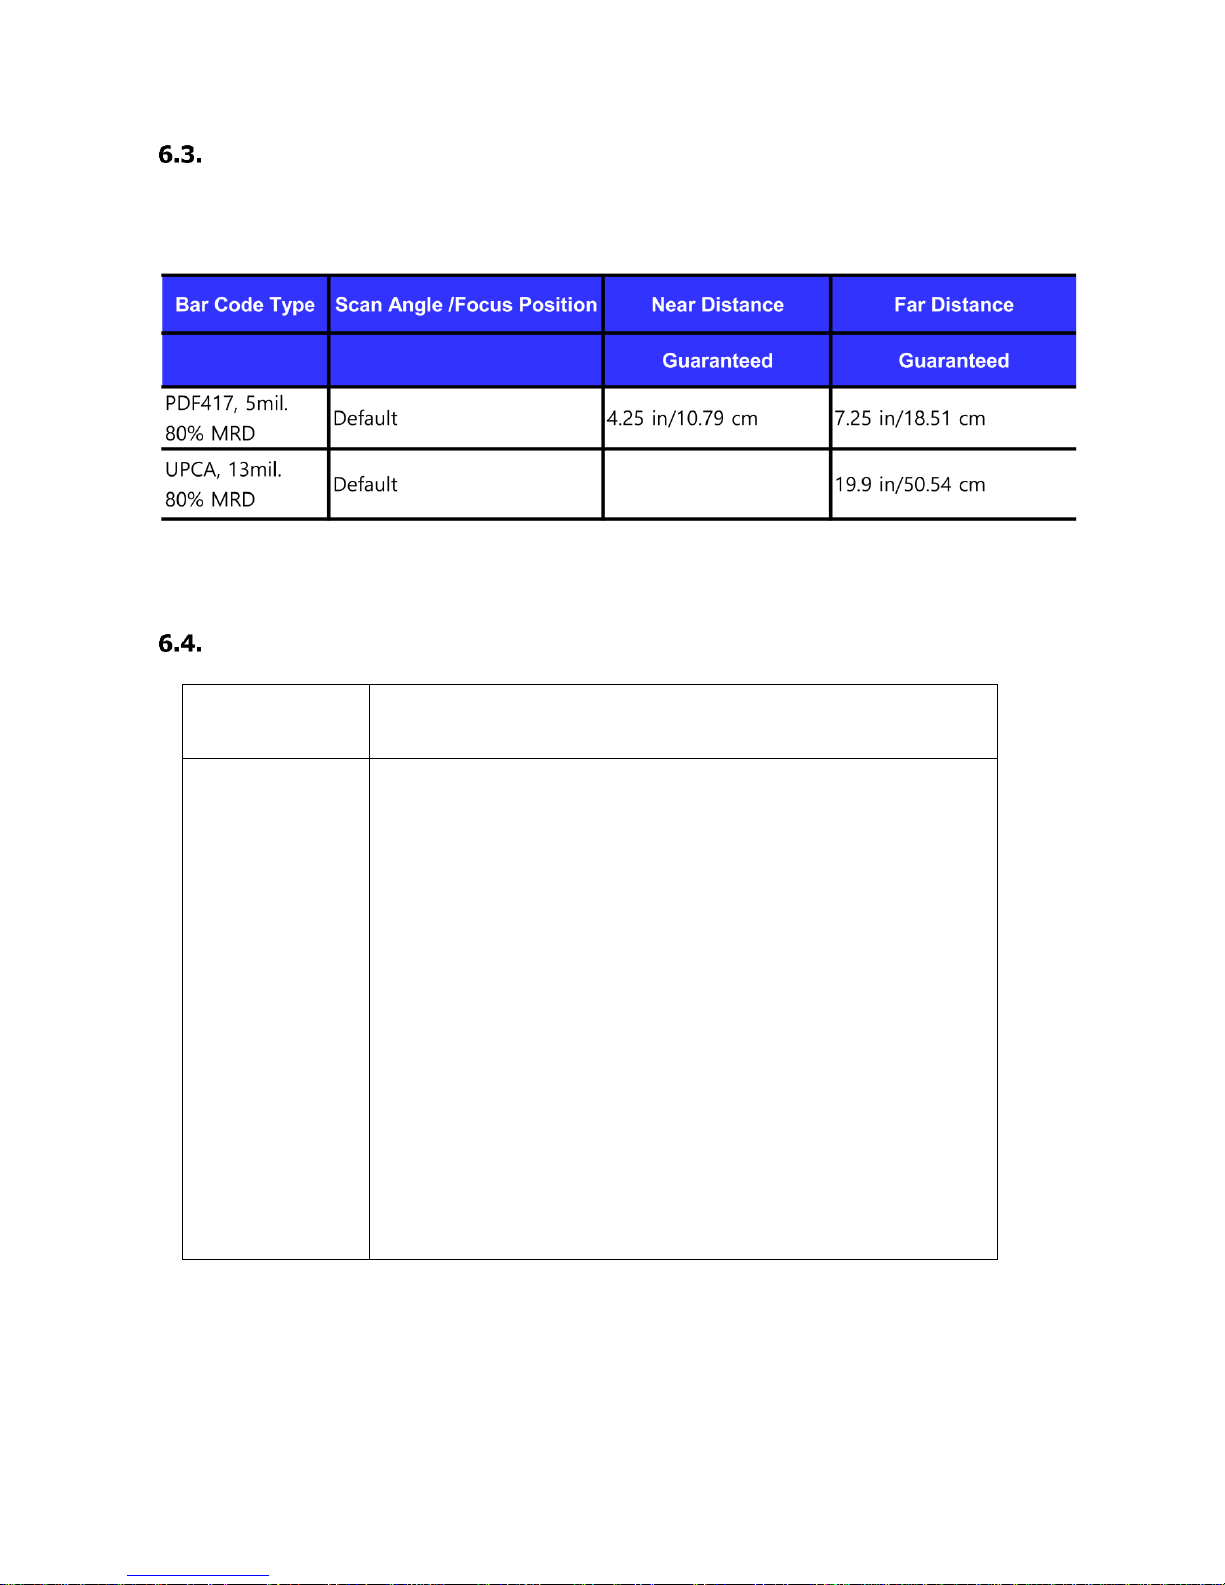
Depth of Field
Depth of Field for SE4710
Supported Bar Code Symbologies
Symbology Type
Symbology Name
SE4710
Symbologies
UPC A,
UPC E1,
EAN 13,
CODE 128,
ISBT 128,
TRIOPTIC CODE 39,
CODE 11,
DISCRETE 2 OF 5,
MSI,
GS1 DATABAR LIMITED,
UCC COUPON,
MATRIX 2 OF 5,
US POSTNET,
UK POSTAL,
AUSTRALIA POST,
USPS 4CB/ONE CODE/INTELLIGENT MAIL,
COMPOSITE CC-C,
COMPOSITE TLC-39,
MICROPDF417,
MAXICODE,
MICRO QR,
HAN XIN
UPC E,
EAN 8,
BOOKLAND EAN,
GS1 128,
CODE 39,
CODE 93,
INTERLEAVED 2 OF 5
CODABAR,
GS1 DATABAR,
GS1 DATABAR EXPANDED,
CHINESE 2 OF 5,
KOREAN 3 OF 5,
US PLANET,
JAPAN POSTAL,
NETHERLANDS KIX CODE,
UPU FICS POSTAL,
COMPOSITE CC-A/B,
PDF417,
DATA MATRIX,
QR CODE,
AZTEC,
Page 19

19
To Decode a Bar Code
1. Position the Bluetooth scanner over one of the Sample Bar Codes on paragraph 6.9.
A range of 4–10 inches (10–25 cm) from the bar code is recommended.
2. Project the aiming brackets by pressing and holding the Scan key. The Scan LED lights red.
3. Center the aimer crosshair over the bar code. The aiming beam should be oriented in line with
the bar code to achieve optimal decoding; Omni-Directional Scanning Positions on paragraph
6.10.
4. When the bar code is successfully decoded, the decode LED lights blue and the terminal beeps.
Sample Bar Codes
You can use the following bar codes to verify decoding:
Code 39 PDF 417
7. Using the Laser/CCD Engine
Overview
The BLUETOOTH SCANNER (N4313/SE965HP laser version, SE655 CCD version) contains a laser
diode that emits a beam toward an oscillating mirror that scans through the code and the reflected
light is bounced off of two mirrors back to the collector. The laser version reads all popular 1D bar
codes. See Overview on paragraph 6.1 also.
☞NOTE: Performance may be impacted by bar code quality and environmental conditions.
Available Laser Engines
The BLUETOOTH SCANNER can be equipped with an N4313, SE965HP or SE655 laser/CCD engine
(depending on the configuration purchased).
Page 20
20
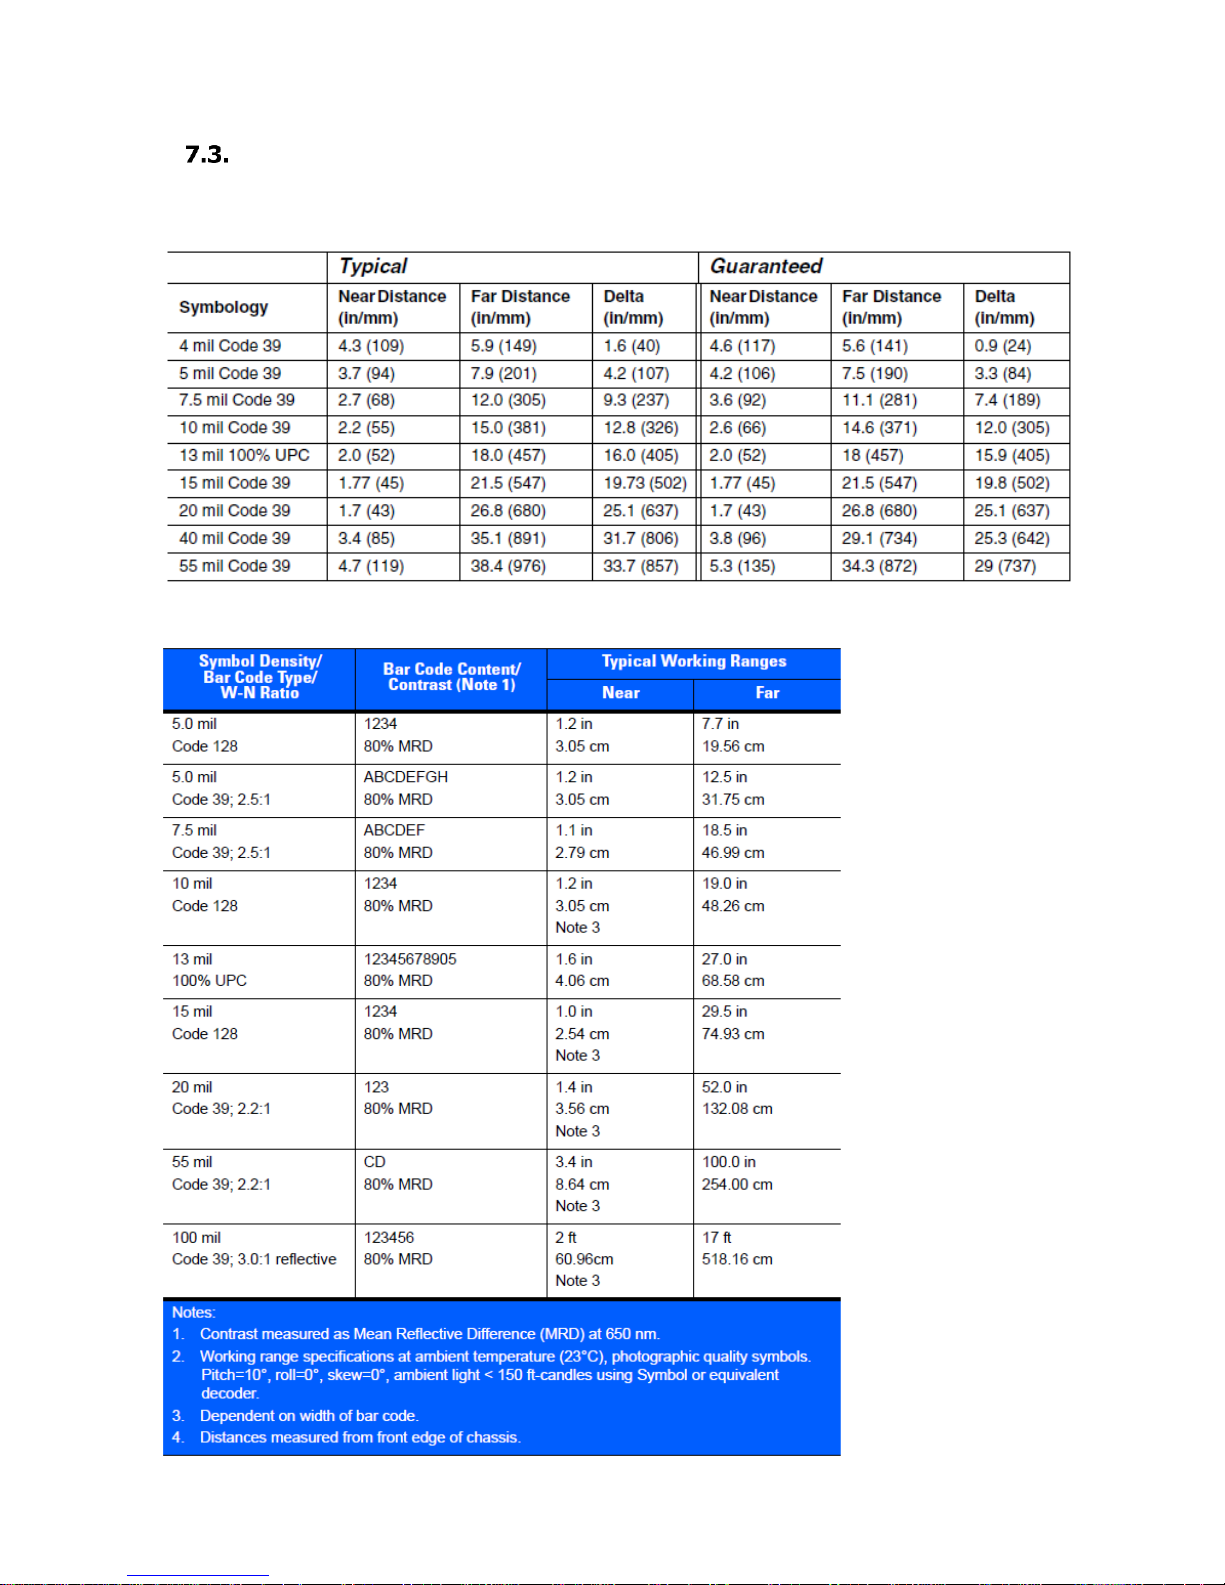
Depth of Field
Depth of Field for N4313
Depth of Field for SE965HP
Page 21
21
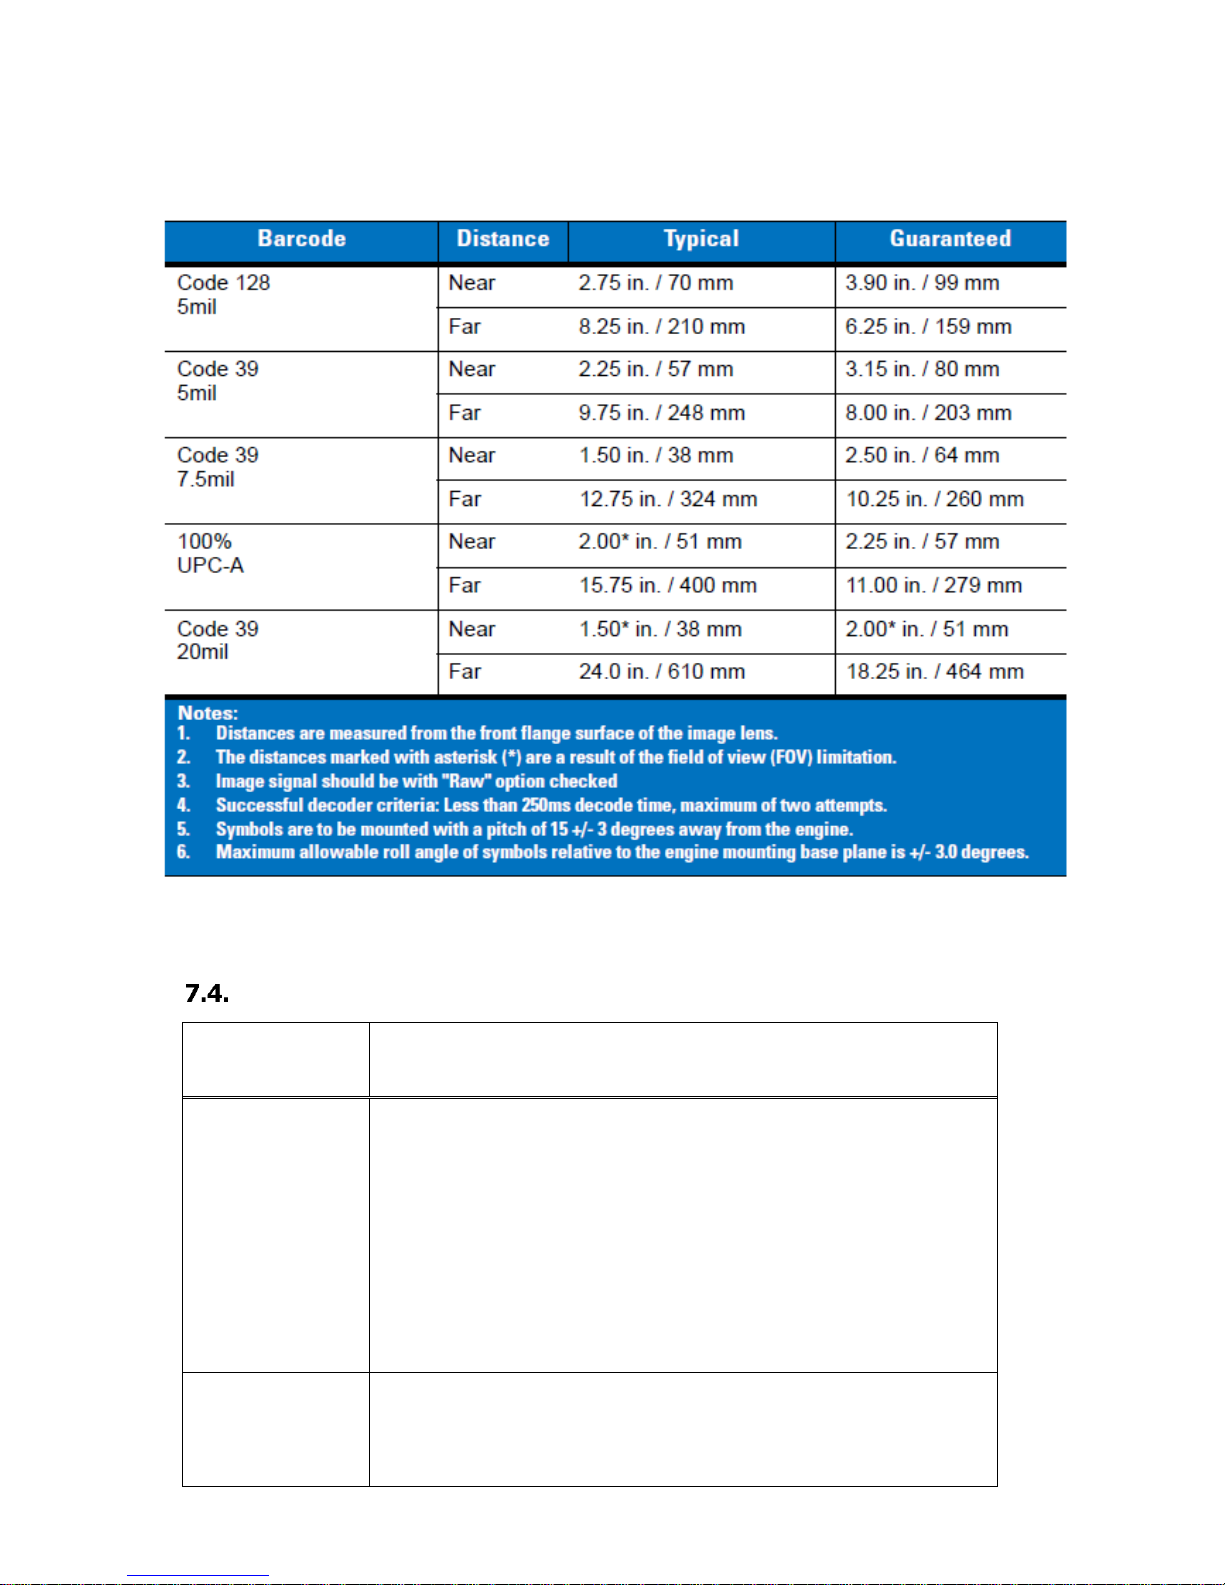
Depth of Field for SE655
Supported Bar Code Symbologies
Symbology Type
Symbology Name
N4313
Symbologies
CODABAR,
CODE 39,
CODE 93,
STRAIGHT 2 OF 5 IATA,
CODE 11,
GS1 128,
UPC A,
EAN 8,
MSI,
GS1 DATABAR OMNIDIRECTIONAL
GS1 DATABAR EXPANDED,
TRIOPTIC
INTERLEAVED 2 OF 5,
NEC 2 OF 5,
STRAIGHT 2 OF 5 INDUSTRIAL,
MATRIX 2 OF 5,
CODE 128,
TELEPEN,
UPC E
EAN 13,
PLESSEY,
GS1 DATABAR LIMITED,
CHINA POST,
SE965HP
Symbologies
UPC A,
UPC E1,
EAN 13,
CODE 128,
ISBT 128,
UPC E,
EAN 8,
BOOKLAND EAN,
GS1 128(EAN 128),
CODE 39,
Page 22
22
TRIOPTIC CODE 39,
CODE 11,
DISCRETE 2 OF 5,
MSI,
GS1 DATABAR LIMITED,
UCC COUPON,
MATRIX 2 OF 5
CODE 93,
INTERLEAVED 2 OF 5
CODABAR,
GS1 DATABAR 14,
GS1 DATABAR EXPANDED,
CHINESE 2 OF 5,
KOREAN 3 OF 5
SE655
Symbologies
UPC A,
UPC E1,
EAN 13,
CODE 128,
ISBT 128,
TRIOPTIC CODE 39,
CODE 11,
DISCRETE 2 OF 5,
MSI,
GS1 DATABAR LIMITED,
UCC COUPON,
MATRIX 2 OF 5
UPC E,
EAN 8,
BOOKLAND EAN,
GS1 128(EAN 128),
CODE 39,
CODE 93,
INTERLEAVED 2 OF 5
CODABAR,
GS1 DATABAR 14,
GS1 DATABAR EXPANDED,
CHINESE 2 OF 5,
Decoding a Bar Code
1. Position the Bluetooth scanner over one of the Sample Bar Codes on paragraph 7.8.
A range of 4-10 inches (10-25 cm) from the bar code is recommended.
2. Project the aiming beam by pressing and holding the Scan key. The Scan LED lights red.
3. Center the aimer beam horizontally over the bar code and highlight all of the vertical bars of the
bar code. The aiming pattern is smaller when the terminal is held closer to the code and larger
when the terminal is held farther from the code. Symbologies with smaller bars or elements (mil
size) should be read closer to the unit whereas larger bars or elements (mil size) should be read
farther from the unit.
4. When the bar code is successfully decoded, the decode LED lights blue and the terminal beeps.
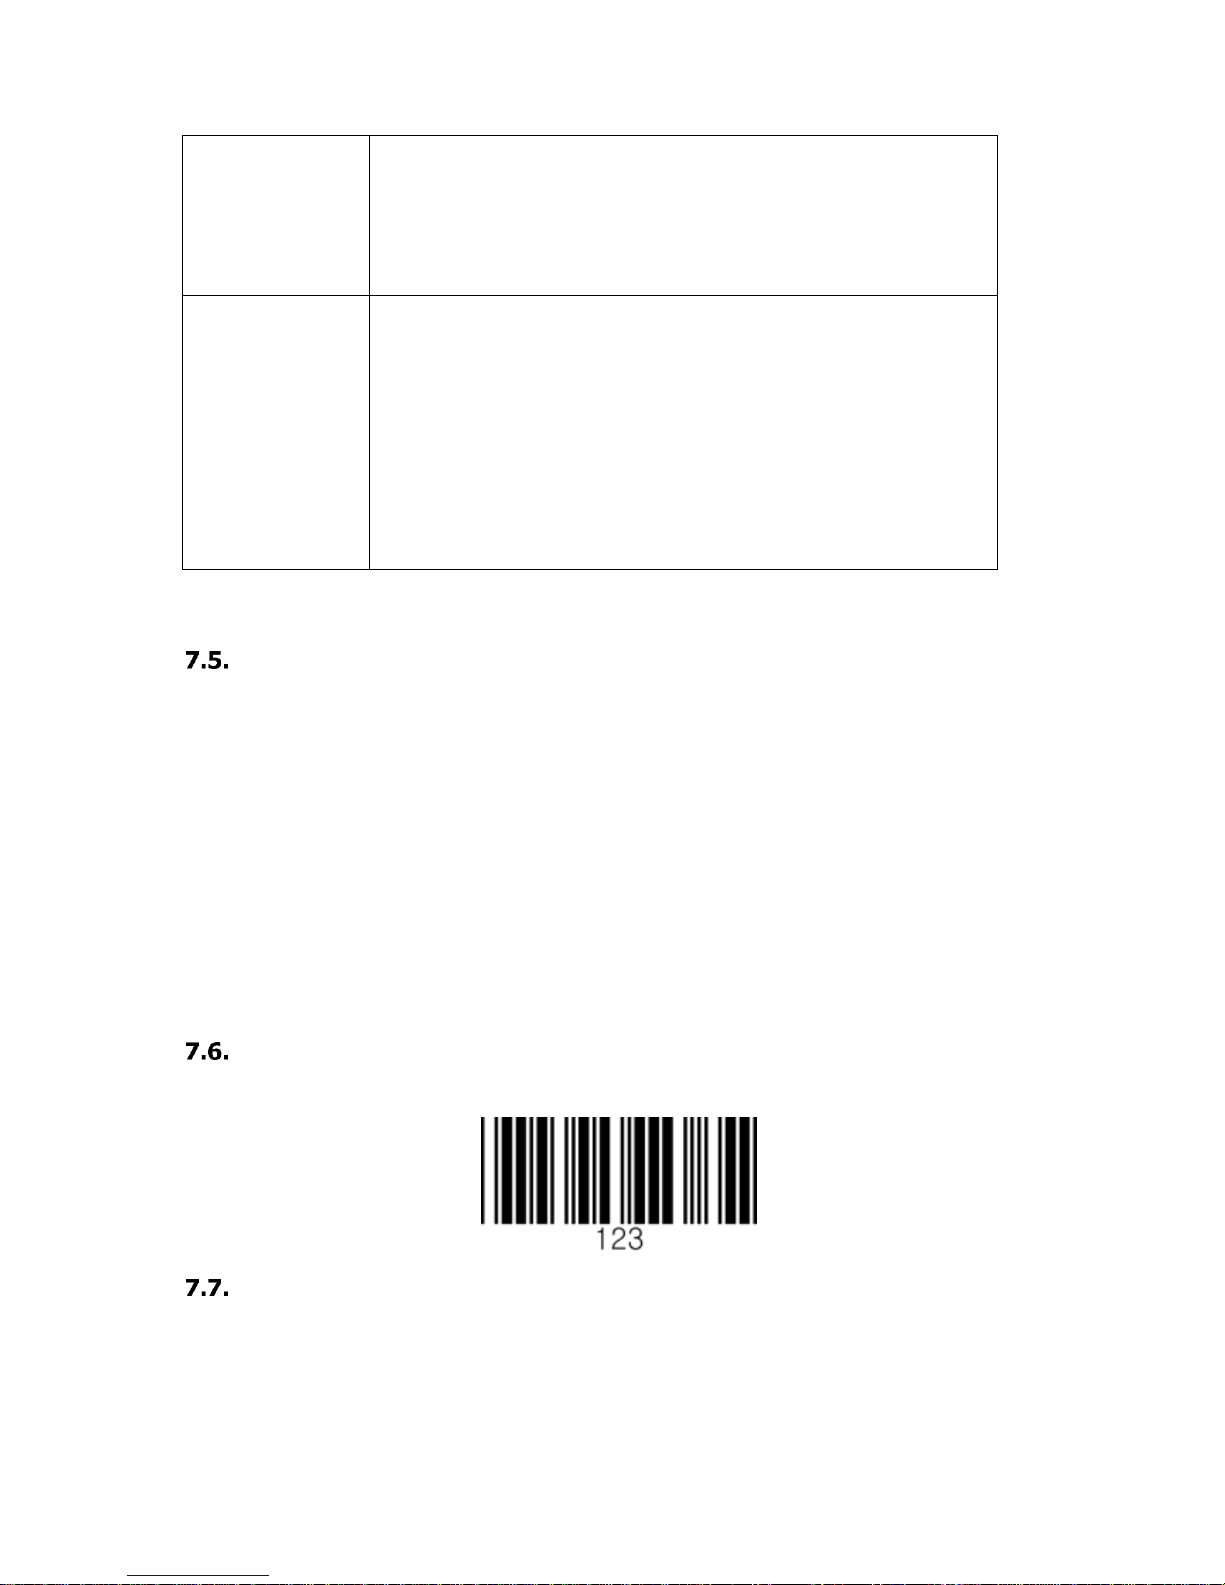
Sample Bar Code
You can use the following bar code to verify decoding:
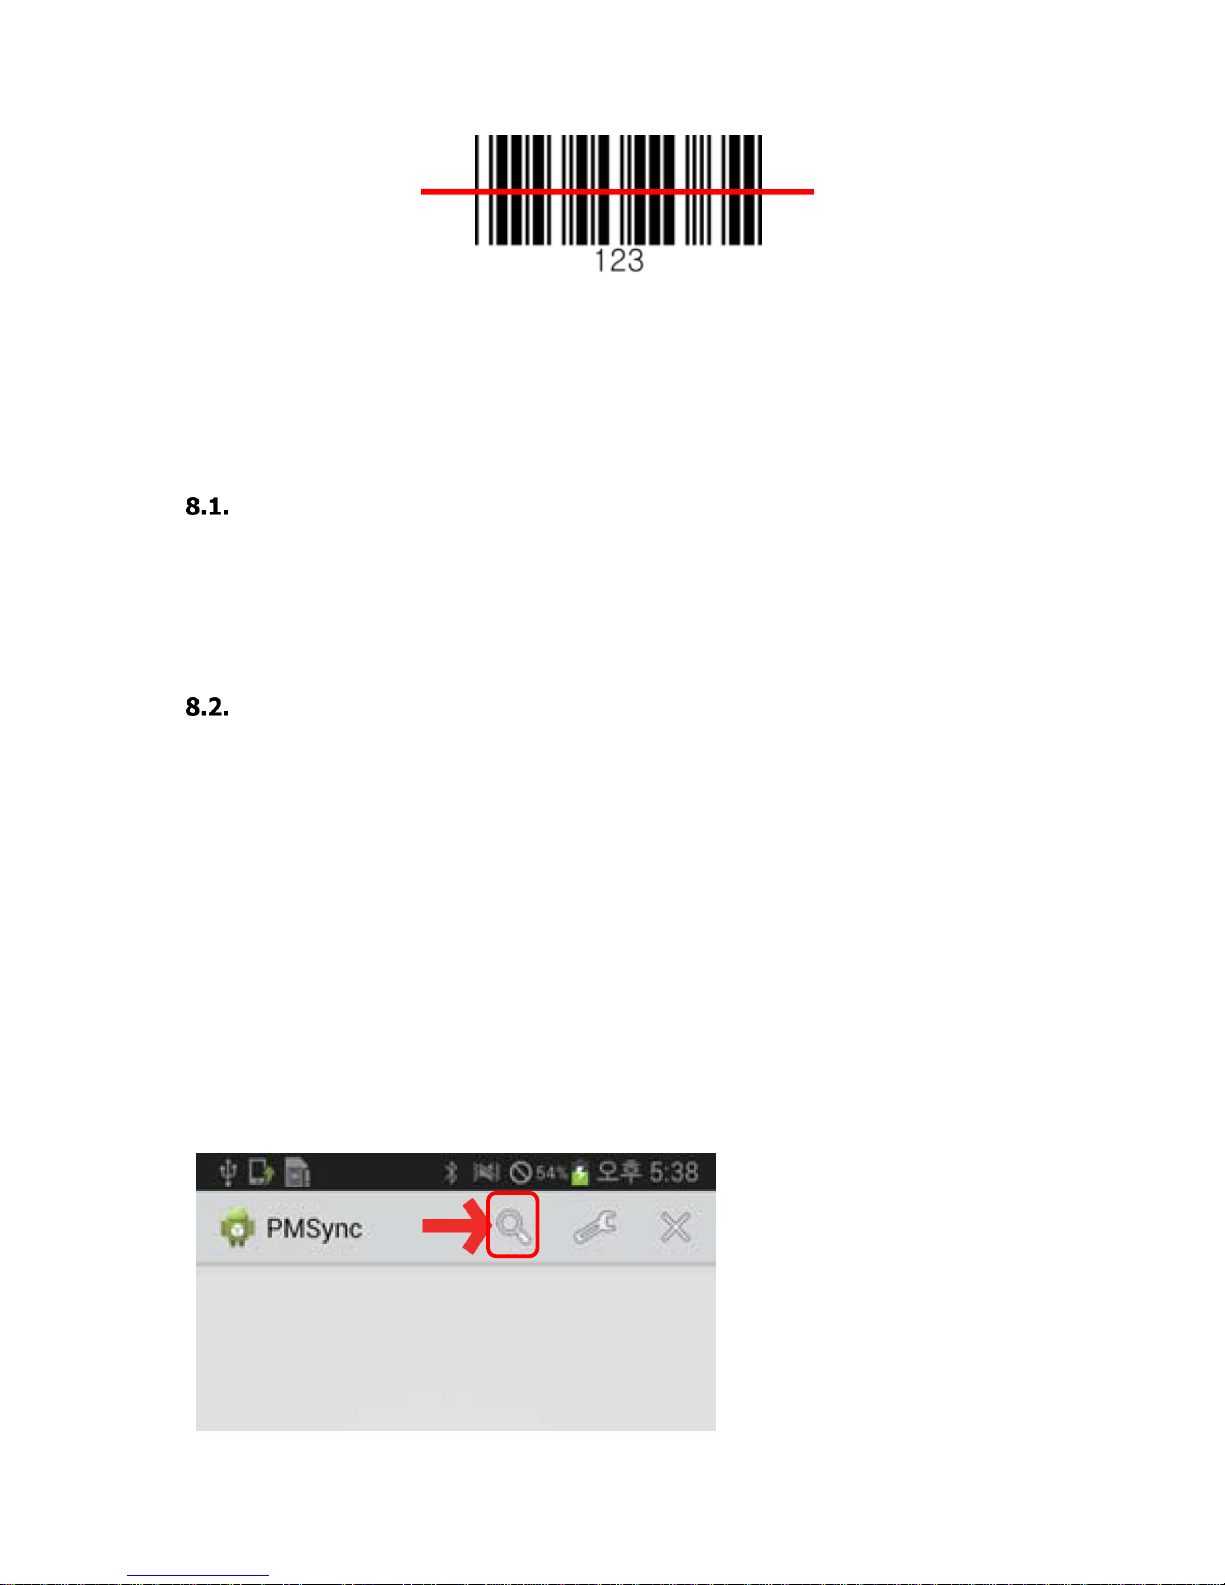
Scanning Positions
The aiming beam must be aimed across the entire bar code to provide you with the best scanning
performance. The aiming pattern is smaller when the terminal is held closer to the code and larger
when the terminal is held farther from the code. Symbologies with smaller bars or elements (mil
size) should be read closer to the unit whereas larger bars or elements (mil size) should be read
farther from the unit.
Page 23
23
8. Bluetooth
Bluetooth wireless technology is a short-range communications technology to connect portable
and/or fixed devices while maintaining high levels of security.
Enabling the Bluetooth
1. Choose “Bluetooth” -> “BT Service” -> Power in the main menu
2. Choose “Enabled” and Save
☞NOTE: Area coverage and Bluetooth radio performance may vary, due to environmental conditions or
interference caused by other devices (microwave ovens, radio transmitters, etc.).
Pairing Bluetooth Devices
Connecting Bluetooth devices usually requires them to be paired; the same pass key must be
entered for each device.
1. Enter User Settings -> Connect Mode
2. Choose “Pairing”
3. Search the BT device from the smartphone and connect
9. Connecting PM3 with Smartphone
1. Start Bluetooth pairing from PM3 device (Refer to 8.1 above)
2. Search the device by selecting the button below
Page 24
24
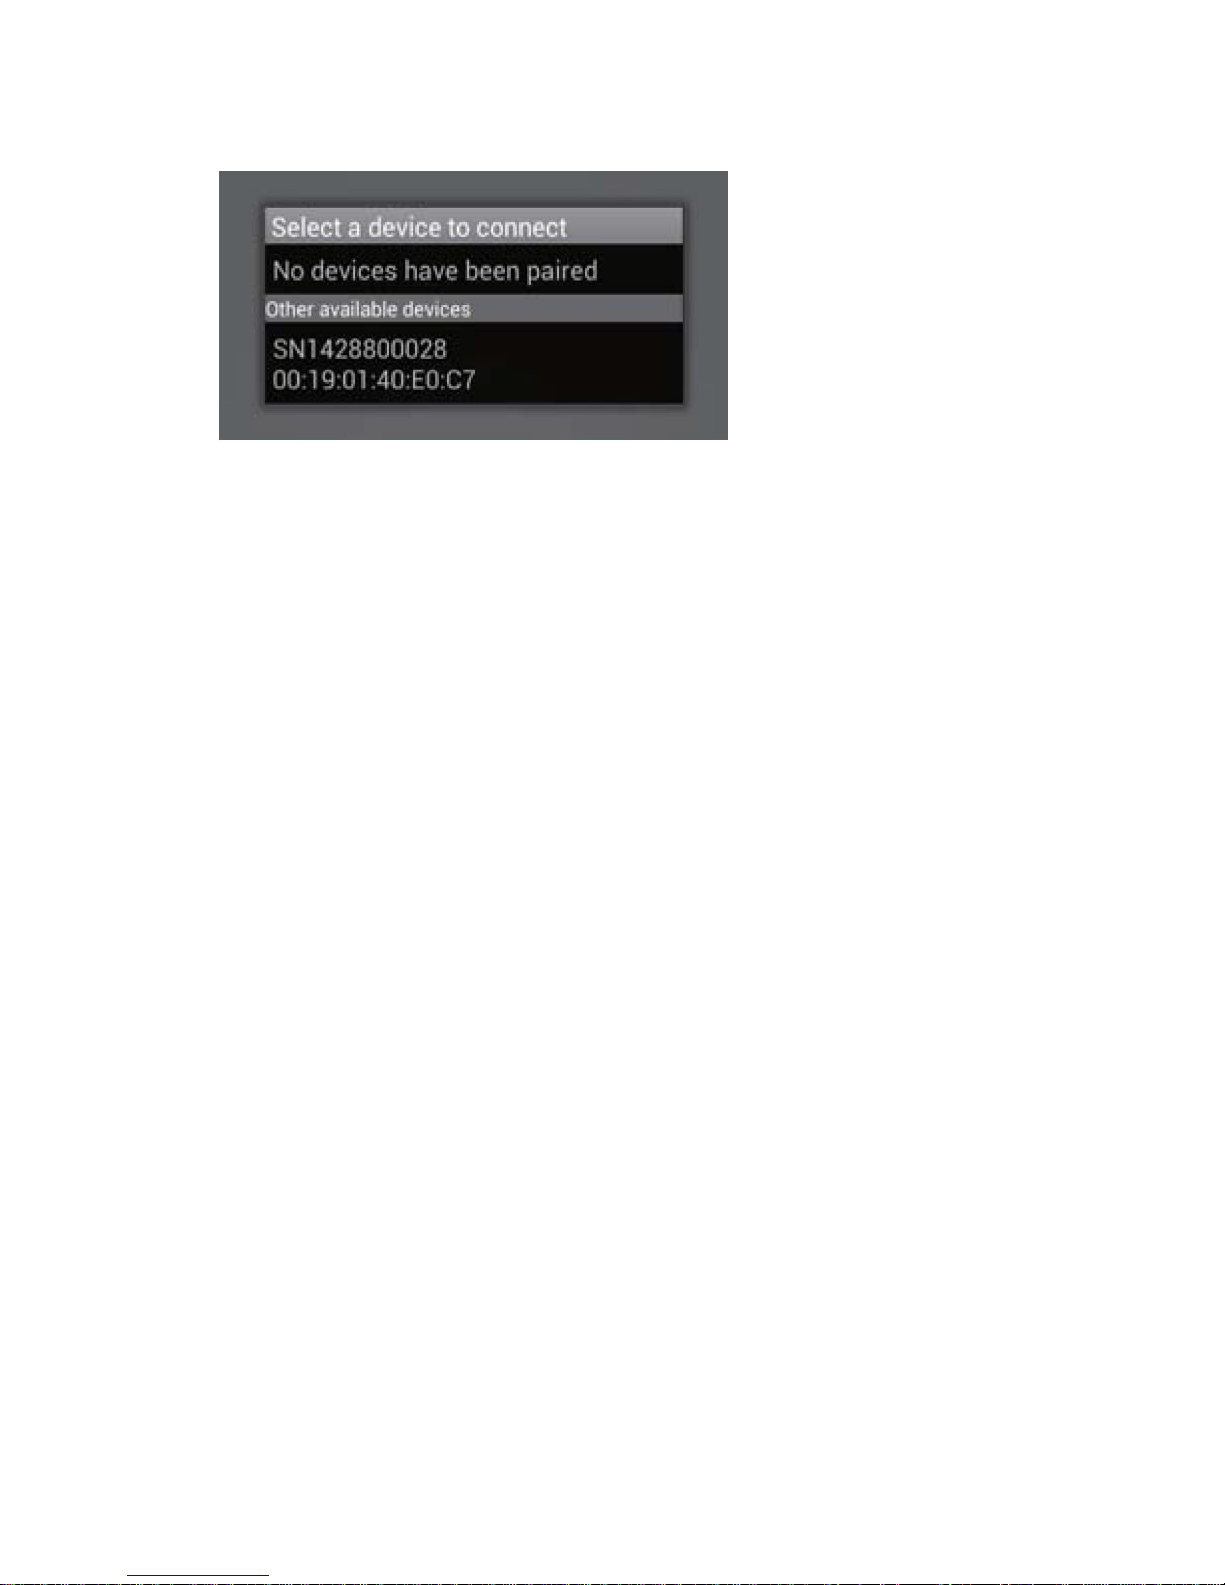
3. Select a device from the list and connect.
10. Reconnecting HID
When HID is disconnected while using PM3 device, reconnection is available by following the
options below.
1. Admin Menu -> Bluetooth -> HID Settings -> HID Reconnect -> Enabled
2. Press DOWN key for 1 second to reconnect
3. “Bluetooth Connected” is shown on the display when successfully reconnected
11. PM3 User Menu and Functions
To use the User Menu, Select “User Settings” in the main menu
1. Auto Scan
- You can select Auto Scan and the scanning time on a 0.25 second cycle
2. Beeper Volume
- Beeper Volume can be adjusted
- Volume size is available among “None”, “Low”, “Middle”, “High”
3. Vibrator
- You can select the vibrator working when scanning is “Success” and “Fail”
- Vibration time can be selected among “Short”, “Middle”, “Long”
4. Connect Mode
- Bluetooth transfer mode can be selected. Basic setting is “SPP 2.0”
Page 25

25
12. PM3 Administrator Menu and Functions
To use the administrator menu, select “Admin Menu” in the main menu.
General uses may not change the settings of the admin menu. Ask for help to an
administrator when changes are required.
1. Barcode/Scan
1.1. View Data
- Searching or deleting the saved barcode data
1.2. Symbologies
- You can select use or disuse of barcode type. It is toggled when pressing the key
- When “*” is shown at the left corner of the display, it means the barcode type is being
used
1.3. Code Options
- Setting the detail options for each of the scanner type
1.4. Scan Options
1.4.1 Scanner Lock
- Scanner Lock Setting
1.4.2 LED On Scan
- LED alert setting when scanning is “success” and “Fail”
1.4.3 Trigger Release
- Operation mode setting for scan trigger
- When enabling, scan button should be pressed in order to apply the trigger time.
Scanner Trigger becomes “off” when the button is not pressed
- Trigger Time is continued if the button is not pressed when the device is disabled
1.4.4 Trigger Timeout
- Setting the Scan Trigger Time Out
1.4.5 Power save mode
- Setting the Power save mode
1.4.6 Terminator
- Setting the terminator text when transmitting the barcode
1.4.7 Transmit Barcode ID
- Setting the Barcode ID Transmission
1.4.8 Security Level
- Setting the Security Level
1.4.9 Scan Angle (SE965HP)
- Setting the angle of the Scanner Beam
1.4.10 Adaptive Scan (SE965HP)
- Setting the focus of the Scanner Beam to Automatic change
1.4.11 Picklist Mode (SE4710)
- Setting the scanner to scan the barcode only indicated by the aimer
Page 26

26
1.4.12 Redundancy (SE4710)
- Setting the Scan level to prevent from misreading
1.4.13 Inverse 1D (SE4710, SE655)
- Setting the scanner whether the color-reversed 1D barcode should be read or not
1.4.14 Prefix / Suffix
- Deleting Prefix, Suffix
1.5. Duplicate
- Setting to check if data is duplicated when scanning
- Duplicated data is not saved when the device is set to Enabled
2. Bluetooth
2.1. Power
- Setting On/Off power of the device
2.2. Wakeup Nulls
- You may transmit, or not transmit the Null data to wake up the module when the
Bluetooth module of the Host is on Sleep
2.3. Connect Alert
- Setting the alert if the Bluetooth is disconnected while transmitting the barcode
2.4. Data Format
- Setting the format of the Barcode transmission data
- Barcode Only : Transmitting the barcode data only
- Packet Data : Transmitting the packet data of the barcode
2.5. Handshake
- You may check if the packet data transmission was “Success” or “Fail” by setting the
handshake function
2.6. HID Settings
2.6.1 HID Reconnect
- Setting the function of reconnection on HID transmission mode
- If there is HID connection record, and it is currently disconnected, you can set it to
Reconnection by using DOWN key
2.6.2 HID Keyboard
- Setting the Keyboard input method of the connected device
2.6.3 HID Delay
- Setting the time of HID text transmission to get help with stable transmission
2.6.4 HID Control Char
- You can transmit the values of ASCII (0x01 ~ 0x1F) which is not expressed by the
keyboard
2.6.5 HID Sync
- Setting the synchronization on the HID transmission mode
3. Configuration
3.1. UI Settings
3.1.1 Language
- Language (English, Korean)
3.1.2 Auto Exit Time
- Setting the operation time of auto exit from the menu
Page 27

27
3.1.3 Display Format
- Setting the display format of the scan result and information
3.2. USB Settings
3.2.1 USB Mode
- You can select the USB connection method. See “3.10. Using the USB memory in
connection with PC
3.3. GPS Settings
3.3.1 GPS Power
- Setting the GPS Power on/off
3.3.2 Power Mode
- Setting the power save mode
3.3.3 Bypass Data
- Setting the bypass of NMEA data
- When setting to Enabled, operated by BT GPS Receiver and not transmits barcode
data
3.3.4 Reset GPS
- GPS Reset Setting
3.4. NFC Settings
3.4.1 NFC Power
- NFC power on/off Setting
3.4.2 Support Type
- Select the supporting tag type
3.4.3 Auto Detect
- Auto Detect Setting
3.4.4 F/W Update
- NFC Firmware Updating
3.5. System Settings
3.5.1 Auto Erase
- When the storage is full, data is automatically deleted if you set it to “Auto Erase”
- When the device is Enable, all data is deleted if the storage is full
- “Buffer full” is displayed when the device is Disable
3.5.2 Sleep Timeout
- Sleep timeout setting
3.5.2 Date/Time
- Date/Time Setting
3.5.4 Button Lock
- Button lock Setting
3.5.5 Power Save
- Power save mode setting
3.5.6 Factory Reset
- Factory reset Setting
3.5.7 F/W Update
- Updating is available when you enter the password (ask for the password to the
administrator)
4. Device Info
4.1. F/W Version
4.2. Memory Info
4.3. Battery Info
Page 28

28
4.4. H/W Revision
4.5. Serial Number
4.6. Part Number
4.7. Scanner Type
4.8. Scanner S/N
4.9. Scanner F/W
4.10. BT MAC Addr.
4.11. BT F/W Ver.
4.12. NFC F/W Ver.
13. Functions of the Keys
On Idle Screen
On Menu Screen
SCAN Key
Scans
Starts/Stops Auto Scan
Selects Menus
Selects settings
UP Key
Turns off when pressing for 5
seconds
Turns on when pressing for 1
second on power OFF
Display enters to the menu
screen when pressing with
DOWN key at the same time
Moves up to the menu above
Keeps it moving up when
pressing for 3 seconds
DOWN Key
Disconnects BT when pressing
for 3 seconds if BT is
connected
Tries to reconnect when
pressing for 1 second if
disconnected on BT HID mode
Display enters to the menu
screen when pressing with UP
Key at the same time
Moves down to the menu
below
Keeps it moving up when
pressing for 3 seconds
14. Initializing the Memory
To delete the data saved in storage:
1. Select “Reset Memory” in the main menu
2. Check the message of “Erase All Data?” and select “Yes”
3. Wait until deleting is completed
15. Using the USB Memory in Connection with PC
When connecting with PC, you can select the serial type and disk type. Basic setting is serial
type.
To use your device with disk type, set as follows
1. Admin Menu-> Configuration -> USB Settings -> USB Mode -> USB Disk
2. Check “Flash Erase And Reset” message and select “Yes”
Page 29

29
3. Wait until memory is completely deleted
4. After deleting, your device is automatically reset and operates with USB memory from this
moment
16. Trouble Shooting and Note
If the device operates abnormally because wrong value setting, restore the device by selecting
factory reset.
How to Factory Reset : In the main menu, “ Admin Menu-> Configuration -> Sys. Settings
-> Factory Reset”
*Note: After factory reset, all settings are initialized, and the saved barcode in the storage is
deleted.
 Loading...