

Page 1

Pointmaker® CPN-5800
Live Streaming Annotation System
w/ Audio Extraction, Volume Control, iPad Control, Scaling,
Capture, Print, and Networking Features
User Guide
e CPN-5800 is a dynamic product,
with features added on a regular basis. e
latest version of this manual will be posted
for download at pointmaker.com, on it’s
product page.
Rel. Date: 080515
Page 2

Copyright
© 2015 by Pointmaker LLC
4650 S. Buttereld Drive, Tucson, AZ 85714-3403
800-552-2262
(520) 745-0001
Fax (520) 745-0004
www.pointmaker.com
No part of this publication may be reproduced, transmitted, transcribed, stored in a retrieval
system or translated into any language in any form by any means without the expressed
written permission of Pointmaker LLC
Pointmaker® is a registered trademark of Pointmaker LLC, of Tucson, Arizona. All other
trademarks are the property of their respective companies.
Page 3

Contents
Section One:
Getting Started .................................................................................................................... 1
Introduction .....................................................................................................................................3
Live Streaming Annotation System with iPad Control, Capture, Print and Network Capabilities ...................3
Features ..........................................................................................................................................................5
Controllers/Markers Overview ...........................................................................................................9
DTU-30 Digitizing Tablet .............................................................................................................................9
KB-30 Keyboard ..........................................................................................................................................10
Touch Screens and Whiteboards ...................................................................................................................12
Mouse Devices .............................................................................................................................................13
Section Two:
Installation .......................................................................................................................... 15
General Installation .........................................................................................................................17
Connecting Audio/Video Sources and Outputs ............................................................................................17
Connecting Controllers ................................................................................................................................19
Videoconferencing .......................................................................................................................................22
Power Up .....................................................................................................................................................22
Section Three:
CPN-5800 Menu System .................................................................................................. 25
Overview .........................................................................................................................................27
Using the CPN-5800 Menu System ................................................................................................29
Default User Settings ...................................................................................................................................29
Menu Basics .................................................................................................................................................29
Preparing the CPN-5800 for Use .....................................................................................................33
Customizing the Color Palette .....................................................................................................................33
Selecting a Brightness Level ..........................................................................................................................35
Changing Pen Proximity ..............................................................................................................................37
Selecting Video Sources ................................................................................................................................37
Setting Video Output ...................................................................................................................................40
Zap Icon Toggle ...........................................................................................................................................41
HDCP Input ...............................................................................................................................................41
Audio Select .................................................................................................................................................42
Background Options ....................................................................................................................................44
Touch Screen Command Areas ....................................................................................................................45
System Info ..................................................................................................................................................46
Capture Options ..........................................................................................................................................47
Setting the Destination for Saved Files .........................................................................................................49
Setting the Verify Option .............................................................................................................................49
Calibrating CPN-5800 Controllers ..............................................................................................................50
Serial Port Settings .......................................................................................................................................53
Setting the Tablet Template ..........................................................................................................................60
Network Features .........................................................................................................................................61
Printer Setup ................................................................................................................................................63
Multipoint ...................................................................................................................................................64
Pointmaker LLC Pointmaker CPN-5800 Live Streaming Annotation System - Page iii
Page 4

Section Four:
Using Markers ................................................................................................................... 69
Overview .........................................................................................................................................71
Assigning Marker Appearance ..........................................................................................................73
Assigning Marker Colors ..............................................................................................................................73
Assigning Line Styles ....................................................................................................................................74
Selecting Pointers .........................................................................................................................................76
Turning the Active Pointer On/O ..............................................................................................................77
Marking ...........................................................................................................................................79
Entering the Marking Mode .........................................................................................................................79
Pointing .......................................................................................................................................................79
Drawing .......................................................................................................................................................80
Typing Text Labels .......................................................................................................................................81
Sizing and Anchoring Frames .......................................................................................................................82
Stamping the Date/Time ..............................................................................................................................83
Clearing Markers .............................................................................................................................85
Clearing All Markers ....................................................................................................................................85
Undoing a Marker ........................................................................................................................................85
Erasing Markers ...........................................................................................................................................86
Using e Chalkboard .....................................................................................................................89
Activating the Chalkboard ............................................................................................................................89
Displaying Dierent Overlays ......................................................................................................................90
Paging rough Overlays .............................................................................................................................91
Turning O the Marker Overlay ..................................................................................................................91
Section Five:
Image Mobility ................................................................................................................... 93
Overview .........................................................................................................................................95
Image Manipulation ........................................................................................................................97
Freezing Video .............................................................................................................................................97
Saving Images...............................................................................................................................................97
Retrieving Images .........................................................................................................................................99
Printing Images ..........................................................................................................................................101
Sending Images ..........................................................................................................................................102
Verifying Saved or Printed Images ..............................................................................................................102
Section Six:
Using RS-232 Commands ............................................................................................... 103
Overview .......................................................................................................................................105
X-Y Coordinate Grid .................................................................................................................................106
(A) Autodetect Video Input ........................................................................................................................106
(AI) Audio Input ........................................................................................................................................107
(AO) Audio Output ...................................................................................................................................107
(AOV) Audio Volume ................................................................................................................................107
(B) Background ..........................................................................................................................................108
(CA) Calibrations .......................................................................................................................................108
(CD) Calibration Types ..............................................................................................................................109
(CE) Color Enable .....................................................................................................................................109
(CL) Clear ..................................................................................................................................................110
(CM) Marker Move ...................................................................................................................................110
(CPF) Freeze ..............................................................................................................................................110
(CPI) Read Specic Image From USB ........................................................................................................110
(CPN) Read Specic Image From TFTP ....................................................................................................111
(CPP) Print Current Image ........................................................................................................................111
(CPRD) Read Current Image from USB ....................................................................................................111
(CPRS) Read Current Image from SMB ....................................................................................................111
(CPRT) Read Current Image from TFTP ..................................................................................................112
Page iv - Pointmaker CPN-5800 Live Streaming Annotation System Pointmaker LLC
Page 5

(CPSD) Store Current Image to USB .........................................................................................................112
(CPSS) Store Current Image to SMB .........................................................................................................112
(CPST) Store Current Image to TFTP .......................................................................................................112
(CPW) Read Specic Image From SMB .....................................................................................................113
(CS) Color Selection ..................................................................................................................................113
(DCT/DCA) Device Type COMM ...........................................................................................................114
(DL) Draw Line .........................................................................................................................................115
(DP) Drop Marker .....................................................................................................................................116
(DUI/DUP) Device Type USB ..................................................................................................................116
(E) Echo .....................................................................................................................................................118
(EM) Erase Method ...................................................................................................................................119
(ESP, ESA) Video Streaming (CPN-5800)..................................................................................................119
(FS) Frame Size ..........................................................................................................................................119
(FT) Frame Type ........................................................................................................................................120
(HI) HDCP Input setting for each HDMI input port ...............................................................................120
(I) Marker Intensity or Brightness ..............................................................................................................120
(IFD) Set Image File Directory ...................................................................................................................121
(IFI) Set Image File Index ..........................................................................................................................121
(IFP) Set Image File Prex ..........................................................................................................................121
(IM) Identify Mode for Multiple Users ......................................................................................................121
(L) Line Style .............................................................................................................................................122
(K) Keyboard Input ....................................................................................................................................122
(M) Video Input Type ................................................................................................................................123
(ME) Verify Dialog Response .....................................................................................................................123
(PA) Pass-through ......................................................................................................................................123
(PT) Pointer Type ......................................................................................................................................124
(PX) Proximity On/O ..............................................................................................................................124
(R) Restart Pointmaker ...............................................................................................................................125
(S) Date/Time Marker ...............................................................................................................................125
(SCO) Scaler Output Format .....................................................................................................................126
(SUM) Menu System .................................................................................................................................127
(T) Text Label ............................................................................................................................................127
(TA) Template Change ...............................................................................................................................128
(TC) Touch Screen Corner Control ...........................................................................................................128
(TCA) Touch Screen Function Areas ..........................................................................................................129
(TR) Touch Screen Right Click Emulation ................................................................................................130
(U) Undo/Erase..........................................................................................................................................130
(V) Select an Overlay .................................................................................................................................131
(VCD) Display Change of Video Input ......................................................................................................131
(VI) Video Input ........................................................................................................................................131
(VIH) Enable or Disable HDCP Input ......................................................................................................132
Appendix .......................................................................................................................... 133
Troubleshooting Guide ..................................................................................................................135
Updating the CPN-5800 ...............................................................................................................137
Quick Reference for Devices ..........................................................................................................139
Quick Reference for Digitizing Tablet ........................................................................................................139
Quick Reference for Keyboard ...................................................................................................................141
Quick Reference for Touch Screens and Whiteboards .................................................................................142
Quick Reference for Other Mouse Devices.................................................................................................142
Symbol Font Chart ........................................................................................................................145
Map Font Chart ............................................................................................................................147
RS-232 (COMM Port) Pinout ......................................................................................................149
Glossary .........................................................................................................................................151
Outside copyright information for software included with the CPN-5800. ...................................155
Pointmaker LLC Pointmaker CPN-5800 Live Streaming Annotation System - Page v
Page 6

Page vi - Pointmaker CPN-5800 Live Streaming Annotation System Pointmaker LLC
Page 7

seCtion one:
GettinG started
Page 8

Page 9

Section One:Getting Started Introduction
introduCtion
e Pointmaker® CPN-5800 is a professional, hardware-based video processor,
designed so that users can display and share content from an iPad, as well as from
multiple video and computer sources. is model also has the ability to change
settings, switch video sources and annotate from the convenience of an iPad.
Pointmakers are valuable assets in courtrooms, boardrooms, class rooms, city
council chambers, government training facilities, sports or weather broadcasts,
video conferences, and more.
Live Streaming Annotation System with iPad Control, Capture,
Print and Network Capabilities
e CPN-5800 gives the user the ability to capture, print and share annotated
images directly from the Pointmaker unit. An annotated image may be “cap tured”
by saving it to a USB storage device, like a ash drive. You can print annotated
images to a color PostScript printer. e printer must be connected either over a
TCP/IP network, or directly through the Pointmaker unit’s USB port to a
IEEE1284 port on the printer. Images are easily shared over a TCP/IP network or
through the mobility of the USB storage device, which is easily transported or
connected to a computer. With a separately purchased iPad, you can download
and use the Pointmaker PVI Control app to annotate and control the Pointmaker
from anywhere in the room.
Marking devices
Drawing lines and markers are controlled by the user during a presentation with
an optional USB digitizing tablet (DTU-CTL470). e included keyboard
provides a few more marking features as noted below. e CPN-5800 is also
compatible with most touch screens and mouse devices.
All Pointmaker video markers oer several simple-to-use graphics, called markers.
ere are two types of markers with which to annotate a video image: pointers and
freehand drawing. Among the 12 pointers available, there is a selection of 8
arrows, each oriented at a dierent angle; 2 dot pointers, small and large; and 2
cross hair pointers, small and large. Of course, there is an option to display no
pointer at all. e second marking capability is free hand drawing. You can select to
draw in 1 of 4 dierent line widths, with or without drop shadows.
When the keyboard is attached, it enables four additional marker types: frames,
text, a date/time stamp, and straight line drawing. Frames include boxes and
circles which can be sized in advance of a presentation, then used to frame or ll
certain areas of the video image. Using the keyboard, presenters may type alphanumeric text directly on the video image, or select an active date and time label that
Pointmaker LLC Pointmaker CPN-5800 Live Streaming Annotation System - Page 3
Page 10
Introduction Section One:Getting Started
can time events displayed on the monitor or screen. Straight line drawing is also
available in three dierent line widths.
Pointers and drawings may be used in combination to annotate the image. As
easily as the markers are created, so are they easily erased, either one at a time until
the screen is clear, or all at once. Markers are actually drawn onto clear “overlays.”
e system supports up to 25 dierent marker overlays, which can be stored ahead
of time and then recalled during the presentation.
Markers can be created in 7 dierent colors, or 3 dierent highlight colors, useful
to help separate points being made, or to increase contrast with the background
image. And, if a video image is not desired, presenters may call up a white
background on the screen and use it like a whiteboard on which to “draw out”
your point.
e Pointmaker CPN-5800 is compatible with most VGA and HDMI sources,
and most DVI (with an HDMI to DVI adapter) and HDMI displays.
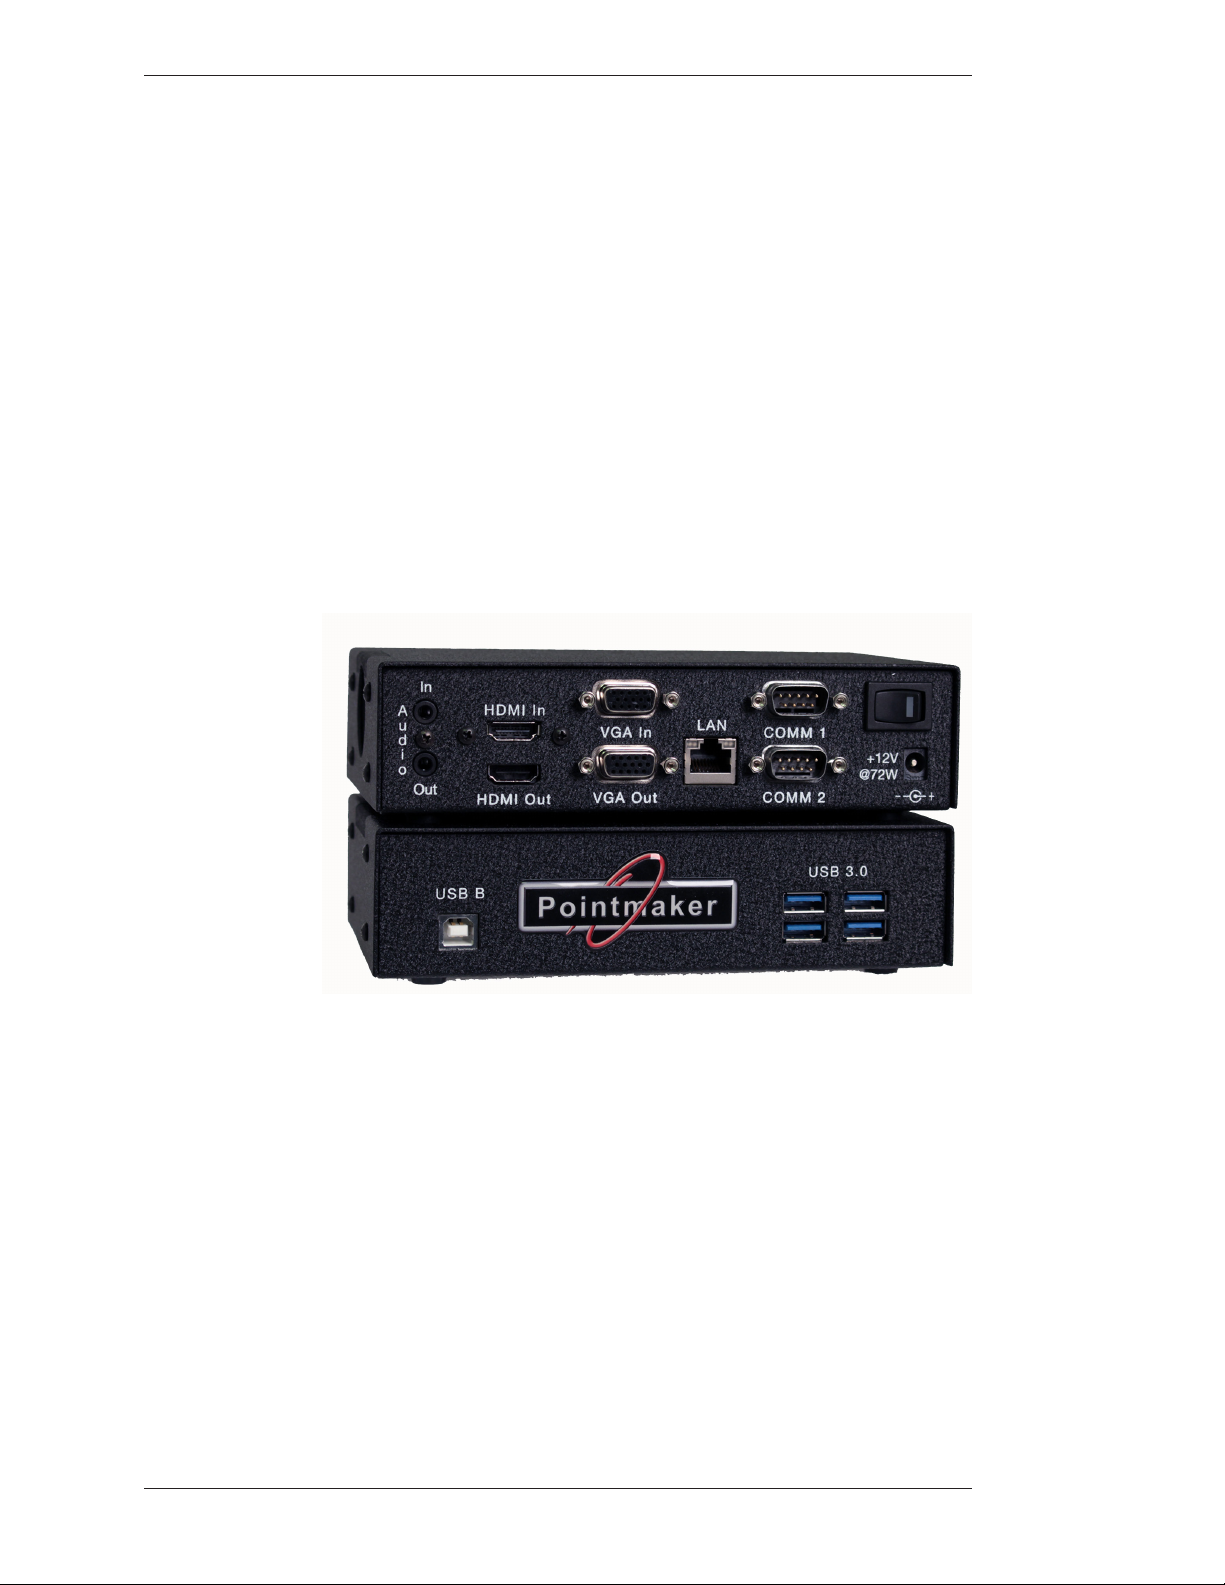
Figure 1-1: Front and Back Panels
iPad Server Options
e CPN-5800 contains an iPad server which supports remote control of certain
features within the unit, along with annotation, all through an iPad app. Operation of iPad app features is featured within the app’s Help area. For more information, please see our website at www.pointmaker.com/servers for further information, or contact a sales representative.
e CPN-5800 is also available without iPad server options.
Page 4 - Pointmaker CPN-5800 Live Streaming Annotation System Pointmaker LLC.
Page 11

Section One:Getting Started Introduction
Features
• Two marking tools
Freehand drawing mode in four dierent line thicknesses; ne, medium
and bold, with or without a drop shadow.
Pointers including arrows, dots and cross hairs, which may be moved or
anchored anywhere on the screen. Arrows may be preset to point in one of
8 dierent angles. Dots and cross hairs may be pre-selected in a small or
large size.
• Four additional marking tools with keyboard connected
Straight line drawing mode allows underscoring, mapping or other wise
drawing a straight line. ree dierent line thicknesses are available: ne,
medium and bold, with or without a drop shadow.
Text can be typed on the video image in one of 6 dierent fonts, each
available in one or more sizes. A text background may be added to further
highlight the text on the video image.
Frames in the shapes of circles or boxes may be sized and positioned to call
attention to an area within the frame. Filled frames or lls allow presenters
to block out portions of the video image, useful in classroom exams or in
blocking out extraneous visuals.
An active date/time label, sometimes called a date/time stamp, can be
placed on the video image to time an event. is label is very useful for
record keeping when saving or printing images because it is embedded in
the image.
• e ability to position and anchor a combination of several markers and
drawings on the screen at once.
• Easily capture or print annotated images.
• Options for clearing lines and pointers from an overlay all at once or one at
a time, beginning with the most recently anchored marker.
• Ability to assign a unique marker color (up to 7) to each marking device.
• On an optional digitizing tablet, an additional 3 highlight colors can be
used to create a see-through colored overlay, just like “Highlighters” on
paper.
• A drop shadow eect may be selected to further optimize the display of
drawn lines.
Pointmaker LLC Pointmaker CPN-5800 Live Streaming Annotation System - Page 5
Page 12

Introduction Section One:Getting Started
• With keyboard connected or when used with AMX/Crestron control ler, or
other control system, you have the ability to store up to 25 dierent marker
overlays of Pointmaker markers so that presentations may be prepared in
advance. Without the keyboard attached, only one over lay is supported.
• Compatibility with VGA and HDMI equip ment.
• A solid white chalkboard can be selected for drawing when the video image
is no longer needed.
• Sync generation allows the Pointmaker to automatically select the sync if
no live video is desired. In the event that sync from a poor video source is
lost, the Pointmaker will automatically switch to chalkboard mode if
auto-chalkboard is enabled.
• Keyboard control provides a quick way to select many of the Menu System
options without having to go to the Menu System. Instead, function keys
provide choices for pointer type, background, marker colors, brightness
levels, video source selection and more.
• Pen Proximity feature allows tablet users to determine what happens to the
active pointer as the pen is moved away from the tablet. e pointer can be
made to disappear as the pen is pulled away, or to remain on the video
image, ready for positioning
• Brightness adjustment gives you the opportunity to set the brightness of
the Pointmaker markers to coincide with the brightness level of the video
signal, so that the markers are displayed optimally for standard video or for
professional broadcasting.
• A/V programmable so that A/V remote control systems can control the
Pointmaker using commands supplied in this manual.
• Two RS-232 ports allow the simultaneous use of two RS-232 tablets or
RS-232 touch screens (or other RS-232 communications devices).
• Four USB 3.0 ports allow the simultaneous use of up to four USB tablets,
USB touch screens, or other USB control devices. e use of USB hubs
increases the device limit to multiple USB control devices.
• Options available to multiple users to designate which RS-232 tablet or
touchscreen takes pri ority over the other when both are drawing.
Page 6 - Pointmaker CPN-5800 Live Streaming Annotation System Pointmaker LLC.
Page 13
Section One:Getting Started Introduction
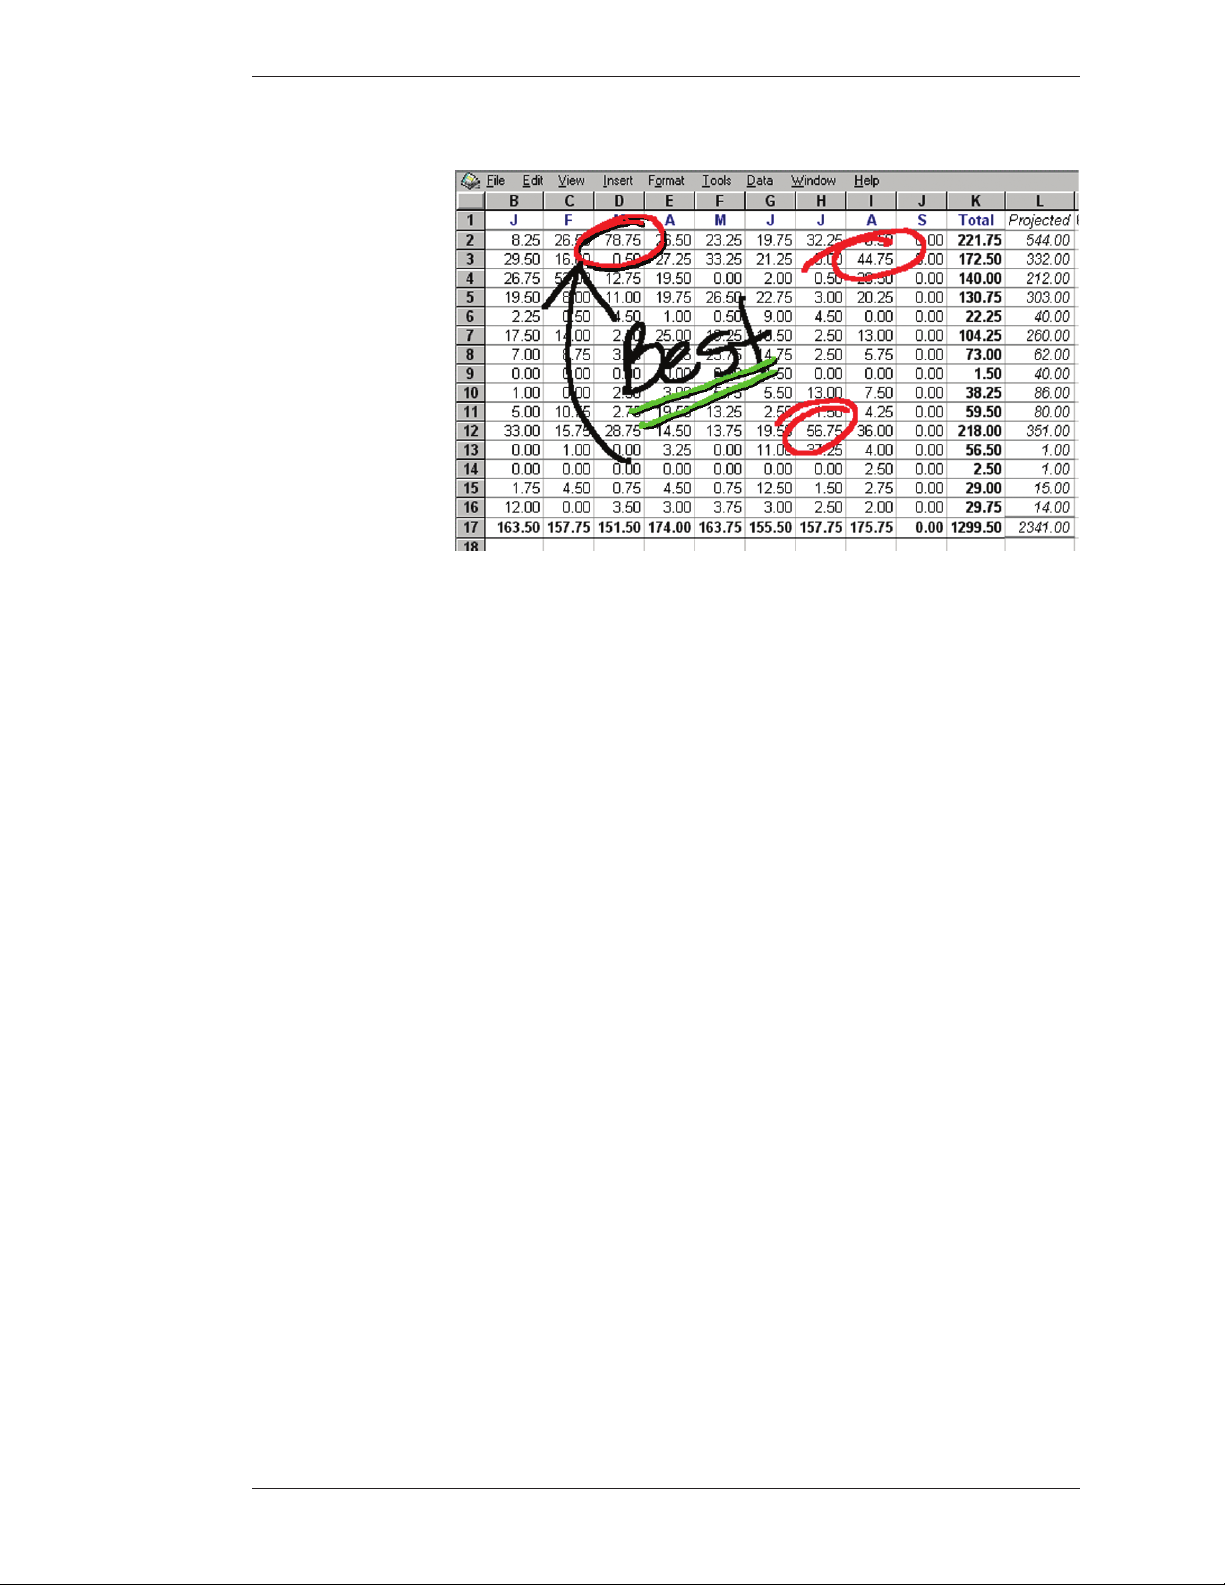
Figure 1-2: Marking example over an image of a spreadsheet
Pointmaker LLC Pointmaker CPN-5800 Live Streaming Annotation System - Page 7
Page 14

Introduction Section One:Getting Started
Page 8 - Pointmaker CPN-5800 Live Streaming Annotation System Pointmaker LLC.
Page 15
Section One:Getting Started Controllers/Markers Overview
Controllers/Markers overview
is section introduces you to the most common devices you might use with the
CPN-5800. e CPN-5800 supports up to two RS-232 devices and up to 10 USB
devices through the addition of powered USB hubs.
IMPORTANT: Be sure to power down the Pointmaker before connecting or
disconnecting any controllers. e Pointmaker auto matically detects installed
controllers upon power up.
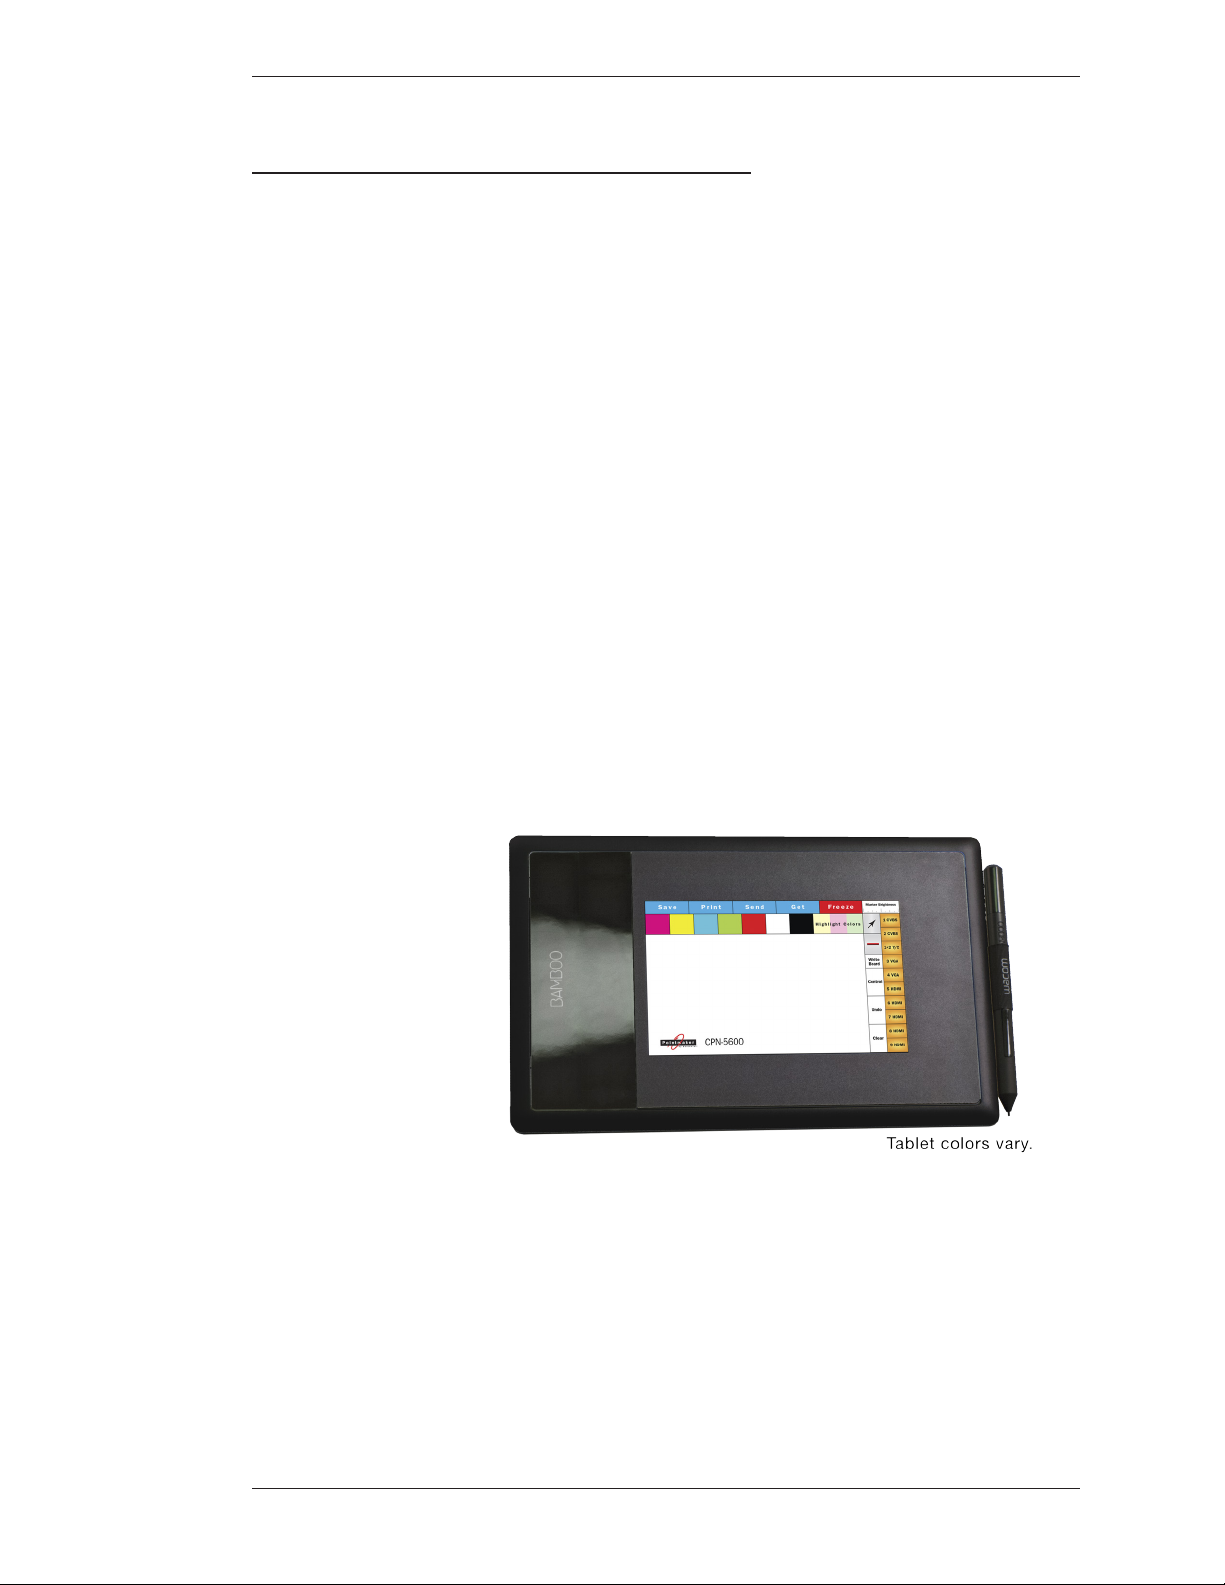
DTU-30 Digitizing Tablet
e Pointmaker DTU-CTL470 Digitizing Tablet is optional for the CPN-
5800(tablet design may vary). In general, the tablet is used to draw, position
point ers or make menu selections. e position and movements of the stylus (also
called a pen) are represented by a video pointer on whatever display devices are
activated. Additionally, most setup commands can be activated using the tablet
rather than entering the on-screen menu system (see Using the CPN-5800 Menu
System, on page 29.
Refer back to this section, if needed, for general instructions concerning the
tablet’s operation.
Figure 1-3: DTU-CTL470 Digitizing Tablet Overview
aCtive area
e maximum area on the Pointmaker digitizing tablet that responds to the stylus.
is area includes the Menu Strip, as well as the Track ing Area.
Pointmaker LLC Pointmaker CPN-5800 Live Streaming Annotation System - Page 9
Page 16

Controllers/Markers Overview Section One:Getting Started
traCkinG area
e drawing/pointing region within the tablet’s Active Area. e Tracking Area
corresponds to the screen area on the monitor or dis play.
Menu strip
e icons (or buttons) at the top of the Active Area that you click to select pointer
or line style, erase or clear markers, change marker col ors, or change to another
marker overlay.
tip Button
e Tip Button of the stylus is a select button, like the left button of a mouse. Use
the Tip Button to draw or position markers. Clicking the Tip Button on a tablet
icon activates that icon’s function. You also use this button in combination with
the Barrel Button to access the menu system.
Barrel Button
Marker and Cursor Movement
KB-30 Keyboard
Use the Barrel Button like the right button of a mouse. It is a rocker button and
works the same way on either end. You primarily use this button to anchor
markers. You also use this button in combination with the Tip Button to access the
menu system. e two buttons must be pressed for at least 5 seconds.
Unlike a mouse controller, a tablet allows you to make drawings and place pointers
with absolute positioning (mouse devices and keyboards use relative positioning).
Absolute positioning means that the position of the stylus on the tablet surface
corresponds directly to the position on the screen. For example, if you place the
stylus in the lower-left corner of the tablet Tracking Area, the active pointer will
move to the lower-left corner of the screen. Absolute posi tioning may take a few
moments to adjust to if you’ve never used a tablet.
With the keyboard, you can select, type, position, save, and erase the markers on
the overlay. You also use the keyboard to access the menu system and change the
appearance of markers. e following are general denitions for keyboard
functions.
More details on each key’s functions can be found in the Appendix (see Activating
the Menu, on page 29).
Page 10 - Pointmaker CPN-5800 Live Streaming Annotation System Pointmaker LLC.
Page 17

Section One:Getting Started Controllers/Markers Overview
Figure 1-4: Pointmaker KB-30 Keyboard Controller
Keyboard Controller Functions
e keyboard functions can be divided into two categories: Marking Keys and
Action Keys.
Marking keys display markers or aect their appearance, such as Frames and
Frame Sizing
Action Keys control operations of the unit, such as changing to a di erent marker
overlay or switching to a dierent video source.
Marker and Cursor Movement
When operating the Pointmaker with the keyboard controller, you can position
active markers using the arrow keys (referred to as Positioning Keys). ese keys
are located to the right of the Enter key. For ne movement, press the Ctrl key
along with one of the Positioning keys.
You can also use Positioning keys to size frames before they are anchored. For ne
sizing, press the Ctrl key along with one of the positioning keys.
Within menus, you can move cursors among the options by using the Position ing
keys.
Pointmaker LLC Pointmaker CPN-5800 Live Streaming Annotation System - Page 11
Page 18
Controllers/Markers Overview Section One:Getting Started
Touch Screens and Whiteboards
e Pointmaker CPN-5800 is engineered for use with many touch screens or
interactive whiteboards sold by other manufacturers. Contact Pointmaker LLC for
compatibility information.
In general, you use the touch screen to draw, position pointers, or make menu
selections. e broad denition of the areas (or zones) on the touch screen are
listed below.
Calibrating the touch screen enhances the intuitive feel of drawing on the dis play.
It’s essential to do a rough calibration the rst time you start the unit after connecting the touch screen. is gives you enough control to activate the menu and do a
complete calibration. (see Calibrating CPN-5800 Controllers, on page 50.
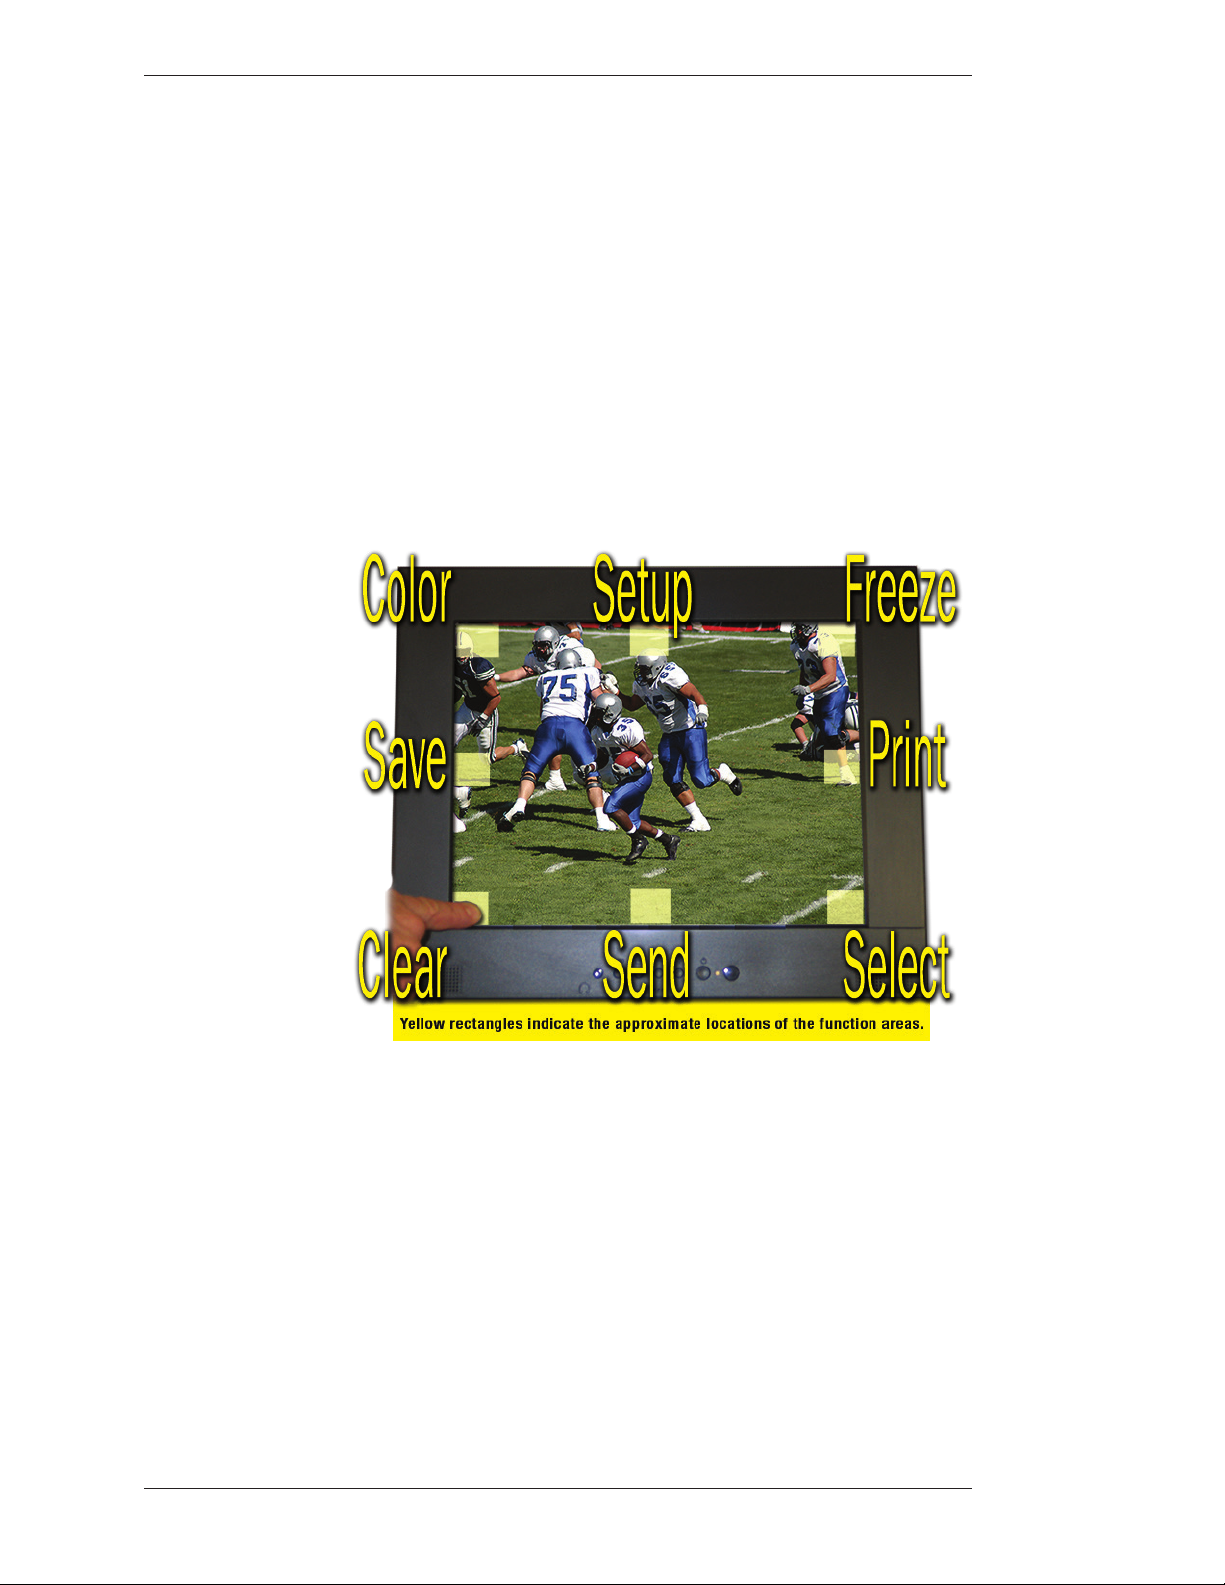
Figure 1-5: Pointmaker Touch Screen Function Area
traCkinG area
e area on the touch screen that responds to the movements of your nger. Draw
and point in this area.
FunCtion areas
e eight regions on the touch screen that, when tapped, activate a function. If
you are drawing and move across one of these areas, the function is not activated.
Page 12 - Pointmaker CPN-5800 Live Streaming Annotation System Pointmaker LLC.
Page 19
Section One:Getting Started Controllers/Markers Overview
Details on touch screen functions can be found in the Appendix (see Quick
Reference for Touch Screens and Whiteboards, on page 136).
Marker and Cursor Movement
When operating the Pointmaker with a touch screen, you position pointers
anytime you tap the screen. You cannot reposition an anchored pointer; how ever,
you can clear or erase a pointer and begin again.
Mouse Devices
ere are numerous other compatible devices for use with the CPN-5800. ey
are mostly based on PC-compatible mouse controllers with two buttons. Since
Pointnaker LLC does not manufacture these devices, you will need to test the
compatibility of any particular unit. For details on mouse func tions, refer to the
Appendix (see Calibrating CPN-5800 Controllers, on page 50.
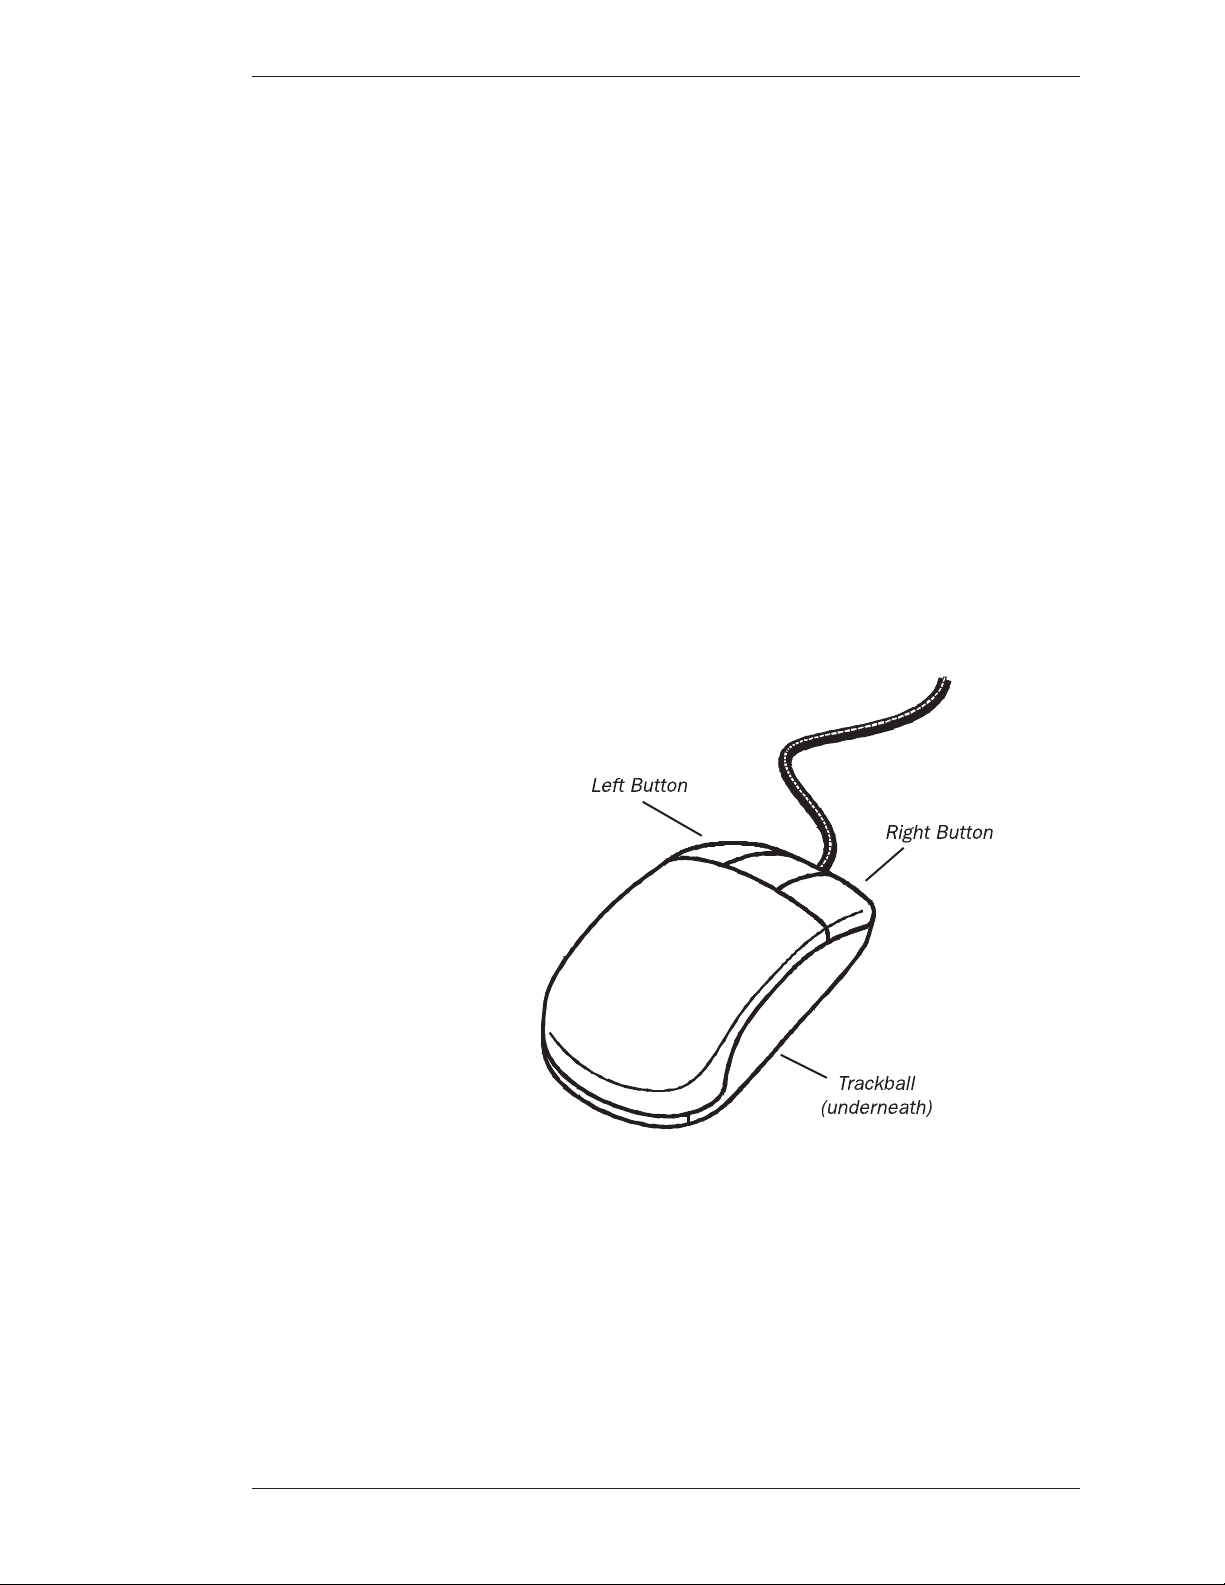
Figure 1-6: Mouse Device
traCk Ball
Moves the cursor or active pointer anywhere on the screen according to how the
ball is rolled.
Pointmaker LLC Pointmaker CPN-5800 Live Streaming Annotation System - Page 13
Page 20

Controllers/Markers Overview Section One:Getting Started
leFt Button or First Button
e Left Button on a mouse allows you to draw when pressed, or anchor a pointer
when clicked. e Left Button is used in combina tion with the Right Button to
access the menu system and change marker color.
riGht Button or seCond Button
e Right Button on a mouse allows you to undo or clear a marker. e Right
Button is used in combination with the Left Button to access the menu system and
change marker color.
Marker and Cursor Movement
When operating the Pointmaker with a mouse device, you can move the cursor or
active pointer anywhere on the screen by moving the mouse’s track ball. e active
pointer or cursor will move respectively.
Page 14 - Pointmaker CPN-5800 Live Streaming Annotation System Pointmaker LLC.
Page 21

seCtion two:
installation
Page 22

Section Two:Installation
Page 16 - Pointmaker CPN-5800 Live Streaming Annotation System Pointmaker LLC
Page 23
Section Two:Installation Connecting Audio/Video Sources and Outputs
General installation
Installation of the Pointmaker CPN-5800 can be divided into the following four
areas:
• Connect Audio/Video Sources and Outputs
• Connect Controllers
• Connect LAN
• Power Up (leaving the CPN-5800 to last)
Connecting Audio/Video Sources and Outputs
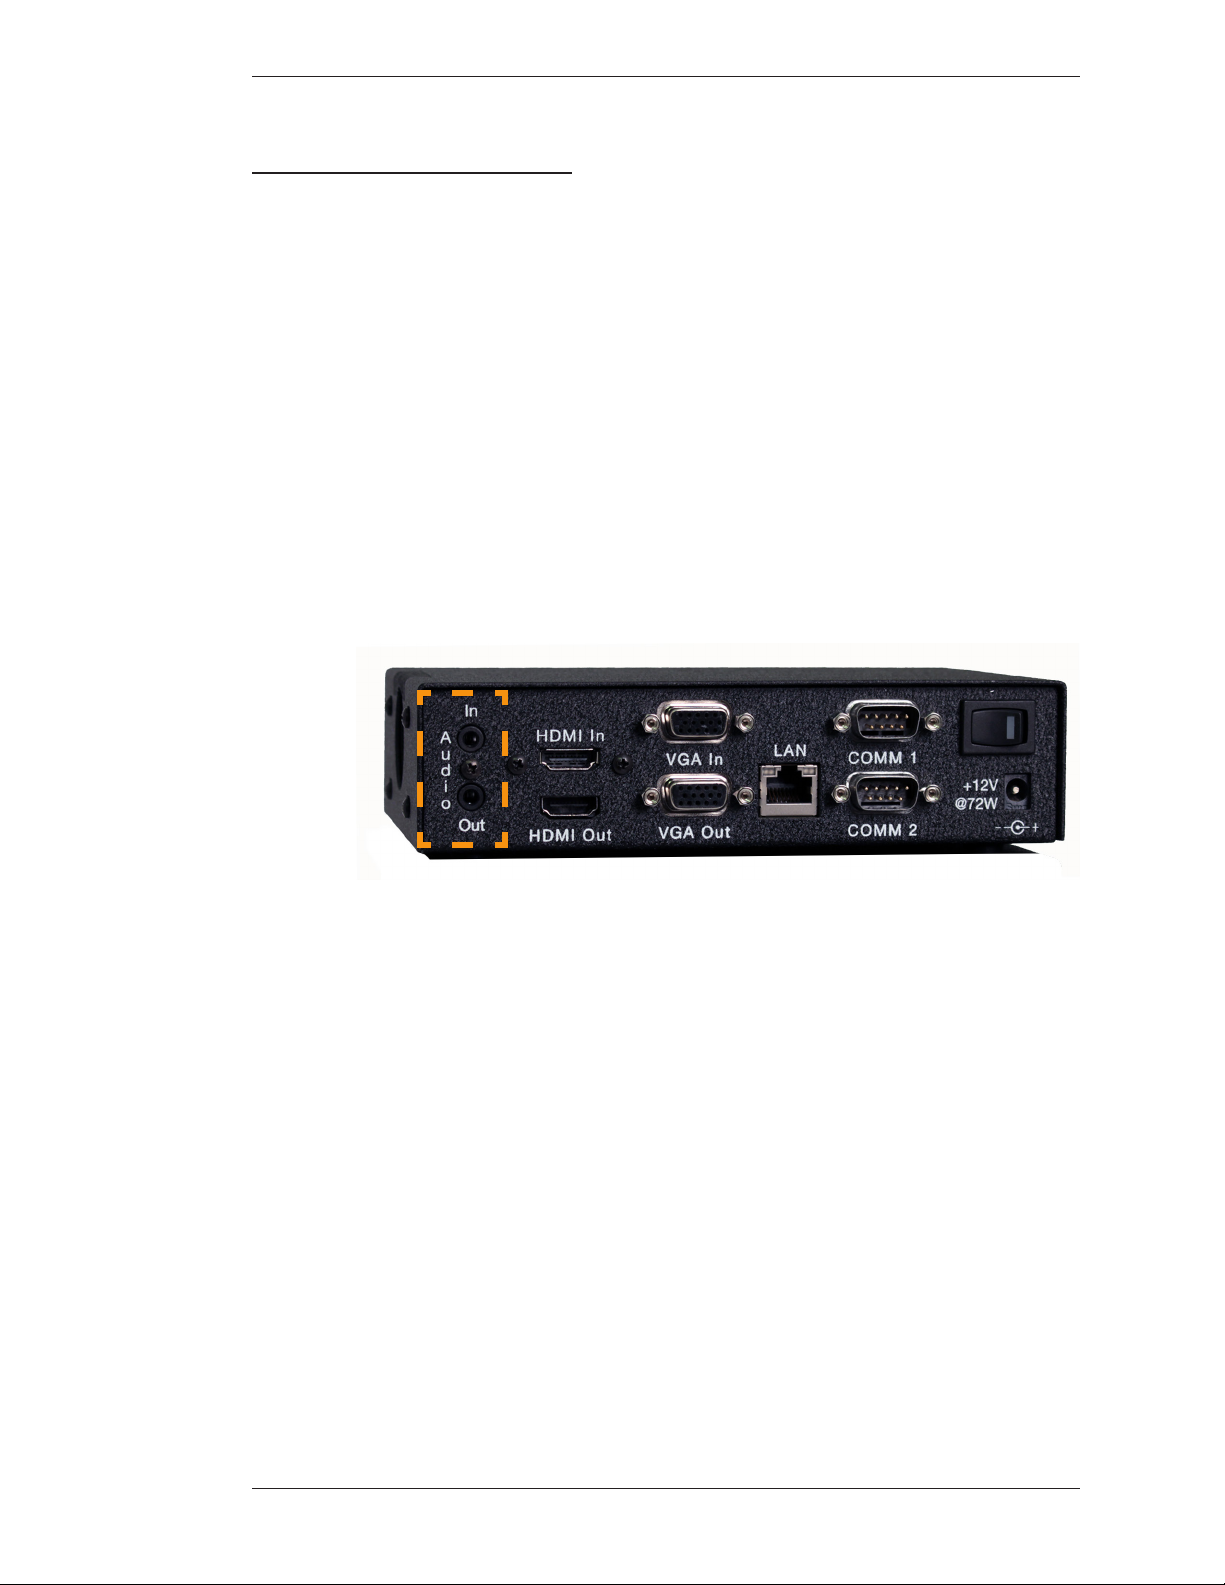
Analog audio input and output ports are supplied for stereo mini plugs (3.5mm).
For connecting video sources, the CPN-5800 supports VGA and HDMI.
For connecting video displays (screens or projectors), there is support for VGA and
HDMI (and DVI-D, if you use a HDMI to DVI-D adapter).
NOTE: Make all connections before applying power.
VGA Connectors
If connecting VGA-Video:
1. VGA Input: Using a VGA video cable, connect a Pointmaker VGA INPUT
connector to a video output connector on a VGA video source.
Figure 2-1: Analog Audio Connectors
Pointmaker LLC Pointmaker CPN-5800 Live Streaming Annotation System - Page 17
Page 24
Connecting Audio/Video Sources and Outputs Section Two:Installation
Figure 2-2: VGA-Video Connectors
2. VGA Output: If desired, use a VGA video cable to connect the
Pointmaker VGA OUTPUT connector to a VGA display device.
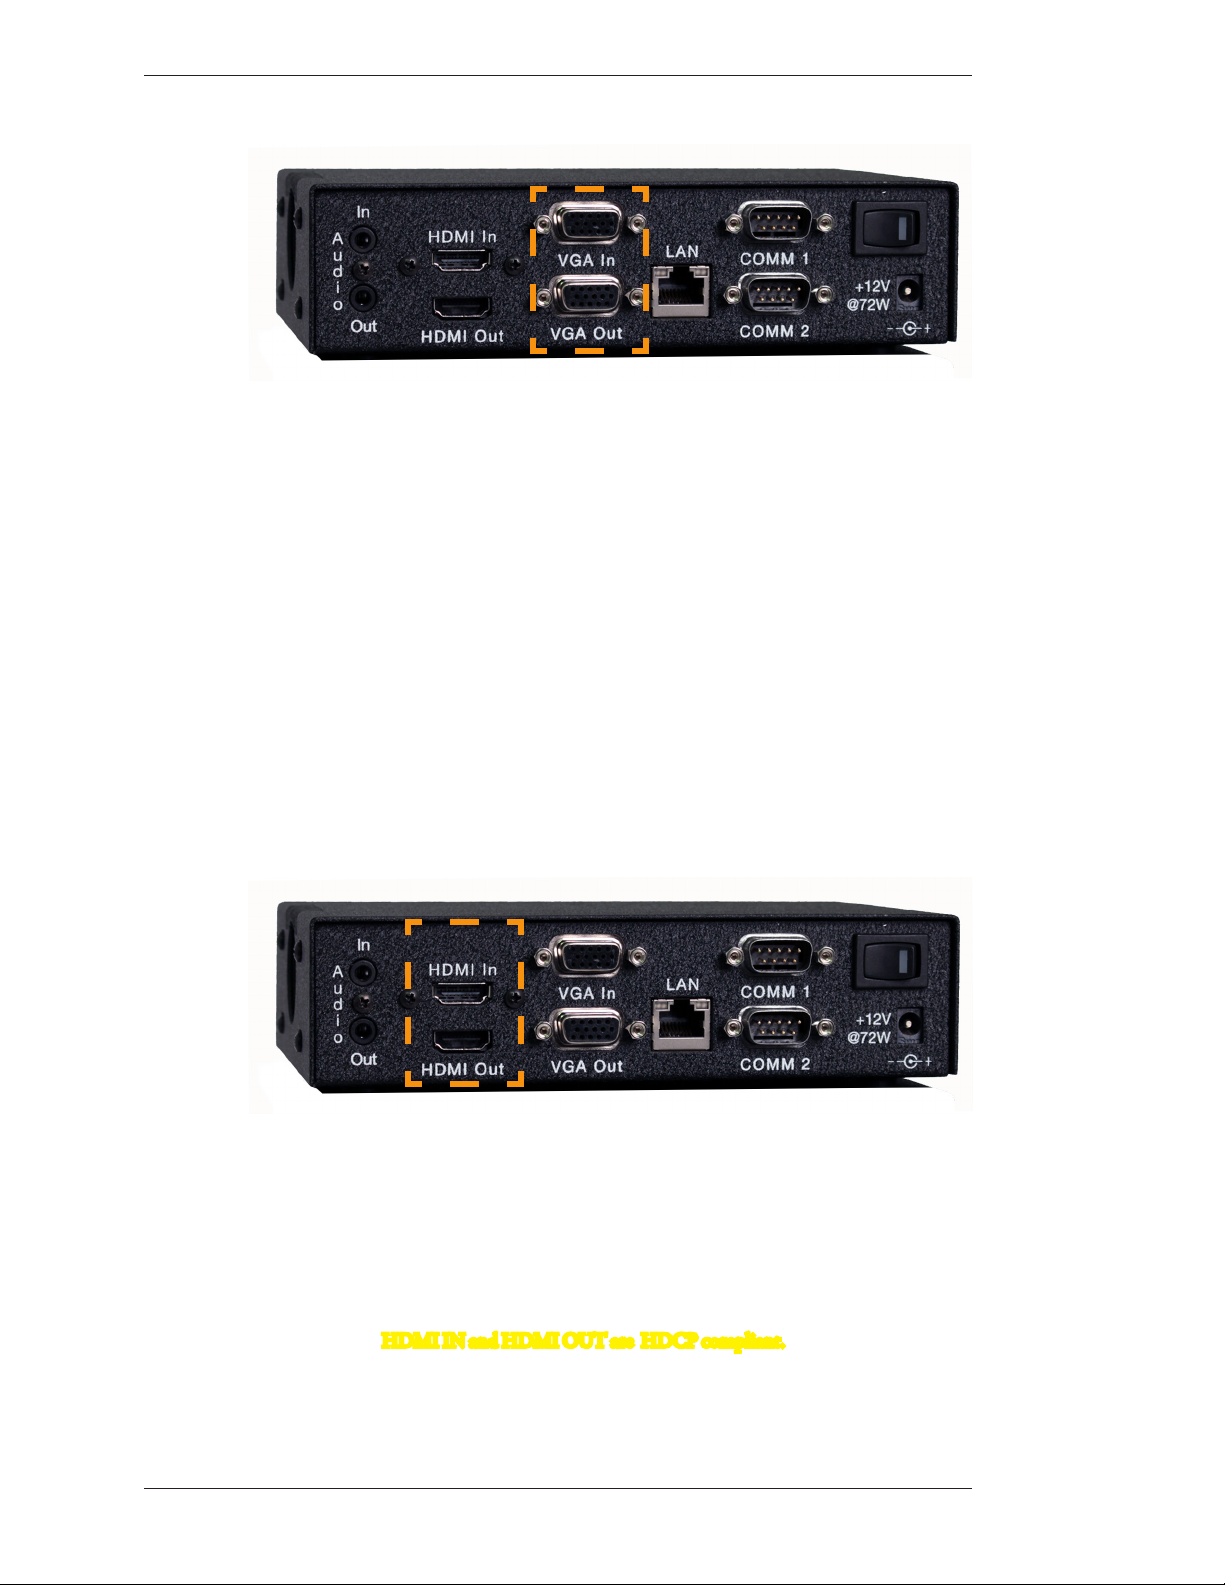
HDMI Connectors
If connecting HDMI video:
1. HDMI Input: Using a HDMI video cable, connect the Pointmaker
HDMI INPUT connector to a HDMI output connector on a HDMI
video source.
Figure 2-3: HDMI Video Connectors
2. HDMI output: Using a HDMI video cable, connect the Pointmaker
HDMI OUTPUT connector to a HDMI output connector on a HDMI
video source.
HDMI IN and HDMI OUT are HDCP compliant.
Page 18 - Pointmaker CPN-5800 Live Streaming Annotation System Pointmaker LLC
Page 25
Section Two:Installation Connecting Controllers
DVI-D Connectors (through HDMI)
1. If desired, use a HDMI to DVI-D video cable to connect the Pointmaker
HDMI INPUT or OUTPUT connector to a DVI display device.
Connecting Controllers
1. e following categories of controllers can be used with the CPN-5800:
• KB-30 Keyboard
• Touch Screens/Electronic
Whiteboards
Here are some guidelines for setting up these devices.
IMPORTANT: Be sure to power down the Pointmaker before connecting or
disconnecting any controllers. e Pointmaker will automatically detect the
installed controllers upon power up. If you change controllers or add a new
controller, you need to power down, install the new controller(s), then power
up.
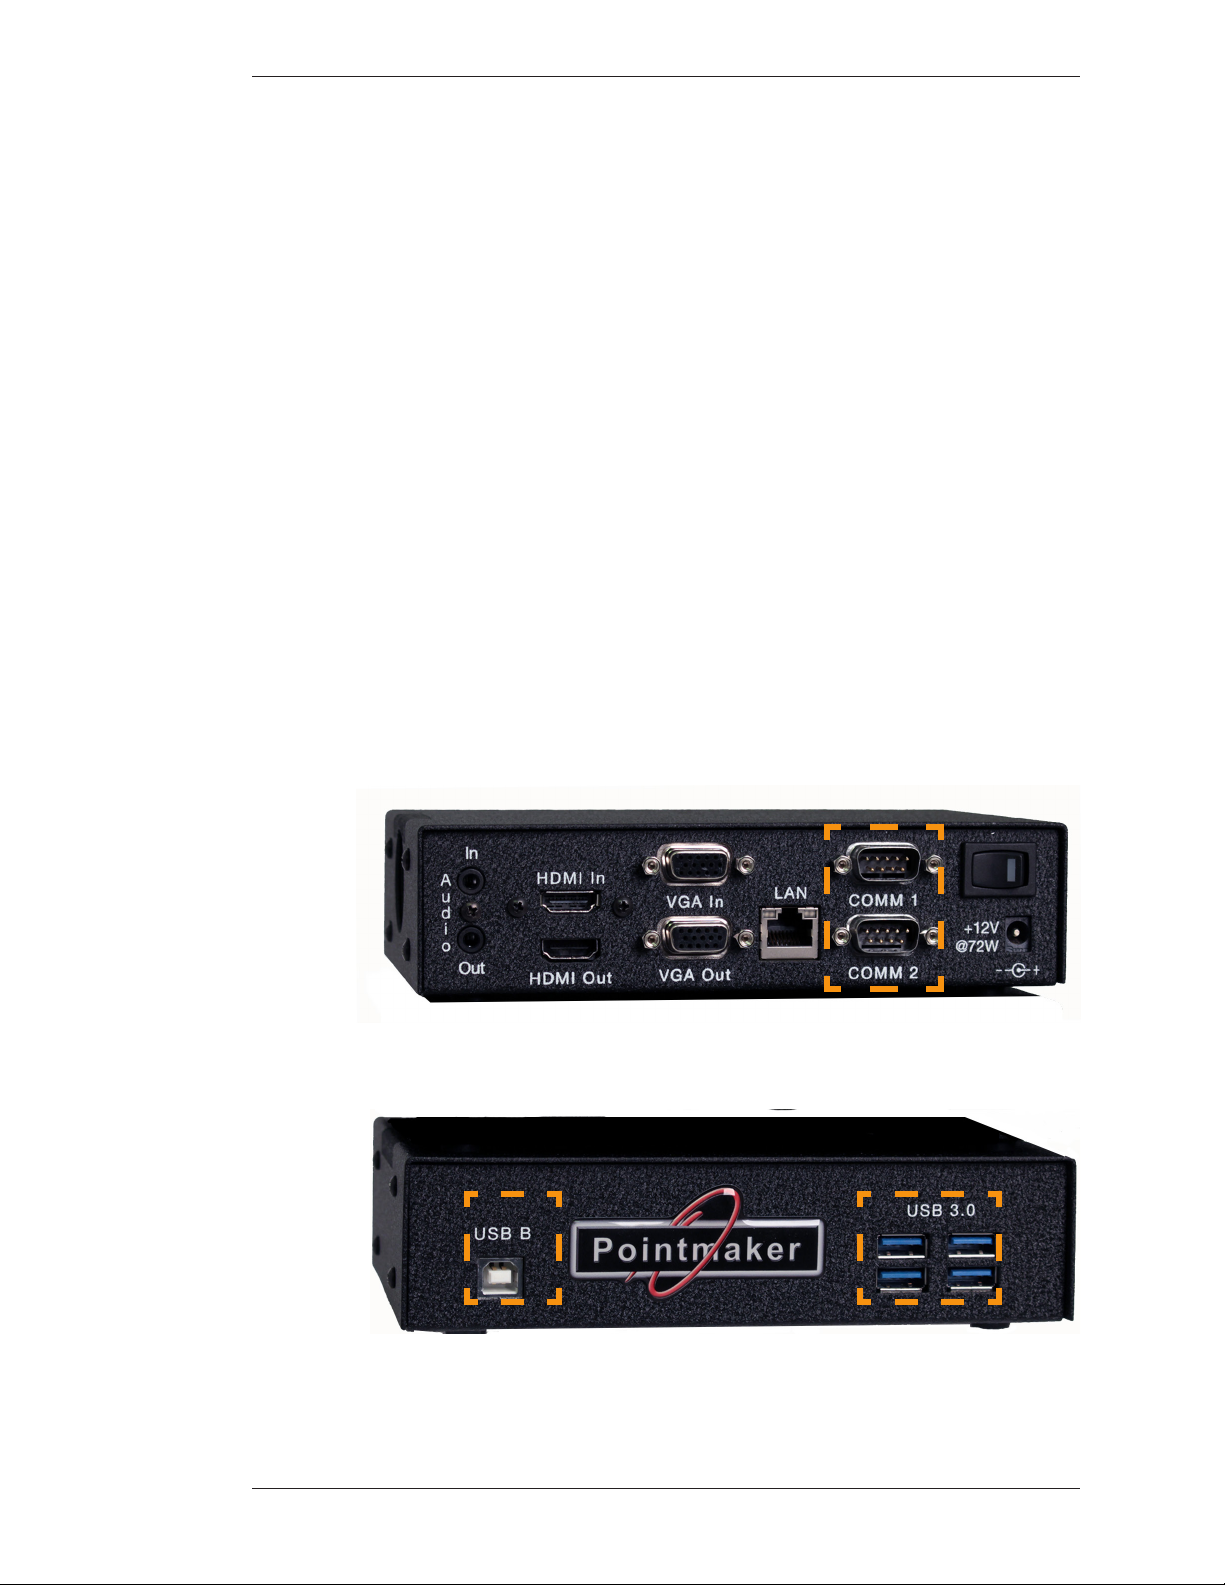
Figure 2-2: Cntroller Ports - Rear
• DTU-CTL470 Digitizing Tablets
• Mouse devices
• iPads
Figure 2-4: Controller Ports - Front
Pointmaker LLC Pointmaker CPN-5800 Live Streaming Annotation System - Page 19
Page 26

Connecting Controllers Section Two:Installation
Connecting a 3rd Party Controller - COMM Port Wiring Issues
Customers sometimes encounter issues with the wiring of controllers other than
those oered by Pointmaker LLC. e following information may be helpful in
solving them.
• Pointmaker COMM ports sometimes use pin 9 to supply power to the
DTX-DRV RS-232 line drivers. e DTX-DRV drivers support cable
extensions for digitizing tablets or touch screens. Pin 9 was selected
because it’s specication is seldom used. If you are connecting a device
other than a DTX-DRV driver to a COMM port, the voltage may cause
unexpected issues with the device.
• COMM 1 and COMM 2 have jumpers for power on pin 9, and are set to
OFF when shipped from the factory. If you require power for a DTX-DRV
driver for either or both of these COMM ports, please contact technical
support.
• Some touch screens may need hardware handshaking. In that case, try a
cable with pins 7 and 8 tied together.
Connecting the Keyboard, Tablet or other USB Devices
1. Connect the device(s) to any USB port on the Point maker.
e system supports up to 4 USB 3.0 devices and 1 USB B device.
Connecting Touch Screens and Electronic Whiteboards
e Pointmaker is compatible with many types of touch screens (call Pointmaker
LLC for compatibility). During these procedures, you may want to refer to the
illustrations of the CPN-5800 front and back panels.
Pre-Installation Recommendations:
Cabling:
If you desire to have the touch screen farther from the CPN-5800 than the
length of the touch screen’s RS-232 cable, you may need to install a line
driver. e touch screen and Pointmaker will not func tion properly if the
signal strength is too weak or encounters interfer ence. While the RS-232
specication indicates usage up to 50 feet, the actual distance at which the
Page 20 - Pointmaker CPN-5800 Live Streaming Annotation System Pointmaker LLC
Page 27
Section Two:Installation Connecting Controllers
signal must be amplied will vary based upon environmental factors.
Pointmaker LLC recommends that you test any conguration to determine
whether the line drivers are needed.
FOR RS-232 Touch Screens:
You may install your own extension cable according to the following specications:
• ree conductor cable
• Male DB-9 to female DB-9 wired straight through on pins 2, 3, and 5.
If you determine that you need a line driver to maintain signal strength, you
may purchase the DTX-DRV line driver from Pointmaker LLC (see “If
installing the optional DTX-DRV extension” on page 22). e DTX-DRV
specication allows for distances up to 450 feet.
For USB Touch Screens:
Pointmaker LLC oers a USB line driver and extension hardware. Many third
party line drivers are also available (call Pointmaker LLC for compatibility).
NOTE: Make all connections before applying power.
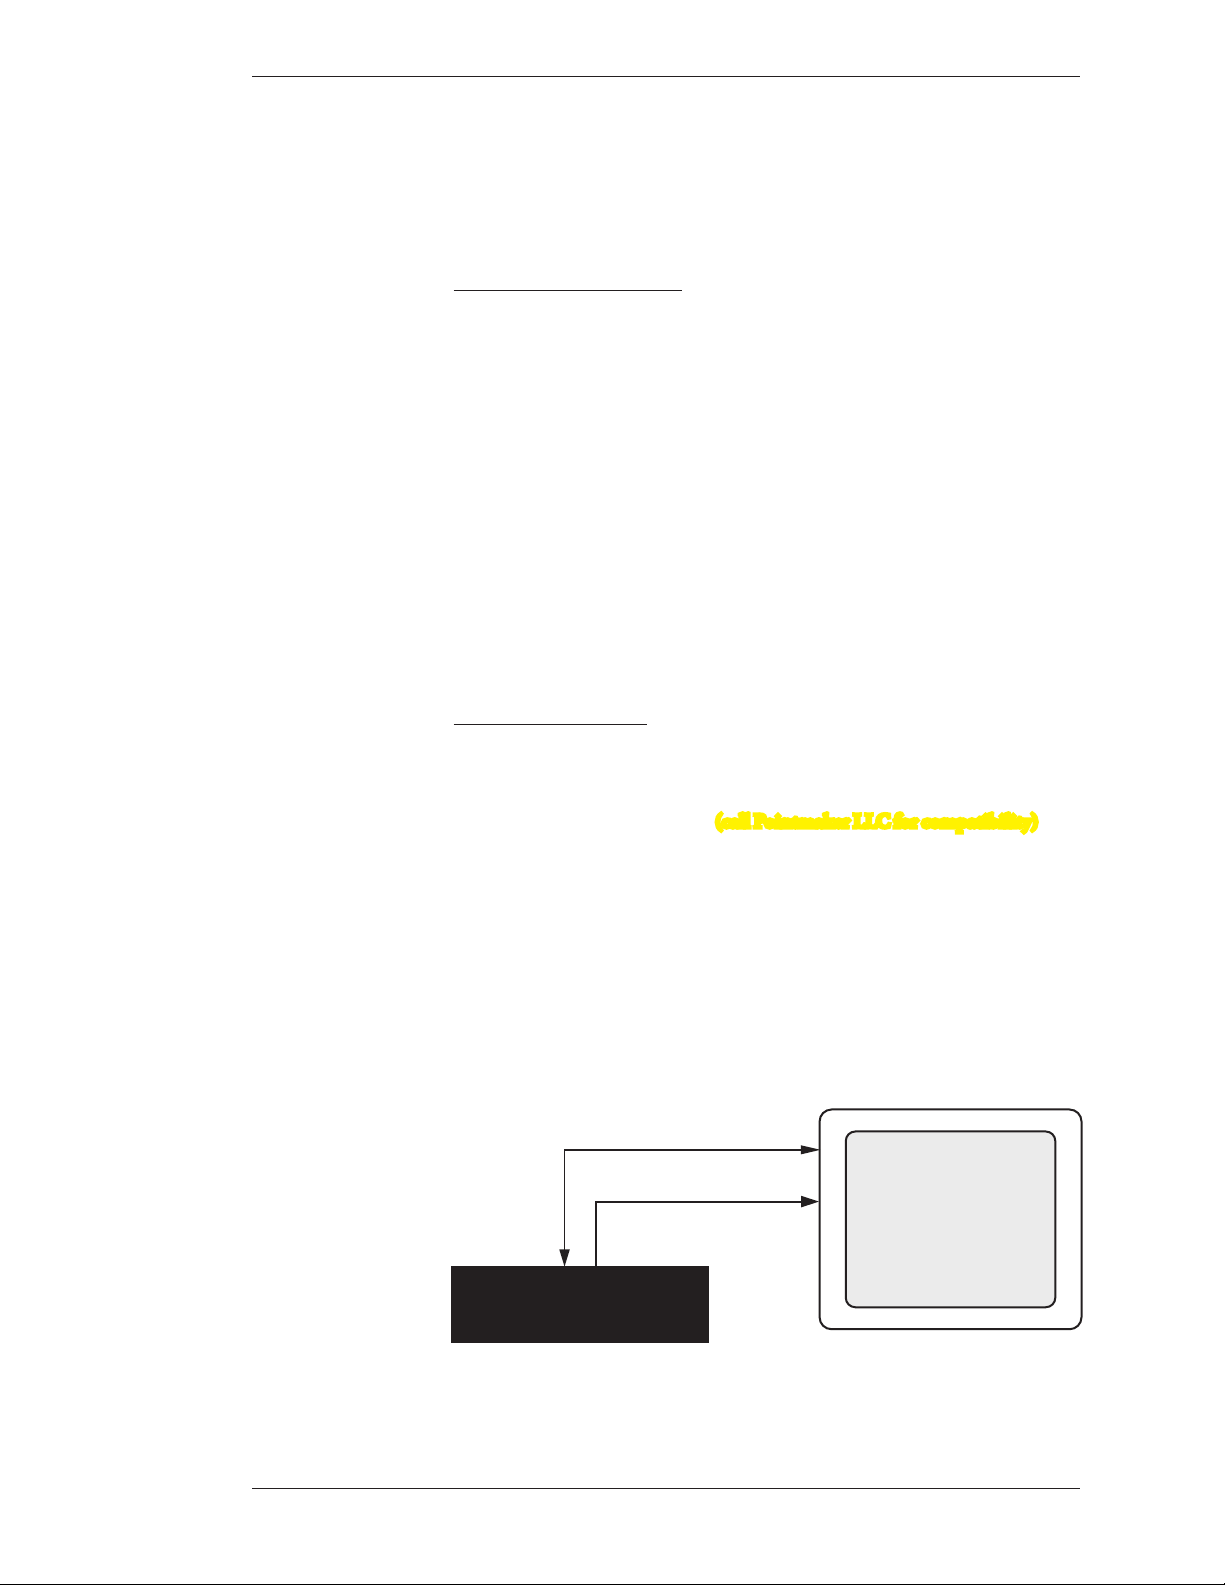
1. Make video connections as indicated earlier in this section, and install the
touch screen to the monitor as directed by your touch screen manufacturer. (see Connecting Audio/Video Sources and Outputs, on page
17)
2. Connect a USB cable and extension to the USB port on the Pointmaker.
USB or RS-232 IN
USB or
COMM Port
Video IN
Video OUT
Touch Screen
and Monitor
Pointmaker
Figure 2-3: Touch screen hook-up overview
Pointmaker LLC Pointmaker CPN-5800 Live Streaming Annotation System - Page 21
Page 28

Power Up Section Two:Installation
NOTE: Be sure to calibrate the touch screen on start up (see Calibrating
CPN-5800 Controllers, on page 46).
If installing the optional DTX-DRV extensions:
1. Connect the female DB-9 connector to the male DB-9 connector on the
DTX-DRV extension transmitter from the touch screen cable(male
microdriver).
2. Using an Unshielded Twisted Pair (UTP) cable with RJ-11connectors,
connect the male microdriver to the female microdriver.
3. Connect the DTX-DRV extension receiver (female microdriver) to a
COMM port on the back of the CPN-5800.
Connecting a Mouse Device
1. Connect the mouse device to a COMM port on the back of the Point-
Videoconferencing
Power Up
ese are the procedures for powering up.
1. Plug the power cord into the back of the Pointmaker and then into any
maker.
If you add a controller at a later time, be sure to power down the Pointmaker,
install the new device, then power up.
e CPN-5800 supports videoconferencing (see Multipoint, on page 64).
grounded outlet.
2. Plug the power cords from any video source(s), controller(s), and
display(s) into any grounded outlet.
3. Turn on each of the connected units, and then press the power button on
the front panel of the Pointmaker.
Page 22 - Pointmaker CPN-5800 Live Streaming Annotation System Pointmaker LLC
Page 29

Section Two:Installation Power Up
NOTE: In order for the Pointmaker to properly sync with the video signals,
the sources should be turned on rst.
After a moment, a Pointmaker splash screen will appear, followed by the
initializing of the ports, and ending with a copyright message.
After the startup process, a marker overlay will appear, displaying any
previously created markers.
If this process is dierent for you, recheck your installation and power up
again. Call Pointmaker LLC for support at (800) 552-2262 or (520) 7450001 if it is still unsuccessful.
NOTE: To bypass port initialization, press ESC during startup.
Pointmaker LLC Pointmaker CPN-5800 Live Streaming Annotation System - Page 23
Page 30

Power Up Section Two:Installation
Page 24 - Pointmaker CPN-5800 Live Streaming Annotation System Pointmaker LLC
Page 31

seCtion three:
Cpn-5800 Menu systeM
Page 32

Page 33

Section ree: CPN-5800 Menu System
overview
is chapter covers the menu system built into the CPN-5800. It includes many
settings you may want to make before a presentation. In general, they are made
from the menu system, although some control devices can also access a few of the
settings directly.
Pointmaker LLC Pointmaker CPN-5800 Live Streamimg Annotation System - Page 27
Page 34

Section ree: CPN-5800 Menu System
Page 28 - Pointmaker CPN-5800 Live Streaming Annotation System Pointmaker LLC.
Page 35

Section ree: CPN-5800 Menu System Menu Basics
usinG the Cpn-5800 Menu systeM
is section describes how to access the menu system and make selections from it.
Default User Settings
1. First, make your selections for the settings you wish to save.
2. Re-boot the unit using the CTRL-ALT-DEL key command or cycle the
power with the power switch.
3. When you see the Copyright screen during the boot process, press
CRTL-ALT-ENTER(on the number pad) to save your personal defaults.
e screen will acknowledge that the settings have been saved.
Menu Basics
Activating the Menu
4. e settings can be recalled at any time by pressing CTRL-ALT-PgDn (on
the number pad).
If the keyboard is installed, it is the only way you can enter the menu sys tem. If the
keyboard is not installed, you can access the menu system from one of the other
control devices. NOTE: Using the CPN-5800 with the PVI Control iPad app
does allow you to access the menu system while the keyboard is installed.
Keyboard: Press Setup Menu[Print Screen] key.
Digitizing Tablet: With the tip in proximity to the tablet, press and hold the Barrel
Button, then press the Tip Button into the drawing area. Keep both pressed for at
least 5 seconds.
NOTE: Press the tip button soon after the barrel button, or the CPN-5800
may interpret the barrel button press as a “clear” command.
Touch Screen (or Whiteboard): Tap upper center function area or whatever function
area you assign (works only if no keyboard is connected).
Mouse Device: Press Right (Second) Button, then Left (First) Button, press both
together for about 10 seconds (works only if no keyboard is connected).
Pointmaker LLC Pointmaker CPN-5800 Live Streamimg Annotation System - Page 29
Page 36

Menu Basics Section ree: CPN-5800 Menu System
e Main Menu appears over the video image.
Menu Conventions
Once the menu system is displayed, you can make selections from it to navi gate to
the option(s) you wish to change. Each menu selection has the appearance of a
rounded-corner button.
Not Selected
If a button is not selected, it has a gray background.
Selected
When a button is selected, it changes to a white background.
Hovering
As you move the selection arrow over a button (called “hovering”), it will either
display a red shadow behind the button text (a Main Menu button), or turn the
text in the menu from blue to red (a submenu button).
Figure 3-1: Main Menu with Annotation highlighted
Submenus
A selection from the Main Menu causes a submenu to appear alongside it. A
selection from the submenu sometimes dis plays a second submenu of choices
based on the selection you make.
Page 30 - Pointmaker CPN-5800 Live Streaming Annotation System Pointmaker LLC.
Page 37

Section ree: CPN-5800 Menu System Menu Basics
Outline Format
e entire menu system is an outline format that allows you to “drill down” to
the specic option you wish to change. Whenever the Main Menu is visible, you
can select directly from it to activate a dierent branch of submenus.
Making menu selections
Digitizing Tablet: Move pen tip lightly across the active area of the tablet until your
selection is highlighted. Push the tip in until it clicks
Keyboard: Use arrow to move to your selection and press the Enter key.
Touch Screen (or Whiteboard): Tap the screen over the option you want to select.
Mouse Devices: Click Left Button on your selection. your selection is highlighted. Push
the tip in until it clicks
Figure 3-2: Sample Submenu
Exiting Menus
Exit a submenu by selecting any option in the Main Menu. Exit the menu system
by selecting EXIT.
Pointmaker LLC Pointmaker CPN-5800 Live Streamimg Annotation System - Page 31
Page 38

Menu Basics Section ree: CPN-5800 Menu System
Page 32 - Pointmaker CPN-5800 Live Streaming Annotation System Pointmaker LLC.
Page 39

Section ree: CPN-5800 Menu System Customizing the Color Palette
preparinG the Cpn-5800 For use
is section covers the menu system functions that are usually set before mak ing a
presentation. Once set, the CPN-5800 will save them in memory, even when
powered down. Some of the functions can also be accessed directly through the
keyboard or digitizing tablet.
e options include:
• Customizing the Color Palette
• Setting a Brightness Level
• Changing Pen Proximity
• Selecting Video Sources
• Calibrating CPN-5800 Controllers
• Serial Port Settings
• Setting the Tablet Template
• Setting Date and Time
e options commonly used during a presentation are covered in the chapter on
markers (see on page 65).
Customizing the Color Palette
During a presentation, all controllers (other than the digitizing tablet) allow you to
select a marking color by cycling through each of the seven available colors. To
streamline color selection, the Color Palette allows you to pre-select which of the
CPN-5800’s seven marking colors you wish to use during a pre sentation. It also
makes it easy to select colors that work well with the images you are presenting.
When the Color Palette command is activated, the seven colors appear over
whatever video input signal is currently selected. is allows you to see how well
the colors contrast with the image.
NOTE: Color choices made using the digitizing tablet override any settings
made in the Color Palette Menu.
Selecting Colors for a Presentation
1. Activate the menu system (see Activating the Menu, on page 29.
Pointmaker LLC Pointmaker CPN-5800 Live Streamimg Annotation System - Page 33
Page 40

Customizing the Color Palette Section ree: CPN-5800 Menu System
e Main Menu appears (see Figure 3-1: Main Menu, on page 30).
2. Select ANNOTATION
Figure 3-3: Annotation Menu
e Annotation Menu appears.
3. Select COLOR PALETTE.
Figure 3-4: Color Palette with all colors selected except white and red.
e Color Palette Menu next to the Main Menu.
4. Select the color or colors that you would like to have available during the
presentation.
Page 34 - Pointmaker CPN-5800 Live Streaming Annotation System Pointmaker LLC.
Page 41

Section ree: CPN-5800 Menu System Selecting a Brightness Level
NOTE: ese selections toggle on and o. Selected colors are sur rounded by
a solid white ll.
You must select a minimum of one color. If you select only one color, you will
not be able to deselect until you select a second color.
5. Activate or disable the DISPLAY COLOR CHANGE option.
If Activated: During presentations, a small block of color appears briey in
the lower-right of your display each time you activate the Change Color
command (see Assigning Marker Colors, on page 73). Normally, the active
pointer will indicate the current color, but if the pointer is o, another
indica tor is needed to show you which color is current. e small color block
serves this purpose.
NOTE: When enabled, this option will be surrounded by a white ll.
If Disabled: No color block will appear when the Change Color command is
activated. Broadcasters and certain other presenters may desire this setting.
NOTE: e digitizing tablet’s commands are not aected by this set ting
because the template’s color icons let you directly select the active color.
6. Exit the Color Palette Menu.
Selecting a Brightness Level
You can select a brightness level for all markers on an overlay. is adjust ment aids
in creating optimum contrast between CPN-5800 graphics and the video image.
e brightness selection is only applied to the current overlay, so it is possible to
display a dierent brightness level for each of the overlays.
Brightness is best controlled from the keyboard, but you can also adjust bright ness
with other devices using the menu system or the tablet template. Key board and
tablet settings override any settings made in the menu system.
Be sure to display the overlay rst so you can see the eects of the change.
From the Tablet
Activate the Brightness Command by pressing the tip button on the
Brightness scale.
Selections to the left decrease brightness, while selections to the right increase
brightness.
Pointmaker LLC Pointmaker CPN-5800 Live Streamimg Annotation System - Page 35
Page 42

Selecting a Brightness Level Section ree: CPN-5800 Menu System
From the Keyboard
1. Repeatedly activate the Change Brightness command until the mark ers
display the desired brightness level.
(see Activating the Menu, on page 29)
NOTE: You can move backwards through the brightness levels by activating
the reverse toggle command.
2. Exit the Brightness mode by selecting any other function.
From the Menu System
1. Activate the menu system (see Activating the Menu, on page 29).
e Main Menu appears (see Figure 3-1: Main Menu, on page 30).
2. Select ANNOTATION
e Annotation Menu appears (see Figure 3-3: Annotation Menu, on page 34).
3. Select BRIGHTNESS.
Figure 3-5: Set Brightness Dialog
e Set Brightness dialog appears in place of the Main Menu, featuring a
transparent background that allows you to adjust brightness in accordance
with your image.
4. Select the level of brightness you desire.
Page 36 - Pointmaker CPN-5800 Live Streaming Annotation System Pointmaker LLC.
Page 43

Section ree: CPN-5800 Menu System Selecting Video Sources
NOTE: Moving the indicator to the left will decrease brightness of Pointmaker markers and menus. Moving the indicator to the right will increase
brightness. If the brightness is set too high for the display, the markers will
smear across the image.
5. Exit the dialog by activating the OK button.
Changing Pen Proximity
e CPN-5800 with optional digitizing tablet may have Pen Proximity on or o.
When Pen Proximity is enabled, the active pointer disappears as you move the pen
tip away from the tablet. When Pen Proximity is disabled, the active pointer
remains on-screen even when you pull the pen away from the tablet or moni tor.
You must have turned the active pointer on for this feature to work.
You can change Pen Proximity from the tablet (Broadcaster template only), or
from the menu system. Factory setting is O.
From the Menu System
1. Activate the menu system (see Activating the Menu, on page 29).
e Main Menu appears (see Figure 3-1: Main Menu, on page 30).
2. Select ANNOTATION.
e Annotation Menu appears (see Figure 3-3: Annotation Menu, on page 34).
3. Select PEN PROXIMITY.
e colored ll in the PEN PROXIMITY box indicates the new sta tus. e
white ll means that pen proximity is enabled.
4. Exit the menu system.
You can now point and draw using the new PEN PROXIMITY set ting.
Selecting Video Sources
e CPN-5800 starts in the DEFAULT mode, which automatically detects the
video inputs and outputs on power up. Whatever video input is selected will be
output to both video outputs.
Pointmaker LLC Pointmaker CPN-5800 Live Streamimg Annotation System - Page 37
Page 44

Selecting Video Sources Section ree: CPN-5800 Menu System
You can override the default selection by choosing a dierent video mode. If there
is an output, but no input, the CPN-5800 will display the chalkboard (see
Activating the Chalkboard, on page 89).
You can select a video mode from the tablet, keyboard, or menu system. e menu
system oers additional adjustments for brightness, contrast, saturation and hue.
From the Tablet
Click on the icon for the desired video input.
NOTE: e inputs are listed on the template.
e CPN-5800 switches to the source you select.
From the Keyboard
Activate the desired Video In command.
Refer to the keyboard commands for your desired input, located in the
Appendix (see Activating the Menu, on page 29).
e CPN-5800 switches to the source you select.
From the Touch Screen
Activate through the use of touch screen areas.
Set two of the touch screen corners to PREV VIDEO and/or NEXT VIDEO.
You can then cycle through the available inputs and chalkboard. (see Touch
Screen Command Areas, on page 45).
e CPN-5800 switches to the source you select.
From the Menu System
1. Activate the menu system (see Activating the Menu, on page 29).
e Main Menu appears (see Figure 3-1: Main Menu, on page 30).
2. Select DISPLAY.
Page 38 - Pointmaker CPN-5800 Live Streaming Annotation System Pointmaker LLC.
Page 45

Section ree: CPN-5800 Menu System Selecting Video Sources
Figure 3-6: Display Menu
e Display menu appears beside the Main Menu.
3. Select VIDEO SOURCE.
Figure 3-7: Video Source dialog
e Video Source dialog appears next to the Main Menu.
4. Select the desired video source.
5. Select Default if you have no video input.
Pointmaker LLC Pointmaker CPN-5800 Live Streamimg Annotation System - Page 39
Page 46

Setting Video Output Section ree: CPN-5800 Menu System
e unit senses the type of video input and selects it automatically. If there is
no video input and you are using the unit in Chalkboard mode, the Default
selection allows you to assign the appro priate video output for your monitor.
Setting Video Output
e CPN-5800 gives you a wide range of video parameters for ne tuning your
video output.
1. Activate the menu system (see Activating the Menu, on page 29).
e Main Menu appears (see Figure 3-1: Main Menu, on page 30).
2. Select DISPLAY.
e Display menu appears (see Figure 3-6: Display Menu, on page 39).
3. Select VIDEO OUTPUT.
Figure 3-8: Video Output dialog
e Video Output dialog appears next to the Main Menu.
is dialog has screen ratio buttons of 4x3, 16x9 and 16x10. Selecting one of
the buttons allows you to then select from the resolutions and vertical refresh
rates listed below.
4x3 16x9 16x10
640x480 @ 60,72,75,85 1280x720p @ 60 1280x800 @ 60
800x600 @ 56,60,72,75 1920x1080p @ 60 1440x900 @ 60
1024x768 @ 60,70,72,75,85 1680x1050 @ 60
Page 40 - Pointmaker CPN-5800 Live Streaming Annotation System Pointmaker LLC.
Page 47

Section ree: CPN-5800 Menu System HDCP Input
4x3 16x9 16x10
1280x1024 @ 60,72,75 1920x1200 @ 60
1400x1050 @ 50,60
Figure 3-9: Video Outputs with Vertical Refresh Rates
Zap Icon Toggle
is toggle switch allows display of a “zap” icon in the lower right-hand cor ner of
the screen as a way of being able to tell if the marking layer is active or hidden. If
no marks have been drawn, there is no other visual way of knowing if the layer is
active or not. e zap icon is visible when the layer is active.
1. Activate the menu system (see Activating the Menu, on page 29).
e Main Menu appears (see Figure 3-1: Main Menu, on page 30).
HDCP Input
2. Select DISPLAY.
e Display menu appears beside the Main Menu (see Figure 3-6: Display
Menu, on page 39).
3. Select VIDEO OUTPUT.
e Video Output dialog appears (see Figure 3-8: Video Output dialog, on page
40).
4. Set the Zap option on or o.
When it is on, the Zap icon shows at the bottom-right of the screen. is
option is used, usually in complicated video congurations, to verify that the
video stream being viewed includes the CPN-5800.
5. Exit the menu system.
is dialog allows you to turn HDCP on or o for the HDMI input. When set
On, the designated source will be encoded with HDCP for output. If set O, a
non-HDCP source will remain non-HDCP for output. HDCP sources will
remain HDCP no matter what the setting.
1. Activate the menu system (see Activating the Menu, on page 29).
Pointmaker LLC Pointmaker CPN-5800 Live Streamimg Annotation System - Page 41
Page 48

Audio Select Section ree: CPN-5800 Menu System
e Main Menu appears (see Figure 3-1: Main Menu, on page 30).
2. Select DISPLAY.
e Display menu appears (see Figure 3-6: Display Menu, on page 39).
3. Select HDCP INPUT.
Audio Select
Figure 3-10: HDCP Input dialog
e HDCP Output dialog appears.
e Audio Select dialog allows you to select audio inputs and outputs.
1. Activate the menu system (see Activating the Menu, on page 29).
e Main Menu appears (see Figure 3-1: Main Menu, on page 30).
2. Select DISPLAY.
e Display menu appears (see Figure 3-6: Display Menu, on page 39).
3. Select AUDIO SELECT.
e Audio Select dialog appears.
Page 42 - Pointmaker CPN-5800 Live Streaming Annotation System Pointmaker LLC.
Page 49

Section ree: CPN-5800 Menu System Audio Select
Figure 3-11: CPN-5800 Audio Select dialog
e dialog for the CPN-5800 allows you to select audio input analog or digital
audio sources. Whatever input you select can be routed to any, all or none of the
audio outputs.
After selecting options, select Output Volume to access the volume control menu.
Figure 3-12: CPN-5800 Audio Select dialog
Slide the red indicator to the desired level e Master output controls all outputs.
Pointmaker LLC Pointmaker CPN-5800 Live Streamimg Annotation System - Page 43
Page 50

Background Options Section ree: CPN-5800 Menu System
Background Options
e Background menu allows you to select between your current Source Video or
the Chalkboard background. It also has an Auto Chalkboard selection which
causes the CPN-5800 to automatically switch to the Chalkboard if no viedo signal
is present at the selected Source Video.
1. Activate the menu system (see Activating the Menu, on page 29).
e Main Menu appears (see Figure 3-1: Main Menu, on page 30).
2. Select DISPLAY.
e Display menu appears (see Figure 3-6: Display Menu, on page 39).
3. Select the BACKGROUND option
Figure 3-13: Background dialog
e Background dialog appears.
4. Select the option(s) you desire.
Switch between Source Video and Chalkboard .
Turn Auto Chalkboard on or o.
5. Exit the menu system.
Page 44 - Pointmaker CPN-5800 Live Streaming Annotation System Pointmaker LLC.
Page 51

Section ree: CPN-5800 Menu System Touch Screen Command Areas
Touch Screen Command Areas
is dialog allows you to asign touch screen commands to the various areas of your
touch screen. Touching the screen in that area(after exiting the menu) will activate
the command. Commands with the word “none” assigned are inactive. (see
Connecting Touch Screens and Electronic Whiteboards, on page 21), also (see Using the
CPN-5800 Menu System, on page 29).
1. Activate the menu system (see Activating the Menu, on page 29).
e Main Menu appears (see Figure 3-1: Main Menu, on page 30).
2. Select DISPLAY.
e Display menu appears (see Figure 3-6: Display Menu, on page 39).
3. Select TOUCH SCREEN AREAS.
Figure 3-14: Touch Screen Corners dialog
e Touch Screen Corners dialog appears.
4. Select one of the areas.
Pointmaker LLC Pointmaker CPN-5800 Live Streamimg Annotation System - Page 45
Page 52

System Info Section ree: CPN-5800 Menu System
Touch Screen Area Select
None
Clear
Undo
Color
Freeze
Print
Color Mode
Previous Video Input
Image Save
Image Send
Image Get
Select
Main Menu
Next Video
Prev Video
Figure 3-15: Touch Screen Area Select menu
e Touch Screen Area Select menu appears.
5. Select the command you wish to assign.
e menu disappears and the Touch Screen Corners dialog reappears.
6. Repeat steps 4 and 5 until you are nished assigning touch screen
command areas.
System Info
7. Select Previous Menu and then exit the menu system.
is selection presents a readout of relevant information concerning your unit.
is information can be useful in troubleshooting, especially if you are contacting
Pointmaker support.
1. Activate the menu system (see Activating the Menu, on page 29).
e Main Menu appears (see Figure 3-1: Main Menu, on page 30).
2. Select DISPLAY.
e Display menu appears (see Figure 3-6: Display Menu, on page 39).
3. Select SYSTEM INFO.
Page 46 - Pointmaker CPN-5800 Live Streaming Annotation System Pointmaker LLC.
Page 53

Section ree: CPN-5800 Menu System Capture Options
Figure 3-16: System Information
Capture Options
A captured frame or eld can be saved to a USB memory device, to a computer
running TFTP, or an SMB share. e File Defaults menu selection allows you to
set the default settings for how the les are saved. It includes the directory, name
and sequence numbering.is allows for fast saving with no dialog boxes involved.
Files are saved in the bitmap format, 24 bit true color, 720x485, with the extension “.bmp”.
1. Activate the menu system (see Activating the Menu, on page 29).
e Main Menu appears (see Figure 3-1: Main Menu, on page 30).
2. Select CAPTURE.
Figure 3-17: Capture dialog
Pointmaker LLC Pointmaker CPN-5800 Live Streamimg Annotation System - Page 47
Page 54

Capture Options Section ree: CPN-5800 Menu System
e Capture dialog appears.
3. Select FILE DEFAULTS.
Figure 3-18: Image File Defaults dialog
e Image File Defaults dialog appears.
4. In the DIR eld, enter the directory name where you wish to save the le.
It must be 8 alphanumeric characters or less, no spaces and no subdi rectories.
e default is PVI.
5. In the PREFIX eld, enter whatever letters you want each lename to
begin with.
e prex must be 5 alphanumeric characters or less, no spaces. e default is
IMG.
6. In the INDEX eld, enter the number to start numbering from.
Each time an image is saved, the number will increment. e default is 1. e
num bering is remembered by the CPN-5800, even through cycling of power.
Given the example shown, lenames will start with img1.bmp, then increment to img2.bmp, img3.bmp and so on.
7. Exit the dialog by selecting the Previous Menu button.
8. Exit the menu system.
Page 48 - Pointmaker CPN-5800 Live Streaming Annotation System Pointmaker LLC.
Page 55

Section ree: CPN-5800 Menu System Setting the Verify Option
Setting the Destination for Saved Files
After setting up the le defaults for saving images, you will want to select the
destination for your saved les. Files can be saved to USB memory devices, a
computer using TFTP, or an SMB share.
1. Activate the menu system (see Activating the Menu, on page 29).
e Main Menu appears (see Figure 3-1: Main Menu, on page 30).
2. Select CAPTURE.
e Capture dialog appears (see Figure 3-17: Capture dialog, on page 47).
3. Select the Destination as USB, TFTP or SMB.
e CPN-5800 will use your selection whenever you activate the Save
command from either the digitizing tablet or the touch screen.
4. Exit the menu system.
Setting the Verify Option
In circumstances where it is important to know that a le has been successfully
saved or printed, this setting allows you to verify the end result. If you turn Verify
on, a dialog will appear after each save or print comand, asking you to verify that
the image was successfully saved or printed.
1. Activate the menu system (see Activating the Menu, on page 29).
e Main Menu appears (see Figure 3-1: Main Menu, on page 30).
2. Select CAPTURE.
e Capture dialog appears (see Figure 3-17: Capture dialog, on page 47).
3. Set Verify ON or OFF.
4. Exit the menu system.
Pointmaker LLC Pointmaker CPN-5800 Live Streamimg Annotation System - Page 49
Page 56

Calibrating CPN-5800 Controllers Section ree: CPN-5800 Menu System
Calibrating CPN-5800 Controllers
You need to calibrate the touch screen on rst installation. Calibration ensures an
intuitive and precise feel to drawing and marking over the particular moni tor you
are using.
NOTE: e calibration described in this section is the most accurate calibration for each touch screen connected to the CPN-5800. How ever, it is usually
necessary upon rst power-up to do a rough calibra tion during the start-up
process. You can access this calibration through a short cut by touching the
copyright screen when it appears. e unit will activate the Touch Screen
Calibration dialog, with instructions for calibrating. is calibration is
accurate enough to operate the unit. You should then do the following
calibration proce dure to obtain the most accurate calibration.
Calibrations are automatically saved for each video port. If you move a touch
screen to a dierent port, run the calibration again. Or, if you have a touch screen
display with multiple video inputs, you should calibrate the touch screen for each
input.
All calibrations are stored in battery backed-up memory. e most recent calibration will be recalled any time power is cycled o and on.
From the Menu System
1. Activate the menu system (see Activating the Menu, on page 29).
e Main Menu appears (see Figure 3-1: Main Menu, on page 30).
2. Select DEVICES
Figure 3-19: Devices menu
Page 50 - Pointmaker CPN-5800 Live Streaming Annotation System Pointmaker LLC.
Page 57

Section ree: CPN-5800 Menu System Calibrating CPN-5800 Controllers
e Devices menu appears
3. Select CALIBRATION.
Figure 3-20: Calibration Menu
e Calibration Menu appears.
4. In the Calibration Menu, select the controller you want to calibrate.
Figure 3-21: Calibrate Touch Screen Dialog
e Calibration dialog for the selected controller appears.
5. Follow the calibration instructions displayed.
After you perform nal calibration procedures, the Calibration dialog
automatically disappears, and you return to the menu system.
Pointmaker LLC Pointmaker CPN-5800 Live Streamimg Annotation System - Page 51
Page 58

Calibrating CPN-5800 Controllers Section ree: CPN-5800 Menu System
6. Exit the menu system.
Repeat this process for each video input on your touch screen display.
Storing (Copying) a Calibration
For each video output, the CPN-5800 has nine memory locations where calibrations can be stored for later recall. ey are numbered 1 through 9. Loca tion
0(zero) is considered the default memory location, and stores whatever calibration
was last done. If you anticipate changing calibrations on a frequent basis, storing
your calibrations in locations 1-9 makes it easy to change the active calibration
without 1) going through the calibration procedure, and 2) having to reboot the
CPN-5800.
To store a copy of the last manual calibration (stored in location 0) in what ever
memory location you choose, select the Copy Calibration command from the
Calibration Menu. en, select the numbered button for your desired memory
location. If there was a calibration previously stored in the location you select, it
will be overwritten.
Note: You will probably want to make a written record of which cali brations
you have stored in each location since the CPN-5800 keeps only the location
number.
Select a Calibration
When you are ready to use a calibration you have previously stored, choose Select
Calibration from the Calibration menu. en, select the numbered but ton for the
memory location you desire. e calibration stored in that location becomes the
active calibration.
Figure 3-22: Copy Calibration Menu
Figure 3-23: Select Calibration dialog
Page 52 - Pointmaker CPN-5800 Live Streaming Annotation System Pointmaker LLC.
Page 59

Section ree: CPN-5800 Menu System Serial Port Settings
Serial Port Settings
Serial ports are used for two main purposes: 1) connecting controller/marker
devices 2) connecting to other systems (videoconferencing, remote control, a
second Pointmaker, a PC). is section explains the options available to you for
each purpose.
e Serial Port dialog also allows you to assign a priority system to control users if
multiple controller/markers are connected.
Configuring Serial Device Types
Initialization of Device Types
Serial ports are “initialized” when the CPN-5800 is powered on. During this
process, the CPN-5800 attempts to determine what device type(controller/
marker) is connected to each port. is procedure can be lengthy since the
CPN-5800 accommodates a wide range of devices, and in its default detection
mode (autodetect), it will run through the entire list of possibilities for each port.
Using the settings available in the Serial Ports menu, it is possible for you to limit
the initialization process for a designated port so that the CPN-5800 looks for
only the device type you specify. is speeds up the initialization process considerably.
Integrating the CPN-5800 with Other Systems
Since only controller/marker device types are able to be recognized during the
initialization process, all other devices must be set up manually. e CPN-5800
allows you to manually adjust communication settings for either of its ports (see
Setting Comm Port Parameters, on page 54). is allows the CPN-5800 to be
integrated with:
1) an A/V system as a remote control command station where it can both
control A/V devices and mark over any images presented;
2) a remote control system which can send commands to the CPN-5800,
controlling its various functions, like AMX/Crestron.
Cisco Codec
e CPN-5800 supports the Cisco Codec through either of the serial ports.
Connect the two units using a straight-through serial cable, making note of which
serial port you use. When you get to the instructions for selecting the device type,
choose either “Codec” or “Cisco Codec”.
Pointmaker LLC Pointmaker CPN-5800 Live Streamimg Annotation System - Page 53
Page 60

Serial Port Settings Section ree: CPN-5800 Menu System
Designating a Serial Device Type
1. Activate the menu system (see Activating the Menu, on page 29).
e Main Menu appears (see Figure 3-1: Main Menu, on page 30).
2. Select DEVICES.
e Devices menu appears (see Figure 3-19: Devices menu, on page 50).
3. Select SERIAL PORTS.
Figure 3-24: Serial Ports Dialog
e Serial Ports dialog appears.
NOTE: All the serial ports installed on your CPN-5800 are listed by
port number, with the device type displayed to the right of each num ber.
If the device type is in blue, it has been assigned through the autodetect
procedure at startup.
4. (optional) Select the device type you wish to have permanently assigned.
If the device type can be permanently assigned (some types cannot), the color
changes from blue to black. With the device permanently assigned, the next
time the CPN-5800 is powered up, the autodetect procedure will skip this
port. If the assigned device needs to be ini tialized at startup, it will be
initialized according to the device type listed.
NOTE: If the device type listed for a port cannot be permanently
assigned (for example: device type “unknown” or if you try to assign
more than one port for use with other systems (see Integrating the
Page 54 - Pointmaker CPN-5800 Live Streaming Annotation System Pointmaker LLC.
Page 61

Section ree: CPN-5800 Menu System Serial Port Settings
CPN-5800 with Other Systems, on page 53), there are two ways to change
it. e next two steps describe how.
5. (optional) Select the arrow to the right of the device type you wish to
change.
Figure 3-25: Device Select Dialog
e Device Select dialog appears.
is dialog presents a scrolling list of all device types currently supported by
the CPN-5800 in alphabetical order. e Page Up and Page Down buttons
allow you to quickly scroll through the names until you nd the device type
you desire. When you locate and select the name you wish to assign, it will
move to the center of the list, where it will be highlighted. e new device
type is now assigned.
Device types which cannot be selected are in white.
Only one of the two COMM ports may be set to Control Port. Either
COMM port may be set to Control Port, but only one at a time may be
assigned as Control Port.
When a “?” button is selected, a screen with further information about that
device type will be displayed.
If a device type that is used for communicating with other systems is selected,
an arrow button will replace its “?” button. Selecting that arrow button will
activate the control port dialog (see Figure 3-27: Control Port Dialog, on page
55).
Pointmaker LLC Pointmaker CPN-5800 Live Streamimg Annotation System - Page 55
Page 62

Serial Port Settings Section ree: CPN-5800 Menu System
You can return to the Serial Ports dialog to make further changes by selecting
the Return button, or by selecting Input Devices and then selecting Serial
Ports.
NOTE: If you are designating a port for use with another system, you
will need to set Comm Port parameters before exiting the menu system
(see Setting Comm Port Parameters, on page 54).
6. (optional) Select the device type name you wish to change.
When the device type name, instead of the arrow to its right, is activated, the
device type will change without having to display the Device Select submenu.
is method is only recommended for those with more extensive experience
in assigning device types. Each time the name is selected, it causes a dierent
device type to appear. e list of devices available using this method is an
abbreviated version of the list n in the Device Select dialog.
A click on the right side of the name moves forward one device. A click on the
left side of the name moves backward one device. (If you are using the
keyboard to select, it moves backward through the list only.) Keep clicking
until the device type you desire is displayed. It will be assigned permanently
when the CPN-5800 is rebooted.
NOTE: If you are designating a port for use with another system, you
will need to set Comm Port parameters before exiting the menu system.
7. Exit the menu system and recycle the power on the CPN-5800.
NOTE: e CPN-5800 must either be rebooted for the new device type
assignments to be made permanent or you can return to the Serial Ports
dialog and select the red box next to the new assignment to activate the
device immediately.
Setting Comm Port Parameters
If you are assigning a port for communicating with another system(see Integrating
the CPN-5800 with Other Systems, on page 51), you must select either Control
Por t or PVI to PVI as your device type. e CPN-5800 sup ports assigning only
one port for each type.
Control Port: Choose this option if the CPN-5800 is being used as an A/V
remote control command station, if it is being controlled remotely using
RS-232 commands, or if it is being connected to a PC.
PVI-to-PVI: Use this selection if the CPN-5800 is being used in a videoconferencing system.
Page 56 - Pointmaker CPN-5800 Live Streaming Annotation System Pointmaker LLC.
Page 63

Section ree: CPN-5800 Menu System Serial Port Settings
1. Select the appropriate device type in the Device Select dialog for the port
where you are connecting the other system (see Figure 3-25: Device Select
Dialog, on page 55).
Where a question mark is usually found, you will instead see an arrow.
NOTE: If the device type you desire for connecting to other systems is
unavailable, check to see if it is assigned to another port. Remem ber, only one
use of each is allowed.
2. Activate the arrow next to the device type to set its communication
parameters.
Figure 3-26: Control Port Dialog
e corresponding dialog appears.
Select the desired baud rate, parity, and stop bits.
NOTE: Factory settings are 9600 baud, no parity, 1 stop bit. Data bits, which
cannot be manually set, are 8 data bits.
3. Exit the menu system and cycle the power on the CPN-5800.
e CPN-5800 implements the new settings.
Designating a USB Device Type
1. Activate the menu system (see Activating the Menu, on page 29).
e Main Menu appears (see Figure 3-1: Main Menu, on page 30).
Pointmaker LLC Pointmaker CPN-5800 Live Streamimg Annotation System - Page 57
Page 64

Serial Port Settings Section ree: CPN-5800 Menu System
2. Select DEVICES.
e Devices menu appears (see Figure 3-19: Devices menu, on page 50).
3. Select USB PORTS.
Figure 3-27: USB Devices Dialog
4. Select INPUT DEVICES
Figure 3-28: USB Devices Dialog
e USB Devices dialog appears.
Up to 10 USB devices can be connected through the use of hubs.
Page 58 - Pointmaker CPN-5800 Live Streaming Annotation System Pointmaker LLC.
Page 65

Section ree: CPN-5800 Menu System Serial Port Settings
NOTE: All the USB devices installed on your CPN-5800 are listed by
port number, with the device type displayed to the right of each number.
If the device type is in blue, it has been assigned through the autodetect
procedure at startup.
NOTE: When the question mark to the right of the device is selected,
the system displays the vendor and product ID for the device.
5. (optional) Select the device type you wish to have permanently assigned.
By selecting the device, it becomes permanently assigned. e text color then
changes from blue to black. With the device permanently assigned, the next
time the CPN-5800 is powered up, the autodetect procedure will skip this
device.
e system does an excellent job of immediately detecting and rec ognizing
USB devices, even when their position on the hub changes. ere are two
instances where you might want to permanently assign a device type to a
device (so autodetect won’t try to re-assign it at the next boot-up): 1) if the
device was marketed after your CPN-5800 system was manufactured or 2) if
the system misidenties the device.
6. (optional) To manually change the device type, select the arrow to the
right of the device type you wish to change.
Figure 3-29: Device Select Dialog (Your listing may dier.)
e Device Select dialog appears.
Pointmaker LLC Pointmaker CPN-5800 Live Streamimg Annotation System - Page 59
Page 66

Setting the Tablet Template Section ree: CPN-5800 Menu System
is dialog presents a scrolling list of all device types currently supported by
the CPN-5800 in alphabetical order. e Page Up and Page Down buttons
allow you to quickly scroll through the names until you nd the device type
you desire. When you locate and select the name you wish to assign, it will
move to the center of the list, where it will be highlighted. e new device
type is now assigned.
When a “?” button is selected, a screen with further information about that
device type will be displayed.
e “Return” button returns you to the Device Select dialog.
Setting the Tablet Template
e CPN-5800 ships with two standard tablet templates: Presenter and Broadcaster. When you select a paper template to use, you must also select the same
template in the CPN-5800 menu system.
e Presenter template includes more options than the Broadcaster template. e
Broadcaster template features only the most commonly used marking functions
preferred for on-air use.
1. Activate the menu system (see Activating the Menu, on page 29).
e Main Menu appears (see Figure 3-1: Main Menu, on page 30).
2. Select DEVICES.
e Devices menu appears (see Figure 3-19: Devices menu, on page 50).
3. Select TABLET TEMPLATE.
Figure 3-30: Tablet Template Menu
Page 60 - Pointmaker CPN-5800 Live Streaming Annotation System Pointmaker LLC.
Page 67

Section ree: CPN-5800 Menu System Network Features
e Tablet Template Menu appears.
4. Activate the template you’ll be using by selecting it.
Whilte lls the background of your selection.
5. Exit the menu system.
You can now use the corresponding paper template in the tablet.
Network Features
e networking capabilities built into the CPN-5800 support various func tions
on a TCP/IP network. Currently, you can print to a color Postscript printer, and
share images with other Pointmaker Video Markers using our Multipoint
software. Programmers can also use the network connection to send Pointmaker
commands.
Network Setup
1. Activate the menu system (see Activating the Menu, on page 29).
2. Select the NETWORK option.
e Main Menu appears (see Figure 3-1: Main Menu, on page 30).
Figure 3-31: Network Menu
Pointmaker LLC Pointmaker CPN-5800 Live Streamimg Annotation System - Page 61
Page 68

Network Features Section ree: CPN-5800 Menu System
e Network Menu appears.
3. Select the Network Setup option.
Figure 3-32: Network Setup dialog w/sample data
e Network 1 Setup dialog appears.
is dialog prepares the CPN-5800 for communicating on your network.
e Network 1 and Network 2 dialogs are identical except for setting the
Nameserver, which is only found in this dialog. ey correspond to the two
network ports at the back of the unit.
4. Select DHCP or STATIC.
If DHCP is selected, IP ADDRESS, NETMASK, GATEWAY and NAMESERVER are assigned automatically.
If STATIC is selected, you must make entries for IP ADDRESS, NETMASK,
GATEWAY and NAMESERVER. (is is the default setting.)
Consult with your IT administrator if you need help with these entries.
5. Select APPLY SETTINGS to nish the network conguration.
6. Exit the menu system.
Page 62 - Pointmaker CPN-5800 Live Streaming Annotation System Pointmaker LLC.
Page 69

Section ree: CPN-5800 Menu System Printer Setup
Printer Setup
e CPN-5800 can print to a color Postscript printer over a TCP/IP network.
is section shows you how to set it up.
1. Activate the menu system (see Activating the Menu, on page 29).
e Main Menu appears (see Figure 3-1: Main Menu, on page 30).
2. Select the NETWORK option.
e Network Menu appears (see Figure 3-31: Network Menu, on page 61).
3. Select the Printer option.
Figure 3-33: Network Printer dialog
e Network Printer dialog appears.
4. Enter the IP address of the Postscript printer.
Check with your IT administrator if you don’t know this address.
5. Enter the Port number.
is is usually 515.
6. Enter the number of copies to be printed each time you give the Print
command. (see Printing Images on page 101)
7. Exit this dialog by selecting Previous Menu.
e next time you give the Print command, it will use these settings.
Pointmaker LLC Pointmaker CPN-5800 Live Streamimg Annotation System - Page 63
Page 70

Multipoint Section ree: CPN-5800 Menu System
Multipoint
e Pointmaker Multipoint© feature gives multiple Pointmaker users the abil ity
to interactively mark over a common image. It utilizes the TCP/IP protocol
common to the Internet, in eect allowing the participants to be anywhere in the
world.
PVI-Server Requirements
A computer running the PVI-Server software is required to coordinate meet ings
with multiple Pointmaker units. A copy of the server software is available on
request. As an alternative, you are also welcome to use a Pointmaker LLC
sponsored server, which is set up on the internet.
Configure the Network Settings
e following steps are required to allow the unit to communicate with other
Pointmakers over a TCP/IP network.
1. Activate the menu system (see Activating the Menu, on page 29).
e Main Menu appears (see Figure 3-1: Main Menu, on page 30).
2. Select the NETWORK option.
e Network Menu appears (see Figure 3-31: Network Menu, on page 61).
3. Select the Multipoint option.
Figure 3-34: Multipoint Network dialog
e Multipoint Server dialog appears.
Page 64 - Pointmaker CPN-5800 Live Streaming Annotation System Pointmaker LLC.
Page 71

Section ree: CPN-5800 Menu System Multipoint
e information entered into this dialog is technical and not usually understood by the average user. You may need to acquire it from your IT department or your ISP. It may help to make a copy of this page for them.
4. Enter the IP address of the computer acting as your Multipoint server.
Check with your IT administrator if you don’t know this address.
You may use our server at 199.223.210.127
5. Enter the Port number.
is is usually 10001. Our server’s port number is 10001.
6. Continue to the next section.
Create, Join or Exit a Multipoint Meeting
Once all the previous steps have been accomplished, the Pointmaker unit is ready
to support the Multipoint features. ese steps explain how you can cre ate a
Multipoint meeting that other Multipoint enabled Pointmakers can join. We also
explain how you can join a Multipoint meeting that someone else has created.
Finally, we explain how to exit a meeting you have joined.
1. Select CONNECT.
Figure 3-35: Multipoint Connect dialog
e Multipoint Connect dialog appears.
2. If needed, enter the NAME of the meeting and the PASSWORD you wish
to assign.
You will need to communicate your choices for name and password to each of
the other people who will be attending the meeting.
Pointmaker LLC Pointmaker CPN-5800 Live Streamimg Annotation System - Page 65
Page 72

Multipoint Section ree: CPN-5800 Menu System
3. Exit the menu system.
You can now interactively mark over any displayed images.
OR:
4. If you wish to exit a meeting you have joined, select EXIT MEETING.
You are disconnected from the meeting. You may select a dierent menu
option or exit the menu system
Configure TFTP Settings
e Pointmaker TFTP feature gives you the ability to save and retrieve images
using the TFTP protocol. To save a le using TFTP, you must rst install a TFTP
server on the computer which will receive the le(s). ere is a free TFTP server
available from solarwinds.com which has been tested successfully with the
CPN-5800. You will need the IP address of the server where TFTP is installed. It’s
also important to make sure your rewall does not block it.
e following steps are required to allow the unit to communicate with the
computer where TFTP has been installed and set up.
1. Activate the menu system (see Activating the Menu, on page 29).
e Main Menu appears (see Figure 3-1, Main Menu, on page 30.)
2. Select the NETWORK option.
e Network Menu appears (see Figure 3-31, on page 61).
3. Select the TFTP option.
Figure 3-36: TFTP Setup Dialog
Page 66 - Pointmaker CPN-5800 Live Streaming Annotation System Pointmaker LLC.
Page 73

Section ree: CPN-5800 Menu System Multipoint
e TFTP setup dialog appears.
4. Enter the IP address of the computer where you’ve installed TFTP.
Check with your IT administrator if you don’t know this address.
5. Enter the Port number.
is is usually 69. Again, check with your administrator
6. Exit this dialog by selecting Previous Menu.
Configure Windows Share (SMB) Settings
e Pointmaker Windows Share (SMB) feature gives you the ability to save and
retrieve images using the SMB protocol. To save a le using SMB, you must rst
activate a Share on a server with the SMB protocol running. e setup dialog
requires a Server and Share name. If the Share is password protected, you will need
the username and password. It’s also important to make sure your rewall does not
block it.
e following steps are required to allow the unit to communicate with the
computer where TFTP has been installed and set up.
1. Activate the menu system (see Activating the Menu, on page 29).
e Main Menu appears (see Figure 3-1, Main Menu, on page 30.)
2. Select the NETWORK option.
e Network Menu appears (see Figure 3-31, on page 61).
3. Select the WINDOWS SHARE option.
Pointmaker LLC Pointmaker CPN-5800 Live Streamimg Annotation System - Page 67
Page 74

Multipoint Section ree: CPN-5800 Menu System
Figure 3-37: Windows Share Setup Dialog
e Windows Share setup dialog appears.
4. Enter the Server name where your share is located.
Check with your IT administrator if you don’t know the name.
5. Enter the Share name.
is is the name assigned to the location on the server. Again, check with your
administrator.
6. Enter the Username and Password, if any.
Your administrator will have this information too.
7. Select the Connect Share button to test your settings.
e Pointmaker will indicate if it is able to connect to your Share. If it fails,
check your settings.
8. Exit this dialog by selecting Previous Menu.
Page 68 - Pointmaker CPN-5800 Live Streaming Annotation System Pointmaker LLC.
Page 75

seCtion Four:
usinG Markers
Page 76

Page 77

Section Four: Using Markers Overview
overview
is section covers marking procedures you might follow while making a presentation. It is assumed that you have made set-up selections sometime before
your presentation (see Preparing the CPN-5800 for Use, on page 33).
e Pointmaker features a variety of graphics, called markers, which you place over
a video image to draw attention to or explain details of the image. e markers
available include freehand drawing and a variety of pointers. With the keyboard
installed, you can type text, draw straight lines, size frames, and anchor a date/time
label. You can place any combination of these markers on the screen, in any
combination of available colors. Such a combination of markers is called a marker
overlay. With the keyboard installed, you can save and retrieve up to 25 dierent
marker overlays.
is section assumes that you are familiar with the operational buttons of your
control device, and how to use them to anchor a marker and draw .
Instructions for marking are divided into the following categories:
• Assigning Marker Appearance
• Marking
• Clearing Markers
• Using the Chalkboard
• Displaying Dierent Overlays
Boeckeler Instruments, Inc. Pointmaker CPN-5800 Color Video Marker - Page 71
Page 78

Overview Section Four: Using Markers
Page 72 - Pointmaker CPN-5800 Color Video Marker Boeckeler Instruments, Inc.
Page 79

Section Four: Using Markers Assigning Marker Appearance
assiGninG Marker appearanCe
While the marker is still active, and before you begin to draw or place mark ers, you
can change the appearance of your drawing or next marker in one of several ways.
• Assign Marker Color
• Assign Line Style
• Assign Pointer Type
• Turn Pointer On/O
Assigning Marker Colors
e color that the active marker displays is the color that the marker will be
anchored in. You can anchor markers of dierent colors on a single overlay.
e colors available during a presentation are based on those activated in the Color
Palette menu (see Customizing the Color Palette, on page 33).
If the color of the markers does not change from black, the brightness level is too
low and must be increased before selecting the color .
From Any Controller
Activate the Change Color command from your control device.
(see Using e Chalkboard, on page 89).
All markers anchored from this point on will appear in the newly selected color.
NOTE: If the pointer has been disengaged, and the Display Color Change
option in the Color Palette Menu has been activated, a small block of color
will briey appear in the lower right of the screen to help you identify the new
marker color. e Display Color Change block does not appear when using
the digitizing tablet.
NOTE: In mouse devices, be careful to click the tip (or rst) button rather
than press it. Pressing the tip (or rst) button could inadvert ently toggle the
pointer on/o or cause the menu system to appear.
You can have drawn lines of dierent styles on a single overlay. Once you draw the
line, or anchor a straight line, you cannot change that line style. How ever, you can
erase or undo the drawing and begin again (see Erasing Markers, on page 86).
Boeckeler Instruments, Inc. Pointmaker CPN-5800 Color Video Marker - Page 73
Page 80

Assigning Marker Appearance Section Four: Using Markers
Assigning Line Styles
You can change line style directly from the digitizing tablet or from the key board.
You can also change the line style from other devices by accessing the menu
system. When the keyboard is installed, you can only access the menu system from
the keyboard.
When a line style is selected from a marking device, the CPN-5800 keeps track of
the style and the device. e device will draw with that style until a dierent style
is selected. is allows each marking device to have its own line style.
From the Digitizing Tablet
1. Click the pen tip on the line style icon on the tablet template.
e Line Style pop-up appears on the screen.
2. Select the line style you wish to draw with.
It includes various thicknesses of plain lines, lines with shadows, and highlight
lines. e highlight lines available on the pop-up are yellow and green. e
current video source shows through the highlight lines area to give an idea of
how the colors work with that source. A third color, pink, can be obtained by
touching the Change Color key on the keyboard, after you select a highlight
line in the pop-up.
3. e pop-up disappears.
All lines drawn from this point on will appear in the newly selected line width
and style.
From the Keyboard
Figure 4-1: Line Style pop-up
1. Activate the Line Style command.
Page 74 - Pointmaker CPN-5800 Color Video Marker Boeckeler Instruments, Inc.
Page 81

Section Four: Using Markers Assigning Marker Appearance
A small sample of the active line style will appear briey in the lower-right
hand corner of the screen.
2. Repeatedly activate the Line Style command until the desired line style
appears in the on screen sample.
You can scroll backwards through the line options, by activating the Reverse
Toggle command.
All lines drawn from this point on will appear in the newly selected line width
and style.
From the Menu System
1. Activate the menu system (see Activating the Menu, on page 29).
e Main Menu appears (see Figure 3-1, Main Menu, on page 30).
2. Select the ANNOTATION option
e Annotation menu appears (see Figure 3-3, Annotation Menu, on page 34).
3. Select the LINE STYLE option.
Figure 4-2: Line Style Menu
e Line Style Menu appears.
4. Select the ne, medium, or bold line, with or without a drop shadow.
5. e active option displays a white ll.
Boeckeler Instruments, Inc. Pointmaker CPN-5800 Color Video Marker - Page 75
Page 82

Assigning Marker Appearance Section Four: Using Markers
NOTE: Drop shadows are always black, therefore, black lines do not have
drop shadows.
6. Exit the menu system.
All lines drawn from this point on will appear in the newly selected line width
and style.
Selecting Pointers
You select a pointer type while the pointer is active, or positionable. After you
anchor the pointer, you cannot change that pointer’s type. However, you can erase
or undo the anchored pointer and begin again (see Erasing Markers, on page 86).
From the Digitizing Tablet
1. Click the pen tip on the desired pointer icon on tablet.
e corresponding active pointer appears on screen, ready for posi tioning or
anchoring.
From the Keyboard
1. Repeatedly activate the POINTERS command until the desired pointer
type appears on screen.
You can scroll backwards through the pointer options, by activating the
Reverse Toggle command.
e pointer you selected appears on screen, ready for positioning.
From the Menu System
1. Activate the menu system (see Activating the Menu, on page 29).
e Main Menu appears (see Figure 3-1, Main Menu, on page 30).
2. Select the ANNOTATION option
e Annotation menu appears (see Figure 3-3, Annotation Menu, on page 34).
3. Select the POINTERS option.
Page 76 - Pointmaker CPN-5800 Color Video Marker Boeckeler Instruments, Inc.
Page 83

Section Four: Using Markers Assigning Marker Appearance
Figure 4-3: Pointers dialog
e Pointers dialog appears.
4. Select a pointer type.
e active option displays a white ll. Selecting NO POINTER turns the
pointer o.
5. Exit the menu system.
Turning the Active Pointer On/Off
Sometimes a presenter chooses not to have the pointer showing during a presentation. is command allows you to turn the visibility of the pointer o or on.
When the active pointer is turned o, you can still anchor pointers.
From the Digitizing Tablet
Since touch screens and whiteboards do not display active pointers, you do not
need to use the Pointer On/O command with those devices.
NOTE: An alternative to the Pointer On/O command, is using the Pen
Proximity feature available on the tablet template or through the menu
system. When active, this feature causes the active pointer to disappear each
time you remove your drawing device from proximity of the tablet or screen
drawing surface (see Changing Pen Proximity, on page 37).
1. Press the Pointer On/O icon on the tablet Menu Strip.
Boeckeler Instruments, Inc. Pointmaker CPN-5800 Color Video Marker - Page 77
Page 84

Assigning Marker Appearance Section Four: Using Markers
e pointer disappears.
2. To make the pointer reappear, repeat the procedure.
From the Keyboard
1. Activate the Pointer On/O command.
e pointer disappears.
2. To make the pointer reappear, repeat the procedure.
NOTE: To turn o all active markers, including active frames, use the
keyboard Active Marker On/O command.
From the Menu System
Pointers are turned o in the same dialog where they are selected (see PTurning the Active Pointer On/O, on page 77.
Page 78 - Pointmaker CPN-5800 Color Video Marker Boeckeler Instruments, Inc.
Page 85

Section Four: Using Markers Marking
MarkinG
is section covers pointing and drawing procedures. e following outline lists
the procedures in the general order that most presenters use them.
• Entering the Marking Mode
• Pointing (with positionable or anchored pointers)
• Drawing
• Typing Text (keyboard installed)
• Framing (keyboard installed)
• Stamping the Date/Time
Entering the Marking Mode
e Pointmaker is in the marking mode by default. e only time it is not in
marking mode is when a menu is displayed. In the Marking mode, the image from
the video source is displayed along with any stored markers. An active pointer is
also displayed, unless it was disabled during setup(see Pointer Toggle, on page 38).
Pointing
You can move the pointer around the screen, using it to direct the viewer’s
attention without anchoring it. You can also position and anchor several point ers
on the overlay, giving you the opportunity to point in a more lasting man ner on
several areas of the image.
Before using or anchoring a pointer, you may want to select a new pointer type (see
Selecting Pointers, on page 76). Or you may change the pointer color (see Assigning
Marker Colors, on page 73).
From Any Controller
1. Position the pointer anywhere on the video image to direct attention to
an image detail.
Refer to instructions for “Point” under your particular control device (see
Using e Chalkboard, on page 89)
Boeckeler Instruments, Inc. Pointmaker CPN-5800 Color Video Marker - Page 79
Page 86

Marking Section Four: Using Markers
2. If desired, reposition the same active pointer anywhere on the image to
make your second point, and continue as often as desired.
3. If desired, anchor the active pointer.
Refer to instructions for “Anchor” under your particular control device.
e pointer is anchored and a new active pointer appear on screen, identical
to the rst.
NOTE: Active pointers are not displayed for touch screens, only anchored
markers.
4. Repeat any of these steps as often as desired.
Drawing
You can draw on the Pointmaker overlay simply by beginning to draw. e
drawing feature allows you to circle important parts of the image, write on the
image, or underscore particular parts of text. You can draw freehand curves or
straight lines.
To draw, you can use the digitizing tablet stylus on the tablet drawing area, your
nger on a touch screen, or a magic marker on the SMART Board. You can also
use other mouse devices to draw. You cannot freehand draw using the keyboard,
but you can use it for straight line drawing.
Before drawing, you may wish to change the drawing line color (see Assigning
Marker Colors, on page 73). Or you may which to change the width and style of the
drawing line (see Assigning Line Styles, on page 74).
Drawing Freehand
1. Position the active pointer (if one is displayed) anywhere on the video
image where the drawing is to begin.
NOTE: If you are using a touch screen or whiteboard, position a n ger or
marker pen.
2. Activate the Draw command from your particular drawing device.
3. Reposition the active marker (if one is displayed) and repeat the above
procedures for another drawn line.
NOTE: You may create as many drawings as desired.
Page 80 - Pointmaker CPN-5800 Color Video Marker Boeckeler Instruments, Inc.
Page 87

Section Four: Using Markers Marking
Straight Line Drawing
is feature works only using the keyboard.
1. Activate the Straight Draw command from the keyboard.
A cursor appears representing the rst endpoint of the straight line.
2. Position the cursor anywhere on the screen where the line is to begin, and
anchor it.
A second cursor appears, joined by a line to the rst endpoint.
3. Position the second cursor where the line is to end and anchor it.
e line segment is complete.
4. If desired, draw another straight line by positioning the new active cursor
and anchoring it.
Typing Text Labels
Anytime you press an alphanumeric key on the keyboard, a text label begins.
Before you anchor a line of text, you can choose to display it in one of six (6) fonts,
each of which oers one or more sizes. ese fonts are (in order): TI Roman (4
sizes); Helvetica (4 sizes); TI Dom Casual (4 sizes); Fargo (3 sizes); Symbol (1 size);
and Map (1 size). Symbol and Map fonts are charted in Sec tion Five: Appendices.
1. Position the active marker anywhere on the image.
2. Create a line of text by pressing the desired text keys.
3. Select the desired font by repeatedly activating the Fonts command until
NOTE: You may anchor many lines as desired.
NOTE: Do not anchor this line of text yet, since only an active (or positionable) line of text will display the font options.
the font appears on screen.
You can scroll backwards through the font options, by activating the Reverse
Toggle command.
4. Select a font size by repeatedly activating the Font Size command until
the correct size appears on screen.
You can scroll backwards through the size options, by activating the Reverse
Toggle command.
Boeckeler Instruments, Inc. Pointmaker CPN-5800 Color Video Marker - Page 81
Page 88

Marking Section Four: Using Markers
5. Turn the text background on or o by activating the Text Back ground
On/O command.
NOTE: e color of the background is always blue.
6. Position the active label anywhere on the video image, then anchor the
label.
e line of text is anchored. You can anchor a new line of text imme diately
below the previously anchored text line by not moving the cursor. Or you can
position the second line of text anywhere on the screen.
NOTE: To create a paragraph of several lines of text, remember that text does
not wrap, so press ENTER or DROP [Insert] at the end of each line.
7. Exit text typing mode by pressing any other function key.
Sizing and Anchoring Frames
is feature works only using the keyboard.
e Pointmaker features four frame types: box frame, circle frame, solid box
frame, and solid circle frame. Frames remain active (sizable and positionable) until
you anchor them.
Before anchoring a frame, you may want to change the frame color (see Assigning
Marker Appearance, on page 73).
1. Select a frame type by repeatedly activating the Frames command until
the desired frame appears.
You can scroll backwards through the font options, by activating the Reverse
Toggle command.
e active frame appears, ready for sizing and positioning. A crossed line
displayed within the boundaries of an active frame represents a solid frame.
e frame will be lled with the color of the active marker after you anchor it.
2. Enter the Sizing mode by activating the Size Frames command.
e frame is now sizable.
3. Size the frame using the keyboard or other controller.
Upward commands make the frame taller. Downward commands make the
frame shorter. Leftward commands makes the frame wider. Rightward
commands make the frame narrower.
For ner control in sizing, activate the Fine Positioning command.
4. Store the size by pressing the ENTER or DROP [Insert] key.
Page 82 - Pointmaker CPN-5800 Color Video Marker Boeckeler Instruments, Inc.
Page 89

Section Four: Using Markers Marking
e sized frame is ready for positioning.
5. Position the sized frame anywhere on the image, then anchor it.
A new active frame appears, identical to the rst.
6. If desired, size and position the new active frame anywhere on the video
image to frame a second area.
7. Exit Frames by pressing any other function key.
Stamping the Date/Time
is feature works only using the keyboard.
You can “stamp” an overlay with the current date and/or time, depending on
which display mode you selected in the Set Date/Time Menu (see Assigning Marker
Colors, on page 73).
While active (or positionable) the date/time stamp is represented by an icon. e
numerical date and/or time will appear as soon as you anchor the icon. You can
anchor only one Date/Time stamp on each overlay. To reposition a stamp, activate
the command again. e old stamp disappears and the new stamp appears, ready
for positioning.
Before anchoring a date/time stamp, you may want to select a new color for the
stamp’s text (see Assigning Marker Appearance, on page 73).
1. Activate the Show Date/Time command.
A date/time icon appears.
2. Position the date/time icon anywhere on the video image.
3. To select a solid or transparent label background, activate the Text
Background On/O command.
4. Anchor the date/time label.
e current date/time label appears. A date/time cursor also appears on
screen, ready for the next action.
Boeckeler Instruments, Inc. Pointmaker CPN-5800 Color Video Marker - Page 83
Page 90

Marking Section Four: Using Markers
Page 84 - Pointmaker CPN-5800 Color Video Marker Boeckeler Instruments, Inc.
Page 91

Section Four: Using Markers Clearing Markers
ClearinG Markers
After you anchor markers (drawings, lines, frames, and pointers), you may want to
clear the screen of all or some of the markers before proceeding to the next point of
discussion. You can erase markers in one of the three following ways:
• Clearing All Markers
• Undoing the Most Recent Marker
• Erasing Markers
If you don’t want to clear markers, but just need to temporarily remove the marker
overlay, then use the Marker Overlay On/O command(see Turning O the
Marker Overlay, on page 91).
Clearing All Markers
Follow these instructions to clear the entire screen of markers.
From the Digitizing Tablet
Select the CLEAR icon on the tablet Menu Strip.
All markers disappear. An active pointer remains on screen unless the pointer
has been disengaged.
NOTE: Markers are cleared even if you are in PC Mode.
From Other Controllers
Activate the Clear command for your particular controller.
All markers disappear. An active pointer remains on screen unless the pointer has been disengaged.
Undoing a Marker
Follow these instructions to undo a marker, beginning with the most recently
anchored marker or line segment. You can repeat this command as often as needed
until the screen is clear of markers.
Boeckeler Instruments, Inc. Pointmaker CPN-5800 Color Video Marker - Page 85
Page 92

Clearing Markers Section Four: Using Markers
From the Digitizing Tablet
Press the tip button on the UNDO icon located on the tablet Menu Strip.
e most recently anchored marker disappears. An active pointer remains on
screen unless the pointer has been disengaged.
NOTE: You can undo markers even if you are in PC Mode.
From Other Controllers
Activate the Undo command for your particular controller.
e most recently anchored marker disappears. An active pointer remains on
screen unless the pointer has been disengaged.
Erasing Markers
Follow these instructions to erase markers from the overlay, wiping them clear like
a traditional eraser. You activate Erase mode from the menu system, but you erase
the markers using your drawing device.
When you are in Erase mode, you can no longer undo markers. Conversely, when
you are in Undo Mode, you cannot erase markers.
Activating Erase Mode
1. Activate the menu system (see Activating the Menu, on page 29).
2. Select the ANNOTATION option
NOTE: Entering Erase mode clears markers from any overlays that you might
have stored.
e Main Menu appears (see Figure 3-1, Main Menu, on page 30).
e Annotation menu appears (see Figure 3-3, Annotation Menu, on page 34).
3. Select ERASE METHOD.
Page 86 - Pointmaker CPN-5800 Color Video Marker Boeckeler Instruments, Inc.
Page 93

Section Four: Using Markers Clearing Markers
Figure 4-4: Erase Method Menu
e Erase Method dialog appears.
4. Select an eraser size SMALL, MEDIUM, or LARGE.
e active size displays a white ll.
NOTE: e larger the eraser size, the more area you can clear in a single
motion. If you do not select an eraser size, the Pointmaker will default to
Medium. Selecting the UNDO option allows you to undo a marker, rather
than erase it.
5. Exit the menu system.
Erasing Procedure
Follow these instructions to erase markers. Be sure you are in Erase mode
before implementing these procedures (see Erasing Markers, on page 86.
From the SMARTBoard
e default mode for SmartBoard operation is Clear. When you remove the eraser
from the SmartBoard pen tray and touch it any where on the board, the Pointmaker overlay will clear.
®
If you would prefer to erase the Pointmaker overlay in the same way that you
would erase dry erase markers, please use the following pro cedure:
Boeckeler Instruments, Inc. Pointmaker CPN-5800 Color Video Marker - Page 87
Page 94

Clearing Markers Section Four: Using Markers
1. After marking, activate the Undo/Erase command.
2. Pick up the eraser.
3. Wipe the eraser over your markers.
e markers disappear as you wipe. When you nish erasing, lift the eraser from
the board. Lifting the eraser closes the eraser function, and enters Marking mode.
If you need to erase again, repeat steps 1-3.
From Other Drawing Devices
1. After marking, activate the Undo/Erase command for your particu lar
controller.
A square eraser appears on screen, ready for positioning.
2. Activate the Draw command, and drag the eraser over the markers
e markers disappear as you wipe. When you lift the drawing device (that is,
your nger or stylus), the Pointmaker closes the eraser function, and enters
Marking Mode. If you need to erase again, repeat steps 1-3.
Page 88 - Pointmaker CPN-5800 Color Video Marker Boeckeler Instruments, Inc.
Page 95

Section Four: Using Markers Using e Chalkboard
usinG the ChalkBoard
You can mark on a solid background (chalkboard) or the video image. When
turned on, the chalkboard will continue to be displayed even when you select a
new marker overlay. Also, the chalkboard will remain on screen until you turn it
o. e chalkboard is most easily selected from the digitizing tablet or key board,
but it can also be selected from the menu system.
Activating the Chalkboard
Use these procedures to turn on the chalkboard.
From the Digitizing Tablet
1. Select the CHALKBOARD icon on the tablet template.
e chalkboard command is only available on certain templates. e
chalkboard appears, along with any markers you may have already anchored.
2. To exit the Chalkboard, select the VIDEO SOURCE icon you desire.
e video source returns, along with any markers you may have anchored on
the chalkboard.
From the Keyboard
1. Activate the CHALKBOARD ON/OFF command.
e chalkboard appears, along with any markers you may have already
anchored.
2. To exit the Chalkboard, repeat step 1.
e video source returns, along with any markers you may have anchored on
the chalkboard.
From the Menu System
1. Activate the menu system (see Activating the Menu, on page 29).
e Main Menu appears (see Figure 3-1, Main Menu, on page 30).
Boeckeler Instruments, Inc. Pointmaker CPN-5800 Color Video Marker - Page 89
Page 96

Using e Chalkboard Section Four: Using Markers
2. Select the ANNOTATION option.
e Annotation menu appears (see Figure 3-3, Annotation Menu, on page 34).
3. Select the BACKGROUND option.
e Background Menu appears.
4. Select the CHALKBOARD option.
5. Exit the menu system.
e chalkboard appears, along with any markers you may have already
anchored.
6. To exit the Chalkboard, repeat steps 1-3, but select the SOURCE VIDEO
option instead of CHALKBOARD.
e video source returns, along with any markers you may have anchored on
the chalkboard.
Displaying Different Overlays
With the keyboard installed, you can display one of 10 stored marker overlays.
Also, you can temporarily turn o the marker overlay, without aecting the
markers you store there.
Figure 4-5: Background Menu
is section covers the following overlay functions:
• Paging rough Overlays (in sequence or out-of-sequence)
• Turning an overlay O/On
Page 90 - Pointmaker CPN-5800 Color Video Marker Boeckeler Instruments, Inc.
Page 97

Section Four: Using Markers Using e Chalkboard
Paging Through Overlays
Use these instructions when the keyboard or tablet is installed and you wish to
display a new overlay. After you display a new overlay you can add or clear markers
from that overlay. Overlays are saved automatically.
From the Keyboard
To go to the next or previous overlay
Activate the Next Overlay or Previous Overlay command.
e next or previous overlay of markers is displayed, and an overlay # briey
appears in the corner of the screen.
To go to an out-of sequence overlay
1. Activate the Go To Overlay # command.
A small “#” sign appears in the lower-right corner, followed by an underscore
prompting you to type a number.
2. Type in the overlay number.
e overlay corresponding to the number appears. is selection is conrmed
by a brief display of the overlay number in the lower-right corner of the
screen.
NOTE: If you do not respond within a few seconds, the overlay does not
change.
Turning Off the Marker Overlay
When the keyboard is installed, you can turn o the Pointmaker overlay to view
the video image without any markers. When you turn the overlay on again, the
markers you anchored on that overlay will reappear. You can only activate this
command from the keyboard.
1. Activate the Marker Overlay On/O command.
e markers disappear.
2. Activate the Marker Overlay On/O command again.
e markers reappear.
Boeckeler Instruments, Inc. Pointmaker CPN-5800 Color Video Marker - Page 91
Page 98

Using e Chalkboard Section Four: Using Markers
Page 92 - Pointmaker CPN-5800 Color Video Marker Boeckeler Instruments, Inc.
Page 99

seCtion Five:
iMaGe MoBility
Page 100

 Loading...