

Page 1

HD Battery IP Camera
User Manual
FCC ID: 2ASH5V1-MI-1080P
Model Name: V1-MI-1080P
Page 2

1. Overview
HD Battery IP Camera
Mic
Ambient Light Sensor
Lens
PIR Sensor
LED
Micro USB Interface,
Micro SD Card Slot and
Charging Status LED
2
Page 3

3
Wall Mount
Magnetic Base
Power Button
Speaker
Page 4

4
Speaker
Red LED
Green LED
USB Plug
Reset Button
Sync Module
Page 5

5
Item
Description
Camera Sensor
1/2.7" 1080P CMOS
Camera Lens
136° Field of View
Image Resolution
Max.1920x1080
Video Bitrate
Auto Adapter
Storage
Micro SD Card (Max.128GB)
Battery
4020mAh(4 to 6 month battery life)
Power Supply
5V/1.5A
Dimensions
78.8mm x 73.5mm x 50.6mm
1.1 Specifications
Packing List:
• HD Battery IP Camera
• Micro USB Charging Cable
• Sync Module(Optional)
• User Manual
• Warranty Card
Page 6

6
2. Getting Started with your IP Camera
HD Battery IP Camera supports Android
phones and iPhone connections. The camera
supports automatic video recording to Micro
SD card after startup, and can be played back
in mobile App. To use this feature, you need to
insert a Micro SD card into the camera.
Insert Micro SD Card: When inserting a Micro
SD card, use your fingernail to press the card
into the camera. When it is fully inserted, the
card will snap into the slot. To remove the
Micro SD card, use your fingernail to gently
press the card into the camera and it will pop
up, allowing you to remove it.
*Note: Micro SD card must be formatted in a
FAT32 file system format.
2.1 Power On, Off and Recharging
Turn On: Press the power button for 2
seconds until you hear “power up”, then
release. When the green LED light turns on,
your IP Camera is on.
*Note: The first time the camera is turned on,
the camera will automatically scan for a
connection, indicated by a flashing green LED
light and play “scan QR code”. Please use the
VPai Home App to configure the camera
network, details refers to section 2.2 “Using
Your IP Camera with a phone”.
Page 7

7
Turn Off: Press and hold the power button for 2
seconds until hearing “power down”, then release.
When the green LED light turns off, your IP Camera
has powered down.
Charge the Battery: If the IP Camera’s battery is
low on power, the camera battery icon on the live
screen of the VPai Home App will flash. Please use
the Micro USB cable to insert the 5V/1.5A charging
adapter to charge the camera. When charging, the
charging status LED will turn on. When it’s fully
charged, the charging status LED will turn off.
*Note: When the battery is too low, the red LED
light will flash quickly for 15 seconds and play "low
battery, system will shut down". If not charged, the
camera will be shut down automatically.
Page 8

8
2.2 Using Your IP Camera with a phone
The camera supports connecting with Android
phone and iPhone. In order to use your camera,
installation of the official VPai Home App is
required. You can scan the QR code below to
download and install the VPai Home App. App
for Android is also supplied on VPai website
(www.vpai360.com), Google Play Store, Baidu
App assistant, Tencent mobile assistant, and
Peasecod platform and on other similar
platforms.
*Note: Android 5.0 or iOS 9.0 above is
required.
The camera supports the connection of the
wireless router or Sync Module.
Sync Module is central hub of your IP Camera
system. This connects to your Wi-Fi network
and to your IP Camera(s).
Page 9

9
Connect HD Battery IP Camera to Wireless
Router: Once the VPai Home app has been
installed on your phone, open the app and choose
to log in with your Email, WeChat, Facebook or
LINE account.
Page 10

10
Tap the add device “+” button on the app
screen to enter the “Choose Device” interface.
The screen prompts will show as follows:
Page 11

11
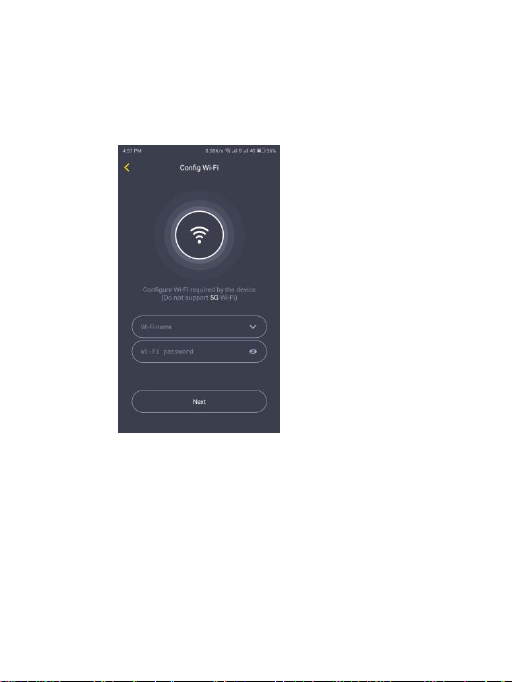
Select “HD Battery IP Cam” to enter the “Config IP
Cam” interface, and then tap the “Start Config”
button when the green LED flashes to enter the
“Config Wi-Fi” interface. The screen prompts will
show as follows:
Page 12
12
Tap the Wi-Fi name drop-down arrow and
select the Wi-Fi hotspot, and enter your Wi-Fi
password. The Wi-Fi configuration will show as
follows:
*Note: 5G network is not supported.
Page 13
13
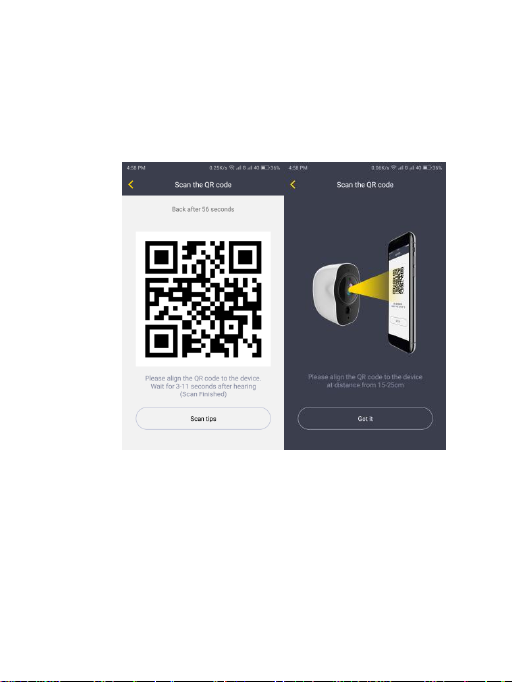
Tap “Next” and then use your HD Battery IP camera
to scan the QR code on the app. Aim the camera to
the QR code from a distance of about 15 to 25cm
for a few seconds. Please follow the on-screen
instruction as shown below.
*Note: When rebinding to the device, you have to
press the Power button twice to start scanning the
QR code.
Page 14

14
*Note: After the QR code has been
successfully scanned, you will hear “scan
finished” and the camera will start to connect to
the router. The green LED light will continue to
flash until the Wi-Fi connection is established.
You will hear “Wi-Fi connected” when the
connection is successful. The Wi-Fi connection
information will be automatically saved. The
next time the camera is switched on, the Wi-Fi
will connect automatically. If the Wi-Fi
disconnects, a red LED light will flash.
Connect Sync Module to Wireless Router:
Tap the add device “+” button and select “Sync
Module” in “Choose Device” interface. The
screen prompts will show as follows:
Page 15

15
Connect the Sync Module to the power supply. Tap
“Start Config” button when the red LED light on the
sync module starts flashing, and after hearing the
“pairing mode”.
*Note: It takes around 20 seconds before the sound
will play “pairing mode” and the red LED light starts
flashing.
Page 16

16
Tap the “Config Wi-Fi” button and select the
Wi-Fi hotspot named VPaiHome_xxxx. The
password is: 12345678. After the connection is
established, the “Config exist Wi-Fi” button
becomes clickable when you return to “Config
Sync Module” interface. The screen prompts
will show as follows:
Page 17

17
Once connected to the Sync Module, tap “Config
exist Wi-Fi” button to access the next page. You can
change the Wi-Fi name and password by clicking
“Change name and password” or tap “Next” to
connect the Sync Module to the Internet.
Page 18

18
Tap “Change name and password” button,
enter a name and password, and then tap
“Next” to complete the setup. After that, you
need to reconnect to the Sync Module’s Wi-Fi
you just set up. Change the name and
password settings as shown below:
Page 19
19
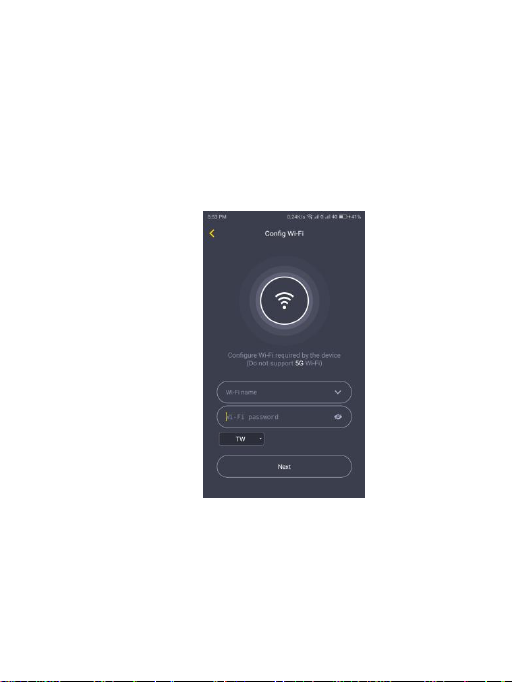
In the “Config exist Wi-Fi” interface, you can tap
“Next” to connect your Sync Module to the Internet.
Tap the Wi-Fi name drop-down arrow (iPhones
require manual input), select the Wi-Fi hotspot and
enter the password. The Sync Module will restart
after you tap “Next”. When the Sync Module is
connected to the Internet, the red LED light will stop
flashing.
*Note: 5G network is not supported.
*Note: To reset the Sync Module, press the reset
button on the module for 8 seconds until the red
LED light flashes fast.
Page 20

20
The Sync Module’s Wi-Fi can be used as a
normal wireless network after the Internet
configuration of the Sync Module is complete.
You can connect the HD Battery IP camera to
the Internet through the Sync Module.
Connect HD Battery IP Camera to Sync
Module’s Wi-Fi: For instructions to connect
the IP camera to the Sync Module’s Wi-Fi,
follow the steps in the “Connect HD Battery IP
Camera to Wireless Router” mentioned in
section 2.2.
Page 21

21
After the camera has been successfully added to
the VPai Home app, you can modify its name and
then tap “OK” to return to the app home page. Tap
the camera preview to enter the camera operation
interface. You can view the camera’s real-time
image, take photos, record videos, send voice
messages and etc. The camera operation interface
will show as follows:
*Note: To wake up the device, tap on the camera
preview screen.
Page 22

22
Add Device
Device Settings
User
Management
Share
Scan QR Code
Device Preview
3. VPai Home App Menu
VPai Home App has the following menu:
Devices: include Add New Device, Device
Sharing, Device Settings, Device Control, etc.
Gallery: view photo/video and share.
Alerts: manage the alarm sent by camera.
Me: account management, alerts manage,
FAQ, etc.
3.1 Devices
The “Devices” interface showed as below:
Page 23

23
Add Device: Tap the “+” to enter add device page.
Details refer to section 2.2 “Using Your IP Camera
with a phone”.
Device Settings: Tap the setting button to enter the
device setup page, to allocate the configurations for
the device parameters.
Share: Generates the device’s corresponding QR
code and share the device with family members.
Scan QR Code: Works with a share function to
scan QR code for devices connection.
Device Preview: Displays the device preview
image, tap on the preview image to enter operation
page.
User Management: The first user who connects to
the device will be the administrator of the device
who has the rights to discharge the user’s rights on
the current device.
Page 24
24
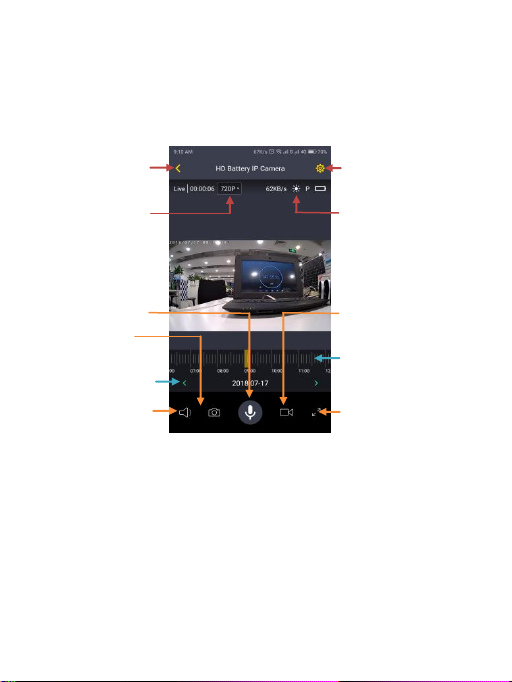
Back
Device
Settings
Record Video
Full Screen
Capture Photo
Talk
Sound
Playback
Timeline
Playback Date
Resolution Setup
Day/Night
Mode
3.1.1 Operations
Click the preview image to enter the camera
operation interface, shown as below:
Back: Go back to the upper level interface.
Device Settings: To enter the device setting
page and configure the device parameters.
Resolution Setup: Switch the default
resolution of 720P to 480P or 1080P.
Day/Night Mode: Improve the visibility when it
is dark or at low-light condition.
Page 25

25
Capture Photo: Control the device to take photos.
Photos will be stored directly to your mobile device.
Sound: Turn on and off the sound of monitoring
video.
Record Video: Control the device to record videos.
Videos will be stored directly to your mobile device.
Full Screen: Display the device image in full screen.
Playback Timeline: The camera supports
automatic video recording to Micro SD card after
startup. You can move the timeline to review the
recorded video.
Playback Date: Tap the left or right arrow to select
a date to use for playback of videos from the
different dates.
Talk: Tap the talk button to open the intercom
function. Or press and hold the button to record,
release the button to send the voice message to the
device to play. When canceling, press and hold the
finger and slide it to cancel the voice message.
3.1.2 Device Settings
Tap the "Device Settings" button on the camera
page or the camera operation interface to enter the
device settings interface. Device settings showed as
below:
Page 26

26
Basic: Display the basic
information of the device. You
can also change the individual
name of the device and check
firmware update here.
Network information: Display
the network information of the
device.
Time zone: Set the time zone of
the device.
Alarm Setting: Configure the
alarm settings.
Audio: Turn on and off the
audio, and change the prompt
language of device.
Other: Configure indicator
setting, display battery level and
SD card capacity. You can also
reset the SD card or all the
parameters of the device by tap
“Reset SD Card” or “Restore to
factory”.
Unbind: Remove the device
from your account.
Page 27

27
3.2 Gallery
3.2.1 Photo/Video
In Gallery interface, you can view, delete, and share
photos/videos. Touch the thumbnail to open the
photo/video; long-press the photo/video thumbnail
(or click the "Select" button on the top right corner)
to select the file: click to delete the file, click to
share the file (details refer to Share), click to
select all. Gallery interface shown as follows.
Page 28

28
3.2.2 Share
Click the “Select” button on the top right corner
of the Gallery (you can also long-press a
picture or video), and you can choose some
photos or videos what you want to share, then
click the share button in the lower left corner
of the interface to share. In addition, click on
the thumbnail to open the photo / video that
you want to share, and then click the share
button to share it. The sharing menu showed
as below.
Page 29

29
Device List
Select/Cance
Calendar
Thumbnail
Select All
Delete
3.3 Alerts
The “Alerts” menu allows you to view all sent alarm
videos and photos when the camera detects
movement from objects. The alert message will be
stored in the cloud and can be viewed and
downloaded in the message interface. The alerts
interface is shown as below.
*Note: Messages that have been read are marked in
gray.
Page 30

30
3.4 Me
The “Me” menu allows you to manage your
account and alerts messages. You can share
the VPai Home app to your friends here. The
“Me” interface is shown as below.
Page 31

31
4. HD Battery IP Camera Firmware Update
You can update the HD Battery IP camera firmware
by either manual update or auto update. For manual
update, you can check the latest firmware on the
Device Settings page of VPai Home app. For auto
update, when you connect the HD Battery IP
camera by using the VPai Home app, it will
automatically detect the latest firmware and prompt
a new firmware update when it is available. If you
choose to accept the update, the green LED light
will flash quickly and the camera will simultaneously
play “upgrading”. When the firmware update is
complete, the green LED light will stop flashing and
the camera will play “upgrading finished”. The
camera will restart after the update has done.
*Note: Make sure the IP camera is fully charged or
connected to a power supply before upgrading the
firmware. Do not turn off the camera during the
update.
Page 32

32
5. Precautions and Warnings
• Check the user agreement before using the
camera.
• The camera is limited to a USB charging
adapter with an output power of 5V/1.5A.
Please use the correct adapter for charging.
• Do not drop or hit your camera, so as not to
damage the device or scratch the camera
lenses.
• Do not place the camera under the sun for a
long time.
• The device may become a little hot during
operating, and it is a normal situation.
Please avoid using the camera in high
temperature environments.
Page 33

FCC Caution.
This device complies with part 15 of the FCC Rules. Operation is subject to the following two
conditions:
(1) This device may not cause harmful interference, and
(2) this device must accept any interference received, including interference that may cause
undesired operation.
Any Changes or modifications not expressly approved by the party responsible for compliance
could void the user's authority to operate the equipment.
Note: This equipment has been tested and found to comply with the limits for a Class B digital
device, pursuant to part 15 of the FCC Rules. These limits are designed to provide reasonable
protection against harmful interference in a residential installation. This equipment generates
uses and can radiate radio frequency energy and, if not installed and used in accordance with the
instructions, may cause harmful interference to radio communications. However, there is no
guarantee that interference will not occur in a particular installation. If this equipment does
cause harmful interference to radio or television reception, which can be determined by turning
the equipment off and on, the user is encouraged to try to correct the interference by one or
more of the following measures:
-Reorient or relocate the receiving antenna.
-Increase the separation between the equipment and receiver.
-Connect the equipment into an outlet on a circuit different from that to which the receiver is
connected.
-Consult the dealer or an experienced radio/TV technician for help.
This equipment complies with FCC radiation exposure limits set forth for an uncontrolled
environment. This equipment should be installed and operated with minimum distance 20cm
between the radiator & your body.
 Loading...