

SOFTWARE AND
USER MANUAL

THE INTELLIGENT RETRIEVABLE INCIDENT SYSTEM (IRIS) BODY CAMERA COMES WITH A LIMITED
HARDWARE WARRANTY AS SET FORTH IN ACCORDANCE WITH
ttps://www.pointblankenterprises.com/limitedwarranty, TO THE FULLEST EXTENT PERMISSIBLE
UNDER APPLICABLE LAW. THIS LIMITED HARDWARE WARRANTY AND THE REMEDIES SET FORTH
THEREIN ARE EXCLUSIVE AND IN LIEU OF ALL OTHER WARRANTIES, REMEDIES, AND
CONDITIONS, WHETHER ORAL OR WRITTEN, STATUTORY, EXPRESS OR IMPLIED WITH RESPECT
TO THE IRIS BODY CAMERA, INCLUDING ANY WARRANTY OF MERCHANTABILITY OR FITNESS
FOR A PARTICULAR PURPOSE.
FCC Statement:
This device complies with part 15 of the FCC Rules. Operation is subject to the following
two conditions: (1) This device may not cause harmful interference, and (2) this device
must accept any interference received, including interference that may cause undesired
operation.
This equipment has been tested and found to comply with the limits for a Class B digital
device, pursuant to part 15 of the FCC Rules. These limits are designed to provide
reasonable protection against harmful interference in a residential installation. This
equipment generates, uses and can radiate radio frequency energy and, if not installed
and used in accordance with the instructions, may cause harmful interference to radio
communications. However, there is no guarantee that interference will not occur in a
particular installation. If this equipment does cause harmful interference to radio or
television reception, which can be determined by turning the equipment off and on, the
user is encouraged to try to correct the interference by one or more of the following
measures:
—Reorient or relocate the receiving antenna.
—Increase the separation between the equipment and receiver.
—Connect the equipment into an outlet on a circuit different from that to which the
receiver is connected.
—Consult the dealer or an experienced radio/TV technician for help.
Caution: Any changes or modifications not expressly approved by the party responsible
for compliance could void the user's authority to operate the equipment.
Please see https://www.pointblankenterprises.com for additional product information.

Table of Contents
USER MANUAL .................................................................................................................................... 1
IRIS CAM Overview ............................................................................................................................. 6
Unit Description and Operation .......................................................................................................... 8
Functions ............................................................................................................................................. 9
Power On/Off .................................................................................................................................. 9
Power On and Auto Record ........................................................................................................ 9
Resetting the Device ....................................................................................................................... 9
Video Recording .............................................................................................................................. 9
Voice Recording .............................................................................................................................. 9
Photo Capturing ............................................................................................................................ 10
Infra-Red (IR) Settings ................................................................................................................... 10
LCD Display Settings ...................................................................................................................... 10
GPS Function ............................................................................................................................. 10
Tagging Button .............................................................................................................................. 11
Playback ........................................................................................................................................ 11
Push To Talk Function For Two Way Radio ................................................................................... 11
Mini Camera and Radio Cables ..................................................................................................... 11
Menu Settings ............................................................................................................................... 12
Resolution ................................................................................................................................. 12
Photo Size ................................................................................................................................. 12
Record Overwrite ...................................................................................................................... 13
Record File Size ......................................................................................................................... 13
Auto IR (Infra-Red) .................................................................................................................... 13
Flicker ........................................................................................................................................ 13
Motion Detection ...................................................................................................................... 13
G-Sensor Set .............................................................................................................................. 13

Pre-Record ................................................................................................................................ 14
Post Record ............................................................................................................................... 14
Car Mode .................................................................................................................................. 14
Video Flip .................................................................................................................................. 14
Auto LCD Off ............................................................................................................................. 14
Auto Power Off ......................................................................................................................... 14
Date Format .............................................................................................................................. 15
GPS Setup .................................................................................................................................. 15
GPS Auto Update Time ............................................................................................................. 15
GMT Setup ................................................................................................................................ 15
Language ................................................................................................................................... 15
Volume ...................................................................................................................................... 15
LED Status ................................................................................................................................. 15
Silent Mode ............................................................................................................................... 16
Recording Alert ......................................................................................................................... 16
Free Space ................................................................................................................................. 16
Officer ID ................................................................................................................................... 16
Firmware Version ...................................................................................................................... 16
Default Settings ......................................................................................................................... 16
WIFI Mode ................................................................................................................................ 16
Troubleshooting ................................................................................................................................ 17
Cannot Power On ...................................................................................................................... 17
Video Appear to be in Black And White.................................................................................... 17
No GPS Signal ............................................................................................................................ 17
Device Frozen or Unresponsive ................................................................................................ 17
Default Settings ................................................................................................................................. 19
SOFTWARE MANUAL ........................................................................................................................ 20

Overview ........................................................................................................................................... 21
Features ........................................................................................................................................ 21
Minimum Requirements ............................................................................................................... 21
Compatible Devices ...................................................................................................................... 21
Setup ................................................................................................................................................. 22
Client Installation .......................................................................................................................... 22
Connect ............................................................................................................................................. 26
Client Uninstallation ..................................................................................................................... 26
Login .................................................................................................................................................. 26
Device Setup ..................................................................................................................................... 28
Modify Password .......................................................................................................................... 28
Browse Password .......................................................................................................................... 28
User Info Tab ................................................................................................................................. 29
Parameters Tab ............................................................................................................................. 30
Device Control Tab ........................................................................................................................ 31

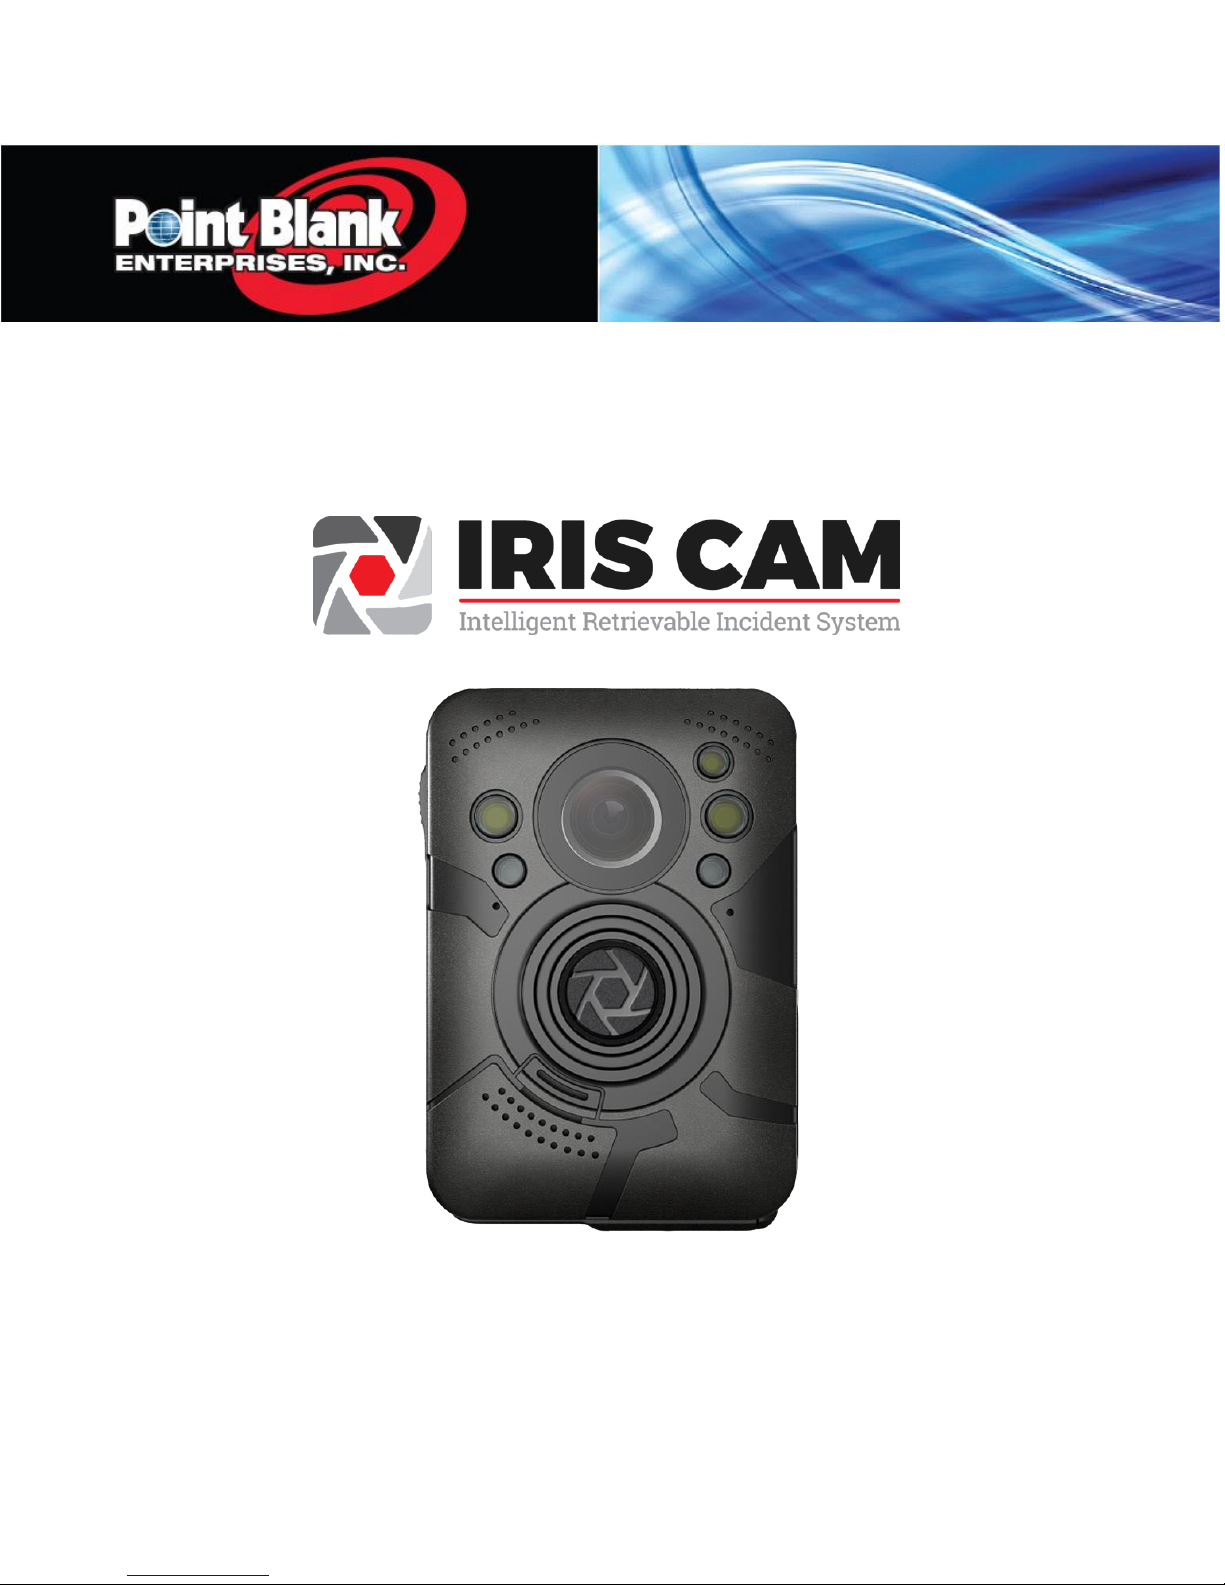
IRIS CAM Overview
The IRIS CAM is an innovative video surveillance solution providing complete personal
surveillance for officers. The IRIS CAM is a high-definition body worn camera device. The
small, secure, lightweight, and versatile design makes the IRIS CAM a truly portable video
recording system. Due to its unique versatile design, the IRIS CAM is the perfect
surveillance solution for law enforcement and military applications. Users can utilize the
camera system to collect evidence, strengthen officer performance and accountability,
document encounters between police and the public, standardize behavioral conduct, and
play back video to assure accuracy and transparency.
Firmware Version:
PBP05GE.20160319.W
IMPORTANT: IRIS CAM should be fully charged for at least 3 hours prior to first use. The
red indicator LED on the front side of the IRIS CAM will turn on while charging and will
turn off when the battery is fully charged. The green indicator LED will turn on when the
device is on and will flash while recording.
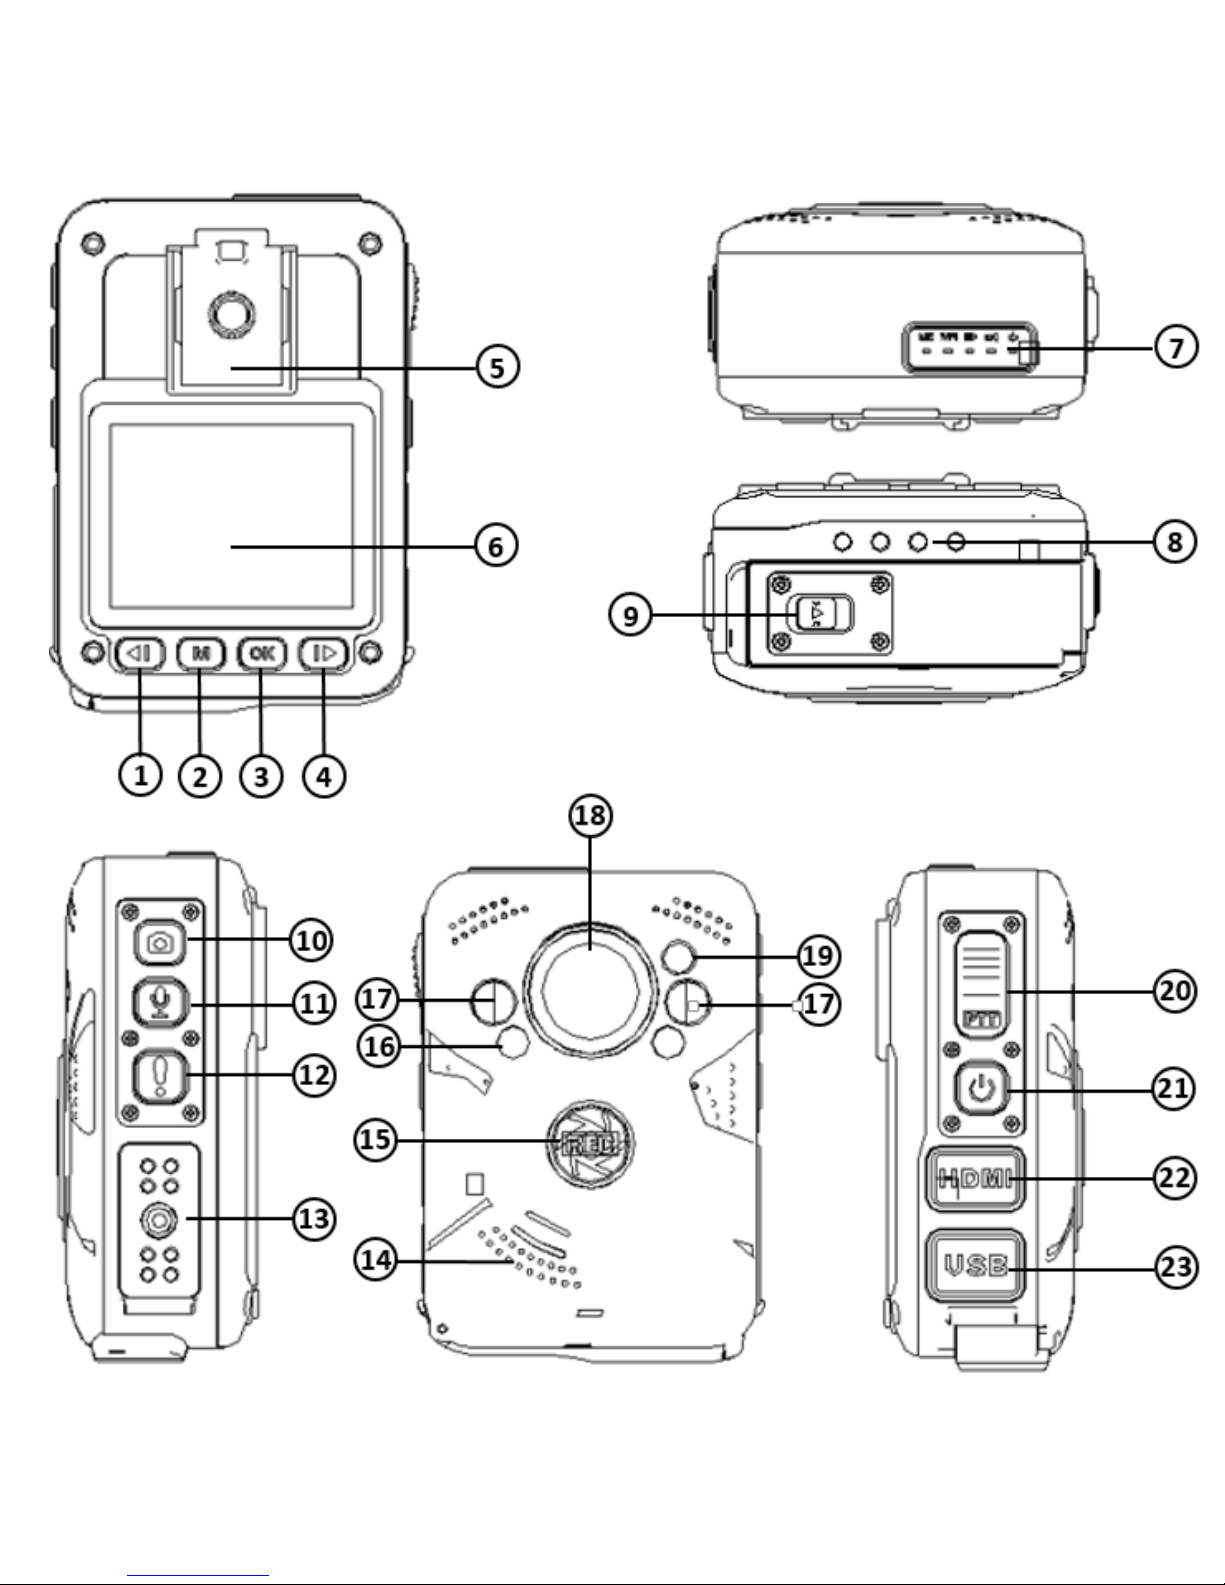

Unit Description and Operation
1. Left Button - Up / Zoom Out
Button / Laser Pointer
2. Menu Button / Back Button
3. OK / Enter Button
4. Right Button - Down / Zoom
In Button / Flash Light
5. Clip Rail
6. LCD Screen
7. LED Indicator Lights
8. Charger Connection Points
9. Battery Access
10. Photo Capture Button
11. Audio Record Button
12. Tagging Event / IR Button
13. Accessory Port
14. Speaker
15. Record Button
16. Flash Light
17. Infrared Light
18. Camera Lens
19. Laser Pointer
20. Push to Talk Button
21. Power Button
22. HDMI Port / Reset Button
23. USB Port

Functions
Power On/Off
To Power On: Press and hold the power button (21) for 2 seconds. The device will
power on and enter into preview mode.
To Power Off: Press and hold the power button (21) for 2 seconds and the device will
power off.
Power On and Auto Record
Press and hold the Record Button (15) for 3 seconds. IRIS CAM will automatically turn on
and begin recording.
Resetting the Device
If the device fails to power on or off or is not functioning properly, users can use the reset
switch located under the HDMI port. This can be done by pressing the button with a thin
object, such as a paper clip. Caution must be taken as materials broken off in the reset
switch opening can prevent button access.
Video Recording
Press the Record Button (15) to begin recording. The camera icon in the upper left of the
LCD screen will turn red. Additionally, the LED around the record button will turn red.
The evidence will be saved to the internal memory as .MP4 files. To stop recording press
and hold the Record button for 3 seconds. The up and down buttons can be used to zoom
in and out.
Voice Recording
Press the Audio Record (11) button to start voice recording. To stop recording, press the
Audio Record (11) Button again. Your Audio files will be saved as .WAV files.

Photo Capturing
Press the Photo Capture Button (10) to take picture(s). Pictures can also be taken while
recording. Your pictures will be saved as .JPG files.
Infra-Red (IR) Settings
In low light situations, videos and pictures can be captured using the Infra-red (IR)
function. To turn on/off IR (manually), press and hold the Tagging/IR Button (12) for 2
seconds. This process will turn on and off the infrared light and the IRIS CAM will
automatically activate and deactivate the Infrared Filter. The IR symbol on top of the
screen will turn green from white when the Infrared function is activated and will turn
back to white when deactivated.
LCD Display Settings
When viewing the LCD, icons and settings will show the camera resolution, WIFI, GPS,
microphone, battery life, date, time and device ID.
GPS Function
With the GPS function enabled, the IRIS CAM will show an embedded GPS location
(coordinates) on the videos and photos. With GPS, users can simultaneously watch the
recorded videos while viewing the location on Google Maps in the application.

GPS On
When GPS is connected the satellite icon on the LCD will show green.
Important: Like any other GPS device, IRIS CAM may not be able to connect to the
satellites when operating inside of some buildings.
Tagging Button
By pressing the tagging button, an event type list will display. Select the event type by
using the left/right button to scroll through the list. Press OK to select an event type.
Playback
Recorded evidence can be seen as thumbnails by pressing the menu button (2) once, the
media gallery will display. Users can choose the videos, pictures and audio to review by
pressing the OK button, then the left and right buttons (1, 4) and clicking the OK button
to select the media to play/pause (3). While watching a video, left and right buttons (1,
4) will change the video speed to fast forward and slow motion.
NOTE: To exit out of preview and media gallery, click the menu button.
Push To Talk Function For Two Way Radio
If the device is connected to a two way radio, it can be used to replace the microphone.
You can activate this function by pressing the PTT button (20).
Mini Camera and Radio Cables
Additional accessories such as mini cameras and radio cables can be used with the
accessory port.
NOTE: Make sure to power off the device before connecting/disconnecting accessories.

Menu Settings
Under the LCD screen, press the Menu button (2) twice to access the device’s menu
settings. To scroll settings use the left right buttons. Pressing once more will take you
back to the main screen.
Important: The default password to change the settings is: 000000
Resolution
To change the video Resolution, highlight “Resolution” and click the OK button (3). Users
can select the desired video resolution and options are from highest quality to normal
quality and include: (2304x1296/30F), (1920x1080/30F), (1280x720/30F) and
(848x480/30F).
Photo Size
To select the photo size, highlight “Photo Size” and click the OK button (3). Users can
choose the desired photo size from the options. 16 Mega-pixels (16M as displayed on
the menu) will be the largest picture size, while 2 Mega-pixels (2M as displayed on the
menu) is the smallest picture size available on the device.

Record Overwrite
Record Overwrite can be set to On or Off. When out of space on the device, this function
allows the oldest videos to be overwritten in order to create space when recording new
videos.
Record File Size
This features allows users to set the length of the video files that are produced when
recording. Users can choose to split videos into files anywhere from 1 minute to 15
minutes.
Auto IR (Infra-Red)
The Auto IR option allows users to disable or select manual and automatic. By selecting
“Manual,” users will need to turn the IR on and off when desired, using the IR Button
(12). In automatic mode, the IR will turn on automatically when low light is detected.
Flicker
This function allows users to select a desired refresh rate. Users can change the display
refresh rate to 50Hz, 60Hz or to Auto to avoid screen flickering.
Motion Detection
The Motion Detection option can be enabled to trigger recording when the camera
detects motion.
G-Sensor Set
G-sensor measures movement through 3 axes; up and down, left and right, forward and
backward. The G-sensor function will detect and automatically start recording significant
or sudden movements. You can choose the sensor sensitivity from High to Low or turn
the sensor off.

Pre-Record
The Pre-Record option is available with or without audio. If the Pre-Record option is
enabled, the device will continuously buffer the video recording and will then save up to
30 seconds of video prior to the button being pressed whenever recording is activated.
Post Record
Post record option is available from 3 seconds to 15 seconds to continue capturing video
after the recording has been stopped by the user.
Car Mode
Car mode option will trigger the device to start recording when it is place into the dock.
Video Flip
The Video Flip option allows will adjust the LCD if flipped upside down. User can select
from off, on, and auto.
Auto LCD Off
This option will set the LCD Screen timeout duration. Duration can be set from 30
seconds to 3 minutes or the timeout can be turned off completely. Users can also turn
the display off manually by clicking the power button.
Auto Power Off
Auto power off function will set the time duration for the device to power off in order to
save battery life. It can be selected from 3 minutes to 5 minutes. The auto power off
function will not turn off the device while it is actively recording.

Date Format
This option is to set the date display format for the device. Users can select from MMDD-YYYY, YYYY-MM-DD, or DD-MM-YYYY.
GPS Setup
This function turns the GPS connection on or off.
GPS Auto Update Time
If GPS auto update time option is enabled, the device’s internal clock will be updated
based on information from the GPS signal.
GMT Setup
GMT setup allows users to change the local time zone.
Language
The language function allows for selection of the language that the device will use for its
menus.
Volume
This option allows users to set the device volume. It displays the options of Low, Med,
High, or Off.
LED Status
The LED Status function allows the users to turn on and off the red LED ring, located
around the record button. This LED ring only displays when recording.

Silent Mode
The Silent Mode function gives users the ability to turn off all sounds from the device.
Recording Alert
When the Recording Alert is enabled, users will hear an audio alert indicating that the
device is currently recording. This alert can be can be specified to play every 30 seconds,
1 minute, 2 minutes, 3 minutes, or it can be disabled.
Free Space
This shows the user the amount of storage space available on the device.
Officer ID
The configured Officer ID is shown here. This can be setup through the software. Once
the Officer ID is set, it will display on any video evidence recorded by the device.
Firmware Version
This option shows the current firmware version.
Default Settings
By clicking OK on the Default Settings option, the device will restart and reset the settings
back to the original factory default settings.
WIFI Mode
WIFI Mode will display AP and can be changed to Dispatch.

Troubleshooting
Cannot Power On
Push the reset button. If the device does not power on, change the battery. Next step
would be try plugging the device into a power source to recharge.
NOTE: If battery life is fully depleted, the camera will not turn on even if plugged into
power source, until it has partially charged.
Video Appear to be in Black And White
Check if the Infra-red function is turned on.
No GPS Signal
First, check if the GPS icon (satellite) is showing. If not, go to GPS setting and turn on.
When GPS is connected, GPS icon will turn green.
NOTE: GPS connections can’t always be made from inside buildings.
Device Frozen or Unresponsive
Reset the device by using the reset button.

IRIS CAM LIMITED ONE YEAR WARRANTY
The IRIS CAM will be free from defects in material and workmanship and will meet the stated
specifications in our materials, under normal use and service when correctly installed, operated and
maintained. This product warranty is effective for the period of one (1) year. If within one (1) year
from the date of purchase the IRIS CAM and/or its radio cable fails due to a defect in material or
workmanship, Point Blank Advanced Technology Group will repair, if possible, or replace it free of
charge. This warranty applies only to the original purchaser and is not transferable.
POINT BLANK ADVANCED TECHNOLOGY GROUP WILL NOT BE LIABLE FOR INCIDENTAL OR
CONSEQUENTIAL DAMAGES TO PURCHASER, OR ANY OTHER PARTY, FOR ANY LOSS, DAMAGE,
INJURY OR EXPENSE OF ANY KIND OR NATURE CAUSED DIRECTLY OR INDIRECTLY BY THE PRODUCT
OR THE FAILURE OF THE PRODUCT TO OPERATE PROPERLY.
THIS WARRANTY IS IN LIEU OF ALL OTHER EXPRESS OR IMPLIED WARRANTIES. ALL IMPLIED
WARRANTIES, INCLUDING THE WARRANTY OF MERCHANTABILITY AND THE WARRANTY OF FITNESS
FOR A PARTICULAR PURPOSE, ARE HEREBY MODIFIED TO EXIST ONLY AS CONTAINED IN THIS
LIMITED WARRANTY, AND SHALL BE OF THE SAME DURATION AS THE WARRANTY PERIOD STATED
ABOVE.
This warranty covers the entire IRIS CAM unit and radio cable. Due to daily wear and tear, it does
not cover car DVR kits, shoulder harnesses or other accessories.
The warranty does not apply to:
(a) damage caused by accident or abuse in handling, such as dropping; (b) acts of God; (c) water
damage; (d) units which have been subject to unauthorized repair, opened, taken apart or otherwise
modified; (e) units not used in accordance with directions; (f ) damages exceeding the cost of the
product; (g) depreciated or loss of charge time; (h) the finish on any portion of the product, such as
surface scratches and/or weathering, as this is considered normal wear and tear.
Warranty service is available by contacting your authorized Point Blank Advanced Technology
Group. A valid copy of original invoice and a Return Merchandise Authorization (or RMA) are
required for all warranty services.
Sunlight Damage: Do not leave the product exposed to direct sunlight where it can cause the
device temperature to exceed 120°F. Extended exposure to direct sunlight can damage the
product.

Default Settings
RESOLUTION..................................................................................................................1280x720/30F
PHOTO SIZE.....................................................................................................................................5M
RECORD OVERWRITE......................................................................................................................OFF
RECORD FILE SIZE.....................................................................................................................10 MIN
IR CUT....................................................................................................................................MANUAL
FLICKER.........................................................................................................................................50Hz
DETECTION.....................................................................................................................................OFF
G_SENSOR SET...............................................................................................................................OFF
PRE RECORD...................................................................................................................................OFF
POST RECORD.................................................................................................................................OFF
CAR MODE.....................................................................................................................................OFF
VIDEO FLIP......................................................................................................................................OFF
AUTO LCD OFF..........................................................................................................................30 SEC
AUTO POWER OFF.....................................................................................................................3 MIN
DATE FORMAT............................................................................................................... MM-DD-YYYY
GPS SETUP......................................................................................................................................ON
GPS AUTO UPDAET TIME……………………………………………………………………………………………..……………ON
GMT SETUP......................................................................................................................................-4
LANGUAGE.............................................................................................................................ENGLISH
VOLUME......................................................................................................................................HIGH
LED STATUS.....................................................................................................................................ON
SILENT MODE……………………………………………………………………………………………………………….…………..OFF
RECORDING ALERT……………………………………………………………………………………………………………………OFF
FREE SPACE..........................................................................Depending on amount of files on device
OFFICER ID.................................................................................................................................Empty
FIRMWARE VERSION.............................................................................Firmware version will display
DEFAULT SETTING...........................................................................................................................NO
WIFI MODE……..…………………………………………………………………………………………………………………………AP
(*)(GMT)United States Time Zones: (−12) — Baker Island and Howland Island
(−11) — American Samoa, Jarvis Island, Kingman Reef, Midway Atoll and Palmyra Atoll
(−10) — Hawaii, most of the Aleutian Islands, and Johnston Atoll
(−09) — most of the state of Alaska
(−08)— the states on the Pacific coast plus Nevada and parts of Idaho
(−07) — Arizona, Colorado, Montana, New Mexico, Utah, parts of Idaho, Kansas, Oregon, North/South Dakota and
Texas
(−06) — Gulf Coast, Tennessee Valley, U.S. Interior Highlands, Great Plains, and most of Texas
(−05) — the states on the Atlantic coast, the eastern two-thirds of the Ohio Valley, most of Michigan
(−04) — Puerto Rico, the U.S. Virgin Islands and Palmer Station
(+10) — Guam and the Northern Mariana Islands
(+12) — Wake Island, McMurdo Station, and Amundsen–Scott South Pole Station

SOFTWARE MANUAL

Overview
This manual is intended to provide the user with the information required for proper
installation, initial setup and explanation of the individual programming options.
Features
Allow user activate via USB
Allow User login
Sync IRIS CAM to computer clock
Modify login password and user ID
Allow user to define Police ID
Allow user to define Video Resolution, Photo Quality and Photo Size
Minimum Requirements
Windows XP (Service Pack 3)
Windows 7 (32 and 64 bit)
Additional or external hard drive storage (recommended for archiving video)
Compatible Devices
IRIS CAM Body Camera

Setup
To install IRIS CAM Client application, double click on setup.exe file.
Client Installation


Connect
After software is installed, the IRIS CAM icon will appear on your desktop.
Double click on the IRIS CAM icon to start the software. If you use Windows 7, run as
Administrator to make sure all functions work properly.
Client Uninstallation
Go to START – ALL PROGRAMS – IRIS CAM: Select Uninstall to delete IRIS CAM Client.
Login
The Login Screen for the IRIS CAM Client application will appear on your desktop.
Next, start the IRIS CAM Client application.
Double click on the “IRIS CAM” icon located on the desktop. Alternatively, the
program can also be started by clicking “Start,” selecting “All Programs,” selecting
“IRIS CAM” and clicking on “IRIS CAM.”

The program will open.
To copy video from the IRIS CAM to your computer, connect the provided USB cable to the
device and the computer. The IRIS CAM will turn on automatically. Make sure the device
is not already plugged in and ON before opening the application.
This will connect the software application to the device.
Enter your password and click the “Login” button. The default password is 000000.

Device Setup
Modify Password
Click the “Modify” button located next to the password field. The Change
Password page will display.
Enter current password into the “Password” field. Then type the new password into
the “New password” section and “Retype password” field to confirm.
Click the “Modify” button. The password will be updated.
Browse Password
At the bottom of the change password page is the “Set Browse Password” section. This is
for a separate application that displays GPS and the video evidence together.
Enter current password into the “Password” field and type the new password into
the “New password” section and “Retype password” field to confirm.

Click the “Apply” button. The password will update.
User Info Tab
The “User Info” tab for the IRIS CAM is displayed by default.
On this screen, users are able to view Device ID, Department Number, User ID and User
name.
Once logged in the device information will display automatically. To change any of the
fields, update the desired field and click “Apply.” This will apply the changes.

Parameters Tab
Click the “Parameters” tab.
On this screen, users are able to change the Video Resolution, Photo Resolution, Video
Length and view the available storage space on the device.
To change any of these features on the device, click the drop down menu and select the
option(s) you prefer.
Once selected, click the “Apply” button. This will apply the new settings to the
device.

Device Control Tab
Click the “Device Control” tab.
This screen allows users to sync their device with their computer’s date and time by
clicking the Manually Set Time and Date button, access their recordings on the device by
clicking the Enter Data Storage and delete the contents of the device using the Format
button.
Click “Manually set time and date.” The device will synchronize with the
computer’s date and time.
Click the “Enter Data Storage” button. This will give access to manage the
recorded files.

Videos are located under the DCIM folder.

To delete the contents off the device, click the “Format” button. A message will
pop up stating that this operation will delete the contents off the device.
Click “Yes” to delete or “No” to cancel the operation.

CORPORATE ADDRESS:
Point Blank Body Armor
2102 Southwest 2nd Street
Pompano Beach, FL 33069
Phone Numbers:
Nationwide: 1 (800) 413-5155
Local/Int’l: (954) 630-0900
Fax: (954) 656-6569
Customer Service: 1 (800) 413-5155
GSA Sales: 1 (800) 413-5155 ext. 1446
International Sales: 1 (800) 413-5155 ext. 13239

Point Blank Enterprises
2102 Southwest 2nd Street
Pompano Beach, FL 33069 USA
1(800) 413-5155
Local/Int’l: (954) 630-0900
Fax: (954) 656-6569
Email: IRISCamSupport@pbearmor.com
www.pointblankenterprise.com
Copyright 2016, Point Blank Enterprises
All Rights Reserved
 Loading...