

Page 1
Page 2

Point Transaction Systems Oy
Vanha Nurmijärventie 62 D
FI-01670 Vantaa
www.point.
point@point.
Tel: 09 477 433 0
Fax: 09 436 24 90
Billing:
09 477 433 42
laskutus@point.
Supplies:
09 477 433 44
tarviketilaukset@point.
Service:
09 477 433 70
Opening hours: Mon - Fri at 8 - 16
Sales:
09 477 433 40
myynti@point.
Order handling:
09 477 433 43
tilaustenkasittely@point.
Customer service:
0600 01 02 03 (1,25 € / min)
Mon - Fri: 8 - 19
Sat: 9 - 14
asiakaspalvelu@point.
© Point Transaction Systems Oy | All rights reserved | ver. 1.0
Page 3

INDEX:
1. BEFORE USE
1.1 Important 4
1.2 Terminal structure 4
1.3 Technical data 5
1.4 Connecting the terminal 6
1.5 Switching the paper 7
1.6 Keypad 7
1.7 Using the menus 7
1.8 Letters and special characters 8
1.9 Testing the connection 8
2. DAILY USE
2.1 TRANSACTIONS 9
2.1.1 Chip card transaction 9
2.1.2 Swipe card transaction 9
2.1.3 Void 10
2.1.4 Manual entry 10
2.1.5 Receipt copy 11
2.1.6 Return 11
2.2 REPORTS AND BANK CONNECTION 12
2.2.1 Print batch 12
2.2.2 Monthly report 12
2.2.3 Journal 12
2.2.4 Send batch 13
2.2.5 Blacklist 13
2.2.6 Report explanations 14
2.3 AUTHORIZATION NOTIFICATIONS 15
3. SETTINGS
3.1 Terminal settings 17
3.2 Print parameters 17
3.3 Sending time 18
3.4 Cashier number 18
3.5 Merchant info 18
3.6 Fixed IP-address 19
3.7 Connection type 19
3.8 GPRS APN 19
3.9 Floor limit 20
3.10 Date and time 20
Page 4

4. PATU -KEYS
4.1 Key input 21
4.2 Clearing the keys 21
5. DOWNLOADS
5.1 Downloading the program 22
5.2 Downloading the parameters 22
5.3 Downloading the certicate 22
6. SPECIAL FUNCTIONS
6.1 Cash receipt 23
6.2 Cash withdraw 24
6.3 Extra 25
6.4 VAT 25
6.5 Mandatory authorization 26
6.6 Preauthorization 26
6.7 Invoice 26
7. TROUBLESHOOTING
7.1 Notications on the screen 27
7.2 Notications on the receipt 27
7.3 Other exceptions 28
7.4 Service 29
7.5 Deleting transactions 30
8. USEFUL CONTACT INFORMATION 31
9. ALPHABETICAL INDEX 32
Page 5
1. BEFORE USE
4
1.1 Important
Notice! If these instructions are not followed and the terminal
is damaged it will void the warranty.
• Protect the power cord and modem. If they are damaged they are not to be
used anymore.
• Terminal can only be connected to an electric outlet that has a groud connection a fuse connection.
• The terminal needs to be placed rmly on a table. It can not be exposed to
direct sunlight, hot temperature, moist or dust.
• The terminal is not waterproof or dustproof, and is intended for indoor use only.
• Poor-quality paper can jam the printer and create excessive paper dust.
• Disconnecting the power during a transaction may cause transaction data les
not yet stored into terminal memory to be lost.
• Never use thinner, trichloroethylene, or ketone -based solvents – they may
cause deterioration of plastic or rubber parts. Do not spray cleaners or other
solutions directly onto the keypad or terminal display.
• If the terminal is damaged it needs to be sent to service. Never try to x the
terminal by yourself.
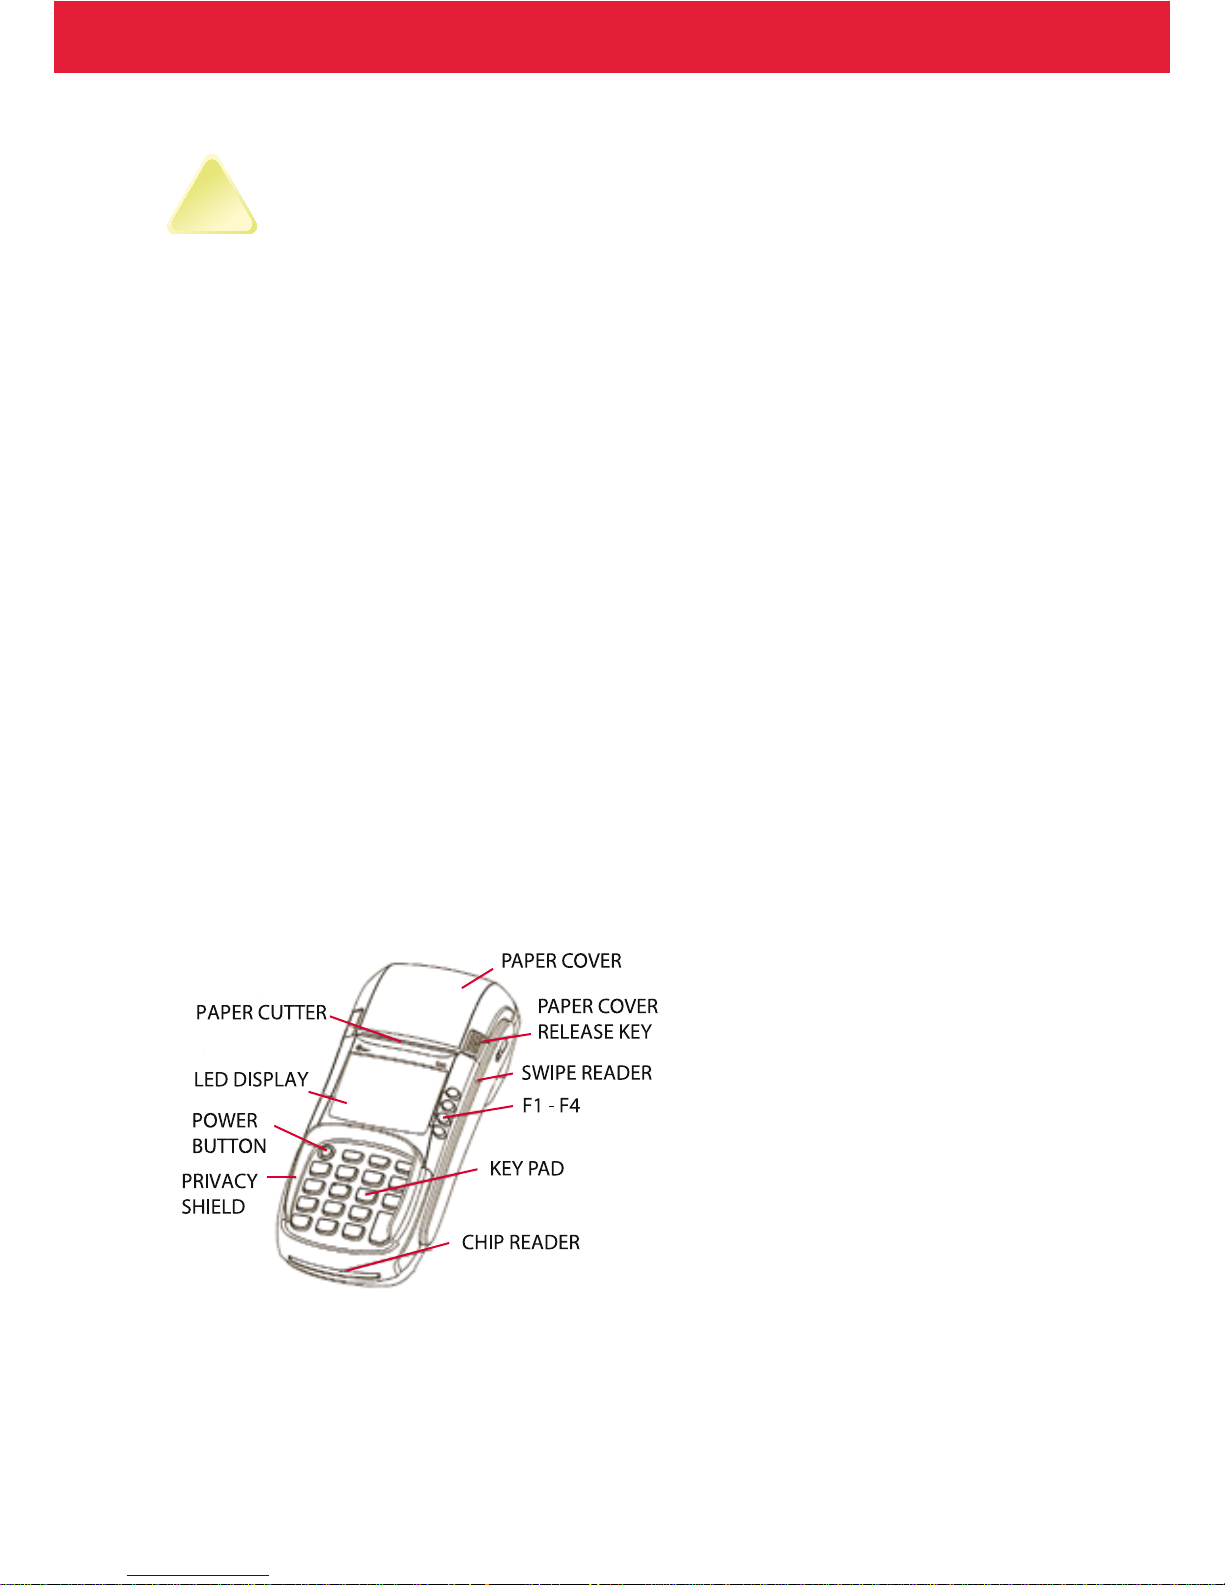
1.2 Terminal structure
!
Page 6

1. BEFORE USE
5
1.3 Technical data
CPU: 32-bit, ARM9-processor
Memory: 8MB FLASH, 16MB SDRAM
Display: 128 x 64 pixel LCD display with LED backlight
Keypad: 10 alphanumeric keys, 8 functional keys and 4 ATM keys, 1 power
key
Readers: Magnetic card reader and IC card reader, EMV certied
SAM: 3, ISO7816
Connections: Broadband and GPRS
Printer: Thermal printer, 20 lps. Paper width: 58 mm
Dimensions: 216 mm x 95mm x 86mm (including key shield) (L x W x H)
Weight: 525 g
Page 7
6
1. BEFORE USE
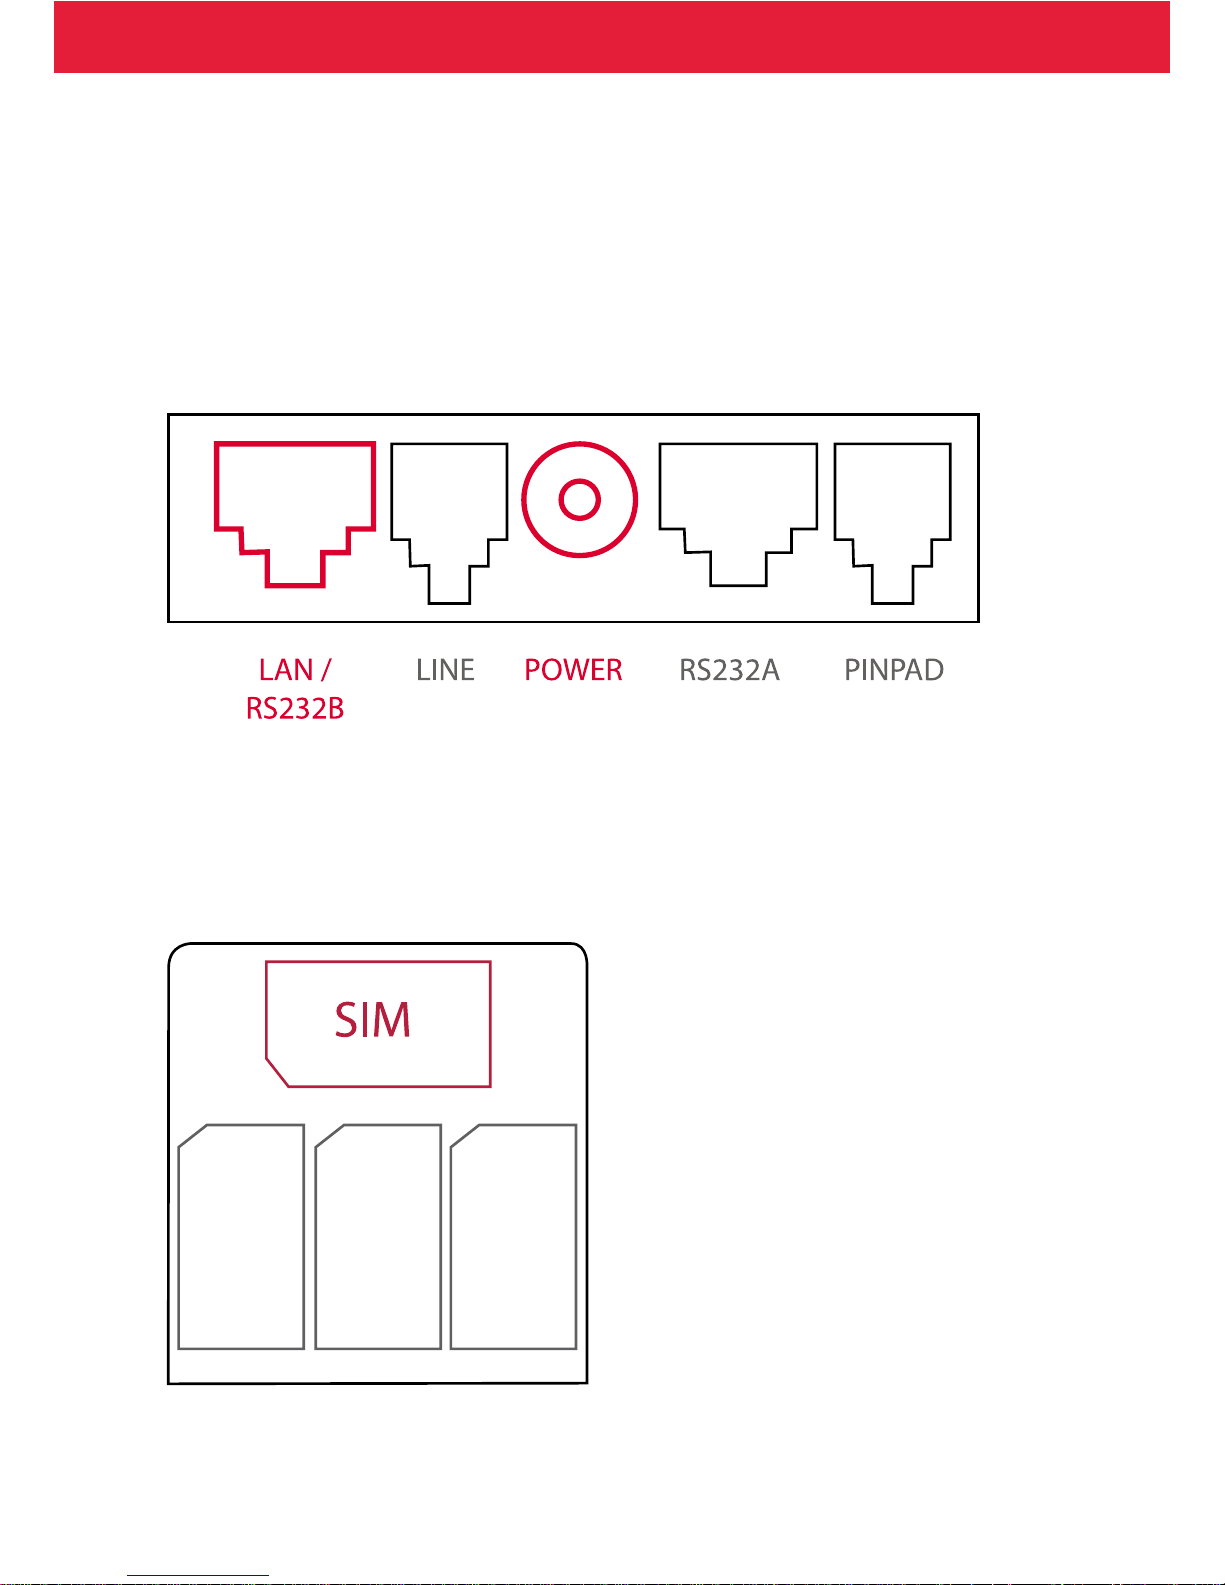
1.4 Connecting the terminal
• Connect the power cord to the power pack.
• Take o the cord shield from the bottom of the terminal
• Attach all the needed peripherals at place
• Place back the cord shield
• When using GPRS, place the SIM card into the SIM slot
• Place the terminal rmly to a table
• Switch on the terminal using the power key
Broadband:
Attach the ethernet cable to: LAN.
Attach the power cord to: POWER.
GPRS:
Attach the power cord to: POWER.
Place the SIM card to the right slot: the one that is sideways. Make sure that the locking
mechanism is in the right position so that the SIM card stays in place.
Page 8
1. BEFORE USE
7
1.5 Switching the paper
• Press down on the button located on the right side of the terminal to unlatch
the paper roll cover, then lift the cover up and back.
• Remove any partial roll of paper in the printer tray.
• Hold the roll so the paper feeds from the bottom of the roll.
• Drop the paper roll into the printer tray.
• Close the paper roll cover by gently pressing directly on the cover until it clicks
shut, allowing a small amount of paper past the glue residue to extend outside
the printer door.
• The terminal informs “Paper loaded, press Enter.” Press Enter.
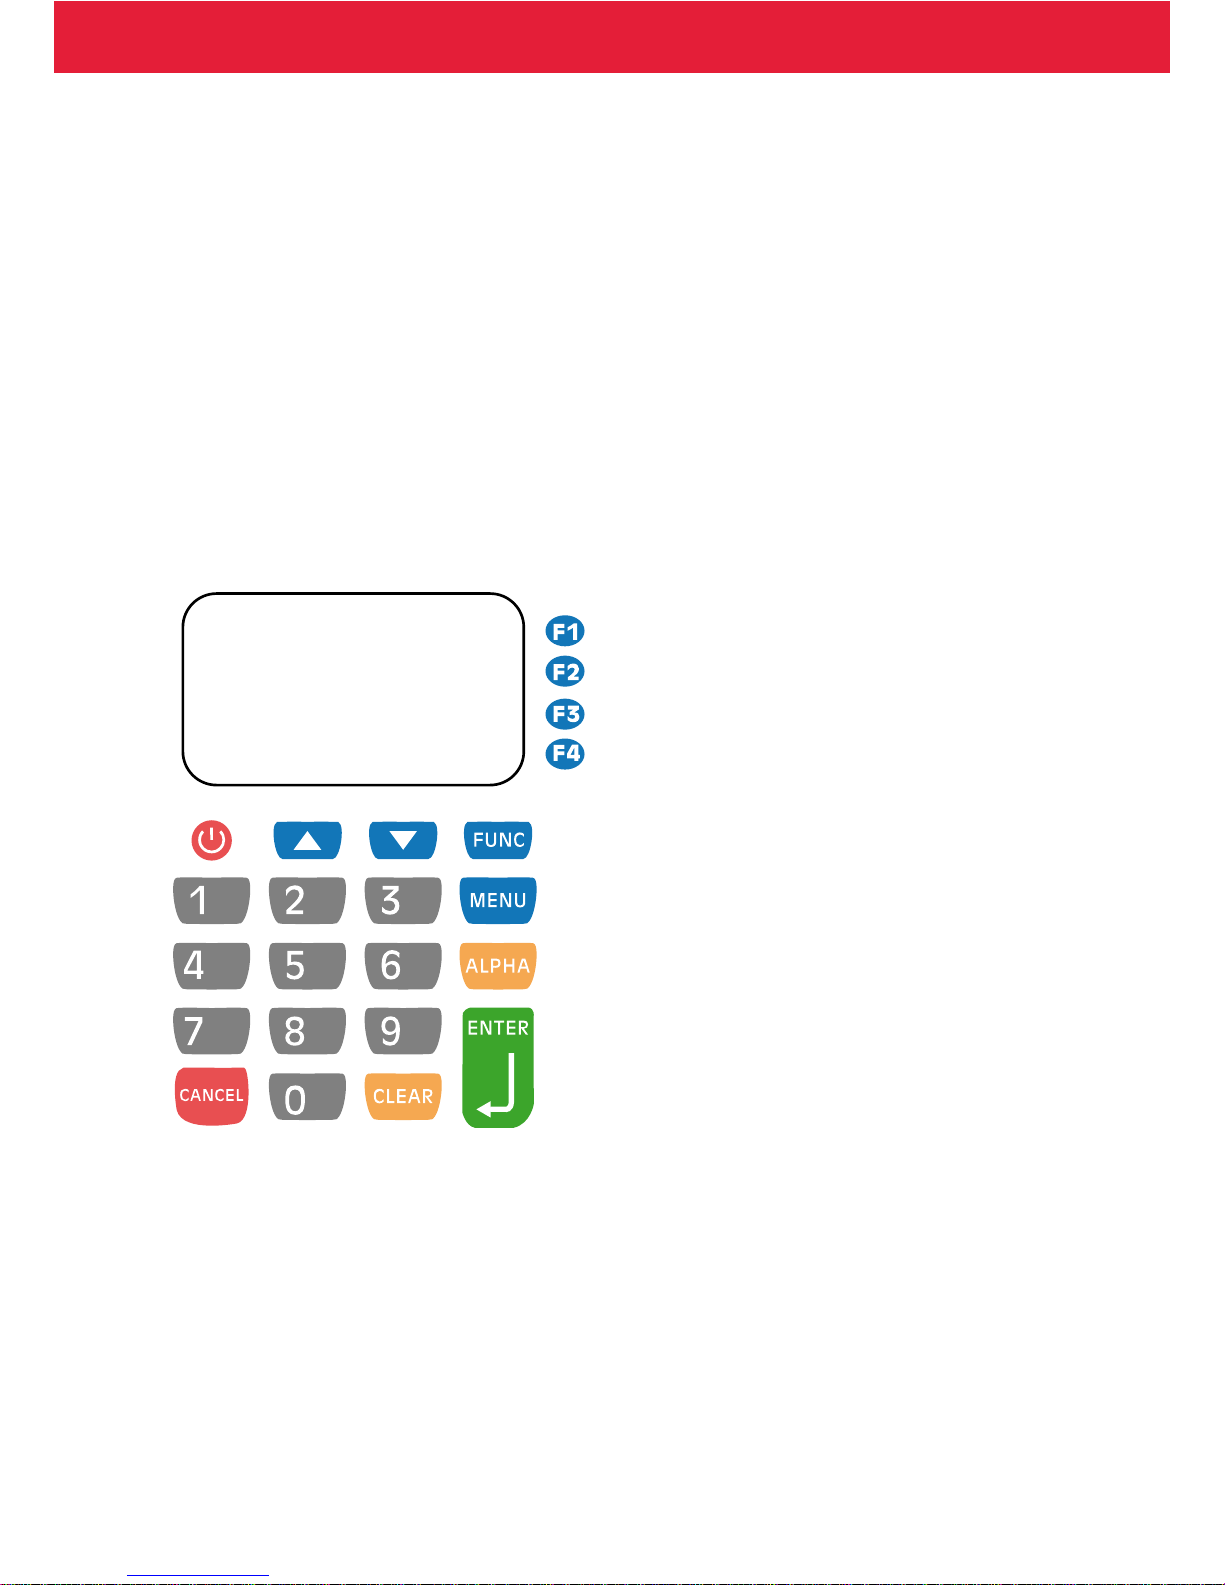
1.6 Keypad
1.7 Using the menus
Move in the menus by pressing the arrow buttons. Make selections by pressing F1
– F4 buttons. Accept selections by pressing Enter. Get to previous menu by pressing
Cancel and to the base screen by pressing Cancel several times.
Page 9

8
1.8 Letters and special characters
Input letters and special characters by rst pressing the number with the wanted
character and then ALPHA button so many times that the character appears. Switch
capital letters to lower case letters by pressing FUNC.
1 = QZ.
2 = ABC
3= DEF
4 = GHI
5 = JKL
6 = MNO
7 = PRS
8 = TUV
9 = WXY
0 = , * # - + _ (space)
1.9 Testing the connection
Press MENU and choose SEND BATCH.
The terminal connects to the bank and if everything is correct it retrieves the necessary les and the blacklist. After this it returns to the base. Now you are ready to
accept card transactions. If any problems should occur see page 32 for more information.
1. BEFORE USE
Page 10

2.1 TRANSACTIONS
2.1.1 Chip card transaction
ENTER AMOUNT: Type in the amount, cents included and press Enter.
PLEASE INSERT OR SWIPE CARD: Insert the card into the chip slot chip facing up.
CREDIT / DEBIT: The customer selects the preferred payment method.
ENTER PIN: The customer enters their PIN-code and presses Enter.
Notice! You can bypass the PIN-code by pressing Enter. In this case the responsibility for the transaction is yours.
The terminal prints out the receipts. The rst one is for the merchant and the second
one for the customer.
If the PIN-code was entered the receipt does not have to be signed. The terminal will
remind you to check the customer’s ID if the transaction exceeds 50,00 € (depending on the card used). Check the ID and write the last 4 digits of the social security
number and which ID was checked to the receipt.
REMOVE CARD: Take the card out of the reader.
Notice! The card must be in the reader during the whole transaction or the
transaction will be aborted.
2.1.2 Swipe card transaction
ENTER AMOUNT: Type in the amount, cents included and press Enter.
PLEASE INSERT OR SWIPE CARD: Swipe the card from the magnetic card reader.
CREDIT / DEBIT: Select the preferred payment method.
The terminal prints out the receipts. The rst one is for the merchant and the second
one for the customer. Ask the customer to sign the receipt.
The terminal will remind you to check the customer’s ID if the transaction exceeds
50,00 € (depending on the card used). Check the ID and write the last 4 digits of the
social security number and which ID was checked to the receipt.
9
2. DAILY USE
Page 11

2.1.3 Void
Notice! You can only void a transaction that has not been sent to the bank.
Press MENU F1 and choose VOID.
ENTER RECEIPT NUMBER: The terminal suggests the last receipt number. Choose it
by pressing Enter or type in the preferred receipt number and press Enter.
PLEASE INSERT OR SWIPE CARD: Insert the card into the chip slot or swipe the card
from the magnetic card reader.
The terminal prints out the receipts. The rst one is for the merchant and the second
one for the customer. Ask the customer to sign the receipt if needed.
TRANSACTION NOT FOUND: The receipt number was incorrect or the transaction
has already been sent to the bank.
2.1.4 Manual entry
Press MENU F1 and choose MANUAL ENTRY.
ENTER CARD NUMBER: Enter the card number and press Enter.
ENTER EXPIRY DATE: Enter the expiry date and press Enter.
DEBIT /CREDIT: Choose the preferred payment method.
ENTER AMOUNT: Type in the amount, cents included and press Enter.
DIAL YES / NO: If you want the terminal to make an automatic authorization for the
transaction choose YES.
Notice! Manually entered transaction must be authorized.
If you pass the autherization by choosing NO the terminal will ask for autherization
code. Call to the authorization centre and ask for an authentication code. Type in
the code given to you and press Enter. You can bypass this by typing 9999. In this
case the responsibility for the transaction is on the company. See the authorization
centres contact information on page 36.
The terminal prints out the receipts. The rst one is for the merchant and the second
one for the customer. Ask the customer to sign the receipt.
The terminal will remind you to check the customer’s ID if the transaction exceeds
50,00 € (depending on the card used). Check the ID and write the last 4 digits of the
social security number and which ID was checked to the receipt.
NOT ALLOWED: It is not allowed to manually enter transaction with the card used.
10
2. DAILY USE
Page 12

11
2.1.5 Receipt copy
Press MENU F1 and choose PRINT COPY from the menu.
RECEIPT NUMBER: The terminal suggests the last receipt number. Choose it by
pressing Enter or type the preferred receipt number and press Enter.
The terminal prints out a copy.
2.1.6 Return
You can use the return at any time. If you need to undo a transaction during
the same day use the VOID instead (page 10).
Notice! It is not allowed to make a return for a bank card.
Press MENU F1 and choose RETURN from the menu.
ENTER AMOUNT: Type in the amount, cents included and press Enter.
PLEASE INSERT OR SWIPE CARD: Insert the card into the chip slot or swipe the card
from the magnetic card reader.
DEBIT / CREDIT: Select CREDIT.
(If you do not have the card, press F1. The terminal asks for the card number and
you can type it in. This is not allowed for all cards.)
The terminal prints out the receipts. The rst one is for the merchant and the second
one for the customer. Ask the customer to sign the receipt.
The terminal will remind you to check the customer’s ID if the transaction exceeds
50,00 € (depending on the card used). Check the ID and write the last 4 digits of the
social security number and which ID was checked to the receipt.
REMOVE CARD: Take the card out of the reader. The card must be in the reader during the whole transaction, or the transaction will be aborted.
2. DAILY USE
Page 13

2.2 REPORTS AND BANK CONNECTION
2.2.1 Print batch
Press MENU and choose PRINT BATCH.
The terminal prints out a report of the current days transactions. It resets
automatically when the batch is sent to the bank.
2.2.2 Monthly report
The monthly report can also be used as a shift report. The terminal collects
transactions to the report until it is been reset.
Notice! The monthly report must be rst printed out before resetting it.
How to print out the monthly report:
Press MENU and choose MONTHLY REPORT from the menu.
Choose again MONTHLY REPORT.
The terminal prints out the report.
How to reset the monthly report:
Press MENU and choose MONTHLY REPORT.
Choose RESET REPORT.
The terminal resets the report.
2.2.3 Journal
Press MENU and choose JOURNAL.
Enter Password: Press Enter.
The terminal prints out a journal of the transactions.
12
2. DAILY USE
Page 14

13
2.2.4 Send batch
The terminal sends the batch automatically if you have entered a sending time in
the settings. You can check this from the SETTINGS menu (page: 20). You can also
send the batch manually for example if the automatic batch sending has not
succeeded.
Press MENU and choose SEND BATCH.
The terminal prints out the report and connects to the bank. It sends the transactions to the bank, retrieves the necessary les: return report, EMV keys, AID and BIN
tables, and the blacklist. After this it returns to the base.
If batch sending is ok terminal prints out text “BATCH SENDING OK”. This text does
not appear if there are no transactions on the report.
Notice! It is the merchant duty to check that the accounting is correct with
the report “LAHETYSERARAPORTTI” and the return report “MAKSUPAATEPALAUTE”.
2.2.5 Blacklist
The terminal updates the blacklist automatically during the batch sending. You can
also download the blacklist manually if it is missing from the terminal.
Press FUNC and choose DOWNLOAD.
Choose BLACKLIST and FULL / UPDATE
FULL = download the whole black list,
UPDATE = download an update for the blacklist
The terminal connects to the bank and downloads the blacklist. It prints out text:
“KIELTOLUETTELO” and the amount of the cards on the blacklist.
2. DAILY USE
Page 15
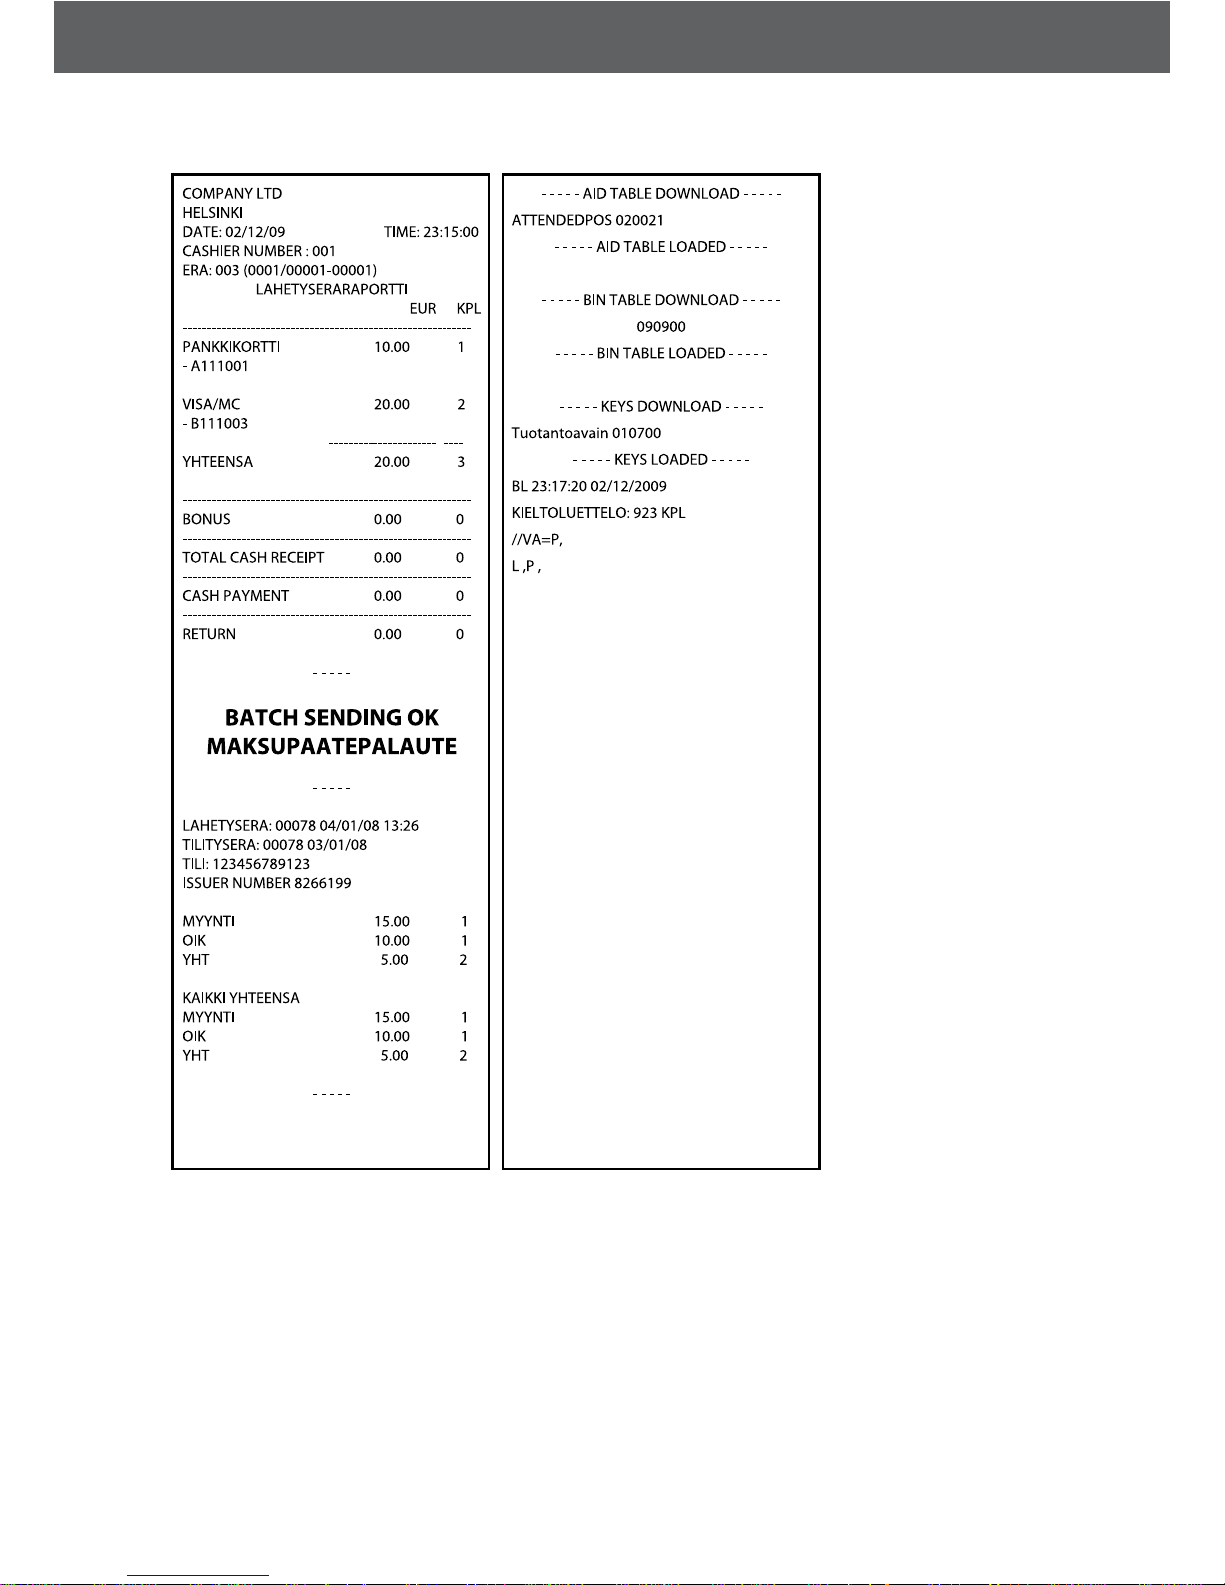
2.2.6 Report explanations
This is an example of
the report and the
information on it.
BATCH SENDING OK,
the batch sending has
succeeded.
MAKSUPAATEPALAUTE,
information of the
previous batch
sending. This only
appears if it has been
created at the bank. It
never appears on
weekends and bank
holidays or if the
terminal has not been
in use.
AID TABLE, BIN TABLE
and KEYS, these are
downloaded automacally if the bank has an
updated version.
KIELTOLUETTELO, this
shows the amount of
the cards on the blacklist.
14
2. DAILY USE
Page 16

15
2.3 Authorization notications
When a transaction is declined at the authorization centre a declining code is
printed on the receipt. This code tells you the reason why it has been declined.
The transaction is declined by a notication given by the bank or the credit card
company.
000-099 Accepted
000 Accepted
001 Check ID
002 Accepted for partial amount
003 Accepted (VIP)
005 Accepted, account type dened by the card donor
006 Accepted for partial amount, account type dened by the card donor
007 Accepted, chip update
100-199 Declined, card removal not needed
100 Declined
101 Card is no longer valid
102 Suspected card counterfeit
103 Cashier, call recipient
104 Limited card
105 Cashier, call recipients’ security department
106 Exceeds PIN-code attempts
107 Cashier, call the card donor
108 Cashier, check the card donors’ special terms, make a manual authorization
109 False payment recipients’ identier
110 False amount
111 False card number
112 PIN-code required
113 Commission not accepted
114 False account type
115 Required action not supported
116 Not enough allowance
117 False PIN
118 Unknown card
119 Transaction is not allowed for card holder
120 Transaction is not allowed for payment terminal
121 Exceeds withdrawals oor limit
122 Security violation
123 Exceeds withdrawals time limit (too often)
124 Crown violation
125 Card is not valid yet
126 False PIN block
127 False PIN length
128 False PIN key synchronization
129 Suspected abuse
2. DAILY USE
Page 17

200-299 Declined, card removal needed
200 Declined
201 Card expired
202 Suspected card counterfeit
203 Cashier, contact the recipient
204 Limited card
205 Cashier, contact recipients’ security department
206 Exceeds PIN-code attempts
207 Special situation
208 Extinct card
209 Stolen card
210 Suspected abuse
300 Successful
306 Unsuccessful
307 unsuccessful, form fault
400 Declined. Accepted revocation of authorization, try again
900-999 System error, authorization not successful
902 False transaction
903 Do the transaction again
904 Form fault, try again
905 Unable to route the transaction to recipient
906 Temporary usage brake in the card donors system
907 No connection to the card donor
908 Unable to route the message
909 System error
910 Unable to connect to the card donor
911 Unable to connect to the card donor
912 Card donor not available
913 Dual transaction sending
914 The original transaction can not be traced
915 Control error, card donors’ system temporarily unavailable
916 MAC-error
917 MAC-synchronization error
918 Data transfer keys not available
919 Encryption keys’ synchronization error
920 Security program error, try again
921 Security program error, no transaction
922 Unknown message number
923 Transaction is being processed
930 Payment terminal error, date error
1Z3 Unable to connect to authorization centre, try again
0Y1 Oine accepted, no authorization
0Y3 Oine accepted, unsuccessful authorization
1Z1 Oine declined
16
2. DAILY USE
Page 18

17
3.1 Terminal settings
The settings listed here are the ones that PAX S80 terminal uses. Some of them are
explained more closely in the manual. The index number is informed in brackets.
Press FUNC and choose EDIT.
PARAM NUMBER TMS_LP
BATCH TIME (4.9) Batch sending time
PHONE NUMBERS Point IP addresses
CASHIER NUMBER (4.5) Cashier number
MERCHANT INFO (4.6) Merchant info of Luottokunta
BATCH SEQ. NUM. Batch sequential number
TCP/IP PARAMETERS (4.7) DHCP / FIXED IP
FIXED IP
ACTIVE IP ADDRESS Active IP address
DEFAULT GATEWAY Default gateway
SUBNET MASK Subnet mask
DNS1 / DNS 2 Terminal does not use DNS addresses
CONNECTION TYPE TCP/IP SSL / GPRS SSL / AUTO
LANGUAGE (Finnish / Swedish / English)
GPRS APN Operators GPRS APN
EXTRA AMOUNT (7.3) Extra amount settings
CASH RECEIPT (7.1) YES / NO
FLOOR LIMIT (4.8) Floor limits of card types
AUTH. MANDATORY (7.5) YES / NO
TAPIOLA OFFICE Oce number of the reference number
FIELD 31 Reference number
TIME SETTINGS (4.9) Date and time
VAT (7.4) YES / NO
PREAUTHORIZATION (7.6) YES / NO
USE PATU YES / NO (terminal uses TCS -> NO)
3.2 Print parameters
Press FUNC and choose PRINT.
Choose PARAMETERS.
The terminal prints out a list of parameters. This shows all the settings of the
terminal. You should save this list.
3. SETTINGS
Page 19

3.3 Sending time
The terminal will send the batch automatically if you have set a sending time in the
settings. Sending time can be altered at any time. We recommend that the time is
after the closing time. Even hours are not recommended (e.g. 2100).
If you do not want to use the automatic sending time set it to be at 9999. In this
case you must send the batch manually.
Go to the menu selection EDIT and choose SENDING TIME.
Type here the time you want to use by four numbers (e.g. 0315).
3.4 Cashier number
If you use more than one terminal it is important to use separate cashier numbers
on the terminals. The cashier number is printed on the receipts. This makes it
possible to know which on which terminal a transaction was made.
Go to the menu selection EDIT and choose CASHIER NUMBER.
Type here the cashier number you want to use by three numbers (e.g. 001, 002,
003).
3.5 Merchant info
If you accept the cards of Luottokunta you must set the merchant info to the
terminal. In Finnish it is Toimialakoodi and you can nd it from the contract you
have made with Luottokunta.
Go to the menu selection EDIT and choose MERCHANT INFO.
Type here the merchant info (toimialakoodi).
18
3. SETTINGS
Page 20

19
3.6 Fixed IP-address
If your network has xed IP-addresses you have to enter them into the terminal.
Go to the menu selection EDIT and choose TCP/IP PARAMETERS.
Choose FIXED IP.
ACTIVE IP ADDRESS =Active IP address
DEFAULT GATEWAY = Default gateway
SUBNET MASK = Subnet mask
DNS1 / DNS 2 = Terminal does not use DNS addresses
3.7 Connection type
Go to the menu selection EDIT and choose CONNECTION TYPE.
AUTO = Terminal uses both GPRS and broadband
TCP/IP SSL = Terminal uses broadband
GPRS SSL = Terminal uses GPRS
3.8 GPRS APN
When using the terminal via GPRS you need to enter the operators GPRS APN to the
terminal settings. By default this is INTERNET. Change only if necessary.
Go to the menu selection EDIT and choose GPRS APN.
Type here the operators APN. You can check it from your operator.
The most common settings are:
DNA, Elisa and Sonera = INTERNET
Saunalahti = INTERNET.SAUNALAHTI
3. SETTINGS
Page 21

3.9 Floor limit
The oor limits can be changed if needed. You can nd the correct oor limit from
the credit card companies’ contracts. The cards of Luottokunta are in the menu by
the order of card types.
Go to the menu selection EDIT and choose FLOOR LIMIT.
Choose the card type you need to change and then choose CHANGE FLOOR LIMIT.
Type in the new oor limit and press Enter.
3.10 Date and time
Go to the menu selection EDIT and choose TIME SETTINGS.
Choose ADJUST CLOCK.
Choose the selection you want to change and then change the value. Press Enter.
20
3. SETTINGS
Page 22

21
4.1 Key input
See the instructions for forming letters on page 8.
Press FUNC.
Go to menu selection KEY INPUT.
Choose KEY INPUT.
MERCHANT ID = Check that the last numbers on the ID are same as “KOHDISTIN /
KOHDISTUSTIETO” on the PATU keys. If the numbers do not match, the keys are not
the right ones to your terminal. Press Cancel. If the numbers match, press Enter.
KEK PART 1 = Type here the key part one (OSA 1). Press Enter.
KEK PART 2 = Type here the key part two (OSA 2). Press Enter.
KVV = Type here the KVV (AVAINTARKISTE). Press Enter.
GENX KEK = Type here the GENERATION NUMBER (AVAINSUKUPOLVI). Press Enter.
SUCCES KEYS = Keys are correctly input.
PARITY ERROR = You have typed the wrong key or made a typing error. Try again.
Notice! Merchant ID is the customer number of your bank. It is named dierently by dierent banks.
Osuuspankki/Nordea = Käyttäjätunnus
Säästöpankit/Aktia/Local Osuuspankki/Handelsbanken = Linjatunnus
Sampo = Asiakastunnus
Ålandsbanken = Lähettäjätunnus
4.2 Clearing the keys
Notice! This is only done when there is problem with the keys. If you clear the
keys on the terminal they have to be cleared from the bank also.
Press FUNC.
Go to menu selection KEY INPUT.
Choose CLEAR ATK.
Choose YES.
4. PATU -KEYS
Page 23

5.1 Downloading the program
Notice! First send the batch to the bank. Press MENU and
choose SEND BATCH. After the program download you have to
download the parameters also.
Press FUNC.
Go to menu selection APPLICATION DOWNLO.
Choose APP + PARAMS.
The download begins. A line of dashes appears on the screen. It changes to stars as
the download proceeds.
5.2 Downloading the parameters
Press FUNC.
Choose DOWNLOAD.
Choose FROM LOADPOINT.
Choose PHONE.
The download begins. A line of dashes appears on the screen. It changes to stars as
the download proceeds. When the download is ready the terminal prints out
“SUCCESSFUL PARAMETERS DOWNLOAD”.
After the parameter download you have to send the batch. Press MENU and
choose SEND BATCH.
5.3 Downloading the certicate
Press FUNC.
Choose DOWNLOAD.
Go to menu selection DOWNLOAD SERTIFICA.
The terminal downloads the certicate and prints out: “SUCCESSFUL CERTIFICATE
DOWNLOAD“.
22
5. DOWNLOADS
!
Page 24

23
6.1 Cash receipt
Cash receipt has to be activated from the EDIT menu (page 17).
Making a cash receipt sale:
Press MENU F1.
Go to menu selection CASH RECEIPT.
Choose CASH RECEIPT SALE.
ENTER AMOUNT: Type in the amount, cents included and press Enter.
VAT %: Type in the VAT percent and press Enter.
The terminal prints out the receipts.
Voiding a cash receipt sale:
Press MENU F1.
Go to menu selection CASH RECEIPT.
Choose CASH RECEIPT VOID.
ENTER AMOUNT: Type in the amount, cents included and press Enter.
VAT %: Type in the VAT percent and press Enter.
The terminal prints out the receipts.
6. SPECIAL FUNCTIONS
Page 25

6.2 Cash withdraw
Notice! It is only allowed to make a cash withdraw with a bank card. You have
to make a contract with your bank to make cash withdraws.
Press MENU F1.
Go to menu selection CASH WITHDRAW.
ENTER AMOUNT: Type in the amount, cents included and press Enter.
PLEASE INSERT OR SWIPE CARD: Insert the card into the chip slot or swipe the card
from the magnetic card reader.
VISA/PANKKI: Choose PANKKI.
ENTER PIN: The customer enters their PIN-code and presses Enter.
The terminal prints out the receipts. The rst one is for the merchant and the second
one for the customer.
If the PIN-code was entered the receipt does not have to be signed. The terminal will remind you to check the customer’s ID if the transaction exceeds 50,00 €
(depending on the card used). Check the ID and write the last 4 digits of the social
security number and which ID was checked to the receipt.
REMOVE CARD: Take the card out of the reader. The card must be in the reader during the whole transaction otherwise the transaction will be aborted.
24
6. SPECIAL FUNCTIONS
Page 26

25
6.3 Extra
Extra has to be activated from the EDIT menu (page 17).
Options:
NO = Extra is not in use.
ONLY BEFORE = Extra amount is given during the transaction.
ONLY AFTER = Extra line is printed on the receipt and it is entered afterwards to the
terminal.
UNRESTRICTED = The terminal asks for extra during the transaction and also prints
an extra line to the receipt.
Notice! If the card in use is a chip card you can only give the extra during the
transaction.
Entering the extra amount afterwards:
Press MENU F1.
Go to a menu selection EXTRA AMOUNT.
ENTER RECEIPT NUMBER: Enter the correct receipt number and press Enter.
EXTRA: Type in the extra amount, cents included and press Enter.
The terminal prints out a receipt.
6.4 VAT
VAT has to be activated from the EDIT menu (page 17).
During the transaction the terminal will ask for a VAT percent, type here the correct
VAT percent. The percentage is calculated on the receipt.
6. SPECIAL FUNCTIONS
Page 27

26
6.5 Mandatory authorization
Mandatory authorization has to be activated from the EDIT menu (page 17).
When using the mandatory authorization the terminal authorizes all the transactions.
6.6 Preauthorization
Preauthorization has to be activated from the EDIT menu (page 17).
Press MENU F1.
Go to a menu section PREAUTHORIZATION.
PLEASE INSERT OR SWIPE CARD: Insert the card into the chip slot or swipe the card
from the magnetic card reader.
ENTER AMOUNT: Press Enter.
DEBIT/CREDIT: Select the preferred payment method.
ENTER PIN: The customer enters their PIN-code and presses Enter.
The terminal makes a one euro authorization and prints out the receipts. This can be
used to make sure the card is valid.
6.7 Invoice
Making an invoice:
Press MENU F1.
Go to a menu selection INVOICE.
Choose INVOICE.
ENTER AMOUNT: Type in the amount, cents included and press Enter.
The terminal prints out the receipts.
Voiding an invoice:
Press MENU F1.
Go to a menu selection INVOICE.
Choose VOID INVOICE.
ENTER AMOUNT: Type in the amount, cents included and press Enter.
The terminal prints out the receipts.
6. SPECIAL FUNCTIONS
Page 28

7.1 Notications on the screen
BLACKLIST MISSING = The blacklist is missing from the terminal. See instructions for
downloading it on pg 13.
USE MAG CARD = The terminal can not read the chip. Use the magnetic stripe
reader.
USE CHIP = The card in use has a chip. Use the chip card reader.
PIN LOCKED = The pin code of the card in use has been locked. It can be unlocked
by contacting the card donor or by using the card on an atm.
APPLICATION LOCKED = The application on the card is locked. The card holder has
to contact the card donor.
JÄSENLIIKENUMERO PUUTTUU = The card is not included in the terminals card
selection. It can not be used.
SERVICE NOT ALLOWED FOR THIS CARD PRODUCT = The card in use is not included
in the terminals card selection. It can not be used.
7.2 Notications on the receipt
CONNECTION ERROR = There is a problem with the connection. See instructions on
pg 33.
BATCH SENDING ERROR = There is a problem with the connection. See instructions
on pg 33.
“SIIRTOAVAIN EI OLE VOIMASSA” = The PATU-keys are no longer valid. See
instructions on pg 21.
”KÄYTTÖAVAIN EI OLE VOIMASSA” = You need to clear the PATU-keys. See
instructions on pg 21.
”TARKISTE EI TÄSMÄÄ” = There is an error with the PATU-information. Contact the
bank.
27
7. TROUBLESHOOTING
Page 29

“PATU-KÄYTTÄJÄ LUKITTU” = The bank has locked the user id. Contact the bank to
open it.
“PYYTÄMÄÄNNE AINEISTOA EI OLE” = The bank does not have information of the
previous batch sending ready.
“TAPAHTUMATIEDOSTO PUUTTU” = The bank does not have information of the
previous batch sending ready.
“ERROR FILE NOT EXISTENT” = The bank does not have information of the previous
batch sending ready.
“OTA YHTEYS NEUVONTAAN” = Contact the bank.
“KERTA AVAIN ON KÄYTETTY” = The batch sequential number has been used.
Change the batch sequential number by adding one number at the Edit menu.
“LÄHETYS HYLÄTTY AINEISTO VIRHEELLISTÄ” = The bank has rejected the batch.
Contact the bank.
7.3 Other exceptions
CONNECTION PROBLEM = Switch the terminal o and on and try again. If this does
not help switch o and on the ADSL modem and try again. Check from your
service provider that the Internet connection is working. If you use GPRS connection
make sure the SIM-card is in place and that the connection is working. The PIN-code
can not be in use. You can place the SIM card to your mobile phone an see if the
card works.
TERMINAL DOES NOT READ CARDS = Switch the terminal o and on and try again.
The reader can be dusty. Clean the reader and try again. For cleaning only use detergents that are ment for electic devises or compressed air. Never open the terminal
by yourself, only spray the detergents to the card readers.
POWER IS OFF = Check the cables and press the power key.
7. TROUBLESHOOTING
28
Page 30

29
7.4 Service
Do not, under any circumstance, attempt to disassemble the terminal. Perform only
those adjustments or repairs specied in this guide.
If the terminal needs to be sent to service, do the following.
Pack the terminal rmly.
Attach a description of the problem and your contact information with the terminal.
Add a notication if there are transactions in the terminal.
You do not have to send the cables with the terminal unless you want them tested
too.
Send the terminal by post. Postage is always paid by the sender.
Service address is:
Point Transaction Systems Oy / Service
Vanha Nurmijärventie 62 D 01670 Vantaa
7. TROUBLESHOOTING
Page 31

7.5 Deleting transactions
Notice! If you delete transactions, it is irreversible. You should
rst make sure that the transactions have been sent to your
bank.
Press MENU and choose JOURNAL.
ENTER PASSWORD: Press Enter.
The terminal prints out a list of all the transactions.
Press MENU and go to menu selection: DELETE TRANSACTION.
You can choose: ONE BY ONE, ALL or RANGE.
ONE BY ONE = Delete one transaction.
RECEIPT NUMBER: Type the receipt number of the transaction you want to delete.
Press Enter.
Choose YES and YES.
ENTER PASSWORD: Press Enter.
The terminal prints out a receipt of the deleted transaction.
ALL = Delete all the transactions.
Choose YES and YES.
ENTER PASSWORD: Press Enter.
The terminal prints out a receipt of the deleted transactions.
RANGE = Delete a range of the transactions.
RANGE START: Type the rst receipt number you want to delete. Press Enter.
RANGE END: Type the last receipt number you want to delete. Press Enter.
Choose YES and YES.
ENTER PASSWORD: Press Enter.
The terminal prints out a receipt of the deleted transactions.
7. TROUBLESHOOTING
30
!
Page 32

31
USEFUL CONTACT INFORMATION
Authorization centres:
American Express: 0800 114 646
Diners Club: 0800 955 55
Luottokunta: 09 696 4646
Bank cards: 0100 3100
Banks:
Handelsbanken: 010 444 2545
Nordea: 0200 672 10
Osuuspankki: 0100 051 51
Sampo: 0600 125 25
Säästöpankit/Aktia/Local Osuuspankki: 0100 4050
Ålandsbanken: 020 429 2910
Operators:
Elisa: 010 808 088
Sonera: 0200 188 18
8. USEFUL CONTACT INFORMATION
Page 33

ALPHABETICAL INDEX
A Authorization notications 15
B Before Use 4
Blacklist 13
C Cash receipt 23
Cash withdraw 24
Cashier number 18
Chip card transaction 9
Clearing the keys 21
Connecting the terminal 6
Connection type 19
D Daily use 9
Date and time 20
Deleting transactions 30
Downloads 22
Downloading the certicate 22
Downloading the parameters 22
Downloading the program 22
E Extra 25
F Fixed IP-address 19
Floor limit 20
G GPRS APN 19
I Important 4
Invoice 26
J Journal 12
K Key input 21
Keypad 7
L Letters and special characters 8
32
9. ALPHABETICAL INDEX
Page 34

33
M Mandatory authorization 26
Manual entry 10
Merchant info 18
Monthly report 12
N Notications on the receipt 27
Notications on the screen 27
O Other exceptions 28
P PATU -keys 21
Preauthorization 26
Print batch 12
Print parameters 17
R Receipt copy 11
Report explanations 14
Reports and bank connection 12
Return 11
S Send batch 13
Sending time 18
Service 29
Settings 17
Special functions 23
Swipe card transaction 9
Switching the paper 7
T Technical data 5
Terminal settings 17
Terminal structure 4
Testing the connection 8
Transactions 9
Troubleshooting 27
U Useful contact information 31
Using the menus 7
V VAT 25
Void 10
9. ALPHABETICAL INDEX
Page 35
 Loading...