

PoGo Products RadioYourWay LX User Manual
AM/FM Radio Recorder/Voice Recorder/MP3, WMA Player
This manual is protected by copyright laws and all rights are reserved. No portion of this manual
may be reproduced in any form or translated into other languages without written permission
from the manufacturer and publisher of this manual. The content of this manual is provided “as
is” and the manufacturer is under NO obligation to notify users of revisions or modifications to
the product or procedures. Every effort has been taken to ensure the accuracy of the information
herein. However, the manufacturer is not responsible for any inaccuracies or omissions that may
affect the units operation. We recommend you read the entire manual to get the most enjoyment
out of your new Radio YourWay LX.

TABLE OF CONTENTS
I. COMPONENT and LCD DISPLAY
1. SET
2. Accessories
3. LCD Display
II. BATTERY CHARGE and USE
1. Charge battery using AC Adapter
2. Charging Status
3. Battery Level
4. Battery Life
5. Powering on
III. MEMORY CARD and RESET
1. Memory Card
2. Maximum Recording Time
3. Precautions
4. Inserting a memory Card
5. Reset Unit
IV. RADIO YOURWAY LX MODES
1. Music mode
2. Voice mode
3. AM mode
4. FM mode
V. RECORDING, PLAYBACK, and DELETING
1. AM and FM
2. Record and Playback Voice
3. Deleting Files
VI. TIMER-RECORDING
1. Setting Current Time
2. Setting Current Date
3. Setting a Timer-Recording
4. Reviewing a Timer-Recording
5. Deleting a Timer-Recording
- 1 -

VII. BASIC BUTTON OPERATIONS
VIII. MAIN MENU STRUCTURE
1. System
2. Play
3. Recording
4. Display
5. Sound
IX. PLAY STYLE MENU
X. FURTHER OPERATION
1. Playback Speed
2. AM/FM Radio
3. Formatting
4. Complete Format
XI. COMPUTER CONNECTION
1. Win XP, 2000, ME, and Mac OSX+
2. Driver Installation for Win98SE
3. PC Connection Display
4. Safely Removing Hardware from a PC
XII. DISPLAY MESSAGES
General Specification
Warranty
I. COMPONENT and LCD DISPLAY
1. SET
- 2 -

①
②
③
④
⑤
⑥
⑦
⑧
⑨
Internal Microphone
LED
LCD
REC
ERASE
A↔B/Repeat
MODE
TIMER
SD/MMC Card Slot
⑩
⑪
⑫
⑬
⑭
⑮
MENU
SPEED
External Speaker
USB/POWER Terminal
Volume +/-
HOLD
RESET
LINE IN
Earphone Jack
2. Accessory
Set USB Cable Stereo Earphone Neck Strap Audio Cable
AC Adapter FM Antenna User Guide
- 3 -

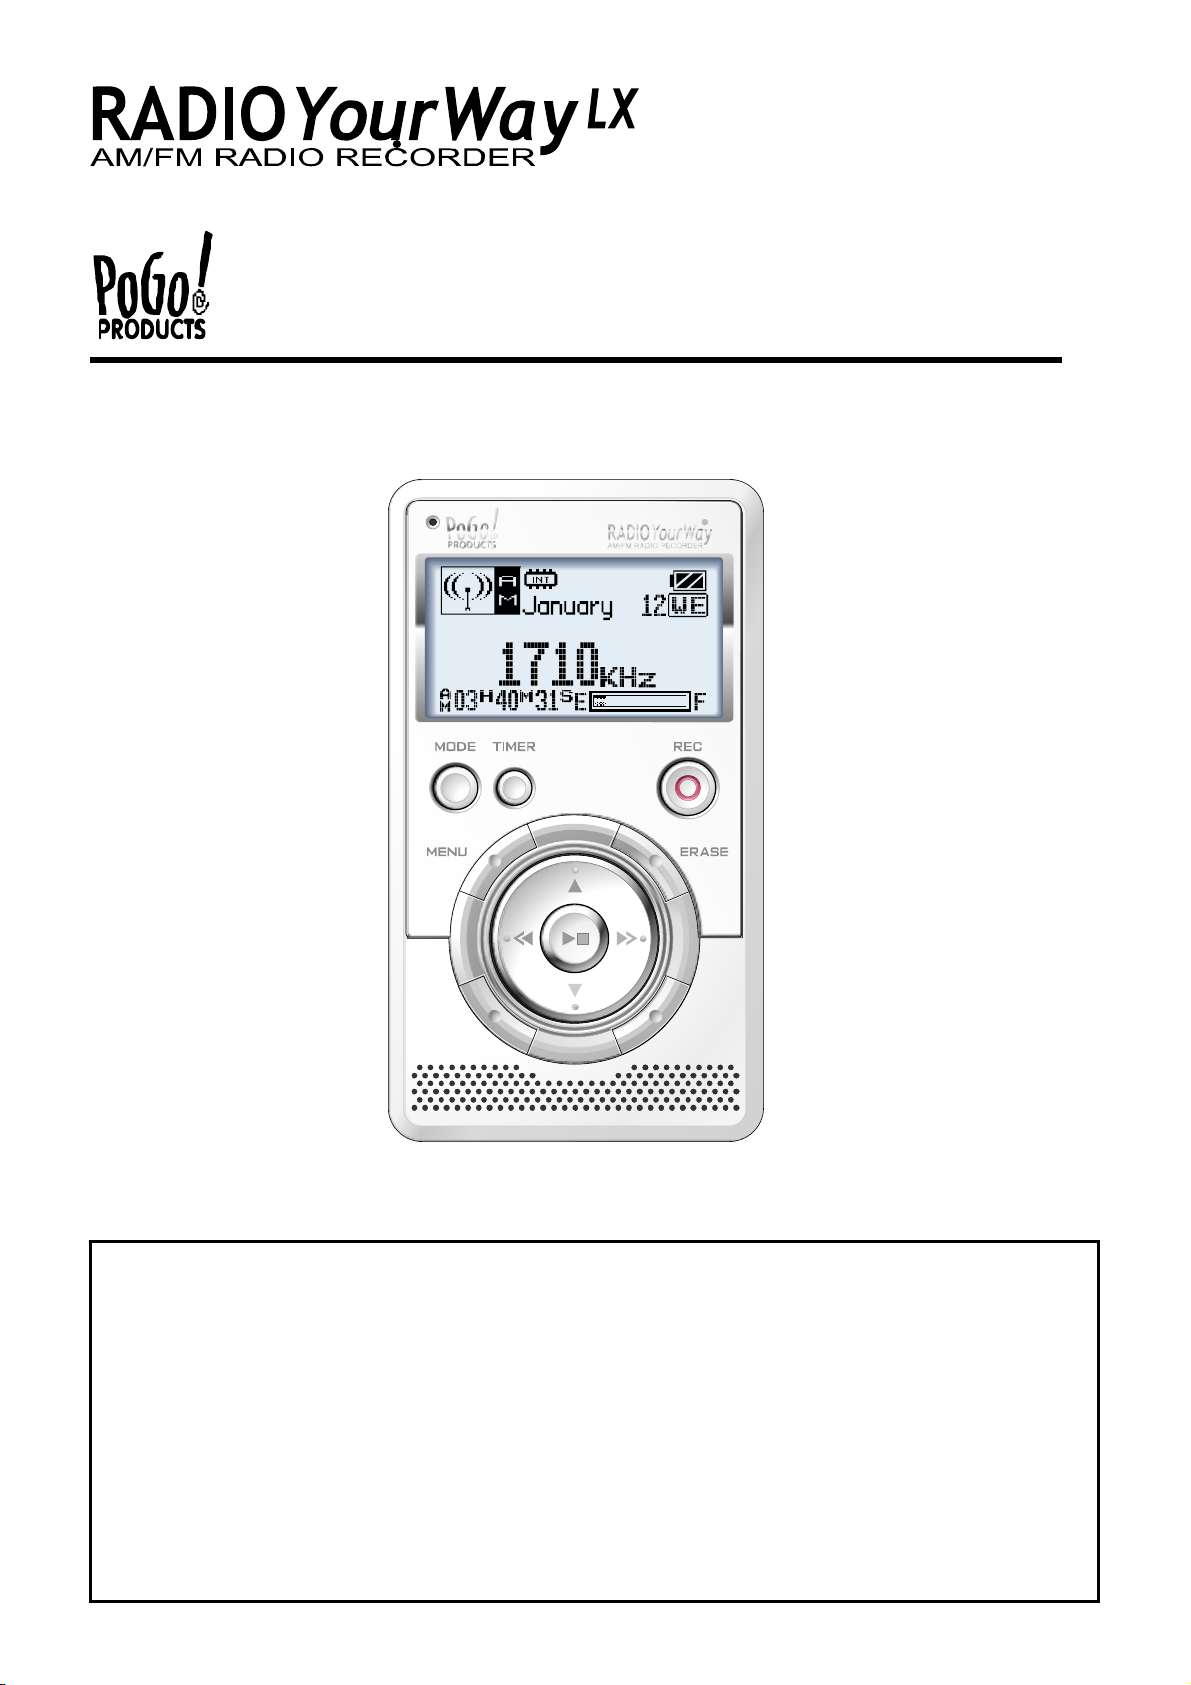
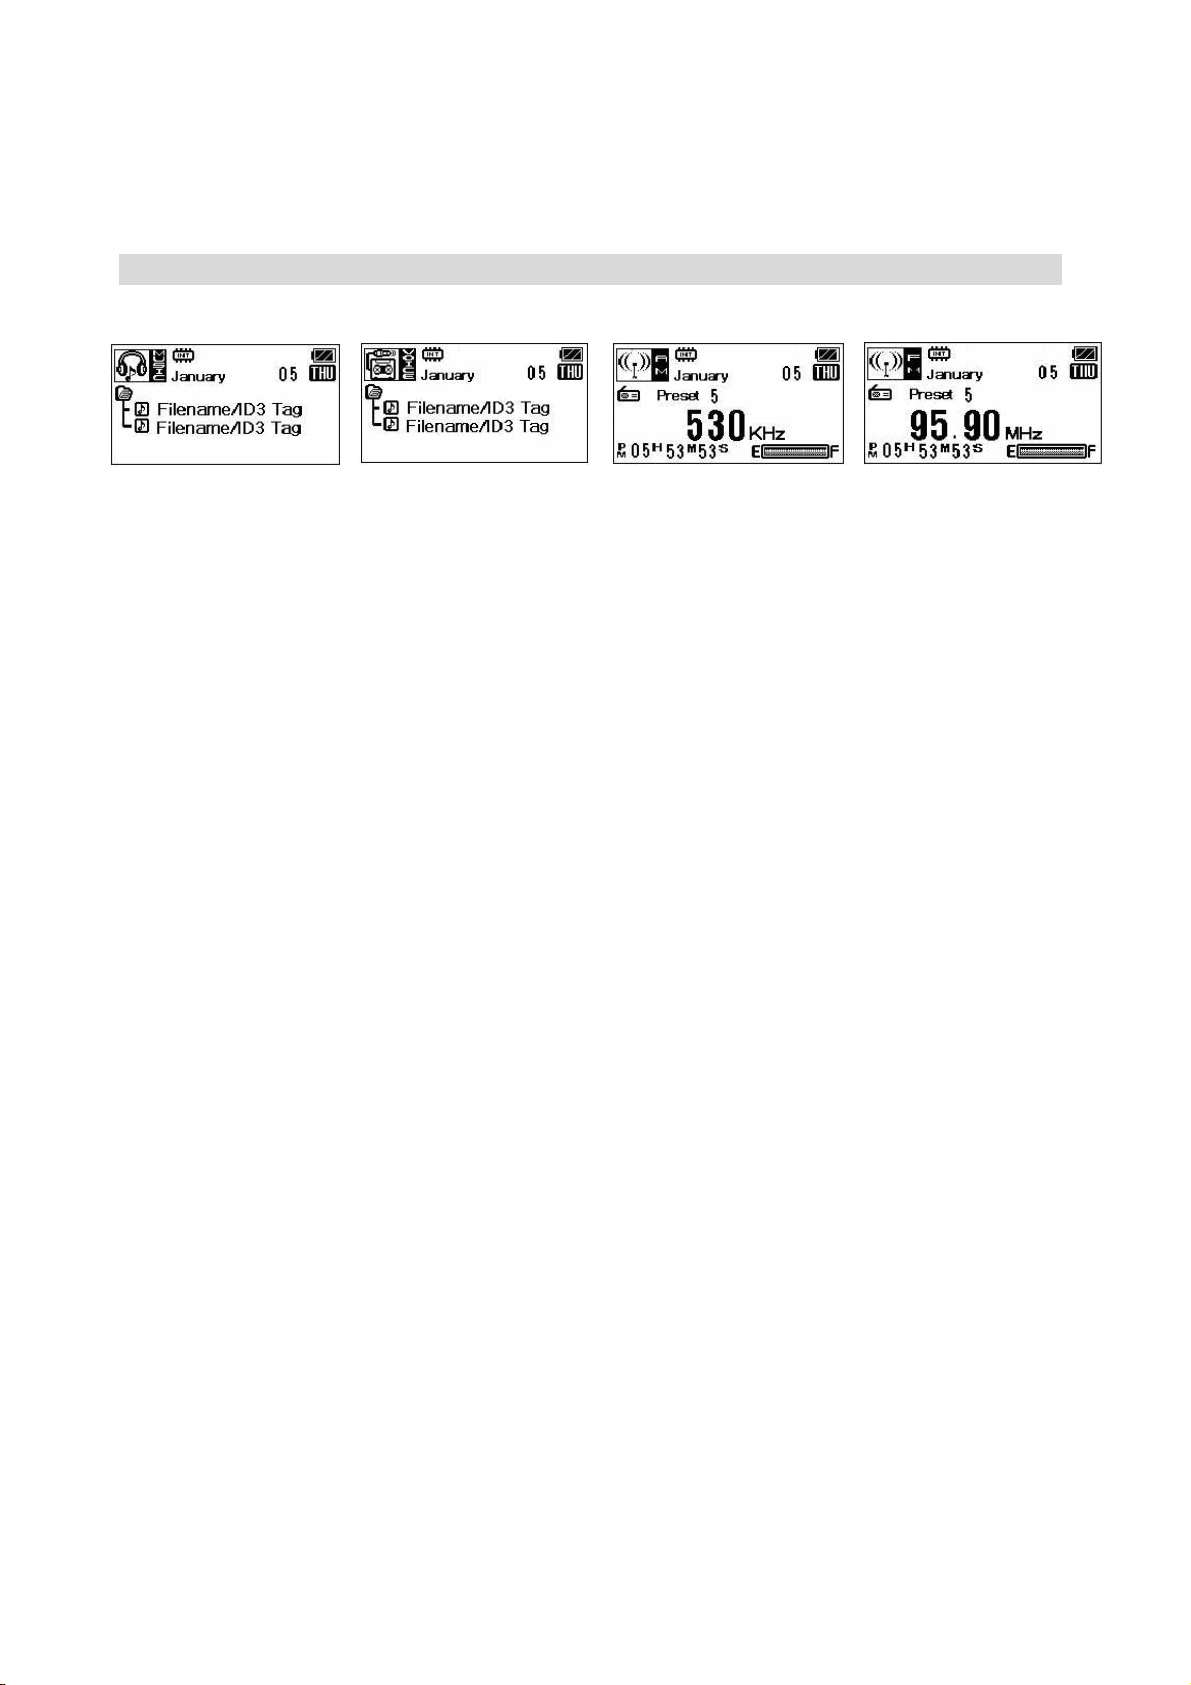
3. LCD Display
▣ POWER ON ▣ POWER OFF
▣ AM Display
① : Radio band
② : Memory( Internal/External)
③ : Month(Calendar)
④ : Date(Calendar)
⑤ : Battery Level
⑥ : Day(Calendar)
⑦ : Preset Frequency NO
▣ FM Display
⑧ : Frequency
⑨ : Present Time
⑩ : Remaining memory status
① : Radio band
② : Memory( Internal/External)
③ : Month(Calendar)
④ : Date(Calendar)
⑤ : Battery Level
⑥ : Day(Calendar)
⑦ : Preset Frequency NO
⑧ : Frequency
⑨ : Present Time
⑩ : Remaining memory status
▣ MUSIC Initial Display
- 4 -
① : MUSIC Mode
② : Memory( Internal/External)
③ : Month(Calendar)
④ : Date(Calendar)
⑤ : Battery Level
⑥ : Day(Calendar)
▣ MUSIC Playback Display
▣ VOICE Initial Display
⑦ : Navigation (Music list up)
① : Music band
② : Memory( Internal/External)
③ : Recording bit rate
④ : Sound effect
⑤ : Repeat
⑥ : Battery level
⑦ : Playing music NO/Total music No
⑧ : Playing time
⑨ : Play Status
⑩ : Music File Information
⑪ : Present time
⑫ : L/R Sound Level
① : VOICE Mode
② : Memory( Internal/External)
③ : Month(Calendar)
④ : Date(Calendar)
⑤ : Battery Level
⑥ : Day(Calendar)
⑦ : Navigation
- 5 -
II. BATTERY CHARGE and USE
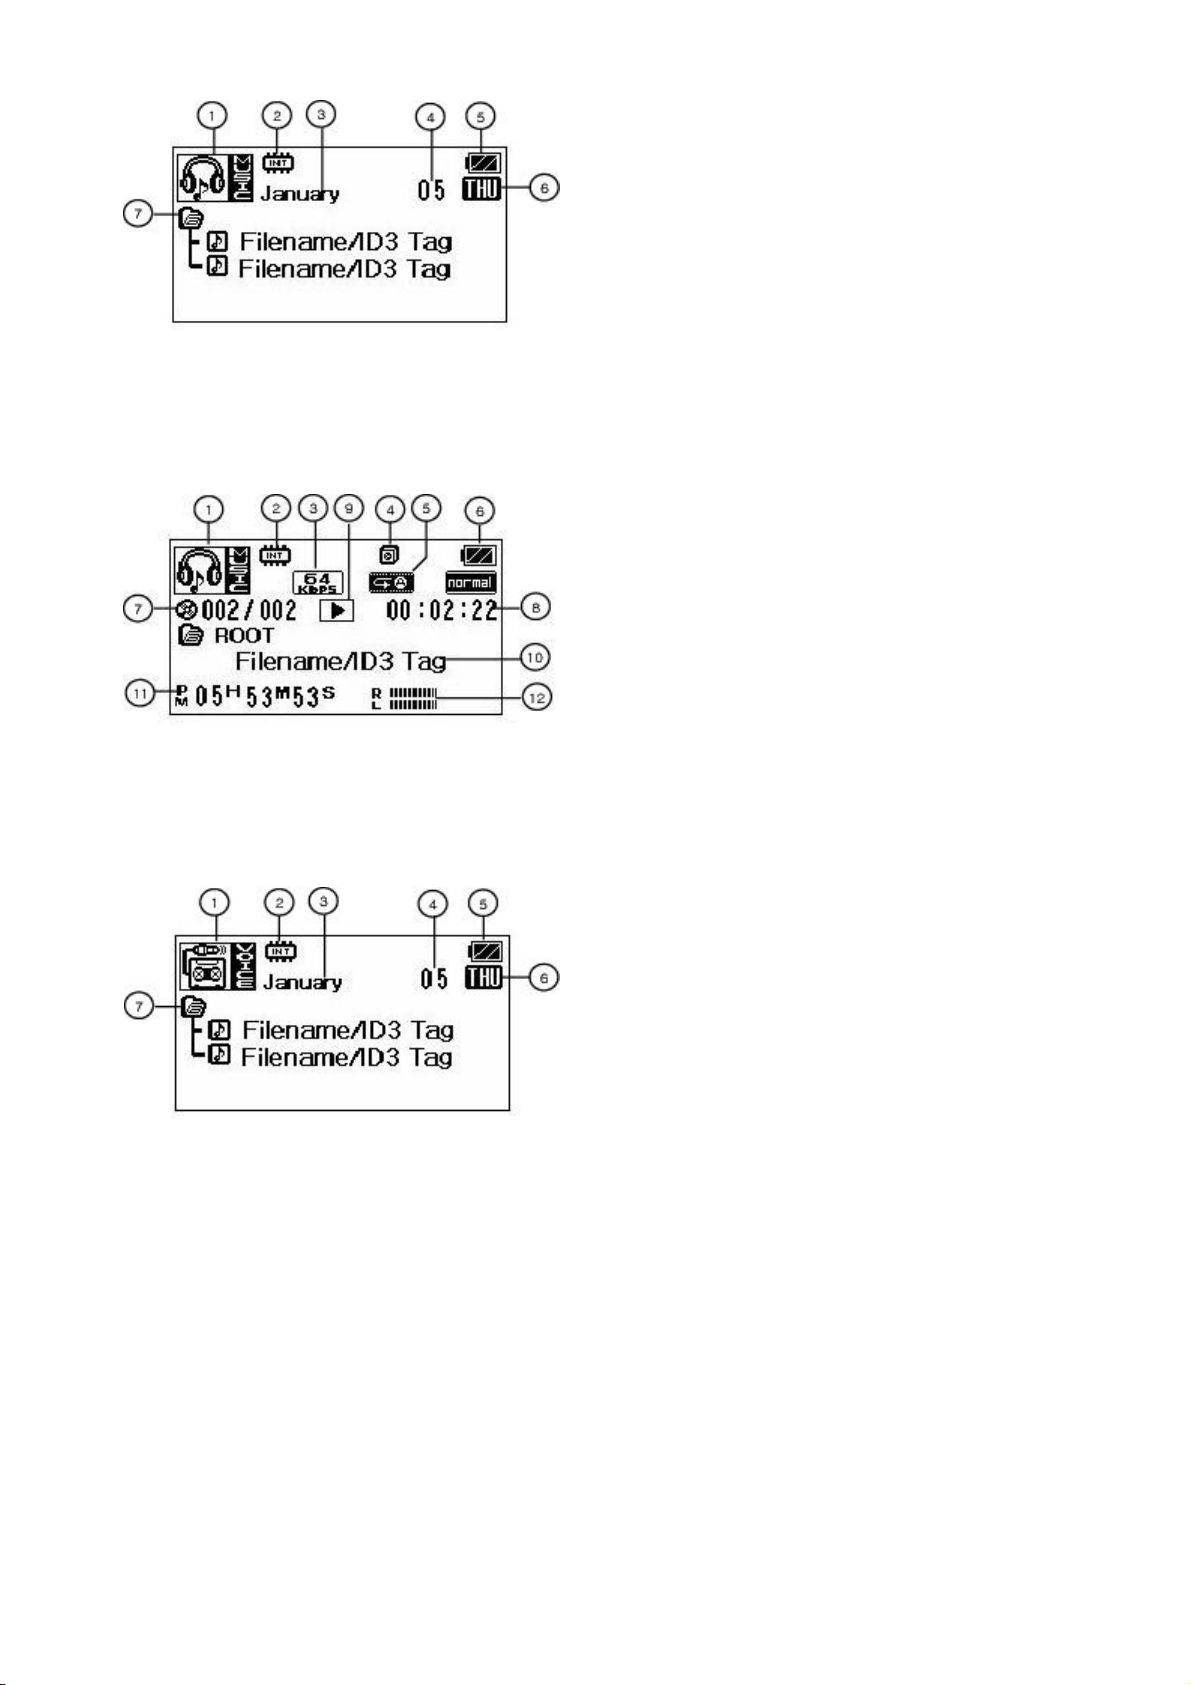
1. Charge battery using AC Adapter
- Connect the adaptor jack as shown in
the diagram; taking note of the
correct side.
- The battery can be charged using the
AC adaptor, or by making a USB
connection with a PC or MAC.
- It takes approximately 4hrs to fully
charge the battery using either
method.
☞ The 4hr charge time (for a full
charge) is an estimate only. Actual
time may vary depending on charging
conditions.
2. Charging Status
3. Battery Level
Full charge
Some power consumed
Power almost drained, should charge battery
No power, charge battery
4. Playback and Recording Battery Life
Charging
Charge Complete
LX battery lasts an average of 7 – 10 hours under normal use.
☞ Actual battery life may vary depending on use.
Before recording for a long period of time, please fully charge the battery.
A Li-polymer battery has its own battery life. If battery consumption has changed drastically,
please replace the battery with a new one from www.pogoproducts.com
5. Powering On
After charging the battery, press and hold the Play/Stop button for 3 seconds to power on.
- 6 -
III. MEMORY CARD and RESET
1. Memory Card
1) Memory Card Type: SD/MMC Card
2) Compatible Capacity: 32MB/64MB/128MB/256MB/512MB/1GB
☞ An external memory card is not provided. You can buy one from just about any electronics
store in your area.
* Radio YourWay LX only supports STANDARD SD cards. High-Speed cards will NOT work.
2. Maximum Recording Time
128MB: 85hrs at 32Kbps
256MB: 17hrs at 32Kbps
512MB: 34hrs at 32Kbps
1GB: 68hrs at 32Kbps
3. Precaution
1) Do not take the memory card out while the unit is playing back or recording a file.
2) When using a new memory card, format the card inside the unit BEFORE using it.
3) If the memory card has been used in any device, (Digital Camera, MP3 Player, etc) you must
format the card in Radio YourWay LX before use. Memory cards must be formatted
in FAT.
4) We do not recommend using a memory card in multiple devices.
5) Only insert or remove card when unit is powered off.
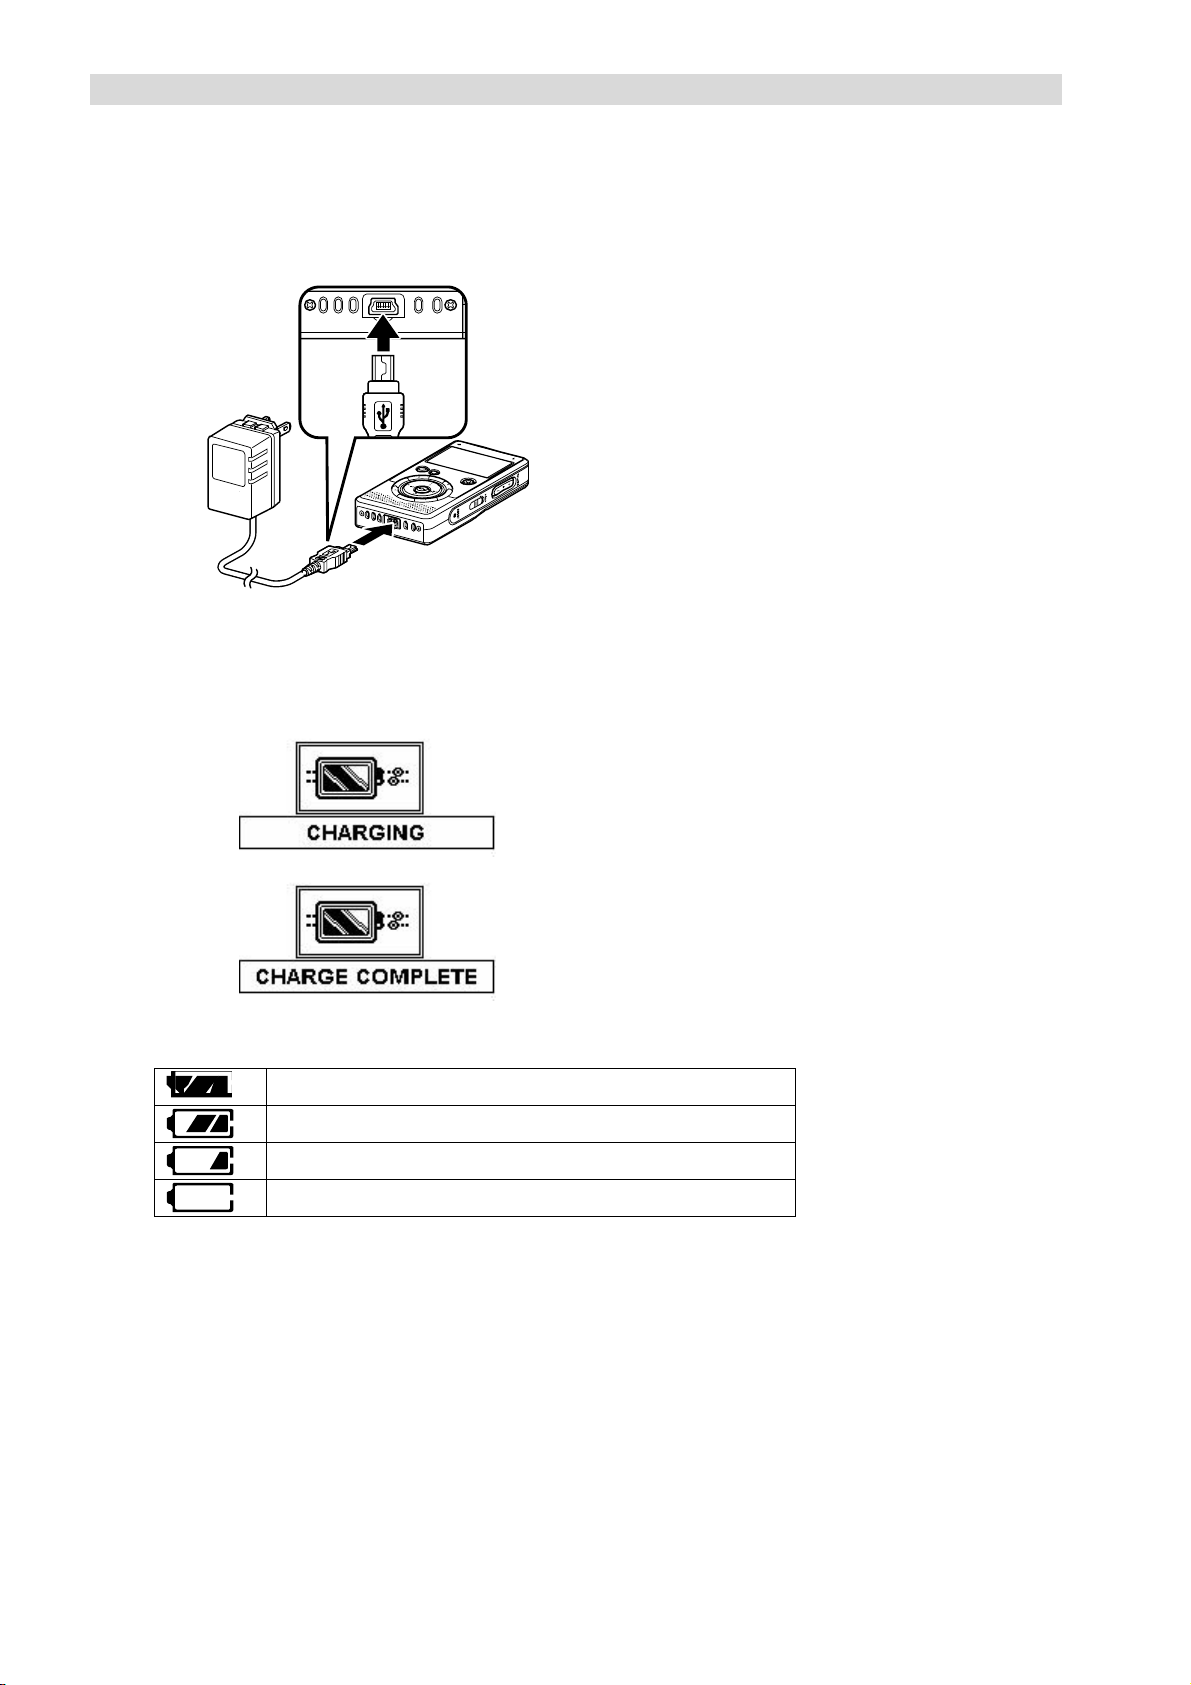
4. Inserting a Memory Card
☞ When inserting a memory card in the unit, be careful and insert the card properly as shown in
the diagram (taking note of the correct side up) or you may damage the card and/or Ext card
slot. Press the A/B – Repeat button to switch from Internal to External memory, or vice-versa.
- 7 -
5. Reset
If the unit is not responding, please reset by pushing the Reset button (found on the right side of
the unit) gently with a thin object for 1 second.
IV. RADIO YOURWAY LX MODES
* Display for Modes
Music Mode Voice Mode AM Mode FM
Mode
① Music mode
All recordings done manually (see Chapter V for more details) will be found in the Music mode. By
default, the Radio YourWay LX organizes the recordings by creating specific folders.
For example, an AM folder will be created under the Root when an AM recording is made. All further
AM recordings will be stored in that folder.
Music mode will also store MP3’s and WMA files that you download from a computer.
NOTE: Folders will not appear if the Play Style is set to File List. See the Play Style Menu chapter for
more details.
② Voice mode
NOTE: For more on Timer-Recordings, please refer to Chapter VI – Timer-Recording.
All recordings made by the Timer-Recording feature will be found in Voice mode. When a Timer-
Recording is made, a Schedule folder will appear underneath Root.
Folders will not appear if the Play Style is set to File List. See the Play Style Menu chapter for more
details.
③ AM mode
You can listen to AM radio in AM mode.
④ FM mode
- 8 -

You can listen to FM radio in FM mode.
V. RECORDING, PLAYBACK, and DELETING
1. AM and FM
Switch to the desired mode by tapping the Mode button. Once you are in the desired mode (AM or
FM), tune in to the station you would like to record by pressing the Fast Forward button (>>) or Rewind
button (<<). To scan for stations, press and hold the Fast Forward button (>>) or Rewind button (<<)
for 3 seconds.
Once you have tuned into your desired station, press the REC button to begin recording. To pause
the recording, simply tap the REC button. PAUSE will display on the screen. Tap the REC button
again to resume recording. The recording light will be solid red while recording.
To stop the recording, tap the Play/Stop button.
To playback the recording, tap the Mode button until you are in Music mode. Select the AM or FM
folder using the Up or Down button, then press the Play/Stop button to access it. Once you are in the
folder, select your recording using the Up or Down button. Press the Play/Stop button to begin
playback.
To stop or pause playback, tap the Play/Stop button during playback.
NOTE: To go back to the root of the LX, tap the Play/Stop button during playback to stop the playback.
Tap the Up or Down button to go to the previous screen. Next, tap the Rewind button (<<) until you
are at the root. Use this method to access files located in other folders.
NOTE: Folders will not appear if the Play Style is set to File List. See the “Play Style” section in the
Main Menu chapter for more details.
2. Record and Playback Voice
Switch to Music or Voice mode by tapping the Mode button. Once you are in Music or Voice mode,
tap the REC button to begin recording. To pause the recording, simply tap the REC button. PAUSE
will display on the screen. Tap the REC button again to resume recording. The recording light will be
solid red while recording.
To stop the recording, tap the Play/Stop button. You will automatically be taken into the MIC folder
(where all voice recordings will be stored) in Music mode.
To playback the recording, select the file using the Up or Down button. Press the Play/Stop button to
begin playback.
- 9 -
To stop or pause playback, tap the Play/Stop button during playback.
NOTE: Folders will not appear if the Play Style is set to File List. See the Play Style Menu chapter for
more details.
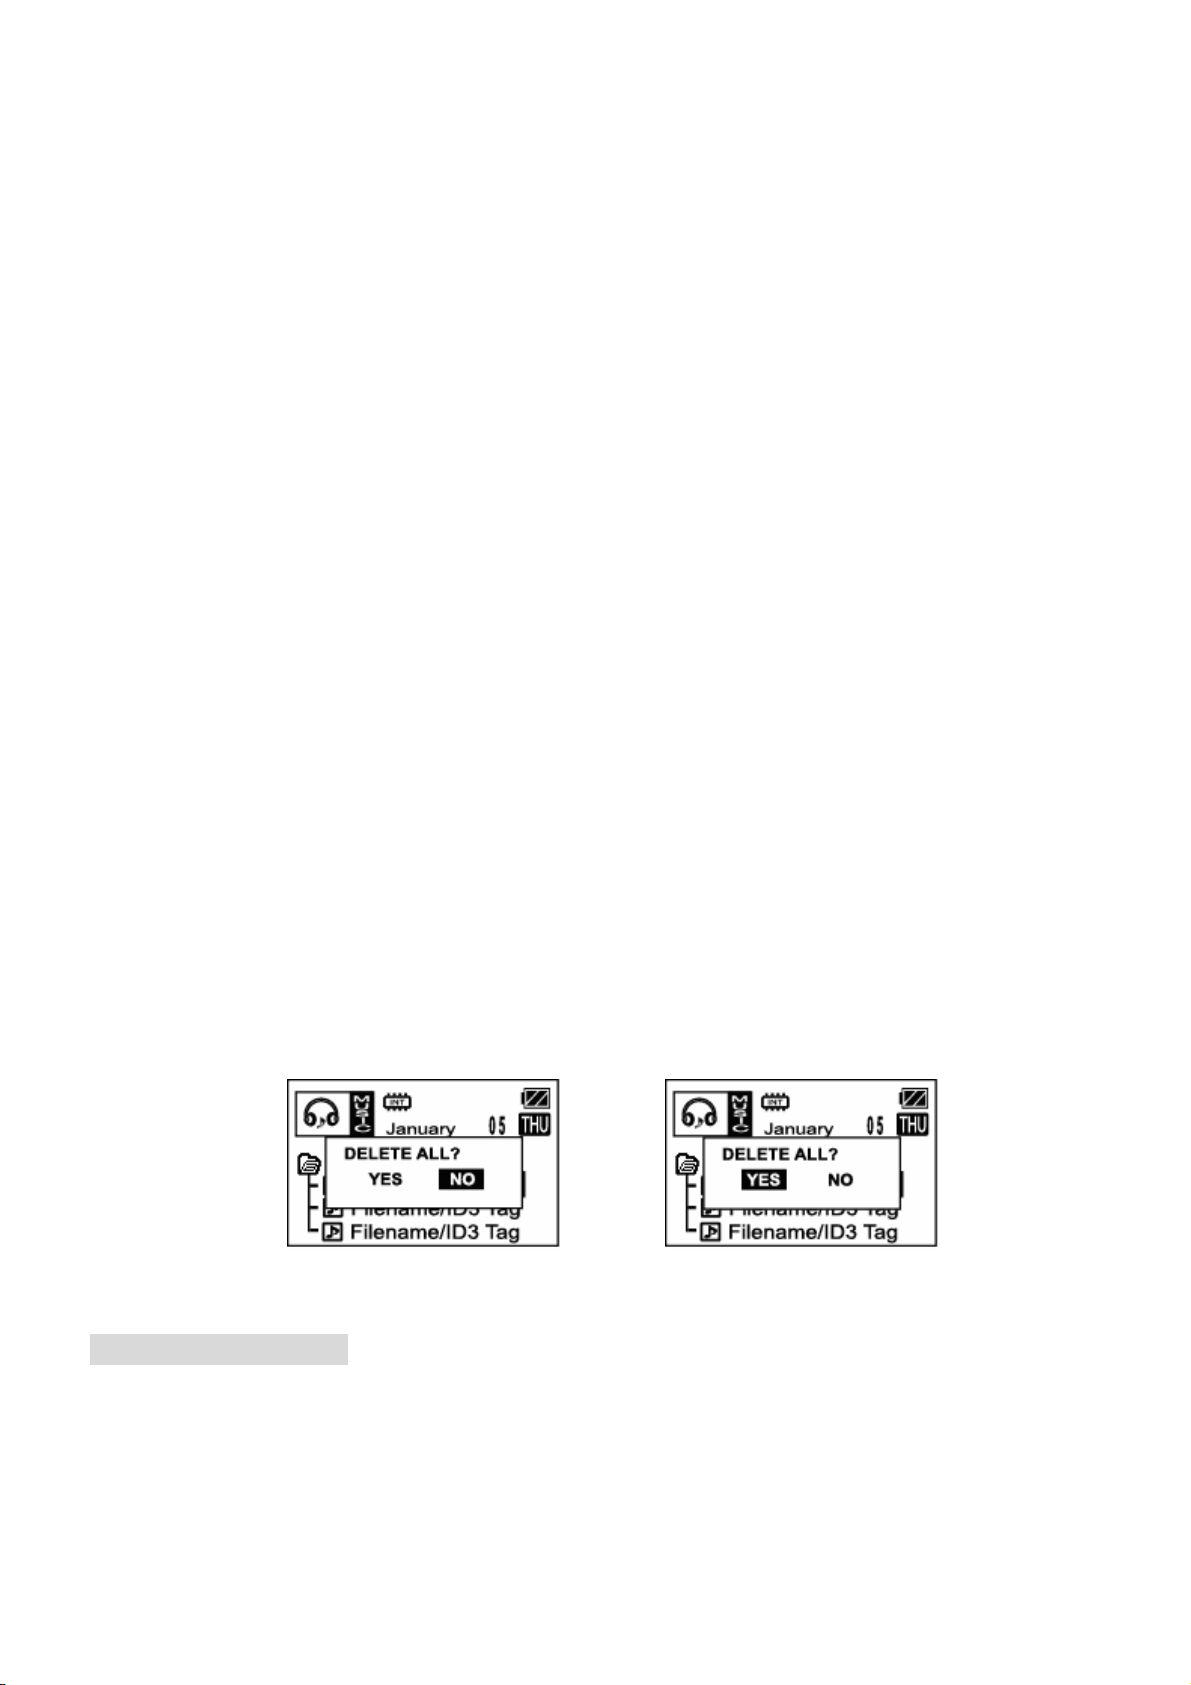
3. Deleting Files
You can delete files/recordings in Music or Voice mode. To delete files/recordings, tap the Mode
button until you are in the desired mode. Select the file/recording you wish to delete using the Up or
Down button, then tap the Erase button.
A pop-up screen will appear displaying “Delete – Yes/NO?”
Select “Yes” using the Fast Forward button (>>) or Rewind button (<<), then press the Play/Stop button
to confirm.
If you do not wish to delete the file/recording, select “NO” and press the Play/Stop button to confirm.
You cannot delete while listening to a playback. You must first stop the playback by tapping Play/Stop
button. Next, tap the Up or Down button to go back to the previous screen.
NOTE: If your file/recording is stored in a folder, such as the SCHEDULE folder in Voice mode, you
must enter that folder in order to access the file/recording. If you tap the Erase button while
highlighting a folder and select “YES” to erase, you will be deleting all contents within that folder.
If you wish to delete all files/recordings within the Music or Voice mode, press and hold the Erase
button in the desired mode until you see the “Delete All?” message. Select “Yes” using the Fast
Forward button (>>) or Rewind button (<<), then press the Play/Stop button to confirm.
VI. TIMER RECORDING
The Timer-Recording feature allows Radio YourWay LX to record unattended.
1. Setting Current Time
In order for Timer Recordings to function properly, the current time and date MUST be set. Make sure
you always have enough battery power. After 1 or 2 hours of the battery being fully discharged, the
- 10 -
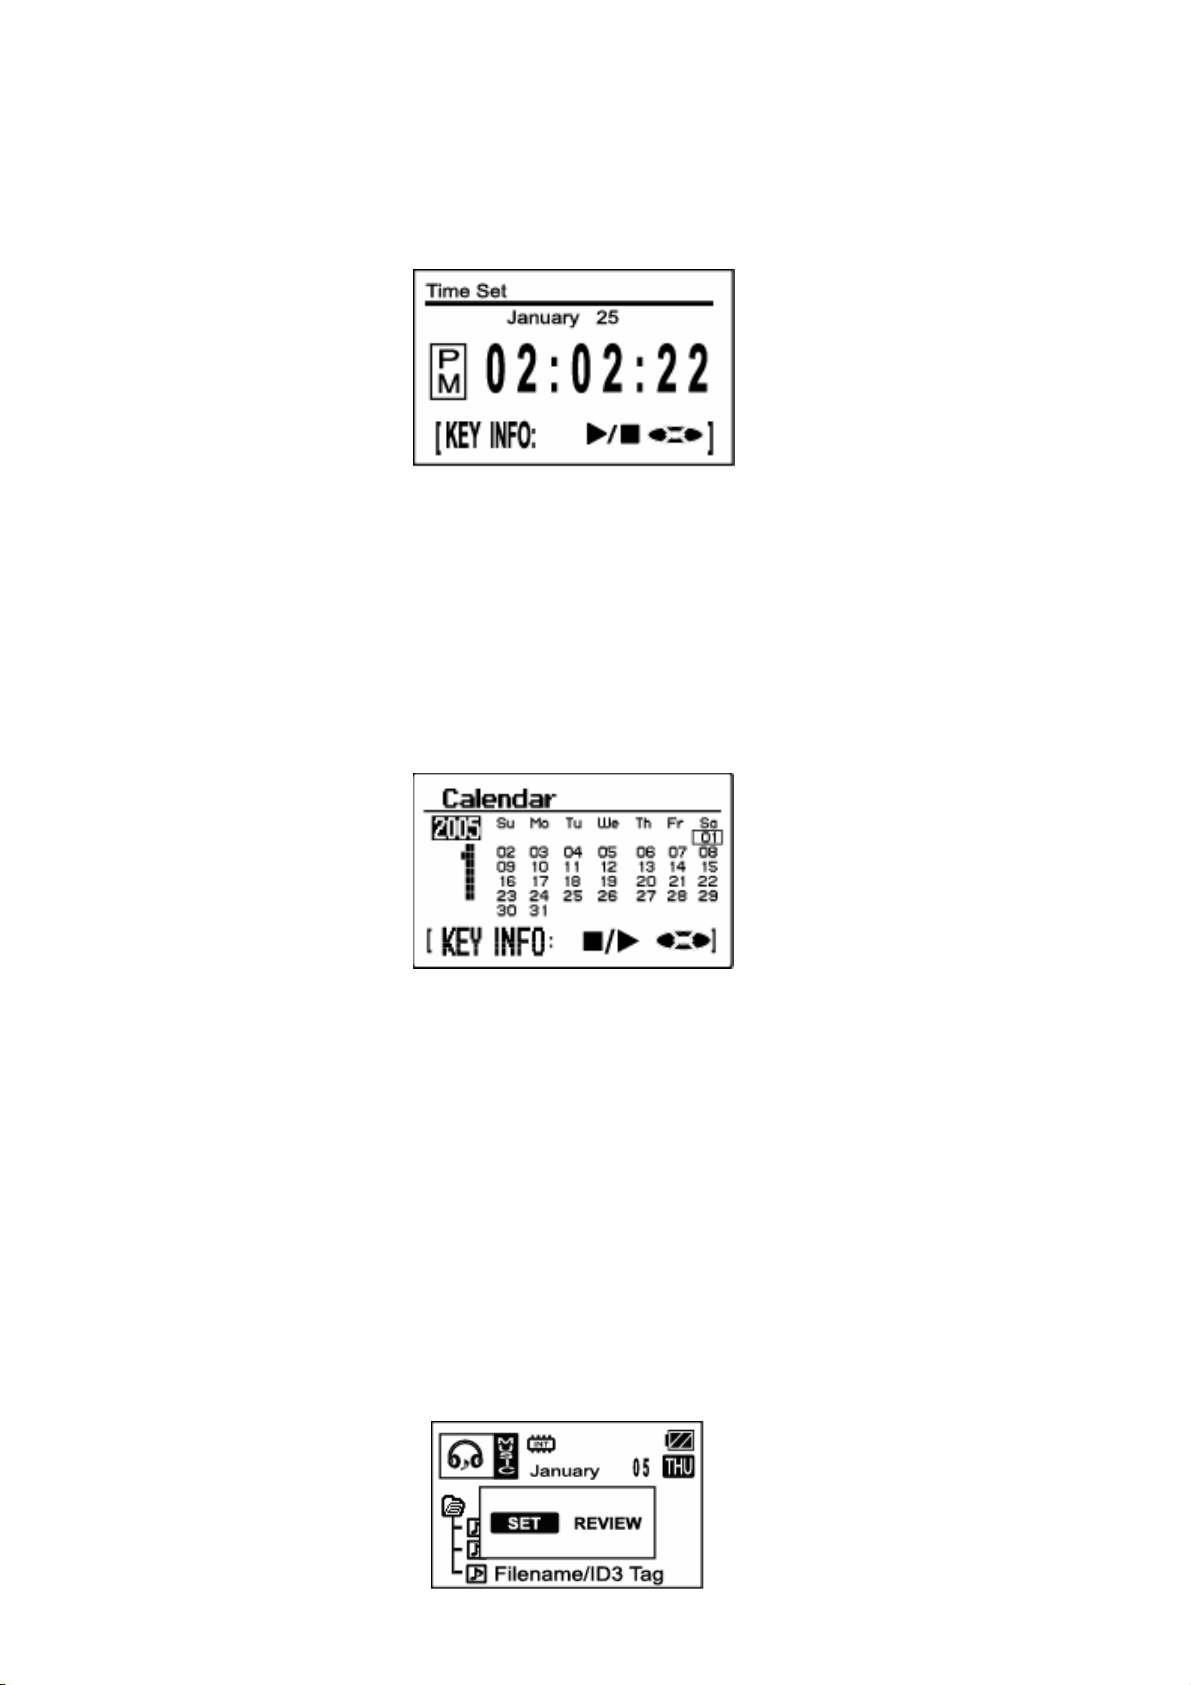
year/day/hour settings will not be able to stay current.
Tap the Menu button to go into the Menu System. With Time Set highlighted, tap the Play/Stop button.
You will now see the Time Set screen, just like the example picture.
To change the Hour/Minutes, use the Up or Down button. To move between the Hour and Minute
fields, use the Fast Forward button (>>) or Rewind button (<<). Push the Play/Stop button to confirm
when you are finished.
2. Setting Current Date
Tap the Menu button to go into the Menu System. Highlight Calendar using the Up or Down button, the
press the Play/Stop button to enter.
To change the Year, Month, or Day, use the Fast Forward button (>>) or Rewind button (<<). To move
between the Year, Month, or Day fields, use the Up or Down button. Push the Play/Stop button to
confirm when you are finished.
Once you have set the current date and time, press the Menu button to exit Menu System.
3. Setting a Timer-Recording
Tap the Timer button in Music, Voice, AM, or FM mode. A pop-up will appear displaying “Set” and
“Review.”
Select “Set” using the Fast Forward button (>>) or Rewind button (<<), then press the Play/Stop button.
- 11 -

NOTE: You cannot set a timer recording when the unit is playing back a file, recording, or in the Menu
mode.
Once you are in the Schedule Set screen, use the Up or Down button to move through the fields. Use
the Fast Forward button (>>) or Rewind button (<<) to change the field setting.
A. The first field is SCHEDULE SET. Select a schedule using the Fast Forward button (>>) or Rewind
button (<<). There are 20 scheduling sets available.
B. The next field is TYPE. Use the Fast Forward button (>>) or Rewind button (<<) to select RECORD,
PLAY, or DELETE.
RECORD – Record on a set time and date. (Timer Recording)
PLAY – Play music or radio on a set time and date. (Alarm Function)
DELETE – Select this to delete the schedule made.
C. The next field is MEMORY. Select the memory you wish to record on or play from (INTERNAL or
SD CARD) using the Fast Forward button (>>) or Rewind button (<<). Note that you may only select
SD CARD if you have an external memory card inserted.
D. The next field is DATE SET. You may set the schedule to work on a weekly basis or on a specific
date. Use the Fast Forward button (>>) or Rewind button (<<) to select WEEK or DATE.
E. The next field is WEEK if the previous field is set to WEEK. You may select EVERY DAY, MON –
SAT, MON – FRI, or individual days of the week. Use the Fast Forward button (>>) or Rewind button
(<<) to select the days.
Note that this field will be DATE if the previous field is set to DATE. With the Month highlighted, use
the Fast Forward button (>>) or Rewind button (<<) to select the desired month to record. Next, press
the Down button to switch to the day. Use the Fast Forward button (>>) or Rewind button (<<) to
select the desired day to record.
To go back to the month, press the Up button. To move to the next field, press the Down button.
F. The next field is SOURCE. You may select from which source you would like to record from (AM,
FM, MIC, or LINE-IN) using the Fast Forward button (>>) or Rewind button (<<).
Note that MUSIC, AM, or FM will be the only choices if the TYPE field is set to PLAY.
- 12 -

If you set the source to MUSIC, you must select a file to play. Press the Down button to highlight the
folder underneath SOURCE. Select the desired folder that contains your file using the Fast Forward
button (>>) or Rewind button (<<). If you do not have any folders stored in Radio YourWay LX, then
Root will be the default folder selected.
Once you have selected the folder, press the Down button to highlight the file. Select your desired file
to play using the Fast Forward button (>>) or Rewind button (<<).
To go back to the folder or Source selection, press the Up button. To move to the next field, press
the Down button.
G. The next field is PRESET. You may select a preset radio station using the Fast Forward button
(>>) or Rewind button (<<).
This field is unavailable if the SOURCE field is set to MIC or LINE-IN.
This field is also unavailable if the TYPE field is set to PLAY, with SOURCE set to MUSIC.
H. The next field is FREQ. You may select a radio station using the Fast Forward button (>>) or
Rewind button (<<).
This field is unavailable if the SOURCE field is set to MIC or LINE-IN.
This field is also unavailable if the TYPE field is set to PLAY, with SOURCE set to MUSIC.
I. The next field is BITRATE. Bit-rate determines the quality of the recording. The higher the bit-
rate, the higher the quality will be. Please note that higher bit-rates will reduce the overall amount of
recording time.
Select the desired bit-rate using the Fast Forward button (>>) or Rewind button (<<). Recommended
bit-rates when recording voice or talk shows are 32KBPS and 64KBPS. Recommended bit-rates
when recording music are 128KBPS and above.
This field is unavailable if the TYPE field is set to PLAY.
J. The next field is START. Set the hour you wish to start the automatic recorder using the Fast
Forward button (>>) or Rewind button (<<). You can change AM to PM, or vice-versa, by continuously
tapping the Fast Forward button (>>) or Rewind button (<<).
Once you have set the starting hour, tap the Down button to select the starting MINUTES. Use the
Fast Forward button (>>) or Rewind button (<<) to set the starting minutes.
You can go back to the starting hour by tapping the Up button.
- 13 -
 Loading...