

Page 1

1
1. Radio YourWay™ Series
1). Precautions
● Do not drop Radio YourWay™, it may cause a malfunction.
● Do not leave Radio YourWay™ in the following areas:
- Place of high temperature (above 60℃)
- Exposed to direct sunlight or near heating appliances.
- Inside a car; especially in the summer
- High humidity area like a bathroom
● Avoid any impact to the LCD Display
● Do not place credit cards, phone cards, bank books or subway tickets near Radio YourWay™. The
magnetism of the player may damage the data stored in the magnetic strip.
● We are not responsible for any damage or claims from a third party resulting from the use of Radio
YourWay™.
● We are not responsible for any loss of files caused by any reason.
● Do not repair, disassemble or make modifications to Radio YourWay™.
● Do not use Radio YourWay™ in any area designated No Electronic Devices like airports or medical
facilities.
● Do not operate while driving.
● If Radio YourWay™ is misused by the user, subjected to static electricity or electrical shock even if just
changing the battery, the files stored in the memory may be lost or corrupted.
Backup all important data!
● Only insert a memory card when the unit is off or a malfunction may occur
2). Player Functions
Radio YourWay™ is manufactured under strict quality control procedures to ensure the best performance
and customer experience.
.
● Elegant Design and Exterior Finishing
Radio YourWay™ is designed with the customer in mind. Using a wide LCD Screen and half miller
window to eliminate the closeness of a small display and show off a high class image to enhance the
user’s experience.
● AM/FM/Voice Recording and MP3 PLAYER
Radio YourWay™ can record AM/FM/Voice and play MP3 files.
● External memory
Radio YourWay™ has the ability to expand the memory capacity using SD or MMC memory cards.
Page 2

2
● Record AM/FM RADIO
With Radio YourWay™ you can record live or future AM/FM broadcasts
.
● RYW-EXPLORER
With Radio YourWay™ you can transmit data between the device and your PC and even send those
files to a friend using E-mail.
● Recording Timer
Radio YourWay™ can be programmed to record voice or radio at a later time with its built in
timer.
● USB Interface
● Displays file/frequency/current time on the wide LCD Screen
● Built-in calendar up to the year 2099
● Elegant Design and Exterior Finishing
● Built-in microphone
● Separate and record files up to a high tone quality of 99
● Lock (HOLD) function to prevent unnecessary battery consumption caused by an
accidental key press.
● TIMER recording function to allow voice or radio recording at a later time/date.
● REPEAT PLAY allows a message to be played repeatedly
● Resume Playback Function
● Section Repeat Play (A↔B REPEAT PLAY)
● Automatic power OFF after 3 minutes of no use.(SLEEP MODE)
● MONITOR Function allows the user to listen to what is being recorded using an earphone (MONITOR)
● H/D Function may be used as a portable hard disk (32MB)
● Volume adjustable 30 levels
● EQ equalizer modes (NORMAL,ROCK,JAZZ,CLASSIC,POP)
● Repeat (NORMAL/SECTION REPEAT/1 TRACK/ALL TRACK)
● Download and playback of MP3 Files
● Real time or reserved FM RADIO RECORDING function
● Real time or reserved AM RADIO RECORDING function
● AM/FM PRESET CH function
● AM Region setting EUROPE (9) or USA (10)
● Setting up to 10 reserved recordings is possible
● S-FORWARD and S-REWIND Searching function (10 times/100 times searching)
● External memory slot (SD-CARD/MMC)
● Built-in high-power speaker
● Easy recording from external audio devices
● Recover time and settings after replacing the battery (BACK-UP Function)
Page 3
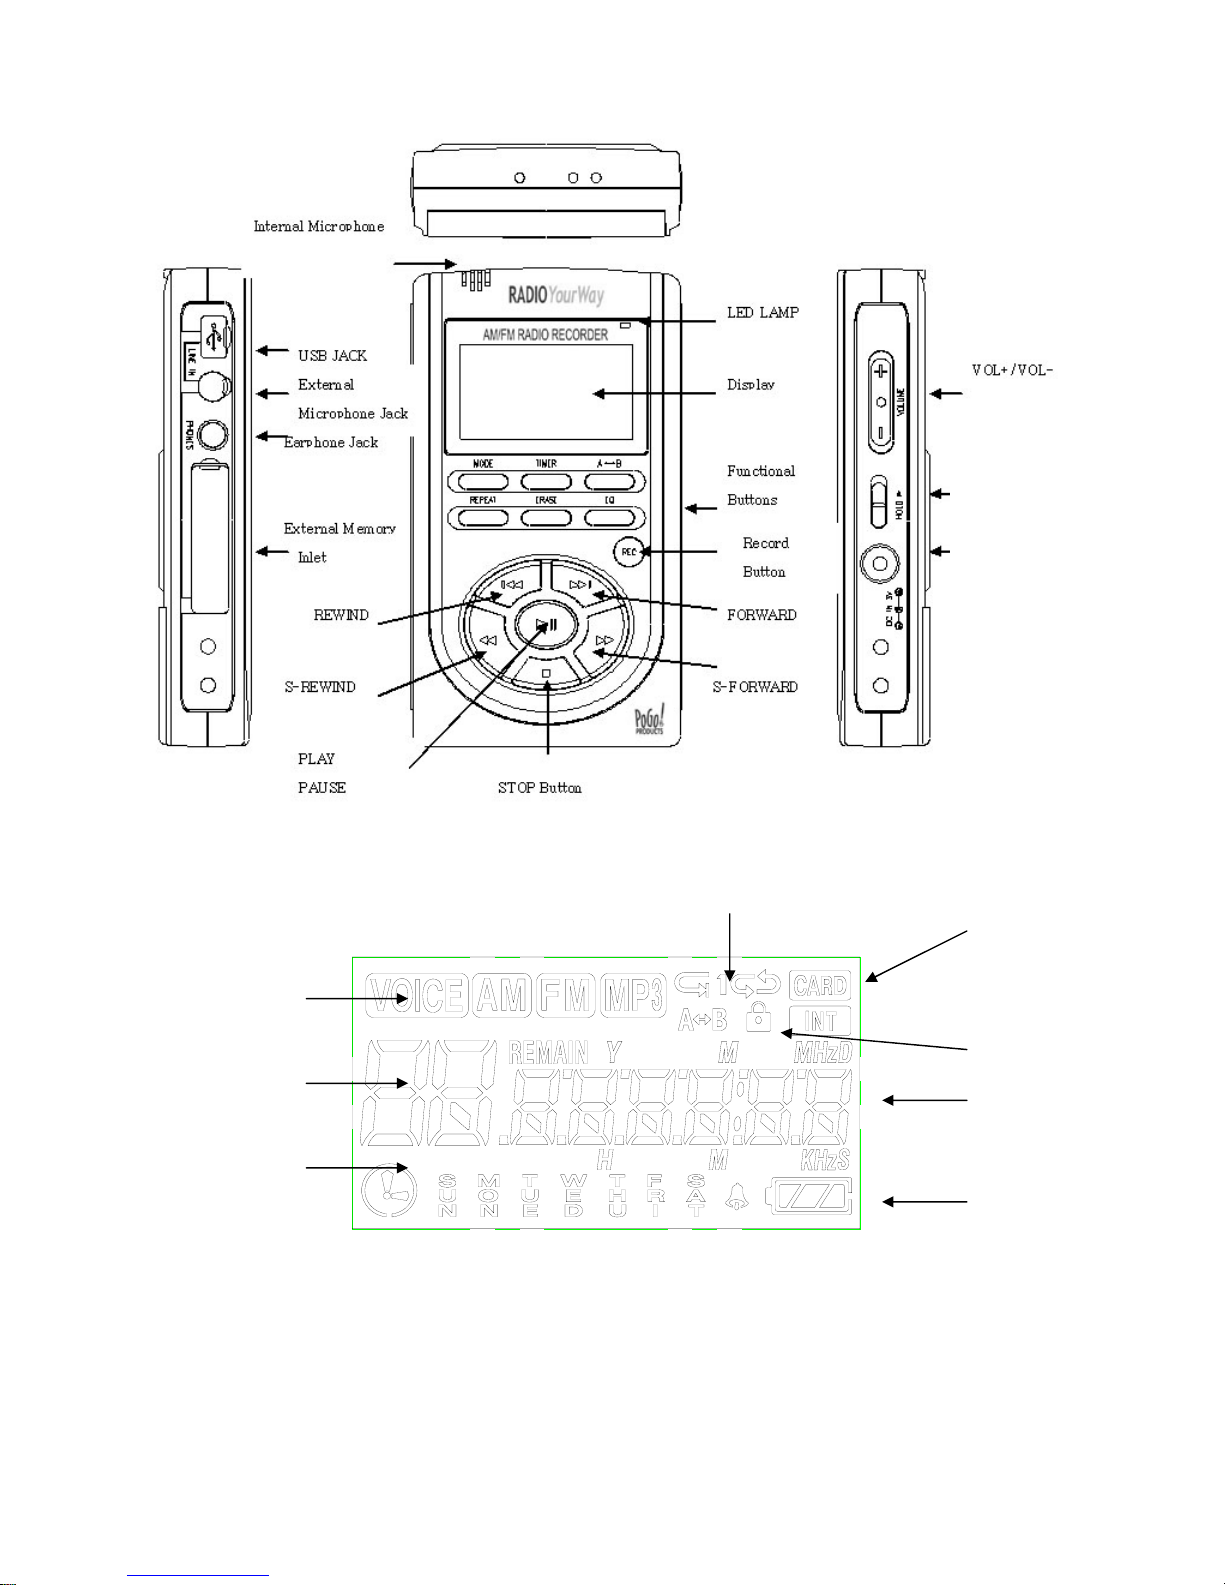
3). Components and LCD Display
HOLD ON/OFF
D.C JACK
Repeat
Reserved
Record
Order of File File Info/
Frequency
Battery
Strength
Lock
Memory
Selection
Mode
Selection
3
Page 4
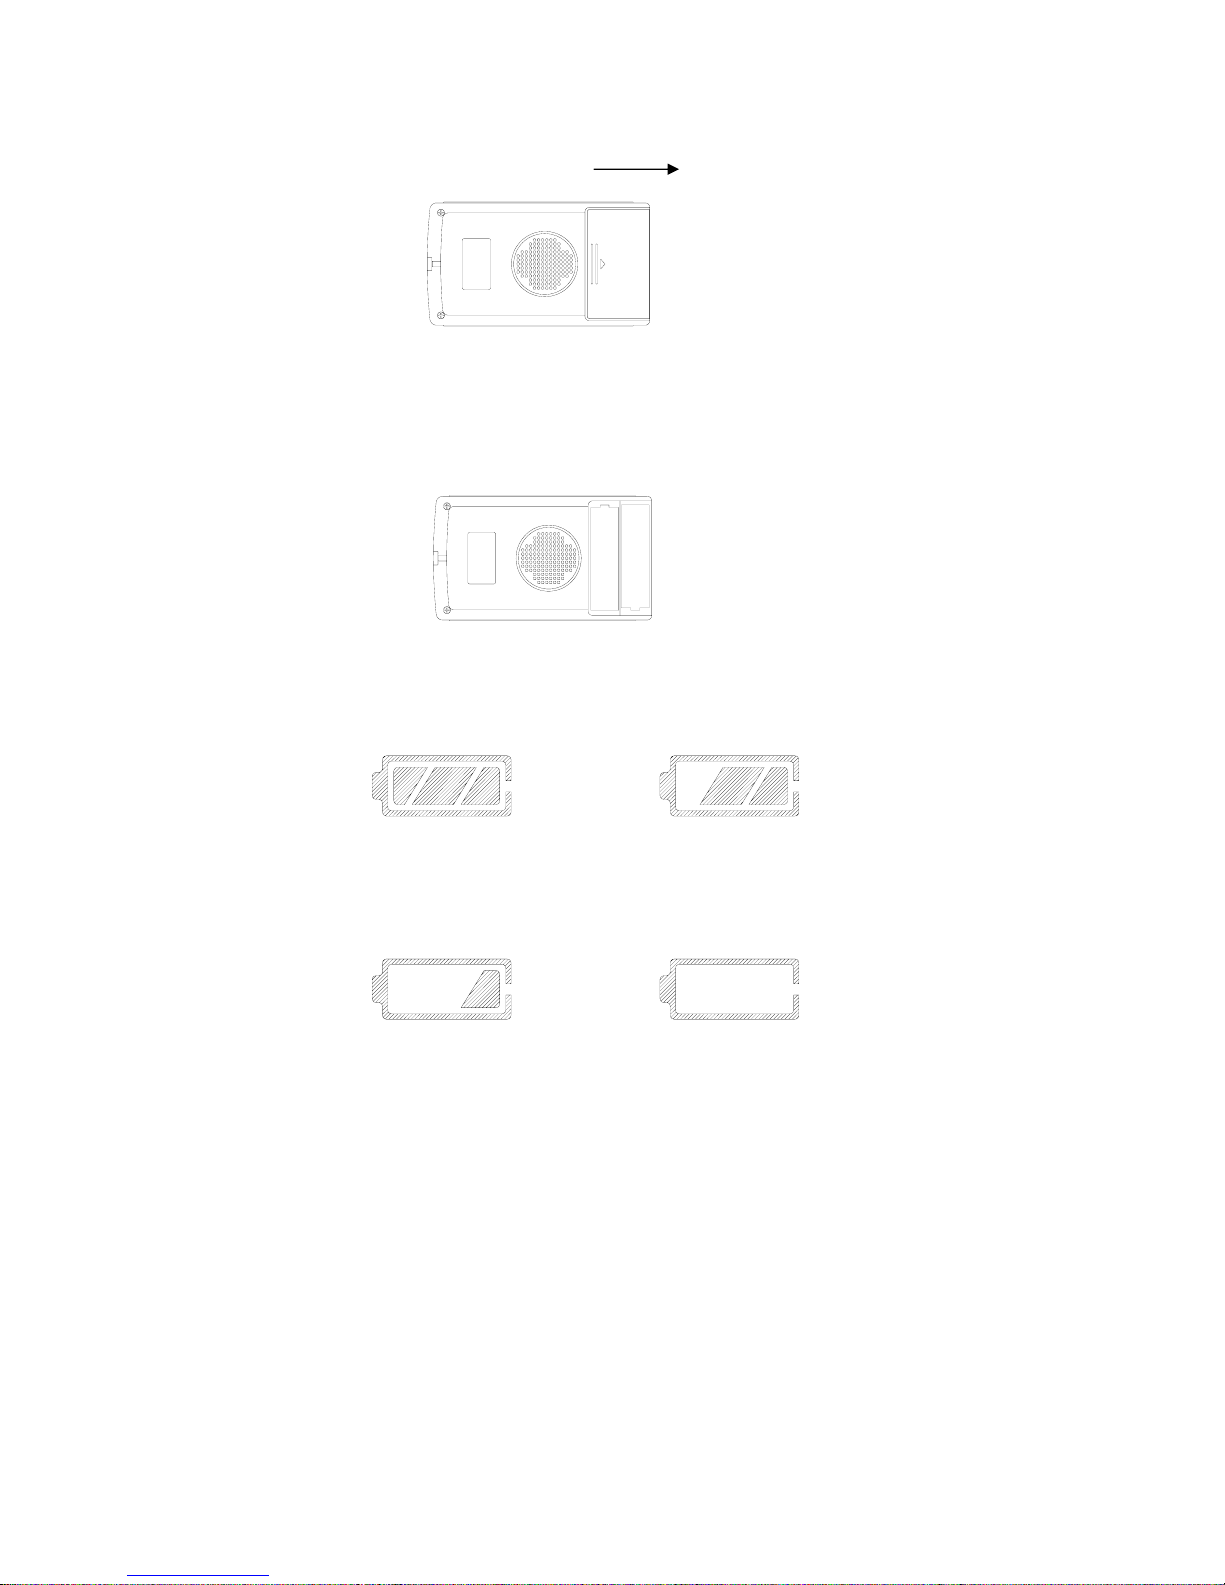
4). Battery Use and Description of Components
① Open the Battery Cover.
Open
② Close the cover after inserting two AAA batteries corresponding to the correct (+) (-) polarities.
Battery: (SIZE "AAA" or UM-4)
③ Check the battery strength by pressing the PLAY/STOP or record mode button.
Battery strength is strong. Battery is partially run down.
Battery is almost run down. Replace the battery.
※ Caution
Check the polarities of the batteries if the LCD Display doesn’t turn ON after inserting new batteries.
※ Note
If you do not use Radio YourWay™ for a long time, the batteries may be run down naturally.
Take out the batteries if you do not plan on using Radio YourWay™ for a long time.
4
Page 5
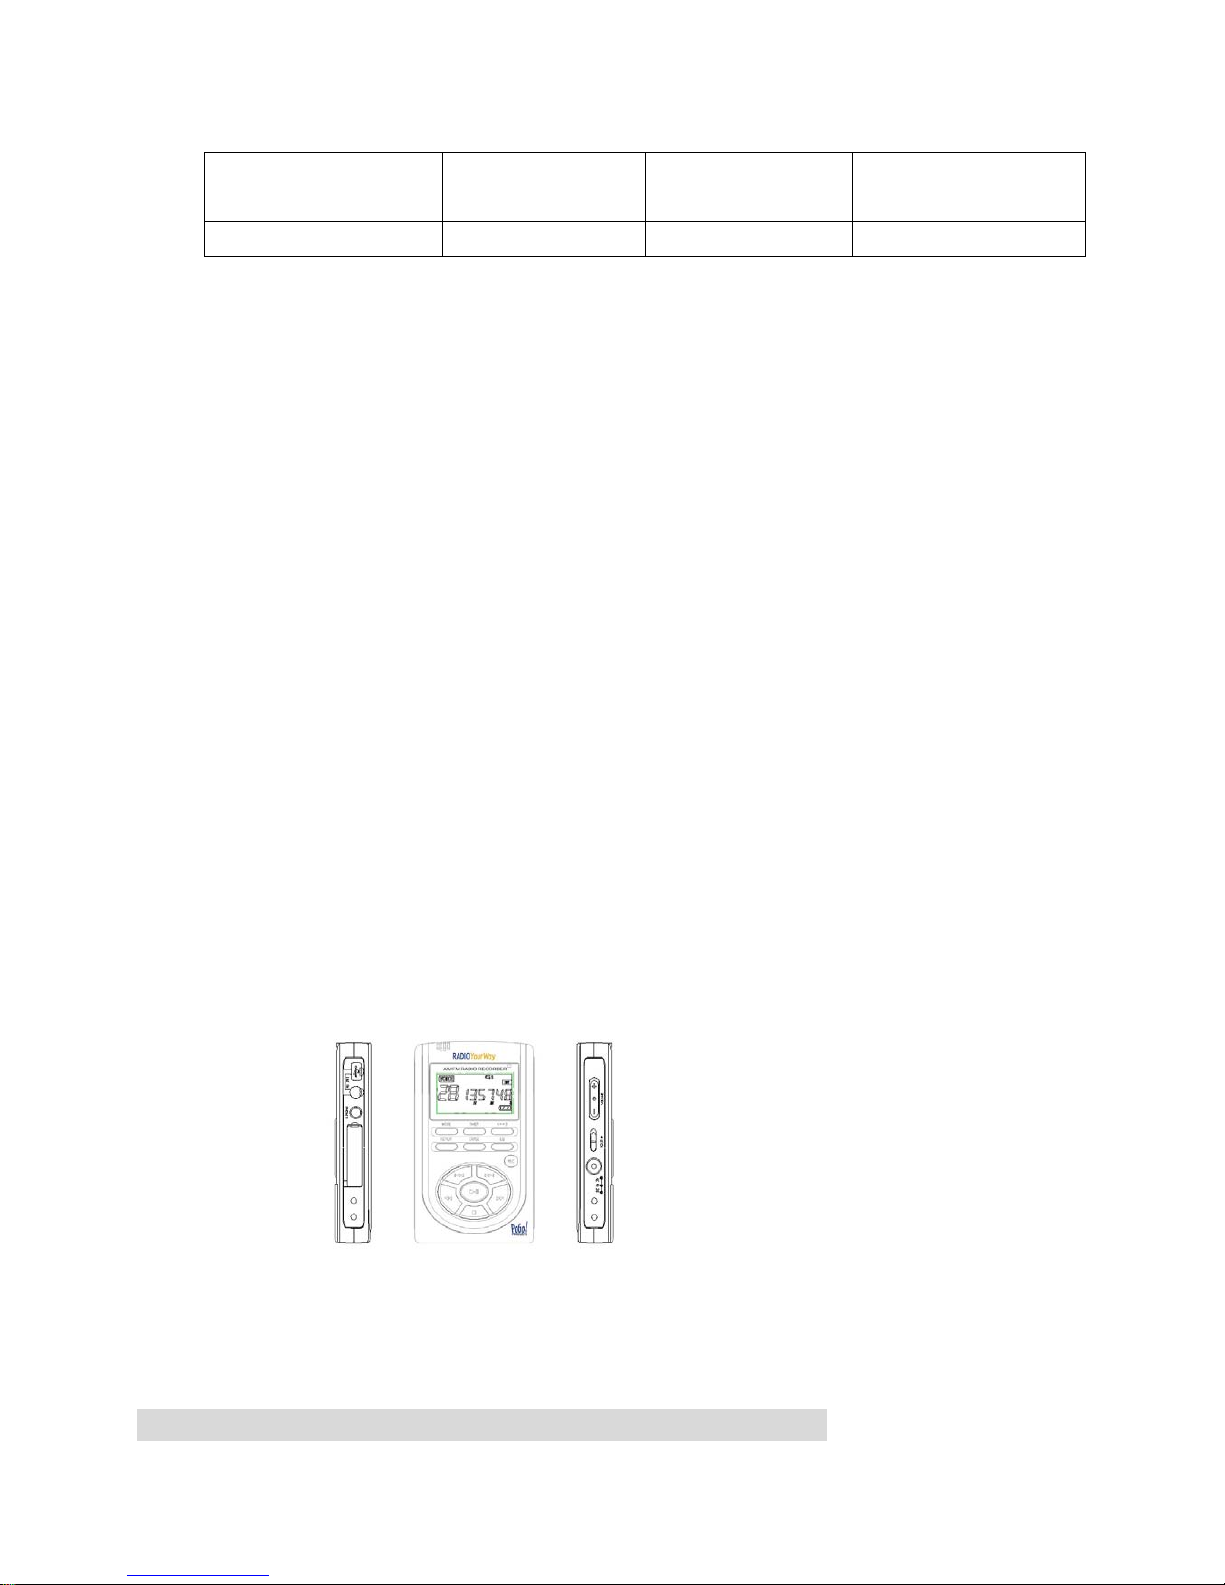
④ Battery Life
Battery Type Recording
Playback via Speaker
(Volume: Middle)
Playback via Ear phone
Alkaline “AAA” LR-03 Approx 11hr Approx 9hr Approx 15hr
⑤ Caution when Using the Battery
● Do not use different types of batteries together.
● If you do not use this recorder & player for a long time, take the batteries out of the body.
● When using rechargeable batteries, carefully read the manual of the battery and charger before
using them.
⑥ Components
STEREO EARPHONE, INSTALL CD
LINE/IN CABLE, USB CABLE, TWO AAA BATTERIES, NECK STRAP
5). Basic Functions
● Turning the Power ON/OFF
To turn the player on, hold the PLAY button for 1-3 seconds.
If no key is pressed for more than 3 minutes, the power is automatically shut OFF.
To turn the player off, hold the STOP button for 1-3 seconds
If you put in the provided batteries after purchasing Radio YourWay™, the Power should turn ON and the initial
display screen appears
When the power is OFF, you may turn the power ON by pressing the PLAY Button.
5
Page 6
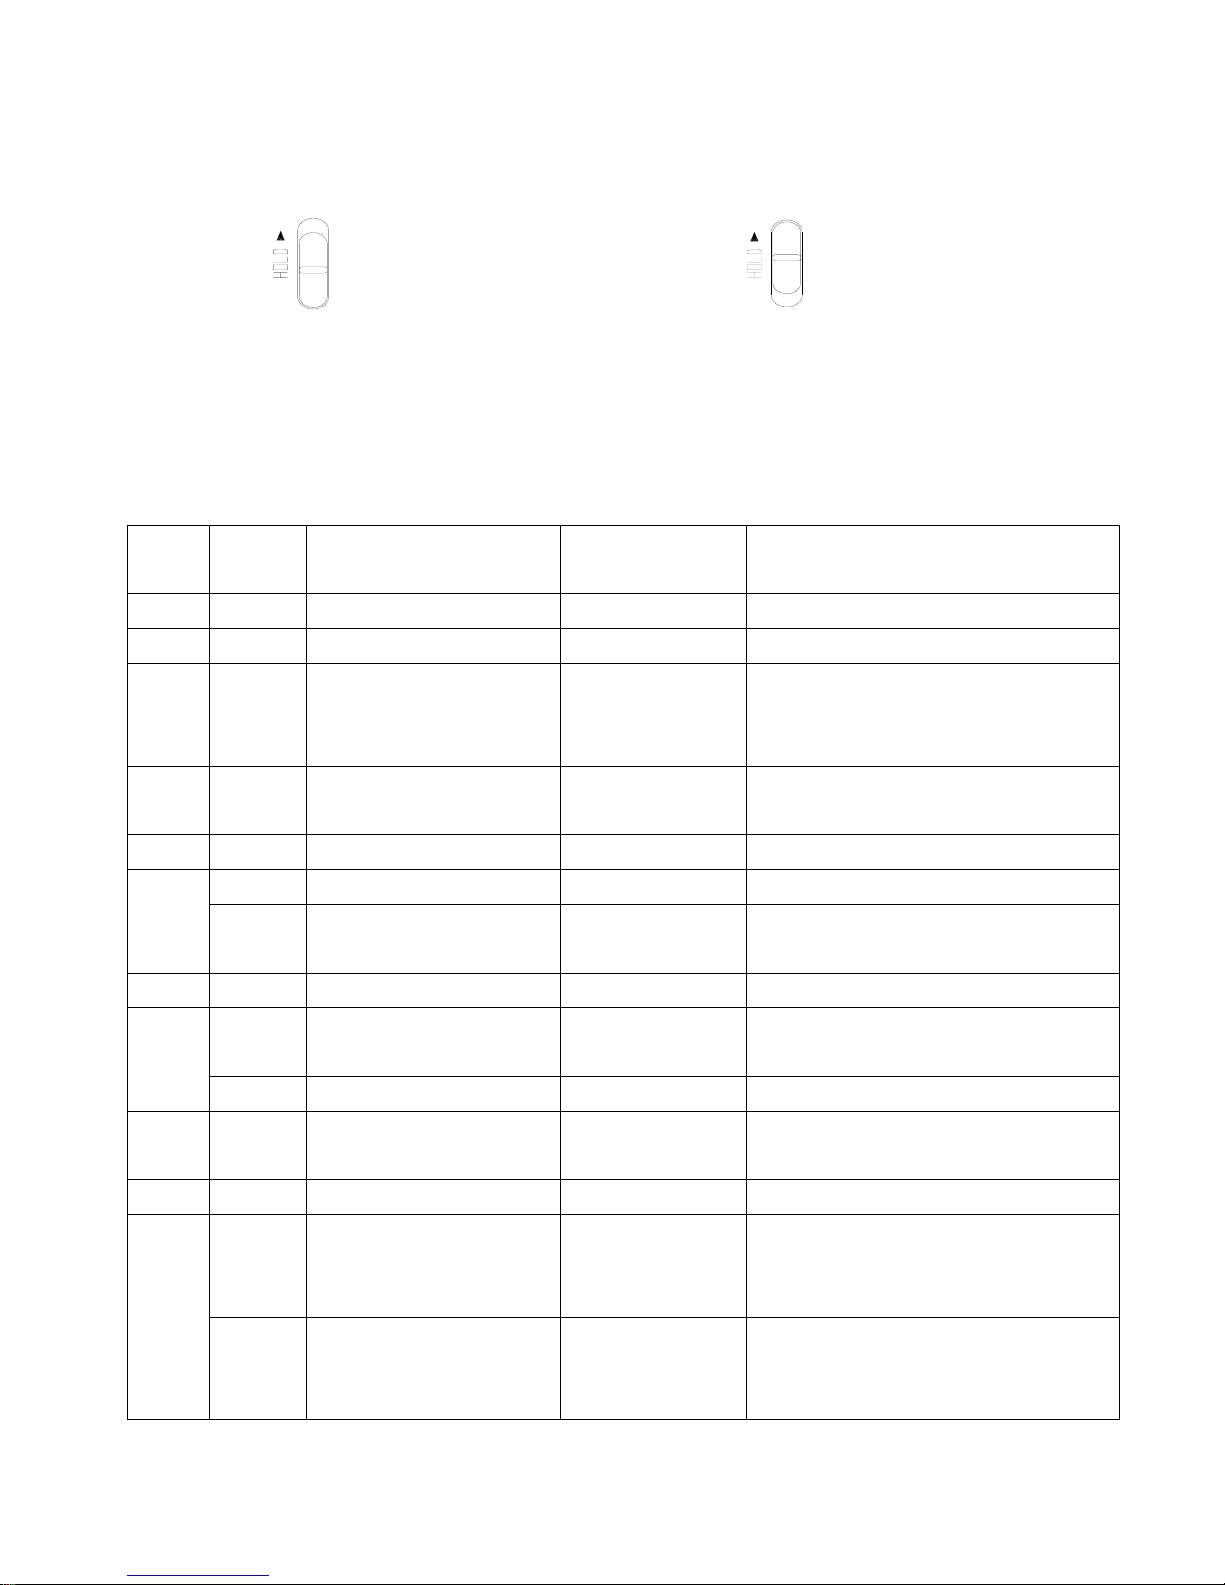
● How to Use the HOLD function
When the lock button is in the upper position, the player is in HOLD and will not operate.
Use this recorder & player only after checking the lock switch is released from the HOLD position.
HOLD OFF HOLD ON
Released Player not operable
6). VOICE/AM/FM/MP3 Buttons
● VOICE MODE (VOICE)
Upon operating the keys, ㅡ means a short press and – - means pressing and holding (longer than 1 sec).
Buttons
Key
Operations
Stopped Upon Recording Playing
ㅡ
Plays the beginning of a file X Pauses a file
ㅡ
Moves to the next file X Begins to play the next file
ㅡ
ㅡㅡ Moves to the previous file X
Plays the previous file
If key held down more than 5 seconds, goes to the
beginning of the file
ㅡ S-FORWARD current file very
fast
X S-FORWARD current file
ㅡ S-REWIND current file very fast X S-REWIND the current file
ㅡ Stop status Stops recording Stops playing
ㅡㅡ
Power OFF
Power OFF after
recording
Power OFF
MODE ㅡ VOICE/AM/FM/MP3 X VOICE/AM/FM/MP3
ㅡ Checks the TIME and sets the
timer for a future recording
X X
TIMER
ㅡㅡ Modifies the TIME Setting X X
A-B
ㅡ Selects from the external/internal
memories
X Repeats the playing section between A-B
REPEAT ㅡ Change the repeat setting X Change the repeat setting
ㅡ Deletes the current file
(push erase to confirm when
blinking)
X X
ERASE
ㅡㅡ Deletes all files
(push erase to confirm when
blinking)
X X
6
Page 7
7
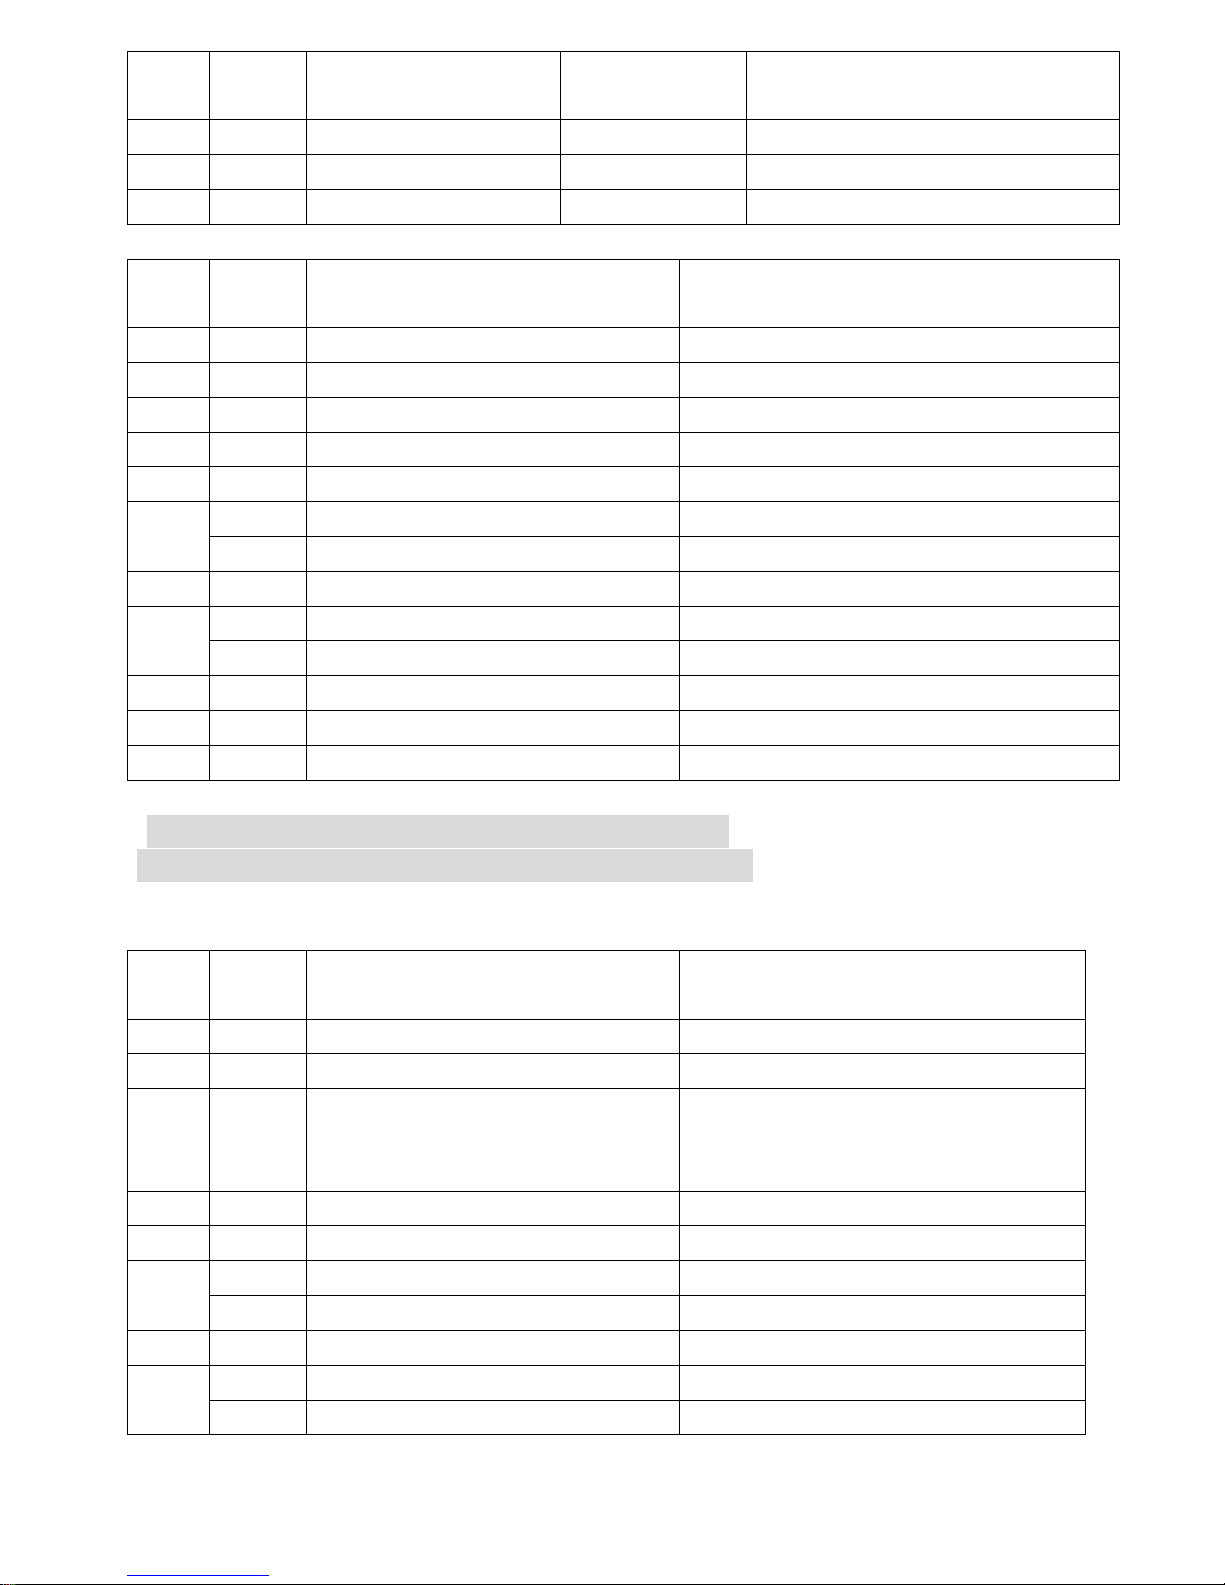
REMAIN
ㅡ Shows remaining record time in
Voice mode
Shows remaining record
time in Voice mode
X
VOL+ VOLUME+ VOLUME+ VOLUME+
VOL- VOLUME- VOLUME- VOLUME-
HOLD ON/OFF ON/OFF ON/OFF
● AM/FM Radio Domain (RADIO/KEY Operation)
Buttons
Key
Operations
Receiving Upon Recording
ㅡ
PRESET the station X
ㅡ
Changes to the next preset X
ㅡ Changes to the previous preset X
ㅡ,ㅡㅡ SEEK TUNNING/AUTO TUNNING X
ㅡ,ㅡㅡ SEEK TUNNING/AUTO TUNNING X
ㅡ X Stops recording
ㅡㅡ Power OFF Power OFF
MODE ㅡ VOICE/AM/FM/MP3 X
ㅡ Checks TIME and reserved settings X
TIMER
ㅡㅡ Sets and modifies TIME X
VOL+ VOLUME+ VOLUME+
VOL- VOLUME- VOLUME-
HOLD ON/OFF ON/OFF
Note) The earphone plays the role of the antenna in the FM Radio.
If the earphone wire is longer, receiving sensitivity is improved.
● MP3 FILE Domain (MP3)
Buttons
Key
Operations
Upon Stopping Upon Playing
ㅡ
Play the current file Pauses the file
ㅡ
Move to the next file Begins to play the next file
ㅡ
ㅡㅡ Moves to the previous file
Plays the previous file
If key held down more than 5 seconds, goes to the
beginning of the file
ㅡ S-FORWARD current file very fast S-FORWARD current file
ㅡ S-REWIND current file very fast S-REWIND current file
ㅡ Stop Stops playing file
ㅡㅡ Power OFF Power OFF
MODE ㅡ VOICE/AM/FM/MP3 VOICE/AM/FM/MP3
ㅡ Checks TIME X
TIMER
ㅡㅡ Modifies TIME Setting X
Page 8
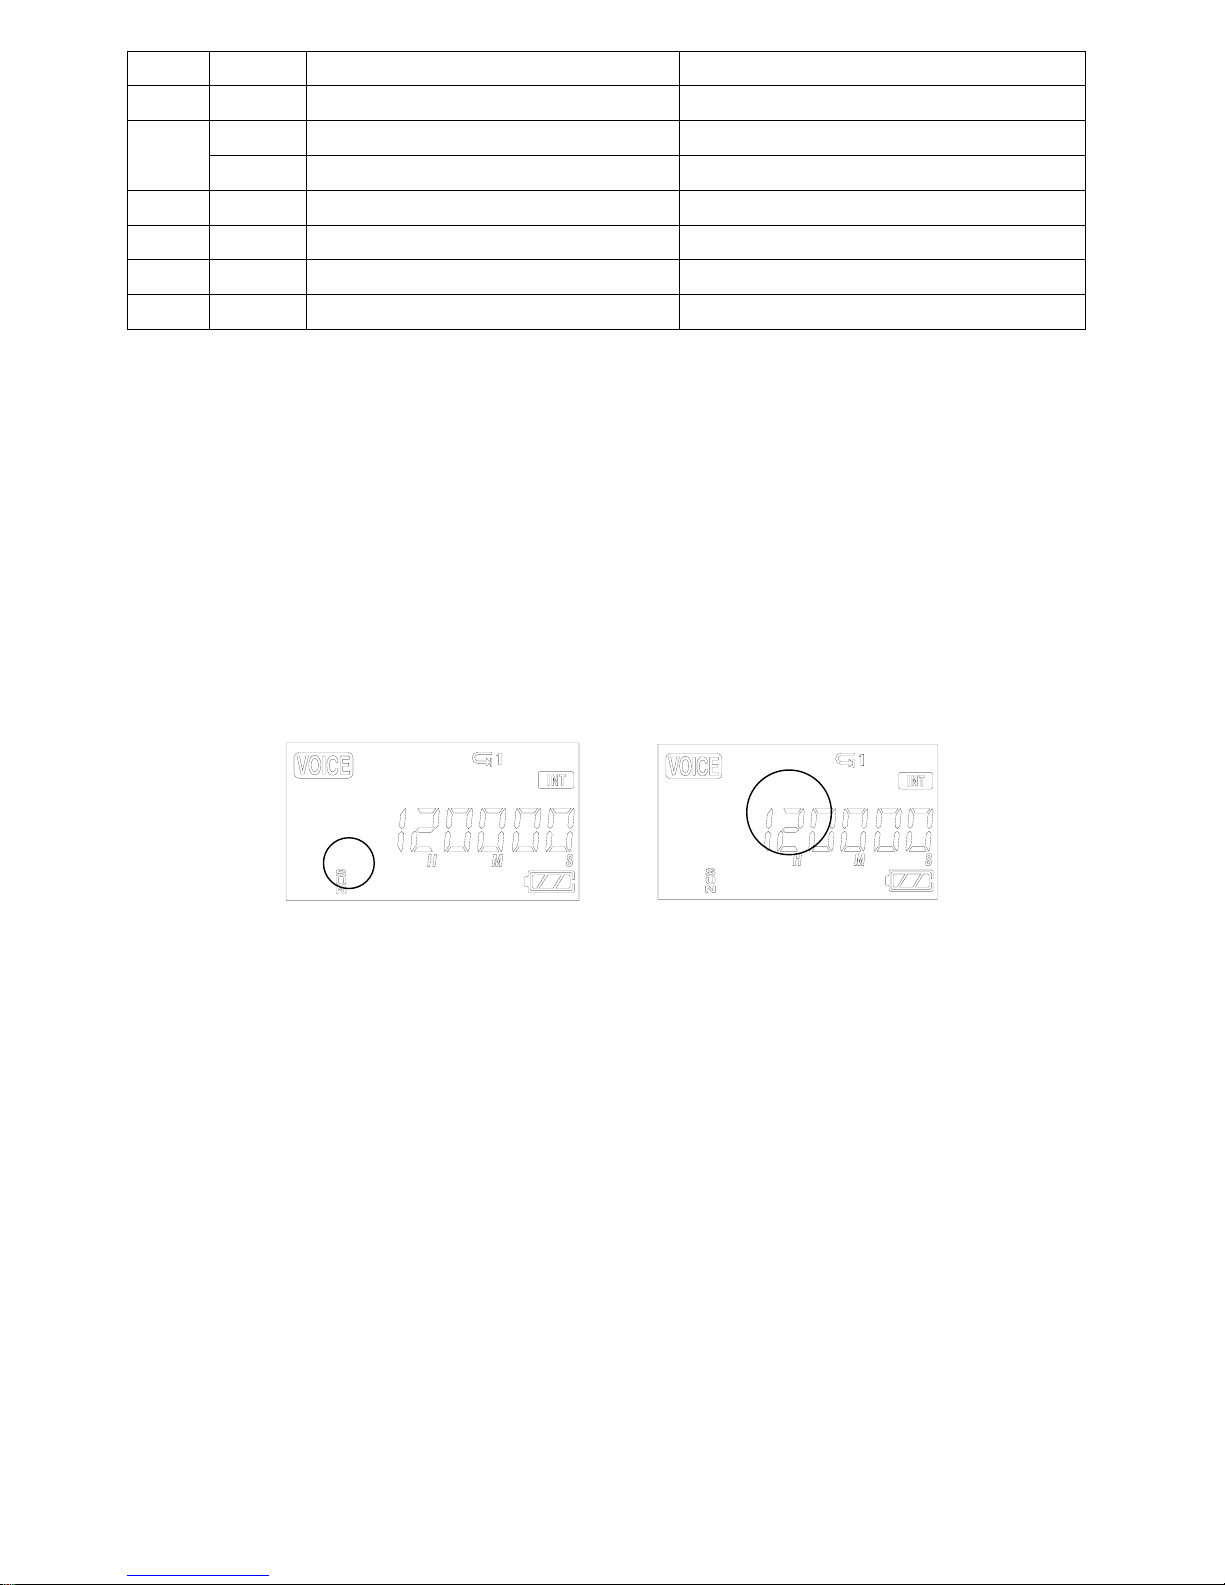
A-B ㅡ Selects from the external/internal memory Repeats playing section between A-B
REPEAT ㅡ Changes repeat setting Changes repeat setting
ㅡ Deletes the current file X
ERASE
ㅡㅡ Deletes all files X
EQ ㅡ ROCK/CLASSIC/NORMAL/POP/LIVE ROCK/CLASSIC/NORMAL/POP/LIVE
VOL+ VOLUME+ VOLUME+
VOL- VOLUME- VOLUME-
HOLD ON/OFF ON/OFF
7). Timer and recording
You need to set the current date and time prior to initiating a recording.
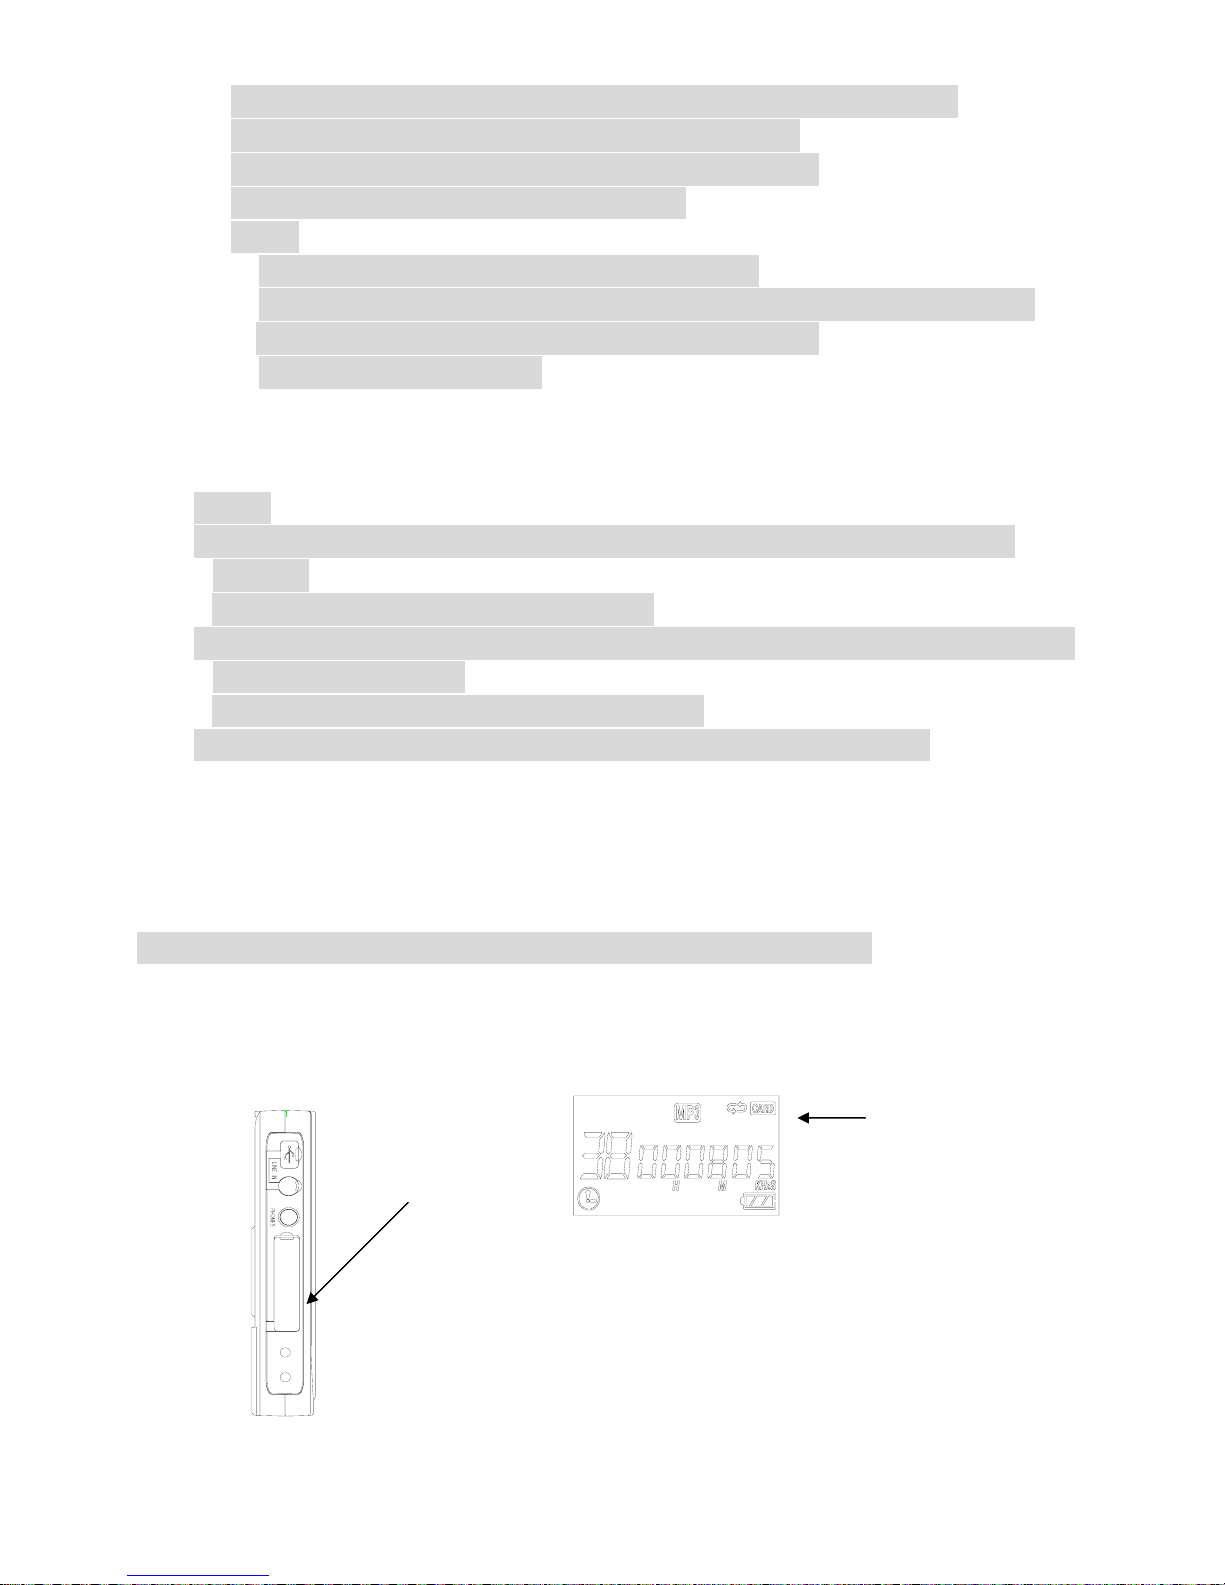
① Press and hold the TIMER Button while the player is stopped.
② When you hold the TIMER Button, the day will be flickering and then if you press
or you
can change the day. Push the PLAY Button to set and now the window displaying the time will
also be flickering. If you press
or you can change the hour, press PLAY again to
set and do the same thing to change the minute and press PLAY again to set
.
③ When the time setting is completed, you may return to the initial screen by pressing the STOP
button.
④ To check the time, press the TIMER button, the current time (hour/minute/second) will display,
and if you want to change the time, you may change the day/hour/minute by pressing and
holding the TIMER Button.
● How to Record
When you are in VOICE/AM/FM Mode, you may record using the RECORD Button.
① Select the mode by pressing the MODE Button.
(When you are in the AM/FM Mode, the frequency currently received is recorded).
② Press and hold the RECORD (REC/STOP) Button for about 1 second with the internal microphone
toward the sound source.
The recording is initiated and a red light indicating recording turns ON.
③ To stop recording, press the STOP button.
8
Page 9
※ Once recording is initiated, you may not stop recording for the first Five (5) seconds.
※ The recording is automatically recorded in the next available slot.
※ When recording for a long time, replace the battery with a new one.
※ Check the capacity of the battery prior to recording.
※ Note
Perform a test recording to avoid any errors while recording.
If the battery is completely run down during a recording, the message “low battery (BAT)” will
display on the screen and the power will be automatically shut OFF.
Replace the battery with new one. .
● Monitoring a Recording
You may listen to what is being recorded by connecting an earphone.
※ Note
-. Do not take the battery out during a recording because it may cause the recording to be lost or a
malfunction
Take out the battery only when the player is stopped.
-. If the corresponding file exceeds the recording capacity or there is not enough room for a recording, the
recording will not be available.
When the memory is FULL, a message "FULL" will display.
-. Recording to MP3 or H/D domains is not available (Only playback is available in MP3).
● Bitrate Setting
To change the recording bitrate from 16kbps to 32kbps, switch the unit to voice mode (using the mode button) and hold down
the REMAIN/EQ button until you see the desired bitrate on the LCD screen.
*When you see the desired bitrate, let go of the REMAIN/EQ button.
8)External Memory
9
A-B Mode Conversion
Display
Page 10

10
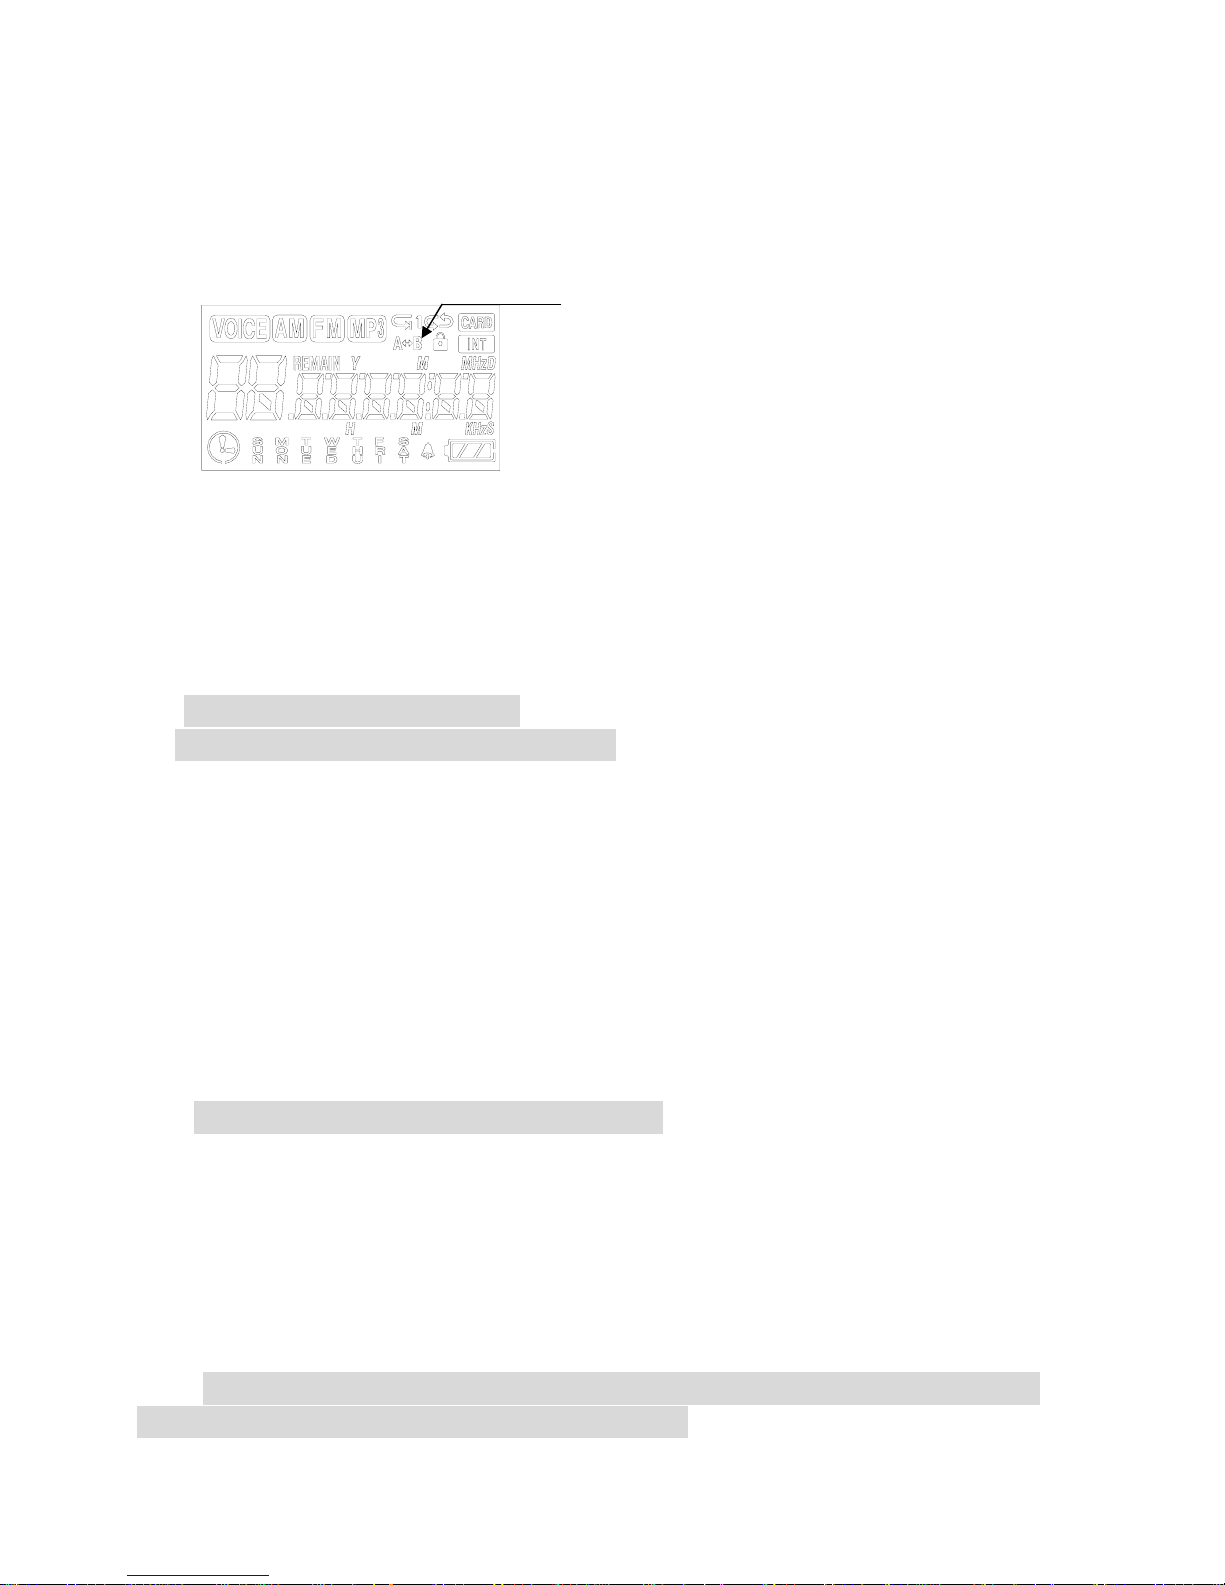
① If you press the A-B Button in the stop status after inserting an external memory card, the display screen
of INT/CARD will be converted and the internal and external memory domains will be separated.
② You may record, play, save from the PC and transfer files with the external memory.
③ Inserting and taking out an external memory card must be performed only when the player is stopped.
Note
Only insert a memory card when the unit is off or a malfunction may occur
. The external memory is compatible with an SD/MMC-CARD only.
-. If you take out the battery or external memory during a recording or playback, it may cause a lost file or
malfunction.
Take out the battery only when the player is stopped and take out or insert the external memory only
after turning-off the power.
-. If the corresponding file exceeds the recording capacity or there is not enough room for the recording, the
recording will not be available.
When the memory is FULL, a message "FULL" will display.
-. Recording to MP3 or H/D domains is not available (Only playback is available in MP3).
• SD/MMC Card Recording
1.Push the A-B button on Radio Yourway to switch to the SD/MMC card and next press the
TIMER Button twice and the reserved recording screen appears.
The minute needle clock indicator and setting channel should be flickering.
Press
FW or RW to select the file number and then push PLAY.
Now the days of the week will flicker. Use
FW or RW to select the desired day and press PLAY.
2. After selecting the day, set the hour by using FW or RW and pushing PLAY (same as before)
to select the desired hour (do the same for minutes). After the minutes are set, the start time
will flicker but you will be setting the ending time now. Set the hour by using
FW or RW and
pushing PLAY (same as before) to select the desired hour (do the same for minutes). When
you finish, you will see the main screen and your unit is ready to record on the selected
day(s) & time(s). You may set up to 10 reserved recordings for all the sections in
AM/FM/VOICE.
Note: Maximum size card that can be used in RYW is; 128MB MMC and 256MB SD. Bigger cards
are not supported and may damage the card and/or unit.
Page 11
9) Playback mode
● Playing a VOICE file
11
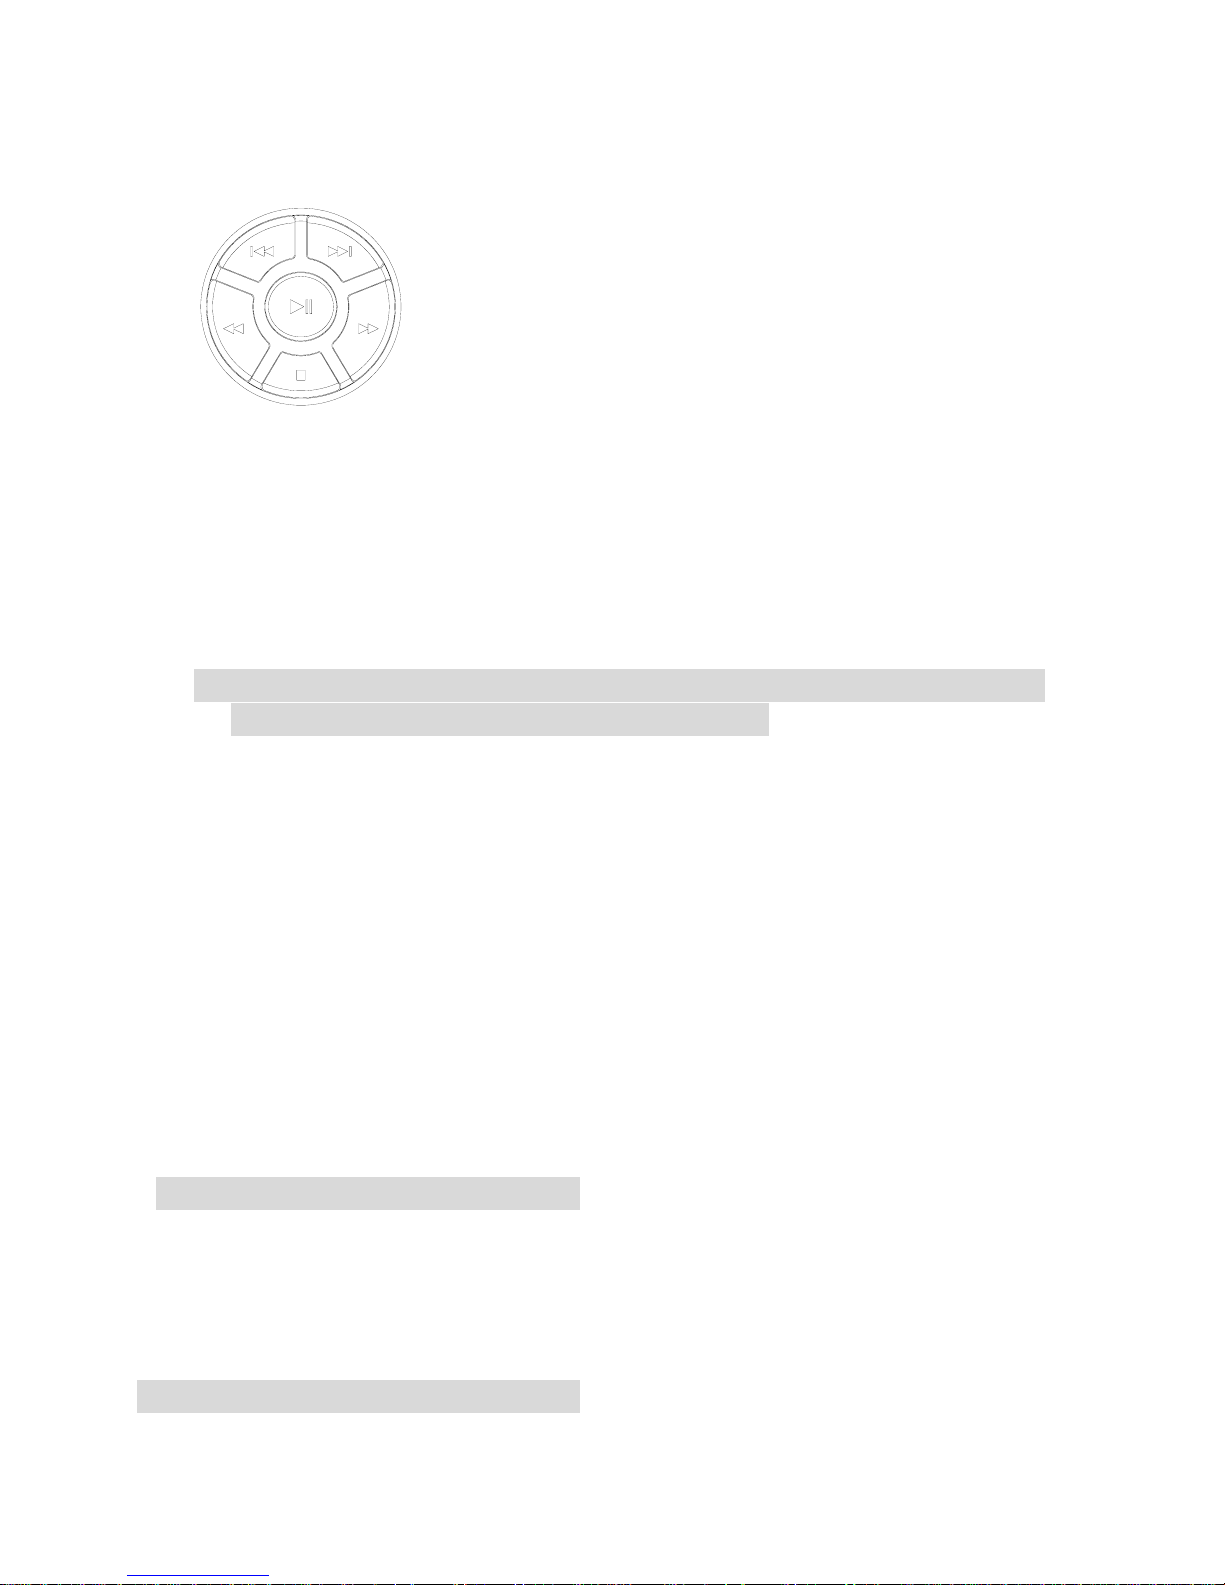
① Select the message you want to listen to.
(Select the file you want 01-99 using Button.)
② You may play by pressing the PLAY () Button.
③ Adjust the volume with the DIGITAL VOLUME button.
Listen to music in quiet areas using the micro speaker.
Use the earphones to avoid interference or in noisy areas.
④ To stop, press the STOP () Button.
If you want to PAUSE (), press the PLAY Button during playback. PAUSE can be
released by pressing the PLAY/STOP Button.
⑤ For the S-FORWARD and S-REWIND function, press the button.
You may stop this function by pressing the PLAY ()/STOP () Button.
⑥ You may select and play the next or previous file during playback using the Button.
※ If the battery is completely run down while playing, a message “BAT” will flicker and automatically
disappear after the warning. Replace the battery with a new one.
● Playing MP3 files
① Using the MODE Button, select the MP3 Domain.
② If there is no music downloaded, the message “NO.IF” displays on the LCD.
③ If you download a music file (MP3) via the USB, the file will be saved in the MP3 Domain and you may
play it using the PLAY Button.
● S-FORWARD and S-REWIND
Selectively play the next file or previous file during playback using Button.
If you press the Button during the playback of a file, S-REWIND/S-FORWARD is initiated at
a speed of about 10 seconds per second.
※Used to fast-forward or rewind a specific section.
If you press the Button when the player is stopped, (showing the file number) S-REWIND/S-
FORWARD is initiated at a faster speed of about 1 minute per second. Pressing will S-REWIND from the end
of the file (Exp a 1 hour file will rewind from 1:00:00 -Æ59:00:00 etc). Pressing will S-FORWARD from the
beginning of the file. (Exp a 1 hour file will fast-forward from 0:00:00 Æ 0:01:00 etc)
※Press PLAY to STOP and play the desired section.
Page 12
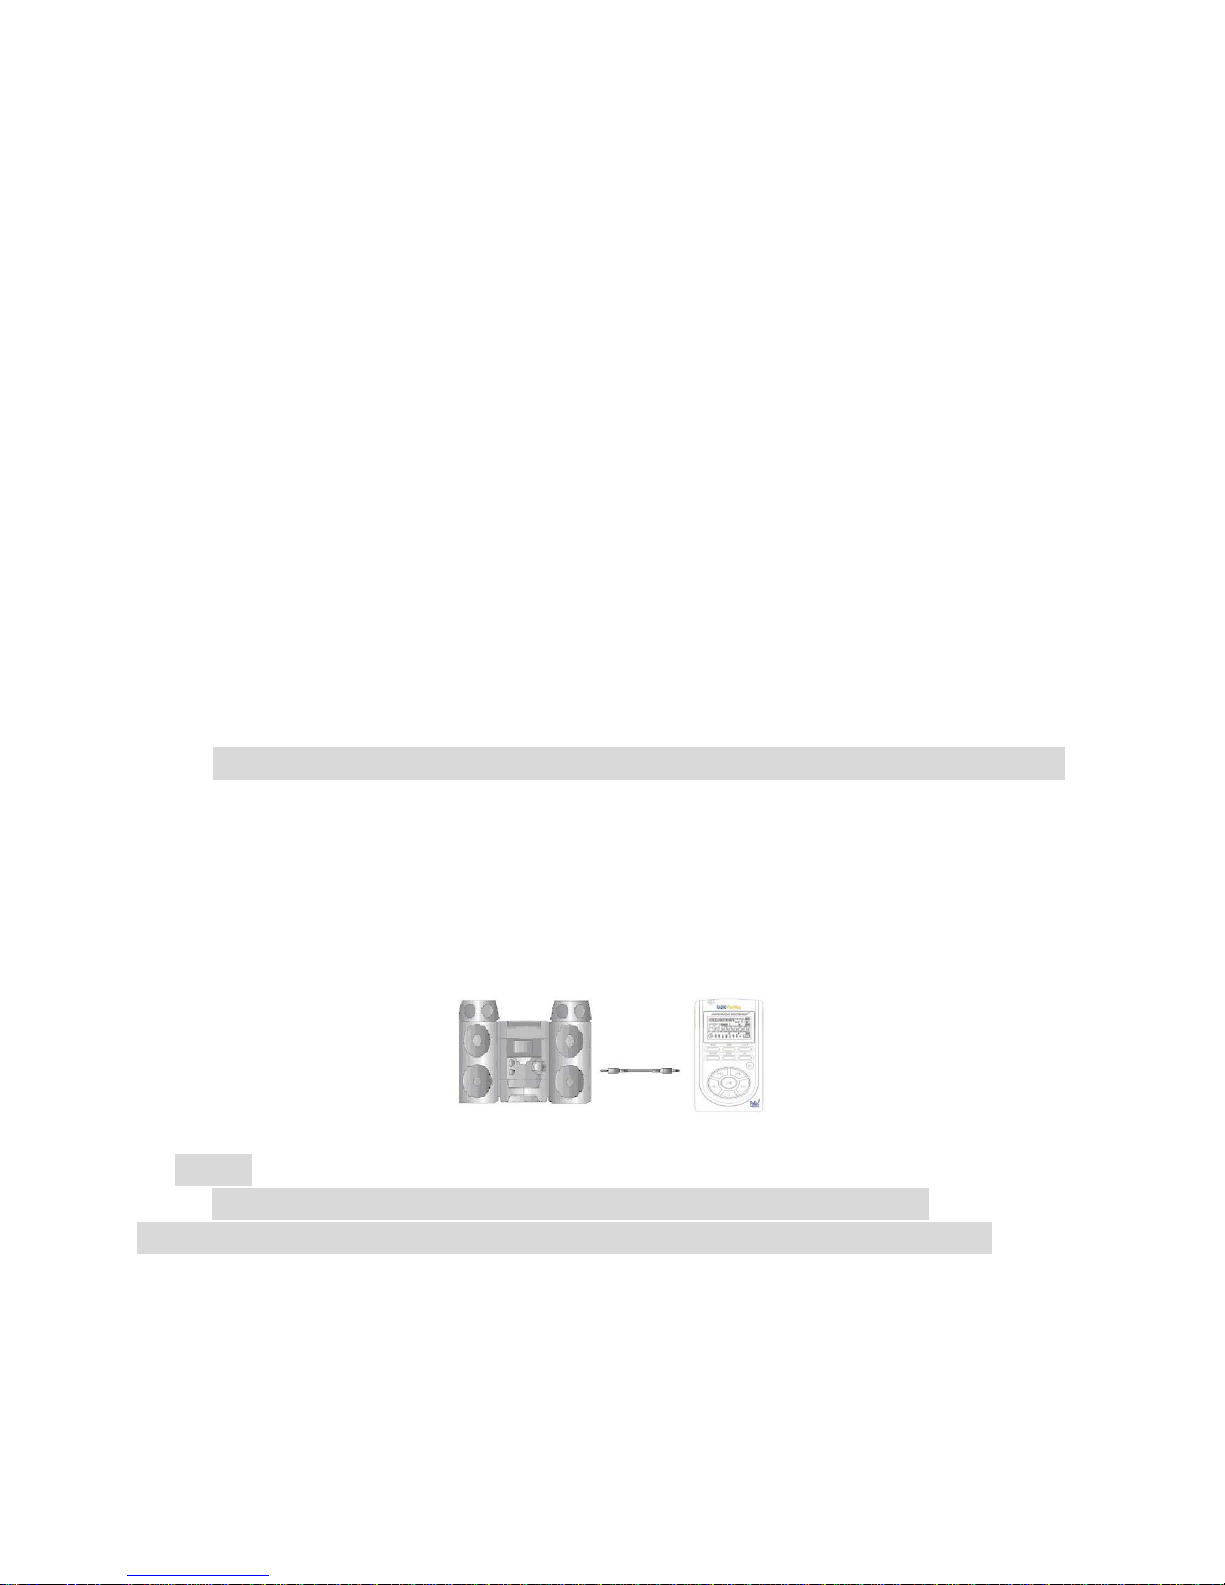
● Resume Function
While listening to a file, press and hold the STOP () Button (this will turn the unit off) when you power on the
unit again (pressing PLAY ), the file will continue (resume) to play from the section you left off.
● Repeat playing in the VOICE Domain
● Repeat playing in the MP3 Domain
You may set the repeat functions by pressing
the REPEAT Button during playback.
NOR: Plays and stops all music
NOR (1): Plays and stops only one music file
(1) ALL: Repeats playing music
ALL: Keeps playing all music in order
● Repeat a Section A↔B
If you want to repeat playing a specific section, press the A-B button to select the beginning of that section
and then press A-B again to select the end of that section. The selected section will continue repeating
until you push A-B or PLAY.
※This only works with one file at a time.
※Section repeat is done the same way for ALL files
● Equalizer Functions
When playing MP3 files, you may play according to genre using the equalizer functions NORMAL, ROCK,
LIVE, CLASSIC and POP.
You may set the equalizer functions when the player is stopped using the EQ Button.
At this time, the message “NOR, ROCK, LIVE, CLA and POP” displays on the LCD.
10). Erasing files
※ Deleting is only available when the player is stopped.
● Deleting a Message One by One
① Select the file to delete using the Button.
② If you press ERASE, “ERASE” will be flickering on the LCD and the message to be deleted is displayed
for confirmation.
While the message “ERASE” is flickering, press the ERASE Button again to delete the message.
If the message is deleted, the number displayed on the LCD will be forwarded to the next file.
※ While the message “ERASE” is flickering, if you press any button, the erase function is cancelled.
※ Note: Once a message is deleted, it is not recoverable.
12
Page 13
● Deleting all Files
① Select the files to delete using the MODE Button.
② If you press and hold the ERASE Button for longer than 5 seconds, the “AL.ERASE” will be flickering.
If you press the ERASE Button again at this time, all files will be deleted.
③ You may delete the information in the MP3 Domain the same way.
Deleting HD files is only available using the PC-APPLICATION after connecting your PC with the USB
connection.
※ Note: If you use up (full) the memory by using the hard disk function, No recording capabilities will be
available. Do not turn off the power or take out an external memory card while deleting files. It may cause a
malfunction.
● Deleting a Reserved Recording
1. Press the TIMER Button once, the time displays and if you press the TIMER Button twice, the reserved
recording screen appears. (AM/FM/VOICE mode only)
2. Select the file to delete using the Button and press erase two times
11). Reserved Recording
※ To set a reserved (future) recording, the TIME Setting must be set.
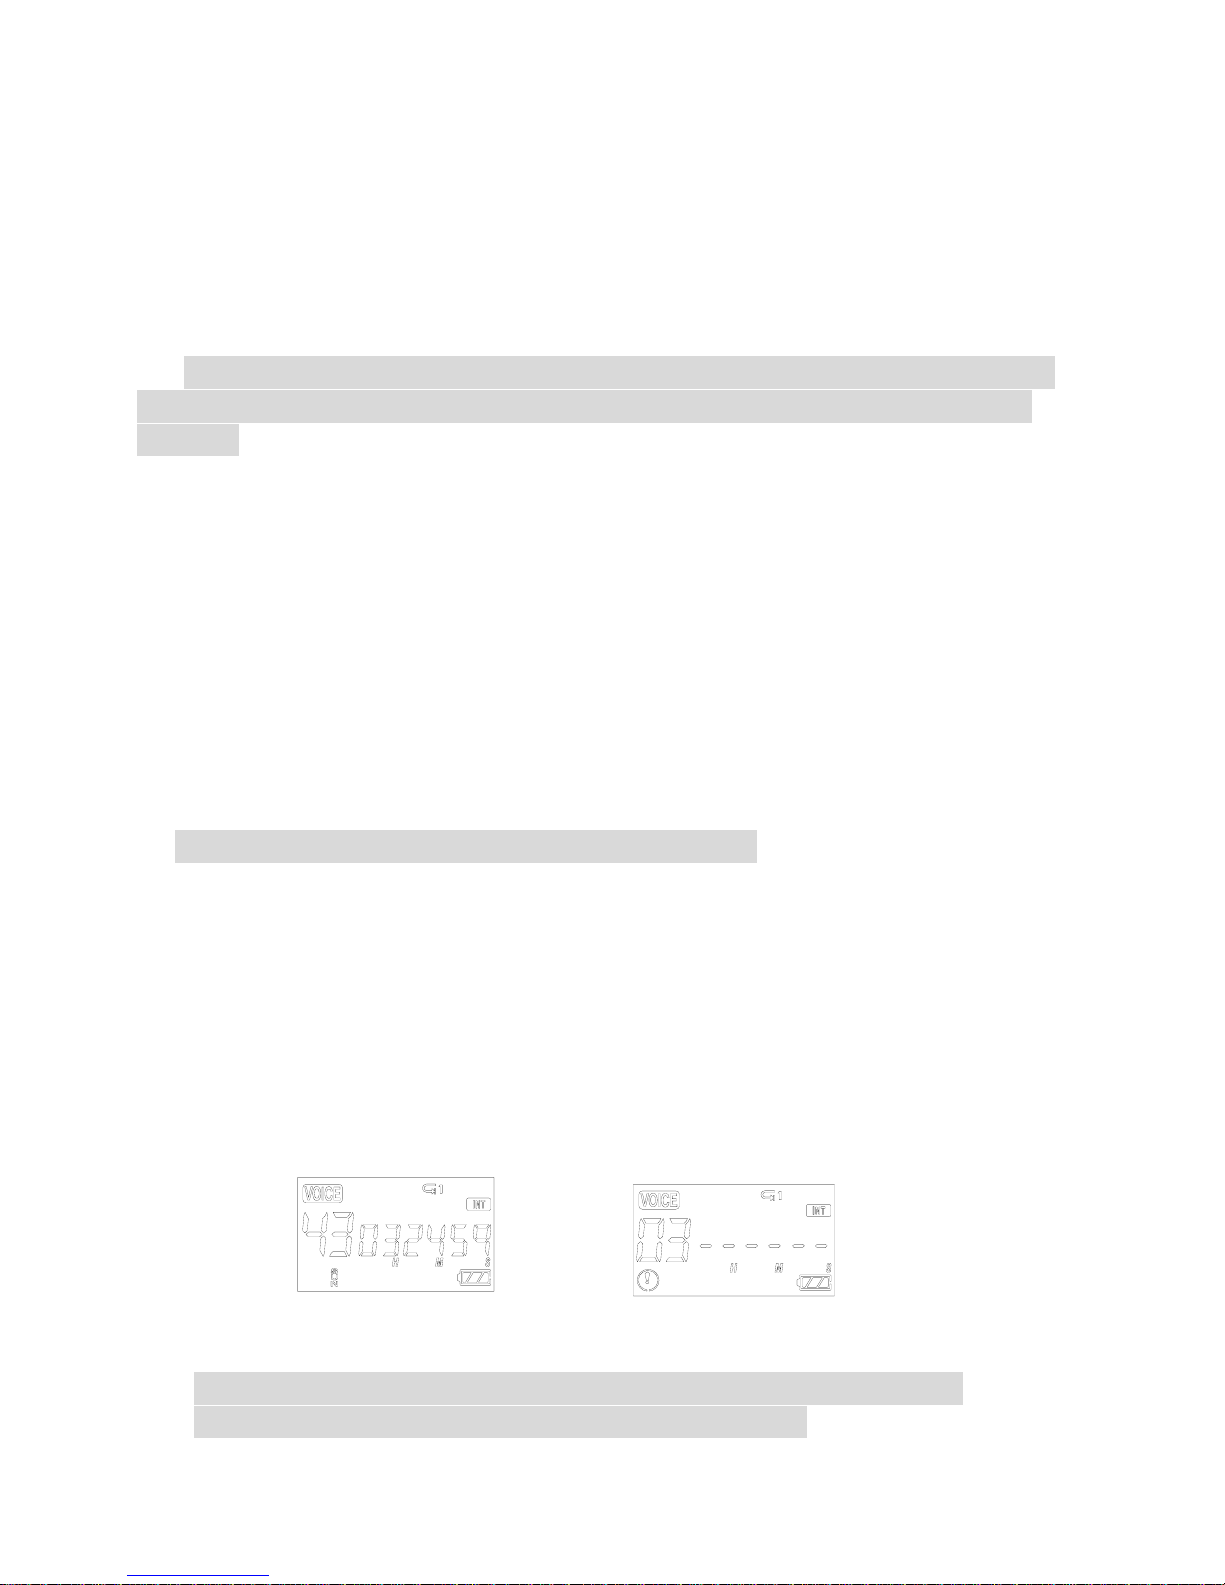
If you press the TIMER Button, the time (Hour/Minute/Day) displays.
If the time setting is done, the correct Day/Hour/Minute/Second will appear on the display screen.
To change it:
① Press and hold the TIMER Button while the player is stopped.
② When you hold the TIMER Button, the day will be flickering and If you press or you can
change it. Push the PLAY Button to set and the window displaying the time will also be flickering. If
you press or you can change the hour, press PLAY to set and do the same to change the minute
and press PLAY to set.
Example of Displaying the Time Example of Displaying the Reserved Recording
※ Make sure you are in the desired mode to set a reserved (future) recording and/or tuned
to the desired AM/FM station prior to setting a reserved (future) recording.
13
Page 14
③ After the time setting is done, if you press the TIMER Button once, the time displays and if you
press the TIMER Button twice, the reserved recording screen appears.
(AM/FM/VOICE mode only)
The minute needle clock indicator and setting channel should be flickering.
Press to select the file number and then push PLAY.
Now the days of the week will flicker. Use to select the desired day and press PLAY.
④ After selecting the day set the hour by using and pushing PLAY (same as before) to select
the desired hour (do the same for minutes). After the minutes are set, the start time will flicker but
you will be setting the ending time now. Set the hour by using and pushing PLAY (same as
before) to select the desired hour (do the same for minutes). When you finish, you will see the main
screen and your unit is ready to record on the selected day(s) & time(s).
(It will seem like you are changing the start time when setting the ending time but trust us you are
setting the ending time)
A start and ending time setting requires 4 PLAY presses.
(Exp- 1 start hour + 1 start minute + 1 ending hour + 1 ending minute = 4
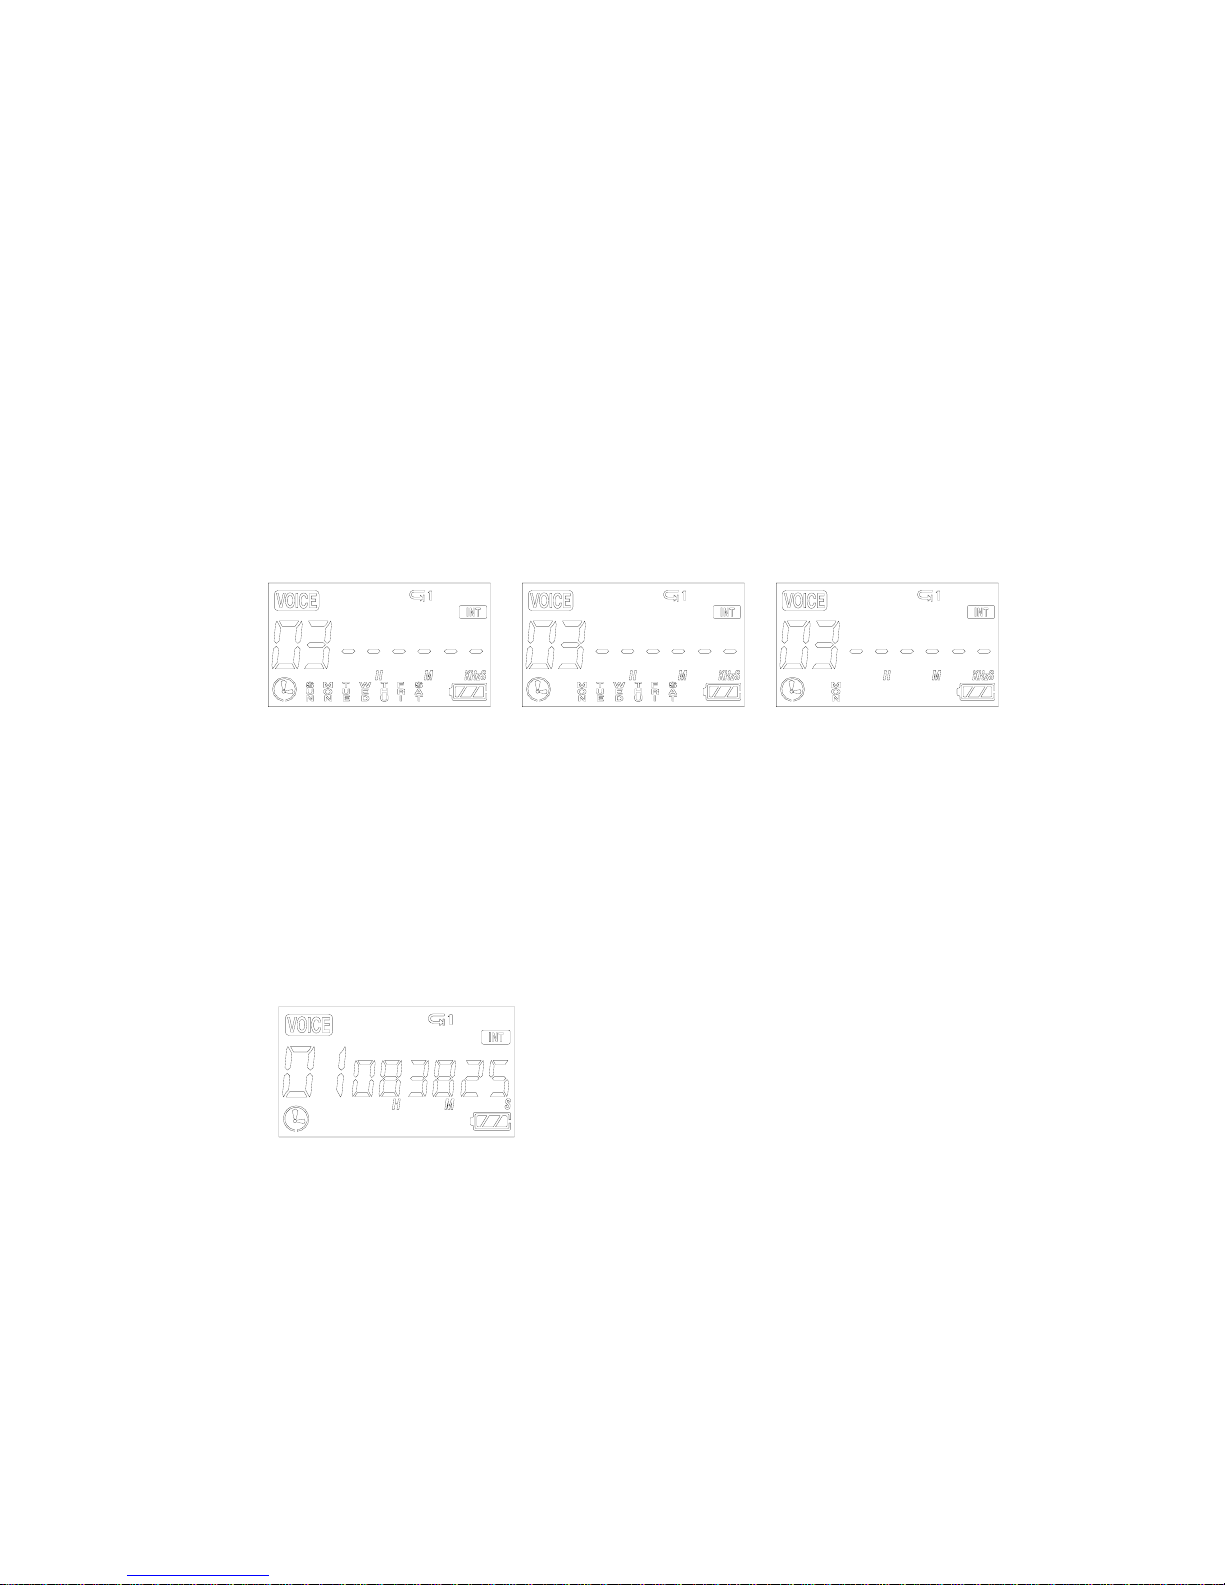
⑤1) The reserved recording is initiated at every Nth time of every day
2) The reserved recording is initiated at every Nth time on Monday - Saturday
3) The reserved recording is initiated on a certain day of every week
You select using and confirming is done using .
⑥ After setting the day, set the hour and minute
. 7 And then, set the hour and minute ending time.
Once END Setting is done, the TIMER icon displays
and the recording is automatically initiated at the
designated time.
* You may set up to 10 reserved recordings for all the sections in AM/FM/VOICE. It is set
the same way described on the last page. A reserved recording is automatically initiated even
when the power is OFF. (Timer function)
14
Page 15
● Deleting a Reserved Recording
1. Press the TIMER Button once, the time displays and if you press the TIMER Button twice, the
reserved recording screen appears.
(AM/FM/VOICE mode only)
2. Select the file to delete using the Button and press erase two times
● Modifying a Reserved Recording
To modify a reserved recording,
1.Follow the procedure to set a new reserved recording
2.When the file number blinks, use the REWIND key to select the number of the reserved recording
you wish to modify.
3.Go through the normal process of setting up the reserved recording.
Note: You can only edit day and time settings. If you made a mistake setting the correct recording
station, you must erase the reserved recording.
12). Line in
● Connecting an External Microphone
- Plug a pre-amplified microphone in the line in terminal of the body.
※. When an external microphone is connected to the line in, the built-in microphone is not operational.
● Connecting to External Devices
You may record from almost any device using the line in and audio cable.
● Connecting to a stereo
When recording from the line in of the voice recorder, connect the audio cable to the line in of the
recorder and to the headphone jack of the output device.
How to Connect to a stereo
※ Note
★ When connecting to an external device, make the connections with the power OFF.
★ Before connecting to any external device, carefully read the manual of the external device
●When recording from an external device, record after connecting the audio cable to this device and decreasing
the volume of the external device.
●To record in the external device, play this device and initiate the recording in the external device at the
same time. (Refer to your devices user manual) (This timing may be different depending on each device,
so make a test recording prior to performing an actual recording).
15
Page 16
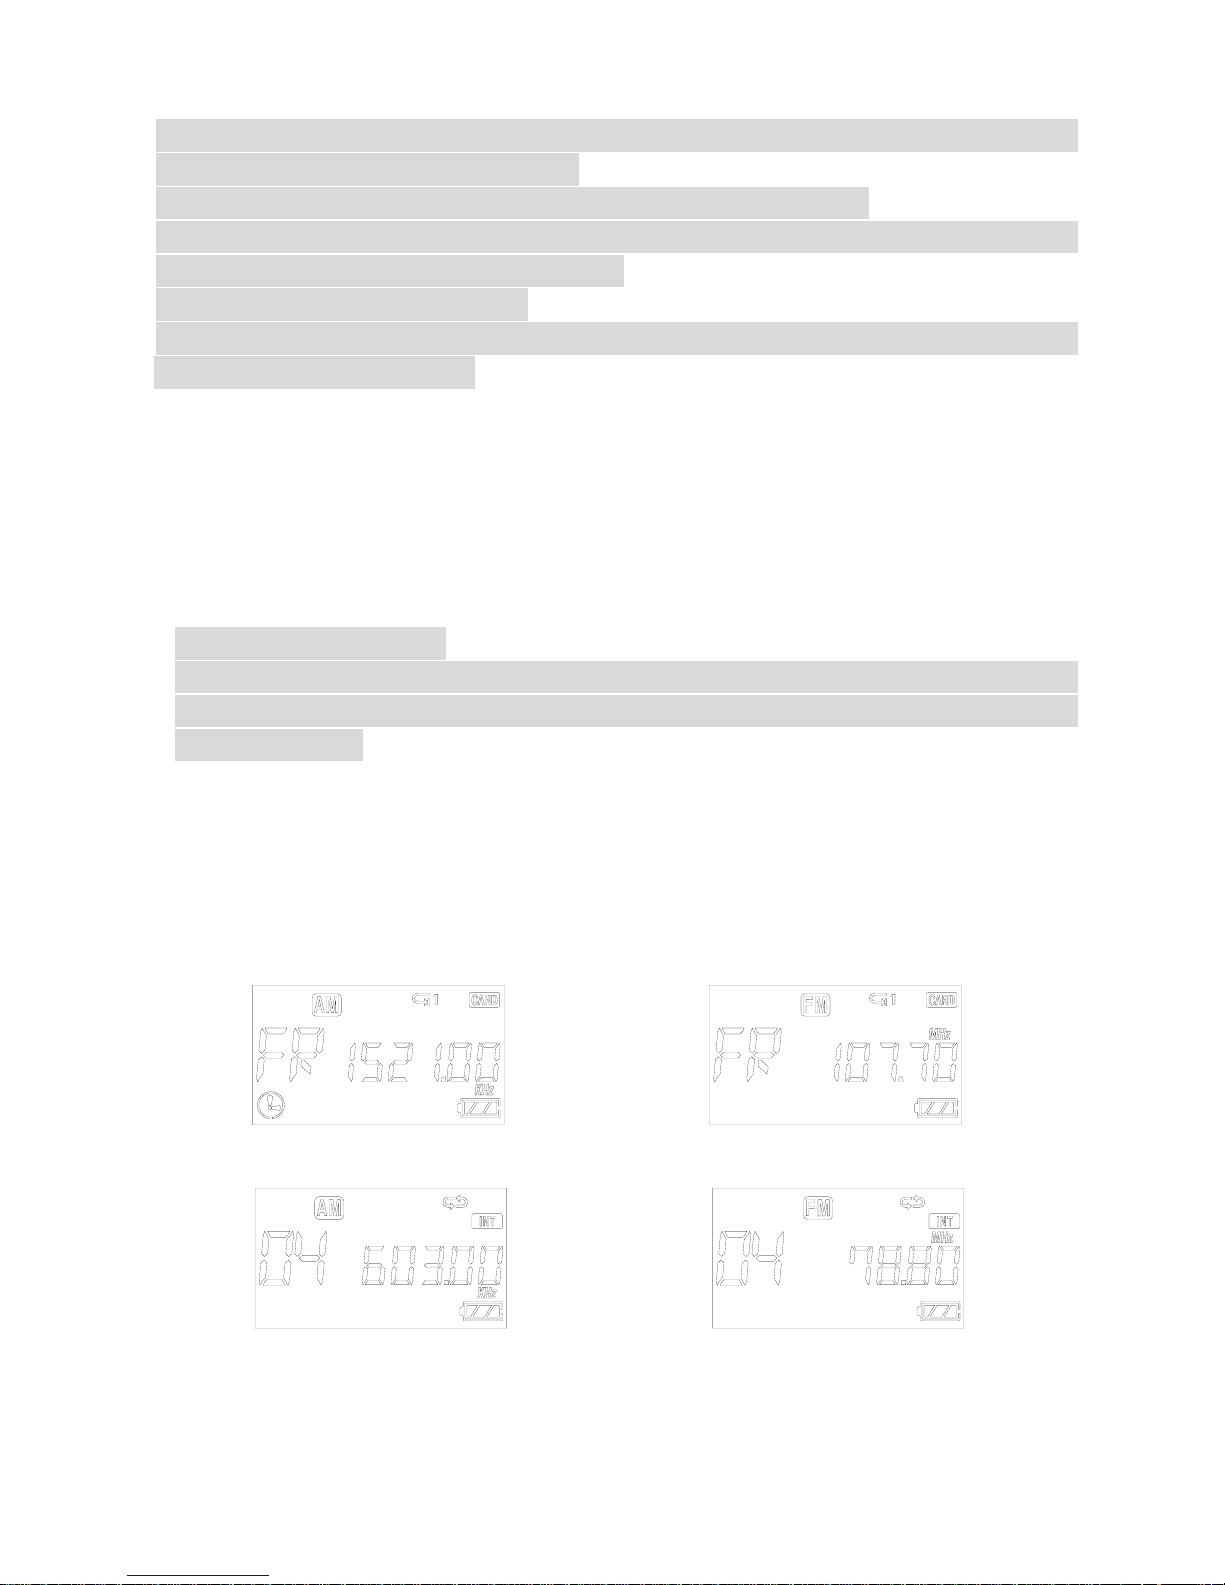
13) AM/FM Radio
When listening to the FM Radio, use earphones. They act as the antenna. You can also plug an antenna in the
headphone jack of the player and use the speaker.
* It is very convenient for you to listen to a broadcast using the AUTO SEEK Function.
After selecting the radio mode, if you press and hold for about 1 second, it will stop at an audible
broadcast channel. This saves time in unfamiliar areas.
After finding a station, AUTO SEEK will stop.
When using AUTO SEEK to find a station, a precise TUNNING may not be available, please perform a fine
adjustment using the REW or FF KEY.
● How to Save a Channel
① Convert to AM/FM mode by pressing the MODE Button.
② The frequency will display on the LCD. Select the frequency using .
③ Press the PLAY Button, a file number (01-10) will be flickering on the display screen. Select a channel
(01-10) using the Button and PRESS PLAY to select that channel. The selected channel will be
saved. (01-10)
④ You may save up to ten channels the same way.
* Confirming the saved channel
If you press the Button, the saved channel and frequency is displayed. You may select a channel
using the Key. In this mode, if you press the Button, you will go back to the frequency (FR)
selection mode.
● How to Record a Radio Broadcast
① Select the broadcast channel you want to record (same as Radio Channel Setting)
② Record by pressing the RECORD Button. The recording will be saved in the voice folder and in the
empty portion just after the last recorded message.
You may check the file in the voice folder after you have finished the recording.
16
Page 17

17
• AM/FM Reserved Recording
* Make sure you are in tuned to the desired AM/FM station prior to setting a reserved (future) recording.
1. Press the TIMER Button twice and the reserved recording screen appears.
The minute needle clock indicator and setting channel should be flickering.
Press to select the file number and then push PLAY.
Now the days of the week will flicker. Use to select the desired day and press PLAY.
2. After selecting the day set the hour by using and pushing PLAY (same as before) to select
the desired hour (do the same for minutes). After the minutes are set, the start time will flicker but
you will be setting the ending time now. Set the hour by using and pushing PLAY (same as
before) to select the desired hour (do the same for minutes). When you finish, you will see the main
screen and your unit is ready to record on the selected day(s) & time(s).
(It will seem like you are changing the start time when setting the ending time but trust us you are
setting the ending time)
A start and ending time setting requires 4 PLAY presses.
(Exp- 1 start hour + 1 start minute + 1 ending hour + 1 ending minute = 4
You may set up to 10 reserved recordings for all the sections in AM/FM/VOICE.
● AM Region Setting
You can change RADIO YourWay’s AM region setting from EUROPE (9) to USA (10) or USA (10) to EUROPE
(9).
1.In VOICE or MP3 mode, press and hold the MODE button.
2.Press and hold the A-B button for about 3 seconds. (With the mode button still held down)
3.Let go of the A-B button and you should see RADIO YourWay display USA or EUROPE on the LCD.
4.Let go of the MODE button and use the A-B button to change between USA (10) & EUROPE (9).
5.Press PLAY to select the desired setting.
* If you take too long to confirm your selections, you have to start the procedure all over again.
Page 18

AM/FM SD card Reserved Recording
1. Make sure you are in tuned to the desired AM/FM station prior to setting a reserved
(future) recording. Push the A-B button on Radio Yourway to switch to the SD/MMC card and
next press the TIMER Button twice and the reserved recording screen appears.
The minute needle clock indicator and setting channel should be flickering.
Press
FW or RW to select the file number and then push PLAY.
Now the days of the week will flicker. Use
FW or RW to select the desired day and press PLAY.
2. After selecting the day, set the hour by using
FW or RW and pushing PLAY (same as before) to select
the desired hour (do the same for minutes). After the minutes are set, the start tim e will flicker but you
will be setting the ending time now. Set the hour by using FW or RW and pushing PLAY (same as before)
to select the desired hour (do the same for minutes). When you finish, you will see the main screen and
your unit is ready to record on the selected day(s) & time(s). You may set up to 10 reserved recordings
for all the sections in AM/FM/VOICE.
2). RYW-Explorer
1). RYW-Explorer
RYW-Explorer
is a management program for uploading and downloading files to Radio YourWay™.
● You can (Download/Upload) MP3, DMF and other data files
● The Function of controlling files is the same as in window Explorer
● Plays MP3, WAV, DVF files and playing lists
● Inter-conversion function between RVF/WAV
● Convenient file transmission
● User-friendly interface
System Requirements for RYW-Explorer
● Pentium 200MHz or faster
● 64MB RAM
● 20MB free hard driver space
● SVGA graphics adapter 256 colors or better
● Microsoft
®
Windows® 98/ME/2000/XP( NT not supported)
● USB port
● CD-ROM Drive
● Sound card, Speaker or Headphone
18
Page 19
2). Quick Software & Drivers Installation Guide
Follow these instructions to load the software and drivers for Radio YourWay™
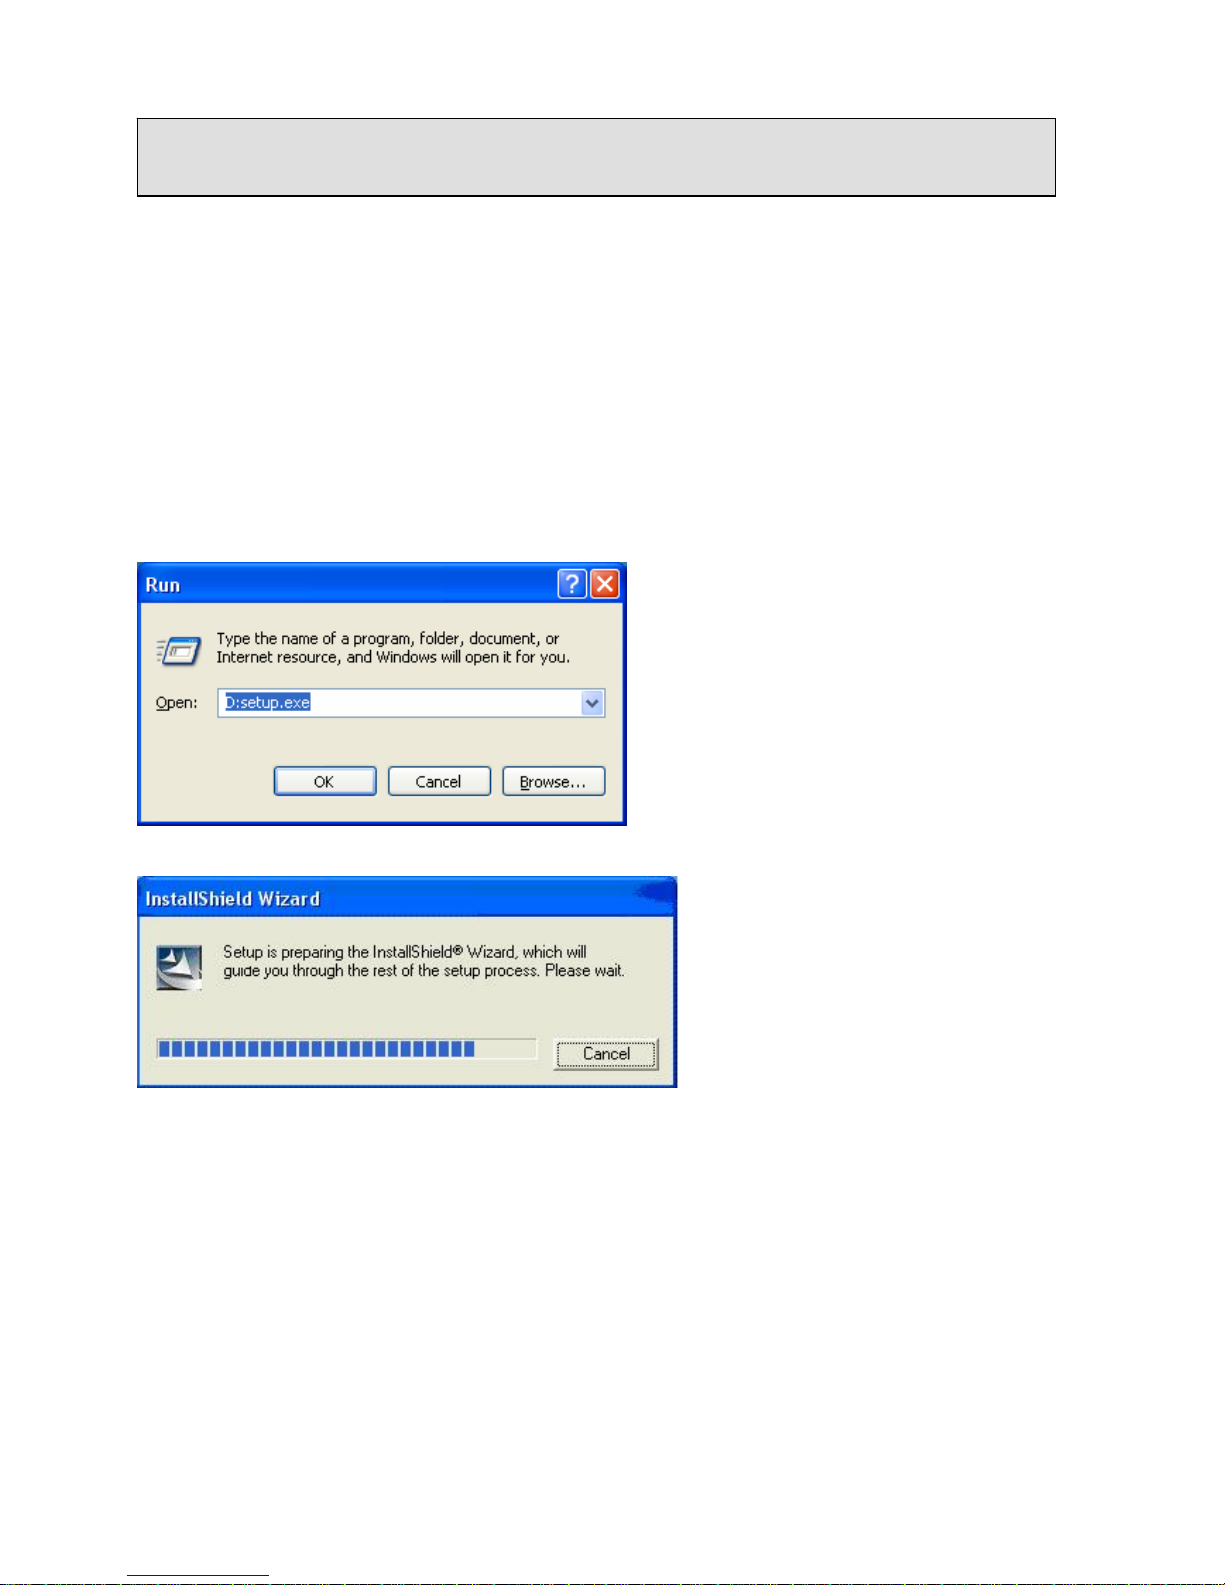
1. Place the software CD label side up into your computer’s CD-ROM drive. After a few seconds you should see
the software selection screen.
Note: If the Installation Software screen does not load automatically, please click the START button in the bottom
left corner of your computer screen and click RUN.
Type D:setup.exe and click ok
(If your PC uses a letter other than “D” substitute that letter)
You should now see the screen below (follow the wizard through)
Once the screen below disappears, you have finished installing the software.
19
Page 20
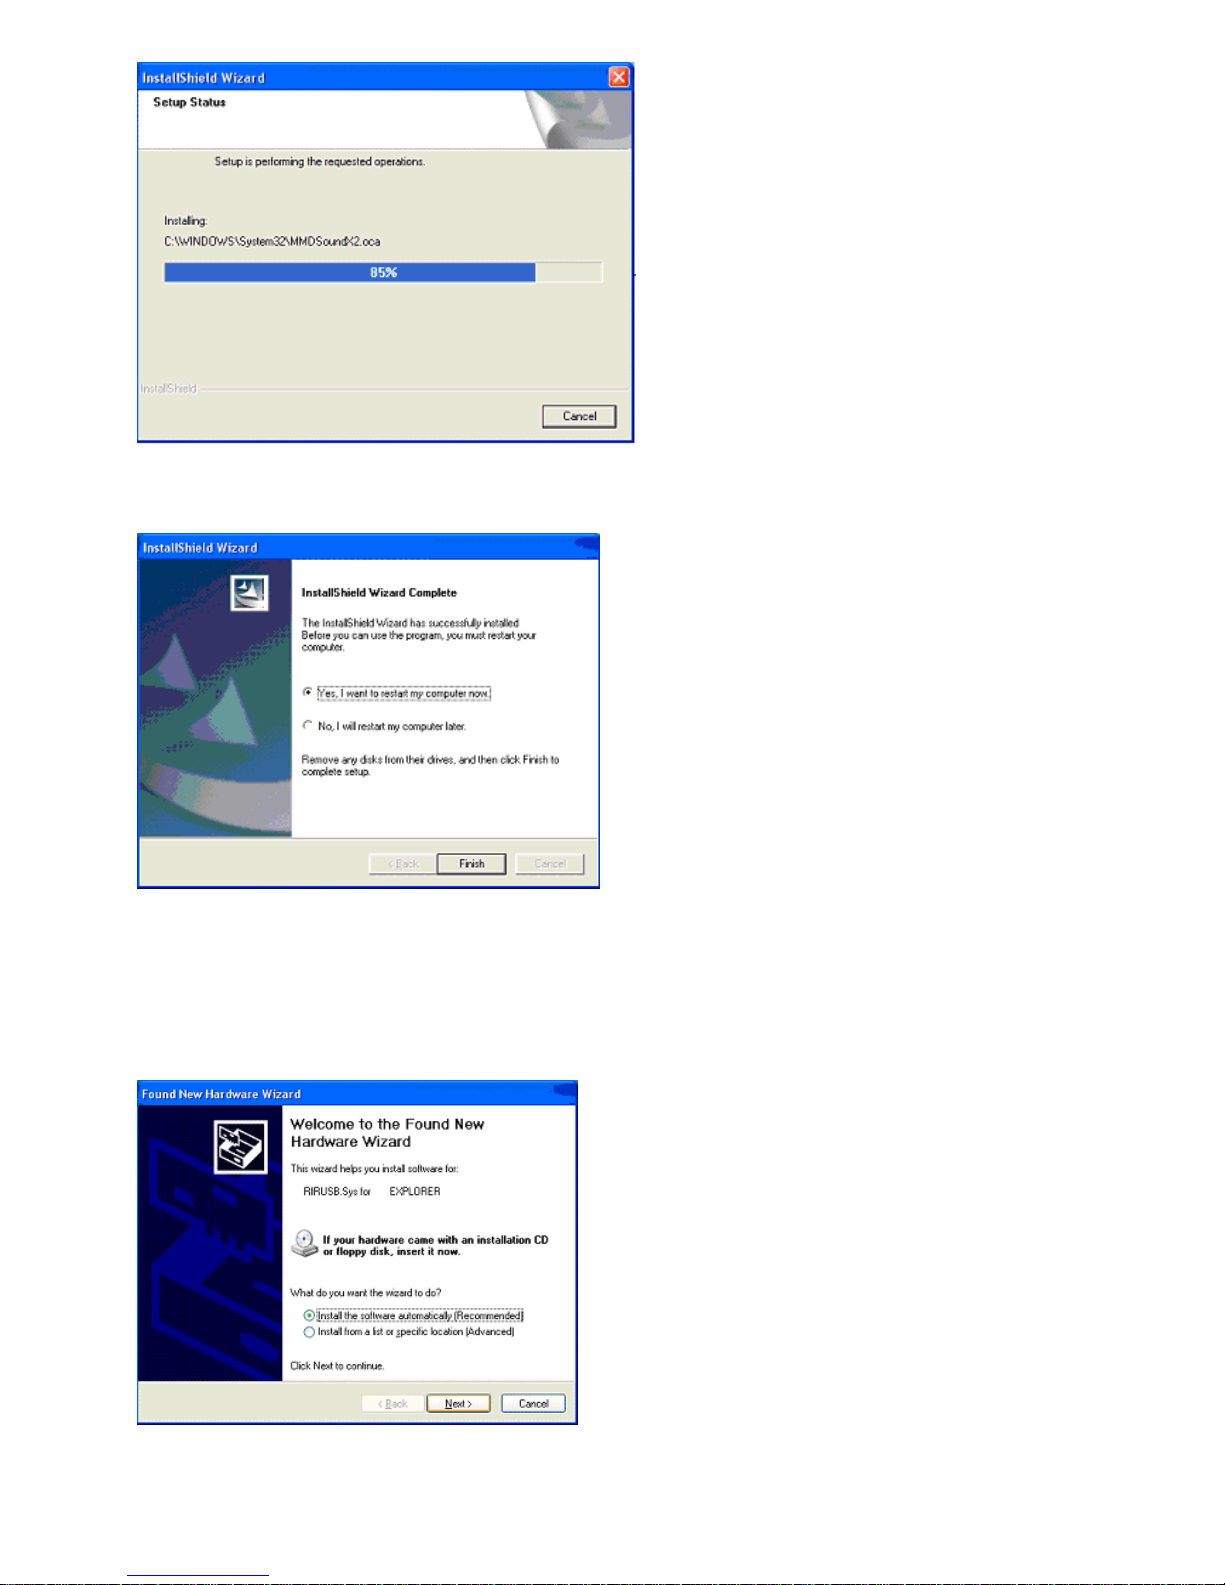
Click finish and restart your computer.
2. Plug in Radio YourWay™ into your computer’s USB port and power it on.
Tip> To power on your unit hold play for 2-3 seconds
Your computer now should display “Found new hardware” and Radio YourWay™ should display USB on its LCD.
You should see the Found New Hardware screen below, just click next
20
Page 21
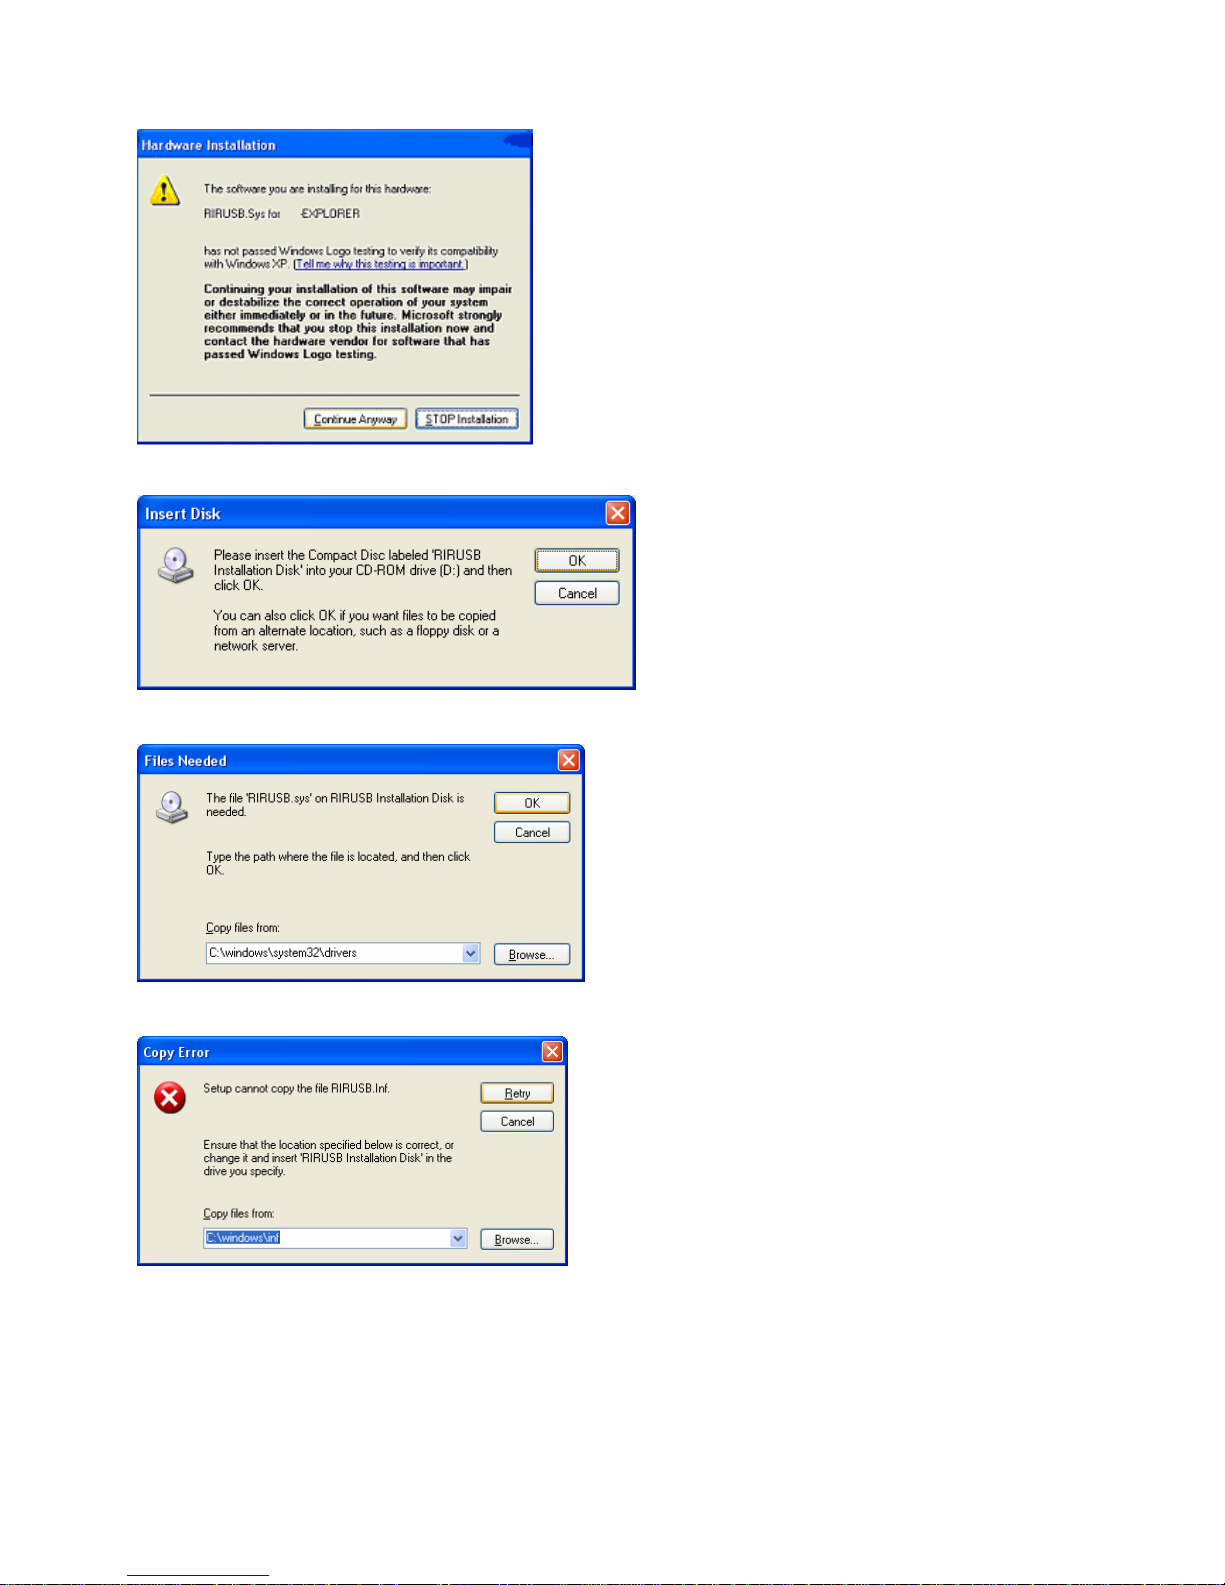
Click continue anyways (Do not worry this will not HARM your PC we have tested this software to be compatible
with your OS)
If you see the screen below click ok.
When you see the screen below, type or browse to C:\windows\system32\drivers
When you see the screen below, type or browse to C:\windows\inf and select retry
21
Page 22
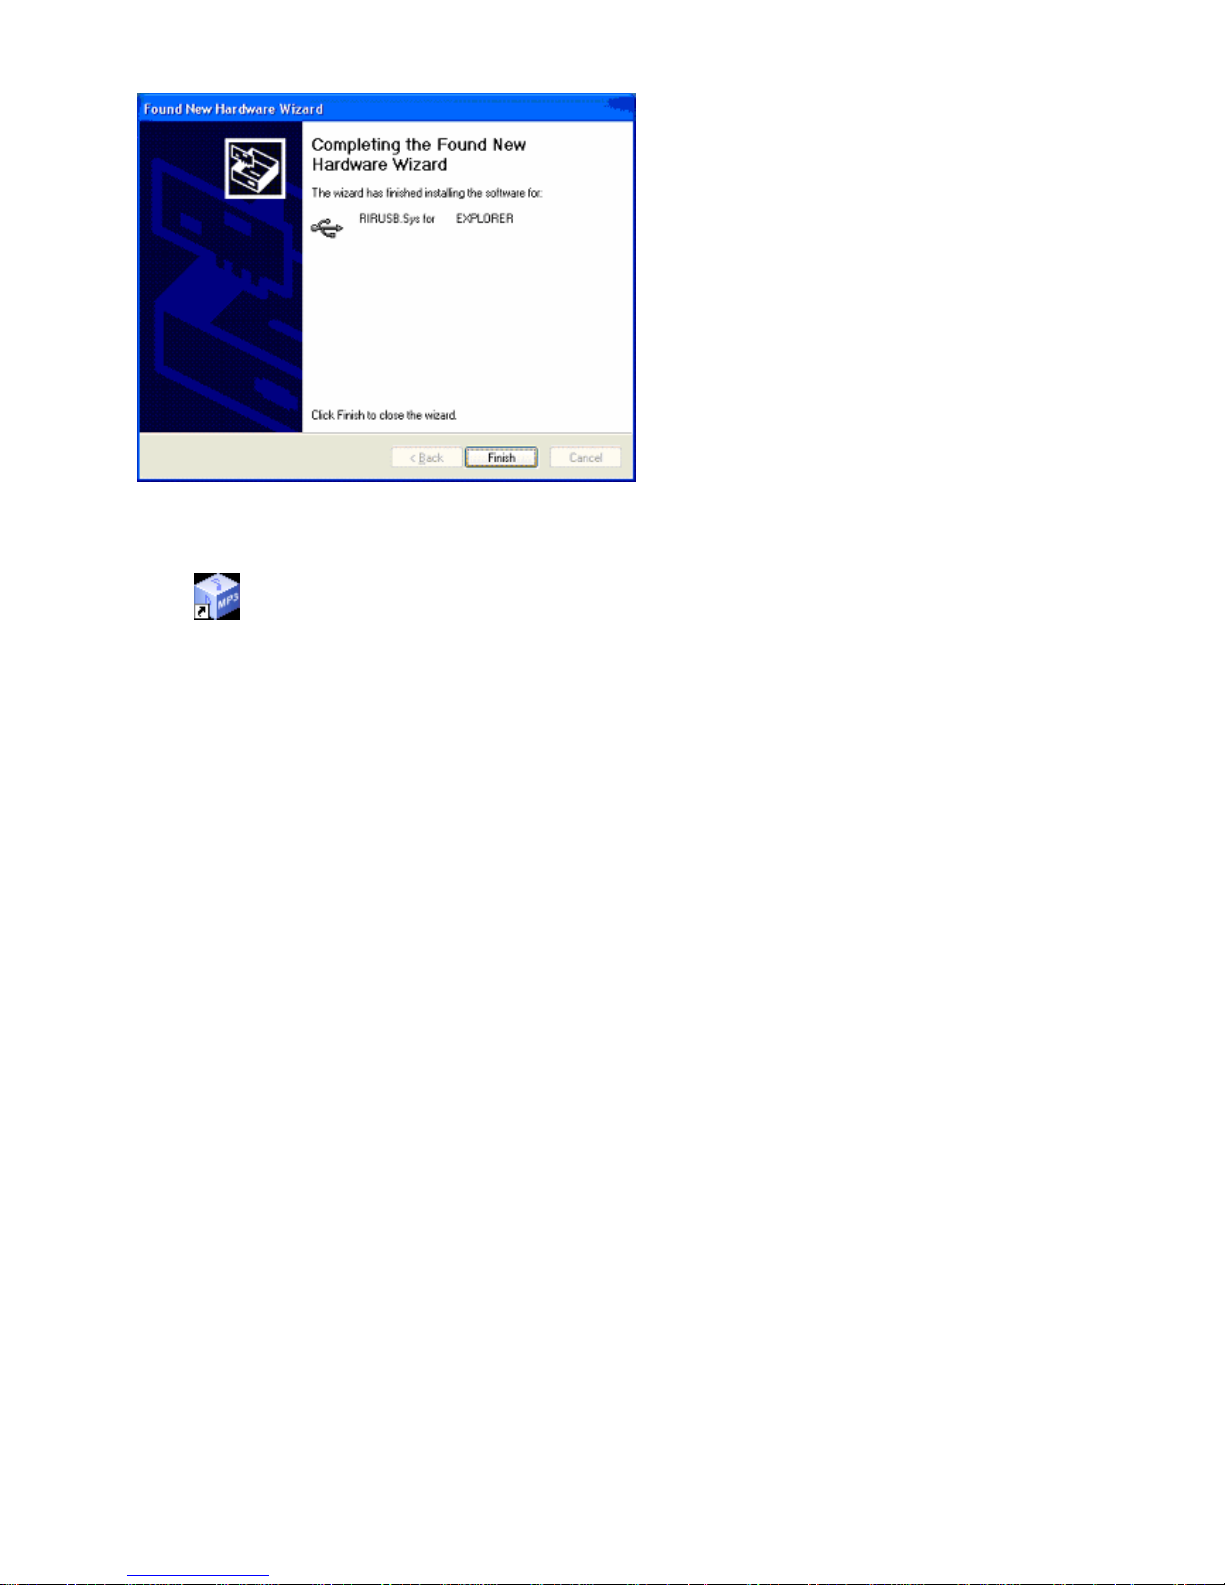
When you see the screen below click finish.
Click the Mp3 manager icon on your desktop (with the player plugged in)
Radio Yourway.lnk
Congratulations your unit is installed and ready to use.
22
Page 23
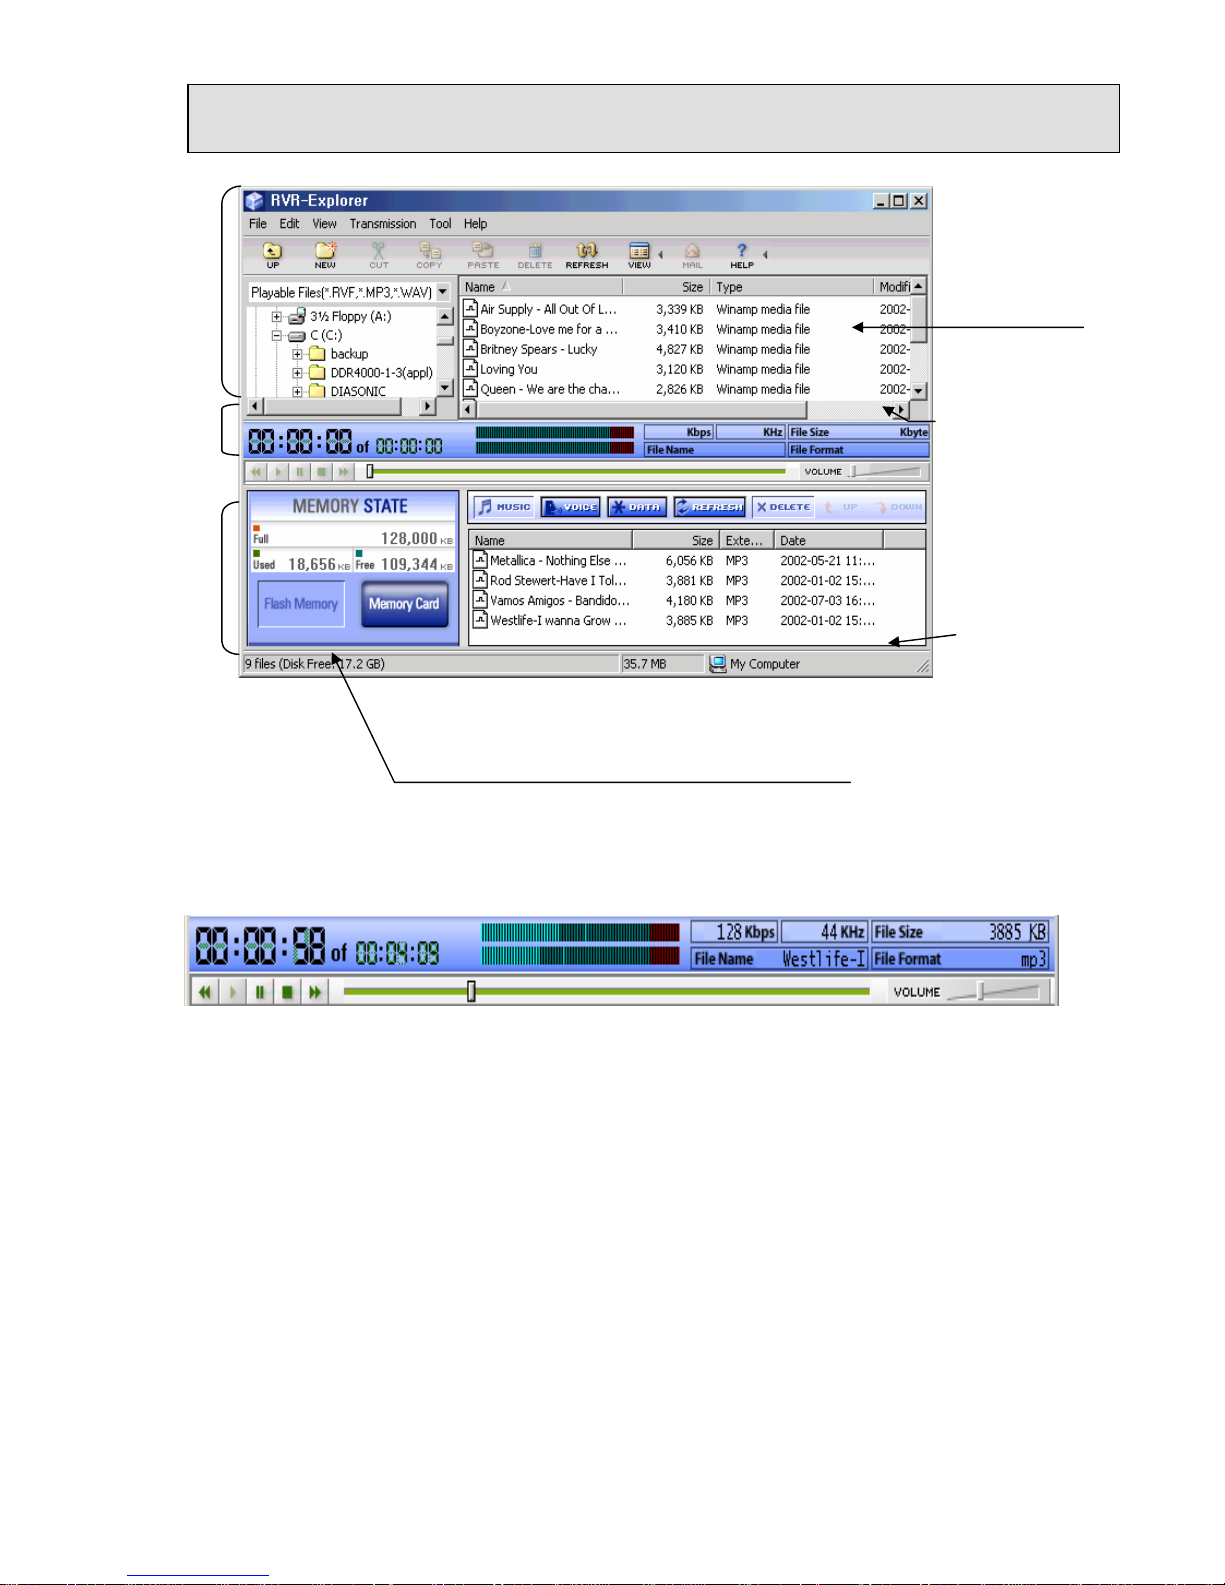
3). RYW-Explorer User Interface
23
Managing
Files
File Managing
Window
Play
Folder
Managing
Window
Manager
Mem
ory
Managing
(1). MP3, WAV and RVF Playing
Memory
Managing
Window
Memory Status
Window
After selecting an MP3, WAV or RVF File to play in the File Managing Window, if you double click the
PLAY Button, playing will begin. At this time, you may check some information of the selected file like bit
rate, sampling frequency, file size, file name, version of file and total running times of files.
You may adjust the playing volume by moving the position bar of the ‘VOLUME’.
You may move the playing position of the song clicking the white position bar with your mouse.
Page 24
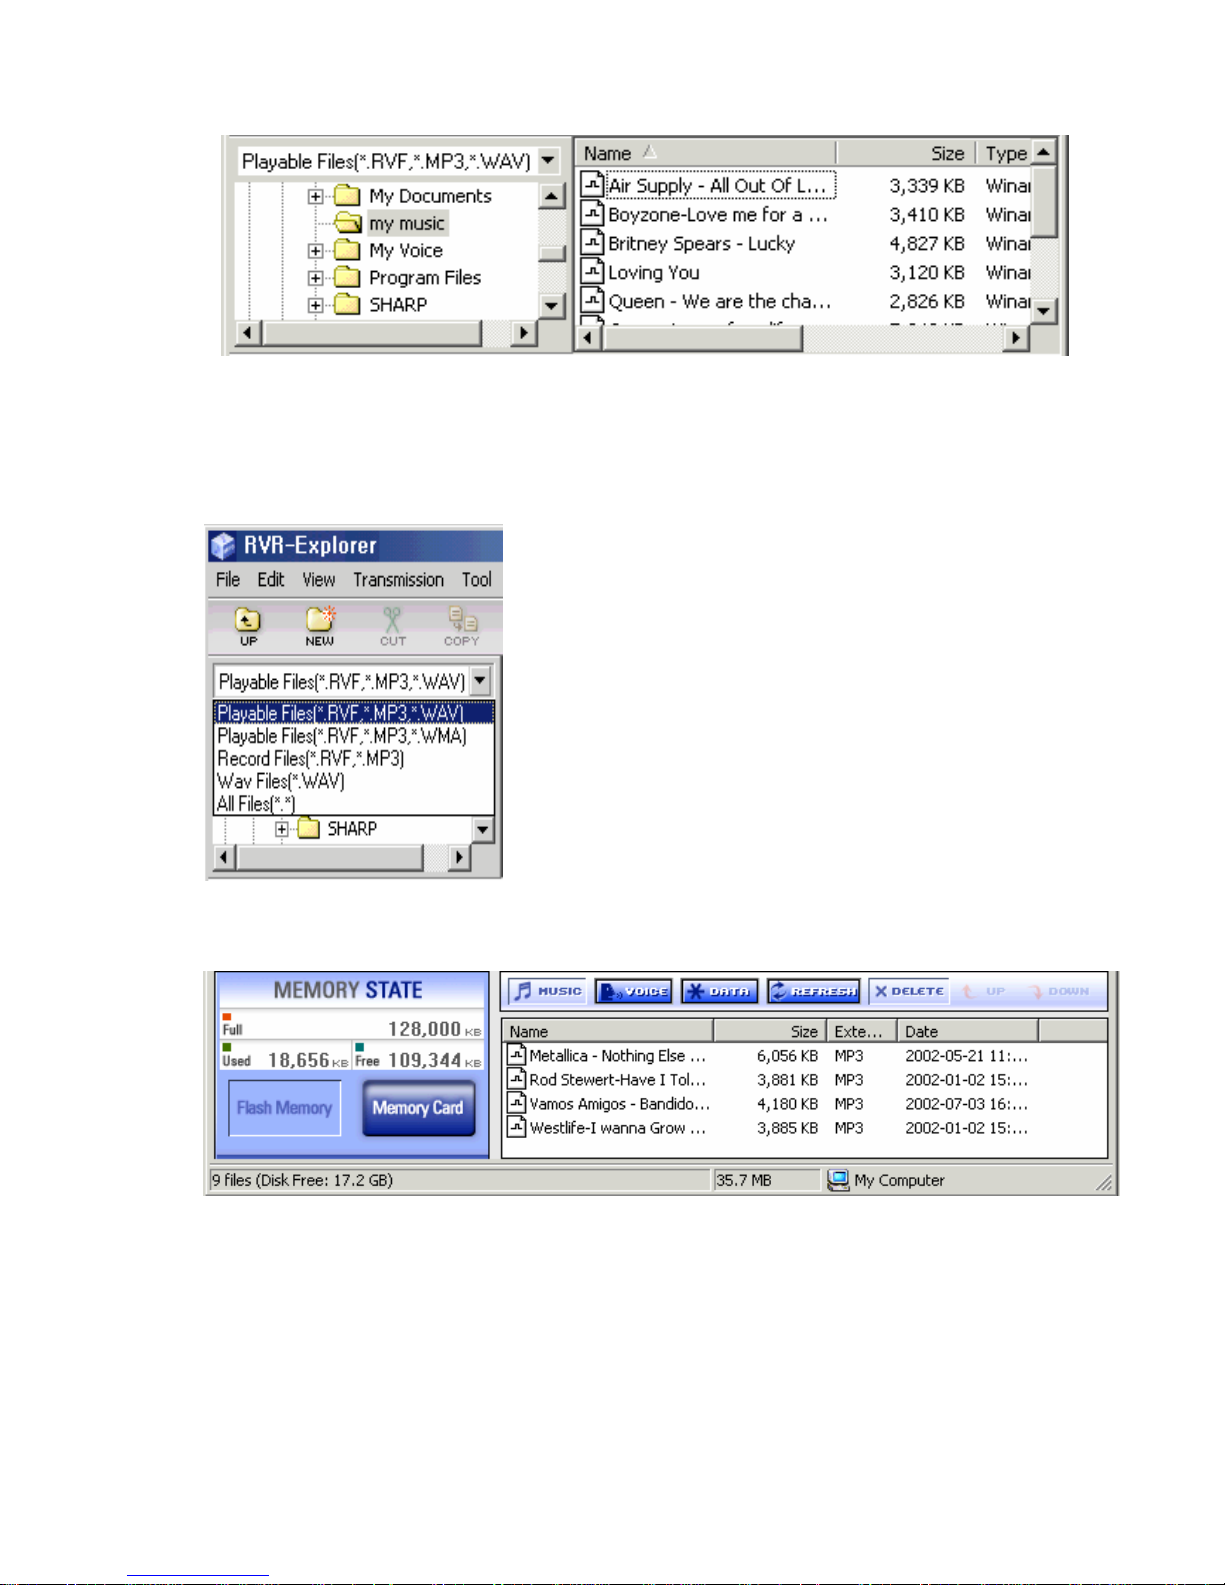
(2). Managing MP3 and RVF Files
The file managing part of RYW-Explorer looks very similar to the one of Windows Explorer.
The hard disk, CD-ROM Driver and folder installed are in the system display on the window on the left
and numbers of files in the folder displayed are on the window on the right.
All files will display in the window and you may allow
numbers of files (including MP3 Files) to be displayed on the
window. You may use managing functions such as moving and
copying just like you would with Windows Explorer.
You may separately manage these DMF files after putting them
in a folder using the file managing feature.
(3). Memory Management
The lower part of RYW-Explorer is used to manage the flash memory and memory card inserted in Radio
YourWay™. If Radio YourWay™ is properly connected; the window will show the status of the memory
and files stored.
MP3 files transmitted will appear on the lower right of the window and the size of the file and unused
space will display as well.
24
Page 25
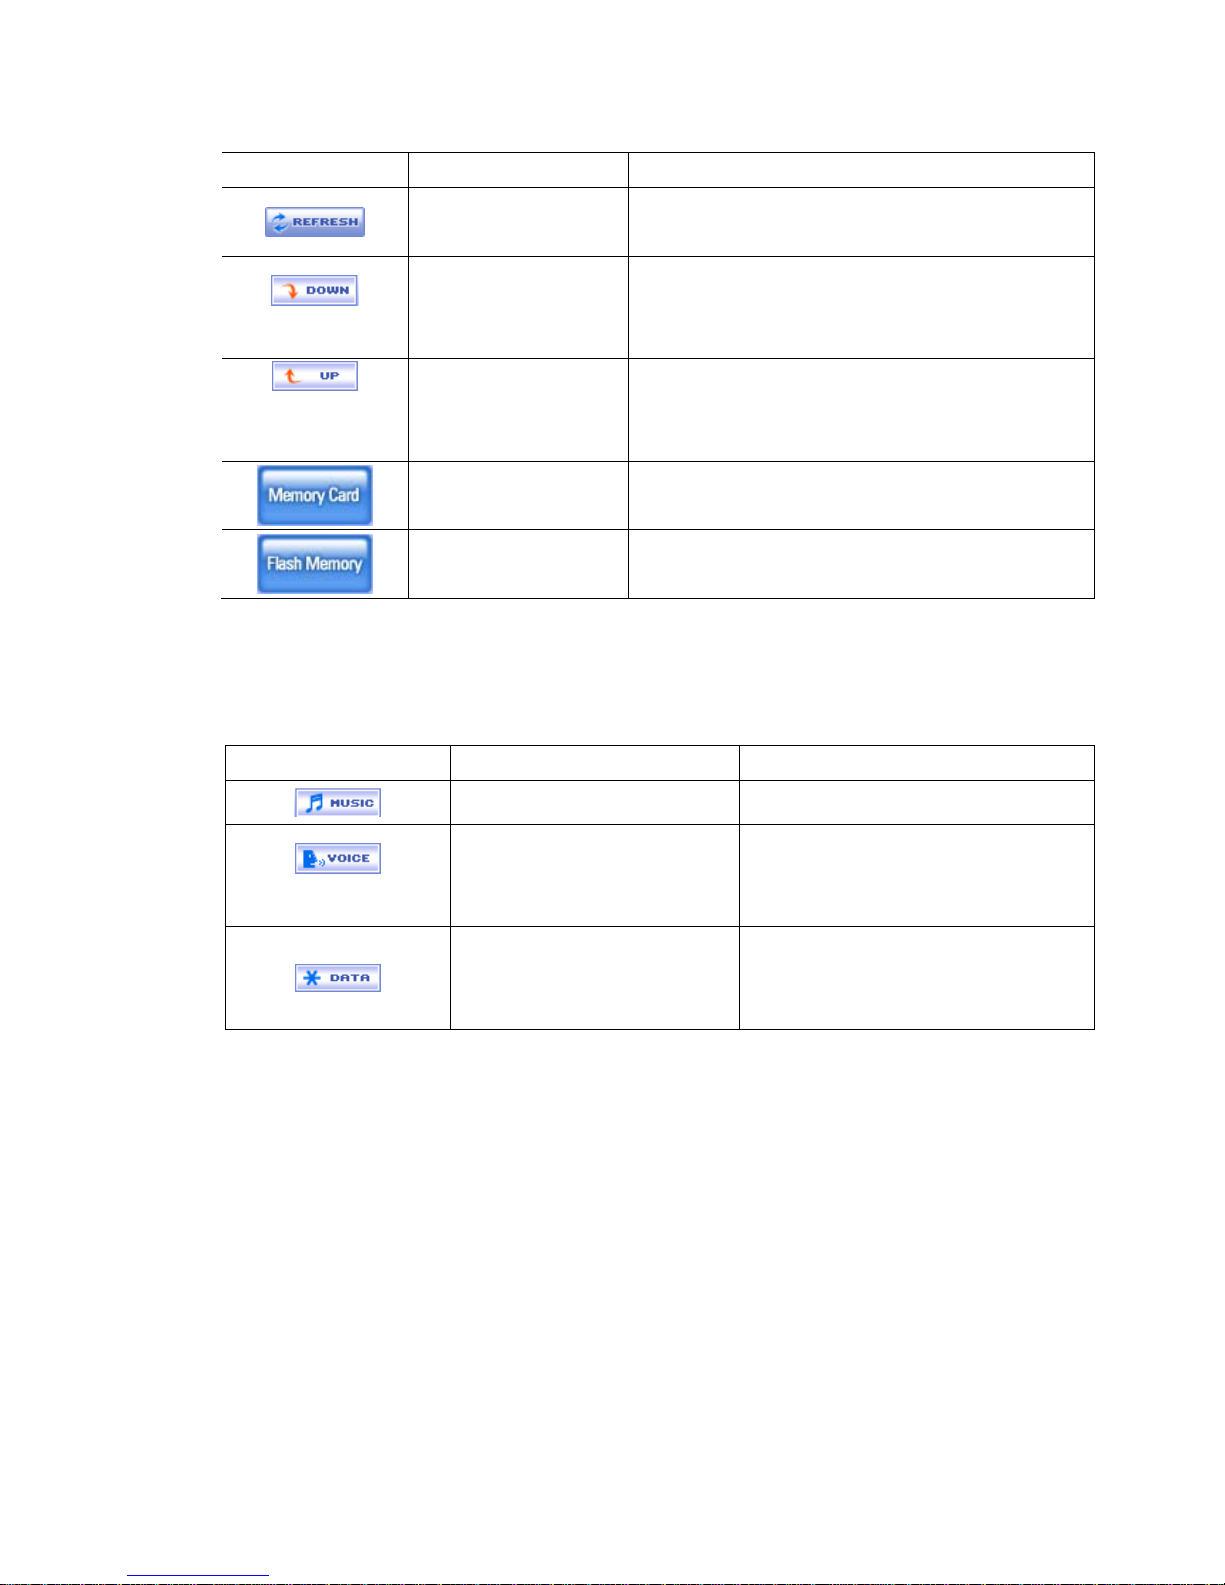
(4). Descriptions of Buttons
Buttons Functions Details
Refresh
Reads and displays the new memory info on the
screen.
Transmit to Radio
YourWay™
(Download)
After selecting the files to transmit, if you press this
button, the selected file will be transmitted
(Download) to the memory.
Transmit to the
Computer (Upload)
Used to transmit (Upload) a file in the memory to the
hard disk in the PC.
Memory Card
Means a memory Card is used in the External
Memory of Radio YourWay™.
Flash Memory The flash memory of Radio YourWay™.
Buttons Functions Details
Selects MP3 Used in MP3 Mode
Selects the RECORD Folder
Used in Voice Record Mode
Only a RVF recorded file, may be
saved/produced
Selects the HD Folder
Used in HD Mode
(Removable Hard Drive)
You may divide and use the memories in 3 folders and play each folder in Radio YourWay™.
25
Page 26
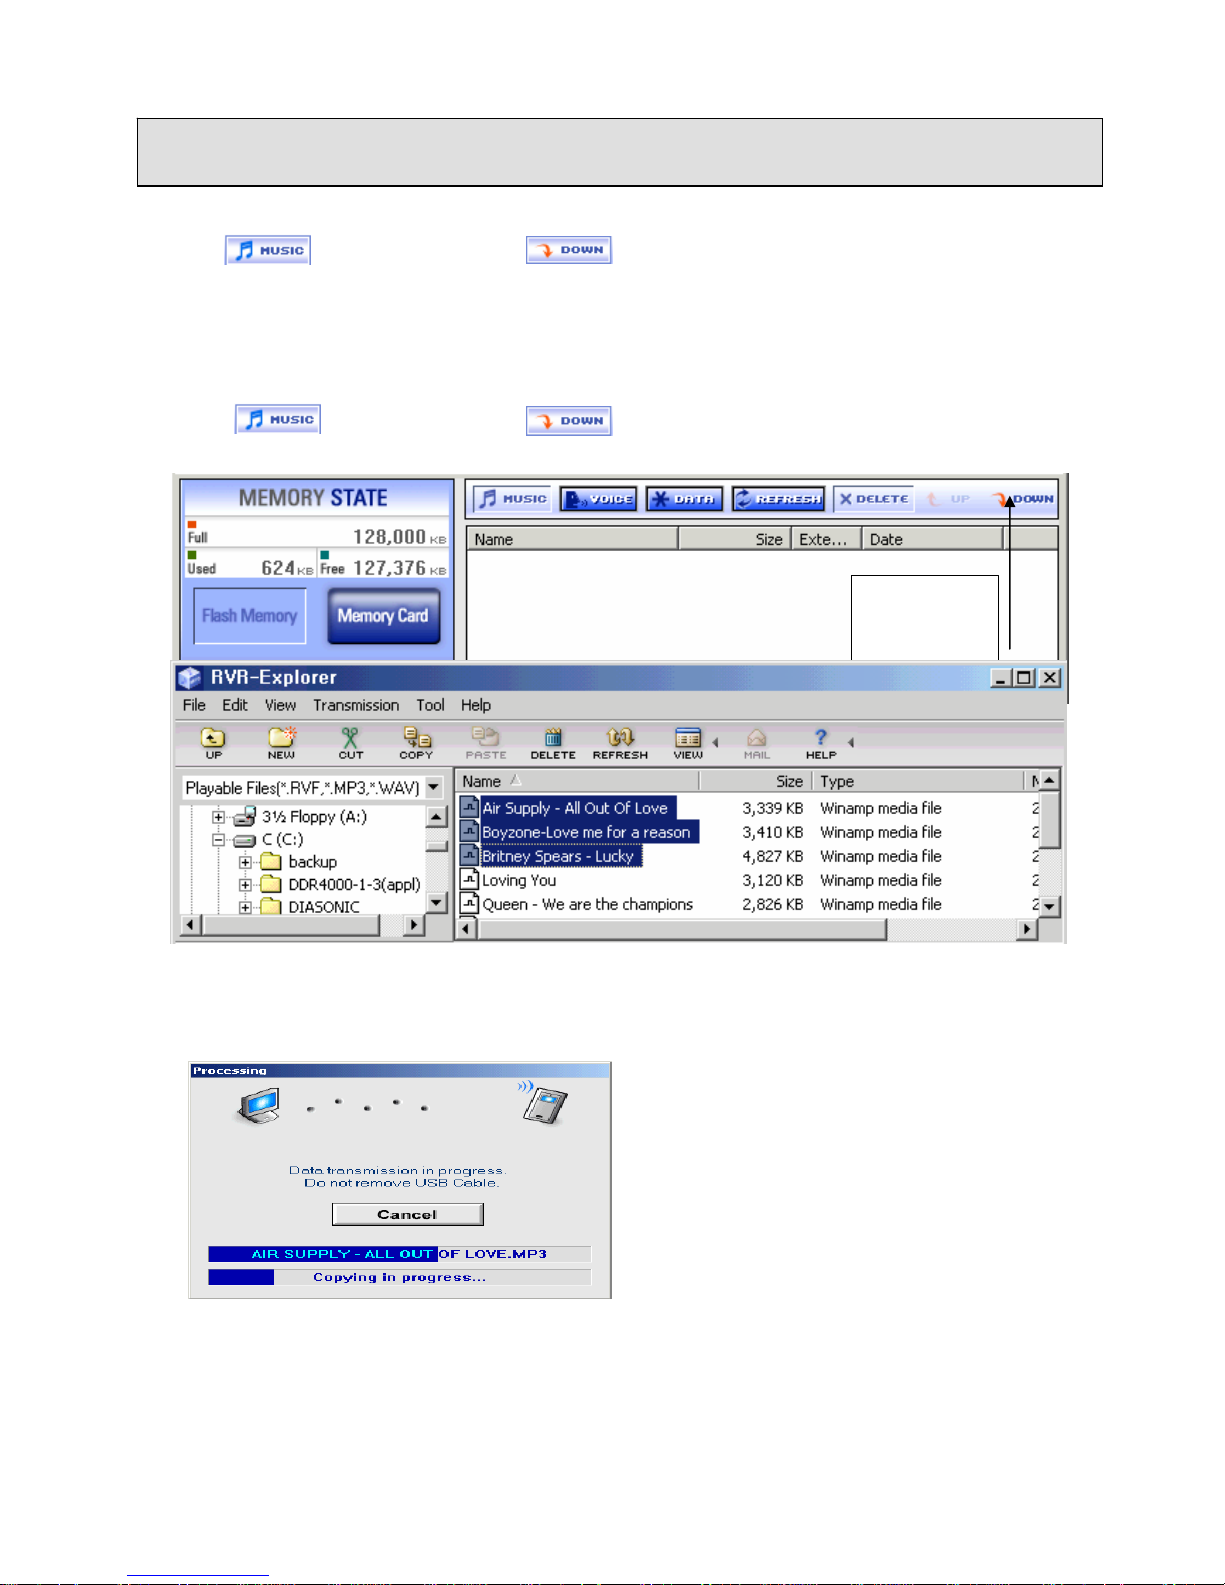
4). Transmitting MP3 Files
Way of transmitting MP3 files to Radio YourWay™ is very simple. As previously stated, select the file and
Click
and then click to start downloading
① Select the MP3 files to transmit in the file managing window.
Click
button and then click to start downloading.
Transfer to
Memory
③ The selected MP3 File is being transmitted.
26
Page 27
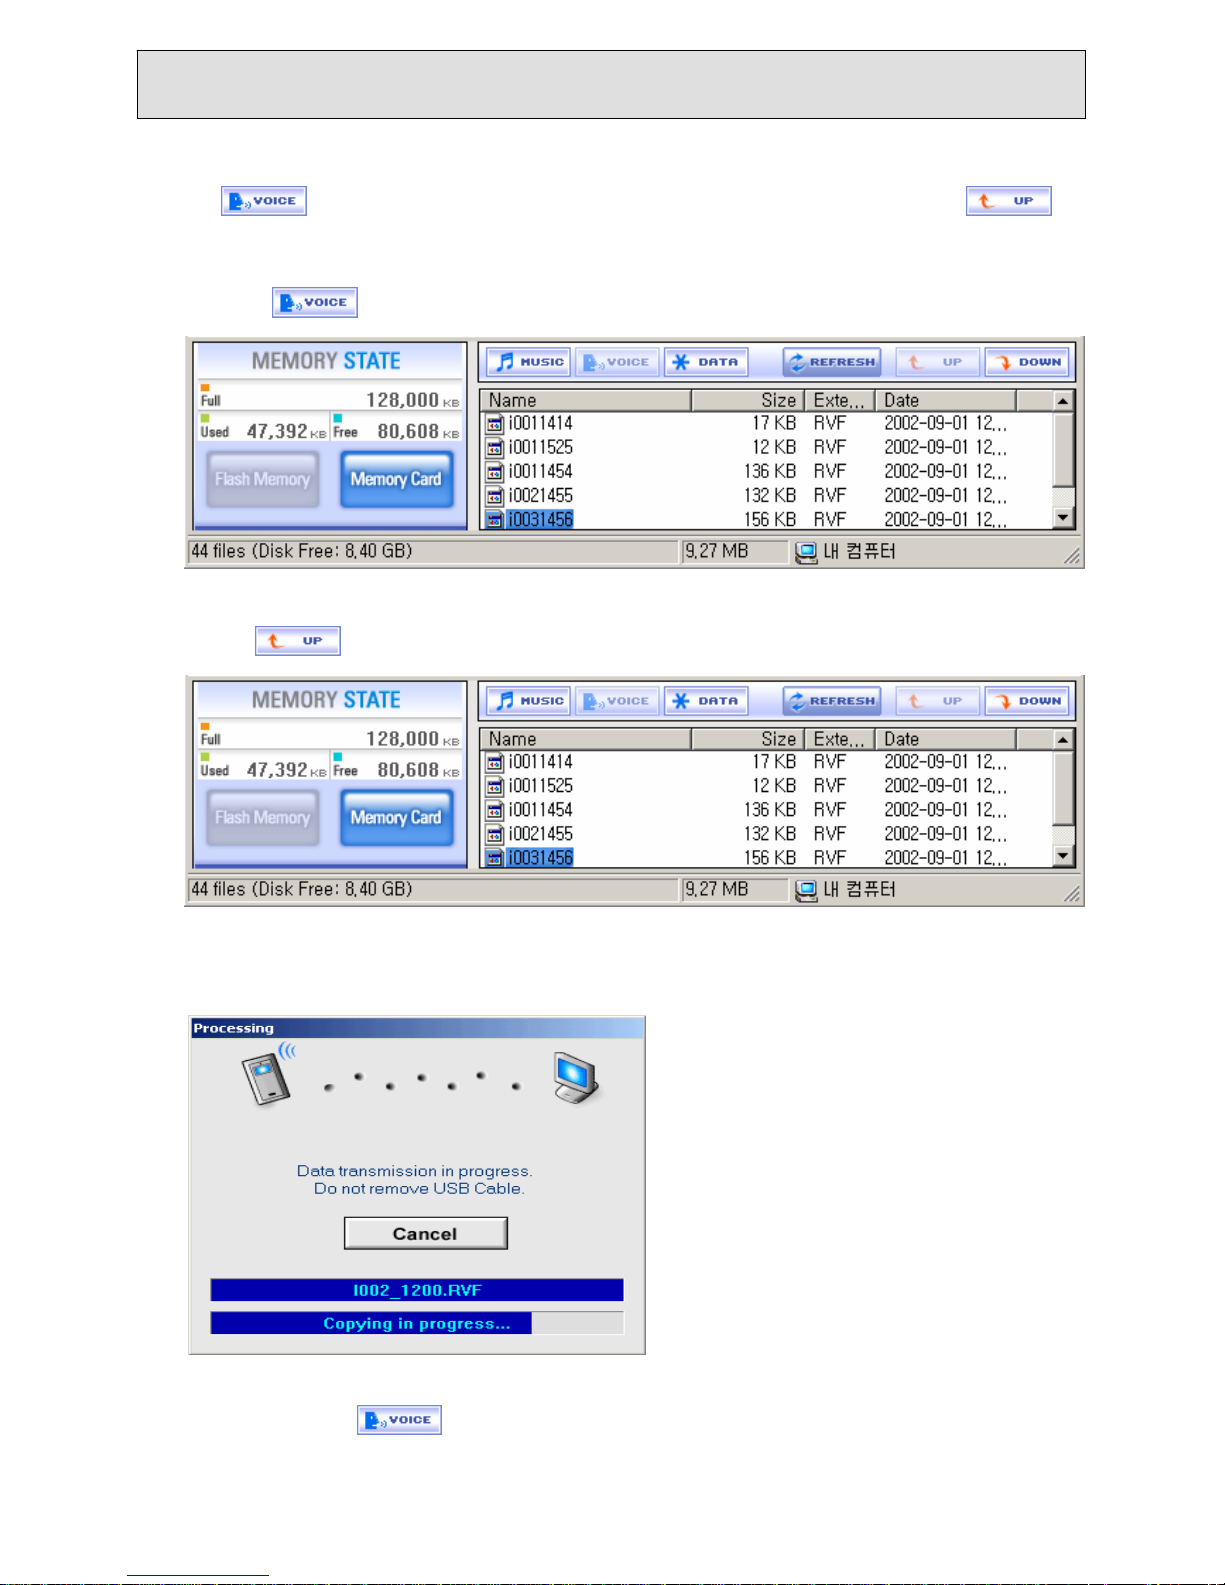
5). Transmitting DMF Files to the PC
Way of transmitting RVF files from Radio YourWay™ to the PC is very simple. As previously stated, click
in the folder managing window and then select the RVF files to transmit and click
① Click and then select RVF files to upload.
② Click to start uploading.
③ The selected DMF File is then transmitted to the PC.
27
● When transmitting RVF files from the PC to Radio YourWay™, the process after selecting the RVF
file is the same as the one for transmitting MP3 Files.
Page 28
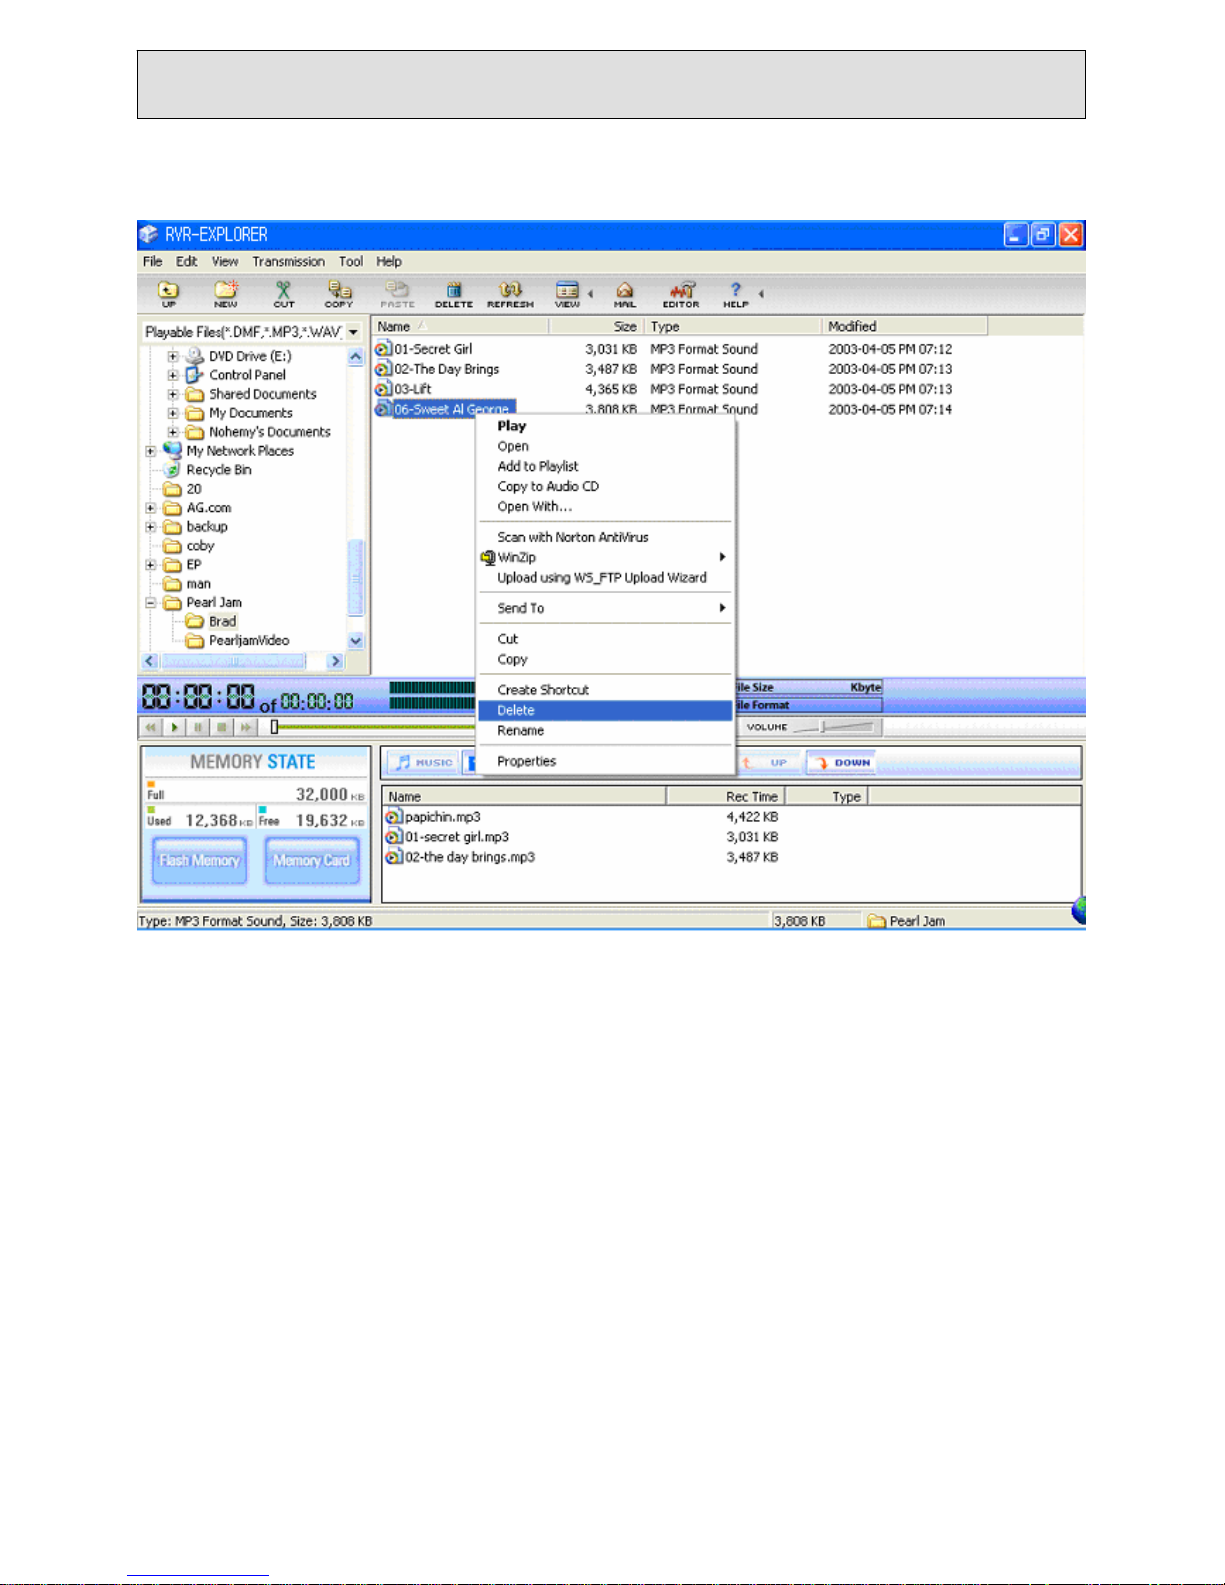
6). Deleting MP3 & RVF Files
Deleting MP3 and RVF Files in Radio YourWay™ is the same as deleting files in Windows Explorer. You may
delete the files by selecting ‘DELETE’ after right clicking your mouse.
28
Page 29
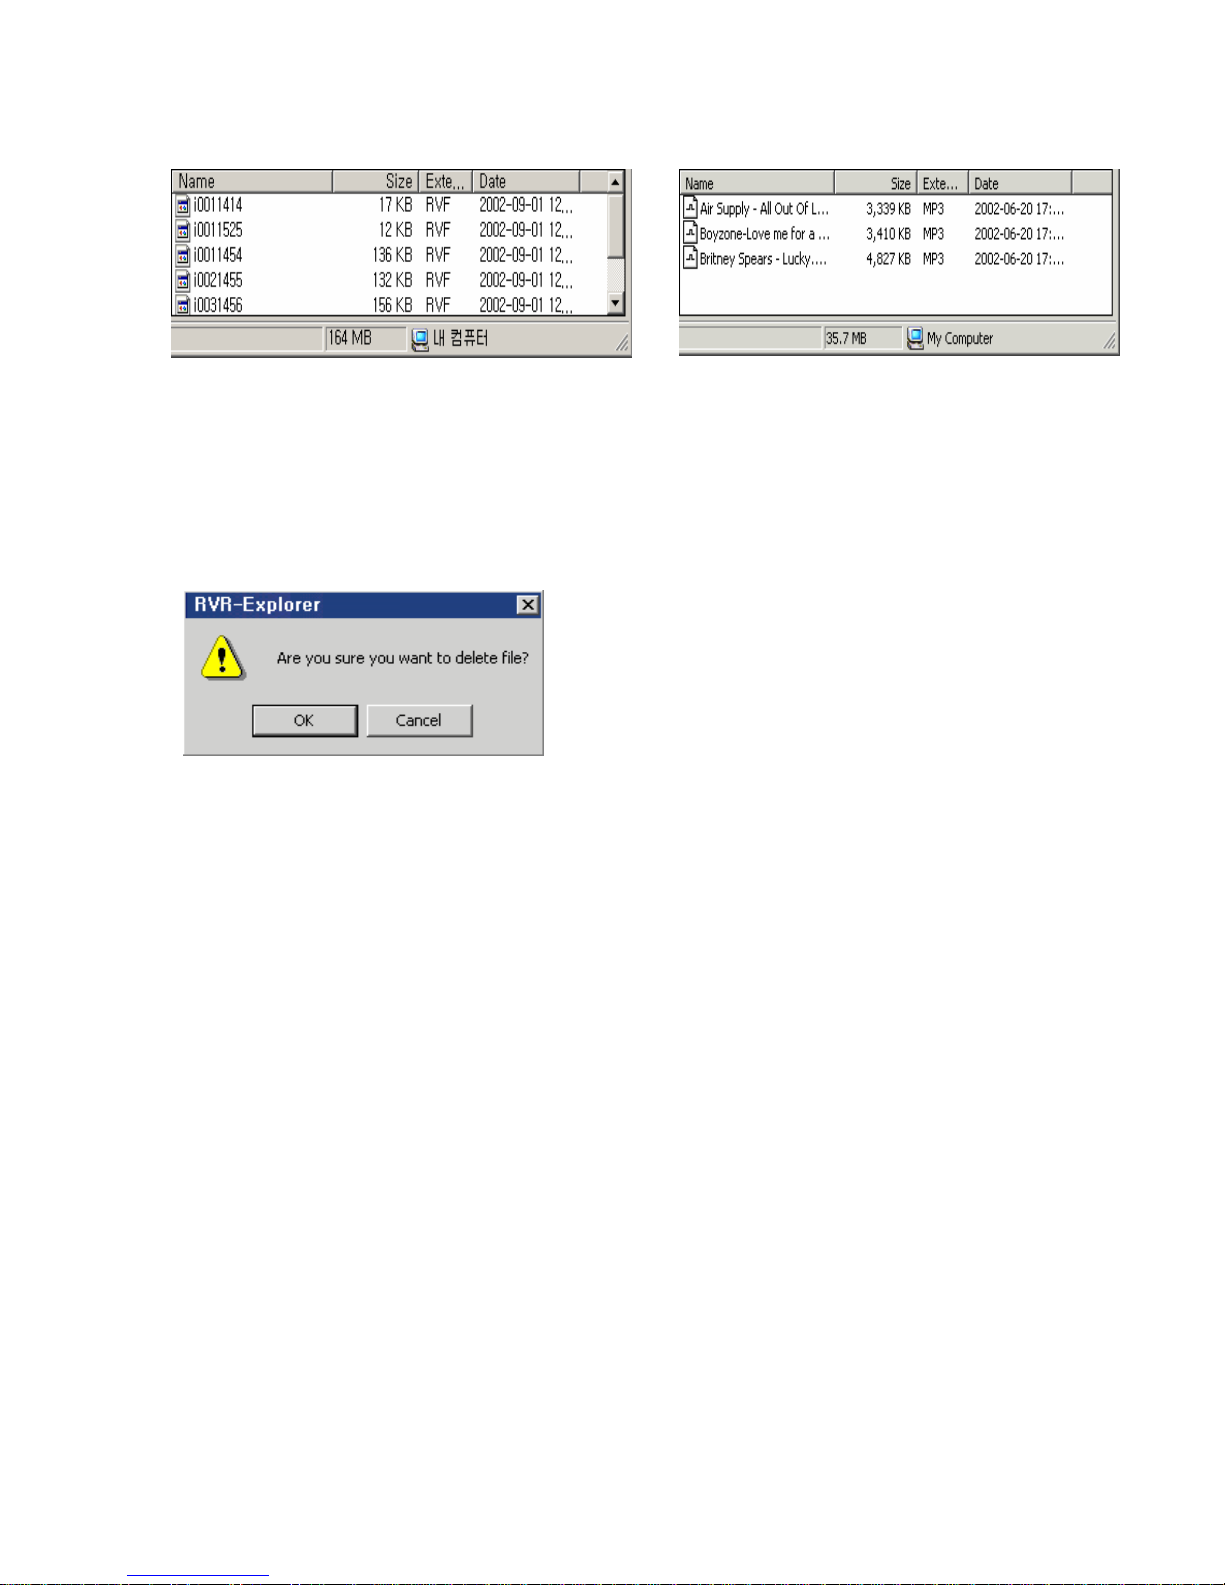
You may delete MP3 and RVF Files stored in the memory the following way:
① Select files to delete and then right click your mouse and select ‘DELETE’
RVF files MP3 files
Click OK to delete the file.
29
After few seconds, the file will be deleted from the memory.
Page 30
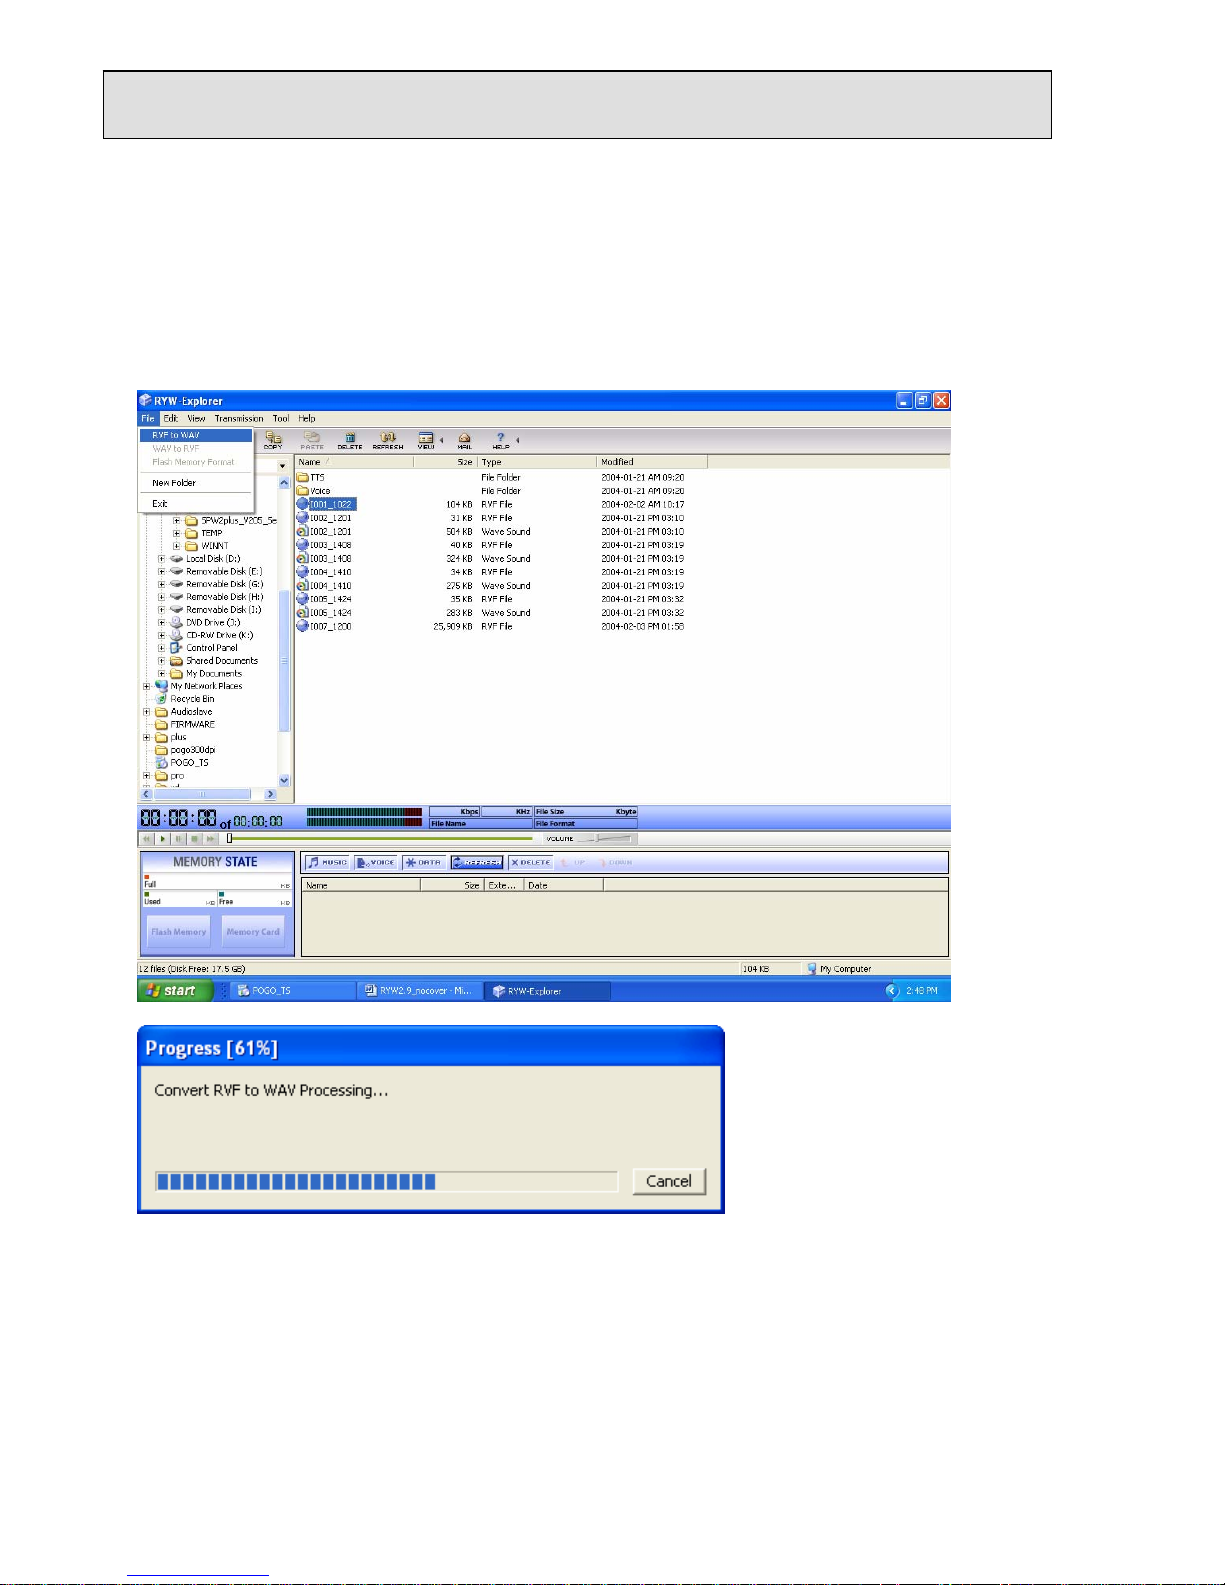
7). Transferring RVF files to WAV
It is possible to transfer RVF files to WAV in order to be able to play your recordings without the RYW software.
1.In the RYW-Explorer select the uploaded RVF file.
Now click the FILE menu and select RVF to WAV option.
2.You should now have a larger WAV file with the same name and in the same directory as the
original (uploaded) RVF file.
30
Page 31
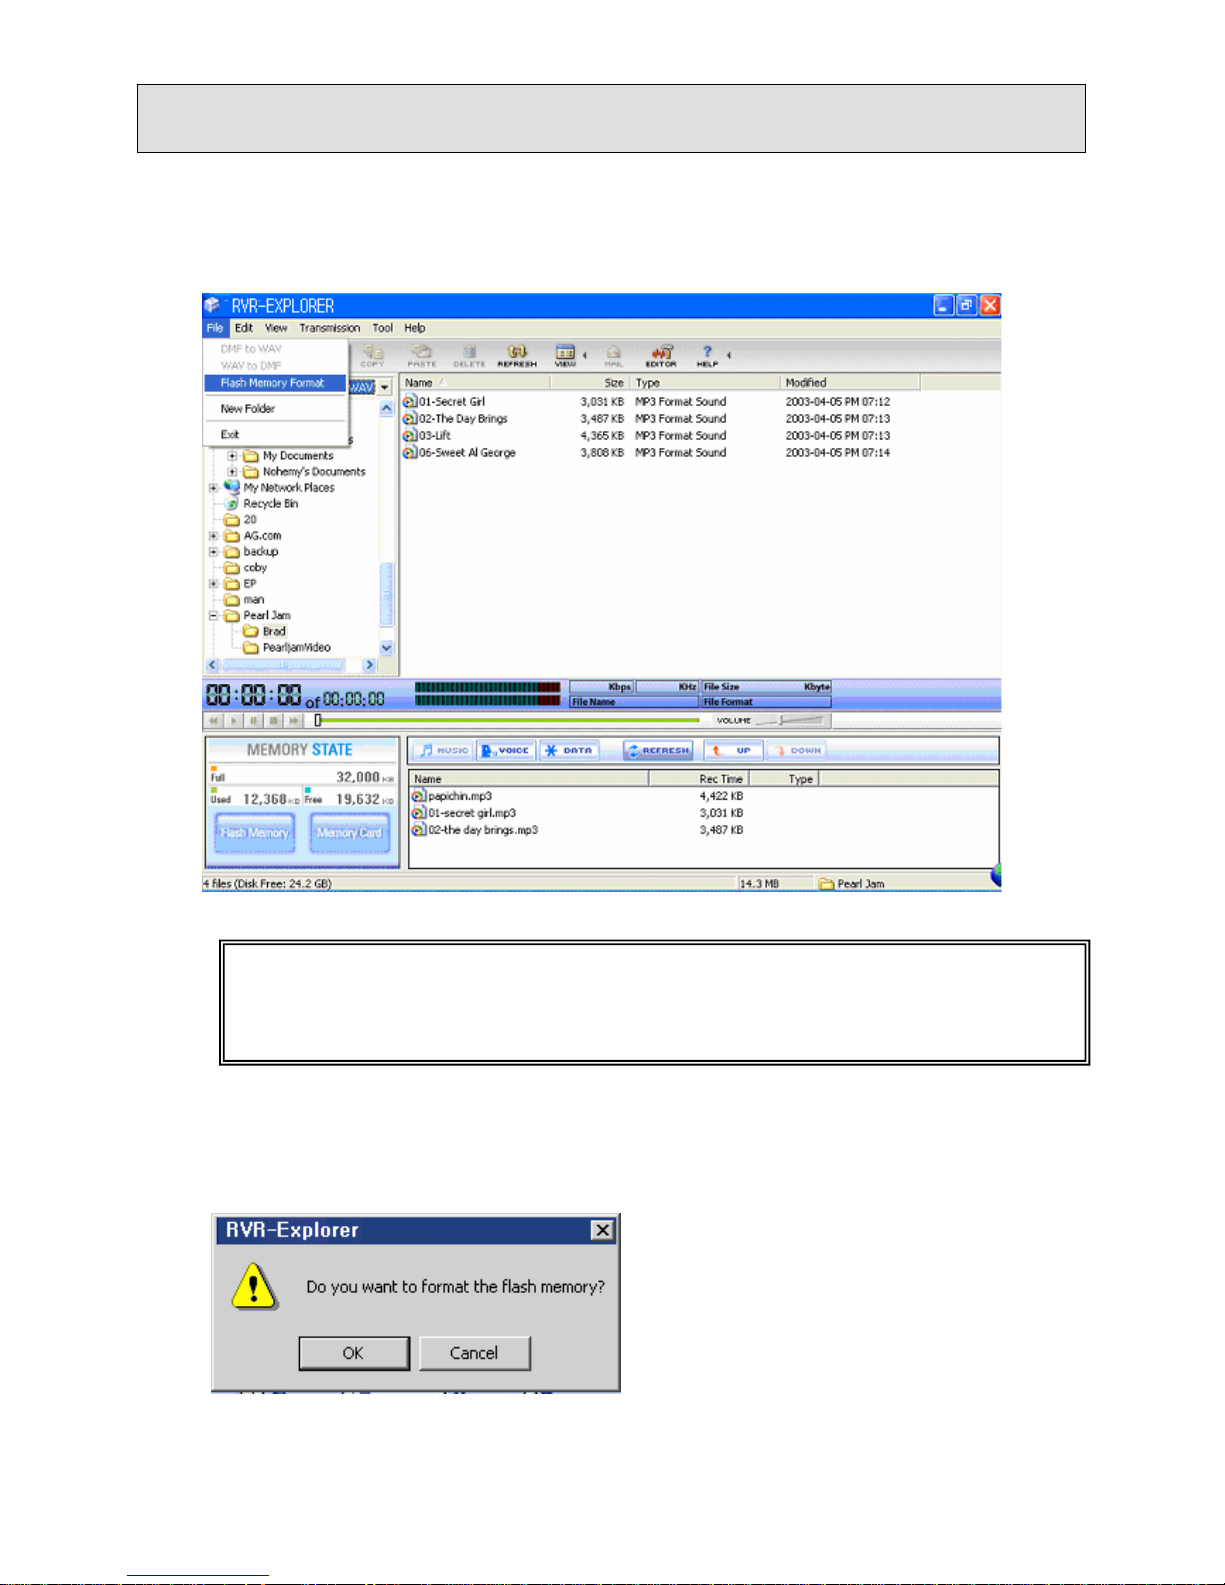
8). Initiating the Flash Memory
Just like formatting a hard disk, you may initiate (format) the memory used in Radio YourWay™. If you format
the flash memory, all data stored in the memory will be lost.
① Select File -> Flash Memory Format in the menu of Radio YourWay™.
※ If you right click the mouse on any empty space in the flash memory managing window, you
will see this Flash Memory Format command. This command also can be used to format the internal
flash memory.
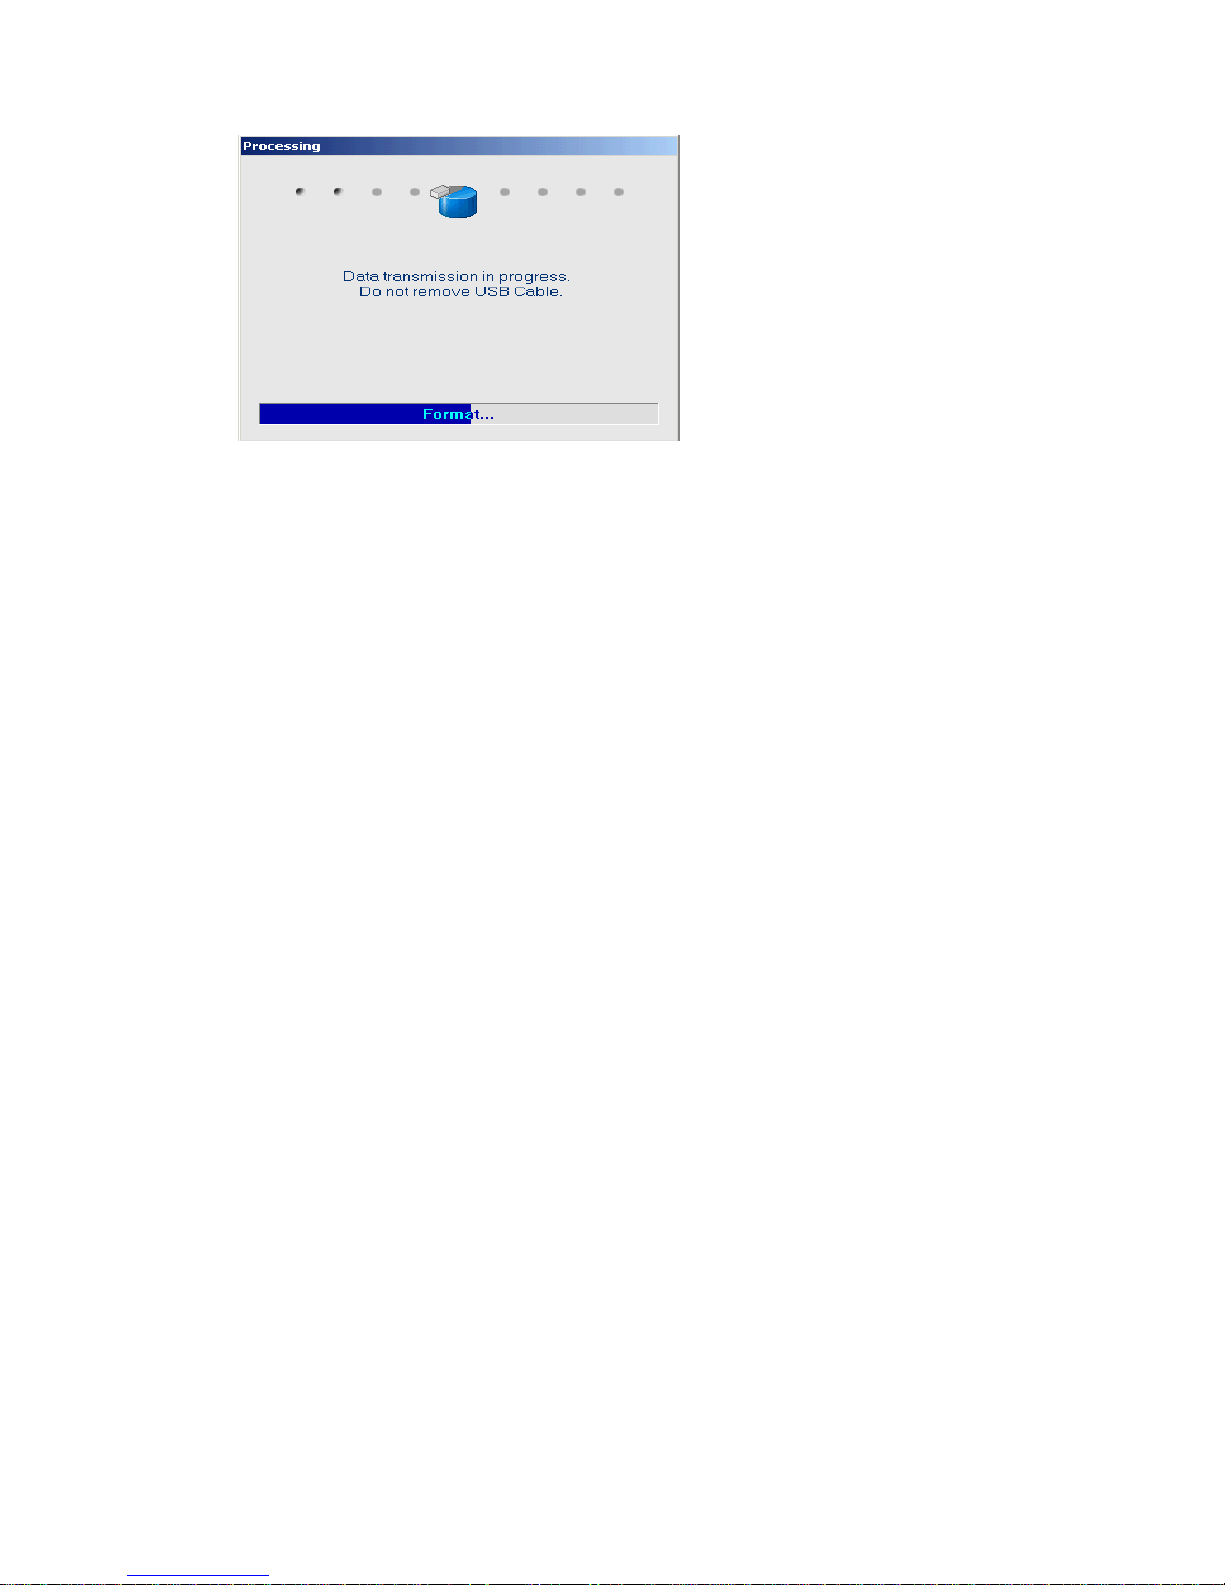
② When a pop-up window prompting you to format appears, click the OK button and the formatting
will be initiated.
31
Page 32
*End of procedure
32
Page 33
33
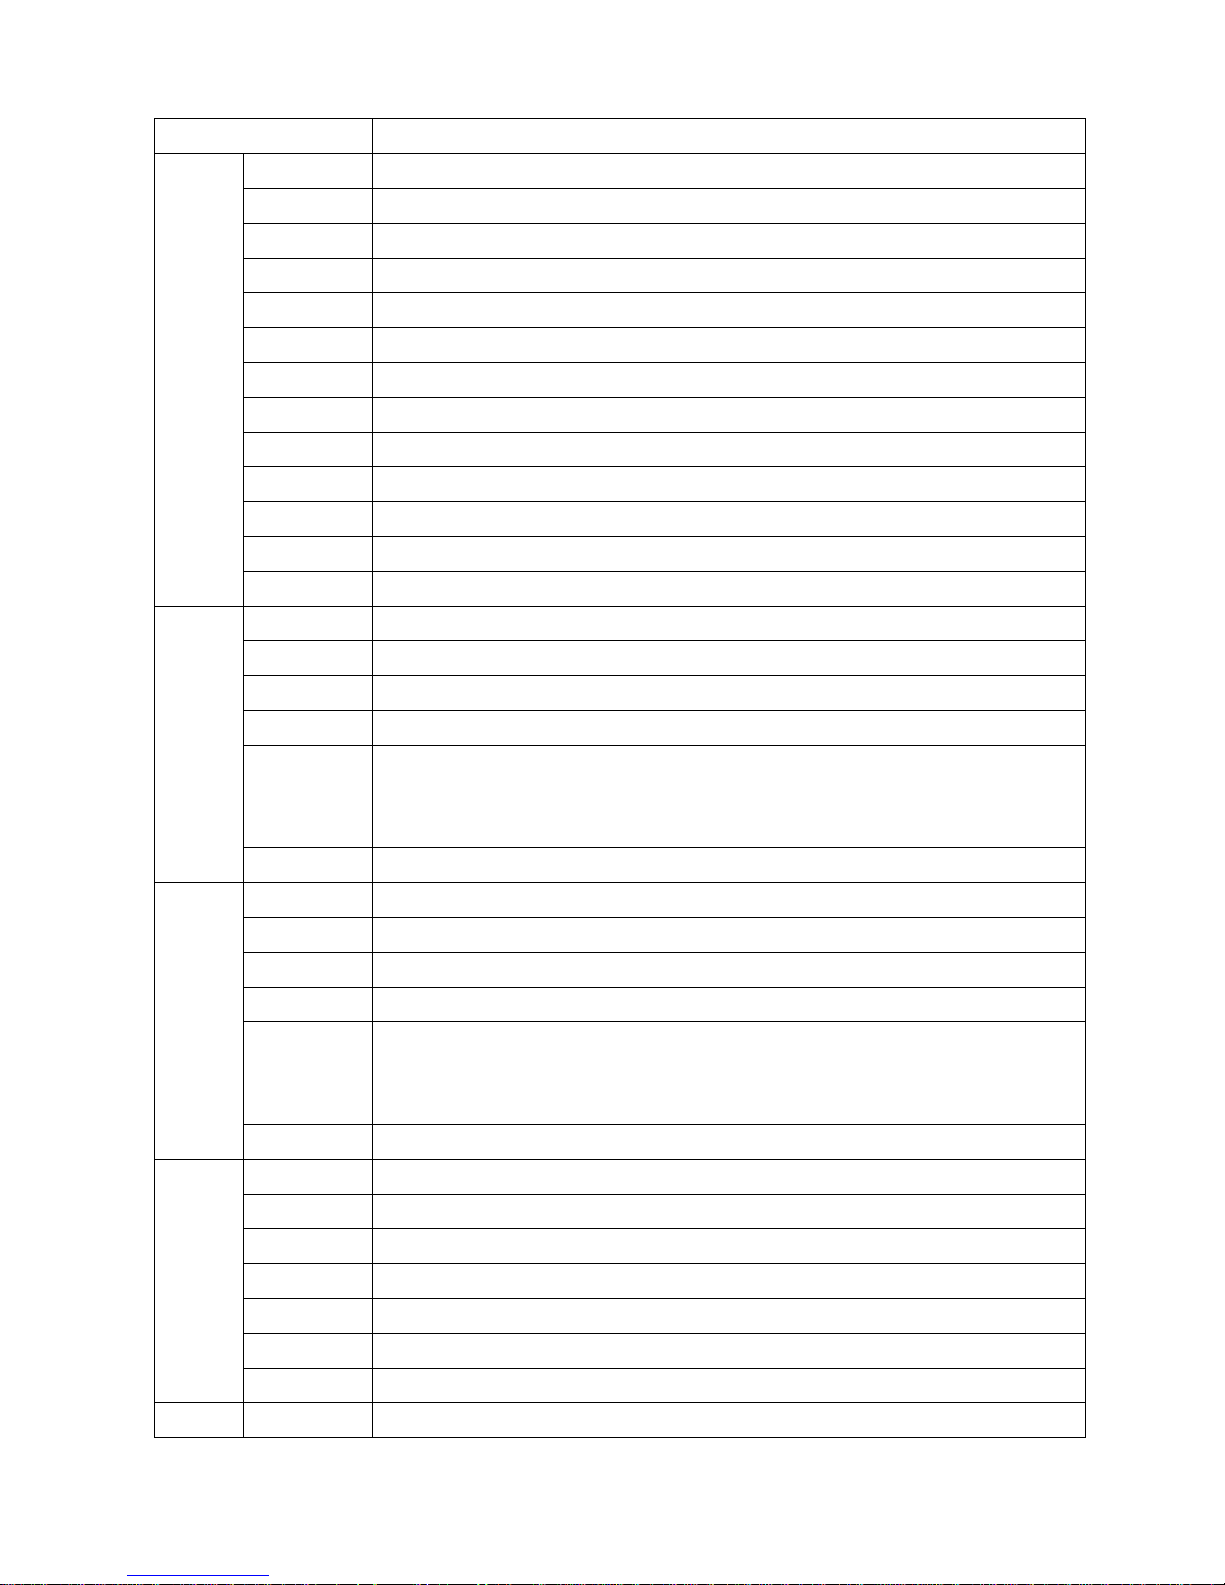
3. General Specification
Model PRY900M2
Record Time 32Mbyte : 135Min/270Min
Mode ADPCM 32Kbps/16Kbps
File VOICE : 99 / MP3
FM Record FM band, Stereo (76MHz-108MHz) (USA 87.5-108)
AM Record
530kHz – 1710kHz
Timer Record
Date / Daily / Weekly
Mic
Built-in Mic / Line (external Mic)
Record Device
Built-in Flash Memory(32MB)/EXT(MMC/SD CARD 256)
S/N 45db (62db input 1kHz , speaker output 50mW )
Distortion 3%±0.2 (62db input 1kHz , speaker output 50mW : HQ mode )
Freq,Response 400Hz-3.2kHz(-6db)
Output Power Max 5mW(stereo earphone 16ohm)
VOICE
RECORD/
PLAY
Repeat Play One messages repeat/Cont. messages repeat / A-B repeat
S/N 45db at 1mv 98.1MHz
Distortion 0.8%(max) at 1mv 98.1MHz ∆f=22.5kHz
Freq,Response 350Hz±30Hz,3kHz±0.25kHz(150Hz-2.5kHz,60dbuV)
Sensitivity 5uV at S/N=26db
Frequency
Cover Range
Europe : 87.5 - 108MHz (Step 50kHz)
USA 87.5-108MHz (Step 100kHz)
FM
RADIO
(Stereo)
Preset Mode 10 Radio station
S/N 35db
Distortion 3%
Freq,Response 150Hz – 1.5kHz at 0db
Sensitivity 68dbuV at 1000kHz
Frequency
Cover Range
Europe: 522kHz – 1620MHz (Step: 9kHz)
USA: 530-1710MHz (Step: 10kHz)
AM
RADIO
Preset Mode 10 Radio station
Bit/Rate 32Kbps-320Kbps(MPEG 1/2 LAYER 3)
S/N 85db up(1kHz input 0db)
Distortion 0.3%±0.05 (1kHz input 0db)
Freq,Response 20Hz-20kHz
Earphone Max 5mW(16ohm)
EQ EQ : NORMAL, ROCK, POP, CLASSIC, LIVE
MP3
Repeat Play ALL1/ALL/1/1ALL/A-B
PC Communication USB 1.1
Page 34
34
System CPU200MHz more than, RAM 64MB more than, 20MB of free space
OS Windows 98, 2000, ME, XP
Sound Card Sound Blaster 16 compatible
Interface
Display 640X480 more than
Ext Line in ∮3.5 plug-in power microphone(mini plug/stereo) IMP less than 3KΩ
Earphone ∮3.5 earphone(mini plug/stereo) IMP less than 16Ω
DC JACK HOLE : ∮2.75, Dia : ∮0.65
IN/OUT
JACK
USB Mini jack (PC : A TYPE)
Diameter 28(IMP 8Ω)
SPEAKER
Max output 80mw(volume max)
Volume Digital volume (30 step)
Memory Flash memory (32MB)
LED Recording display LED(RED)
Mode VOICE/AM/FM/MP3
Messages 01-99(INDEX)
EQ NOR ,ROC ,POP ,CLA, LIV
Repeat ALL1/ALL/1/1ALL/A-B
LCD
(TN)
Clock CLOCK,SUN,MON,TUE,WED,THU,FRI,SAT,
Adaptor DC3V/200mA(CE,CUL,T,FCC)
Key Function
FF/PLAY/STOP/REW/F.SEARCH/R.SEARCH/REC/REPEAT/MODE/ERASE/EQ/A-
B/TIMER/VOL+/VOL-
Power Requirement 3V , LR03 , tow alkaline battery(‘AAA” size or UM-4 )/NiMH 1.2V x 2
MP3 PLAY Approx. 13hour during the mp3 play(earphone output: volume middle position)
VOICE PLAY Approx. 13hour during the voice play(earphone output: volume middle position)
RADIO PLAY Approx. 11hour during the radio play(earphone output: volume middle position)
Battery
Life
RADIO/VOICE
REC
Approx. 8hour during the radio play(earphone output: volume middle position)
Accessory
Connecting cable for external equipment(1) / application CD(1) /
Neck strap(1) / stereo earphone(angle type)(1) / EXT ANT(60cm)(1) / battery()(2) /
USB cable (1) / manual (1)
Size 98.5*18*55
Page 35

35
Warranty
● If any defect or error occurs, stop using the product and contact the shop you purchased or Pogo
Products Inc. General Directory Number: (714) 671-1854
● Warranty (Warranty Regulation)
Pogo! Products guarantees a free repair or service for a period of one year from the original date of
purchase only.
If any defect or error occurs during the warranty period, please contact us.
A dated order/receipt is REQUIRED for all warranty claims.
Ensure the above information is provided and if it not, consult with the shop you purchased to obtain
it.
(Free Repair or Service)
A. This product is manufactured under a strict quality control and inspection process.
B. If any defect or error occurs under normal operation, in accordance with the caution or notes in this
manual during the warranty period, you are entitled to a free repair or exchange from our company.
C. The free repair/service does NOT include shipping charges.
3. Even during the warranty period, you will be charged for the following defect/damage or error:
1) Without a dated purchase order/receipt.
2) If the original date of purchase is passed the warranty period or the dated purchase order/receipt
is modified in any way.
3) For any defect or damage resulting from misuse, abnormal use, abnormal condition, improper
storage and/or exposure to direct sunlight or moisture.
4) For any defect or damage resulting from any unauthorized modification or repair.
5) For any defect or damage resulting from disasters such as fire, air pollution, earthquake or war.
6) For any defect or damage resulting from a leak of the battery.
7) Consumable such as battery.
4. The warranty is valid only for service in the USA.
(Caution Upon Shipping or Transporting)
Upon shipping or transporting the product, please be careful about the following:
1. Enclose the original dated purchase order/receipt with the product during the warranty period.
2. Avoid damage to the product during shipping/transportation using proper packing materials.
The customer shall bear the cost of shipping/transportation.
3. Use registered and/or insured mail to prevent a loss.
● If any defect occurs during the use of this product, contact the shop you purchased or Pogo Products Inc.
● Replacement, repairs (charge/free) or refunds must be in accordance with our policy and can be found at:
http://www.pogoproducts.com/support.html
● If you have any further questions about this product, please contact Pogo Products Inc.
Page 36

PoGo! Products Inc.
590 W. Central Ave Suite E
Brea, CA 92821
Phone: 714-671-1854
The warranty may be used only in the USA. Please keep your dated purchase order/receipt safely as it is
required for any warranty service.
36
 Loading...