

PO FUNG ELECTRONIC BF H6 User Manual

1
BF-H6 User Manual
To users
Thank you for your favor with our products.
This product is a high-power radio, If you are long time transmit will cause the
heat of this machine is a normal phenomenon, In the case of sufficient distance
recommended to use Middle (Middle power) or Low (Low power) to transmit!
Thanks for using!
LCD 大屏幕显示 LCD Screen
高中低三档功率可选 High/Medium/Low Power are optional
DTMF 编码 DTMF Encoded
U/V 全段接收 UHF/VHF Full frequency receive
128 组存储信道 Up to 128 memory channels.
中转 1750HZ 转发信令 1750 Hz TONE for access to repeaters
ANI 身份码发送 ANI code
数字/模拟亚音自动扫描 CTCSS/DCS to Automatic Scan
快捷菜单操作模式 Shortcut menu operation mode
有线复制功能 Wired Clone
紧急报警呼叫功能 Emergency alarm call function
中英文语音报号 Chinese/English switch over
2
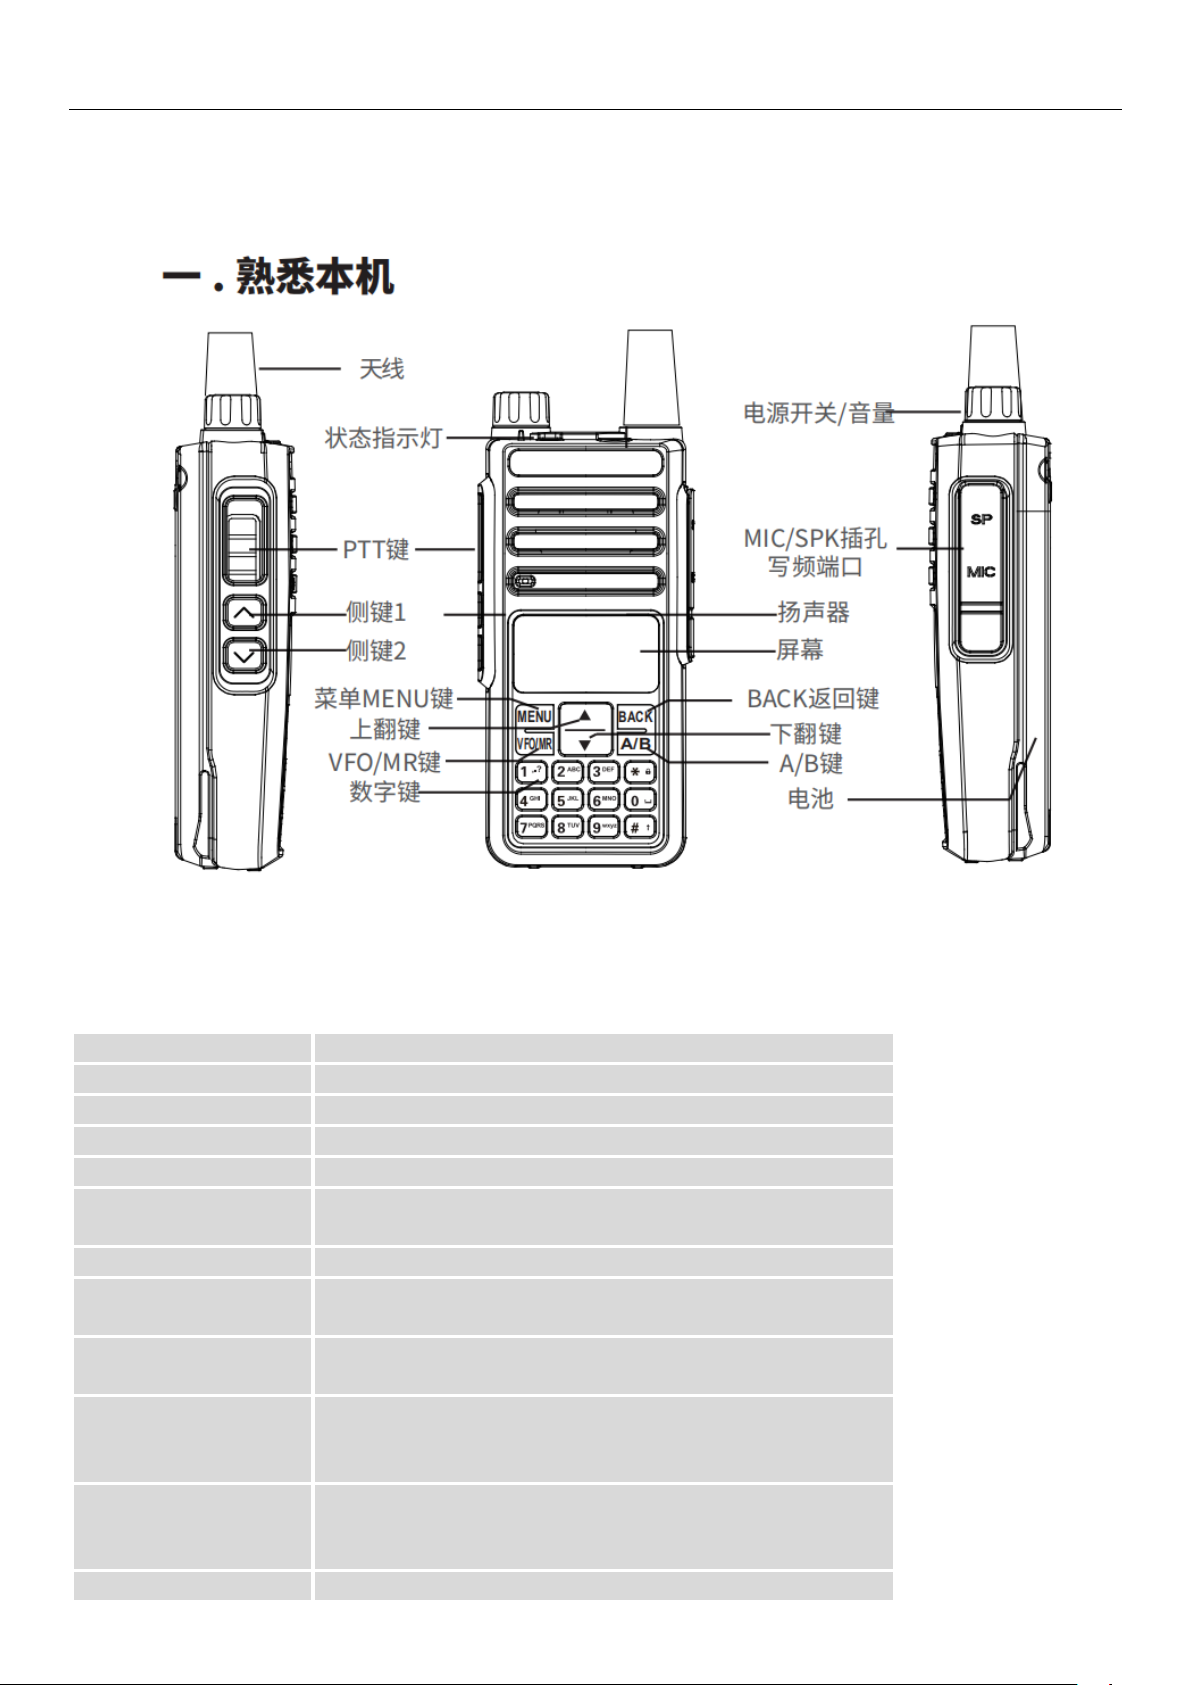
熟悉本机 Familiar with this Product
■熟悉本机(插图说明)
Antenna
A helical antenna for receiving and transmitting signals.
Battery Push-button
This is for fixing the battery
Battery Pack
This is to power the radio
Speaker
This is for the radio output voice
Microphone
This is putting voice into the radio
External interface
This is for external earphones; Or external write frequency line, can use PC write frequency
software to write frequency operation and program upgrade.
Strap buckle
The radio body can be clamped on the belt for easy carrying.
【Power/Volume】Knob
Rotate the knob clockwise to turn the radio on or to increase the volume, and rotate the
knob counter-clockwise to turn the radio off or to decrease the volume.
【SOS】button
Long press to open the alarm function, and then press this button to cancel the alarm
function.
【PTT】Transmit button
After press this key, the radio is in the transmitting status and speaks into the microphone
to call the other party. After releasing this key, the radio is in the receiving status.
【MENU】button
Press it to activate the menu mode, enter the menu and press this button to select menu
items.
In power off status, Press and hold this button to switch channel mode or frequency mode.
【】/【】UP/DOWN button
In frequency mode, change the current frequency;
3
In channel mode, switch channels up and down;
In Menu status, change to set the menu items and menu values, press more than 2 seconds
to quickly forward or backward search.
In scanning status, Change the scanning direction.
[Exit] and A/B switch button
In the input status, clear the input information; In standby mode, press this button to
switch A/B, Switch 65-75/76-108mhz frequency in the FM mode.
* ,#, 0-9 number buttons
0-9 are numeric keys used for input frequency, channel number, menu item and menu
value, * key for channel, frequency, CTCSS/DCS and FM broadcasting station scanning,
Long press the # key to lock or unlock the keyboard, Press [PTT] button to transmit, and
then press the number button to transmit the corresponding DTMF number.
【PTT】键(发射按键)【PTT】Key(Transmit Key)
Transmit and receive conversion key: when transmitting, press this key and speak into the microphone; Release this key
when receiving.
1、Transmit Interface
2、Receive Interface (Triangle icon flicker)
侧键 1(CALL 键) Side key 1(CALL Key)
Press the button to turn on the FM radio, and then press the button to turn off the FM radio.
FM Radio Interface
侧键 2(MONI 键)Side key 2( MONI Key)
Long press this key to monitor function. In channel mode, short press to temporarily switch high, medium and low
transmission power. In frequency mode, short press can change high, medium and low transmission power.
橙色键 Orange Key
Long press this button to turn on the alarm function, short press again to close.
LCD 显示屏 LCD Screen
For display all working status of the Radio.
VFO/MR 键
For frequency mode and channel mode switching
1、 Standby for frequency mode
4
2、Standby for channel mode
功能键盘 Function of the keyboard
Menu select/confirm key: [MENU]
Use this key to activate menu mode and select items in the menu mode.
MENU Interface
“▲” UP Key(Long press for more than 2 seconds to move forward quickly)
“▼“ DOWN Key(Long press for more than 2 seconds to back up quickly)
[BACK]/ [EXIT]: Exit/clear key (In the input status, clear the input information)
数字键盘 Numeric keypad
For enter information into the programming menu of a radio; in the non-standard CTCSS editing status, the non-standard
CTCSS can be directly input, and the corresponding DTMF encoding will be issued when the number key is pressed in the
transmit status.
[*] Key
Press this key to invert the receiving and transmitting frequencies;
Press for more than 2 seconds to lock or unlock the keyboard.
[#] Key
Press for more than 2 seconds to turn on frequency or channel scanning
In the FM radio Mode, press the button to search FM station automatically.
[0]Key
Press for more than 2 seconds to display the current battery voltage in standby mode.
Power / Volume Knob
To turn on the power, turn the [Power Switch / Volume Control] knob clockwise until you hear a "click" sound and a short
beep sounds. To turn off the radio, turn the knob counterclockwise until you hear a click. (English version supports channel
number broadcast); Turn clockwise to increase volume and vice versa.
状态指示灯 Led indicator lamp
Transmit ---- Red light
Receive-----Green light
外部接口 External interface
5
This is for external earphones; Or external write frequency line, can use PC write frequency software to write frequency
operation and program upgrade.
DTMF
After the DTMF is turned on, press the PTT + Side 2 will send out TONE.
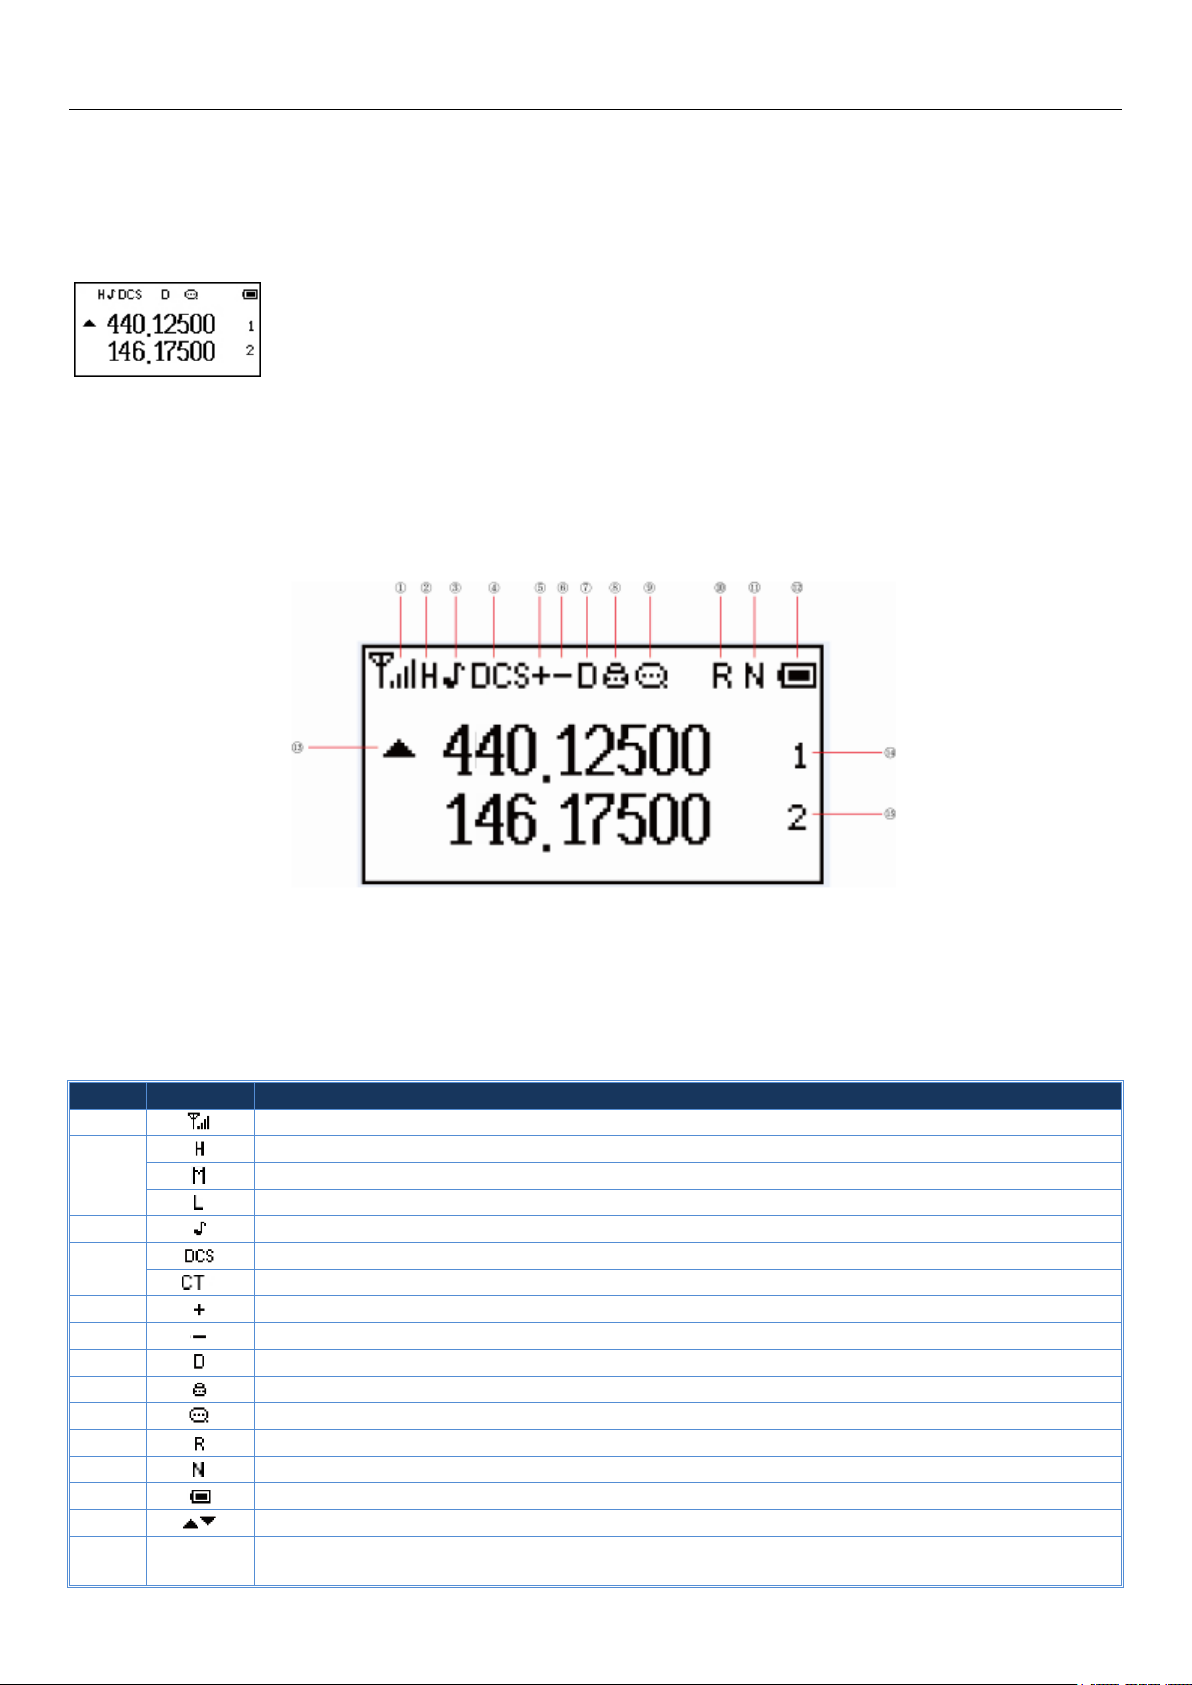
点阵屏界面显示 LCD Icons
The LCD screen is used to display all the working status of the two-way radio. The corresponding function icons are displayed on the screen
during operation. The screen allows you to know the meaning of the icons and how to set the functions more quickly.
界面图标说明 Description of LCD Icons
No.
icon
Description
1 The channel signal indication
2
The channel transmits at high power;
The channel transmits at medium power
The channel transmits at low power
3 When the DTMF is set to DT-ST/DT+ANI/ANI-ST, the symbol appears
4
The current is CDCSS
The current is CTCSS
5 The current transmission frequency is the reception frequency plus a frequency bias(Set in menu 24th)
6 The current transmission frequency is the reception frequency minus a frequency bias(Set in menu 24th)
7 Has been set to dual-band double-waiting function, and allows waiting on two frequency bands displayed on the screen at the same time
8 The keyboard lock is locked; Press the [*] to unlock
9 The VOX has been turned on
10 In channel or frequency mode the invert the receiving and transmitting frequencies
11 The radio work in narrowband mode
12 The more bars, the more battery power, The icon flashes when the intercom is disabled
13 A/ B band pointer
14
Arabic
numerals
In channel mode, the current channel number for A
6
15
Arabic
numerals
In channel mode, the current channel number for B
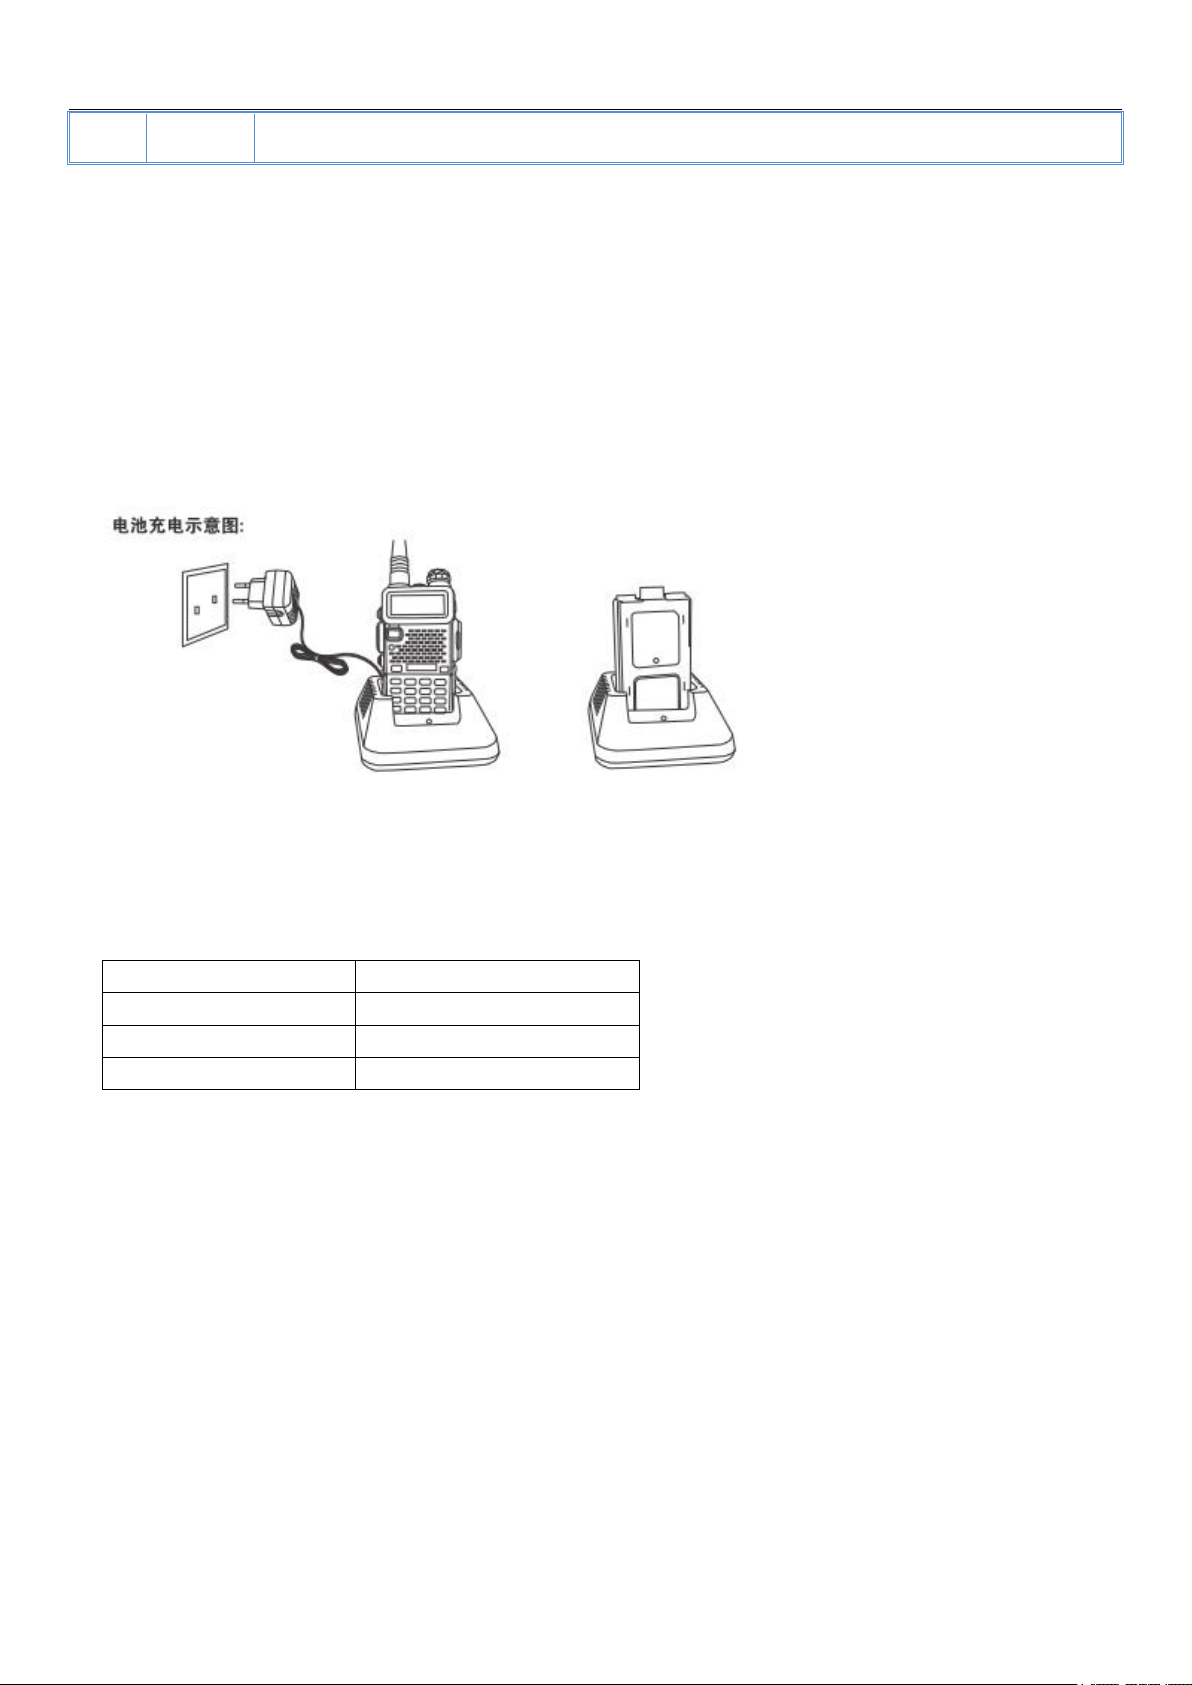
■用前准备 Preparation before use
充电 Charging
Note: Be sure to ensure that the product is off when charging. Battery into the charger may be charging red flashing
constantly flashing, this is the battery power is too low, the charger to protect the battery pre-charge process, is a
normal phenomenon, Generally continue for 30 seconds to turn the red light of the normal status of charge
Please charge the battery with the charger specified by our company. The indicator light of the charger shows the charging
status.
1. Plug the power adapter into a power outlet;
2. Plug the other end of the power adapter into the socket on the back of the charging cradle;
3. Insert the battery or the battery-equipped product into the charging cradle correctly; the indicator light on the charging
cradle shows the charging status. When the indicator light is red, it indicates the start of charging. When the indicator
turns green, the charging is completed. Below is a detailed char.
Indicator display
Current charge status
Red light flashes
Battery power is too low
Red light
In charging
Green light
The charging is completed
Note:
● For best battery performance, charge for a minimum of 4 hours on first charge.
■电池信息 Battery information
●The first use of the battery
Since the battery is not fully charged at the factory, please charge the new battery before use. Under normal circumstances, the battery
when used for the first time, need to charge 4 hours, lithium-ion battery charging using slow charge or fast charge can be performed
when charging. It is recommended that the new battery be operated as above for the first three uses. When you find the battery power
is low, you need to charge the battery.
●Suitable battery type
Please use the specified battery for charging; use of other batteries may cause explosion, resulting in human injury.

7
●Battery safety attention
1. Do not allow metal contacts (including coins, keys, jewelry, or other conductive metal) to be touched by the battery contacts or pole
pieces. Otherwise, the battery may short circuit, discharge, heat or leak, which may result in damage to the item or personal injury.
Therefore, be careful when handling any battery.
2. Do not short-circuit the battery terminals or discard the battery in a fire. Do not disassemble the battery pack. When the battery is discarded,
please put into a dedicated battery recycling box.
●Battery normal operation instructions
★Please charge the battery indoors, battery charging at room temperature best.
★Under normal circumstances, the charger indicator from red to green when the battery is fully charged, at this time the battery can be
removed.
★You can charge when Battery installed in the walkie-talkie, but when charging is best to turn off the walkie talkie, to ensure that the battery
is fully charged.
★Please do not charge the battery when the battery power is not used up (after the battery is exhausted, the voice prompt alarm will be
given), which will shorten the service life of the battery.
★Do not put a fully charged battery back on the charger to "power up" again, as this operation significantly reduces the cycle life of the
battery.
●Extend battery life
★Battery performance will reduce below -20 ℃ temperature conditions. Prepare back-up batteries for use in colder weather. Please do not
throw away cold batteries that cannot work. These batteries may be used at room temperature.
★Dusting the battery contacts may affect the battery life. Please wipe the contacts with a clean, dry cloth before inserting the batteries into
the walkie-talkie.
●Battery storage needs to know
1.Since the battery will have a self-discharge phenomenon, the battery when not in use for a long time, please fully charge the battery and
then stored to avoid over-discharge of its battery to damage the battery.
2. When the battery is in storage, remove the battery to recharge when stored about 6 months. To avoid over-discharge of electrolyte affect
battery capacity.
3. Pay attention to the temperature and humidity of the battery storage environment. Store the battery at room temperature in a cool, dry
place to minimize self-discharge of the battery.
 Loading...