

Page 1
Page 2

USB 2.0 ULTRA-Portable Portable Hard
THE DATA STORED ON THIS HARD DRIVE IS NOT
GUARANTEED BY POCKETEC.
POCKETEC
IS NOT RESPONSIBLE FOR ANY LOSS OF DATA.
LWAYS BACK UP ALL DATA REGULARLY.
A
Drive
Page 3

Table of Contents
Introduction 03
Features and Benefits 04
The POCKETEC Package 04
Minimum System Requirements 05
Care and Handling 05
Hardware Installation 06
Software Installation for Windows® 07
Software Installation for Macintosh® 10
Installing the DataStor for Use with LINUX 11
Installing the DataStor for Use with DOS 11
Removing the DataStor After Use 12
Frequently Asked Questions 13
How To… 17
Warranty Information 18
Contact Information 19
2
Page 4

Introduction
Pocketec proudly introduces the DataStor Mini™, the miniature version of
the award winning DataStor™ USB 2.0 Drive. The ultra-portable Mini is
smaller than your wallet but it packs enough storage space for 5,000 MP3
songs, 29 CDs worth of data, or 8.5 hours of digital video (20GB version).
Best of all, the Mini is totally bus powered by the host computer so you
don’t have to lug around an AC adapter or worry about batteries. Just plug
the Mini into the USB port of your computer and you instantly have access
to 20GB of extra storage space.
The DataStor Mini™ works with laptops and desktops and is compatible
with Windows®, MAC, DOS and Linux, so cross-platform file sharing is a
breeze. The Mini is USB 2.0 certified, offering the fastest transfer rates.
Plug-N-Play, hot-swappable, and hot-pluggable features make the Mini
convenient and easy to use. The Mini is the perfect way to back up your
critical data or to take your data with you wherever you go.
*To achieve USB 2.0 speeds, your computer must be USB 2.0 enabled.
3
Page 5

Features and Benefits
• USB 2.0 certified with transfer rates up to 480Mbps (40x faster than USB 1.1)
• Backwards compatible with USB 1.1
• Tiny footprint offers maximum portability
• Massive storage capacity
• Stackable (multiple DataStor minis can be attached to your computer)
• No additional power source required (no batteries or AC adapter required)
• Cross-platform compatible (Windows®, MAC OS, LINUX and DOS)
• Plug-N-Play (drivers not required for Windows® XP/2000/ME and MAC OS 10.1+)
• DOS Level Support
• Average sustained write speed of 16MB/s and read speed of 18MB/s*
The POCKETEC Package
Your POCKETEC™ package contains the following:
• DataStor mini Ultra-Portable Hard Drive
• Standard DataStor mini USB connection cable
• Quick Start Guide
• CD-ROM Installation mini-CD with E-Manual
• Mini Carrying Case
• One-Year Limited Warranty
* The speed may vary depending on the host computer. The average sustained speed is the average
transfer rates of the drive on various computers using performance-testing software.
4
Page 6

Minimum System Requirements
• 400MHz or equivalent processor
• Minimum required RAM for your OS
• Windows® 98/98SE/ME/2000/XP, MAC OS 8.6 or higher
• Available USB port (Note: to achieve USB 2.0 speeds you must use the DataStor
mini with a USB 2.0 port)
• CD-ROM drive for driver installation or Internet connection for driver download.
Note: Driver not required for Windows® ME/2000/XP and MAC OS 10.1 +.
Driver required for Windows® 98/98SE and MAC OS 8.6-10.0.x.
Note: For Macintosh® computers with a front-loading CD-ROM, please download the
drivers from www.pocketec.net and install the downloaded drivers. (Front-loading CDROM drives cannot read mini-CDs). Only use the mini-CD for CD-ROM drives with a
slide-out tray.
Care and Handling
• Please keep the DataStor mini in the protective carrying case when it is not in use,
so as to minimize risk of damage. Always handle your DataStor mini drive carefully.
• Do not move or disconnect the DataStor mini from your computer while the DataStor
mini drive is writing or reading data to or from the drive. This may cause loss of data
or damage to the hard drive.
• Before unplugging the DataStor mini or turning off the DataStor mini, click on the
“Stop Storage Device” icon on the task bar (or for the MAC, drag the DataStor mini
drive to the trash can), then turn the DataStor mini drive’s power switch to the “OFF”
position. Failure to do so may cause loss of data or corruption of the partition. Note:
this is not required for LINUX or DOS. Failure to do so may cause loss of data.
• No formatting is necessary. The DataStor mini is already formatted. DO NOT leave
the DataStor mini connected and on while reformatting other drives.
5
Page 7
Care and Handling
• DO NOT open the outer case. Opening the case may damage the DataStor mini, its
components or the hard drive and will VOID THE WARRANTY.
• DO NOT expose the DataStor mini to extreme temperatures or humidity. Either may
cause serious damage to the hard drive.
• DO NOT put on or near electromagnetic equipment such as amplifiers, speakers,
source units, magnets or any other magnetized devices.
• DO NOT shock the drive. Static shock can cause the drive to lose data.
Hardware Installation
First, make sure you have all the package contents. You should have one USB cable,
one DataStor mini drive, one installation mini-CD w/E-Manual, one Quick Start Guide
and one carrying case. If you are missing any of the above contact POCKETEC
immediately. If you are running MAC OS 8.6 – 10.0.x you must first install the drivers.
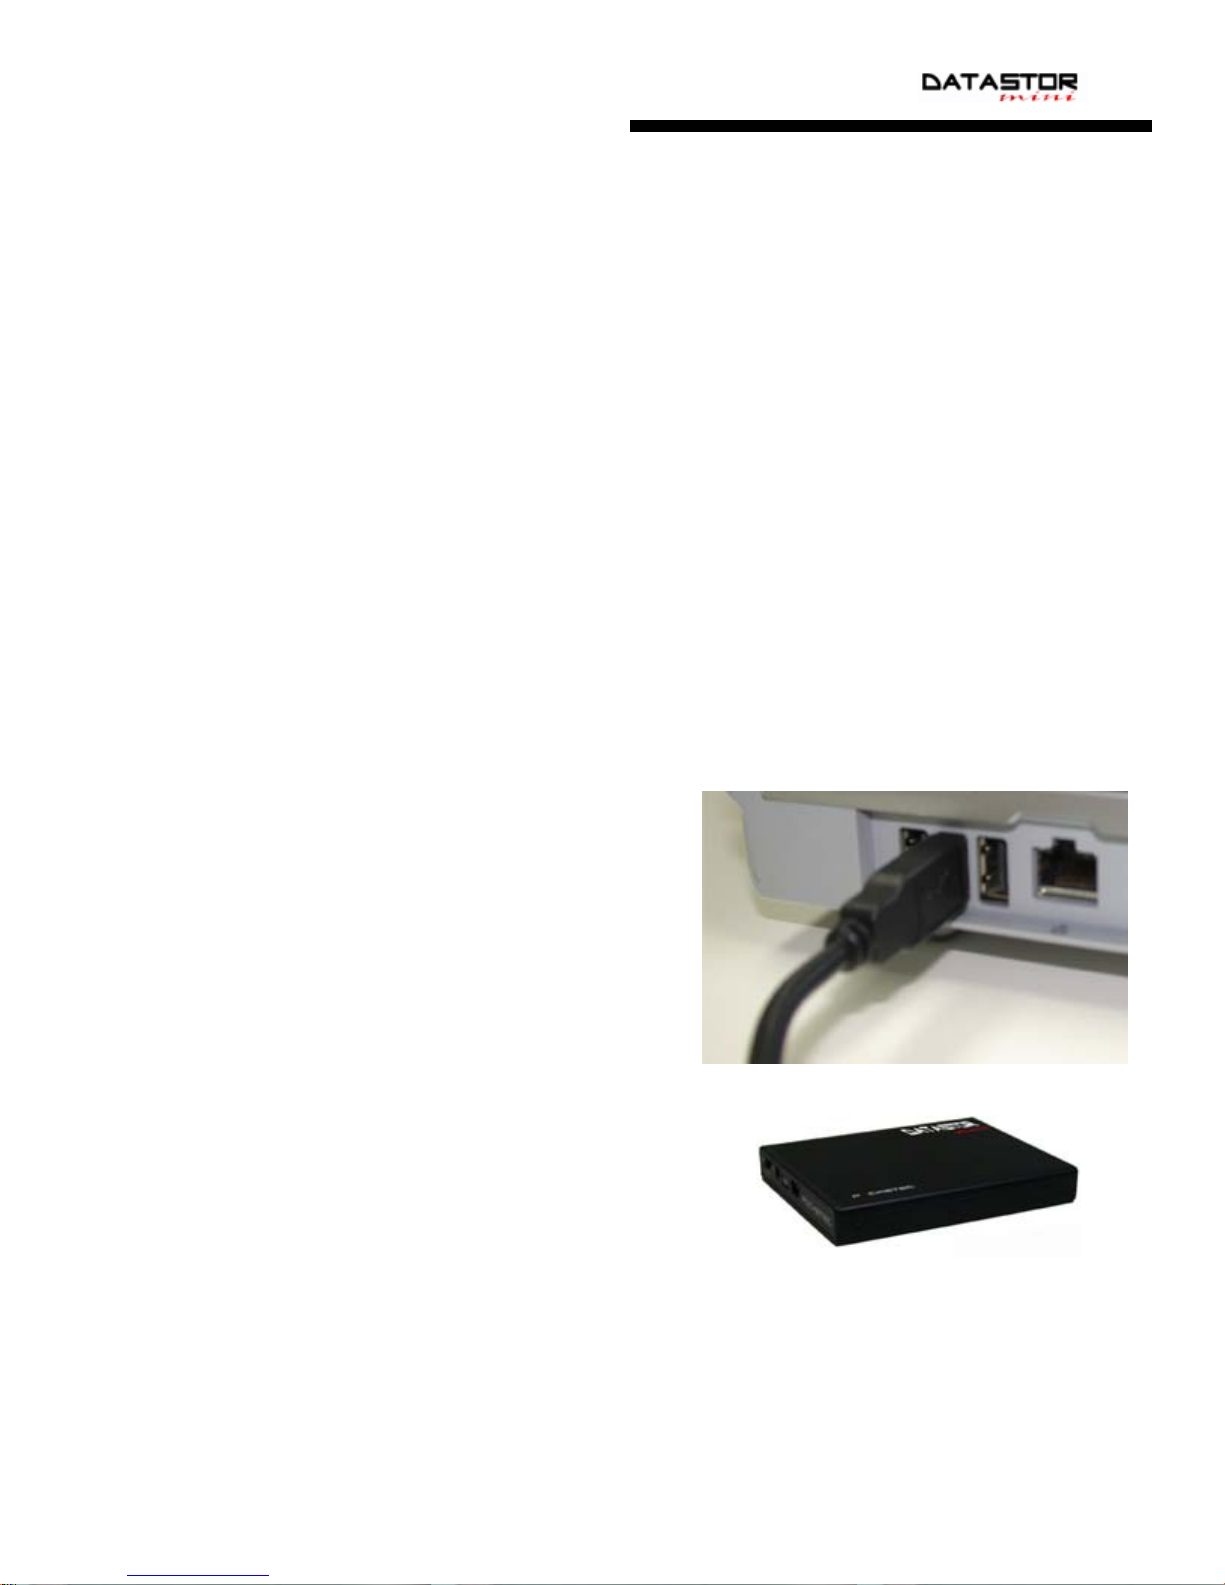
1. Take the USB cable and locate an available
USB port on your computer.
2. Connect the USB connector to your USB port
on the computer or powered USB hub. Note:
Only USB ports located directly on the
computer or a powered USB hub will provide
sufficient power. USB ports on keyboards or
non-powered USB hubs will not work.
3. Connect the mini-USB connector to your
DataStor mini drive.
4. Make sure all connections are secure.
5. Turn the power switch to the “USB” position.
(DO NOT TURN THE POWER SWITCH TO THE
EXT POSITION).
That completes the Hardware Installation Process
6
Page 8
Driver Installation For Windows®
Software drivers are not required for computers running the following operating systems:
Windows
Software drivers must be installed for Windows® 98 and 98SE. For driver installation
from the mini-CD, follow steps 1 - 7 below after the hardware installation.
® ME/2000/XP
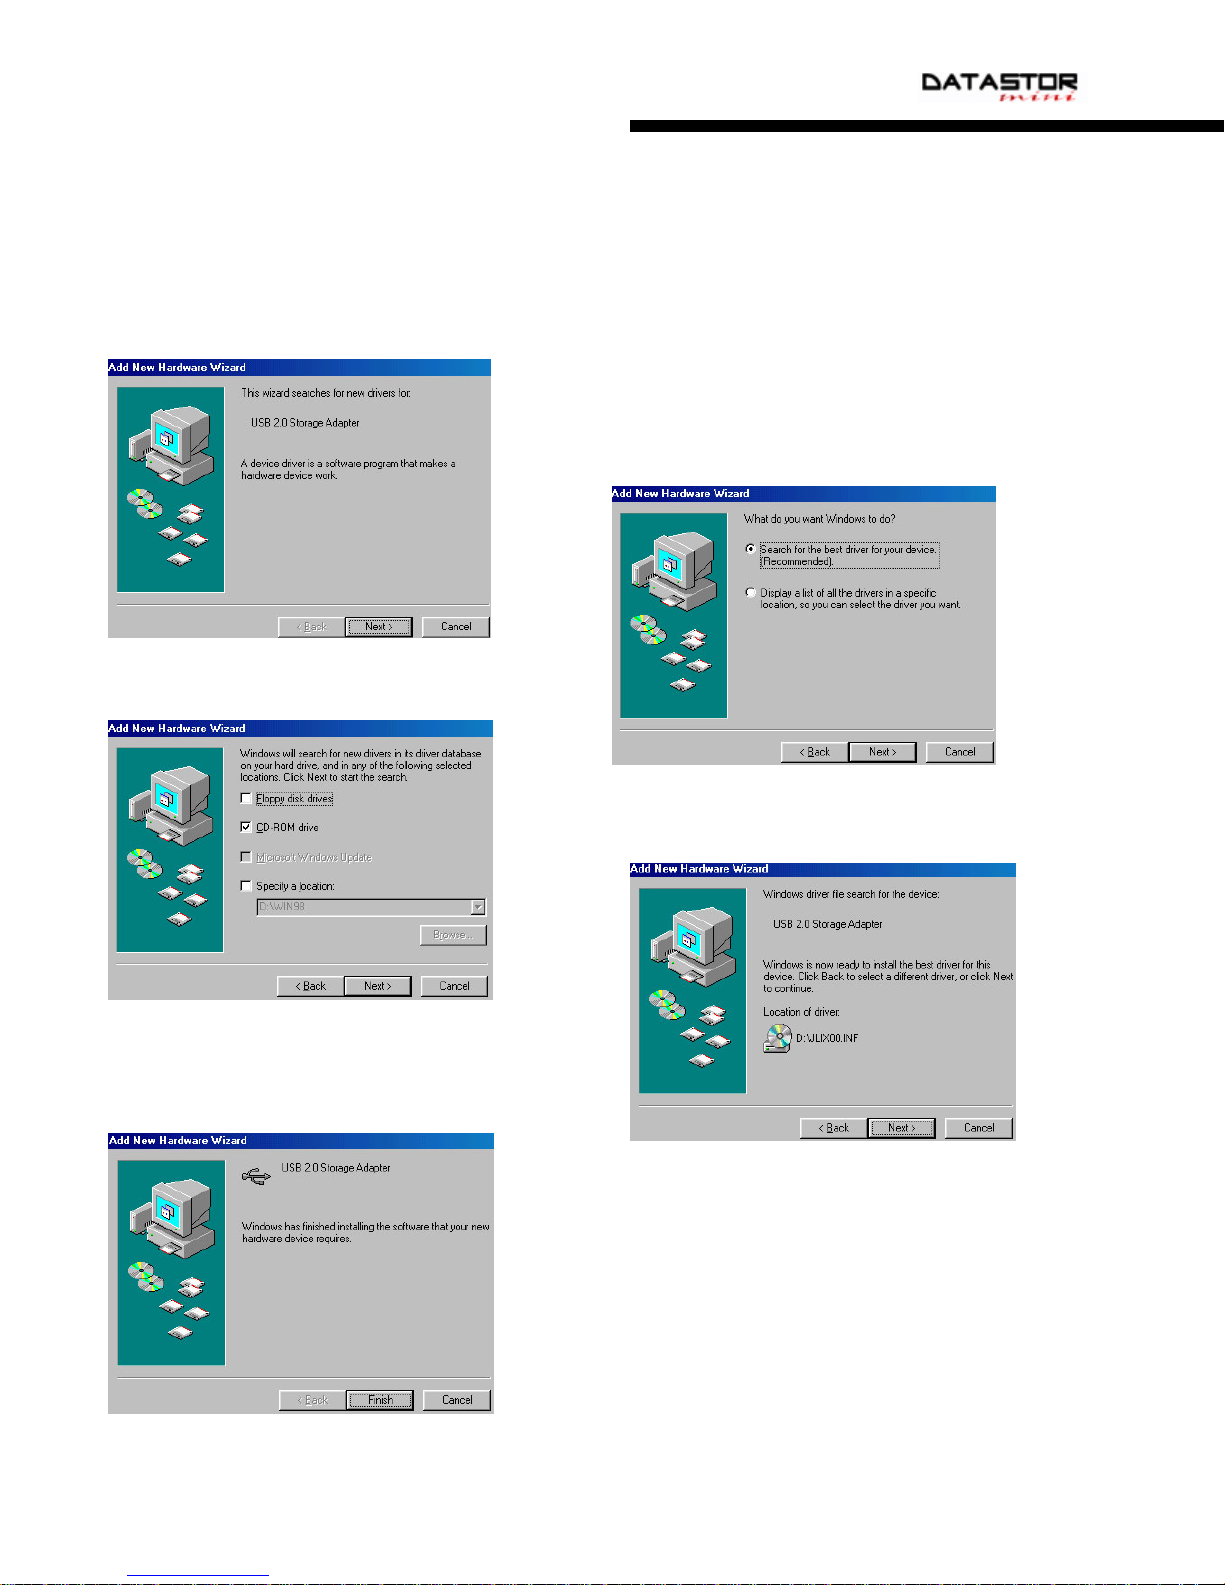
1. Insert the POCKETEC Drivers CD into your CD-ROM.
2. Select Next at the new hardware wizard.
3. Select “Search for the best driver for your
device (recommended)” and select Next.
4. Check the CD-ROM drive only and select Next.
5. When the wizard finds the JLIX00.INF driver
select Next.
6. Select Finish to complete the driver installation
process.
For driver installation of the downloaded drivers,
please view the next page.
7
Page 9
Downloaded Driver Installation For Windows®
Software drivers are not required for computers running the following operating systems:
Windows
Software drivers must be installed for Windows
from the downloaded file, follow steps 1 - 19 below.
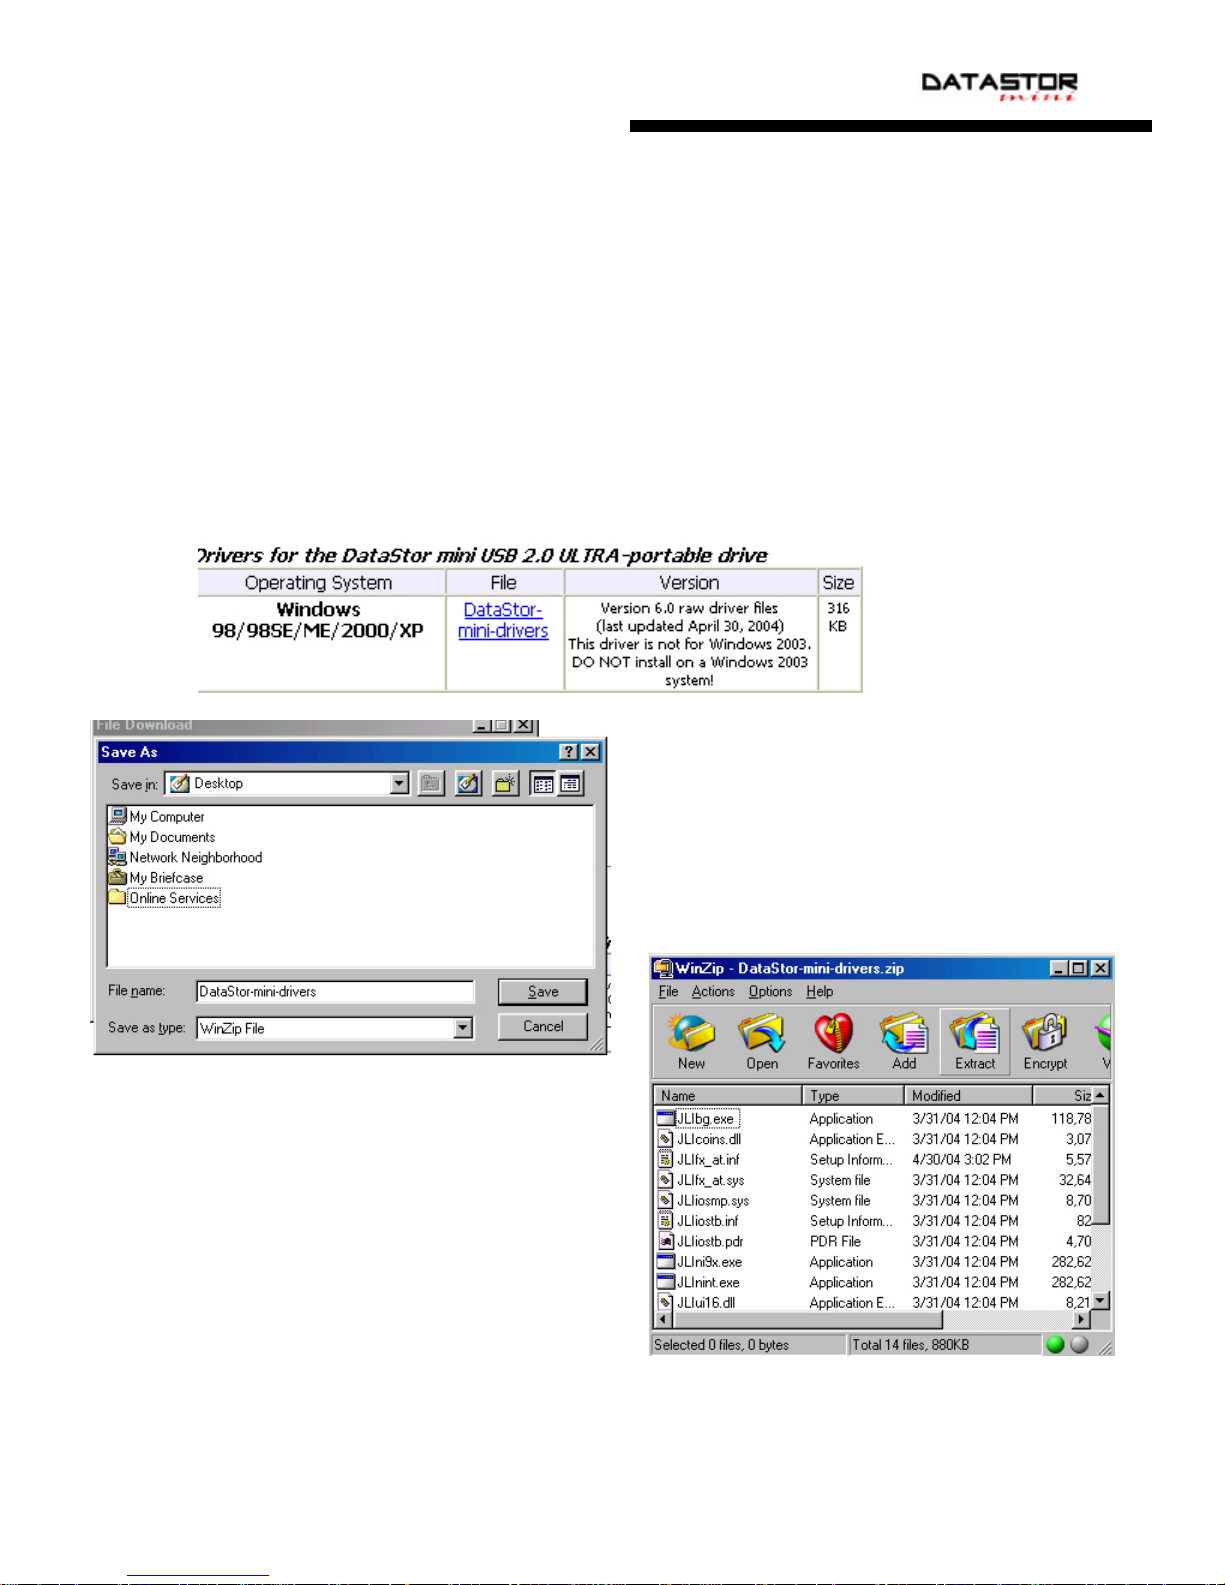
1. Go to www.pocketec.net
2. Go to the DOWNLOADS section and click drivers for Windows.
3. Select the “DataStor mini” link to download the drivers.
® ME/2000/XP
® 98 and 98SE. For driver installation
7. Select to extract the files to a directory (in this
example we are using the desktop).
8. After the drivers are successfully extracted,
close the extraction program.
9. Next, plug in your DataStor mini drive.
10. Turn it on to the “USB” position.
4. Download the files to your desktop.
5. Open the DataStor-mini-drivers.zip
file.
6. Select Extract to unzip the files to a
location on your computer.
8
Page 10
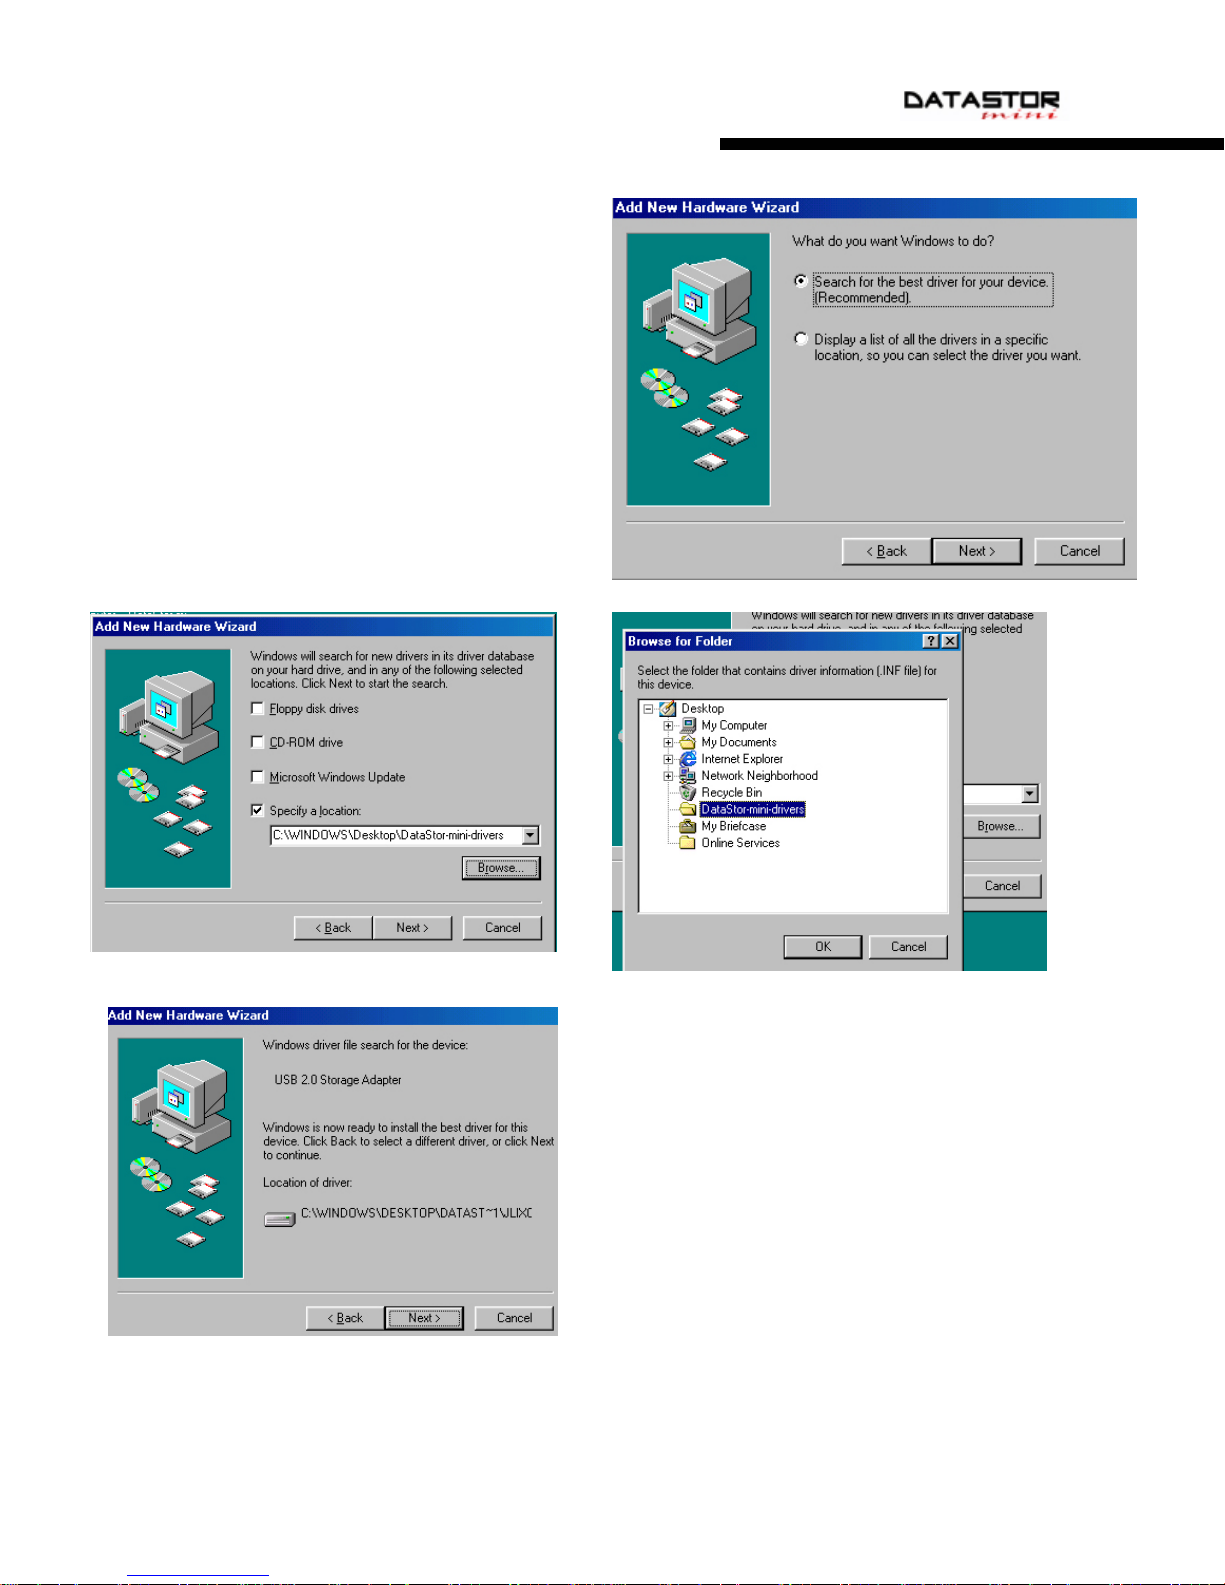
11. Wait for the “Add New Hardware Wizard” to start.
12. Select “Next” when the wizard starts.
13. At the next window. Select “Search for the
best driver for your device.
(Recommended).”
14. Select “Next” to continue.
15. Check the box next to “Specific Location”
16. Select Browse, and browse to the
DataStor-mini-drivers folder (in this example
it was extracted to the desktop). And select
OK.
17. Select Next to continue the installation.
18. After the wizard picks up the drivers,
select Next to continue.
19. Select Finish to complete the driver
installation.
9
Page 11
Driver Installation for Macintosh®
Software drivers are not required for computers running the following operating systems:
MAC OS 10.1.x – 10.3.4.
Software drivers must be installed for MAC OS 8.6-9.2.2. For
driver installation from the mini-CD, follow steps 1 - 6 below.
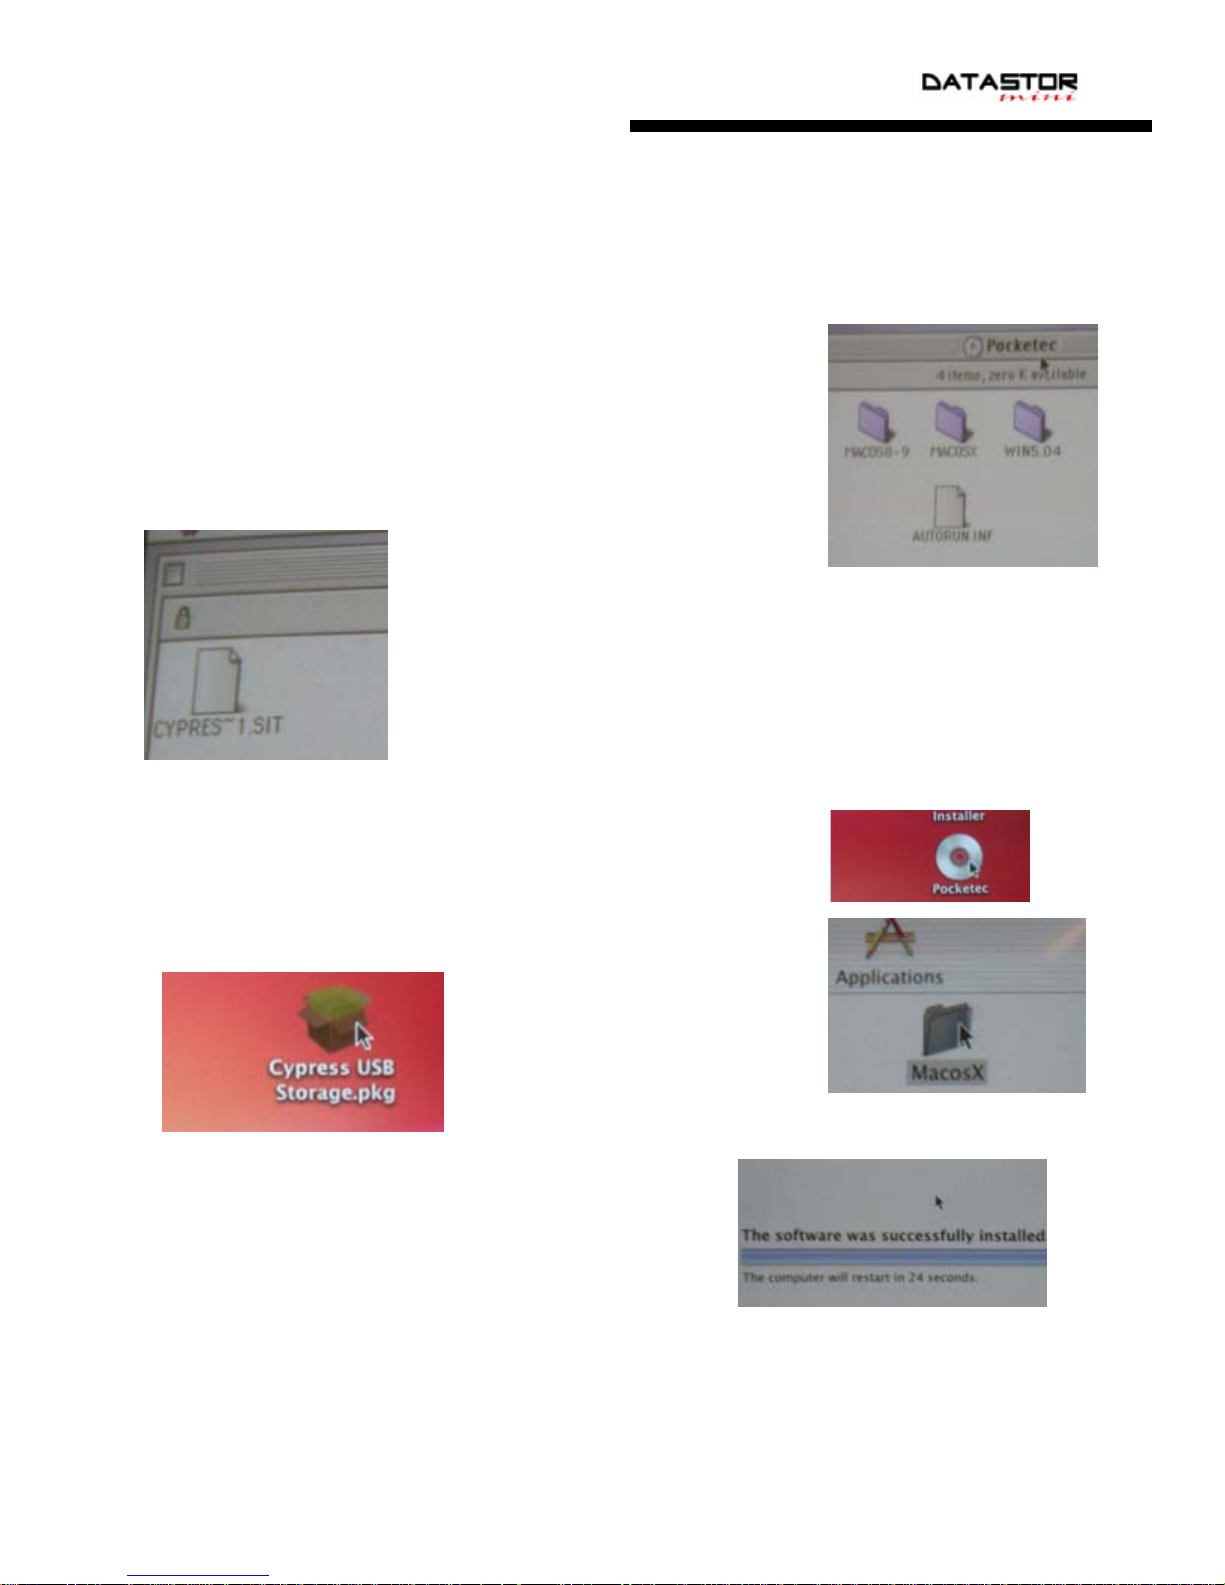
1. Insert the DataStor installation CD into your CD-ROM.
2. Open the “MAC OS 8-9” folder.
3. Open the “Cypres~.sit” file.
4. Expand the file using sit expander.
5. Wait for the driver to finish
loading.
6. If you do not receive the message to restart your
computer or you select not to restart your computer,
restart your computer before turning on the
DataStor mini. Note: you MUST restart your
computer in order to complete the driver installation
process.
Driver installation for MAC OS 10.1.x +. Follow steps 1 – 7
below.
1. Insert the mini-CD into the CD-ROM tray/slot.
2. Wait for the POCKETEC CD to appear and open it.
3. Open the folder
MAC OS 10.
4. Expand the
Cypress Installer
and save it
somewhere on your computer.
5. Open the Cypress Installer that was saved to
your computer.
6. Follow the installer and choose your options.
7. Restart your computer when the installation is
finished.
10
Page 12

Mounting In Linux
To mount the DataStor mini in Linux, follow steps 1 – 8 below.
Note: Drivers are not required for Linux. You should do this in your “root” account
1. Locate the mini-USB to USB cable
2. Locate the DataStor
3. Plug the USB cable directly into a USB port on the computer
4. Plug the mini-USB into the mini-USB port on the DataStor
5. Turn the DataStor power switch to USB
6. Use whatever partitioning tool to see if the DataStor is recognized and the partition is
seen.
7. Create a mount point in folder mnt, i.e. mount /dev/sda1 /mnt /<name here>
8. Type the following in FSTAB:
/dev/sda1 /mnt/usbhd vfat noauto,user,owner,rw 0 0
Note: SDA1 may not be the DataStor, type in the proper scsi device.
Installing in DOS
Note: DUSE does not work all BIOS, for latest DUSE version you may check our website: www.pocketec.net Also, the
DUSE drivers are not compatible with USB 2.0 PCMCIA cards.
1. Create a Win98/98SE boot disk
2. Add the DUSE.exe and DUSEALDR files to the boot disk
3. Open the config.sys file in notepad
4. Add the line device=a:\duse.exe
5. Close notepad, save changes
6. Plug-in the DataStor directly into a USB port on your computer
7. Boot to DOS
8. Wait for drivers to load and enable USB support
9. Turn the DataStor on to “USB”
Note: If the drivers did not load properly or having trouble with the drive in DOS please visit our trouble shooting section.
11
Page 13
Safely Removing the DataStor mini After Use
(Windows®)
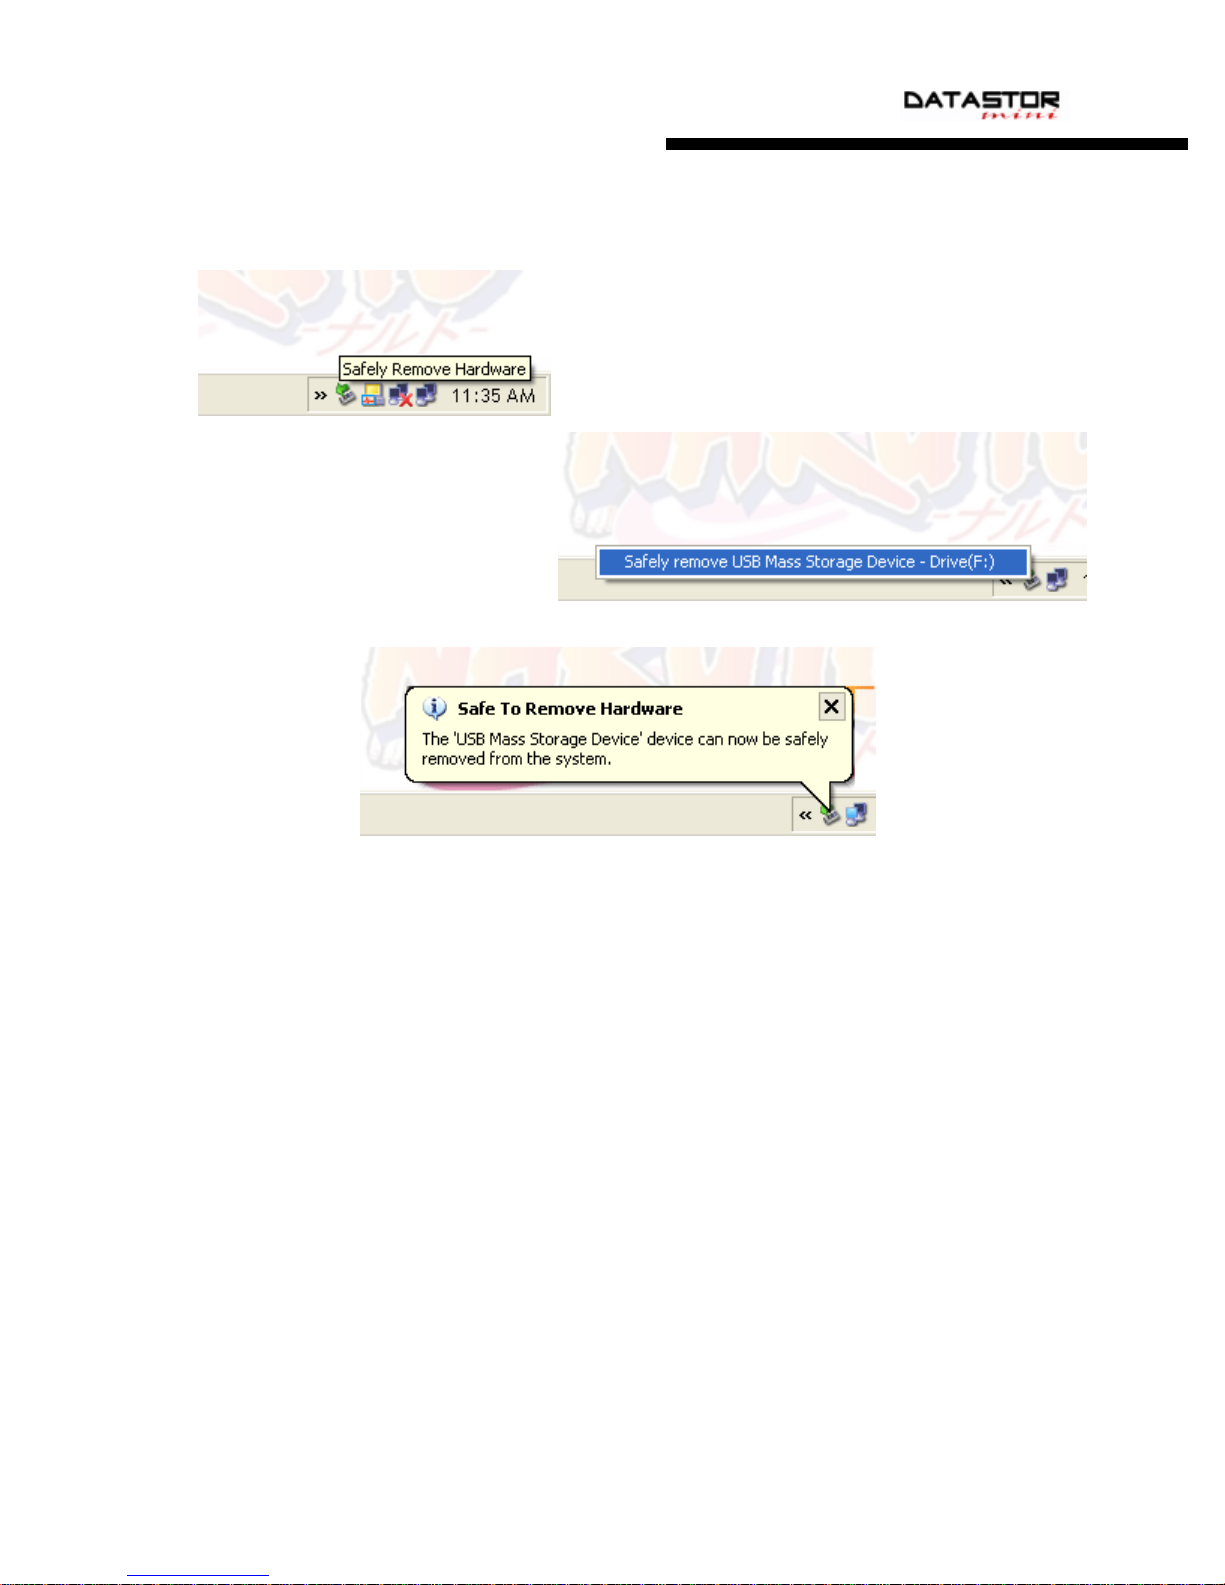
1. Locate the safe removal icon in
your system tray.
2. Select the safe removal icon and
choose the DataStor mini.
3. Your computer will notify you that
the DataStor mini is safe to be
removed
4. Turn the DataStor mini off then
unplug it from your computer.
Safely Removing the DataStor mini After Use
(MAC OS 8.6 and higher)
1. Select the DataStor mini.
2. Drag the DataStor mini icon to your trash can on your desktop.
3. Select to remove the DataStor mini.
12
Page 14

Frequently Asked Questions
uestions answered in this section:
Q
Q
: Do I really have to use the safe removal tool each time I want to turn off/disconnect
Q
Q
my DataStor mini?
: How do I use my DataStor mini?
Q
Q
: Why doesn’t the DataStor mini work with Windows 95 and Windows NT?
Q
Q
: Can I use a USB hub with the DataStor mini?
Q
Q
: Can I daisy chain the DataStor mini to other DataStor mini drives?
Q
Q
: Why doesn’t my DataStor mini work with my computer?
Q
Q
: How do I format my DataStor mini?
Q
Q
: What are the Minimum System Requirements for the DataStor mini?
Q
Q
: Why does my transfer rate seem so slow when it says it can transfer up to 480Mbps?
Q
Q
: Why does the DataStor mini show less space available than what I bought?
Q
Q
: Can I leave the DataStor mini on all day and night, every day?
Q
Q
: What back up program do I need to use to back up my computer?
Q
Q
: Why does the DataStor mini driver for Windows XP give me a warning message
Q
Q
when I install the drivers?
: Why is the LED on the DataStor mini red?
Q
Q
: Where can I buy extra cables?
Q
Q
: Why can’t I transfer more than 4GB at a time?
Q
Q
: What kind of utilities can I use with my DataStor mini?
Q
Q
: Does the DataStor mini work with Pocket PCs and PDAs with USB ports?
Q
Q
: Can I download pictures from my digital camera directly to the DataStor mini without
Q
Q
plugging both devices into a computer?
13
Page 15

QQuueessttiioonnss aanndd AAnnsswweerrss
Q: Do I really have to use the safe removal tool each time I want to turn off/disconnect
Q
my DataStor?
A: Yes, we highly recommend that you use the safe removal tool. It is important because
A
if you are transferring data to the drive and you happen to forget it and you unplug the
drive or turn off the drive, it can cause serious harm not only to the DataStor but also to
your internal hard drive. However, for intermediate to advanced users you may want to
bypass this step by disabling the write cache. But remember, by turning off or removing
the drive while still it is being accessed can cause harm to the drive even with the write
cache disabled.
Q: How do I use my DataStor?
Q
A: Think of the DataStor like your internal hard drive except it is portable, so you can
A
carry it with you. Now, when you save data, documents for example, you can save it to
the DataStor rather than your internal drive. All you have to do is browse to it. For more
detailed examples and instructions on how to do a back up or transfer data, please view
the “How To” portion of this manual.
Q: Why doesn’t the DataStor work with Windows 95 and Windows NT?
Q
A: The DataStor and other USB drives do not work with those two operating systems
A
because those systems do not support USB drives.
Q: Can I use a USB hub with the DataStor?
Q
A: You may use a USB hub if and only if it is a powered USB hub. A powered USB hub
A
is a USB hub that draws its power from a wall power outlet.
Q: Can I daisy chain the DataStor to other DataStor drives?
Q
A: No, there is no extra port on the Datastor for daisy chaining. In order to stack the
A
drives, you will need to plug each drive into a USB port of the host computer or a
powered USB hub.
Q: Why doesn’t my DataStor work with my computer?
Q
A: There are numerous reasons why the DataStor may not be working with your
A
computer. Please visit http://support.pocketec.net/dsmini/
14
Page 16

Q: How do I format my DataStor?
Q
A: You can format your DataStor drive in Windows 98/SE/ME/2000/XP, DOS and OS
A
X+. Please go to the How To Guide for detailed instructions on how to format your
DataStor in the specific OS.
Q: What is the Minimum System Requirements for the DataStor?
Q
A: The system requirements are: 400Mhz or equivalent processor, your operating
A
systems minimum RAM requirement, and minimum operating hard drive space.
Windows 98/SE/ME/2000/2003/XP, DOS 4+, Linux Kernal 2.4.5+, OS 8.6-9.2.1, or OS
10+. Available USB port, CD-rom tray for driver installation or internet connection for
driver download.
Q: Why does my transfer rate seem so slow when it says it can transfer up to 480Mbps?
Q
A: The USB 2.0 speed can transfer up to 480Mbps or 60MBps. (8bits = 1Byte, 480Mbits
A
divided by 8bits = 60MB per second). However, the actual rotational speed of the drive
is 4200RPM, which can only handle 128Mbps or 16MBps.
Q: Why does the DataStor show less space available than what I bought?
Q
A: When connected to a computer the drive space is seen in binary. When people say
A
1KB = 1000Bytes, 1MB = 1000KB, 1GB = 1000MB, but the computer sees it as 1KB =
1024Bytes, 1MB = 1024KB, 1GB = 1024MB. After doing the math and factoring in the
24MBytes per GB results in the computer showing less than what you would think the
capacity is. Also, the partition takes up some space as well as the file system.
Q: Can I leave the DataStor on all day and night, every day?
Q
A: Yes you can leave the DataStor on all day and night, however it is not recommended
A
that you do so. The DataStor is designed to function as a secondary hard drive and not
your primary hard drive. If you need a drive to use as both secondary and primary drive,
we recommend the DataStor PRO series for that task.
Q: What back up program do I need to use to back up my computer?
Q
A: Any back up program that can back up to a file can back up your computer and data
A
onto the DataStor. We offer technical support for the built-in Windows back up program
and BackUp MyPC only.
15
Page 17

Q: Why does the DataStor driver for Windows XP give me a warning message when I
Q
install the drivers?
A: Due to the drivers not being WHQL certified for Windows XP, it will give you that
A
warning message. However, our drivers have been tested for compatibility for Windows
XP and do not cause your system to become unstable or crash.
Q: Why is the LED on the DataStor red?
Q
A: The LED can be red, green or orange. Depending on the internal hard drive of the
A
DataStor the LED color will vary. The LED does not indicate that the drive is working or
not working. It’s more of an action light. Of course if the LED is not on at all, that would
indicate that it is not receiving power at all.
Q: Where can I buy extra cables?
Q
A: You can purchase additional cables from our website. Please visit:
A
http://www.pocketec.net
to purchase extra cables.
Q: Why can’t I transfer more than 4GB at a time?
Q
A: The DataStor comes preformatted under the FAT32 file system, thereby making it
A
compatible with Win 98/SE/ME/2000/2003/XP, DOS, Linux and MAC OS 8.6+. However,
DOS and Windows places a 4GB transfer limitation for FAT32 file systems. You may
remove this limitation by reformatting the DataStor to the NTFS file system. However,
the NTFS file system is only compatible with Windows 2000/2003/XP, Linux, some
versions of DOS and MAC OS 10.3 – 10.3.2. Also, whenever you format the drive, you
will erase ALL data on the drive so make sure that you have a copy of your important
data prior to formatting.
Q: Does the DataStor mini work with Pocket PCs and PDAs with USB ports?
Q
A: The DataStor mini is not compatible with any Pocket PCs or PDAs.
A
Q
: Can I download pictures from my digital camera directly to the DataStor mini without
Q
going through a computer?
A: No, you cannot plug your DataStor mini into your digital camera. You must first
A
download the pictures to a computer and then transfer the pictures from your
computer to the DataStor mini.
16
Page 18
How To…
Transfer Files and Folders to the DataStor mini
Copy and Paste
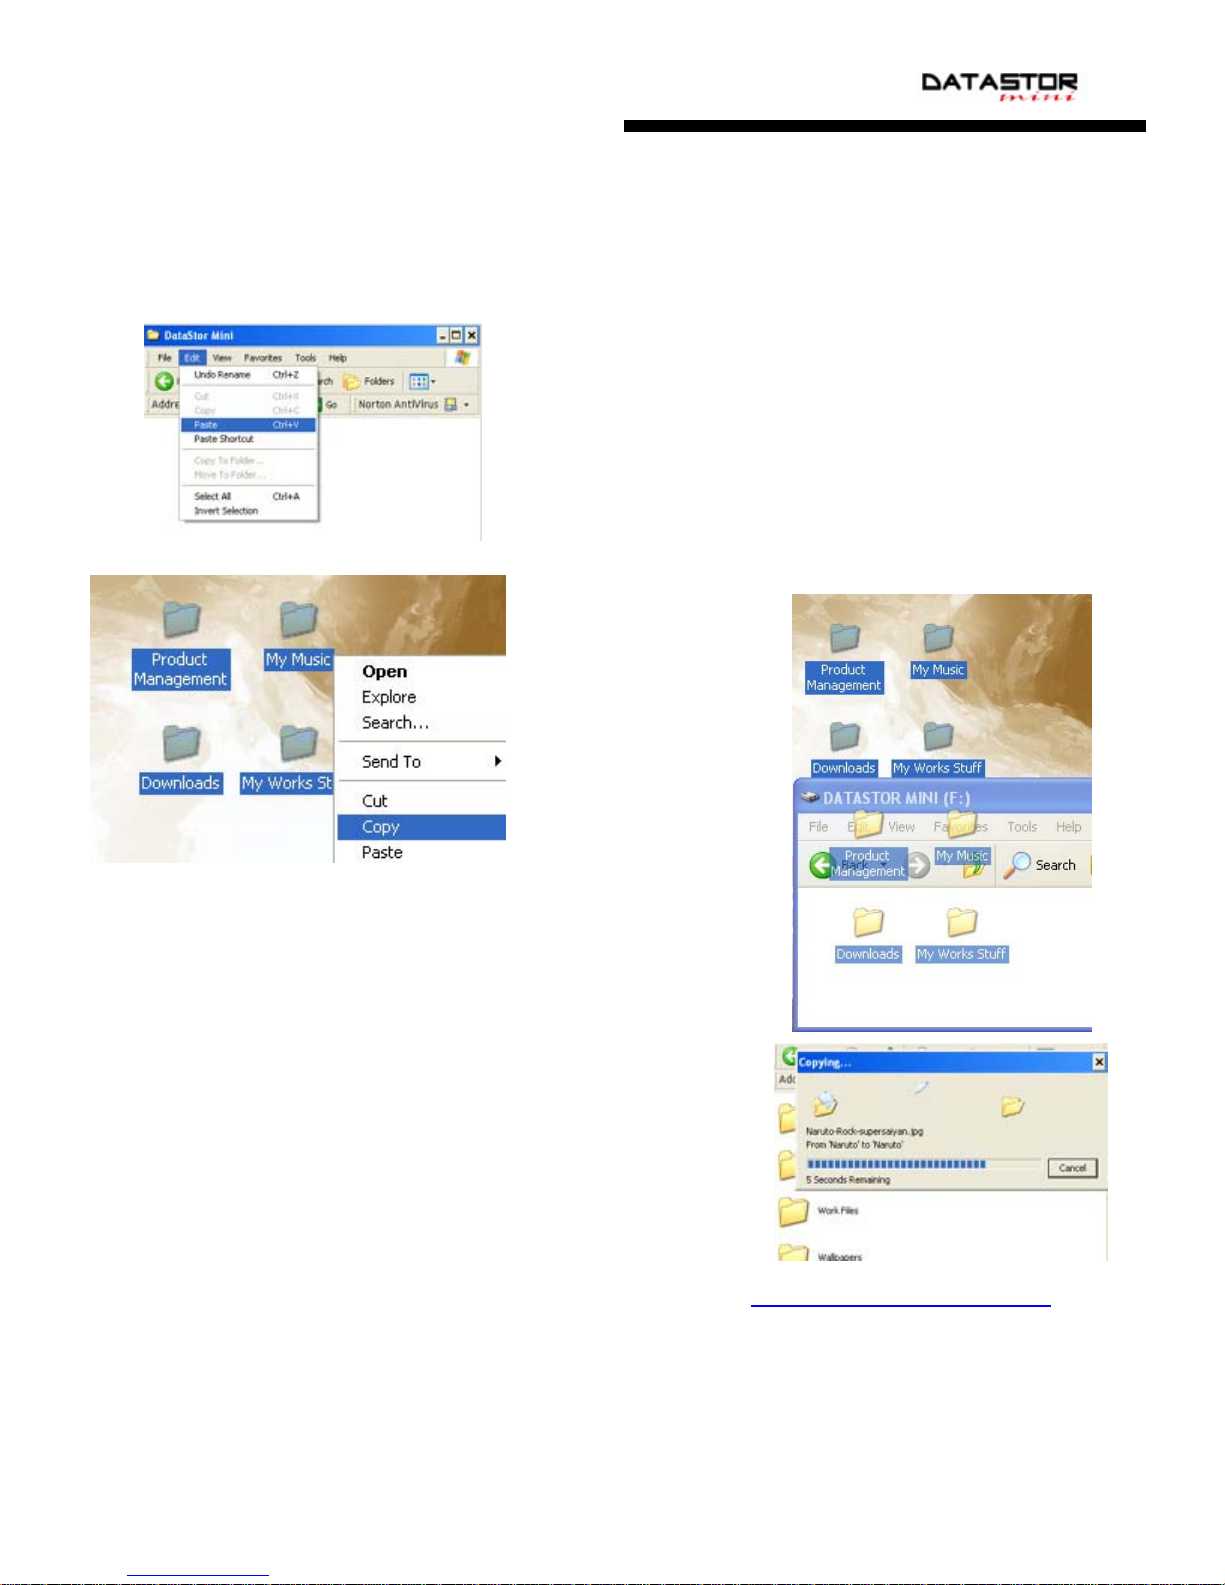
1. Select the files you want to transfer.
2. Right-click on the selected files.
3. Select Copy.
4. Open the DataStor mini.
5. Go to Edit and select Paste.
6. Wait for the transfer to complete before
safely removing the drive.
Drag and Drop
1. Open the DataStor mini Window.
2. Select the files you want to copy and hold down the
mouse-1 button.
3. Drag the mouse cursor over to the DataStor mini
Window and release the mouse-1 button.
4. Wait for the transfer to finish before safely removing
the DataStor mini.
Note: For instructions on how to use backup software please visit: http://support.pocketec.net/dsmini/
17
Page 19

One-Year Limited Warranty
POCKETEC’s warranty obligations are limited to the terms set forth below: POCKETEC warrants that, subject to the
following limitations, each of its products (“Product”) will be free from defects in material and workmanship and
conform to the POCKETEC specifications for a period of ONE (1) YEAR from the date of the original retail purchase.
This warranty applies only to Products manufactured by POCKETEC that contains the “POCKETEC” trademark,
trade name, or logo affixed thereon.
POCKETEC will have no liability for any Product returned if POCKETEC determines that:
The Product was not purchased from an authorized reseller.
The person asserting the warranty is not the original purchaser of the Product.
The asserted defect is attributable to misuse, abuse, mishandling, improper installation, alteration (including
removing or obliterating labels), or accident while in the possession of someone other than POCKETEC.
Your exclusive remedy for any defective Product is limited to the repair or replacement of the defective Product.
POCKETEC may elect which remedies to provide in its sole discretion. POCKETEC shall have a reasonable time
after determining that a defect exists prior to repairing or replacing a defective Product. POCKETEC’s replacement
Product under its limited warranty will be manufactured from new and serviceable used parts. POCKETEC’s warranty
applies to repaired or replaced Products for the balance of the applicable period of the original warranty or ninety
days from the date of shipment of a repaired or replaced Product, whichever is longer.
There are no warranties that extend beyond the face of the POCKETEC limited warranty. POCKETEC disclaims all
other warranties, expressed or implied, regarding the Products, including any implied warranties of merchantability,
fitness for a particular purpose or non-infringement. Some jurisdictions do not allow the exclusion of the implied
warranties.
POCKETEC’s entire liability for any defective Product shall in no event exceed the purchase price of the defective
Product. This limitation applies even if POCKETEC cannot or does not repair or replace any defective Product and
your exclusive remedy fails of its essential purpose.
POCKETEC has no liability for general, consequential, incidental or special damages. These include loss of recorded
data, the cost of recovery of lost data, lost profits, downtime, loss of goodwill, damage to or replacement of
equipment and property, the cost of the installation or removal of any Products, the installation of replacement
Products, and any necessary inspection, testing, or redesign caused by any defect or by the repair or replacement of
Products arising from a defect in any Product.
In the United States, some states do not allow exclusion or limitation of incidental or consequential damages, so the
limitations above may not apply to you. This warranty gives you specific legal rights, and you may also have other
rights that vary from state to state.
18
Page 20

Contact Us
For more information or customer service, please reach us at:
http://www.pocketec.net
Customer Service and General Inquiries:
818-717-9556
Technical Inquiries:
818-717-9556 Press 2 at the Menu
Online Technical Support Site
http://support.pocketec.net
Sales Inquires:
19
Page 21
 Loading...