

Page 1

Your FP202 Datalink phone is guaranteed for one year from the date
of purchase. If found to be faulty within the guarantee period it will
be repaired or replaced at our discretion, subject to our standard
terms and conditions. The guarantee does not cover accidental
damage or negligence. The telephone must only be used in the U.K.
in accordance with its instructions for use and must not be
tampered with, or taken apart by anyone who is not an authorised
representative of the company. The guarantee in no way limits your
legal rights. Should you have any problems, please return your
telephone to your supplier.
Please ensure that a note of your name and address and details of
the problems are enclosed, together with a copy of your purchase
invoice and that goods are returned in their full original packaging
with instructions enclosed. Goods are returned to the manufacturer
at the customers own risk and expense
Your FP202 Datalink phone is approved for use on business or
private direct exchange lines and on compatible PBX extensions.
When connected to a direct exchange line this must be a standard
exclusive (not shared service) line. The line should cater for either
loop disconnect or multifrequency signalling. The telephone can
signal Timed Break and Earth Recall.
This telephone is not suitable for use as an extension to a payphone
or on shared service or (1+1) carrier systems.
This apparatus has been approved for the use of the following
facilities
- Simple telephone facility
- DTMF Signalling
- 32 digit Automatic Storage of last number dialled
- Save feature to transfer last number dialled to another memory
location or to annote a telephone number in memory during a
call
- 20 Direct Memory locations of 32 digit capacity
- Ringer Volume slide control
- Ringer Pitch control
- Time Break or Earth Loop Recall (selectable)
- Operation in absence of proceed indication
- Suitable for PABX's providing secondary proceed indication
- Push-to-Mute function or optional Push-to-Speak
- 32 digit save function
- Memory Protection Switch
- Data Port connection
Any other usage will invalidate the approval of the apparatus if as a
result it then ceases to conform to the standards against which
approval was gained.
You have invested in a quality product and simple care and cleaning
will keep it in good condition.The plastic parts and cards should be
wiped with a cloth dampened with clean water.
DO NOT use spray polishes as these can affect the internal circuits.
DO NOT use abrasive cleaners as these will dull the high gloss
finish.
DO NOT let the coiled cord become knotted or twisted.
Wall Mounting
You may wish to mount the FP202 Datalink phone on a wall. To do
this:
- Slide the plastic “wall mount” upwards to remove, turn it around
and replace it in the slot.
- The Handset will then stay in the cradle when the telephone is
on the wall.
- Position two screws into the wall at a distance of 10cm apart.
- Ensure that the screw heads are 5mm from the wall.
- Place the telephone on the screw using the keyhold slots on the
rear of the telephone.
If your telephone does not appear to be working, the following
simple instructions should enable you to discover the problem. You
may wish to ask a friend to help you by making and receiving calls
from your line to theirs.
1. Check all the handsets have been correctly replaced and the
telephones are firmly plugged into the sockets. Attempt a call. If
the problem persists proceed through the following steps and
attempt to make a call at each stage.
2. Unplug all your telephones and plug in an individual instrument.
If this instrument works try it in all the sockets. This action
should indicate if this telephone and your sockets are working
correctly.
3. Plug in your telephones one at a time. If the problems only occur
with all your telephones plugged in, please read the instruction
headed “Installation” - Section 5.
4. Any continuing case of difficulty should be referred in the first
instance to the supplier of the telephone.
FP
Datalink Phone
Care Of Your Telephone In Case Of Difficulty
Facilities & Features
User Guide
© Pocket (UK) Ltd 2001
Conditions Of UseConditions Of Use
Guarantee
Page 2
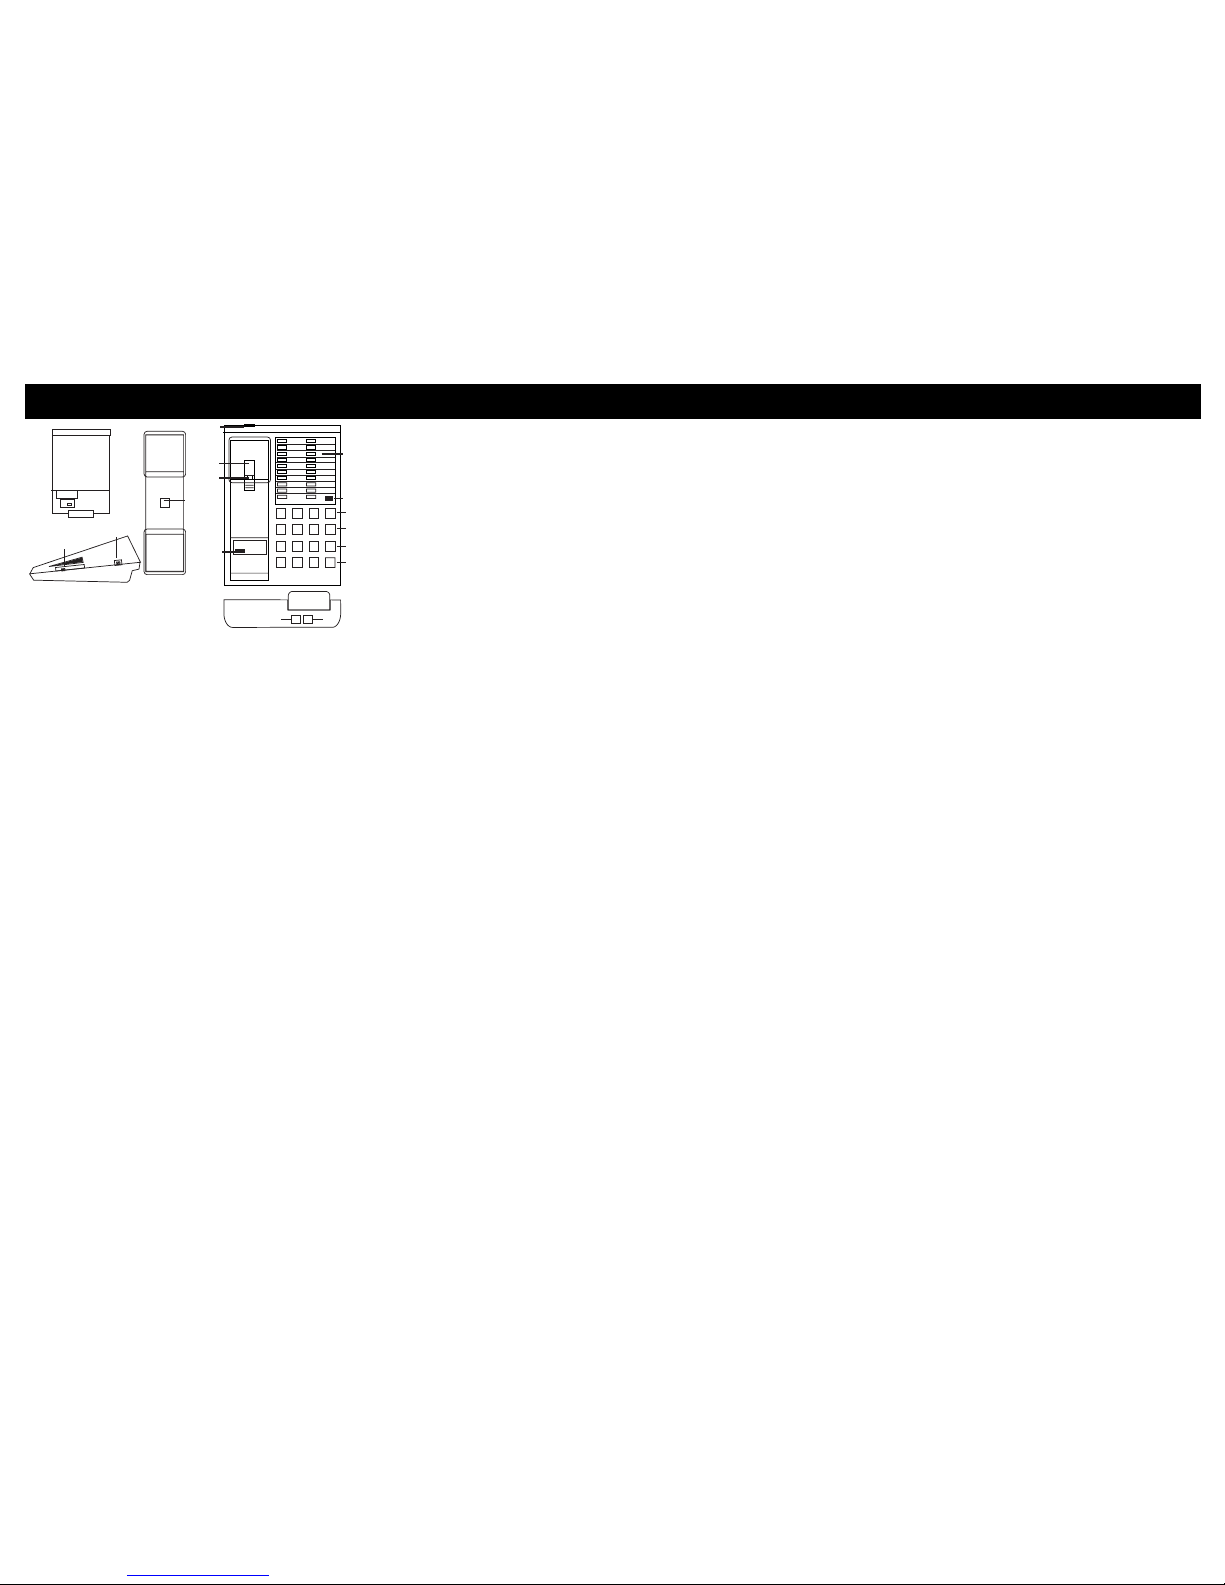
Location & Utilisation Of Controls Setting Dialling and Recall Mode Operating Procedures
1
4
7
*
2
5
8
0
3
6
9
#
Store
Recall
Save
LNR
Store
Recall
Save
Last number
redial / Pause
Park
Hook
Switch
Wall
Mount
Mute
button
in
handset
Memory
Protection
Switch
(under inlay)
ETH TLB
Ring
Indicator
Ringer pitch
control
Ringer volume
control
Memory
Keys
Utilisation Of Controls
The button functions are as follows:
0 - 9 - Dialling digits
* - # - Dialling codes for MF Signalling
Recall - For use on a PBX or for star services
Tone - Switches from Loop Disconnect to DTMF during dialling
Save - Used during conversation to store a memo number or
last number dialled in a separate memory allowing you
to make other calls before dialling this number again
Store - Used to store a telephone number in memory
LNR - Last number redial
Pause - Pause function
Mute - To prevent the other party from hearing you (ie. push
down (on handset) to mute) or, alternatively, on specially
adapted models this can be amended to push-to-speak.
In this instance, the phone will be clearly marked as
such
The switch functions are as follows:
Ring Vol (slide) - Allows you to set the level of the ringer loudness
Ring Pitch - Allows you to set the pitch of the ringer
ELR/TLB - Sets the Recall to Earth (ETH) or
Time Loop Break (TLB)
Memory Protection - Allows you to protect numbers stored in memory
location
Visual Indicators:
Ring - This indicates an incoming call by lighting up.
Installation
Your FP202 Datalink phone is designed to be plugged into the new phone
sockets adopted in the UK. The plug and socket are designed so that the
plug will only fit the socket the correct way round. Please note any other
method of connection will invalidate the instrument approval.
On any exchange line you may have as many sockets as you like, the number
of which may exceed the number of telephones. Your telephone can be
moved from socket to socket by simply plugging it in where you wish.
However, if you unplug your telephone whilst involved in initiating a call or
talking, the call may be lost.
There is a limit on how many telephones may be connected to an exchange
line at any one time. Plugging in too many telephones will overload your
exchange line and as a result your telephones may not ring. To enable you to
check if you are overloading a line, a Ringer Equivalence Number (REN) is
marked on the base of the telephones you wish to plug in. The ringers should
operate satisfactorily if the sum of the REN numbers are 4 or less. Include all
equipment provided. If a telephone is supplied unmarked you can assume it
to have a REN of 1, but this should be confirmed by your local sales office.
NOTE: NOT ALL TELEPHONES HAVE THE SAME REN VALUE.
This FP202 Datalink phone has a REN of 1.
Once you have completed the “Initial Set-up Procedure” ( Section 4) then
plug your telephone into the socket. Once plugged in wait for 4 seconds
before making or answering a call.
Your FP202 Datalink phone is now ready for use.
A preset switch will be found situated in the battery compartment. Namely the
RECALL MODE SELECTOR SWITCH, and should be set as follows:-
The Recall Mode Selector Switch - If you are connected
to a TONE dialling exchange, set the switch to the TLB (Timed Loop Break)
position to enable you access certain Network Services. If you are connected
to a PULSE dialling exchange, set the switch to the ELR (Earth) position as
recall has no function on direct lines connected to such exchanges. (This will
avoid the possibility of cutting off your call should the recall button be pressed
accidentally.) If you are connected to a PABX, set the switch according to the
requirements of your particular PABX. If in doubt, consult your PABX
Instructions or your PABX maintainer. Set the switches, refit the battery
compartment cover ensuring that it clicks fully into place.
Setting The Ringer - RINGER VOLUME SLIDE CONTROL
The ringer volume control allows the ringer volume to be varied whilst still
allowing you to make calls. Set to minimum position the ringer will be off.
RINGER PITCH SWITCH - Set the switch to the HI, MED or LO position to
adjust the pitch of the ringer.
Connect To Telephone Socket - When the setting up
instructions have been completed, connect the plug at the end of the
telephone lead into the telephone socket. The plug will only fit the correct way
round.
Connecting a Datalead - When required connect the plug at the
end of the data lead to the data port at the rear of the telephone. The plug will
only fit the correct way round.
Manual Dialling
To make a call: - Lift handset, listen for dial tone
- Key in number you wish to call
Last Number Redial
To redial the last number manually dialled: - Lift handset, listen for dial tone
- Press redial button
Save Memory - This memory enables you to transfer the last
telephone number you dialled into a Save memory location allowing you to
make other calls before trying the number again. To use this facility, press the
SAVE button. Replace the handset. To call the number, lift handset, await
dial tone and press the Save button. The number in the Save memory will
then be dialled automatically.
Memory Operation - Up to 20 telephone numbers each consisting
of a maximum of 32 digits (including pauses or change of dial mode
instruction) may be stored in memory.
To store a number, please adopt the following procedure:-
1) Ensure that the telephone is plugged into the telephone socket, and that
the memory protection switch is positioned to the right. Lift handset.
2) Press STORE button once. Note that button only moves a short distance.
3) Enter the telephone number to be stored.
4) Press the STORE button again.
5) Press desired memory location button.
6) To protect the number stored ensure the memory protection switch is
positioned to the left.
Storing Numbers whilst on a Call - Numbers may also be
stored when you are actually in the process of making a call and using the
handset. This is useful, for example, if you are given a telephone number
during your conversation. The number may then be dialled from memory at a
later time. To store the number, press STORE button and then dial number,
press STORE button again and then desired memory location button. Write
down references to numbers stored against memory location buttons.
Changing a Number in a Memory Location - If you wish
to change a number in a memory location, simply follow the instructions for
storing a number. Entering the new number will automatically erase the
previous number.
Dialling Numbers from Memory - To dial a number from
memory, lift handset, await dial tone and press button corresponding to
memory location require. Sometimes it may be necessary to combine the
information from 2 memories or to combine memory dialling with manual
dialling. In these cases, simply press the 2 memory buttons in sequence or
press the desired memory button followed by manual dialling of the remainder
of the number. These combinations are often carried out when alternative
carriers are used.
Handset Mute Button - Whilst this is depressed the other party
will not hear the conversation. If specified the Executive FeatureSet 2
Memoryphone can be supplied with this button as 'push to talk', and in this
instance the telephone will be clearly marked as such.
Operating Procedure For PBX Connection
NOTE: The FP202 Datalink phone is suitable for connection to a PABX
which returns secondary proceed indication.
PBX Recall - When connected to a PBX, the telephone will send a Recall
Signal to the exchange when the RECALL (R) button is pressed. This FP202
telephone provides either TIMED LOOP BREAK or EARTH RECALL Consult
you PBX supplier or maintainer to ascertain which is compatible with your
PBX. Having established which you require select either ELR (Earth Recall) or
TLB (Timed Loop Break) using the ELR/TLB switch.
N.B. Unlike the other keys the Recall key is a 'hard switch' not a 'soft press'
key. This means it will only depress slightly, and will remain depressed until
released.
PABX Pause Facility - On PABX systems which provide secondary
proceed indication you must wait for the secondary proceed dial tone after
dialling the initial access digit(s), normally 9 for an outside line. For correct
operation of the Memory facilities it is therefore necessary to store a Pause
after the access digit to ensure correct dialling. Pressing the LNR key
automatically inserts a 2 second pause in the dialling sequence.
NB: Do not enter more than 1 consecutive pause. Failure to comply with
this may result in unsatisfactory operation and will invalidate the
approval.
General Use - It must be noted that there is no guarantee of correct
working of this telephone in all circumstances when connected to a PBX. Any
difficulties should be referred to the telephone supplier. This telephone is
approved for connection to most PBX's. The supplier of this telephone
should be consulted for an up to date list of PBX's with which this telephone is
compatible.
Line
Cord
Data
Cord
 Loading...