

Page 1
NVIDIA© Quadro© and NVIDIA NVS™ User Guide v2_15_13
PNY | 100 Jefferson Road | Parsippany, NJ 07054-0218 | 800.230.0130 | www.pny.com/quadro
Copyright © 2013 by PNY, all rights reserved. No reproduction of this document in any form is permitted
without prior written authorization from PNY. NVIDIA and Quadro are registered trademarks of NVIDIA
Corporation. NVS is a trademark of NVIDIA. The PNY logo is a registered trademark of PNY. All other
registered trademarks are the property of their respective owners.
Page 2

Table of Contents
Introduction 3
Minimum System Requirements 3
Package Contents 3
Hardware Installation 4
Additional Power Requirements 5
Attaching Displays 6
NVIDIA Graphics Driver Installation 7
NVIDIA nView™ Installation 7
NVIDIA Control Panel 8
Technical Support 13
PNY’s Replacement Warranty 13
FCC Information 13
- 2 -
Page 3

Introduction
Congratulations on the purchase of your new NVIDIA Quadro or NVIDIA NVS professional graphics board.
You are now the owner of a state-of-the-art graphics board specifically designed for demanding 3D or
enterprise graphics and video applications, offering features and functionality beyond any other cards in their
class. We recommend that you read through this User Guide before installing your graphics board to ensure
proper operation.
Minimum System Requirements
▪ PCI Express x16 slot for x16 PCIe boards or an x1 PCI Express slot for x1 PCIe boards
▪ Windows
▪ 1GB or more of system memory, 2GB recommended
®
8, 7, Vista®, XP SP3, Linux®, or Solaris®
▪ 200MB of available disk space for full installation
▪ Blu-ray or DVD-ROM drive
▪ DisplayPort, DVI or VGA compatible display(s)
Package Contents
Please check your package, which should contain the items noted below. If you find any damaged or
missing components please contact your reseller immediately.
▪ NVIDIA Quadro or NVIDIA NVS professional graphics board
▪ Unattached full height bracket with NVIDIA Quadro low profile boards
▪ Unattached low profile bracket with NVIDIA NVS low profile boards
▪ DVI-I to VGA adapter, one per DVI-I connector (Quadro or NVS series)
▪ One DisplayPort to DVI-D SL adapter is provided with any Quadro series board that features
DisplayPort connectors
▪ Two DisplayPort to DVI-D SL adapters are provided with the NVIDIA Quadro K5000 and select NVIDIA
Quadro NVS 295 and NVIDIA NVS 310 part numbers
▪ Four DisplayPort to DVI-D SL adapters are provided with select NVIDIA NVS 450 part numbers
▪ Four mini-DisplayPort to DisplayPort adapters are provided with all NVS 510 part numbers
▪ Four mini-DisplayPort to DVI-D SL adapters are provided with select NVS 510 part numbers
▪ A mini-DisplayPort to DisplayPort adapter and a DisplayPort to DVI-D SL adapter is provided with the
NVIDIA Quadro K2000D (both feature locking connectors)
▪ VHDCI to quad DVI-D SL adapter provided with select NVS 420 part numbers
▪ VHDCI to quad DisplayPort adapter provided with select NVS 420 part numbers
▪ DMS-59 to dual DVI-I SL adapter cable provided with select NVS 300 part numbers
▪ DMS-59 to dual DisplayPort adapter cable provided with select NVS 300 part numbers
- 3 -
Page 4
▪ Stereo I/O Bracket included with NVIDIA Quadro K5000, K4000, and 4000
▪ SPDIF audio interface cable provided with NVS 295
▪ Auxiliary power connector cable(s) – provided with any Quadro board requiring them
▪ DVD-ROM with driver software for Windows 8, 7, Vista or XP SP3 (64- or 32-bit)
Hardware Installation
Follow the steps listed in the order given to successfully install your new NVIDIA Quadro or NVIDIA NVS
professional graphics board.
Important
Static electricity can severely damage electronic components. Take the following precautions when
installing your new graphics board:
▪ Before touching any electronic parts, discharge the static electricity from your body by touching the
internal metal frame of your system while it is unplugged
▪ Don’t remove your card from the packaging clamshell until you are ready to install it. Whenever you
remove a card from your system, always place it back in the clamshell
▪ Never let any clothing or jewelry touch any electronic parts
▪ When handling your card, hold it by its edges, and avoid touching any circuitry or the PCIe connector
Selecting the Correct Expansion Slot
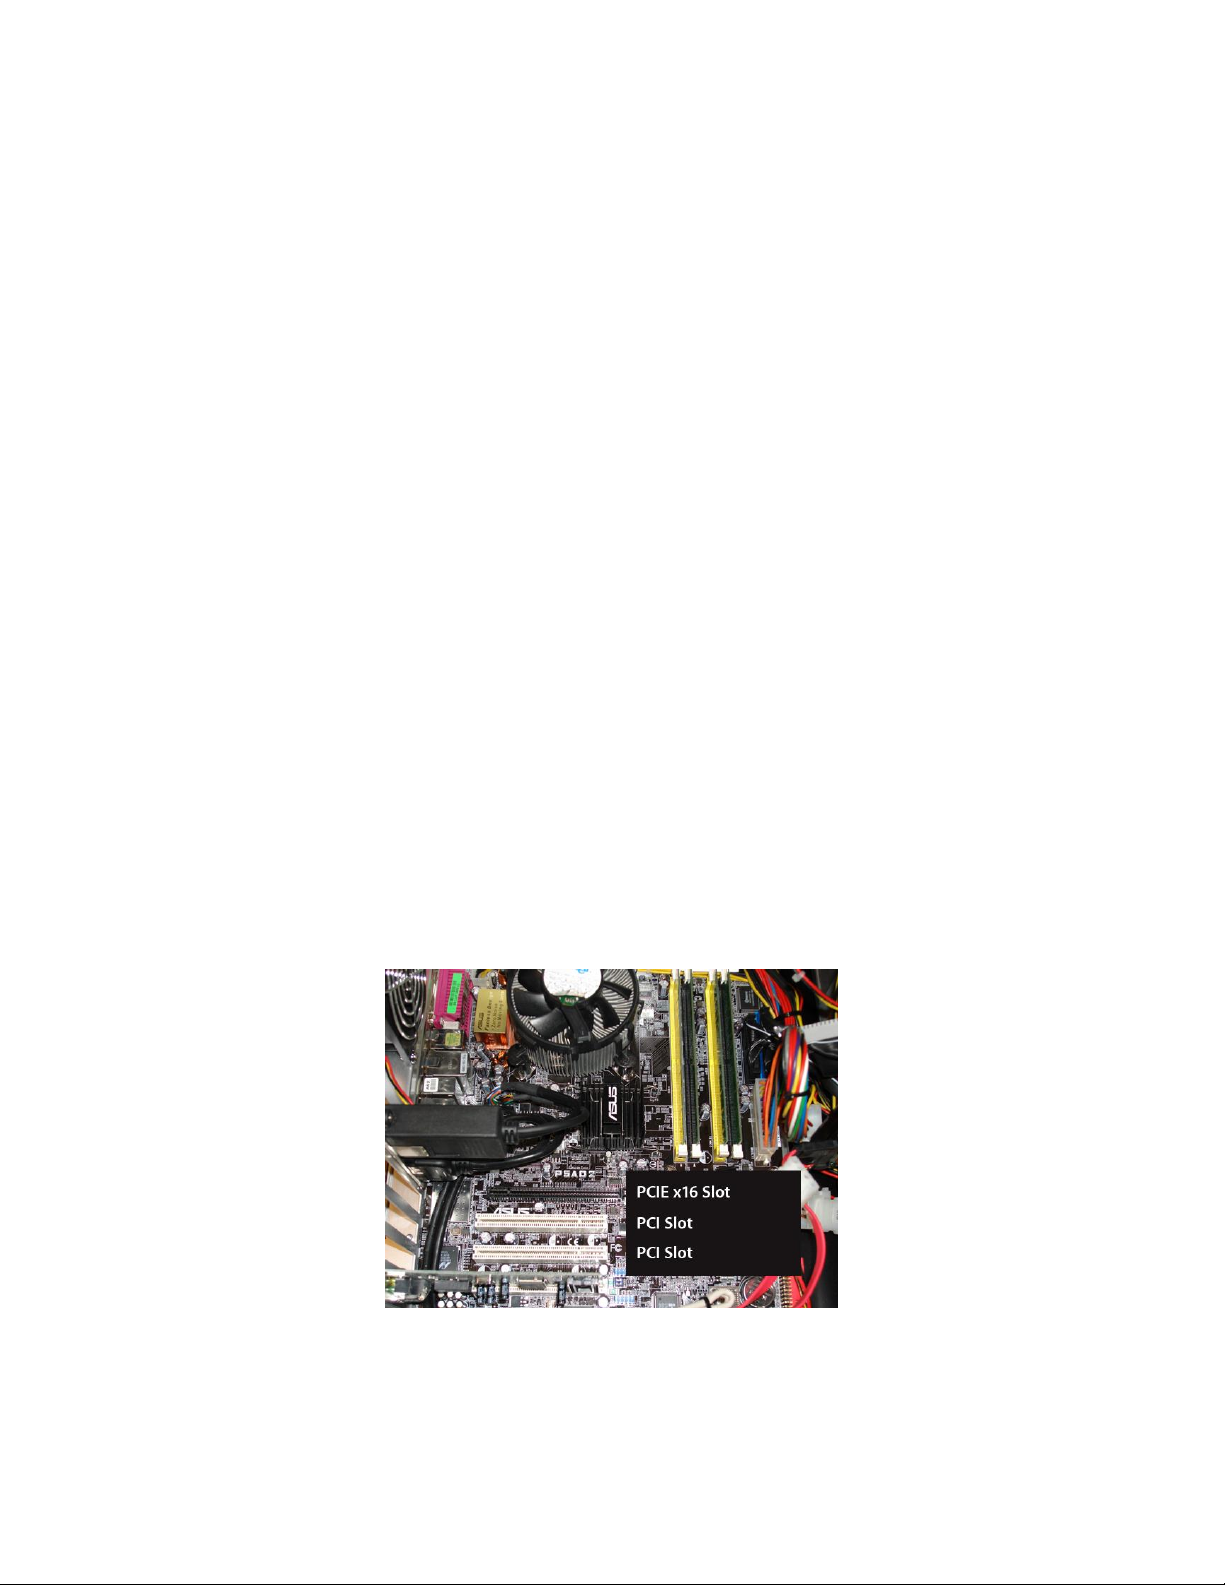
PCI Express motherboards have a combination of PCI Express and PCI slots. Slots may look similar at first;
however you will notice differences once you examine them closely. PCI Express x16 slots on the
motherboard are usually closest to the CPU. PCI Express x1 slots are smaller and should be labeled as
such. If you are unsure which connectors are PCI Express x16 or x1 consult your system manual to identify
the appropriate slot. Plugging a graphics card into the incorrect slot could damage the card, your system, or
both. Never force a card into a slot that does not easily accommodate it.
Typical motherboard showing PCIe x16 and PCI slots
- 4 -
Page 5
Low Profile or Standard Height Bracket
The Quadro K600, 600, 410, and 400 are designed for SFF (Small Form Factor) systems; consequently a
low profile bracket is attached. If your system requires a full height bracket one has been provided. Simply
replace the low profile bracket with the standard height bracket and proceed with hardware installation.
The NVS 510, 420, 310, 300, and 295 have full height brackets attached, but a low profile bracket is
provided for SFF systems. If necessary replace the standard height bracket with the low profile bracket and
proceed with hardware installation.
Inserting Your Graphics Card
Remove the backplane cover for the slot you intend to use and save the mounting bracket screw. Position
the graphics board over the expansion slot that coincides with the type (PCI Express x16 or x1) of the card
purchased. Push the card firmly and evenly until it’s fully seated in the slot. Replace the screw to secure
the bracket of the graphics card to the system chassis, and then replace the cover of your computer.
Attach any DisplayPort, DVI, or VGA compliant monitor cable(s) to the appropriate connectors on your
graphics board. All cables should be connected before your system is powered on.
Additional Power Requirements
NVIDIA Quadro 6000, K5000, 5000, K4000, and 4000
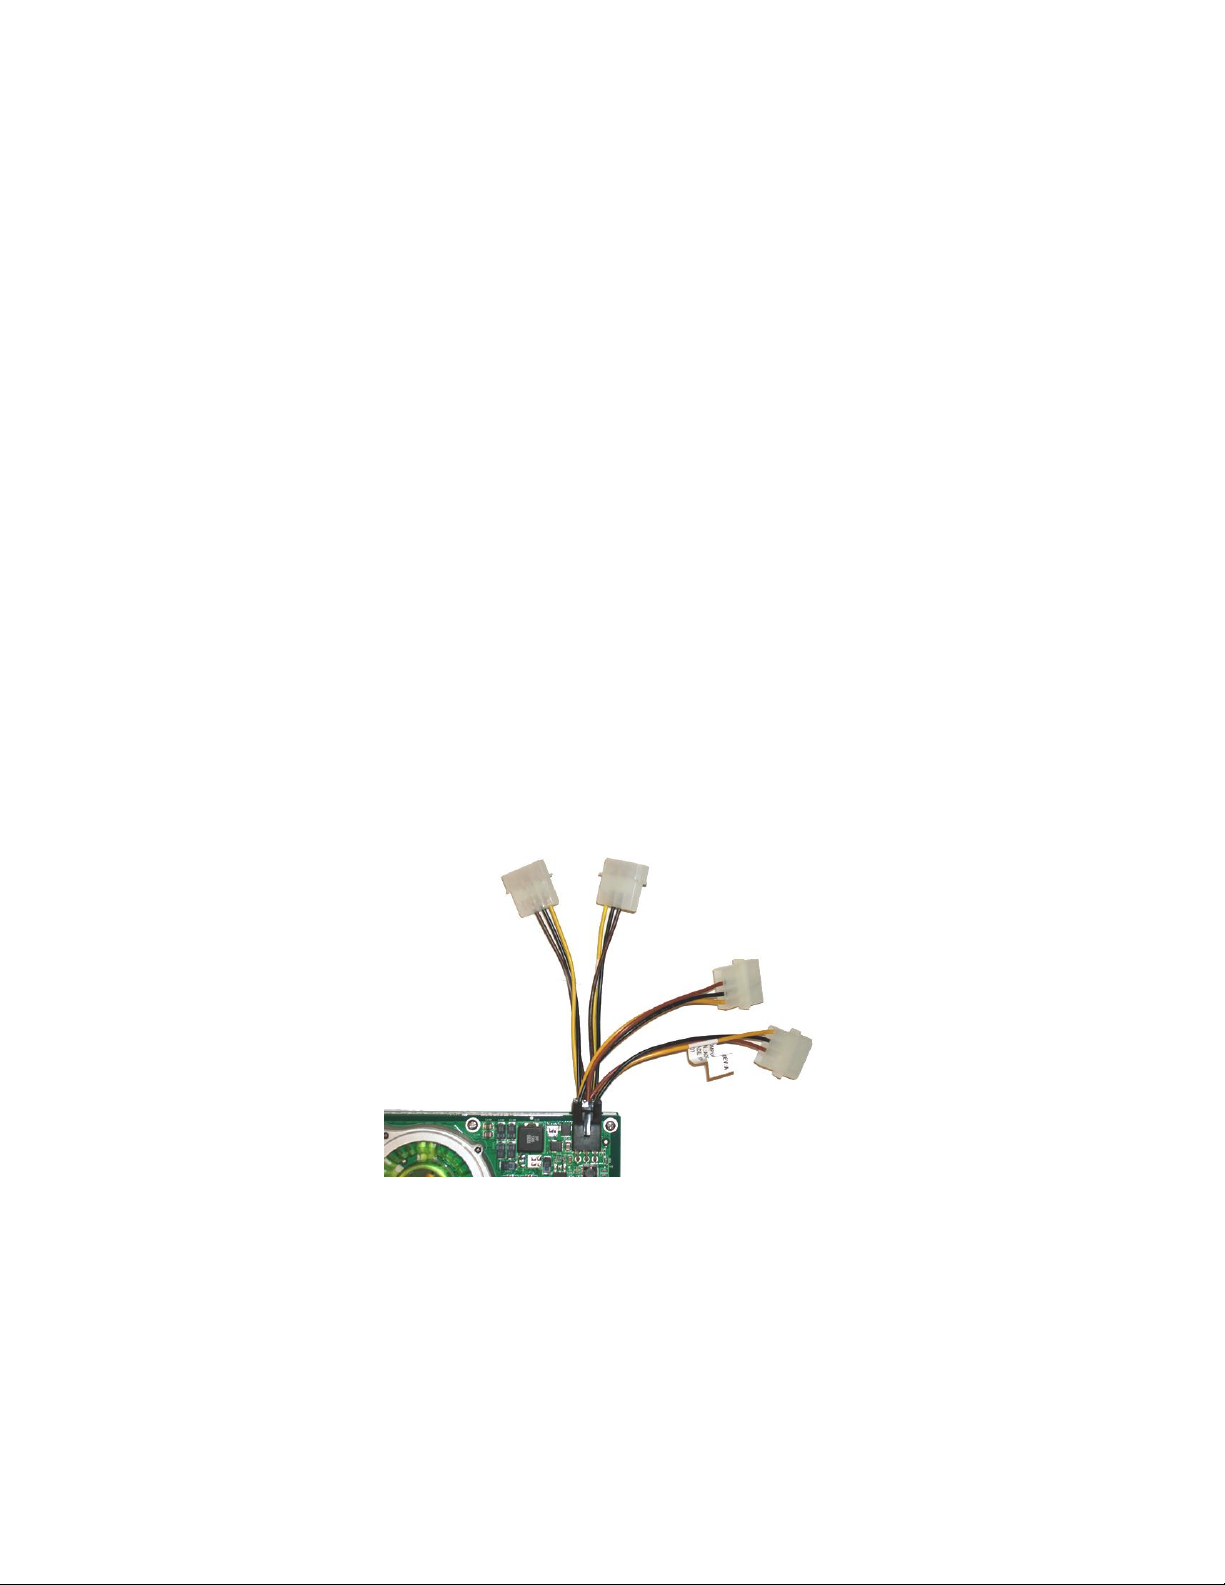
In order for the NVIDIA Quadro graphics boards noted above to operate correctly, the auxiliary power
connector cable(s) which are supplied must be utilized. These ‘Y’ cable have two 4-pin connectors that
attach to power supply taps, and a 6-pin connector that plugs into a matching receptacle on your graphics
board.
Connectors for auxiliary power cables are keyed. Always verify the orientation of cable and connector and
never force the cable into the connector.
A representative Quadro graphics board with two auxiliary power connector cables plugged into card, loose ends
must be plugged into available power supply taps
Quadro 6000 Auxiliary Power Requirements
Quadro 6000 graphics boards have two auxiliary power connectors, one 8-pin connector and one 6-pin
connector. The 8-pin connector will drive your Quadro 6000 when connected to the dedicated graphics 8pin connector tap provided by PCIE Gen 2 compliant power supplies. Older systems must use two 6-pin
auxiliary power connector cables (provided) for proper operation. This requires that four power supply taps
be available. One 6-pin cable connects to the 8-pin connector (parts are keyed to ensure proper
connection) and the second 6-pin connector plugs into the remaining 6-pin connector. PNY strongly
recommends the use of a PCIE Gen 2 compliant power supply with the Quadro 6000.
- 5 -
Page 6

Connecting the SPDIF Audio Cable
An 18” SPDIF audio interface cable is provided with NVIDIA NVS 295 professional graphics boards. This
cable allows content with an audio signal, such as Blu-ray or DVD to be passed from the motherboard for
further processing and signal conversion. One end of the cable connects to the two-pin connector on the
graphics board while the other needs to be attached to the SPDIF motherboard connector. Consult the
documentation that came with your system for additional information on this topic.
Attaching Displays
NVIDIA Quadro 6000, 5000, 4000, and 2000
These boards have a single DVI-I DL connector and two DisplayPort connectors. Although this gives a total
of three output connectors only two can be used at the same time.
NVIDIA Quadro K5000
This board has DVI-I DL, DVI-D DL, and 2 DisplayPort 1.2 output connectors. Since all four outputs are
active up to 4 displays can be driven simultaneously from the provided connectors with Windows Vista or
later. If you have DisplayPort 1.2 compliant monitors or a DisplayPort 1.2 Hub then DisplayPort multistreaming and Display Cloning are also available and up to four displays can be driven simultaneously.
Windows XP can only support two displays.
NVIDIA Quadro K4000 and K2000
This board has a DVI-I DL and 2 DisplayPort 1.2 output connectors. Since all 3 outputs are active up to 3
displays can be driven simultaneously from the provided connectors with Windows Vista or later. If you
have DisplayPort 1.2 compliant monitors or a DisplayPort 1.2 Hub then DisplayPort multi-streaming and
Display Cloning are also available and up to four displays can be driven simultaneously. Windows XP can
only support two displays.
NVIDIA Quadro K2000D
This board features DVI-I DL and DVI-D DL connectors along with a mini-DisplayPort connector. Three
displays can be driven when directly attached to the available connectors. If you have DisplayPort 1.2
compliant monitors or a DisplayPort 1.2 Hub then DisplayPort multi-streaming and Display Cloning are also
available and up to four displays can be driven simultaneously. Windows XP can only support two displays.
NVIDIA Quadro 2000D
This board features two DVI-I DL connectors. Analog displays are supported via the supplied DVI to VGA
adapters.
NVIDIA Quadro K600, 600, 410, and 400
These boards feature a DVI-I DL connector and a DisplayPort connector. An analog display is supported via
the supplied DVI to VGA adapter.
NVIDIA NVS 510
This board features four mini-DisplayPort connectors and is shipped with four locking mini-DisplayPort to
DisplayPort adapters. Some configurations of this card also include four locking mini-DisplayPort to DVI-D
SL adapters. Mixed DisplayPort and DVI monitor configurations are supported, up to four displays total with
Windows Vista or later. Windows XP can only support two displays simultaneously.
NVIDIA NVS 450
This board features four DisplayPort connectors, which support any DisplayPort monitor. Some NVS 450
boards are sold with four DisplayPort to DVI single-link adapters. To connect DVI-D SL displays to the NVS
450 plug in the supplied adapters and then attach your display(s) to the DVI connectors provided.
- 6 -
Page 7

NVIDIA NVS 420 x16 or 420 x1
These low profile boards utilize VHDCI connectors. Depending on which configuration you purchased either
a VHDCI to quad DVI single-link or VHDCI to quad DisplayPort adapter cable is included. Connect the
VHDCI adapter cable to the VHDCI connector on your NVS 420 and then connect your display(s) cable(s) to
the DVI or DisplayPort connectors provided, starting with the lowest number first (numbered from 1 – 4).
NVIDIA NVS 310, 295 x16, and NVS 295 x1
These boards feature two DisplayPort connectors which support any DisplayPort monitor. Some models
include two DisplayPort to DVI-D single-link adapters. If you utilize DVI displays connect the DisplayPort to
DVI-D single-link adapters and then connect your display cables to the adapters.
NVIDIA NVS 300 x16 or 300 x1
These boards feature a single DMS-59 connector and ship with a DMS-59 to dual DVI-I SL ‘Y’ adapter cable
and two DVI to VGA adapters or a DMS-59 to dual DisplayPort adapter cable. Plug the provided adapter
into the DMS-59 connector on the graphics board and then connect your display cables to the connectors on
the adapter.
NVIDIA Quadro or NVS Graphics Driver Installation (Windows)
Power up your system and let it boot into Windows 8, 7, Vista or XP SP3. Logon and proceed as noted
below:
▪ Insert the NVIDIA Quadro by PNY driver installation DVD into the Blu-ray or DVD-ROM drive. The DVD
will autorun and you will be presented with a main menu that includes driver installation, along with
other options.
▪ From the main menu click on the ‘Drivers’ option and the proper driver for your version of Windows 8, 7,
Vista, or XP SP3 will be presented (64- or 32-bit versions are provided). Click on the driver
recommended for your system and the software will be automatically installed.
NVIDIA Quadro or NVS Graphics Driver Installation (Linux)
Power up your system and let it boot into Linux. Logon and proceed as noted below:
▪ Download the Linux driver appropriate to your Quadro board and Linux distribution from the Internet.
Drivers can be downloaded from the PNY or NVIDIA websites. The PNY driver download page URL is:
http://www3.pny.com/support/support_landing_subcat.aspx?SectionID=1090&RootSectionID=1061&Ty
peID=5
▪ Install the driver as described by your Linux distribution documentation or via the script provided with
the driver download
NVIDIA nView Installation
nView is a desktop utility that simplifies multiple display management and enhances your desktop. After
installing the graphics driver and rebooting your system, the NVIDIA nView wizard will appear. You can
choose to install nView (highly recommended) or cancel nView setup. Each screen presented by the setup
wizard will give you a brief description of the options nView will enable. Detailed nView documentation is
available on your driver DVD.
NVIDIA Mosaic™ Technology
Mosaic technology enables seamless taskbar spanning as well as transparent scaling of any application
across up t0 16 displays using multiple NVIDIA Quadro, Quadro NVS, or NVS series graphics cards
(Windows 8 or 7 only).
- 7 -
Page 8

NVIDIA Control Panel
The NVIDIA Control Panel (available after driver installation) allows you to access and configure all of the
features offered by your NVIDIA Quadro, Quadro NVS, or NVS series professional graphics card. From
changing screen resolution and other image settings, to selecting optimum performance options for your
professional 3D applications, tailoring productivity enhancements such as nView, or working with expansive
ultra-high resolution or multiple display systems with NVIDIA Mosaic technology, the NVIDIA Control Panel
provides direct access to the powerful hardware and software capabilities of your new graphics board.
Because of the many features offered the remainder of this User Guide focuses on accessing and
configuring the NVIDIA Control Panel.
To launch the NVIDIA Control Panel right-click the Windows desktop and select “NVIDIA Control Panel”.
You will be presented with the screen shown below in Figure 1 (All screen shots from Windows 7).
Screen shots of the NVIDIA Control Panel configuration process begin on the next page.
Figure 1 – 3D Settings: Adjust image settings with preview
▪ These settings allow you to adjust your card for either performance or quality. Options include ‘Let the
3D application decide’, ‘Use the advanced 3D image settings’ or ‘Use my preference emphasizing:
Quality’. A preview option provides interactive visual feedback if you elect to adjust these settings with
the slider control.
Figure 2 – Manage 3D Settings
- 8 -
Page 9

▪ The listbox contains all of the features you can adjust on your NVIDIA Quadro or NVS graphics board.
You can change the setting of a feature using the dropdown listbox beside the feature name. If in doubt
about a particular feature the ‘Application-controlled’ setting is your best option.
Figure 3 – Change Resolution
▪ Use this option to set the display resolution (in pixels), select a color quality setting (32-bit
recommended), and adjust the refresh rate of your display. Settings can be specified for each display
attached to your graphics board.
Figure 4 – Change Flat Panel Scaling
- 9 -
Page 10

▪ If you elect to use a resolution on your flat panel display other than the display’s native resolution, this
setting allows you specify the scaling used in order to achieve the highest possible display quality, but
please note that flat panel displays always look best when run at native resolution.
Figure 5 – Adjust Desktop Color Settings
▪ Allows you to adjust the color settings for your desktop. These changes will not affect any video
playback. To change video color settings, go to ‘Adjust Video Color Settings’.
Figure 6 – Rotate Display
- 10 -
Page 11

▪ NVIDIA NVRotate allows you to change the orientation of your desktop. This is useful if you have
rotated your physical display and need to rotate the desktop to match the orientation of your display.
Options include ‘No rotation (Landscape)’, ’90 degrees to the left (Portrait)’, 90 degrees to the right
(Inverted Portrait)’, and ‘180 degree rotation (Inverted Landscape)’.
Figure 7 – Manage Custom Resolutions
▪ Manage Custom Resolutions allows you to select and utilize, with the highest possible performance and
visual display quality, any custom (non-standard) resolutions supported by any display attached to your
NVIDIA Quadro, NVIDIA Quadro NVS, or NVIDIA NVS graphics board.
Figure 8 – Set up Multiple Displays
- 11 -
Page 12

▪ Set up Multiple Displays allows you to set optimal parameters for each display, gives you full control
over features such as horizontal or vertical monitor spanning, and allows you to position the displays
relative to one another based on where they are physically located.
Figure 9 – Adjust Video Color Settings
▪ Adjusting the video color settings allows you to fine tune the color settings for video content on your
display. For best results play a video while you make adjustments to view the changes as they happen.
Figure 10 – 3D Stereo Settings
- 12 -
Page 13

▪ Enables the viewing of stereoscopic 3D images generated by many scientific/technical or visualization
solutions and some Digital Content Creation (DCC) applications.
For additional information on configuring your NVIDIA Quadro, NVIDIA NVS, or NVIDIA NVS professional
graphics board driver software please refer to the Driver Release Notes provided on your driver DVD.
Technical Support
PNY provides free United States-based technical support for NVIDIA Quadro or NVIDIA NVS professional
graphics boards purchased from PNY 5 days a week, Monday thru Friday, from 9:00 am to 7:00 pm Eastern
Time. For technical support call PNY at 800.230.0130 or email QuadroSupport@pny.com. Registering
your board with PNY will ensure access to this valuable service.
PNY’s Replacement Warranty
PNY warrants your NVIDIA Quadro or NVIDIA NVS professional graphics board to be free from defects in
materials and workmanship for a period of three years from the date of purchase (For additional information
visit http://www.pny.com/support/register/warr2.asp.), of the product as sold to the original purchaser,
subject to all the terms and conditions hereunder. This warranty is not assignable.
PNY’s sole obligation under this warranty is to replace the product with like or similar product. This warranty
applies only on the condition that the product has been installed, maintained and operated under conditions
of normal use and in accordance with the installation guide provided herewith. The provisions of this
warranty shall not apply if, in PNY’s judgment, the product has been subject to misuse or neglect, improper
installation, damaged in an accident, or repaired or altered in any way that adversely affects its performance
or reliability.
THIS WARRANTY IS IN LIEU OF ANY OTHER WARRANTIES, EITHER EXPRESS OR IMPLIED,
INCLUDING WITHOUT LIMITATION ANY WARRANTIES OF MERCHANTABILITY OR FITNESS FOR A
PARTICULAR PURPOSE OR TITLE AGAINST INFRINGEMENT, WHICH OTHER WARRANTIES ARE
EXPRESSLY EXCLUDED AND DISCLAIMED. PNY SHALL NOT BE LIABLE FOR LOSS OF PROFITS OR
ANY SPECIAL, INCIDENTAL OR CONSEQUENTIAL DAMAGES WHICH PURCHASER MAY SUSTAIN,
EVEN IF PNY HAS BEEN ADVISED OF THE POSSIBILITY OF SUCH LOSSES OR DAMAGES. IN NO
EVENT SHALL PNY’S LIABILITY EXCEED THE PURCHASE PRICE OF THE DEFECTIVE PRODUCT.
SOME STATES DO NOT ALLOW THE EXCLUSION OR LIMITATION OF INCIDENTAL OR
CONSEQUENTIAL DAMAGES, SO THESE LIMITATIONS MAY NOT APPLY TO YOU. THIS WARRANTY
GIVES YOU SPECIFIC LEGAL RIGHTS AND YOU MAY ALSO HAVE OTHER RIGHTS, WHICH VARY
FROM STATE TO STATE.
THIS WARRANTY SHALL NOT BE EXTENDED, ALTERED OR VARIED EXCEPT BY A WRITTEN
INSTRUMENT DULY SIGNED BY PNY.
Warranty coverage requires proof of purchase documentation evidencing the date of purchase (sales receipt
or invoice).
The information in this document is subject to change without notice.
FCC Information
This equipment has been tested and found to comply with the limits for a Class B digital device, pursuant to
Part 15 of the FCC Rules. These limits are designed to provide reasonable protection against harmful
interference in a residential installation. This equipment generates radio frequency energy, and if not
installed and used in accordance with the instructions, may cause harmful interference to radio or television
reception, which can be determined by turning the equipment off and on. The user is encouraged to try to
correct the interference by one or more of the following measures:
▪ Reorient the receiving antenna
▪ Increase the separation between the equipment and receiver
▪ Connect the equipment to an outlet on a circuit different from that to which the receiver is connected
- 13 -
Page 14

▪ Consult the reseller or an experienced radio or TV technician for additional help and assistance
This device complies with Part 15 of FCC Rules. Operation is subject to the following two conditions: (1)
This device may not cause harmful interference and, (2) this device must accept any interference received,
including interference that may cause undesired operation.
Notice to user: Changes or modifications to this product not approved by the party responsible for FCC
compliance could void your authority to operate this equipment. In order for an installation of this product to
maintain compliance with the limits for a Class B device, shielded cables must be used for the connection of
any devices external to this product.
To the suitability, certification, and operation of the products herein documented with regard to
electromagnetic compatibility, the following regulations apply:
▪ EN 50081-1 (EN55022 class B)
▪ EN 50082-1 (IEC 801 Part 2, 4 / ENV 50140 / ENV 50141)
- 14 -
 Loading...