

Page 1

Pinnacle Pro-ONE RTDV
Pinnacle Pro-ONE
U
SER'S GUIDE
Page 2

Pinnacle
Pinnacle
User’s Guide
Pro-ONE RTDV
Pro-ONE
Version 1.0 / GB July 2002
41001623
© Pinnacle Systems 2002
All rights reserved.
No part of this manual may be reproduced or transferred to other media without explicit written
permission from Pinnacle Systems, Braunschweig, Germany.
All brand or product names are trademarks or registered trademarks of their respective holders.
This manual is printed on chlorine-free paper using environmentally safe ink.
Pinnacle Systems. has written this manual to the best of its knowledge, but does not guarantee that the
programs/systems will fulfill the desires of the user.
No warranty is made as to the specifications of features.
Pinnacle Systems. retains the right to make alterations to the content of the manual without the obligation
to inform third parties.
All tenders, sales, supply and manufacturing contracts from Pinnacle Systems, including consultancy,
installation and other contractual performance are subject exclusively to the General Sales and Delivery
Terms of Pinnacle Systems.
Page 3
Part I - Getting Started
CHAPTER 1: WELCOME 1
Contents
W
ELCOME
H
OW THIS GUIDE IS ORGANIZED
!1
CHAPTER 2: BEFORE YOU BEGIN 4
S
YSTEM REQUIREMENTS
P
ACKAGE CONTENTS
CHAPTER 3: INSTALLING ADOBE PREMIERE 7
CHAPTER 4: INSTALLING THE HARDWARE 8
D
EFRAGMENTING THE HARD DISK
I
NSTALLING THE PRO
-ONE 8
CHAPTER 5:
CONNECTING BLACKBOX AND VIDEO DEVICES 11
H
OW TO CONNECT VIDEO AND AUDIO DEVICES
C
ONNECTING THE BLACK
C
ONNECTING THE AUDIO LOOPTHROUGH
C
ONNECTING THE VIDEO DEVICES
P
LAYER AND RECORDER IN ONE DEVICE
C
ONNECTING THE VIDEO MONITOR AND LOUDSPEAKERS
BOX 13
12
13
13
17
18
CHAPTER 6: INSTALLING THE SOFTWARE 19
2
4
5
8
I
NSTALLING THE SOFTWARE FOR WINDOWS
I
NSTALLING THE SOFTWARE FOR WINDOWS ME
I
NSTALLING THE SOFTWARE FOR WINDOWS
A
DDITIONAL INFORMATION FOR THE SETUP PROGRAM
A
FTER THE INSTALLATION
P
-ONE
RO
AND THE SETTINGS TAB
98 SE 20
22
2000 / XP 24
26
28
31
CHAPTER 7: QUICK TOUR 34
P
REREQUISITES
H
OOKING UP VIDEO EQUIPMENT TO PRO
S
TARTING AND PLAYING BACK AN EXAMPLE PROJECT
C
REATING A NEW PROJECT
C
APTURE SETTINGS AND CAPTURE
E
DITING IN ADOBE PREMIERE
W
AYS OF EXPORTING
-ONE 35
User’s Guide
34
35
36
37
40
42
i
Page 4

Part II - Creating Movies
CHAPTER 8: WORKING WITH DVTOOLS 49
P
REPARATION
S
CANNING TAPES
V
IDEO RECORDING
P
LAYBACK
E
XPORT AS PREMIERE STORYBOARD
50
52
57
59
62
CHAPTER 9: PINNACLE EFFECTS 63
E
FFECTS ANIMATION (KEYFRAMING
T
RANSITIONS
F
ILTERS
K
EYFRAMING
P
INNACLE EFFECTS KEYBOARD SHORTCUTS
: A
DDITIONAL INFORMATION
CHAPTER 10: PINNACLE
P
INNACLE
PRO-ONE
REAL TIME
)64
65
77
87
88
PRO-ONE
& REAL TIME 89
89
CHAPTER 11: TITLEDEKO RT 98
W
ELCOME TO TITLEDEKO
L
AUNCHING TITLEDEKO
T
HE TITLEDEKO
S
ELECTING TEXT AND OBJECTS
F
ORMATTING TEXT AND OBJECTS
T
RANSFORMING TEXT AND OBJECTS
U
SING AND MODIFYING LOOKS AND STYLES
L
AYERS AND BACKGROUNDS
L
ET’S MAKE A TITLE
RT U
RT 98
RT 99
SER INTERFACE
100
104
106
108
111
114
118
CHAPTER 12: HOLLYWOOD FX RT 126
I
NTRODUCTION
B
EFORE YOU START
G
ETTING STARTED
T
UTORIAL
T
UTORIAL
T
UTORIAL
T
UTORIAL
P
INNACLE ONLINE
P
ERFORMANCE
T
ROUBLESHOOTING
: T
RANSITIONS
: T
RANSITION
: E
NVELOPES
: P
ATH EDITING
& O
PTIONS
+ 132
126
126
127
127
134
137
143
143
145
Pinnacle Pro-ONE
ii
Page 5

CHAPTER 13: ALPHA MAGIC FX 146
INTRODUCTION 146
ALPHA MAGIC FX AND PINNACLE GRADIENT WIPE 146
CREATE YOUR OWN GRADIENTS 149
CHAPTER 14: EXPORTING YOUR MOVIES 151
OUTPUT TO ANALOG VIDEO RECORDER 151
OUTPUT TO DV TAPE 151
EXPORT TO TAPE 152
OUTPUT AS AVI FILE 155
OUTPUT FOR DVD AND MPEG2-CD 157
OUTPUTTING INTERNET FORMATS 159
ADVANCED EXPORT SETTINGS 159
Part III - Tools, Tips & Utilities
CHAPTER 15: PINNACLE PRESETS 167
PINNACLE PRESETS 167
PINNACLE EXPORT PRESETS 168
CHAPTER 16: PINNACLE PRO-ONE CONTROL 170
SETTINGS—VIDEO INPUT 171
SETTINGS—VIDEO FORMAT 172
SETTINGS—AUDIO INPUT 173
SETTINGS—OUTPUT 174
SETTINGS—GENERAL 175
CHAPTER 17: INSTANT VIDEO RT 177
WHAT IS INSTANT VIDEO RT? 177
THE INSTANT VIDEO RT WINDOW 177
THE INSTANT VIDEO RT OPTIONS MENU 180
CHAPTER 18: EDITING WIDESCREEN PROJECTS 183
SHOOTING 16:9 WIDE SCREEN FOOTAGE 183
CAPTURING 16:9 WIDE SCREEN FOOTAGE 184
EDITING A 16:9 WIDE SCREEN PROJECT IN PREMIERE 184
OUTPUTTING A 16:9 WIDE SCREEN PROJECT TO TAPE 186
OUTPUTTING A 16:9 WIDE SCREEN PROJECT AS MPEG-2 FILE FOR CD OR DVD 186
User’s Guide iii
Page 6

Part IV - Appendix
APPENDIX A: TECHNICAL DATA I
APPENDIX B: TROUBLESHOOTING III
G
ENERAL
G
ENERAL PROBLEMS
P
ROBLEMS WITH
P
ROBLEMS WITH THE VIDEO DISPLAY ON THE
P
ROBLEMS WITH CAPTURE
P
ROBLEMS WITH EDITING AND RENDERING
P
ROBLEMS WITH PLAYBACK AND OUTPUT
P
ROBLEMS WITH THE COMPATIBILITY OF VIDEO DEVICES
DVT
OOLS
PC S
CREEN
III
III
V
VI
VII
VIII
XI
XIV
APPENDIX C:
PINNACLE EFFECTS—KEYBOARD SHORTCUTS XV
APPENDIX D:
PINNACLE DVTOOLS—KEYBOARD SHORTCUTS XVI
APPENDIX E: MULTIMEDIA TERMINOLOGY XVIII
APPENDIX F: LICENSE AGREEMENT XXVIII
FCC COMPLIANCE STATEMENT XXXIII
INDEX
Pinnacle Pro-ONE
iv
Page 7
About the User’s Guide
This User’s Guide explains how to install and use the Pinnacle Pro-ONE and
the Pro-ONE RTDV hardware and software. Instead of using the complete
product name, the abbreviation Pro-ONE is used for a better readability.
Subheadings
In the margins are subheadings to help you quickly find your way through
this manual.
Important text passages are marked with the “notepad” and this format.
Numbers mark step by step instructions:
1. Start TitleDeko RT.
Bullets mark instructions for optional steps the order of which is not
important.
Connect the board to the blackBOX.
•
All keyboard commands appear in this font:
setup
Menus, commands, options or buttons which the user can select are written
in
italics.
User’s Guide
v
Page 8

N
OTES
Pinnacle Pro-ONE
vi
Page 9
Part I - Getting Started
Part I of this manual contains the introduction, the system requirements, the
installation, the cabling and the commissioning of
Welcome
Before you begin
Installing Adobe Premiere
Installing the Hardware
Pro-ONE
.
Connecting the blackBOX and the Video Devices
Installing the Software
A Short Tour
Page 10

Page 11

Chapter 1: Welcome
W
ELCOME
!
Thank you very much for choosing a product from Pinnacle Systems. We
are pleased to be able to offer you a particularly powerful editing system in
Pro-ONE, which opens up a new dimension in video editing in its class.
The difference between Pro-ONE and Pro-ONE RTDV is that the Pro-ONE RTDV
has the capability to do RealTime-DV-out
It is very important for us not only to achieve the best performance but also
to direct the operation of the equipment towards practical requirements. To
this end, we have asked professional editors from around the world for their
expectations and requirements. The outcome of this is a robust and
productive product for experienced editors and producers. With Pro-ONE we
want you to be able to give your creativity free rein. Choose and combine
professional effects from the extensive range of professional effects and
thus create the look that gives your productions the right appearance and the
required substance – leave it to Pro-ONE to take care of the immediate
presentation in full quality.
You will be impressed by the outstanding real-time capabilities of Pro-ONE.
Display videos on 3D objects so that you can incorporate these with
dramatic effect into a scene. Theme-related effects make it easier for you to
set up scenes quickly. You can even combine up to 10 effects in real time.
We recommend that you experiment first with the examples included to find
out more about the performance capabilities of Pro-ONE.
We hope you have fun with your new editing system.
<RXU3LQQDFOH3UR21(7HDP
Chapter 1: Welcome
1
Page 12

H
OW THIS GUIDE IS ORGANIZED
This User Guide describes the Pro-ONE features and explains how to use
them within Adobe Premiere. For detailed information on Adobe Premiere,
please refer to the Adobe Premiere User's guide.
This manual consists of the following chapters:
Part I - Getting Started
Overview
The chapter “Welcome” introduces the Pinnacle Pro-ONE, provides an
overview of its capabilities along with the conventions used and
organization of this User’s Guide.
System requirements
The chapter “Before You Begin” gives you all necessary information about
the system requirements needed to work efficiently with Pro-ONE. In
addition the package contents are introduced in detail.
Installing Adobe Premiere
The chapter “Installing Adobe Premiere” tells you how to install Adobe
Premiere.
Hardware installation
The chapter “Installing the Hardware” explains the hardware installation.
Connecting the blackBOX
The chapter “Connecting the blackBOX” shows how to connect the ProONE, the blackBOX and the video devices.
Software installation
The chapter “Installing the Software” describes the installation of the
software under Windows 98 SE, Windows Me, Windows 2000 and
Windows XP.
Short Tour
The chapter “Short Tour” gives you detailed information on how to capture,
edit and playback video clips to tape.
In addition, the Device control functions are described in detail.
Part II - Creating Movies
DVTools
The chapter “Pro-ONE and DVTools” introduces step by step how to capture,
playback and export video clips using the DVTools.
Pinnacle Pro-ONE
2
Pinnacle Effects
The chapter “Pinnacle Effects” introduces the Pinnacle Systems’ real time
transitions and filters which allow you to check the effects without having
to render the clip.
Page 13

Real time Effects
The chapter “Pinnacle real time effects” provides an overview of the
different kinds of Pinnacle real time effects and their use.
TitleDeko RT
The chapter “TitleDeko RT” explains how to use the TitleDeko RT
character generator to add titles, rolls and crawls, with a variety of text
effects.
Hollywood FX RT
The chapter “Hollywood FX RT” describes how to generate 3D transitions
and realtime effects for your projects.
Alpha Magic FX
The chapter “Alpha Magic FX” introduces Alpha Magic FX, a collection of
more than 300 top-quality transitions and dynamic effects.
Export
The chapter “Exporting the Projects” explains the settings for an export of
your project.
Part III - Tools, Tips & Utilities
Pinnacle Presets
The chapter “Pinnacle Presets” gives you information about the Pinnacle
presets included with Pro-ONE which contain settings that guarantee an
optimal operation of Pro-ONE and Adobe Premiere.
Pro-ONE Control
The chapter “Pro-ONE Control ” describes all features of the Control, which
allows you to specify individual settings.
Instant Video RT
The chapter “Instant Video RT” gives you information about how to
minimize the rendering time under Adobe Premiere considerably.
Editing Widescreen Movies
The chapter “Editing Widescreen Movies” describes how to capture, edit
and playback widescreen movies.
Part IV - Appendix
Appendix
The “Appendix” contains, the technical data, a troubleshooting guide, a
detailed multimedia glossary, the license agreement, and the declaration of
conformity.
Index
An index concludes this User’s Guide.
Chapter 1: Welcome
3
Page 14
This chapter recommends computer system components that are required for
the operation of the Pro-ONE and lists the items included with the Pro-ONE.
For changes or supplements that could not be included in the printed
documentation, please, refer to the ReadMe file on the CD-ROM supplied
with your system!
S
YSTEM REQUIREMENTS
Please make sure your system meets the following requirements before
installing the Pro-ONE:
Chapter 2:
Before You Begin
PC System
Processor: 733 MHz, Pentium III, Athlon or better
1 x 32-bit PCI 2.1 slot
Windows 98 SE / Windows Me
256 MByte RAM (or more)
Windows 2000 / Windows XP
256 MByte RAM (recommended 512)
500 MByte hard disk capacity for system files and programs, e.g. Adobe
Premiere
UDMA100 or better, 20 GByte hard disk capacity for capture / playback
of video, able to sustain at least a minimum of a 15 MBytes/sec transfer
rate.
DMA data transfer
You should absolutely install a DMA busmaster driver to ensure the smooth
function of your PRO-ONE board. You will find this driver on the CDROM supplied with your motherboard, in the internet, or contact your
dealer.
Pinnacle Pro-ONE
4
Graphics board with 1024 x 786 x 16 bpp with DirectDraw drivers,
OpenGL compatible
DirectX 8.0 or higher
CD-ROM drive
48 kHz compatible sound board.
Page 15
Software
Windows 98 SE, Windows Me, Windows 2000, Windows XP.
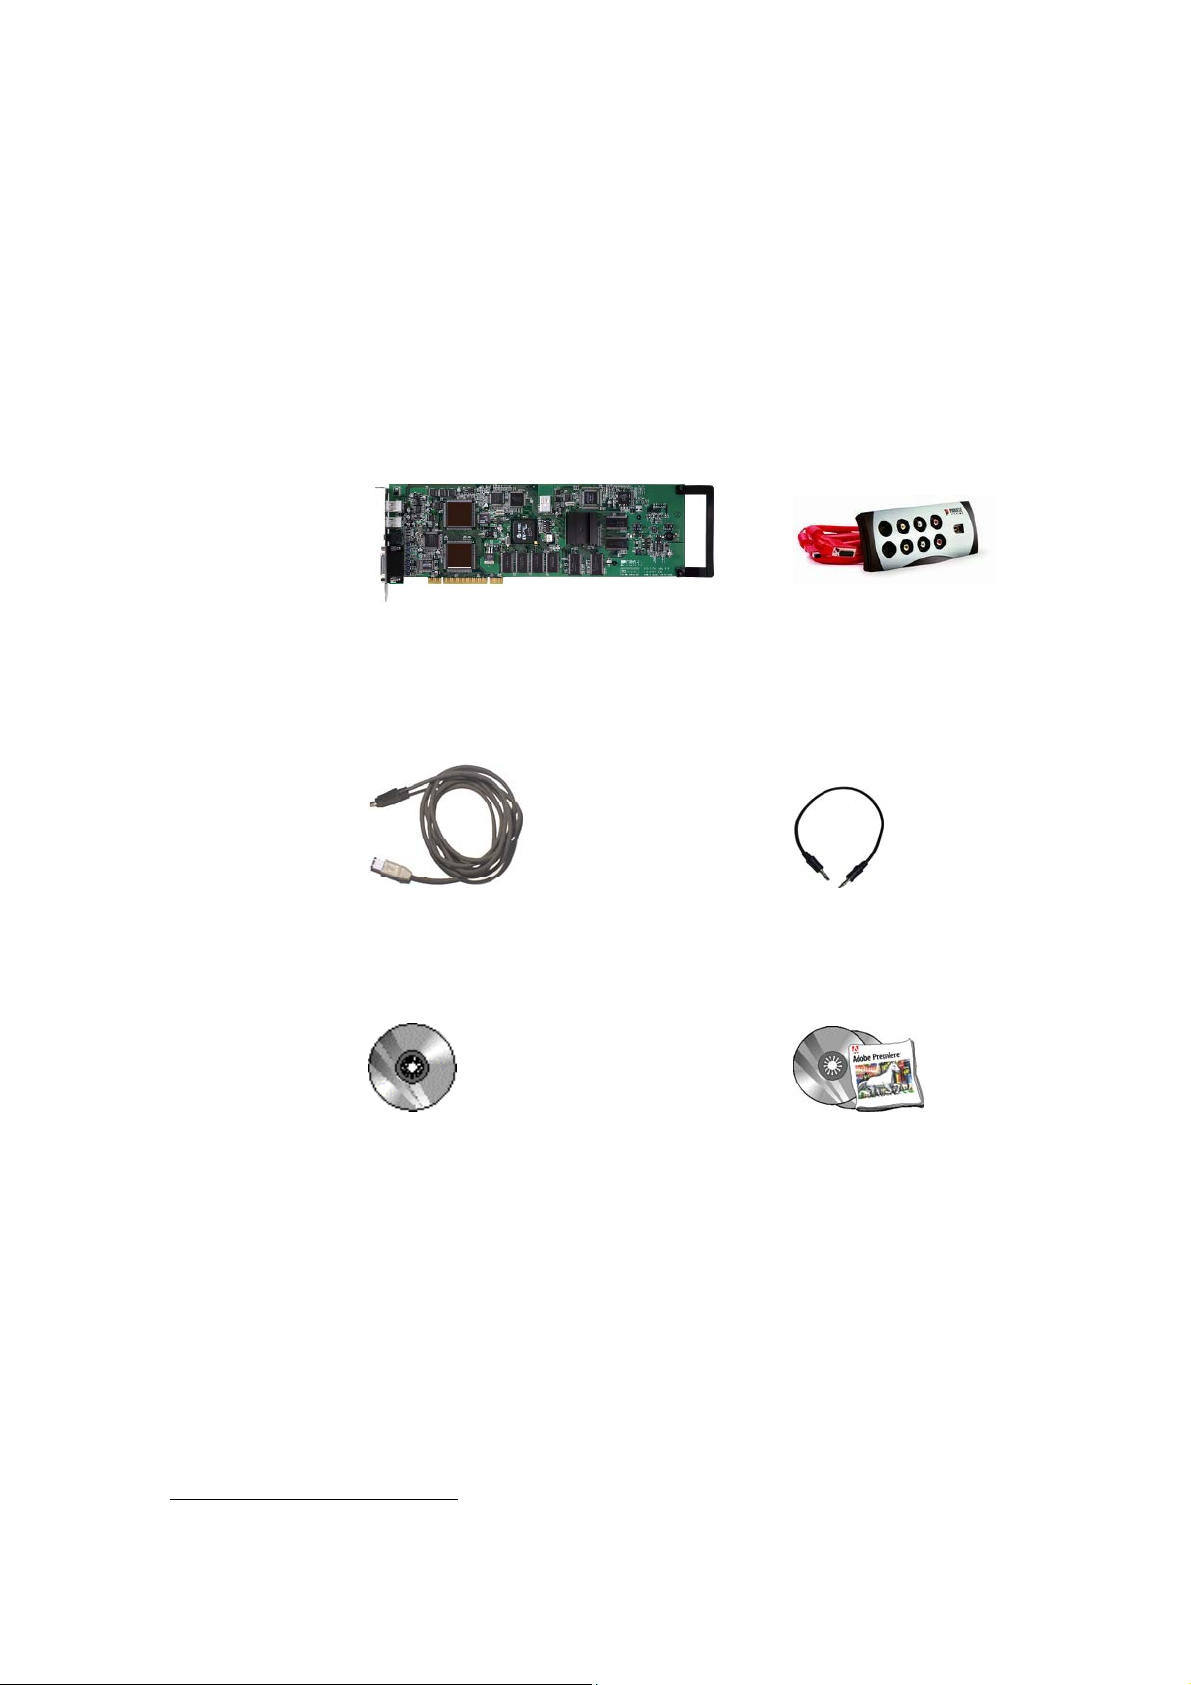
PACKAGE CONTENTS
Please make sure your Pro-ONE system is complete before you begin the
installation. The system includes
*
:
Pro-ONE board
**
blackBOX
IEEE-1394 cable Audio cable
CD-ROM with: CD-ROM with Adobe Premiere
- Pro-ONE drivers
- Adobe Premiere plug-ins
- Adobe Premiere presets
- Sample project
- Instant Video RT
- Pinnacle RT Effects engine
- Hollywood FX RT
- Alpha Magic FX
- Alpha Magic Quick Reference
*
Depending on the delivery scope, the package contents may vary from the contents listed in this manual.
**
For model and serial number of your board, refer to the label on the board.
Chapter 2: Before you begin 5
Page 16
- TitleDeko RT
- Pinnacle PCI Performance Enhancer (PPE)
- Online documentation
- Service and support information
- ReadMe and online help files
CD-ROM with This manual
Pinnacle Impression DVD SE
If any parts are missing, please contact your retailer.
Computer components are sensitive to electrostatic charge. Do not take the
Pro-ONE board out of its antistatic package until you install it.
Related Information
Refer to Pinnacle at http://www.pinnaclesys.com/support for the latest
information on configurations and software updates.
Refer to Microsoft Windows documentation, online help and Microsoft
Website for information on the Windows operating system.
Refer to Adobe www.adobe.com for the latest information on Adobe
Premiere.
Pinnacle Pro-ONE
6
Page 17
Chapter 3:
Installing Adobe Premiere
The following chapter describes the procedure to install Adobe
Premiere.
You must install Adobe Premiere
your computer, because the Pro-ONE presets must be copied to the
appropriate Adobe Premiere folder during the installation of the Pro-ONE
software.
Proceed as follows to install Adobe Premiere:
1. Place the Adobe Premiere CD-ROM in your CD-ROM drive.
2. If the installation program does not start automatically, select
the
3. Depending on your drive, enter, for example:
If your CD-ROM drive has a different drive designation, change the path
accordingly.
—or—
Click on
mentioned above and double-click the
4. Click OK.
menu.
Start
e:\premiere\setup.
Browse
..., switch to your CD-ROM drive and to the directory
before
installing the Pro-ONE board in
Run…
setup.exe
file.
from
5. Follow the program installation instructions on the screen.
6. Install the Adobe Premiere Update.
After
you have installed Adobe Premiere on your computer, you can install
the Pro-ONE board and software.
If you ever need to reinstall Adobe Premiere, please remember to run the
Pro-ONE setup program again, selecting at a minimum the Presets and
PlugIns. Pro-ONE will not work correctly with Adobe Premiere if these
components are missing.
Chapter 3: Installing Adobe Premiere
7
Page 18
Installing the Hardware
D
EFRAGMENTING THE HARD DISK
Before installing and configuring the Pro-ONE you should defragment your
hard disk/s. Please use your Windows System tools for this. Under
Windows 98 SE / Me you find the defragmenter tool via
Accessories, System Tools, Disk Defragmenter
Chapter 4:
Programs,
.
If you use Windows 2000 / XP, please proceed as follows: Click on
Computer
Properties
Defragment Now...
I
NSTALLING THE
The following chapter explains how to install the Pro-ONE into your
computer.
, then click right on the disk to be defragmented, then choose
,
Tools
, and under
.
Defragmentation
click on the button
PRO-ONE
My
Pinnacle Pro-ONE
8
In the interest of your own safety and the flawless functioning of your new
product and computer system please note the following:
Computer components are sensitive to static charge. Divert any
electrostatic charge from your person before touching the components
with your hands or any tools.
Before opening the computer make sure that the power plug is
disconnected from the wall outlet.
Page 19
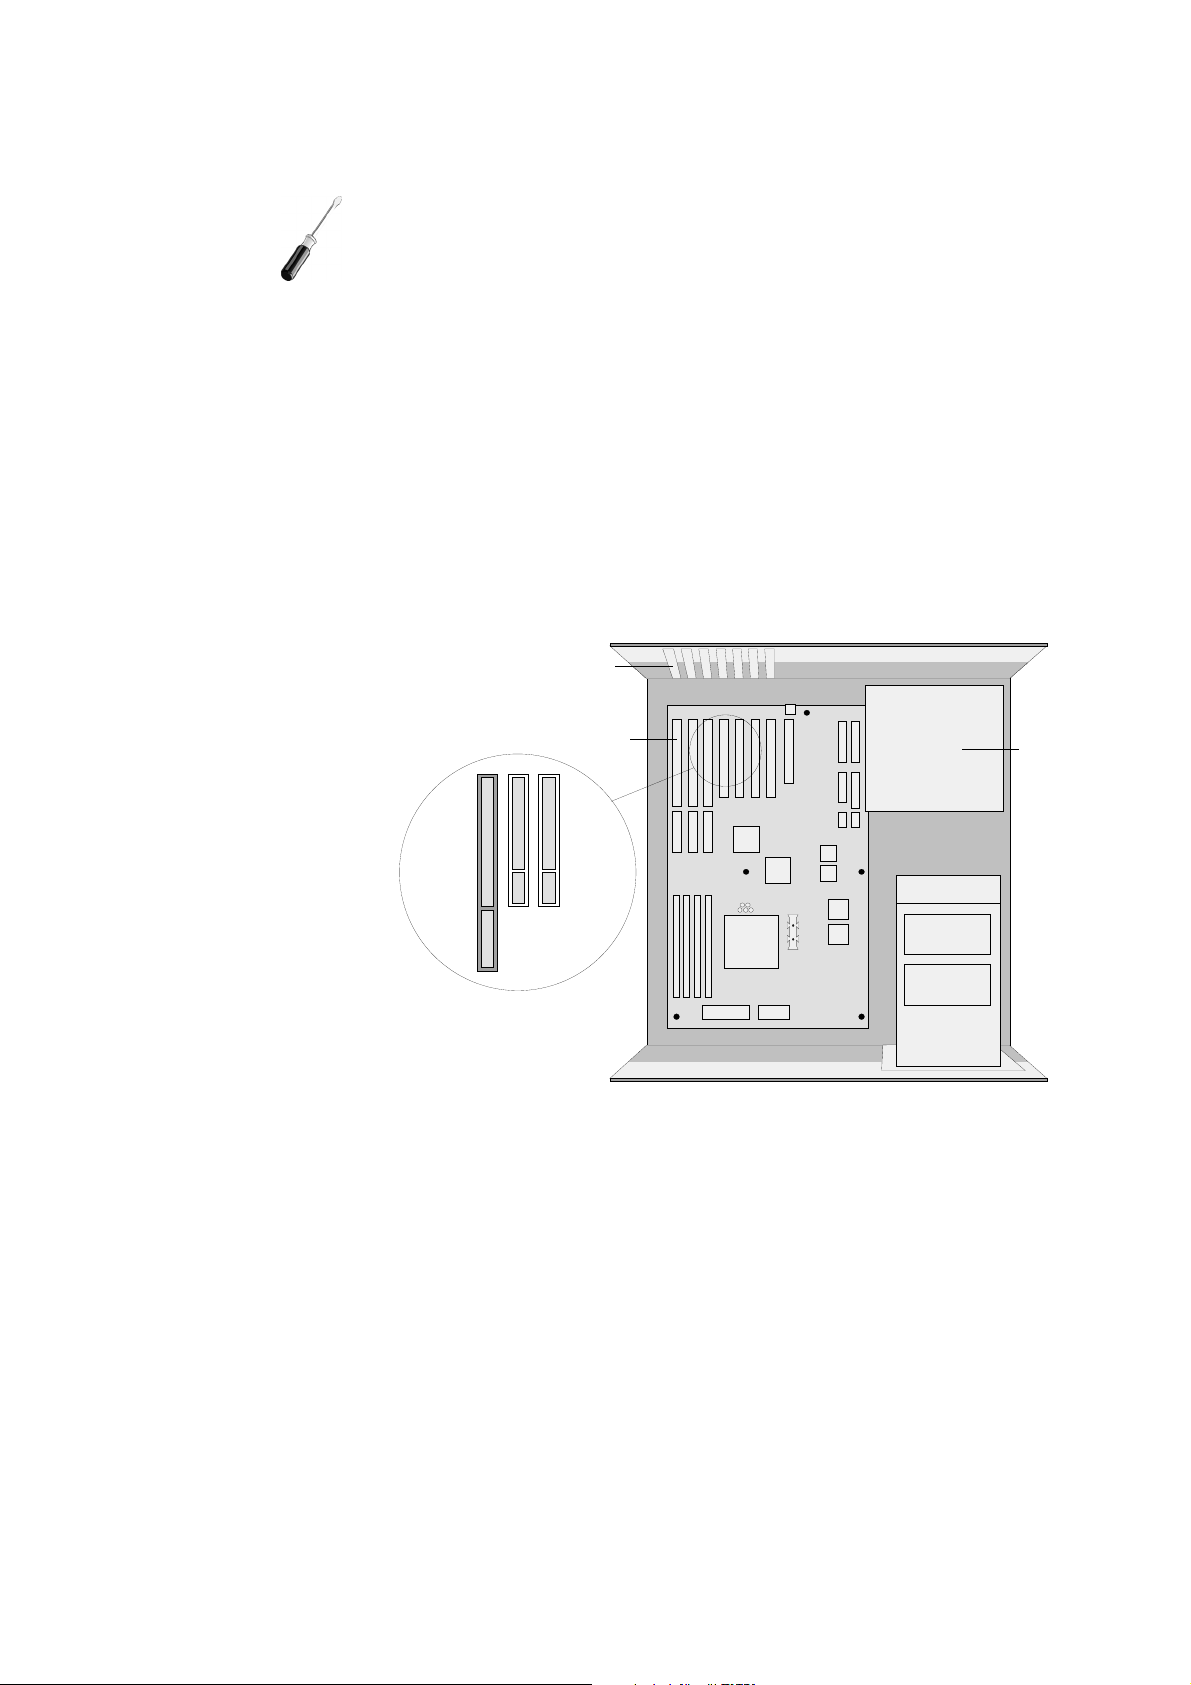
Inserting Pro-ONE
To insert the
Pro-ONE
into your computer, proceed as follows:
1. Discharge yourself.
Discharge yourself by touching the metal case of your computer.
2. Switch off the computer, disconnect the cables.
Switch off the computer and all peripheral devices. Pull out the power
cord and disconnect all necessary cables.
3. Remove the cover.
Loosen the screws of the computer's cover and remove the cover.
4. Select a PCI slot.
Select a free (busmaster) PCI slot for the
Slot shields
Slots
Pro-ONE
board.
Power
supply
unit
PCI slots
5. Remove the slot bracket.
Remove the slot bracket at the back of the computer. If necessary,
remove the screw at the cover.
6. Insert the board.
Insert the board carefully in the selected slot. Hold the board at the top
edge and push both ends simultaneously into the slot. Press the board's
top edge to make sure that the board is firmly seated in the slot. If your
computer has an additional retainer opposite the slot, slide the board into
this retainer as well so as to ensure better stability.
Chapter 4: Installing the Hardware
9
Page 20
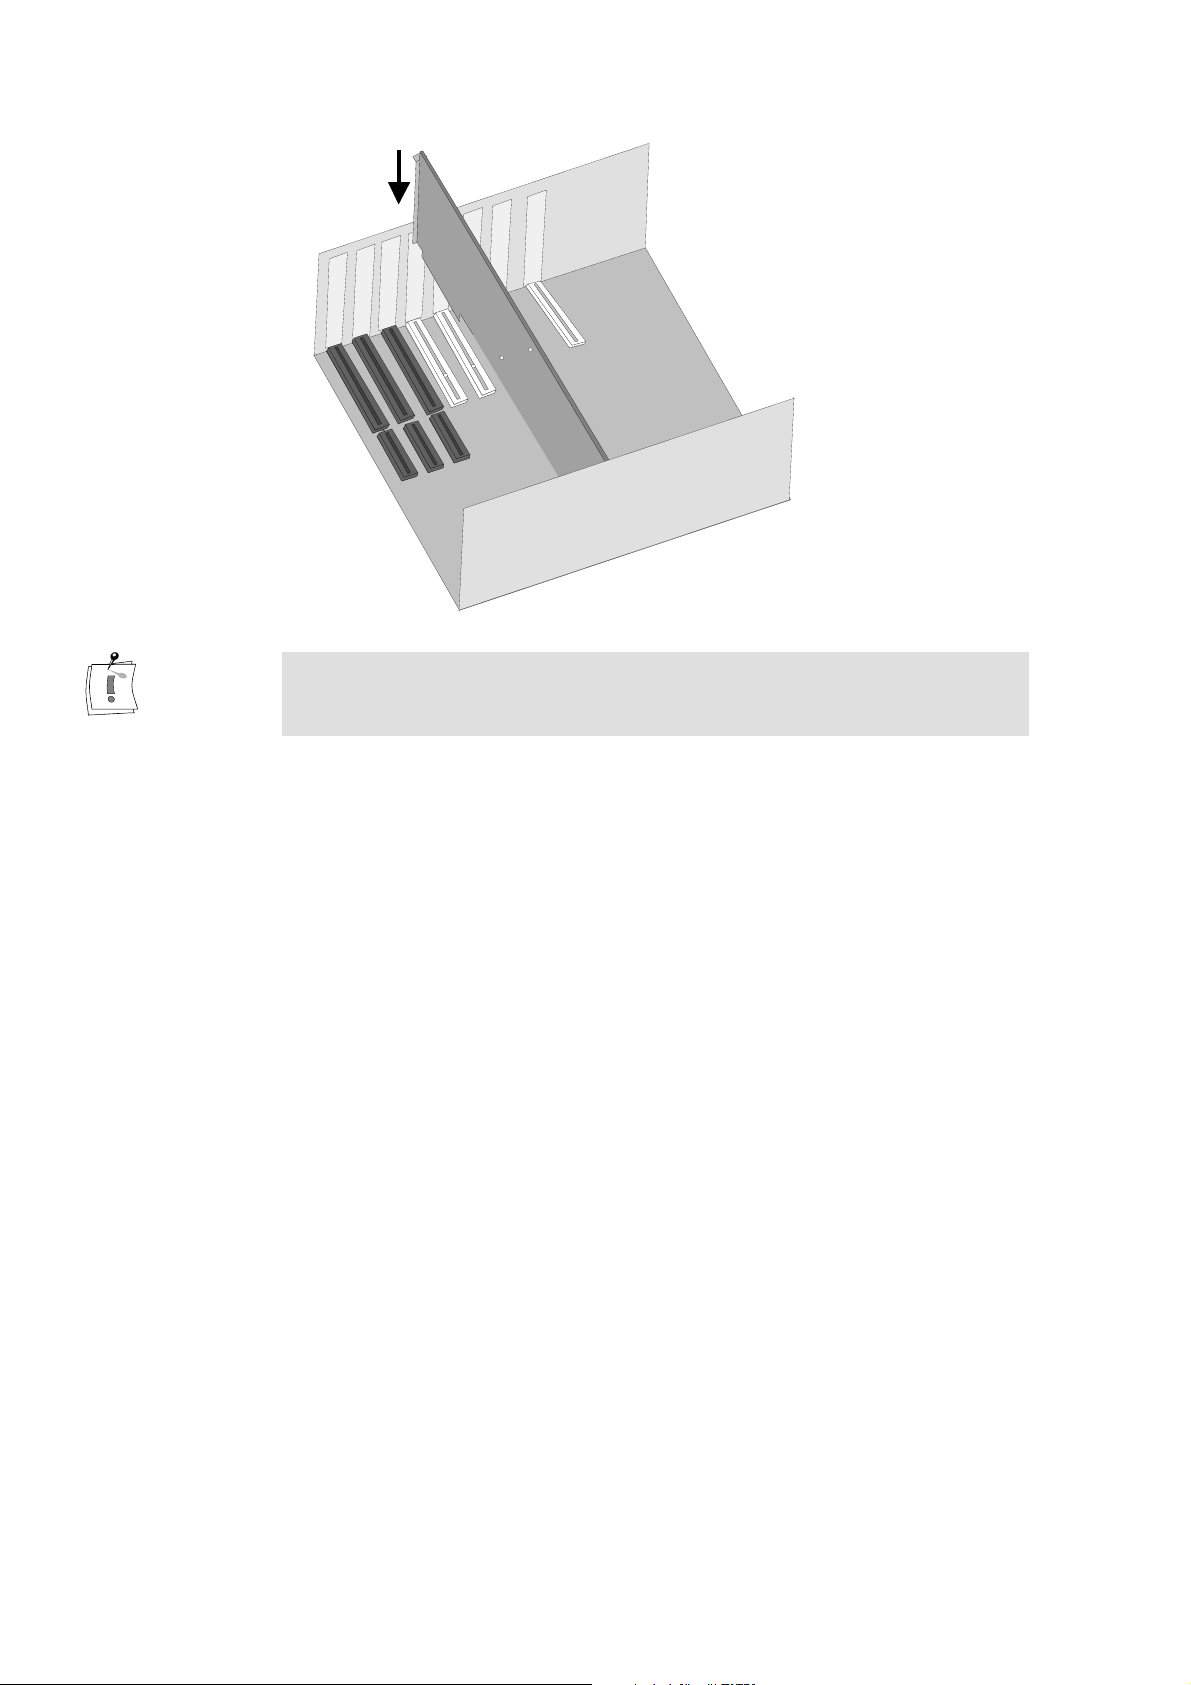
If the board cannot be inserted without problems, do not force the board into
place. The contacts at the connector could bend. Instead, pull the board out
carefully and try again.
7. Screw in the slot bracket.
Screw the slot bracket tight.
8. Reconnect the cables.
Reassemble the computer’s casing. Reconnect the cables.
The Pro-ONE hardware installation is completed.
In the next step, you can connect the breakout box and the video devices
as is described in the following chapter and install the software as
described in the chapter „Installing the Software“.
Pinnacle Pro-ONE
10
Page 21
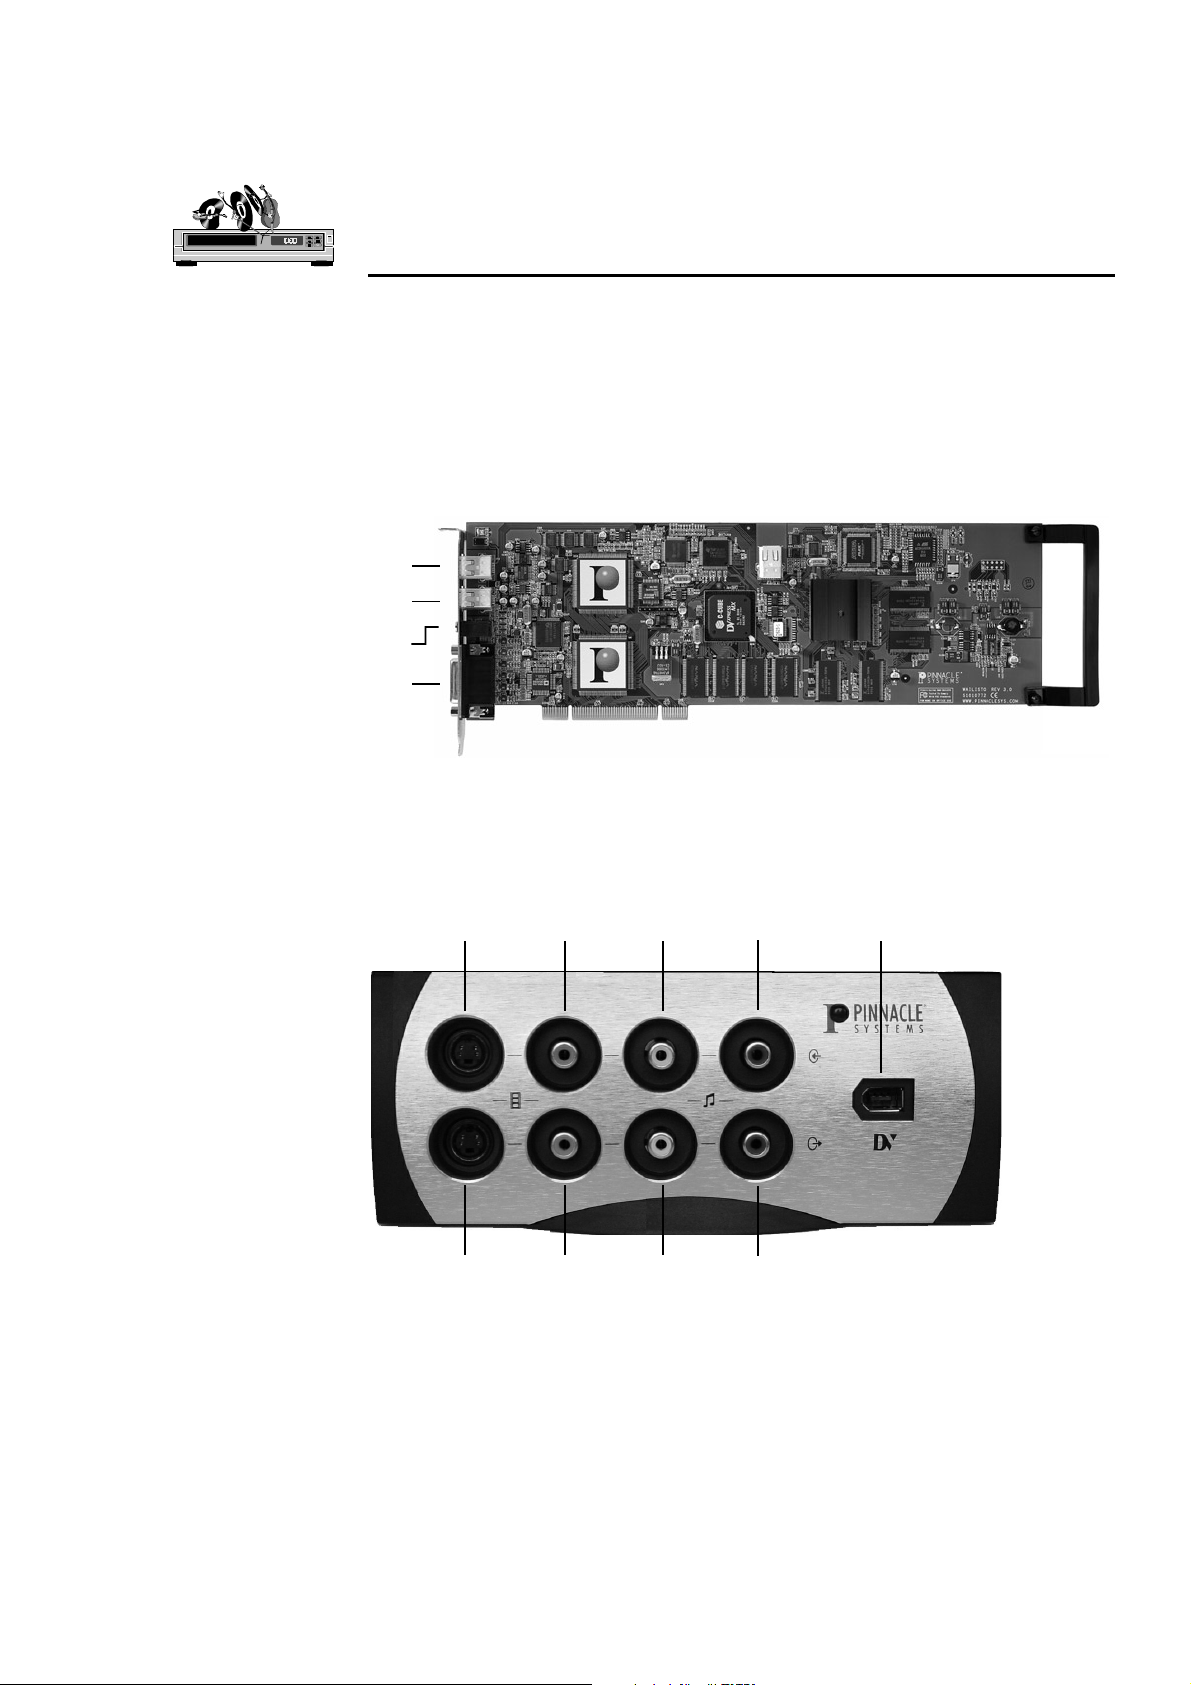
The following chapter tells you how to connect your video devices to the
y
Pro-ONE via the blackBOX,
will need the appropriate cables.
The following illustration shows the Pro-ONE board with its connections:
Connects to DV devices
(1394 connector)
Connects to DV devices
(1394 connector)
Audio connector
Connects to the blueBOX
(26-pin D-t
pe)
Chapter 5: Connecting
blackBOX and Video Devices
with the computer turned off
. To do so you
The following illustration shows the connections of the blackBOX:
Video Inputs Audio Inputs
S-Video Composite Left
S-Video Composite Left Right
Video Outputs Audio Outputs
Right
DV Input /
Output
Chapter 5: Connecting the blackBOX and the Video Devices
11
Page 22
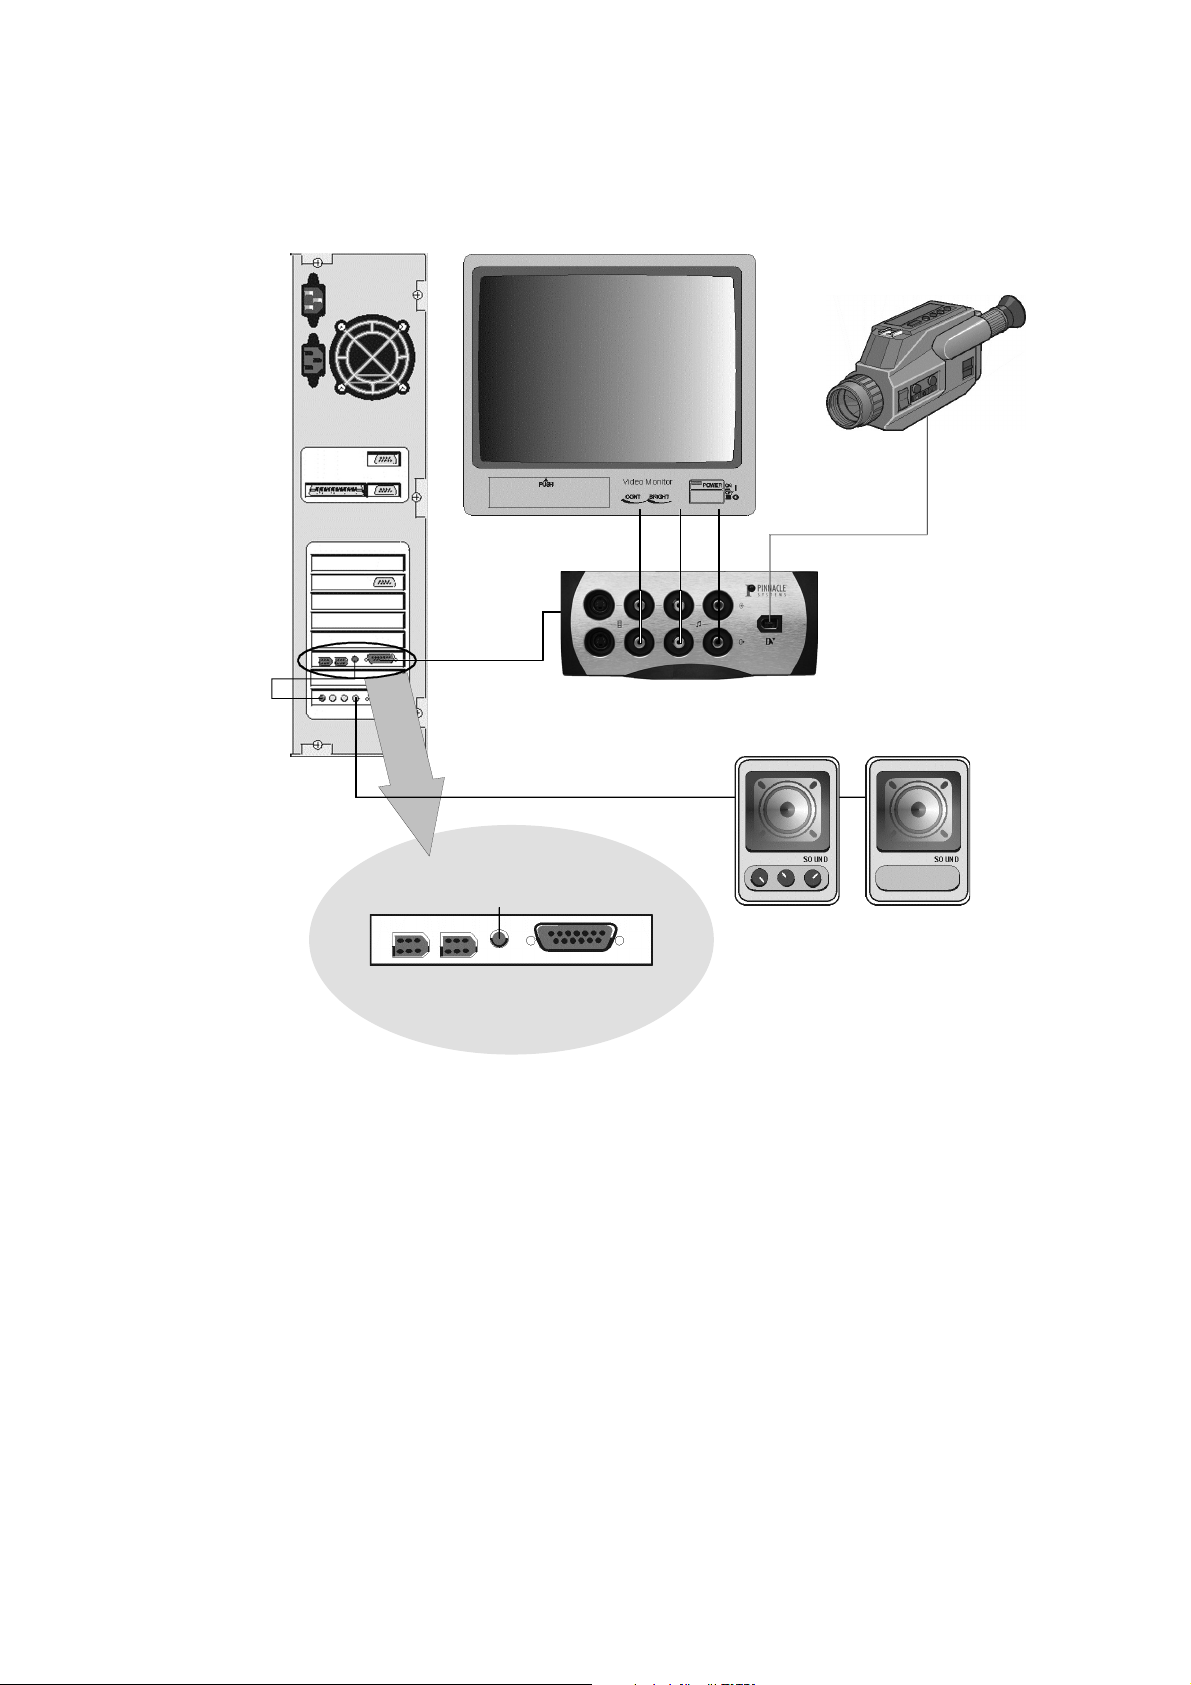
H
OW TO CONNECT AUDIO AND VIDEO DEVICES
DV Camcorder
Input
Audio out to Soundboard Line in
blackBOX
Audio out
to Soundboard
DV devices
IEEE
Video
Audio out Soundboard
blackBOX
Audio
1394
Output
Speakers
Pinnacle Pro-ONE
12
Page 23
C
ONNECTING THE BLACK
Via the blackBOX you can connect your analog video devices or an external
monitor to your Pro-ONE board. Connect the blackBOX to the Pro-ONE
board directly via the cable of the blackBOX.
blackBOX Out Pro-ONE IN
BOX
blackBOX Cable
blackBOX Cable (DV)
C
ONNECTING THE AUDIO LOOPTHROUGH
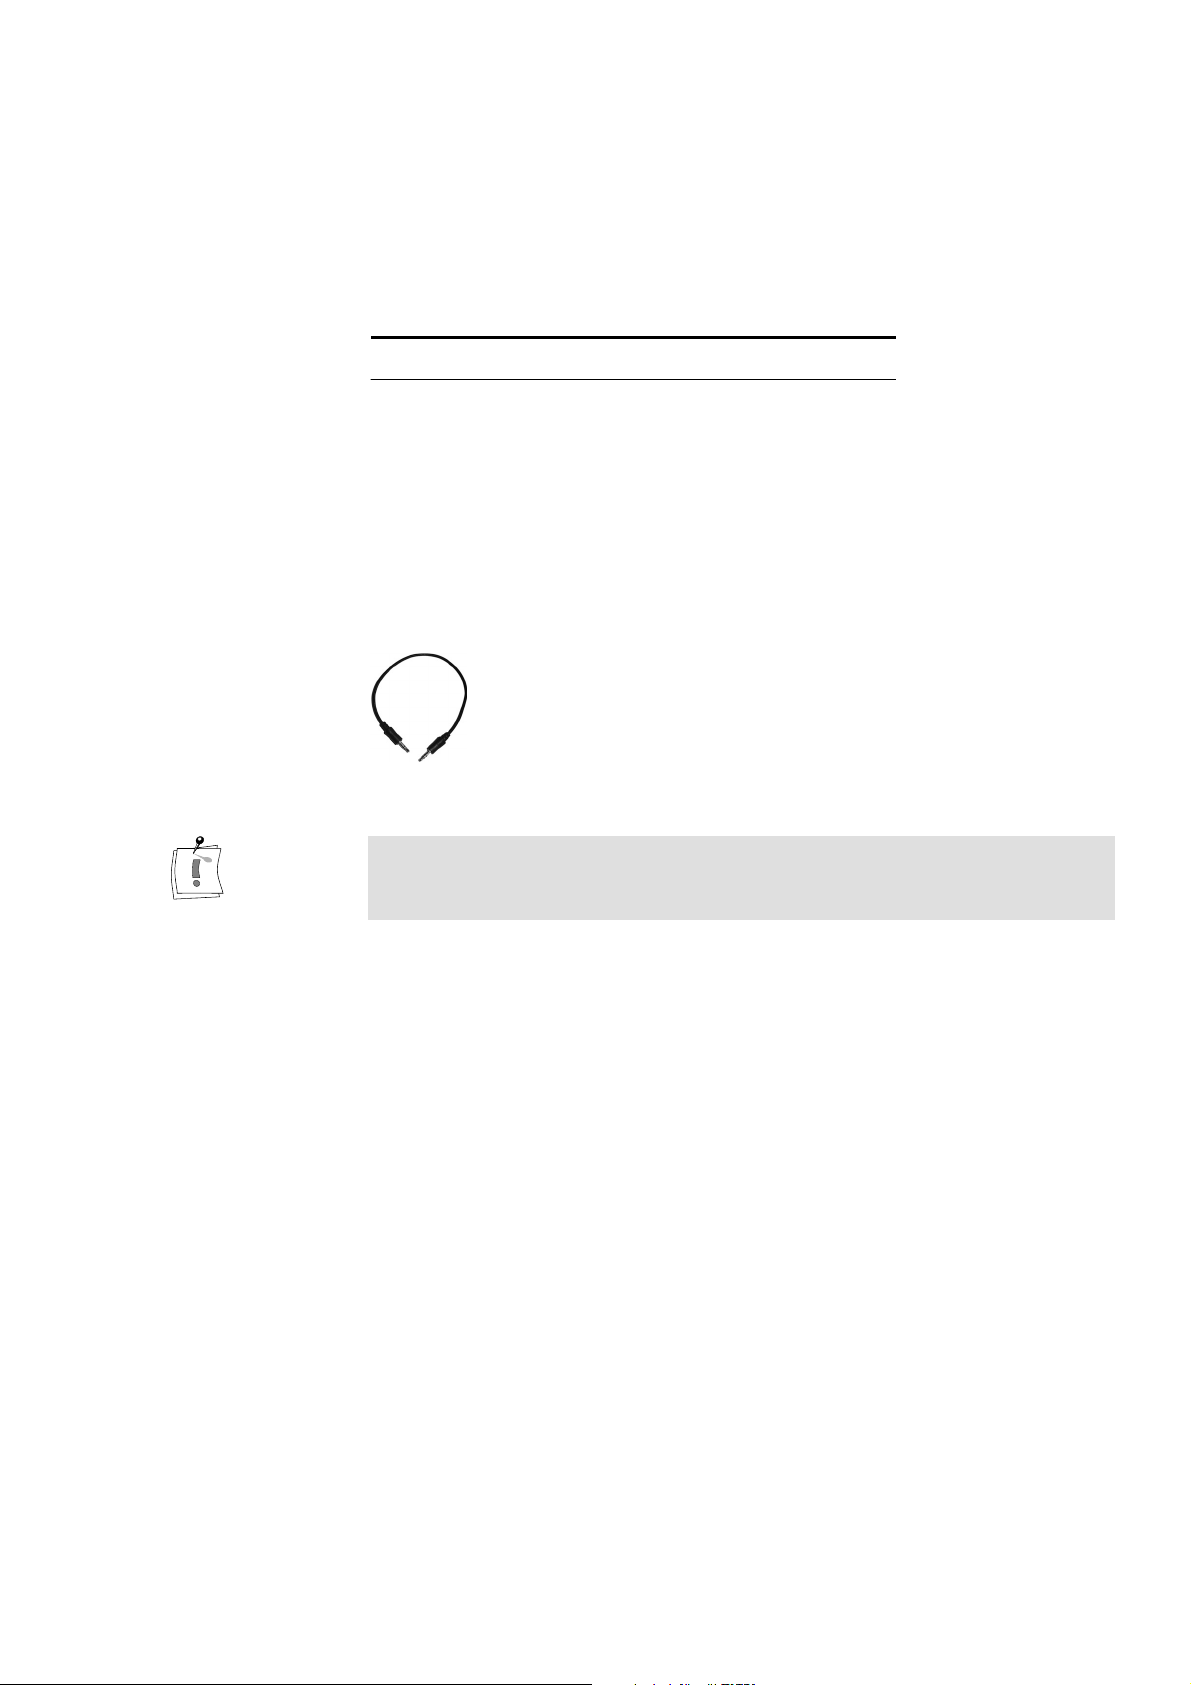
For audio monitoring using your PC speakers, connect the Audio Output on
the back of the Pro-ONE board to the Audio Line-IN of your sound board
using the Audio cable included in the package.
Make sure to enable or un-mute the Line-In on the sound board to monitor
the Pro-ONE's audio on the PC speakers. Do this via the audio mixer or the
software included with the sound board.
26-pin D-type Connector
¾
Input / Output DV
¾
C
ONNECTING THE VIDEO DEVICES
In the following, the options for cabling your video source—referred to as
the
player
that you want to digitize (“capture”) to your hard disk and then edit on your
PC.
Subsequently, connections to the
device—typically a VCR—that you would like to output your final
production to.
—are described. The player provides the video and audio signals
Player: DV device
Devices that connect to the board include any DV or Digital 8 format video
camcorder or recorder that has an IEEE-1394/DV connector. On many
devices, this connector is labeled “i.Link”.
Chapter 5: Connecting the blackBOX and the Video Devices
recorder
are explained. The recorder is the
13
Page 24
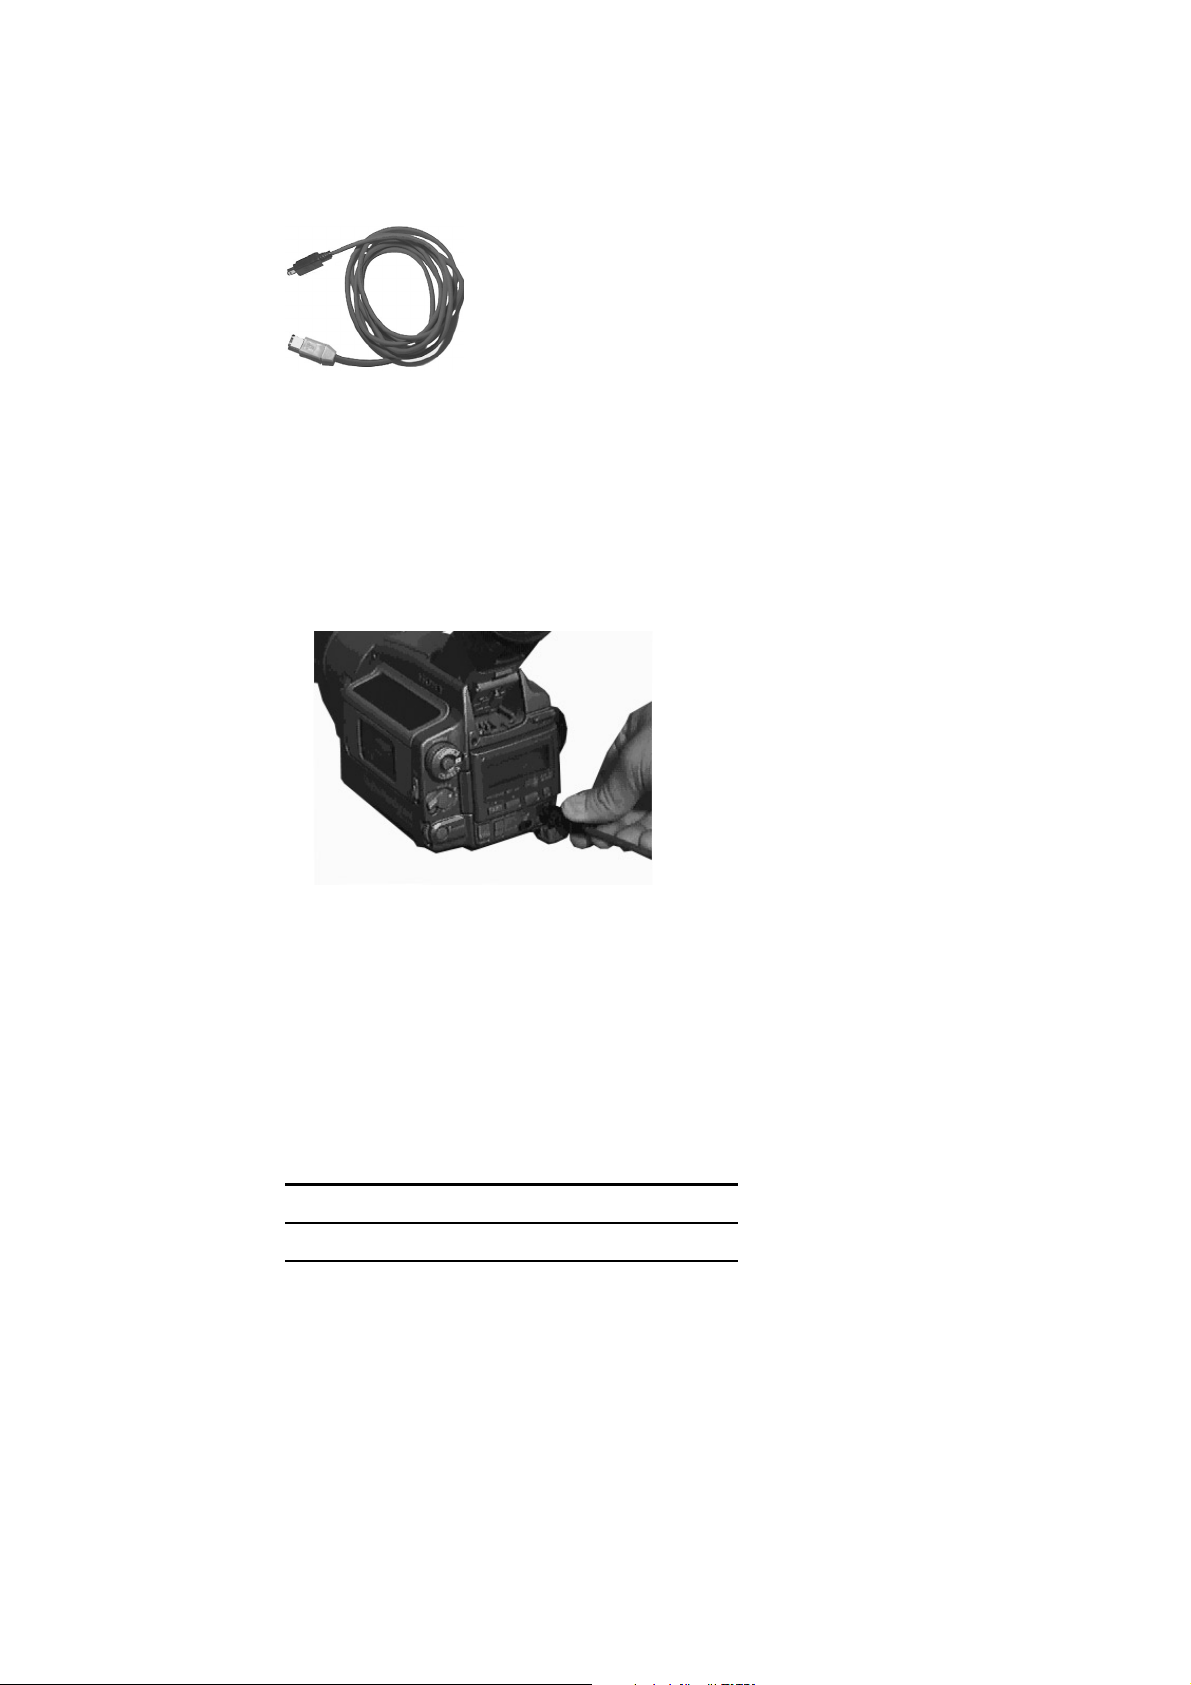
To connect your DV camcorder/VCR to the Pro-ONE, use the IEEE-1394
DV cable included in the package.
1. Connect the IEEE-1394 cable to the Pinnacle
Pro-ONE
.
Connect the 6-pin connector of the IEEE 1394 DV cable to one of the
1394 data ports of your Pro-ONE.
2. Connect the IEEE-1394 cable to the DV device.
Connect the 4-pin connector of the IEEE 1394 AV cable to the DV
IN/OUT or the DV OUT connector of your DV camcorder/VCR.
Video and audio signals are transferred via the IEEE-1394 cable so no other
connection is required to connect your DV device as a player.
S-Video
Player: S-Video device / Composite video device
Choose this type of connection if your player has an S-Video output.
The following table gives an overview of the connections:
Player Out blackBOX In
S-Video Output
Audio Output L
Audio Output R
S-Video Input
¾
Audio Input L
¾
Audio Input R
¾
Pinnacle Pro-ONE
14
Page 25

Composite
video
Choose this type of connection if your player has a Composite video output.
The following table gives on overview of the connections:
Player Out blackBOX In
Composite Video Output
Audio Output L
Audio Output R
Composite Video Input
¾
Audio Input L
¾
Audio Input R
¾
If your player is equipped with S-Video outputs as well as with Composite
video outputs, please choose S-Video, as this will provide the highest level
of video quality.
If your player has a SCART connector, you will need an appropriate
adapter. This adapter is available wherever video recorders are being sold.
Recorder: DV device
PAL device:
Many PAL devices sold in Europe usually have only a DV
can be identified by the label DV OUT (and not DV IN/OUT) on the DV
connector. Such devices do
not
support recording of DV data back to
videotape. Note that with Pinnacle Pro-ONE, you can of course use the
analog outputs to play your finished DV project to an analog VCR.
output
. These
Devices that connect to the board include any DV or Digital 8 format video
equipment that has an IEEE-1394/DV connector. On many devices, this
connector is labeled “i.LINK”.
If you have not already done so, connect your DV camcorder/VCR to the
Pro-ONE. Use the IEEE-1394 AV cable included in the package.
1. Connect the IEEE-1394 cable to the
Pro-ONE
.
Connect the 6-pin connector of the IEEE-1394 DV cable to one of the
1394 data ports of your Pro-ONE.
Chapter 5: Connecting the blackBOX and the Video Devices
15
Page 26
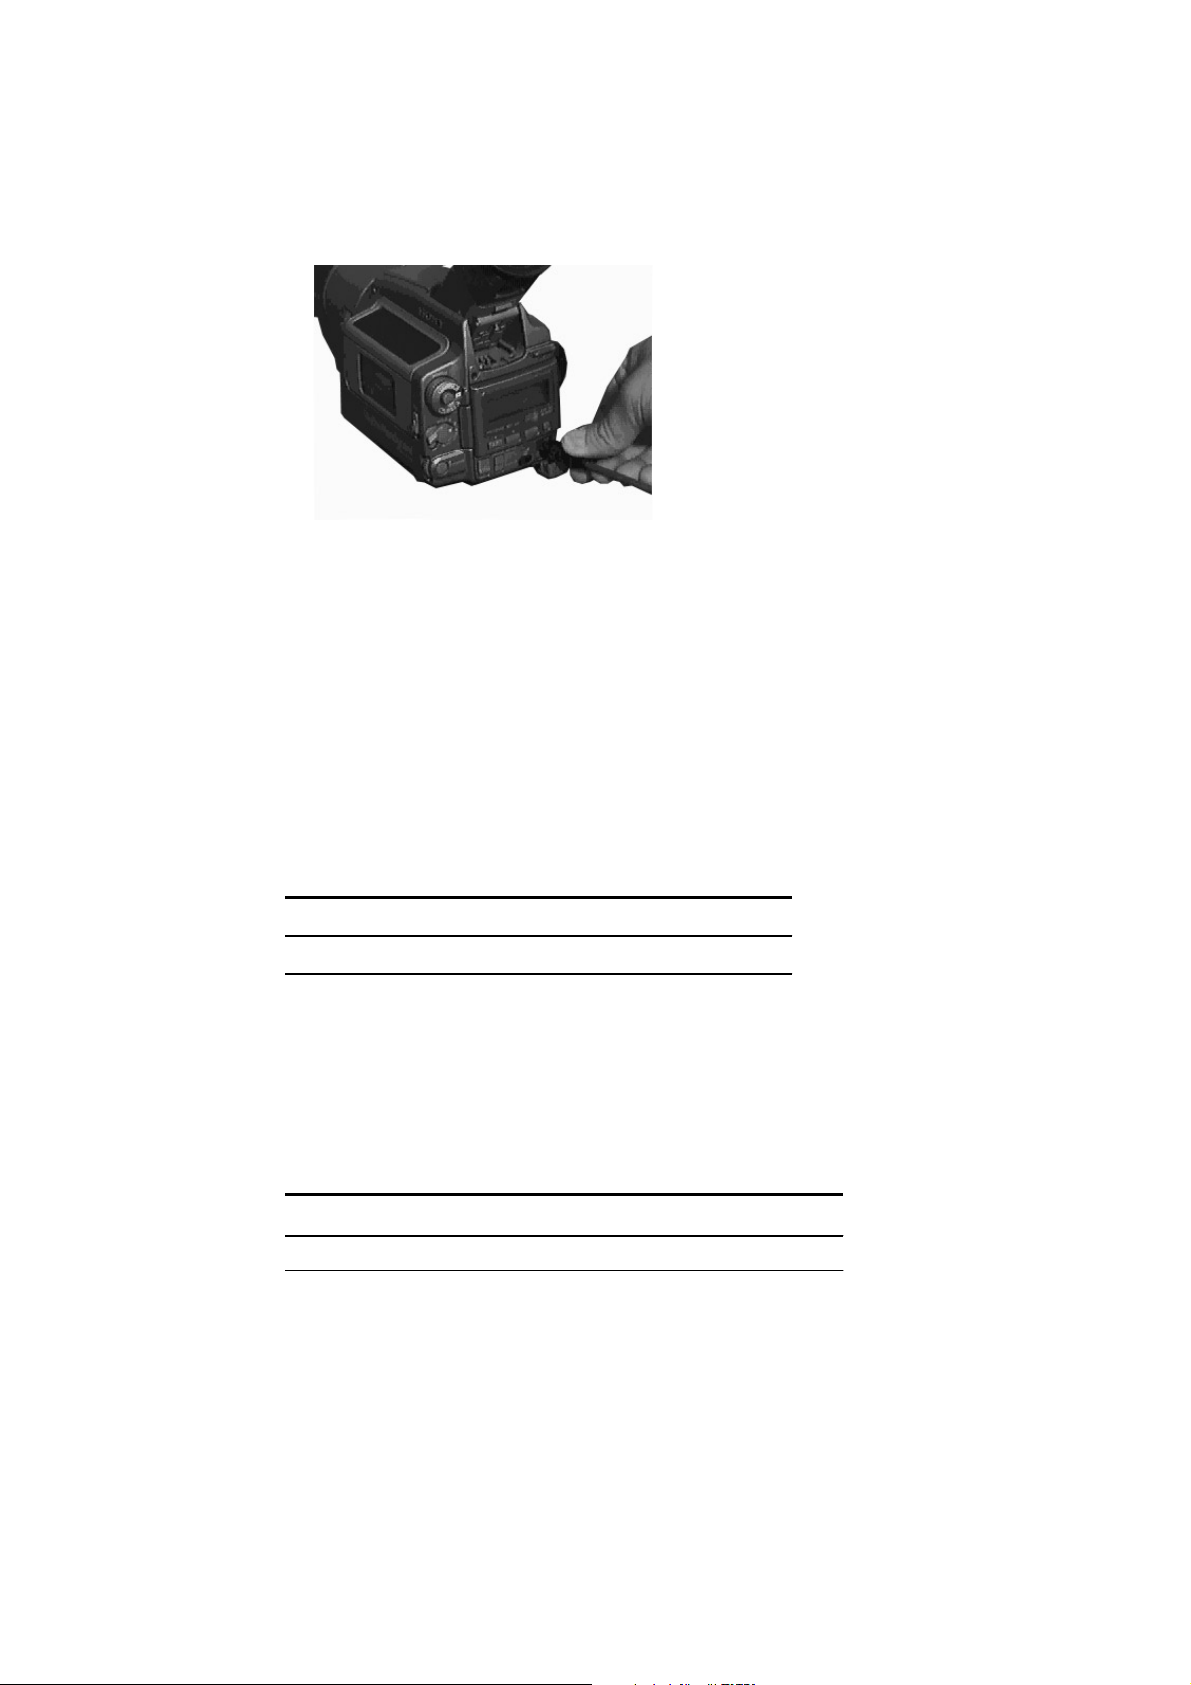
2. Connect the IEEE-1394 cable to the DV device.
Connect the 4-pin connector of the IEEE-1394 AV cable to the DV
IN/OUT connector of your DV camcorder/VCR.
Pro-ONE can output either to DV or to analog, but not both at the same time.
You can select the active output later in Adobe Premiere by right-clicking
on the Instant Video RT window and selecting
Settings
in the menu that
appears.
S-Video
Composite
Video
Recorder: S-Video device / Composite video device
Choose this type of connection if your recorder has an S-Video input.
The following table gives an overview of the connections:
blackBOX Out Recorder In
S-Video Output
Audio Output L
Audio Output R
Choose this type of connection if your recorder has a Composite input.
The following table gives an overview of the connections:
blackBOX Out Recorder In
Composite Video Output
Audio Output L
Audio Output R
S-Video Input
¾
Audio Input L
¾
Audio Input R
¾
Composite Video Input
¾
Audio Input L
¾
Audio Input R
¾
Pinnacle Pro-ONE
16
If your player is equipped with S-Video outputs as well as with Composite
video outputs, please choose S-Video, as this will provide the highest level
of video quality.
If your player has a SCART connector, you will need an appropriate
adapter. This adapter is available wherever video recorders are being sold.
Page 27
P
LAYER AND RECORDER IN ONE DEVICE
Up to now, player and recorder have been treated as two separate devices.
When editing video with Pro-ONE, it is also possible to combine both
functions in one single video device. In this case, connect the device to the
blackBOX as a player
avoid video signal feedback, you should deactivate the option
loopthrough
in the Pro-ONE Control software.
as a recorder, as described above. In order to
and
Video
Similarly, in order to avoid audio signal feedback, you should deactivate the
option
Audio loopthrough
in the Pro-ONE Control software.
Chapter 5: Connecting the blackBOX and the Video Devices
17
Page 28
C
ONNECTING THE VIDEO MONITOR AND LOUDSPEAKERS
In order to check the image and the sound quality during capture, editing
and output, we recommend that you connect a video monitor or TV set,
either with integrated or separate loudspeakers. There are two possibilities:
The monitor can be connected to a free S-Video or Composite Video and
audio output of the blackBOX. If necessary, use an appropriate adapter.
Connect the monitor to the video and audio outputs of your recorder. In
this case the output signal of Pro-ONE is transmitted to the input of the
recorder, through the recorder and on to the monitor.
Audio connection
To monitor audio it is just fine to connect the audio out of the Pro-ONE
with your sound card and use the computer loudspeakers.
In order to achieve the best quality when you master to tape use the audio
output of the blueBox and connect it to your recorder when outputting
analog either S-Video or Composite.
If outputting IEEE-1394, Audio will be transmitted along with the Video on
the IEEE-1394 cable and no additional connections need to be made.
Pinnacle Pro-ONE
18
Page 29

Chapter 6:
Installing the Software
After you have installed the Pro-ONE board in your computer, you can install
the Pro-ONE drivers and software.
Make sure that you have installed Adobe Premiere
Pro-ONE software.
The installation steps for Windows 98 SE / Me, and Windows 2000 / XP are
slightly different. Please refer to the corresponding sections:
Installing the Software for Windows 98 SE as of page 20,
Installing the Software for Windows Me as of page 22.
Installing the Software for Windows 2000 / Windows XP as of page 24.
During the installation the following items are copied to / installed on your
hard disk:
Pro-ONE software
• Pro-ONE drivers
• Instant Video RT
• Pinnacle Real-time effects
• DVExpert
before
you install the
• PPE performance tool
DVTools
Presets / Plugins for Adobe Premiere
Hollywood FX RT
TitleDeko RT title generator
Alpha Magic Wipes
Online manual
Up-to-date ReadMe and Help files
The Pinnacle Pro-ONE program group is created.
Chapter 6: Installing the Software
19
Page 30

I
NSTALLING THE SOFTWARE FOR WINDOWS
Depending upon the system configuration you may be asked to re-start your
computer during the installation. If this is the case, re-start your computer
by clicking on the
Important: During the software installation you will install the IEEE1394
driver. For this installation you need the “base5.cab” file on Windows 98
SE installation CD-ROM.
To install the software for Windows 98 SE, proceed as follows:
1. Switch on computer.
Switch on your computer. Windows is started automatically.
If your computer is configured in such a way, that Windows is not started
automatically, start Windows now.
button..
Yes
98 SE
VGA
After Windows starts, a new hardware (the “Standard PCI Graphics
Adapter (VGA)”) is found.
The
Add New Hardware Wizard
2. Click
Click on the
3. Click
In the next window click on the
4. Select
.
Next
Now specify the folder in which Windows should search for the device
drivers. Activate the check box CD-ROM drive, make sure all other
check boxes are deactivated and insert the Pro-ONE CD in your CD-ROM
drive, click the
The Pinnacle Pro-ONE D3D driver will be found. Click on
5. Follow the instructions.
Follow the instructions of the Windows installation program.
.
Next
button.
Next
.
Next
CD-ROM drive
Next
, insert the installation CD, click
button.
dialog appears.
button.
Next
Next,
Next
click
.
Pro-ONE
Overlay
Pro-ONE E4
Pinnacle Pro-ONE
20
A “PCI Multimedia Device” (the “Pinnacle Pro-ONE Overlay”) is found as
a new hardware component. The software for the new component will be
installed.
The “Pinnacle Pro-ONE E4” is found as a new hardware component. The
driver is installed automatically.
Page 31

IEEE 1394
The “Texas Instruments PCI OHCI Compliant IEEE 1394 Host Controller”
will be found.
6. Click
Click on the
7. Click
Click on the
8. Follow the instructions.
Follow the instructions of the Windows installation program.
Depending on your system, you may now be prompted for a restart. If
this is the case, confirm with
automatically after the restart.
Following, the Pinnacle software installation program starts.
Note: If the Setup program is not started automatically, please proceed as
follows: If necessary, insert the Pro-ONE installation CD-ROM into the
CD-ROM drive, double click on the
desktop and change to the CD-ROM drive. The file
be detected. Open this file.
.
Next
Next
Next, Next
Next
button.
.
button. Click
again.
Next
. The installation will continue
Yes
My Computer
icon on the Windows
autorun.exe
will
—Or—
Select the
where e:\ represents the driver letter for your CD-ROM drive. If
necessary, enter another letter. Click on OK.
... command in the
Run
menu and enter
Start
e:\autorun
,
The Setup program
The Setup program is started in the language determined by the Regional
Settings (
installed Windows version: German, English, or French.
If other Regional Settings than German, English or French are activated on
your computer, you need to select the language in which the installation
should be carried out.
9. If necessary, select language, click
If necessary, select the language in which the installation should be
carried out.
Click on the
10.Follow the instructions.
Start
menu,
Next
Settings, Control Panel, Regional Settings
.
Next
button.
) of the
Follow the instructions of the setup program.
Please now continue with “Additional information for the Setup Program”
section on page 26 in this chapter.
Chapter 6: Installing the Software
21
Page 32

I
NSTALLING THE SOFTWARE FOR WINDOWS ME
Depending upon the system configuration you may be asked to re-start your
computer during the installation. If this is the case, re-start your computer
by clicking on the
To install the software for Windows Me, proceed as follows:
1. Switch on computer.
Switch on your computer. Windows is started automatically.
If your computer is configured in such a way, that Windows is not started
automatically, start Windows now.
Yes
button.
IEEE 1394
VGA
The “Texas Instruments PCI OHCI Compliant IEEE 1394 Host Controller”
will be found. The
2. Insert Install CD and click Next.
Insert the Pro-ONE CD in your CD-ROM drive, and click the
3. Click
4. Follow the instructions.
The “ Standard PCI Graphics Adapter (VGA)” is found.
5. Click
Next
Click on the
Follow the instructions of the Windows installation program.
Depending on your system, you may now be prompted for a restart. If
this is the case, confirm with
automatically after the restart.
Next
Click on the
installed.
Found New Hardware Wizard
.
button.
Next
. The installation will continue
Yes
.
button. The “Pinnacle Pro-ONE D3D” driver will be
Next
dialog appears.
Next
button.
Pro-ONE
Overlay
Pro-ONE E4
Pinnacle Pro-ONE
22
6. Follow the instructions.
Follow the instructions of the Windows installation program.
A “PCI Multimedia Device” (the “Pinnacle Pro-ONE Overlay”) is found as
a new hardware component. The software for the new component will be
installed.
The “Pinnacle Pro-ONE E4” is found as a new hardware component. The
driver is installed automatically.
Page 33

Depending on your system, you may now be prompted for a restart. If this is
the case, confirm with
the restart.
The Pinnacle software installation program starts.
Note: If the Setup program is not started automatically, please proceed as
follows: Double click on the
and change to the CD-ROM drive. The file
detected. Open this file.
—Or—
. The installation will continue automatically after
Yes
My Computer
icon on the Windows desktop
autorun.exe
will be
Select the
where e:\ represents the driver letter for your CD-ROM drive. If necessary,
enter another letter. Click on OK.
... command in the
Run
menu and enter
Start
e:\autorun
,
The Setup program
The Setup program is started in the language determined by the Regional
Settings (
installed Windows version: German, English, or French.
If other Regional Settings than German, English or French are activated on
your computer, you need to select the language in which the installation
should be carried out.
7. If necessary, select language, click
If necessary, select the language in which the installation should be
carried out.
Click on the
8. Follow the instructions.
Start
menu,
Next
Settings, Control Panel, Regional Settings
.
Next
button.
) of the
Follow the instructions of the setup program.
For more information concerning the Pinnacle setup program read in the
“Additional information for the Setup Program” section as of page 26 in this
chapter.
Chapter 6: Installing the Software
23
Page 34
I
NSTALLING THE SOFTWARE FOR WINDOWS
Depending upon the system configuration you may be asked to re-start your
computer during the installation. If this is the case, re-start your computer
by clicking on the
To install the software for Windows 2000 / Windows XP, proceed as
follows:
1. Switch on computer.
Switch on your computer. Windows is started automatically.
If your computer is configured in such a way, that Windows is not started
automatically, start Windows now.
Important for Windows 2000 / Windows XP: Log in with administrator
rights.
Yes
button.
2000 / XP
IEEE 1394
VGA
After the start of Windows the “Texas Instruments PCI OHCI Compliant
IEEE 1394 Host Controller” is installed automatically.
The “Video Controller (VGA Compatible)” is found.
The
Found New Hardware Wizard
2. Click
Click on the
3. Click
In the next window click on the
4. Select
Now specify the folder in which Windows should search for the device
drivers. Activate the check box
check boxes are deactivated and insert the Pro-ONE CD in your CD-ROM
drive, click the
The Pinnacle driver is found. Click on
5. Click
Confirm the
.
Next
button.
Next
.
Next
CD-ROM drives
button.
Next
.
Yes
Digital Signature
, insert the installation CD, click
appears.
button.
Next
CD-ROM drives
.
Next
window with
Next
, make sure all other
.
Yes
.
Pinnacle Pro-ONE
24
6. Follow the instructions.
Follow the instructions of the Windows installation program.
Page 35

Pro-ONE
Overlay
A “Multimedia Controller” (the “Pinnacle Pro-ONE Overlay”) is found as a
new hardware component.
7. Click
Next
.
Pro-ONE E4
Click on the
8. Click
Click on the
9. Click
Confirm the
10.Follow the instructions.
Follow the instructions of the Windows installation program.
The “Pinnacle Pro-ONE E4” is found as a new hardware component.
11. Cl ic k
Confirm the
The driver is installed.
12.Follow the instructions.
Follow the instructions of the Windows installation program.
Next, Next
.
Yes
.
Yes
button.
Next
.
button. Click on
Next
Digital Signature
Digital Signature
again.
Next
window with
window with
Yes
Yes
.
.
Depending on your system, you may now be prompted for a restart. If
this is the case, confirm with
Note:
Under Windows 2000 / Windows XP the Pinnacle setup program
is not started automatically. To start the setup program, please proceed as
follows: Double click on the
and change to the CD-ROM drive. The file autorun.exe will be detected.
Open this file.
—Or—
Select the
where e:\ represents the driver letter for your CD-ROM drive. If
necessary, enter another letter. Click on OK.
The “Pinnacle Pro-ONE 1394” driver, which is effective following a
restart, is entered during the setup program.
... command in the
Run
.
Yes
My Computer
menu and enter
Start
icon on the Windows desktop
e:\autorun
,
Chapter 6: Installing the Software
25
Page 36

The setup program
The setup program is started in the language determined by the Regional
Settings (
installed Windows version: German, English, or French.
If other Regional Settings than German, English or French are activated on
your computer, you need to select the language in which the installation
should be carried out.
Start
menu,
Settings, Control Panel, Regional Settings
) of the
13.If necessary, select language, click
If necessary, select the language in which the installation should be
carried out.
Click on the
14.Follow the instructions.
Follow the instructions of the installation program.
For more information concerning the Pinnacle setup program read in the
“Additional information for the Setup Program” section as of page 26 in this
chapter.
A
DDITIONAL INFORMATION FOR THE SETUP PROGRAM
Next
button.
Next
.
Selecting Setup Type
In the
Typical
Setup Type
option.
window, Pinnacle Systems recommends to select the
Typical
Installs all components and uses the default settings.
Compact
Skips some components (e.g. online manual) and uses the default
settings.
Custom
Lets you select the components and allows to adjust the settings
individually.
Selecting hard disk
If you wish to copy the files to another hard disk / another folder, click on
the
Browse
folder. Click on the
The driver software should be installed on the system hard disk and not on
the hard disk for the video files!
... button in the
button to proceed the installation.
Next
Setup Type
window and define the hard disk / the
Pinnacle Pro-ONE
26
Page 37

Selecting components
If you have chosen Custom as setup type you can directly choose those
components in the dialog box
Pinnacle Pro-ONE software
The option Pro-ONE software includes the drivers for Pro-ONE, which
must be installed in order to use the functions of Pro-ONE.
System software
The System software includes DirectX and DirectMedia. If you have
received the note at the beginning of the installation that there is no
DirectX or an older version installed on your system, you should install
the system software.
Adobe Premiere AddOns
Plug-ins for Adobe Premiere. Contains plug-ins for capture, device
control and playback for best performance under Adobe Premiere. In
addition the Pro-ONE real time effects are installed.
TitleDeko RT. A character generator for producing high quality titles.
Alpha Magic FX. A collection of bitmaps that can be used with the
Pro-ONE’s gradient wipe realtime transition plug-in.
Select Components
, which you want to install.
Presets for Adobe Premiere which have been developed specifically
for the Pro-ONE board and the PAL and NTSC standard. These presets
are required for working with Adobe Premiere.
Hollywood FX RT. A collection of high quality 3D effects. The
application Hollywood FX RT gets automatically installed during the
Pro-ONE driver install.
Documentation
The User´s Guide is also available in PDF format and can be opened with
the Acrobat Reader. If no Acrobat Reader or an older version has been
installed on your computer you can install the current version. In
addition, you can install a sample project file which will be copied into
the “...\Program Files\Pinnacle\Pro-One\SampleProject” folder.
If you wish to use this Sample Project, copy the folder to the capture /
playback hard disk before opening the project in Adobe Premiere.
DVTools
DVTools let you scan for clips on your DV tape, add in and out points,
control your DV devices, transfer DV to your hard disk and back to DV
tape.
After having selected the components you want to install, click
Next
.
Chapter 6: Installing the Software
27
Page 38
A
FTER THE INSTALLATION
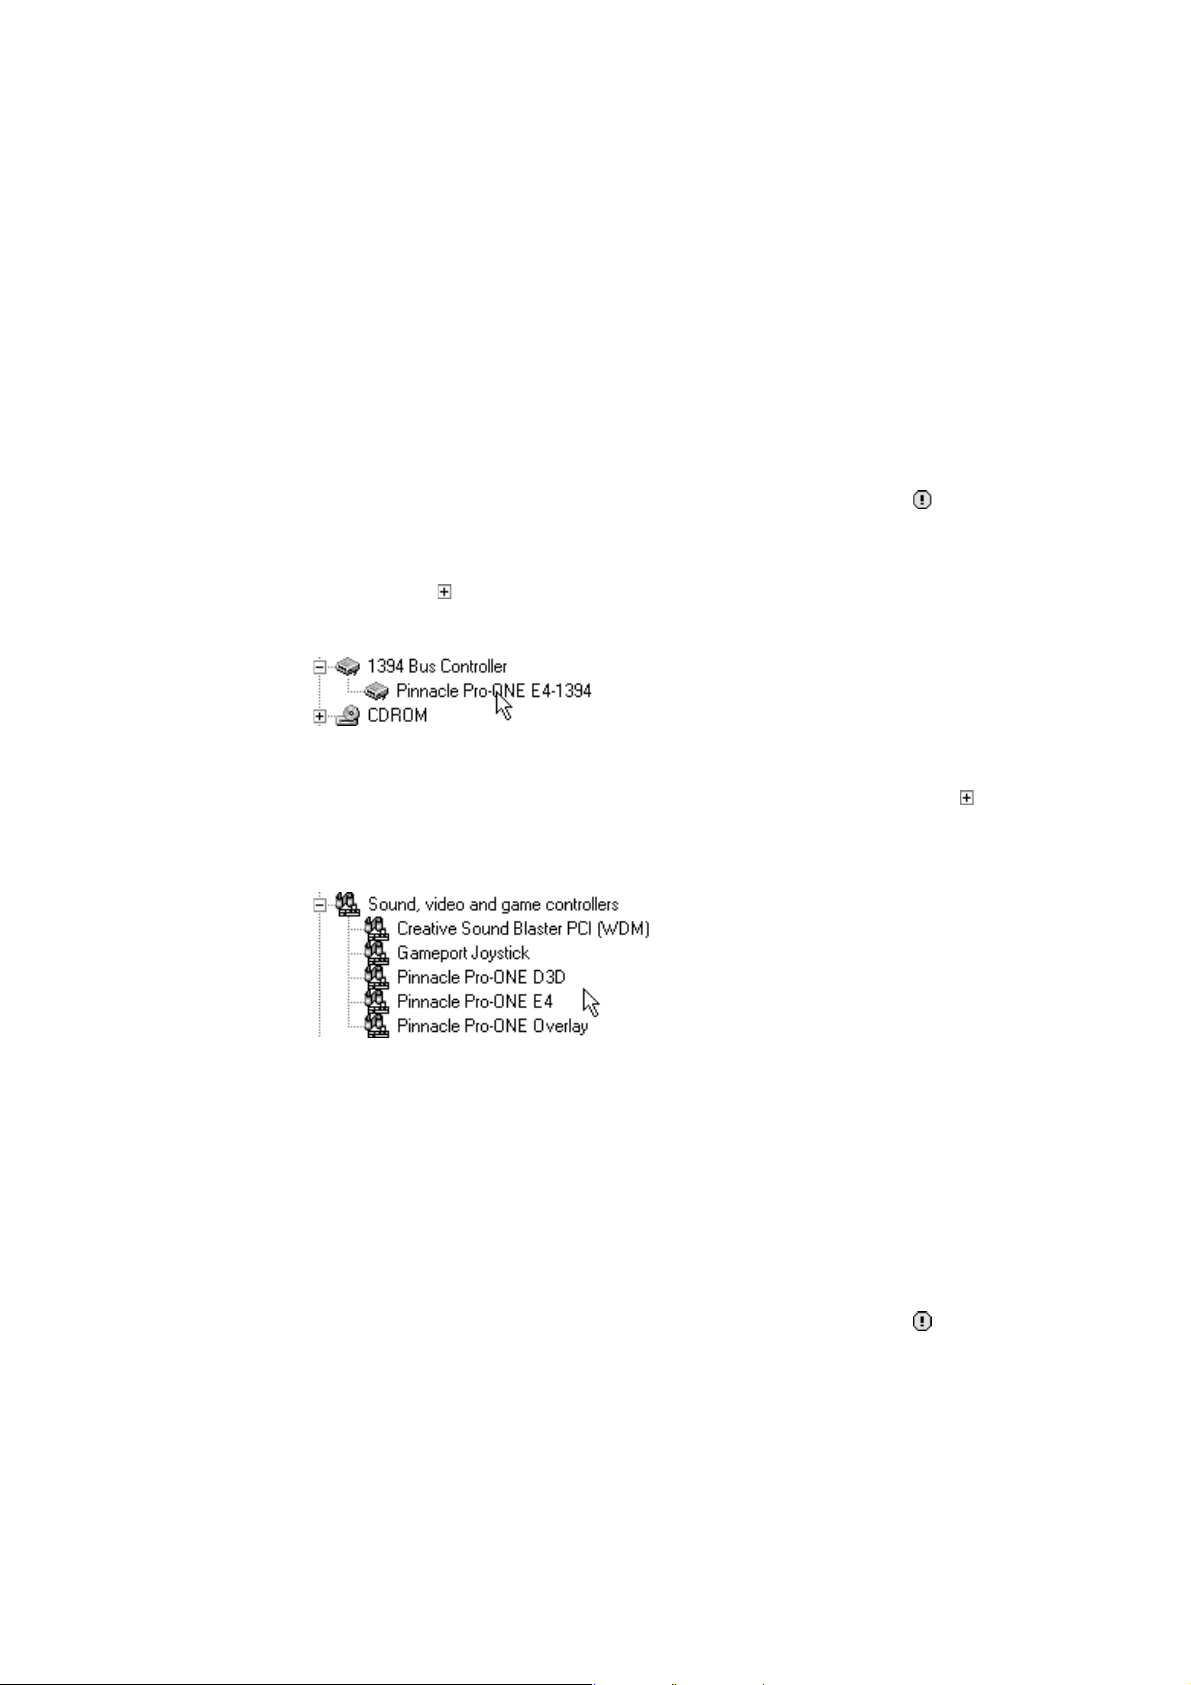
To make sure that all Pro-ONE components are installed correctly, you can
open the Device Manager to check this.
Windows 98 SE / Me
1394 Bus
Controller
Sound, video
and game
controllers
Do this by clicking on the Windows
Control Panel
System
in your system appears.
If there are any conflicts indicated by yellow exclamation marks
should try to resolve the conflicts, before working with your system.
•
•
. Now select the
Click on the
Pinnacle Pro-ONE-1394
To check if the Pinnacle Pro-ONE D3D, the Pinnacle Pro-ONE E4, and
the Pinnacle Pro-ONE Overlay are installed correctly, click on the
to “Sound, video and game controllers”. You should find the respective
entries.
. In the window that opens, double-click on the icon labeled
Device Manager
left to “1394 Bus Controller”. You should find the
entry.
button and selecting
Start
tab. A list of all hardware devices
Settings
, you
and
left
Pinnacle Pro-ONE
28
Windows 2000 / XP
Do this by clicking on the Windows
Control Panel
System
list of all hardware devices in your system appears.
If there are any conflicts indicated by yellow exclamation marks
should try to resolve the conflicts, before working with your system.
. Now select the
. In the window that opens, double-click on the icon labeled
Hardware
tab and the
button and selecting
Start
Device Manager
Settings
button. A
, you
and
Page 39
1394 Bus
Controller
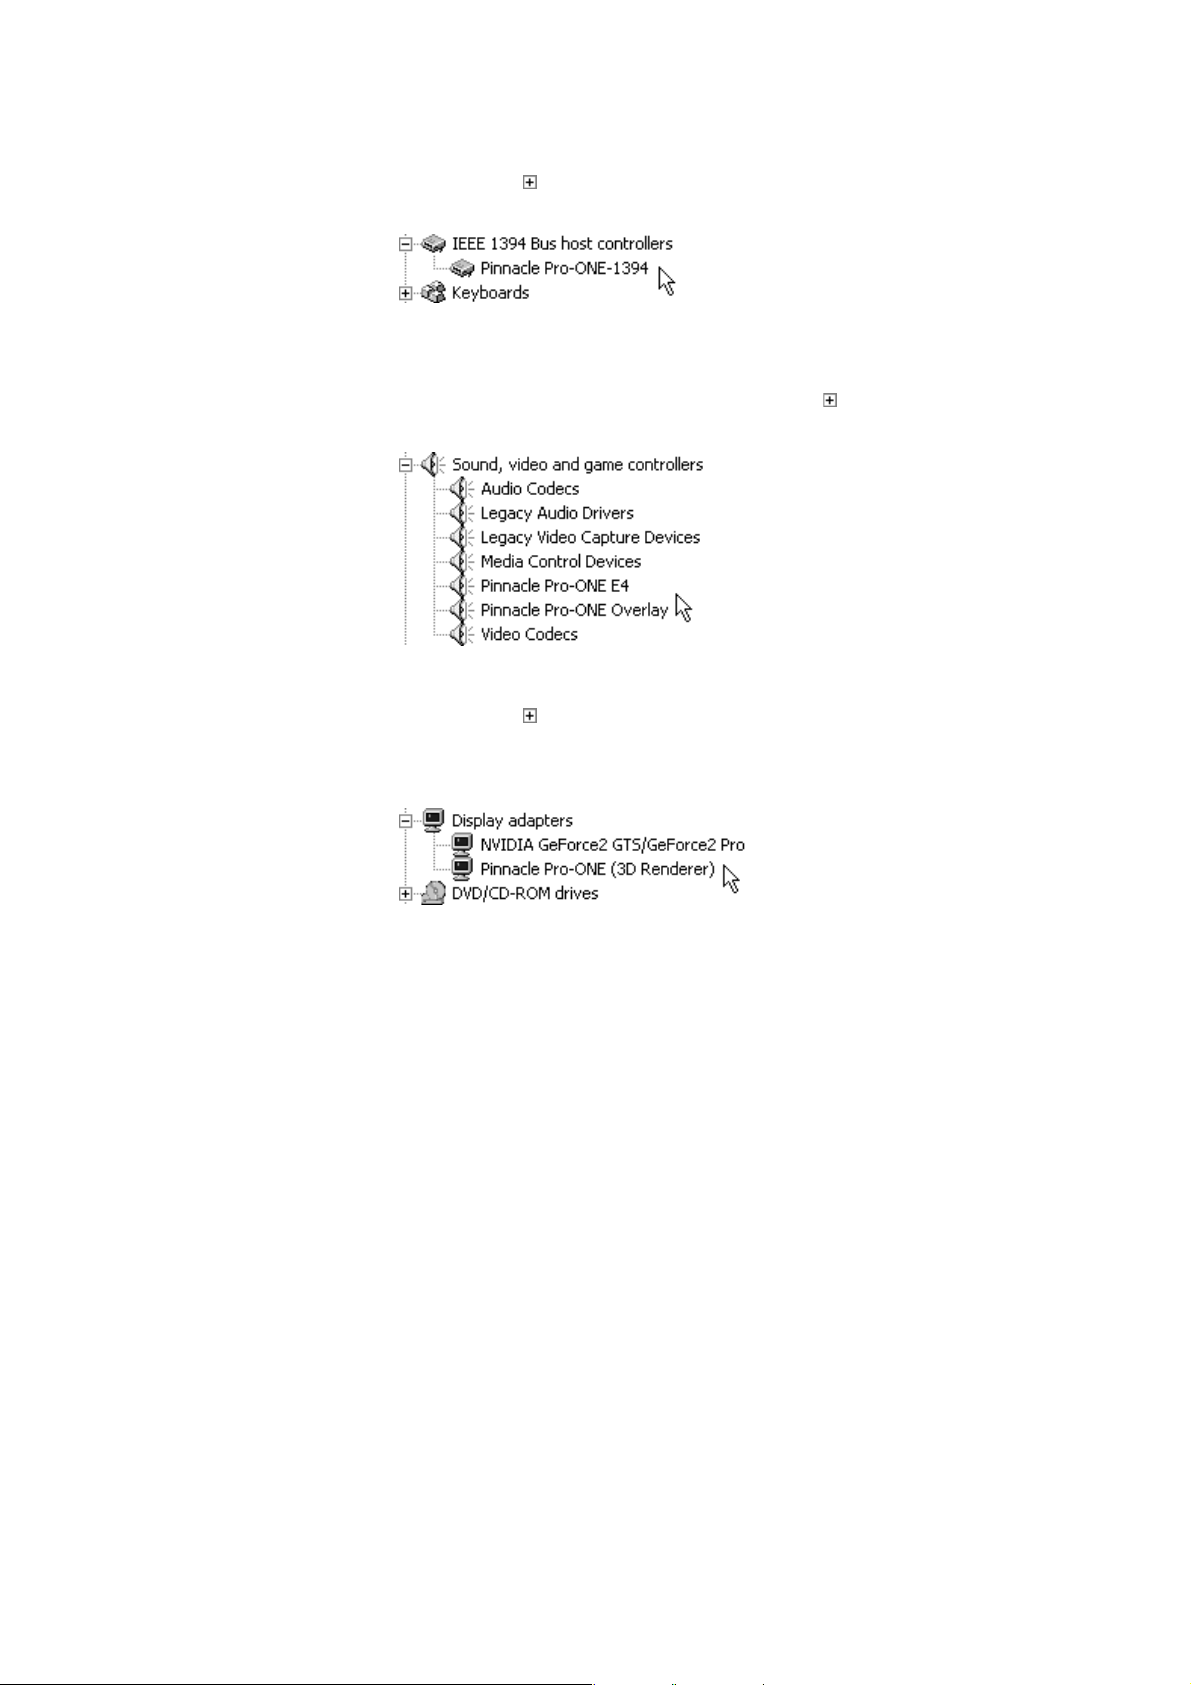
Click on the
•
the
Pinnacle Pro-ONE-1394
left to “IEEE 1394 Bus host controllers”. You should find
entry.
Sound, video
and game
controllers
VGA
To check if the Pinnacle Pro-ONE E4, and the Pinnacle Pro-ONE
•
Overlay are installed correctly, click on the
game controllers”. You should find the respective entries.
Click on the
•
Pro-ONE-(3D Renderer)
left to “Display adapters”. You should find the
entry.
left to “Sound, video and
Pinnacle
One or more device/s is/are not installed correctly
In this case, it could help to run the Pro-ONE Setup program again.
1. Insert the installation CD into the CD-ROM drive.
The Setup program will start automatically.
Note: If the Setup program is not started automatically, please proceed as
follows: Double click on the
and change to the CD-ROM drive. The file
detected. Open this file.
—Or—
Select the
where e:\ represents the driver letter for your CD-ROM drive. If
necessary, enter another letter. Click on OK.
... command in the
Run
My Computer
Start
icon on the Windows desktop
autorun.exe
menu and enter
will be
e:\autorun
,
Chapter 6: Installing the Software
29
Page 40
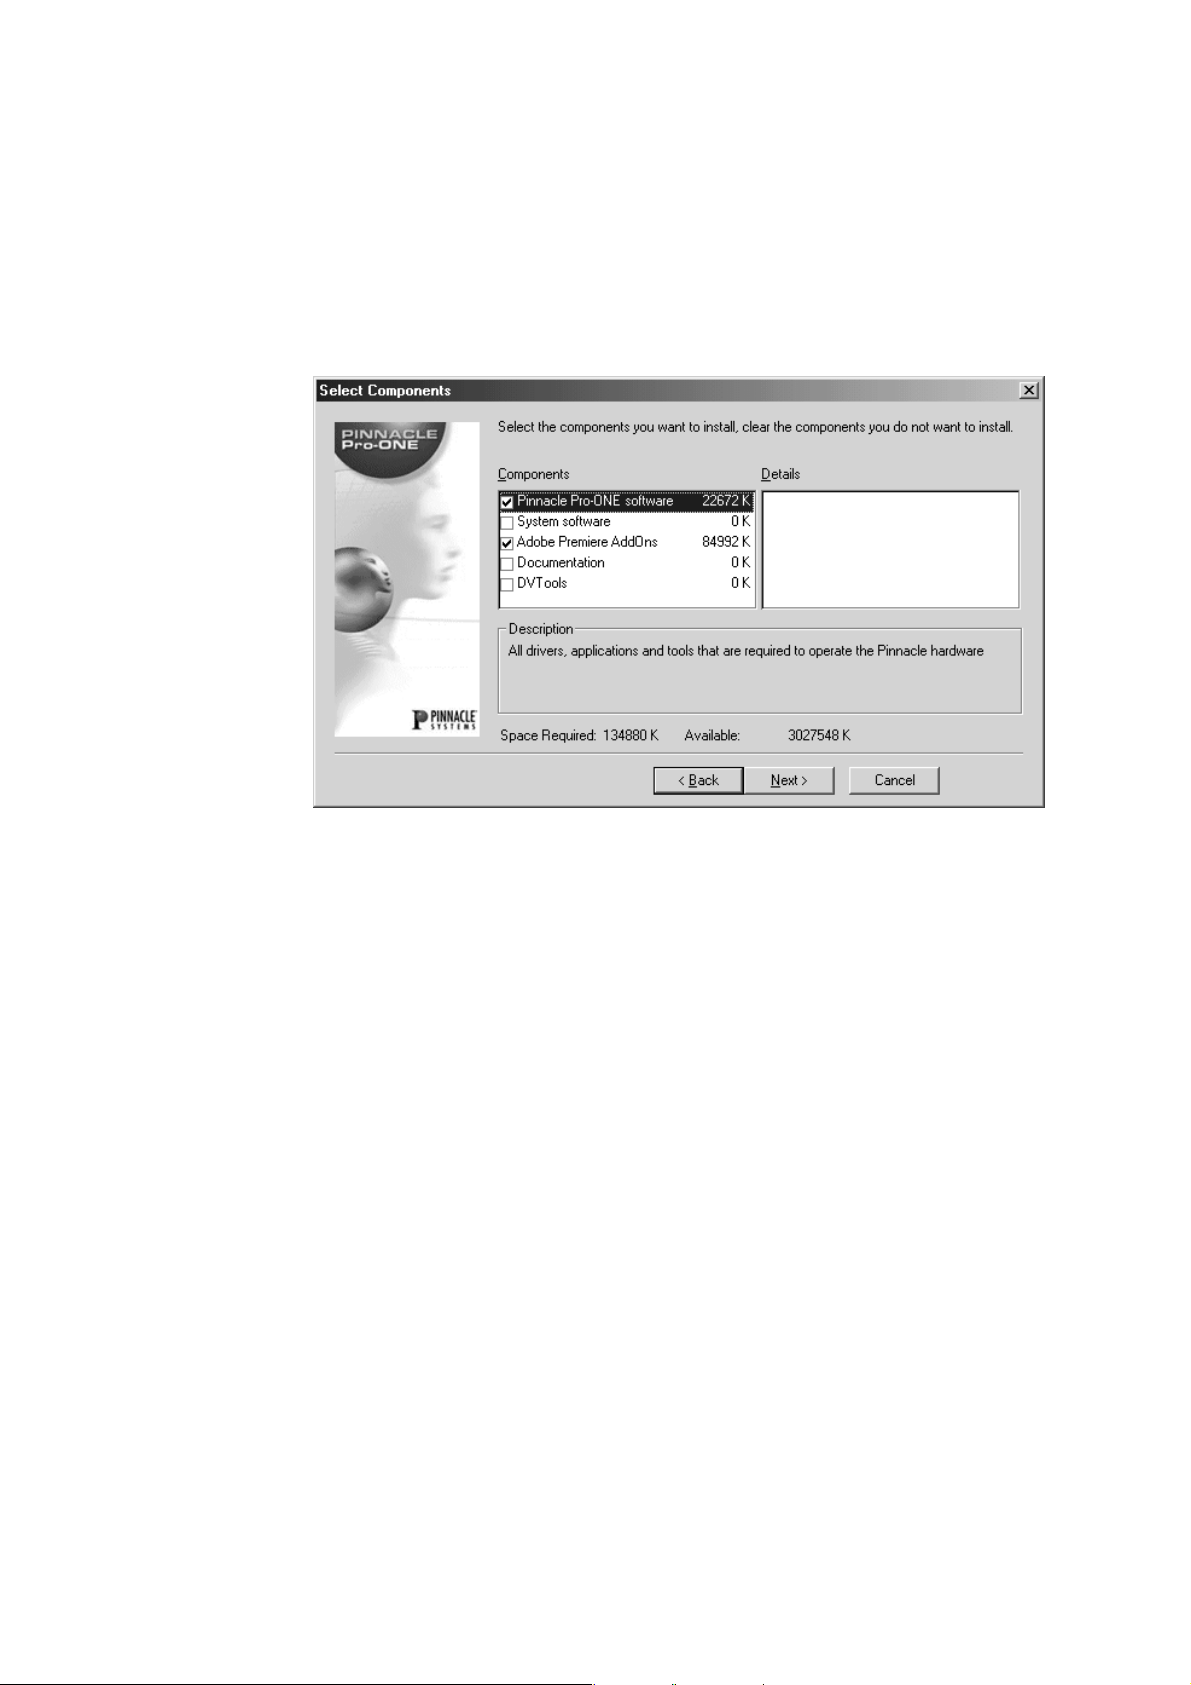
2. Click on No when you are asked whether you want to de-install the
already installed software.
3. In the
button.
4. In the
software
Setup Type
Select Components
option and then click
window select the
Custom
window choose the
.
Next
option and click on the
Next
Pinnacle Pro-ONE
5. Follow the instructions of the setup program.
After the reboot all components should be installed correctly.
Pinnacle Pro-ONE
30
Page 41
PRO-ONE
AND THE SETTINGS TAB
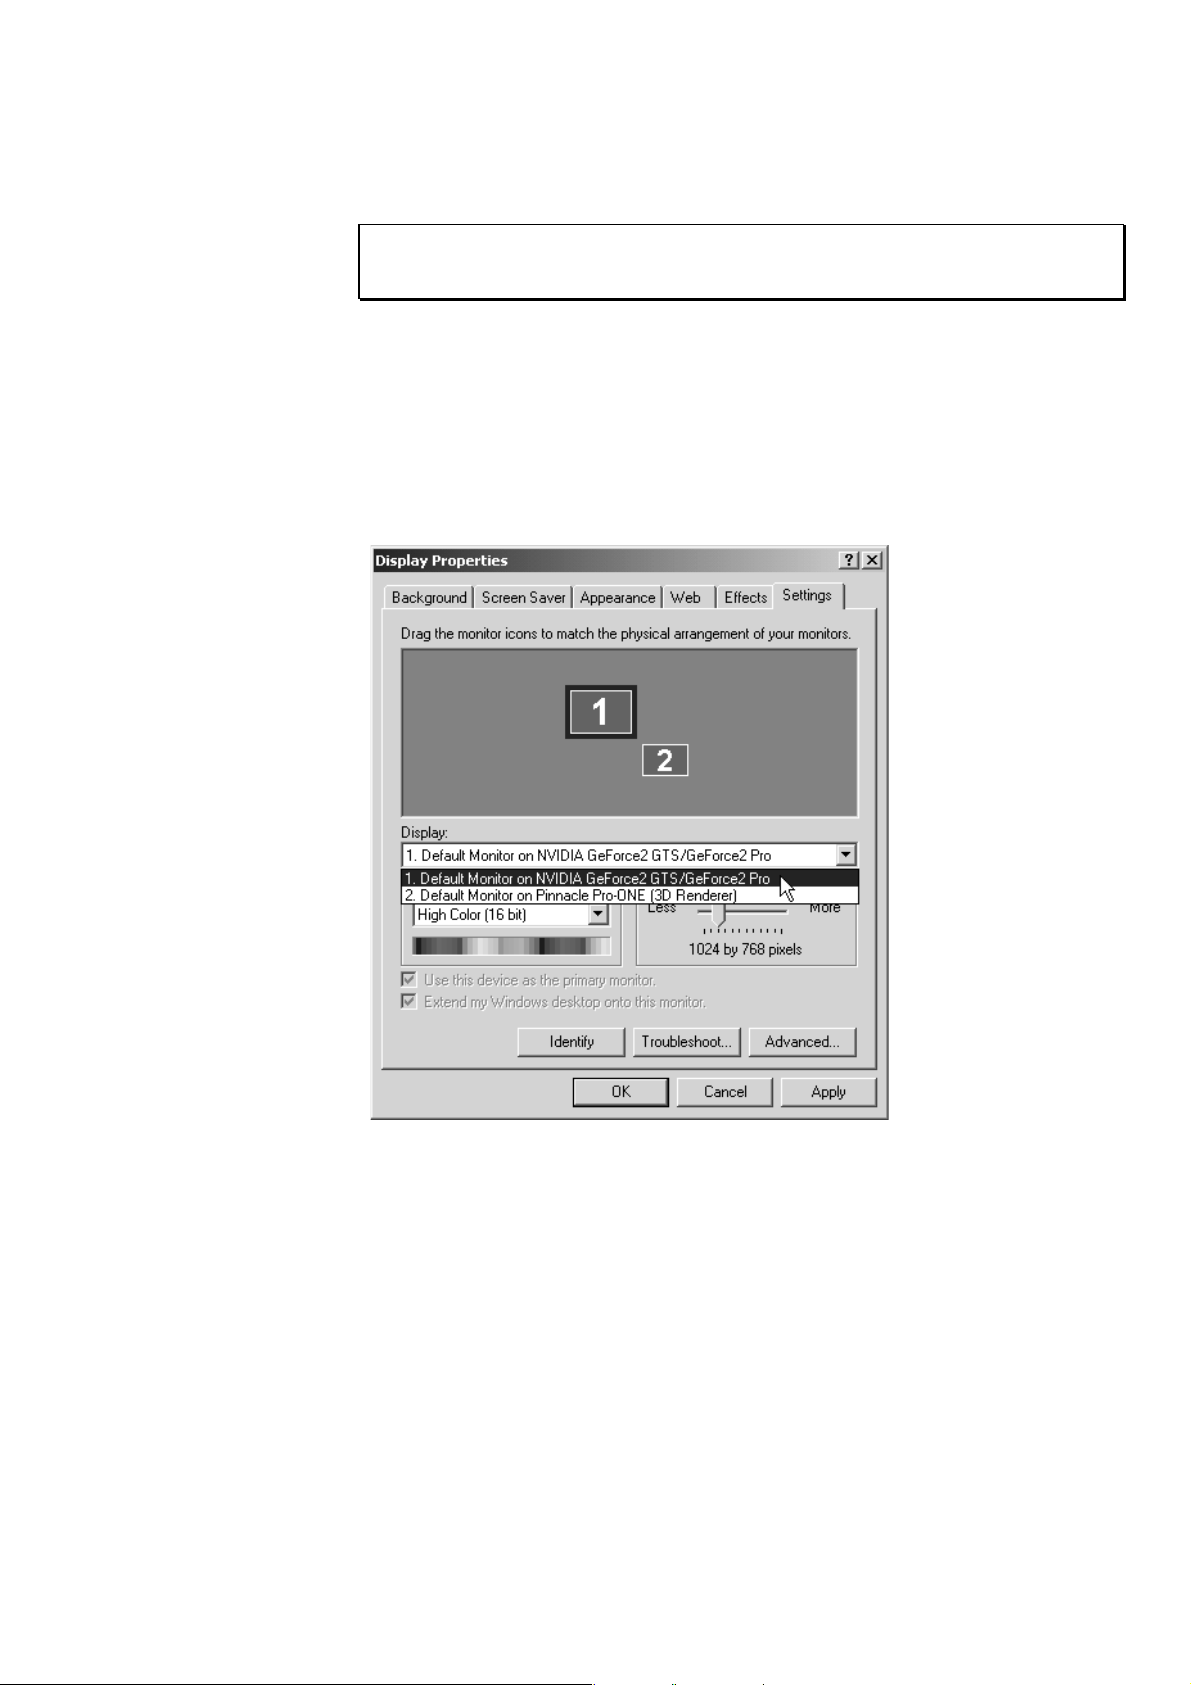
Note:
This paragraph exclusively refers to the installation under Windows
2000 and Windows XP!
When you have completed the
(right mouse click on the desktop,
you will find two entries under
Default Monitor on NVIDIA GeForce2 GTS/GeForce2 Pro (example)
Default Monitor on Pinnacle Pro-ONE (3D Renderer)
Pro-ONE
Display
installation, on the
Properties
command and
:
Settings
Settings
tab
tab)
Chapter 6: Installing the Software
31
Page 42
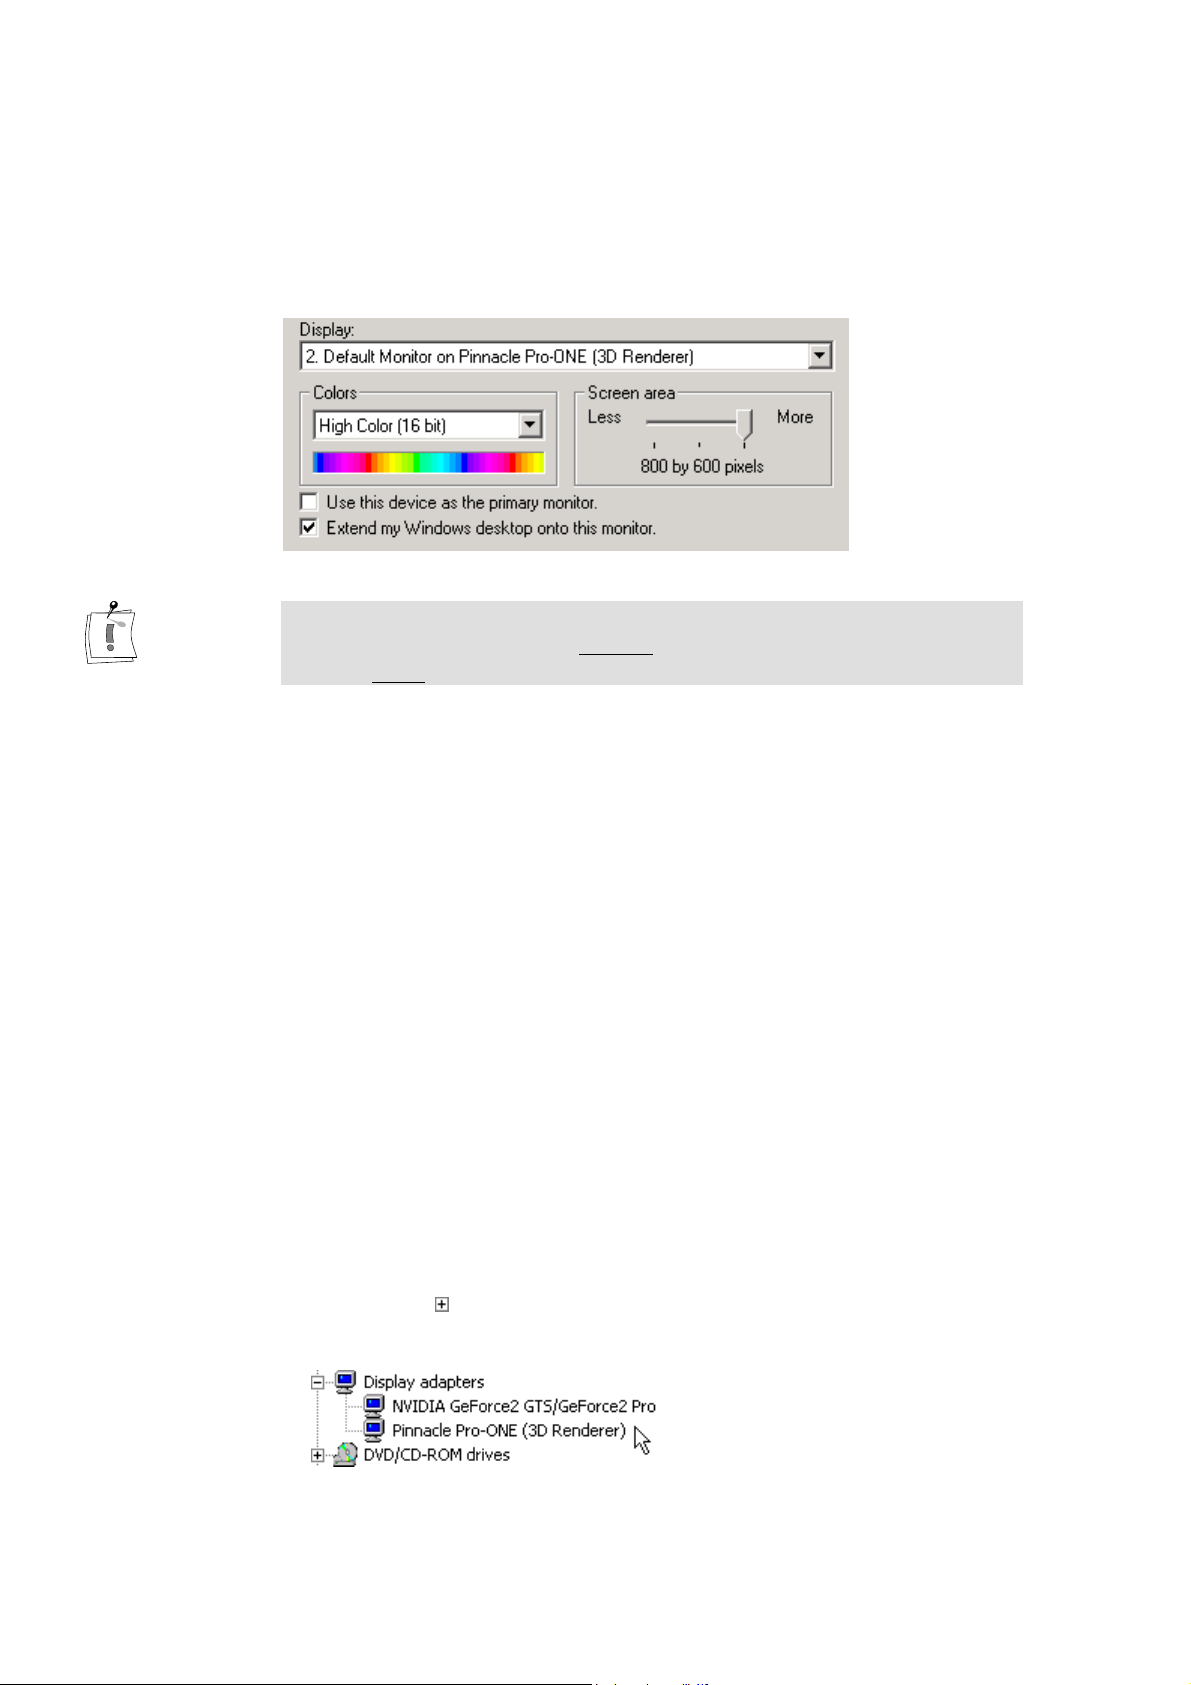
In order to play all Pinnacle effects in real time, the Pinnacle Pro-ONE (3D
Renderer) has to be registered as Desktop extension. To check this, select
the Default Monitor on Pinnacle Pro-ONE (3D Renderer). Make sure that
the Extend my Windows desktop onto this monitor check box is active.
Important: Under no circumstances should you activate the Use this device
as the primary monitor option Always use your graphics board as primary
monitor, never the Pinnacle Pro-ONE (3D Renderer).
For all cases ...
If you should inadvertently use Pinnacle pro ONE (3D Renderer) as primary
monitor (cursor and desktop symbols are invisible), you can correct this as
follows:
1. Restart your computer.
1. To open the Windows Advanced Options Menu window, please press the
<F8> several time during the start up of your computer.
2. Use the arrow keys to choose the Enable VGA Mode option and press the
<Enter> key.
3. In the Please select the operating system to start window press the
<Enter> key again.
Windows is started in the VGA mode.
4. Now, please delete the “Pinnacle Pro-ONE (3D Renderer)” entry in the
Device Manager. Do this by clicking on the Windows Start button and
selecting Settings and Control Panel. In the window that opens, double-
click on the icon labeled System. Now select the Hardware tab and the
Device Manager button.
5. Click on the
Pro-ONE (3D Renderer)“ entry.
left to „Display adapters“. You should find the „Pinnacle
32 Pinnacle Pro-ONE
Page 43
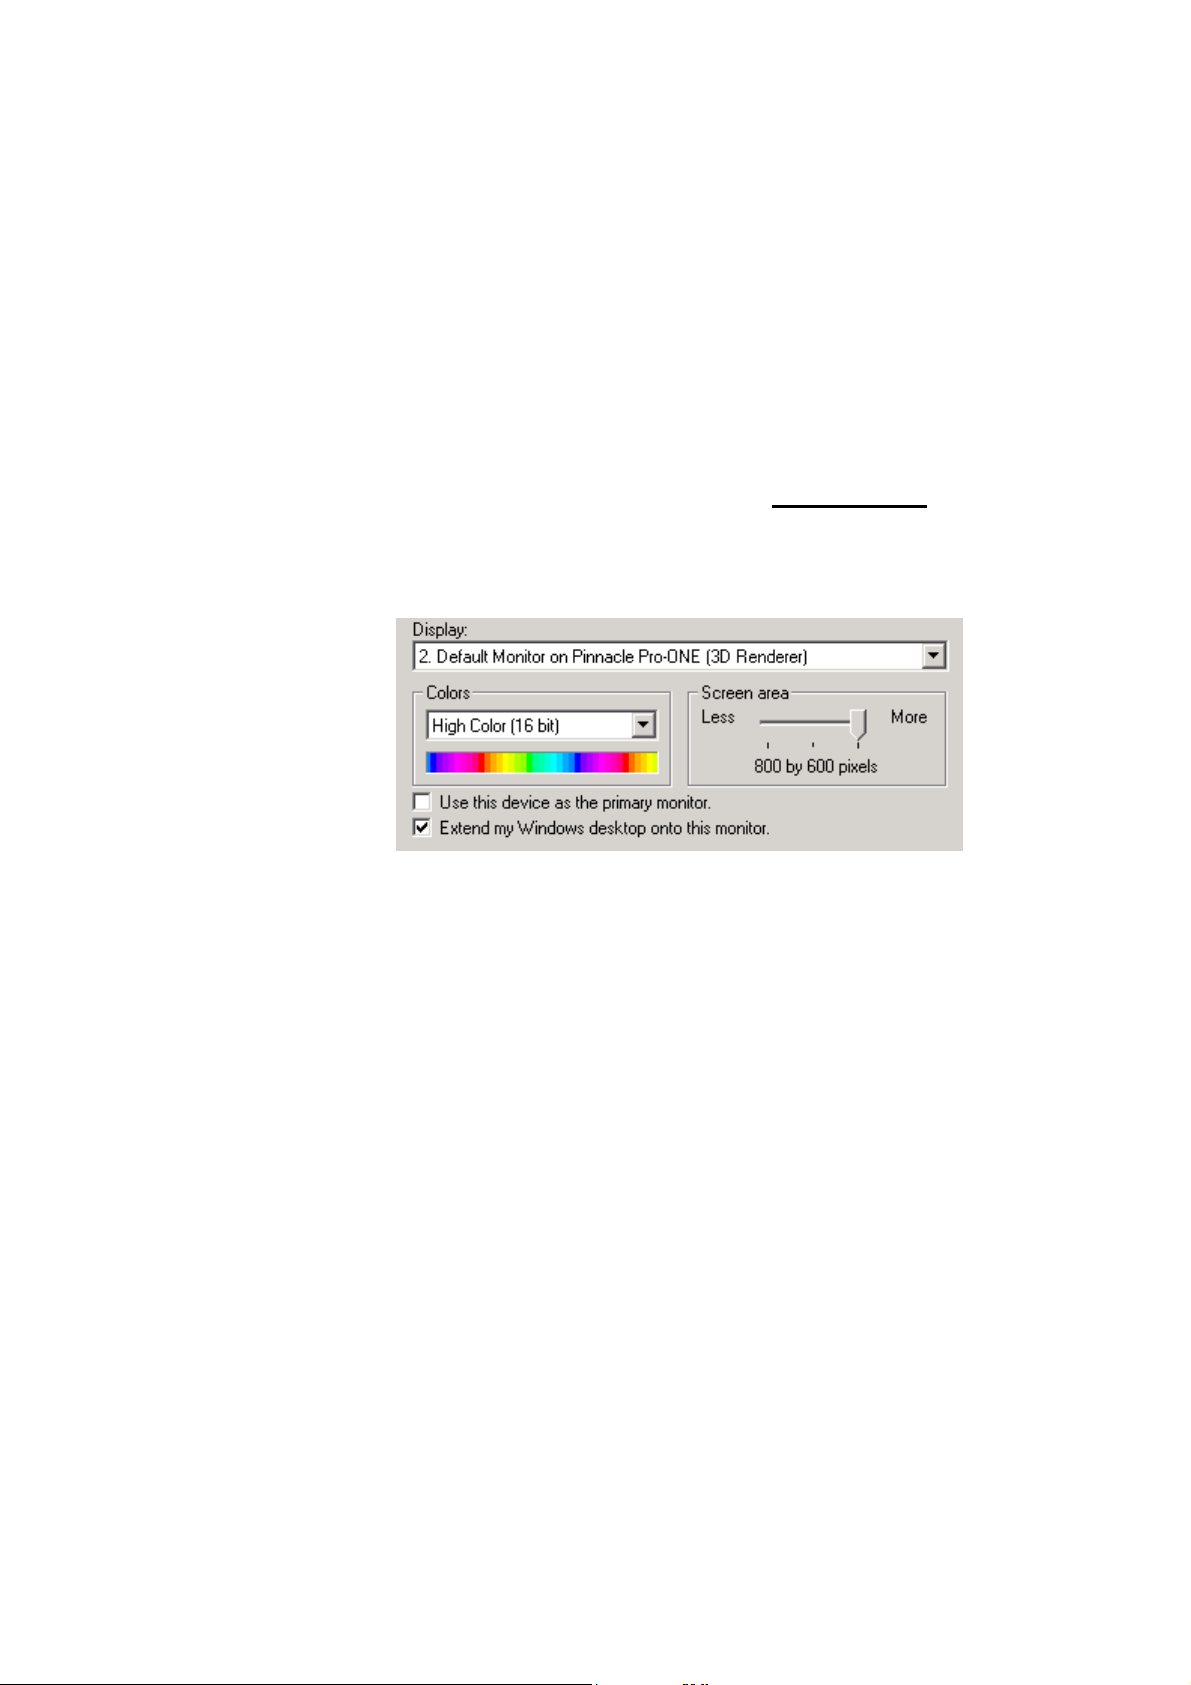
6. Select the „Pinnacle Pro-ONE (3D Renderer)“ entry and click on the
Action Menu and the command Uninstall.
7. Close the Confirm Device Removal window with OK.
8. You will be asked to re-start your computer, click on the Yes button.
After the Re-start of Windows the “Pinnacle Pro-ONE (3D Renderer)” is
found as a new hardware component.
9. Confirm the Digital Signature window with Yes.
10. Cli ck r igh t o n th e de skt op and sel ec t th e Properties command.
11. In th e Settings tab make sure that your graphics board and not Pinnacle
Pro-ONE (3D Renderer) is used as primary monitor and that the Extend
my Windows desktop onto this monitor check box is activated for
Pinnacle Pro-ONE (3D Renderer).
Chapter 6: Installing the Software 33
Page 44

Chapter 7: Quick Tour
t
In this chapter you can take a quick tour to see the most important steps in
creating a video using Pinnacle
able to follow the tour with your system, then you can be sure that your
system will function perfectly.
The following steps will be carried out based on an example project:
Pro-ONE
and Adobe Premiere. If you are
P
REREQUISITES
Hooking up your video equipment to Pinnacle
Starting the example project and its analog output
Creating a new project in Adobe Premiere
Capture settings and capturing video clips
Editing in Adobe Premiere with Pinnacle Effects (real-time effects and
TitleDeko RT amongst others)
Exporting the video project.
A prerequisite for following the tour in this chapter is to have Pinnacle
ONE
installed, a control monitor connected to an analog output of the
blackBOX and a DV device for recording video.
In this chapter you will find out how to use the facilities of the
board, which differ from the standard functions of Adobe Premiere. These
differences refer to the general settings and project presets for the hardware
and software of Pinnacle
standard functions of Adobe Premiere, please refer to the Adobe Premiere
manual.
Pro-ONE
. For more detailed information on the
Pro-ONE
Pro-
Pro-ONE
Pinnacle Pro-ONE
34
Page 45

HOOKING UP VIDEO EQUIPMENT TO PRO-ONE
• Connect your DV device to Pinnacle Pro-ONE using the FireWire-1394
interface (use the DV cable provided).
• Switch your DV device to the Player mode (VCR mode).
• If you are using an analog video device (VHS or S-VHS), make the video
and audio connections to the blackBOX.
• Connect your video monitor to the output of the blackBOX (e.g. via the
composite output).
• Also, make an audio connection to an external active loudspeaker. If
your monitor has its own audio system then this can be used.
STARTING AND PLAYING BACK A SAMPLE PROJECT
1. Copy the SampleProject file from where it installed to the video capture /
playback disk drive for best performance. Double click on the My
Computer, double click on the C:\, then double click on the Program
Files. Double clicking on the Pinnacle folder, then Pro-ONE should
reveal a folder named SampleProject. Right click on this and select
Copy.
Close the window.
Double click on My Computer, then right click on D:\ (where D is the
letter of your video capture / playback disk drive), and select Paste.
Close this window.
2. Start Adobe Premiere from the program group in Pinnacle Pro-ONE (Start
menu, commands Programs, Pinnacle Pro-One and Adobe Premiere).
3. Choose the project preset Pinnacle DV PAL (the project presets provided
include all the defaults that will guarantee optimum performance of
Pro-ONE with Adobe Premiere).
4. Now open the example project in Adobe Premiere using the File menu
and the Open command:
d:\SampleProject\DemoProOne.ppj.
The project will be displayed in the Premiere editing window.
5. Activate the editing window by clicking with the mouse and then
pressing the <Enter>-key. The playback of the project should start
immediately.
The video will appear on your video monitor. If this is not the case,
check the cabling or the program position (e.g. AV1).
Feel free to experiment and make changes, noting the changes made to
the effects and the overall look and feel of the project. If you wish to save
the changes, click on File, then Save As... and give the project a different
name (e.g. MyChanges.ppj).
6. Close the sample project.
Chapter 7: Quick Tour
35
Page 46
C
REATING A NEW PROJECT
1. Create a new directory for storing all files specific to the project (video
clips, titles, frames, etc.).
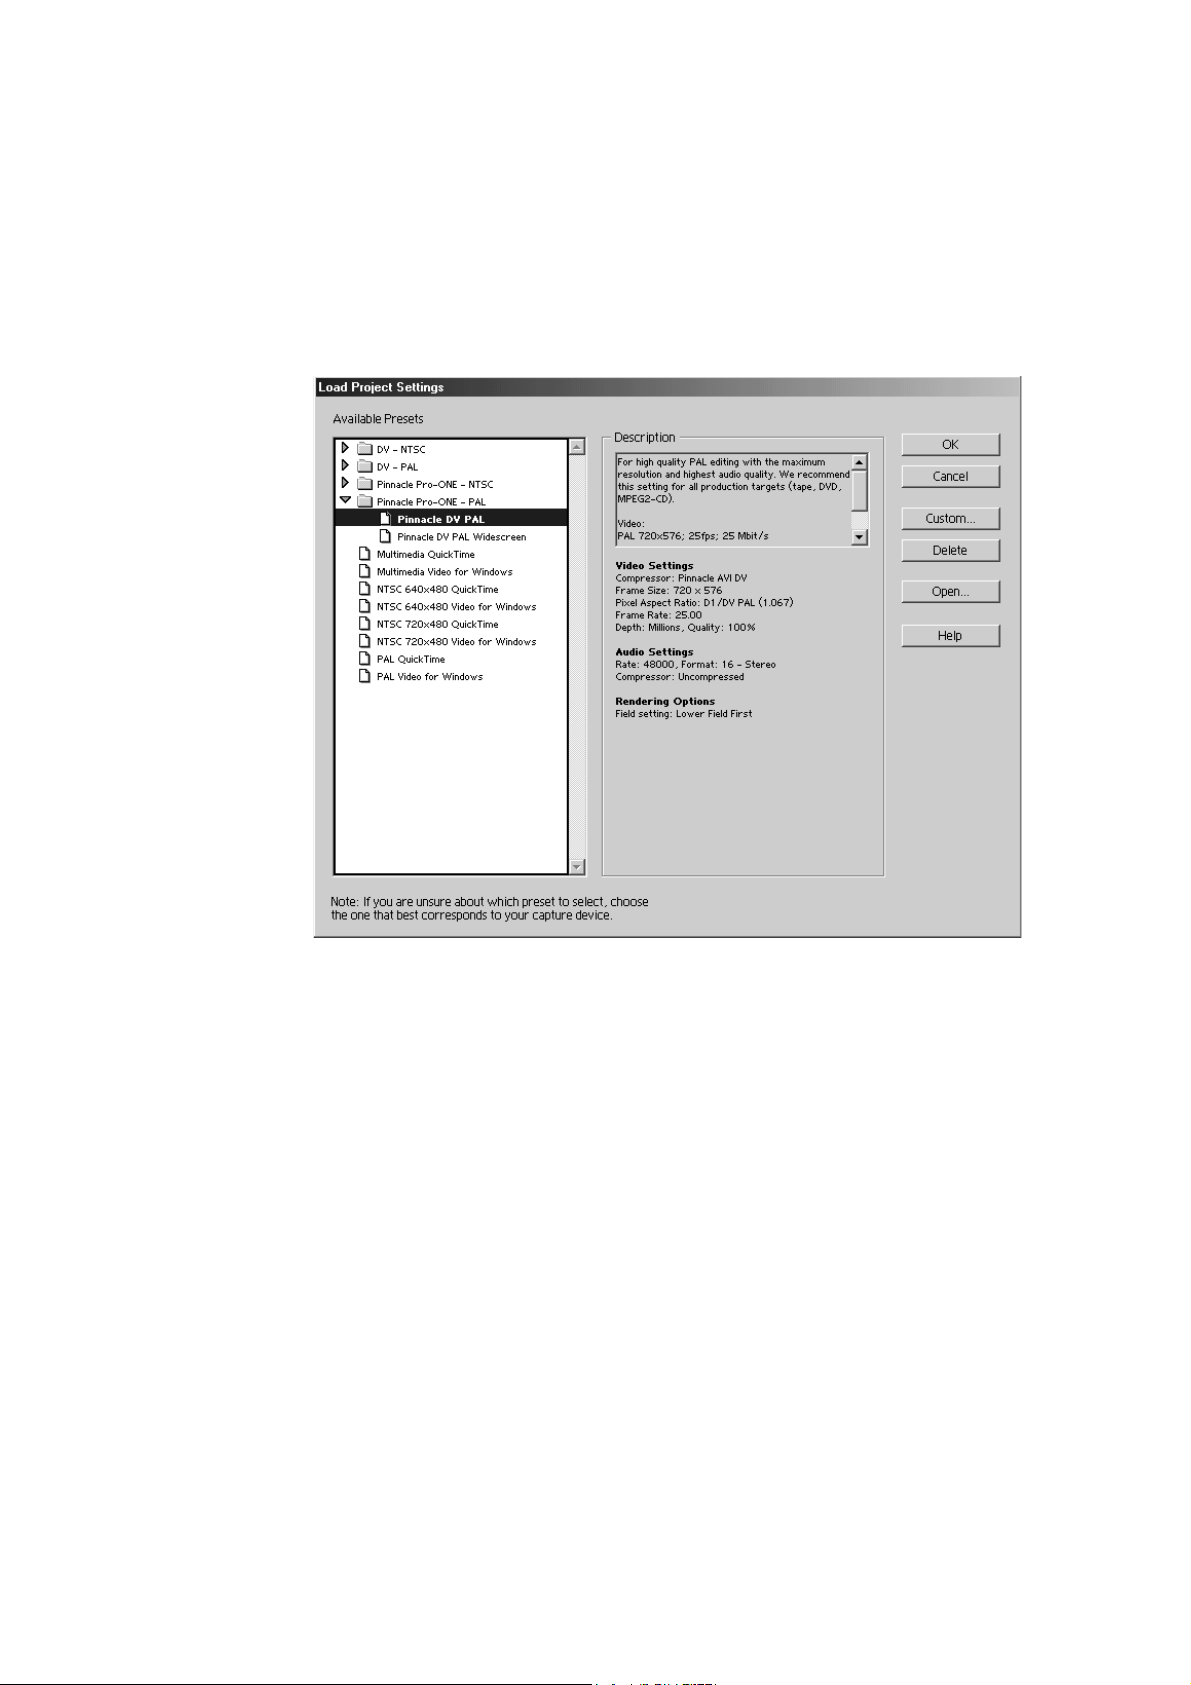
2. Start a new project using the
The
Load Project Settings
window will appear.
menu and the
File
New Project
command.
Here you will find that there are two project presets available in the
“Pinnacle Pro-ONE – PAL” folder
Pinnacle DV PAL
Pinnacle DV PAL Widescreen
3. If you are using video material in 16:9 format choose
or NTSC)
NTSC) project preset.
All the real-time effects and titles will be matched accordingly to the
selected mode and will be displayed with the appropriate aspect ratio and
the corresponding resolution.
These defaults automatically set the right output resolution, change the
sequence of the half frames, the audio format and set many other Adobe
Premiere parameters to the values necessary for optimum operation of
your Pro-ONE.
4. Now save your new project using the
command. Choose the directory that you created earlier and enter a new
project name.
Widescreen
here, otherwise choose the
menu and the
File
Pinnacle DV
Pinnacle DV (
Save as
PAL or
(PAL
Pinnacle Pro-ONE
36
Page 47
C
APTURE SETTINGS AND CAPTURE
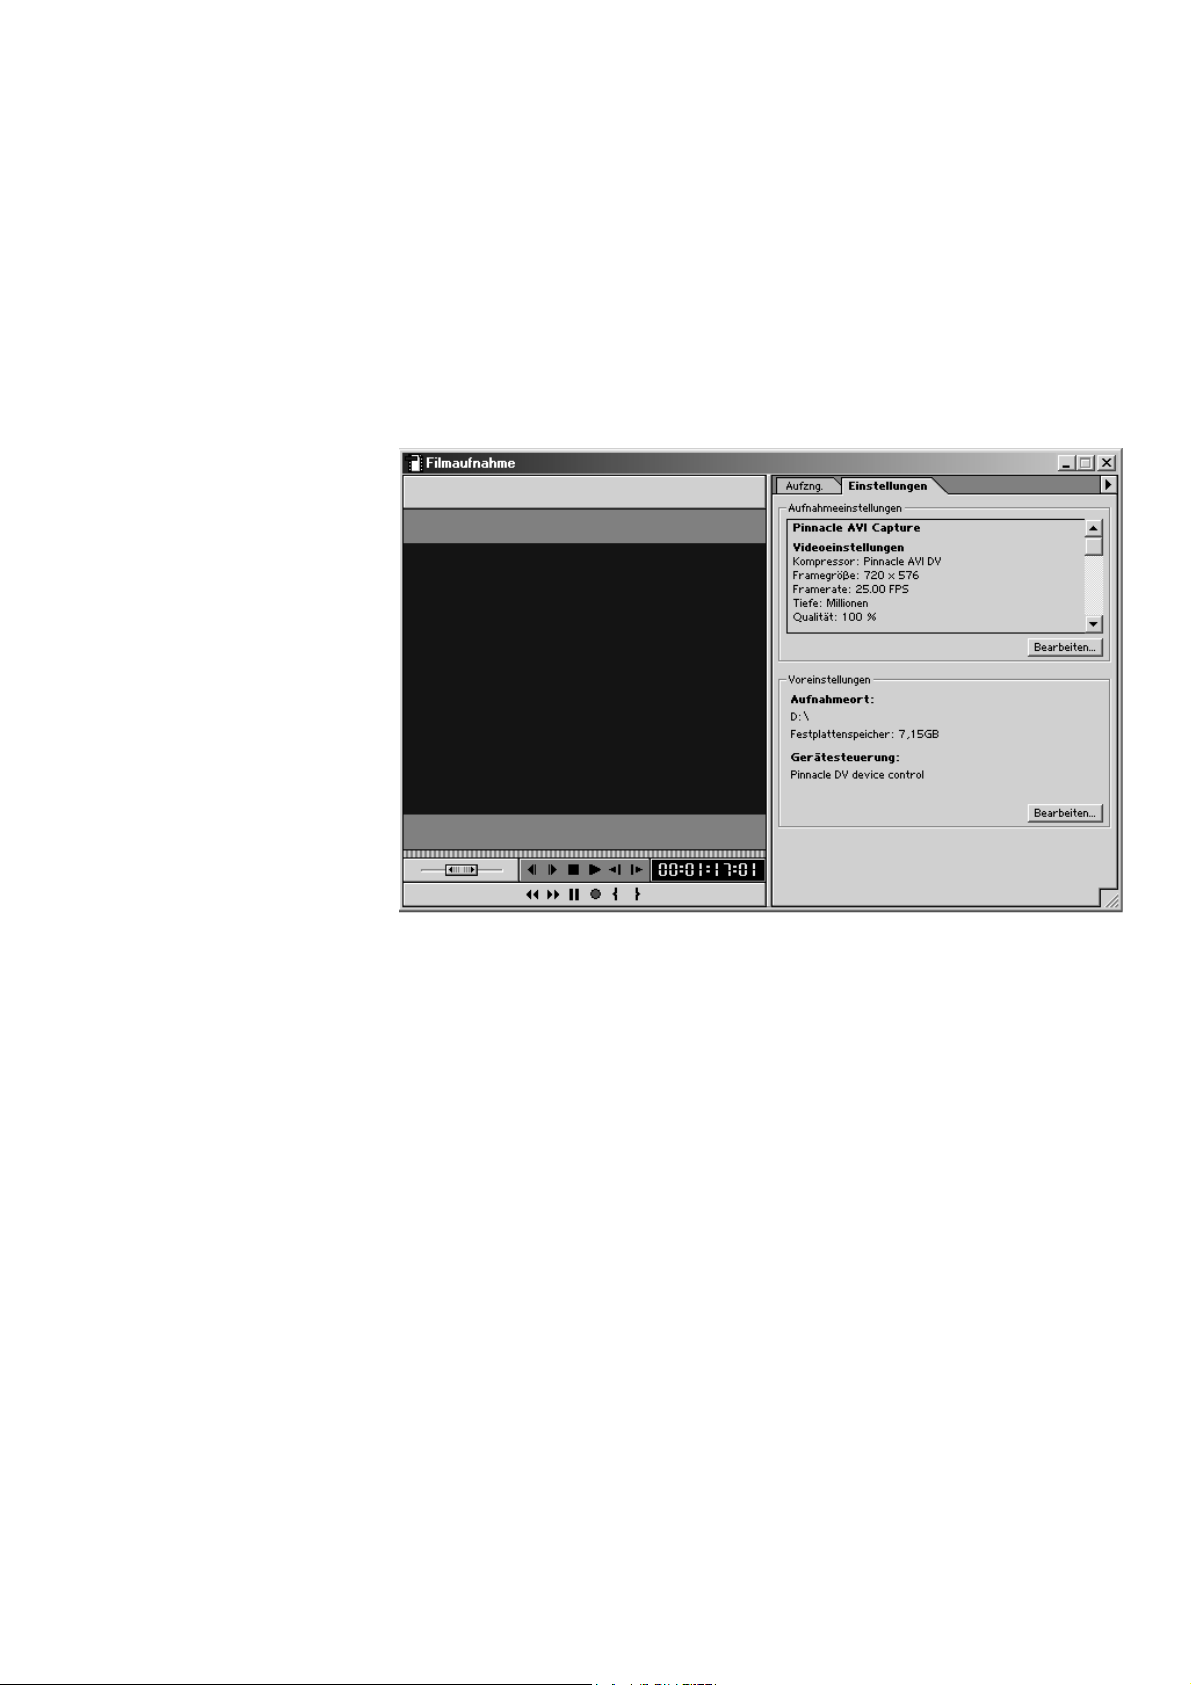
1. Start the
Capture
The capture window will be opened. When the DV device is switched on
(VCR mode), the device control will be detected automatically and the
controls will appear at the bottom of the preview window. However, if
you are using an analog video source, the
the capture window at this point.
Movie Capture
and
Movie Capture
window using the
.
menu and the commands
File
Record
button will be shown in
Before you can record video sequences under Adobe Premiere, you must
select the recording drive (Scratch Disks). The recording drive is the
drive on which your video files are stored. It should have sufficient
performance and enough free storage space for capturing the digital
video. You can test this with the DVExpert tool (
Pinnacle Pro-ONE, Tools, DVExpert
movie recording, Premiere will automatically prompt you to select a
drive for recording. When selecting the drive, please proceed as follows:
3. Click on the
The
Preferences
button in the
Edit
window will open.
Preferences
). When you initialize your first
area.
Start, Programs
,
Chapter 7: Quick Tour
37
Page 48
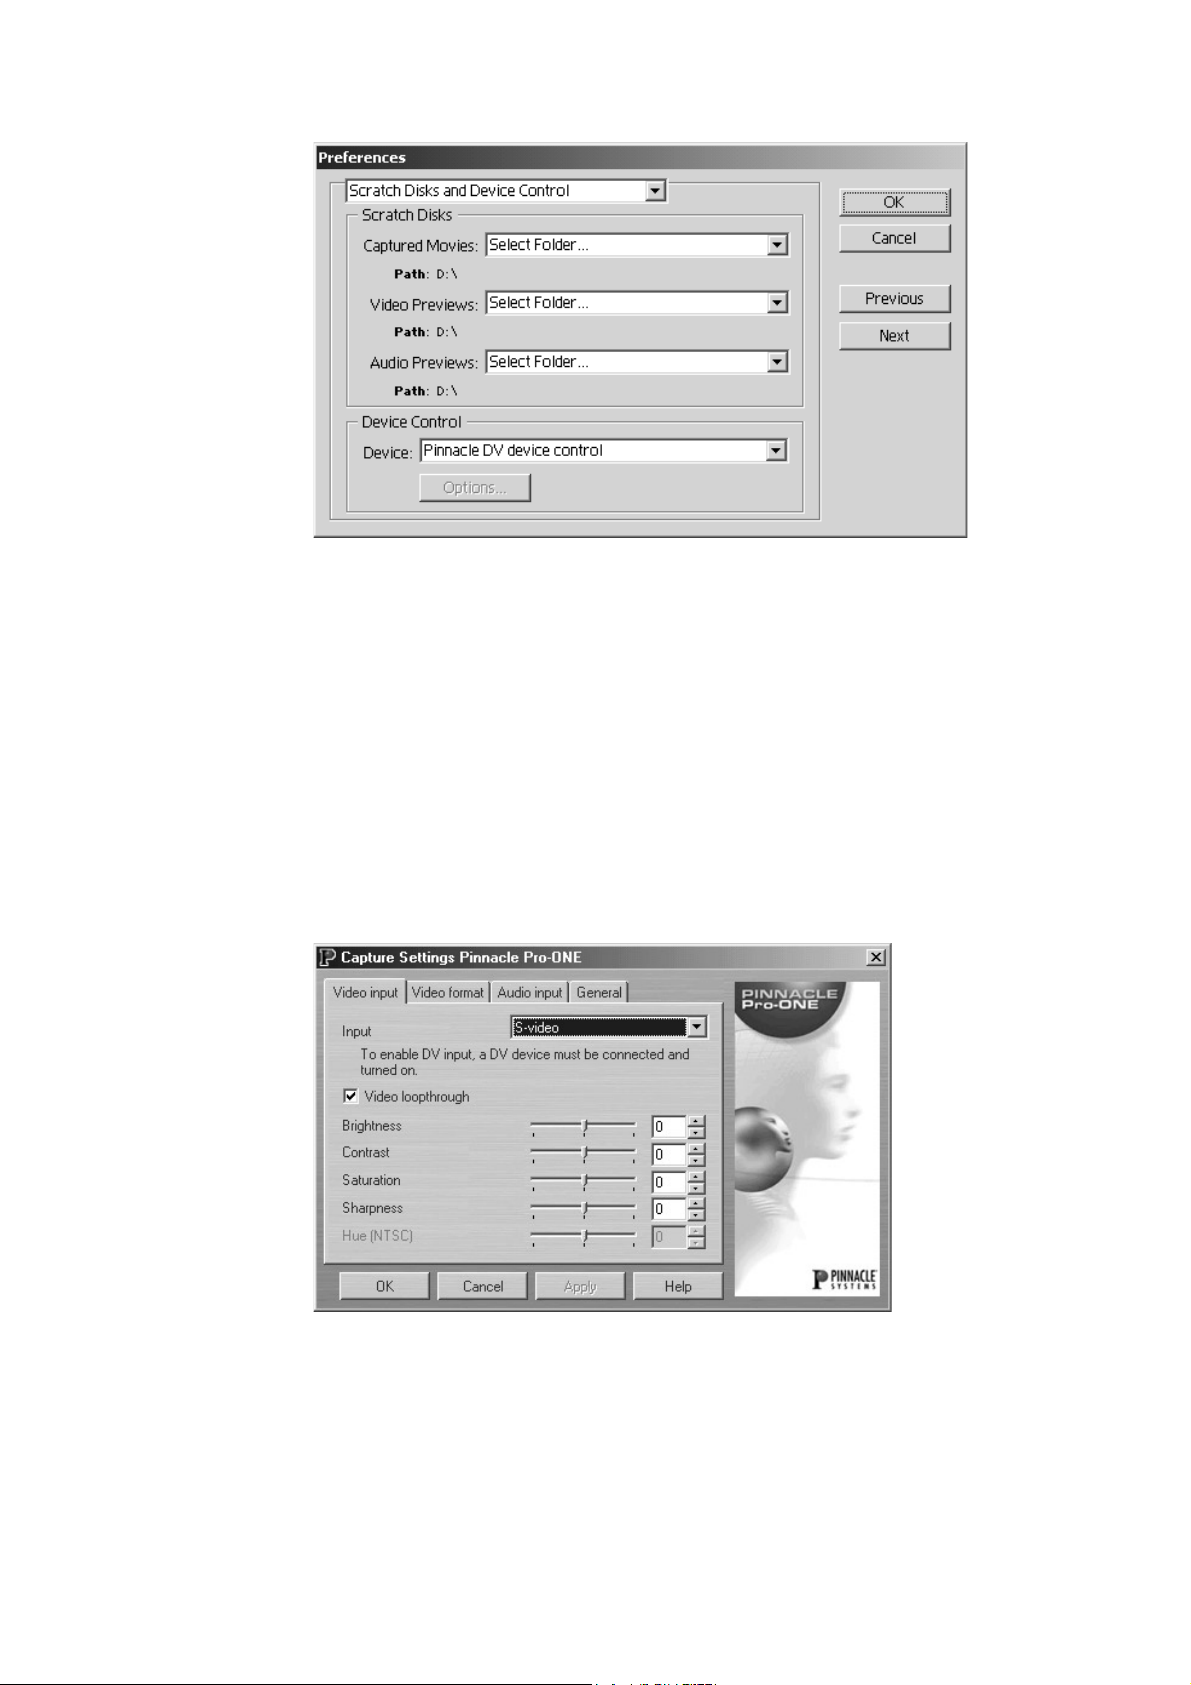
4. Select the destination directory on your video hard disk under
.
Disks
Scratch
Pinnacle DV device control
In the case of an analog video source, no device control is entered.
Close the window with OK.
5. The details of the project settings will be shown in the
area. Open the
the
Settings
The
Capture Settings Pinnacle Pro-ONE
Project Settings
button.
must be entered in the
window using the
window will appear.
Device Control
Capture Settings
button. Click on
Edit
area.
Pinnacle Pro-ONE
38
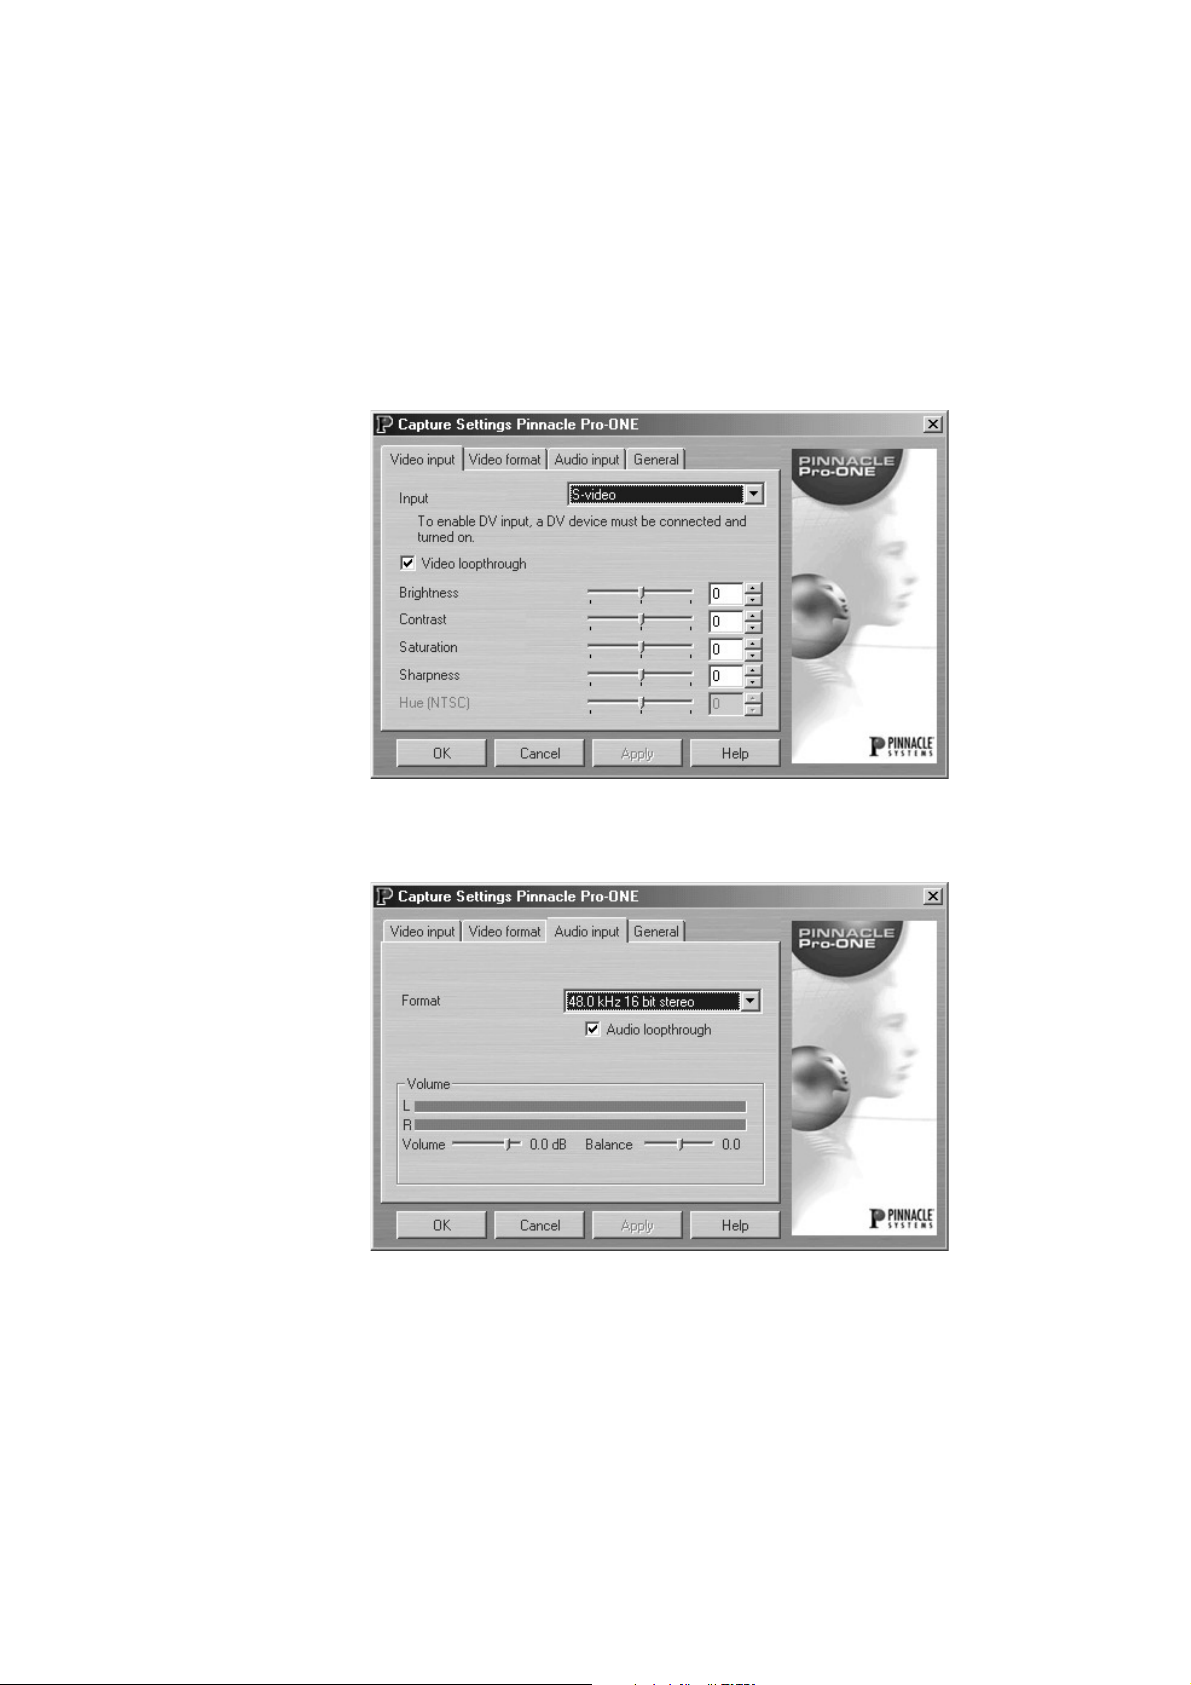
Video input
Choose the video input that your video source is connected to and
adjust the values for brightness, contrast etc. as required (only
selectable with analog video sources).
tab
Page 49

Video format
Select the video standard and the frame size here.
tab
Audio input
Choose the audio input and the required audio recording format here.
You can also adjust the recording level for the audio at this point if
required.
General
Choose the overlay settings here.
6. Now click on OK to accept the new values and close the dialog window.
7. Click on the
device control is selected, the
button amongst the selection of other commands for the control of the
device. The capture will start. The video will be displayed on your PC
monitor and recorded.
8. Watch the progress indicator in the
that frames are being omitted, press the <ESC> key to terminate the
recording. Please check that your system resources are adequate for the
settings made.
9. When you have captured your video material, press the <ESC> key to
terminate the recording. A window will appear in which you can enter a
file name. The video clip will then be automatically incorporated in the
Adobe Premiere project window.
tab
tab
Record
button in the
Record
Movie Capture
function will be displayed as a red
Movie Capture
window. When a
window. If you notice
10.Repeat this procedure a number of times.
Note:
your video material from a DV video source. One is to make the
recording using IN and OUT points and another is to use batch capture
(using a batch list that you have created yourself). You will find more
detailed information in the Adobe instruction manual.
11.Close the
Your DV device can be switched off for the subsequent editing of the video
project. While editing, use the analog cabling to your video monitor to
display the real-time effects in real time. Only when you have finished your
project you need to switch on your DV device again to save the project to
DV.
In Adobe Premiere there are other ways in which you can capture
Movie Capture
window.
Chapter 7: Quick Tour
39
Page 50
E
DITING IN ADOBE PREMIERE
The following describes editing in Adobe Premiere with Pinnacle Effects
(including real-time effects and TitleDeko RT) as well as playing back the
project.
Real-time effect
1. To edit video clips, activate the
drag this into the editing window onto video track
2. After this, drag a second video clip from the project window into the
editing window onto video track
editing window will increase automatically when the video clip is
moved. By appropriate overlapping of the two video clips, a Pinnacle
real-time transition can be added from the
Here there are a number of real-time effects available including
Magic effects
transition) as well as the high-quality 3D
effects.
(which can be selected from the Pinnacle
Project
window. Choose a video clip and
Video 1A.
Video 1B.
The working area in the
Transitions / Pinnacle
Gradient Wipe
Hollywood FX RT
palette.
Alpha
real-time
Pinnacle Pro-ONE
40
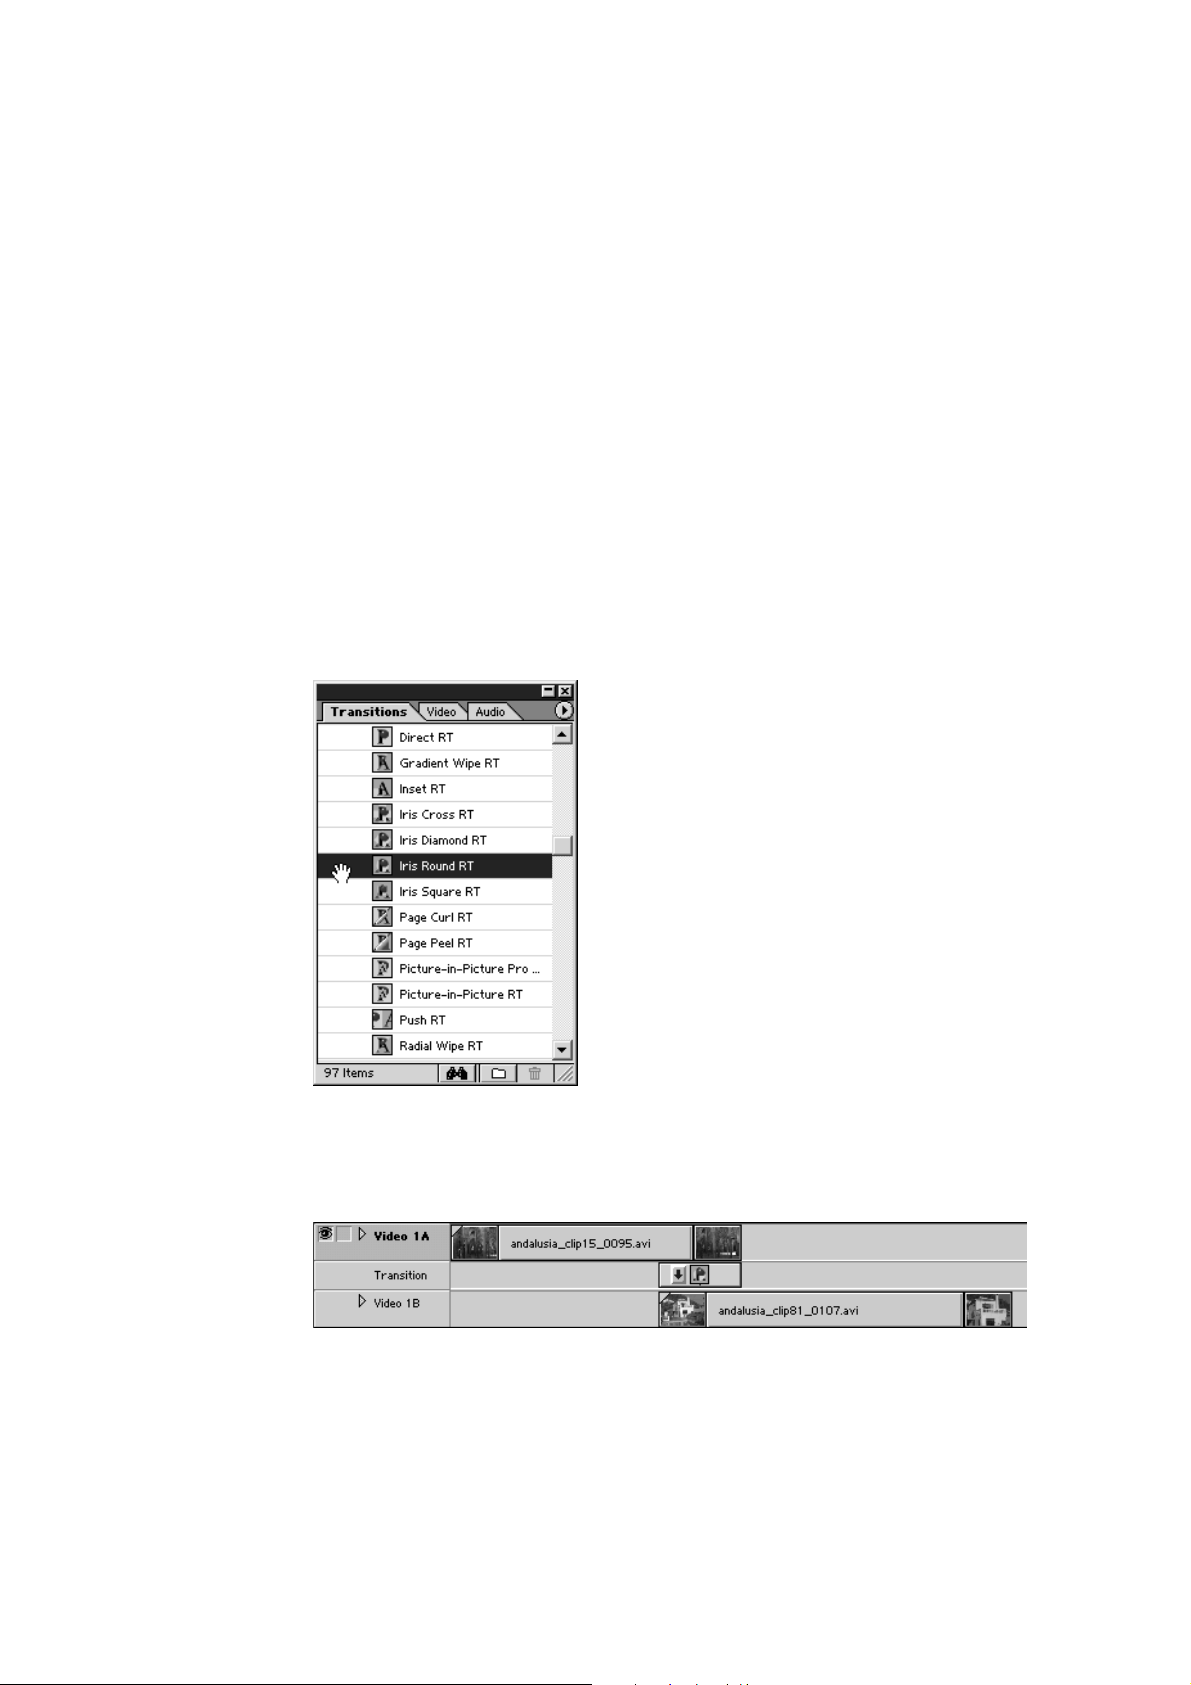
3. Choose the
clips in the
transition determines the speed of the effect on playback.
Iris Round RT
Transition
transition and drag this between the two video
track. In doing so, note that the length of the
Page 51
4. Now start the first playback of the video project. Make sure that the
editing window is active and press the <Space> bar (on the keyboard). If
you press the <Space> bar again, the recording will be stopped. Another
way of recording is by “scrubbing” in the editing window. To do this,
move the mouse pointer to the time line (edit window). The frame
corresponding to the position in the time line will appear in the preview
window.
5. The video will appear on your video monitor. When this has happened,
save your project.
TitleDeko
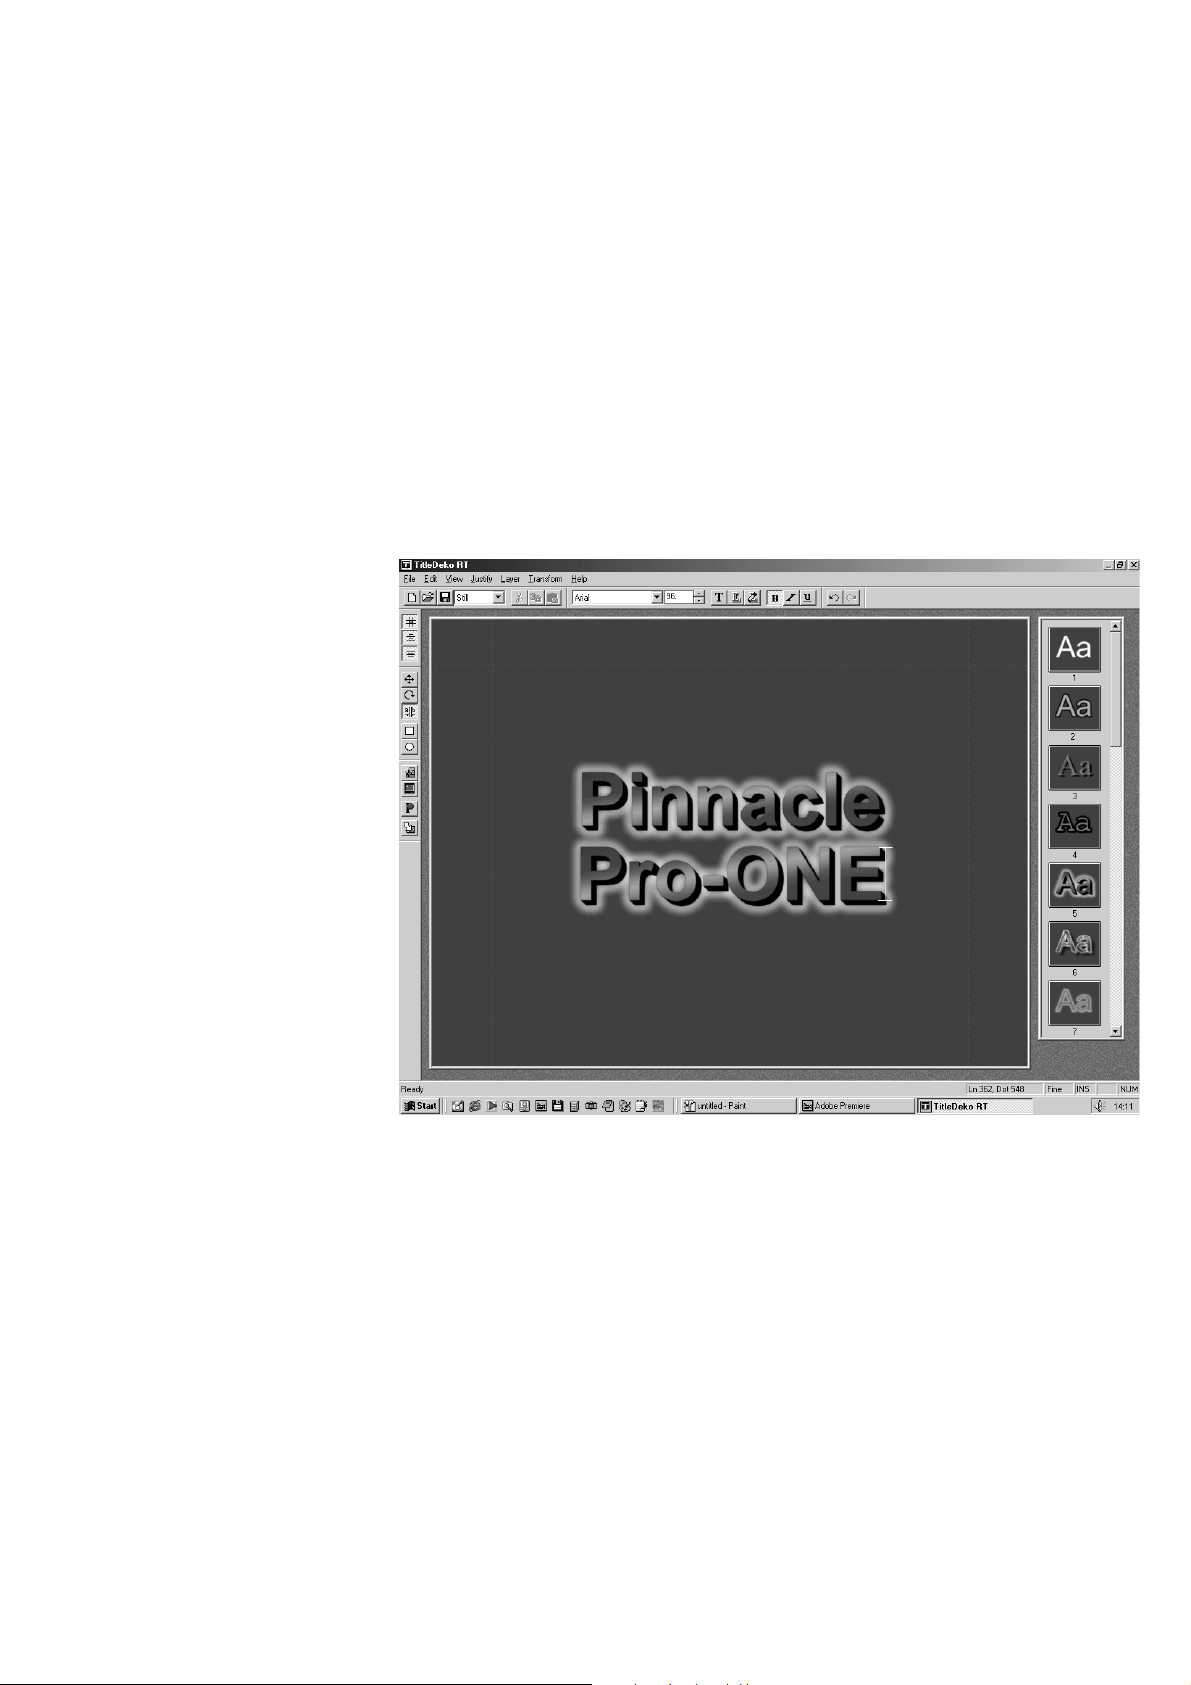
6. Open the
commands
and the size and style of the text. Select the text from the Edit menu
using the
TitleDeko RT
and
New
Select All
title generator from the
TitleDeko
command and center this in the TitleDeko window.
. Here you can enter text and select a font
menu using the
File
7. Accept the title in Adobe Premiere with <F12> (save the title if you are
prompted to do so).
The title will be created in the Adobe Premiere project window.
8. Drag the title into the editing window (video track Video 2) on top of the
first video clip. Move the mouse to the end of the title and drag this to the
required length. Now start playing back your project with the help of the
<Space> bar. The video with the title will appear on your video monitor.
Now save your project.
Note:
If you want to edit the title again, double-click on it in the editing
window. TitleDeko will be opened and the title can be modified. If you
now use the <F3> key, you will see the changes on the video monitor.
Accept the title in Adobe Premiere with <F12>.
Chapter 7: Quick Tour
41
Page 52
In TitleDeko RT you can not only create static titles but also moving
titles (rolling or sliding)!
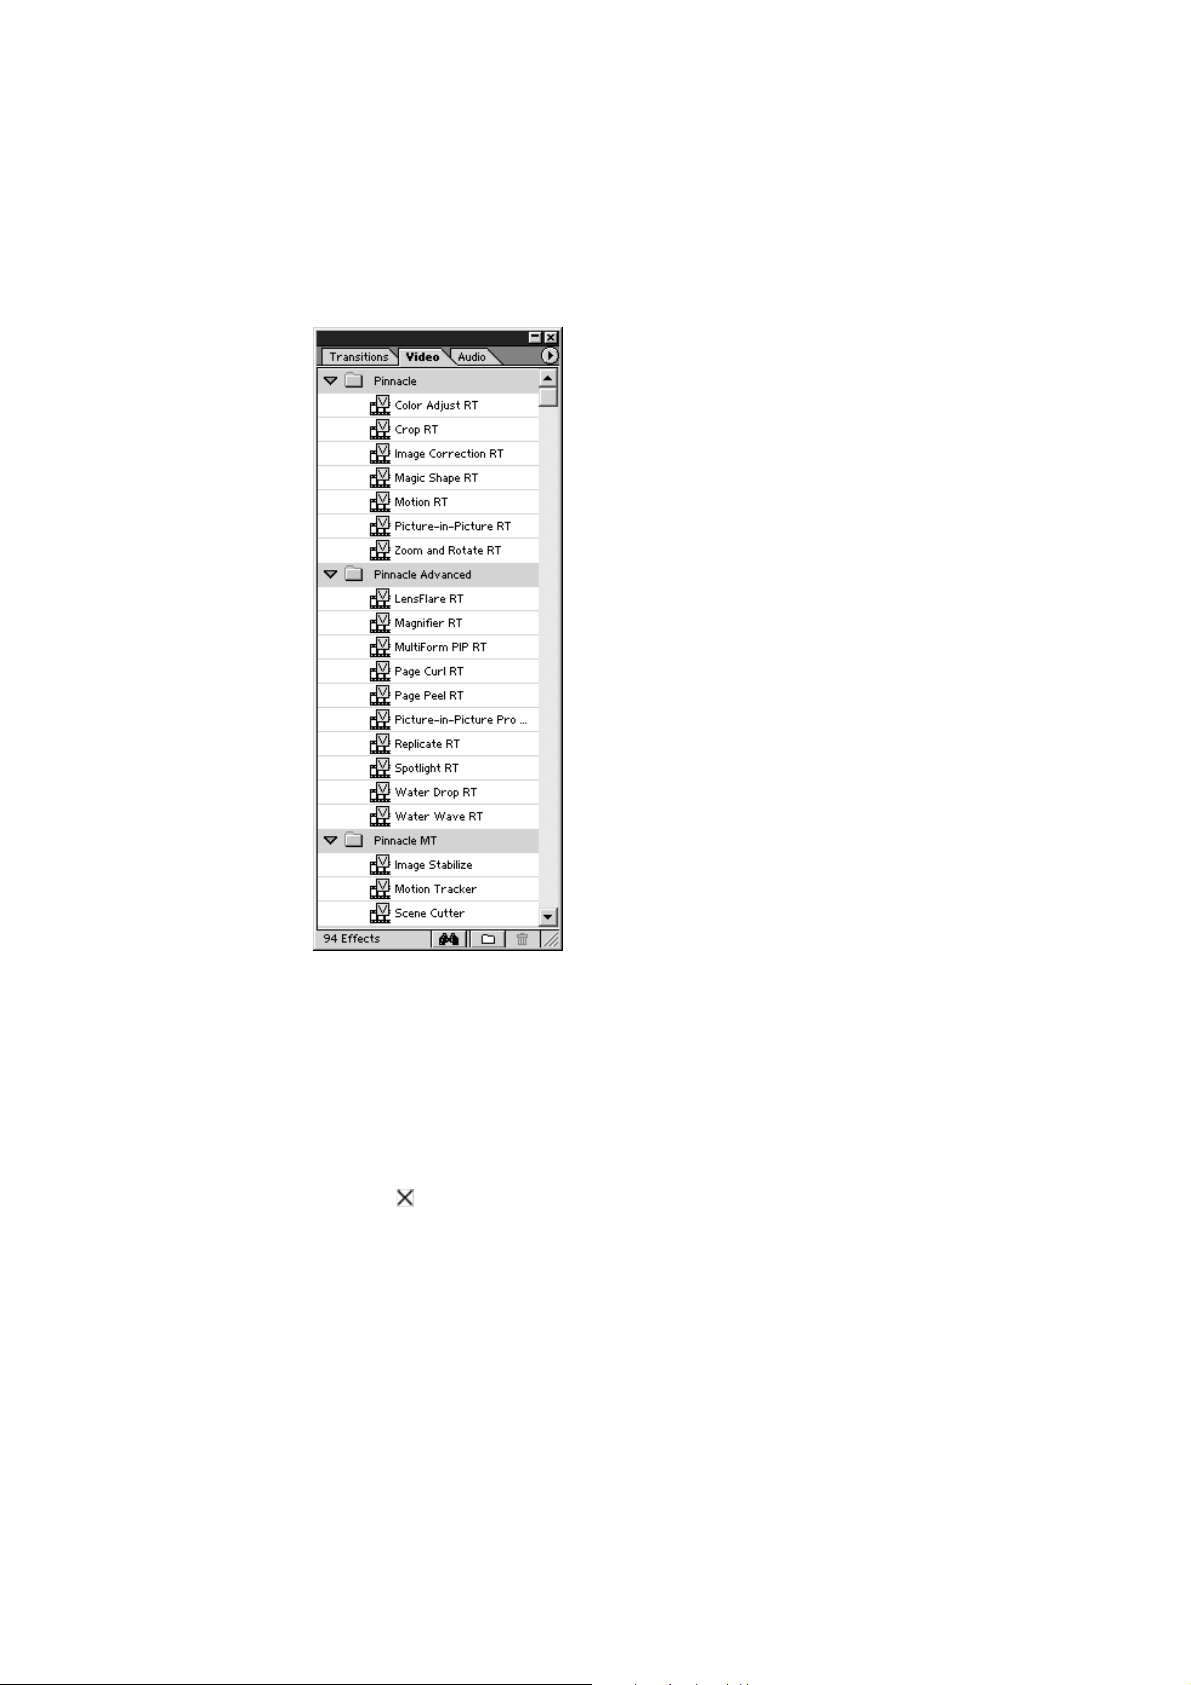
Real-time filters
In the
time filters. You can place these directly onto a video clip.
Transitions
palette on the
tab is a folder with Pinnacle real-
Video
A setup dialog will open where you can make all the settings. You can
accept the settings by clicking on OK.
9. Now start playing back the video project with the help of the <Space>
bar. The video with all the effects will appear on your video monitor.
Important:
an “x” (
rendered. To do this, press the <Enter> key. The necessary calculations
will then be performed.
W
AYS OF EXPORTING
The following section describes the exporting of your project
to an analog recorder
to DV
as Pinnacle MP2
as Pinnacle AVI
All effects that have not originated from Pinnacle will show
) when they are being played back until they have been
Pinnacle Pro-ONE
42
Page 53
Outputting to an analog recorder
Outputting is currently set up for outputting via the
outputs)
a video recorder between the output of the blackBOX (composite or S-VHS
as well as audio L+R) and the video monitor.
It is essential that you note the choice of program position on the video
recorder (e.g. AV1).
1. By pressing the <Space> bar, the video project is sent to the video
2. If you are using effects that do not originate from Pinnacle, the message
. To record onto an analog video recorder it is necessary to connect
recorder via the blackBOX. Switch the recorder manually to “Record”
first of all.
“Project needs rendering” will appear in the Instant Video RT window.
Start the playback using the <Enter> key. All the necessary calculations
will be carried out and the playback will start automatically. Before
doing so, switch your video recorder manually to “Record”.
blackBOX (analog
Outputting to a DV device
If you are playing a new DV tape, this must have a continuous time code.
To achieve this, switch your DV device into
and press the Record button with the lens covered until the tape has been
fully recorded.
Camera
mode. Rewind the tape
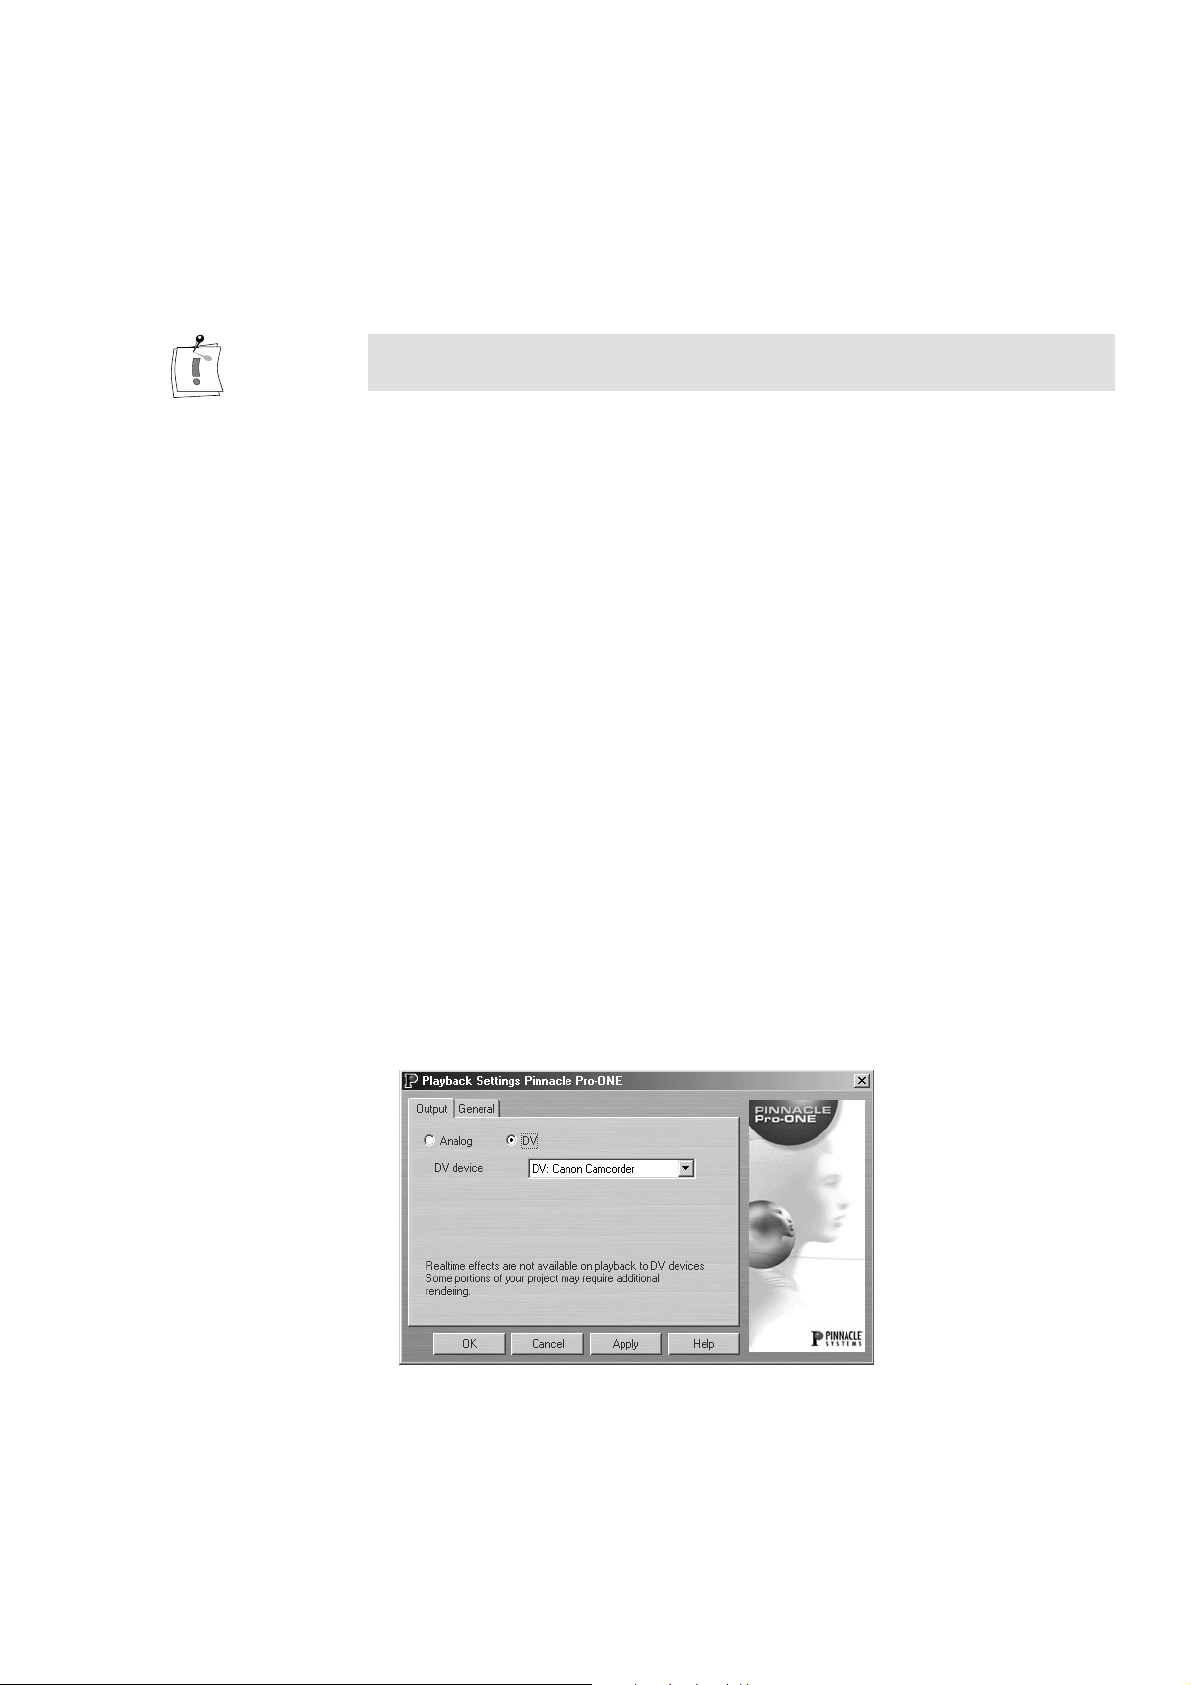
Some settings have to be made for outputting to DV tape.
1. To do this, in Adobe Premiere click on the
with the right mouse button and choose the
The
Playback Settings Pinnacle Pro-ONE
your DV device in the
2. By pressing the <Space> bar, the video project is sent to the DV device
(DV input) via the FireWire-IEEE 1394 interface. The recording function
is not started automatically. The video should now be visible in the
display of the DV device or on the video monitor connected to it.
Output
tab and close the window with OK.
Instant Video RT
Settings
window will appear. Select
command.
window
Chapter 7: Quick Tour
43
Page 54

3. To save the video to DV tape, ensure that the editing window is active
and that
Preferences, Scratch Disks and Device Control
and the commands
The creation of the remaining effects will now start.
Pinnacle DV device control
Export Timeline
under
and
Scratch Disks
Export to Tape...
is set up (
). Choose the
.
File
Edit
menu
,
4. In the
function. This will automatically put the DV device into record mode.
If you should already have a video movie on your DV tape, you can
specify the start of the recording by additionally activating the
tape options
The
synchronized start of playback and recording. This procedure is not
necessary with a new DV tape.
5. After completing the settings, confirm with
Premiere switches over to playback mode, instructs the device control to
prepare the required operations and starts the playback. After playback
has finished, Premiere switches back to editing mode once more.
The settings just made are not saved and must therefore be entered again
as required.
6. If you find that recording has not been started or finished accurately, we
would recommend you to use black frames at the start and end of your
project. This will ensure that the whole project is recorded. Note that the
accuracy of the
device used. Pinnacle Systems cannot guarantee that all DV devices
support this function.
Export to tape
in the
Preroll
button allows you to make fine adjustments to the
window, activate the
Timecode and Preroll
Export to tape...
function is dependent upon the DV
Activate recording deck
Print to
area.
OK.
Exporting as Pinnacle MP2
Another possibility for saving your video project is to export it as Pinnacle
MP2. In this way you can prepare your video for further editing (with
Pinnacle Impression) on DVD.
1. In Adobe Premiere, choose the
Timeline
target directory and the file name. Before saving, click on the Settings
button
2. In the
under
3. Click on the
NTSC). If you have created your project in widescreen format, select
Pinnacle DVD
To carry out the MP2 export as an MPEG2-CD, you can either choose
the preset
or NTSC)
and
Movie.
.
Export Movie Settings
File Type
Load
Pinnacle MPEG2-CD
Widescreen
In the window that follows, you can specify the
window select the entry
.
button and select the entry
(PAL or NTSC)
.
menu and the commands
File
Pinnacle DVD
Widescreen.
(PAL or NTSC) or
Export
Pinnacle MP2
(PAL or
MPEG2-CD
(PAL
Pinnacle Pro-ONE
44
Page 55
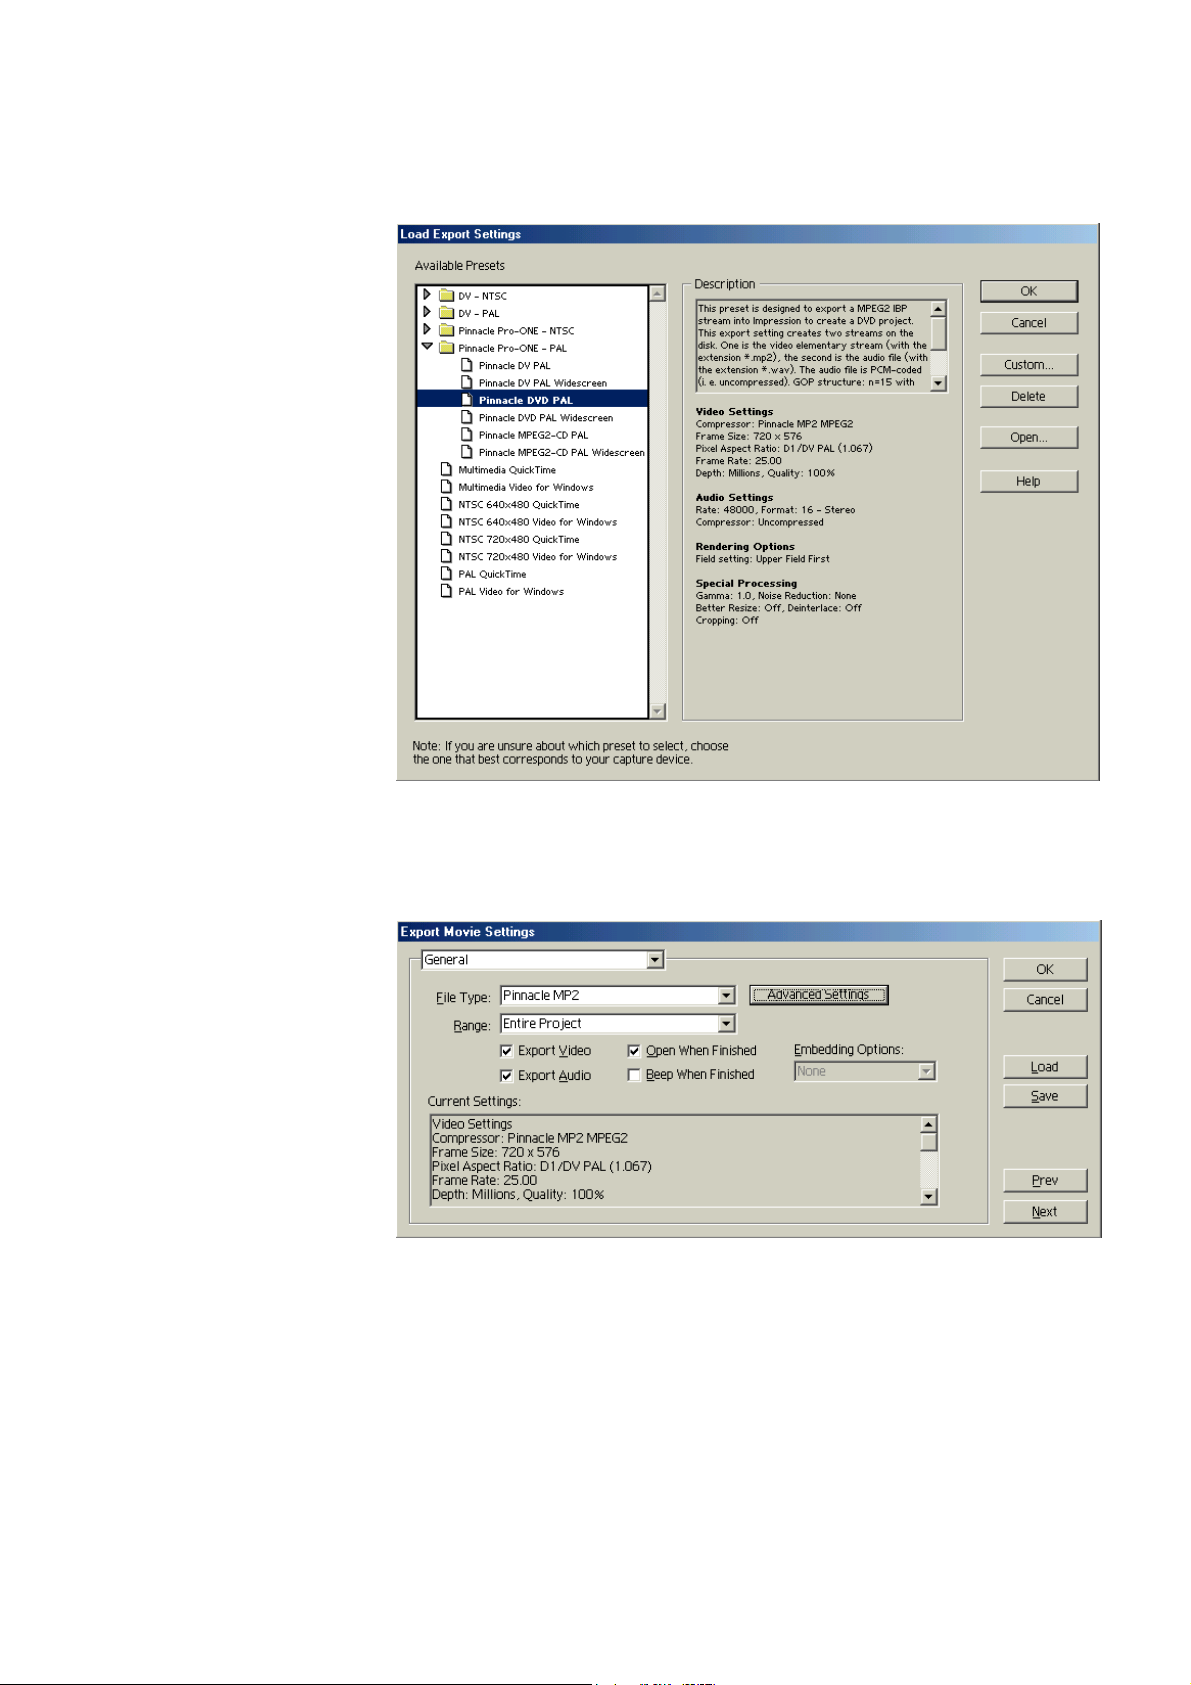
4. In this step, choose the entry Pinnacle DVD (PAL or NTSC) and close
the Load Export Settings window with OK.
5. In the Export Movie Settings window, activate Pinnacle Impression using
the Advanced Settings button and activate the check box Open When
Finished.
6. Confirm all windows with OK.
The creation of the video project will now be started. When the
calculations are complete, Pinnacle Impression will open automatically
and the MP2 video file and the associated *.wav file will appear in the
Impression editing window.
7. You can now add various menus and create the final MP2 file using the
Build DVD function. This is loaded into DVD burning software in order
to create a DVD.
Chapter 7: Quick Tour
45
Page 56
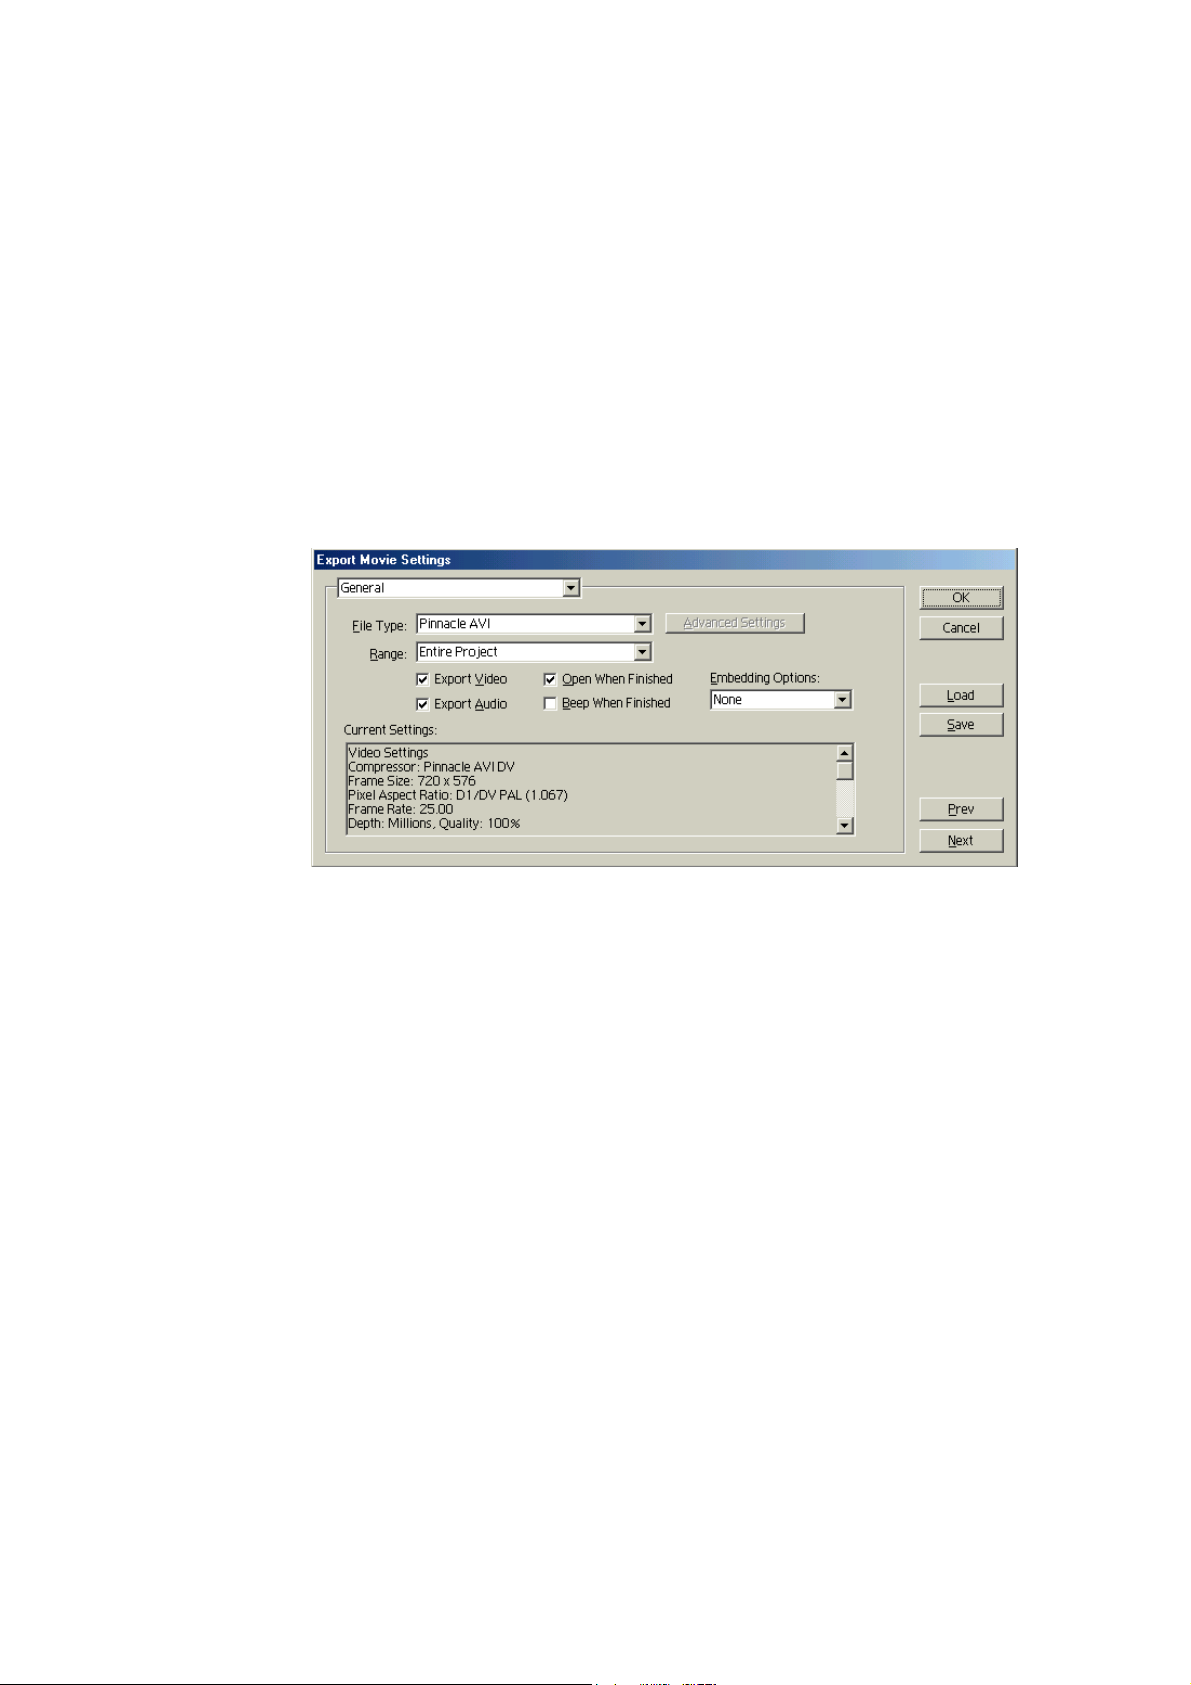
Exporting as Pinnacle AVI
Exporting as Pinnacle AVI is another way of saving your video project.
Here, you create an *.avi file from your project in Adobe Premiere.
Warning! The maximum possible size of the *.avi file to be created will
depend upon the file system you are using, FAT16, FAT32 or NTFS.
1. In Adobe Premiere, choose the File menu and the commands Export
Timeline and Movie. In the window that follows, you can specify the
target directory and the file name. Click on the Settings button before
saving.
2. In the Export Movie Settings window, choose the entry Pinnacle AVI
under File Type. The details of the calculation will be shown under
Current Settings.
3. Confirm all windows with OK.
The creation of the video project will now be started. When the
calculations are complete, the clip widow will open and the video file
(*.avi) can be played back by clicking on the Play button. The video will
be displayed depending on the choice of video output – analog or DV
(Instant Video RT, right mouse click, Settings).
46 Pinnacle Pro-ONE
Page 57
Part II - Creating Movies
Part II of this manual explains the applications that come
with Pinnacle Pro-ONE.
Working with DVTools
Pinnacle Effects
Pinnacle Pro-ONE & Real Time
TitleDeko RT
Hollywood FX
Alpha Magic FX
Exporting Projects
Page 58

Page 59
Chapter 8:
Working with DVTools
DVTools provides you with the facility to record video material or
individual pictures easily and conveniently from an analogue or DV device
onto the hard disk or to play it back on a videotape.
If you use a DV device, DVTools will also help you in viewing and
archiving your DV tapes and will enable you to effectively choose the clips
needed for your movie. Recording and playback take place automatically
via the DV device control, even when you have several clips one after the
other.
Your DV tapes are scanned and the positions of the clips stored in a
database. You can show individual clips, define new starting and finishing
points for a scene and conveniently arrange your clips in a Clip Gallery.
Only then are the chosen scenes recorded onto your hard disk. The Clip
Gallery can be exported to Adobe Premiere as a Storyboard for further
processing.
In this way, you can edit the recorded video material in Adobe Premiere and
then play back the finished results on a tape using DVTools.
Using the “Cutlist-Playback” facility (which means the consecutive
playback of analogue, DV, or even different video material without gaps),
you can of course also put together the best scenes from several DV tapes
and save them to your hard disk. However, with DVTools, you can also
save them for archiving onto a new DV tape without any difficulty. This
saves you something both in time and in DV tapes.
Notable features
Tapescan with automatic scene identification (also manual)
Recording from analogue and DV input
Recording of file sizes greater than 2 GByte possible
Cutlist Playback for analogue and DV
Cutlist Playback for different material
Recording time and date changes
Batch list export to Adobe Premiere Storyboard format
Chapter 9: Working with DVTools
49
Page 60
P
REPARATION
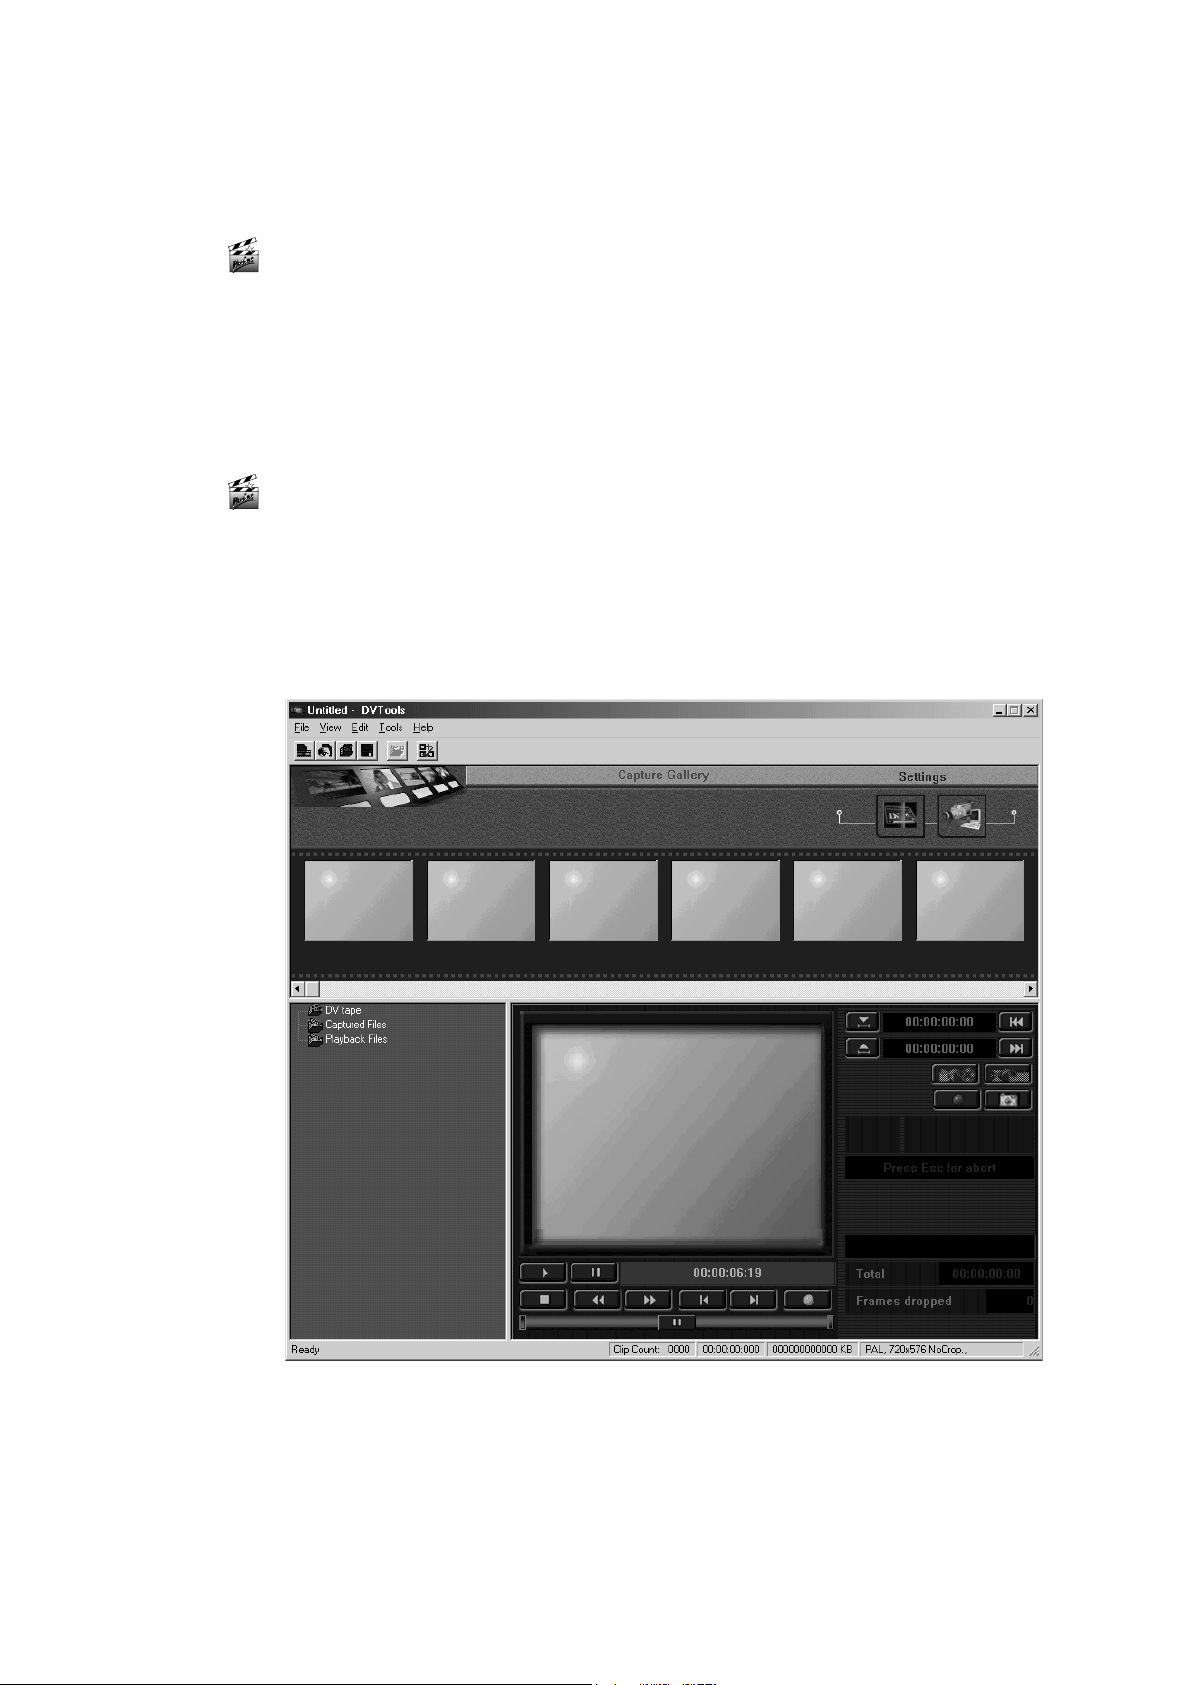
Connecting the video source
With DVTools you can record from both a DV device and from an analogue
video source. If you have not already done so, connect your unit now to the
Pro-ONE board (DV device) or the blackBOX (S-VHS / composite device).
Switch the unit on and make sure that it is in playback
have not already done so, insert a videotape into the unit.
mode. If you
VTR
Open DVTools
Choose
program group and click on
first time the “Capture Options” dialog box will appear. For information
about this box, please refer to the “Checking the settings” section as of page
51.
Programs
in the
menu. Choose the
Start
DVTools
Pinnacle Pro-ONE
. If you open the DVTools for the very
Pinnacle Pro-ONE
50
You will find yourself in the DVTools – Capture Gallery window. Here,
you can define the capture settings, scan DV tapes and record clips. For
playing back video material onto videotape later, DVTools automatically
switches over to the DVTools – Playback Gallery window. For more
information, read the section “Playback” on page 59.
Page 61
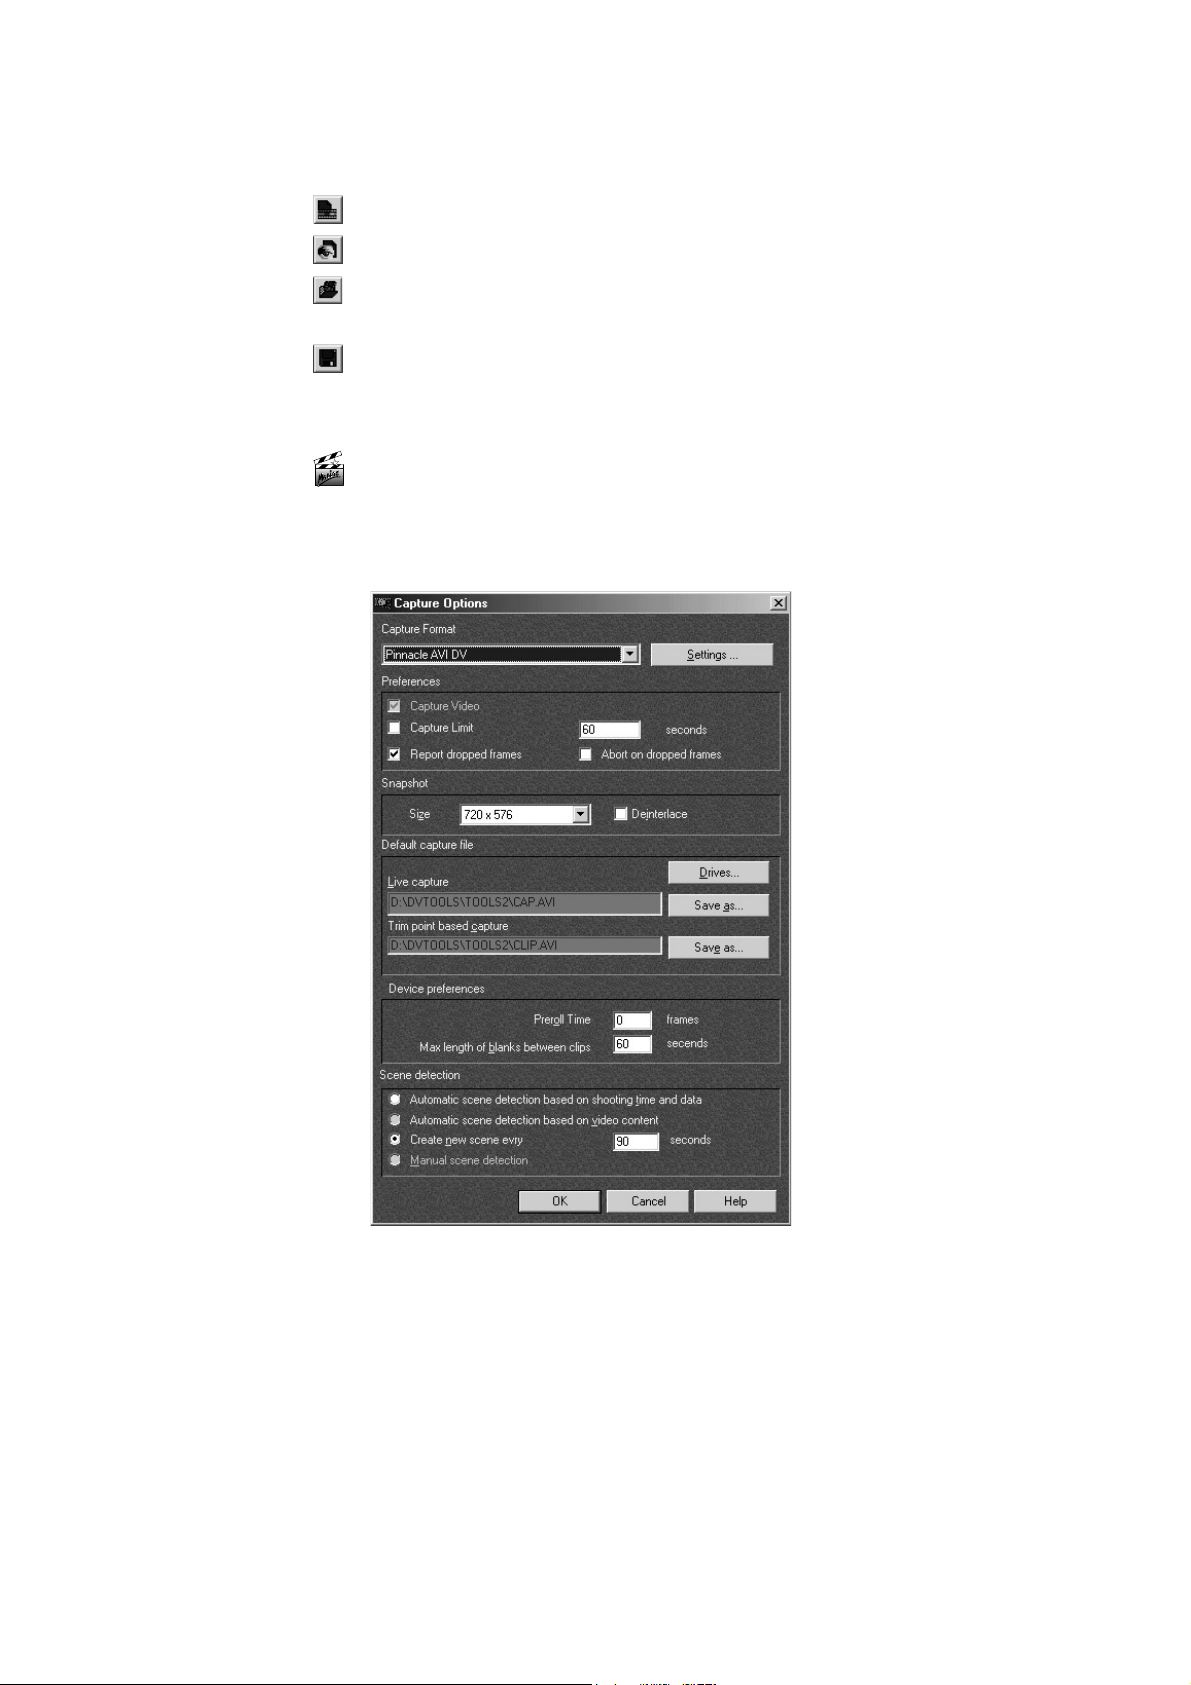
The “New”, “Open” and “Save” buttons
You can create a new Capture Gallery using this button.
This button opens a new Playback Gallery.
With this button, you can open a Capture or Playback Gallery that has
previously been saved.
The Capture / Playback Gallery will be saved when you click on this button.
You will also find these commands in the
Checking the settings
Check the settings by clicking on the
edge of the window.
Settings
menu.
File
button at the upper right-hand
Check all the settings in the
should be set for the Capture Format.
DV
Important:
on which the video data will be saved. Please select your video disk.
Click on the
On the
Composite
Overlay
You will find a detailed description of the individual parameters in the
online help.
The
Default capture file
Settings...
Video input
, or
has been selected.
tab check that the correct input is set:
DV Camcorder
Capture Options
option lets you specify the disk drive
button in order to open the Pro-ONE check window.
. Open the
dialogue box.
General
Chapter 9: Working with DVTools
tab and make sure that an
Pinnacle AVI
S-video
,
51
Page 62

DV device only
S
CANNING TAPES
If you are using a DV device, check the settings under
Control settings
from within DVTools, click on the
You can record your video material directly from videotape by winding the
source video to the required position and clicking on the
Read more about this under
However if you want to record more material from different positions or if
you do not have an overview of the DV tape contents, it is recommended
that you first scan the whole videotape. This is only possible with DV
devices on account of the device control required.
Scanning video tapes
When you scan a videotape, no video pictures are recorded onto the hard
disk. The scanning only searches for the start and finish points of all the
clips on a DV tape so that you can find the clips that you want to use for
your final movie more easily.
and the
Tools
command in the menu. If you want to control your device
Activate device control
Special recordings
on Page 58.
check box.
Capture
Device
button.
You can choose the type of scene detection under
Automatic scene detection based on shooting time and date
Automatic scene detection based on video content
Create new scene every x seconds
Manual scene detection
With manual scene detection you define the start of a new scene by pressing
the space bar during playback.
Note:
If possible, you should use formatted tapes for scanning so that a
continuous time code is available as otherwise this can lead to scanning
errors. You format tapes by first recording “nothing” on the tape from start
to finish. To do this, wind the tape to the beginning, cover the lens with the
cap and record the whole tape. This results in a continuous time code, which
is also retained when you start recording.
Settings
:
Pinnacle Pro-ONE
52
Page 63
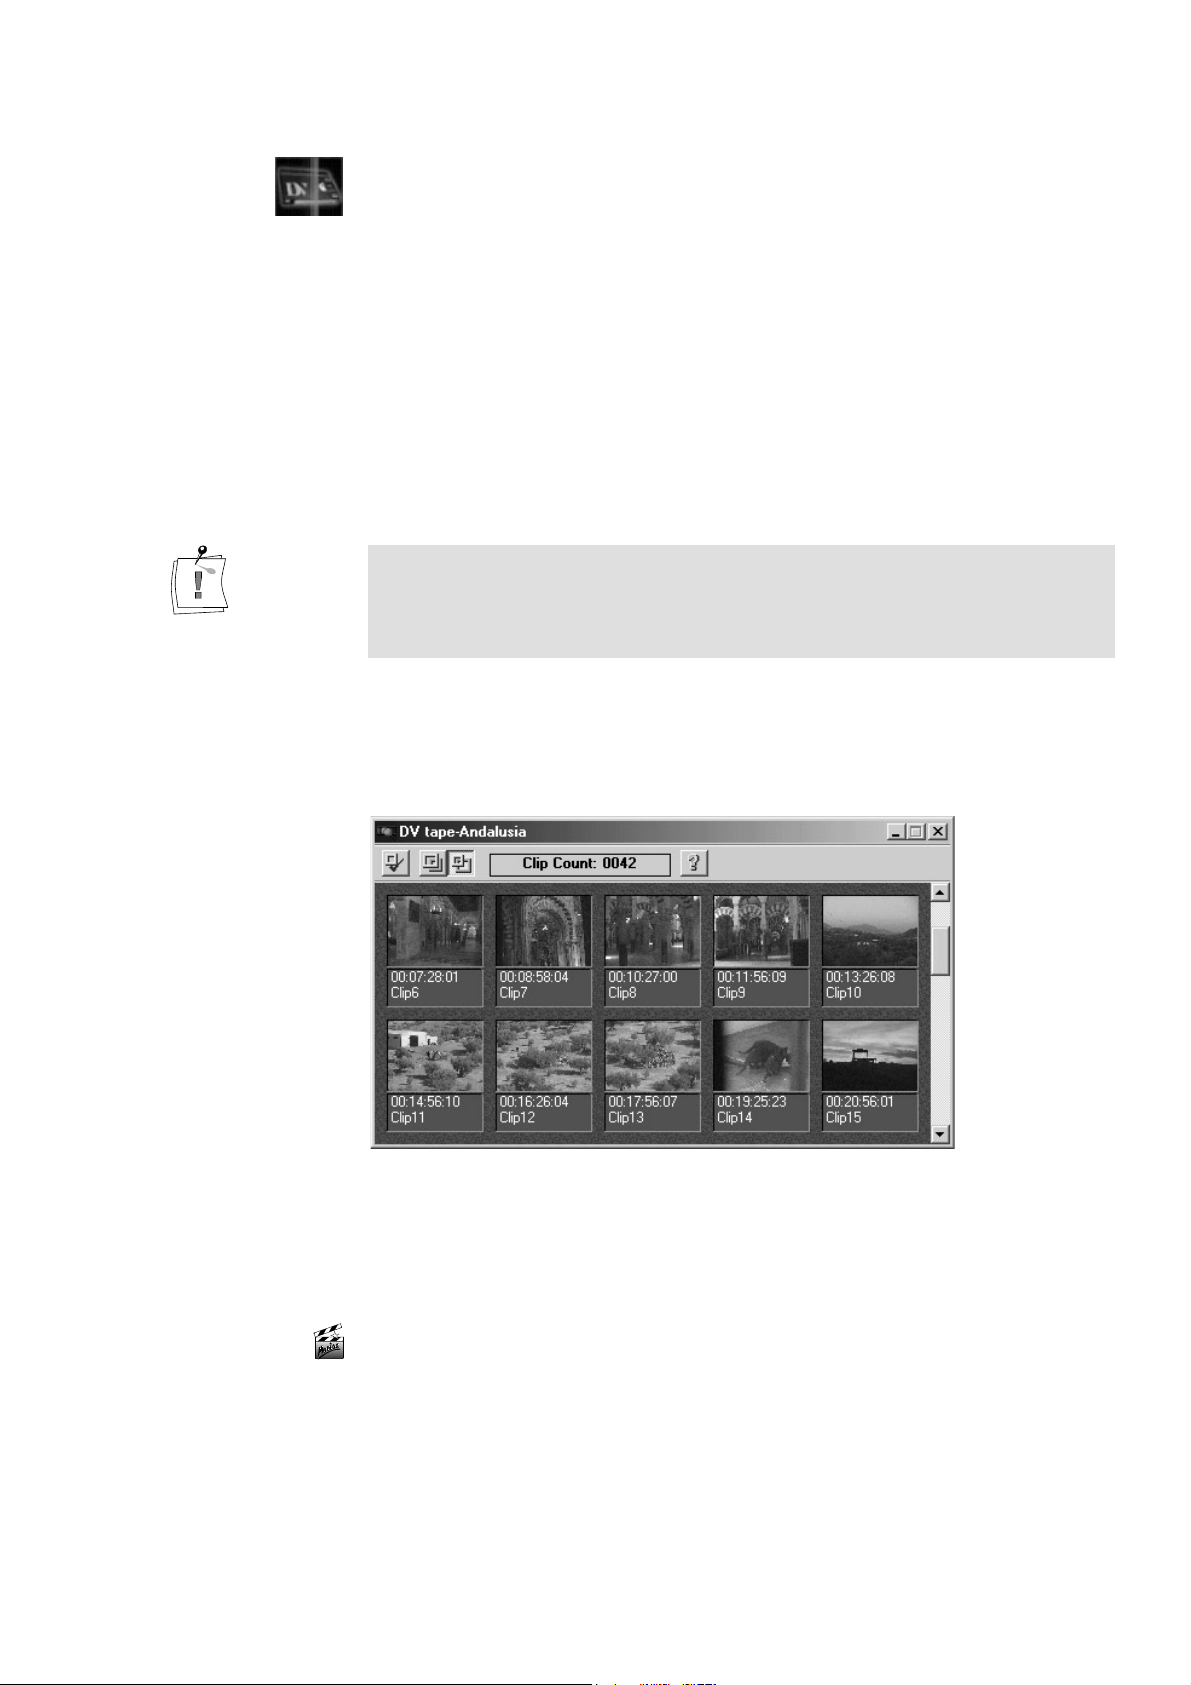
To start the scanning process, click on the
DV tape...
After the videotape has been rewound, DVTools identifies the tape.
If the tape is not known to the database, in the next step you are
requested to give a name and a description.
If the tape has already been scanned, you can terminate the procedure at
this point or repeat it.
DVTools then searches the videotape for clips. This process lasts about as
long as it would take to play back the existing video material from your
videotape.
command from the
Tools
menu
button or choose the
Scan
.
Scan
To terminate the scan, press the <ESC> key
You can continue an interrupted scan from any point at any time. To do this,
re-start the scanning process, choose
following window either enter the clip number from which the scan is to be
started or choose
A window will appear showing all the clips found on the tape in the form of
a “Posterframe” (the first picture in a clip).
Continue.
Rescan
.
, click on OK, and in the
If you want to use several videotapes for your movie, proceed in this
manner for each tape. The contents will be held separately for each tape in a
database and can be called up again at any time. DVTools manages any
number of tapes.
Choosing clips
In order to view information for a scene, double-click on the required clip.
The
Clip Info
window will appear
.
Chapter 9: Working with DVTools
53
Page 64
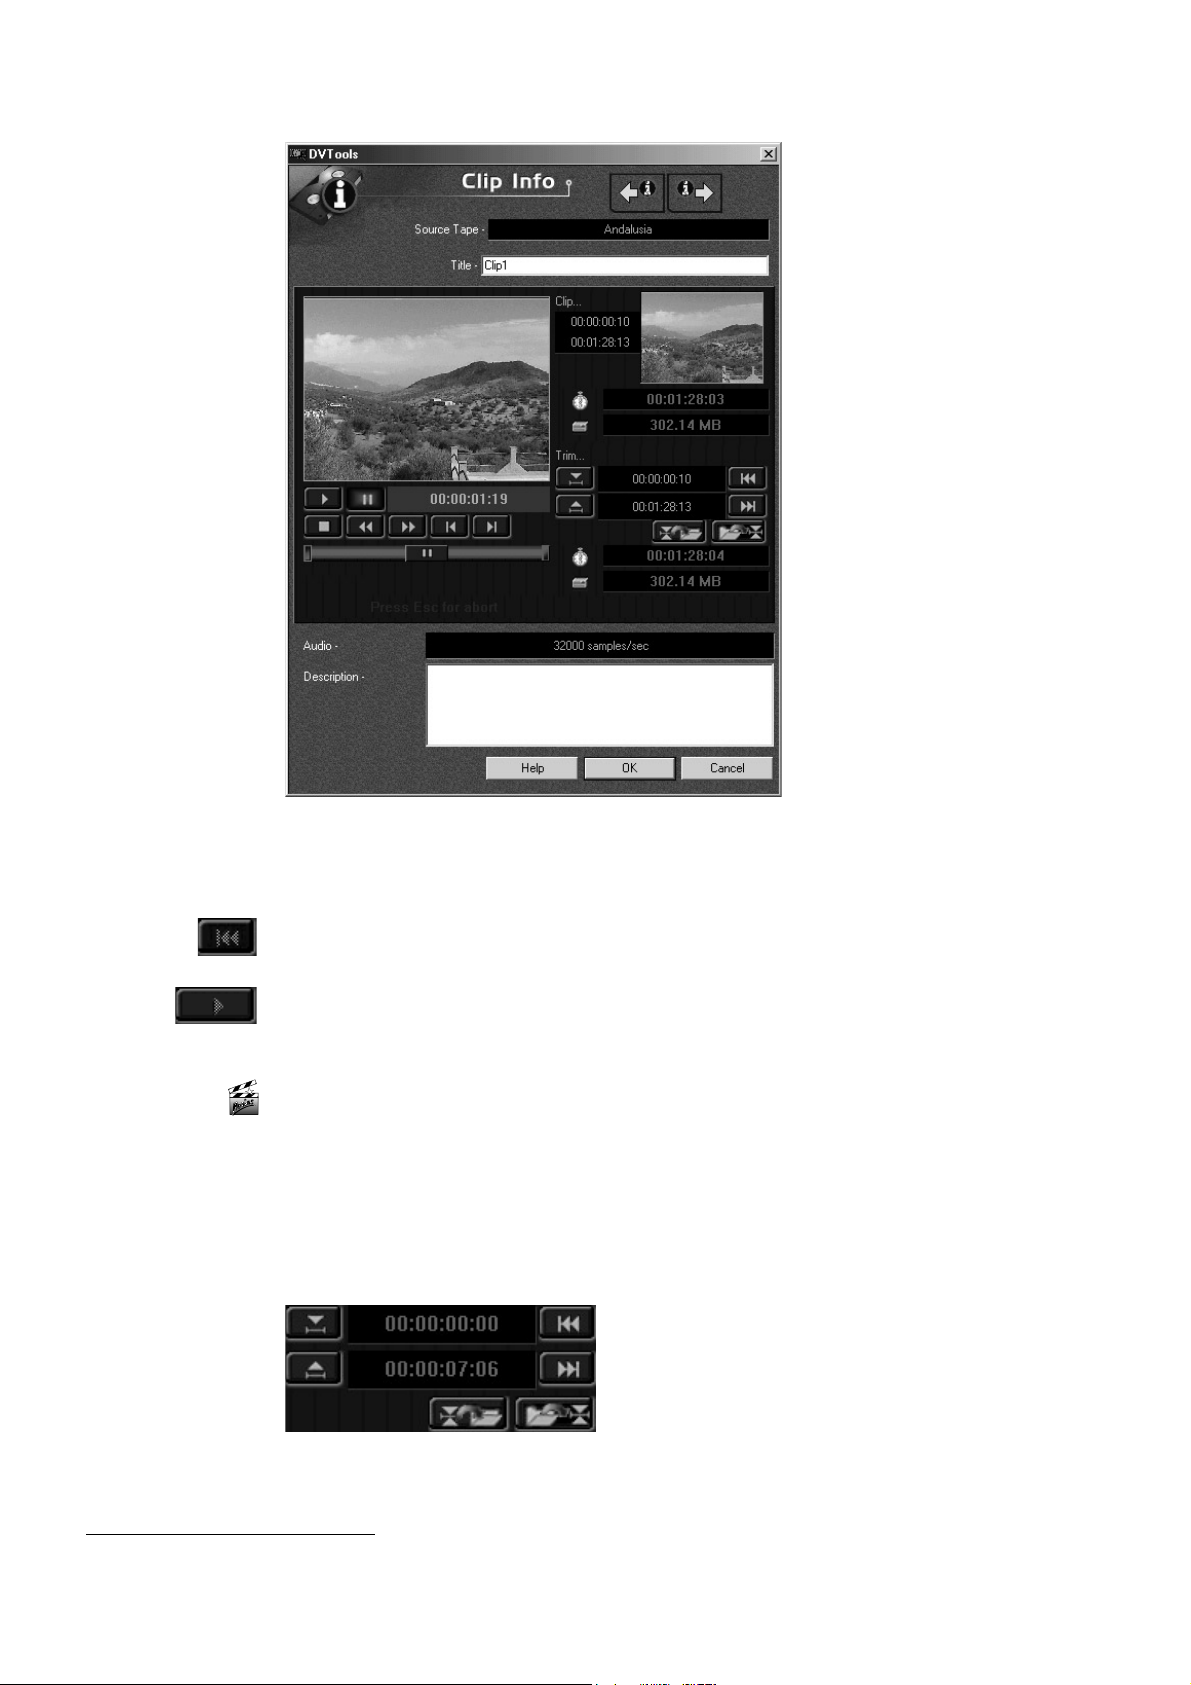
The
Clip Info
window shows the title of the clip, the time code and – if
available – the editing points. You can also add a description of the clip at
this stage, and set editing points.
In order to view the selected clip, wind the tape to the start of the clip by
clicking on the
Wind to start
button.
When the DV device has found the start of the clip, click on the
in the
DV device control
area.
*
Play
Editing clips
It is possible that you may not want to use the whole clip but only a certain
part of it. In this case, you can edit the clip using the elements that you can
see to the right of the Preview area. This takes place either in the Clip-Info
window or using the controls in the lower right-hand part of the Capture
Gallery preview window.
button
*
This step is not necessary if you have recorded the clip using the
Pinnacle Pro-ONE
54
Live capture
DV extract
or
buttons.
Page 65
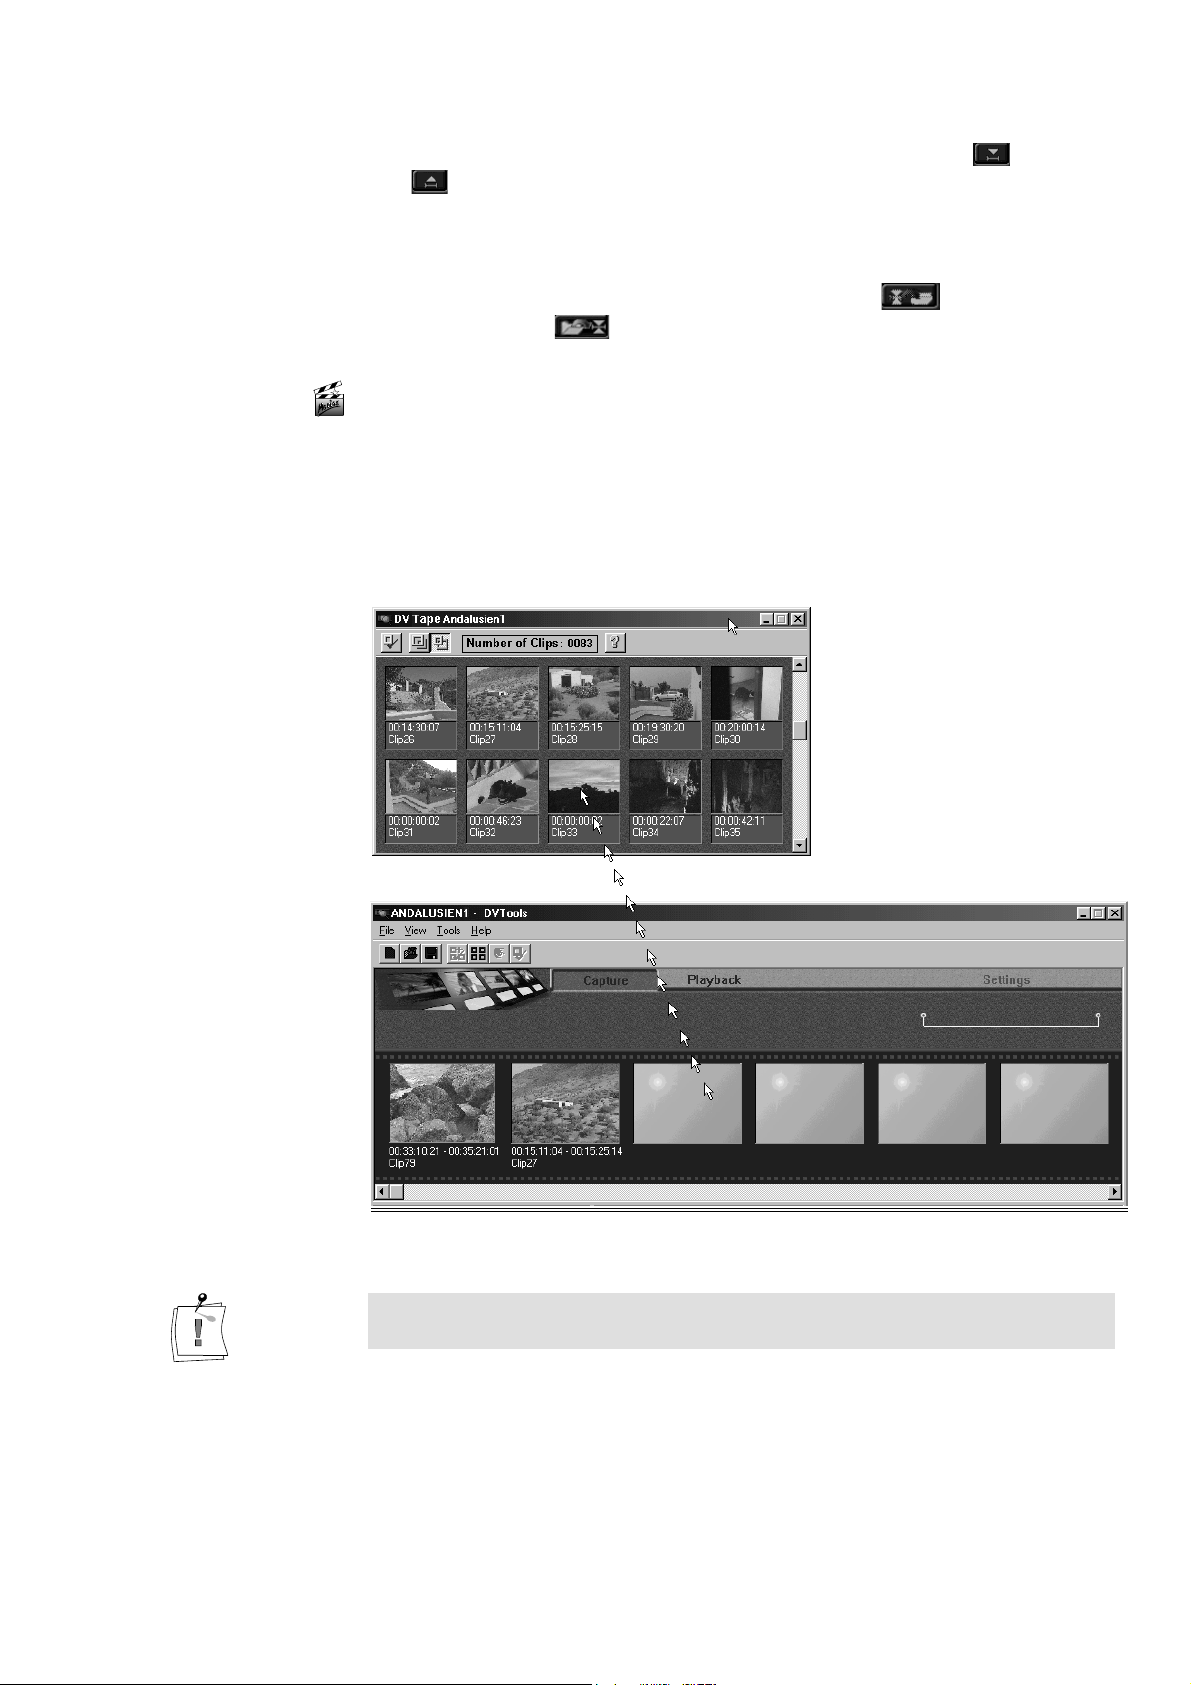
Here, the start and finish points of a clip are defined using the (Start)
and
playback or you can stop the tape and then set the start and finish points.
The tape can easily be wound forwards and backwards using the slide
control (Jog-Shuttle) in the lower part of the
you have entered the start and finish points, click on
finish points). The
(Finish) buttons. You can either click on the buttons during
DV device control
button will delete pre-defined trimming points.
area. When
(Accept start and
Incorporating video sequences into the Clip Gallery
When you have viewed your video material, you can now choose the clips
that you want to capture on your hard disk. To do this, drag the required
clips directly from the DV tape database into the Clip Gallery. You can
arrange the clips in the Clip Gallery in any order you like. You can also
change the order retrospectively.
You can use video material from any number of DV tapes in one Clip
Gallery.
Chapter 9: Working with DVTools
55
Page 66
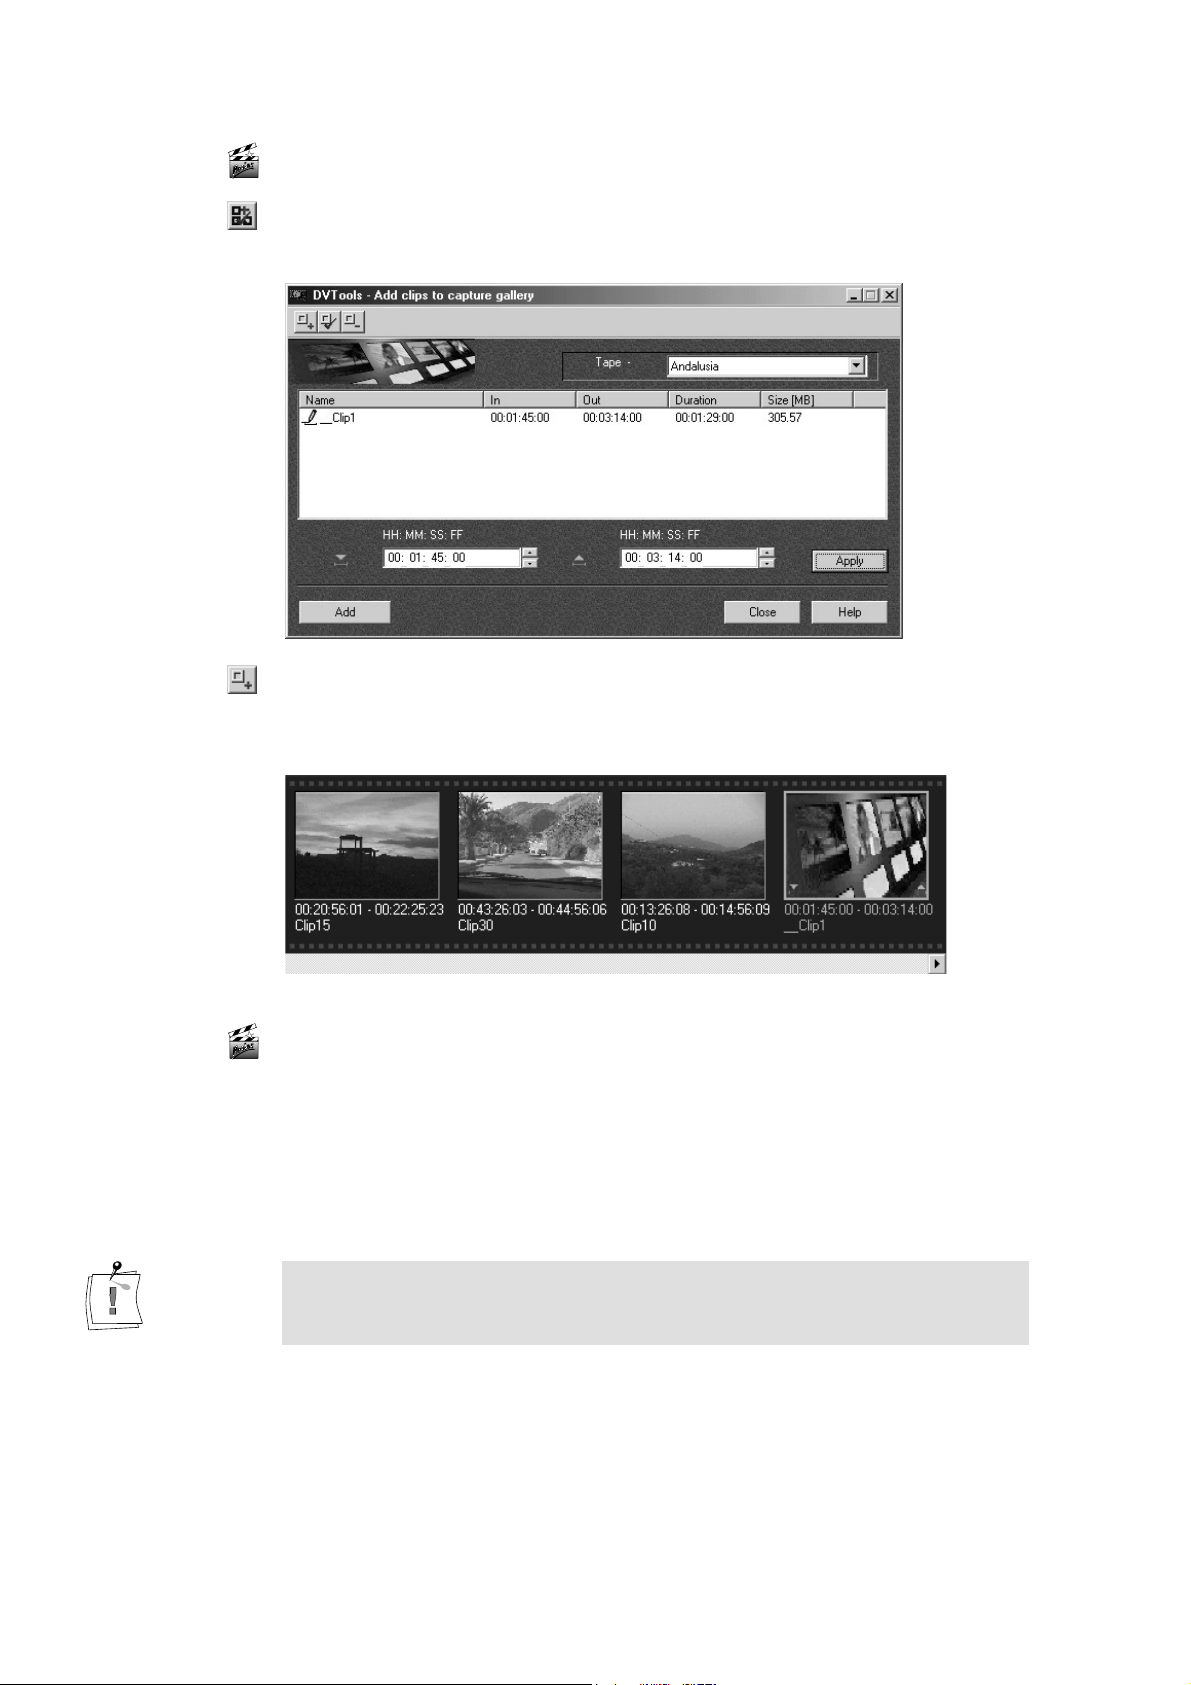
Adding clips manually
If you want to add further clips manually (including from other videotapes),
click on the
Add clips to capture gallery
button.
Click on the
points. Click on the
The clip will be added to the gallery.
button, select the
New
Apply
and
Add
and define the start and finish
Tape
buttons.
Saving a project / gallery
Save the contents of the
start and finish points. To do this, choose
the Clip Gallery menu. The Clip Gallery files will be saved on your hard
disk with the ending *.sto.
Clip Gallery
with the added clips and the newly set
and
File
Save Gallery as...
from
Pinnacle Pro-ONE
56
When the clips from the Clip Gallery have been captured on hard disk, you
can export the Clip Gallery to a Premiere Storyboard. Read about this under
“Export as Premiere Storyboard” on Page 62.
Page 67
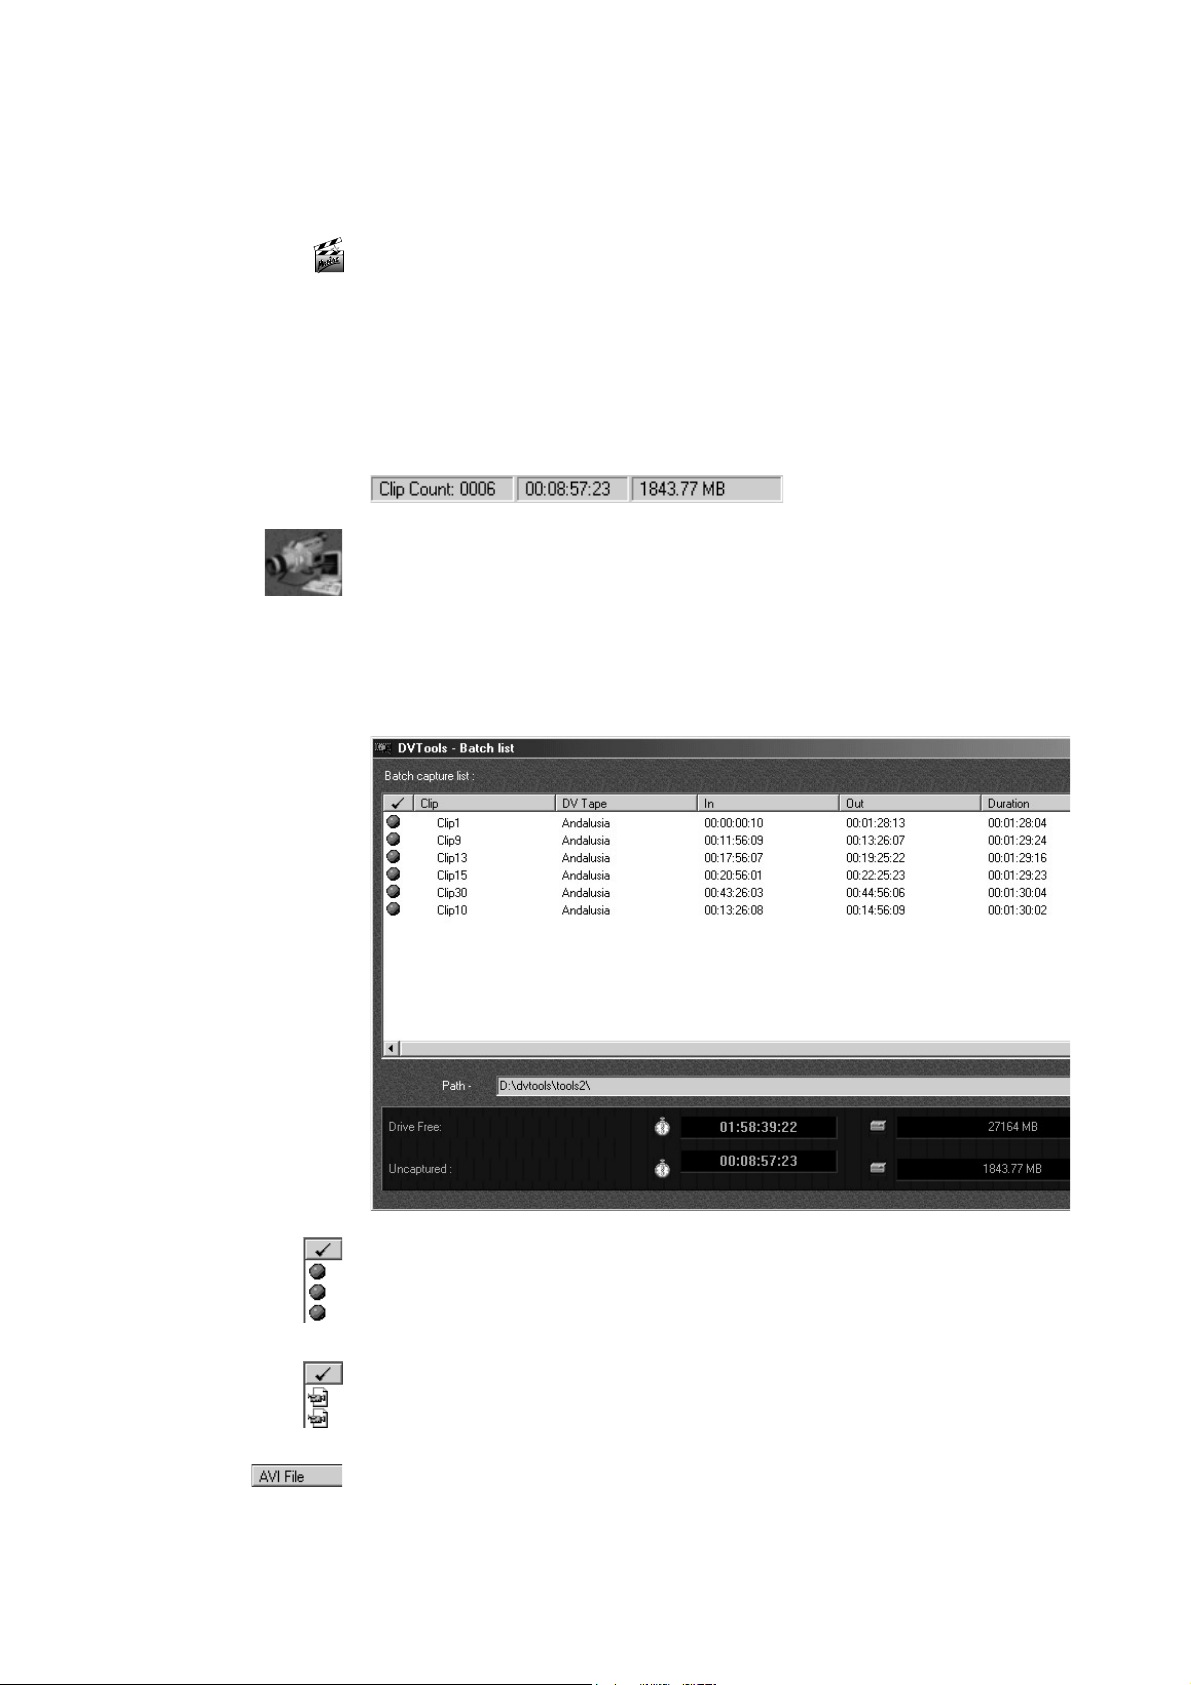
V
IDEO RECORDING
Recording clips on hard disk (Batch Capture)
After you have chosen the clips for your movie, you can create AVI files
from them.
The status bar in the lower part of the
expected size of all the AVI files to be created. DVTools checks to see that
there is sufficient memory space available before recording.
To start the recording process, click on the
hand part of the DVTools window or choose
gallery
Before starting the recording process, the
selected clips is displayed. Here you can see which clips have already been
captured and which are still to be recorded.
from the
Tools
menu.
Clip Gallery
Capture
Batch list
window shows the
button at the top right-
Capture Scenes from capture
window showing all the
The “circle” on the left beside the individual clips means that this clip has
been selected for capture. You can remove this selection by clicking on the
symbol with the mouse. Clicking on the “tick” will select all clips for
capture or remove the selection as appropriate.
If a clip has been captured, the camera symbol will appear to the left of the
clip. If you want to capture it again (e.g. because some frames have been
left out), click on the camera symbol.
If you do not want to use the standard directory that you have selected under
Settings
which you would like to copy the AVI files.
, click on
AVI File,
enter a file name and choose a directory into
Chapter 9: Working with DVTools
57
Page 68
If you do not want to use the standard directory that you have selected under
Settings
which you would like to copy the AVI files.
All clips in the Clip Gallery will then be recorded. The AVI files will be
numbered consecutively in order and created in DVExplorer under
Captured Files
Note:
several clips, as files with a maximum size of 4 GByte can be stored on
FAT32 formatted hard disks.
You will find particulars of the memory space in the status bar at the
bottom.
, click on AVI file, enter a file name and choose a directory into
.
If an individual clip is larger than 4 GByte, it will be divided into
Special recordings
Live recordings
You can record your video material directly from videotape by winding the
source video to the required position and clicking on the
The sequence will be directly written to the hard disk. To stop recording,
click on the
to allocate a file name. After this, the
giving you details of the number of recorded pictures and the pictures
omitted. You can record as many sequences as you like in this way.
Stop capture
button. In the Save
DVTools – Report
window you will be asked
as
Capture
window will appear
button.
Image size
Movement
compensation
Recording DV extracts
With this button, you can record just an extract of the scanned video clip
after you have reset the in and / or out point. Here too, the clip is recorded
immediately onto the hard disk.
Recording individual frames
With DVTools you can also record individual frames from your video
source. Before using DVTools for recording individual frames from your
video material, you should check the particular settings for TV standard and
BMP size under
Choose the image size for your single frame from the list box under
Snapshot
If the picture movement is to be filtered out (deinterlacing), choose the
Deinterlace
You will find more information on “deinterlacing” in the online help for this
dialogue.
If you are working in VTR mode, look for the picture on your videotape that
you want to record using the tape transport buttons and click on the
button to stop the videotape.
.
Capture Options
option.
.
Pause
Pinnacle Pro-ONE
58
Page 69
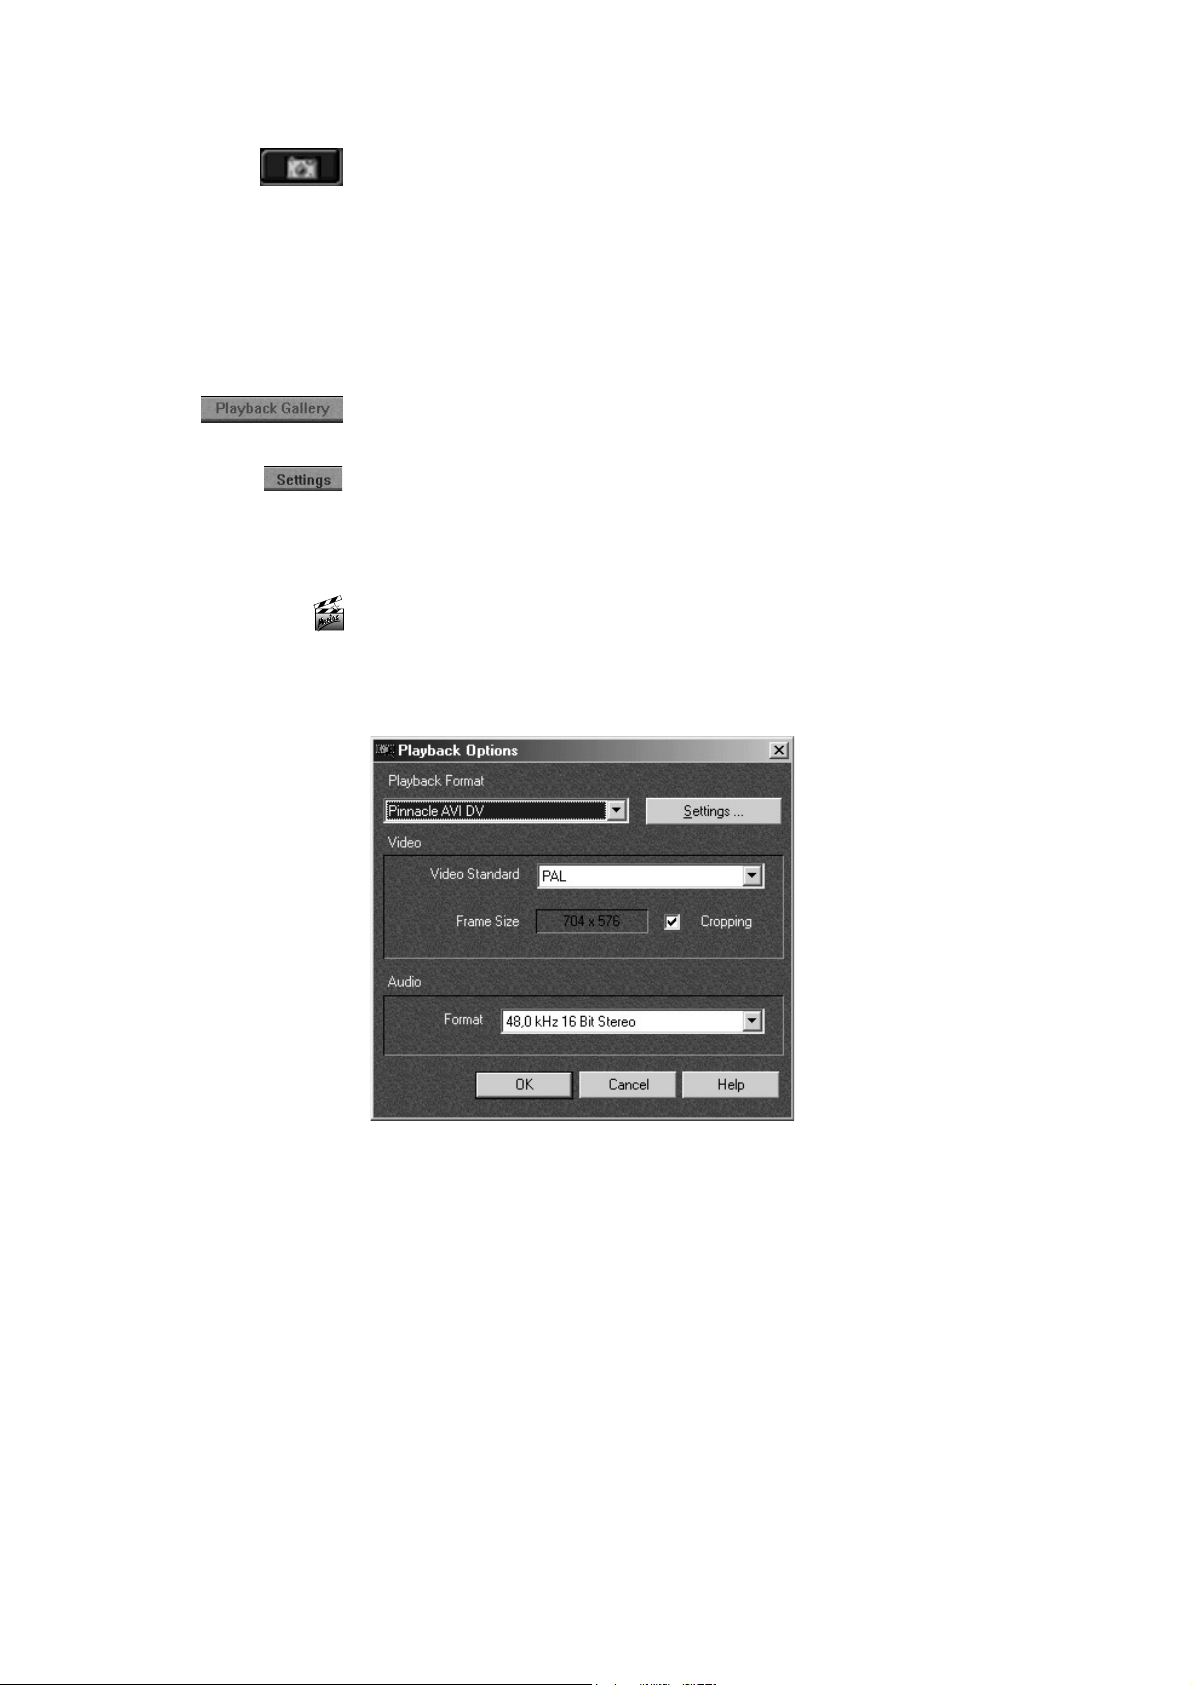
P
LAYBACK
Click on the
under which the BMP file is to be saved.
Snapshot
button. You can now enter a name and directory
In order to change to playback mode, choose the commands
and
New Playback Gallery
The DVTools – Playback Gallery window will appear. The Clip Gallery is
now used for playback and you can specify the playback settings here.
Click on
them if required.
Settings
in order to check the playback parameters and to change
in the
File
menu.
New Gallery
Checking the settings
Before you start, check the playback settings by clicking on the
button at the top right-hand edge of the window.
Settings
DV device only
Check all the settings in the
should be set for the playback format.
DV
Click on the
Output tab check that the correct output filter has been set:
Composite
activated. Open the
selected.
You will find a detailed description of the individual parameters in the
online help.
If you are using a DV device, check the settings under
Control settings
from within DVTools, click on the
Settings...
. If the output is to be made to a DV device, this option must be
General
command in the menu. If you want to control your device
Playback Options
button to open the Pro-One check window. On the
tab and make sure that an
Activate device control
dialogue box.
Tools
Chapter 9: Working with DVTools
Pinnacle AVI
S-video
Overlay
and the
check box.
or
has been
Device
59
Page 70

Putting together a playback sequence
Now bring together the clips that you want to record in the Clip Gallery. To
do this, drag the clips into the Clip Gallery from the list of
The clips will appear in the
sequence of the clips by shifting them in the Clip gallery.
Playback Files
folder. You can change the
Captured Files
.
Importing video sequences
Along with the recorded video sequences, other clips can also be added to
the gallery for playing back. To add a clip, click on the
folder in the left part of the window with the left mouse button and choose
the
Import file
files will appear in the
required order in the Clip Gallery.
command. Highlight the required files and click on OK. The
Playback Files
folder. Drag the sequences into the
Captured Files
Start playback
Individual clips
All Clips
From current
position
Playing back individual clips in the gallery
In order to play back individual clips, double-click on the required clip in
the Clip Gallery or in DVExplorer. The clip will be played back in the Clip
Info window as soon as you click on
points here if you do not want to play back the whole clip.
Playing back all clips in the gallery
If you want to play back all clips in the gallery, select the first clip in the
Clip Gallery. Click right, select
button in the Preview window. The clips will be played back in the order
that they appear in the gallery.
Playing back clips from the current position
If you select any clip you like in the Clip Gallery as the first clip, click right,
select
window, all the clips from the selected clip onwards will be played back.
Seek start of clip
, and click on the
Seek start of clip
. You can also set start and finish
Play
, and click on the
button in the Preview
Play
Play
Pinnacle Pro-ONE
60
Page 71
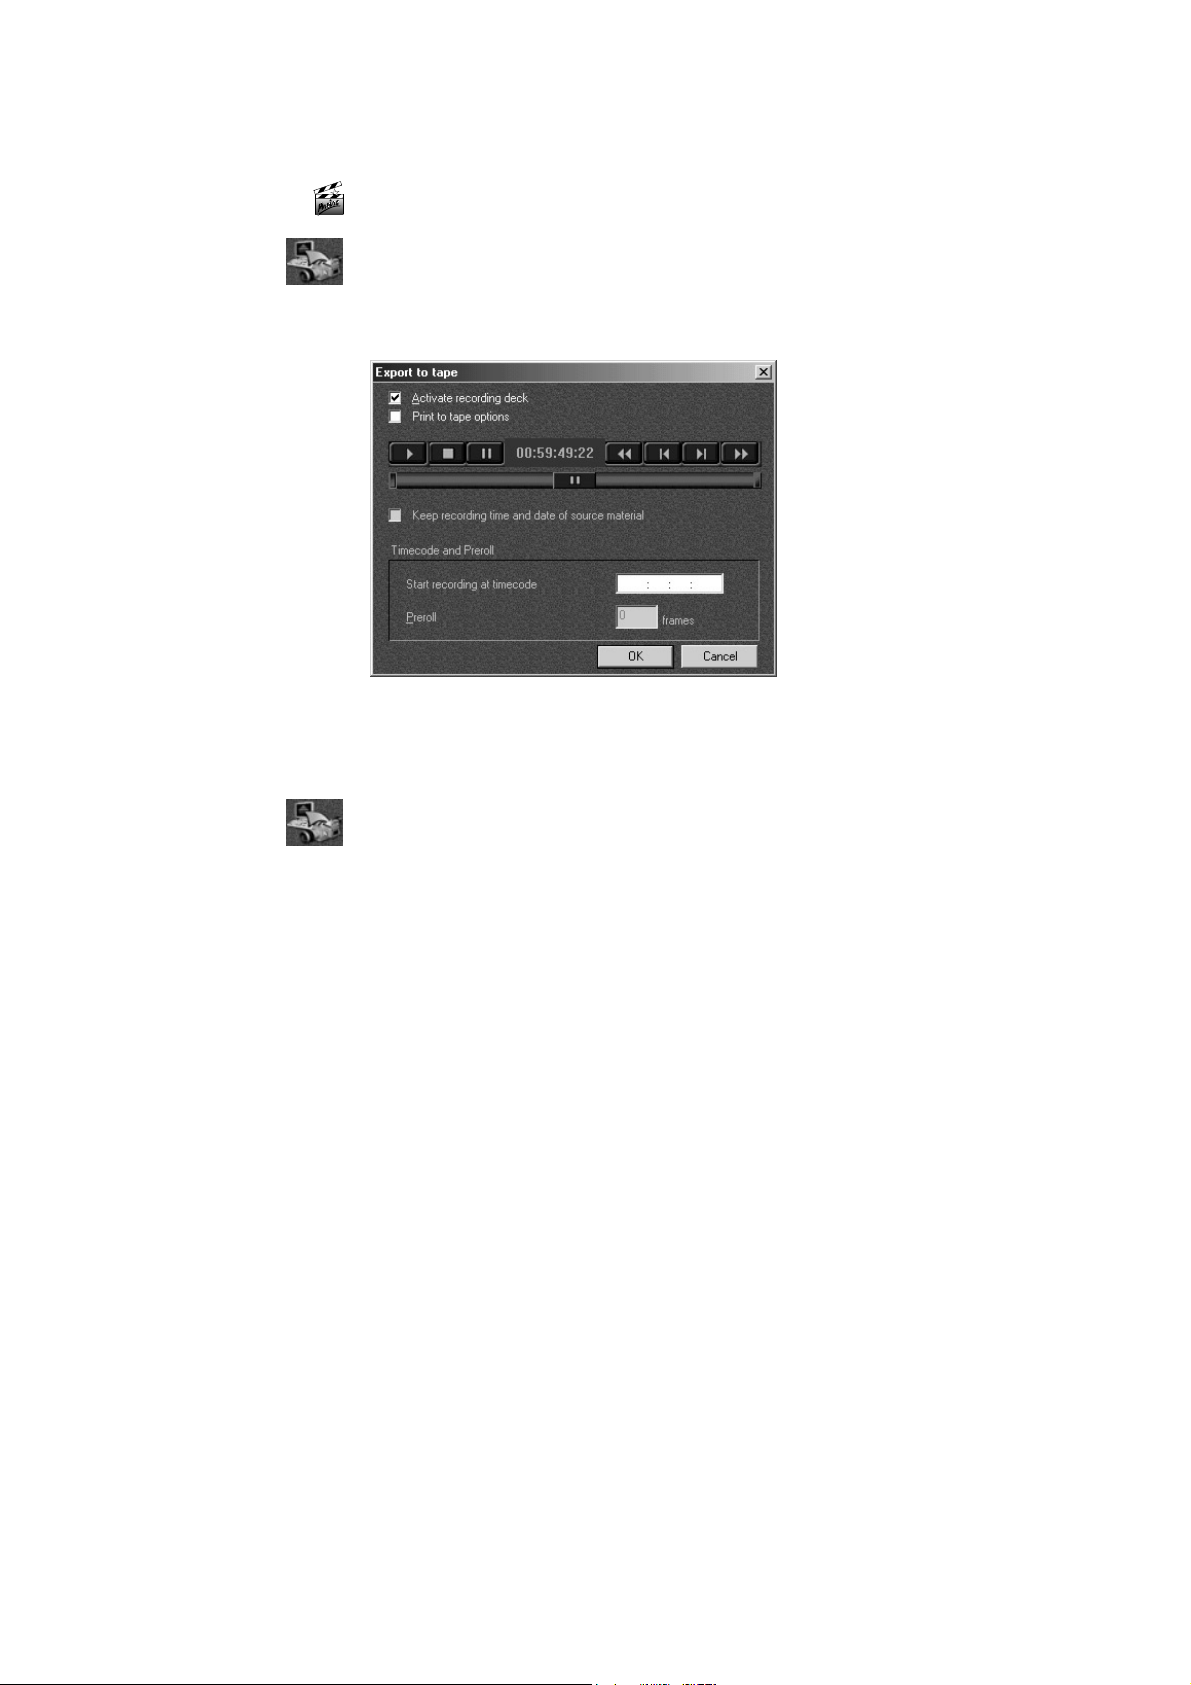
Capturing to tape
Recording with a digital device
If you want to capture the Clip Gallery on tape, click on the
button. The
Activate the
to start the recording.
Recording with an analog device
If you output the clips to an analog device, the recording is started
immediately. Switch the unit to record as soon as you want to start
recording.
Export to tape
Activate recording deck
window will appear.
check box and click on the OK button
Print to tape
Chapter 9: Working with DVTools
61
Page 72
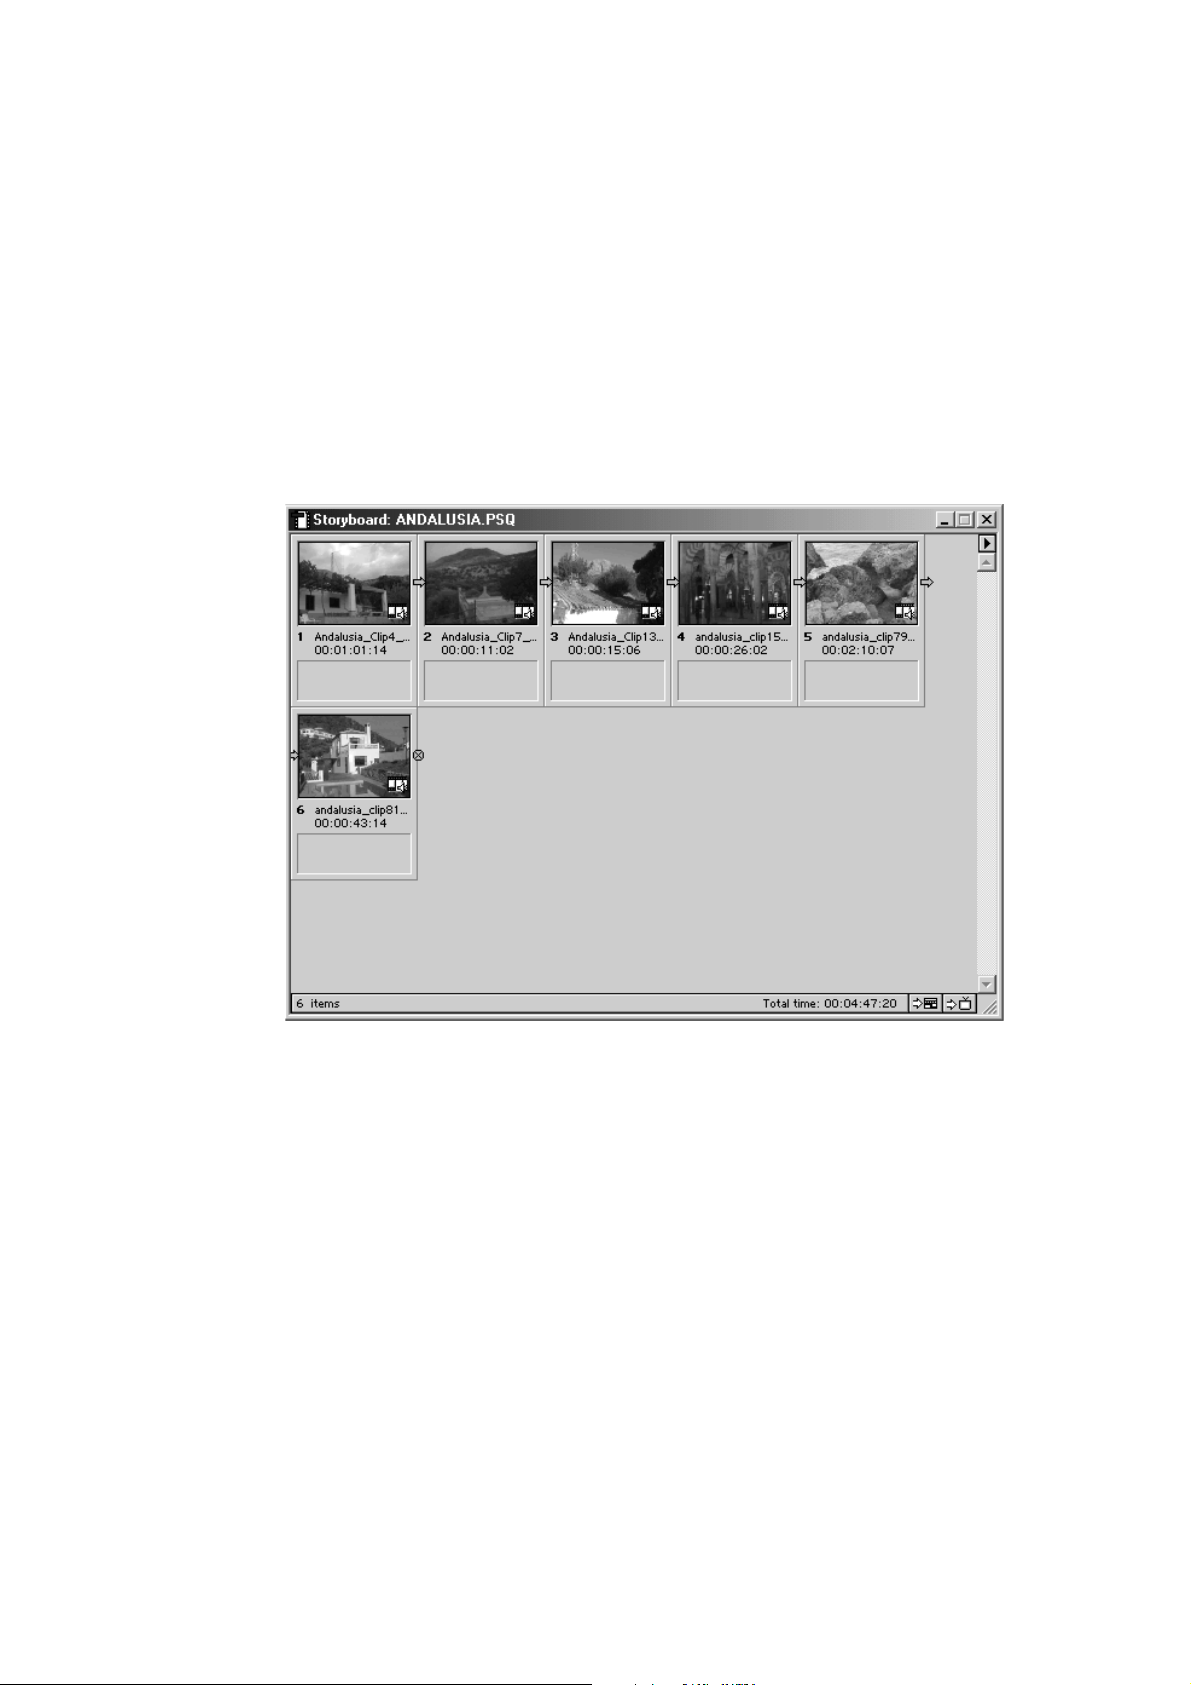
E
XPORT AS PREMIERE STORYBOARD
When you have arranged all the clips in the required order using DVTools,
you can export these directly to Adobe Premiere. To do this, choose the
Export - Premiere Storyboard
the
DVTools - Export
name for a Premiere Storyboard file (*.stq) and click on OK.
If Adobe Premiere has not already been started, then you must start this
application. Choose a suitable Pinnacle project preset and click on OK.
Open the Storyboard using the
project will appear in the Premiere Storyboard view.
window in order to export all the clips. Allocate a file
command in the
menu and the
File
menu. Click on OK in
Tools
command. The
Open
Pinnacle Pro-ONE
62
From here, you can incorporate the clips into the time line and assign
effective transitions, filters, titles, etc. to them. You will find detailed
information on Pinnacle Effects in the chapter on “Pinnacle Effects” as of
page 63. The chapter “TitleDeko RT” on Page 98 describes in detail how
fantastic titles can easily be produced.
For working with Adobe Premiere, in particular with regard to the
possibilities for working with Storyboard, please refer to the associated user
manual.
Page 73
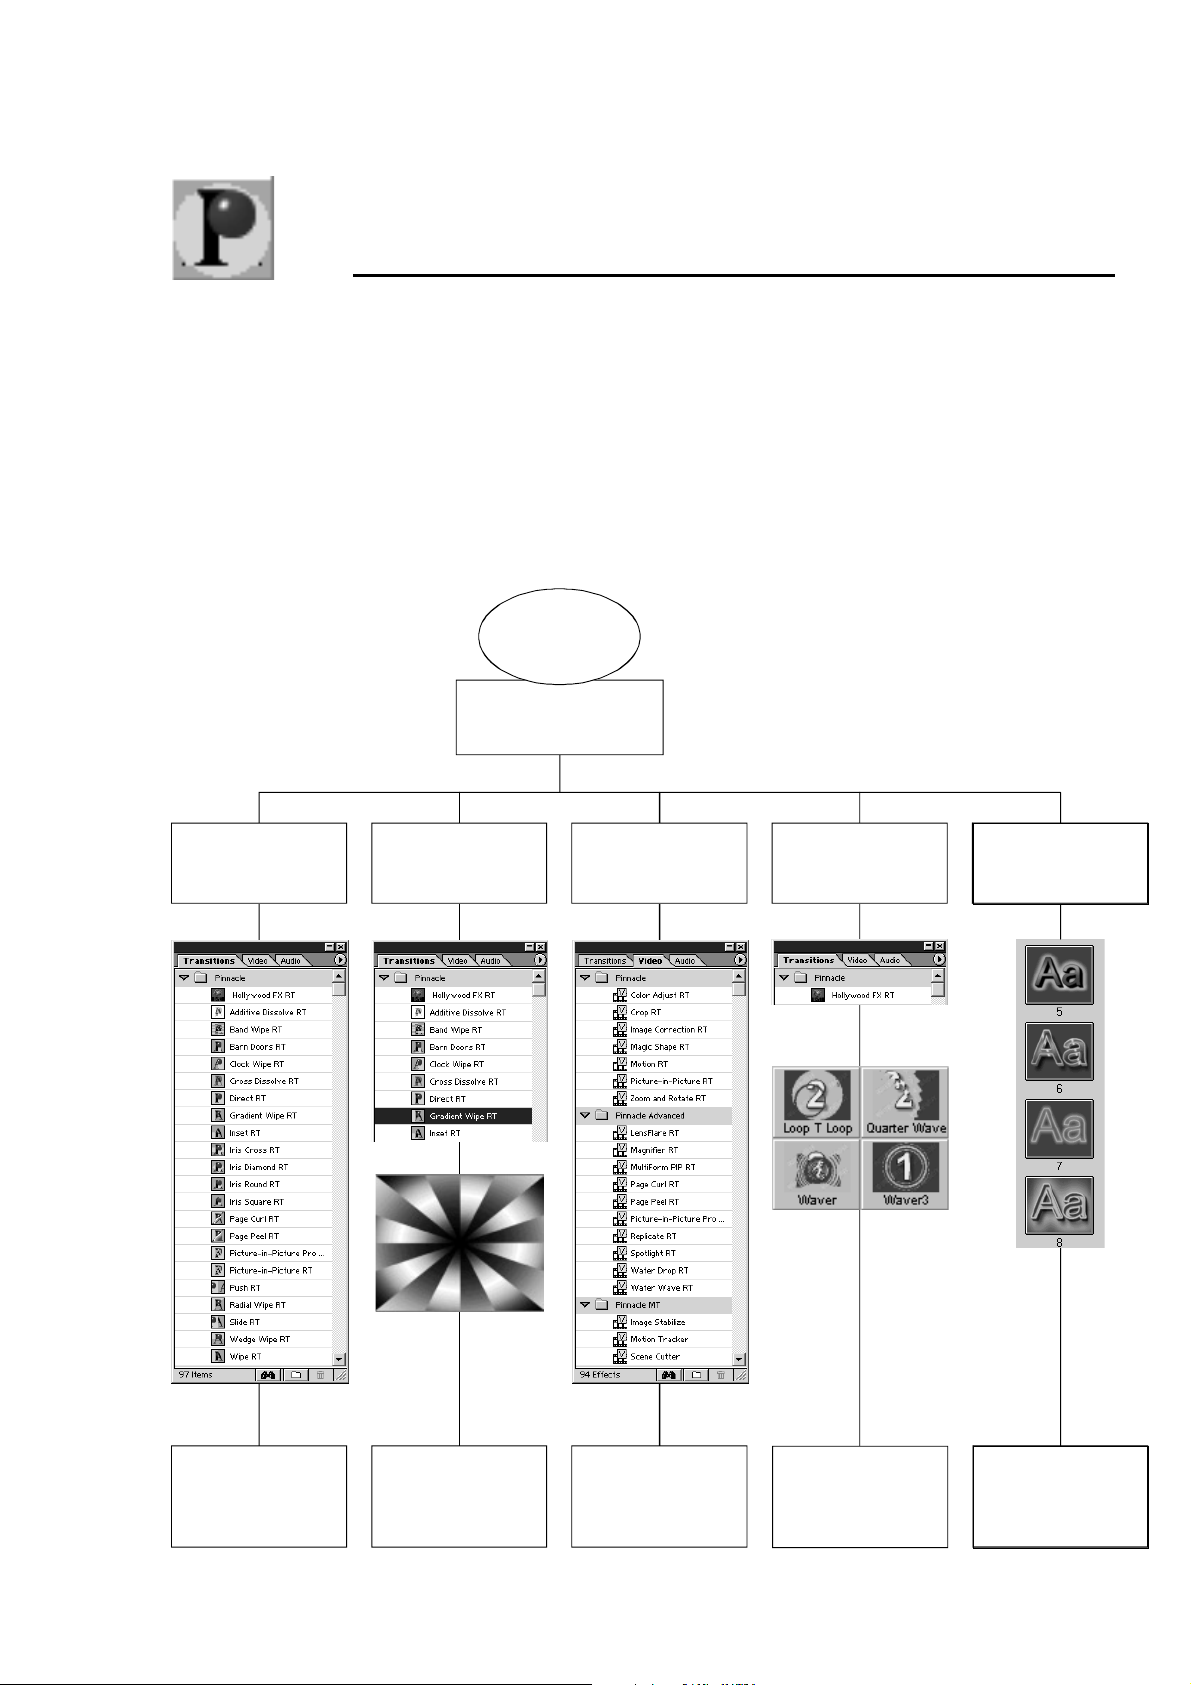
Chapter 9:
p
Pinnacle Effects
This chapter explains how Pinnacle Pro-ONE works with transitions and
filters. All effects can be used in real time and with many simultaneous real
time combinations. You can find more detailed information on the real time
features of Pinnacle Pro-ONE in the chapter “Pinnacle Pro-ONE & Real
Time” on page 89.
The following diagram shows you an overview of the types of effects that
Pinnacle Pro-ONE provides.
Pinnacle
Pro-ONE
Real time effects
Pinnacle Pro-ONE
Real time
transitions
Pinnacle Pro-ONE
Al
ha Magic
Pinnacle Pro-ONE
Real time filter
Hollywood FX RT
Pinnacle Pro-ONE
TitleDeko RT
Pinnacle transitions are
located in the Pinnacle
folder of the Transitions
window of Adobe
Premiere.
Use the Pinnacle
Gradient Wipe
transition to load
Alpha Magic.
Look for the Pinnacle
Filters in the Pinnacle
folder of Premiere's
Video filter window.
Use Hollywood FX RT
Transition from the
Pinnacle folder in
Premiere's Transition
window.
under Adobe P remiere
Chapter 9: Pinnacle Effects
Open TitleDeko RT
by choosing File /
New / TitleDeko.
63
Page 74

E
FFECTS ANIMATION (KEYFRAMING
Many other video editing solutions provide real time effects and most also
let you change a variety of parameters such as position, angle, border color
and thickness and the direction of an effect.
Pinnacle Pro-ONE provides all that, but goes a step beyond, because it lets
you animate nearly all effect parameters over time. Thus, you can not only
create a picture-in-picture transition with a red border and a shadow, but
you can animate the movement and even things like the border color over
time.
)
This animation is achieved through so-called
frame in your transition where parameters are set to a certain value. For
example, you can use a keyframe at the beginning of a picture-in-picture
transition to define the starting point of the video window. At the end, a
second keyframe defines the end position. In between, Pinnacle Pro-ONE’s
keyframing engine will then move the video window smoothly from the
start to the end position.
Keyframing is a very powerful technique that gives you complete control
over every single aspect of your effects. However, it can also be somewhat
daunting at first. This is why many of the Pinnacle Pro-ONE effects provide
presets, which are predefined animations that can be called up with a single
mouseclick. These presets cover a range of typically used effects animations
and are also a good starting point when trying to understand how
keyframing works.
keyframes
. A keyframe is one
Pinnacle Pro-ONE
64
Page 75
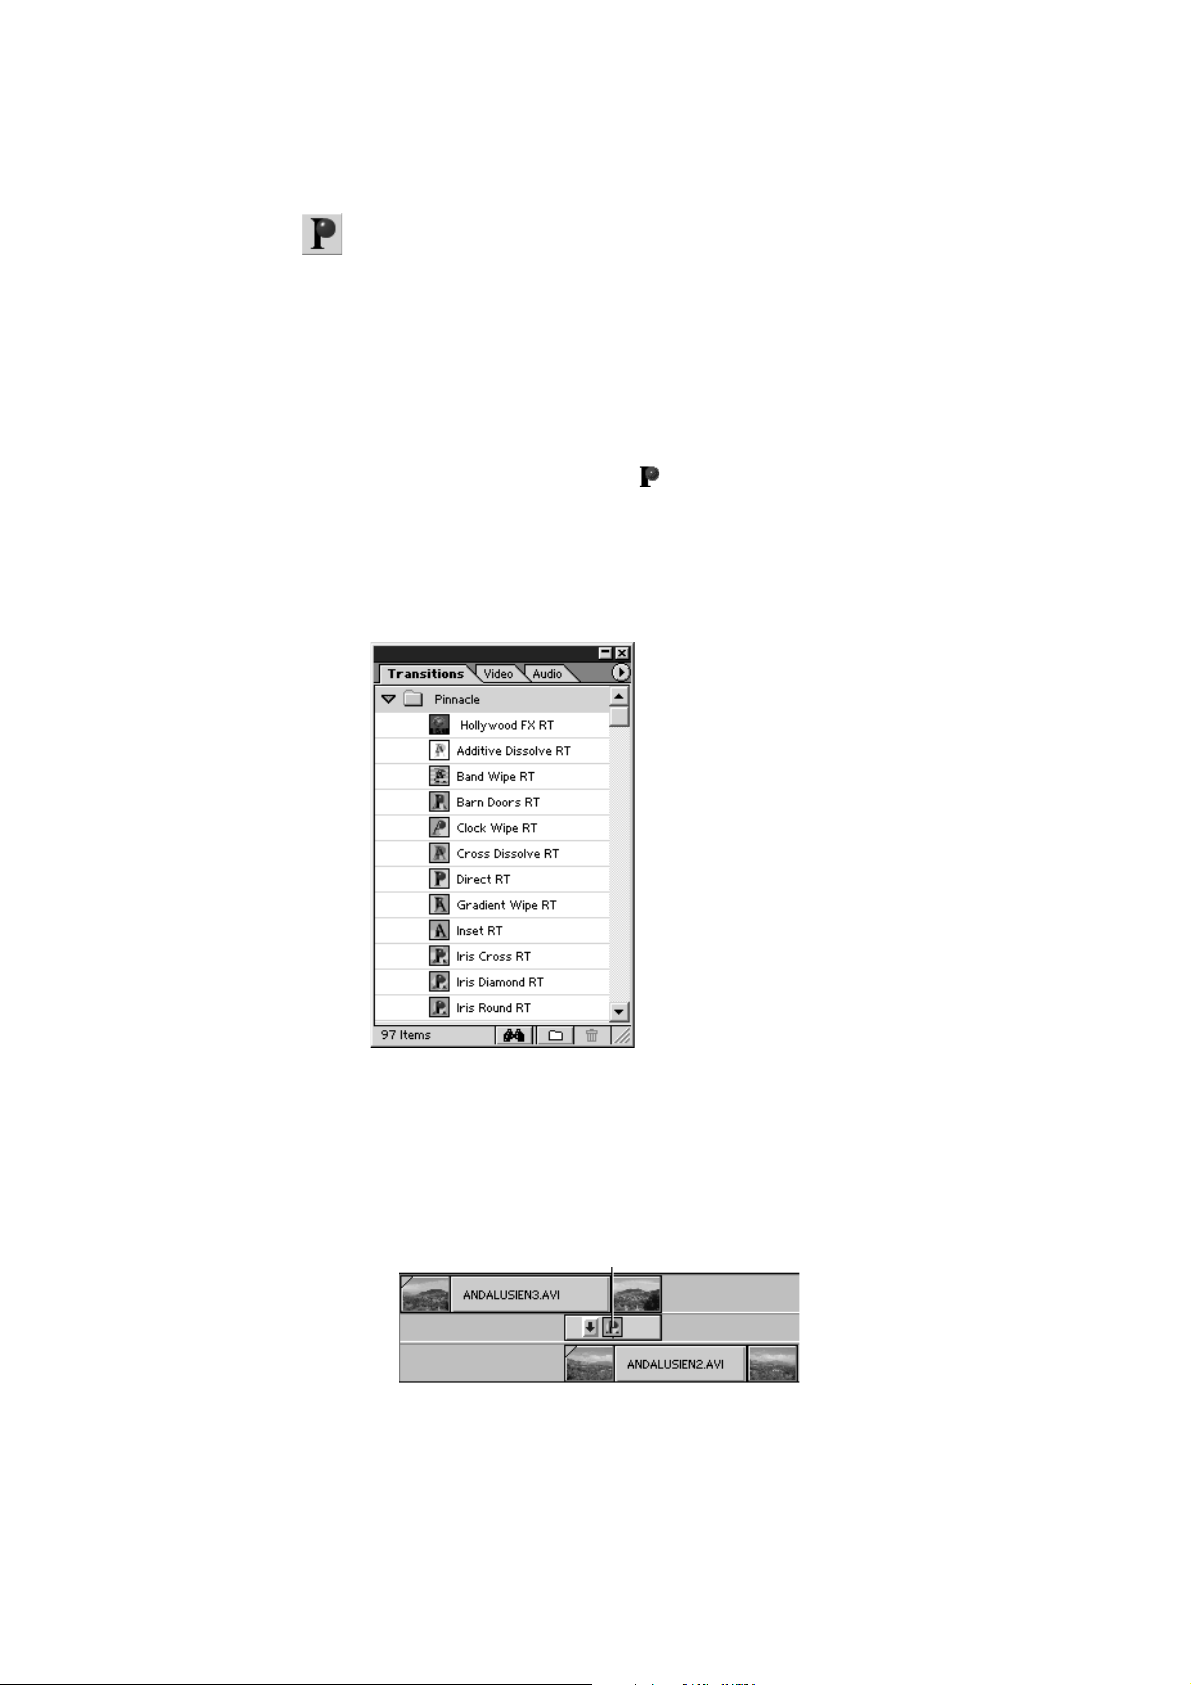
T
RANSITIONS
Pinnacle Systems provides a large number of transitions under Adobe
Premiere that all run in real time.
Make sure that you work with the transitions provided by Pinnacle Systems
wherever possible, as otherwise you will not be able to get the benefit of the
Pinnacle Pro-ONE real time features. Of course, you can combine the
Pinnacle effects with other non Pinnacle effects in any way you choose, but
they will not be played back in real time.
You will find the Pinnacle transitions in the
easily be recognized by the
default settings)
Some of the Pinnacle transitions are similar to the corresponding Premiere
effects, but they typically provide more settings and also keyframing.
Furthermore, they can be used in real time.
in the icon. (This icon may not appear with
Transitions
window. They can
You can change the parameters of each individual transition by
double-clicking the transition in the Adobe Premiere
window, or
double-clicking the transition after moving into the Timeline window.
Transition
Chapter 9: Pinnacle Effects
Transitions
65
Page 76
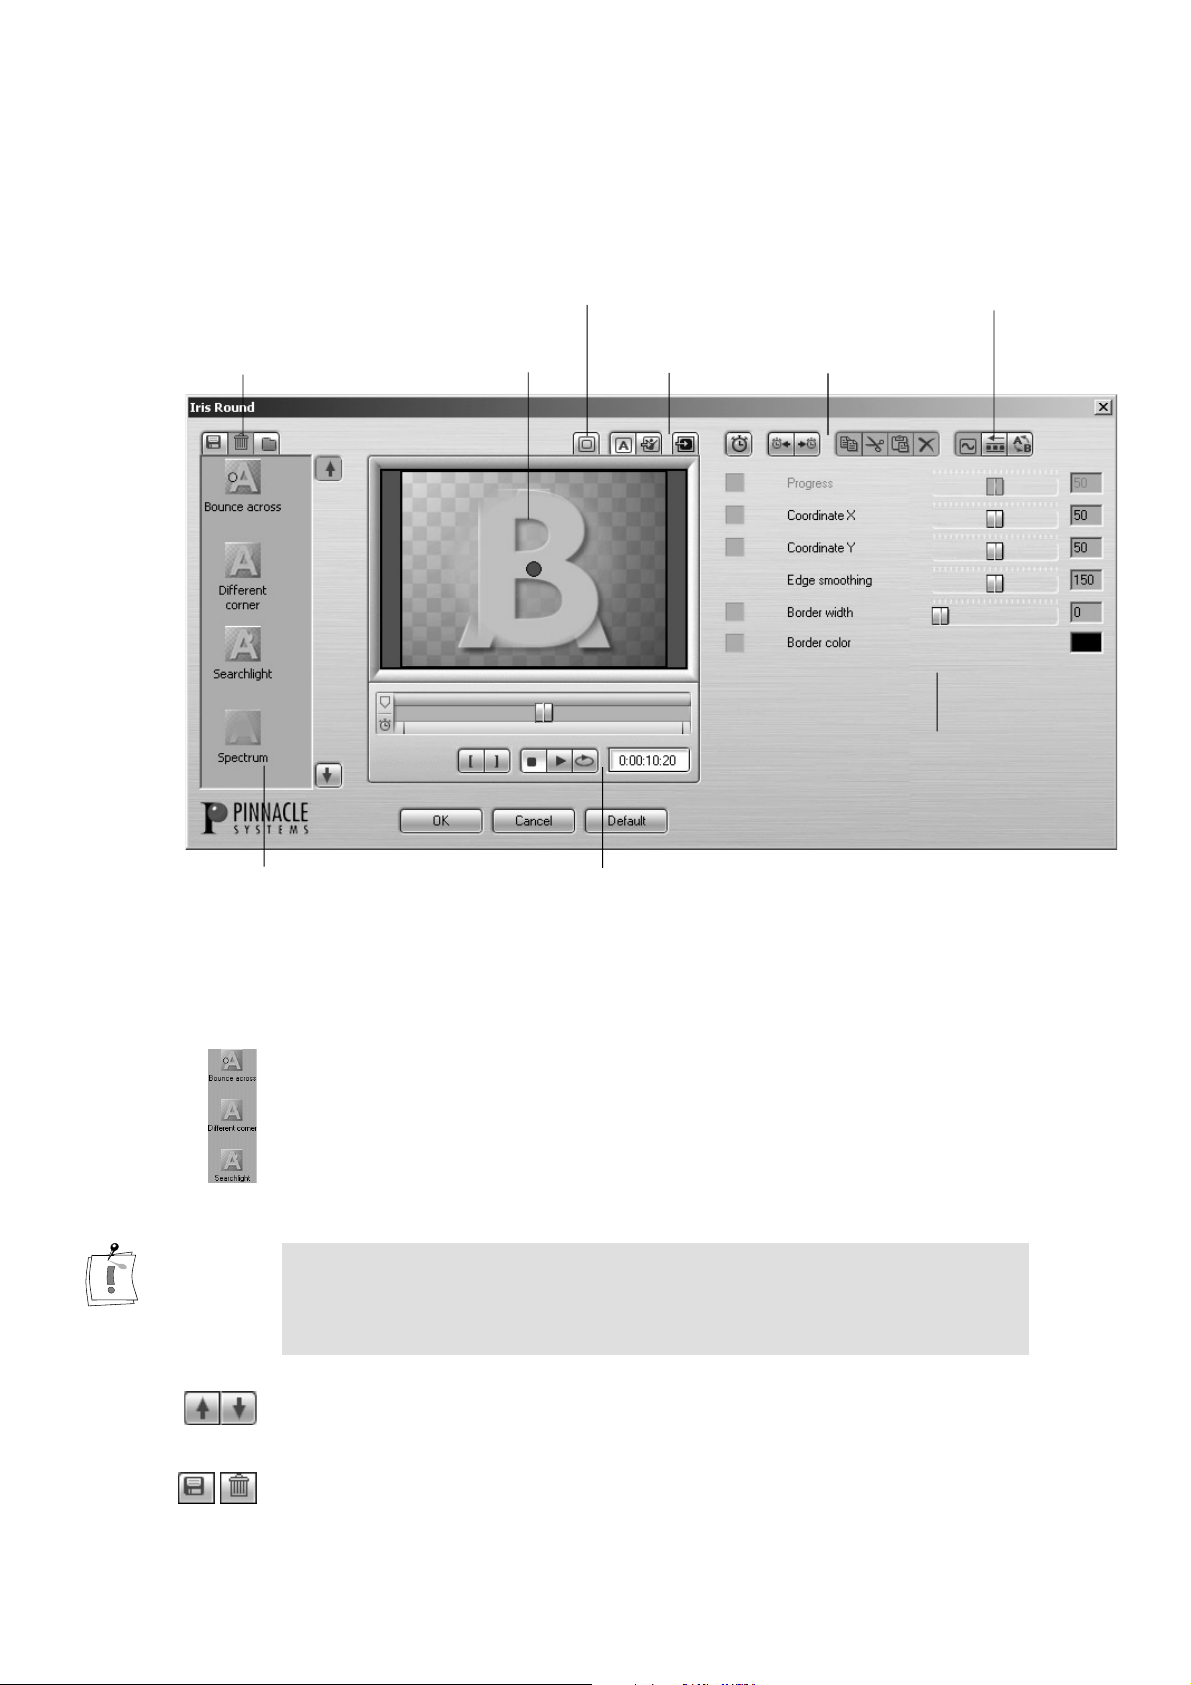
The individual elements of the effects window are described in more detail
g
y
y
y
g
below.
Preset
Controls
Preview
Window
Safe
Zones
Overla
Output
General
Settin
/
frame
Ke
Controld
Effect Parameter
Settin
s
s
Presets
Pla
back
Controls
Presets
Presets are saved effects animations. Pinnacle offers you the possibility of
using ready-made effects animations for nearly all transitions. For each
effect, on the left of the Effects dialog, you will find a selection of presets,
which you can select and change to meet your own requirements. In
addition, you may also create and save your own presets.
The Presets provided by Pinnacle may also be adjusted to fit your needs. In
most cases, this is best done by first moving the position slider to the start (i.
e. the leftmost position) and then changing parameters. Otherwise, you may
inadvertently generate new keyframes.
With these buttons, you can scroll up or down among the presets.
Pinnacle Pro-ONE
66
In order to save and delete presets, use the
Save
and
Delete
buttons. Note
that the Pinnacle-supplied presets cannot be deleted
Page 77
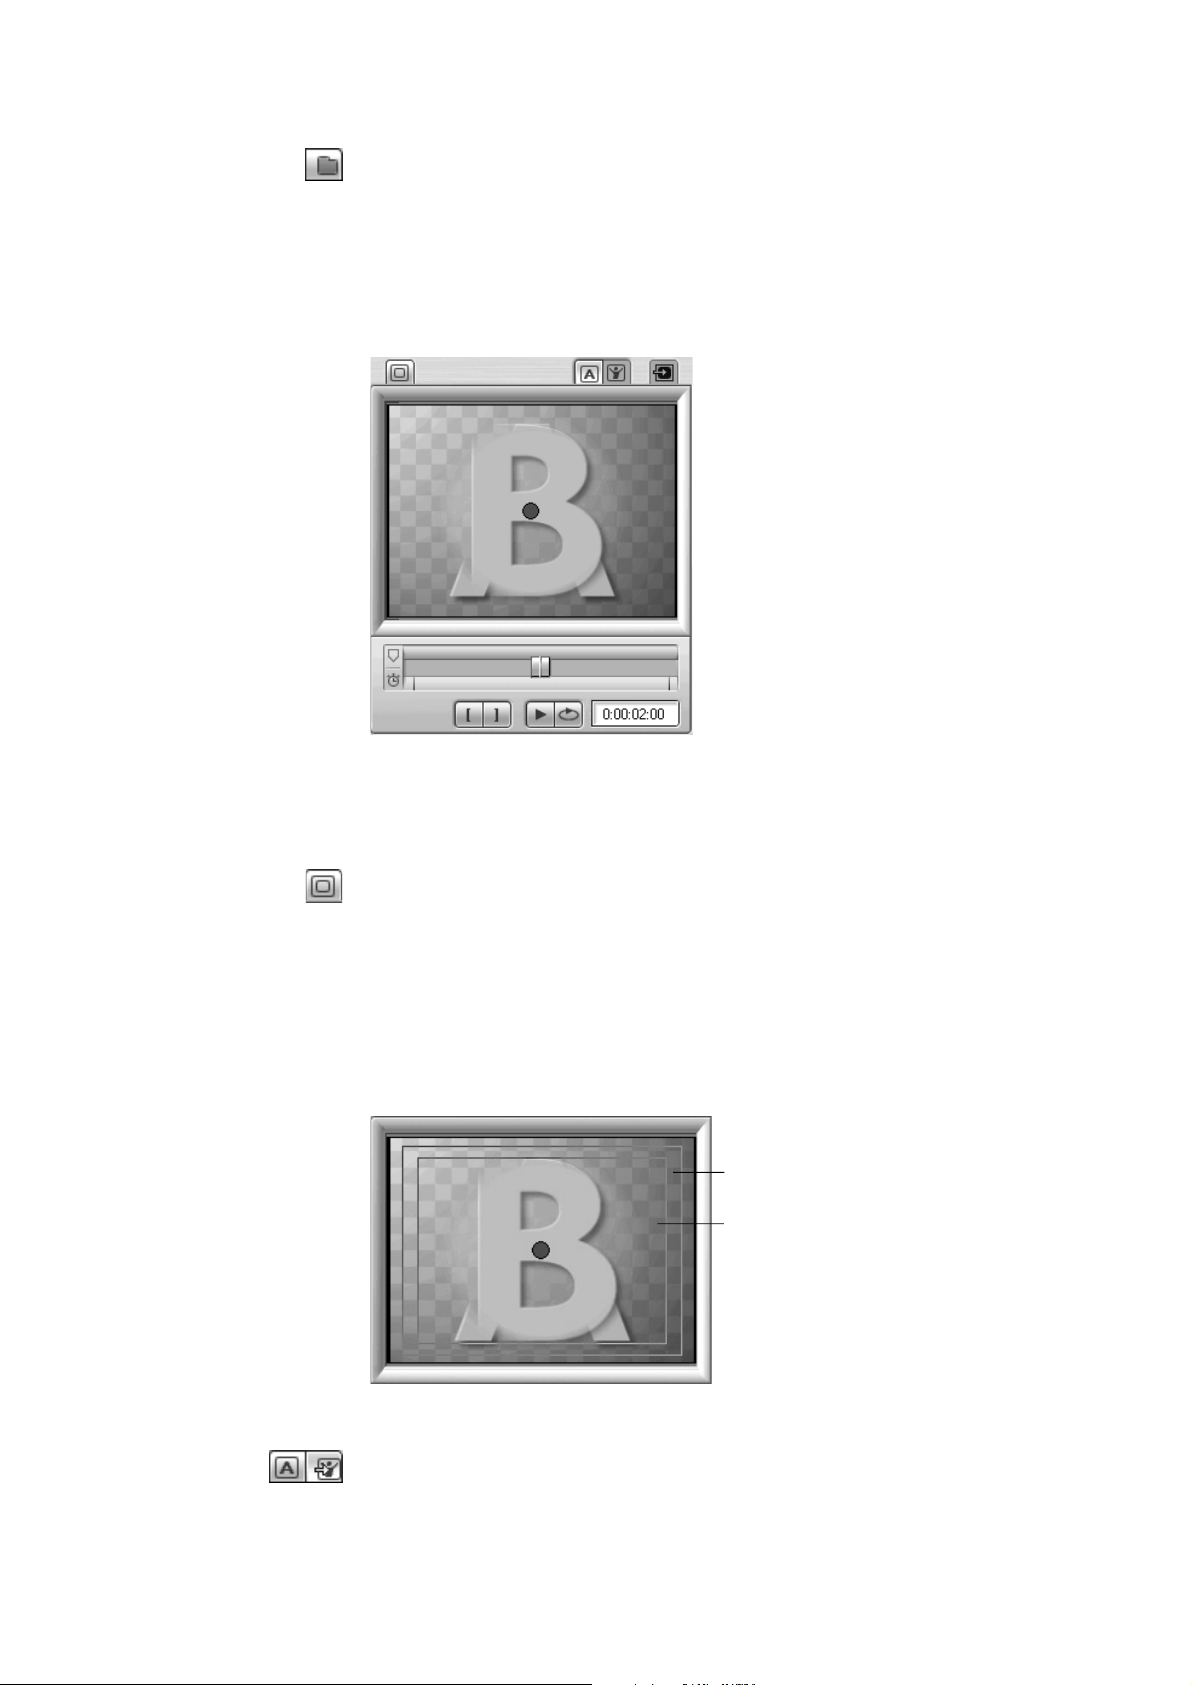
You can use this button to open Pinnacle Preset Manager, which will help
you to manage the presets that you have set up yourself. This also includes
the import of presets that have been created on a different computer as well
as the export of current presets.
Preview
In the preview window you can check to see what your transition will look
like as you create your effects.
Action and title safe margins
Television sets enlarge a video image. In doing so, the outside edges are
sometimes cut off at the edge of the screen (overscan). The extent of the
overscan is not the same with all television sets. You should therefore make
sure that the important parts of the video image, such as effects or titles for
example, are situated within the so-called “safe” areas.
If you click on this button, the safe areas will be shown.
Video-safe
area
Title-safe
area
With these buttons, you can choose whether placeholders or your original
clips are used in the preview.
Chapter 9: Pinnacle Effects
67
Page 78
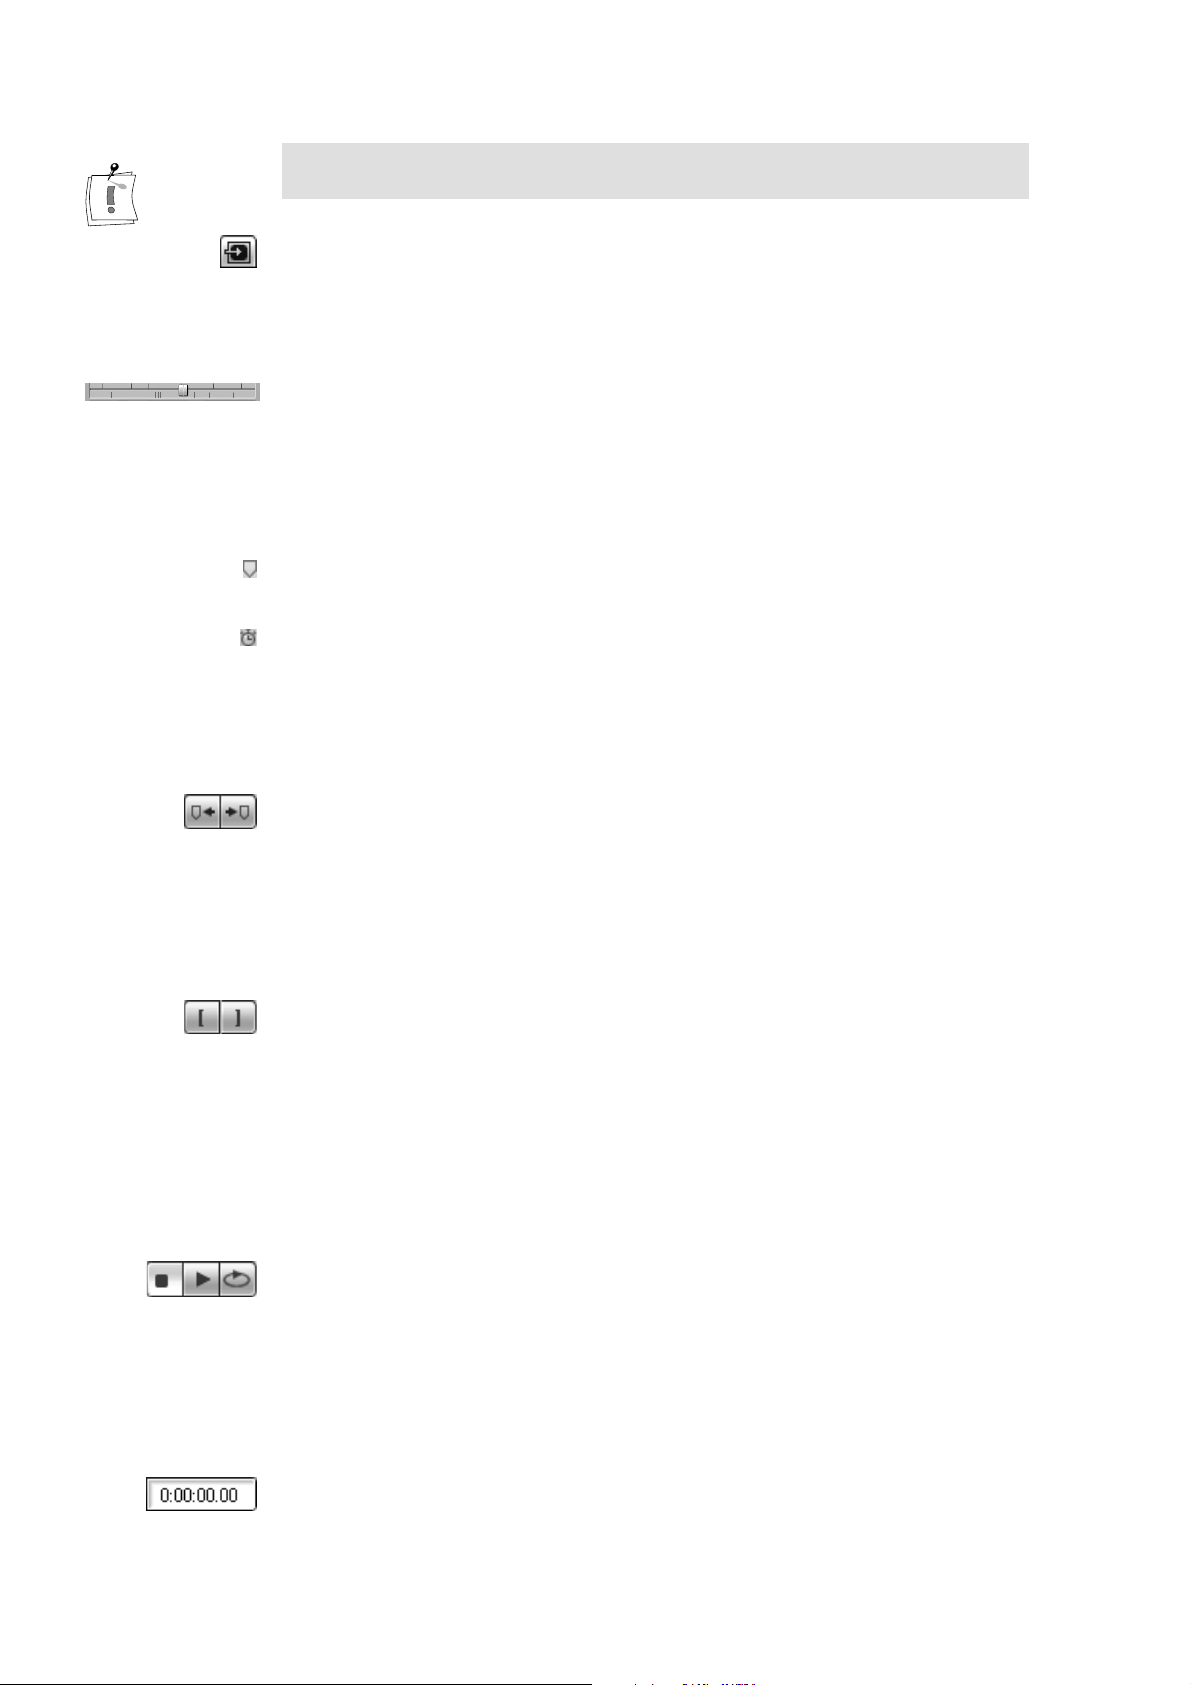
The “Original clips” option is only available if you opened the transition
from the
If you would also like to check your video on your TV or video monitor,
activate the
the Premiere monitor window.
Controlling playback
You can view the transition from start to finish or position it at a particular
point using the
You will be able to see the current position in the Premiere timeline in the
timecode display beneath the position slider.
In addition, there are two types of markers shown on the slide control:
Timeline
Markers from the Premiere Timeline window are shown as red vertical
lines above the position slider.
The current effect’s keyframes (see also “Keyframing” at the end of this
chapter on Page 87) are shown as blue vertical lines below the position
slider.
window.
Video output
position slider
option. The effect will then also be displayed in
.
Jumping to marker positions
With these buttons you can jump to the previous or next position
respectively. Note that this is only possible if markers have been set on the
Premiere timeline. If there are no Premiere markers during the time of the
transition, the two buttons do not appear.
Defining the in and out points
These buttons set the starting and finishing point of the transition. They are
also known as “in” and “out” points. To do this, move the position slider to
the point where the transition is to start and click on the in point button.
Then move the position slider to the point where the transition is to finish
and click on the out point button. The location of the in and out points will
be shown in the recessed area of the position slider.
Stop / Play / Loop
If you click on the
current position of the slide control. Clicking on the
playback.
If you click on the
beginning. If the playback is not stopped, it will loop back to the start
indefinitely.
button, the transition will be played back from the
Play
button will end the
Stop
button, the clip will be played back from the
Loop
Pinnacle Pro-ONE
68
The current position in the Premiere timeline is displayed as timecode. The
format is hour:minute:second:frame-count.
Page 79
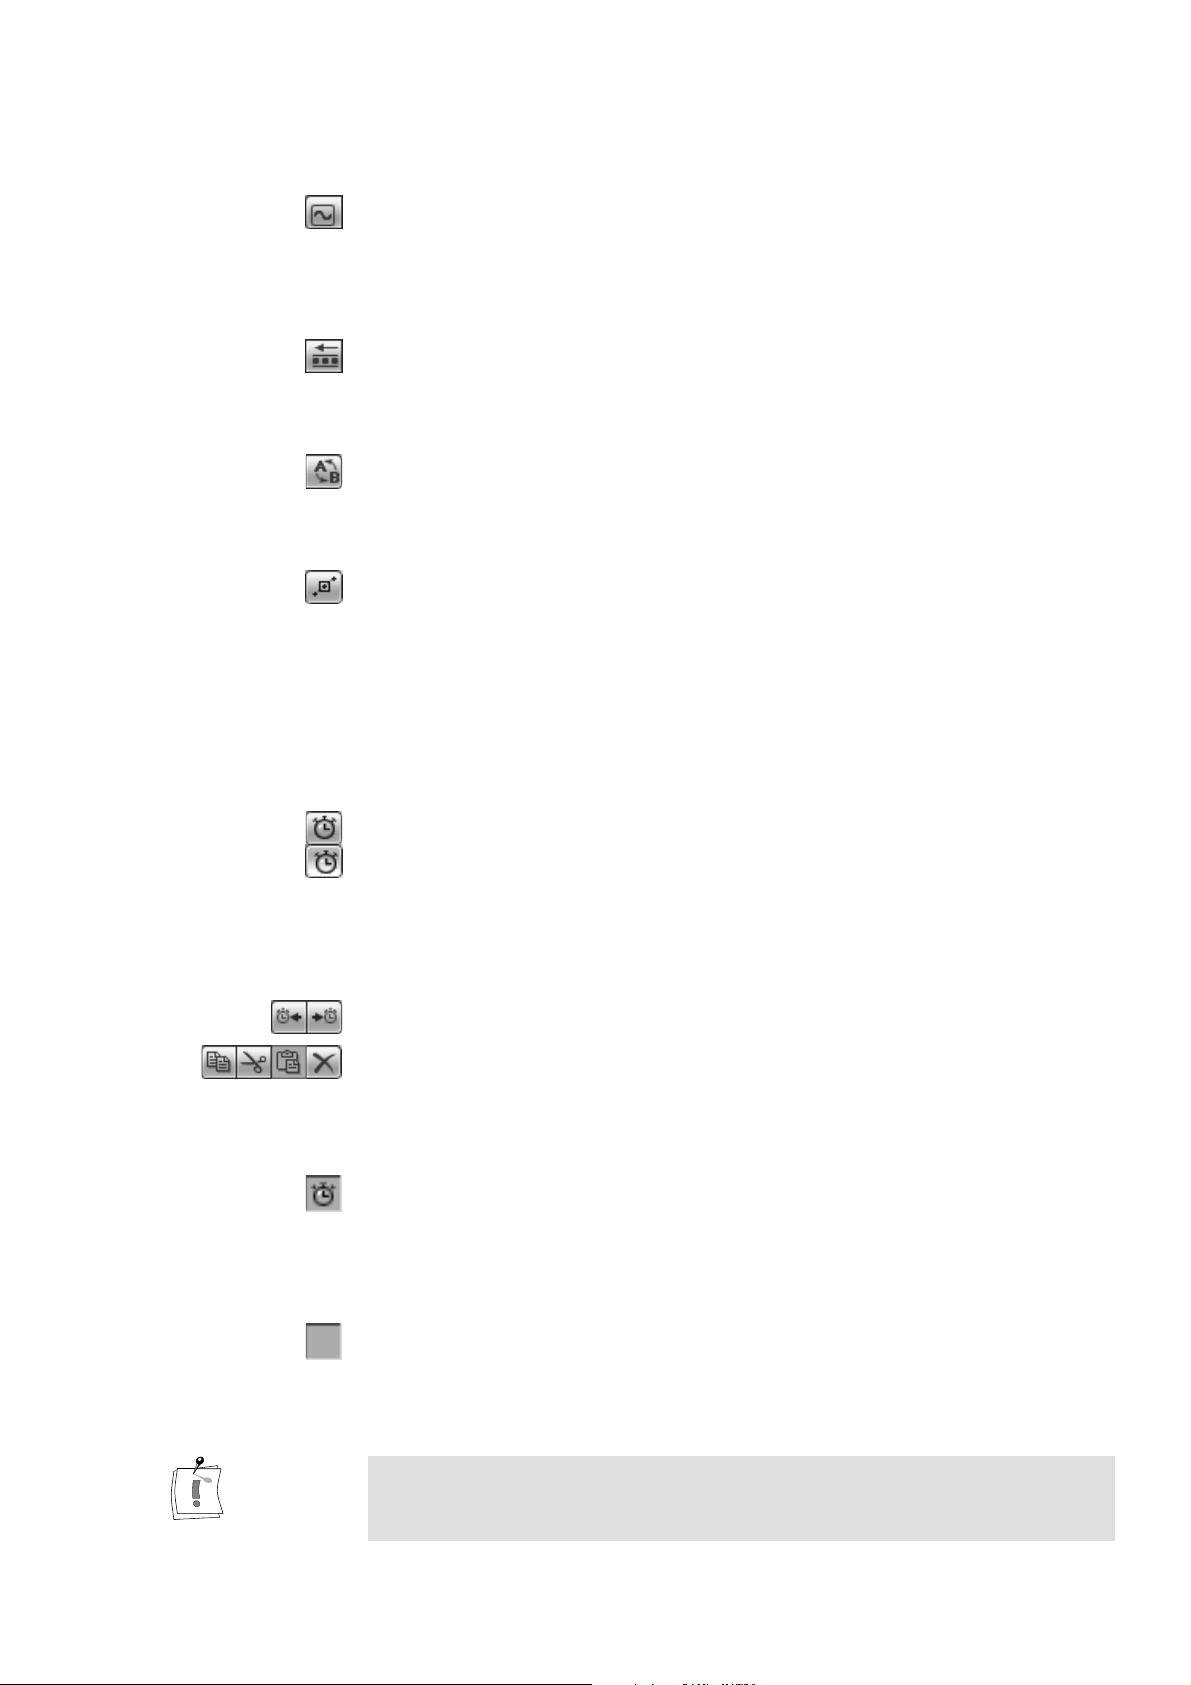
General settings
Smooth motion
If the keyframing is activated, this button can be selected. A special kind of
interpolation allows the progress of the effect to be played more smoothly.
Reverse
The sequence of the transition can be reversed with this button.
Swap sources
Video sources A and B can be swapped with this button.
Use Motion Tracking
This button is only available with transitions with
If this button is activated, the transition will follow the movement path that
the motion tracking RT filter has calculated. This button is only available if
you have previously activated the “Motion Tracking” filter.
X- / Y parameters
For more information, please read the corresponding section on Page 83.
Keyframing
This button switches keyframing on and off.
Warning: If you switch keyframing off, all the settings and the keyframes
for the current transition will be lost.
Moves to the previous or next keyframe.
A keyframe and all its parameters is copied, cut, inserted or deleted. This is
also useful for moving the position of a keyframe: cut it and then paste it to
a different location.
This indicator tells you that a keyframe is set at the current position for the
indicated parameter.
The keyframe for this parameter can be switched off by clicking on this
icon.
This tells you that a keyframe is possible but has not been set at the current
position.
A keyframe is automatically set at this position by changing the parameter.
Parameters that do not have a keyframe symbol (e.g. the “Edge smoothing”
in “Pinnacle Iris Round”), cannot be used for keyframing, i. e. they cannot
be animated over time.
Chapter 9: Pinnacle Effects
69
Page 80
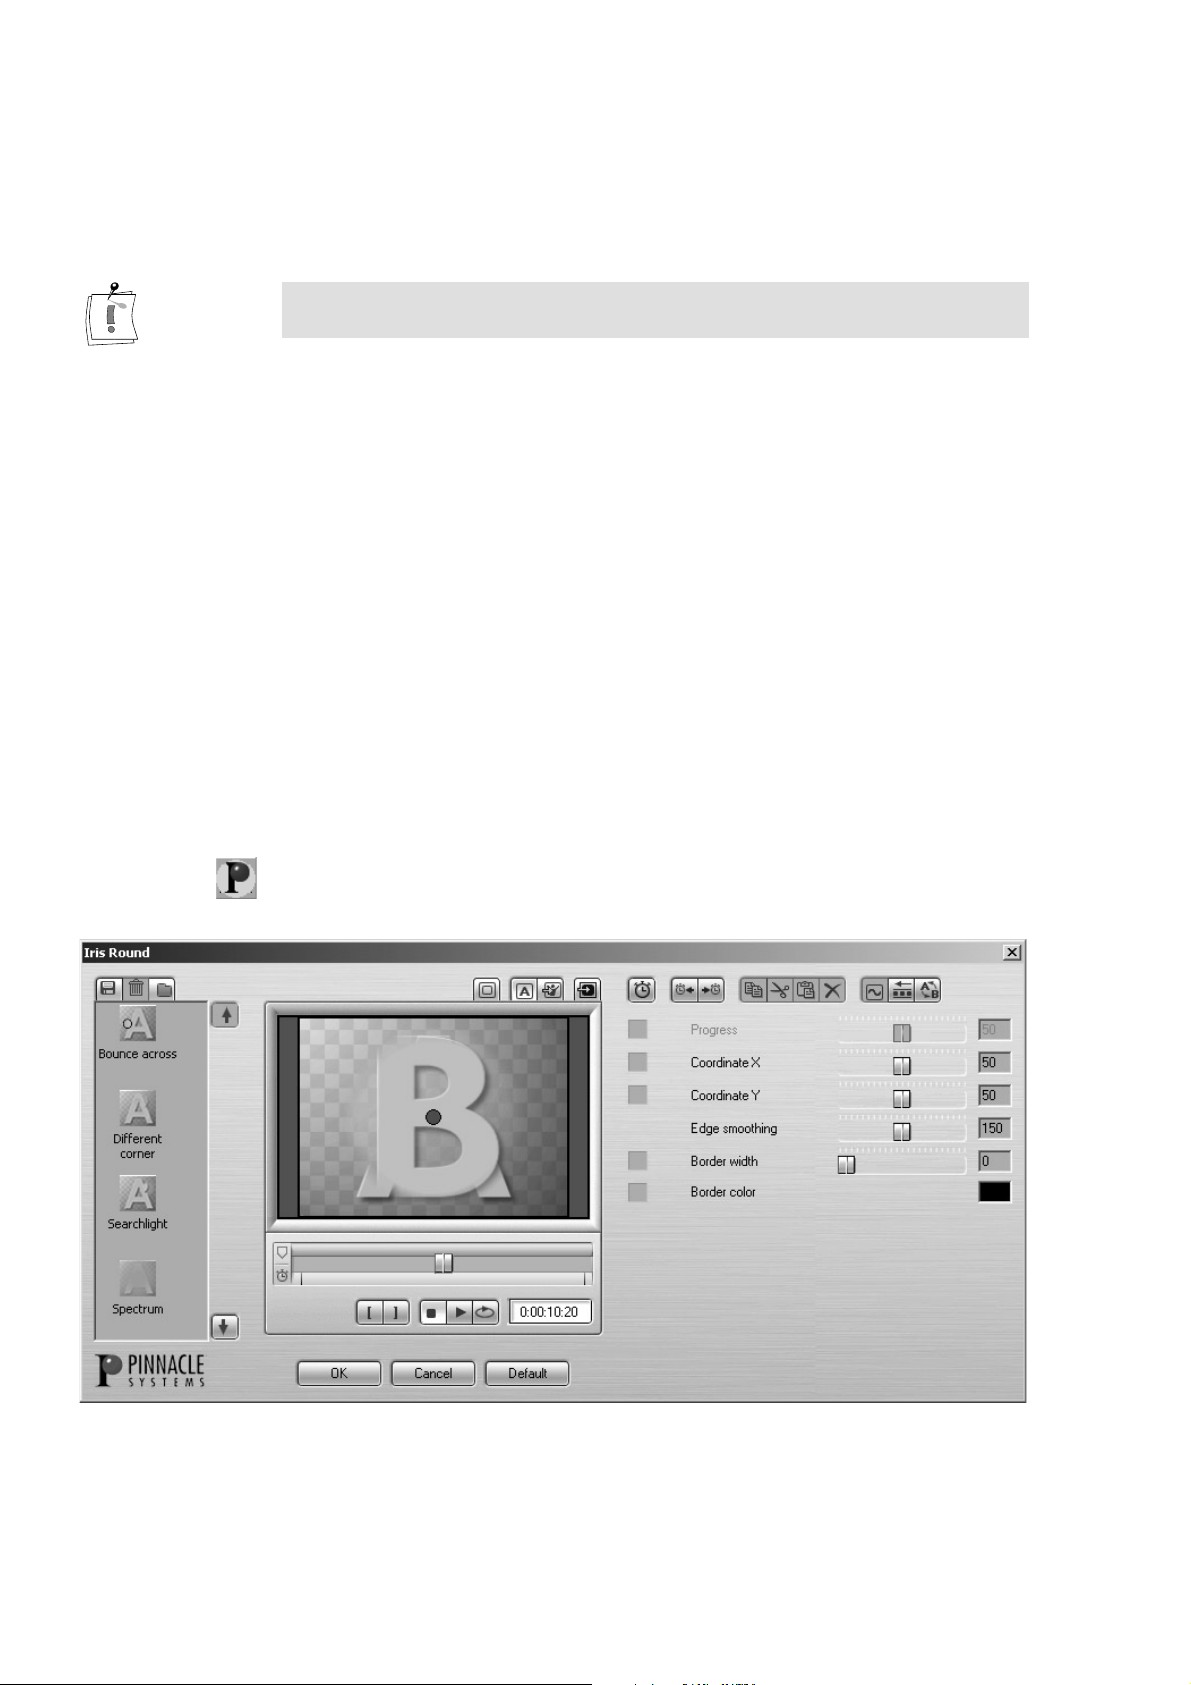
You will find further details on this subject in the section on “Keyframing”
at the end of this chapter on Page 87.
The end of this chapter and Appendix C on page XV contains an overview
of the keyboard shortcuts that can be used with the Pinnacle Effects dialogs.
Other
settings
Depending on the effect, the dialog box will show other parameters such as
direction, border (smoothing, width, color) and shadow (offset, opacity,
direction). Parameters may be adjusted by using their sliders or knobs or by
typing numbers into the numeric entry fields. Once a parameter is active by
clicking it with the mouse, you can also use the mouse wheel or the arrow
keys to change it.
The following sections describes a range of transitions and their settings
features:
Iris Round RT
The “Iris Round RT” transition can be customized through a variety of
parameters.
Coordinate X
Pinnacle Pro-ONE
70
With this slider you can shift the center of the transition in the horizontal
direction.. The current
Position
of the center is also displayed numerically.
Page 81
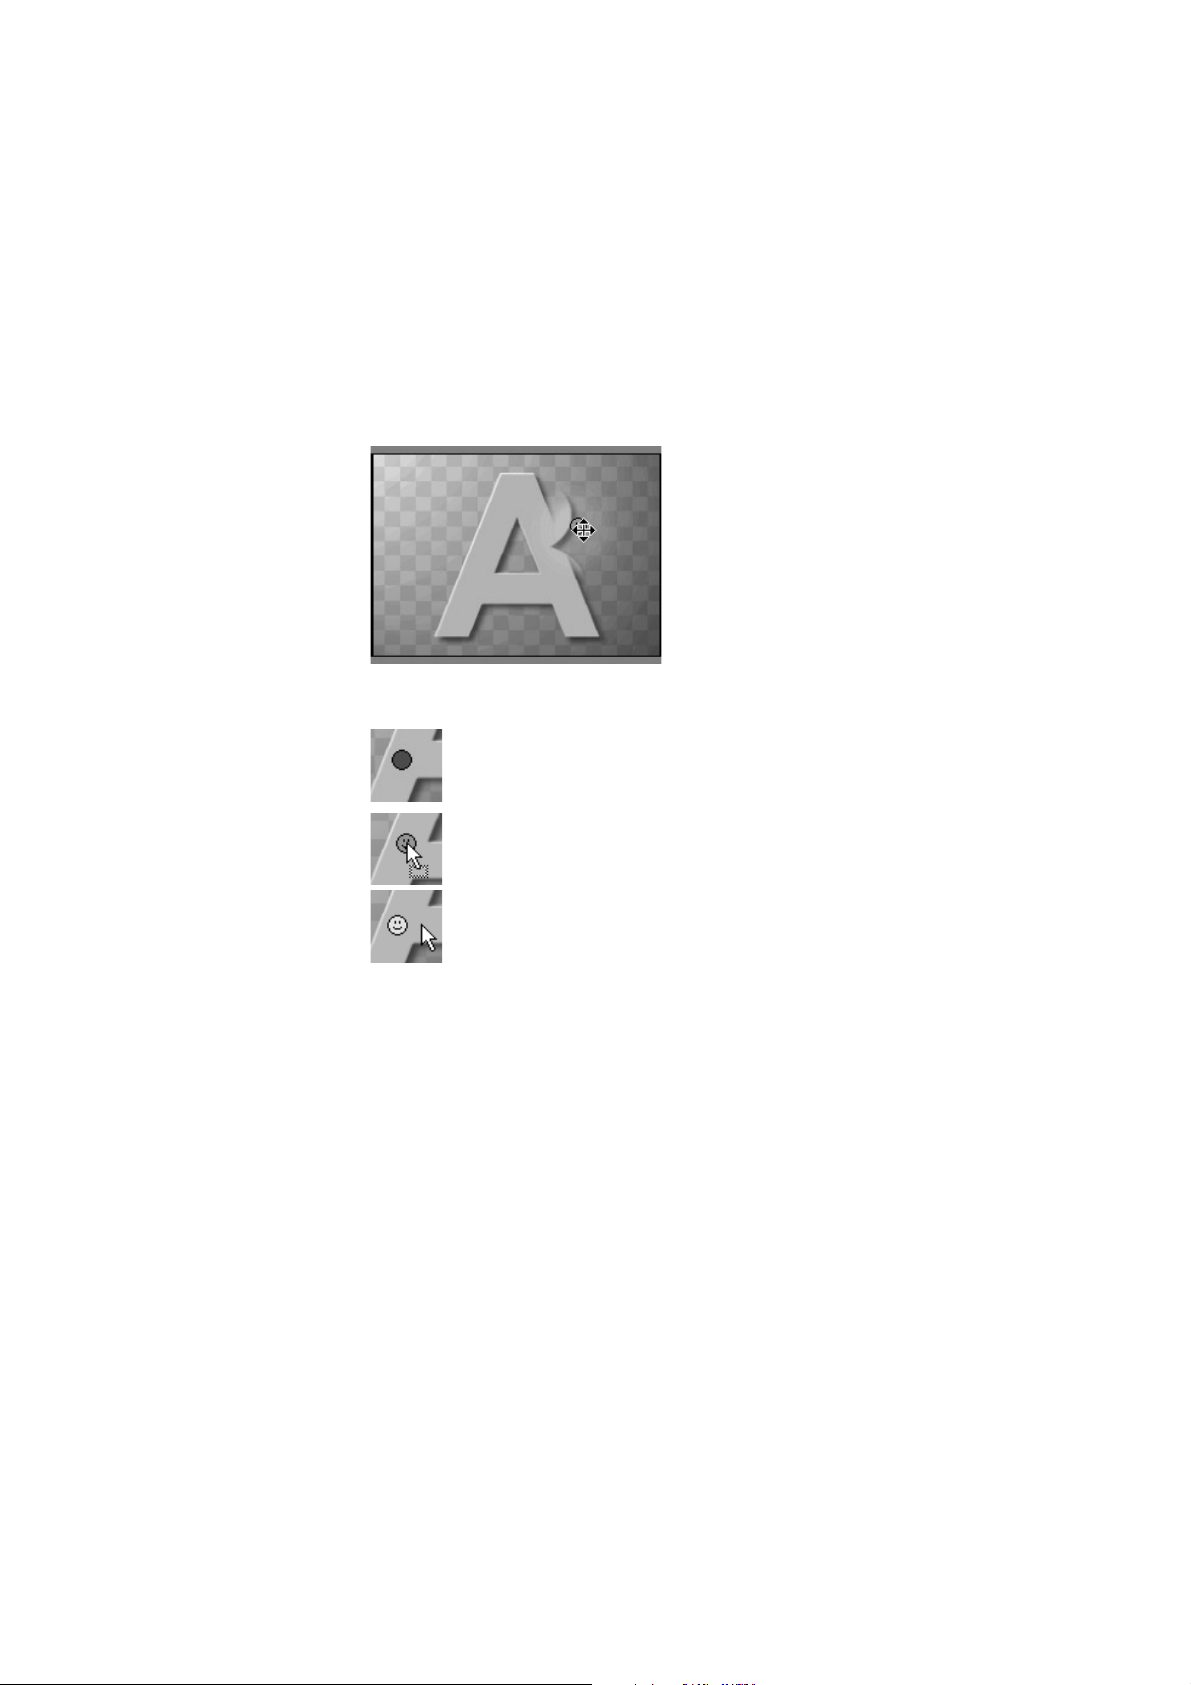
Coordinate Y
Please use this slider to shift the center of the transition in the vertical
direction. The current
Position
of the center is also displayed numerically.
Progress
In this transition, the
The larger the value, the more the circle opens. As a default, the progress
runs from 0 to 100%—the circle opens linearly from zero up to its full size.
Through keyframing of the progress, you can first open the circle, for
example, and then close it again (see also “application example”) or you can
freeze the movement for a certain amount of time.
The dot changes its appearance depending on the mouse pointer position:
Inactive.
Progress
slider controls the opening of the iris circle.
Border width
Border color
Edge smoothing
The center of the transition can be moved freely with the mouse.
The center of the transition can be moved to the right, left, up and
down in the direction of the mouse pointer by clicking with the
left mouse button.
You can apply borders of any desired width between the two elements of
the transition by using this slider.
To define the color of the border, click on the color box and choose one of
the standard Windows colors with the color picker dialog.
This slider adjusts the softness of the edge of the transition. Note that it may
not be keyframed (i. e. animated over time). Its setting always applies to the
entire duration of the effect. This parameter cannot be set for individual
keyframes. Its value always applies to the whole effect.
Chapter 9: Pinnacle Effects
71
Page 82

Application example
In this application example, you will set up keyframing in such a way that
you open the circle to 50%, let it freeze for a short time and then close it
again. Using keyframing, only a single transition needs to be used for this.
Proceed as follows:
1. First drag two video clips into the Timeline window, one each for video
track 1A and 1B, and overlap them for a second or two.
2. Now drag the
the two video clips.
3. Double-click on the transition. The effects dialog opens.
4. Switch keyframing on.
5. Make sure that you are at the beginning of the effect by moving the
position slider to the far left. Note that the value of Progress is “0” here.
The iris is fully closed.
6. Now move the position slider to approximately 40% of the transition
duration and set the
keyframe will appear next to Progress
7. Move the position slider even more to the right, to about 60%. Again
adjust the
8. Finally move the position slider to the far right - the end of the transition.
Change the progress value to “0”.
9. Play back the transition by clicking
for a short while and then closes again.
10. If you want, you can save your effects animation by clicking on the
button. Enter a name and click OK. A new icon will appear in the preset
list.
Pinnacle Iris Round
Progress
Progress
slider to “50” and note the
effect to the transition track between
slider to “50”. Note that the symbol for a
.
.
. The iris opens up to 50%, stops
Play
Save
Pinnacle Pro-ONE
72
Page 83
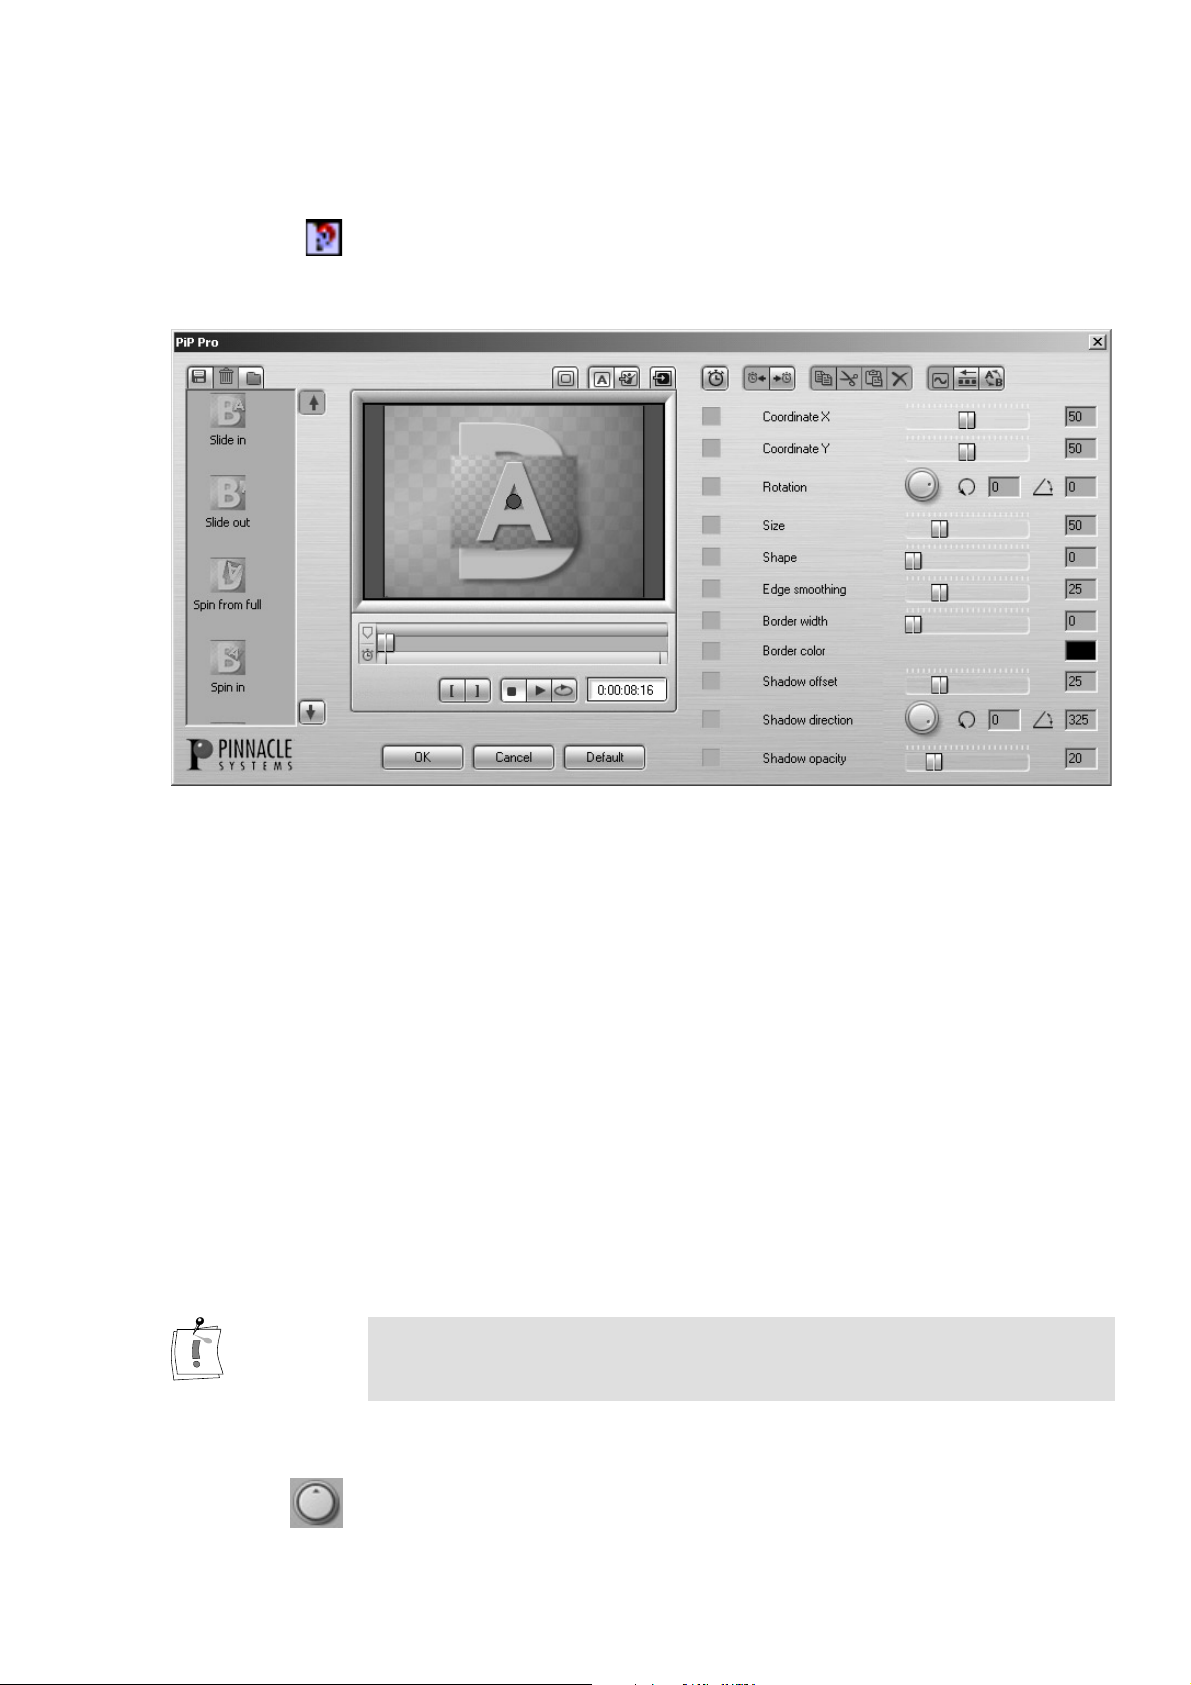
Picture-in-Picture Pro RT
The Picture-in-Picture Pro RT transition offers you the possibility of
displaying one picture within another and to “animate” it with additional
effects such as rotation, zoom, border, shadow and opacity.
Keyframes can be set for all the parameters of the Picture-in-Picture Pro RT
effect.
After you have opened the “Picture-in-Picture Pro RT” transition, you can
adjust the following settings:
Coordinate
Enter the X and Y position for the Picture-in-Picture Pro RT. The center
position is at “0 / 0”.
The picture can also be moved in the preview window directly by dragging
the red dot with the mouse. When holding down the <Shift> or <Ctrl> keys
the movement of the mouse can be restricted to the X and Y directions
respectively.
More exact positioning can be achieved by direct entry in the X and Y fields
or by using the arrow keys on the keyboard.
For all settings, if an input field has been selected with the mouse, the value
of the field can be changed using the arrow keys, the mouse wheel and by
direct entry from the keyboard. An entry is completed by pressing <Enter>.
Rotation
You can set the rotation around the Z axis either using the knob or via the
input fields for
Number of revolutions
and
.
Angle
Chapter 9: Pinnacle Effects
73
Page 84

Size
Adjusts the size of the picture.
Shape
Border width
Border color
Edge smoothing
Shadow
These controls adjust the shape of the corners, the border width and the
border color. If you want no border, set the border width to “0”.
The slide control for the edge smoothing works differently in the Picture-inPicture Pro effect:
Colored border
If you have specified a colored border (
Edge smoothing
more the edge becomes blurred towards the outside, but it will remain
well-defined towards the inside.
Colored border with shadow
If you have specified a colored border and a shadow, the values set also
influence the shadow. The higher the value, the more transparent the
shadow becomes towards the outside.
No border
If the Border width is “0”, the
softness of the edge of the video window. The higher the value, the more
the edge becomes blurred towards the inside.
Shadow
(Offset, Opacity, Direction)
settings affect this border. The higher the value, the
Edge smoothing
Border width
of 1 and above), the
parameter determines the
Setting up the
Picture-in-
Picture Pro RT
effect
To control the shadow of your picture, you can change the parameters for
the offset, opacity and direction of the shadow. Individual keyframes can
also be set for these parameters. In this way, the shadow can be made to
wander around the object or the shadow opacity can change during the
course of the effect.
If no shadow is to be used, make sure that the shadow offset is set to zero.
Note: The Picture-in-Picture Pro RT effect is also available as a filter. This
is useful if you want to apply picture-in-picture to a video clip in track 2 or
above. Not all features are available in the filter version of the Picture-inPicture effect.
If you want to create a Picture-in-Picture RT effect, please proceed as
follows:
1. First drag two video clips onto the timeline, one each onto video track
1A and 1B. Trim and move them so that they start at the same time.
2. Now drag the Pinnacle Picture-in-Picture Pro RT effect to the transition
track between the two video clips.
Pinnacle Pro-ONE
74
3. Double-click on the transition. The effects dialog opens.
4. Change the
5. Select 60 for
setting to 50.
Size
to round the corners.
Shape
Page 85

6. Add a 10 unit wide green border with
Border width
and
Border color
.
Adding
animation
7. Set the
8. Change the
9. Set
and the shadow.
10.View the transition by clicking
clips, ensure that the
If you want to animate your Picture-in-Picture Pro RT effect, please proceed
as follows:
1. If you have not already done so, then drag two video clips onto the time
bar, one each onto video track 1A and 1B. Trim and move them so that
they start at the same time.
2. Now drag the Pinnacle Picture-in-Picture Pro effect to the transition track
between the two video clips.
3. Double-click on the transition. The effects dialog opens.
4. Activate keyframing.
Shadow opacity
Shadow direction
Edge smoothing
to 75 and the
to 45 degrees. Turn the knob left for this.
to 25. Note that this influences both the green border
button is activated.
Shadow offset
. If you want to see your original
Play
to 50.
5. If you are not at the beginning of the effect, move the position slider to
the start of the transition (i. e. the far left).
6. Drag the “Picture-in-Picture Pro RT” away from the center and into the
lower left-hand corner by using the red dot. Alternatively, enter “-25”, “25” for the X and Y coordinates under
<Enter>.
Ensure that the keyframing symbol is turned on for every parameter that
you changed!
7. Leave the remaining parameters unchanged and move the position slider
to the last frame of the transition (i. e. the far right).
8. Change the following parameters:
Position
9. View the changed effect by clicking
original clips, ensure that the
Experiment with the other parameters such as shadow, opacity, rotation
etc. You can set a keyframe at any point in the transition and change the
parameters to achieve more complex animations. When finished, you
may save your animation as a preset by clicking on
to “35”, “35”.
button is activated.
Shape
Play
Position
to “100%”,
. Confirm each entry with
to “30%” and
Size
. If you want to see your
.
Save
Chapter 9: Pinnacle Effects
75
Page 86
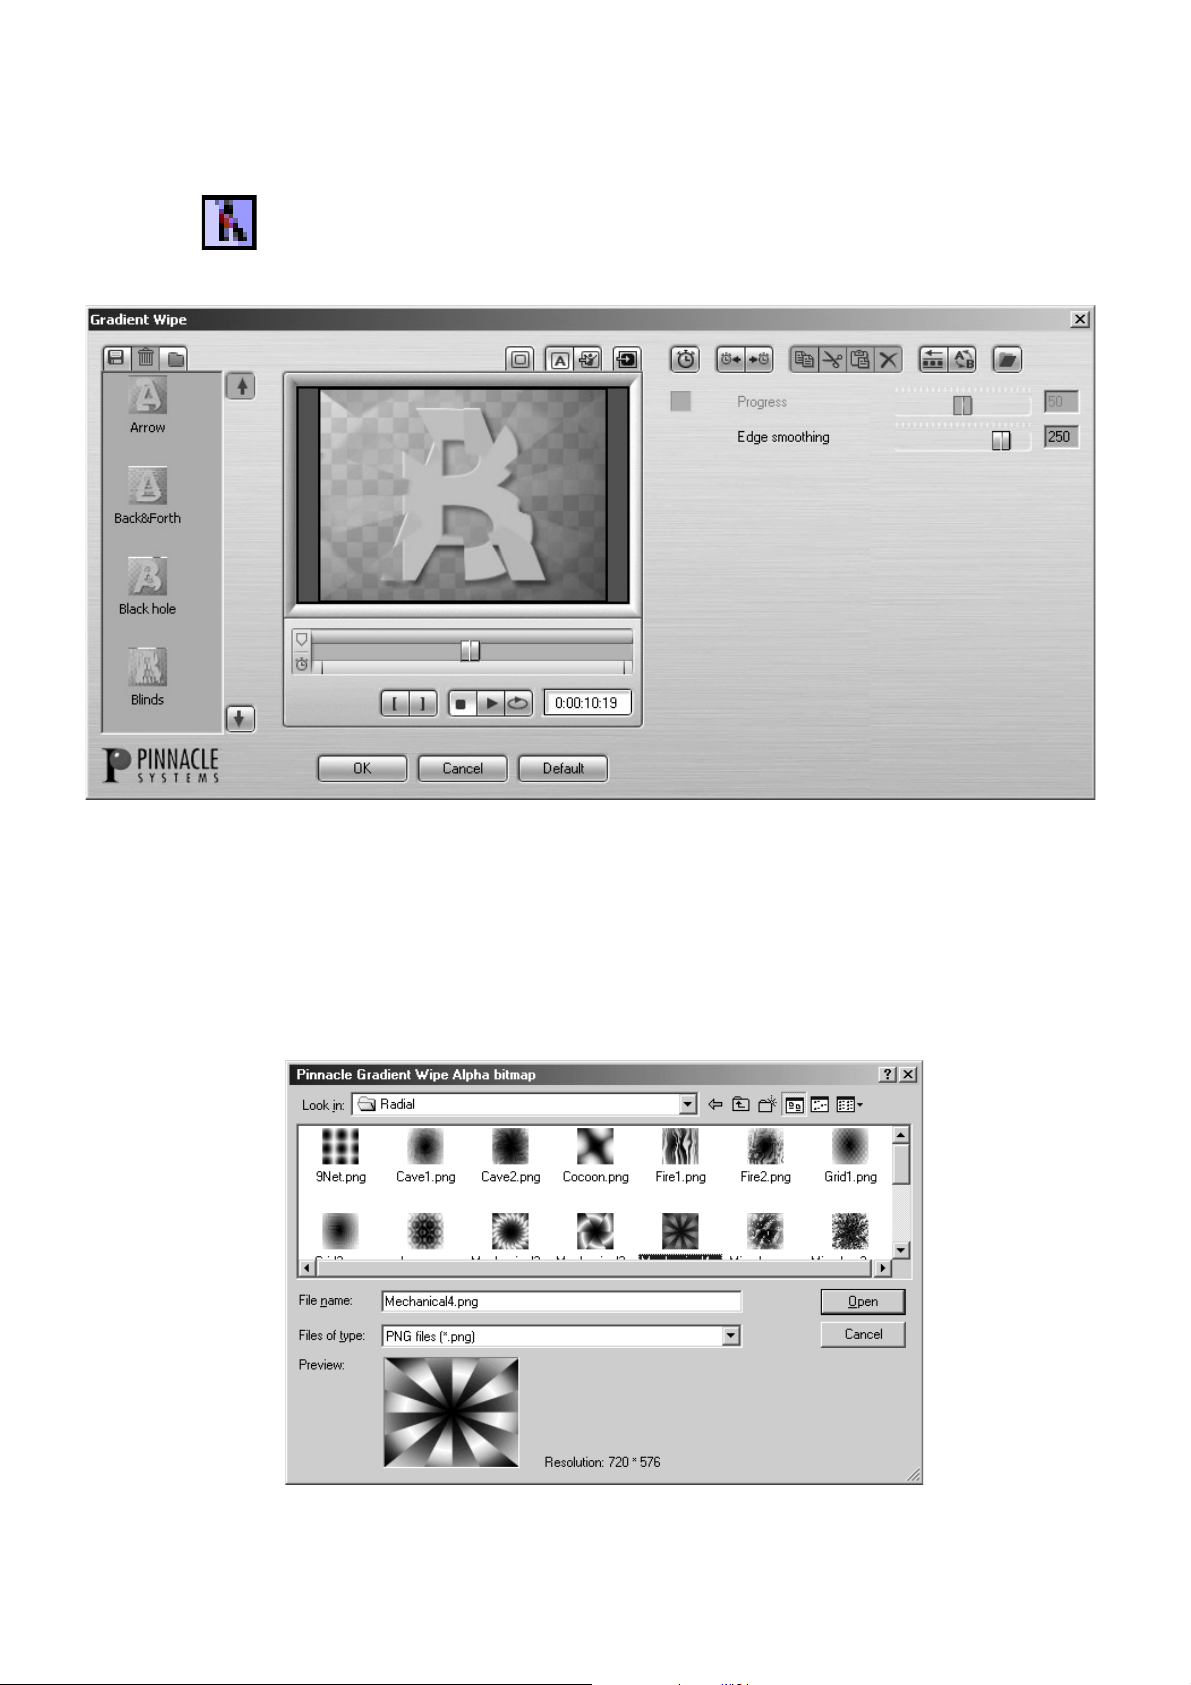
Gradient Wipe RT
In addition to some of the parameters you have seen before, the Gradient
Wipe RT transition allows you to define the effect by choosing one of over
400 Alpha Magic FX gradient wipe bitmaps.
These gradient wipe bitmaps contain information about the progress of the
effect as different scales of gray. You can create your own transitions by
producing your own PNG or BMP files or modifying already existing ones.
You will find more detailed information on Alpha Magic FX in the Chapter
“Alpha Magic FX” on Page 146 in this user manual.
If you use some of the Alpha Magic FX bitmaps very often, you can save
the entire transition as a preset by clicking on the
Save
button.
Pinnacle Pro-ONE
76
Page 87
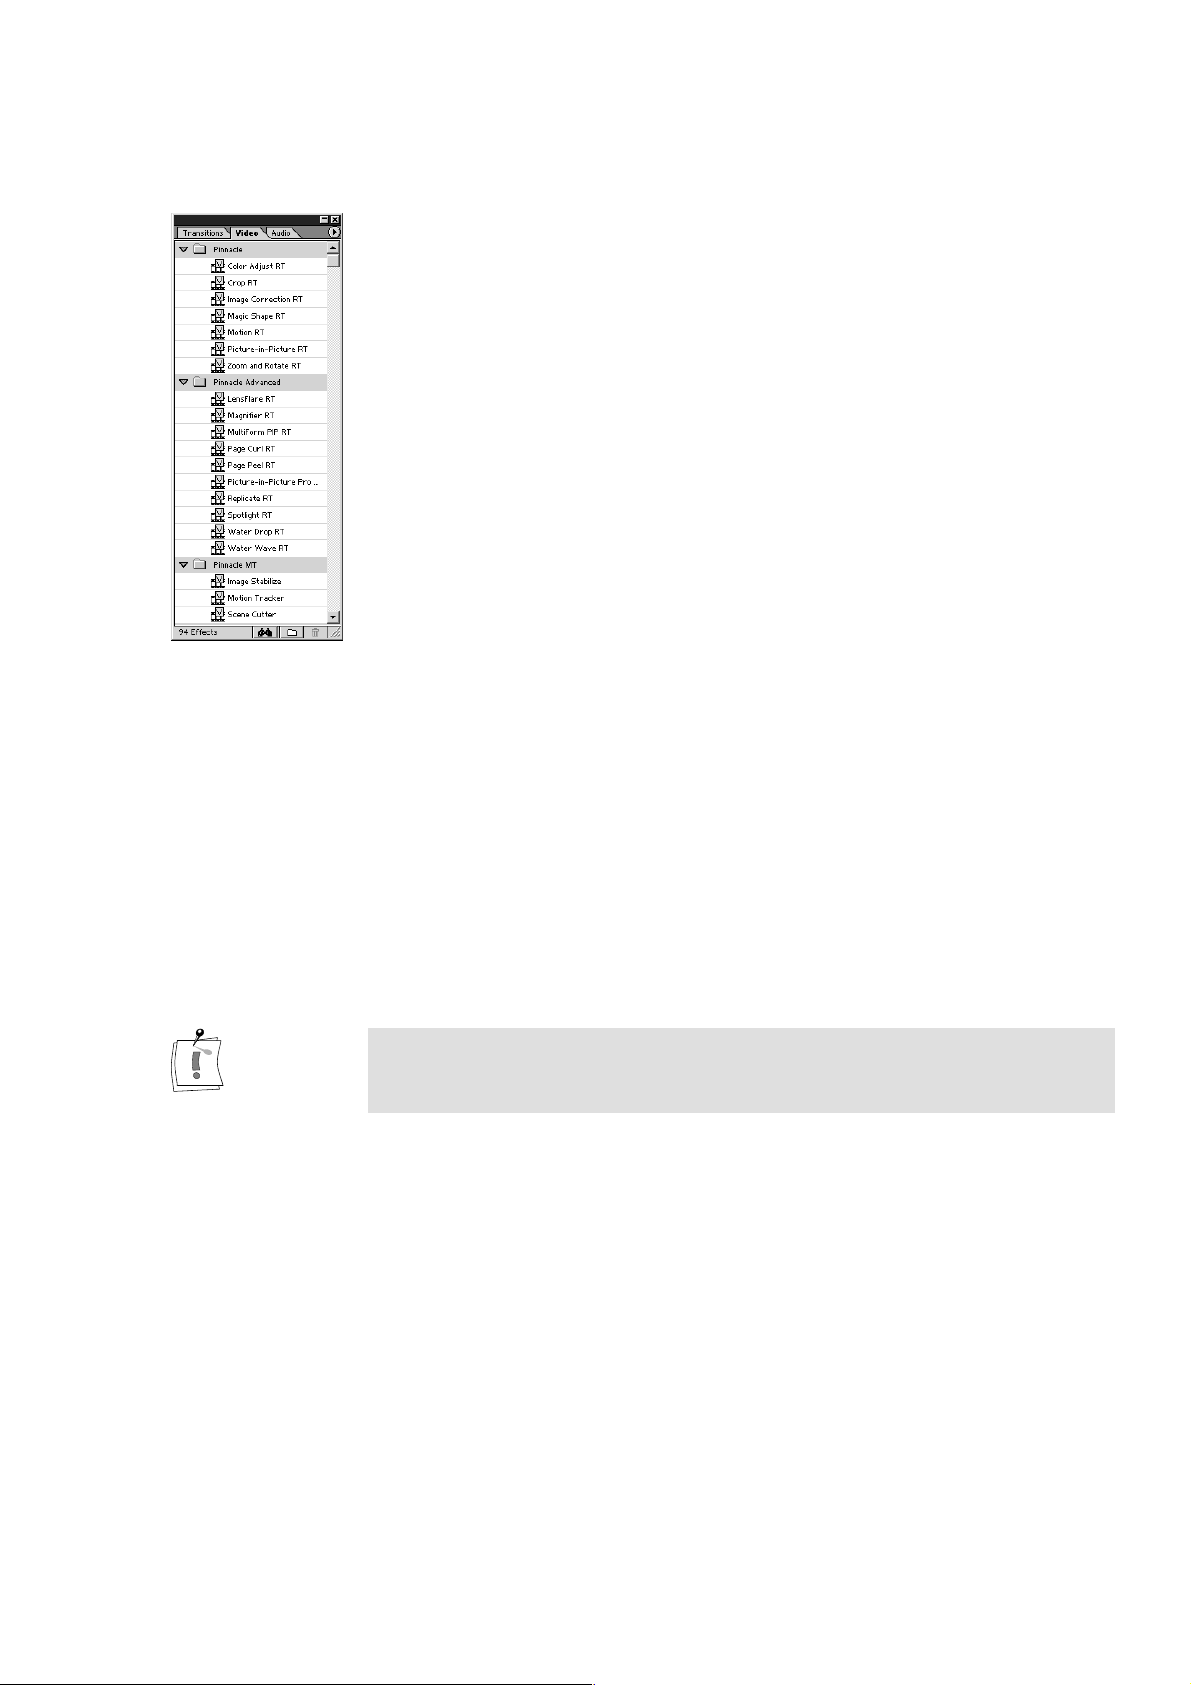
F
ILTERS
In addition to the transitions, the Pinnacle folder Pro-ONE includes the
following real-time filters:
Color Adjust RT
Crop RT
Image Correction RT
Magic Shape RT
Motion RT
Picture-in-Picture RT
Zoom and Rotate RT
*
Under “Pinnacle Advanced” you will find the filters:
LensFlare RT
Magnifier RT
MultiForm PIP RT
Page Curl RT
Page Peel RT
Picture-in-Picture Pro RT
Replicate RT
Spotlight RT
Water Drop RT
Water Wave RT
*
*
*
The following filters can be found under “Pinnacle MT”:
Image Stabilize
Motion Tracker
Scene Cutter
The filters marked with a * are also available as transitions. However,
transitions can only be used in the transition track between Video 1A and
1B. Filters can also be applied to video on the tracks 2 and above.
All Pro-ONE filters run in real time and can also be used in some
combination with other effects and still play in real time. Read the chapter
“Pinnacle Pro-ONE & Real Time” on Page 89 for more details on what plays
in real time and what requires rendering.
The filters are employed by dragging them onto a clip in the timeline
window.
Chapter 9: Pinnacle Effects
77
Page 88
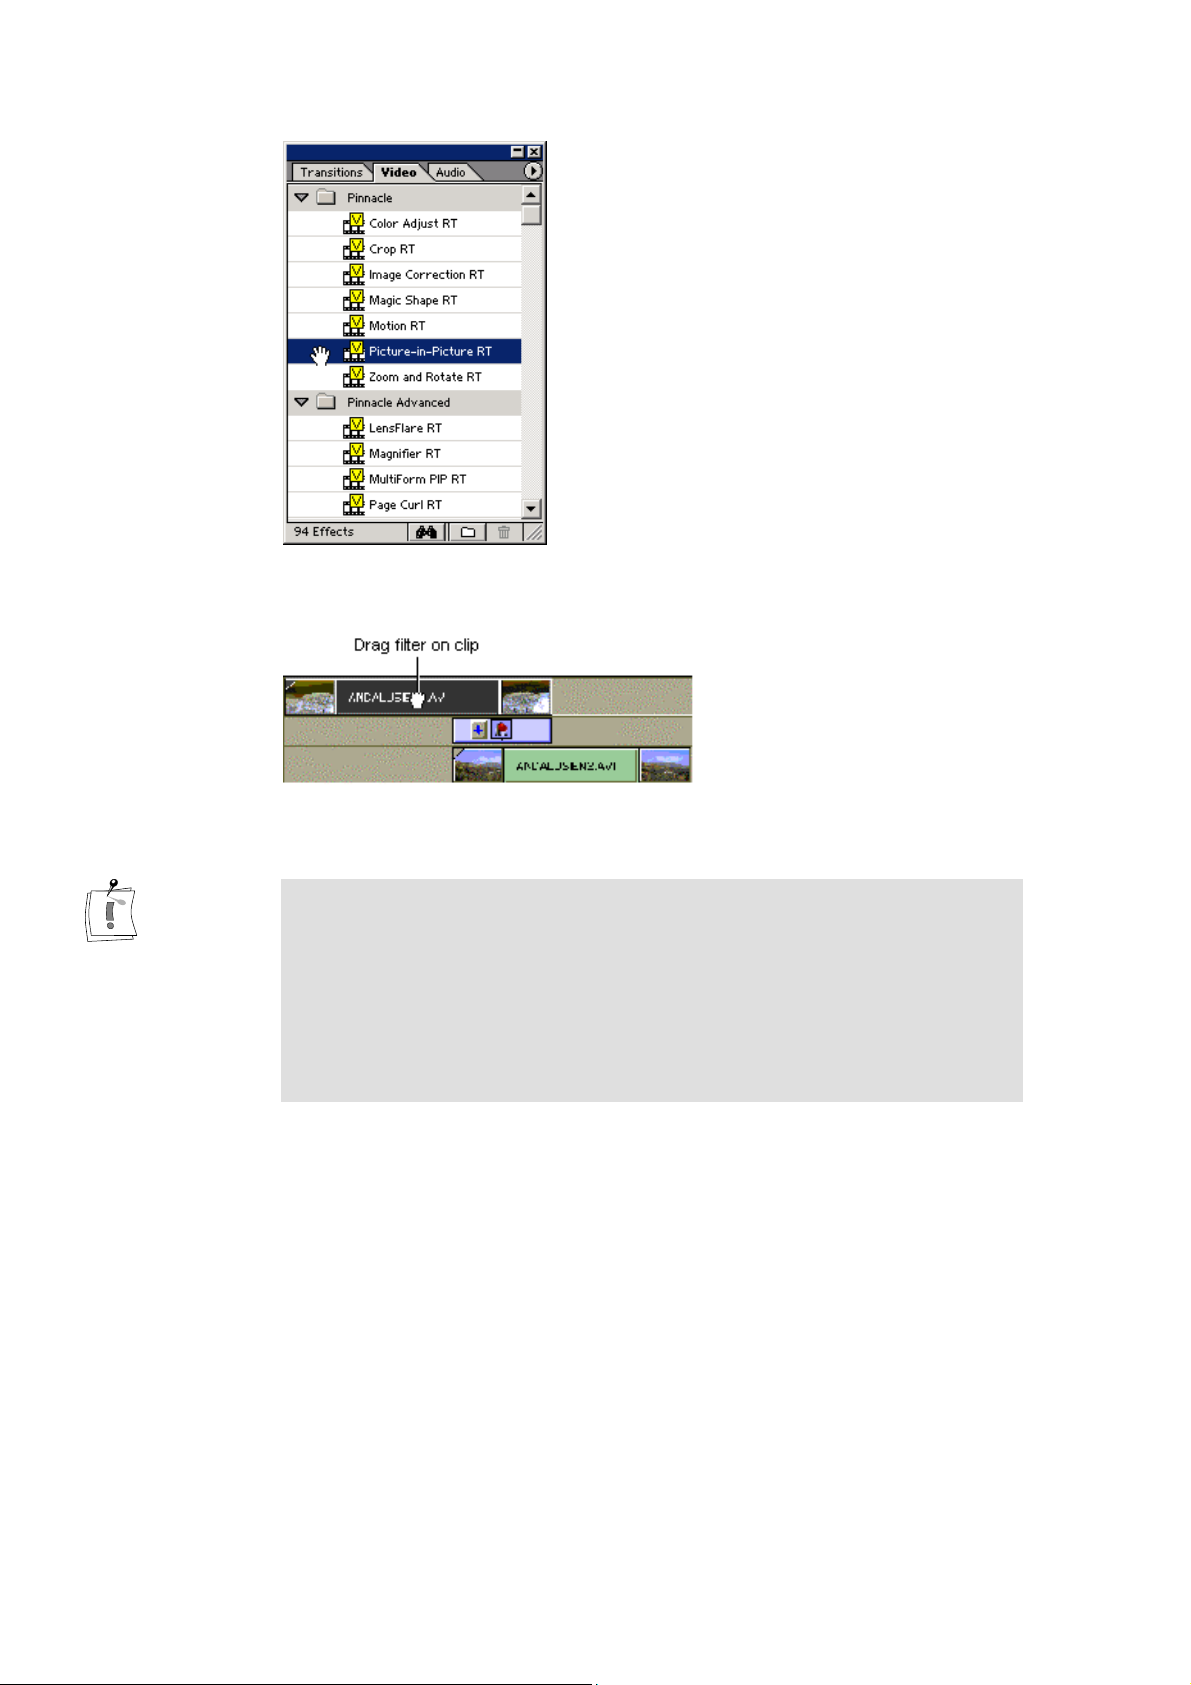
If you use the Pinnacle filters “Motion RT”, “Page Curl”, “Page Peel”,
”Picture-in-Picture Pro RT” and “LensFlare RT”, “Magic Shape RT, or
“MultiForm PIP RT” on media in tracks 2 and above, then you should also
set transparency on the clip so that the background is visible. To do this,
click the clip with the right mouse button and select Video Options and then
Transparency. Choose a Key Type of Alpha Channel for video clips and
stills. TitleDeko RT titles will set their transparency automatically when
placed onto the timeline.
The functionality of the filters that are not available as transitions is
explained in more detail below:
Color Adjust RT
(This filter works in real time with video sequences, but not with bitmaps and titles.)
The Color Adjust RT filter allows you to adjust brightness and contrast for
each of the three primary colors: red, green, blue.
78 Pinnacle Pro-ONE
Page 89

Crop RT
With this filter, parts of the video sequence are cut away and the remainder
of the picture is scaled so that it fills the screen.
Image Correction RT
(This filter works in real time with video sequences, but not with bitmaps and titles.)
With this filter you can change the brightness, the contrast and the color
saturation. Here too, the settings can be keyframed (animated over time) for
interesting effects like fade-to-white.
Magic Shape RT
The Magic Shape RT filter allows a clip from your video sequence to
appear over a background. You can define the shape of the clip and the
background color by means of different parameters. If you create a second
sequence in an additional video track, the clip can be seen at the same time
as this sequence.
If you want to use a square or a circle, please make sure that you choose a
3:4 ratio for the size (Size X = 15, Size Y = 20, Size X = 30, Size Y = 40,
...).
You can create a star by dragging the value of the slider for Inner radius
below 100.
You can also determine the color and the transparency of this clip.
Please note that Alpha Channel must be set as the key type under
Transparency in the Effects window.
Motion RT
The Motion RT filter may be used for the animation of titles, and to position
a video clip in 3D space.
Motion RT allows objects to be positioned, scaled and rotated in the X, Y
and Z direction. In addition, you can also specify the opacity and the edge
smoothing. Animation through keyframing is of course possible and works
very similar to the Picture-in-picture transition.
Chapter 9: Pinnacle Effects
79
Page 90
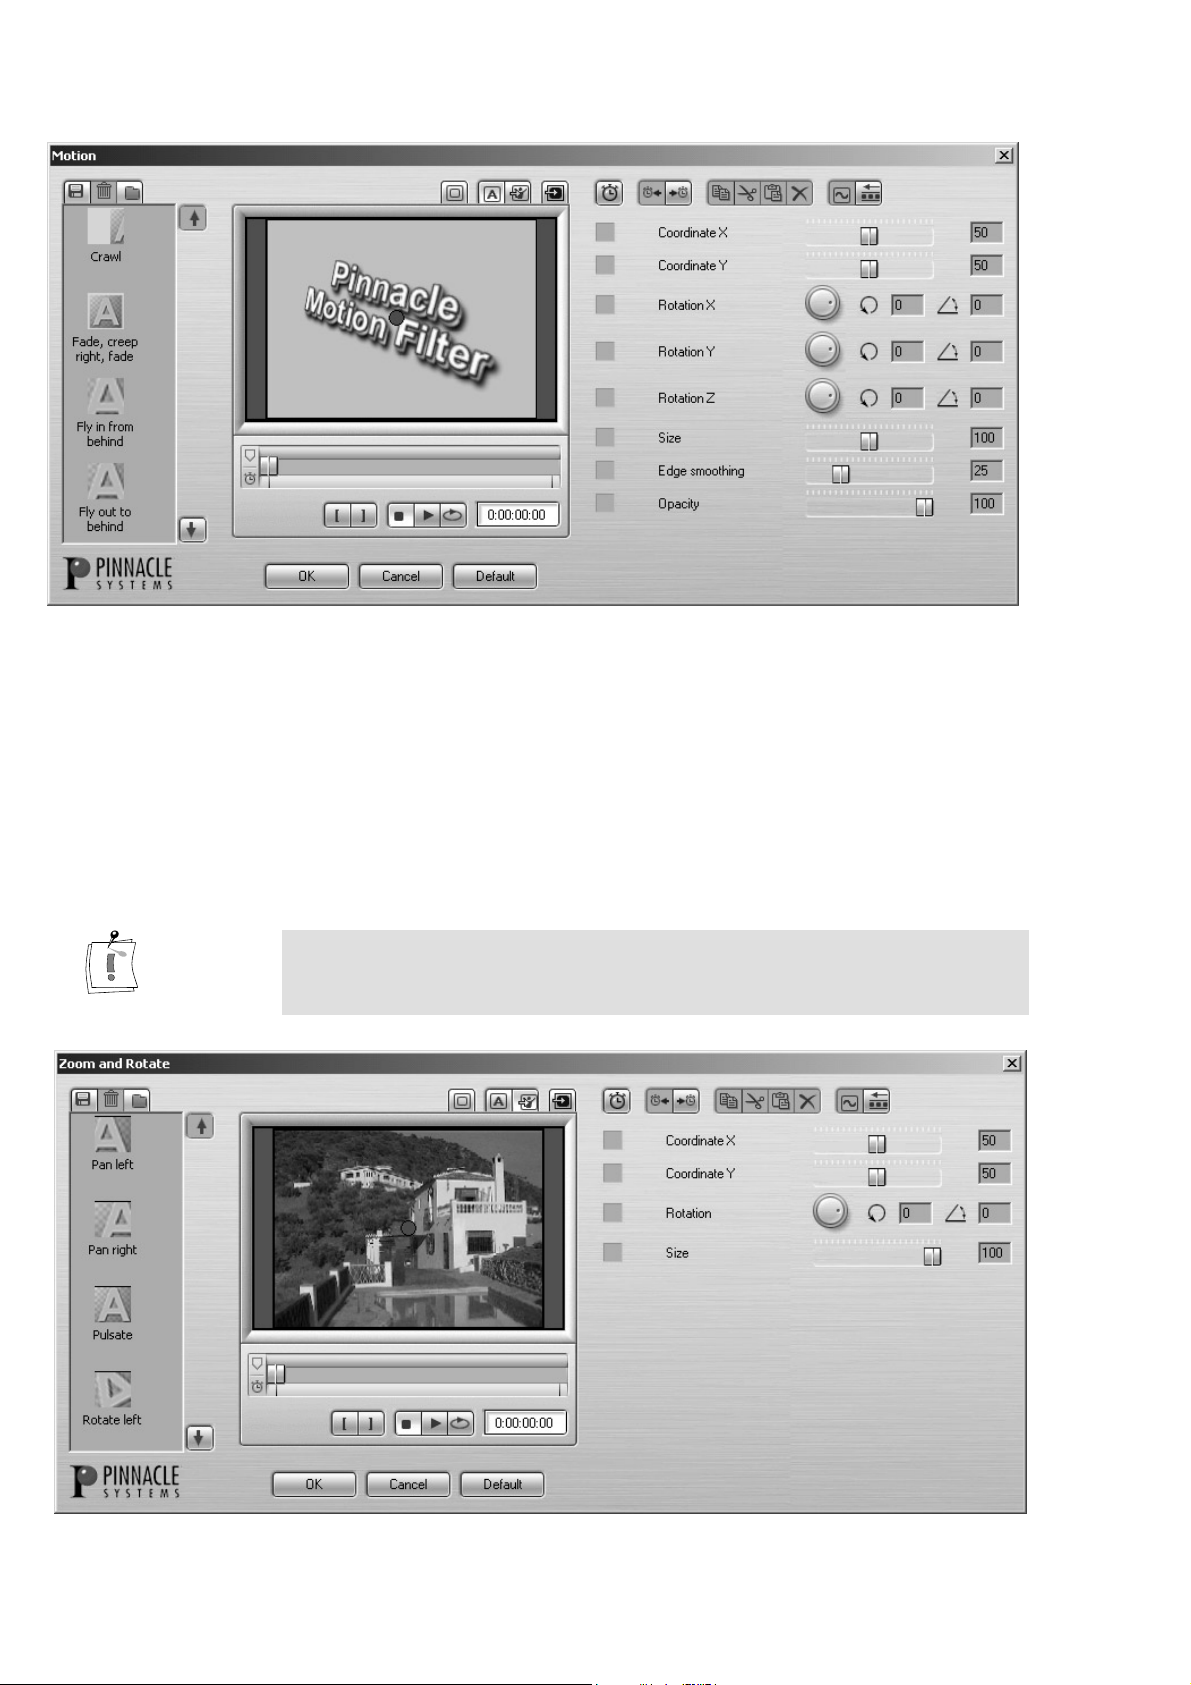
Zoom and Rotate RT
With this filter you can zoom and rotate the contents of your video clip.
You can specify the center point, the size (i. e. zoom factor) and the angle of
rotation. All parameters can be animated over time using keyframing.
A typical application for Zoom and Rotate is to crop off unwanted edges
from your video clips.
Note that the parameters Size and Rotation are not independent of each
other. If you rotate, some amount of zoom will occur to ensure that entire
video frame is filled with the clip image.
Pinnacle Pro-ONE
80
Page 91

Lensflare RT
This filter simulates the light reflection, which occurs when bright sunlight
falls on the lens of a camera. You can make various adjustments to this filter
by means of parameters such as intensity, radiation type or reflection
intensity.
Magnifier RT
If you apply this filter to your video sequence, this will be played back as if
viewed through a magnifying glass. Parameters such as size, position or
refraction can be adjusted.
MultiForm PIP RT
Multiform Picture-in-Picture RT allows you to make a second video "show
through" the sequence in a non-rectangular form. Unlike the Magic Shape
RT filter, not just a part but the complete video sequence appears in the
transition.
The parameters in the dialogue box are the same as those for the Magic
Shapes.
Please note that Alpha-channel must be set as the key type under
Transparency in the Effects window.
This filter is particularly effective if you use it in conjunction with the
Motion Tracking filter. In this case, the clip from the sequence moves along
the movement path of the second video sequence.
To do this, the “Motion Tracker” filter must be used and the Use Motion
Tracking button must be activated.
For more information, compare the description of the Picture-in-Picture Pro
RT transition on Page 72.
Replicate RT
If you use this filter, instead of being played back in one window, the
sequence will be played back in several windows arrange side by side and
above one another.
Spotlight RT
The parameters of the Spotlight RT filter are similar to those of the Magic
Shapes RT and the Multiform Picture-in-Picture RT filters
In addition to their features, here you have the option of superimposing a
spot on the video sequence and of defining its offset.
Along with the color of the selected clip from the sequence, you can also
define the color of the surroundings of the clip.
Chapter 9: Pinnacle Effects
81
Page 92

Water Drop RT
With this filter, you create the effect of a water drop, the shape of which you
can define by means of several parameters.
Water Wave RT
The Water Wave RT filter creates a wave, the frequency and direction of
which you can change.
Image Stabilize
Many digital cameras have an image stabilizing function. However, if you
have forgotten to switch this on or if the result is not satisfactory, the quality
of your video material can be improved with the Image Stabilize. Unwanted
movements, “shakes” or jerky panning shots can be smoothed out using this
filter.
The Image Stabilize first performs an analysis of the entire clip. It tries to
determine camera movement through advanced techniques such as motion
tracking and edge detection. This information is then used to compensate for
the camera movement by zooming into the clip slightly and moving the
window against the clip movement.
If the clip contains pans or zooms, the Image Stabilize attempts to detect
them so that they are not “stabilized away”. Instead, in many cases a pan
will get smoothed out and look even better.
Video material with scenes containing clear edges and well structured
objects, lots of details and easy to track objects are particularly well suited
to stabilization.
But the image stabilizer cannot do magic. With video material containing
rapid movements, poor picture definition or low contrast or which are
lacking well-defined objects that can be tracked, stabilizing can lead to poor
results.
Also, the Pinnacle Image Stabilizer may not always recognize pans and
zooms or it may track objects erroneously when they turn or the lighting
changes drastically. And finally, zooming into the clip for compensation
will result in a slight loss of image quality. This may or may not be
noticeable, depending on the contents of your clip.
Using the Pinnacle Image Stabilizer
A new feature of the Image Stabilizer is the option to choose a clip for
analyzing the motion of the video. In this regard, you can shift and change
the size of the yellow frame in the video window directly with the mouse or
you can use the appropriate slider. In this way, you can exclude objects that
move independently in the foreground from the stabilizing.
Pinnacle Pro-ONE
82
The zooming-in can also be controlled by means of the Size slider.
Page 93
Drag the Pinnacle Image Stabilizer onto a video clip in the timeline. A
dialog will open automatically and the analysis will start. You will see the
clip and some bright green markers that show motion tracking of points and
edge detection.
In the position slider, you will also see a progress bar. When it reaches the
end, the analysis phase is completed and you can close the dialog. The
compensation of camera movement will now occur in real time when you
play the clip in the timeline.
If you apply more edits to your project, you may have to run the analysis
phase again—this is indicated by a red bar at the top of the timeline
window. Do this by selecting the clip and clicking on Image Stabilize
in the Premiere Effects Control palette.
To compare the result with the original video, use the “Picture-in-Picture”
function or the “Clock” to view both videos – with and without filter – side
by side.
Setup
Motion Tracker
The Motion Tracker filter can track the position of an object in a video clip.
The tracking information can then be used in various other effects such as
Magic Shape RT, Multiform Picture-in-Picture RT
as many transitions. The center of the effect will then move as if it were
“attached” to the object in the video clip.
Motion Tracking is done by first defining a reference frame in the video
clip. Then, a point in this reference frame is selected by positioning a
crosshair cursor. Now, the motion tracking process can be started. Once it is
finished, the track will be displayed. It is now available in other effects that
are placed in the same area of the timeline.
Differently colored bars at the bottom of the video window indicate the
quality of the tracking: “green” corresponds to “very good”, “red” means
“no tracking possible”. Please note that an object can only be tracked as
long as it is visible.
The Motion Tracking process works best when the object to be tracked is
clearly distinguished from the background or has a visible edge or corners.
If you have already applied other filters to the sequence, these should be
deactivated in the
the tracking process.
Effects
window before tracking, as they will slow down
or
Spotlight RT
as well
You can switch the display of the movement path on or off with this button.
This button shows or hides the quality bargraph at the bottom of the video
window.
If small, red bars indicate that it has not been possible to track the object
accurately, you should try selecting a different point for tracking.
Chapter 9: Pinnacle Effects
83
Page 94

Click on this button to define a new
Tracking. The crosshair cursor will then be displayed. Note that it is
possible to set several reference frames.
reference frame
for the Motion
After positioning the crosshair cursor, the
start the tracking process.
With this button, you can delete individual reference points.
Application example
In this example, you will use the
magnifying lens to an object.
To do this, proceed as follows:
1. First, drag a suitable video clip for the motion tracking into the Timeline.
2. Now apply the
this video clip.
The
Motion Tracking RT
3. With the slider, select a frame of the video clip in which the object to be
tracked is clearly visible.
4. Click on the
the video window.
5. Now drag the crosshair cursor with the mouse onto the object to be
tracked. The frame around the crosshair cursor can be changed in size
using the mouse - this marks the search radius for the motion tracking.
Motion Tracking RT
Set reference point
Motion Tracking RT
window will open.
button. A crosshair cursor will appear in
Start Motion Tracking
filter to attach a
filter from the
Pinnacle MT
button will
folder to
6. Click on the
video window and also a quality bargraph at the bottom. Wait for the
tracking to finish. If the bargraph shows red areas or if you notice that
the tracking got lost at some point, then you may want to try to set a
second reference point and then re-track by clicking
Tracking
Delete
7. When the motion tracking is complete, close the dialog with OK.
The motion of the point is now available as a
used by other effects at this point in the Timeline window.
8. Apply the
same video clip in the Timeline.
The
Magnifier RT
9. Click the
the motion path. Note that this button is only visible if there is a motion
track at this point in the timeline.
10.You may now adjust other parameters of the effect, such as size. It is also
possible to turn on keyframing (cf. application example on Page 72) in
order to combine motion tracking with additional animation. Note that
changing the position of the magnifier will still be possible, but it is now
relative to the motion track.
Start Motion Tracking
. You can always delete reference frames again by clicking
.
Magnifier RT
Use Motion Tracking
filter from the
dialog will open automatically.
button. You will see the track in the
Start Motion
motion path
Pinnacle Advanced
button. The magnifier will now follow
and can be
folder to the
Pinnacle Pro-ONE
84
Page 95
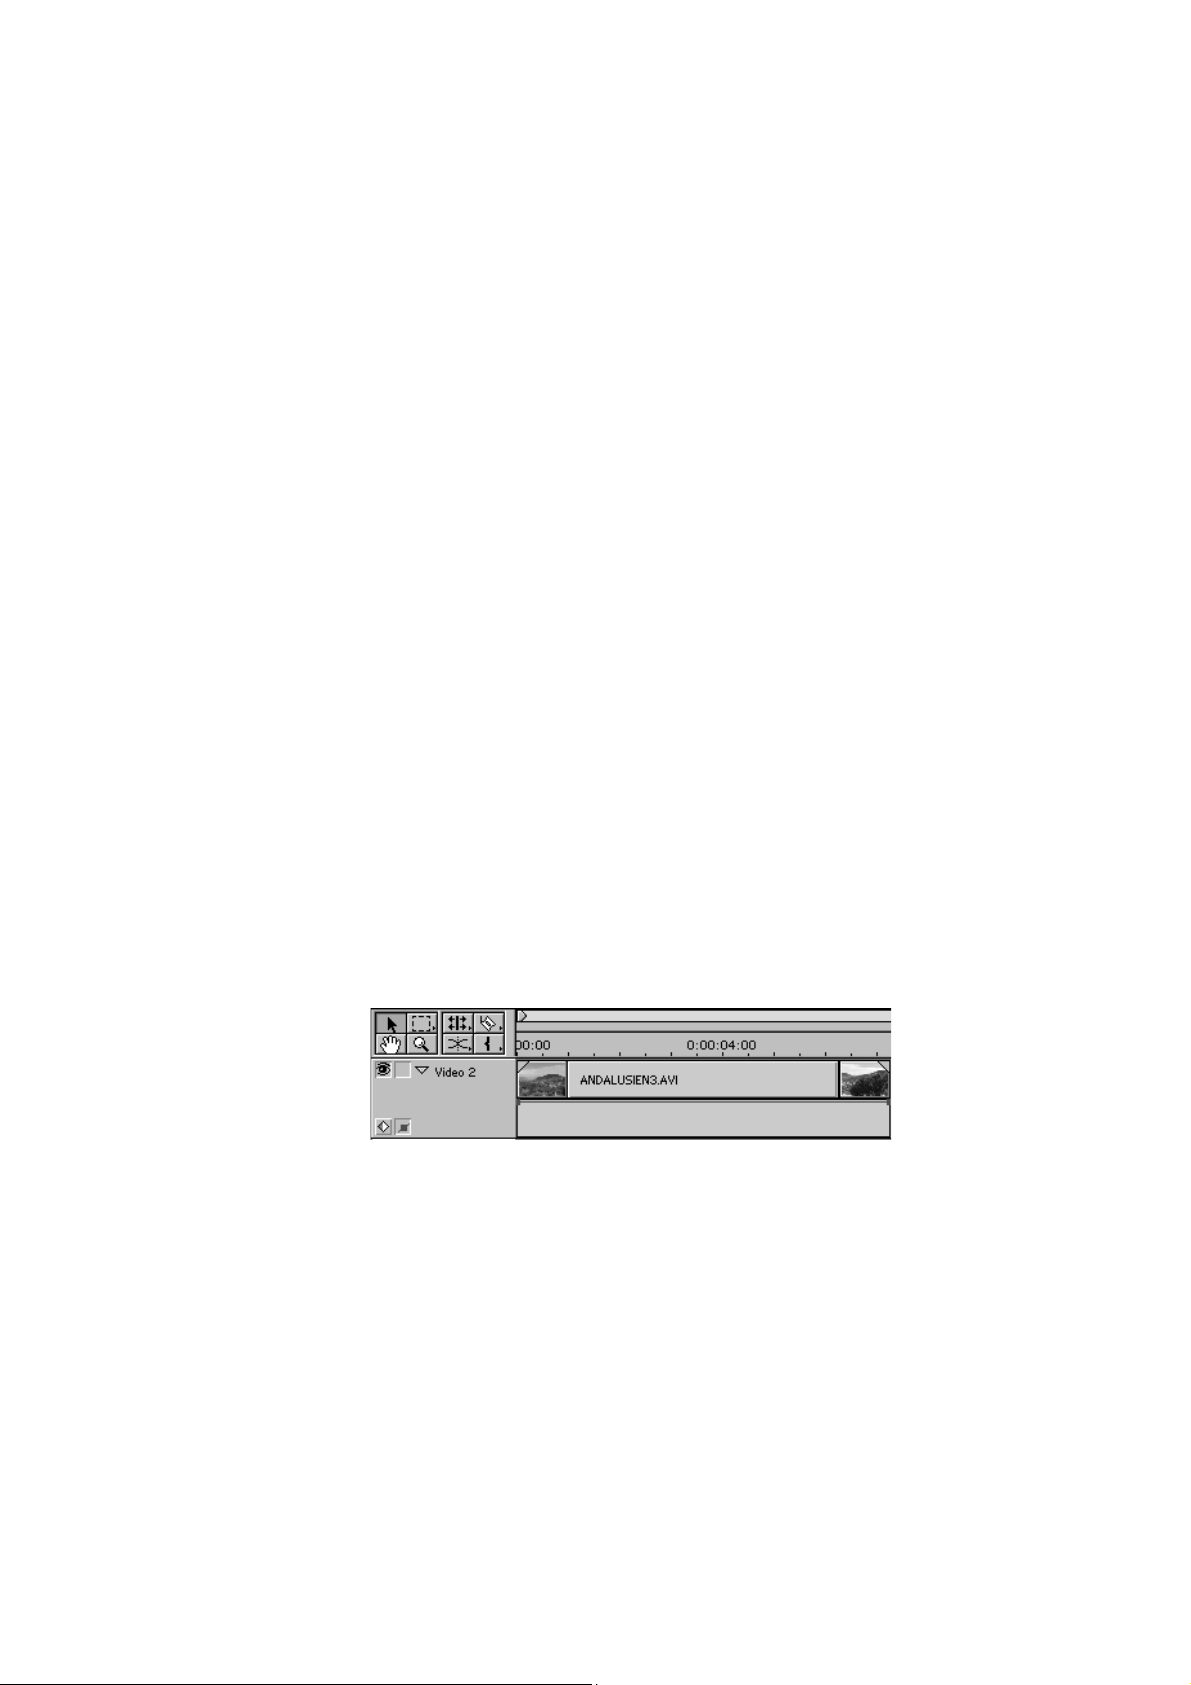
Other examples
Motion tracking can also be used to move a title or an image with an object
in a video clip. In order to do this, first apply the
to a clip in the timeline and track an object as described above. Now place a
title or an image in track V2 or higher above the video clip. Make sure to
turn on transparency if an image is used. Drag the
title or image. Click
then adjust the position and size as desired.
on Use Motion Tracking
Motion Tracking RT
Motion RT
in the
Motion RT
filter onto the
dialog and
filter
Scene Cutter
If you have digitalized video sequences that are made up of several scenes,
you can "cut" the individual scenes with this filter and divide them up into
individual clips. The scene cutting runs automatically. When the scene
cutting is complete, you can define the minimum and/or the maximum
length of the scenes. The Scene Cutter filter automatically creates a
Storyboard file.
For the options available when working with storyboards, please refer to the
associated Adobe Premiere User Manual.
Video Opacity
rubber band
Transparency:
Alpha Channel
Alpha Matte
Opacity and Transparency Effects
If you place a still image, title or video clip onto track 2 or above, the
opacity of this media may be adjusted using the fade control, also known as
a rubber band. If this rubber band is not visible, click on the triangle next to
the word Video.
The rubber band is adjusted by dragging it at any point with the mouse.
With Pro-ONE, the Premiere fade control will be performed in real time.
Furthermore, Pinnacle supports the transparency modes “Alpha Channel”,
and“Black Alpha Matte” in real time when they are being used on still
images and titles.
Chapter 9: Pinnacle Effects
85
Page 96
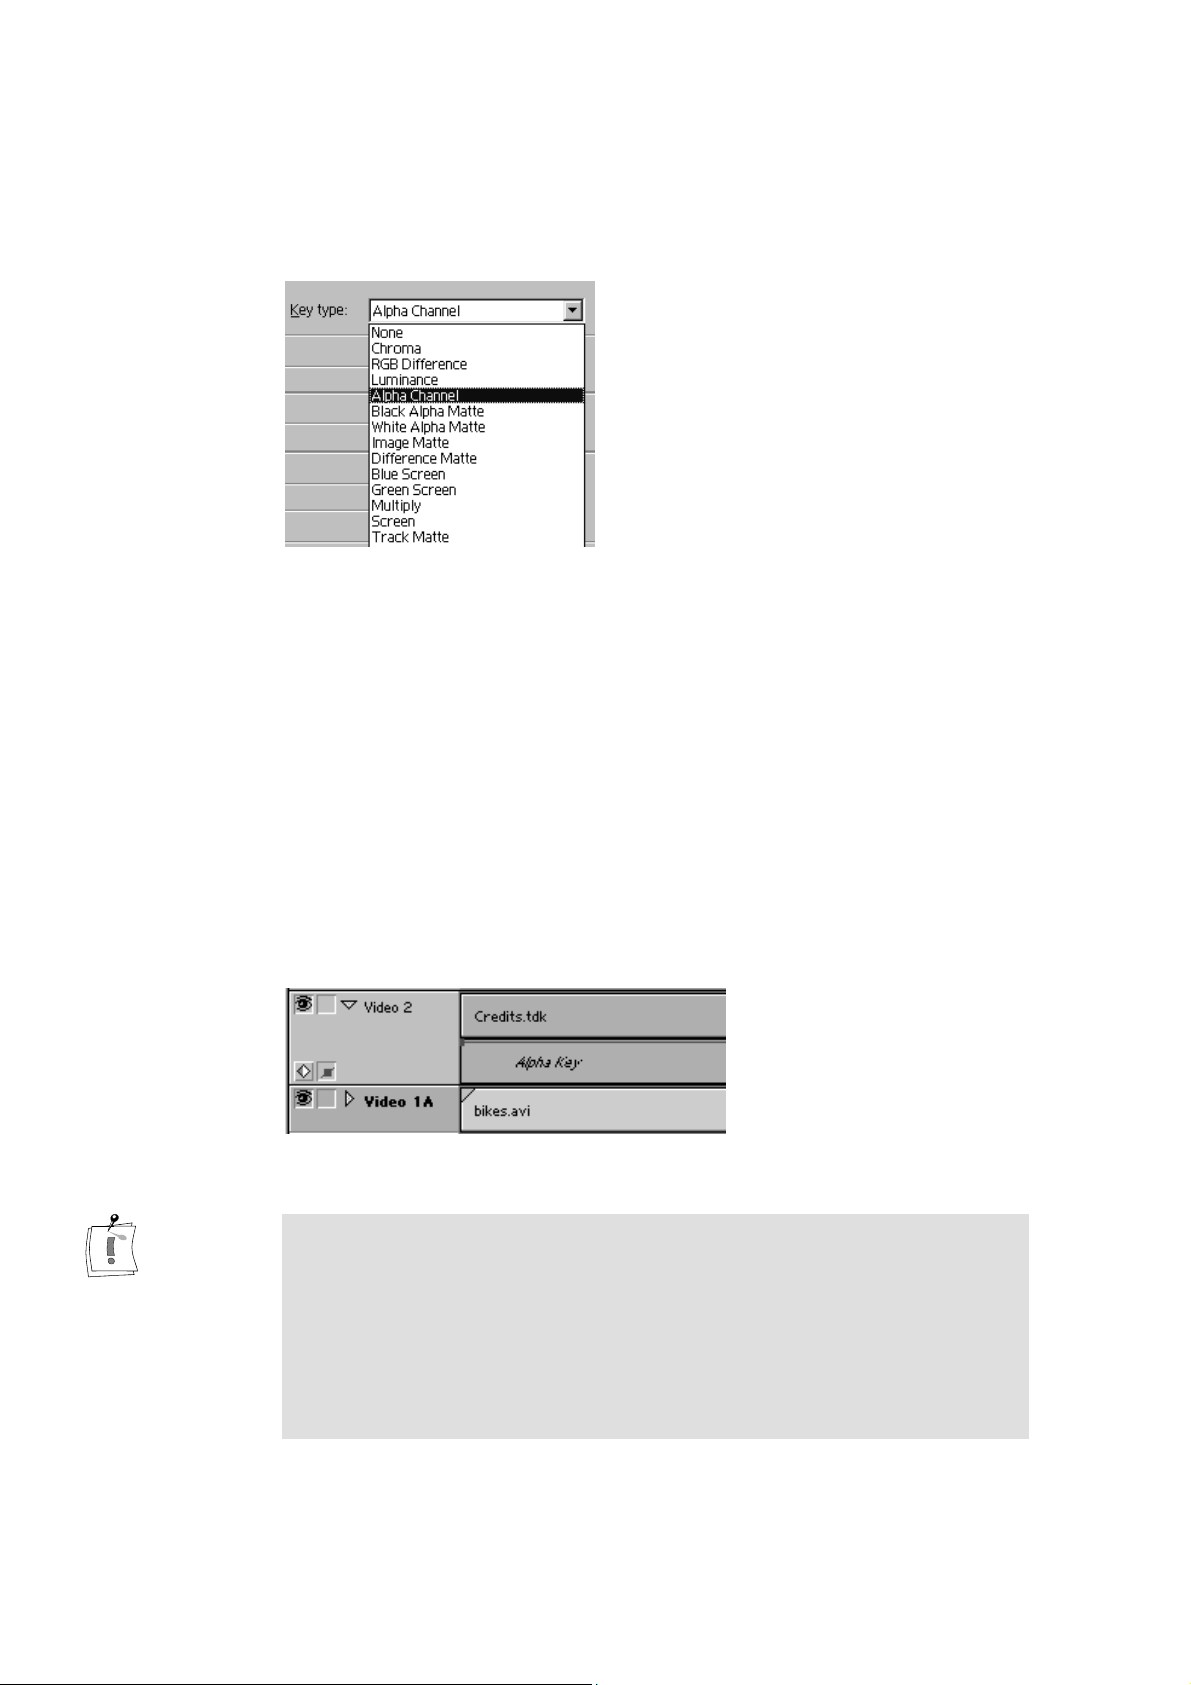
Click with the right mouse button on the title or the graphic in the overlay
track and choose the commands
context menu. Select either
.
type
Alpha Channel
Choose
channel, such as TitleDeko RT titles.
Black Alpha Matte
Use this option if, for example, the title appears on a black background.
During the overlay, this black background will be made “transparent”.
Alpha Channel
, when your material already uses an alpha
Video Options
Alpha Channel,
and
Transparency
or
Black Alpha Matte
from the
as the
Key
White Alpha Matte
Use this option if the title appears on a white background. During the
overlay, the white background will be made “transparent”.
Setting an alpha channel is not necessary with titles that were created with
Adobe Premiere or with TitleDeko RT, as these automatically activate the
correct transparency when you place them onto the timeline.
If you use the Pinnacle filters “Motion RT”, “Page Curl”, “Page Peel”,
”Picture-in-Picture Pro RT” and “LensFlare RT”, “Magic Shape RT, or
“MultiForm PIP RT” on media in tracks 2 and above, then you should also
set transparency on the clip so that the background is visible. To do this,
click the clip with the right mouse button and select
Transparency
stills. TitleDeko RT titles will set their transparency automatically when
placed onto the timeline.
. Choose a
Key Type
of
Alpha Channel
Video Options
for video clips and
and then
Pinnacle Pro-ONE
86
Page 97

Speed
Pro-ONE will play clips slower or faster in real time. To set this effect on a
clip, right click it in the timeline and select
rate as a percentage or a new duration.
The maximum speed that can be played in real time without dropping
frames depends on a number of factors, for example the speed of your hard
disks and the complexity of the timeline at this point. Generally, a speed of
300% or lower should always work in real time. However, if you arrange
several clips with different speeds on top of each other, you should make
sure that the sum of all speeds at any given point in the timeline does not
exceed 300%.
If you want to replay the video sequence "backwards", enter a negative
value. Here too, percentages up to -300% can be executed in real time.
If you do see dropped frames during playback, then please use the Pinnacle
Render Timeline (
of the affected area.
For rates below 100% (“slow motion”), Pro-ONE interpolates the appropriate
field of a frame for highest image quality.
File, New, Pinnacle Render Timeline
. Now enter either a new
Speed
) to force rendering
K
EYFRAMING
: A
DDITIONAL INFORMATION
Keyframing control for individual parameters
Each keyframable parameter of a transition or filter shows an indicator that
also allows you to turn keyframing on or off for each keyframe of the
animation individually.
An example to illustrate what this feature may be used for: take a Picture-inpicture Pro effect that has five keyframes which determine the size and
position of the video window. If you now want to change the border color,
you can do this by moving the position slider to the start and then adjusting
the parameter
animation, the border color will not change at these points as long as the
Border color keyframe selection remains inactivated. In summary: each
parameter has its own keyframe. If, for example, you set a keyframe for the
position, this does not set a keyframe for the other parameters of a transition
at this point. You must set a keyframe for every value required. You can see
whether you have set a keyframe for a certain parameter by this symbol
Border color
. Although there are four more keyframes in the
.
Chapter 9: Pinnacle Effects
87
Page 98

P
INNACLE EFFECTS KEYBOARD SHORTCUTS
General Preview
<Shift> + <Q> Prev. marker <Ctrl> + Mouse Moves into X direction
<Shift> + <W> Next marker <Shift> + Mouse Moves into Y direction
<Shift> + <A> Prev. keyframe
<Shift> + <S> Next keyframe
<Shift> + <1> Prev. frame
<Shift> + <2> Next frame Cursor left - 1
<Shift> + <C> Copy keyframes Cursor right + 1
<Shift> + <X> Cut keyframes Cursor down - 1
<Shift> + <V> Paste keyframes Cursor up + 1
<Shift> + <Del> Delete keyframes Minus - 1
<Shift> + <I> Set in point Plus + 1
<Shift> + <O> Set out point Page down - 10
Space Play / stop Page up + 10
Slider
Wheel Edit
Cursor left - 1 Cursor left Moves cursor in the edit area
Cursor right + 1 Cursor right Moves cursor in the edit area
Cursor down - 1 Cursor down - 1
Cursor up + 1 Cursor up + 1
Minus - 360 Minus Changes the directory
Plus + 360 Plus Will be ignored
Page down - 10 Page down - 10
Page up + 10 Page up + 10
Enter Will be ignored
Pinnacle Pro-ONE
88
Page 99

Chapter 10:
P
INNACLE
Creativity rule
of thumb
Pinnacle
PRO-ONE
Pinnacle
you all the effects you need—and it is a very productive video editing
system. You can create complex video projects very quickly, and key to this
productivity are the Pinnacle real time effects. The Pinnacle
engine gives you immediate, full quality playback even of sophisticated
layered video effects.
This chapter summarizes the available real time effects, explains how even
combined multi-layered effects can play in real time, and what can be done
to make best use of the Pinnacle
information about real time audio effects.
Do what you want. Use the effects you want. If some parts of your projects
need to be rendered—no problem, Pinnacle
accelerated render engine. But whenever an effect you want to apply is
available as Pinnacle real time effect, use it. This will greatly increase your
editing productivity, giving you time for more creativity and better results.
REAL TIME
Pro-ONE
delivers professional quality, high flexibility, and gives
Pro-ONE
Pro-ONE
& Real Time
Pro-ONE
video effects engine. It also gives
Pro-ONE
includes a hardware-
effects
Real time rule
of thumb
A segment of the timeline is real time playable if all the media in it are real
time compatible, the number of media does not exceed the real time limits,
all the effects are Pinnacle real time effects, and a few simple effects
combination rules are fulfilled.
A real time segment will appear in the Premiere Monitor window and on the
analog outputs immediately and in full quality when you play or scrub the
timeline. This way, it can also printed to an analog tape deck without any
rendering process (or alternatively, in the case of
tape deck).
When you are finished editing your project and want to output it to DV or
other formats such as MPEG or RealVideo, then an export process that
includes rendering is required.
Pro-ONE
outputting on DV, all effects must first be rendered.
On the other hand, with
both on the analog and on the digital output.
outputs real time effects exclusively to the analog output. For
Pro-ONE RTDV,
the real time effects are available
Pro-ONE RTDV,
to a digital
Chapter 10: Pro-ONE & Real Time
89
Page 100

Real time compatible media
To be real time playable with Pinnacle Pro-ONE, all media on the timeline
must be of one of the following formats:
DV AVI clips
Pinnacle Pro-ONE-compatible DV AVI files, either captured or rendered by
a video application or from another source. The clip’s video standard, PAL
or NTSC, must match the current Premiere project setting.
If you would like to use other video clips, you may import them into
Premiere and put them into your project, but the affected segments will then
require rendering. In many cases, a better approach is to put the clip into a
new, empty project and then export it as a Pinnacle Pro-ONE DV AVI clip
using the appropriate Pinnacle Pro-ONE preset. The resulting clip will then
be real time playable in your project.
Still images and titles
Still images of all formats that Premiere can import will play back in real
time. For titles, both TitleDeko RT and the Premiere title application will
create files that are real time playable. A still image or title may contain
transparency information in the form of an 8 bit alpha channel, but only one
of these may be used at any point in the timeline if real time playback is
desired. Real time playback is only possible when, at every point in the
timeline, a maximum of one still image or title with alpha channel is used.
Although still images of any resolution can be imported and used in
Premiere, you will achieve the best quality if you scale them to the
appropriate video resolution (720x480 for NTSC or 720x576 for PAL)
before using them in Premiere. This can be done with Adobe PhotoShop
LE, which is included on your Premiere CD.
Real time effects
Pinnacle Pro-ONE includes two types of real time effects: transitions and
filters.
Transitions are used in between two clips on the V1A and V1B tracks, they
are located in the “Pinnacle” folder within the Premiere
selection.
Filters, on the other hand, are applied to clips on the tracks V2 and above.
These are stored in the “Pinnacle” and “Pinnacle Advanced” folders in the
Premiere
For details about using the Pinnacle effects and animating them by using
keyframes, please see Chapter “Pinnacle Effects” as of page 63.
Video
filter selection.
Transitions
Pinnacle Pro-ONE
90
 Loading...