

Page 1

([SUHVV
7KH)XQDQG(DV\:D\WR
6KDUH<RXU+RPH0RYLHV
RQ'9'
8VHU*XLGH
Table of Contents I
Page 2

Special thanks to Mike Iampietro, William Chien, Brian Lane, Bill Loesch,
Ivan Maltz, Chris Zamara, and Nick Sullivan.
Writing: René White
Express, Pinnacle Systems, and the Pinnacle Systems logo are registered
trademarks of Pinnacle Systems, Inc.
All rights reserved. QDesign MPEG-2 Layer II Fast Encoder/Decoder (c) 19962001 by QDesign Corporation. Windows Media is a trademark of Microsoft
Corporation. All other trademarks are the property of their respective owners.
You agree not to remove any product identification or notices of the proprietary
restrictions from Pinnacle Systems’ products or manuals.
All products mentioned in this manual are trademarks of their respective
owners.
Express User Guide © 2001 by Pinnacle Systems, Inc. All rights reserved.
No part of this manual may be copied of distributed, transmitted, transcribed,
stored in a retrieval system, or translated into any human or computer language,
in any form or by any means, electronic, mechanical, magnetic, manual, or
otherwise, without the express written permission of Pinnacle Systems, Inc.
Pinnacle Systems, Inc.
280 North Bernardo Avenue
Mountain View, CA 94943
Pinnacle Part Number 41001018
Printed in the USA.
Express II
Page 3

Table of Contents:
Pinnacle Express
CHAPTER 1: OVERVIEW
COMPUTER REQUIREMENTS………..………………………….2
INSTALLING YOUR SOFTWARE.………………………………...3
CONNECTING THE CAMERA…………………………..………...4
ON-LINE HELP……………………...………………..………...4
ABBREVIATIONS AND CONVENTIONS.………………..………...5
CHAPTER 2: BRINGING IN VIDEO
TRANSPORT CONTROLS..………………………………….……8
OURCE MATERIAL OPTIONS…………………………………..8
S
C
APTURE VIDEO DIALOG BOX………..………….…………...10
THE CAPTURED AND IMPORTED FILE WINDOW.………………12
SCENE DETECTION OPTIONS..………………………...…..…..13
CHAPTER 3: PREVIEWING THE DISC
THE TV SCREEN.……………………………………………..16
THE REMOTE CONTROL………………………………………16
THE DISC METER..……………………………………………17
OUTPUT MEDIA SETTINGS…………………………..………...18
Table of Contents III
Page 4

CHAPTER 4: TV SCREEN AND REMOTE CONTROL
TV SCREEN………………….……………………….……….21
REMOTE CONTROL NAVIGATION..……………………………22
CHAPTER 5: CUSTOMIZING MENU PAGES
MENU PAGE ELEMENTS……..…………………………….…25
THE STYLE CHOOSER………………………………………...28
CREATE CUSTOM MENU DIALOG BOX……………..………...30
CHAPTER 6: EDITING SCENES AND STILL IMAGES
THE EDIT VIDEO DIALOG BOX.……..………….……………..34
THE THUMBNAIL LIST VIEW…….………….………………...35
THE ICON LIST VIEW…………….…………………………....37
THE EDIT TOOLS.……………………………………………..38
EDIT OPTIONS…………………………..…………………….39
THE PLAYER………………………..………………………...40
RIM A SCENE……………………..………………..………...41
T
I
MPORTING FOLDERS.……………..………………..………...43
SLIDESHOW………………………..………………..………...44
CHAPTER 7: MAKING THE DISC
ASSIGNING YOUR FILES..…………………………………….47
TRANSCODING AND COMPILING YOUR PROJECT…..…………48
BURNING THE DISC…..………………………………………49
THE CLEAN-UP FILES BUTTON..…..…..……………………...50
APPENDIX
TECHNICAL SUPPORT..……………………………………….51
LICENSE AGREEMENT……………………………..…………53
NDEX………………….…………………………..…………57
I
Express IV
Page 5
Chapter 1:
Overview
Pinnacle Express lets you use your personal computer to
turn your home movies into DVDs and Video CDs. Soon
you’ll be able to send a friend or family member movies
that they can play in their DVD player. With Pinnacle
Express, it’s as easy as 1-2-3.
First, Pinnacle Express lets you “capture
video” or transfer the video from your
camcorder to your PC’s hard drive. You can also include
videos and stills you have saved on the PC.
Next, preview what your disc will look like on a
DVD player. Pinnacle Express automatically
creates a scene index menu page for you! You can test
your disc with the on-screen remote or just click on a
menu page item and see it play. From this screen you can
access tools that let you pick a menu page style, customize
menu pages, arrange the video scenes and/or still images
in any order, or delete, combine, or split scenes.
The final step is to burn your movies to CD or
DVD using your burner. Pinnacle Express lets
you create VideoCD, Super VideoCD, or DVD discs.
Chapter 1: Overview
1
Page 6

COMPUTER REQUIREMENTS
In addition to your Express software, you need a PCcompatible computer with:
• Pentium II 300 or higher or equivalent
• Microsoft Windows 98 Second Edition, Windows
Millennium, Windows 2000 or Windows XP
• DirectX-compatible graphics card
• DirectX-compatible sound card
• 64 MB of RAM (128 MB recommended)
• 200 MB of free hard disk space to install software
• Your hard drive must be capable of sustained reading
and writing at 4 MB/sec. All SCSI and most UDMA
drives are capable of this. DV-format video consumes
3.6 MB of hard disk space for every second of video, so
four minutes of DV video will require almost 900 MB
of hard disk space.
• CD-ROM drive
• Speakers
• Mouse
Express
2
Page 7

INSTALLING YOUR SOFTWARE
To install your Studio Express software:
1. Insert the Express CD-ROM into your CD-ROM
drive. If you have Autorun enabled for your CD-ROM,
Setup will run automatically.
2. If you do not have Autorun enabled, navigate to your
CD-ROM drive, and double-click on Setup.exe.
3. Select the language of your choice.
4. Enter your serial number (found on the outside back
cover of this manual).
5. Agree to the Express software license terms (click “I
Agree”). If you do not accept or understand the terms,
you should promptly return this product to your dealer.
6. Choose “Typical” installation (recommended). Only
advanced computer users should choose “Custom.”
7. Click “Next” until the installation is completed.
8. Restart. In some cases, you may be instructed to restart
your PC.
9. Next, you will be given the opportunity to register
your copy of Express. You can quickly and easily
register using your Internet connection. Registration is
important for three reasons:
• Registration allows Pinnacle Systems to inform you
of free upgrades to the Express software
• Registration makes you eligible for special offers
and promotions from Pinnacle Systems
• Registration is required to receive technical support
Chapter 1: Overview
3
Page 8

CONNECTING THE CAMERA
After the software application installation is complete,
connect your DV video device to your PC, using any
IEEE-1394 DV cable (4-pin to 6-pin). If you have a laptop
computer, you may have a 4-pin IEEE-1394 connector.
To connect your DV camcorder/VCR to your PC:
1. Connect the IEEE-1394 cable to your PC.
Connect the 6-pin connector of the IEEE-1394 DV
cable to one of the IEEE-1394 data ports on your DV
board.
2. Next, connect the IEEE-1394 cable to the DV device.
Connect the 4-pin connector of the IEEE-1394 DV
cable to the DV IN/OUT or the DV OUT connector of
your DV camcorder/VCR. Make sure that your
camcorder is turned on and in VTR mode.
ON-LINE HELP
On-line help is right where you need it, when you need it,
while you’re working in Express.
Standard On-line Help: Click the Help button in the
Express main menu bar, or press F1 to display the table of
contents page of the standard help topics. Click Help >
Help Topics if you want to search for a specific topic, or
command.
Tool Tips: To find out what a button or other Express
control does, pause your mouse pointer over it and a Tool
Tip appears explaining its function.
Express
4
Page 9

ABBREVIATIONS AND CONVENTIONS
This guide uses the following conventions to help
organize the material.
Terminology
Express refers to Pinnacle’s video capture and disc
authoring software.
The term DV refers to DV and Digital8 camcorders,
VCRs, and tapes.
The term 1394 refers to OHCI-compliant IEEE-1394
FireWire, DV, or iLink interfaces, ports and cables.
The term Analog refers to 8mm, Hi8, VHS, SVHS, VHSC or SVHS-C camcorders, VCRs and tapes, and to
Composite (RCA) and S-Video cables and connectors.
The term assets refers to video and audio files and scene
index menu pages.
The term video file refers to source video/audio from a DV
capture device, or analog video/audio that has been
digitized and saved to disk.
The term scene refers to a video file that Express has
Scene Detected and placed in List View.
The term scene index menu page (or just menu page)
refers to a graphic background for up to nine interactive
buttons, and to the layouts, text styles, and frame types
comprising the menu page.
The term thumbnail refers to the reduced-sized scene
image covering each menu button.
Chapter 1: Overview
5
Page 10

Dialog Box and Window Names
Names of buttons, dialog boxes, windows and related
items are written in Italics so you can find them in the text
faster.
Example: Click the Accept button in the TitleDeko
window.
Choosing Menu Commands
The right angle bracket symbol (>) denotes the path for
hierarchical menu items. For example, to create a new file,
the instruction would be
Example: Select File > New Project
Keyboard Conventions
Key names are spelled with initial caps. A plus sign
denotes a key combination.
Example: Press Ctrl + A to select all the video scenes in
the List View.
Brackets denote keys that do not have names printed on
them.
Example: Press the [Spacebar] to pause the slideshow.
Mouse Clicking
When a mouse click is required, the default is always a
left-click unless specified.
Express
6
Page 11
Chapter 2:
Bringing In Video
As mentioned earlier, you make a CD or DVD in three
steps: (1) Bring In Video, (2) Preview and Edit your video
in the TV Screen, and (3) Make your Disc. These modes
are represented by three buttons atop the Express interface,
which are ordered in the sequence used to make a disc.
Bring In Video is the process of transferring a video file
from a digital camcorder or other source to your PC’s hard
drive.
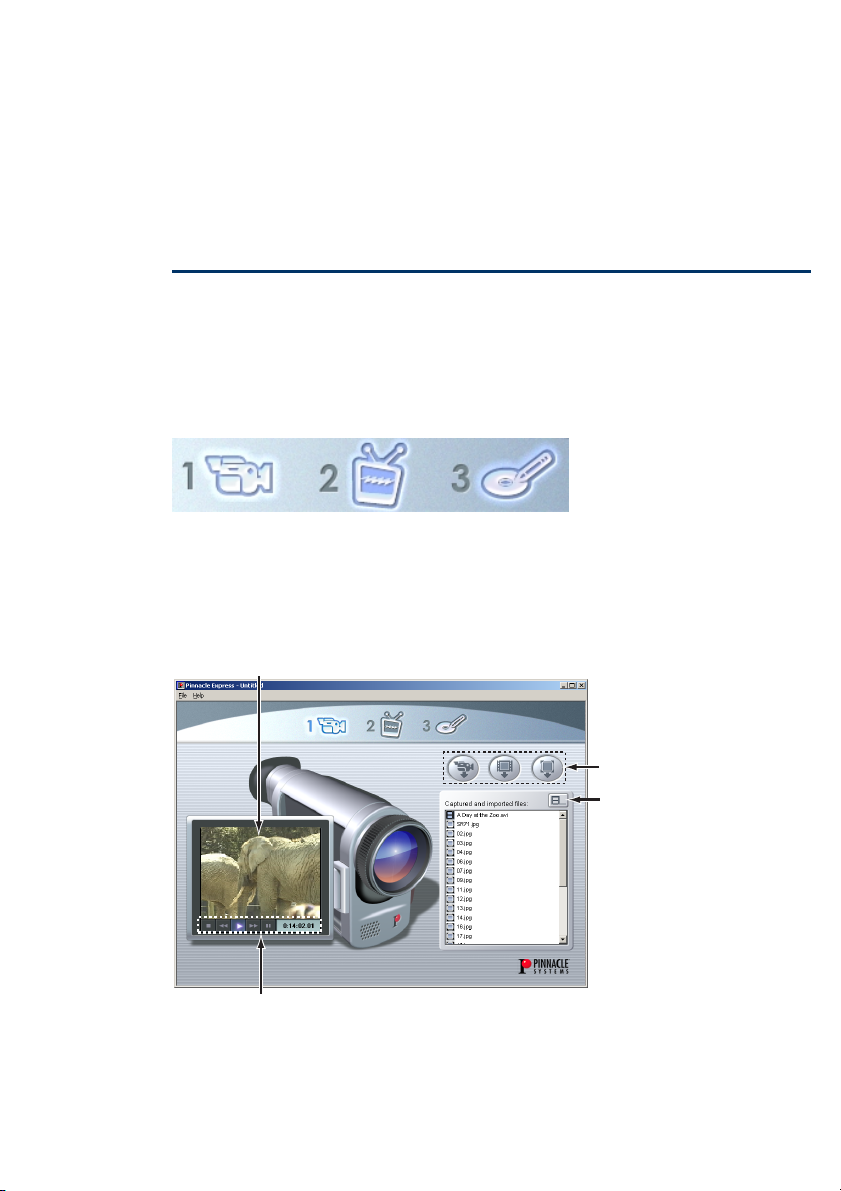
Your Bring In Video screen looks like this:
Preview screen
Source
material
options
File and
Scene Detection
options
Transport controls
Chapter 2: Bringing In Video 7
Page 12
Transport Controls
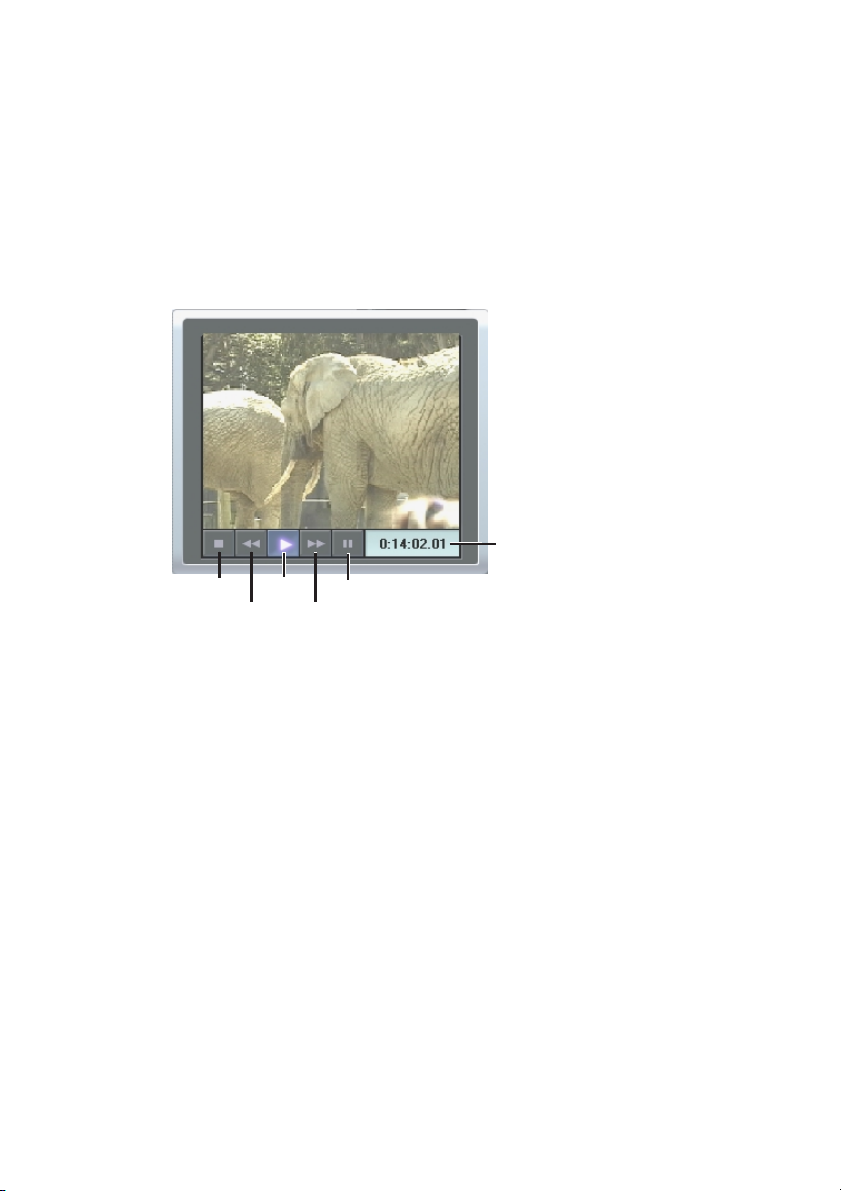
Use the Transport controls to view your tape or seek to the
tape location at which capture is to begin. The Counter
window displays the current position of the tape, and the
control buttons display the current mode of the camcorder
or VCR.
Counter
window
Stop
Play Pause
Rewind
Fast Forward
Source Material Options
The three buttons on the right side of the screen allow you
to capture video via a 1394 (FireWire) connection from a
DV device, import video from an AVI file, or import a still
image.
The Asset List: Express shows the file name and type of
each asset (the files you capture and import) in the
Captured and imported files window (see below).
Express 8
Page 13

Capturing Video from Your Camcorder
Often you will want to start your project by bringing in
video from your camcorder. Express supports digital
camcorders and VCRs using your PC’s 1394 (Firewire)
interface. Your DV device (camcorder or VCR) is
connected to your PC as described in Chapter 1. You may
capture an entire tape, or start and stop capture at any
point in the tape.
The Capture video button begins the capture process
by opening the Capture Video from DV Camcorder
dialog box (see below).
Import File
Express also allows you to import video files already on
your PC’s hard disk. If you wish to import video from a
type 2 AVI file (the type created by a DV camcorder),
click the Import video button to open a browser. Click
the Import still button to bring in still images from
your hard drive.
You can also import video and still image files by
dragging them from Windows Explorer into the Captured
and imported files window (see below).
Chapter 2: Bringing In Video 9
Page 14
The Capture Video From DV Camcorder
Dialog Box
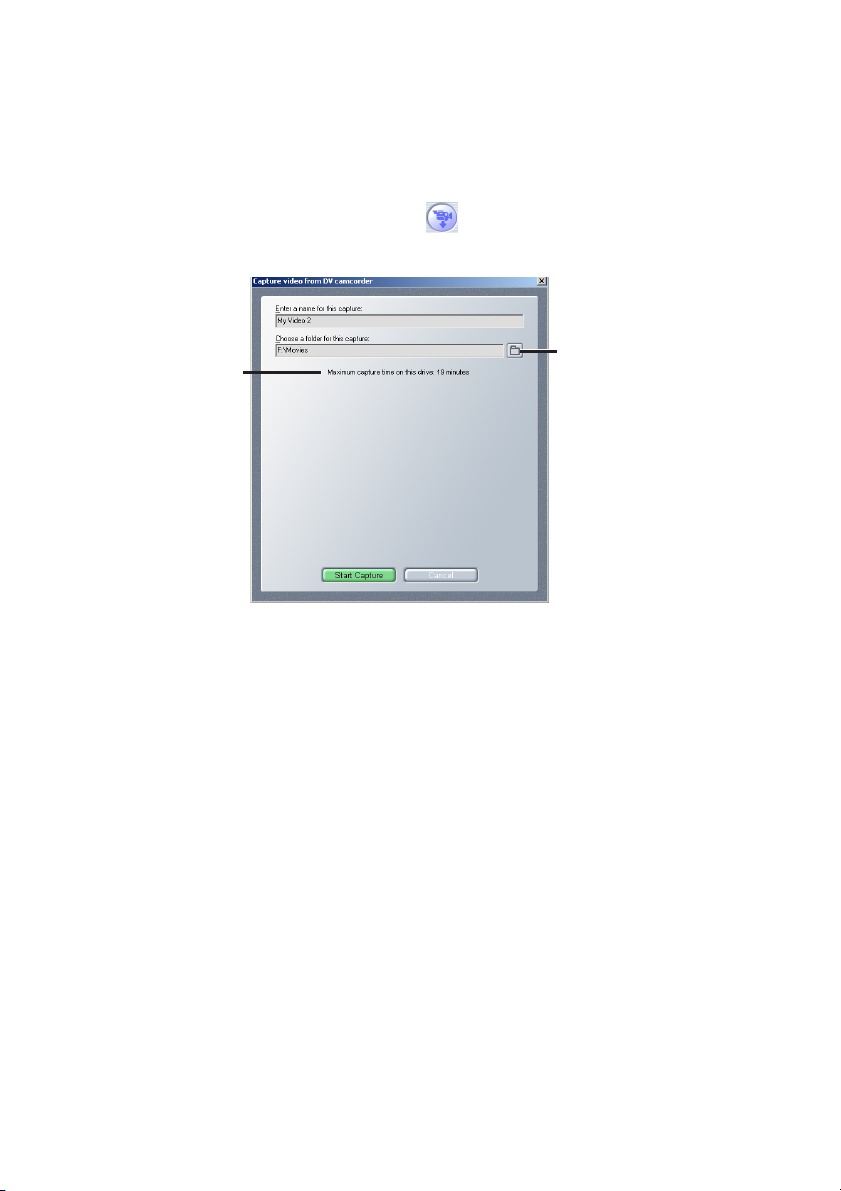
The Capture video button begins the capture process
by opening this dialog box:
Maximum
capture
time
Select scene
detect options
The Preview screen above the Transport Controls
continues to display incoming video. When you choose the
drive where the video will be captured, Express calculates
and displays the maximum capture time. Enter a name for
your capture, and click the Start Capture button.
Express 10
Page 15
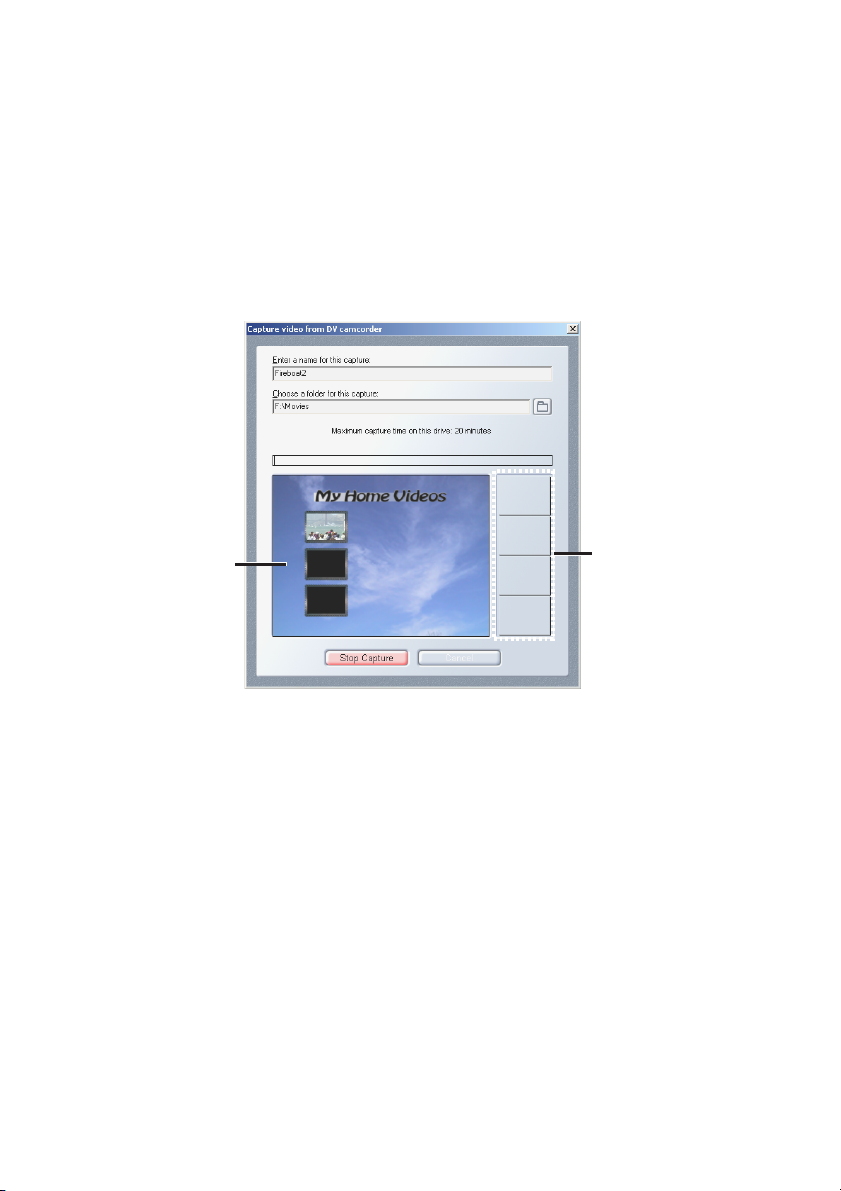
The Start Capture button triggers the display of a sample
scene index menu page with scene thumbnails created
from the initial frame of each video scene detected. When
one menu page is populated with thumbnails, it slides to
the right and another menu page is generated. This
continues until you click the Stop Capture button to end
your capture session.
Sample
menu
page
Populated
menu
pages
Chapter 2: Bringing In Video 11
Page 16
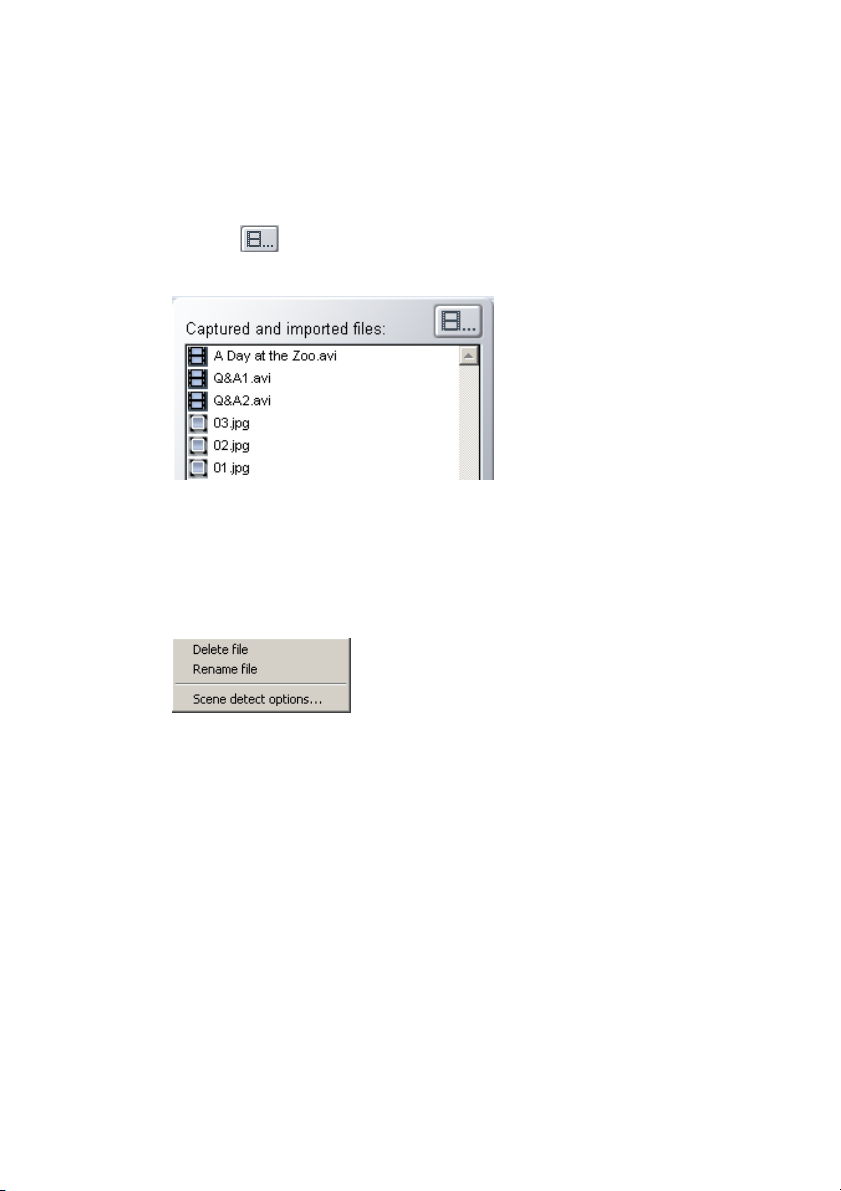
The Captured and Imported Files Window
As you capture and import, Express shows the file name
and type of each asset in this window. The Asset menu
button at the top right of the window gives you
commands for managing your assets.
Deleting and Renaming assets
To delete or rename any asset, select the file name from
the list, click the Asset menu button, and select the desired
operation from the pop-up Asset menu.
Scene Detection options
The Scene detect options choice on the Asset menu opens
the Scene Detection Options dialog box where you choose
how you want Scene Detection to operate (see below).
Importing assets by dragging from Explorer
Another way to import files is to select them in Windows
Explorer and drag them onto the asset list.You can
instantly create a slide show by dragging in a folder of
images in one operation!
Express 12
Page 17
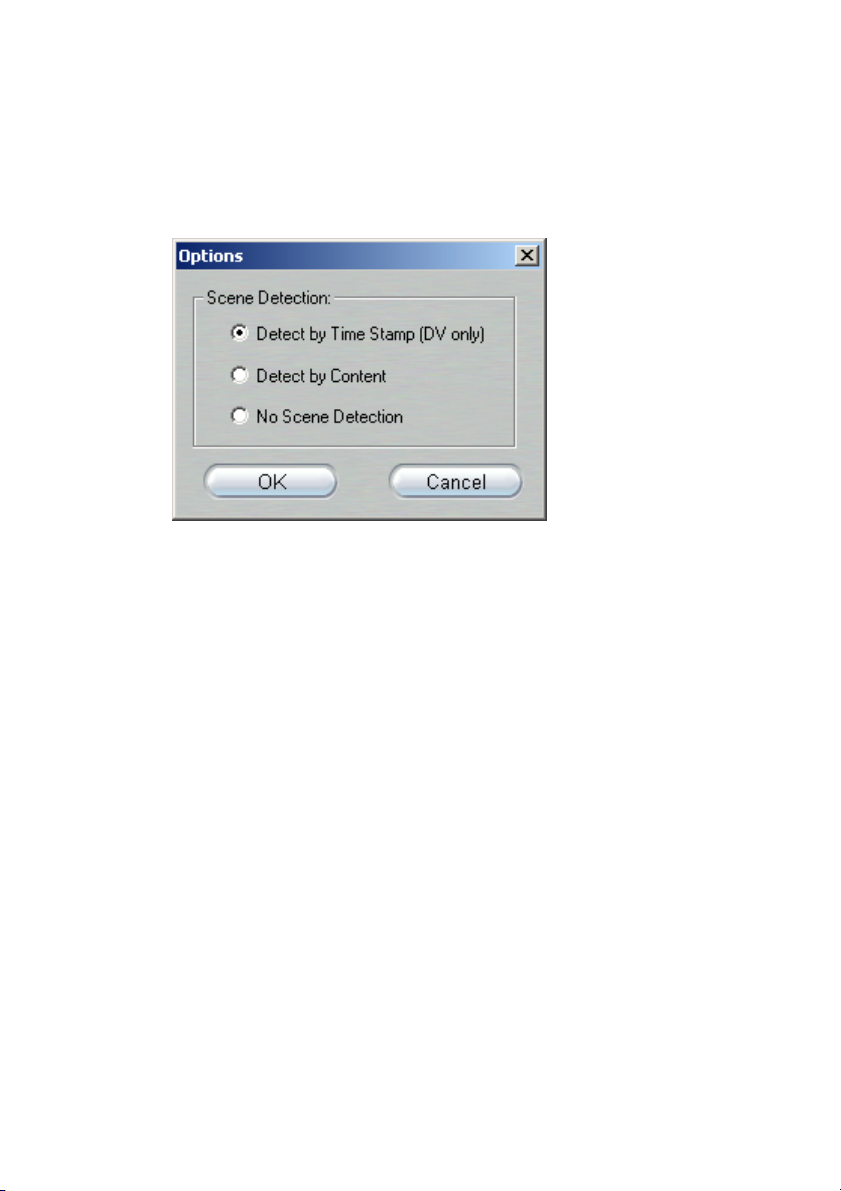
The Scene Detection Options Dialog Box
Open this dialog with Scene detect options from the Asset
menu in the Captured and imported files window.
Automatic Scene Detection is a key feature of Express. It
eliminates the drudgery of manually marking the
beginnings and ends of video scenes. When Express
captures your video to your hard drive, it automatically
detects natural breaks that occur in that video.
Your choices are:
• Detect by Time Stamp: This option only works with
DV video. It detects scenes by sensing a discontinuity in
the time of day recorded along with the video.
• Detect by Content: This option, which detects scenes
by changes in brightness, works with any video. Use it
if when bringing video from tape that has been dubbed,
or when using analog tapes with a Digital8 camcorder.
• No Scene Detection: This option skips the scene
detection feature (don’t worry—you’ll still be able to
divide video clips into scenes manually).
Chapter 2: Bringing In Video 13
Page 18

Express 14 Chapter 3: Previewing the Disc 15
Page 19
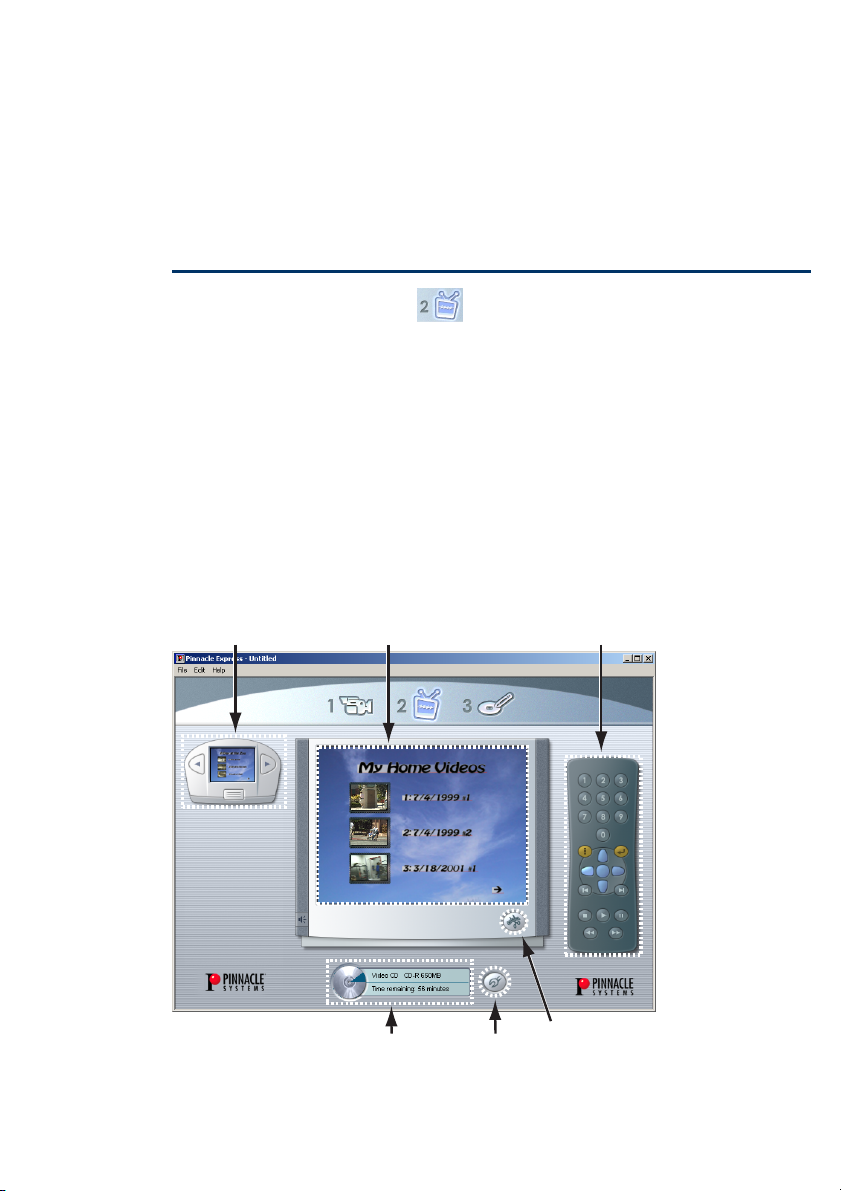
Chapter 3:
Previewing The Disc
Clicking on this TV icon
takes you to the
Preview/Edit screen, where Express shows how your
finished project will look when played on your DVD
player and TV. The on-screen DVD Player Remote
Control gives you a realistic feel for the interactivity you
build into each project.
In addition to previewing your project, this screen is also
where you design menu pages, rearrange and trim scenes,
and choose the type of blank media on which you’ll be
recording. You’ll learn more about these subjects in later
chapters.
Style Chooser
TV Screen
Remote Control
Disc Meter
Output/Media
Settings
Edit Video
Settings
Page 20
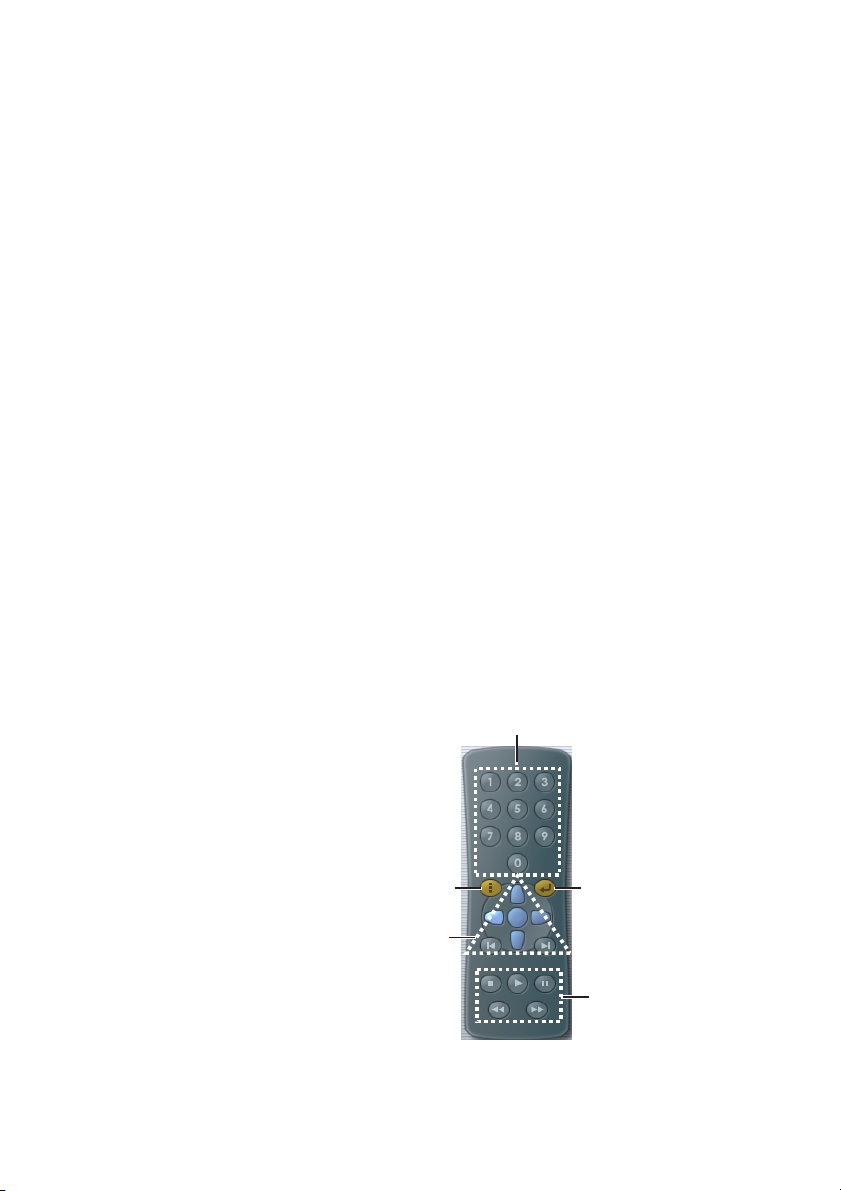
The Preview/Edit mode displays six areas of interest: the
Style Chooser, the TV Screen, the Remote Control, the
Edit Video Settings button (which opens the Edit Video
Settings dialog box), the Output Media Settings button,
(which opens the Output Media Settings dialog box), and
the Disc Meter. This chapter describes the TV Screen, the
Remote Control, the Output Media Settings dialog box
and the Disc Meter.
The TV Screen
The TV screen previews what you will see on your TV
when the completed disc is played in a VideoCD or DVD
player. It displays menu pages as well as full-motion video
and still images from your project.
Click your mouse on the scene icons within the menu
pages to play the corresponding scenes. Use the remote
control to return to menu pages. You can also use mouse
clicks to navigate from one menu page to another.
The Remote Control
16
This control
allows you to
navigate
between menu
pages, and to
play scenes in
any order.
Express
Return to menu
(DVD only)
Navigation
buttons
(DVD only)
Number pad
Return to menu
(VCDs and SVCDs)
Movie controls
Page 21
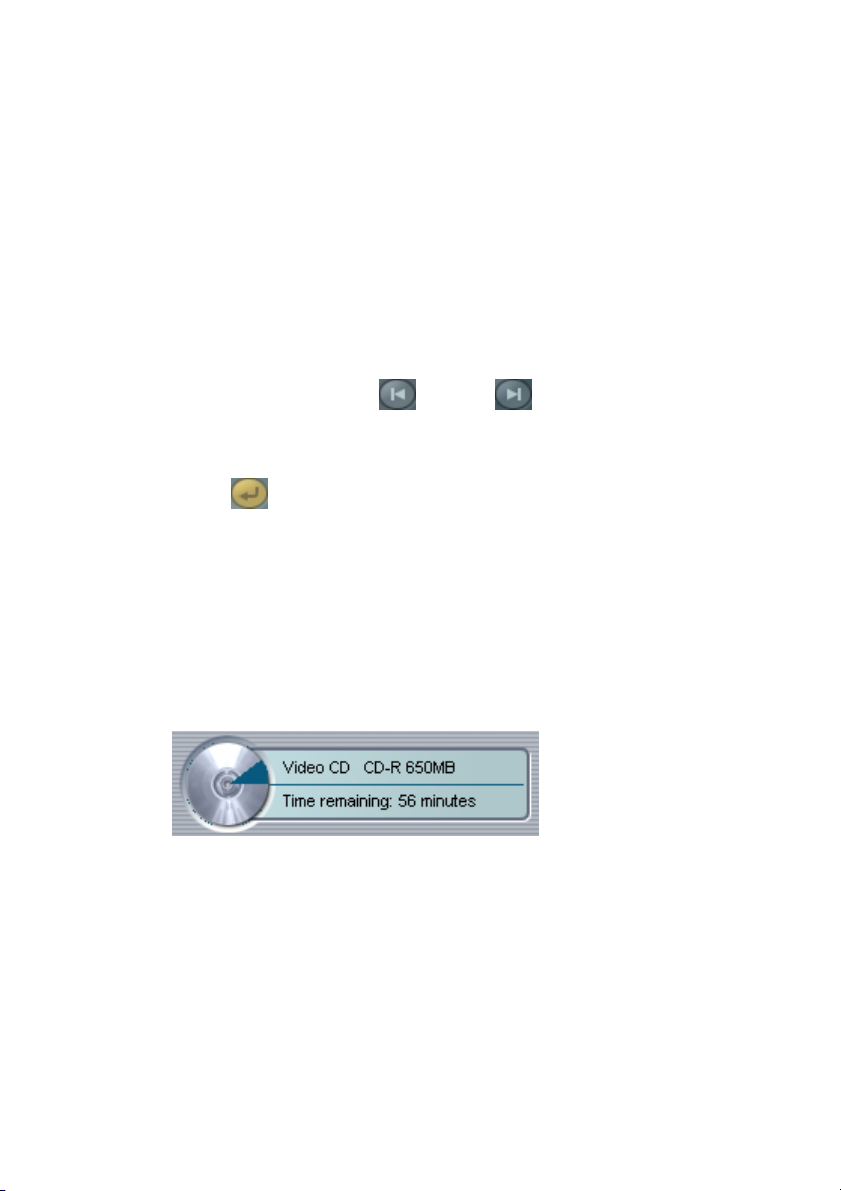
Number pad
When the menu page displays, press any two-digit scene
number for direct access to the corresponding scene.
Navigation buttons
Move (Up, Down, Left, Right) through a DVD menu page,
and once a scene is selected, play it by clicking the center
button.
Jump to the previous or next scene or menu page.
Return to Menu Button
Click at any time to return to the most recentlydisplayed menu page.
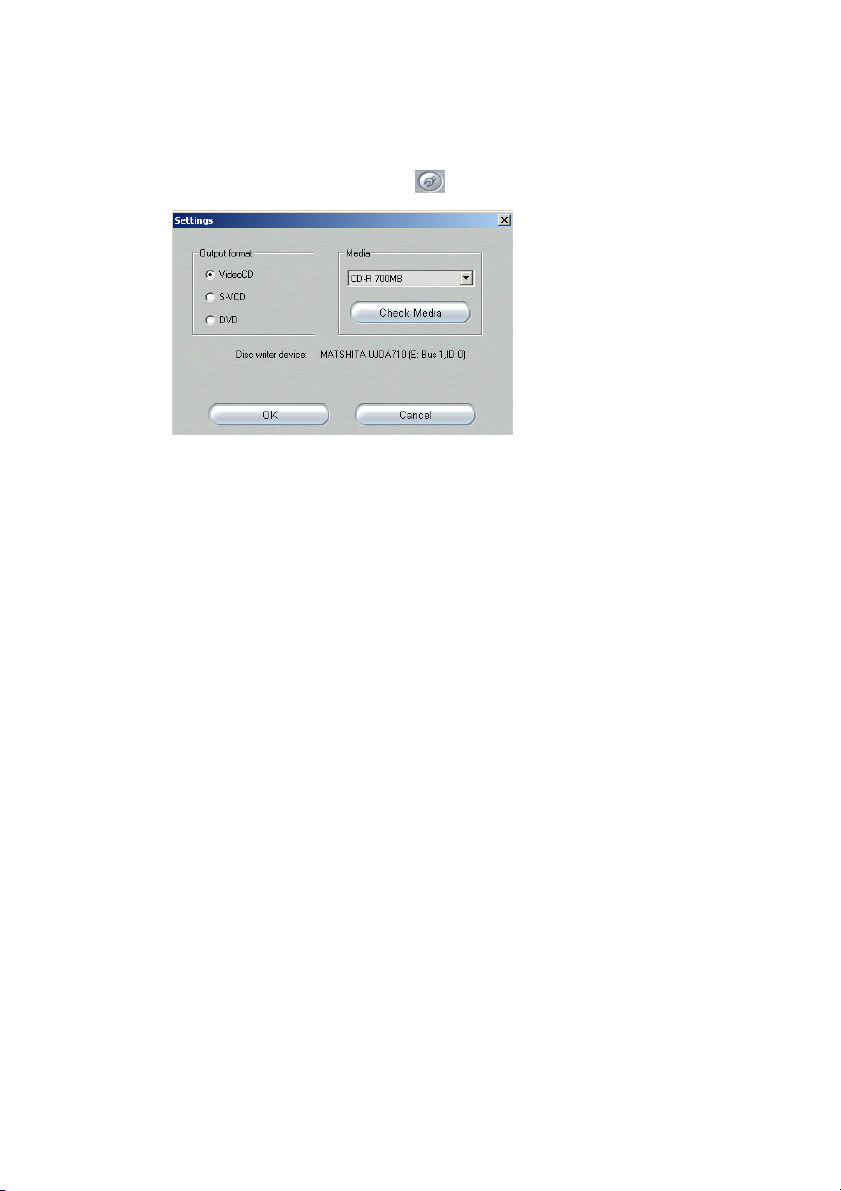
The Disc Meter
This display shows you the current recordable capacity on
your output disc. The figure depends on both the output
format chosen in the Output Media Settings dialog box
(see below) and the estimated space remaining on the disc.
Chapter 3: Previewing the Disc 17
Page 22
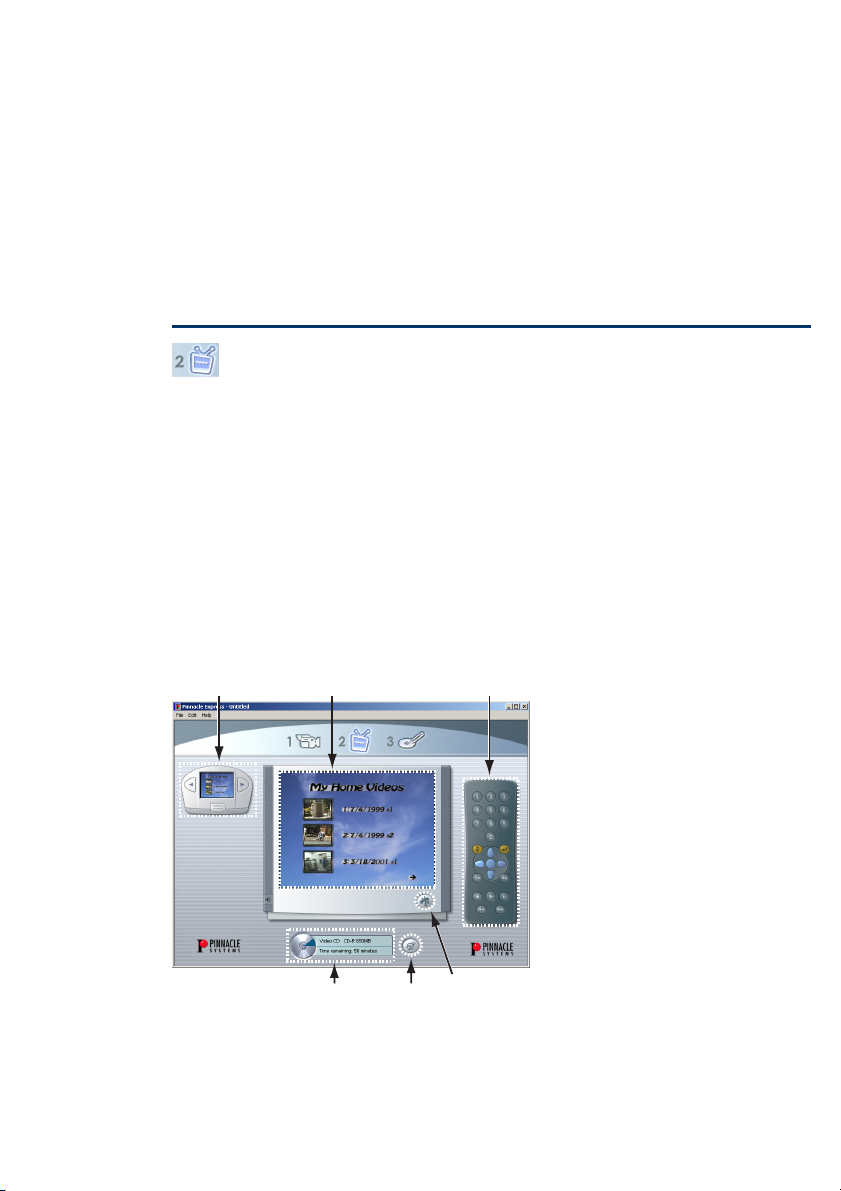
Output Media Settings
Click the Settings button to open this dialog box:
Output Format
Select the type of disc you wish to create.
VCD (VideoCD): This is an extremely popular format in
China and other parts of the world. A VideoCD disc
allows up to 70 minutes of VHS-quality video to be
burned onto a CD and is supported by a large number of
DVD players. Check the Pinnacle web site for a list of
compatible players.
18
S-VCD (Super-VideoCD): Super-VideoCD is an
enhancement to the VCD format. An S-VCD disc allows
up to 30 minutes of near-DVD quality video to be burned
onto a CD and is supported by a number of DVD players.
Check the Pinnacle web site for a list of compatible
players.
Express
Page 23

DVD (Digital Versatile Disc): A DVD disc is the ultimate
in video quality. Express can burn up to 90 minutes of
high-quality video and audio onto to a DVD-R/RW disc.
For a list of compatible DVD burners, check the Pinnacle
web site.
Media
Based on the output format you choose, Express will
prompt you as to which type of media is needed.
CD-R (and CD-RW): Use for VCD and S-VCD titles. If
you are using CD-RW, Express will prompt you to erase
the disc.
DVD-R (and DVD-RW): Express supports General
DVD-R (write once) and DVD-RW (write many) media.
Express will support other DVD formats in the future.
Check the Pinnacle web site for updates.
Check Media
Place the blank or erasable disc into your drive and
Express will verify its usability.
Chapter 3: Previewing the Disc 19
Page 24

20
Express
Page 25
Chapter 4:
TV Screen and Remote
Control
This is where Express shows you how your project
will look on a television screen. The DVD Player Remote
Control gives you a realistic feel for the interactivity you
build into each project.
TV Screen
The TV Screen is designed to have the look and feel of a
television you would find in your living room. It displays
scene index menu pages as well as full-motion video and
still images from your project. You navigate in the TV
Screen with either your cursor or the Remote Control.
Style Chooser
TV Screen
Remote Control
Disc Meter
Chapter 4: TV Screen and Remote Control 21
Output/Media
Settings
Edit Video
Settings
Page 26
Cursor Navigation
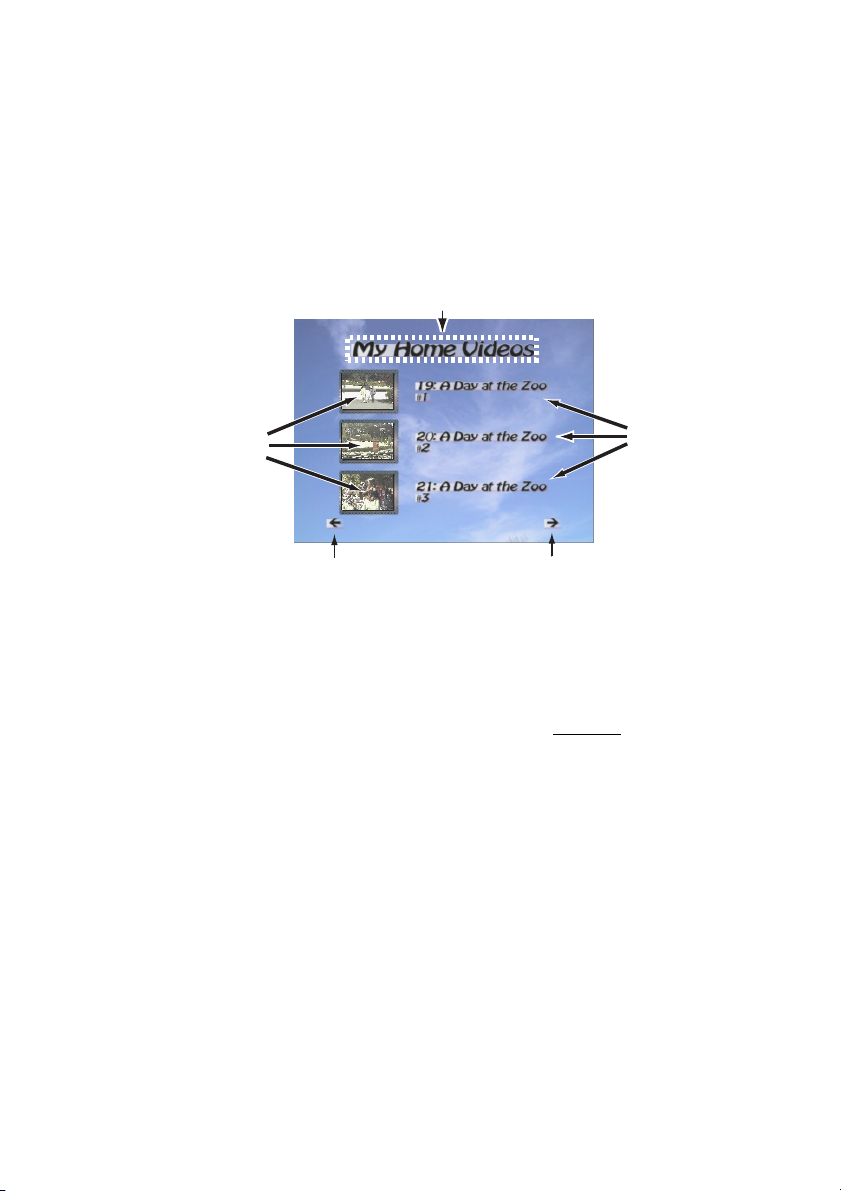
If a project has more than one menu page, left- and rightarrows appear at the bottom of the page to indicate
previous or subsequent pages. Click these arrows with
your cursor to move through menu pages.
Project Title
Scene
Thumbnails
Titles
Previous page Next page
Click any thumbnail with your cursor and the
corresponding scene or still image will activate, come fullscreen, and play.
Click any title with your cursor and a text field opens.
Modify or create a new title, then press [Enter] and the
modifications are applied.
Express 22
Page 27
Remote Control Navigation
The Express Remote Control features all functions needed
to navigate through VideoCDs, Super VideoCDs, and
DVDs.
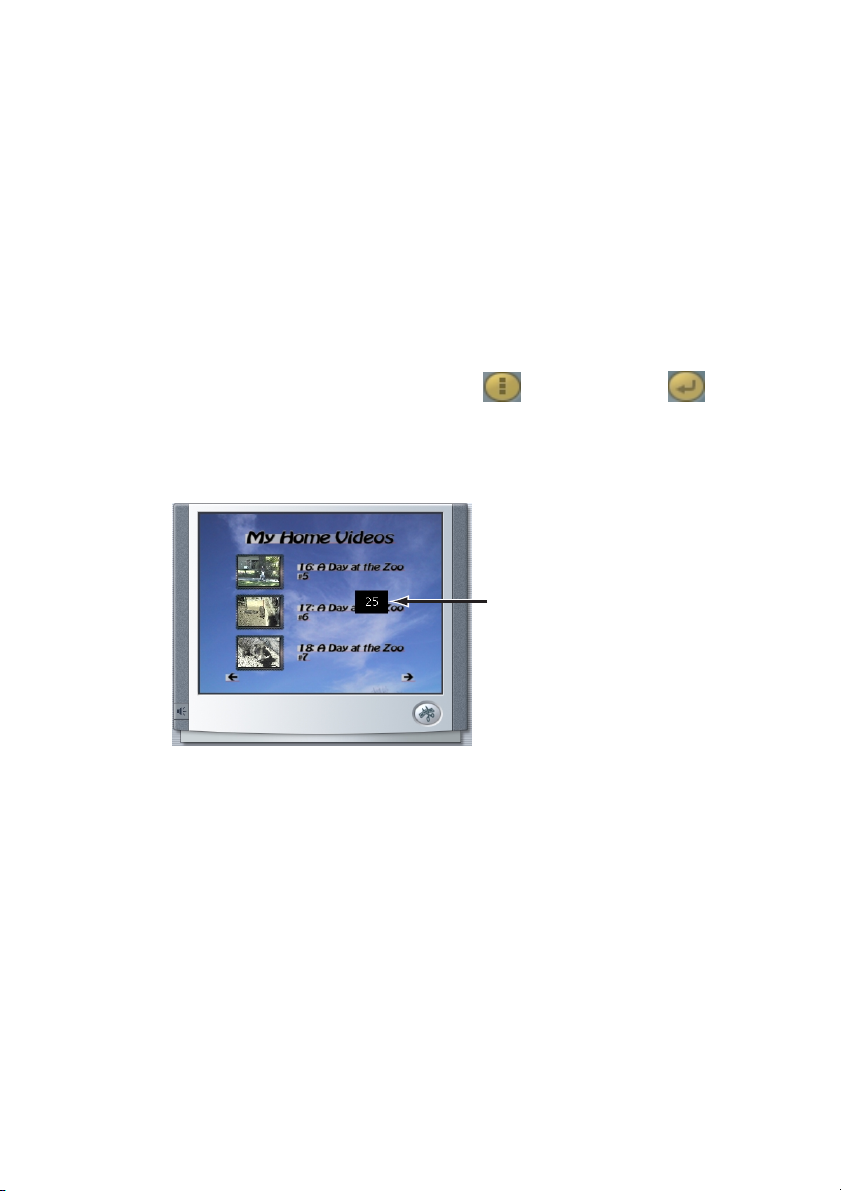
Number Pad
The 10-digit number pad allows direct access to any scene
in a movie. If you are not already on a menu page, use the
Go To Menu Page button (click for DVDs and for
Video CDs and Super Video CDs) to return to a menu
page. Then key in the scene number you want to access,
and Express plays that scene immediately.
Display of
scene number
keyed into
number pad
Chapter 4: TV Screen and Remote Control 23
Page 28
DVD Navigation Buttons
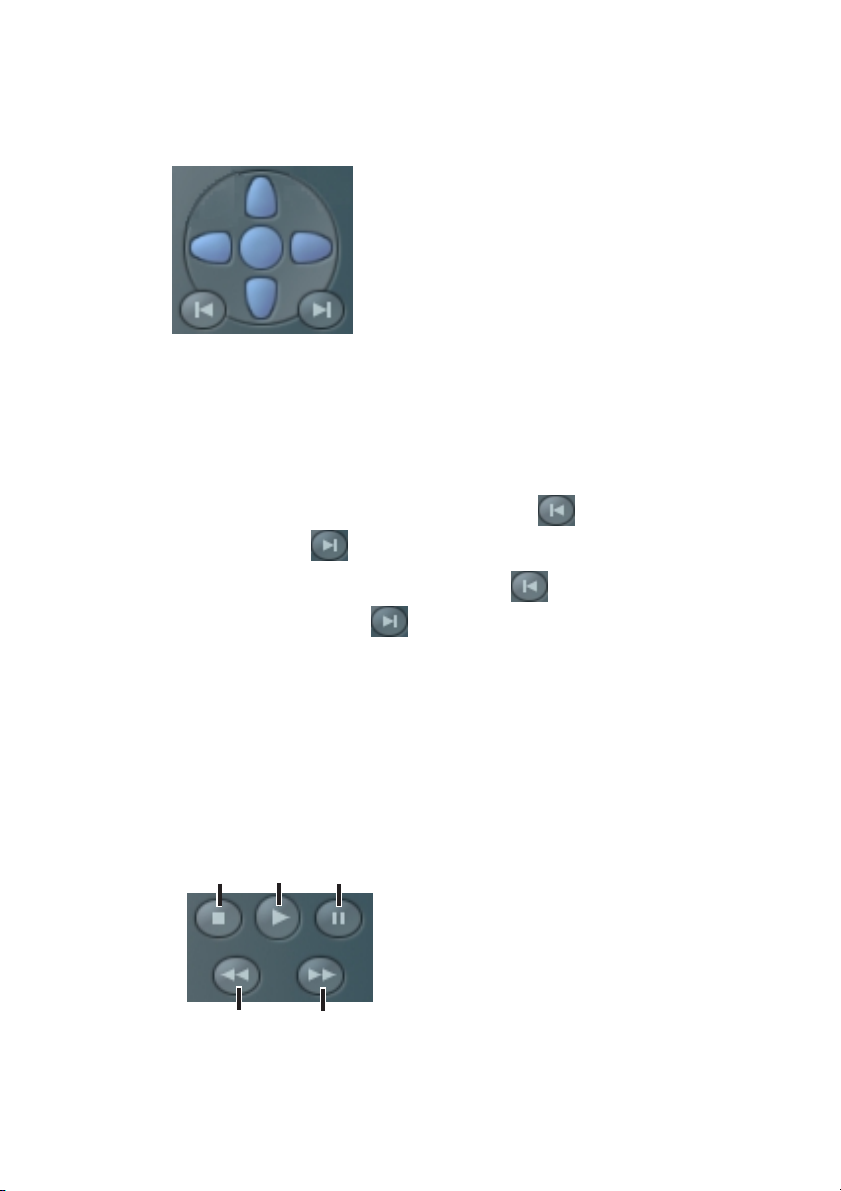
These seven buttons provide navigation to selected scenes
within a menu page. Selected scenes are highlighted. Blue
buttons take you Up, Down, Left and Right. The center
blue button is Play Selected Scene. The two remaining
buttons have dual functions:
• When a scene is playing or paused, is Play Previous
Scene and is Play Next Scene.
• When a menu page is displayed, is Show Previous
Menu Page, and is Show Next Menu Page.
Note: if you can’t navigate through DVD menu pages with
the blue buttons, click the Settings button (see Chapter 3)
and verify you’ve selected DVD as your Output Format.
Movie Controls
These are controls for the movie only, and do not affect
scenes or menu pages.
Stop
Play Pause
Reverse x10 Forward x10
Express 24
Page 29
Chapter 5:
Customizing Menu Pages
This is where you choose pre-made styles for
your scene index menu pages, or design custom menu
pages. Before describing both approaches, here’s an
overview of the elements which combine to make
Express menu pages.
MENU PAGE ELEMENTS
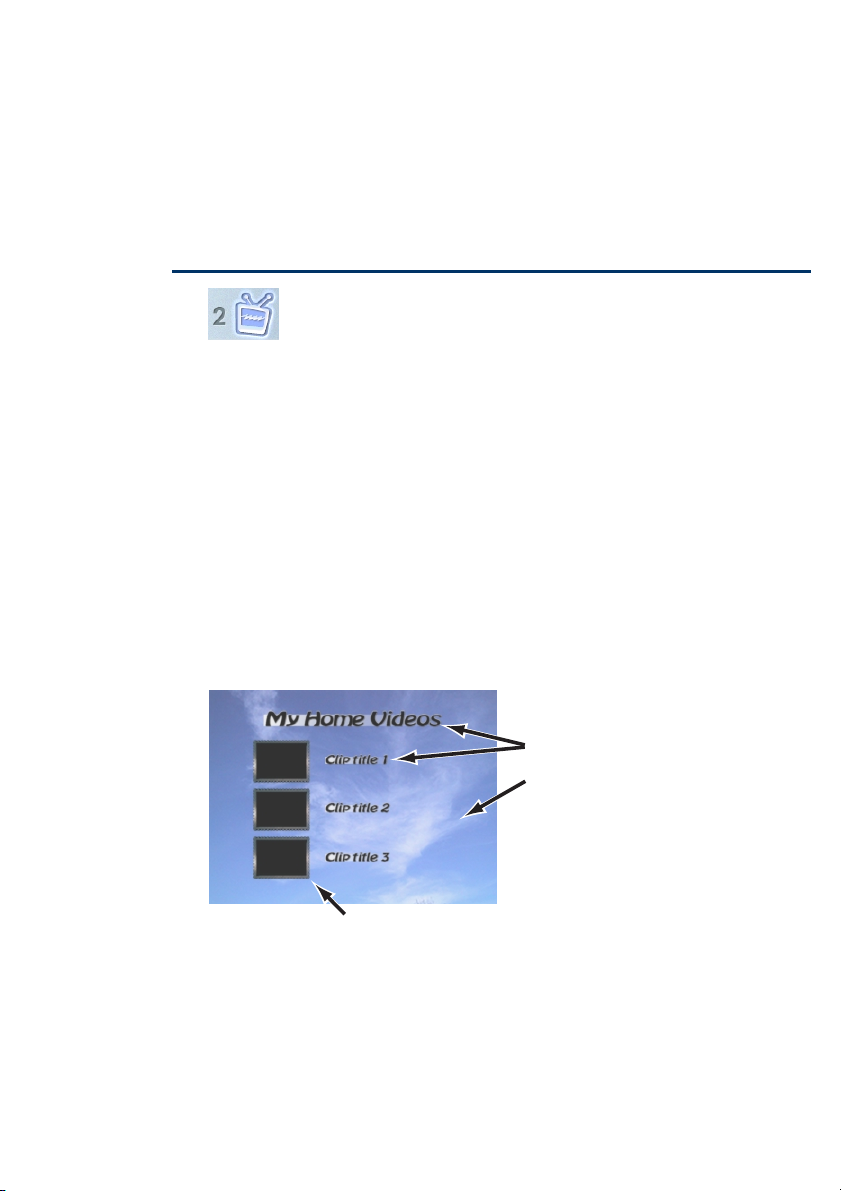
An Express scene index menu page is comprised of
four graphic elements and one audio element. The
graphic elements are Layout, Background, Text style,
and Frames. The audio element is a WAV or MP3 file
you can assign to any menu page.
Text style
Background
Fram e
You can access each element when you customize a
menu page, a process described later in this chapter.
Chapter 5: Customizing the Menu Pages 25
Page 30
Layout
This menu page element is the template that
determines how frames, main title, and scene title are
arranged on the page. Layouts differ in the number and
position of frames, and whether or not they include
main titles or scene titles.
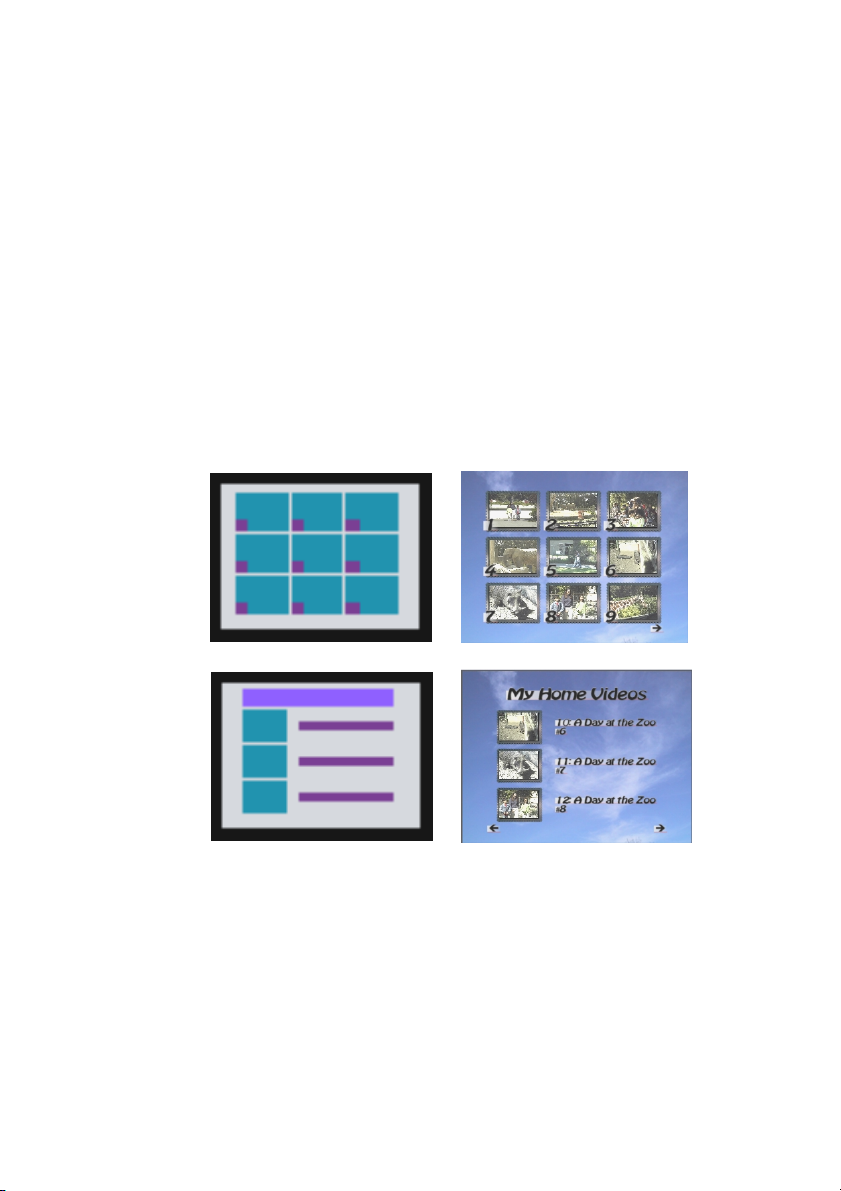
To illustrate, here are two Express layout templates
and their associated menu pages with background, text
and frames. Notice that although there are nine scenes
in the top menu page, there is no main title, and the
scene titles are limited to ascending numbers.
Express 26
Menu page layout
Menu page with elements
The layout indicates the positioning of frames, main
title, and scene titles/numbers within the menu page.
Layouts are selected in the Create Custom Menu
dialog box (see below).
Page 31

Background
This menu page element is the image which creates the
graphic background. Express comes with a number of
attractive backgrounds, and also allows you to import
any BMP, JPG, PCD, PCT, TGA, TIF, or WMF file
for use as a custom background.
The Express background aspect ratio is 4 to 3. If you
import an image with a different aspect ratio, Express
will scale it to fit within the frame, and fill the
remaining area with the color of the top-left pixel of
the imported image.
Backgrounds are found and imported in the Create
Custom Menu dialog box (see below).
Text style
With this menu page element, Express offers you
multiple text styles with different fonts and colors that
you can apply to your menu pages. Text Styles are
found in the Create Custom Menu dialog box.
Frames
Frames surround each scene thumbnail, and you can
choose frames that differ in color and transparency.
In addition to being a graphic element on the menu
page, frames are highlighted to indicate which scene is
selected when navigating through a DVD menu page.
Frames are found in the Create Custom Menu dialog
box.
Chapter 5: Customizing the Menu Pages 27
Page 32
Sound
Sound can be used as a menu page element. Express
comes with a selection of music and sound effect
WAV files. You can also import custom WAV or MP3
files (e.g. sound effects, music, or voice-over
narration). You can attach any WAV or MP3 file to
any menu page or still image.
Audio files are found and imported in the Create
Custom Menu dialog box (see below).
THE STYLE CHOOSER
For fast and easy menu pages, use the Express Style
Chooser. It’s pre-loaded with numerous styles
featuring different combinations of layouts,
backgrounds, text styles and frames.
Navigating the Style Chooser
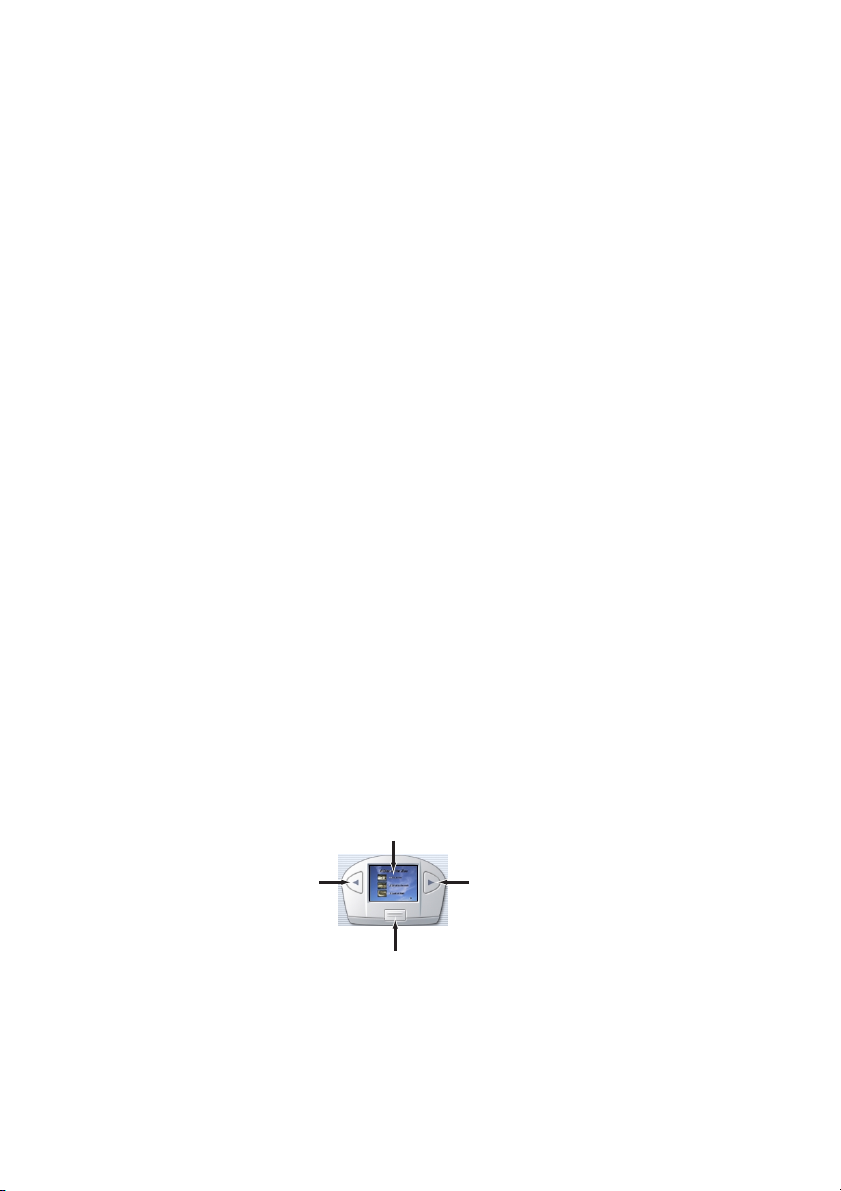
The Style Chooser displays a thumbnail of the current
menu page appearing on the TV Screen. As you scroll
forward or backward through the style choices, each
thumbnail is replicated in the TV screen for immediate
viewing.
Menu Page
thumbnail
Express 28
Scroll backward
Open/close
drawer
Scroll forward
Page 33
The Style Chooser also offers a No Menu choice:
when your disc is inserted in a player, the disc plays
from start to finish without displaying a menu page.
The viewer still has the ability to jump forward or
back between scenes with the remote control.
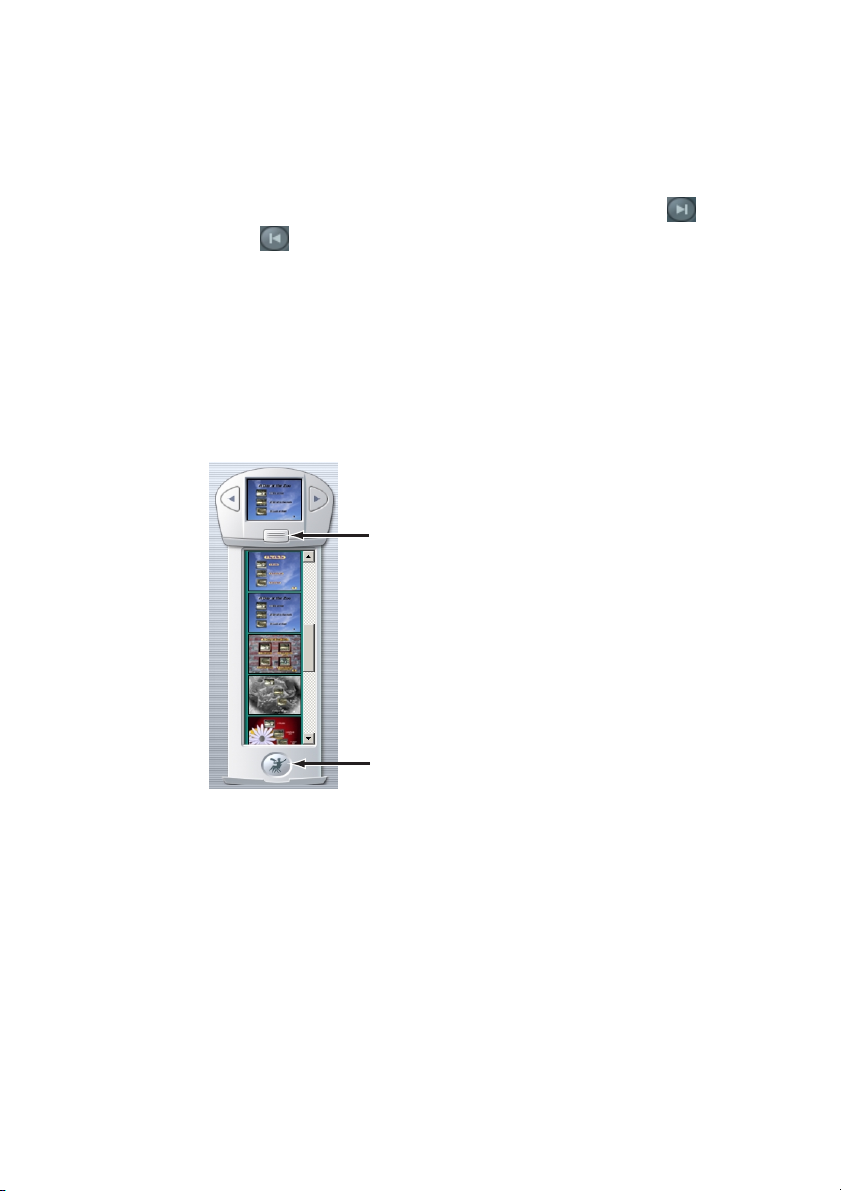
The Style Chooser Drawer
Click the Open Drawer button on the Style Chooser to
display five style thumbnails at a time. Click on any
style and it appears instantly in the TV Screen,
displaying scene thumbnails and titles of imported or
captured assets.
Click to open or close drawer
Click to create
custom menu
Click on the button at the bottom of the drawer to
customize a menu page.
Chapter 5: Customizing the Menu Pages 29
Page 34
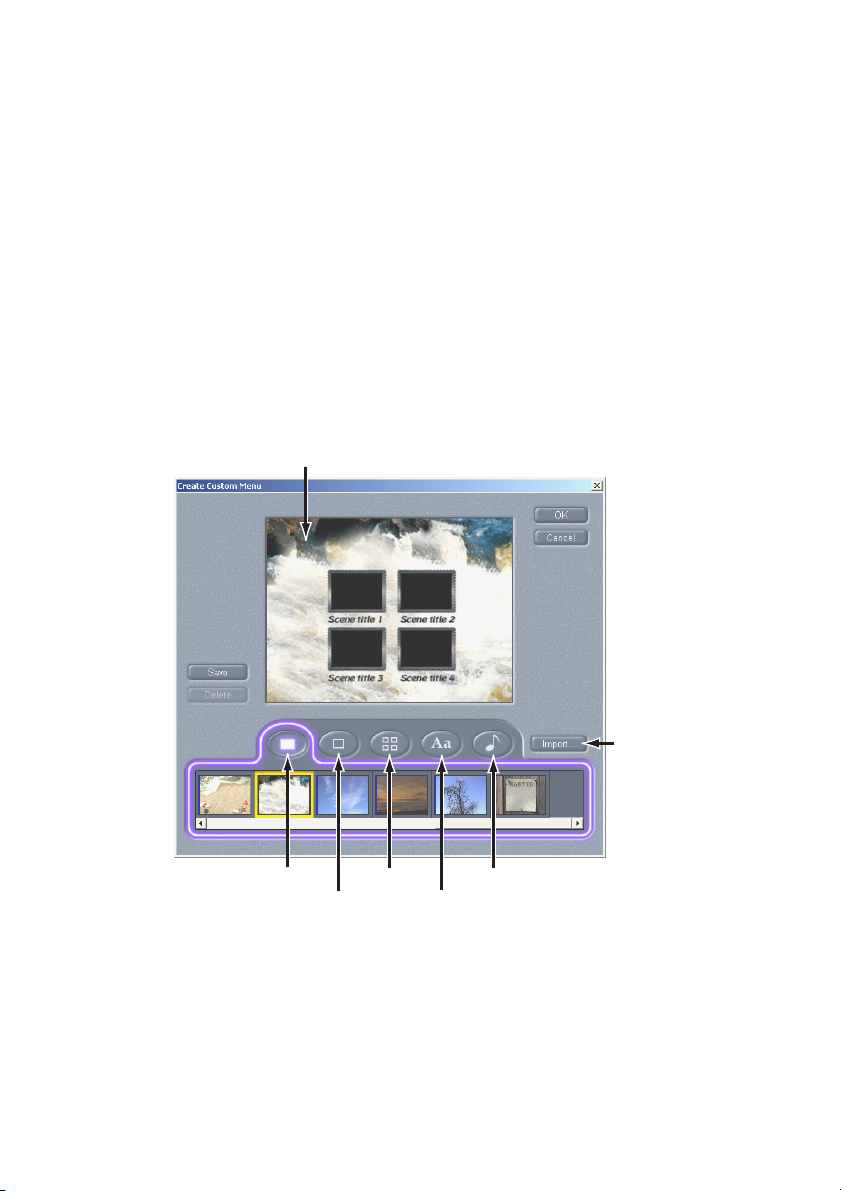
Create Custom Menu Dialog Box
Access this dialog box by clicking the Create Custom
Menu button on the Style Chooser. This is where you may
customize each element of a menu page. Click on any of
the five element buttons and choices appear. Click on any
choice and the sample menu page is immediately updated
in the Preview screen with the new element choice.
To use your own background images, MP3 or .WAV files,
click the Import button and make your selection to open a
browser.
Preview screen
Express 30
Background
Frame
Layout
Text Style
Click to import
music/images
Music
Page 35

Menu Page Audio Files
When attaching an audio file to a menu page, Express sets
the minimum duration at 40 seconds, and the maximum
duration at 280 seconds. Here are three examples:
• When displaying a menu page with a 15-second audio
file attached, Express plays the audio file and adds
another 25 seconds of silence before playing the file
again. This continues for as long as the menu page
displays.
• When displaying a menu page with a 120-second audio
file attached, Express plays the audio file and
immediately plays it again (loops the audio file). This
continues for as long as the menu page displays.
• When displaying a menu page with a 300-second audio
file attached, Express plays the first 280 seconds and
begins playing it immediately from the start. This
continues for as long as the menu page displays.
Chapter 5: Customizing the Menu Pages 31
Page 36

Express 32 Chapter 6: Editing Scenes and Still Images 33
Page 37
Chapter 6:
Editing Scenes and Still
Images
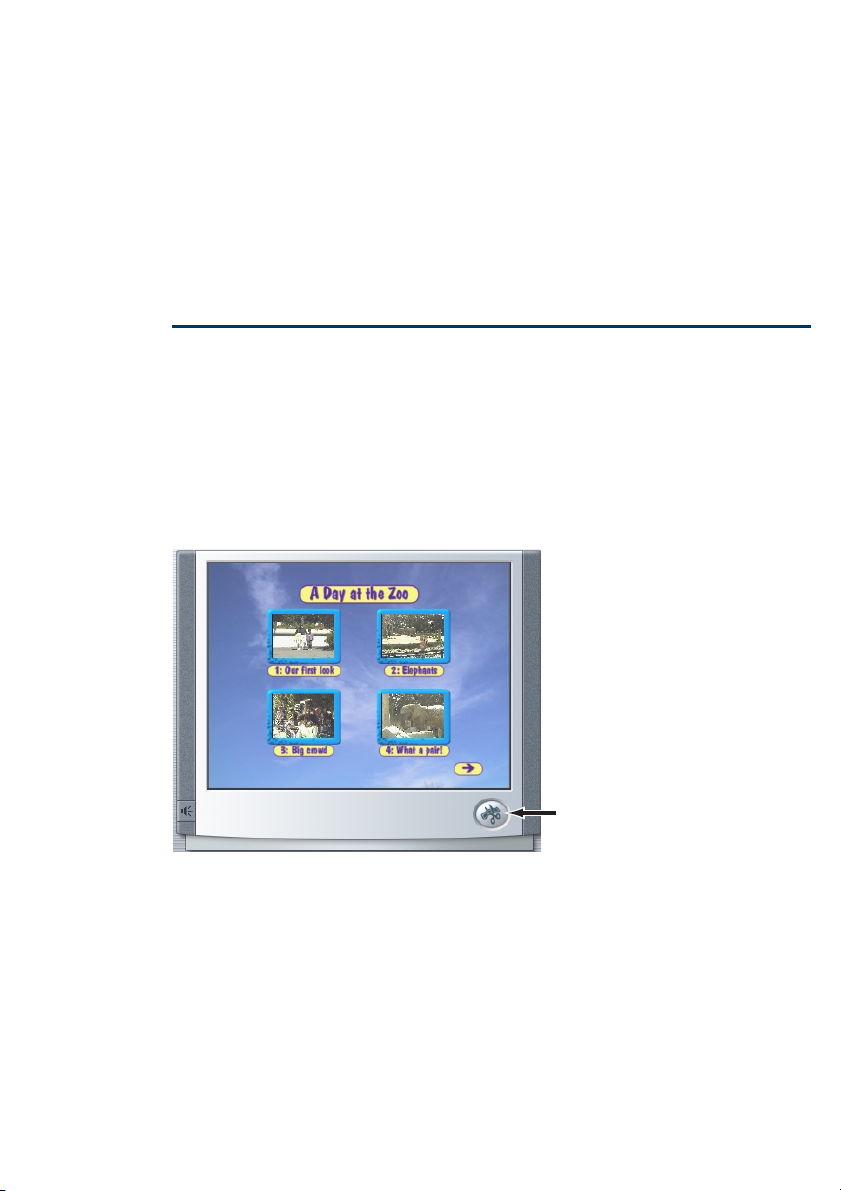
When you have a menu page constructed to your liking,
you may wish to edit your video scenes and still images.
Click the Edit Video button to open the Edit Video dialog
box. This is where you rearrange, trim, and rename scenes,
change scene thumbnails, attach audio files to Slideshows,
and add dissolves and fades between scenes and still
images.
Click to Edit Video
Page 38
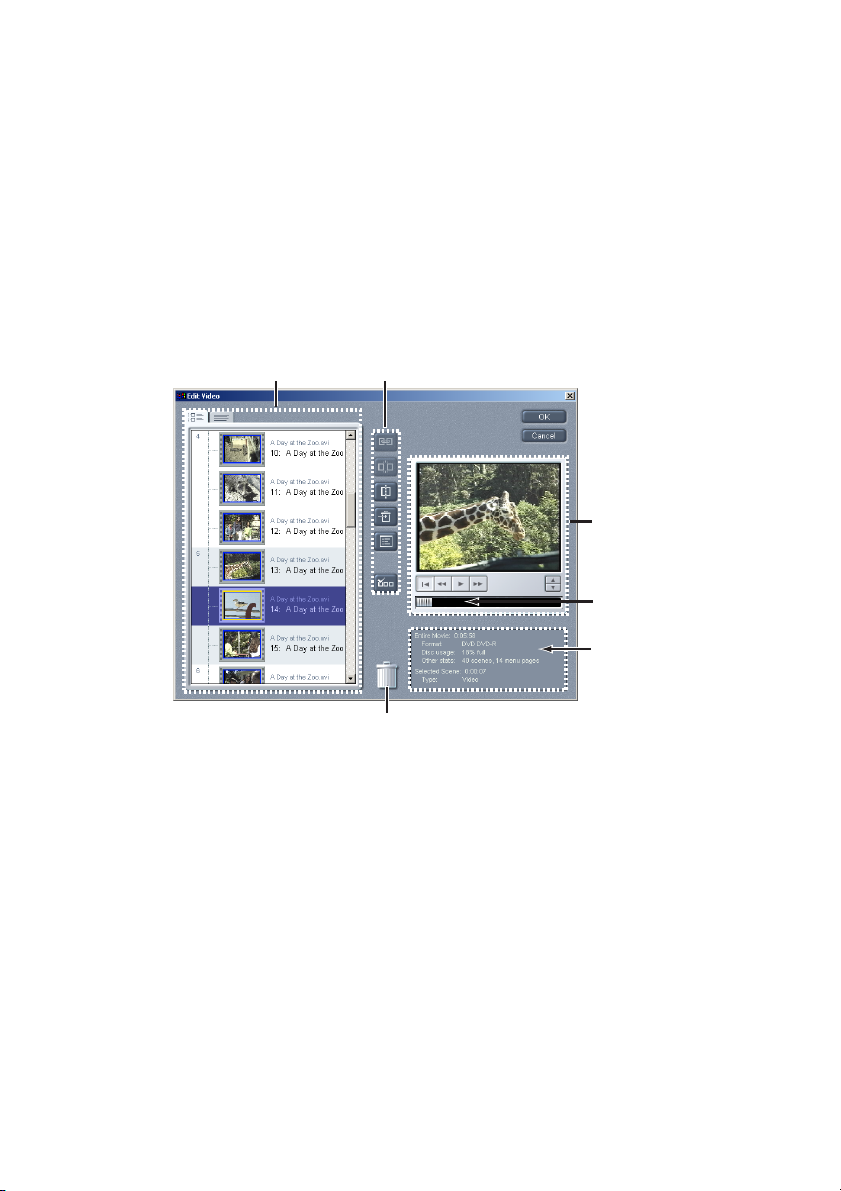
THE EDIT VIDEO DIALOG BOX
This dialog box opens with two List Views of the menu
pages, a Player to view scenes and still images, a scene
information box that updates with each selection in the
List View, and a suite of edit tools. Each List View is a
view of the menu pages, one that allows you to scroll
through all scenes and still images.
List Views of menu pages
Edit tools
Player
Scrubber
Updated
scene information
Recycle bin
When Express brings in video from a DV device, it
assigns scenes a captured video title and a scene title. The
default captured video title is the recording date of the
video, and the default scene titles are ascending numbers
assigned in the order each scene is detected.
Express 34
Page 39
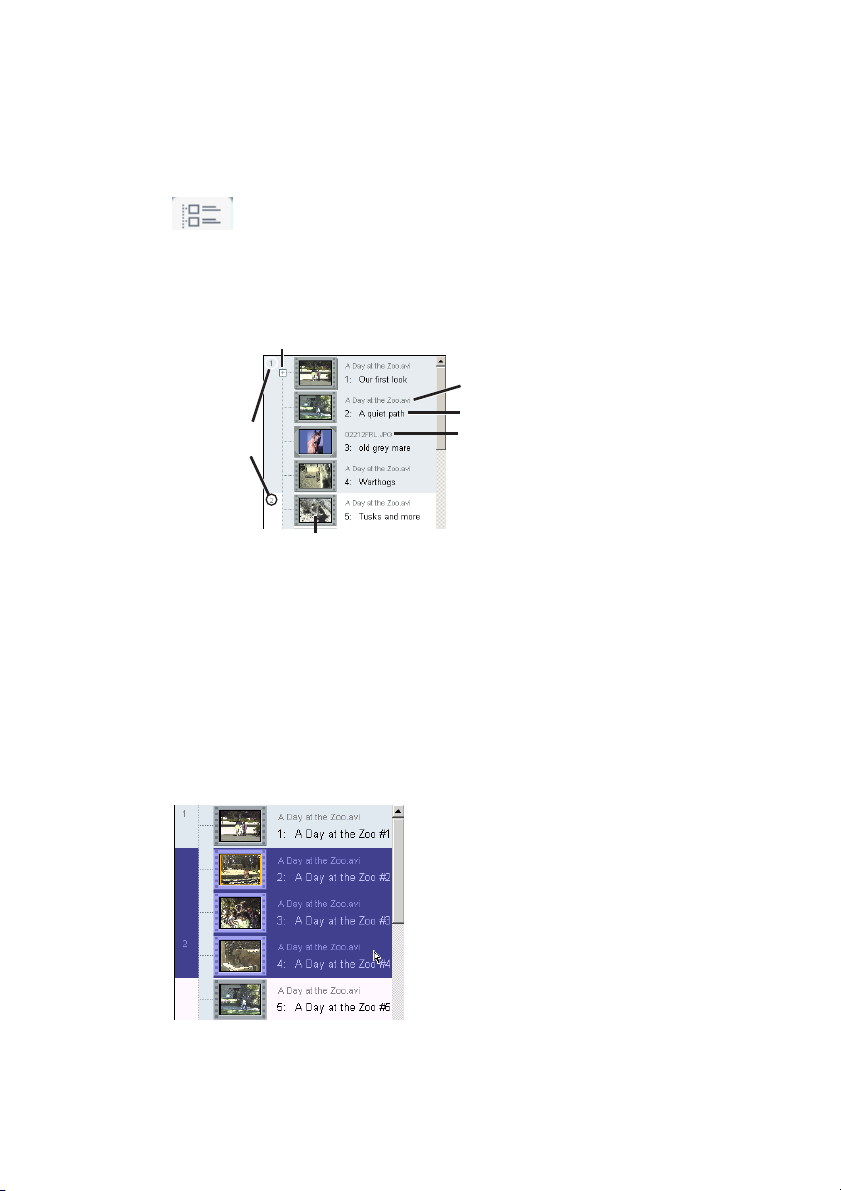
The Thumbnail List View
Access this List View by clicking the Thumbnail tab
at the top of the dialog box. This view of the menu
page displays the thumbnail representing the scene, the
title of the captured video file or still image, and the scene
title.
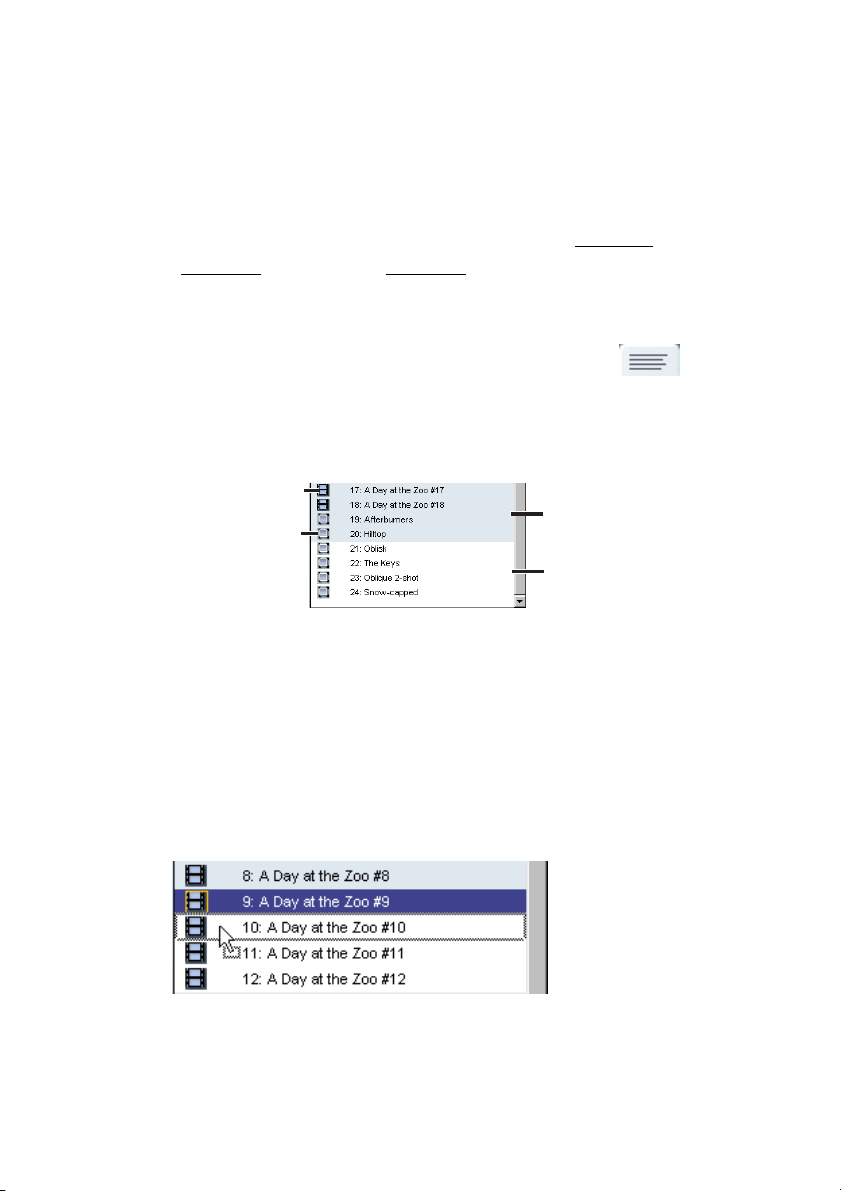
Indicates combined scenes
Captured video title
Menu page
numbers
Scene title
Still image title
Scene thumbnail
The menu pages illustrated above have four scenes per
page, indicated by the alternating gray and white
horizontal list sections.
Navigating the Thumbnail List View
Click any list section and it turns blue, indicating that it is
selected. Click and drag between sections to select
multiple sections.
Click and drag cursor
to select multiple sections
Chapter 6: Editing Scenes and Still Images 35
Page 40
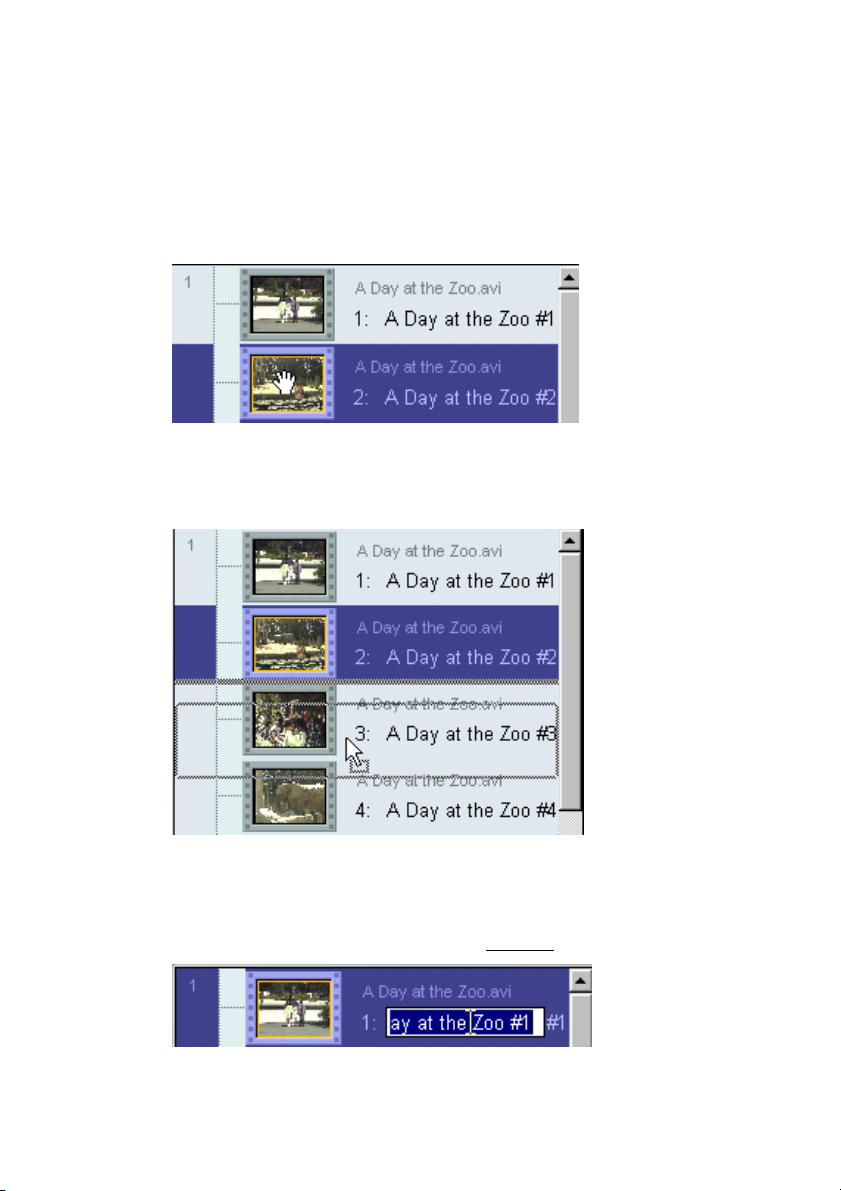
When your cursor passes over the scene thumbnail, it turns
into the grabber symbol. The grabber will take a scene (or
scenes if selected) and move it anywhere within the list.
This is the key to rearranging scenes and still images in
Express.
As you click and drag with the grabber, it changes to an
arrow with a rectangle, signifying that moving the
selection is allowed.
Renaming Scene and Still Image Titles
Click a title and a text field opens with an I-Beam cursor.
Type in your new title and press [Enter].
Express 36
Page 41
Duplicating Selected Scenes
You can duplicate selected scenes and still images in both
the Thumbnail and Icon List Views by using the standard
Windows keyboard commands for Copy (Ctrl + C), Cut
(Ctrl + X), and Paste (Ctrl + V).
The Icon List View
Access this List View by clicking the Icon tab at the
top of the dialog box. This Icon View of the menu page
displays three times as many scenes as the Thumbnail
View.
Movie icon
Still image icon
Navigating in the Icon List View
Just as with the Thumbnail View, click any list section and
it turns blue, indicating that it is selected. Click and drag
between sections and you select multiple scenes.
Menu page 1
Menu page 2
Your cursor turns into a grabber symbol when you move
over the movie or still image icon. Click and drag to
reposition a scene (or scenes).
Note: Unlike the Thumbnail List View, you cannot
rename scenes in this view.
Chapter 6: Editing Scenes and Still Images 37
Page 42
The Edit Tools
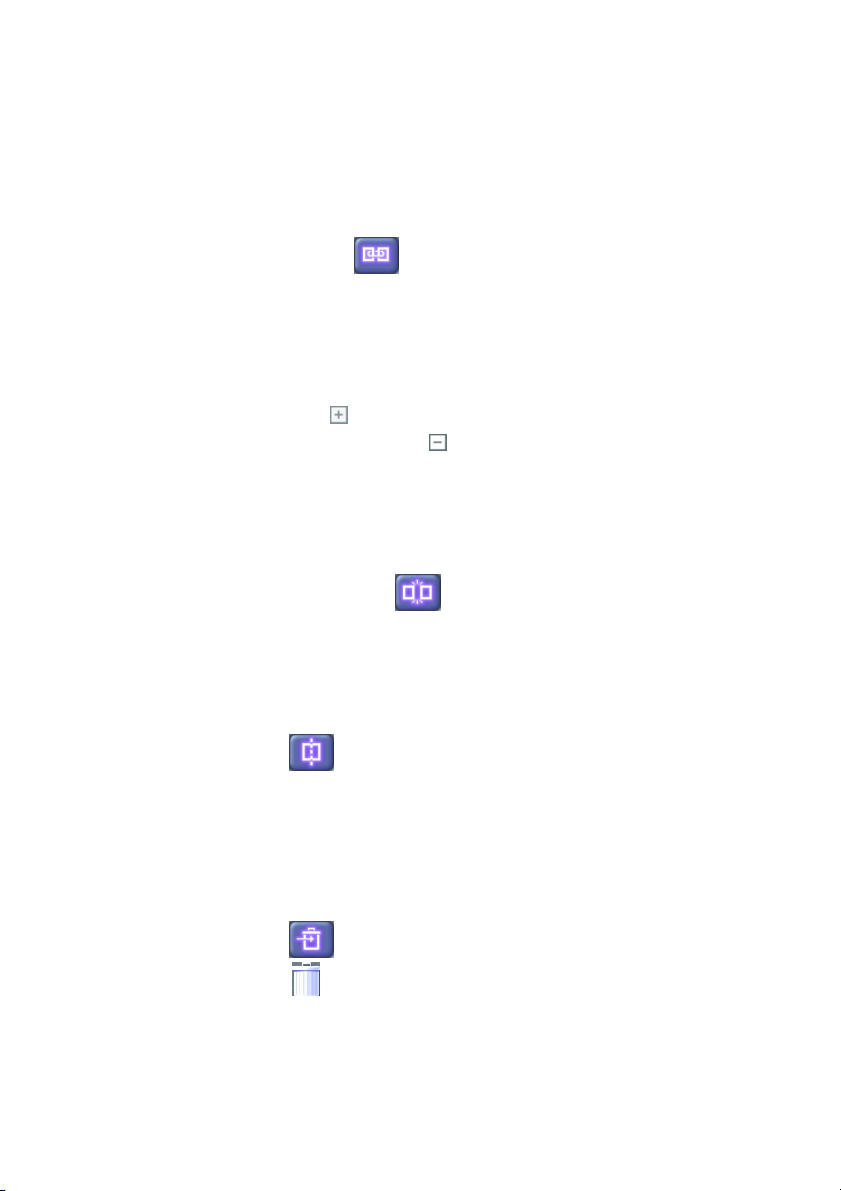
Combine Scenes
This allows two or more scenes to play as one extended
scene. This button becomes active when two or more
scenes are selected in either of the List Views (you can
also left-click in a selected scene and choose Combine
from the dropdown menu).
Clicking the button combines the scenes, and is indicated
by the Plus sign in the List View. Clicking the Plus sign
changes it to a Minus sign and expands the List,
displaying all combined scenes.
Uncombine Scenes
This separates scenes which have previously been
combined. This button
becomes active when a
combined scene is selected in a List View, and the
combined scene is collapsed.
Split
This button
divides a scene at the frame displayed in
the Player window. This is a powerful editing tool used
along with the Delete button, because it allows you to trim
the beginning or end of any scene to frame accuracy.
Delete
This button sends the selected scene or scenes to the
Recycle Bin . After splitting a scene, send the unwanted
portion to the Recycle Bin.
Express 38
Page 43
The Recycle Bin
Click on the icon to view deleted scenes. You have the
option to restore deleted scenes to your list view.
Thumbnail
This button creates a new scene thumbnail from the
frame displayed in the Player window. This means that
you can choose the most representative frame in any
scene, and not be locked into using the initial frame of that
scene. (Hint: use the Frame Forward and Frame Reverse
buttons in the Player to choose the precise frame you wish
to designate, then click the Thumbnail button to update
that scene’s thumbnail).
Scene Options
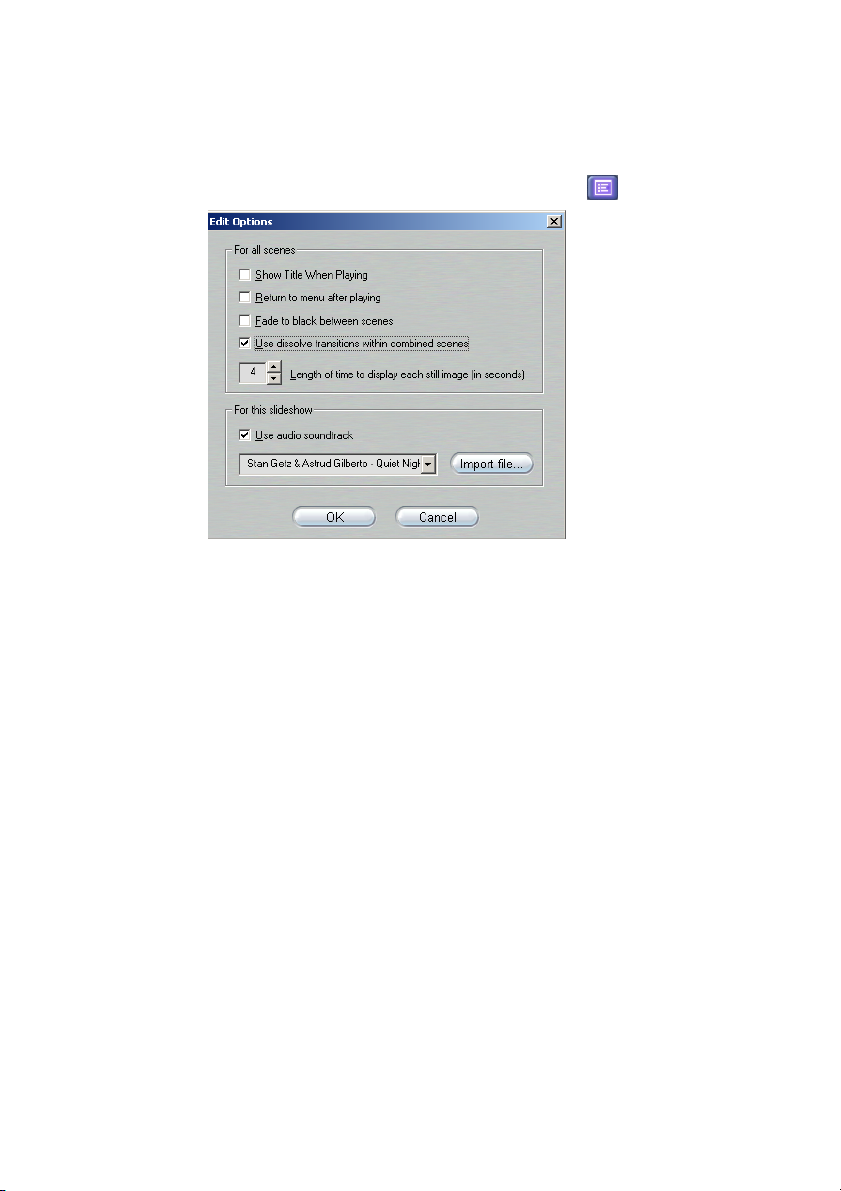
This button opens the Edit Options dialog box (see
below).
Edit Options
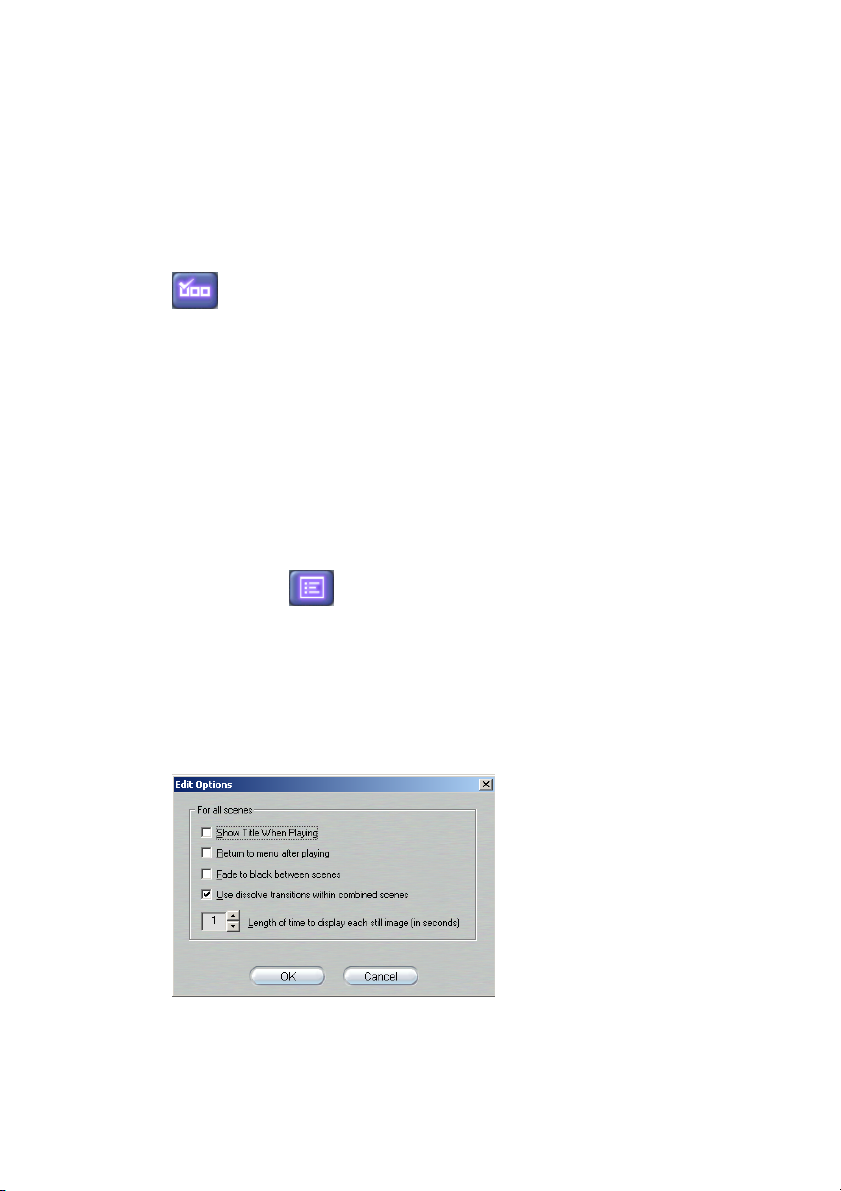
The Edit Options dialog box offers choices which affect
how your disc will be viewed by the user:
Chapter 6: Editing Scenes and Still Images 39
Page 44
Show title when playing: This displays the scene title for
2 seconds at the beginning of each scene. This is a global
setting for all scenes.
Return to menu after playing: This returns the user to
the menu page after each scene. This is a global setting for
all scenes. If this choice is not made, each subsequent
scene plays automatically without user intervention.
Fade to black between scenes: Choose this and Express
globally places a video cross-fade between all scenes. The
cross-fade does not affect audio.
Use dissolve transitions within combined scenes:
Choose this and Express places a dissolve between all
combined scenes and still images (see Slideshow below).
Length of time to display each still image: This sets the
duration for display of still images. Minimum duration is 1
second; maximum is 999 seconds. This is a global setting
for all still images.
The Player
The buttons and controls in the Player window let you
navigate through a scene.
Play/Pause: The Play button previews the scene
from the current position. Once preview begins, Play
toggles to a Pause button. When paused, the frame on
which Preview stops becomes the selected frame.
Scrubber: Grab the Scrubber with your cursor to
quickly transverse forward and backward through the
scene. The Scrubber shows at a glance your relative
position within a scene. Regardless of length, the Scrubber
Express 40
Page 45
bar represents the entire length of the scene, with the left
edge as the beginning.
Frame Forward/Reverse: The Frame Forward
button advances the Scrubber incrementally one frame
forward with each click. The Frame Reverse button
reverses the Scrubber incrementally one frame backwards
with each click.
Fast Reverse: Plays the scene in fast-reverse mode at
10x the normal speed.
Fast Forward: Plays the scene in fast-forward mode
at 10x the normal speed.
Go To Beginning: Moves Scrubber to the first frame
of your scene.
TRIM A SCENE
A video scene is a number of video frames joined together
and displayed at a constant rate, giving a viewer the
perception of motion.
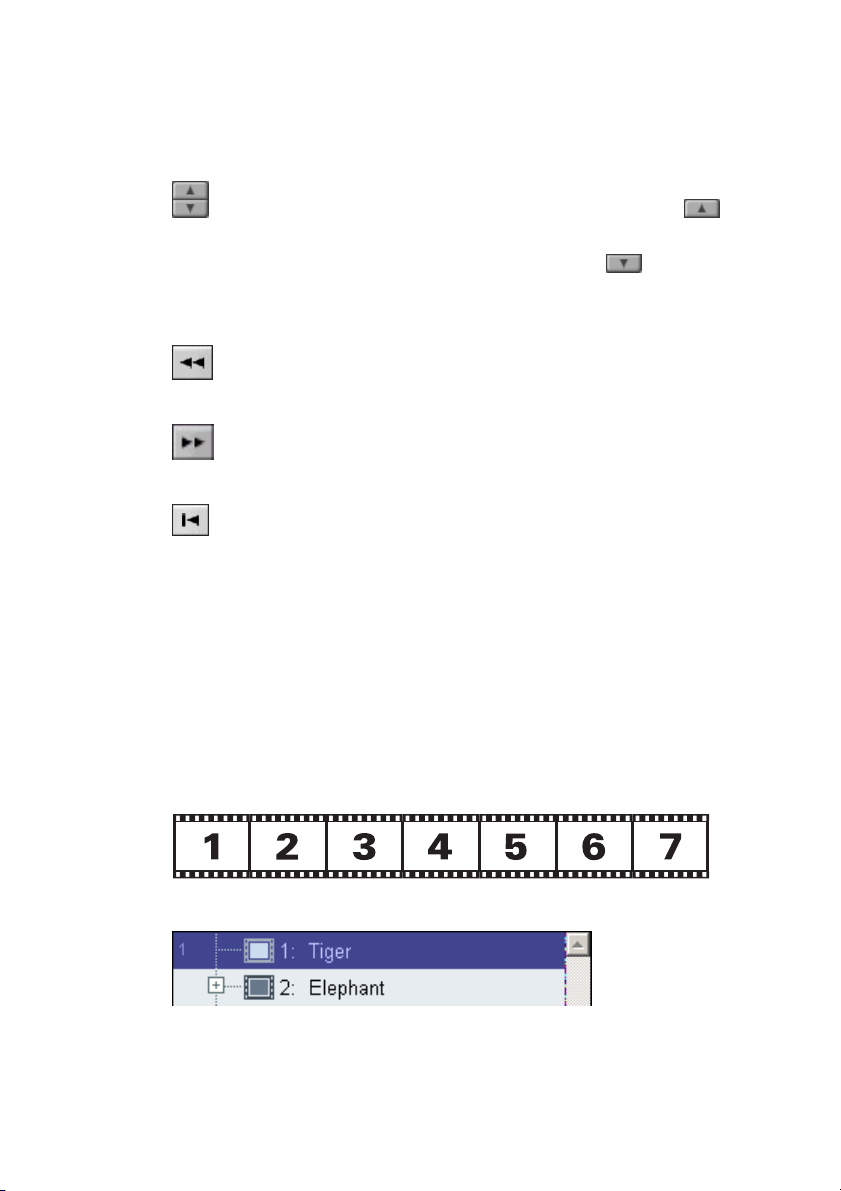
To trim a scene, we’ll use this sample video scene named
Tiger, 7 frames in length (for purposes of illustration).
This is Tiger in the Express List View:
Chapter 6: Editing Scenes and Still Images 41
Page 46
We want a new, trimmed scene to start with frame 2 and
end with frame 5.
To trim the scene:
1. Select the scene. If either the Fade to black between
scenes or Use dissolve transitions within combined
scenes edit options are selected, deselect them (either
choice can be re-initiated after trimming).
2. Use the Scrubber to move within proximity of frame 2.
3. Use the Frame Forward/Reverse buttons to display
frame 2 in the Player. This is the first frame of your
trimmed scene.
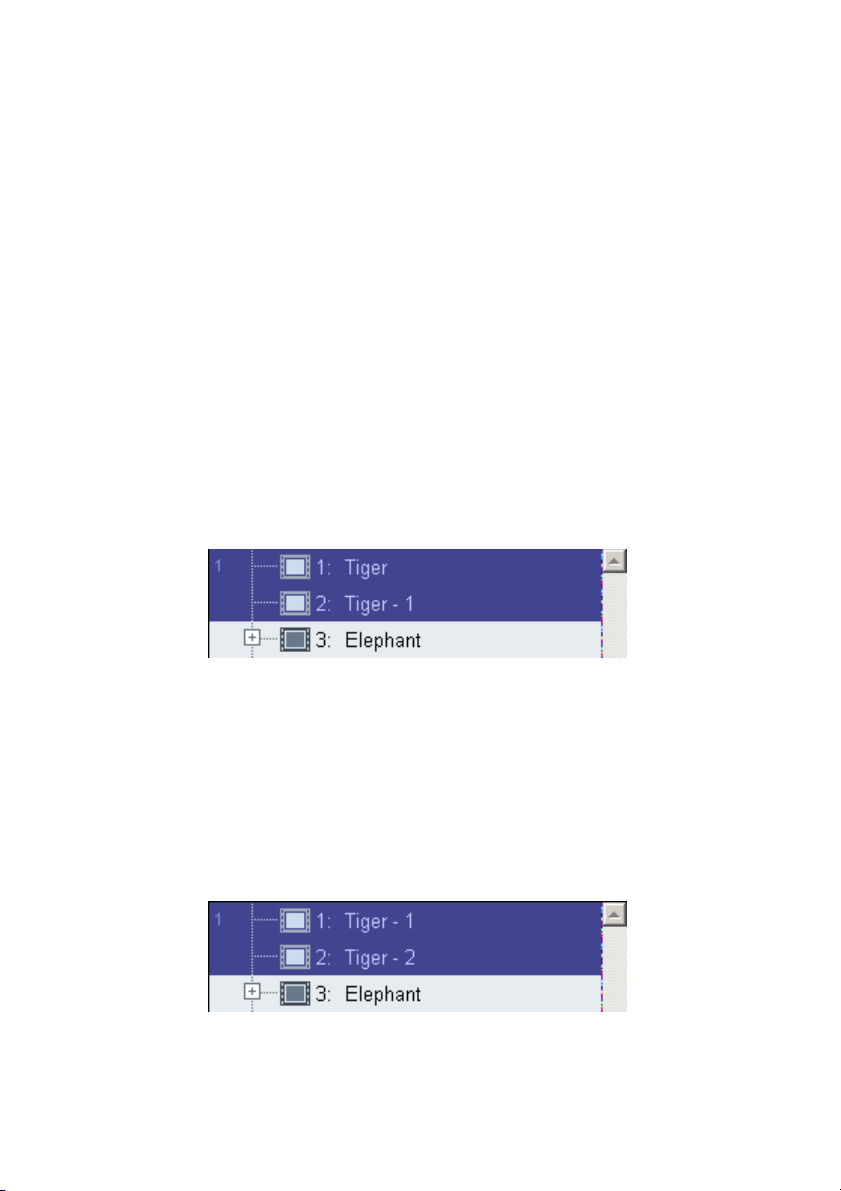
4. Click the Split button. Express places both new scenes
in the List View, and names Frame 1 “Tiger,” and
Frames 2 through 7 “Tiger-1.”
5. Select “Tiger” in the List View and click the Delete
button. “Tiger-1” remains in the List View.
6. Select “Tiger-1” and scrub to frame 6. This is the
frame following the last frame of our new trimmed
scene.
7. Click the Split button. Express places both new scenes
in the List View, and names Frames 2 through 5
“Tiger-1” and Frames 6 and 7 “Tiger-2.”
Express 42
Page 47
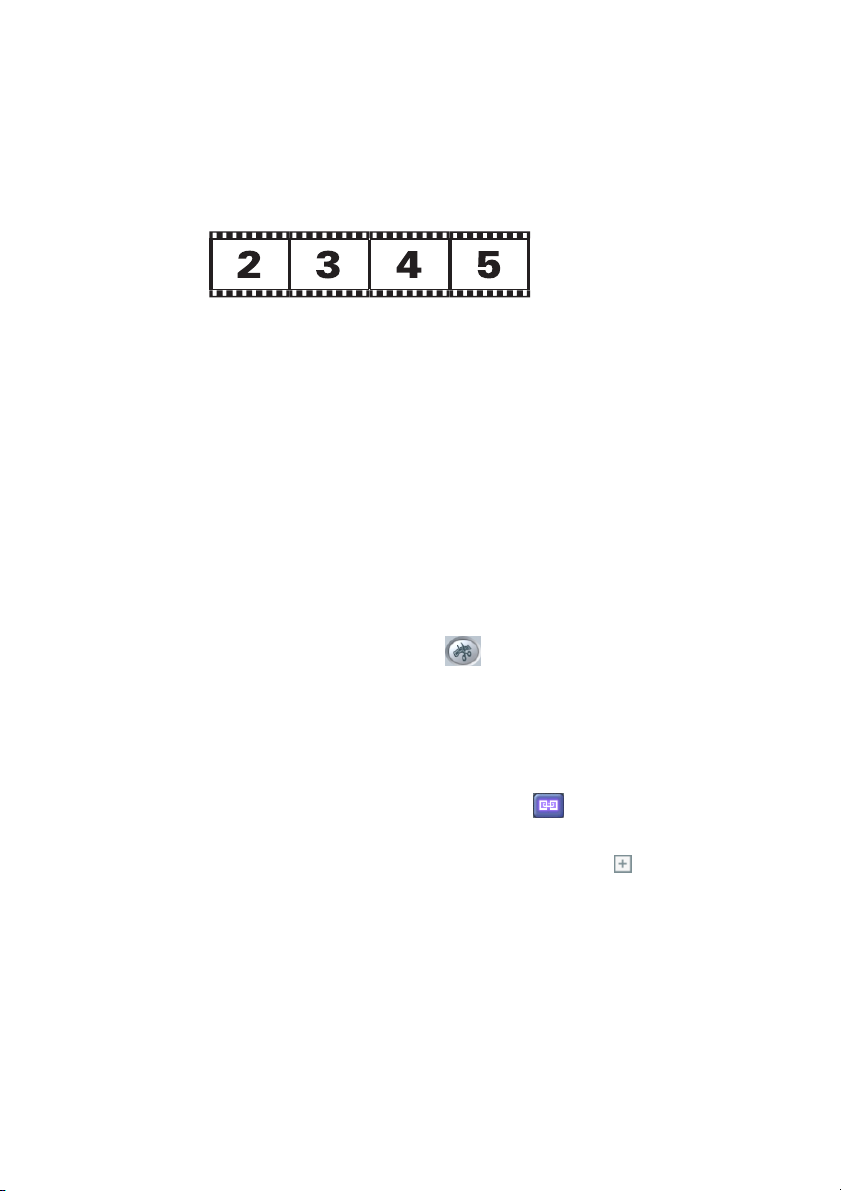
8. Select “Tiger-2” in the List View and click the Delete
button. “Tiger-1” remains in the List View and is our
desired trimmed scene, beginning at Frame 2 and
ending with Frame 5.
SLIDESHOW
Another powerful feature of Express is Slideshow, the
ability to take a collection of digital still images, combine
them in List View, choose whether to cut or dissolve
between images, and set durations for image display. You
even have the option to attach an MP3 or WAV file to
each Slideshow.
Creating a Slideshow
To create a Slideshow:
1. Click on the Edit button to open the List View.
2. Use your cursor to select the still images you wish to
include in your Slideshow (you can also include video
scenes in a Slideshow; see Intermixing Still Images
and Video Scenes below).
3. Click the Combine Scenes button to condense all
selected still images and scenes into one scene. Your
new condensed scene now has a plus sign to the left
of its icon.
4. To re-arrange still images and video scenes within the
Slideshow, click the plus sign. It toggles to a minus
sign and expands the condensed scene. Drag and drop
individual still images and video scenes as described
Chapter 6: Editing Scenes and Still Images 43
Page 48
under the Thumbnail List View and the Icon List View
topics above.
5. Finally, click the Scene Options button and:
• Choose a duration for displaying each still (from 1
to 999 seconds). This is a global setting in Edit
Options.
• Choose whether or not to fade up from black with
the first still image and fade to black after the final
still image. This is a global setting in Edit Options.
Express 44
• Notice that Express offers additional options for
Slideshow. Choose whether or not to add an audio
file (WAV or MP3) to a Slideshow.
• You can construct multiple slideshows in a project,
and import separate audio files for each one.
Page 49
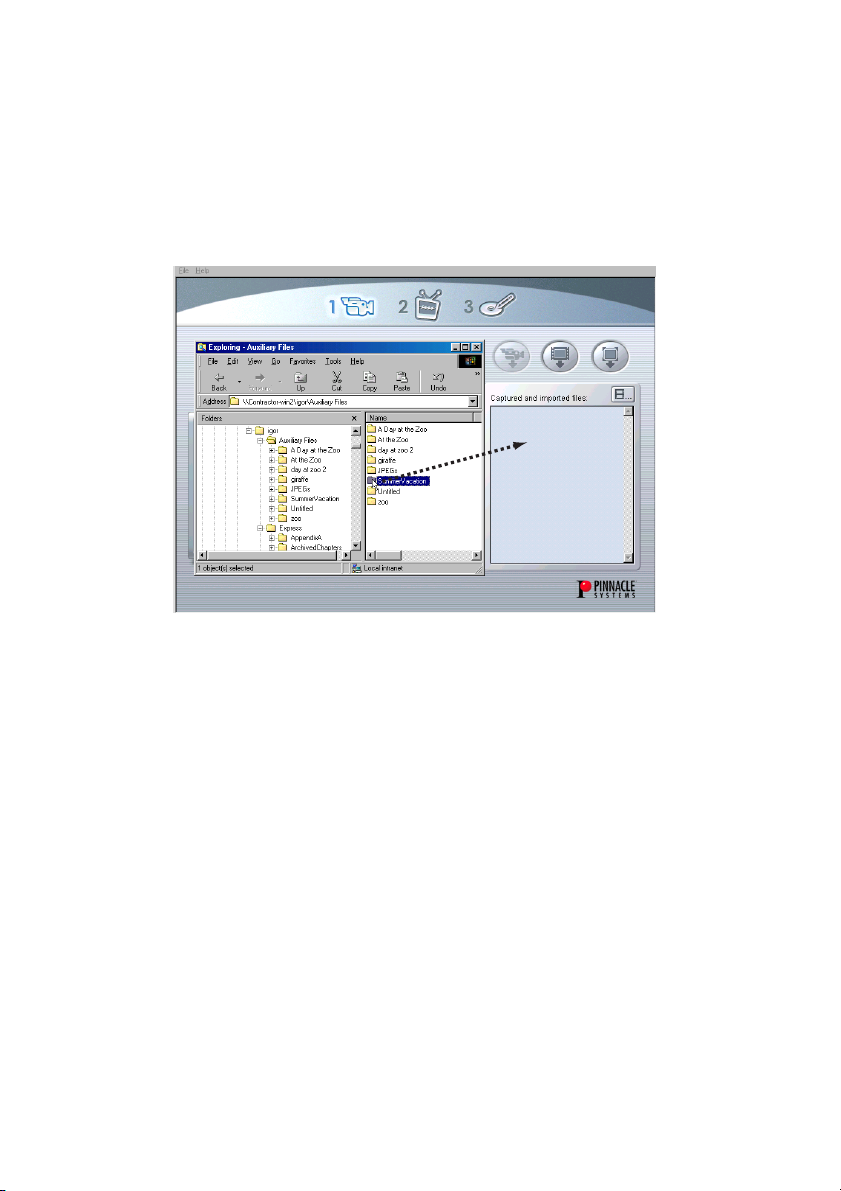
Importing Folders
A time-saving technique for importing multiple images is
to place them in a folder, and drag that folder from
Explorer directly into the Captured and Imported Files list.
Still Image Ordering
When importing a folder of still images, the images appear
in their original order. However, they can be rearranged in
any order when you open the Express List View.
Keep in mind that still images can be added or deleted
once in the List View.
Chapter 6: Editing Scenes and Still Images 45
Page 50

Intermixing Video Scenes and Still Images in
Slideshow
You have the flexibility to combine video scenes with still
images in a Slideshow. If you have attached an audio file,
however, keep in mind that any natural audio from the
video scene will be mixed with the attached audio file.
Express 46
Page 51

Chapter 7:
Making the Disc
Prior to Making the Disc , you must already have
chosen the Output format from the Output Media Settings
dialog box (Chapter 3).
When the Making the Disc window opens, you have the
Transcoding, Compiling, and Disc Burning elements of
making a disc displayed on-screen.
Assigning Your Files
If you’re making a VCD, you’re transcoding your files to
MPEG-1. If you’re making an S-VCD or DVD, you’re
transcoding to MPEG-2.
By default, Express assigns these files to a Temp folder in
Pinnacle Express on your C: drive. These can be quite
large files, depending on the length of your project.
Chapter 7: Making the Disc
47
Page 52
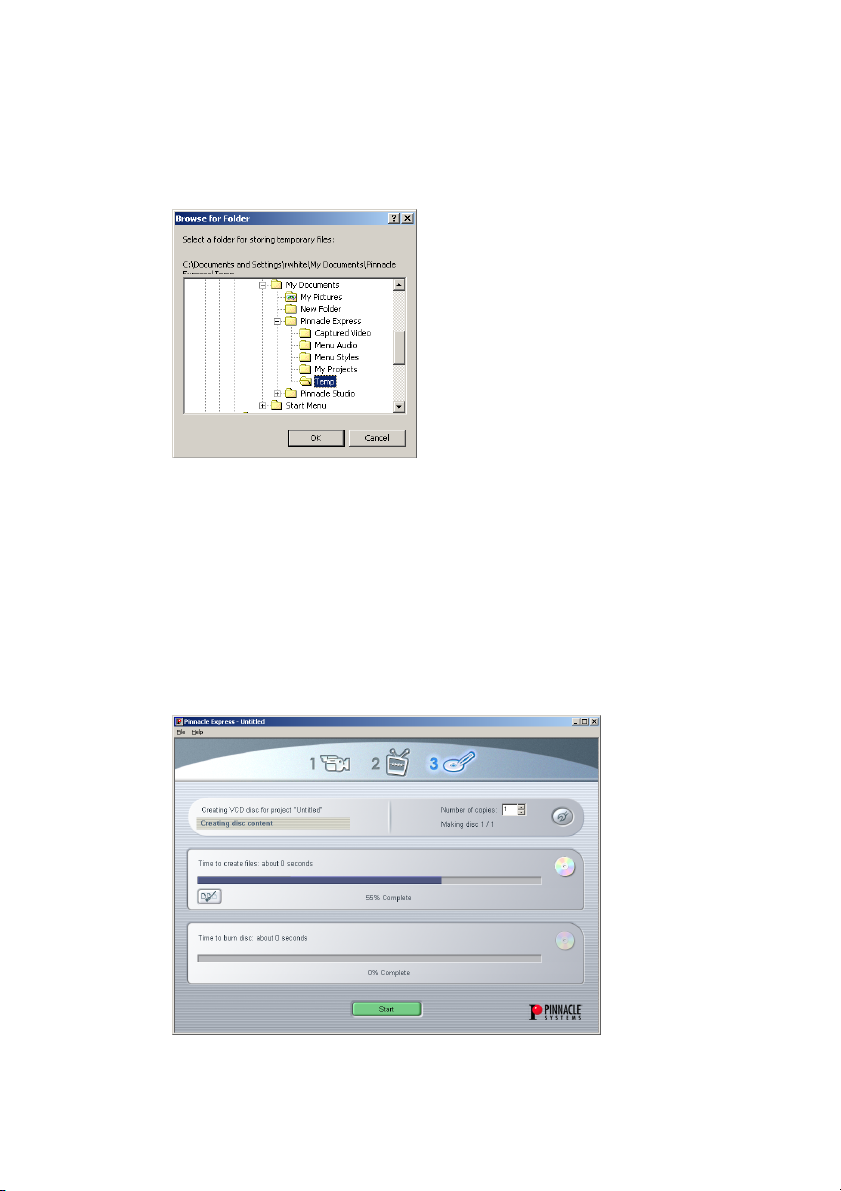
Click the Options button to open a Browse for Folder
dialog box where you can choose any location for these
transcoded and compiled files.
When you have your files assigned, click the Start button
to begin burning your disc.
Transcoding and Compiling your Project
This screen displays the progress of transcoding and
compiling your AVI files and still images. The time
needed for these operations is related directly to the speed
of your hard drive.
Express
48
Page 53
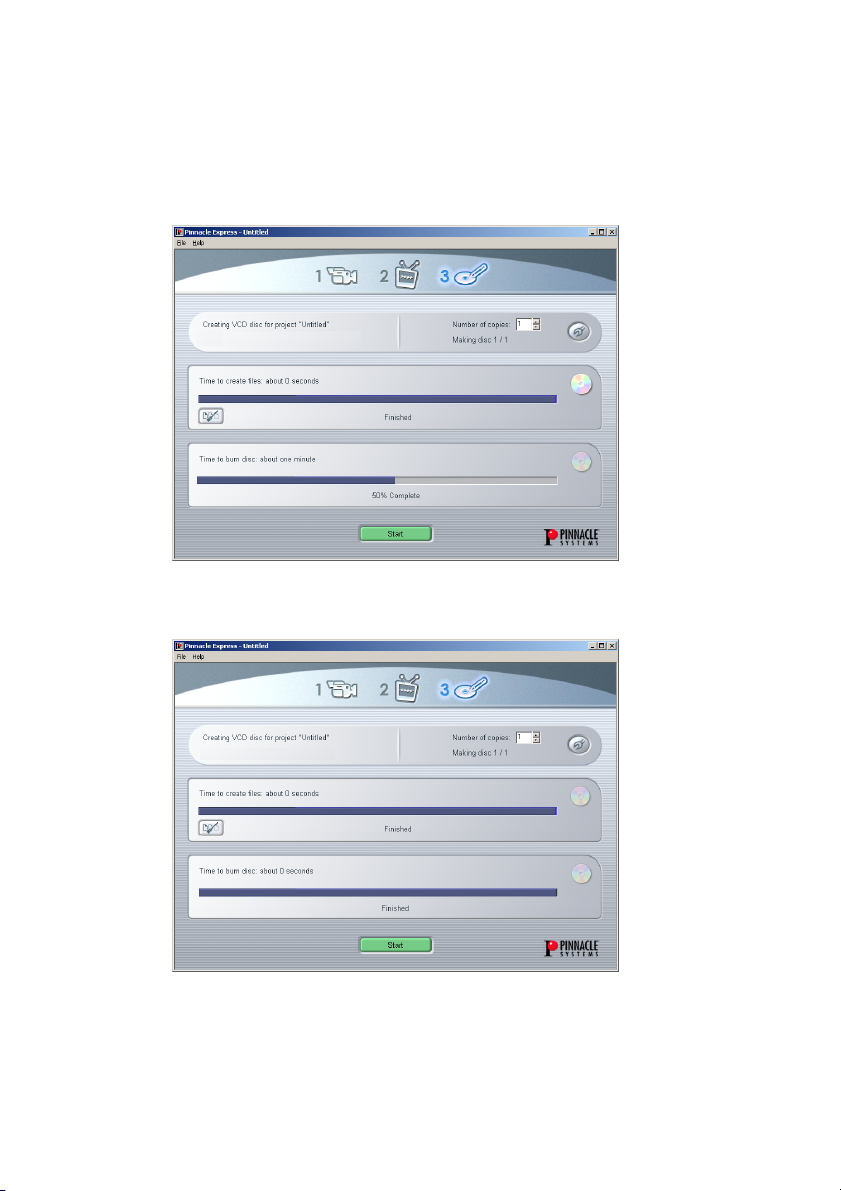
Burning the Disc
Express takes the compiled files and burns a disc. Progress
is displayed here.
When the disc is completed, the screen reads “Finished”
and your disc tray opens with the completed disc.
If you’re burning more than one disc, Express prompts
you to load another blank.
Chapter 7: Making the Disc
49
Page 54
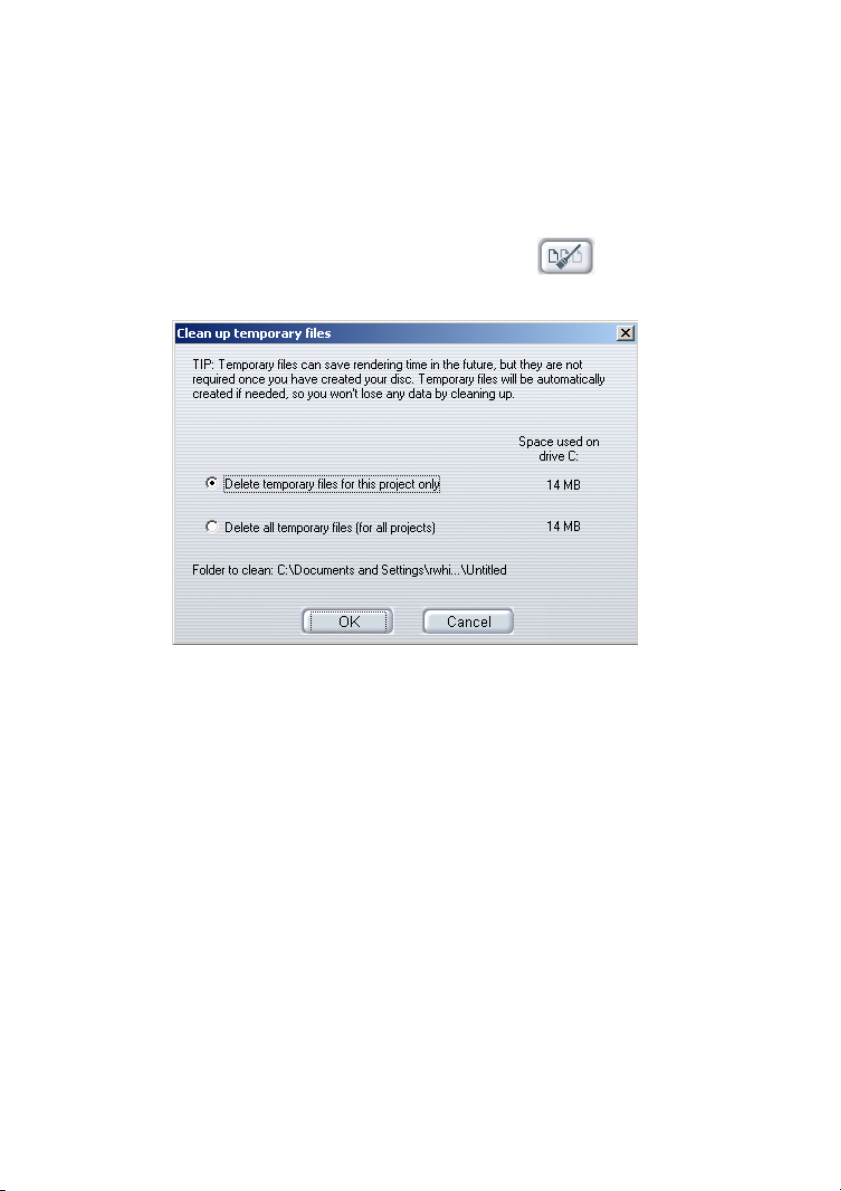
The Clean-up Temporary Files Option
Once you have transcoded, compiled, and rendered a
project, you can have potentially huge files.
Express displays the Clean-up button , which offers
two options:
Express
50
Page 55

Appendix A:
Technical Support
Pinnacle Systems has FREE 24 x 7 self-service
troubleshooting assistance. 24 hours a day, 7 days a week,
you have two ways to find answers to your questions. You
can use:
FAQs (Frequently Asked Questions)
Go to http://www.pinnaclesys.com/support/express
This is the best way to get your questions answered. Here
you can easily find answers to the most common questions,
as well as download the latest updates.
1. Discussion Forum
Go to http://www.pinnaclesys.com/support/express
and select Pinnacle Express Discussion Forum.
Search Pinnacle Systems’ online Discussion Forum to
see if someone has already encountered your question.
Post your question on the Discussion Forum and get
help from Pinnacle Systems and other users. This
forum is also searchable so you can—for example—
type in “mp3 file size limits,” and discussions with
solutions on this topic will be displayed.
Appendix A: Technical Support
51
Page 56

2. Email Support
If you are unable to find answers to your questions
using our website, Pinnacle Systems also offers
troubleshooting and technical support by email. Email
is usually responded to within 48 hours (excluding
weekends and holidays). Our email address is
Additional Support
Pinnacle Systems gives priority to electronic support
vehicles (FAQs, Forums and email). However, if you wish
to contact us directly, telephone support is available at
1-650-237-1800, from 8AM to 5PM Monday through
Thursday, and 10AM to 5PM Friday (all times are Pacific
time).
Express
52
Page 57

Appendix B:
License Agreement
CAREFULLY READ THE FOLLOWING TERMS AND CONDITIONS
BEFORE USING THIS PROGRAM. USING THIS PROGRAM
INDICATES YOUR ACCEPTANCE OF THESE TERMS AND
CONDITIONS. IF YOU DO NOT ACCEPT OR UNDERSTAND
THEM, YOU SHOULD PROMPTLY RETURN THIS PRODUCT TO
YOUR VALUE-ADDED RESELLER OR DEALER.
The export and re-export of Pinnacle software products are controlled by
the United States Export Administration Regulations and such software
may not be exported or re-exported to any country to which the United
States embargoes goods. In addition, Pinnacle software may not be
distributed to persons on the Table of Denial Orders, the Entity List, or
the List of Specially Designated Nationals.
By downloading or using a Pinnacle software product you are certifying
that you are not a national of any country to which the United States
embargoes goods and that you are not a person on the Table of Denial
Orders, the Entity List, or the List of Specially Designated Nationals.
Proprietary Property
The Express program, Pinnacle Systems’ trademarks, product names, user
manuals, documentation and other support materials are either patented,
copyrighted, trademarked, constitute valuable trade secrets (whether or
not they or any portion thereof may be copyrighted or patented) or are
otherwise proprietary to Pinnacle Systems. In addition, this program may
contain the proprietary property of others which has been licensed to
Pinnacle Systems (such as utility or plug-in software or programs, clip art
and sample files).
QDesign MPEG-2 Layer II Fast Encoder/Decoder (c) 1996-2001 by
QDesign Corporation. Windows Media is a trademark of Microsoft
Corporation. All other trademarks are the property of their respective
owners.You agree not to remove any product identification or notices of
the proprietary restrictions from Pinnacle Systems’ products or manuals.
Appendix B: License Agreement 53
Page 58

License and Prohibitions
You may:
(a) use the Express program and accompanying written materials
(“programming materials”) in connection with a single computer. A
copy of the program is being furnished to you along with this license
agreement. If you wish to use this program on more than one
computer, you must license additional copies of the program;
(b) use the program and accompanying written materials on a licensed
computer network. A “computer network” is any combination of two
or more terminals or computers that are electronically linked and
capable of sharing the use of a single software program. A “licensed
computer network” is a computer network for which you have
purchased from Pinnacle Systems, or its dealer, sufficient copies of
this program so that the number of concurrent users of this program
on the computer network at any given time is not greater than that
number of copies of the program so purchased;
(c) copy the program once only solely for backup purposes in support of
your use of the program so long as you prominently label the backup
copy with the appropriate copyright notice;
(d) use the program for your personal use or in your business or
profession. Permitting unauthorized users access to the program and
program materials is a violation of this license agreement; and
(e) transfer the program and license to another party if the other party
agrees to accept the terms and conditions of this agreement. If you
transfer the program, you must at the same time either transfer all
copies to the same party or destroy any copies not transferred. If you
transfer possession of any copy of the program to another party, your
license is automatically terminated.
Prohibited Uses
You may not, without explicit prior written permission from Pinnacle
Systems:
(a) use, modify or transfer the program, or copy the program in whole or
in part, except as expressly provided herein;
(b) reverse-engineer, decompile or otherwise recreate the program or
hardware in whole or in part;
(c) make copies of or distribute, for profit or otherwise, or authorize the
copying or distribution of the program, hardware, or materials related
thereto, except as herein provided;
Express 54
Page 59

(d) make alterations to the program or merge it into any other software;
(e) grant sublicenses and leases or other rights in the program or
program materials to others;
(f) make verbal or media translations of the program, in whole or in part,
or of the program materials;
(g) modify the program for use on non-compatible hardware;
(h) make telecommunications data transmissions of the program in
whole or in part;
(i) distribute the program on either a permanent or temporary basis to
others;
(j) make available any part of the program or program materials to any
third party, other than your own properly authorized employees; or
(k) make any alteration, modification, connection, disconnection,
improvement or adjustment of any kind to or use Express except as
explicitly contemplated in the enclosed programming materials.
It is agreed that the violation by you of any of the prohibitions described
above shall be a material breach by you of this license agreement, and any
attempt to sublicense, assign, or transfer any of the rights, duties, or
obligations under this agreement, except as expressly provided herein, is
void.
Term
The license is effective until terminated. You may terminate it at any time
by destroying the program together with all copies in any form. It will
also terminate upon conditions set forth elsewhere in this agreement or if
you fail to comply with any term or condition of this agreement. You
agree that upon such termination you will destroy the program together
with all copies in any form.
Limited Warranty
The program is provided “as is” without warranty of any kind, either
expressed or implied, including but not limited to the implied warranties
of merchantability and fitness for a particular purpose, with the sole
exception of defective diskette(s) and Express described below. The entire
risk as to the quality and performance of the program is assumed by you.
If the program proves defective, you (and not Pinnacle Systems, its
Licensors, or its dealers) assume the entire cost of all necessary servicing,
repair or correction.
Appendix B: License Agreement 55
Page 60

Program Warranty
Pinnacle Systems warrants to the original licensee that the diskette(s) on
which the program is recorded, shall be free from defects in material and
workmanship only for a period of thirty (30) days from the date of
original purchase. If a defect covered by this warranty occurs during this
period, and it is returned to the dealer from whom it was purchased not
later than five (5) days after the end of such period, the dealer shall, at its
option, either repair or replace the item. This warranty is in lieu of all
other express or statutory warranties, and the duration of any implied
warranty, including but not limited to the implied warranties of
merchantability and fitness for a particular purpose, is hereby limited to
said thirty (30) day period.
Updates
Periodically Pinnacle Systems may introduce new versions or releases of
the software. To qualify for notification of the availability of these new
versions or releases and their prices, you must first complete and return
the enclosed program registration card. All new versions or releases
which are provided to you shall become part of the program and shall be
governed by the terms of this license agreement.
Express 56
Page 61

Pinnacle Express: Index
—Numbers—
1394. See IEEE-1394
8mm
Video equipment,
—A—
Abbreviations and
conventions, 5
Analog
Defined, 5
Aspect ratio
For menu page
backgrounds, 27
Asset
Deleting, 12
List, 8
Menu button, 12
Renaming, 12
Asset List, 12
Assets
And Style Chooser, 28
Defined, 8
Assigning your files, 9
Audio
Importing, 28, 30
Audio file formats, 28
AVI files, 9
—B—
Background (menu page
element), 27
Background image file
formats, 27
Bring In Video
Defined, 7
Screen, 7
Source material options, 8
Bring In Video mode, 7
Burning the disc, 49
Buttons
Asset Menu, 12
Capture video, 9
Check Media, 19
Clean up (temporary
files), 50
Create Custom Menu, 30
Edit Video, 33
Help, 4
Import Video, 9
Import Still, 9
Open Drawer (on Style
Chooser), 29
Options (in Make Disc
mode), 48
Start (in Make Disc
mode), 48
Pinnacle Express: Index 57
Page 62

Start capture, 11
Stop capture, 11
Tools tips for, 4
Transport control, 8
—C—
Cables and connectors
Analog, 5
Camcorder
Capturing from, 9
Connecting, 4
Capture video
Button, 10
Dialog box, 10
Captured and Imported Files
window,12
CD-R, CD-RW, 19
Check Media button, 19
Clean up temporary files, 50
Combine Scenes tool, 38
Commentary. See Voice-
over
Compiling, 48
Composite
Cables and connectors, 5
Computer
Minimum requirements
for, 2
Connecting the camera, 4
Conventions and
abbreviations, 5
Copying
Scenes and images, 37
Counter window, 8
Create Custom Menu button,
8
Create Custom Menu dialog
box, 30
Create Thumbnail tool, 39
Creating a slide show, 43
Creating DVDs and
VideoCDs
Three-step process, 1
Cursor navigation
In TV Screen, 22
Customizing menu pages, 30
—D—
Delete Scene tool, 12
Deleting
Assets, 12
Dialog boxes. See Windows
Digital Versatile Disc. See
DVD
Digital8
Included under "DV", 5
With analog tapes, 13
DirectX
Graphics card, 2
Sound card, 2
Disc Meter, 17
Discs
Burning multiple, 49
Disk space requirements, 2
Dissolves, 40
Duplicating
Scenes and images, 37
Duration, 40
Express 58
Page 63

Duration limits of sound
files, 31
DV
And automatic scene
detection, 13
DVD
Creation process, 1
Navigation buttons, 24
Select as output format, 18
Transcoding, 47
DVD-R, DVD-RW, 19
—E—
Edit mode, 33
Edit Scene Options dialog
box, 39
Edit Video button, 33
Edit Video dialog box, 34
Icon tab, 37
Thumbnail tab, 39
Editing scenes, 41
Editing with frame accuracy,
38
Elements of menu pages, 25
Equipment requirements,
Computer, 2
Hard disk, 2
Express
Defined, 1
Registration of, 3
Software installation, 3
Software license, 3, 53
Technical support, 51
Upgrades, 3
—F—
Fade to black (scene option),
40
Fast Forward button, 41
Fast Reverse button, 41
File formats
Audio, 28
For menu page
backgrounds, 31
Files
AVI, 9
Captured and imported, 12
Temporary, cleaning up,
50
FireWire. See IEEE-1394
Fonts for menu page text, 30
Frame accuracy in editing,
38
Frame Forward button, 41
Frame Reverse button, 41
Frames
In menu page layout, 27
—G—
Go To Beginning button, 41
Grabber, 36
Graphic
Menu page background,
27, 30
Graphics card
DirectX-compatible, 2
Pinnacle Express: Index 59
Page 64

—H—
Hard disk
Performance test, 2
Requirements, 2
Transferring video to, 2
Help. See On-line help
Help button, 43
Hi8
Video equipment, 5
—I—
Icon list view, 37
Navigating, 37
IEEE-1394
DV cable, 4
iLink. See IEEE-1394
Images
Arranging, 45
Creating a slideshow, 431
Duplicating, 37
Editing, 33
Importing, 12, 30
Intermixing with scenes,
46
Previewing, 34
Renaming, 36
Reordering, 43
Transcoding and
compiling, 48
Import Video button, 9
Import Still button, 9
Importing
Backgrounds and audio,
27-28
Files from Windows
Explorer, 46
Folders (of images files),
46
Incoming video display, 7
Installation
"Typical", 3
Camcorder, 4
Manual (without
Autorun), 3
Software, 3
Intermixing scenes and
images, 461
Introduction to Express, 1
Italics, 5
—K—
Keyboard conventions, 5
—L—
Layout (menu page element),
28
License terms, 53
List views
Introduced, 34
Multiple selection in, 35
Navigating, 35
Reordering scenes and
images, 35-36
List Views
Icon, 37
Thumbnail, 35
Express 60
Page 65

—M—
Make Disc Mode, 47
Managing large files, 50
Manual installation, 3
Maximum duration of sound
files, 31
Media
Checking, 19
Choice of, 18
Format, 18-19
Settings, 18
Memory - minimum
required, 2
Menu commands, 6
Menu page
Defined, 25
Menu pages, 25
Aspect ratio of
background, 27
Background, 27
Creating discs without, 29
Customizing, 30
Elements of, 25-28
Frames, 27
Importing audio files, 28
Layout, 26
List views, 34
Multiple, 34
Navigating, 35, 37
Renaming scenes, 36
Thumbnails, 35
Minimum duration of sound
files, 31
Mixing scenes and still
images, 46
Modes
Bring In Video, 7
Edit, 33
Make Disc, 47
Mouse clicking, 6
Movie controls
On Remote Control, 24
MPEG-1, MPEG-2, 47
Music,
File formats, 28
Importing, 28
—N—
Narration. See Voice-over
Navigating
Icon list view, 37
Thumbnail list view, 35
Navigating menu pages, 22-
24
Navigation
Buttons (DVD), 24
In the Style Chooser, 27
In TV Screen, 21-24
No Menu
Style Chooser option, 29
Pinnacle Express: Index 61
Page 66

—O—
OHCI-compliant IEEE-1394.
See IEEE-1394
On-line help
Button, 4
How to use, 4
Types of, 43
On-screen remote control.
See Remote control
Open Drawer button (Style
Chooser), 29
Operating systems
supported, 2
Options
For Bring In Video, 8
Scene, 39
Scene detection, 13
Options button (in Make
Disc mode), 48
Output media
Format, 18
Output Media Settings
dialog box, 18
Overview, 1
—P—
Pause button, 40
Play button, 401
Playback controls
Frame Forward/Reverse,
41
Play/Pause, 40
Scrubber, 40
Fast Forward, 41
Fast Reverse, 41
Go To Beginning, 41
Player (in Edit Video dialog
box), 40
Positioning of frames and
titles, 30
Preview window (video
capture), 12
Preview/Edit mode, 15
Project
Editing, 33
Previewing, 15
Transcoding and
compiling, 48
—R—
RAM, 2
RCA. See Composite
Recycle Bin tool, 38
Registration
And technical support, 3
Of Express, 3
Remote Control, 16
Navigation in TV Screen,
22
Number pad, 23
Renaming
Assets, 12
Images, 36
Scenes, 36
Reordering
Scenes and images, 36
Requirements, equipment, 2
Return to menu (scene
option), 40
Express 62
Page 67

—S—
Scene
Defined, 5
Selected, 36
Scene detection
Explained, 13
Options, 13
Options dialog box, 13
Thumbnail frames, 39
Scene Options tool, 39
Scenes
Arranging, 36
Duplicating, 37
Editing, 41
Editing options, 381
Intermixing with images,
46
Playing back, 22
Previewing, 34
Renaming in list view, 36
Reordering, 36
Titles of, 35
Trimming, 41
Scrubber, 40
Selected scene (indicated by
highlighted frame), 24
Serial number, Express, 3
Setup. See Installation
Show title (scene option), 40
Slideshow, 43
creating, 43
Intermixing scenes and
images, 46
Software
Installing, 3
Upgrades, 3
Software license terms, 3
Software registration
Importance of, 3
Sound
Effects, 28
File formats, 28
Sound card
DirectX-compatible, 2
Sound effects
Importing, 28
Source material options, 8
Split Scene tool, 38
Start button (in Make Disc
mode), 48
Start capture button, 10
Still images. See Images
Stop capture button, 102
Style Chooser, 28
Drawer, 29
Navigating, 28
No Menu option, 29
Styling menu page text, 30
Super-VideoCD. See S-VCD
S-VCD
Described, 18
Select as output format, 18
Transcoding, 47
SVHS, SVHS-C
Video equipment, 5
S-Video
Cables and connectors, 5
Pinnacle Express: Index 63
Page 68

—T—
Tapes. See Videotapes
Technical support, 3, 51
Television. See TV Screen
Templates (for menu page
layout), 26
Text style (menu page
element), 26
Thumbnail list view, 35
Navigating, 35
Thumbnails
Changing, 39
Defined, 12
During capture, 11
Frames for, 27
In Style Chooser, 27
On menu pages, 22
Style, 29
Titles
Automatically assigned,
34
Changing, 36
Tool tips, 4
Tools
Combine Scenes, 38
Create Thumbnail, 39
Delete Scene, 38
Edit Scene Options, 39
Recycle Bin, 38
Split Scene, 38
Uncombine Scenes, 38
Transcoding, 48
Transition effects, 40
Transport controls, 8
Trimming scenes, 41
TV Screen,16, 21
Navigation options, 22-24
Typical installation, 3
—U—
Uncombine Scenes tool, 38
Upgrades
Information about, 3
—V—
VCD
Described, 18
Media type selection, 18
Select as output format, 18
Transcoding, 47
VCR
Capturing from, 9
VHS, VHS-S
Video equipment, 5
Video
Displayed during capture,
10
Video capture
Capture video button, 9-10
Dialog box, 10
Hard disk requirements, 2
Preview window, 10
Starting, 11
Stopping, 11
Thumbnail frames, 11
Video equipment
Analog, 5
Installation, 4
Video file, 5
Video scenes. See Scenes
Express 64
Page 69

VideoCD. See VCD
Creation process, 1
Videotape
Current position, 8
Videotapes
Analog, and scene
detection, 13
DV, 13
Voice-over, 28
—W—
Windows
Capture Progress dialog
box, 10
Capture Video dialog box,
10
Captured and Imported
Files, 12
Counter (on transport
controls), 8
Create Custom Menu
dialog box, 30
Edit Scene Options dialog
box, 11
Edit Video dialog box, 34
Making the Disc, 47
Output Media Settings
dialog box, 18
Scene Detection Options
dialog box, 13
The Player, 40
Windows (operating system)
Versions supported, 2
Windows Explorer, 45
Pinnacle Express: Index 65
Page 70

Page 71

Pinnacle Express: Index 51
 Loading...