


INSTRUCTION MANUAL
RA400 REMOTE ELECTRONIC ALARM ANNUNCIATOR
This document describes the installation, programming and operation of the RA400 Remote
Electronic Alarm Annunciator, which is designed for use with the LC2000 or most TMS Series
models.
RA400 Instruction Manual - 2017-07-30.docx July 30, 2017
DWG NO. 20059 REV . N/C


Section 1.0 PRODUCT OVERVIEW ........................................................................................ 4
1.1 TMS/LC2000 Compatibility .................................................................................... 5
1.2 TEST Pushbutton .................................................................................................. 6
1.3 RESET Pushbutton ............................................................................................... 6
1.4 Visual Alarm Strobe ............................................................................................... 6
1.5 Audible Annunciator .............................................................................................. 6
1.6 Power Indicator LED ............................................................................................. 7
1.7 User-Selectable Advisory Pocket Insert ................................................................ 7
Section 2.0 INSTALLATION ..................................................................................................... 8
2.1 Mounting ................................................................................................................ 8
2.2 Wiring .................................................................................................................. 12
2.2.1 AC Power ............................................................................................................ 12
2.2.2 Communications .................................................................................................. 13
2.2.2.1 Cable Requirements ............................................................................................ 13
2.2.2.2 RA400 Terminal Connections ............................................................................. 14
2.2.2.3 RA400 Communications Wiring Detail ................................................................ 14
2.2.2.4 RS-485 Communications Wiring Detail ............................................................... 15
2.2.2.5 Line Termination Resistor ................................................................................... 16
2.2.3 RS-2 Remote TEST/RESET Wiring .................................................................... 16
Section 3.0 CONFIGURATION .............................................................................................. 17
3.1 On-Board Programming ...................................................................................... 17
3.1.1 Setting Logical Address - S3 ............................................................................... 17
3.1.2 Setting Shutoff Delay – S4 .................................................................................. 18
3.1.3 Alarm Programming – S5, S6, S7 ....................................................................... 19
3.1.4 Miscellaneous Programming – S5 ....................................................................... 21
Section 4.0 PRODUCT SPECIFICATIONS ............................................................................ 22
TABLE OF CONTENTS
Page

1.0 Product Overview
The RA400 Remote Annunciator panel is used in applications where it is desired to receive
TMS/LC2000 series alarms from various on-site locations at distances up to 4000 feet (1200M)
away from the main console. Since the RA400 is a microprocessor-based, addressable device
communicating over the RS-485 Peripheral Expansion Bus, up to 16 RA400 panels may be
connected to a single TMS/LC2000. The RA400 is housed in a NEMA 4X enclosure for harsh
industrial/ outdoor environments. The visual indicator employs an ultra-bright, LED strobe for
maximum reliability in extreme temperatures. The membrane overlay pushbuttons are 1.75” on
centers for easy operation with gloved hands.
RA 400
TANK 1 HIGH LEVEL ALARM
If Alarm
Sounds Call:
REMOTE ANNUNCIATOR
POWER
COMPANY ABC INC.
(555) 501-0005
RESET TEST
PNEUMERCATOR
Liquid Level Control Syst ems
DRAWING NO. 20060 REV. N/C
Figure 1.0-1 Front Panel View
RA400 Instruction Manual - 2017-07-30.docx Page 4 of 22 July 30, 2017

pp
J1
FRONT PANEL
D2D3
+3.3V +5V
FRONT PANEL
CABLE
CONNECTOR
(2) LEDS
PLUG-IN TERMINAL
(2) RS-485 COMMS.
PLUG-IN TERMINAL
BLOCKS
RS-485 COMMS.
CH. A (+)
I
CH. B (-)
N
SHIELD
ON
LINE TERMINATOR
"ON" FOR
END-OF-RUN ONLY
OFF
S2
(2) ROTARY
SWITCHES
RS 2
BLOCK
O
U
T
LINE VOLTAGE
SWITCH
(3) DIP
S3
ADDRESS
SELECT
S4
SHUTOFF
DELAY
1
ALARM
TYPE
2
3
TA / D1
TB / D2
TC / D3
TD / D4
LK / D5
* / D9
*/D10
*/D11
W/D12
*/D13
*/D14
*/D15
OPEN
4
5
6
7
8
1
2
3
OPEN
4
5
6
7
8
1
2
3
OPEN
4
5
6
7
D16
8
ALARM
GROUP
EDIT EN
FP ACK
SER EN
3BT2BT
SP1 / D6
SP2 / D7
TB4
SP3 / D8
COM
SILENCE
TEST
REMOTE
SWITCH
S5
1
2
3
4
5
6 8
7
S6
1 7
2
3
4
5
6
8
S7
1 7
2
3
4
5
6
8
SWITCHES
1/2 AMP
250 VAC
FAST
ACTING
AC
IN
FUSE
115V
HOT
NEUTRAL
GND
LINE TERMINATOR
SWITCH
AC POWER PLUG-IN TERMINAL BLOCK
(W/ SCREWFLANGE TO SECUREPLUG)
DRAWING NO. 20061 REV. A
Figure 1.0-2 Interior View
1.1 TMS/LC2000 Compatibility
The RA400 can be used with most TMS/LC2000 models provided appropriate firmware is loaded.
RA400 support is provided with the following TMS/LC2000 console firmware versions:
LC2000: V6x.00.08 or later
TMS2000: V2x.00.13 or later; V2x.01.xx
TMS3000: V3x.00.13 or later; V3x.01.xx
TMS2000W, TMS4000, TMS4000W: All firmware versions supported
where “xx” denotes “don’t care” values
Please contact Technical Support for an upgrade if you have firmware outside of the above range,
or if you have questions about identifying the firmware version in your console.
IMPORTANT! Confirm that the installed TMS/LC2000 console firmware
version su
orts RA400 communications.
RA400 Instruction Manual - 2017-07-30.docx Page 5 of 22 July 30, 2017

A
(
)
r
A
)
A
A
1.2 TEST Pushbutton
The TEST pushbutton is used to confirm operation of the front panel audible and visual alarms. For
tank fill operations, TEST should always be used to confirm RA400 operation prior to filling the tank.
1.3 RESET Pushbutton
The RESET pushbutton is used to acknowledge alarm conditions. Note that acknowledging an alarm
condition silences the audible annunciator for all existing alarms, but does not turn off the visual alarm,
which remains active until the alarm condition is removed. The audible alarm will be re-activated for
new alarms.
1.4 Visual Alarm Strobe
The visual alarm strobe is activated upon occurrence of any of the user-programmable tank, sensor,
contact closure or system alarm conditions listed in the Alarm Programming Table in section 3.1.3.
The visual alarm strobe flashes two to three times every six seconds as a result of loss of
communications between the RA400 and TMS/LC2000 console. Note that the visual alarm strobe
remains active until the alarm condition is removed.
1.5 Audible Annunciator
A front panel horn is provided to annunciate both user-selectable alarms as well as communications
failures. The horn can be silenced manually by pressing the RESET pushbutton, automatically by
eliminating the alarm condition, or by programming an audible alarm shutoff. See section 3.1.2 for
audible alarm shutoff delay programming. Under alarm conditions, the beep rate of the annunciator
varies with the alarm type as follows;
Alarm Group
Tank
(TMS Only)
Sensor
Contact Closure
System
Communications All One Fast Beep every 6
ms = milliseconds
larm Type Beep Rate
Leak Fast
SP1 Medium Fast (100ms)
SP2 Medium Slow (200ms)
SP3 Slow (400ms)
Wate
ll Fast (50ms
ll Slow (400ms)
ll Slow (400ms)
Slow (400ms)
Seconds
50ms
RA400 Instruction Manual - 2017-07-30.docx Page 6 of 22 July 30, 2017

(
1.6 Power Indicator LED
A front panel LED indicator is provided to confirm that the RA400 is being supplied with AC power,
and that the RA400 DC power supply is operational.
DANGER! DO NOT assume that failure of the Power Indicator LED to operate
is an indication that the AC connection is not LIVE. The LED will also not
operate if the RA400 fuse has blown, or if the DC supply or LED has failed.
TURN OFF POWER AT THE CIRCUIT BREAKER BEFORE SERVICING!
1.7 User-Selectable Advisory Pocket Insert
The RA400 front panel includes a 0.8”H x 3.5”L clear pocket window that accepts a pocket insert
displaying alarm description and emergency contact information. Blank inserts and pre-printed
labels are provided for most alarm descriptions. These labels are applied to the blank pocket insert,
which is then installed from the inside of the front cover. Optionally, the users may print their own
labels, or write directly on the pocket insert. If writing directly on the pocket insert, an indelible marker
or other permanent ink method should be used.
INSER T LABEL - P/ N 313259-1-2 0
SAMPL E L ABE L SHO WN, SEE NO TE BEL OW)
TANK 1 HI GH L EV EL AL AR M
COMPANYABC INC.
If Alarm
SoundsCall:
(555)501-0005
NOTE : 20-LA BEL 8 1/2" X 11 " SHEET WITH
BLANK AND PR E-PRINTE D LABELS
PROVIDED. USE TEMPLATE (ON CD OR
DOW NLOAD F ROM www .pneume rcato r.com )
TO FILL IN AND PRINT ADVIS ORY A ND
EMERGENCY CONTACT INFORMATION AS
NEEDE D. LA BEL INF ORMA TION M AY A LSO
BE HA ND WRIT TE N.
CARR IER INSER T - P/N 313245- 1
TOP
P/N 313245 -1REV . N/ C
INSERT W I TH LABEL
INSTALL THRU SLOT
AS SHOWN
INSTALL LABEL ON CARRIER INSERT
TOP
TANK 1 HI GH L EV EL AL ARM
COMPANY ABC INC.
If Alarm
P/N 313245 -1REV . N/ C
SoundsCall:
(555)501-0005
OU TSIDE CO VER VI EWINSIDE COV ER VIEW
DRAWING NO. 20062 REV. N/C
RA400 Instruction Manual - 2017-07-30.docx Page 7 of 22 July 30, 2017

2.0 Installation
The RA400 is designed for both indoor and outdoor installation. If the unit is to be installed outdoors,
the installer must pay attention to local code requirements for outdoor conduit runs containing AC
line voltage.
WARNING! This device is designed for Ordinary Location, Non-Hazardous
installation only, as defined by Underwriters Laboratories (UL) and the
National Electrical Code (NEC). DO NOT install where flammable vapors may
be present.
2.1 Mounting
The RA400 is designed for wall mounting using the four mounting holes as shown in Figure 2.1-1.
Mounting hole placement is made easy using supplied 1:1 scale mounting template in Figure 2.1-2.
Note that these mounting holes are outside of the gasketed interior of the enclosure and therefore
do not affect weatherproof performance.
DIMENSIONS: INCHES [MM]
1
5
[140]
2
21
[93]
3
32
COMMUNICATIONS
CONDUIT OPENING
15
3
[100]
16
5
3
[92]
8
13
[61]
2
7
[200]
7
8
3
[180]
7
32
(4)
MOUNTING
HOLES
AC POWER
CONDUIT
7
[149]
5
3
[53]
2
32
8
OPENING
32
COVER
SHOWN
FOR REF.
13
[20]
16
(4) MOUNTING
SCREWS
SCREW
ANCHOR
9
[39]
1
16
RA400 Instruction Manual - 2017-07-30.docx Page 8 of 22 July 30, 2017
7
[Ø22] HOLE TYP. 2 PLS.
Ø
8
FOR 1/2" NPT
OR METRIC EQUIVALENT
Figure 2.1-1
WATERTIGHT FITTING
DRAW ING NO. 20025 REV. A

(This page intentionally left blank)
RA400 Instruction Manual - 2017-07-30.docx Page 9 of 22 July 30, 2017

RA400 Instruction Manual - 2017-07-30.docx Page 10 of 22 July 30, 2017
Figure 2.1-2 Mounting Template
DRAWING NO. 20024 REV. N/C
7
3
32
[180.0]
3
21
32
[93.0]
USE (4) #10 X 2 " LENGTH
MOUNTING SCREWS
(3/8" MAX. SCREW HEAD DIA.)
DIMENSIONS: INCHES (MM)

(This page intentionally left blank)
RA400 Instruction Manual - 2017-07-30.docx Page 11 of 22 July 30, 2017

2.2 Wiring
2.2.1 AC Power
Wire AC power in accordance with Figure 2.2.1-1 below. Be sure to set 115/230VAC selector switch
to the proper voltage. Note that the AC terminal block can be wired in-place or unplugged.
DANGER! AC power must be turned off at the circuit breaker before
attempting to connect AC wiring to this device.
WARNING! Do not connect or disconnect front panel display cable while
AC power is applied. Damage to display or main board may occur!
FUSE
115/230 VAC
SWITCHABL E
1/2 AMP
250 VAC
FAST
ACTING
AC
IN
115V
HOT
NEUTRA L
GND
RA400 Instruction Manual - 2017-07-30.docx Page 12 of 22 July 30, 2017
115/230 VAC
50/60Hz
Figure 2.2.1-1
DWG NO. 20026 REV. A

2.2.2 Communications
The RA400 supports an RS-485 multi-drop cabling topology as illustrated in Figure 2.2.2-1 below.
Maximum cable distance from the TMS/LC2000 console to the furthest RA400 is 4000 feet (1200M).
PNEUME RCATOR
LiquidLe vel Control S yste ms
TMS
TMS
TA NK MANA GE ME NT SYS TEM
#2#1
ETD1000 OR RA400ETD1000 OR RA400
REMOTE AN NUNCI ATOR
RA 400
ET D 1000
ELECTR ON IC TA NK DI SP LA Y
PNE
PNEUME RCATOR
LiquidLe ve
LiquidLe vel Control S yst ems
ET D 1000
RA 400
PNEUME RCATOR
LiquidLevelControl Systems
ELEC TR ONIC TA NK DISPL AY
REMOTE AN NUNCI AT OR
END-OF-RUN
ETD1000 OR RA400
RA 40 0
REMOTE AN NUNCI ATOR
ET D 1000
ELECTR ON IC TA NK DI SP LA Y
PNE
PNEUME RCATOR
LiquidLe ve
LiquidLe vel Control S yste ms
AC
POWER
AC
POWER
AC
POWER
JUNCTION BOX
4000 FEET (1200 M) MAX. DISTANCE
DWG NO. 20027 REV. B
Figure 2.2.2-1 TMS Communications Topology
PNEUMERCATOR
Liquid Level Control Systems
LC2000
LC 2000
LEAK/POINT LEVEL CONSOLE
PNEUMERCATOR
Liquid Level Cont rol S yst ems
REMOTE ANNUNCIATOR
AC
POWER
RA 400
JUNCTION BOX
4000 FEET (1200 M) MAX. DI STANCE
RA 400
PNEUMERCATOR
Liquid Level Con trol S ys tems
#2#1
RA400RA400
REMOTE ANNUNCIATOR
AC
POWER
END-OF-RUN
RA400
PNEUMERCATOR
Liquid Level Con trol S ys tems
REMOTE ANNUNCIATOR
AC
POWER
RA 400
DWG NO. 20188 REV. N/C
Figure 2.2.2-2 LC2000 Communications Topology
2.2.2.1 Cable Requirements
Cable type should be 24AWG, single twisted pair, shielded, designated for RS-485 communications
having a nominal impedance of 120 ohms.
Recommended Cables:
-4 F to 176 F (-20 C to 80 C) Operation* - Belden 9841 or equivalent
-94 F to 392 F (-70 C to 200 C) Operation* - Belden 89841 or equivalent
*See Section 4.0 Product Specifications for Operating Temperature range limits of the RA400.
IMPORTANT! Use only recommended RS-485 communications cable or
manufacturer’s DOCUMENTED equivalent.
RA400 Instruction Manual - 2017-07-30.docx Page 13 of 22 July 30, 2017
C
O
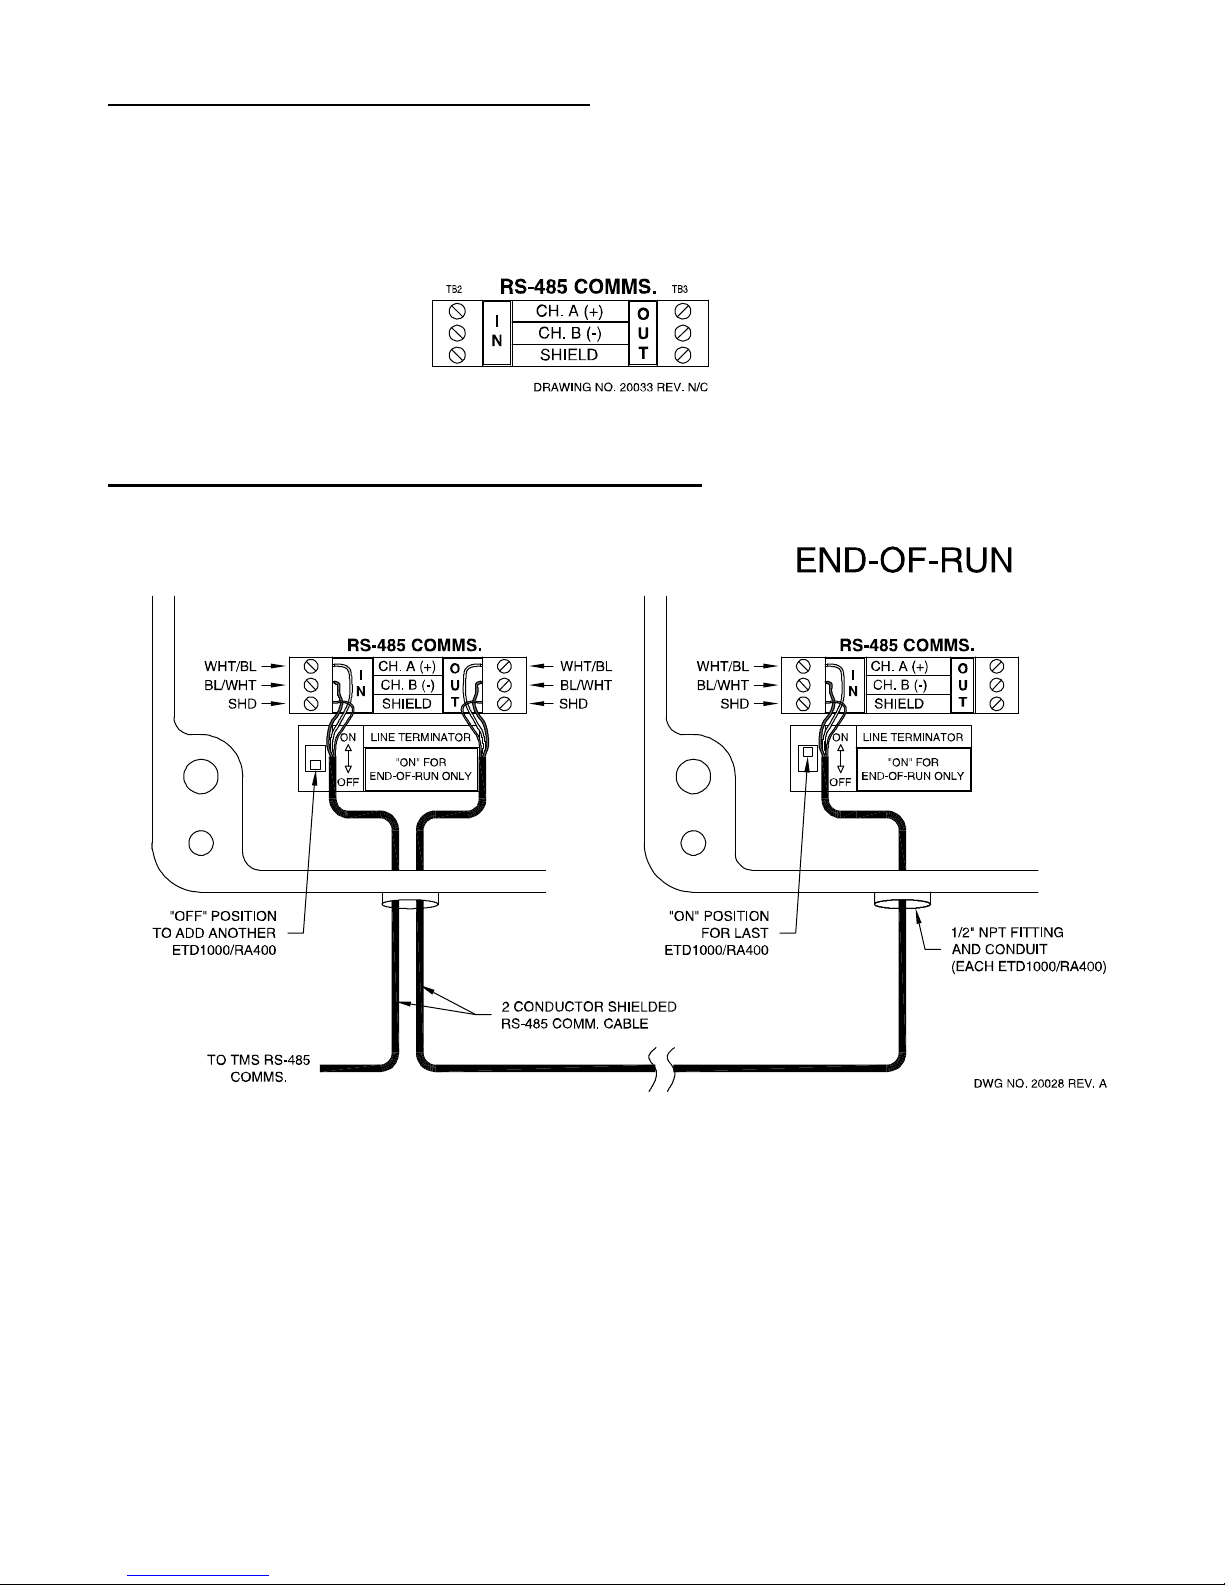
2.2.2.2 RA400 Terminal Connections
Plug-in terminal blocks TB2 and TB3 are provided for connection to the RS-485 Expansion Bus.
Both input and output terminals are provided to support multi-drop wiring to additional RA400s or
other RS-485 expansion bus peripherals.
RS-485
CH. A (+)
I
CH. B (-)
N
SHIELD
DRAWING NO. 20033 REV. N/C
MMS.
3BT2BT
O
U
T
2.2.2.3 RA400 Communications Wiring Detail
See Figure 2.2.2.3-1 below.
END-OF-RUN
"OFF" POSITION
TO ADD ANOTHER
ETD1000/RA400
WHT/BL
BL/WHT
SHD
TO TMS RS-485
COMMS.
RS-485 COMMS.
CH. A (+)
I
CH. B (-)
N
SHIELD
ON
LINE TERMINATOR
"ON"FOR
END-OF-RUN ONLY
OFF
O
U
T
WHT/BL
BL/WHT
SHD
2 CONDUCTOR SHIELDED
RS-485 COMM. CABLE
WHT/BL
BL/WHT
SHD
"ON" POSITION
FOR LAST
ETD1000/RA400
Figure 2.2.2.3-1 RA400 Communications Wiring
RS-485 COMMS.
CH. A (+)
I
CH. B (-)
N
SHIELD
ON
LINE TERMINATOR
"ON"FOR
END-OF-RUN ONLY
OFF
O
U
T
1/2" NPT FITTING
AND CONDUIT
(EACH ETD1000/RA400)
DWG NO. 20028 REV. A
RA400 Instruction Manual - 2017-07-30.docx Page 14 of 22 July 30, 2017

C
K
2.2.2.4 RS-485 Communications Wiring Detail
Current version TMS/LC2000 consoles have the same type of plug-in terminal connector and wiring
designations as the RA400, as illustrated in Figure 2.2.2.4-1 below. Previous versions have a 6position modular jack. If the board type is a previous version, you will need to replace it with a current
revision board. Please contact the factory for more details.
– – OR – – TMS3000/TMS4000LC2000/TMS2000
RS-485 COMMS.
)
L)
T
)
H
T/B
/W
H
L
HIELD
(B
(W
S
(
A
.
H
SHD
CH. B
C
GND
ISGND
HOT
NEUT
ISGND
3 POSITION
TERMINAL BLOCK
GND
ISGND
HOT
NEUT
ISGND
CH. A(WHT/BL)
CH. B(BL/WHT)
SHD (SHIELD)
RS-485 COMMS.
1/2" NPT
FITTING AND
CONDUIT
RS-485
COMMUNICATIONS I/O
3/4" NPT
FITTING AND
CONDUIT
3 POSITION
TERMINAL BLOC
RS-485
COMMUNICATIONS I/O
DRAWING NO . 20189 REV. N/
Figure 2.2.2.4-1 RS-485 Communications Connection, Current Version Boards
RA400 Instruction Manual - 2017-07-30.docx Page 15 of 22 July 30, 2017

A
2.2.2.5 Line Termination Resistor
The RS-485 bus requires that the end-of-run device be terminated with a 120-ohm resistor. This is
accomplished by setting the LINE TERMINATION switch to “ON” if the selected RA400 is the last
device on the bus. Otherwise this switch should be set to “OFF”.
LINE TERMINATOR
ON
"ON" FOR
END-OF-R UN ON LY
OFF
DRAWING NO. 20034 REV.
S2
2.2.3 RS-2 Remote TEST/RESET Wiring
A connection is provided to externally TEST and RESET the RA400 using a Pneumercator model
RS-2 Remote TEST/RESET Switch Assembly or similar device having NORMALLY OPEN contacts.
Note that the front panel TEST and RESET pushbuttons remain active when wired for external
operation.
RS-2
RA400 / RA400W
1/2" NPT FITTING
AND CO NDU IT
R
B
G
E
L
R
D
K
N
SILENCE
COM
TEST
REMOTE
SWITCH
3 CONDUCTOR 22 A WG CAB LE
BELDE N 8443 OR EQUIV.
NOTE: BE LDEN COLORS SHO WN )
(
COVER
TEST
RESET
RED
BLACK
GREEN
1/2" NPT FITTING
AND CO NDU IT
Figure 2.2.3-1 RS-2 Remote TEST/RESET Wiring
RA400 Instruction Manual - 2017-07-30.docx Page 16 of 22 July 30, 2017
200 FEET (60 M) MAX. DISTANCE
DRAWING NO. 20063 REV. A

A
A
3.0 Configuration
The RA400 provides user-programmable features that allow the operator to alter audible/visual
alarm operation as well as control interaction with the TMS/LC2000 for remote alarm
acknowledgement. These programmable features are selectable using on-board dipswitches. No
programming is required at the TMS/LC2000 console.
3.1 On-Board Programming
3.1.1 Setting Logical Address – S3
The TMS/LC2000 has the ability to individually address up to sixteen (16) RA400 remote displays.
Rotary dipswitch S3 is used to select unique addresses for each RA400 connected to the same
TMS/LC2000. Note that address order is not important, and that RA400 device addresses are
independent of other TMS/LC2000 smart peripheral types. For example, an RA400 set to device
address “4” will not conflict with an ETD1000 also set to device address “4”.
Table 3.1.1-1 S3 Assignments
ADDR ESS
SELECT
DRAWING NO. 20064 REV. A
S3
S3 RA400
Address
Select
Device
ddress
01
12
23
34
45
56
67
78
89
9 10
11
B 12
C 13
D 14
E 15
F 16
RA400 Instruction Manual - 2017-07-30.docx Page 17 of 22 July 30, 2017

(
A
3.1.2 Setting Shutoff Delay – S4
The RA400 provides the user with selectable automatic shutoff delays for the audible alarm. Once
initiated, the audible alarm will turn off after the selected time delay has elapsed, or immediately if
acknowledged at the front panel. This feature is useful in applications where continued operation of
an unacknowledged audible alarm poses a nuisance or noise abatement problem.
WARNING! Use this feature only if an unacknowledged alarm will not
pose a potential safety or environmental hazard.
Table 3.1.2-1 S4 Assignments
SHUTOFF
DELAY
DRAWING NO. 20065 REV. A
S4
S4 RA400
Shutoff
Select
Shutoff Delay
Minutes)
0NONE
11
22
33
44
55
66
77
88
99
10
B 11
C 12
D 13
E 14
F 15
RA400 Instruction Manual - 2017-07-30.docx Page 18 of 22 July 30, 2017

3.1.3 Alarm Programming - S5(1-5), S6, S7
The RA400 alarm programming provides the user with considerable flexibility in the selection of
which alarms it is to annunciate. Referring to Table 3.1.3-1 below, the Alarm TYPE dipswitches
allow the user to select between four types of alarms; TANK, SENSOR, CONTACT CLOSURE and
SYSTEM. For each alarm type, the Alarm GROUP dipswitches allow the user to select a tank,
sensor or contact closure group, for example, tanks 1 thru 4, 5 thru 8, 9 thru 12, etc., or all tanks.
The user can further select individual devices within the selected Alarm GROUP. The TANK and
SYSTEM alarm types also provide specific alarm selections as indicated in Table 3.1.3-1 below.
RA400 Instruction Manual - 2017-07-30.docx Page 19 of 22 July 30, 2017

RA400 Instruction Manual - 2017-07-30.docx Page 20 of 22 July 30, 2017
Table 3.1.3-1 Alarm Programming
ALARM PROGRAMMING
SWITCH S5 SWITCH S6 SWITCH S7
1 2 3 4 51 2 3 4 5 6 7 8 1 2 3 4 5 6 7 8
Type Group Tank Selec ts Tank Alarm Sel ects
C C C C CT1 T2T3T4LEAKSP1SP2SP3* * * W * * * -
C C C C OT5 T6T7T8LEAKSP1SP2SP3* * * W * * * -
C C C O C T9 T10 T11 T12 LEAK SP1 SP2 SP3 * * * W * * * -
C C C O O T13 T14 T15 T16 LEAK SP1 SP2 SP3 * * * W * * * -
C C O C C T17 T18 T19 T20 LEAK SP1 SP2 SP3 * * * W * * * -
C C O C O T21 T22 T23 T24 LEAK SP1 SP2 SP3 * * * W * * * -
C C O O C Select All Tanks LEAK SP1 SP2 SP3 * * * W * * * -
C C O O O Select All Tanks LEAK SP1 SP2 SP3 * * * W * * * -
Type Group Leak/Point Level Senso r Selects
C O C C CS1 S2S3S4 S5 S6S7S8S9 S10 S11 S12 S13 S14 S15 S16
C O C C O S17 S18 S19 S20 S21 S22 S23 S24 S25 S26 S27 S28 S29 S30 S31 S32
C O C O C S33 S34 S35 S36 S37 S38 S39 S40 S41 S42 S43 S44 S45 S46 S47 S48
C O C O O S49 S50 S51 S52 S53 S54 S55 S56 S57 S58 S59 S60 S61 S62 S63 S64
C O O C C S65 S66 S67 S68 S69 S70 S71 S72 S73 S74 S75 S76 S77 S78 S79 S80
C O O C O S81 S82 S83 S84 S85 S86 S87 S88 S89 S90 S91 S92 S93 S94 S95 S96
C O O O
C
Select Al l Leak/Point Level Sensor s (S6, S7 settings do not apply)
C O O O O Select All Leak/Point Level Sensor s (S6, S7 settings do not apply)
Type Group Contact Closure Input Selects
O C C C CC1 C2C3C4 C5 C6C7C8C9 C10 C11 C12 C13 C14 C15 C16
O C C C O C17 C1 8 C19 C20 C21 C22 C23 C24 C25 C26 C27 C28 C29 C30 C31 C32
O C C O C C33 C34 C35 C36 C37 C38 C39 C40 C41 C42 C43 C44 C45 C46 C47 C4 8
O C C O O C49 C50 C51 C52 C53 C54 C55 C56 C57 C58 C59 C60 C61 C62 C63 C64
O C O C C Select Al l Contact Closure Inputs ( S6, S7 settings do not apply)
O C O C O Select All Contact Closure Inputs ( S6, S7 set tings do not a pply)
O C O O C Select Al l Contact Closure Inputs (S6, S7 settings do not apply)
O C O O O Select All Contact Closure Inputs ( S6, S7 settings do not apply)
Type Group System Alarm Selects
O O C C CTD PF SF - - - - - - - - - - TK SR CC
“TD” = T heft Detect, “PF” = Probe Failure, “SF” = Sensor Fau lt
“TK” = Any T ank Alarm, “SR” = Any Sensor Alarm , “CC” = An y Contact Closure Alarm
Notes
“O” = OPEN
“C” = CLOSE
An alarm select is ACTIVE when the cor responding switch is OPEN.
“*” = Fu ture U se, “-“ = N ot Ap plicable or D on’t Care

)
A
A
3.1.4 Miscellaneous Programming - S5(6-8)
S5
Function Position(s
larm Type 1,2 See Section 3.1.3
larm Group 3,4,5 See Section 3.1.3
Not used 6 NA
Front Panel Ack. 7 *Closed = LOCAL
Open = LOCAL and TMS/LC2000
Factory only 8 MUST be set to “Closed”
Front Panel (FP) Acknowledge Settings: If set to LOCAL, front panel acknowledgement will only
silence local RA400 audible alarm. If set to LOCAL and TMS/LC2000, both RA400 and
TMS/LC2000 audible alarms will be silenced.
Mode
*Factory Default
RA400 Instruction Manual - 2017-07-30.docx Page 21 of 22 July 30, 2017

4.0 Product Specifications
Dimensions: 7.9” W x 5.5” H x 3.5” D
Weight: 8 lbs
Operating Temperature: -40 ºF to 160 ºF (-40 ºC to 70 ºC)
Humidity: 95% Non-condensing
Enclosure Construction: Cast Aluminum, Epoxy Powder Coat Paint Finish, Gasketed Cover
w/Captive SS Screws
Enclosure Rating: NEMA 4X, Watertight and Corrosion-proof
Power Requirements: 115 / 230 VAC Switchable, 50-60Hz, 5W Max.
Audible Alarm: 100db
Visual Alarm: Ultra-bright LED Strobe
Communications: TMS/LC2000 Peripheral Expansion Bus
Communications Format: RS-485, Half-Duplex
Connection Type: Plug-In Terminal Block with Wire Entries
Input: Ch. A (+), Ch. B (-), Shield
Output: Ch. A (+), Ch. B (-), Shield
Recommended RS-485 Cable: Belden 9841 (PVC Jacket), 89841 (FEP Teflon Jacket) or similar
Maximum Cable Length: 4000 Feet/1200 Meters total to end of run
Slave Address Select: 1 thru 16, Rotary Dip Switch Selectable
RA400 Instruction Manual - 2017-07-30.docx Page 22 of 22 July 30, 2017
 Loading...